Mitac 210B Wireless Router User Manual manual 1214 1of2
Mitac International Corporation Wireless Router manual 1214 1of2
Mitac >
Contents
- 1. Manual Part 1
- 2. Manual Part 2
Manual Part 1
Rhine II
10/100 Mbps Broadband Router
User’s Manual
Broad Net Technology Inc.
Federal Communication Commission Interference Statement
This equipment has been tested and found to comply with Part 15 of the FCC
Rules. These limits are designed to provide reasonable protection against
harmful interference in a residential installation. This equipment generates,
uses and can radiate radio frequency energy and, if not installed and used in
accordance with the instructions, may cause harmful interference to radio
communications. However, there is no guarantee that interference will not
occur in a particular installation. If this equipment does cause harmful
interference to radio or television reception, which can be determined by
turning the equipment off and on, the user is encouraged to try to correct the
interference by one of the following measures:
- Reorient or relocate the receiving antenna.
- Increase the separation between the equipment and receiver.
- Connect the equipment into an outlet on a circuit different from that
to which the receiver is connected.
- Consult the dealer or an experienced radio/TV technician for help.
FCC Caution: To assure continued compliance, (example - use only shielded
interface cables when connecting to computer or peripheral devices). Any
changes or modifications not expressly approved by the party responsible for
compliance could void the user's authority to operate this equipment.
This device complies with Part 15 of the FCC Rules. Operation is subject to
the following two conditions: (1) This device may not cause harmful
interference, and (2) this device must accept any interference received,
including interference that may cause undesired operation.
FCC RF Radiation Exposure Statement:
This equipment complies with FCC RF radiation exposure limits set forth for
an uncontrolled environment. This equipment should be installed and operated
with a minimum distance of 20 centimeters between the radiator and your body.
This transmitter must not be co-located or operating in conjunction with any
other antenna or transmitter.
Table of Contents
Table of Contents.....................................................................................................................3
Congratulations on your purchase of the Rhine II......................................................................1
This Package Contains.............................................................................................................1
Confirm That You Meet Installation Requirements ................................................................1
Hardware Setup .............................................................................................................................2
Indicator LEDs.........................................................................................................................3
Configuring Your Computer........................................................................................................3
Configuring Your Computer with Windows 95/98/ME..............................................................3
Step 1. Configure TCP/IP Settings ..........................................................................................3
Step 2. Disable HTTP Proxy ...................................................................................................6
Internet Explorer..................................................................................................................6
Netscape...............................................................................................................................7
Step 3. Obtain IP Settings from Your Rhine II........................................................................7
Configuring Your Computer with Windows 2000 ......................................................................8
Step 1. Configure TCP/IP Settings ..........................................................................................8
Step 2. Disable HTTP Proxy ...................................................................................................9
Internet Explorer................................................................................................................10
Netscape.............................................................................................................................10
Step 3. Obtain IP Settings From Your Rhine II.....................................................................10
Configuring Your Computer with Windows NT 4.0.................................................................11
Step 1. Configure TCP/IP Settings ........................................................................................11
Step 2. Disable HTTP Proxy .................................................................................................13
Internet Explorer................................................................................................................13
Netscape.............................................................................................................................13
Step 3. Obtain IP Settings From Your Rhine II.....................................................................14
Configuring Your Macintosh Computer....................................................................................16
Step 1. Configure TCP/IP Settings ........................................................................................16
Step 2. Disable HTTP Proxy .................................................................................................17
Internet Explorer................................................................................................................17
Netscape.............................................................................................................................17
Step 3. Obtain IP Settings From Your Rhine II.....................................................................18
Configuring Your Rhine II – Quick Setup................................................................................19
Configuring Your Rhine II – Basic Configuration...................................................................1
System........................................................................................................................................1
Time Zone..............................................................................................................................1
Password Settings ..................................................................................................................1
WAN Settings............................................................................................................................2
Dynamic IP ............................................................................................................................2
PPPoE....................................................................................................................................3
Static IP..................................................................................................................................3
Bridging .................................................................................................................................4
LAN Settings .............................................................................................................................4
Wireless Settings .......................................................................................................................5
Channel and SSID..................................................................................................................5
Encryption..............................................................................................................................5
NAT Settings .............................................................................................................................6
Configuring Your Rhine II – Advanced Configuration.....................................................8
Firewall.........................................................................................................................................8
Client Filtering .........................................................................................................................8
DMZ (Demilitarized Zone) ......................................................................................................9
SNMP...........................................................................................................................................9
Community...............................................................................................................................9
Trap .........................................................................................................................................10
Configuring Your Rhine II – Tools .............................................................................................11
Configuration Tools ....................................................................................................................11
System Log..................................................................................................................................11
Firmware Upgrade.......................................................................................................................12
Reset............................................................................................................................................12
Congratulations on your purchase of the Rhine II.
The Rhine II is a Broadband Router designed to share Internet Access, provide security, and to
network multiple devices for a variety of users. The Rhien II’s simple installation setup can be used
by the least experienced of users, while providing networking professionals with easy to configure
advanced features. Please read the User Guide for advanced features of this product.
Thank you for purchasing a BRN product. We know you will enjoy the many features of the Rhine
II.
This Package Contains
• One Rhine II
• One Power Adapter
• This Quick Installation Guide
• One Installation CD
• One Category 5 Fast Ethernet Cable
Confirm That You Meet Installation Requirements
Before proceeding with the installation of your Rhine II, please be sure you have the following:
• A computer with an Ethernet network card installed.
• Your Windows CD, if your computer is running Windows 95, 98, or ME
• An Internet connection through a cable or DSL modem or an external dial-up or ISDN modem.
• An additional Ethernet network cable.
• A Web browser such as Internet Explorer or Netscape.

Rhine II
BroadNet Technology Inc. 2
Hardware Setup
Rhine II – Front Panel
1. Connecting Computers: Connect computers directly to the Rhine II on ports 1-4 on the front
panel. If you have more than 4 computers to plug in, connect a hub or a switch (using its uplink
port) and connect additional computers to that device.
2. Connecting a Cable Modem or DSL Modem: Connect your Cable or DSL modem to the
WAN port on the rear panel.
3. Power: Plug the power cord into the power jack.
Rhine II – Rear Panel

Rhine II
BroadNet Technology Inc. 3
Indicator LEDs
The front panel of the Rhine II provides indicator LEDs (Light Emitting Diodes) for easy
monitoring. The following table defines the function of each LED.
LED Condition Status
Power
(green) On Rhine II is receiving power.
On The WAN port has established a valid network
connection.
WAN
(green) Flashing The WAN port is transmitting or receiving data.
On The indicated LAN port has established a valid network
connection.
Link/Act
(green) Flashing The indicated LAN port is transmitting or receiving data.
On The indicated LAN port is operating at 100Mbps.
10/100
(amber) Off The indicated LAN port is operating at 10Mbps.
On The indicated LAN port is operating in full-duplex mode.
FDX/COL Flashing A collision occured on the indicated LAN port.
Configuring Your Computer
This Quick Installation Guide provides configuration instructions for Windows 95, 98, ME, NT 4.0,
and 2000 and for Macintosh OS 7.x. Please be sure that you are following the proper instruction set
for your operating system.
• Configuring Your Computer with Windows 95/98/ME begins on this page.
• Configuring Your Computer with Windows 2000 begins on page 8.
• Configuring Your Computer with Windows NT 4.0 begins on page 12.
• Configuring Your Macintosh Computer begins on page 17.
Configuring Your Computer with Windows 95/98/ME
You may find that the instructions here do not exactly match your version of Windows. This is
because these steps and screenshots were created from Windows 98. Windows 95 and Windows
Millennium Edition are very similar, but not identical, to Windows 98.
Step 1. Configure TCP/IP Settings
After you have completed the hardware setup by connecting your devices, you need to configure
your computer to connect to your Rhine II. You need to determine how your ISP issues your IP
address. Many ISPs issue these numbers automatically using a networking technology known as
Dynamic Host Control Protocol, or DHCP. Other ISPs will specify your IP address and associated
numbers, which you must enter manually. This is also known as a static IP address. How your ISP
assigns your IP address determines how you will configure your computer.
Rhine II
BroadNet Technology Inc. 4
Here is what to do:
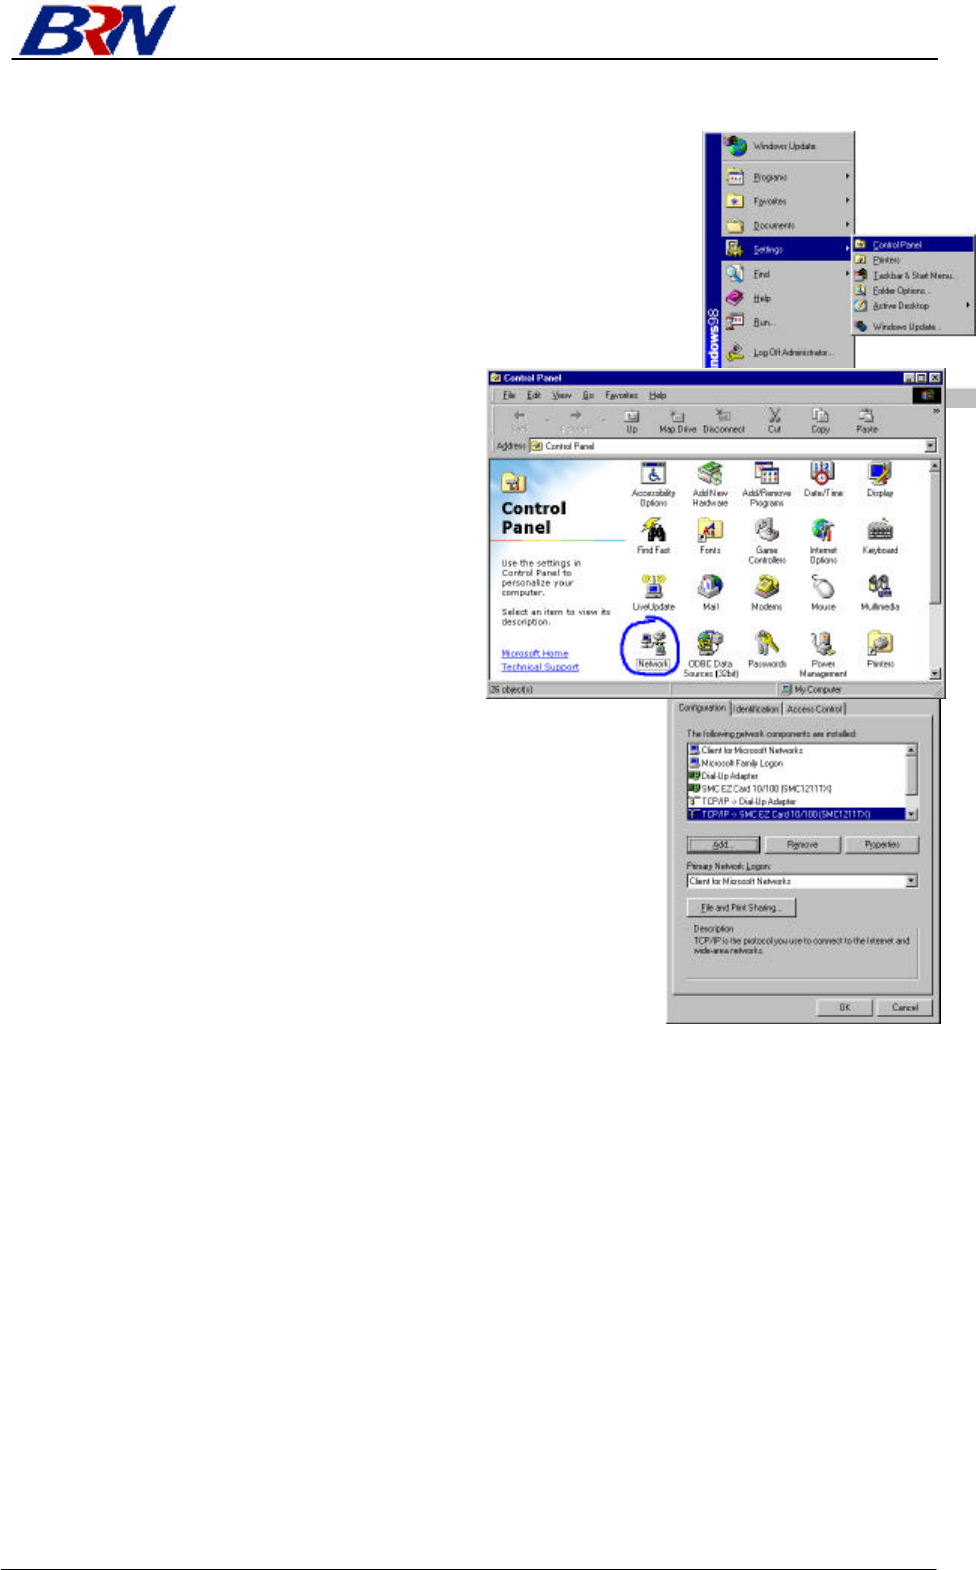
1. From the Windows desktop, click the “Start” button. Choose
“Settings,” then click “Control Panel.”
2. From “Control Panel,” double-click the
“Network” icon.
3. In the “Network” window, under the
“Configuration” tab, double-click the
“TCP/IP” entry that is listed with your network card.
Rhine II
BroadNet Technology Inc. 5
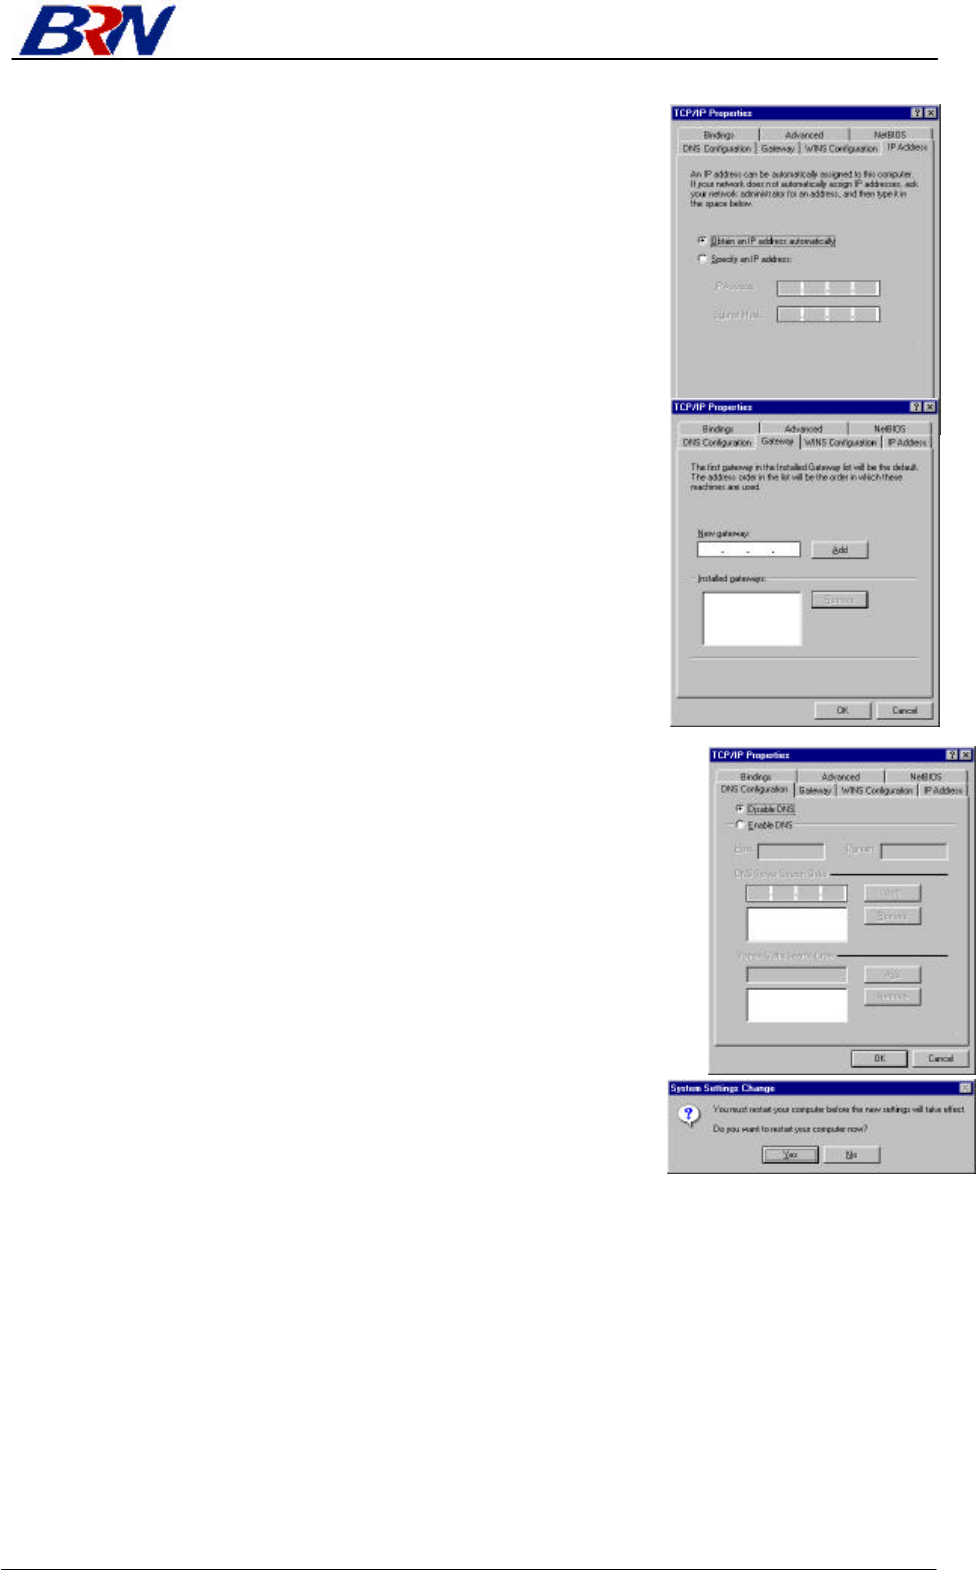
4. Select the “IP Address” tab.
If “Obtain an IP address automatically” is already selected, your
computer is already configured for DHCP. Click “Cancel” to
close each window, and skip to Step 2 “Disable HTTP Proxy.”
5. Locate your IP address and Subnet Mask. Record them in the
spaces provided below.
6. Click the “Gateway” tab and record the numbers listed under
“Installed gateways.”
7. Click the “DNS Configuration” tab. Locate the DNS servers listed
under “DNS Server Search Order.” Record the listed addresses.
8. After writing down your settings, check to make sure you have
recorded them correctly. Click the “IP Address” tab and then click
“Obtain an IP address automatically.” Click OK.
9. Windows may need your Windows 95/98/ME CD to copy
some files. After it finishes copying, it will then prompt you
to restart your system. Click “Yes” and your computer will
shut down and restart.
TCP/IP Configuration Setting
IP Address ____.____.____.____
Subnet Mask ____.____.____.____
Primary DNS Server ____.____.____.____
Secondary DNS Server ____.____.____.____
Default Gateway ____.____.____.____
Rhine II
BroadNet Technology Inc. 6
Step 2. Disable HTTP Proxy
You will need to verify that the “HTTP Proxy” feature of your Web browser is disabled. This is so
that your Web browser will be able to view the configuration pages inside your Rhine II. The
following steps are for Internet Explorer and for Netscape. Determine which browser you use and
follow the appropriate steps.
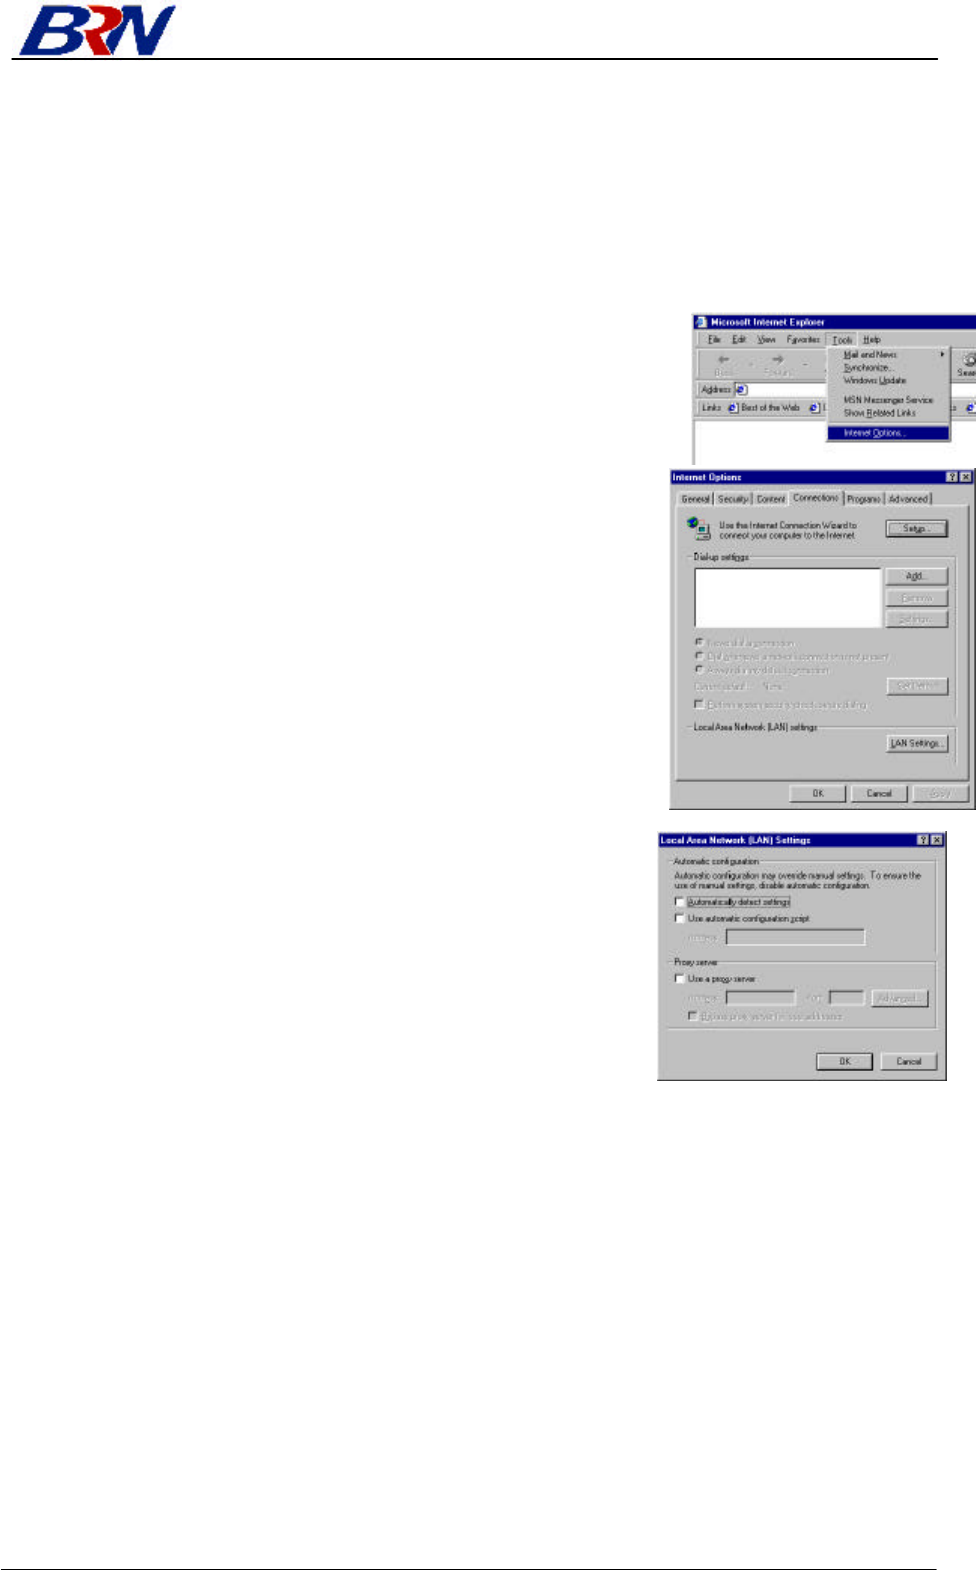
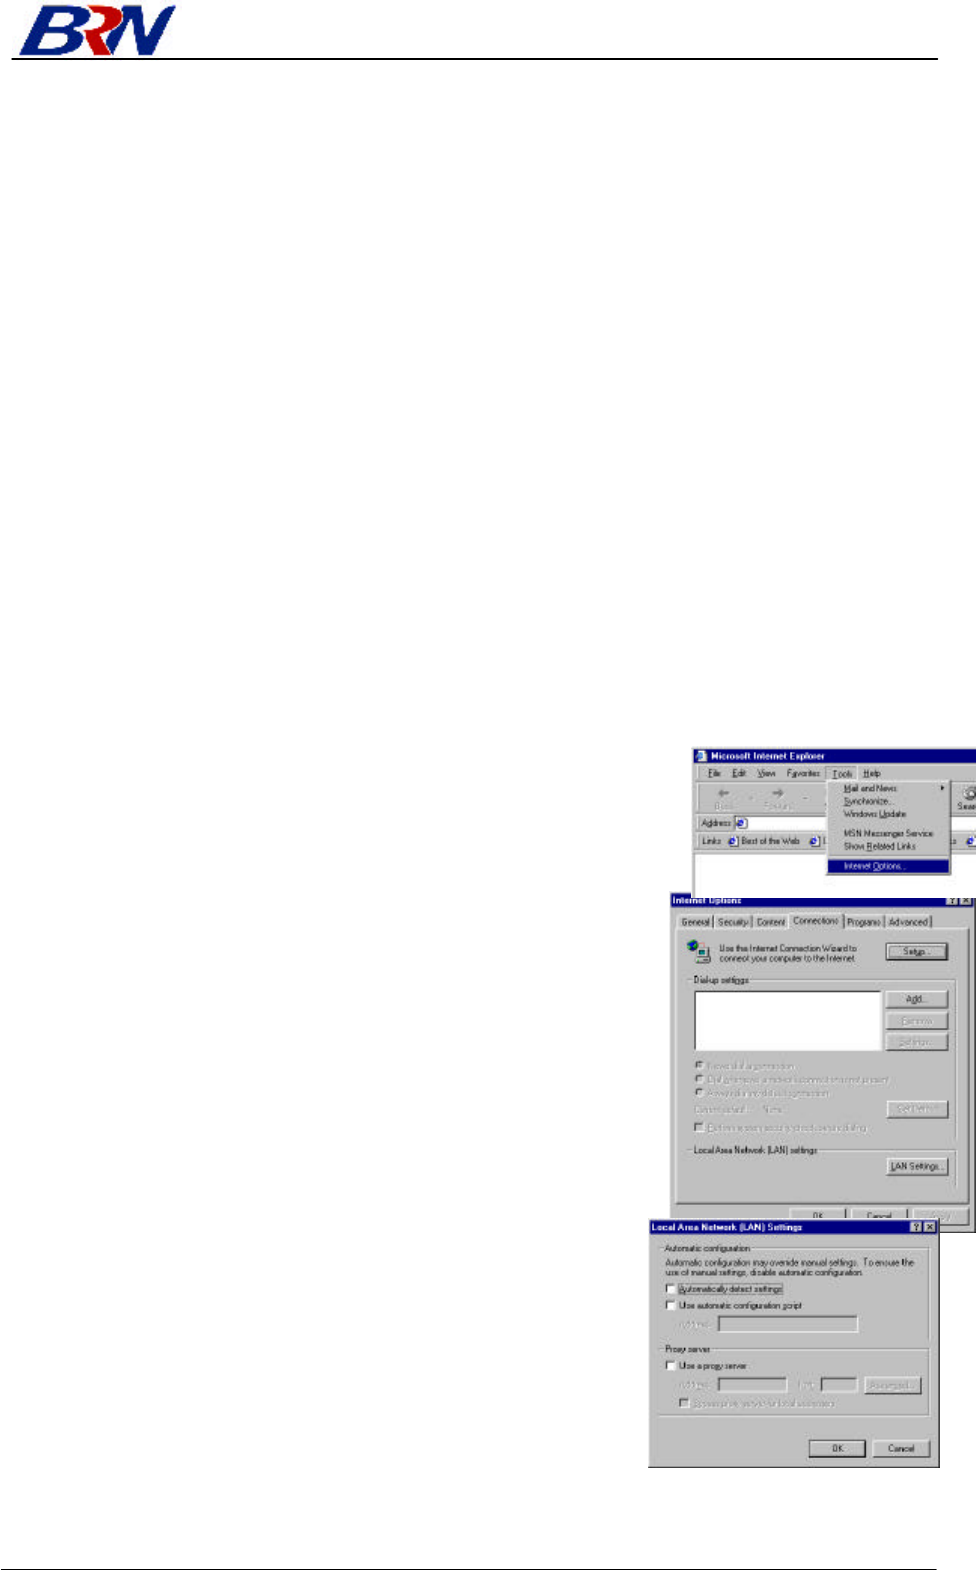
Internet Explorer
1. Open Internet Explorer and click the stop button. Click “Tools,”
then “Internet Options.”
2. In the “Internet Options” window click the “Connections” tab.
Next, click the “LAN Settings…” button.
3. Clear all the checkboxes.
4. Click “OK,” and then click “OK” again to close the “Internet
Options” window.

Rhine II
BroadNet Technology Inc. 7
Netscape
1. Open Netscape and click the stop button. Click “Edit,” then click
“Preferences…”
2. In the “Preferences” window, under “Category” double-
click “Advanced,” then click “Proxies.” Select “Direct
connection to the Internet.” Click “OK.”
3. Repeat these steps for each Windows 95/98/Me
computer connected to your Rhine II.
Step 3. Obtain IP Settings from Your Rhine II
Now that you have configured your computer to connect to your Rhine II, it needs to obtain new
network settings. By releasing any old IP settings and renewing them with settings from your Rhine
II, you will also verify that you have configured your computer correctly.
1. Click “Start,” then “Run…”
2. Type “WINIPCFG” and click “OK.” It may take a minute
or two for the “IP Configuration” window to appear.
3. From the drop-down menu, select your network card. Click
“Release” and then “Renew.” Verify that your IP address is
now 192.168.0.xxx, your Subnet Mask is 255.255.255.0 and
your Default Gateway is 192.168. 0.1. These values confirm
that your Rhine II is functioning. Click “OK” to close the
“IP Configuration” window.
Now that your computer is configured to connect to your Rhine II, please skip to “Configuring
Your Rhine II” on page 21.
Rhine II
BroadNet Technology Inc. 8
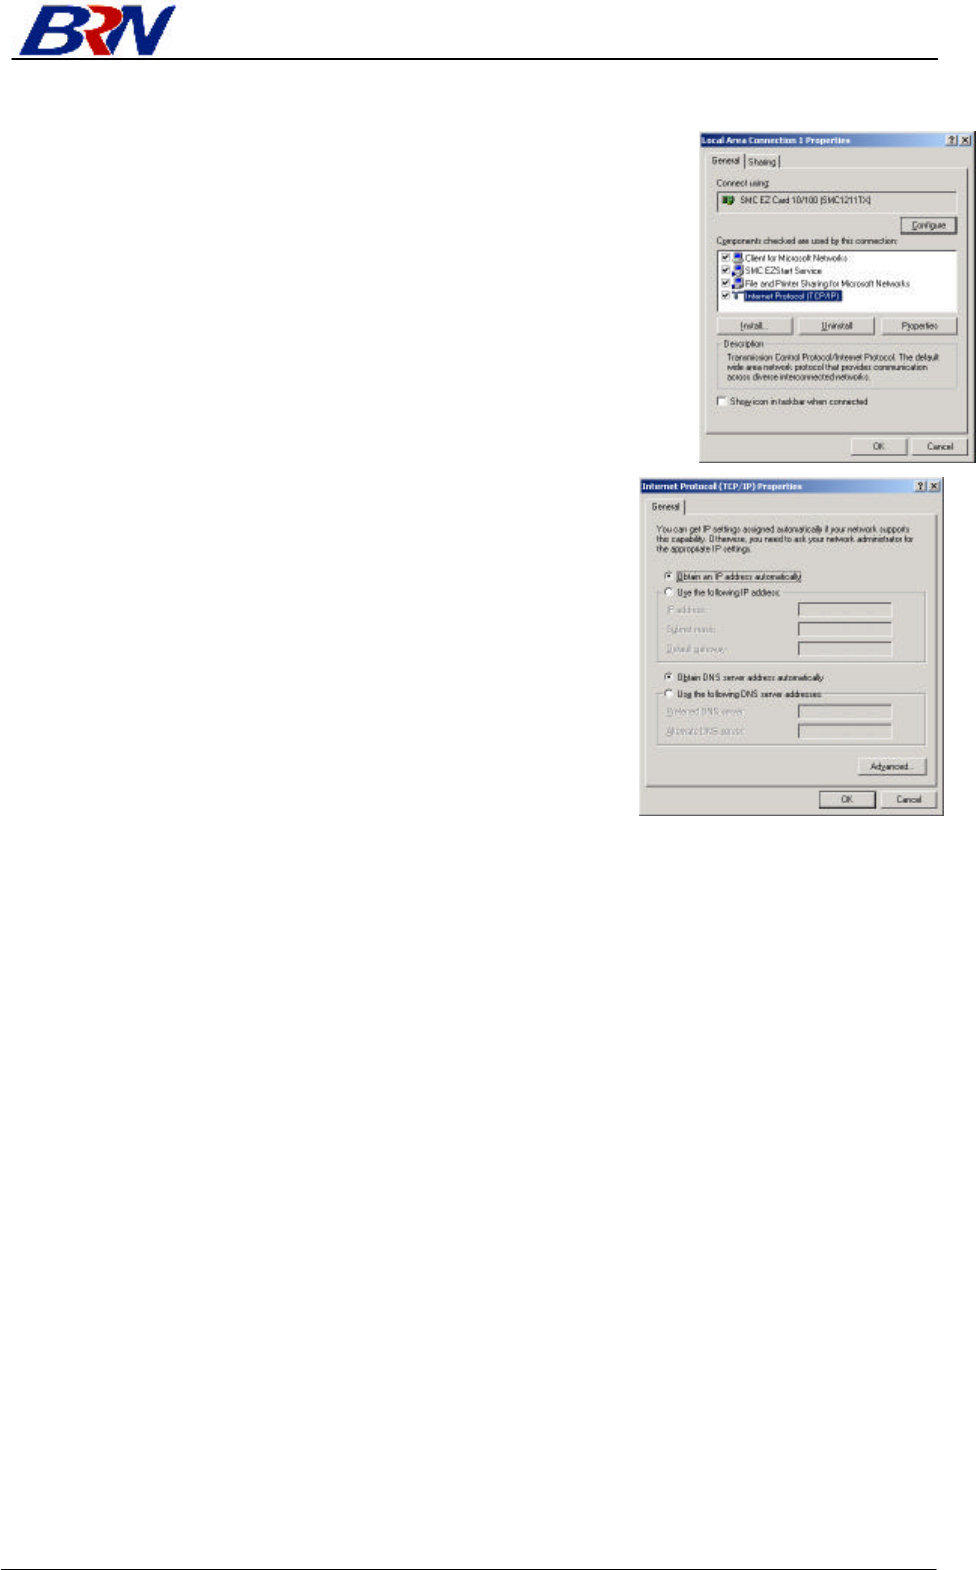
Configuring Your Computer with Windows 2000
Step 1. Configure TCP/IP Settings
After you have completed the hardware setup, you need to configure your computer to connect to
your Rhine II. You also need to determine how your ISP issues your IP address. Many ISPs issue
these numbers automatically, using a networking technology known as Dynamic Host Control
Protocol, or DHCP. Other ISPs will specify your IP address and associated numbers, which you
must enter manually. This is also known as a static IP address. How your ISP assigns your IP
address determines how you will configure your computer.
Here is what to do:
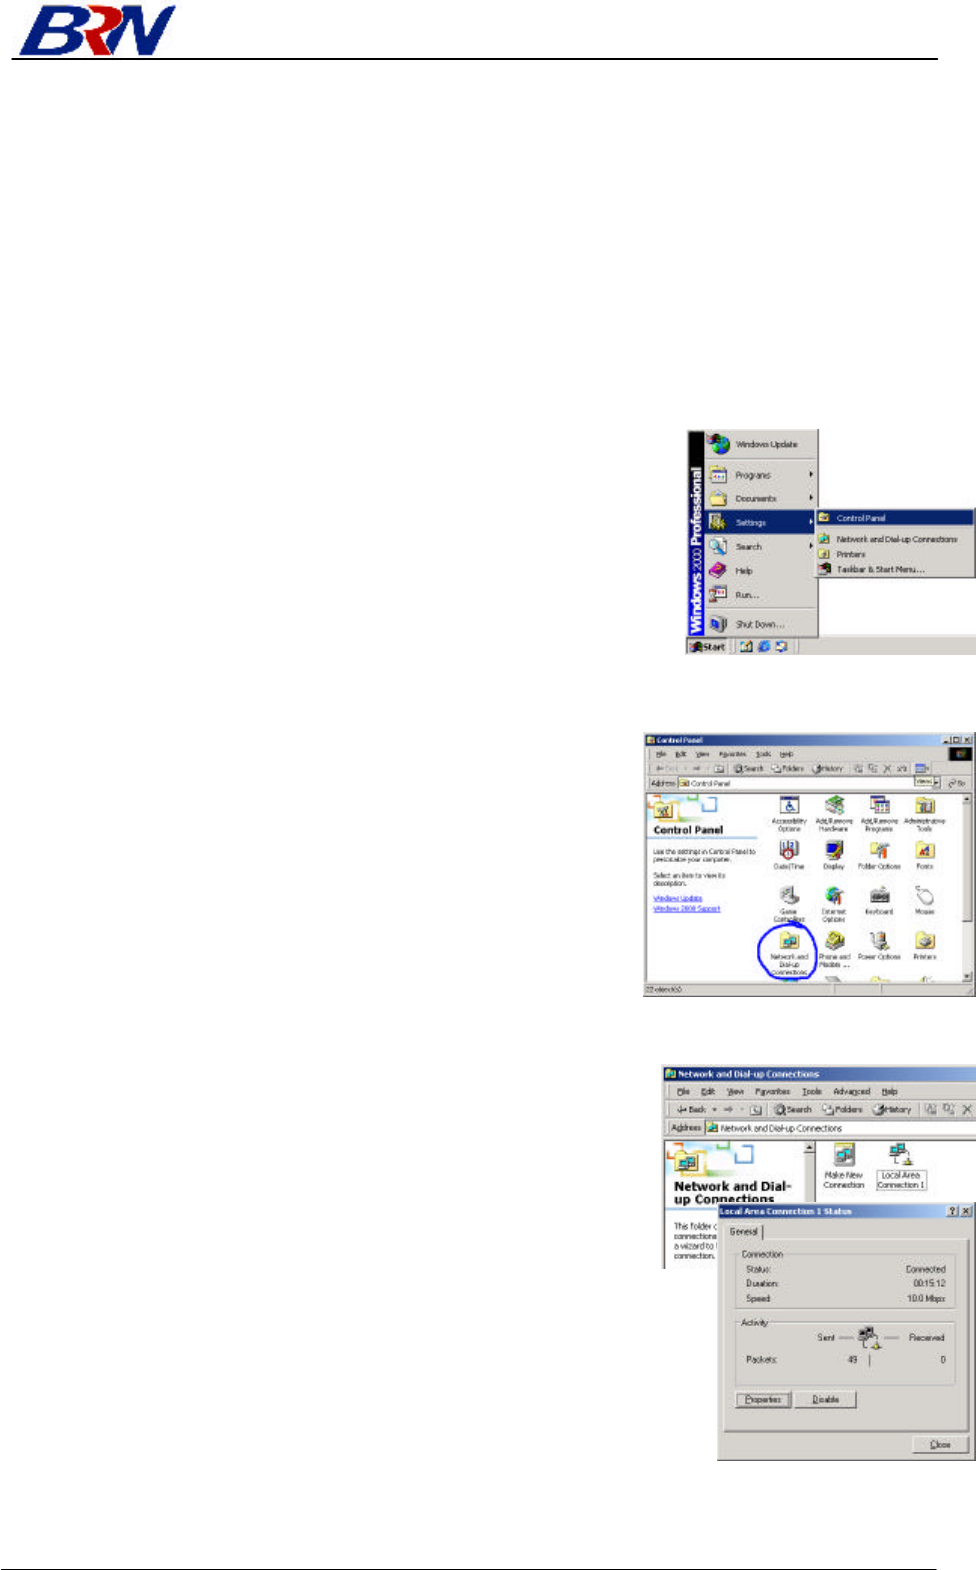
1. From the Windows desktop, click the “Start” button. Choose
“Settings,” then click “Control Panel.”
2. Double-click the “Network & Dial-Up Connections” icon.
3. Double-click the icon that corresponds to the connection to
your Rhine II.
4. Click “Properties.”
Rhine II
BroadNet Technology Inc. 9
5. Double-click “Internet Protocol (TCP/IP).”
6. All the information that you need to record is on the
“Internet Protocol (TCP/IP) Properties” dialog box. Use
the spaces below to record the information.
If “Obtain an IP address automatically” and “Obtain DNS
server address automatically” are already selected, your
computer is already configured for DHCP. Click “Cancel” to
close each window, and skip to Step 2 “Disable HTTP Proxy.”
7. Select “Obtain an IP address automatically” and then select
“Obtain DNS server address automatically.” Then click
“OK.” Click “OK” or “Close” to close each window.
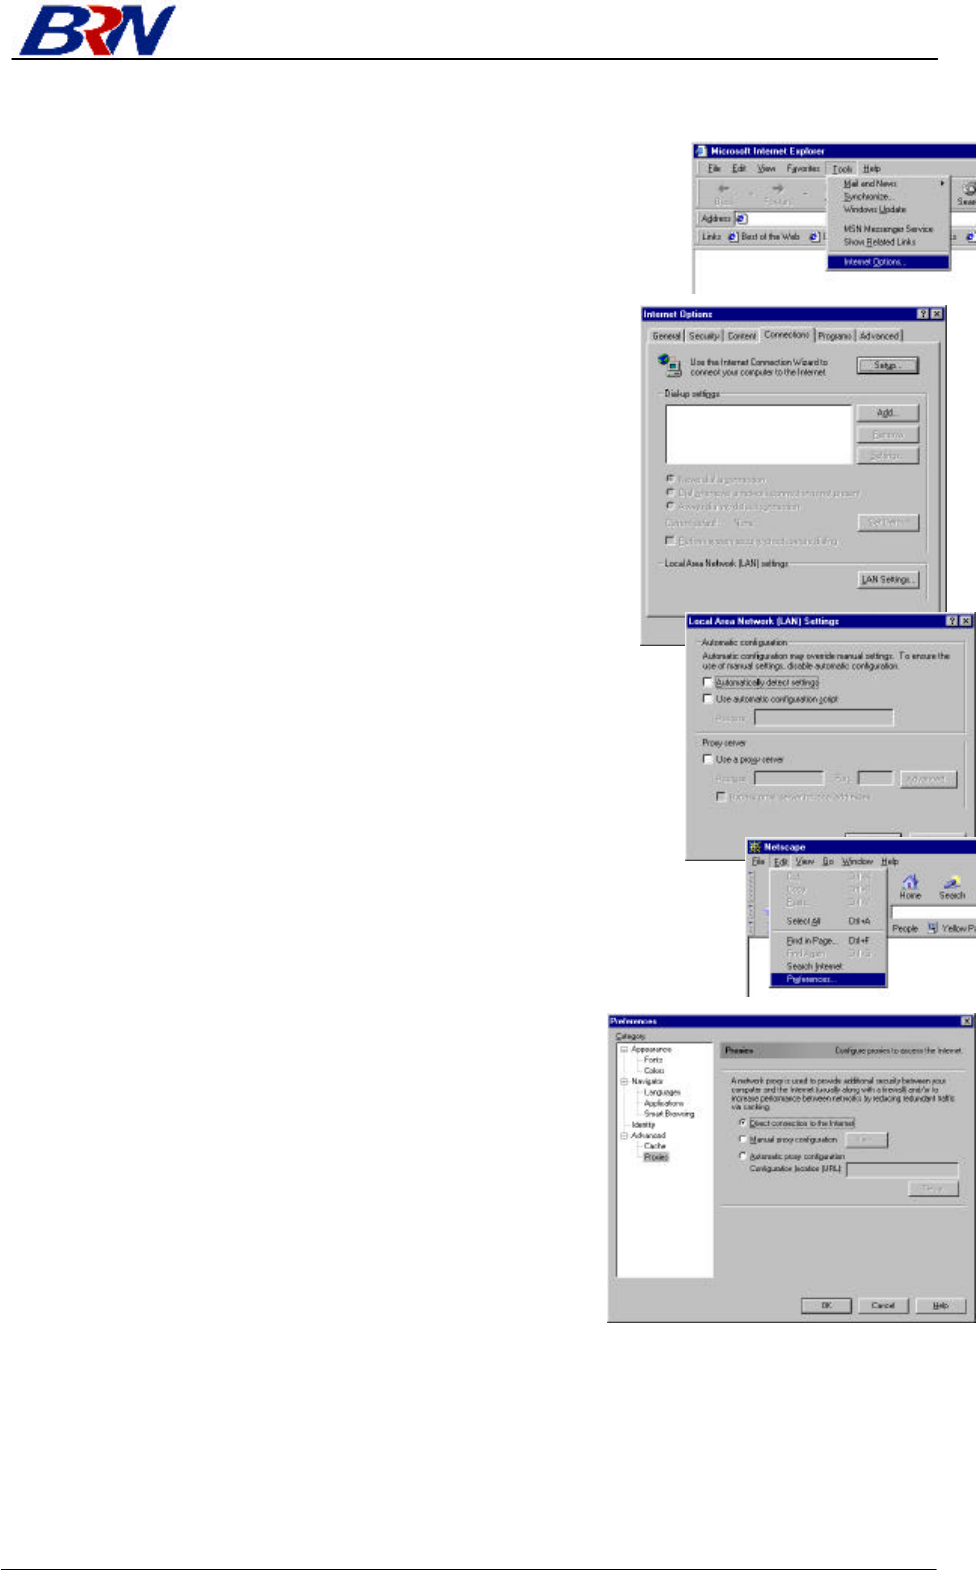
Step 2. Disable HTTP Proxy
You will need to verify that the “HTTP Proxy” feature of your Web browser is disabled. This is so
that your Web browser will be able to view the configuration pages inside your Rhine II. The
following steps are for Internet Explorer and for Netscape. Determine which browser you use and
follow the appropriate steps.
TCP/IP Configuration Setting
IP Address ____.____.____.____
Subnet Mask ____.____.____.____
Primary DNS Server ____.____.____.____
Secondary DNS Server ____.____.____.____
Default Gateway ____.____.____.____
Rhine II
BroadNet Technology Inc. 10
Internet Explorer
1. Open Internet Explorer and click the stop button. Click “Tools,”
then “Internet Options.”
2. In the “Internet Options” window click the “Connections”
tab. Next, click the “LAN Settings…” button.
3. Clear all the checkboxes.
4. Click “OK,” and then click “OK” again to close the “Internet Options”
window.
Netscape
1. Open Netscape and click the stop button. Click “Edit,” then click
“Preferences…”
2. In the “Preferences” window, under “Category” double-
click “Advanced,” then click “Proxies.” Select “Direct
connection to the Internet.” Click “OK.”
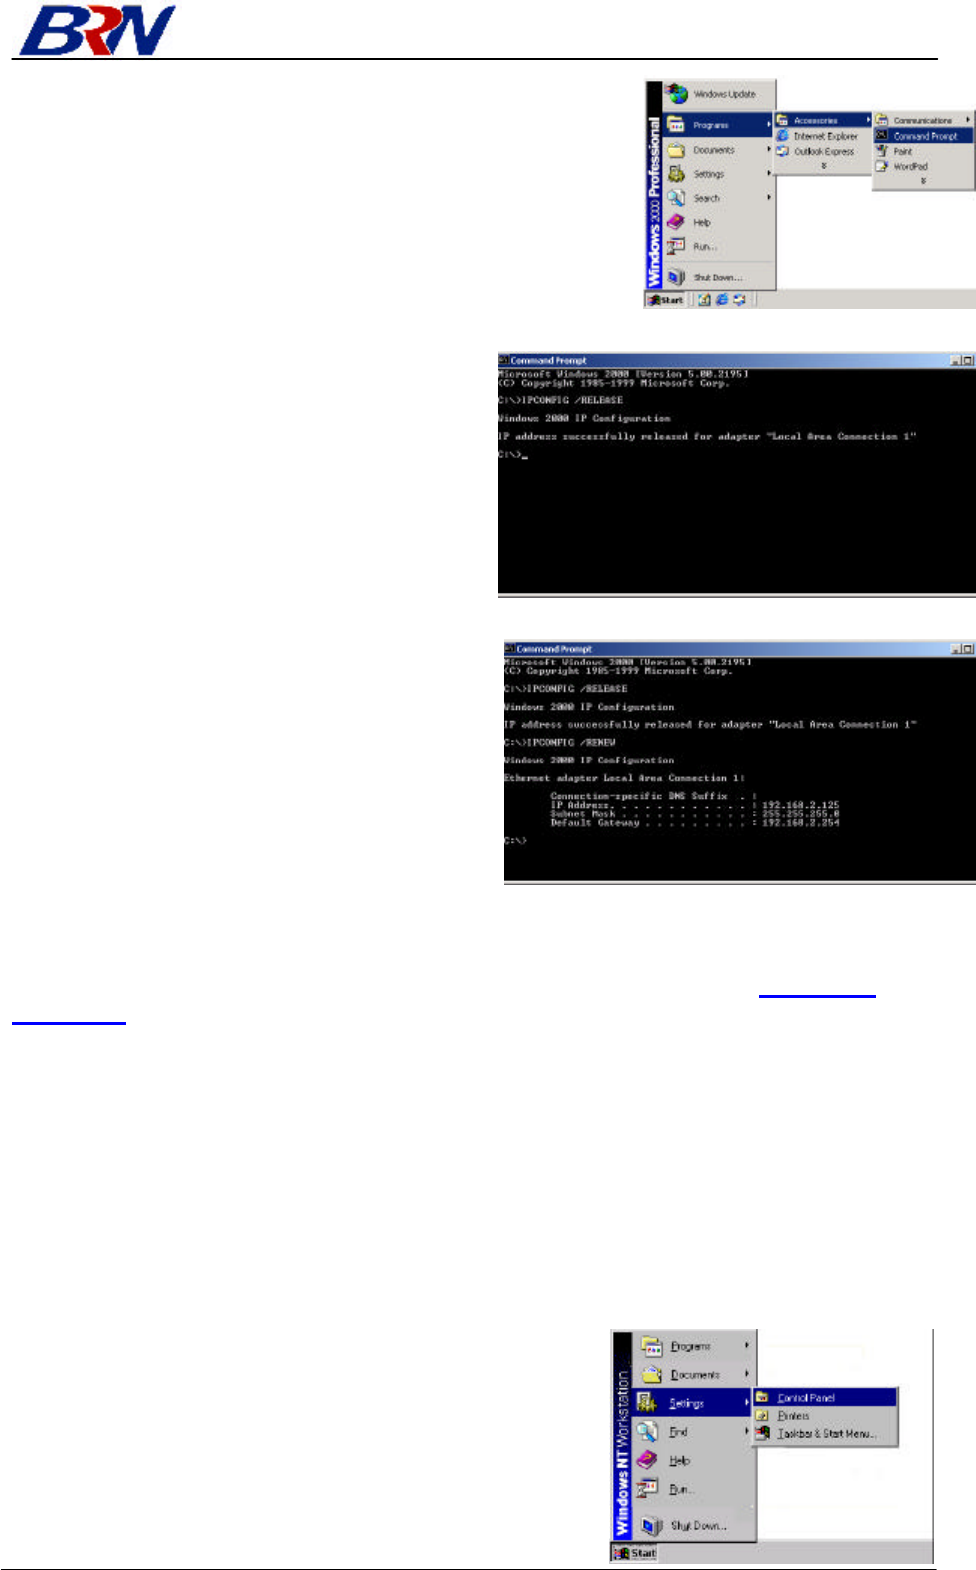
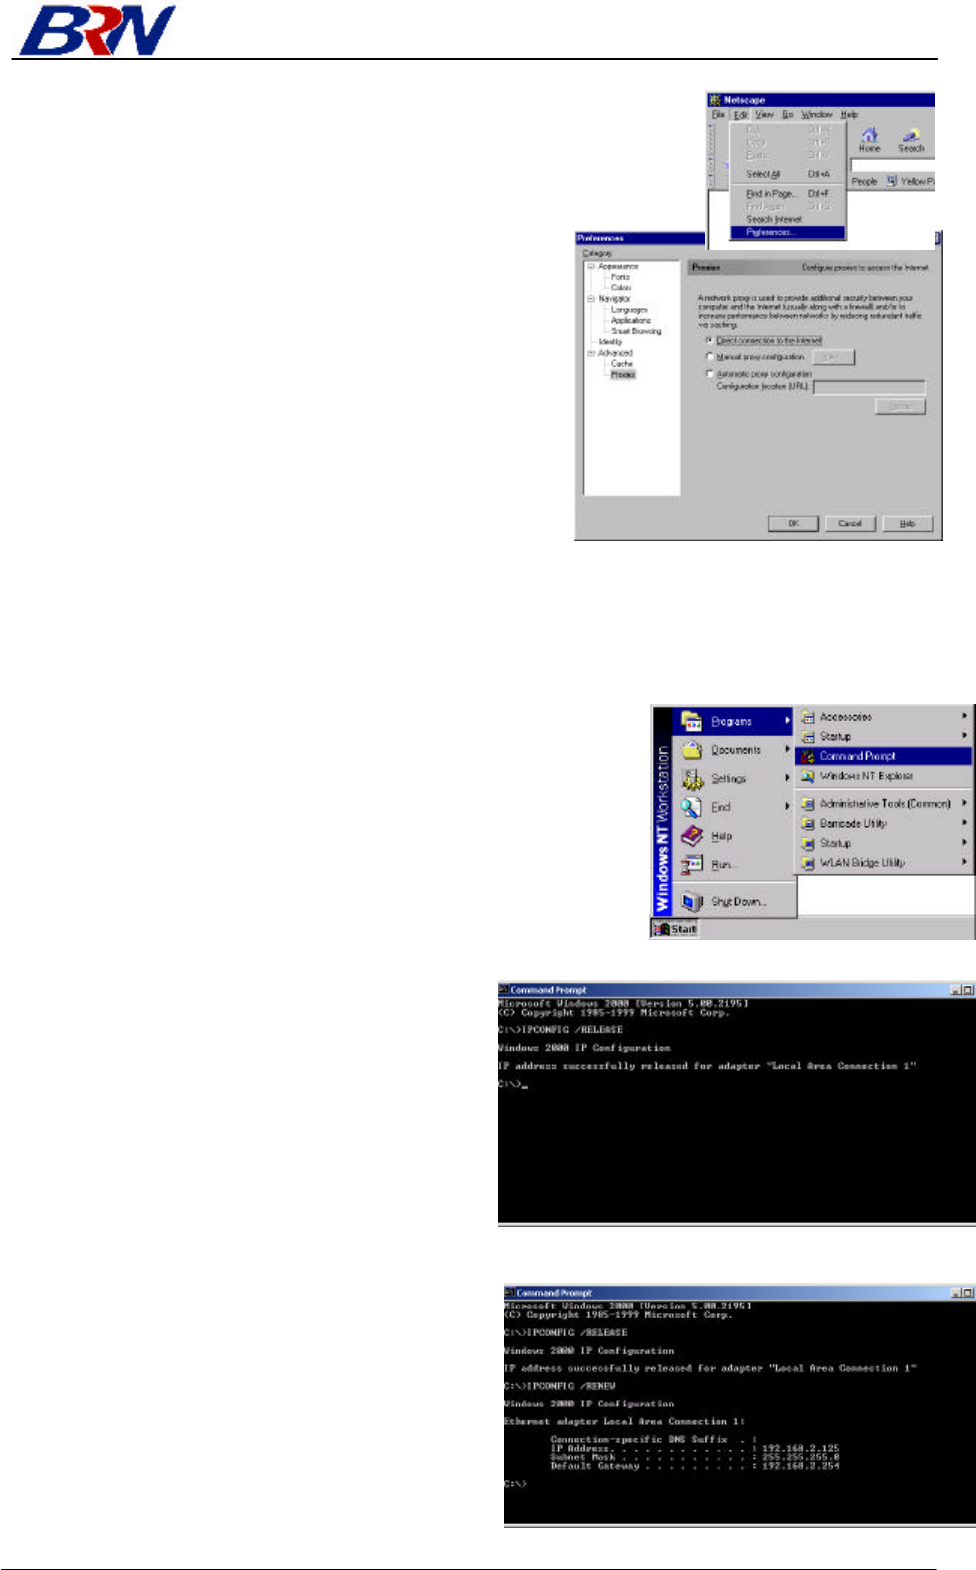
Step 3. Obtain IP Settings From Your Rhine II
Now that you have configured your computer to connect to your Rhine II, it needs to obtain new
network settings. By releasing any old IP settings and renewing them with settings from your Rhine
II, you will also verify that you have configured your computer correctly.
Rhine II
BroadNet Technology Inc. 11
1. From the Windows desktop, click the “Start” button,
then “Programs,” then “Accessories,” and then click
“Command Prompt.”
2. In the “Command Prompt” window,
type “IPCONFIG /RELEASE” and press
the <ENTER> key.
3. Type “IPCONFIG /RENEW” and press
the <ENTER> key. Verify that your IP
address is now 192.168.0.xxx (2-255),
your Subnet Mask is 255.255.255.0 and
your Default Gateway is 192.168.0.1.
These values confirm that your Rhine
II is functioning.
4. Type “EXIT” and press <ENTER> to close the “Command Prompt” window.
Now that your computer is configured to connect to your Rhine II, please skip to “Configuring
Your Rhine II” on page 21.
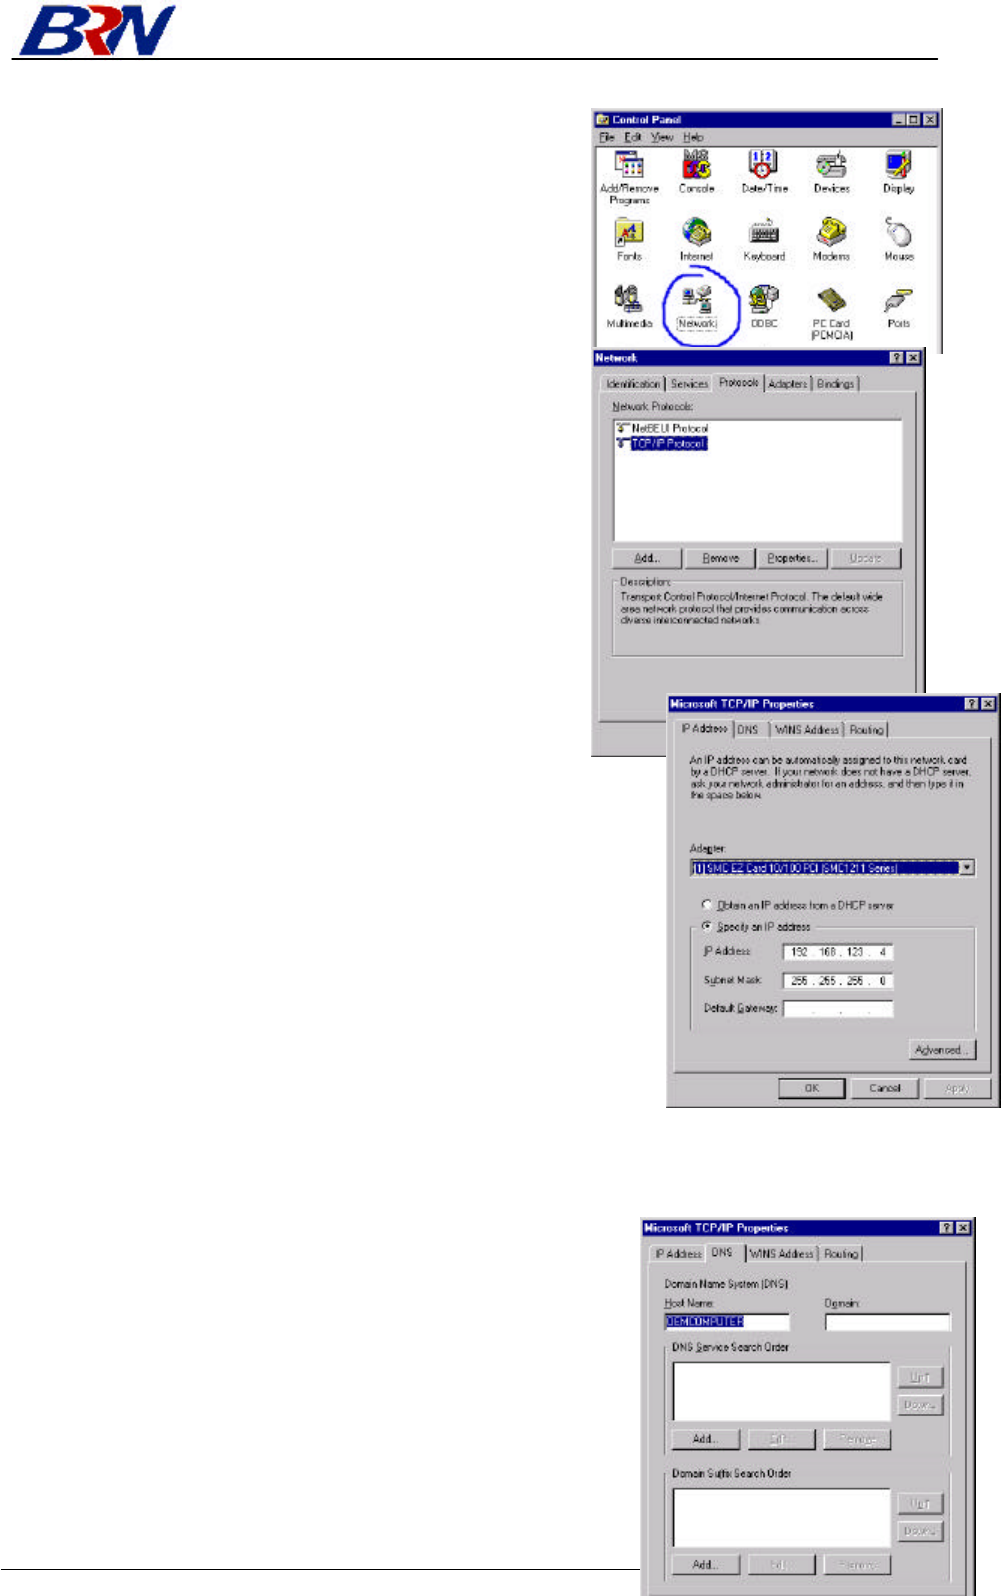
Configuring Your Computer with Windows NT 4.0
Step 1. Configure TCP/IP Settings
After you have completed the hardware setup, you need to configure your computer to connect to
your Rhine II. You need to determine how your ISP issues your IP address. Many ISPs issue these
numbers automatically using a networking technology known as Dynamic Host Control Protocol, or
DHCP. Other ISPs will specify your IP address and associated numbers, which you must enter
manually. This is also known as a static IP address. How your ISP assigns your IP address
determines how you will configure your computer.
Here is what to do:
1. From the Windows desktop click “Start,” then
“Settings,” and click “Control Panel.”
Rhine II
BroadNet Technology Inc. 12
2. Double-click the “Network” icon.
3. Select the “Protocols” tab.
4. Double-click “TCP/IP Protocol.”
5. Select the “IP Address” tab.
6. In the “Adapter” drop-down list, be sure your Ethernet
adapter is selected.
If “Obtain an IP address automatically” is already selected, your
computer is already configured for DHCP. Click “Cancel” to close each window, and skip to Step 2
“Disable HTTP Proxy.”
7. In the “TCP/IP Properties” dialog box, click the IP address
tab to locate your IP address, subnet Mask, and default
gateway. Record these values in the space provided below.
8. Click the “DNS” tab to see the primary and secondary DNS
servers. Record these values in the appropriate spaces
below.
Rhine II
BroadNet Technology Inc. 13
9. After writing down your IP settings, click the IP address tab. Select “Obtain IP address
automatically” and click OK. Click OK again to close the “Network” window.
10. Windows may copy some files, and will then prompt you to restart your system. Click “Yes”
and your computer will shut down and restart.
TCP/IP Configuration Setting
IP Address ____.____.____.____
Subnet Mask ____.____.____.____
Primary DNS Server ____.____.____.____
Secondary DNS Server ____.____.____.____
Default Gateway ____.____.____.____
Step 2. Disable HTTP Proxy
You will need to verify that the “HTTP Proxy” feature of your Web browser is disabled. This is so
that your Web browser will be able to view the configuration pages inside your Rhine II. The
following steps are for Internet Explorer and for Netscape. Determine which browser you use and
follow the appropriate steps.
Internet Explorer
1. Open Internet Explorer and click the stop button. Click “Tools,”
then “Internet Options.”
2. In the “Internet Options” window click the “Connections” tab.
Next, click the “LAN Settings…” button.
3. Clear all the checkboxes.
4. Click “OK,” and then click “OK” again to close the
“Internet Options” window.
Netscape
1. Open Netscape and click the stop button. Click “Edit,” then
Rhine II
BroadNet Technology Inc. 14
click “Preferences…”
2. In the “Preferences” window, under “Category”
double-click “Advanced,” then click “Proxies.”
Select “Direct connection to the Internet.” Click
“OK.”
Step 3. Obtain IP Settings From Your Rhine II
Now that you have configured your computer to connect to your Rhine II, it needs to obtain new
network settings. By releasing any old IP settings and renewing them with settings from your Rhine
II, you will also verify that you have configured your computer correctly.
1. From the Windows desktop, click the “Start” button, then
“Programs,” and then select “Command Prompt.”
2. In the “Command Prompt” window, type
“IPCONFIG /RELEASE” and press the
<ENTER> key.
3. Type “IPCONFIG /RENEW” and press the
<ENTER> key. Verify that your IP
address is now 192.168.0.xxx, your Subnet
Mask is 255.255.255.0 and your Default
Gateway is 192.168.0.1. These values
confirm that your Rhine II is functioning.

Rhine II
BroadNet Technology Inc. 15
4. Type “EXIT” and press <ENTER> to close the “Command Prompt” window.
Now that your computer is configured to connect to your Rhine II, please continue to “Configuring
Your Rhine II”.