Mitel Deutschland 68981AA630D-01 Mobile DECT phone with integrated BT connectivity for handset User Manual BA 610d 620d 630d GAP GB 1FA56B
Mitel Deutschland GmbH Mobile DECT phone with integrated BT connectivity for handset BA 610d 620d 630d GAP GB 1FA56B
UserMan

www.aastra.com
Created on: 16.10.2008 • Issue 1 • Products similar to illustrations • Right to make technical changes reserved.
Aastra
610d, 620d, 630d
Aastra 610d, 620d, 630d with
GAP-compatible communication systems
User's Guide

i
General information..................................................................................................................1
Prescribed use / Declaration of Conformity …………………………………………………2
Notes on safety …………………………………………………………………………2
Note for wearers of hearing aids …………………………………………………………3
Communications Regulation Information …………………………………………………3
FCC Notices (U.S. Only) …………………………………………………………………3
Health and Safety Information …………………………………………………………3
Industry Canada (Canada only) …………………………………………………………4
Installation ...............................................................................................................................5
Inserting the standard battery ……………………………………………………………5
Inserting the power battery ………………………………………………………………5
Installing/removing a mounting bracket or rotary clip ………………………………………6
Attaching the carrying strap ………………………………………………………………6
Headset connection/Bluetooth® …………………………………………………………7
Aastra 630d - Headset: To remove the sealing cover………………………………………7
USB and external charging connection ……………………………………………………8
Aastra 630d - USB connector: To remove the sealing cover ………………………………8
Connecting the charging unit ……………………………………………………………8
Power supply / Power supply unit …………………………………………………………9
Micro SD card ……………………………………………………………………………9
Important information about the battery …………………………………………………9
Precautions during use ………………………………………………………………10
Commissioning .......................................................................................................................11
Charging and durations …………………………………………………………………11
Battery: Charging states …………………………………………………………………12
Battery warning ………………………………………………………………………12
Registering your handset (log-in)…………………………………………………………12
Registration …………………………………………………………………………13
Subscription …………………………………………………………………………13
Function overview...................................................................................................................14
Displays, softkeys, LEDs and key functions ………………………………………………14
Key assignment (on delivery) …………………………………………………………14
Display arrangement …………………………………………………………………15
Display ………………………………………………………………………………15
Softkey line and idle display……………………………………………………………16
LED …………………………………………………………………………………17
Key functions …………………………………………………………………………18
Navigating in menus ...............................................................................................................21
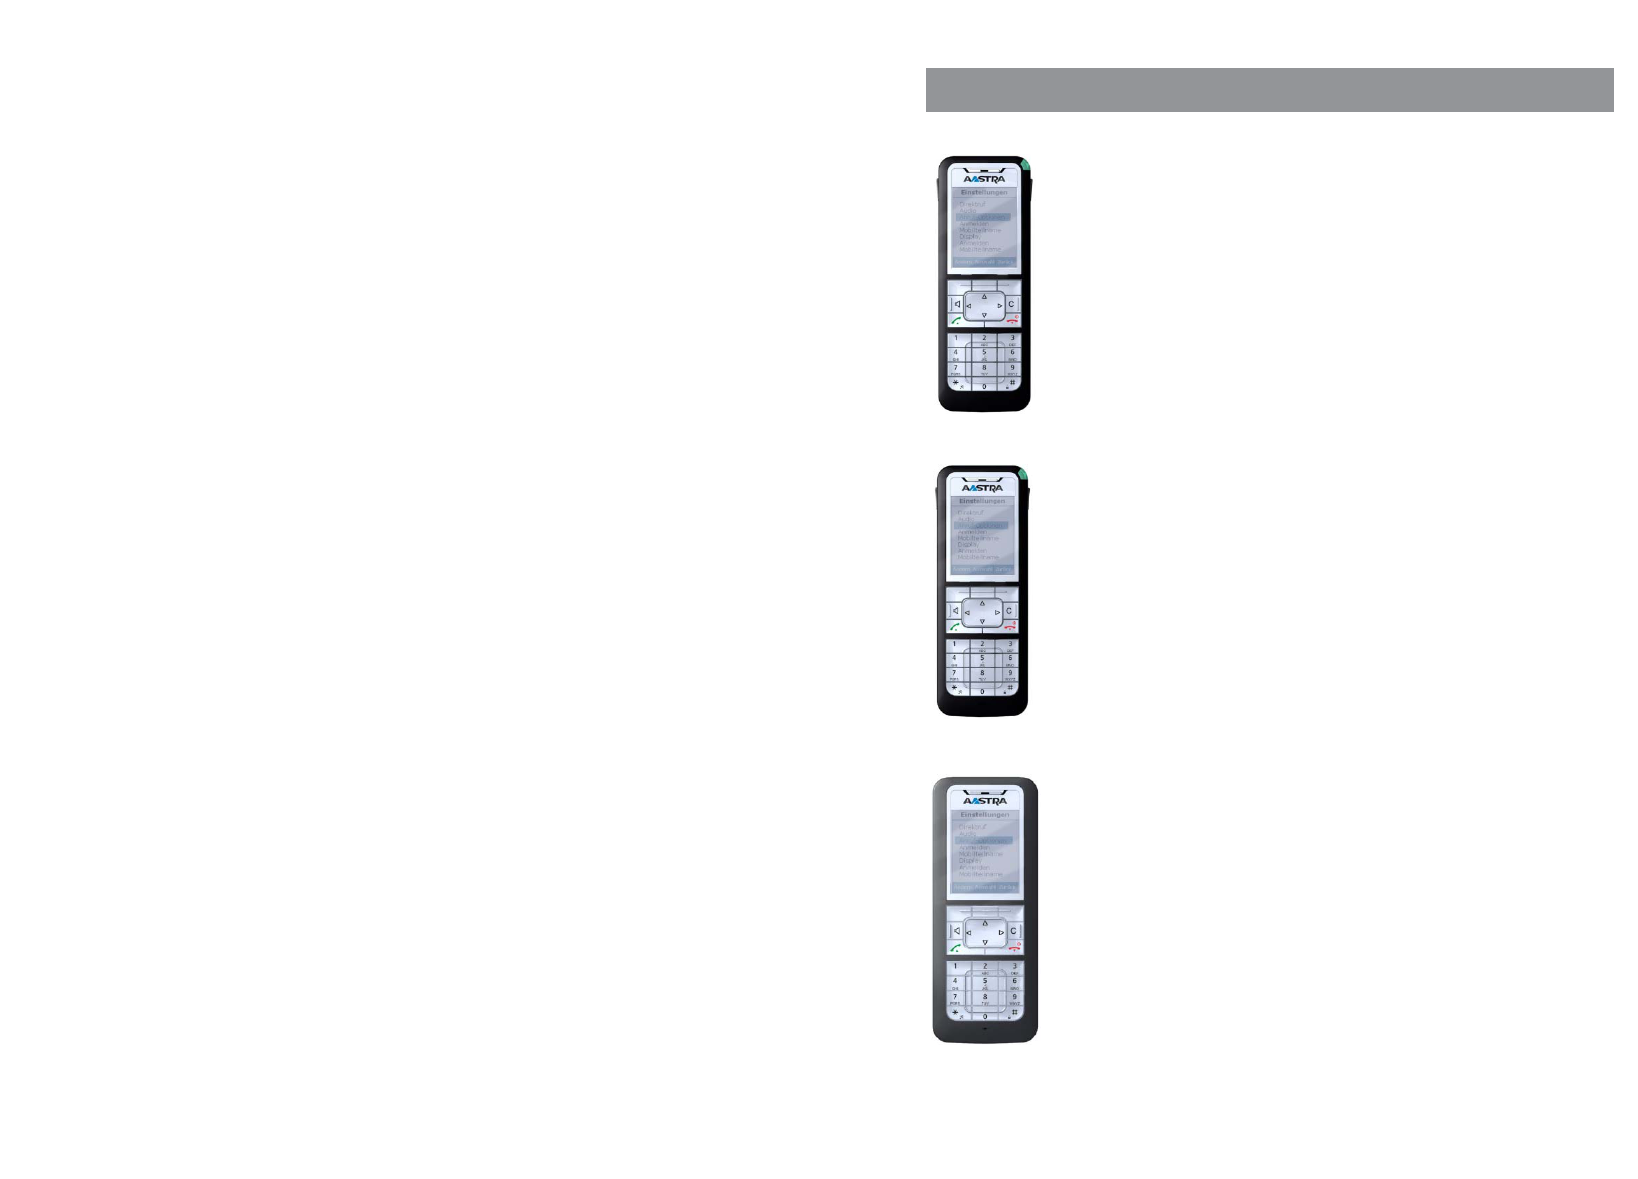
Example: Setting the language …………………………………………………………21
Example: Personal phone book/Editor ……………………………………………………21
Editor …………………………………………………………………………………23
Contents
Thank you for choosing an Aastra product. Our product stands for
highest quality standards combined with high-quality design.
The following User's Guide will assist you in using your Aastra DECT telephone and provide answers
to all your most important questions. If you should require further technical support or information
about other Aastra products, please contact the person responsible for your system or get in touch
with your local dealer.
You can also find further information about these devices and other products on
our website.
We hope you enjoy using your Aastra DECT telephone
About this User's Guide
Your handset can be used as a system or GAP telephone. The telephone system must support the
device as a system telephone.
The handset is described as a GAP-compatible telephone in this User's Guide.
GAP (Generic Access Profile) and the DECT standard define methods according to which digital cord-
less telephones can set up connections. As the GAP standard is not manufacturer-specific, it's possi-
ble to combine base stations and handsets from different manufacturers with one another. Basic
functions (making and receiving calls) as well as the local features of the device are always possible
when using these combinations. Other system features that may be supported by the telephone
system (e.g. code entry) can be found in the corresponding user’s guide of the respective system
manufacturer.
Welcome

iiiii
ContentsContents
Protection functions …………………………………………………………………39
Profiles ………………………………………………………………………………40
"Info" menu …………………………………………………………………………40
"Active features" menu …………………………………………………………………41
"Phone book" menu ……………………………………………………………………41
"Time/Alarms" menu …………………………………………………………………42
"Audio" menu …………………………………………………………………………44
"Call filter" menu ………………………………………………………………………46
"System" menu …………………………………………………………………………47
"Settings" menu…………………………………………………………………………48
"Security" menu …………………………………………………………………………51
"Profiles" menu ………………………………………………………………………53
Key programming ...................................................................................................................55
Programming (general) …………………………………………………………………55
Special features for the VIP list (on the hotkey on delivery)…………………………………56
Appendix.................................................................................................................................57
Care and Maintenance …………………………………………………………………57
Environmental Characteristics and Disposal ………………………………………………57
Instructions for disposal ………………………………………………………………57
Declaration of Conformity ………………………………………………………………58
Limited Waranty ………………………………………………………………………59
Exclusions ……………………………………………………………………………59
Warranty Repair Services ………………………………………………………………59
After Warranty Service…………………………………………………………………60
Accessories ……………………………………………………………………………61
Technical specifications …………………………………………………………………63
Menu Structure …………………………………………………………………………65
Index……………………………………………………………………………………68
Basic functions ........................................................................................................................24
Switching the handset on/off ……………………………………………………………24
Key lock / Phone lock ……………………………………………………………………24
Switching hands-free operation on/off ……………………………………………………24
Acknowledging an appointment/alarm …………………………………………………25
Adjusting the volume of the earpiece during the call ……………………………………25
Switching the ringer on/off ………………………………………………………………25
Switching ringer off at call ………………………………………………………………25
Illumination ……………………………………………………………………………26
Changing the brightness/contrast of the display …………………………………………26
Muting the handset ……………………………………………………………………26
Automatic hide / Info window ……………………………………………………………27
Event window and "Info"- Menu …………………………………………………………27
Vibration alarm (620d, 630d only) ………………………………………………………27
Configuring your personal directory ………………………………………………………27
Editing lists ……………………………………………………………………………28
Using the Bluetooth® headset (Aastra 620d, 630d) ………………………………………29
Registration …………………………………………………………………………29
Telephoning via the Bluetooth headset…………………………………………………30
Special key (Hotkey) /VIP list (Aastra 620d, 630d) …………………………………………30
VIP list (Aastra 610d) ……………………………………………………………………30
Special functions (Aastra 630d only)………………………………………………………31
SOS …………………………………………………………………………………31
"Mandown" …………………………………………………………………………31
Telephoning............................................................................................................................33
Answering a call…………………………………………………………………………33
Making internal / external calls …………………………………………………………34
Direct dial ……………………………………………………………………………34
Predial ………………………………………………………………………………34
Calling from the Redial list ………………………………………………………………34
Calling from your personal Phone book …………………………………………………35
Calling from the Caller lists ………………………………………………………………35
Ending calls ……………………………………………………………………………36
Multiple connections ……………………………………………………………………37
Consultation call / Brokering …………………………………………………………37
Devices menu..........................................................................................................................38
Notes on the display symbols in the menu………………………………………………38
Overview ………………………………………………………………………………38
Info …………………………………………………………………………………38
Active features ………………………………………………………………………38
Phone book …………………………………………………………………………39
Time/Alarms ………………………………………………………………………39
Audio ………………………………………………………………………………39
Call filter ……………………………………………………………………………39
System ………………………………………………………………………………39
Settings ………………………………………………………………………………39
1iv
General information
General information
Aastra 610d
- 3 softkeys (programmable) / 2 sidekeys
- Caller list for 30 entries
- Redial list for 20 entries
- Local phone book for 100 entries
- Connection socket for headset
- Safety class IP 50
Aastra 620d
- 1 hotkey / 3 sidekeys / 3 softkeys (programmable)
- Caller list for 50 entries
- Redial list for 30 entries
- Local phone book for 200 entries
- Headset connection via cable or
Bluetooth
- Micro SD card for device-specific settings (optional)
- Mini USB connection
- Safety class IP 50
Aastra 630d
- 1 hotkey / 3 sidekeys / 3 softkeys (programmable)
- 1 emergency call key
- Caller list for 50 entries
- Redial list for 30 entries
- Local phone book for 200 entries
- Sensor for "Mandown"
- Headset connection via cable or
Bluetooth
- Micro SD card for device-specific settings (optional)
- Mini USB connection
- Safety class IP 65 (dust and water spray protected)
M
@
f
or
a
l
e
rs
Contents

32
General information
Note for wearers of hearing aids
Before using the handset, users of hearing aids should note that radio signals can affect hearing aids
and, if powerful enough, can cause an unpleasant buzzing sound.
Communications Regulation Information
FCC Notices (U.S. Only)
This device complies with part 15 of the FCC Rules. Operation is subject to the following two condi-
tions:
(1) This device may not cause harmful interference, and (2) this device must accept any interference
received, including interference that may cause undesired operation.
Modifications not expressly approved by this company could void the user's authority to operate the
equipment.
NOTE: This equipment has been tested and found to comply with the limits for a Class B digital
device, pursuant to Part 15 of the FCC Rules. These limits are designed to provide reasonable protec-
tion against harmful interference in a residential installation. This equipment generates, uses and
can radiate radio frequency energy and, if not installed and used in accordance with the instructions,
may cause harmful interference to radio communications. However, there is no guarantee that inter-
ference will not occur in a particular installation. If this equipment does cause harmful interference
to radio or television reception, which can be determined by turning the equipment off and on, the
user is encouraged to try to correct the interference by one or more of the following measures:
• Reorient or relocate the receiving antenna.
• Increase the separation between the equipment and receiver.
• Connect the equipment into an outlet on a circuit different from that to which the receiver is con-
nected.
• Consult the dealer or an experienced radio/TV technician for help.
Health and Safety Information
Exposure to Radio Frequency (RF) Signals:
The wireless phone is a radio transmitter and receiver. It is designed and manufactured not to
exceed the emission limits for exposure to radio frequency (RF) energy set by the Federal Communi-
cations Commission (FCC) of the U.S. Government. These limits are part of comprehensive guidelines
and establish permitted levels of RF energy for the general population. The guidelines are based on
the safety standards previously set by both U.S. and international standards bodies. These standards
include a substantial safety margin designed to assure the safety of all persons, regardless of age
and health.
This device and its antenna must not be co-located or operating in conjunction with any other
antenna or transmitter.
General information
Prescribed use / Declaration of Conformity
This product can be used in all EU member states on a DECT-GAP-compatible communication sys-
tem. The telephone complies with the radio-specific European harmonised standards for DECT. The
CE mark on the product confirms its conformance with the technical directives for user safety and
electromagnetic compatibility, the relevant declaration of conformity according to European Direc-
tive 99/5/EC applies at the date of issue.
The declaration of conformity can be viewed on the Aastra homepage on the Internet.
This device is also approved for use in North America (USA and Canada). For more information on
this, read the safety information on page 3.
Please also use the other documentation that was supplied with the parts of your telephone system.
Notes on safety
It is imperative to observe the following instructions when setting up, connecting and using the
telephone.
•Place the charger cradle on a non-slip surface.
•Lay the connection cable so it cannot cause accidents!
•Important instructions for using the battery are given on page 9.
•Do not place the handset or the charger cradle
•close to heat sources
•in direct sunlight
•next to other electrical devices
•Protect your telephone from moisture, dust, aggressive liquids and gases.
•Only use approved accessories.
•Only use the plug-in power supply supplied (23-00-1061-00).
•Always switch off the handset before removing the battery
•Never
•open the charger cradle or the handset (except for the battery compartment cover) yourself!
•touch the plug contacts with pointed metallic objects!
•carry the charger cradle by the connection cable!
•Only clean your telephone with a slightly moist cloth.
•Do not use your telephone in explosive areas.
•Do not use the Aastra 610d and 620d in wet rooms (e.g. bathrooms).
54
Installation
Installation
Inserting the standard battery
Aastra 610d, 620d
Push the battery cover downwards until it disengages
from the locking mechanism and lift off. Insert the bat-
tery with the contacts downwards. Replace the battery
cover and push upwards until it snaps into place.
Aastra 630d
Undo the two screws on the back of the handset with a
suitable tool and remove the cover. Insert the battery
with the contacts downwards, close the battery com-
partment with the cover and screw back in place. Do
not damage the rubber seal when assembling.
Inserting the power battery
You can order a battery with higher capacity
(power battery) for the Aastra 620d and 630d
as an accessory (see page 61).
This battery has a thicker design so you need another
battery cover that protrudes approx. 6 mm beyond the
rear of the device.
Install the new battery cover as described above.
In the Aastra 620d you should remove any installed
fixing bracket beforehand.
This EUT has been shown to be capable of compliance for localized specific absorption rate (SAR) for
uncontrolled environment/general population exposure limits specified in ANSI/IEEE Std. C95.1-
1992 and had been tested in accordance with the measurement procedures specified in FCC/OET
Bulletin 65 Supplement C (2001) and IEEE 1528-2003.
Industry Canada (Canada only)
Operation of this device is subject to the following two conditions: (1) this device may not cause
interference, and (2) this device must accept any interference, including interference that may cause
undesired operation of the device.
Privacy of communications may not be ensured when using this telephone.
Exposure to Radio Frequency (RF) Signals:
The wireless phone is a radio transmitter and receiver. It is designed and manufactured not to
exceed the emission limit for exposure to radio frequency (RF) energy set by the Ministry of Health
(Canada), Safety Code 6. These limits are part of comprehensive guidelines and established permit-
ted levels of RF energy for the general population. These guidelines are based on the safety stan-
dards previously set by international standard bodies. These standards include a substantial safety
margin designed to assure the safety of all persons, regardless of age and health.
This device and its antenna must not be co-located or operating in conjunction with any other
antenna or transmitter.
This device has been shown to be capable of compliance for localized specific absorption rate (SAR)
for uncontrolled environment / general public exposure limits specific in ANSI/IEEE C95.1-1992 and
had been tested in accordance with the measurement procedures specified in IEEE 1528-2003.
General information
7
Installation
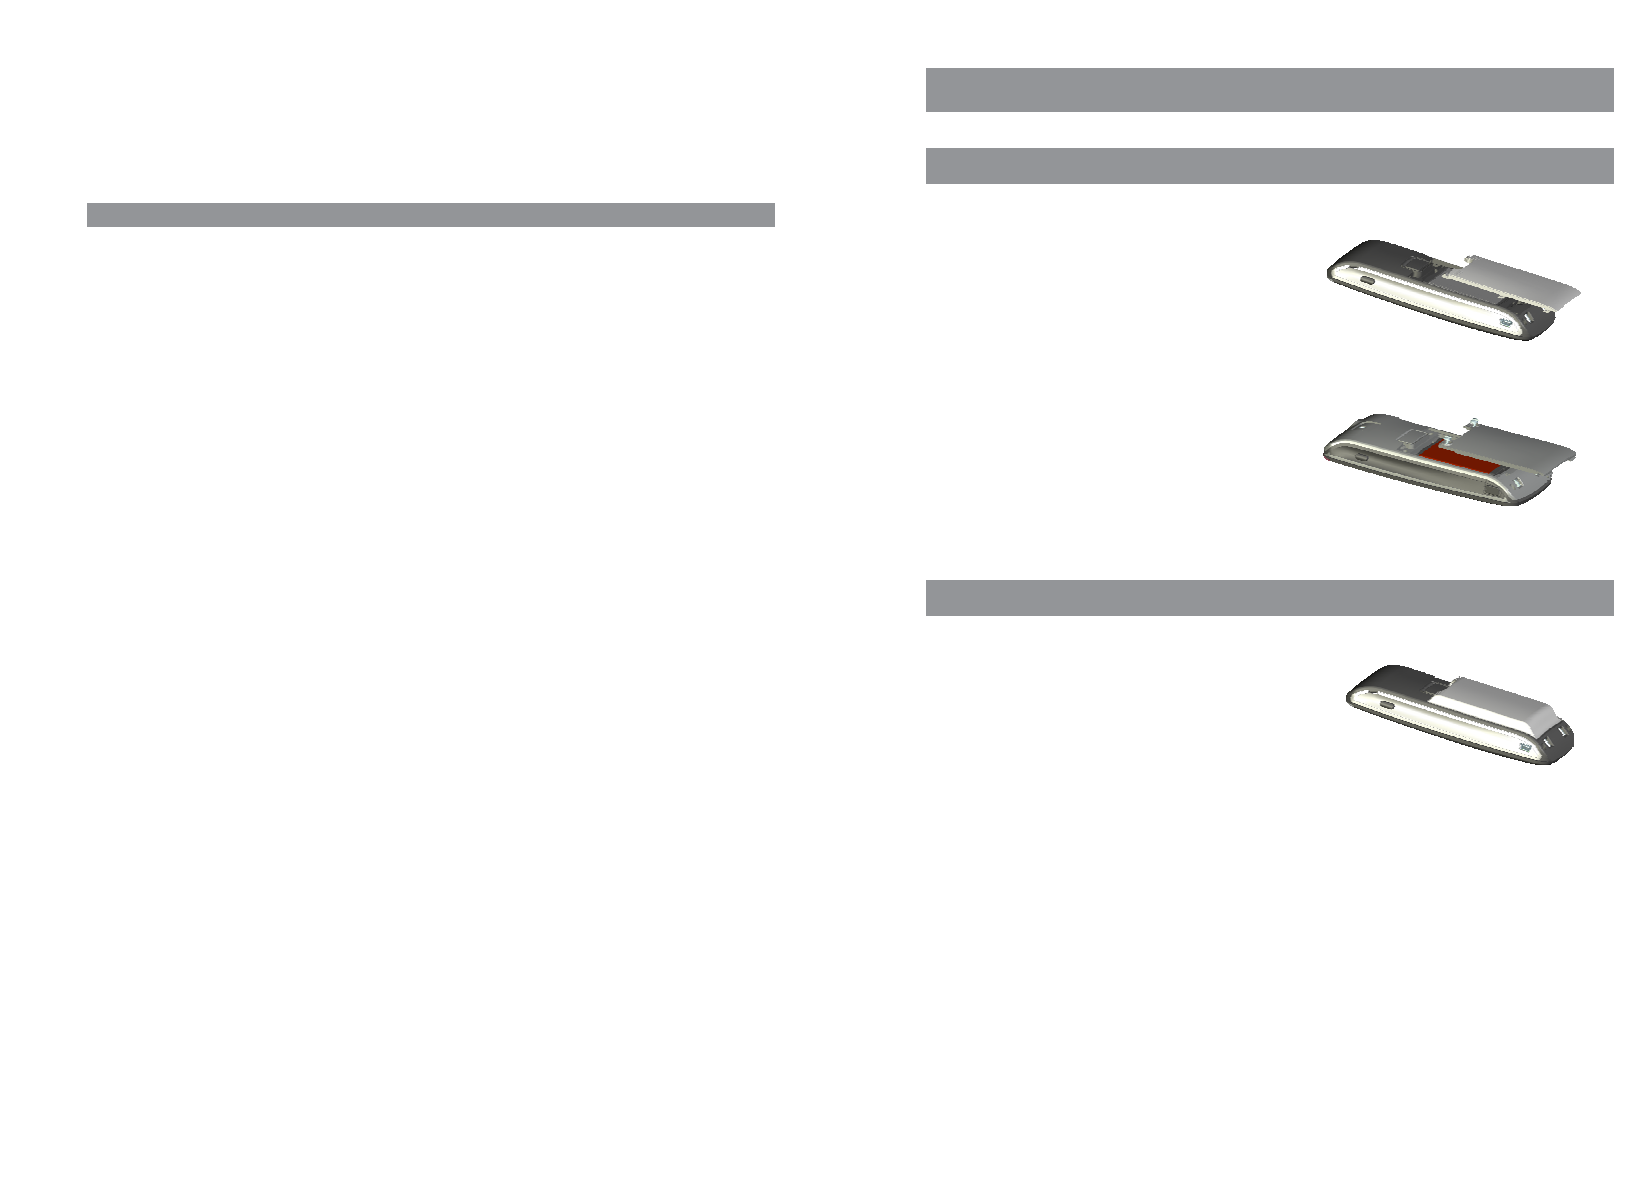
Headset connection/
Bluetooth
®
All handsets have a 2.5 mm jack plug at the bottom left for connecting a headset. Only use the
recommended headsets (see Accessories page 61).
The Aastra 620d/630d mobile handsets have a
Bluetooth
interface (2.0) for corresponding headsets.
With a headset only audio data can be transferred via the
Bluetooth
interface.
Aastra 630d - Headset: To remove the sealing cover
The opening of the headset connection is closed with a captive cover. If the headset is not in use,
please close the opening so the device can be used in accordance with its protection class.
Remove the sealing cover from the device by pulling it out on the upper edge. Never pull it out on
the bottom edge.
6
Installation
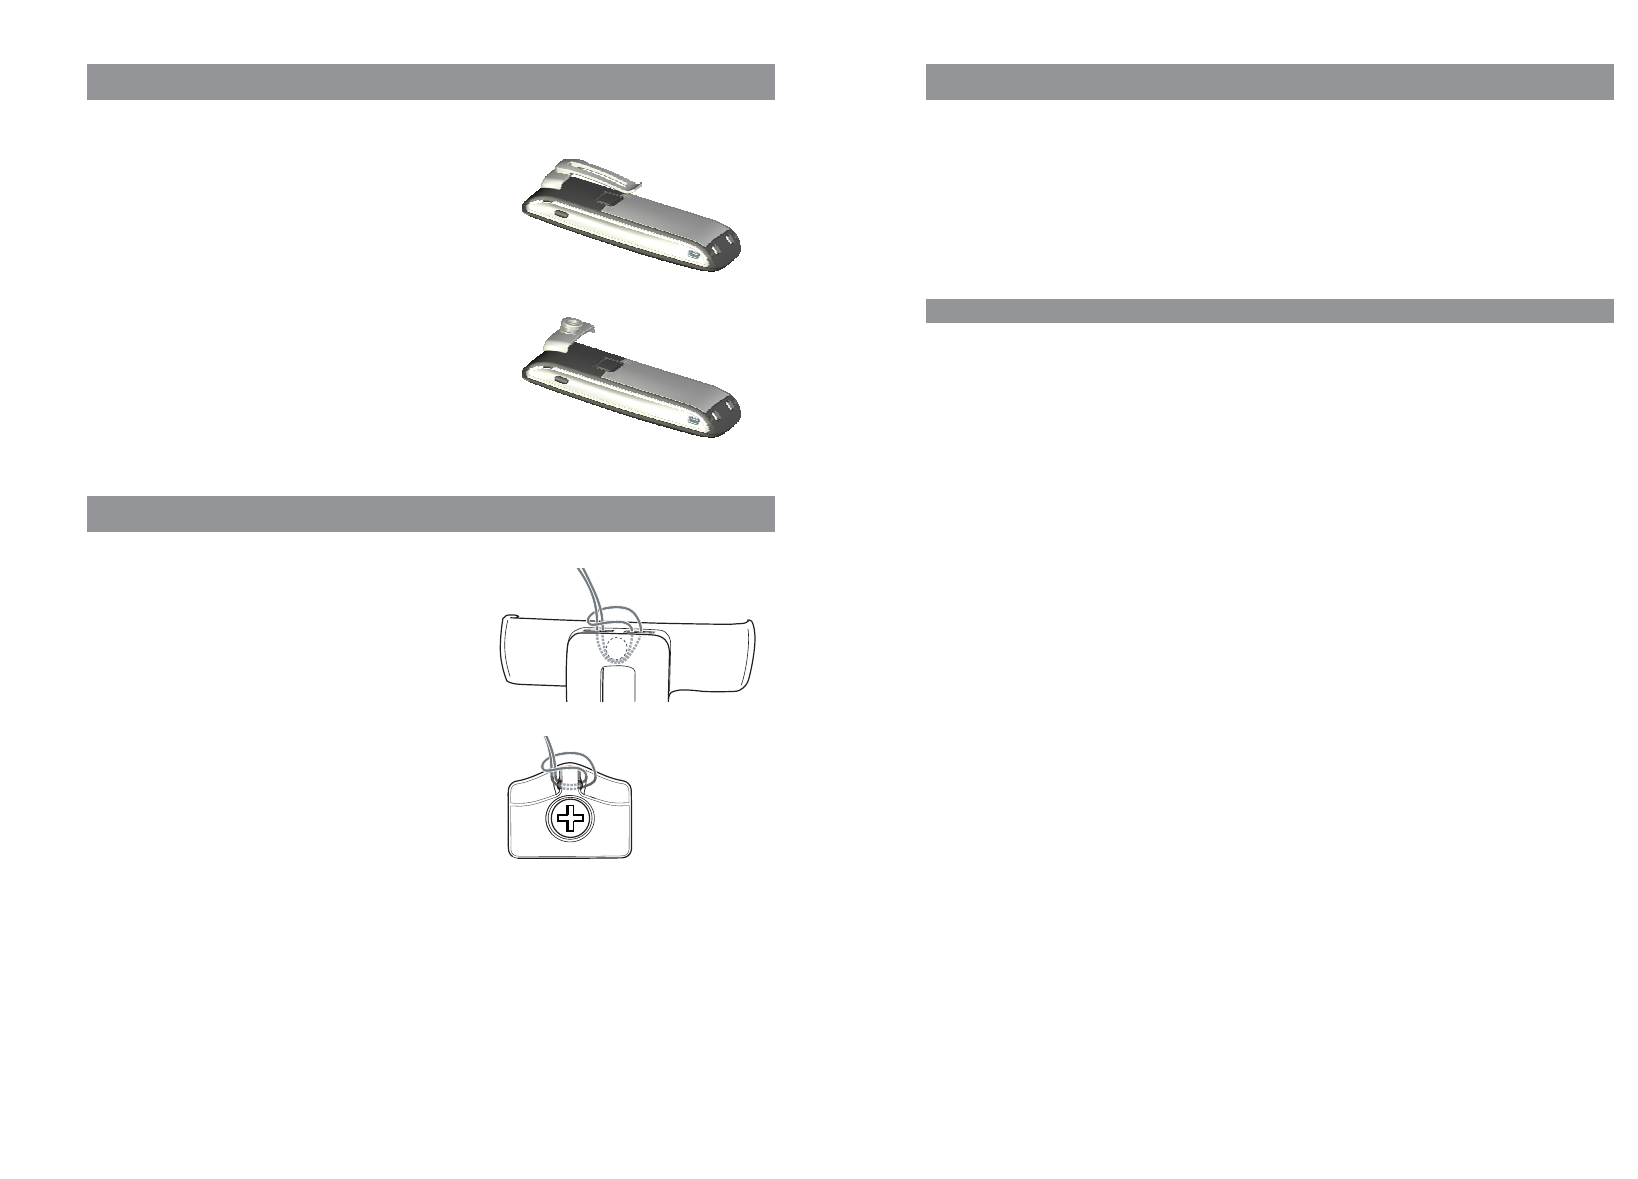
Installing/removing a mounting bracket or rotary clip
Aastra 610d, 620d
Place the supplied fixing bracket on both openings at
the upper end of the handset and snap in place by
pressing downwards. To remove the fixing bracket,
press into the small cutouts at the edge of the bracket
and pull the two sides slightly apart.
The Aastra 610d and 620d can also be fitted with
a rotary clip as an accessory. Place the supplied fixing
bracket on both openings at the upper end of the
handset and snap in place by pressing downwards. The
clip is then pushed onto the protruding button. To
release the handset from the clip, press the top button.
Attaching the carrying strap
Aastra 610d, 620d: There are two openings
in the upper part of the fixing bracket. Feed the lower
end of the carrying strap through these openings (ple-
ase install with the fixing bracket removed). Carrying
straps are available as accessories (see page 61).
Aastra 630: A carrying strap with carrying strap
attachment is available as an accessory. To
attach the holder, replace the screwed-on belt
clip by the carrying strap attachment.
9
Installation
Power supply / Power supply unit
The power supply unit is designed for 100V to 240V AC (50-60 Hz). It is supplied with four change
adapters enabling virtually worldwide use. Where necessary, connect the plug normally used in your
country to the power supply unit. There are two versions of the plug-in power supply unit that are
connected slightly differently:
Version 1: Set the switch on the power supply unit to OPEN and push out the existing plug upwards.
Then insert the new plug required into the power supply unit and lock it with the switch (LOCK).
Version 2: Remove any existing plug by pressing OPEN. Then insert the required new plug into the
power supply unit at a slight angle with the label TOP upwards. Press downwards until it snaps into
place.
Micro SD card
Aastra 620d, 630d: There is a slot for a micro SD card under the battery in the handset. This is not
used in the current delivery condition and is available for future applications. Please make sure that
the card slot is not damaged when inserting the battery.
Important information about the battery
The devices are powered by a Li-ion battery (both standard and power battery).
It is vital that you read the safety regulations before using the battery for the first time. Keep these
safety regulations and all instructions for use at hand for future reference.
•Dispose of used batteries according to the instructions on page ???.
Failure to heed any of the following precautions when using the battery can lead to overheating, fire
and danger of explosion.
•CAUTION: Risk of explosion if the battery is replaced by an incorrect type.
•Never try to use the battery for the power supply of any device other than these handsets.
•Never use or leave the battery close to a naked flame.
•Never put the battery into a microwave oven, do not throw it into a fire and do not expose it to
high temperatures by any other means.
• Never carry or store the battery together with electrically conducting objects (neck chains, pencil
leads, etc.)
•Never attempt to open the battery, never modify it in any way or subject it to severe blows.
•Never immerse the battery in fresh or salt water.
•Never use or leave the battery in direct sunlight, in a vehicle parked in blazing sunlight or in any
other location with high temperatures.
8
Installation
USB and external charging connection
Aastra 620d, 630d: A mini USB connection (2.0) is located at the bottom right. This has two func-
tions:
•as an interface for connecting to a PC to load data from or to the device, for example. If the hand-
set is connected to a PC, the battery is charged at the same time. The charging process is, howe-
ver, slower than if the handset is charged in the charging unit.
•as a connection socket for a USB charging device (see Accessories, page 61) to charge the handset
even when it is in a leather pouch. The charging process is also slower here than charging in the
charger cradle.
Only use a shielded USB cable (see Accessories, page 61)
Aastra 630d - USB connector: To remove the sealing cover
The opening of the USB connection in the Aastra 630d is closed with a captive cover. If the USB cable
is not in use, please close the opening so the device can be used in accordance with its protection
class.
Remove the sealing cover from the device by pulling it out on the upper edge. Never pull it out on
the bottom edge.
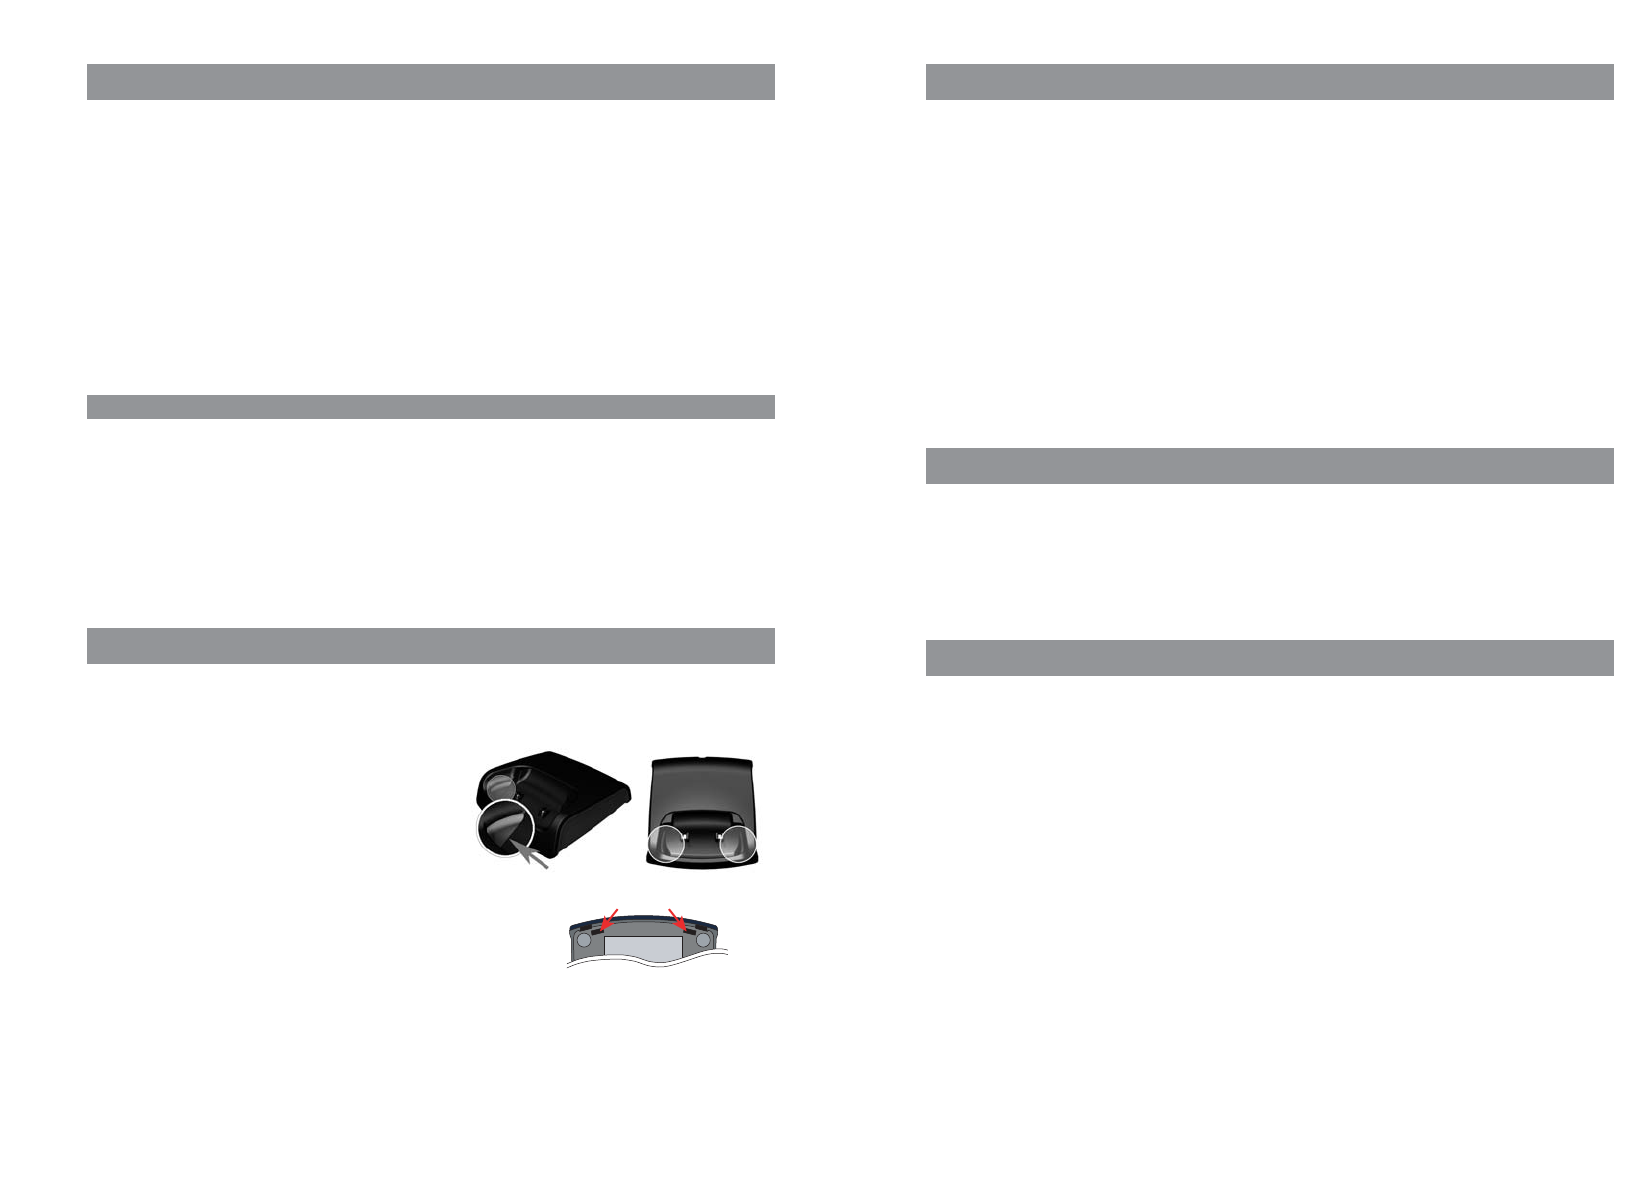
Connecting the charging unit
Aastra 610d, 620d: This handset can be used without any changes to the charger cradle.
Aastra 630d: To use this handset, you must remove
the two lateral guides in the charger cradle. They are
easy to lift on the inside edge using a fingernail or a
paper clip.
The plastic guides can also be removed, by pushing a suitable
screwdriver into the slits on the bottom of the charger.
Connect the plug-in power supply to the charger cradle and place the connection cable through the
cable guide. Place the charger cradle on a non-slip surface. Change the plug of the power supply
unit if necessary (see below).

11
Commissioning
Commissioning
Charge the battery before using your handset for the first time.
Maximum battery performance is first reached after three to five charging and discharging cycles.
Place the handset in the charger cradle regularly to achieve optimum battery charge.
After initial charging of the battery your handset is ready for use, calls can be received or made from
this handset.
Charging and durations
Charging time in the charger cradle (empty battery):
Full capacity: 2 hours (standard battery), 4 hours (power battery).
Charging time with USB charging device:
Full capacity: 4 hours (standard battery), 8 hours (power battery).
Talk time:
Standard battery - up to 15 hours (when fully charged) for North America.
Standard battery - up to 12 hours (when fully charged) for other countries.
Power battery - up to 30 hours (when fully charged) for North America.
Power battery - up to 24 hours (when fully charged) for other countries.
Standby time:
Standard battery - up to 105 hours (when fully charged) for North America.
Standard battery - up to 110 hours (when fully charged) for other countries.
Power battery - up to 190 hours (when fully charged) for North America.
Power battery - up to 200 hours (when fully charged) for other countries.
Note
Poor radio signals (far away from the system base station) reduce the handset standby and talk
times. High loudspeaker or ringer volume, frequent key activation and display illumination as well as
active vibration alarm and
Bluetooth
operation are features that can specifically shorten standby
and talk times.
10
Installation
• If you ever notice liquid leaking out, unusual odour, build-up of heat, discolouration, deformation
or any other abnormal condition when you use, charge or store the battery, remove the battery
immediately from the handset and keep it away from naked flames.
• The battery fluid can damage your sight. If at any time battery fluid accidentally gets into your
eyes, rinse your eyes immediately with clean tap water and contact a doctor.
• If the battery is to be used by children, make sure a responsible adult instructs the children in the
precautions and proper handling, and make sure the children handle the battery correctly.
• If battery fluid accidentally gets onto your clothing or skin, rinse the affected place immediately
with pure tap water. Prolonged contact with battery fluid can lead to skin inflammation.
Precautions during use
• The battery is designed for use with these handsets only.
• Only use the charger cradle supplied for charging.
• A new battery is not charged so you need to charge it before using for the first time.
• Using the battery in a cold environment can shorten the expected operating life of a full charge.
Charge the battery at a location with a temperature between 10° C and 35° C. Charging outside
this temperature range can lead to a longer-than-usual charging time or even to failure of the
charging process.
• An extremely short operating time after a full charge indicates that the lifetime of the battery has
expired. Replace the battery.
• Never wipe the battery with thinners, benzene, alcohol, or other volatile substances, or chemically
treated cloths. These can cause deformation of the battery and malfunction.

13
Commissioning
Registration
A registration is stored in the device for each communications system on which the handset has
been logged in. A registration entry also includes a system name (e.g. A, B, C,..).
If you have logged into the system with your handset, this name appears on the display.
Subscription
After the handset is subscribed in one or more communications systems you can use the telephone
to make and receive calls. If the Auto search feature (see page 47) is activated, the handset (in idle
mode) automatically selects the nearest accessible system and logs in there. If you don't want to use
the automatic search, you can search exclusively for any desired system using the stored registra-
tion entries.
12
Commissioning
Battery: Charging states
The charge status of the battery is indicated on the display. The displays mean:
Batteries are 81 - 100 % charged
Batteries are 61 - 80 % charged
Batteries are 41 - 60 % charged
Batteries are 21 - 40 % charged
Batteries are 0 - 20 % charged
•If the handset is placed in the charger cradle when the battery is completely discharged, there is
no indication until a specific charge status is reached. This process can take a few minutes and is
not a malfunction.
•Even when the handset is switched off, the battery slowly discharges.
•When charging, the LED lights orange; when the battery is fully charged, the LED lights green (can
be deactivated in Menu Settings -> Illumination -> LED indications -> Life indication).
Battery warning
When the battery capacity is almost exhausted, a warning sign appears on the display and a series of
warning beeps sounds (can be deactivated in the Menu Audio -> Attention tones). If you are
making a call, you have approximately five minutes' talk time left before the handset switches itself
off.
Registering your handset (log-in)
Your handset can be operated on up to 10 different communications systems.
To do so, it must be registered or, more precisely, logged in on each station.
Your system administrator will usually register the handset for operation on the telephone system.
The log-in must be enabled for this. Depending on the manufacturer of the system, the enabling can
vary. In most cases the IPEI of the handset is needed (found in Menu System -> Show IPEI). To
register the handset itself on the communication system, proceed as described in the "System"
menu. This requires a PARK number sequence and an access code (AC = Authentication Code) from
the system administrator.
15
Function overview
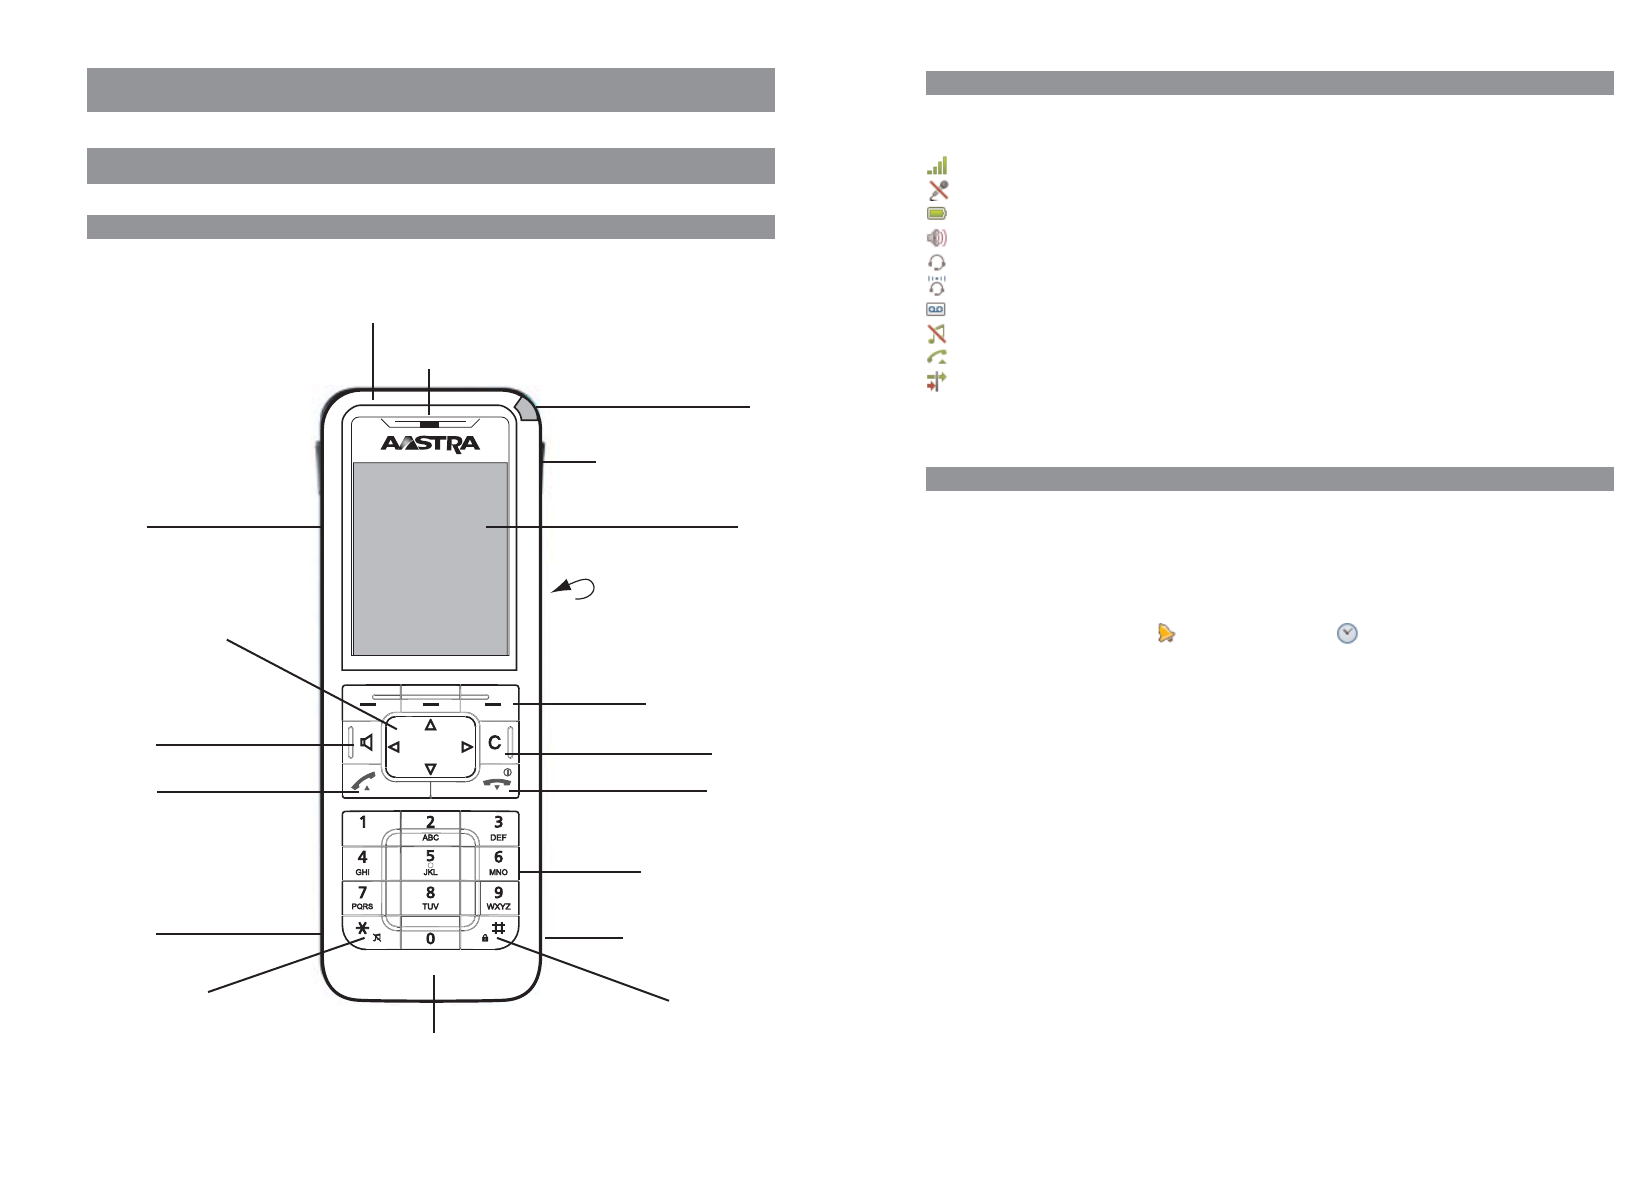
Display arrangement
Symbols on the upper display line:
Signal strength
Microphone switched off
Battery charge status
Loudspeaker switched on
Headset active
Bluetooth
headset active
Voice box message (if available)
Ringer switched off
Call key pressed
Call filter active
Display
Information on the current connection status or lists and text
of the menu are shown on the display. In the idle status you will see
•System name with internal call number
•Your programmed user name
•Current time and date
•Any programmed alarm clock and/or appointment
•Any activated features
•Symbols for programmed functions
The time is only displayed if it has been transferred from the system or set by you.
The navigation keys are used to scroll upwards or downwards through selection lists (e.g. phone
book) and the features menu. A selectable entry is highlighted.
14
Function overview
Function overview
Displays, softkeys, LEDs and key functions
Key assignment (on delivery)
Emergency call key (Aastra 630d only)
Earpiece
Aastra 610d:
+/- keys (volume adjustment)
Aastra 620d/630d:
3 sidekeys (programmable) and
volume adjustment
Navigation keys
Open listening/Hands-free
mode
Call key/consultation call key
Headset connection
Ringer on/off
LEDs
Hotkey (programmable)
(not Aastra 610d)
Displays
Rear: Loudspeaker
3 softkeys (programmable)
Delete key
Cancel key / Power on/off key
Number/letter keys
Mini USB connection
(not Aastra 610d)
Key lock
Microphone
17
Function overview
LED
The LED (3-colour/red-orange-green) at the upper corner signals specific events that currently can-
not be changed as they are required by the system or can be switched on or off by you. Please refer
to the following table for more details.
Colour Status Description can be switched on/off
Green Flashes quickly Incoming call Yes
Flashes slowly Ready indicator / Within range / Not in Yes
the charger cradle
Lights Hands-free operation switched on Yes
Lights Battery fully charged (if in the charger cradle) Yes 1)
Red Flashes quickly Mandown (Aastra 630d only) No
Flashes quickly Outside the system range No
Flashes quickly Alarm call / Message No
Flashes slowly New entries in the info panel (e.g. call list) Yes
Flashes slowly Alarm clock / Appointment Yes
Orange Flashes slowly Ready indicator / Within range / Not in Yes 1)
the charger cradle / Battery capacity below 60%
Lights Battery is charging Yes 1)
1) coupled to the on/off switch of the ready indicator
16
Function overview
Softkey line and idle display
The three keys below the display are called softkeys. The functions assigned to these keys are shown
in the bottom display line. The key function changes automatically according to the operating state
of the handset.
When the handset is delivered the following symbols are shown in the softkey line:
Enables selection from the redial list.
Navigation menu. This is used to call up a selection list with frequently used features.
These include:
• Handset phone book (personal phone book)
• Information lists (call list, voice box*, redial)
• Profiles
* if available
These functions are also assigned to the navigation keys.
You can use them to reach the phone menu (see page 38).
Note
Please note that the functions of the softkeys are programmable and can have a different assign-
ment later.
19
Function overview
Key Duration . . . in status Description
Key C short Incoming call Switch off the call signal (for current
call only)*
Lists Delete the corresponding entry
Editor Delete the character left of the cursor
long Lists Delete the complete list (except phone book)
Menus Return to Standby status
Editor Delete all characters
Call key short Standby Connection set-up
(pick-up), green Connection R-key function
Lists Set up connection to selected
entry
long Standby Select the redial list
Lists Transfer the entry into predial
End key short Standby Special Options menu
(hang-up), red Connection End connection
Incoming call Reject call (if supported by
system)
Menus/Lists Return to Standby status
Editor Exit Editor without changes
long Every status Switch off handset
Handset switched off Switch on handset
Number keys short Standby Enter number into predial
- Editor Character according to table (see page 23)
Number long Standby Connection to voice box (if available)
Number - long Standby Select the corresponding Quick Call
destination (if Quick Call programmed)
Key short Standby Enter * in predial
Editor To switch between upper and lower case
when entering text.
long Standby Switch call signal on/off (permanent)
Key short Standby Enter # in predial
Editor Character according to table (see page 23)
long Standby Key lock on
18
Function overview
Key functions
The following table gives an overview of the various key functions (on delivery).
Key Duration . . . in status Description
Right softkey short Standby Call up the whole menu
Menus, Lists Call up the respective option menu or save
long Standby Programming the key function
Left softkey short Standby Redial
Menus, Lists Confirmation (Ok)
Connection Option menu during connection
long Standby Programming the key function
Middle softkey short Standby Display of the "Navigation Menu" (list of
the functions that can also be accessed via the
navigation keys)
Menus, Lists,
Editor Cancel (Esc)
long Standby Programming the key function
Navigation key short Standby Select the personal phone book
Top Connection Increase volume (save with Ok)
Menus, Lists Scroll up
Editor One line up
Navigation key short Standby Select the personal phone book
Bottom Connection Reduce volume (save with Ok)
Menus, Lists Scroll down
Editor One line down
Navigation key short Standby Select the info list
Left Editor Cursor back one character
long Editor Cursor to start of line
Navigation key short Standby Select the profile setting
Right Editor Cursor forward one character
long Editor Cursor to end of line
Hands-free short Standby Set up connection with hands-free operation
Connection Switch open listening/hands-free operation
on/off
Lists Set up hands-free connection to selected
entry
* Only if supported by the PBX
21
Navigating in menus
Navigating in menus
Example: Setting the language
1. Open the menu - depending on the configuration of your handset, press
- the softkey
or
- briefly press the end key and select the menu item from the list.
2. Use the navigation keys ➐/❷to select the Settings entry from the list and press the
Ok
softkey.
3. Use the navigation keys ➐/❷to select the Display entry from the list and press the
Ok
softkey.
4. Use the navigation keys ➐/❷to select the Language entry from the list and press the
Ok
softkey.
5. Use the navigation keys ➐/❷to select one of the languages offered from the list and
press the softkey (Save).
6. Exit the menu by pressing the
Esc
softkey several times.
Example: Personal phone book/Editor
1. Open the menu - depending on the configuration of your handset, press
- the navigation key ❷
- the softkey and select the Phone book entry/
Ok
and Personal directory/
Ok
.
- one of the function keys to which you have assigned access to the phone book.
2. If the phone book is empty, press the
New
softkey.
If entries already exist, press the softkey, select New entry and confirm with
Ok
.
3. You will see an overview of the possible entries. Select Name and press the
Ok
softkey.
4. Press the key repeatedly to select the character of a key, the character assigned to this key
then appears. The entry position automatically moves forward if you make no immediate
entry or enter a new character. You can correct entries by moving the cursor to the num-
20
Function overview
Key Duration . . . in status Description
Hotkey (not 610d)short Standby Select the programmed function (VIP list)
long Standby Programming with the desired
function
SOS key long All states Make an emergency call (call or message,
(630d only) depending on the programming and the
telephone system)
Top sidekey short Standby Select the programmed function
(620d, 630d only) Connection Increase volume (for current
connection only)
long Standby Programming with the desired
function
Sidekey short Connection Increase volume (for current
(610d only) connection/save with Ok)
Middle sidekey short Standby Select the programmed function
(620d, 630d only) long Standby Programming with the desired
function
Bottom sidekey short Standby Select the programmed function
(620d, 630d only) Connection Reduce volume (for current
connection only)
long Standby Programming with the desired
function
Sidekey short Connection Reduce volume (for current
(610d only) connection/save with Ok)

23
Navigating in menus
Editor
Entering names/call numbers
The Editor helps you to enter or change call numbers and names in the lists (e.g. phone book).
The maximum length for entering call numbers (numbers) is 32 characters and for entering names
(letters) is 16 characters.
For entering letters the following character set can be used:
Key Upper case Lower case
1? ! 1 - + * / = & ( ) % ¿ ¡ ? ! 1 - + * / = & ( ) % ¿ ¡
2A B C 2 Ä Å À Á Ã Æ Ç a b c 2 ä å à á ã æ ç
3D E F 3 È É Ê Ë d e f 3 è é ê ë
4G H I 4 Í Ì Î Ï ∏g h i 4 í ì î ï π
5JKL5 j k l 5
6M N O 6 Ñ Ö Ò Ó Ô Õ Ø m n o 6 ñ ö ò ó ô õ ø
7P Q R S 7 ß Ωp q r s 7 ß µ
8T U V 8 Ü Ù Ú Û t u v 8 ü ù ú û
9WXYZ 9 w x y z 9
0space , . 0 : ; _ ” ‘ ˆ ˜ space , . 0 : ; _ ” ‘ ˆ ˜
✳Switching upper/lower case Switching lower/upper case
## @ €$ £ ¥ § < > { | } [ \ ] # @ €$ £ ¥ § < > { | } [ \ ]
22
Navigating in menus
ber/letter to be deleted with the ➛/❿keys and then pressing the Ckey. You can now add
new characters at this point.
Every word is automatically started with an upper case letter. Press the * key several times
to switch between upper and lower case (Aor ais shown) or only upper case at the start of
the word (Aa is shown).
5. Now select the next line from ❷(e.g. Private) and press
Ok
.
6. Enter the private call number for the entry and press
Ok
.
7. Select the next line from ❷(e.g. Business) and press
Ok
.
8. Enter the business call number for the entry and press
Ok
.
9. Using this method enter the mobile call number and the e-mail address if required.
10. If you want to assign a Quick Call number key to the entry, select Quick call and press
Ok
.
Select a key 2...9 from the list and press
Ok
. Exit the list with
Esc
. In the list you can delete or
overwrite existing entries.
11. You can assign a special melody to the entry that will signal a call from this call number.
Select Melody and press
Ok
. Select a melody from the list. Press
Ok
to save your selection.
12. Press the softkey to save the complete phone book entry.
25
Basic functions
Acknowledging an appointment/alarm clock
You are notified of an appointment or alarm clock by the specified ringer and the LED flashing red
for approx. 45 sec. The display shows the corresponding text. You can acknowledge the signalling
with
Esc
.
Adjusting the volume of the earpiece during the call
Aastra 610d
Press the +/- sidekeys to increase/lower the volume of the current call or use the ➐(louder) and ❷
(quieter) navigation keys.
Aastra 620d/630d
Press the top or bottom sidekeys to increase or lower the volume of the current call or use the ➐
(louder) and ❷(quieter) navigation keys.
Note
If you press the
Ok
softkey when adjusting the volume, the new value is saved (i.e. accepted as a
menu entry).
Switching the ringer on/off
Switch off: Press the star key and hold for a moment, the symbol appears on the display.
Switch on: Press the star key again and hold for a moment, the symbol will switch off.
Switching ringer off at call
If you want to switch off the ringer for a call that has just come in, press the Ckey. You can still
accept the call as long as the caller has not hung up.
24
Basic functions
Basic functions
Switching the handset on/off
Switching the handset off
Press the End key and hold it down for a moment
or …
Press the End key briefly, select
Switch off
and press
Ok
.
The handset will switch off after a confirmation prompt.
Switching the handset on
To switch on press and hold the End key until the display lights again. This can take up to 10
seconds.
Key lock / Phone lock
Switching on the key lock
Press the router key and hold for a moment. The key lock is activated and the symbol appe-
ars in the display.
Switching the key lock off
Press the softkey with the symbol and then the router key within 3 seconds.
Releasing the phone lock
If you have locked your telephone against unauthorised use (see page 51), you can release the lock
again by pressing the softkey and entering your PIN.
Switching hands-free operation on/off
Press the loudspeaker key to switch hands-free operation on or off.
The symbol appears on the display if the hands-free operation feature is enabled.
If you make a call using the handset and place it in the charger cradle, the hands-free operation fea-
ture is automatically activated.

27
Basic functions
Automatic hide / Info window
If you are in a menu or an entry mask when a call comes in, the information relevant to the call appe-
ars on the display (caller name/call number etc.). After completing the call you return to the where
you were before the call arrived.
In some settings of the Devices menu information text appears that automatically scrolls if the text is
long. You can also scroll manually by pressing the ➐/ ❷keys.
Event window and "Info"- Menu
In the idle state of the handset an event window will appear, when e.g. new entries are saved in the
Caller list, the Voice box* or the Message list*. If there is more than one new entry you will see the
topic New Infos.
To access the entries you can open the Info-Menu:
Just press in the idle state the Navigation key ➛and choose one menu item. Alternatively you can
also open the Info-Menu by pressing the - key or the -key.
Vibration alarm (620d, 630d only)
The vibration alarm can be switched on/off in the Menu -> Audio -> Ringer settings ->
Device -> Vibra Call.
Configuring your personal directory
In the personal directory on the Aastra 610d you can save up to 100 names with up to 3 call numbers
each. In the Aastra 620d/630d this is 200 names with 3 call numbers each.
How to create new entries is described in the "Example" section of the Phone Book/Editor from
page 21.
26
Basic functions
Illumination
The keyboard and display are lit. The illumination is activated each time a key is pressed and remains
lit for an adjustable time. You can make changes in the Menu -> Settings -> Illumination ->
Keyboard/Display .
Changing the brightness/contrast of the display
Aastra 610d
Adjust the brightness of the display to your local conditions. Change the contrast in the Menu
-> Settings -> Display -> Contrast .
Aastra 620d, 630d
Adjust the brightness of the display to your local conditions. Change the brightness in the Menu
-> Settings -> Display -> Brightness.
Muting the handset
If you do not want your call partner to listen in while you talk to someone in the room for instance,
you can temporarily mute your handset.
You are making a call.
Press the softkey. The symbol appears on the top line of the display.
Your call partner on the telephone can no longer hear you.
Press the softkey once more when you want to talk with your call partner again. Your call partner
on the telephone can hear you again.
* If supported by the system

29
Basic functions
Using the
Bluetooth
®headset (Aastra 620d, 630d)
The
Bluetooth
®word mark and logos are owned by the Bluetooth SIG, Inc. and any use of such
marks by [licensee name] is under license. Other trademarks and trade names are those of their
respective owners.
The
Bluetooth
feature of the handsets allows registration of two
Bluetooth
headsets, one of which
can be selected for use.
A registered and accessible
Bluetooth
headset ( symbol) has priority over any other headset also
connected via cable ( symbol).
If the hands-free operation key is pressed when a headset is being used (
Bluetooth
or connected via
cable), the call is forwarded to the handset loudspeaker.
If the connection between the handset and
Bluetooth
headset is lost during a call, a message appe-
ars on the display. You can decide whether you want to continue the call with a headset connected
via cable if necessary, or on the handset itself, or to terminate the call.
Registration
Switch the headset to "Pairing mode". Follow the User's Manual of the headset for this.
Switch on the function in Menu -> Settings -> Bluetooth -> BT Status die Funktion ein (An).
Open the Menu -> Settings -> Bluetooth -> Subscribe headset and then press the
New
soft-
key.
The headset that is found is shown by its name on the display. Confirm the display with
Ok
and enter
the PIN of the headset. The headset is now logged in and the symbol appears on the top line of
the display.
You can specify the active headset in the Menu -> Settings -> Bluetooth -> Select headset.
28
Basic functions
Editing lists
The following options are available in the redial list and caller list:
Open the respective list, e.g. in the Info menu, with the ➛navigation key.
Press to reach the Options menu.
The following options are available
Dial number …
The previously selected entry is immediately called.
Predial
The previously selected entry is transferred to the predial for calling.
Add to...
The call number of the entry is transferred into your personal phone book, the call filter or the
VIP list.
Details ...
Further information on the entry is displayed.
Delete
Deletes the entry.
Delete all
Deletes the entire list.

31
Basic functions
Special functions (Aastra 630d only)
SOS
The Aastra 630d handset has an SOS key. When it is pressed the hands-free mode is activated and a
previously saved emergency call number is called.
The emergency call number is the same call number that is dialled when "Mandown" is triggered
(Aastra 630d) or when a programmed emergency call key is pressed. You can enter the emergency
call number in the Menu -> Security-> SOS number .
"Mandown"
The handset can trigger an automatic emergency call. Prerequisite is that you have programmed an
emergency call number and the "Mandown" feature is active.
When the "Mandown" feature is activated, an integrated mercury-free position switch constantly
determines the angle of tilt of the handset. In most cases the handset is normally worn vertically
with the belt clip directly fastened to the person, for example. This position check is made every
5 seconds to check that the device is still in the upright position. If the device is
more than 60 degrees from the upright position, an alarm is triggered after a settable time.
The following values can be selected:
Delay
This is the length of time the device can be non-vertical without triggering an alarm.
Prealarm
This is the time for which an alarm – if activated – is signalled on the handset before the emer-
gency call is sent. To disable the alarm tone (i.e. to deactivate the Mandown), press the
Esc
soft-
key. Changing the handset position will not deactivate the alarm tone.
Alarm tone
The pre-alarm can also be issued without the alarm tone and can be deactivated in the menu.
Auto answer
A call from the programmed emergency call number can be automatically accepted with hands-
free operation if this is set in the menu.
Repeat alarm
The time after which a renewed pre-alarm is sent with subsequent emergency call can be defi-
ned.
The "Mandown" alarm is only triggered if the device is switched on and in idle mode (i.e. not when
scrolling in the menu, for instance).
30
Basic functions
Telephoning via the
Bluetooth
headset
Answering a call:
Press the "Connect key" on the headset. The symbol is displayed.
Ending a call:
Press the "End key" on the headset or the End key on the handset.
Making a call:
Enter the call number on the handset and press the "Connect key" on the headset.
Special key (Hotkey) /VIP list (Aastra 620d, 630d)
On delivery the special key (hotkey) at the top right of the 620d and 630d handsets is prepared as
VIP phone book/VIP list for saving up to six telephones to be available very quickly (the key can be
reprogrammed).
To program your favourite call numbers briefly press the hotkey followed by the
New
softkey. Enter
the name and the call number. You can specify further call numbers under the option -> New
Entry.
To dial these call numbers briefly press the hotkey, select the desired entry and press the call key
: the call will be set up.
VIP list (Aastra 610d)
The programmable keys of the Aastra 610d can also be assigned with a VIP phone book. To do so,
program one of these keys as described on page 55 and then save the name and call number as des-
cribed in the previous section.
33
Telephoning
Answering a call
Press the Call key.
… or
Reject
Press the
Reject
softkey.* The call is rejected. The caller hears the busy signal.
The ringer is deactivated, but you can still answer the call.
… or
Press and select from the options that are shown.
•Accept
The call is answered.
•Reject
The call is rejected, the caller hears the busy signal.
•Add to …
The call number of the caller is transferred to the personal phone book, the call filter
or the VIP list.
* if supported by the system
Telephoning
32
Basic functions
All settings can be made in Menu -> Security -> Sensor Alarm -> Mandown. You can enter
the emergency call number in Menu -> Security -> SOS number. The emergency call number
is the same call number that is dialled by pressing the SOS key (Aastra 630) or a programmed emer-
gency call key.
35
Calling from your personal Phone book
In idle mode press the ❷navigation key .
t Enter the first letter(s) of the desired name.
… or
Select an entry with the navigation keys.
You can call up the different call numbers belonging to the name with the
softkey.
Press the call key, the selected entry will be called.
Note
You can also call up your personal phone book via the Navigation menu (see page 16) or via the
menu access when the handset is in idle mode.
Calling from the Caller lists
Your handset stores the call numbers of the received and missed calls (depending on the transfer of
the call number). 50 entries can be stored (the entries are limited to 30 in the Aastra 610d).
In idle mode press the ➛navigation key, the Info menu will open.
Select Caller list and then select the name or the call number. The following symbols
indicate the respective call type:
Received, answered call
Missed call
Rejected call
Filtered call
Forwarded call
SOS call
Call with automatic accept
34
Making internal / external calls
Direct dial
tPress the Call key and dial the internal or external call number with preset code for
assigning external lines.
Predial
t Enter the call number and press the Call key.
Note
Correcting an entry in Predial
•Briefly press Ckey to delete individual digits;
•Press the Ckey and hold for a moment to delete the entire call number.
Calling from the Redial list
In idle mode press the softkey . The last 30 dialled subscribers are displayed.
The entries are limited to 20 in the Aastra 610d.
Select an entry with the navigation keys.
Press the call key, the selected call number will be dialled.
Note
You can also call up the redial feature by pressing the Call key and holding for a moment.
TelephoningTelephoning
37
Multiple connections
Consultation call / Brokering
During the call press the R-key (softkey) or the Call key ; your first connection is
put on hold.
t Enter the internal or external call number.
You speak with the called subscriber.
To alternate (swap back and forth between the call partners), press the R-key or the call
key .
36
You can display further information on the entry with the softkey.
Press the call key, the selected entry will be called.
Note
You can also call up the Info menu/call list via the Navigation menu (see page 16) or via the Menu
Access when the handset is in idle mode.
Ending calls
You can end calls by briefly pressing the End key.
TelephoningTelephoning
3938
Devices menu
You can call up the Devices menu in the following ways:
•In Idle mode, press .
•In Idle mode, press and select Menu.
Notes on the display symbols in the menu
Save To make settings in the menu, you must open the respective setting window
with the
Ok
softkey. Your entry is then saved with the softkey.
Information You can display further information on the entries with the softkey.
Options You can open further submenus (e.g. Delete, Edit) with the softkey.
Esc
/
Back
You can cancel entries with the
Esc
softkey and/or go one step back in the
menu.
Calling By pressing the softkey an entry is dialled directly or transferred into pre-
dial.
Overview
Info
This menu provides access to the call list, redial list and the voice box (if available).
Quick access to this information is also possible on the ➛☎navigation key or via the key.
Active features
You can quickly reach some important settings, such as Bluetooth, Mandown, Call filter, Profiles,
Alarm clock and Appointment, via this menu.
Devices menu
Phone book
Allows access to your personal phone book.
This can also be quickly accessed with the ❷navigation key or via the key.
Time/Alarms
In this menu you can set the date and time, program appointments and alarm clock times and
define the formats for the date and time display.
Audio
In this menu you can make settings for the volume, ringer and attention tones.
Call filter
The call filter* allows you to answer or block incoming calls. You can specify the call numbers and
the filter status in the menu.
System
In this menu you can specify the active system for your handset and administer registrations to diffe-
rent systems as well as read the IPEI number and information on the status of hardware and soft-
ware.
Settings
Device settings, such as key lock, key programming, user name, display settings, illumination,
Blue-
tooth
etc., are available here.
Protection functions
This menu can be accessed via the PIN (Personal Identification Number). On delivery, it is 0-0-0-0 (4 x
zero). Here you can block the handset (lock), change the PIN, program an emergency number, enter
settings for the alarm sensor (in 630d only) as well as completely or partially reset the handset to its
state on delivery.
* if supported by the system
Devices menu

4140
Profiles
This menu is used to create and administrate user profiles. Five modifiable profiles are preset.
"Info" menu
Caller list
Shows the entries in the caller list. If a phone book entry is created for a call num-
ber, the corresponding name is displayed.
-> Predial Call number is transferred to the predial.
Dial number... Call number will be dialled.
Add to ... Call number can be transferred into the phone book, the
call filter or the VIP list.
Details... Information on the entry is displayed.
Delete The entry will be deleted.
Delete all The list will be deleted after a confirmation prompt.
Voice box
Displays new messages in the voice box of your communications system
(if available).
Redial list
Displays the entries in the redial list. If a phone book entry is created for a call num-
ber, the corresponding name is displayed.
-> Predial Call number is transferred to the predial.
Dial number... Call number will be dialled.
Add to ... Call number can be transferred into the phone book, the
call filter or the VIP list.
Details... Information on the entry is displayed.
Delete The entry will be deleted.
Delete all The list will be deleted after a confirmation prompt.
Devices menu
"Active features" menu
The "Active features" menu provides quick access to a number of selected menu items.
Bluetooth Switch on/off and configure the Bluetooth function - not Aastra 610d (see page
50).
Mandown Switch on/off and configure the Mandown function - Aastra 630d only (see page
52).
Call filter Access to the filter settings* (see page 46).
Profiles Quick swapping between the various profiles (see page 53).
Alarm clock Switch on/off and configure the alarms 1...3. The respective alarm clock is selected
with the ➛and ❿keys (see page 43).
Appointment Switching on/off and configuring the appointments 1...3. The respective appoint-
ment is selected with the ➛and ❿keys (see page 42).
"Phone book" menu
The "Phone book" menu provides access to your personal directory.
Further details for dialling from the phone book and for creating a new entry can be found on
pages 35 and 21.
You make changes in the phone book as follows:
Personal directory
Select an entry from the list.
-> Edit The entry can be modified.
New entry Create a new entry.
Add to ... The following selected call number will be transferred to
the call filter or the VIP list.
Delete The entry will be deleted.
Memory Shows the number of already stored entries.
* if supported by the system
Devices menu

43
Alarm clock
Shows the list of alarms. Up to three alarm times can be entered and activated.
Status: On/Off
Change
Here you can choose between Once (at the next specified time
with this value), Daily (repeats daily) and Off.
Time Show the time set for the alarm.
Change
Changes the time setting.
Text Shows the text entered for the alarm.
Change
Change/enter the text (max. 32 characters).
Note
If the ringer is deactivated, there is also no acoustic signalling to indicate a set
alarm or appointment.
Format setting
Setting option for the display formats of the date and time.
Time format
Change the time format (24-hour or 12-hour am/pm)
Date format
Change the date format dd.mm.yy, e.g. 27.12.08
mm/dd/yy, e.g. 12/27/08
yy-mm-dd, e.g. 08-12-08
dd-mmm-yyyy, e.g. 27-Dec-2008
42
"Time/Alarms" menu
You can move the entry position of all settings with the ➛and ❿☎navigation keys and change the
values with the ➐and ❷keys.
Date/Time
Time Show the time currently set in the handset.
Change
Change the time setting.
Date Show the date currently set in the handset.
Change
Change the date setting.
Note
If the time and the date are transferred from the telephone system, you cannot
make this setting.
Appointment
Shows the list of appointments. Up to three appointments can be entered and activated.
Status: On/Off
Change
Activate or deactivate appointment.
Time Show the time set for the appointment.
Change
Change the time setting.
Date Show the date set for the appointment.
Change
Change the date setting.
Text Show the text entered for the appointment.
Change
Change/enter the text (max. 32 characters).
Note
If the ringer is deactivated, there is also no acoustic signalling to indicate a set
alarm or appointment.
Devices menuDevices menu

45
Noise detection
When this function is active, the volume of the ringer is automatically raised if
there is loud background noise.
Attention tones
Select whether the respective attention tones should be activated or not.
Key click Audible confirmation when a key is pressed.
Confirm tones Confirm successful/unsuccessful settings.
End of menu Alert tone on reaching the end of a menu list.
Battery warning Alert tone if the battery is almost empty.
Only a few minutes are left before the call will be disconnected.
Coverage warning Alert tones if the wireless connection threatens to disconnect.
Loud environment
If the handset is mainly used in a loud environment, the handset attempts to improve the
voice transmission.
44
Devices menuDevices menu
"Audio" menu
Open the menu, select Audio and press
Ok
.
Volume settings
Earpiece Shows the currently set volume. You can change the volume with the ➛and
❿navigation keys.
Handsfree
Shows the currently set volume. You can change the volume with the ➛and
❿navigation keys.
Corded headset
Shows the currently set volume. You can change the volume with the ➛and
❿navigation keys (does not apply to Bluetooth headset).
Ringer Shows the currently set volume. You can change the volume with the ➛and
❿navigation keys.
Ringer settings
Melodies
Internal Selection of melodies for internal calls.
External Selection of melodies for external calls.
VIP call Selection of melodies for incoming VIP calls.
Emergency call Selection of melodies for incoming emergency calls.
Alarm clock Selection of melodies for the alarm.
Appointment Selection of melodies for the appointments.
Note
You can listen to the melody with the softkey before saving.
Type Select whether the call tone melody should be played once or repeated.
Device Select whether signalling is made via loudspeaker (ringer), vibration alarm (not
Aastra 610d) and/or on the headset.
Volume Shows the currently set volume. Change the volume with the ➛and ❿navi-
gation keys (increasing or level 1…7).

47
"System" menu
Select system
Auto search
The handset logs in automatically to the system currently available with the
highest signal strength. The handset can only be logged in if it has been regis-
tered on the applicable system beforehand. If necessary, please contact your
system administrator.
[Systemname]
List of systems on which the handset is already registered. The selected system
is marked.
Select a system with the navigation keys.
When is pressed, the handset attempts establish a connection.
Subscriptions
New system
Enter the access code and (optionally) the PARK code. Ask your system adminis-
trator for information.
[Systemname]
You can change the system name and the call number with Edit. The change
only affects the indication on the idle display. Your actual call number is not
changed. You can delete the registration to the respective system with Delete.
Show IPEI
The international handset ID is displayed. This may be required for identifying your handset
in the telephone system.
Version info
Information concerning the handset hardware and software status is displayed.
46
Devices menuDevices menu
"Call filter" menu
The call filter* allows you to answer or block incoming calls. The Accept List setting only allows the
call numbers in the call number list to be signalled (no other calls). The Block List setting means all
calls are signalled except the calls from the call numbers in the list. The call number list can contain
10 entries.
Status You can change the filter mode.
Accept list
Calls for the call numbers entered in the list are accepted.
Block list
Calls for the call numbers entered in the list are rejected.
Filter off Call filter is deactivated.
List of numbers
Shows the entries in the call number list. If the list is empty, press the
New
softkey.
Name Enter a name for the call number.
Number Enter the call number. This entered caller number must correspond exactly to
the call number transferred by the network.
or …
Select a call number from the list.
-> Edit The entry can be modified.
New entry Create a new entry.
Dial number... The entry will be dialled immediately.
Predial The entry will be transferred to the predial.
Add... Transfers the call number into the personal phone book
or the VIP list.
Details... Shows call number and name.
Delete The entry will be deleted.
Delete all The list will be deleted after a confirmation prompt.
* if supported by the system

4948
Devices menu
Charger
Here you can select for how long the display illumination remains active if the
device is placed in the charger cradle (off, 1... 240 sec.).
LED indications
You can switch the LED indicators on/off according to requirements (see also
page 17).
Life indication Slowly flashing green or orange LED.
Deactivated if the charge indication
(orange or green LED) is also deactivated.
Incoming call Rapidly flashing green or orange LED for
incoming call.
Infos Slowly flashing red LED for a new entry,
e.g. in the call list.
Handsfree Lights green LED when the loudspeaker
is activated.
Appointment Slowly flashing red LED when the appointment
is signalled.
Alarm clock Slowly flashing red LED when the alarm time
is signalled.
Device options
Silent charging
The handset does not give an acoustic signal for any calls when it is in the char-
ger cradle. When you take it out, calls are acoustically signalled again. The calls
are recorded in the call list.
“Silent Charging“ will not apply when the handset is charged via the USB con-
nector (Aastra 620d, 630d).
Auto. key lock
If this option is active, the keyboard is automatically locked after approx. 60 sec
if no key is pressed.
Auto. answer (charger)
If this feature is active, the handset automatically answers a call if it is taken out
of the charger cradle.
Devices menu
"Settings" menu
Key lock
Press
Ok
to activate the key lock (see also page 24).
Key programming
This menu item allows you to program the softkeys (except for Esc), the sidekeys and the
hotkeys (not Aastra 610d). After calling up the function press the key that you want to pro-
gram. A selection list of programmable features appears. It is the same selection that is dis-
played if the programmable key is pressed and held down in Idle mode. How to proceed is
described on page 55 .
User name
You can enter a name here that will be displayed in Idle mode.
Display
Language Select a display language from the list.
Font settings
(Aastra 620d/630d only) You can select a small, medium or large font for text
on the display.
Colour scheme
(Aastra 620d/630d only) You can choose between five different background
colours for the selection menus.
Brightness (Aastra 620d/630d only) You can change the brightness of the display to match
local lighting conditions.
Contrast (Aastra 610d only) You can change the contrast of the display to match local
lighting conditions.
Illumination
Display dimming
This setting means that the display illumination remains permanently active or
dimmed for 30 sec. even when the device is in Idle mode or in the charger
cradle. This setting reduces the life of the battery.
Display Here you can select for how long the full display illumination (each time a key is
pressed, for instance) remains active (10 ... 240 s).
Keyboard Here you can select for how long the keyboard illumination remains active each
time a key is pressed (1 ... 240 s).

51
"Security" menu
You need to enter a PIN to open the "Security" menu. On delivery this is set to 0 0 0 0
(4 x zero).
Phone lock
The phone is locked. Incoming calls only can be accepted. Any programmed emergency call
key or SOS key of the Aastra 630d can also be used. To remove the phone lock, see page 24.
Change PIN
You can change the PIN for the "Security" menu. Enter the new PIN and repeat the entry of
the new PIN.
SOS number
Enter the number to be called in case of emergency. This emergency number is dialled
when the SOS key is pressed (Aastra 630d), when a programmed emergency key is pressed
or by the Mandown feature (Aastra 630).
Reset to default
You can reset different areas of your settings to the status they had on delivery.
Phone book
You can delete your phone book entries after a confirmation prompt.
All lists All lists (call list, redial list, call list) are deleted after a confirmation prompt.
User settings
All user settings (e.g. language, display settings) are deleted after a confirma-
tion prompt.
All The handset is reset to the status it had on delivery after a confirmation
prompt. The registration of the handset on the system and the PIN are not
affected by this.
50
Devices menuDevices menu
Auto. answer (call)
If this feature is active, the handset automatically answers a call after the first
call tone (useful when using a headset - not
Bluetooth
headset).
Note
If you do not use the headset, please deactivate this feature as unnoticed
eavesdropping by the caller is possible.
Voice box no.
The number of your voice box is stored here. This call number is dialled if the 1 key is pres-
sed and held for a moment. If the call number of the voice box is administered by the tele-
phone system, this setting does not appear.
Bluetooth
Status Shows whether Bluetooth is activated or not. Press
Change
to activate or deacti-
vate.
Select headset
Select the subscribed headset you want to use from the list.
Subscribe headset
Press
New
to register a new headset for use on your handset. Also carry out the
necessary steps on the headset (see User's Manual for the headset).
The handset searches for any
Bluetooth
devices within range for approx. 30 sec.
Select an entry, press
Ok
and enter the PIN of the headset. The "pairing" is star-
ted.
If you want to change the name or to delete a
Bluetooth
headset, select ...
-> Edit Change the name of a headset.
Delete The registration data for the respective
headset are deleted after a confirmation
prompt.

53
52
Aastra 630d only:
Descriptions of the "Mandown" feature can be found on page 31.
Alarm sensor
Mandown
Status Shows whether "Mandown" is activated or not. Press the
Change
softkey to activate or deactivate.
Auto answer
You can select whether your telephone automatically answers a
call from the selected emergency number in hands-free mode.
Alarm tone You can configure whether or not the pre-alarm should emit an
alarm tone.
Delay You can set the time for how long the device can be non-vertical
before triggering an alarm (off, 2 sec ... 60 sec).
Prealarm You can set the time that should elapse until the actual emergency
call is sent. A call tone increasing in volume (alarm tone) is signal-
led during this time (if not deactivated). The alarm can still be can-
celled during the pre-alarm (off, 5 sec ... 240 sec).
Repeat alarm
If the emergency call is not successful, (e.g. because the line is
busy), it is possible to set after which time a repeated pre-alarm is
sent with subsequent emergency call (off, 5 sec ... 240 sec).
Devices menu
"Profiles" menu
When the handset is delivered it has four profiles with characteristic settings pre-programmed for
the "intended purpose". A fifth profile is available for further settings. You can change all profiles
and rename them if required.
Select
No profile No profile can be used with this setting. The settings you select apply.
Normal Parameters for "normal" use are configured in this profile.
Headset Parameters for using a headset are preset in this profile.
Meeting Parameters for using the handset during a meeting are preset in this profile.
Loud Parameters for use in a particularly loud environment are preset in this profile.
<Profile 05>
This profile is available for your own use.
Settings Choose one of the profiles to make changes.
Profil name
Change the name of the profile if required.
Ringer volume
Set your preferred ringer volume (off, rising, 1...7).
Ringer device
Configure where or how the ringer should be signalled (loudspeaker, headset,
vibration alarm).
Ringer typeSelect whether the ringer should ring once or repeatedly.
Key click Switch the key click on or off.
Noise detection
Switch the automatic noise detection for a louder ringer on or off.
Loud environment
Adapt the speech quality in a loud environment.
Devices menu

55
Key programming
Your handset allows you to assign specific keys with frequently used functions.
Aastra 610d
The 3 softkeys below the display can be programmed.
Aastra 620d/630d
The 3 softkeys below the display and the three sidekeys can be programmed. The hotkey (right side-
key) can also be assigned.
The symbol/icon of the programmed function is shown on the display (except for hotkey) after pro-
gramming. A short key press is sufficient to call up the function in Idle mode.
Programming (general)
Press the respective key and hold it for a moment or use the Menu -> Settings -> Key pro-
gramming (see page 48).
The following selection is offered:
Default key Assigns the key with the function it had on delivery.
No function The key is not assigned.
VIP list The key is assigned with a number list (max. 6 entries).
Alarm clock You can program entry to the alarm clock settings.
Appointment You can program entry to the appointment settings.
Profile The selection of profiles is offered.
Info The Info menu (caller list, redial,...) can be programmed.
Caller list The caller list is accessed.
Redial list The redial list is accessed.
Voice box Assigns the key with the selection of the voice box.
Menu The key is assigned with the menu access.
54
Silent charging
Switch the "Silent charging" on or off.
LED incoming call
Switch the LED display for an incoming call on or off.
Key programmingDevices menu
57
Appendix
Care and Maintenance
Your telephone is a product that meets the highest design and manufacturing standards. It should
therefore be treated with care. The suggestions listed below will help you enjoy this product for a
long time.
Follow all the safety precautions given on page 1. These precautions apply to the handset, the char-
ger cradle and the rechargeable batteries (i.e. the entire telephone) as well as to the accessories.
To clean the telephone, first pull out the adapter plug of the charger cradle from the mains socket.
Wipe the devices first with an antistatic cloth or soft, damp leather rag and then with a dry cloth.
Note: Never spray your telephone with cleaning agents or solvents. Clean the handset and charger
cradle contacts with a lint-free cloth.
Environmental Characteristics and Disposal
(applicable for the European Union)
This product is environmentally friendly and can be recycled. It was manufactured in accordance
with statutory requirements and with the Manufacturers’ Guideline 2002. It was developed with
special focus on low energy consumption, long life, and ease of servicing. The few materials used in
its manufacture are environmentally friendly. Help to extend the life of your communications device
by adhering to the safety instructions, the information on battery lifetime, and the care and mainte-
nance instructions.
Instructions for disposal
To prevent potential consequences to the environment and to health from the disposal of hazardous
substances contained in electrical and electronic devices, the directives of the European Parliament
and the Council with respect to
• Directive 2002/96/EC "Waste electrical and electronic equipment" and
• Directive 2002/95/EC "Restriction of the use of certain hazardous substances in electrical and
electronic equipment"
are nationally and legally regulated in all countries of the EU.
The legislation is aimed primarily at the avoidance of waste from electrical and electronic equipment
as well as at the re-utilization of materials, the final recycling and other forms of recycling such
waste in order to reduce the amount of waste to be disposed of as well as to decrease the entry of
hazardous substances from electrical and electronic equipment into the waste system.
56
Personal directory Access to the phone book is assigned.
Navigation Assigns the key with the alternative access to the functions that lie
on the navigation keys.
Emergency call Assigns the key as an emergency call key. The number that was
stored in the Menu -> Security -> SOS number is dialled.
Only assign the sidekeys or the hotkey with this function.
Note
If you have reprogrammed the functions from the status they had on delivery, you can access these
functions through a number of alternatives.
Redial … by pressing the Call key and holding it for a moment.
Navigation … by pressing the keys , , ,
Menu … by pressing the End key and selection of Menu.
Special features for the VIP list (on the hotkey on delivery)
You can only assign the VIP list with numbers if you have programmed the key. After the first call up
of the key enter the corresponding number and the name so that the list is available.
AppendixKey programming

59
Limited Waranty
(applicable for sales in USA, Canada)
Aastra warrants this product against defects and malfunctions during a one (1) year period from the
date of original purchase. If there is a defect or malfunction, Aastra shall, at its option, and as the
exclusive remedy, either repair or replace the telephone set at no charge, if returned within the war-
ranty period. If replacement parts are used in making repairs, these parts may be refurbished, or may
contain refurbished materials. If it is necessary to replace the telephone set, it may be replaced with
a refurbished telephone of the same design and color.
If it should become necessary to repair or replace a defective or malfunctioning telephone set under
this warranty, the provisions of this warranty shall apply to the repaired or replaced telephone set
until the expiration of ninety (90) days from the date of pick up, or the date of shipment to you, of
the repaired or replacement set, or until the end of the original warranty period, whichever is later.
Proof of the original purchase date is to be provided with all telephone sets returned for warranty
repairs.
Exclusions
Aastra does not warrant its telephone sets to be compatible with the equipment of any particular
telephone company. This warranty does not extend to damage to products resulting from improper
installation or operation, alteration, accident, neglect, abuse, misuse, fire or natural causes such as
storms or floods, after the telephone is in your possession.
Aastra shall not be liable for any incidental or consequential damages, including, but not limited to,
loss, damage or expense directly or indirectly arising from the customers use of or inability to use
this telephone, either separately or in combination with other equipment. This paragraph, however,
shall not apply to consequential damages for injury to the person in the case of telephones used or
bought for use primarily for personal, family or household purposes.
This warranty sets forth the entire liability and obligations of Aastra with respect to breach of war-
ranty, and the warranties set forth or limited herein are the sole warranties and are in lieu of all other
warranties, expressed or implied, including warranties or fitness for particular purpose and merch-
antability.
Warranty Repair Services
Should the set fail during the warranty period;
In North America, please call 1-800-574-1611 for further information.
Outside North America, contact your sales representative for return instructions. You will be respon-
sible for shipping charges, if any. When you return this telephone for warranty service, you must
present proof of purchase.
58
The product you have purchased was developed with a state-of-the-art environmental and recycling
orientation and thus complies with the guidelines of the European directives.
The product is marked with the symbol indicated. When disposal is required, this
symbol obligates the owner of the product to dispose of this product at a collection
point separate from unsorted household waste. Suitable facilities for the return of
electrical and electronic waste have been created for this purpose. Obsolete equip-
ment can be brought free of charge to these public reception points for disposal
(bring system). Please refer to the information from the responsible offices in the
cities and communities for the location of these disposal reception points.
Caution!
Electrical equipment waste does not belong in domestic waste. Bring this type of
waste free of charge to the recognised reception points for disposal.
Declaration of Conformity
(applicable for the European Union)
CE mark
This device complies with the requirements of the EU directive:
1999/5/EU directive on radio and telecommunications terminal equipment and the mutual recogni-
tion of their conformity. Conformity to the above-mentioned directive is confirmed by the CE mark
on the device.
AppendixAppendix

61
Accessories
You can obtain the following accessories through your dealer:
Accessories
Aastra 610, 620, 630 / Charger with international AC-Adapter
Aastra 610d / Handset
Aastra 620d / Handset
Aastra 610d / Handset
Aastra 620d, 630d / Power-Battery-Pack
Aastra 620d / Cover for Power Battery Compartment
Aastra 630d / Cover for Power Battery Compartment
Aastra 610d, 620d / Rotary-Belt Clip
Neck Band Aastra 610d, 620d, 630d with Neck Band Holder for Aastra 630
Aastra 610d / Leather Pouch
Aastra 620d / Leather Pouch
Aastra 60d / Leather Pouch
Aastra 620d, 630d / Mini USB Service Cable
60
After Warranty Service
Aastra offers ongoing repair and support for this product. This service provides repair or replace-
ment of your Aastra product, at Aastra's option, for a fixed charge. You are responsible for all ship-
ping charges. For further information and shipping instructions;
In North America, contact our service information number: 1-800-574-1611.
Outside North America, contact your sales representative.
Note: Repairs to this product may be made only by the manufacturer and its authorized agents, or
by others who are legally authorized. This restriction applies during and after the warranty period.
Unauthorized repair will void the warranty.
AppendixAppendix

63
Technical specifications
applicable for … USA, Canada All other countries
Standard: DECT / GAP DECT / GAP
No. of channels: 60 duplex channels 120 duplex channels
Frequencies: 1920 MHz to 1930 MHz (UPCS) 1880 MHz to 1900 MHz
Duplex method: Time-division multiplex, Time-division multiplex,
10 ms frame length 10 ms frame length
Channel subdivision: 1728 kHz 1728 kHz
Bitrate: 1152 kbps 1152 kBit / s
Modulation: GFSK GFSK
Voice coding: 32 kpbs 32 kpbs
Output: 5 mW (average output per 10 mW (average output per
active channel) active channel)
Range: up to 980 ft outdoors, up to300 m outdoors,
160 ft indoors up to 50 m indoors
Bluetooth
QD ID: B014700 B014700
Power supply charger cradle: AC 110 – 240 V / 50 /60 Hz AC 110 –240 V / 50 /60 Hz
Handset operating time Standby time / talk time Standby time / talk time
/Standard battery: up to 95 hours / 15 hours up to 100 hours / 12 hours
Handset operating time
/Power battery: Standby time / talk time Standby time / talk time
up to 190 hours / 30 hours up to 200 hours / 24 hours
Standard rechargeable battery: Li-Ion battery, 3.7 V / 850 mAh Li-Ion battery, 3.7 V / 850 mAh
Power battery (Aastra 620d / 630d): Li-Ion battery, 3.7 V / 1800 mAh Li-Ion battery, 3.7 V /1800 mAh
Time to charge completely discharged
standard batteries: 2-4 hours 2-4 hours
Permissible ambient temperatures
for operating the handset: 41° F to 104° F 5° C to 40° C
Permissible storage temperature: 23° F to 113° F -5°C to +45°C
Charger cradle dimensions: Length / Width / Height Length / Width / Height
2.99 x 2.95 x 0.94 in 76 x 75 x 24 mm
62
Headsets
You will find a list of corded headsets and Bluetooth headsets that you can purchase from your dea-
ler on our Internet site. Aastra headsets that comply with the safety requirements of EN60950-1 Item
6.2. are recommended. This does not constitute any appraisal of the acoustic and functional quality
of the headsets of the individual manufacturers.
USB charger
If you want to charge your Aastra 610d, 630d handset with a USB charger, please use one of the
commercially available USB plug-in power supplies with the following data.
Connection type: Mini USB connector
Type: Switching power supply: 100V to 240 V / 50 – 60 Hz
Output power: approx. 5 W
Output voltage: 5 V/DC
Only use a plug-in power supply unit certified by your authorities.
AppendixAppendix

6564
Handset dimensions: Length / Width / Height Length / Width / Height
Aastra 610d / 620d: 5.31 x 1.93 x 0.89 in 135 x 49 x 22.5 mm
Aastra 630d: 5.31 x 2.08 x 0.89 in 135 x 53 x 22.5 mm
Charger cradle weight: 1.41 oz 40 g
Handset weight: Aastra 610d / 620d (with battery): Aastra 610d /620d (with batt.):
4.23 oz 120 g
Aastra 630d (with battery): Aastra 630d (with batt.):
4.41 oz 125 g
Length of power supply cable: 5 ft 1,5 m
Appendix
Menu Structure
Info Caller list >List<
Voice box 1) >Call<
Redial list >List<
Active features Bluetooth 2)
Call filter
Profiles
Alarm
Appointment
Phone book Personal directory >List<
Time/Alarms Date/Time Time
Date
Appointment Apointment1, 2, 3 Status
Time
Date
Text
Alarm Alarm 1, 2, 3 Status
Uhrzeit
Text
Format settings Time format 24h , 12h am/pm
Date format dd.mm.yy
mm/dd/yy
yy-mm-dd
dd-mmm-yyyy
Audio Volume settings Earpiece
Handsfree
Corded headset
Ringer
Ringer settings Melodies Internal
External
VIP call
Emergency call
Alarm
Appointment
Type Repeat
Once
Device Ringer
Vibra call 2)
Headset
Volume
Noise detection
Appendix

6766
Appendix
Security 3) Phone lock
Change PIN
SOS number
Alarm sensor 4) Mandown Status
Auto answer
Alarm tone
Delay
Pre alarm
Repeat alarm
Reset to default Phone book
All lists
User settings
All
Profiles Select
Settings No profile
Normal
Headset
Meeting
Loud
Profile 05
1) Depending on model
2) Not Aastra 610d
3) Available after entering PIN
4) Aastra 630d only
Appendix
Attention tones Key click
Confirm tones
End of menu
Battery warning
Coverage warning
Loud environment
Call filter 1) Status
List of numbers >List<
System Select system Auto search
>System name<
Subscriptions New system
>System name< Edit
Delete
Show IPEI
Version info
Settings Key lock
Key programming >Key<
User name
Display Language
Font settings 2)
Color schemes 2)
Brightness/Contrast
Illumination Display dimming
Display
Keyboard
Charger
LED indications
Device options Silent charging
Auto. key lock
Auto. answer (charger)
Auto. answer (call)
Voice box no. 1)
Bluetooth 2) BT Status
Select headset
Subscribe headset

6968
L
Language.....................................................21, 48
LED................................................................17, 49
Loud environment............................................45
M
Making calls.......................................................34
Mandown..............................................31, 41, 52
Menu Structure.................................................65
Micro SD card.......................................................9
Mounting bracket...............................................6
Muting the handset .........................................26
N
Noise detection.................................................45
Notes on safety ...................................................2
P
Phone lock .........................................................51
PIN.......................................................................51
Power battery......................................................5
Power supply.......................................................9
Prealarm.............................................................31
Precautions........................................................10
Predial.................................................................34
Prescribed use .....................................................2
Profiles................................................................41
R
Redial............................................................34, 40
Registering your handset................................12
Reset to default.................................................51
Ringer setting....................................................44
Ringer type ........................................................44
Rotary clip ............................................................6
S
Select headset...................................................50
Select system.....................................................47
Show IPEI ...........................................................47
Silent charging..................................................49
Softkeys..............................................................14
SOS......................................................................31
SOS number.......................................................51
Special key.........................................................30
Standard battery.................................................5
Standby time.....................................................11
Subscribe headset............................................50
Subscription ......................................................13
Subscriptions.....................................................47
Switching the ringer on/off ............................25
T
Talk time.............................................................11
Technical specifications...................................63
Time....................................................................42
U
USB........................................................................8
User name..........................................................48
V
Version info........................................................47
Vibration alarm.................................................27
VIP list...........................................................30, 56
Voice box............................................................40
Voice box no......................................................50
Volume...............................................................44
Appendix
Index
"Active features" menu ...................................41
"Audio" menu....................................................44
"Info" menu .......................................................40
"Phone book" menu.........................................41
"Security" menu................................................51
"Settings" menu................................................48
"System" menu .................................................47
"Time/Alarms" menu .......................................42
A
Accessories ........................................................61
Acknowledging an appointment/alarm.......25
Alarm clock..................................................41, 43
Alarm sensor......................................................52
Alarm tone.........................................................31
Appointment ..............................................41, 42
Attaching the carrying strap.............................6
Auto. answer (call)............................................50
Auto. answer (charger)....................................49
Auto. key lock....................................................49
B
Battery warning..........................................12, 45
Bluetooth.....................................................41, 50
Brightness....................................................26, 48
Brokering ...........................................................37
C
Call filter.............................................................41
Caller list ......................................................35, 40
CE mark ..............................................................58
Charging time ...................................................11
Charging unit.......................................................8
Colour scheme ..................................................48
Confirmation tones ..........................................45
Contrast .......................................................26, 48
Coverage warning............................................45
D
Date.....................................................................42
Declaration of Conformity ..........................2, 58
Delay...................................................................31
Delivery ..............................................................51
Device.................................................................44
Device options ..................................................49
Devices menu....................................................38
Direct dial...........................................................34
Display................................................................48
Display dimming ..............................................48
Displays ..............................................................14
Disposal..............................................................57
E
Earpiece volume ...............................................25
Editing lists ........................................................28
End of menu......................................................45
Ending calls........................................................36
Entering names/call numbers........................23
Environmental Characteristics .......................57
External charging connection ..........................8
F
Font.....................................................................48
H
Hands-free.........................................................24
Headset connection ...........................................7
Hearing aids.........................................................3
Hotkey ................................................................30
I
Idle display.........................................................16
Illumination.................................................26, 48
Important information about the battery......9
K
Key assignment.................................................14
Key click..............................................................45
Key functions.....................................................18
Key lock........................................................24, 48
Keyboard............................................................48