Mitel Deutschland 68983AA610D-01 1,9 GHz DECT Phone, portable part User Manual BA 610d 620d 630d GAP GB 1FA56B
Mitel Deutschland GmbH 1,9 GHz DECT Phone, portable part BA 610d 620d 630d GAP GB 1FA56B
UserManual.wiki
>
Mitel Deutschland
>
68983AA610D 01 User Manual
UserMan
Navigation menu
Upload a User Manual
Namespaces
Wiki Guide
HTML
PDF
Info
Views
User Manual
Discussion / Help
Navigation

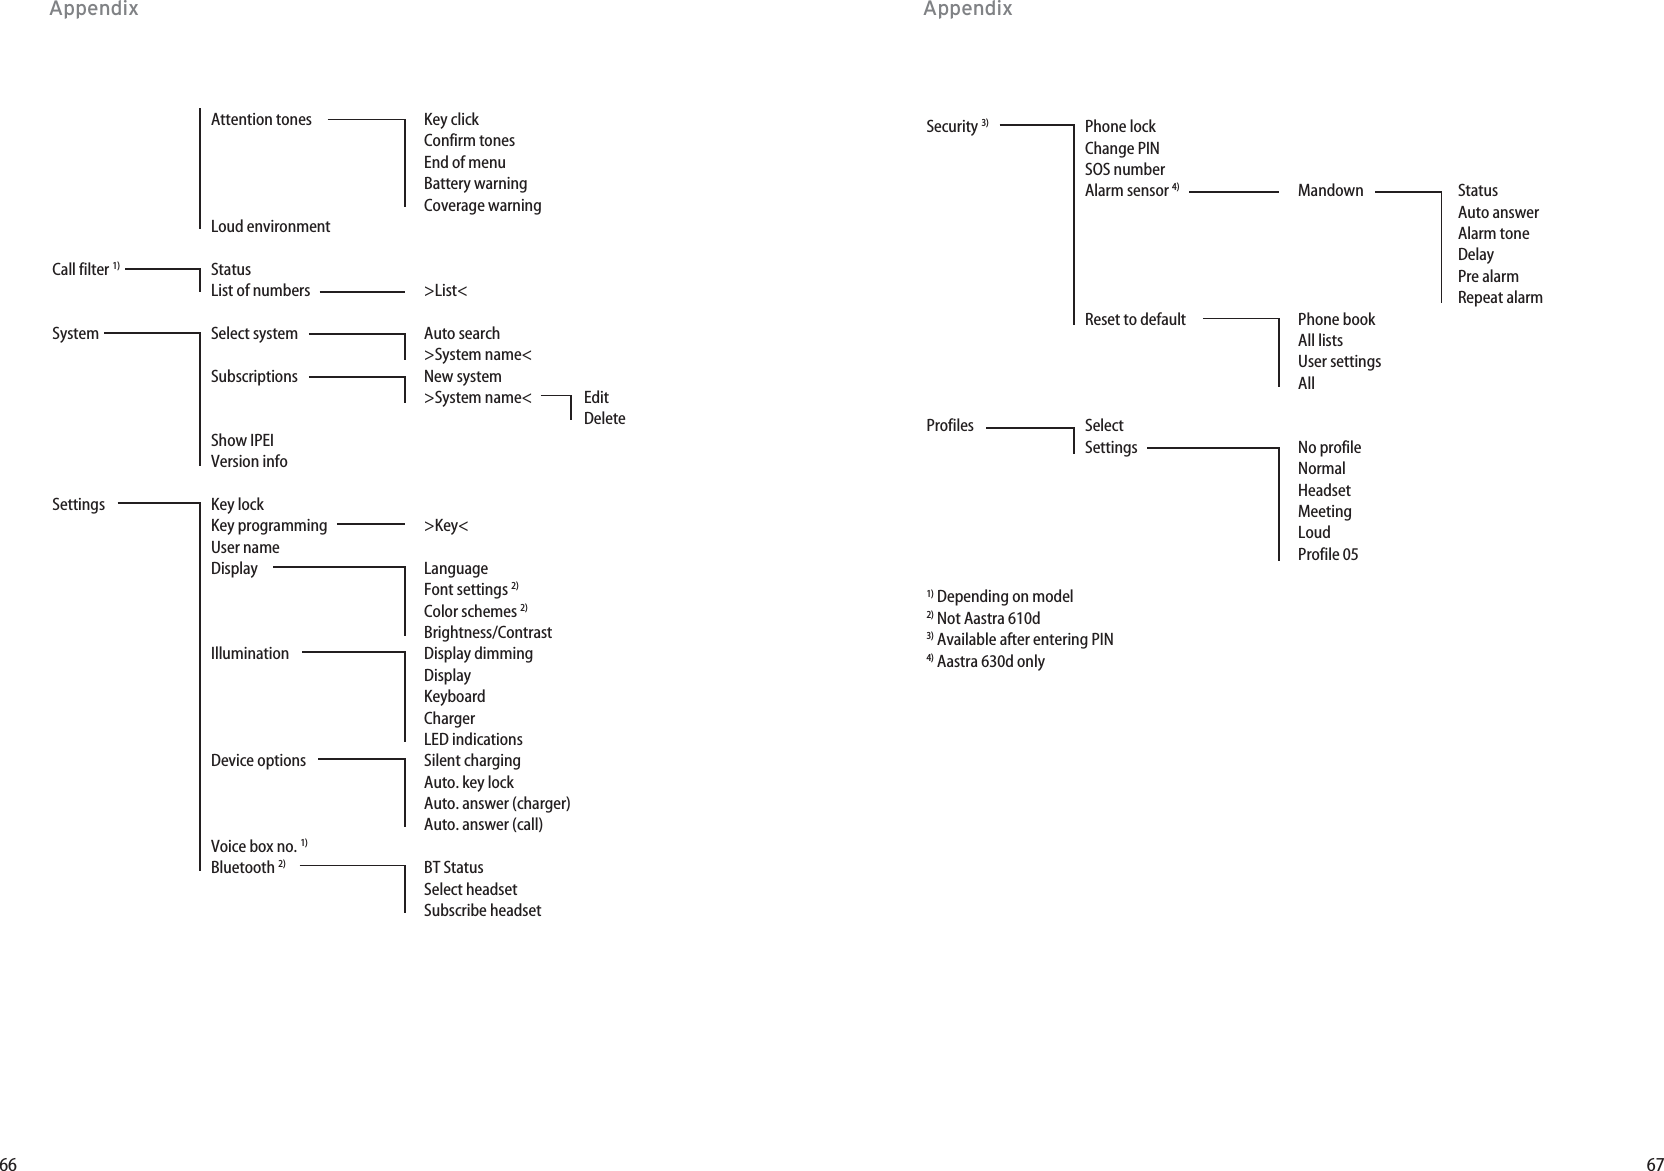
![23Navigating in menusEditorEntering names/call numbersThe Editor helps you to enter or change call numbers and names in the lists (e.g. phone book).The maximum length for entering call numbers (numbers) is 32 characters and for entering names(letters) is 16 characters. For entering letters the following character set can be used: Key Upper case Lower case1? ! 1 - + * / = & ( ) % ¿ ¡ ? ! 1 - + * / = & ( ) % ¿ ¡2A B C 2 Ä Å À Á Ã Æ Ç a b c 2 ä å à á ã æ ç3D E F 3 È É Ê Ë d e f 3 è é ê ë4G H I 4 Í Ì Î Ï ∏g h i 4 í ì î ï π5JKL5 j k l 56M N O 6 Ñ Ö Ò Ó Ô Õ Ø m n o 6 ñ ö ò ó ô õ ø7P Q R S 7 ß Ωp q r s 7 ß µ8T U V 8 Ü Ù Ú Û t u v 8 ü ù ú û9WXYZ 9 w x y z 90space , . 0 : ; _ ” ‘ ˆ ˜ space , . 0 : ; _ ” ‘ ˆ ˜ ✳Switching upper/lower case Switching lower/upper case## @ €$ £ ¥ § < > { | } [ \ ] # @ €$ £ ¥ § < > { | } [ \ ]22Navigating in menusber/letter to be deleted with the ➛/❿keys and then pressing the Ckey. You can now addnew characters at this point. Every word is automatically started with an upper case letter. Press the * key several timesto switch between upper and lower case (Aor ais shown) or only upper case at the start ofthe word (Aa is shown).5. Now select the next line from ❷(e.g. Private) and press Ok.6. Enter the private call number for the entry and press Ok.7. Select the next line from ❷(e.g. Business) and press Ok.8. Enter the business call number for the entry and press Ok.9. Using this method enter the mobile call number and the e-mail address if required.10. If you want to assign a Quick Call number key to the entry, select Quick call and press Ok.Select a key 2...9 from the list and press Ok. Exit the list with Esc. In the list you can delete oroverwrite existing entries.11. You can assign a special melody to the entry that will signal a call from this call number.Select Melody and press Ok. Select a melody from the list. Press Okto save your selection.12. Press the softkey to save the complete phone book entry.](https://usermanual.wiki/Mitel-Deutschland/68983AA610D-01/User-Guide-1064627-Page-15.png)
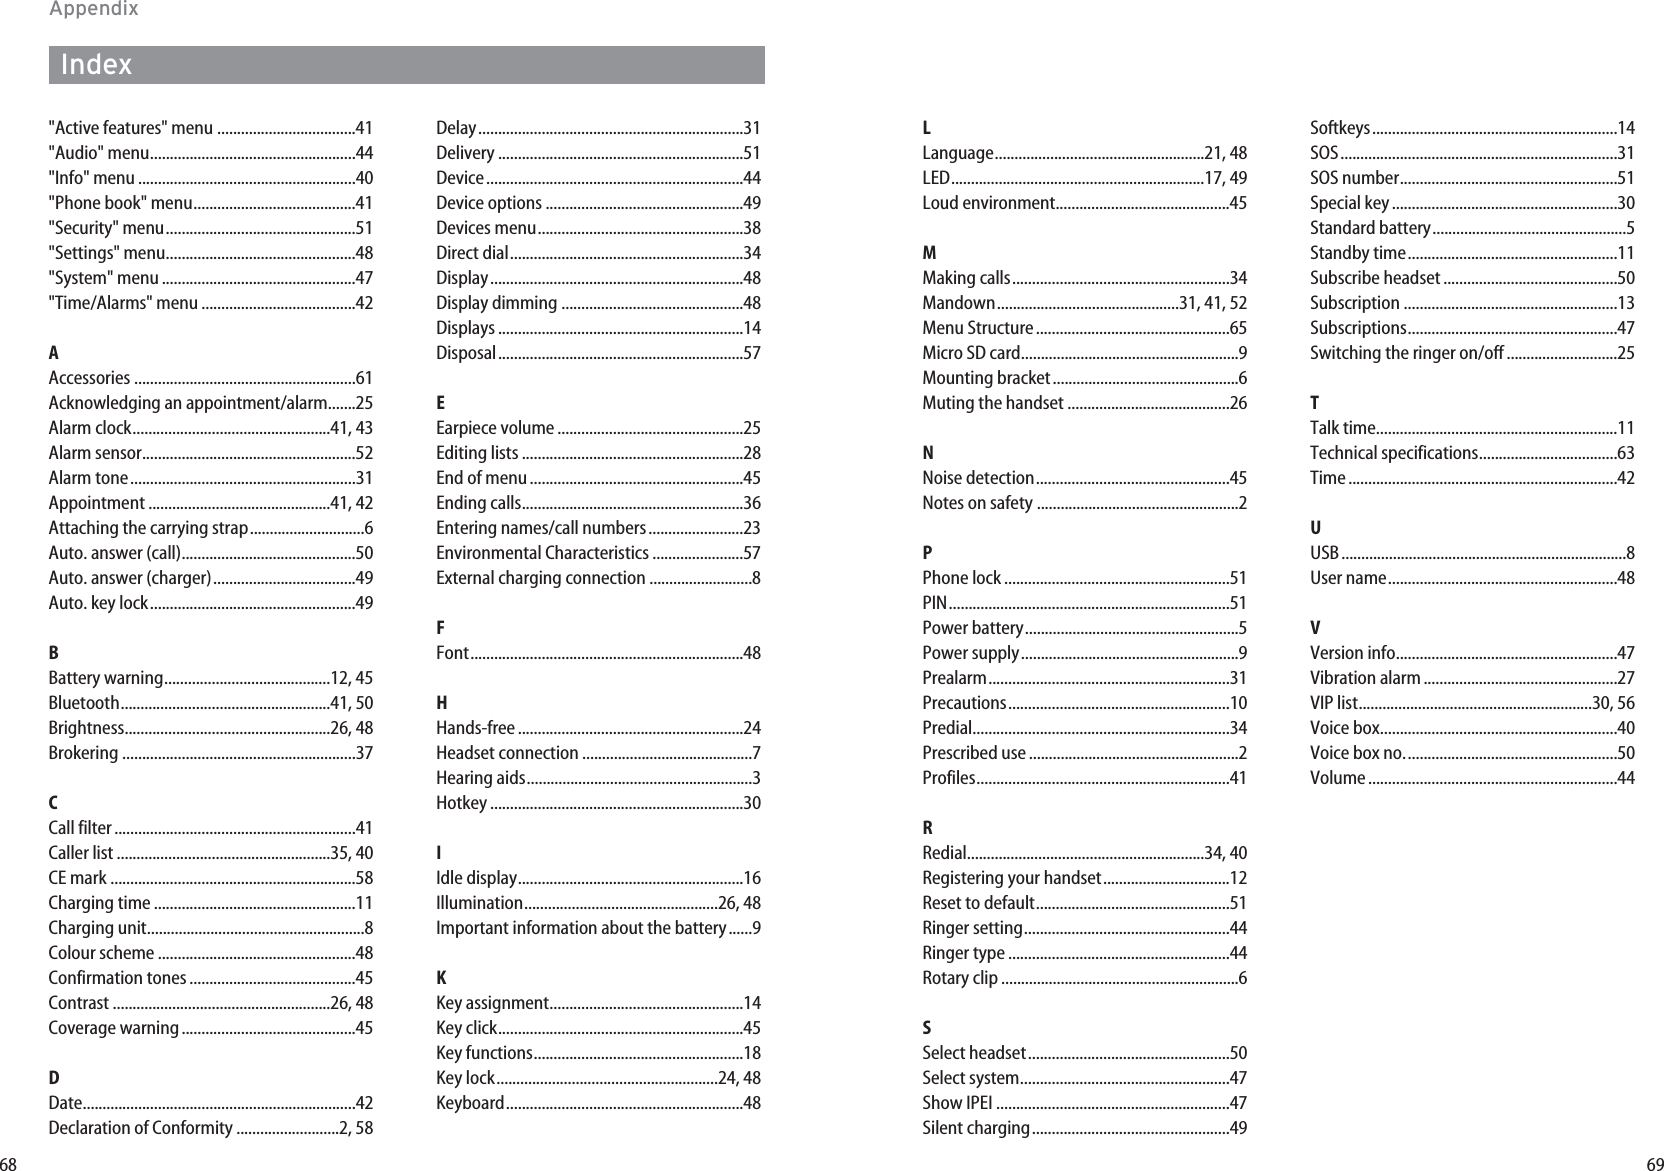
![29Basic functionsUsing the Bluetooth®headset (Aastra 620d, 630d)The Bluetooth®word mark and logos are owned by the Bluetooth SIG, Inc. and any use of suchmarks by [licensee name] is under license. Other trademarks and trade names are those of theirrespective owners.The Bluetoothfeature of the handsets allows registration of two Bluetoothheadsets, one of whichcan be selected for use.A registered and accessible Bluetoothheadset ( symbol) has priority over any other headset alsoconnected via cable ( symbol).If the hands-free operation key is pressed when a headset is being used (Bluetoothor connected viacable), the call is forwarded to the handset loudspeaker.If the connection between the handset and Bluetoothheadset is lost during a call, a message appe-ars on the display. You can decide whether you want to continue the call with a headset connectedvia cable if necessary, or on the handset itself, or to terminate the call.RegistrationSwitch the headset to "Pairing mode". Follow the User's Manual of the headset for this.Switch on the function in Menu -> Settings -> Bluetooth -> BT Status die Funktion ein (An).Open the Menu -> Settings -> Bluetooth -> Subscribe headset and then press the Newsoft-key. The headset that is found is shown by its name on the display. Confirm the display with Okand enterthe PIN of the headset. The headset is now logged in and the symbol appears on the top line ofthe display.You can specify the active headset in the Menu -> Settings -> Bluetooth -> Select headset.28Basic functionsEditing listsThe following options are available in the redial list and caller list:Open the respective list, e.g. in the Info menu, with the ➛navigation key.Press to reach the Options menu.The following options are availableDial number …The previously selected entry is immediately called.Predial The previously selected entry is transferred to the predial for calling. Add to...The call number of the entry is transferred into your personal phone book, the call filter or theVIP list.Details ...Further information on the entry is displayed.DeleteDeletes the entry.Delete allDeletes the entire list.](https://usermanual.wiki/Mitel-Deutschland/68983AA610D-01/User-Guide-1064627-Page-18.png)
![47"System" menuSelect systemAuto searchThe handset logs in automatically to the system currently available with thehighest signal strength. The handset can only be logged in if it has been regis-tered on the applicable system beforehand. If necessary, please contact yoursystem administrator.[Systemname]List of systems on which the handset is already registered. The selected systemis marked.Select a system with the navigation keys. When is pressed, the handset attempts establish a connection.SubscriptionsNew systemEnter the access code and (optionally) the PARK code. Ask your system adminis-trator for information.[Systemname]You can change the system name and the call number with Edit. The changeonly affects the indication on the idle display. Your actual call number is notchanged. You can delete the registration to the respective system with Delete.Show IPEI The international handset ID is displayed. This may be required for identifying your handsetin the telephone system.Version infoInformation concerning the handset hardware and software status is displayed.46Devices menuDevices menu"Call filter" menu The call filter* allows you to answer or block incoming calls. The Accept List setting only allows thecall numbers in the call number list to be signalled (no other calls). The Block List setting means allcalls are signalled except the calls from the call numbers in the list. The call number list can contain10 entries.Status You can change the filter mode.Accept listCalls for the call numbers entered in the list are accepted.Block listCalls for the call numbers entered in the list are rejected.Filter off Call filter is deactivated.List of numbersShows the entries in the call number list. If the list is empty, press the Newsoftkey.Name Enter a name for the call number.Number Enter the call number. This entered caller number must correspond exactly tothe call number transferred by the network.or …Select a call number from the list.-> Edit The entry can be modified.New entry Create a new entry.Dial number... The entry will be dialled immediately.Predial The entry will be transferred to the predial.Add... Transfers the call number into the personal phone book or the VIP list.Details... Shows call number and name.Delete The entry will be deleted.Delete all The list will be deleted after a confirmation prompt.* if supported by the system](https://usermanual.wiki/Mitel-Deutschland/68983AA610D-01/User-Guide-1064627-Page-27.png)