Mitsubishi Electric CP-W5000DW Digital Color Printer User Manual CP W5000DW QUICK GUIDE enu 141021 1of4
Mitsubishi Electric Corp Digital Color Printer CP W5000DW QUICK GUIDE enu 141021 1of4
User Manual
FRANÇAIS ENGLISHDEUTSCHITALIANONEDERLANDSESPAÑOL
DIGITAL COLOR PRINTER
MODEL
CP-W5000DW
QUICK SETUP GUIDE
THIS QUICK SETUP GUIDE IS IMPORTANT
TO YOU.
PLEASE READ IT BEFORE USING YOUR
DIGITAL COLOR PRINTER.
Hereby, Mitsubishi Electric Corporation, declares that this digital color printer is in
compliance with the essential requirements and other relevant provisions of Directive
1999/5/EC.
2
WARNING :
TO PREVENT FIRE OR SHOCK HAZARD, DO NOT EXPOSE THIS APPLIANCE TO RAIN
OR MOISTURE.
INFORMATION
This Class A digital apparatus complies with Canadian ICES-003.
CAUTION :
TO REDUCE THE RISK OF ELECTRIC
SHOCK,
DO NOT REMOVE COVER (OR BACK)
NO USER-SERVICEABLE PARTS INSIDE
REFER SERVICING TO QUALIFIED SERVICE
PERSONNEL.
RISK OF ELECTRIC SHOCK
DO NOT OPEN
CAUTION
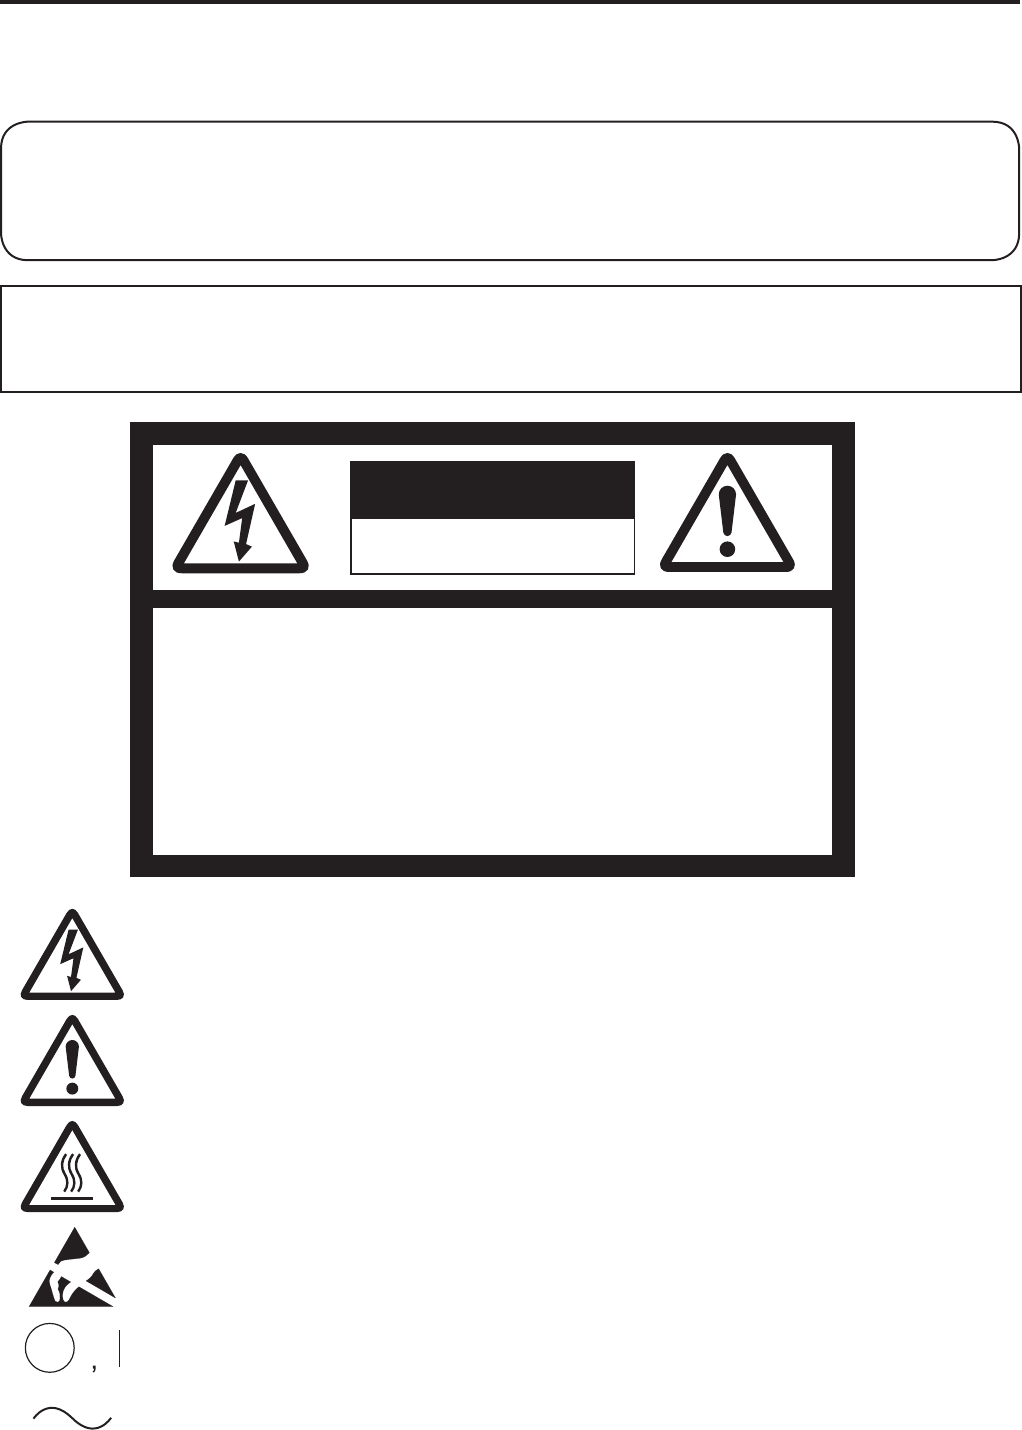
7KHOLJKWQLQJÀDVKZLWKDUURZKHDGV\PEROZLWKLQDQHTXLODWHUDOWULDQJOHLVLQWHQGHG
to alert the user to the presence of uninsulated “dangerous voltage” within the
SURGXFW¶VHQFORVXUHWKDWPD\EHRIVXI¿FLHQWPDJQLWXGHWRFRQVWLWXWHWKHULVNRI
HOHFWULFVKRFN
The exclamation point within an equilateral triangle is intended to alert the user to
the presence of important operating and maintenance (servicing) instructions in the
literature accompanying the appliance.
7KH³&DXWLRQKRWVXUIDFH´V\PEROLQGLFDWHVWKDWWKHPDUNHGLWHPPD\EHKRWDQG
should not be touched.
The “Electro Static Discharge (ESD) warning” symbol indicates that trouble (including
equipment malfunction) due to static electricity may occur in certain conditions.
The “OFF/ON” symbol indicates connection to or disconnection from the mains, at
least for mains switches.
The “Alternating current” symbol indicates that the equipment is suitable for
alternating current only.
WARNING:
Use the included AC power cord so as not to interfere with radio and television reception.
If you use other cables, it may cause interference with radio and television reception.
FRANÇAIS ENGLISHDEUTSCHITALIANONEDERLANDSESPAÑOL
3
CAUTION:
&KDQJHVRUPRGL¿FDWLRQVQRWH[SUHVVO\DSSURYHGE\WKHSDUW\UHVSRQVLEOHIRUFRPSOLDQFHFRXOGYRLG
the user’s authority to operate the equipment.
NOTE:
This equipment has been tested and found to comply with the limits for a Class A digital device, pursuant to Part
15 of the FCC Rules. These limits are designed to provide reasonable protection against harmful interference
when the equipment is operated in a commercial environment. This equipment generates, uses, and can radiate
radio frequency energy and, if not installed and used in accordance with the instruction manual, may cause
KDUPIXOLQWHUIHUHQFHWRUDGLRFRPPXQLFDWLRQV2SHUDWLRQRIWKLVHTXLSPHQWLQDUHVLGHQWLDODUHDLVOLNHO\WRFDXVH
harmful interference in which case the user will be required to correct the interference at his or her own expense.
This device complies with Industry Canada licence-exempt RSS standard(s). Operation is subject to the
following two conditions:
(1) this device may not cause interference, and
(2) this device must accept any interference, including interference that may cause undesired operation
of the device.
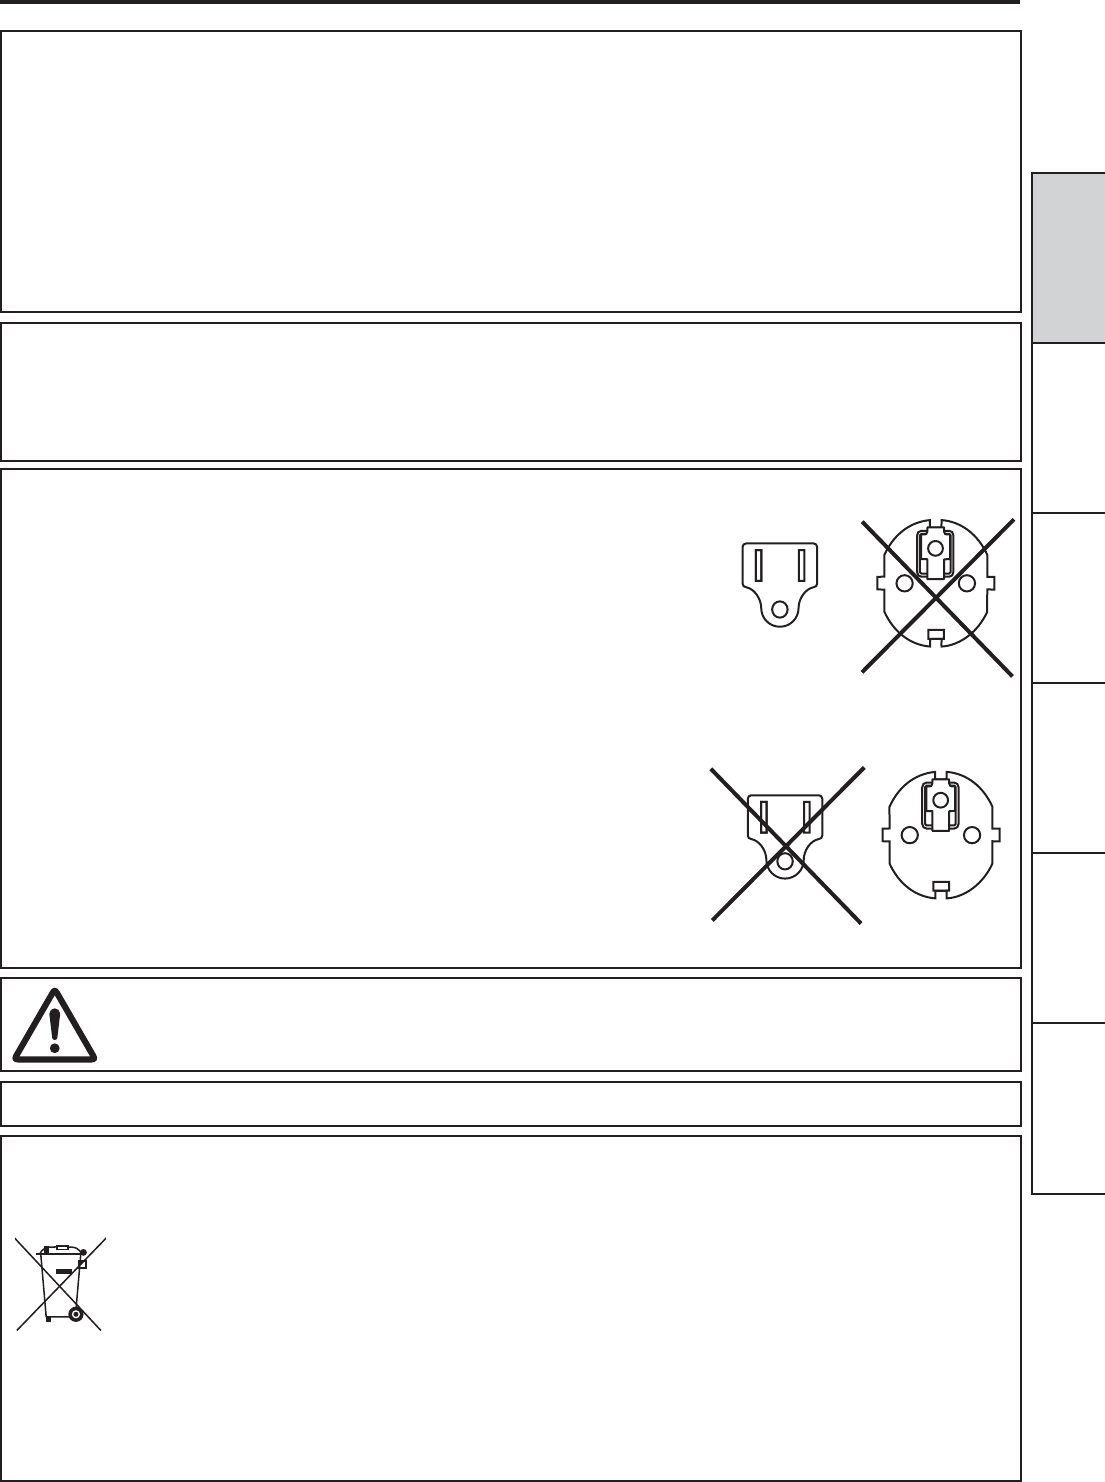
WARNING:
In the USA or Canada, use the AC power cord according to the recommendations as
below, in order to comply with UL60950-1 and CAN/CSA C22.2 No. 60950-1-03.
Connect to the 120 V receptacle of the room or the host equipment.
The AC power cord should be UL or CSA approved and consist of type SVT, size
16 or 18AWG, length 2 m or shorter cord with IEC60320-1/C13 type, 125 V 10 A or
higher rating connector and NEMA 5-15 type, 125 V 10 A or higher rating plug.
8VHWKH$&SRZHUFRUGDVVSHFL¿HGDERYHVRDVQRWWRLQWHUIHUHZLWKUDGLRDQG
television reception.
If you use other cables, it may cause interference with radio and television reception.
WARNING:
In Europe, use the AC power cord according to the recommendations as below, in
order to comply with EN60950-1.
Connect to the 230 V receptacle of the room or the host equipment.
The AC power cord should be VDE approved and consist of core size 0.75 mm
2
or
bigger, length 2 m or shorter cord with IEC60320-1/C13 type, 250 V 10 A or higher
rating connector and CEE(7)VII type, 250 V 10 A or higher rating plug.
8VHWKH$&SRZHUFRUGDVVSHFL¿HGDERYHVRDVQRWWRLQWHUIHUHZLWKUDGLRDQG
television reception.
If you use other cables, it may cause interference with radio and television reception.
WARNING:
7KHVRFNHWRXWOHWVKDOOEHLQVWDOOHGQHDUWKHHTXLSPHQWDQGVKDOOEHHDVLO\DFFHVVLEOH
This product is applicable to connect to Norwegian IT power distribution systems.
1RWH7KLVV\PEROPDUNLVIRU(8FRXQWULHVRQO\
7KLVV\PEROPDUNLVDFFRUGLQJWRWKHGLUHFWLYH(&$UWLFOH,QIRUPDWLRQIRUXVHUVDQG$QQH[,9DQGRU
to the directive 2006/66/EC Article 20 Information for end-users and Annex II.
Your MITSUBISHI ELECTRIC product is designed and manufactured with high quality materials and
components which can be recycled and/or reused.
This symbol means that electrical and electronic equipment, batteries and accumulators, at their end-of-life,
should be disposed of separately from your household waste.
If a chemical symbol is printed beneath the symbol shown above, this chemical symbol means that the battery
or accumulator contains a heavy metal at a certain concentration. This will be indicated as follows:
Hg: mercury (0,0005%), Cd: cadmium (0,002%), Pb: lead (0,004%)
In the European Union there are separate collection systems for used electrical and electronic products,
batteries and accumulators.
Please, dispose of this equipment, batteries and accumulators correctly at your local community waste
collection/recycling centre.
Please, help us to conserve the environment we live in!

4
In the interest of safety, please observe the following precautions:
POWER REQUIREMENT
This Digital Color Printer is designed to operate on 120 V AC 50/60 Hz in the U.S.A. and Canada, and 220 V - 240 V AC 50/60
Hz in Europe. Never connect to any outlet or power supply having a different voltage or frequency. In addition, be sure to supply
power to the printer from a receptacle with a ground fault circuit interrupter.
WARNING : THIS APPARATUS MUST BE EARTHED.
PROTECTIVE MEASURES
SAFETY PRECAUTIONS
IF ABNORMALITIES ARISE, .....
8VHRIWKHSULQWHUGXULQJHPLVVLRQRIVPRNHRUDEQRUPDO
sounds (without adopting countermeasures) is dangerous.
In such a case, unplug the power cord from the source
outlet immediately, and request maintenance service from
the sales dealer.
NEVER INSERT ANY OBJECT INTO THE PRINTER
)RUHLJQREMHFWVRIDQ\NLQGLQVHUWHGLQWRWKLVSULQWHU
constitute a safety hazard and can cause extensive
damage.
DO NOT PLACE ANYTHING ON THE DIGITAL
COLOR PRINTER
Heavy objects placed on the Digital Color Printer can cause
damage or obstruct proper ventilation.
PROTECT THE POWER CORD
'DPDJHWRWKHSRZHUFRUGPD\FDXVH¿UHRUVKRFNKD]DUG
When unplugging, hold by the plug only and remove
carefully.
DO NOT PLACE WATER CONTAINERS ON THE
PRINTER
'RQRWSODFHÀRZHUYDVHVDQGRWKHUZDWHUKROGLQJ
containers on the printer. If, for some reason, water seeps
to the inside of the printer, unplug the power cord from the
source outlet, and contact the sales dealer. If used without
corrective measures, the printer may be damaged.
“In the interest of safety, avoid handling of liquids near the
printer.”
DO NOT REMOVE THE CABINET
Touching internal parts is dangerous, besides, it may lead
to malfunction. Contact the sales dealer to carry out internal
FKHFNVDQGDGMXVWPHQWV
UNPLUG THE POWER CORD DURING A LONG
ABSENCE
Turn off the main power switch and unplug the power cord
during a long absence.
WHEN TRANSPORTING THE PRINTER
:KHQWUDQVSRUWLQJWKHSULQWHUUHPRYHWKHLQNULEERQDQG
print paper from the printer.
WHEN MOVING THE PRINTER
&KHFNWKDWWKHVOLGHGRRULVFORVHG¿UPO\$QGSD\DWWHQWLRQ
not to press the front release button accidentally. When the
VOLGHGRRULVQRWFORVHG¿UPO\RU\RXSUHVVWKHIURQWUHOHDVH
button accidentally, the slide door may open. It can cause
injury or damage.
BE CAREFUL AROUND PAPER EXIT SLOT
Don’t insert your hand or any material into the print output
slot and the waste output slot during printing. If you do so,
\RXU¿QJHUZLOOEHLQMXUHG
DO NOT PUT YOUR HAND OVER THE PRINT
PAPER HOLDER
,I\RXGRVR\RXU¿QJHUZLOOEHLQMXUHG
DO NOT TOUCH THE THERMAL HEAD EXCEPT
WHEN CLEANING
Do not touch the thermal head (located inside the top cover)
except when cleaning.
They are heated to high temperature and may cause burns
or injury when touched.
Also, malfunction caused by static electricity may occur.
WHEN PLACING THE PRINT PAPER, KEEP THE
PRINT PAPER UPRIGHT
When you put the print paper sideways on a table, etc., it
may roll and fall. This may cause injury.
CONNECTION CABLES
Use the provided power cord.
DO NOT LEAVE THE SLIDE DOOR OPEN
When the printer is moved with the slide door open, it may
cause injury or damage.
CLOSE THE SLIDE DOOR FIRMLY
7DNHFDUHQRWWRSLQFK\RXUKDQGZKHQFORVLQJWKHVOLGH
GRRU:KHQWKHVOLGHGRRULVQRWFORVHG¿UPO\LWPD\RSHQ
during transportation and it may cause injury or damage.
DO NOT PUSH DOWN ON THE SLIDE DOOR
If you push down on the slide door when they are open, this
printer may fall and it can cause damage or injury.
DO NOT LEAN ON THE EXIT PAPER TRAY, DO
NOT APPLY PRESSURE TO IT FROM ABOVE, OR
DO NOT PUT A HEAVY OBJECT ON IT
The exit paper tray may be damaged, causing injury.
FRANÇAIS ENGLISHDEUTSCHITALIANONEDERLANDSESPAÑOL
5
INSTALLATION LOCATIONS
SAFETY PRECAUTIONS
MAINTAIN GOOD VENTILATION
Ventilation slots and holes are provided on the rear and both
sides of this printer. Place the printer on a hard and level
VXUIDFHDQGNHHSDVSDFHEHWZHHQWKHSULQWHUDQGWKHZDOOV
to ensure proper ventilation. When putting the printer on the
V\VWHPUDFNWDNHDVSDFHEHWZHHQWKHSULQWHUDQGWKHEDFN
DQGVLGHVRIWKHUDFN
SUITABLE LOCATIONS
$YRLGVKDN\SODFHVRUKRWVSULQJVDUHDVZKHUHK\GURJHQ
VXO¿GHDQGDFLGLFLRQVDUHOLNHO\WREHJHQHUDWHG
AVOID PLACES WITH HIGH HUMIDITY AND DUST
Do not place the printer at a high humidity and dusty
locations. They can cause extensive damage to this printer.
$YRLGSODFHVZKHUHWKHSULQWHULVOLNHO\WREHH[SRVHGWRRLO\
fumes and vapors.
AVOID PLACES LIKELY TO BE EXTREMELY HOT
Places exposed to direct sunlight, or near heating
appliances can attain extremely high temperatures, which
may deform the cabinet, or can become a prime cause of
damage.
PLACE THE PRINTER ON A HORIZONTAL LEVEL
7KHSULQWHULVOLNHO\WREHDIIHFWHGLILWLVSODFHGLQVODQWHG
conditions or in an unstable places.
PROTECT AGAINST DEW FORMATION
,QH[WUHPHO\FROGUHJLRQVLIWKHSULQWHULVPRYHGTXLFNO\
IURPDQH[WUHPHO\FROGSODFHWRZDUPHURQHGHZLVOLNHO\WR
be formed. If dew is formed, printing is not possible.
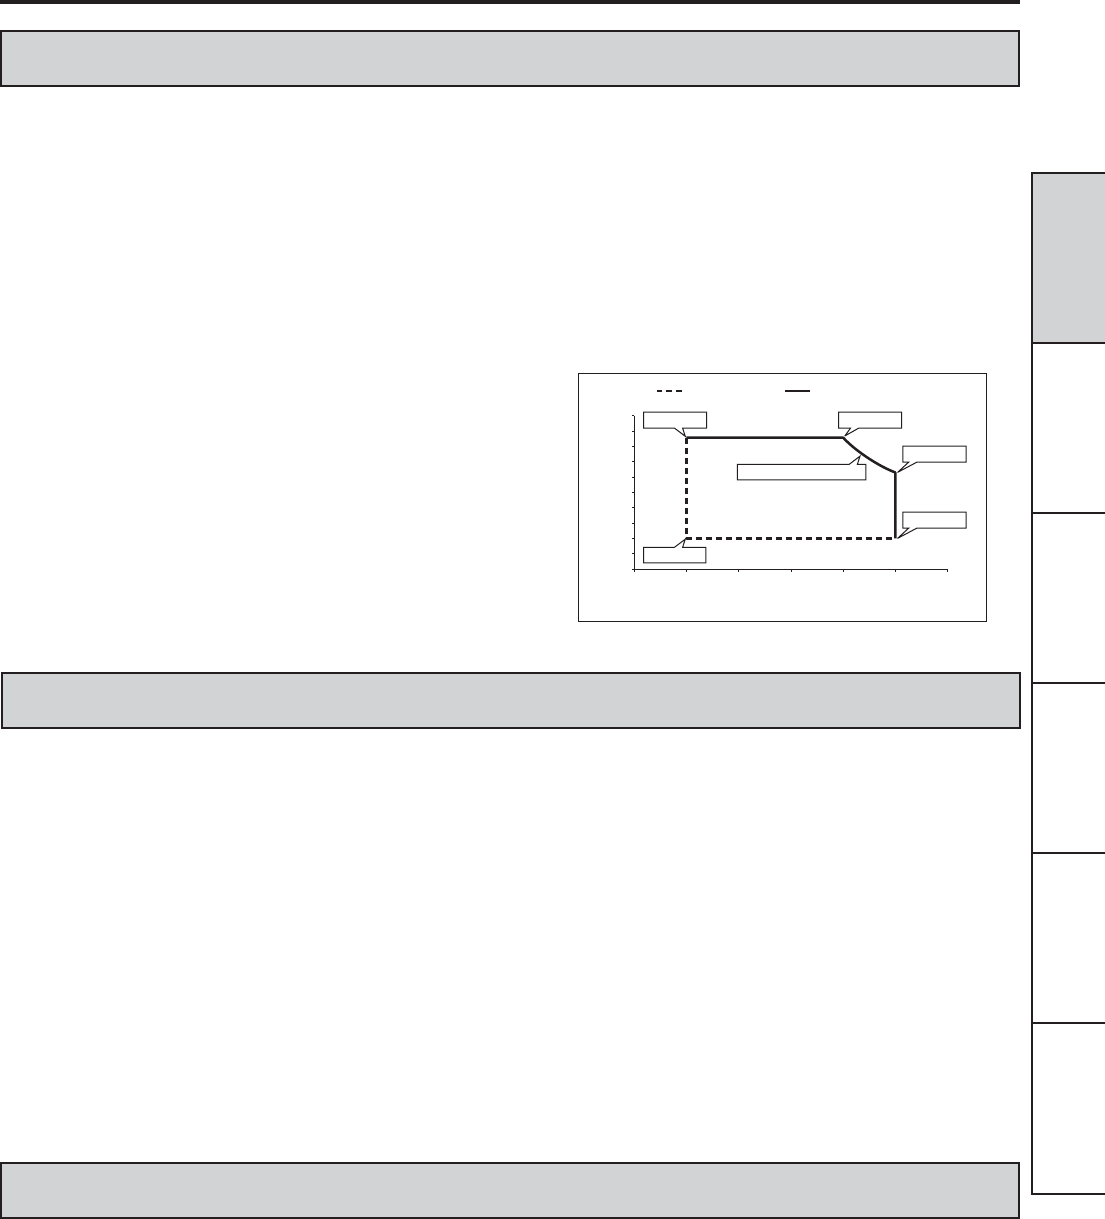
OPERATING AMBIENT TEMPERATURE RANGE
The operating ambient temperature/humidity range is
15°C/20%-86%RH - 30°C/20%-86%RH - 35°C/20%-
5+:KHQXVLQJWKHSULQWHURQWKHV\VWHPUDFNEHVXUH
WRNHHSWKLVDPELHQWWHPSHUDWXUHLQVLGHWKHUDFN
:KHQWKHSULQWHULVXVHGLQDORZWHPSHUDWXUHLWPD\WDNH
some time to start printing.
0
10 15 20 25 30 35 40
20
40
60
80
100
Lower Limit Upper Limit
Temperature (°C)
Relative Humidity (%)
15°C/86% 30°C/86%
35°C/20%
15°C/20%
0.0225 Humidity Ratio
35°C/63%
FOR LONG OPERATING LIFE
UNSUITABLE MATERIALS FOR THE DIGITAL
COLOR PRINTER
&RDWÀDNLQJDQGGHIRUPDWLRQDUHOLNHO\WRRFFXULIWKHSULQWHU
is wiped with chemical dusters, benzine, thinner or any other
solvent, if rubber or PVC items are left in contact with the
printer for extended duration, or if the printer is sprayed with
insecticide.
CARE OF THE CABINET
Unplug and clean with a soft cloth slightly moistened with a
mild soap and water solution. Allow to dry completely before
operating. Never use petroleum base solutions or abrasive
cleaners.
HEAD ABRASION
The thermal head wears out. When it is abraded, it becomes
KDUGWRSULQWRXW¿QHGHWDLOVRIWKHSLFWXUH,QVXFKDFDVHLW
is necessary to replace the thermal head. Consult with the
sales dealer for replacing the head.
CONNECTING DEVICES
Read thoroughly “Operating Precautions” of the instruction
ERRNOHWVIRUWKHGHYLFHVFRQQHFWHGZLWKWKH'LJLWDO&RORU
Printer. The power cord must be disconnected after printing
is over.
CAUTION ON RELOCATING
:KHQWUDQVSRUWLQJWKLVSULQWHUPDNHVXUHLWLVQRWOLNHO\WR
be subjected to impacts. They can be a prime cause for
GDPDJH)XUWKHUPDNHVXUHWRGLVFRQQHFWWKHSRZHUFRUG
from the power outlet, and the cables from the connected
devices.
OTHER CAUTIONS
'RQRWSXOORXWQRUWRXFKWKHSULQWSDSHUXQWLOSULQWLQJLV
completed. It may degrade the print quality or cause an
error.
'XVWRURWKHUIRUHLJQPDWWHUDGKHULQJWRWKHSULQWSDSHU
RUWKHLQNULEERQFDVVHWWHRUGHIRUPDWLRQUHVXOWLQJIURP
exposure to extremely low or high temperatures could
FDXVHORVVRIFRORUXQHYHQFRORURUOLQHVRUZULQNOHVLQ
the print images.
'HSHQGLQJRQWKHLQWHUQDOWHPSHUDWXUHWKHSULQWHU
may stop printing temporarily during printing. (The LCD
displays “COOLING.”) Please wait for the printer to
resume printing.
Empty the front cover bin and the exit waste bin
frequently to prevent jamming the strips at the print
output slot and the waste output slot.
7KHH[LWSDSHUWUD\LVXVHGIRUVWRULQJWKHFXWSULQWSDSHU
temporarily. The print paper may fall from the tray or
PD\QRWEHVWRUHGLQWKHSULQWHGRUGHU7DNHRXWWKHSULQW
SDSHUIURPWKHH[LWSDSHUWUD\EHIRUHWKHWUD\LV¿OOHGXS
NOTE:
YOUR UNDERSTANDING IS REQUESTED FOR THE
LOSS OF IMAGES IN MEMORY DUE TO THE SUDDEN
OCCURRENCE OF A MALFUNCTION.
6
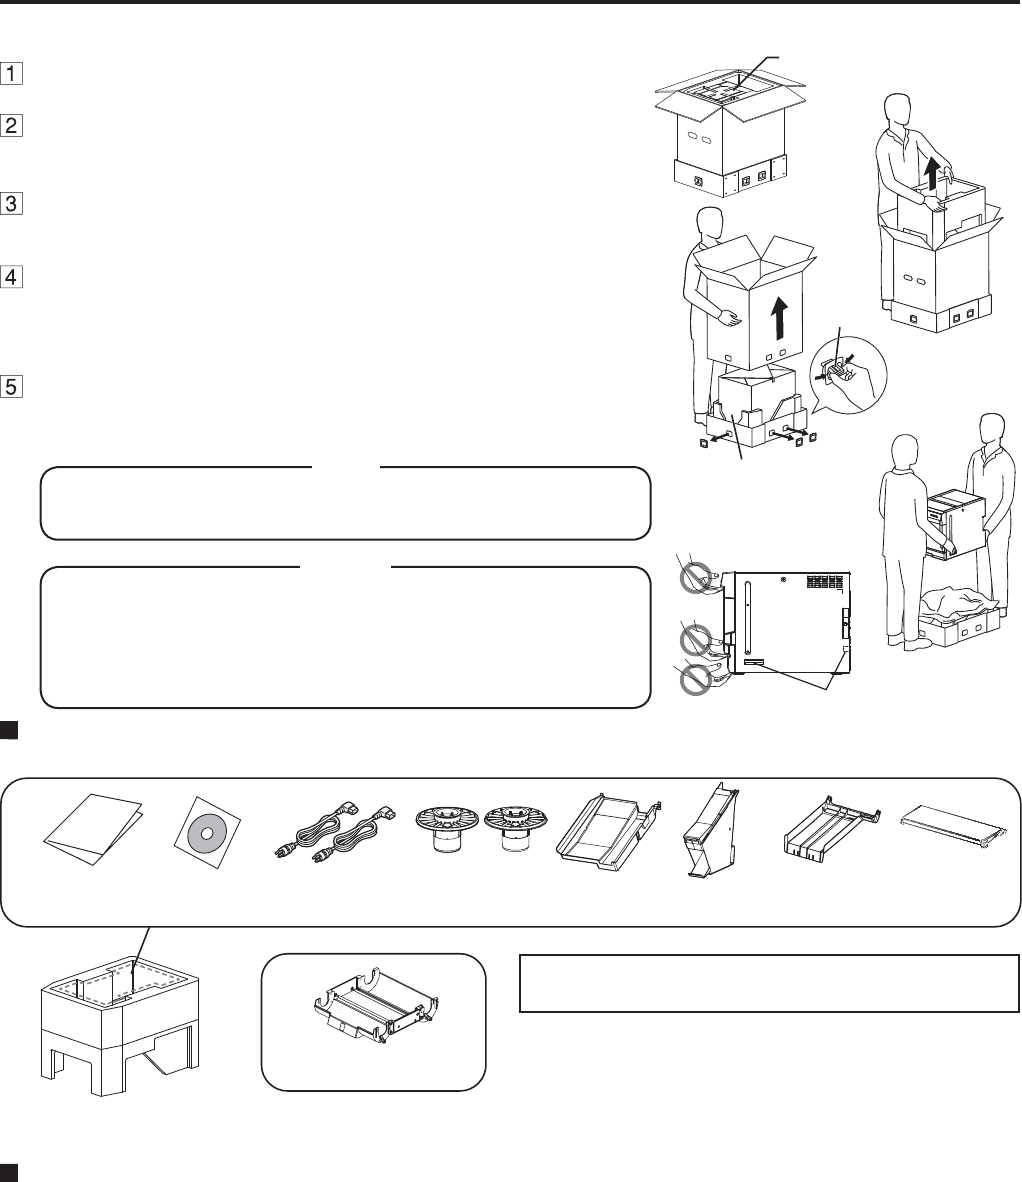
UNPACKING
7DNHWKHSULQWHURXWRIWKHER[E\WKHIROORZLQJSURFHGXUHV0DNHVXUHWRFKHFNWKHDFFHVVRULHV
CONTENTS
7KHDFFHVVRULHVLWHPVDUHSODFHGLQWKHWRSFXVKLRQ&KHFNDOOLWHPVDUHLQFOXGHG
,QNULEERQFDVVHWWH
7KHLQNULEERQFDVVHWWHLV
contained in the printer.
4XLFNVHWXS
guide CD-ROM 3DSHUÀDQJHVPower cords Exit paper
tray Exit waste
bin %UDFNHWIRUH[LW
paper tray Attachment for
exit paper tray
PAPER / INK RIBBON
:KHQXVLQJWKLVSULQWHUPDNHVXUHWRXVHWKHIROORZLQJW\SHVRIWKHSDSHULQNULEERQ
Product name Print size Number of prints
3.7ZRLQNULEERQVLQFOXGHG [0D[LPXPVL]H 'XSOH[SULQWLQJ
CK5000 (Paper) 8 x 12 (Maximum size) 250 (Duplex printing)
Using the Manuals
The Operation Manual and the Operation Manual for the Printer driver are prepared in the Portable Document Format (PDF) in
the CD-ROM. Adobe® Reader® is required to open the Operation Manual.
Opening the Operation Manual
1. Load the CD-ROM into the CD-ROM drive.
2. Open CD-ROM “CP-W5000D”.
'RXEOHFOLFNRQ³,1'(;KWPO´ZLWKLQWKH&'520$ODQJXDJHVHOHFWLRQOLVWIRUWKH2SHUDWLRQ0DQXDOZLOOEHGLVSOD\HG
0RYHWKHPRXVHSRLQWHUWRWKHGHVLUHGODQJXDJHDQGFOLFN
This will launch Adobe
Reader and the Operation Manual will open.
$GREHWKH$GREHORJRDQG5HDGHUDUHHLWKHUUHJLVWHUHGWUDGHPDUNVRUWUDGHPDUNVRI$GREH6\VWHPV,QFRUSRUDWHGLQWKH
United States and/or other countries.
0DNHVXUHWRUHPRYHWKHSURWHFWLYHPDWHULDOVIURPWKHLQN
ULEERQFDVVHWWHSDSHUÀDQJHVDQGH[LWSDSHUWUD\
Open the box and take out the accessories.
Remove the top cushion.
Hold and release the joint parts (6 pieces) at the bottom of
the box to remove the upper box.
Unwrap the packing.
Remove the protective materials for transportation such as protective sheet.
Take out the printer.
+ROGWKHSULQWHUE\WKHKROGLQJVORWVLQWKHVLGHVDQGEDFNDVVKRZQLQWKH
¿JXUH
7KHSULQWHUZHLJKVDERXWNJ,WVKRXOGEHFDUULHGFDUHIXOO\E\
two people.
NOTE
'RQRWFDUU\WKHSULQWHUE\WKHIURQWSDQHO7KHIURQWFRYHUELQPD\
be removed and fall. It may cause injury or damage.
:KHQWKHVOLGHGRRULVQRWFORVHG¿UPO\RU\RXSUHVVWKHIURQW
release button accidentally, the slide door may open. It can cause
injury or damage.
CAUTION
Accessories
3DFNLQJ
Joint
parts
Holding slots
FRANÇAIS ENGLISHDEUTSCHITALIANONEDERLANDSESPAÑOL
7
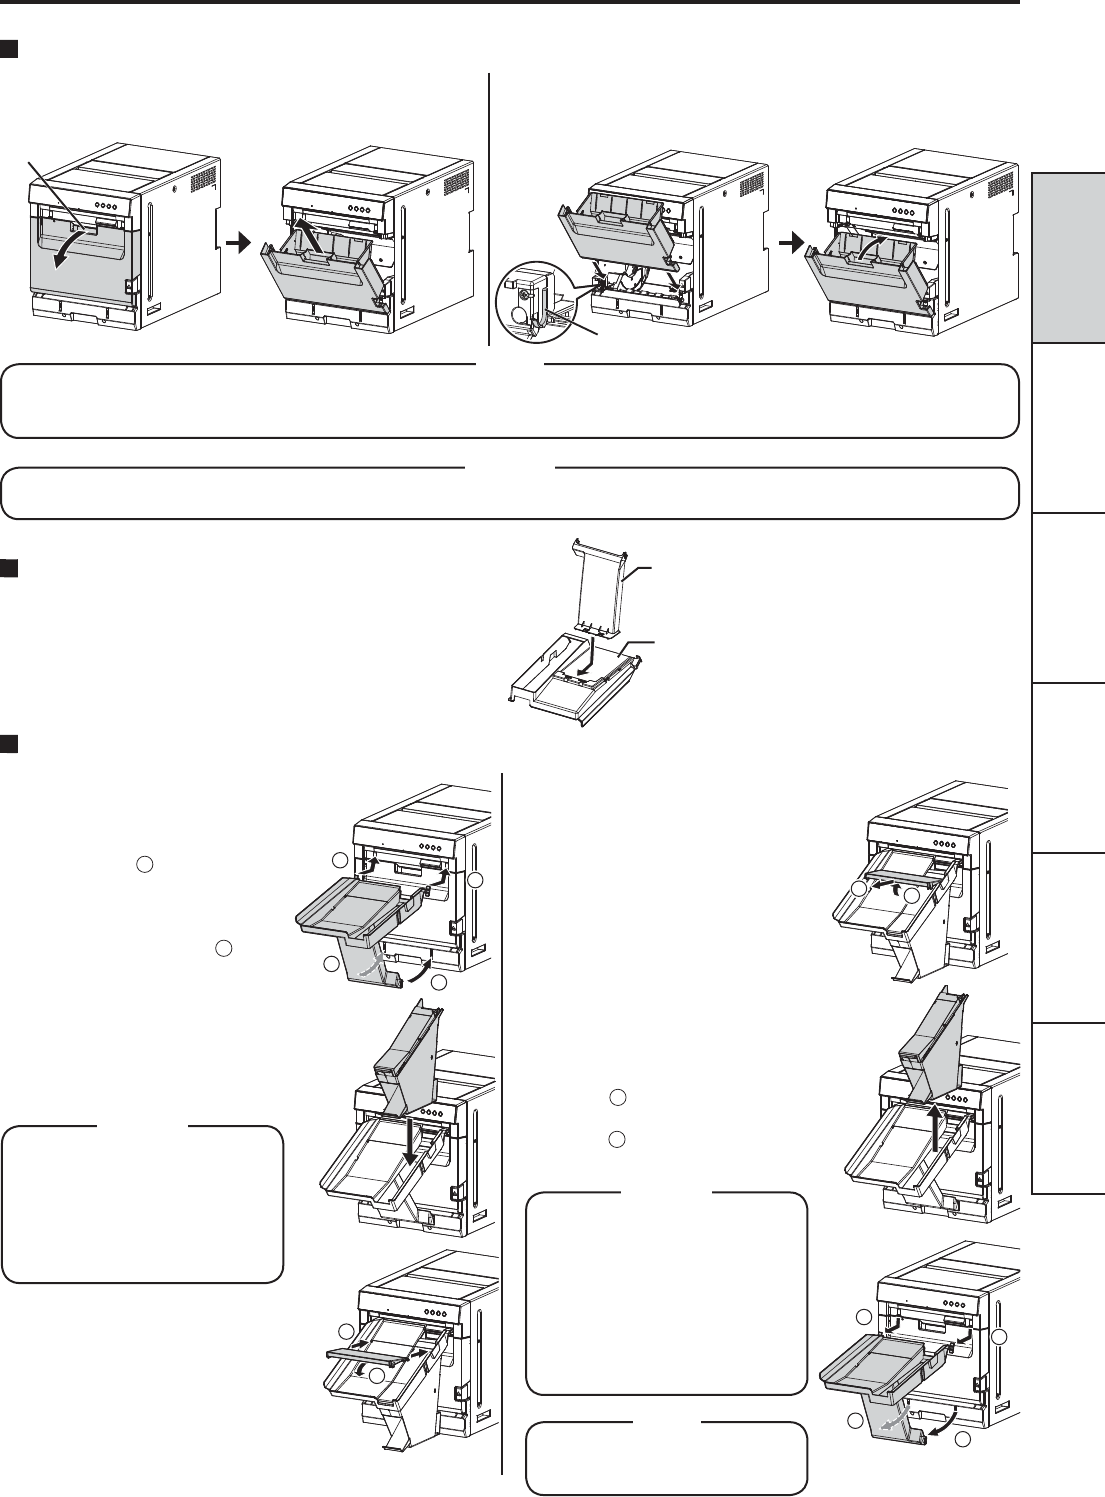
HOW TO MOUNT AND REMOVE THE FRONT COVER BIN
HOW TO MOUNT AND REMOVE THE EXIT PAPER TRAY
HOW TO ASSEMBLE THE EXIT PAPER TRAY
Guide
Handle
Tilt the front cover bin toward you by the handle. Then lift
and remove the front cover bin. To mount the front cover bin, insert the projections at the
bottom of both sides of the bin along the guides at the bottom
of both sides of the slide door and then close the front cover
bin.
1
1
2
2
1
2
2
,QVHUWWKHEUDFNHWIRUWKHH[LWSDSHUWUD\LQWRWKHERWWRPRIWKH
exit paper tray.
Bottom of the
exit paper tray
%UDFNHWIRUH[LW
paper tray
'RQRWSXOOWKHIURQWFRYHUELQIRUFHIXOO\EHFDXVHLWPD\EHORFNHG,QVXFKDFDVHPDNHVXUHWKDWWKHSULQWHUSRZHULV
RQDQGWKHQKROGGRZQWKH(17(5EXWWRQRQWKHRSHUDWRUFRQWUROSDQHOIRUDZKLOHWRXQORFNWKHELQ
NOTE
The front cover bin gets heavy as paper strips accumulate. When removing the front cover bin, be careful not to drop it.
CAUTION
<How to mount>
)XOO\LQVHUWWKHXSSHUKRRNVRQ
both sides of the exit paper tray
into the tray insertion slots at
the front top ( 1). Then tilt the
tray downward and insert the
ORZHUKRRNVRIWKHWUD\LQWRWKH
tray insertion slots at the bottom
DVVKRZQLQWKH¿JXUH 2).
2. Insert the exit waste bin into the
exit paper tray.
3. Mount the attachment on the
exit paper tray as shown in the
¿JXUH
'RQRWLQVHUWWKH
XSSHUDQGORZHUKRRNV
forcefully. If you do
VRWKHKRRNVPD\EH
damaged, causing the
exit paper tray to fall.
CAUTION
<How to remove>
1. Remove the attachment from
the exit paper tray as shown in
WKH¿JXUH
2. Lift and remove the exit waste
bin from the exit paper tray.
Whenever removing the exit
waste bin, get rid of paper
strips.
3. Pull the bottom of the exit paper
tray toward you to release the
ORZHUKRRNVDQGWLOWWKHH[LW
paper tray as shown in the
¿JXUH 1). Then release the
XSSHUKRRNVIURPWKHIURQW
panel ( 2).
'RQRWUHPRYHWKHH[LW
paper tray forcefully. Do
not turn it to the right
or left or do not twist it.
,I\RXGRVRWKHKRRNV
may be damaged,
causing the exit paper
tray to fall.
CAUTION
*HWULGRISDSHUVWULSV
frequently.
NOTE
1
2
3
2
2
1
1
3
1
2
1
BEFORE OPERATION
8
BEFORE OPERATION
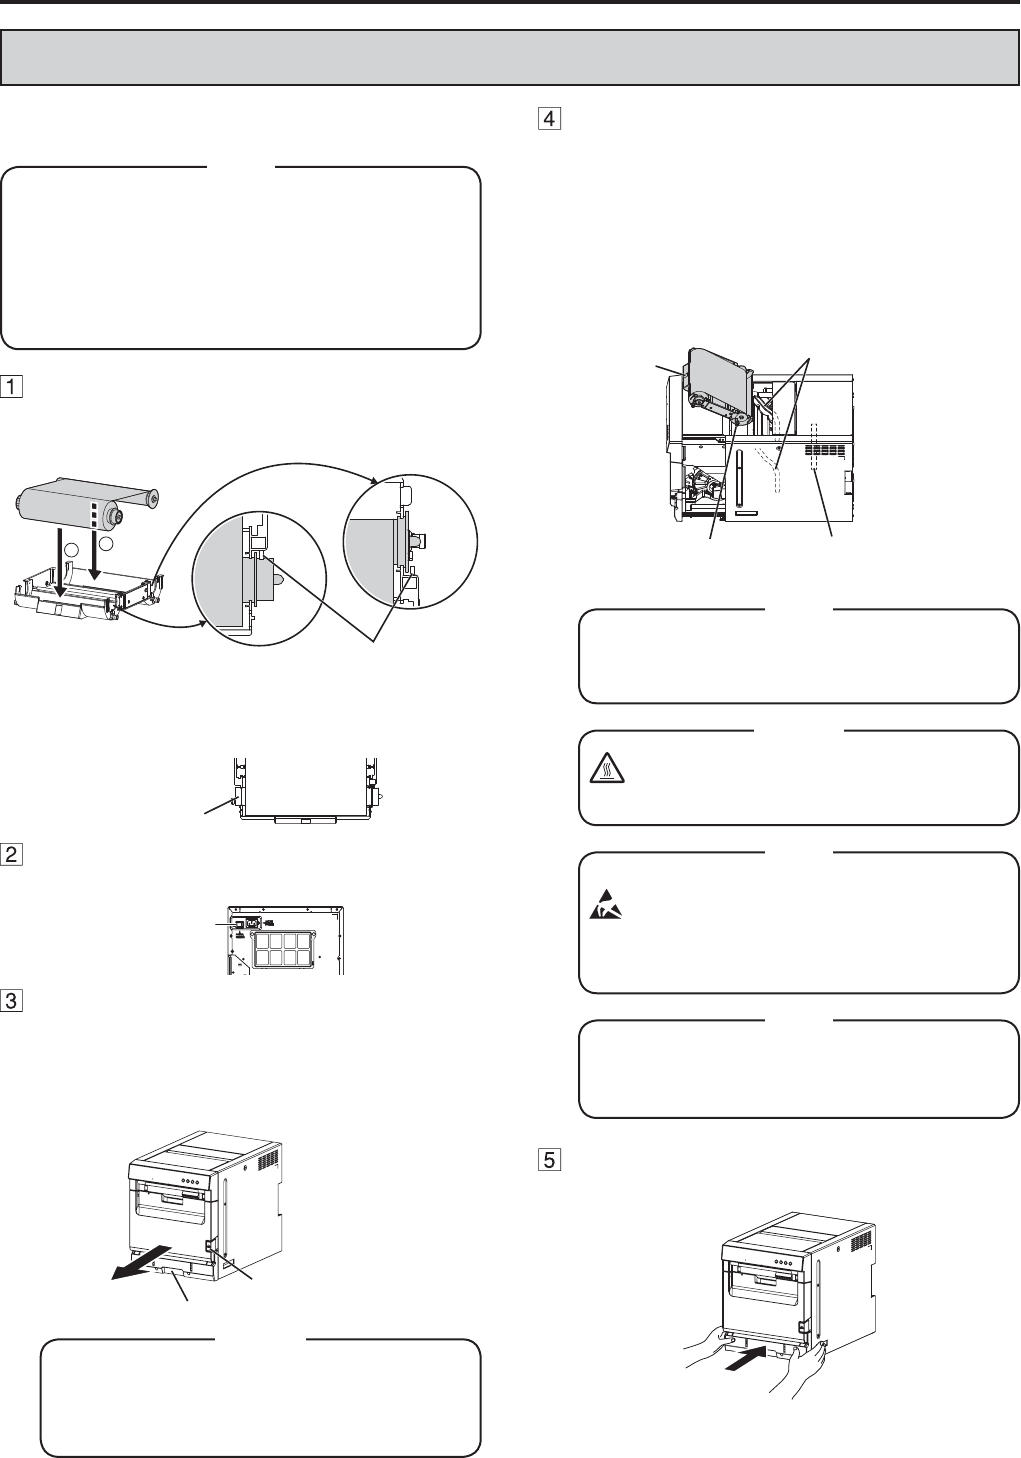
INK RIBBON INSTALLATION
%HIRUHLQVWDOOLQJWKHLQNULEERQFDVVHWWHLQWRWKLVSULQWHUORDG
WKHLQNULEERQLQWKHLQNULEERQFDVVHWWH
3ODFHWKHLQNULEERQFDVVHWWHRQDÀDWVXUIDFH
ZKHQORDGLQJWKHLQNULEERQ
6HOHFWDSODFHWKDWLVIUHHRIGXVWZKHQORDGLQJ
WKHLQNULEERQ'XVWRUGLUWVHWWOLQJRQWKHLQN
ribbon results in poor print quality.
0DNHVXUHWKDWWKHVKDIWVRIWKHLQNULEERQ¿WLQWR
WKHLQNULEERQFDVVHWWH¿UPO\
NOTE
Load the ink ribbon in the ink ribbon
cassette as shown below.
0DNHVXUHWRORDGLWLQWKHFRUUHFWSRVLWLRQ
12
,QNULEERQ
White parts
,QNULEERQFDVVHWWH
0DNHVXUHWRVHWWKHLQNULEERQUROOHUWRWKHLQNULEERQ
FDVVHWWH¿UPO\
7XUQWKHVKDIWWRHOLPLQDWHDQ\VODFN
Shaft
Press the POWER switch on the rear
panel to turn on the power.
POWER
switch
After the POWER indicator changes from
orange to green, press the front release
button and pull out the slide door by the
handle at the front bottom. Pull out the
slide door until it stops.
Handle
Front release
button
Do not push down on the slide door. If you
push down on the slide door when they are
open, this printer may fall and it can cause
damage or injury.
CAUTION
Place the ink ribbon cassette containing
the ink ribbon in the position as shown in
the illustration.
7RLQVHUWWKHLQNULEERQFDVVHWWHDOLJQWKHSURWUXVLRQV
on both sides of the cassette with the right and left
guides inside the slide door and slide it in a slanting
direction.
0RXQWWKHLQNULEERQFDVVHWWHWRWKHEDFN¿UPO\E\
holding the handle.
Protrusion Thermal
head
Guides
Handle
'RQRWWRXFKWKHWKHUPDOKHDG Fingerprints
or dust on the thermal head will degrade the
print quality.
NOTE
Do not touch the thermal head right
after printing because it is extremely hot.
Otherwise you may get burned or injured.
CAUTION
Note that the thermal head is quite sensitive
to static electricity. When you touch the
thermal head while carrying static electricity
on your body, the thermal head may be
damaged.
NOTE
,QVHUWWKHLQNULEERQFDVVHWWHVORZO\,ILW
falls from the insertion slot, the printer or
accessories may be damaged.
NOTE
When not changing the print paper, push
the slide door to close.
When changing the print paper, see “PRINT
PAPER INSTALLATION.”
FRANÇAIS ENGLISHDEUTSCHITALIANONEDERLANDSESPAÑOL
9
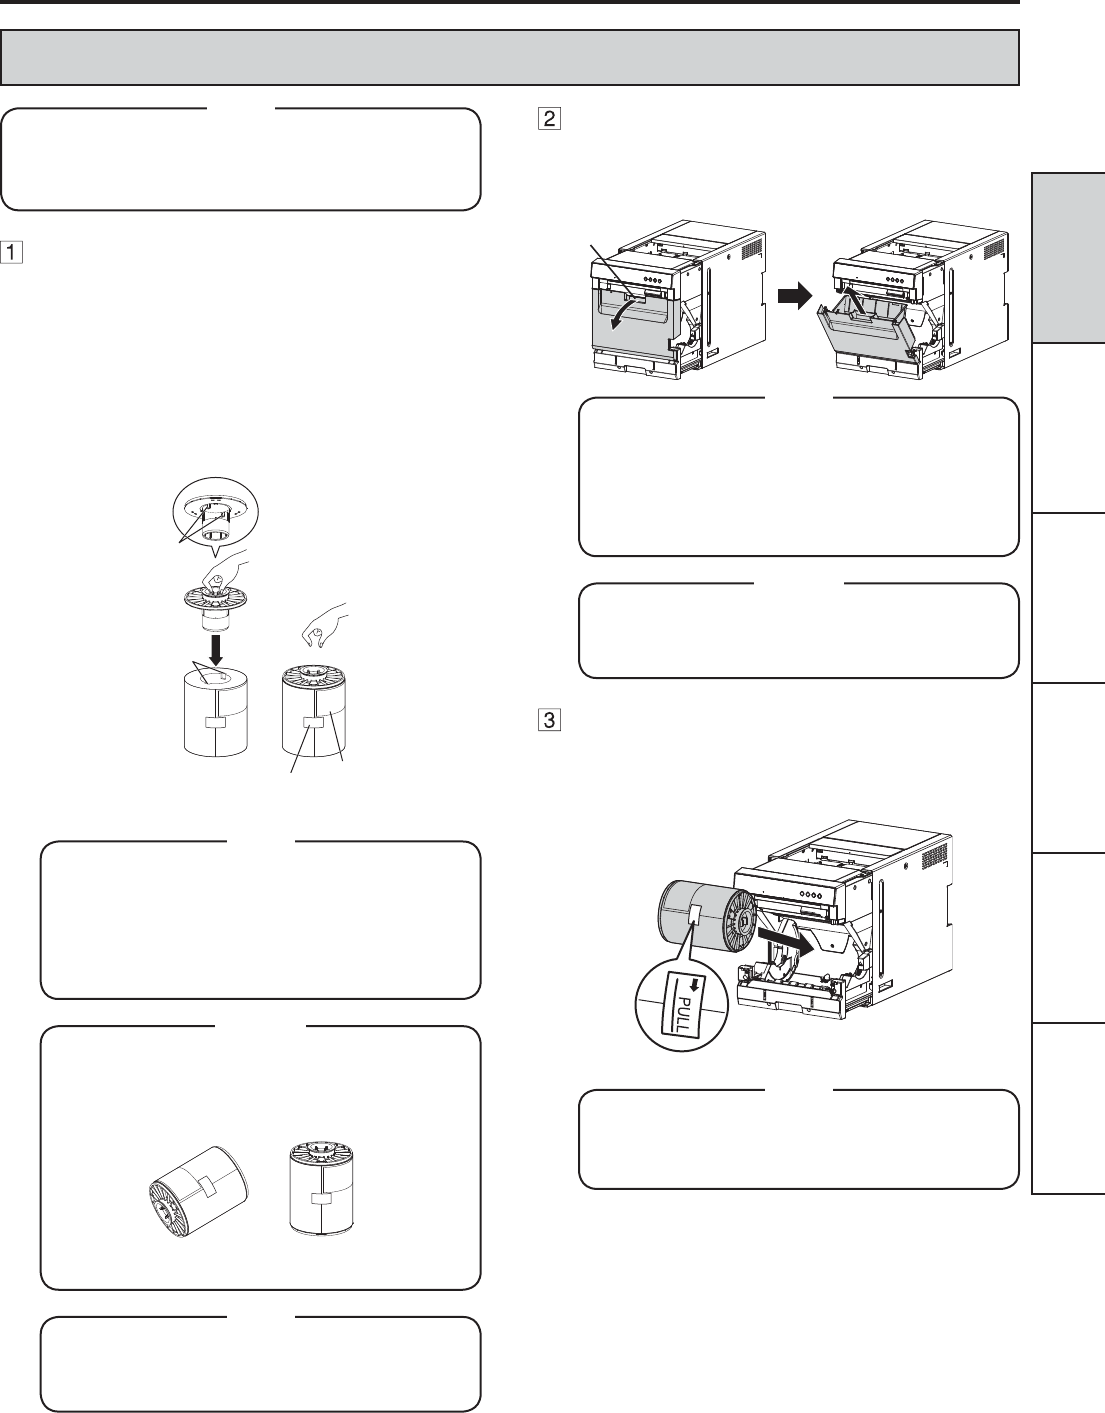
PRINT PAPER INSTALLATION
'RQRWSXVKGRZQRQWKHVOLGHGRRU If you push
down on the slide door when they are open, this
printer may fall and it can cause damage or injury.
NOTE
$WWDFKWKHVXSSOLHGSDSHUÀDQJHVWRERWK
sides of the print paper.
+ROGWKHODWFKHVRIWKHSDSHUÀDQJHZLWKJHDUDOLJQWKH
SURMHFWLRQVRIWKHSDSHUÀDQJHZLWKWKHLQGHQWDWLRQV
in the print paper core, and then insert the paper
ÀDQJHLQWRWKHSULQWSDSHU0DNHVXUHWKDWWKHUHLV
QRFOHDUDQFHEHWZHHQWKHSDSHUÀDQJHDQGWKHSULQW
paper.
1H[WKROGWKHODWFKHVRIWKHSDSHUÀDQJHZLWKRXWJHDU
and insert it into the opposite side of the print paper.
6WLFNHU
Indentations
Projections
Barcode
label
7DNHFDUHQRWWRSLQFK\RXU¿QJHUV
'RQRWUHPRYHWKHVWLFNHURQWKHSULQWSDSHU
roll yet.
'RQRWUHPRYHWKHEDUFRGHODEHO
'RQRWORRVHQWKHSDSHUUROO$Q\VODFNLQWKH
print paper may degrade the print quality.
NOTE
:KHQSODFLQJWKHSULQWSDSHUNHHSWKHSULQW
paper upright.
When you put the print paper sideways, it
may roll and fall. This may cause injury.
INCORRECT CORRECT
CAUTION
)LQJHUSULQWVRUGXVWRQWKHSDSHU¶VVXUIDFH
may degrade print quality and cause paper
jams.
NOTE
BEFORE OPERATION
Open the front cover bin toward you by
its handle. Lift and remove the front cover
bin.
Get rid of paper strips from the front cover bin.
Handle
'RQRWSXOOWKHIURQWFRYHUELQIRUFHIXOO\
EHFDXVHLWPD\EHORFNHG,QVXFKDFDVH
PDNHVXUHWKDWWKHSULQWHUSRZHULVRQDQG
then hold down the ENTER button on the
RSHUDWRUFRQWUROSDQHOIRUDZKLOHWRXQORFN
the bin.
NOTE
7KHIURQWFRYHUELQJHWVKHDY\DVSDSHU
strips accumulate. When removing the front
cover bin, be careful not to drop it.
CAUTION
Install the print paper into the printer so
WKDWWKHSDSHUÀDQJHZLWKJHDUFRPHVWR
the left.
0DNHVXUHWKHSULQWSDSHULV¿UPO\LQVWDOOHG
/RDGWKHSULQWSDSHUVORZO\LQWRWKHSULQWHU,I
it is dropped inside the printer, the printer or
accessories may be damaged.
NOTE
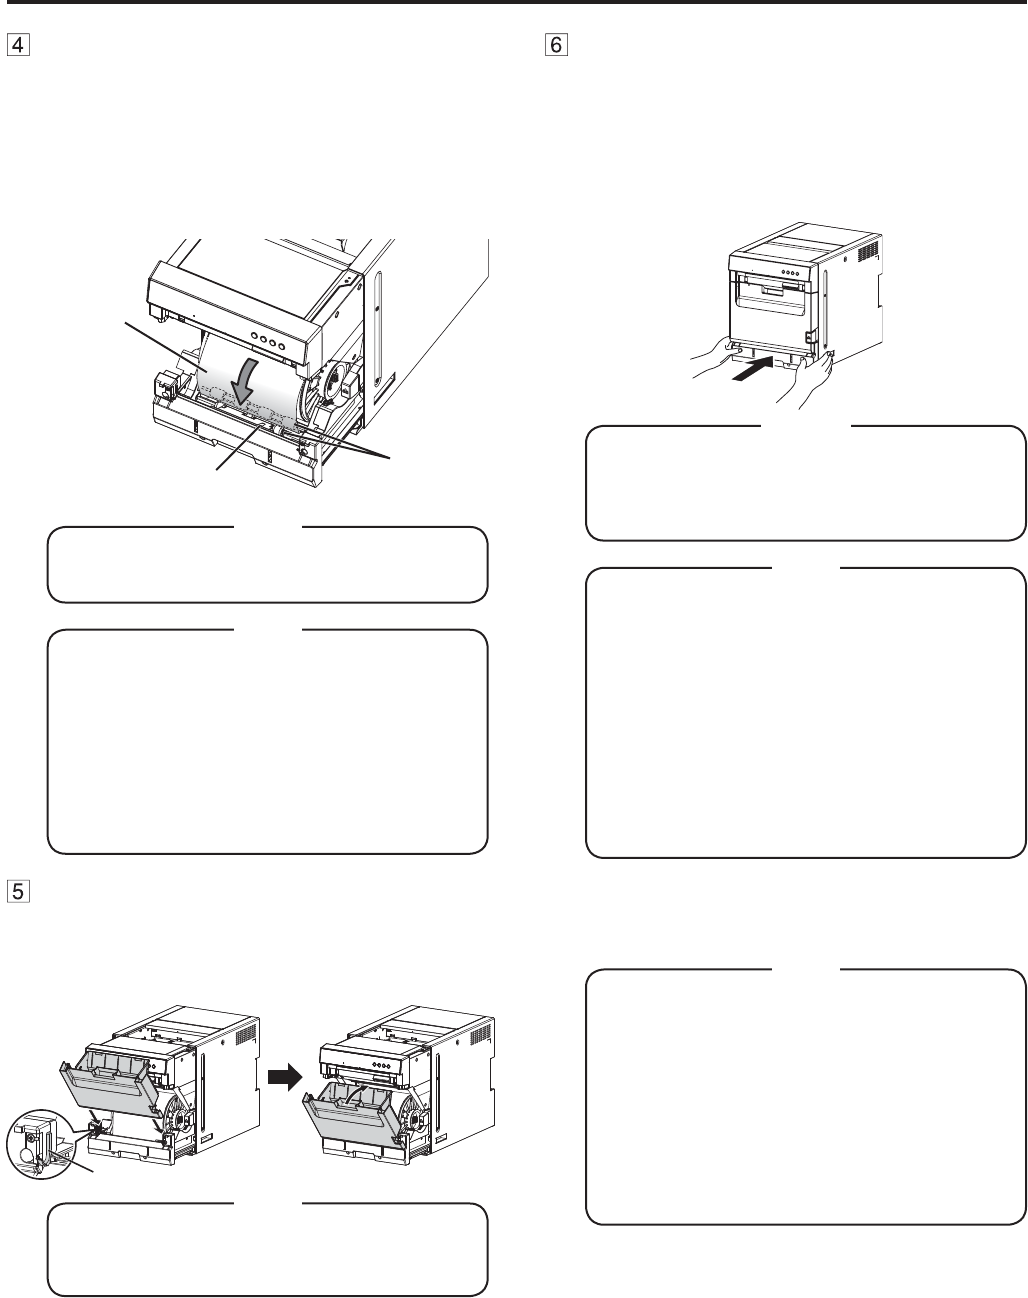
10
Remove the sticker and insert the print
paper between the rollers to feed it as
VKRZQLQWKH¿JXUH,QVHUWWKHSULQWSDSHU
until the blue indicator at the front bottom
of the slide door illuminates.
5HPRYHWKHVWLFNHUEHIRUHLQVHUWLQJWKHSULQWSDSHU
EHWZHHQWKHUROOHUV0DNHVXUHWRLQVHUWWKHSDSHU
straight.
Rollers
Blue indicator
Print paper
.HHSWKHUROOHUVFOHDQ'LUWRQWKHUROOHUV
may produce poor print quality.
NOTE
:KHQWDNLQJWKHSULQWSDSHURXWSXOOLWXS
WRZDUG\RXE\KROGLQJWKHSDSHUÀDQJHV
0DNHVXUHWRWXUQRQWKHSRZHUEHIRUH
replacing the print paper.
0DNHVXUHWRHOLPLQDWHDQ\VODFNIURPWKH
print paper. If you carry out the following
VWHSVZLWKRXWHOLPLQDWLQJWKHVODFNWKHSULQW
paper may be damaged.
'RQRWUHPRYHWKHEDUFRGHODEHO
NOTE
Mount the front cover bin.
Insert the projections at the bottom of both sides of the
front cover bin along the guides at the bottom of both
sides of the slide door and then close the front cover
bin.
Guide
0DNHVXUHWKDWWKHIURQWFRYHUELQLV
mounted correctly. Incorrect mounting may
cause paper jam.
NOTE
BEFORE OPERATION
Push the slide door to close.
Hold the holding slots in both sides and push the front
of the printer with both hands to close the slide door as
VKRZQLQWKH¿JXUH
When a new paper is loaded and the slide door is
closed with the power turned on, the paper will be
automatically fed and cut. The printer ejects two pieces
of paper and displays “Ready 8x12” on the LCD.
:KHQFORVLQJWKHVOLGHGRRUEHFDUHIXOQRW
to get your hands caught between the printer
and the slide door. Otherwise, you may get
injured.
CAUTION
:KHQFORVLQJWKHVOLGHGRRUSXVKLWXQWLOD
FOLFNLVKHDUG
,IWKH$/$50LQGLFDWRULOOXPLQDWHVZKHQWKH
slide door is closed, the print paper may
have not been installed correctly.
,QWKLVFDVHRSHQWKHVOLGHGRRUWRPDNH
sure that the print paper has been installed
correctly. Then close the slide door again.
7KHSULQWHUWDNHVVRPHWLPHWR¿QLVK
initialization before starting the feed-and-cut
operation. This is not a malfunction. Wait for
WKHSULQWHUWR¿QLVKLQLWLDOL]DWLRQ
NOTE
Installation of the print paper and the ink
ribbon is completed.
(PSW\WKHIURQWFRYHUELQIUHTXHQWO\WR
prevent jamming the strips at the print output
VORW:KHQHYHU\RXUHSODFHWKHSDSHUPDNH
sure to throw away the paper strips in the
front cover bin.
:KHQHYHU\RXUHSODFHWKHLQNULEERQFOHDQ
the thermal head and the platen roller.
7KH/&'RQWKHRSHUDWRUFRQWUROSDQHOPD\
display “PAPER END” even when some print
paper still remains. This is not a malfunction.
NOTE

FRANÇAIS ENGLISHDEUTSCHITALIANONEDERLANDSESPAÑOL
11
PRINTER DRIVER INSTALLATION
Before connecting the printer and the personal computer, install the printer driver.
The printer driver is required to print the data from the personal computer connected with this printer.
The printer driver for Windows® is supplied with this printer.
Required operating system: Windows® 7 (32-bit and 64-bit) and Windows® 8 (32-bit and 64-bit)
Refer to the PRINTER DRIVER GUIDE in the CD-ROM for installing the printer driver.
0LFURVRIWDQG:LQGRZVDUHWKHWUDGHPDUNVRUWKHUHJLVWHUHGWUDGHPDUNVRI0LFURVRIW&RUSRUDWLRQLQWKH86$DQGRWKHU
countries.
5HIHUWRWKHIROORZLQJZHEVLWHWRFKHFNWKHODWHVWYHUVLRQRIWKHSULQWHUGULYHUDQGWKHSULQWHULQIRUPDWLRQ
http://www.mitsubishielectric.co.jp/vcp/support/driver_en.html
NOTE
BEFORE OPERATION
CONNECTION WITH USB DATA SIGNAL EQUIPMENT
CONNECTING TO PERSONAL COMPUTER
Connect the printer and a personal computer with a USB cable.
Connect the printer to a personal computer as shown below.
To USB port
Personal computer Digital color printer
To USB port
$86%FDEOHLVQRWVXSSOLHGZLWKWKLVSULQWHU8VHWKH86%FHUWL¿HGFDEOHRIPRUOHVVLQOHQJWK
NOTE

MITSUBISHI ELECTRIC EUROPE B.V.
UK Branch
7UDYHOOHUV/DQH+DW¿HOG+HUWV$/;%(QJODQG8.
Phone +44 (0) 1707 276100 FAX +44 (0) 1707 278755
German Branch
Gothaer Strasse 8, 40880 Ratingen ; Postfach 1548, 40835 Ratingen ; Germany
Phone +49 (2102) 486-9250 FAX +49 (2102) 486-7320
French Branch
25, Boulevard des Bouvets - 92741 NANTERRE cedex, France
Phone +33 (1) 55 68 55 00 FAX +33 (1) 55 68 57 31
Benelux Branch
Nijverheidsweg 23a,
3641 RP Mijdrecht, The Netherlands
Phone +31 (0) 297-282461 FAX +31 (0) 297-283936
Spanish Branch (Barcelona)
Ctra. de Rubí, 76-80 - Apdo. 420
08190-Sant Cugat del Vallés - (Barcelona) Spain
Phone +34 93 565 3154 FAX +34 93 589 4388
MITSUBISHI ELECTRIC US. INC.
Visual and Imaging Systems
5900-A Katella Ave.
Cypress, CA 90630-5019, U.S.A.
Phone 888-307-0309
Manufactured by Mitsubishi Electric (Malaysia) Sdn. Bhd.
3/2.DZDVDQ3HULQGXVWULDQ6HQDL,,6HQDL-RKRU'DUXO7DN]LP0DOD\VLD
Please contact the nearest Mitsubishi sales branch to get DOC (Declaration of Conformity) of the EC Directive
1999/5/EC.