Mobi Technologies 70209T MobiCam DXR Touch Wireless Monitoring System User Manual
Mobi Technologies, Inc. MobiCam DXR Touch Wireless Monitoring System Users Manual
Users Manual
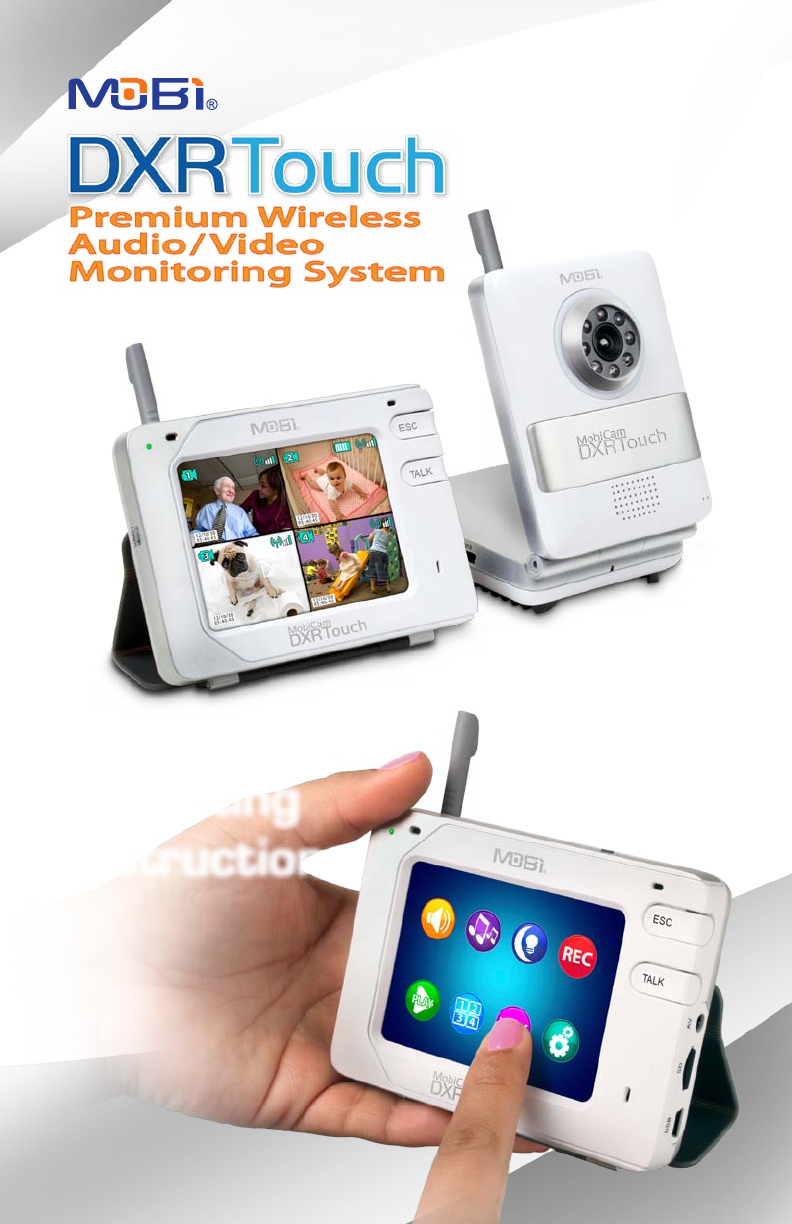
IMPORTANT:
Keep instructions for future reference.
70208
Complete
Operating
Instructions
Complete
Operating
Instructions
Complete
Operating
Instructions

1
INTRODUCTION
Congratulations on the purchase of this MobiCam® DXR Touch Monitoring
System, which incorporates the latest advanced technology. To fully maximi-
ze and benet from this product’s avanced features we hightly recommend
you review these instructions. This 2.4 GHz Digital monitor enables you to
transmit picture and sound signals cordlessly, which is ideal for many situa-
tions suchs as monitoring a baby, young children or the elderly or used as
oce or warehouse monitoring system.
RADIO INTERFERENCE PARAMETERS
FCC Statement
15.19: This device complies with part 15 of the FCC Rules. Operation is subject
to the following two conditions: (1) This device may not cause harmful inter-
ference and (2) This device must accept any interference received, including
interference that may cause undesired operation.
15.21: Changes or modications not expressly approved by the party respon-
sible for compliance could void the user’s authority to operate the equipment.
FCC Radiation Exposure Statement
This equipment has been tested and complies with Federal Communications
Commission radiation exposure limits as set forth for uncontrolled environ-
ments. This equipment should be installed and operated with minimum
distance 20cm between the radiator and your body. This Camera must not
be co-located or operating in conjunction with any other antenna or Cam-
era. This equipment complies with FCC RF radiation exposure limits set forth
for an uncontrolled environment. This device and its antenna must not be
co-located or operating in conjunction with any other antenna or Camera.
This device has been tested for compliance with FCC RF Exposure (SAR) limits
in the typical laptop computer conguration and this device can be used in
desktop or laptop computers via side mounted USB slots. This device and its
antenna must not be co-located or operated in conjunction with any other
antenna or Camera.
IC Statement
Operation of this device is subject to the following two conditions: 1. This
device may not cause interference, and 2. This device must accept any inter-
ference, including interference that may cause undesired operation of the
device.
TABLE OF CONTENTS
Introduction 1
Radio Interferece Parameters 1
Package Contents 2
Monitor/Receiver 2
Camera/Transmitter 3
To Start
Charging/Powering On 4
Locking the Screen 4
Set to Another Language 4
Pairing Camera and Monitor 5
Main Menu 6
Touch Navigation
Volume/Display 7
Lullabys 7
Night Light 7
Record 8
Play 9
Quad and Channel View 10
VOX (Voice Activation) 10
Settings
Monitor Settings 11-14
Camera Settings 15
Per Camera and Convenience Icons 16
Webcam Use • Data/File Transfers 17
Audio/Video Out 18
Troubleshooting 18
Factory Default Settings 19
Battery Replacement 20
Product Safety 20
Proper Disposal 21
Limited Warranty 21
About Mobi® / Contact Mobi® 22
IMPORTANT: Use ONLY a ngertip or other NON-SHARP object to select touch screen
options. Using sharp objects can damage the screen and void the warranty.
2 3
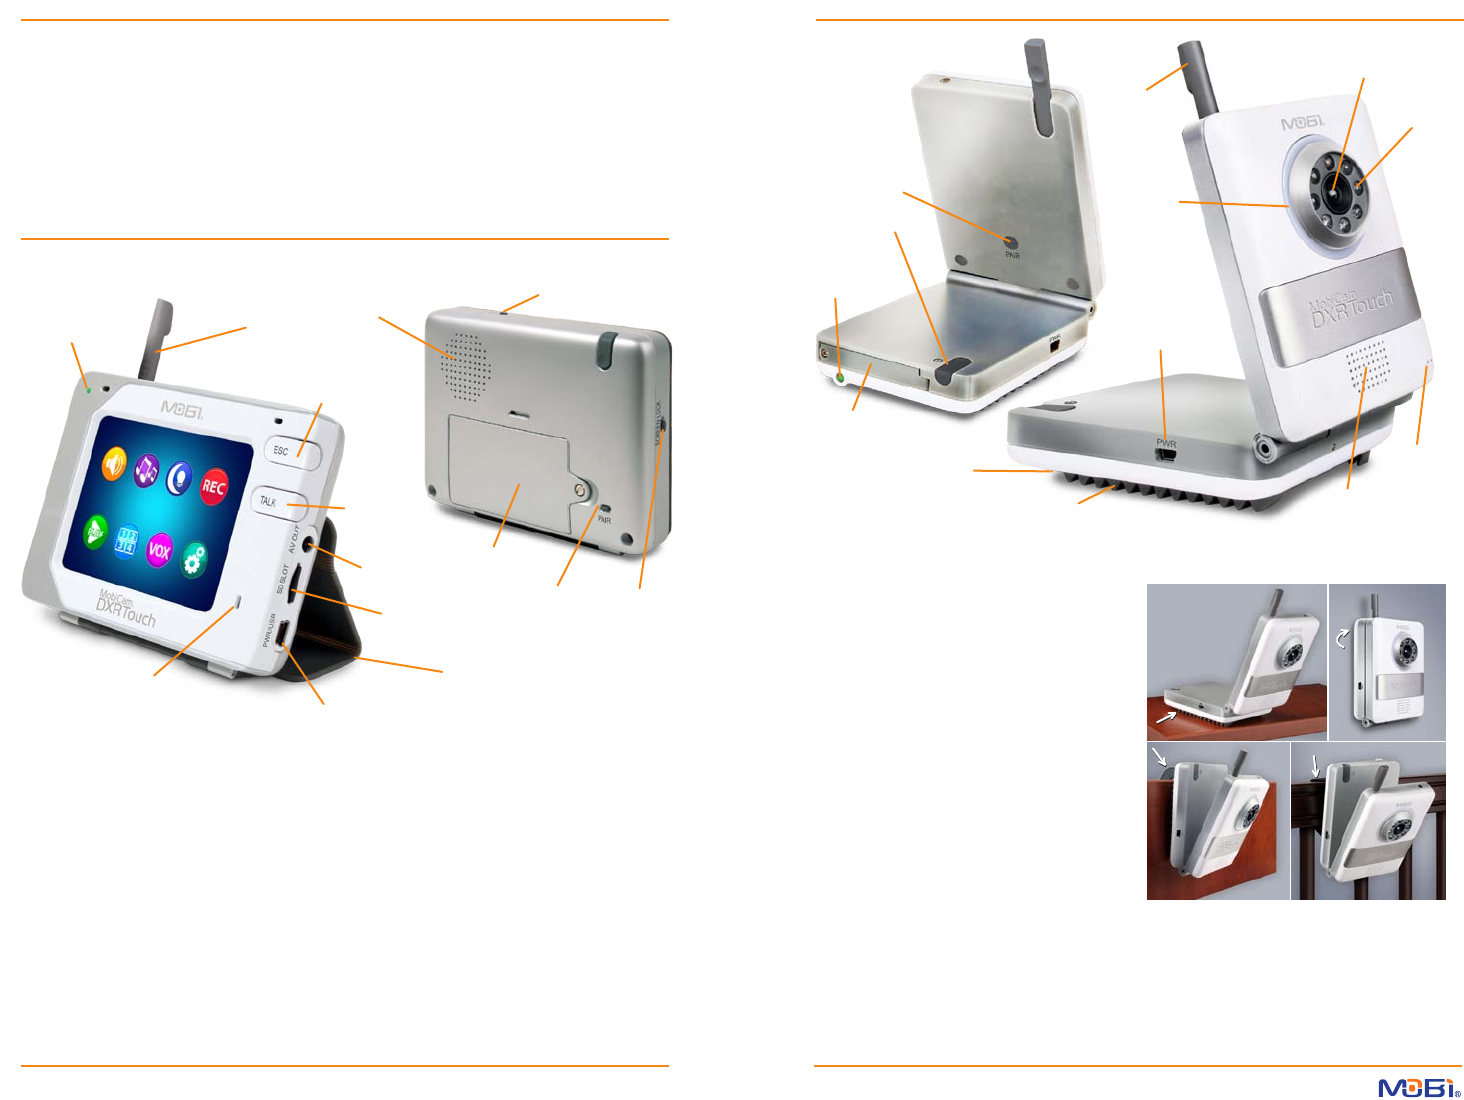
CAMERA
MONITOR
PACKAGE CONTENTS
• 1 Monitor/Receiver • 1 Camera/Transmitter
• 2 AC/DC Adaptors 5V 800mAh • 1 Li-Ion Rechargeable Battery (for monitor only)
• 1 Attachable Strap Mount • 1 Door/Drawer Attachable Hook
• 1 Wall Anchor Mount with Screw • 1 USB to Mini USB Data Cord
• 1 AV-Out Cable • 1 User Manual PAIR
Button
Strap Mount
(underneath)
Power ON
LED Indicator
Camera
Lens
Night
Light
Night Vision
IR LEDs
DC Power
Input
2-Way Talk /
Lullaby Speaker
Microphone
ON / OFF
Button
Battery
Compartment
Retractable
Antenna
Ridge-Grip
Surface Stand
Positioning/Mounting Options
A. Horizontal to Slightly Angled Surfaces - Built-in Ridge-Grip Feet… B. Wall Mount Screw with
Drywall Anchor (included)… C. Door or Drawer Hook Mount / Stand (included)… D. Horizontal
Rails / Drawer Handles - Attachable Strap Mount (included)
Camera / Transmitter Unit
features:
• PAIR Button
• LED for Power ON / Pairing (ashes)
• Microphone & Speaker
• DC Input (AC/DC adaptor included)
• Night Vision
• Temperature Sensor and Alarm
• VOX (Hi/Mid/Lo/O) with receiver control
• Adjustable Volume from receiver
• Adjustable TX Power (High-Low) from receiver
• 4 Lullaby choices
• Night Light
• Rechargeable Battery 3.7V 1500 mAh
(not included - sold separately)
• 2.4GHz Digital FHSS, 100% secure with full
privacy and interference free
Monitor / Receiver Unit
features:
• 3.5” QVGA resolution TFT touch panel screen
• VGA resolution (640*480) up to 25 frames per
second
• up to 250-300m range
• 2-way communication
• MENU/ESCAPE button
• PAIR Button
• TALK Button
• Lock Screen Button for disabling touch screen
• SD Card Slot up to 32 Gb (not included)
• Mini USB Output port (for connection to a PC
and charging)
Power ON
LED Indicator
Retractable
Antenna
2-Way Talk
Speaker
ON/OFF
Button
Lock Screen
Button
Battery
Compartment
PAIR
Button
Combo
Screen Cover /
Fold-back Stand
Escape/Menu
Button
2-Way Talk
Button
AV
Output
DC Power Input /
Mini USB Output
2-Way Talk
Microphone
SD Card Slot
(card not included)
• A/V Output port
• DC Input (AC/DC adaptor included)
• Two-Color LED: solid green for power on;
ashing red for charging
• Quad-View split screen (up to 4 camera
capability)
• Main Menu color icon display
• Rechargeable Li-ion Battery 3.7V 1200 mAh
(included for monitor only)
A. B.
C. D.
A. B.
C. D.
WARNING: To prevent strangulation never place a power cord within reach of a child.
TO START
A. Plug one of the AC/DC adapters (they are interchangeable) into the monitor and allow it to
charge the Monitor Battery for at least 5-1/2 hours.
B. Plug the other AC/DC adapter into the camera. Turn the Camera On by holding the ON/OFF
Button down for several seconds. The green “Power On” Indicator lights when powered up.
C. Turn the Monitor On by holding its ON/OFF Button down for several seconds. Its “Power On”
Indicator will light up (green on battery power, red when charging) and the Mobi logo will
appear on the screen.
D. Press ESC Button to go to the Main Menu.
NOTE: While viewing the Main Menu, if no
buttons are pressed, or the screen is not
touched after 30 seconds, the monitor will
automatically exit the Main Menu mode.
E. Press ESC Button once again to go to the
Camera View. Along the top and bottom
of the screen, small “Per Camera” Icons (ex-
plained on page 16) will appear over the
view from the camera, which should be on
and paired with the monitor.
4 5
LOCKING THE SCREEN: If you press the Lock Screen Button a LOCK icon will appear and the
touch-screen function will be disabled. Pressing the Lock Screen Button again will revert it back to
normal touch-screen function.
TO SET TO ANOTHER LANGUAGE: The monitor is set to English by default. The MobiCam®
DXR Touch can also display in French, German, Portuguese, Spanish, or Italian. To change the
language follow this sequence: press the ESC Button
touch Setting icon
touch System Setting
touch slider to See More List
select Language from the list
select a new Language
press the ESC Button
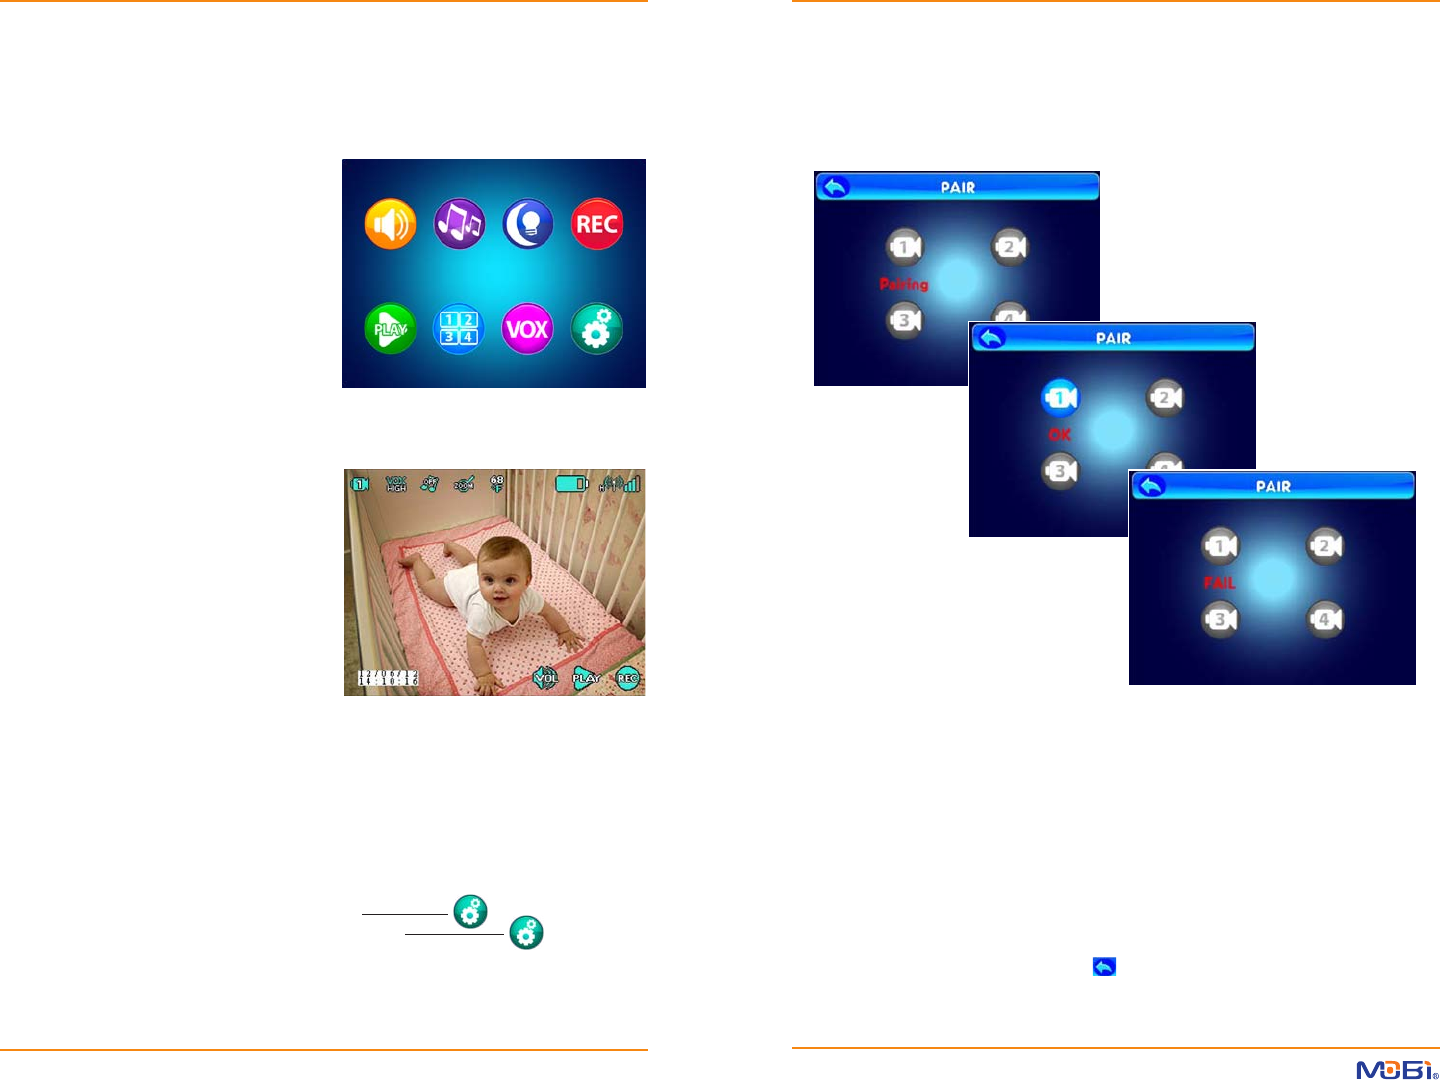
Main Menu
Camera View
PAIRING: The monitor and camera are paired (wirelessly linked) by the manufacturer at the fac-
tory. If you ever need to relink the camera, or you want to pair Additional Cameras (sold separately)
you need to pair each following this sequence:
NOTE: Before pairing be sure the camera and monitor are both turned on and both are
within 10 feet of each other.
1. Power On the Monitor and Camera
2. Press and hold the Pair Button on the back of the Monitor until the Pair Screen is displayed,
then release the button.
3. Press and release the Pair Button on the Monitor and select a camera number (1-4) to be
paired. The word “Pairing” appears below the icon of the selected camera as it waits to be
paired.
4. You have 10 seconds to press and hold the Pair Button on the back of the Camera to com-
plete Pairing, otherwise restart from step 2 above.
5. The word “OK” or “Failed” will be displayed on screen.
6. Press the ESC Button or the Return icon to go back. To pair additional cameras repeat
the steps above.
IMPORTANT: Use ONLY
a ngertip or other NON-
SHARP object to select
touch screen options.
Using sharp objects can
damage the screen and
void the warranty.
select one of four Lullabys
and/or...
deactivate all Lullabys...
adjust Lullaby Volume
TOUCH NAVIGATION ... touch the ESC Button to start at Main Menu
from Main Menu ... ... to These Screens ... ... to Do This ...
6 7
MAIN MENU ... touch the ESC Button to open the Main Menu on screen
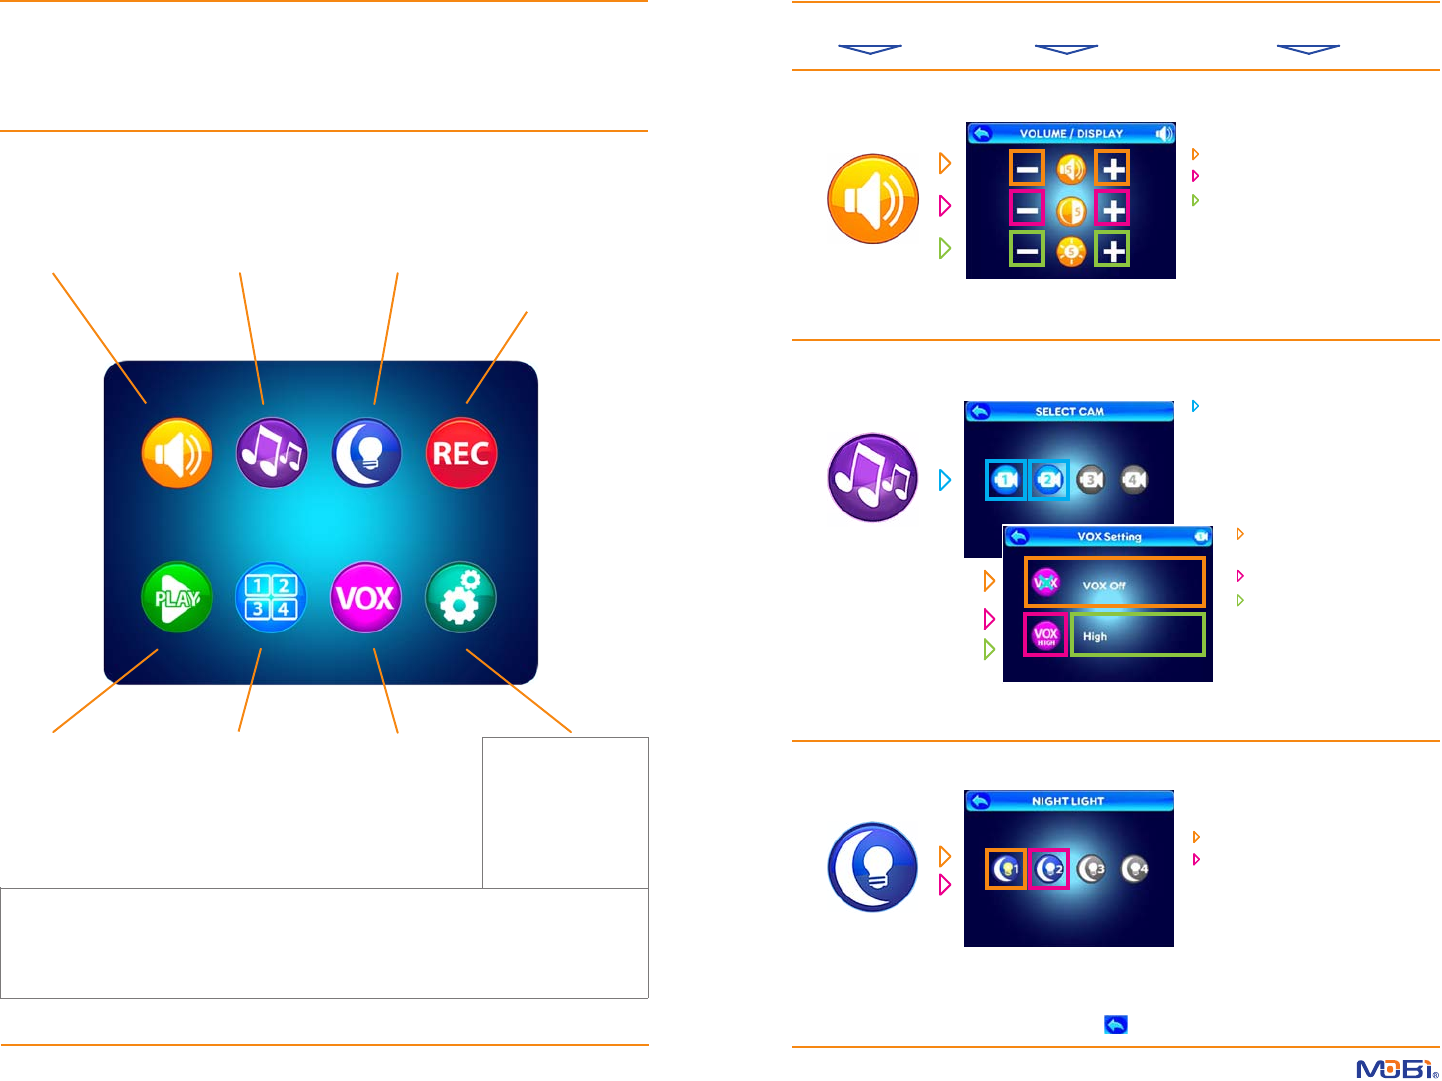
VOLUME / DISPLAY
adjust
• Sound Volume
• Screen Contrast
• Screen Brightness
PLAY
select / play
• Recorded Video
• Recorded Photo
• Delete Files
LULLABYS
select
• Camera Number
• Lullaby Choice
• Lullaby Volume
QUAD / CHANNEL
select
• Quad View
• Specic CAMs
• Switch CAMs
NIGHT LIGHT
select
• Camera Number
• Night Light On
• Night Light O
VOX (Voice Activation)
select
• Camera Number
• VOX On/O
• Sound Sensitivity
• Auto Record On/O
RECORD
select
• Record Video
• Take Photo
• Format SD Card
• SD Information
• Time/Date Stamp
• 6 Languages
• Reset to Default
• About / Version
• Date/Time
• Date/Time
• Time Alarm
• Auto Switch Time
• AV Out Format
• Zoom/Pan/Tilt
• Screen Timeout
• Touch Calibration
• SD Card Update
SETTINGS
for the Camera
• Temperature Alarm
• TX Power/Volume
SETTINGS
for the Monitor
• USB Output
• Recording Schedule
Touch the appropriate icon to access all Settings and Options.
touch – or + icons to adjust...
Monitor Volume
Screen Contrast
Screen Brightness
select a Camera...
select Night Light icon for the camera
you wish to control in order to...
turn the Night Light ON
turn the Night Light OFF
(the light bulb image in the icon
changes to yellow when ON and
back again when OFF)
VOLUME / DISPLAY
LULLABYS
NIGHT LIGHT
IMPORTANT: Use ONLY a ngertip or other NON-SHARP object to select touch screen
options. Using sharp objects can damage the screen and void the warranty.
HINT: To move back one screen touch Return icon or go to camera view by pressing the ESC Button.
TOUCH NAVIGATION ... touch the ESC Button to start at Main Menu
from Main Menu ... ... to These Screens ... ... to Do This ...
TOUCH NAVIGATION ... touch the ESC Button to start at Main Menu
from Main Menu ... ... to These Screens ... ... to Do This ...
8 9
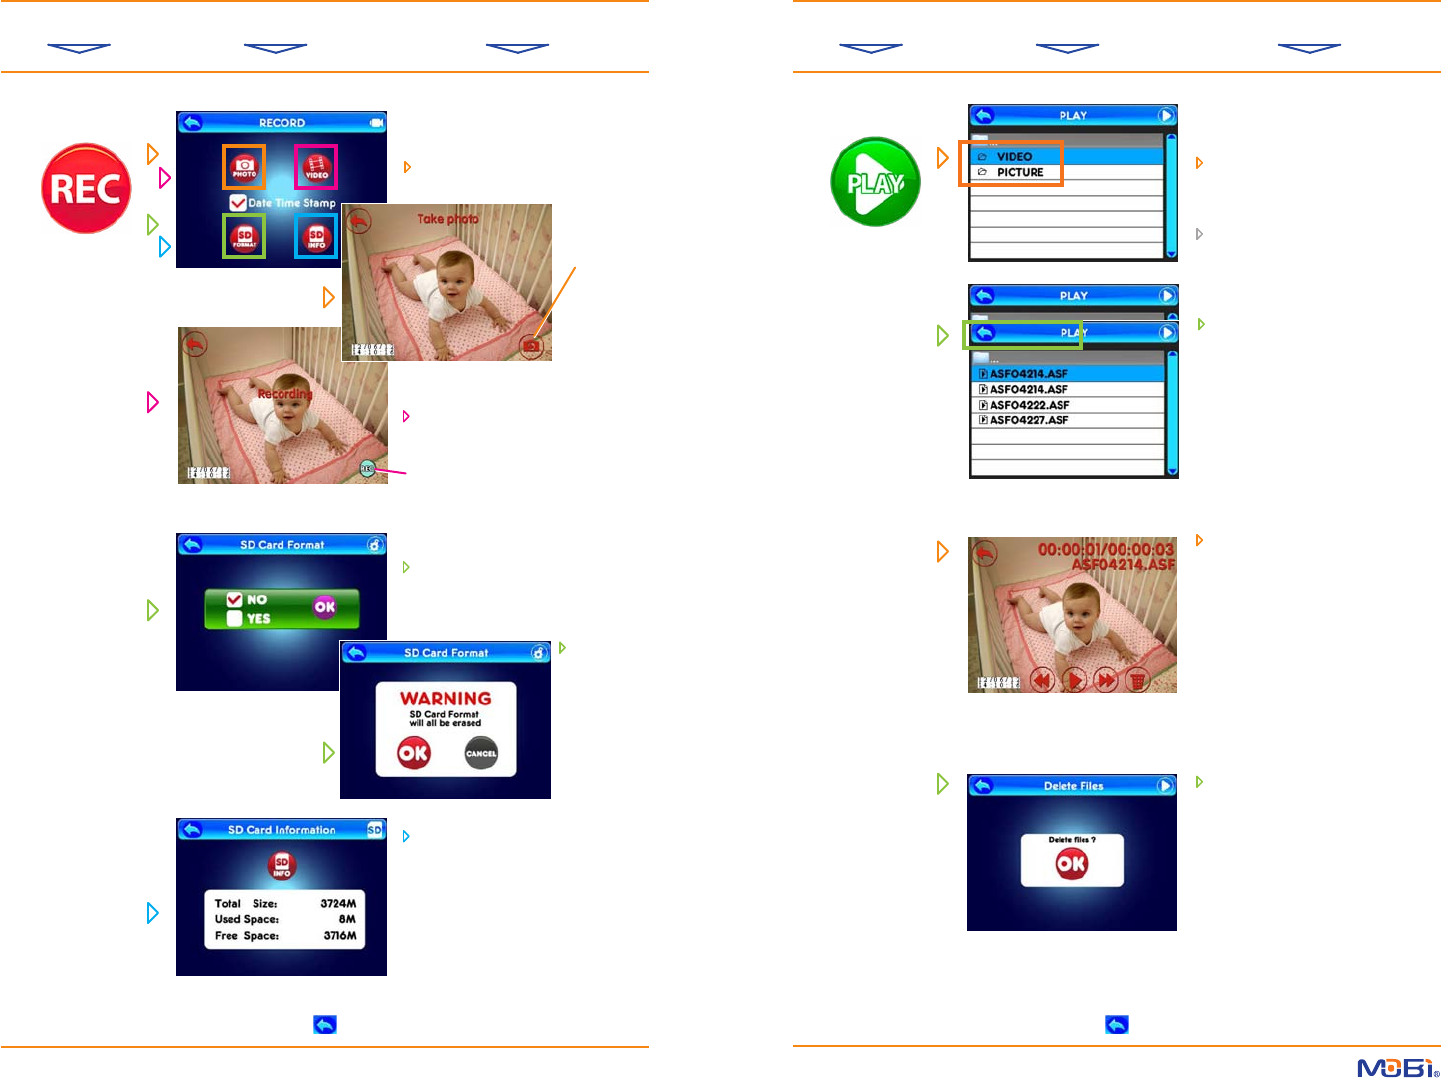
as you view a Recorded Video le
the screen will also show...
Return icon (upper left) - used to
exit the playback at any time
Elapsed Time / Total Play Time /
and Date-Time Stamp (upper
right)
Video Play controls (bottom center)
Delete icon (bottom right)
when the Delete icon is touched
you see this to conrm le deletion
with an OK
Video
goes to the camera view and you can
record a video (with sound) of the
scene by touching this REC icon to
start recording - and press again
to stop recording
SD Info
displays Total Size, Used Space,
and Free Space on any SD card you
may have in the SD card slot
RECORD
SD Format
lets you Format / Erase an SD
memory card
select OK
or Cancel
PLAY touch to select one of two options...
Video or Picture
select Video or Picture
select a folder for the Date of the
Recording (year/month/day)
select a Video or Picture File to
Play or View
NOTE: All recording
functions require an
SD memory card with
available space (max
32 Gb) to be in the
SD card slot on the
monitor.
NOTE: While recording
no other functions are
available until record-
ing is stopped.
touch one of four functions...
Photo
goes to camera view and you can
take a photo of the scene by touch-
ing this
Still
Camera
icon
HINT: To move back one screen touch Return icon or go to camera view by pressing the ESC Button.HINT: To move back one screen touch Return icon or go to camera view by pressing the ESC Button.
TOUCH NAVIGATION ... touch the ESC Button to start at Main Menu
from Main Menu ... ... to These Screens ... ... to Do This ...
TOUCH NAVIGATION ... touch the ESC Button to start at Main Menu
from Main Menu ... ... to These Screens ... ... to Do This ...
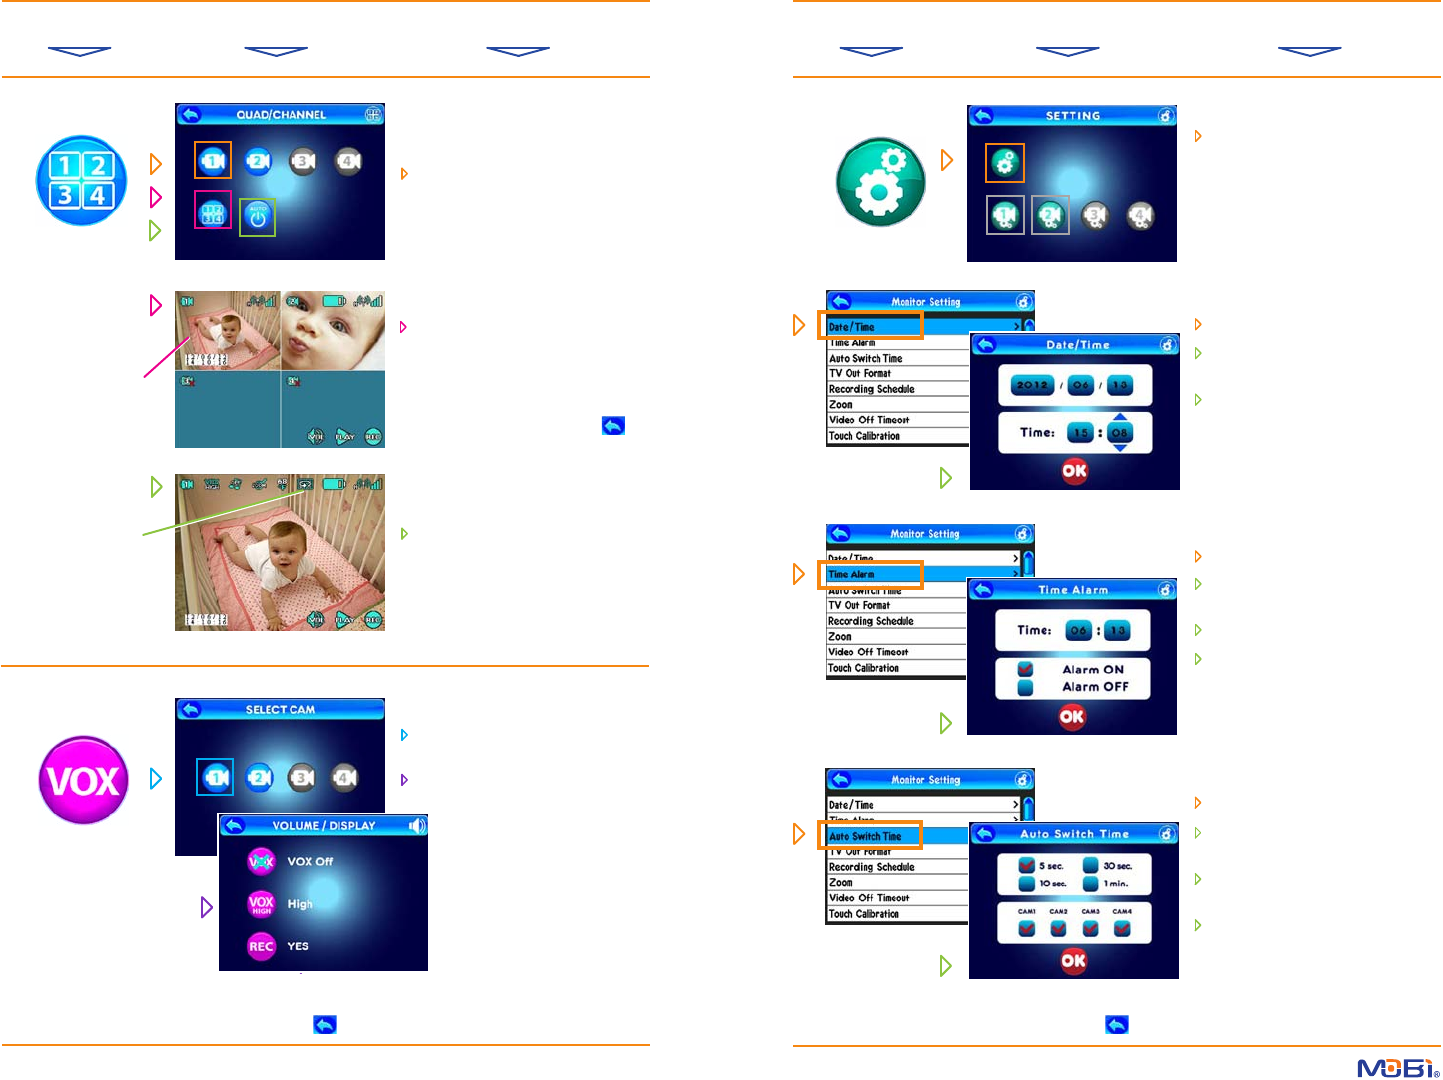
Monitor Setting
on the Setting Screen, simply touch
the System Setting icon (at the top)
to access monitor functions...
From the Monitor Setting list...
select Date/Time
touch any value, then touch the arrows
to adjust value up or down
press OK to save changes
From the Monitor Setting list...
touch Time Alarm
touch any value, then touch the arrows
to adjust value up or down
touch Alarm On or Alarm O
touch OK to set
10 11
NOTE: In Auto Scan
mode (indicated by
this symbol) you can
select which cameras
to include and the scan
time between each
camera. (Refer to Auto
Switch Time on page 11.)
NOTE: All cameras
must be Paired to
the monitor for view-
ing access. (Refer to
Pairing on page 5.)
NOTE: In Quad mode,
touching any active
camera image changes
to that full screen single
camera view. Also sound
only from the last came-
ra in full screen mode
can be monitored.
QUAD / CHANNEL SETTINGS
VOX
Sound Activated Monitoring
From the Monitor Setting list...
touch Auto Switch Time
select a camera switching interval
(5 sec to 60 sec)
check the cameras to be included in
auto switching mode
touch OK to set
choose from these options...
Single Camera View
select a Camera icon (1-4, which
will be shown in color and active if
paired)to be your constant channel if
choosing Single Camera View
Quad View
select the Quad icon and see all
currently paired cameras (up to 4)
simutaniously
Auto Scan View
select the Auto Scan icon to go to a
full view from each paired camera
(up to 4) as they change from one to
the next
Sound Activated Mode (VOX)
select a paired Camera icon
(the ones in color)
select from 3 options...
VOX (set to On or O)
Sound Sensitivity
(set to High, Med or Low)
Sound-Activated Recording
(set to Yes or No)
NOTE: VOX keeps monitor
(picture and sound) o
until the camera detects a
sound, which automatic-
ally turns the monitor back
on. This helps prevent false
alarms and allows parents
more rest.
HINT: To move back one screen
touch the Return icon...
or go to camera view by pressing
the ESC Button.
HINT: To move back one screen touch Return icon or go to camera view by pressing the ESC Button.HINT: To move back one screen touch Return icon or go to camera view by pressing the ESC Button.
TOUCH NAVIGATION ... touch the ESC Button to start at Main Menu
from Main Menu ... ... to These Screens ... ... to Do This ...
Language
Language
TOUCH NAVIGATION ... touch the ESC Button to start at Main Menu
from Main Menu ... ... to These Screens ... ... to Do This ...
Zoom/ Pan /Tilt
Zoom/ Pan /Tilt
12 13
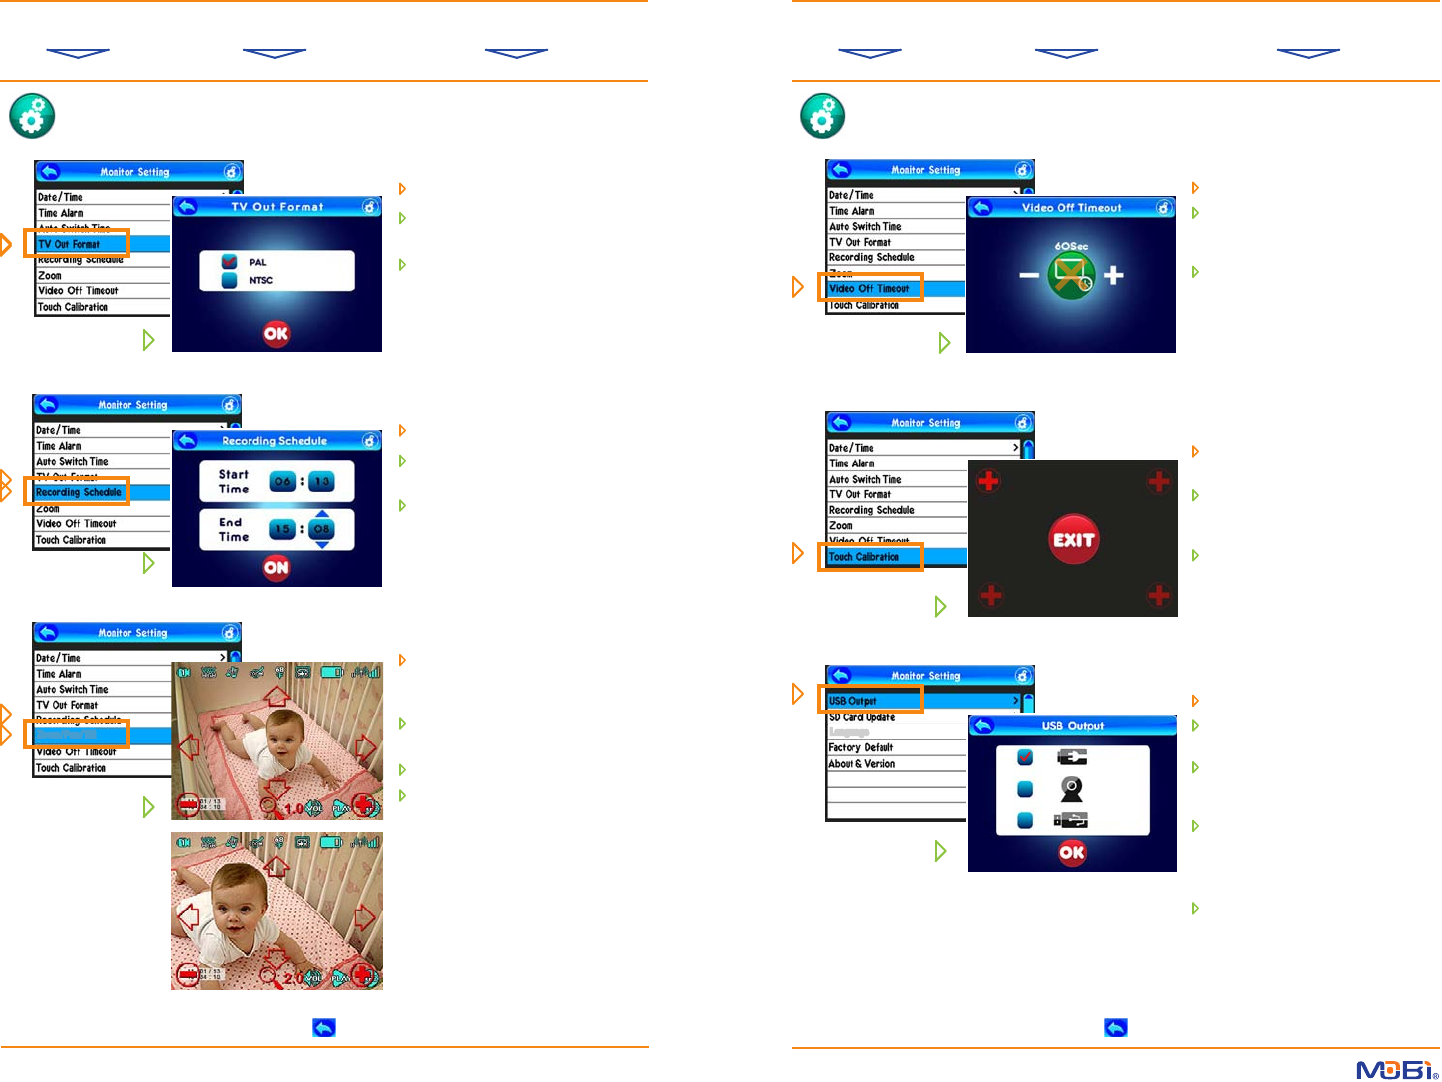
SETTINGS (cont.) SETTINGS (cont.)
From the Monitor Setting list...
select TV Out Format
choose either PAL or NTSC video
format (US standard is NTSC)
touch OK to set
From the Monitor Setting list...
touch Video O Timeout
touch the timer icon to choose
between non-active (X) or active
(no X) Timeout Mode
if active, touch the – or + icons to set
the limit at which time the video will
automatically Timeout (turn o)
From the Monitor Setting list...
select Touch Calibration
touch the + icons as they appear in
each corner of the screen (this cali-
brates the monitor for best touch
screen accuracy)
once all four corners are touched,
tap EXIT to return to the Monitor
Setting list
From the Monitor Setting list...
touch USB Output
select the Top icon for Charging the
monitor via the AC Adapter (included)
select the Middle icon to use the sys-
tem as a USB Webcam on a PC* via
the USB Data Cable (included) or...
select the bottom icon for PC le
transfer mode to or from an SD Card
in the monitor via the included USB
Data Cable
touch OK to set
From the Monitor Setting list...
select Zoom/Pan/Tilt and go to the
camera scene with Zoom/Pan/Tilt
icons overlaying the image...
to Zoom-In touch the + icon
(maximum of 3.0-to-1 enlargement)
to Zoom-Out touch the – icon
to Pan or Tilt touch the arrow icons
(you can Pan or Tilt only after you have
zoomed in)
NOTE: Press the ESC Button to return
to the video image without Zoom/
Pan/Tilt icons overlaying it.
Monitor Setting (cont.) Monitor Setting (cont.)
From the Monitor Setting list...
select Recording Schedule
touch any value and then touch the up
and down arrows to adjust time
to activate press On
(or OFF to deactivate)
*See page 17 for details on using the USB
Output for viewing video or transferring
video or photo les to a PC.
HINT: To move back one screen touch Return icon or go to camera view by pressing the ESC Button.HINT: To move back one screen touch Return icon or go to camera view by pressing the ESC Button.
TOUCH NAVIGATION ... touch the ESC Button to start at Main Menu
from Main Menu ... ... to These Screens ... ... to Do This ...
Language
Language
Language
Language
Language
Language
14 15
TOUCH NAVIGATION ... touch the ESC Button to start at Main Menu
from Main Menu ... ... to These Screens ... ... to Do This ...
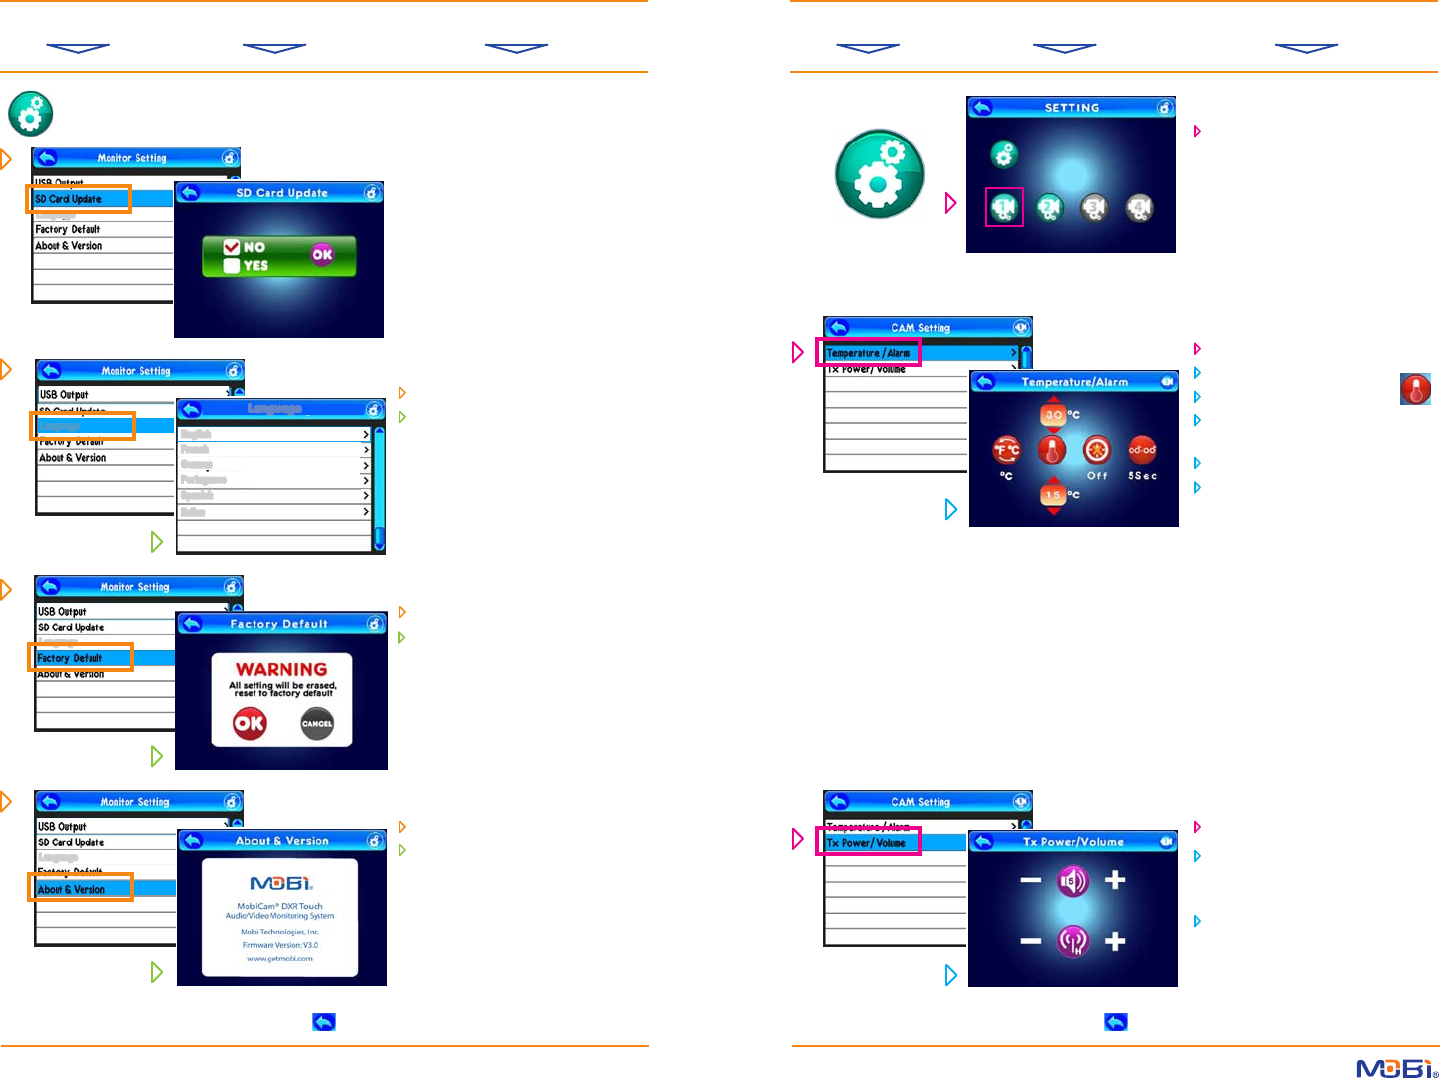
From the Monitor Setting list...
touch Language
touch one of the 6 specic Languages
you want the monitor to show in all
text displays
From the Monitor Setting list...
touch Factory Default
choose OK to reset all settings, or
Cancel if you change your mind
From the Monitor Setting list...
touch About & Version
here you will see the product name
and manufacturer, and the latest
version of the installed rmware
From the Camera Setting screen...
touch Temperature/Alarm
set ºF or ºC (default is ºF)
touch the thermometer icon
set the maximum and minimum
alarm temperature range
set the Alarm to be On or O
if On, set the Alarm Time (from 5 to
60 seconds)
NOTE: When the room temperature
(where the camera is) goes above or
below the temperature range you
set, the monitor will sound an alarm
and the small Temperature icon on
the monitor screen will ash showing
the out-of-range temperature in that
room. The ESC Button will temp-
orarily silence the repeating alarm
until the temperature returns to the
set range, or you turn the Alarm O
from this screen.
From the Camera Setting list...
touch Tx Power/Volume
adjust the Camera Speaker Volume
(top icon) up or down for the Two-
Way Talk function
set the Transmit Range Power
(lower icon) on High or Low
Monitor Setting (cont.)
English
English
French
French
German
German
Portuguese
Portuguese
Spanish
Spanish
Italian
Italian
Language
Language
Language
Language
From the Monitor Setting list...
NOTE: Though shown here for refer-
ence, this function to be used ONLY
for Updating System Firmware, to
be downloaded and put onto an SD
card, in order to be installed using this
option. Specic instructions will be
provided to registered users regarding
any new rmware.
SETTINGS (cont.) SETTINGS (cont.) Camera Settings
on the Setting Screen, simply touch
the Camera icon (on the bottom
line) for the one you wish to control
the settings for...
NOTE: Only Paired camera icons
will show in color and be active
for touch control.
HINT: To move back one screen touch Return icon or go to camera view by pressing the ESC Button.HINT: To move back one screen touch Return icon or go to camera view by pressing the ESC Button.
16 17
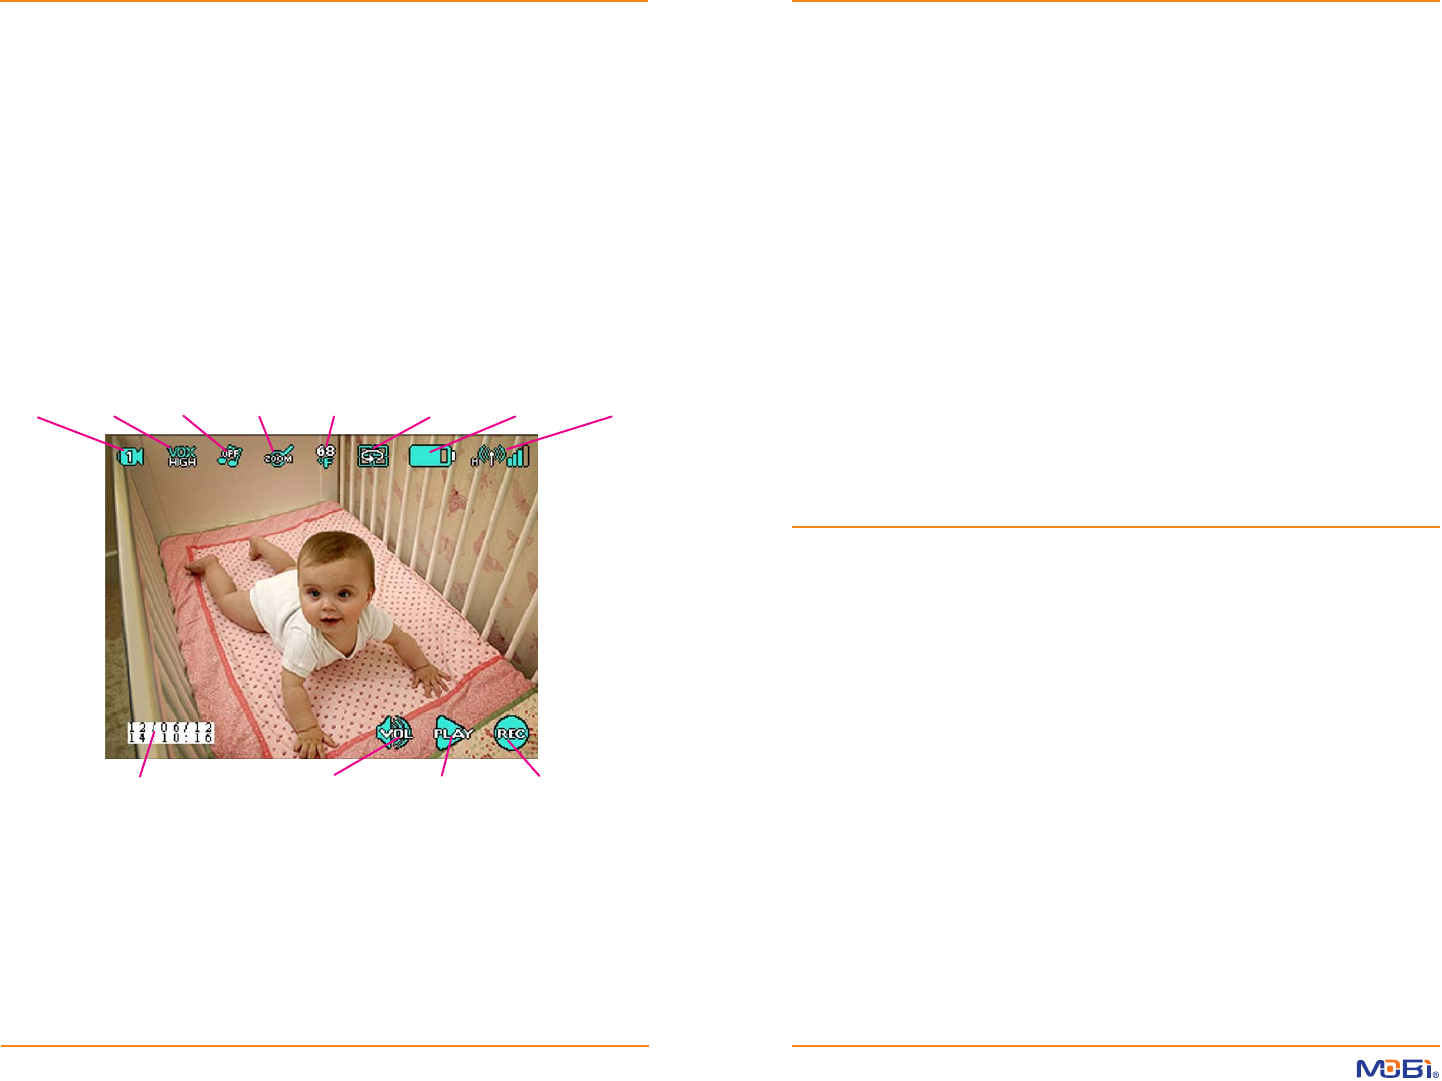
INDIVIDUAL CAMERA and CONVENIENCE ICONS
Specic small icons are created for each paired camera at the top edge of the screen which relate
to that individual camera (except Battery Level, which is for the monitor only). To use them...
just observe or touch one of the following Individual Camera icons to either...
A... view current Camera Number, or change to the next camera you want to view
B... view current VOX level, or change VOX sound sensitivity level for that camera
C... view Lullaby status, change the Lullaby selection, or turn o Lullabys from that camera
D... add Zoom/Pan/ Tilt controls over the scene to manipulate the image from that camera
NOTE: Other individual camera icons appear for informational purposes, such as Room
Temperature, Switching Mode and Signal Strength, and when in Quad Mode, each
camera screen shown will also display the Signal Strength of that particular camera.
Each paired camera scene also displays Convenience Icons (shown along the bottom of the screen)
so you can either view the current Date/Time Stamp or...
touch and bypass the Main Menu to...
1... instantly adjust Volume controls for that camera
2... instantly access the Play Video/View Photo control panel
3... instantly Record Video from that camera...with just one touch!
Battery Level
(monitor)
Room
Temperature
Switching
Mode (On)
Signal
Strength
direct to
RECORD
direct to
PLAY
direct to
VOLUME
DATE/TIME STAMP
Year/Month/Day
Hour/Minute/Second
Camera
Number
A
VOX
Level
B
Lullaby
Status
C
Zoom /
Pan/Tilt
D
1 2 3
WEBCAM USE
DATA/FILE TRANSFERS
To view a larger version of the monitor screen on your PC* screen...
Note: Using this feature allows viewing only on the computer. Once USB Connection
is established the monitor screen is turned o and all features and buttons (with the
exception of the ESC Button) will not be functional.
1. set the USB Output on the monitor to the Webcam icon (refer to page 13)
2. using the USB Cord (included), connect the monitor to an available USB port on your PC*
3. wait for your computer to automatically recognize and install the appropriate drivers and you
receive a Successful Installation message.
4. once you have installed the device driver, your MobiCam® DXR Touch can be utilized as a wireless
webcam.
5. once the picture from the monitor is displayed on your computer screen, pressing the ESC Button on
the monitor toggles between Single and Quad View modes.
The DXR Touch can be used in conjunction with Skype®, Windows Messenger®, Google Talk® and
Yahoo Messenger®. When utilizing Skype®, Windows Messenger®, Google Talk® or Yahoo
Messenger®, please refer to their documentation for techical support.
* The MobiCam® DXR Touch is only compatable with Windows® PCs.
To transfer photo and video les from the monitor to your PC* ...
Note: Using this feature allows viewing only on the computer. Once USB Connection
is established the monitor screen is turned o and all features and buttons (with the
exception of the ESC Button) will not be functional.
1. set the USB Output on the monitor to the USB Connection icon (refer to page 13)
2. using the USB Cord (included), connect the monitor to an available USB port on your PC*
3. wait for your computer to automatically recognize and show the outside Memory Device.
4. you may then move or copy les from the SD Card (not included) as you normally would with
any such storage device (provided one is in the monitor and has data stored on it)
* The MobiCam® DXR Touch is only compatable with Windows® PCs.
IMPORTANT: Use ONLY a ngertip or other NON-SHARP object to select touch screen
options. Using sharp objects can damage the screen and void the warranty.

18 19
FACTORY DEFAULT SETTINGS
Item Default value Range
Monitor setting value
Volume 5 0-9
Contrast 5 0-9
Brightness 5 0-9
Date & Time 2011/09/01,08:00
Alarm Time Off, 09:00 On , Off
Date Time Stamp Off On , Off
Auto Switch time 5s 5s,10s,30s,1min
Recording schedule Off On , Off
Start Time : 12:00:00
Final Time: 12:11:00
Zoom 1.0 1.0 to 3.0
TV out format PAL PAL,NTSC
Monitor Video Off Timeout Off, 60s From 5s to 180s
Camera setting value
VOX setting Off High, Middle, Low, Off
Lullaby Off Off, Lull 1, Lull 2, Lull 3, Lull 4
Temperature setting ºF ºF - ºC
Min 59ºF - Max 86ºF 50ºF - 122ºF
Alarm Off On/Off, 5s,10s,30s,1m (increments)
Volume 5 0-9
TX Power High High, Low
Night Light Off Off, On
AUDIO/VIDEO OUT
You can hear and see audio/video output on a TV or other AV device
directly from your DXR Touch monitor.
Simply connect the AV OUT Cord (included) to the AV OUT jack on the right side of the monitor
and connect the other ends (three RCA connectors) to the Audio and Video Input jacks on your TV,
DVR, or Camcorder, and select the appropriate input setting on that AV device.
The monitor screen will automatically turn o, signaling the unit is connected. Please refer to your
AV device manual for proper input selection and operation.
TROUBLESHOOTING
Problem Solution
Monitor will not turn on • Check AC/DC connection
• Conrm power outlet is working properly
• Charge Battery Pack
Monitor on but no picture • Conrm “Audio Only” mode is not selected
• Conrm “VOX” mode is OFF
• Conrm there are no obstructions in front of camera
• Conrm camera and monitor are paired properly
Camera will not turn on • Check AC/DC connection
• Conrm power outlet is working properly
Battery does not recharge • Check AC/DC connection.
• Check battery pack connection in the monitor.
• Conrm power outlet is working properly
• Conrm batteries are placed correctly in monitor
Connection is lost • Conrm monitor and camera are ON.
• Conrm AC/DC adapter is connected properly
• Conrm battery has suciant power.
• Place camera and monitor near each other and press
camera Pair button to relink camera and monitor.
• Reduce distance between camera and monitor.
• Remove or avoid other wireless products that may
be near camera or monitor.
20 21
PRODUCT SAFETY
This product is not intended to be used as a medical monitor
and its use should not replace adult supervision.
CAUTION
• Periodically examine this product for damage to the cord, housing or other parts that may result
in the risk of re, electric shock or serious injury. Do not operate any product with a damaged
cord or plug. If the product malfunctions, or is damaged in any manner, please contact the
manufacturer for examination and repair to avoid a potentially serious hazard.
• Never use the camera, monitor, or AC adapters near water (i.e. bathtub, sink, etc.).
• Always use the camera and the monitor where there is adequate ventilation. To prevent
overheating keep the camera and the monitor away from heat sources such as radiators, heat
registers, stoves, or other appliances that produce heat.
• Use only a dry cotton cloth to keep the units free of dust. Do not use a damp cloth, water, or
liquid cleaner of any kind.
• Remove the battery from either unit during long periods of non-use, as batteries may leak.
• Unplug the AC adapters from the monitor and the camera during periods of non-use. To
disconnect from the electrical outlet, grip the transformer and pull from the power socket.
Never remove by pulling the cord.
• Only use the Monitoring System with the supplied power adapters.
WARNING
This product is not a toy. Keep out of reach of children. To prevent strangulation never place a
power cord within reach of a child.
LIMITED WARRANTY
Notes:
Mobi Technologies, Inc. warrants this product to be free from defects in material and workman-
ship for a period of ninety (90) days from the date of purchase. Should this product prove to be
defective at any time during the warranty period, Mobi Technologies, Inc. will, at its option, either
replace or repair it without charge. After the warranty period, a service charge will be applied for
replacement of parts or labor for repair. If you suspect that the product is malfunctioning or is
defective, please call Mobi toll free at 1. 877. 662.4462 and ask for the Service Department. If the
problem still persists after consulting with our Service Department, you may return the product
to obtain warranty service. Please return it to Mobi along with a dated sales receipt from the place
of purchase to verify that it is within the authorized warranty period. This warranty does not cover
damage caused by accident, misuse, abuse, improper maintenance, unauthorized modication,
or connection to an improper power supply. A fee may be charged for repair resulting from such
damage. This warranty excludes all incidental or consequential damages and any liability other
than what is stated above.
PROPER DISPOSAL
If you eventually dispose of the DXR Touch Monitor, Camera, Batteries, or AC Adapters, do so in
accordance with current federal, state and local regulations. As a consumer, you may be obligated
by law to recycle used batteries.
Do not mix products bearing the WEEE symbol (crossed out trash bin icon) with
your general household waste.
For the correct collection and treatment of these products take them to the
collection points designated by your local authority. Alternatively, contact the
supplier that sold you the product.
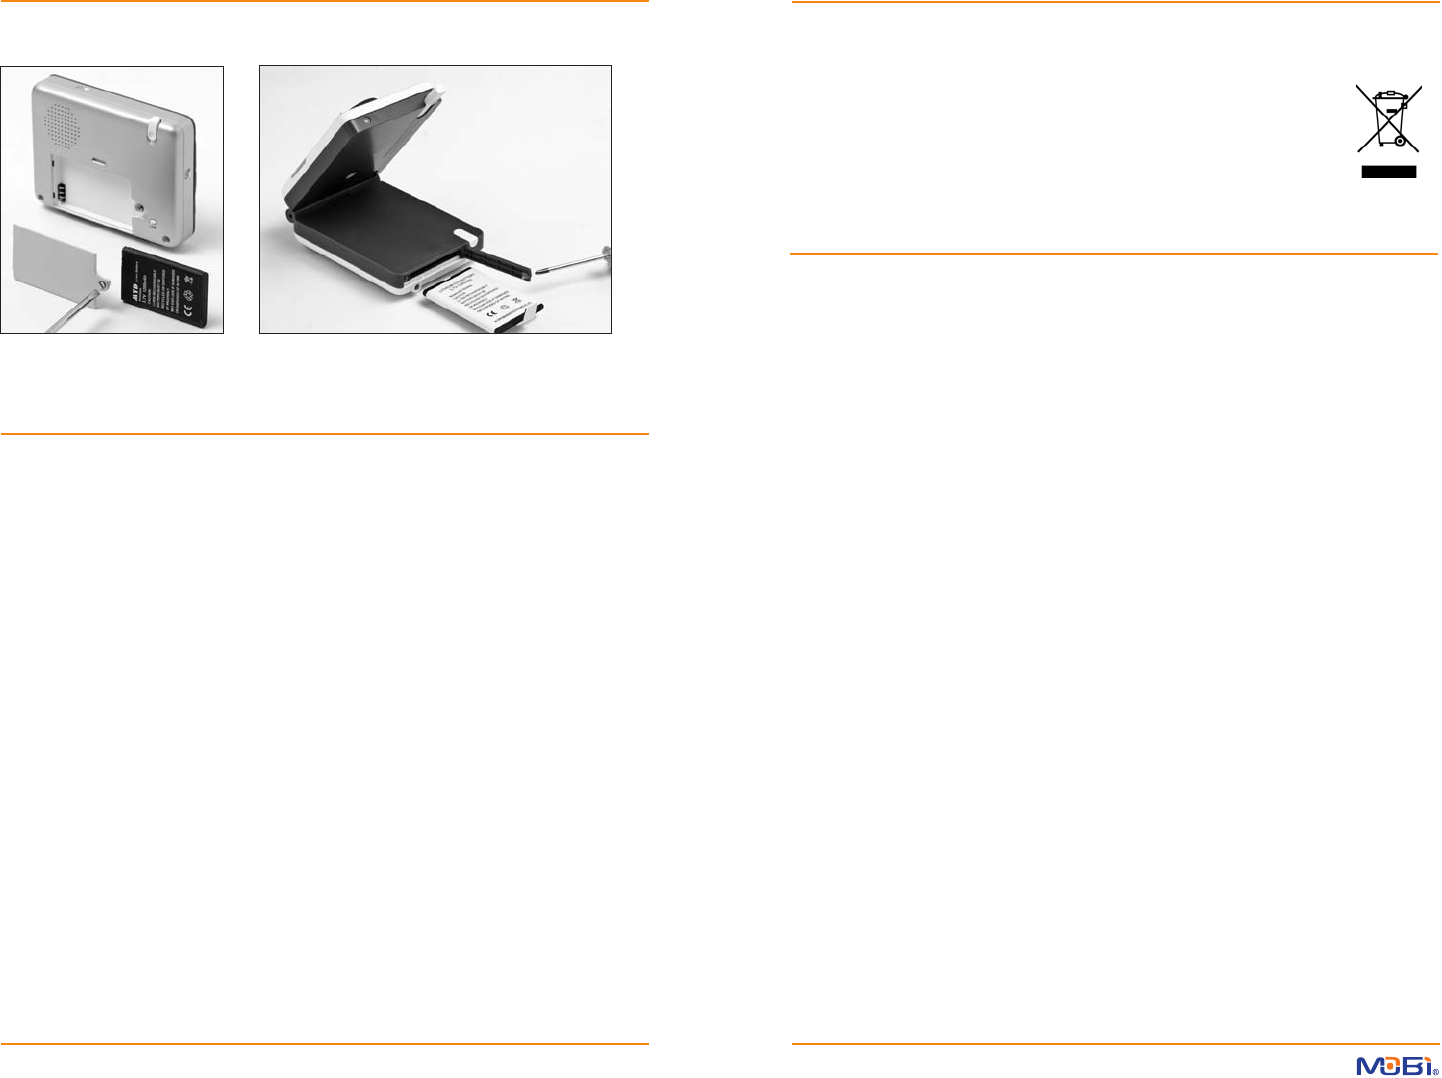
BATTERY REPLACEMENT
Monitor Battery (included)
Li-Ion 3,7V 1200 mAh
Camera Battery (not included, sold separately, Mobi part
# 70216) Li-Ion 3,7V 1500 mAh

Mobi Technologies, Inc.
5913 Blackwelder St
Culver City CA 90232
Toll Free 877.662.4462
Be sure to register this
product on the Mobi website
to receive rmware updates.
www.getmobi.com
Mobi, MobiCam, and DXR Touch
are registered trademarks of
Mobi Technologies, Inc.
SD is a trademark of SD Association.
Skype®, Windows Messenger®, Google Talk®
and Yahoo Messenger® are trademarks
of their respective companies.
© 2013 Mobi Technologies, Inc.
All Rights Reserved