Mobi Technologies DW700RX MOBICAM DXR User Manual
Mobi Technologies, Inc. MOBICAM DXR
Users Manual
MOBICAM DXR
680 680
15
70204
130
270
1050
2100
PWR.
camera
camera
3.5 receiver
Receiver
70204
14
camera
camera camera
camera
camera camera
camera
camera
Camera
battery
receiver
receiver
receiver
receiver
receiver
receiver
pairing operation
Power save mode on
Camera and receiver are
too close
The camera has a high sensitivity microphone
Keep the camera at least 10 feet away from the
receiver. If the camera must be within 10 feet
of the receiver, keep the volume down
Press power key to resume receiver image,
please refer to [Power Saving] section at page
12 for details.
Black screen &
Buttons no function
Audio feedback
VOX Record&Alarm
does not work
VOX Menu set to
“OFF”
Set VOX Sensitivity/VOX Alarm/VOX Record
to ON
and receiver
2
Camera stand
USB cable
Mounting kit
and Installation
13
receiver
receiver
receiver
camera
camera
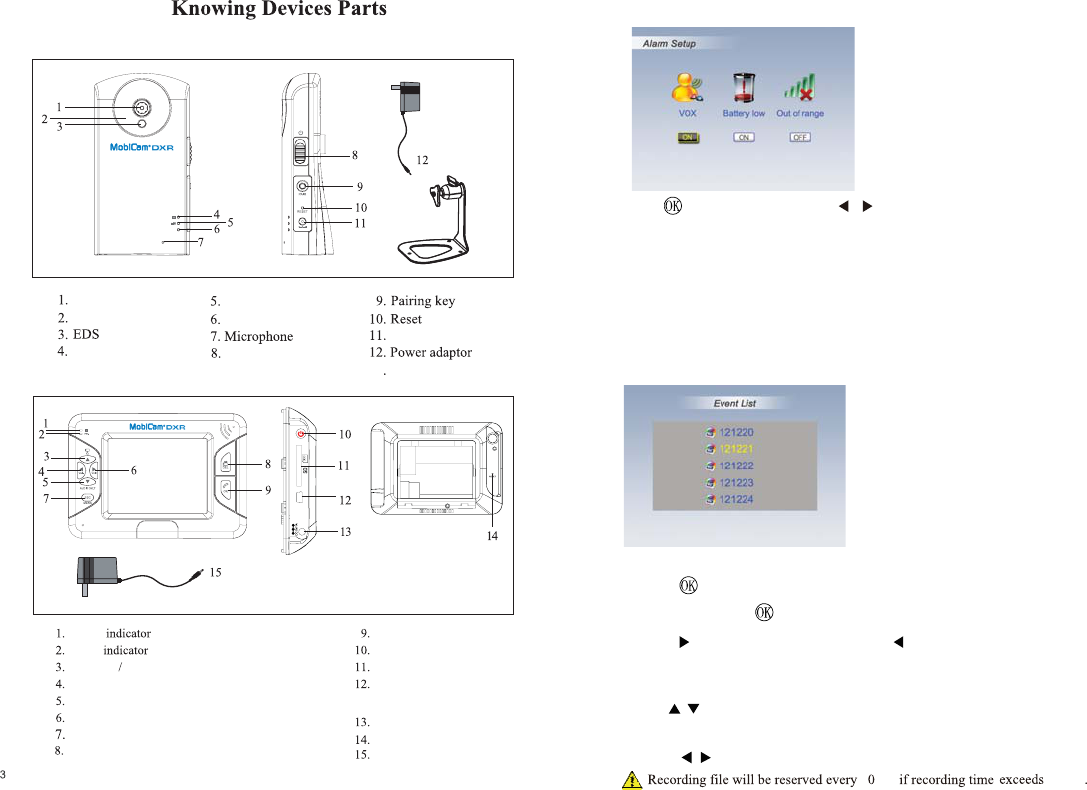
Camera
Receiver
Lens
IR LED
Battery indicator
Link indicator
Power indicator
Power key
DC IN jack
BSU
Battery
Power
Cursor up Channel switch
Cursor left/ Volume down
Cursor down/ Audio switch
Cursor right/ Volume up
Enter/Exit menu
Record/Delete
PTT button/Confirm
Power button
SD card slot
USB port(For FW upgrade/
DC IN jack
Reset
Power adaptor
Event List
12
Alarm Setup
AP software connection)
Press to shift to on /off. Press / to move between the items.
Battery low alarm ON: The receiver will give an alarm for 15 seconds when
the camera battery is low.
The receiver will give an alarm for 15 seconds when the
camera is triggered by voice.
Out of range alarm ON: The receiver will give an alarm for 15 seconds when
the receiver and camera is
out of wireless transmitting
VOX alarm ON:
range.
3sec 3sec
0
1.
Press DEL to enter deletion mode.
2.
Use to select the record file you need to delete.
to select YES or NO.
3. Press 4. Press OK to delete.
Play back Mode
1. Press to enter Record Folder.
2. Continue to press to Play/Pause file.
3. Press to fast forward video clip, press to to back reverse video clip;
press ESC to Stop/Exit.
Event List
13
13 Camera stand
DC IN 5V/1A
PWR.
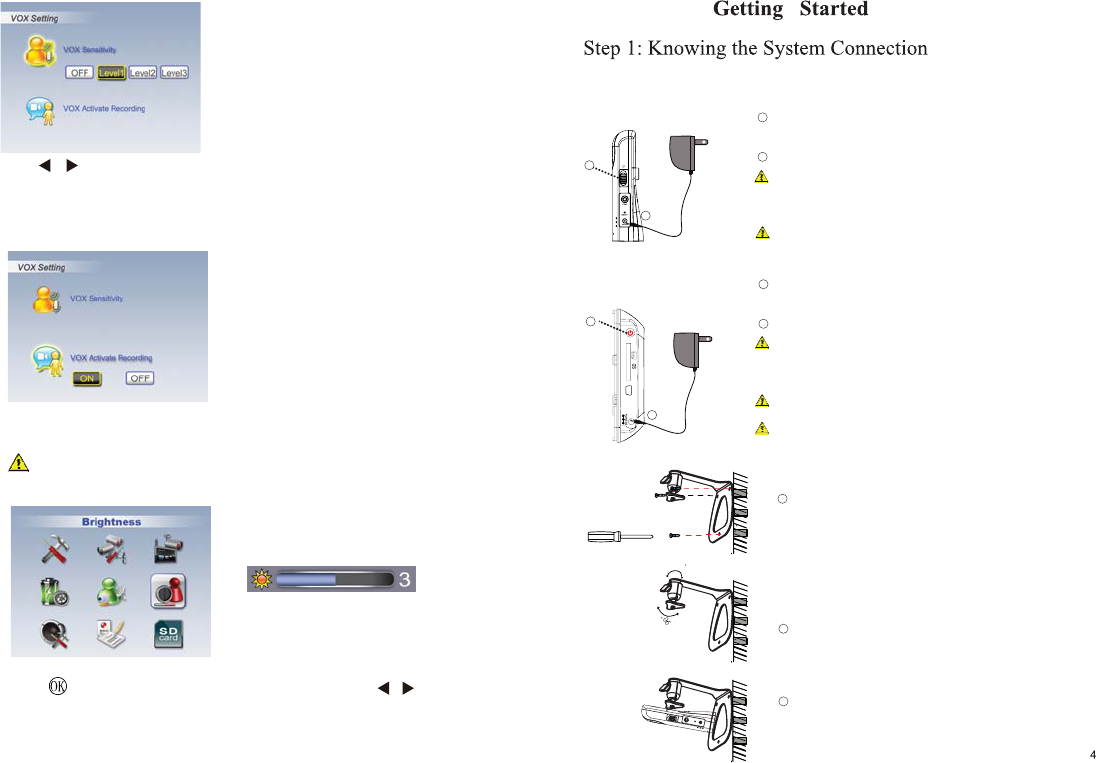
Camera Connection
1
1
2
2
LCD Monitor Connection
NI
rewopgnihctiwsnogulpnehtNICDs’aremacotelbacrewoptcennoC
.teltuollawotretpadaylppus
.aremacehtNOnrutotec
no]nottuBrewoP[P
gniggulpybyllacitamotuastratsssecorpgnigrahcyrettabmuihtiLni-tliuB
Only use 5V/1A power adaptor provided in the package.
llufyrettabegrahce
saelp,yticapacllufevahoT.ylppusrewopgnihctiwsni
.ffoseog]rotacidnIyrettaB[neerglitnu
1
2
1
1
2
3
2
Only use 5V/1A power adaptor provided in the package.
egrahcotretpadarewopnigniggulp,derpusthgil]rotacidnIyrettaB[nehW
.yrettab
rewopstinostigulpnehtNICDs’r
evieceRotelbacrewoptcennoC
.teltuollawotretpada
.reviecerehtNOnrutot]nottuBrewoP[sserP
gniggulpybyllacit
amotuastratsssecorpgnigrahcyrettabmuihtiLni-tliuB
yrettabegrahcesaelp,yticapacllufevahoT.ylppusrewopgn
ihctiwsni
.esuelbatroprofregrahctuohtiwreviecerehtgnitarepoerofeb
DC IN 5V/1A
ush
VOX Sensitivity
VOX Activate Recording
Brightness
11
OFF --VOX funtion will be disabled.
level 3 means high sensitivity,level 1 means low sensitivity
Use / to adjust VOX sensitivity level.
System will auto record for 30 sec once camera is triggered by voice when
set “VOX activate recording” to ON.
Please set VOX sensitivity to level 1~3 before proceed with this function.
Press to enter camera brightness adjustment bar, press / to
adjust brightness of current channel.
and Installation
360
Screw the camera onto the bracket
Adjust camera to the proper view angle. Make sure the lens is upright
relative to your subject. Tighten the nut. Adjust the antenna to an
upright position.
Select the position for the camera and secure the camera stand.
Screws and anchors are supplied. Use an appropriate screw type
for the mounting surface.
Step 2: Basic Operation
srotacidnIdnasnottuBnoitcnuFaremaCgniwonK
I.
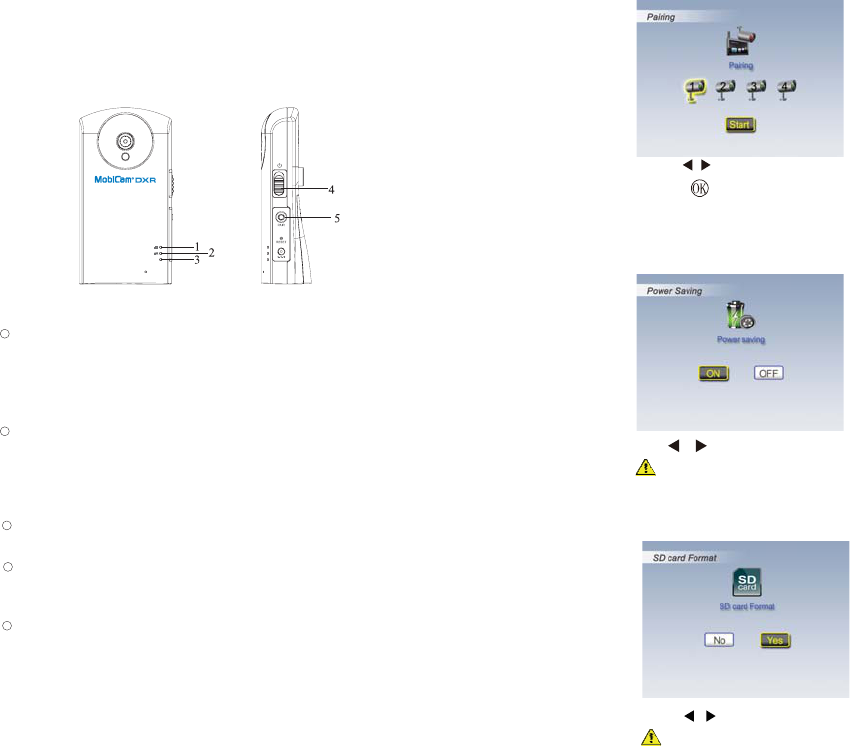
Pairing Camera
Power Saving
105
SD Card Format
]onttuBrewoP[
litnusdnoces2rofnottubdloh,aremacehtFFOrewopoT.aremacehtNOrewopotecnoPush
.ffoseog]rotacidnIr
ewoP[
]yeKkniL[
.]aremaCgniriaP–noitarepOdecnavdA[eeS.reviecerhtiwaremacriapotsserP
]rotacidnIyrettaB[
.f
foseogDELneerGlitnuyrettabegrahcesaelp;gnigrahCyrettaB=DELneerG
gnihciwsnogulpesaelp,emitetunim-3niFFO
gninrutsiaremaC;woLyrettaB=DELdeR
.esusuounitnocdnagnigrahcrofylppusrewop
.degrahCylluFyrettaB=FFODEL
]r
otacidnIkniL[
]aremaCgniriaP–noitarepOdecnavdA[eeS.gnissecorpnisiecneuqesgniriaP=DELgniknilB
.ediugasan
oitces
.reviecerehtybpudekcipsiaremaC=DEL
.edomyb-dnatsnisiaremaC=FFODEL
]rotacidnIrewoP[
.NOderewopsiare
macnehwNOseogDEL
1
2
3
4
5
Blue
1. Use to select a channel.
2. Press to start system countdown from 60 seconds.
3. Within 60-second countdown, press PAIR at the camera side. Image will
display when pairing is complete.
Use / to turn [Power Saving] mode On/Off.
By setting [Power Saving] mode On, both receiver and camera will enter
standby mode after 2-minute idle time and speaker volume will be mute.
Press power key of the receiver to resume monitor and camera .
Press / to select No or Yes.
For first time use, it is strongly recommended to format the SD card.
DC IN 5V/1A
PWR.
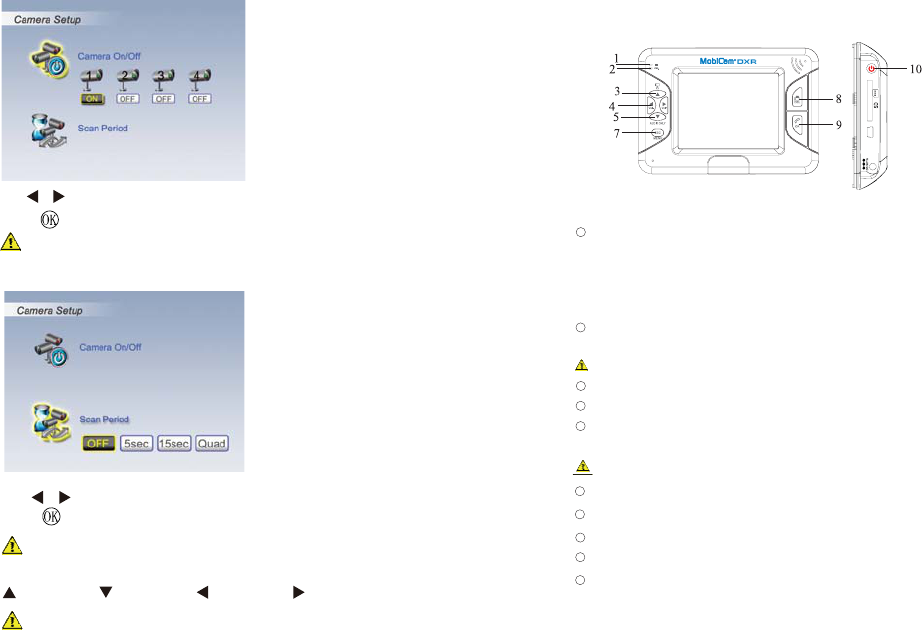
Know Receiver Function Buttons and Indicators
BSU
1
6
]nottuBrewoP[
.rotinomehtFFOrewopotsdnoces2roftidlohneht,norewopotnottubPush
]rotacidnIyrettaB[
.ffoseogDEL
neerGlitnuyrettabegrahcesaelp;gnigrahCyrettaB=DELneerG
rewopgnihctiwsnogulpesaelp,emitetunim-3niFFOgni
nrutsiaremaC;woLyrettaB=DELdeR
.esusuounitnocdnagnigrahcrofylppus
.degrahCylluFyrettaB=FFODEL
]rotacidnI
rewoP[
.NOderewopsiaremacnehwNOseogDEL
.edoM]evaSrewoP[niFFOsirotinomelihwNOsniamerDEL
][Manual Channel Switch )edoM(/]PUrosru
C[)edoMuneM(
/]2HCyektoH[)edoMweiVDAUQ(/
]1HCyektoH[)edoMweiVDAUQ(/
]NWODrosruC[)edoMuneM(
]4HCyektoH[)ed
oMweiVDAUQ(/]+loV/thgiRrosruC[)edoMuneM(
][)edoM
weiV(/][)edoM(
]3HCyektoH[)edoMweiVDAUQ(/]-loV/LeftrosruC[)
edoMuneM(
]nottuBretnE/uneM[)edoMuneM
uneM
(
1
2
3
6
4
5
7
8
9
01
View
[Turn on/off audio]
)edoM(View
Manual Record Delete Record File
][ Confirm )edoM
weiV(/][ Push to Talk )edoM( uneM
II.
69
Camera On/Off
Scan Period
Use / to select the camera you need to turn off,
press to change ON/OFF status.
Make sure available cameras are set to ON for SCAN or QUAD mode
Use / to change Scan Time interval from OFF / 5 sec / 15 sec / Quad,
to confirm the settings.
To leave QUAD display, simply press directional keys to enter
single channel.
When system enter into power save mode from QUAD, press any key
to resume monitor
= CAM1; = CAM2; = CAM3; = CAM4;
press
Press to turn on/off audio when setting VOX sensitivity to OFF.
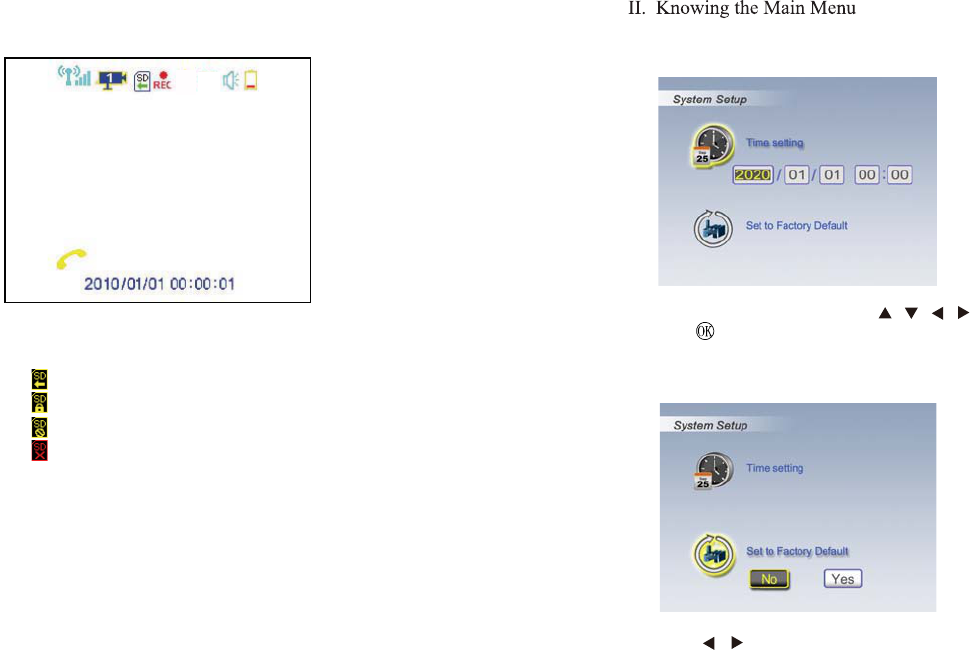
I. Knowing Screen Icons
Step 3: Advanced Operation
a. Signal indicator
b. Current display channel indicator
c. ---SD card available
---SD card locked(flashing)
---SD card full(flashing)
---SD card error(flashing)
d. Recording indicator(flashing)
e. VOX (Voice-activation) triggering record ON
f. VOX (Voice-activation) triggering alarm ON
g. Camera battery low indicator
h. Push-to-talk indicator
i. System time
7
Time Setting
Set to Factory Default
8
i j
a b c d e f g
h
i
92;
Press OK to enter time setting, use / / / to change setting,
press again to save.
Use / to select between No and Yes.
The antenna used for this transmitter must be installed to provide a separation distance
of at least 20 cm from all persons and must not be co-located or operated in conjunction
with any other antenna or transmitter.
FCC NOTE:
This device complies with Part 15 of the FCC Rules. Operation is subject to the following two
conditions:(1)this device may not cause harmful interference, and (2) this device must accept
any interference received, including interference that may cause undesired operation.
The manufacturer is not responsible for any radio or TV interference caused by
unauthorized modifications to this equipment. Such modifications could void the
user's authority to operate the equipment.
This equipment has been tested and found to comply with the limits for a
Class B digital device, pursuant to Part 15 of the FCC Rules. These limits are
designed to provide reasonable protection against harmful interference in a
residential installation. This equipment generates, uses and can radiate radio
frequency energy and, if not installed and used in accordance with the
instructions, may cause harmful interference to radio communications. However,
there is no guarantee that interference will not occur in a particular installation.
If this equipment does cause harmful interference to radio or television reception,
which can be determined by turning the equipment off and on, the user is
encouraged to try to correct the interference by one or more of the following
measures:
-- Reorient or relocate the receiving antenna
-- Increase the separation between the equipment and receiver.
-- Connect the equipment into an outlet on a circuit different
from that to which the receiver is connected.
-- Consult the dealer or an experienced radio/TV technician for help.
IC NOTE:
Operation is subject to the following two conditions: (1) this device may not cause interference,
and (2) this device must accept any interference, including interference that may cause undesired
operation of the device."