Mobile Action Technology MA720R1 USB Bluetooth Adapter User Manual Manual rev
Mobile Action Technology Inc. USB Bluetooth Adapter Manual rev
Manual rev
USB Bluetooth
Adaptor
l
a
u
n
a
M
r
e
s
Un
o
i
t
a
c
i
n
u
m
m
o
c
s
s
e
l
e
r
i
W
Version 2.1

Step 1 004-009,012
Step 2 010
Step 3 013-019
Step 4 020-024
Advanced Configuration 025-026
Step 5 027-029
Bluetooth Services 030-032
Frequently Asked Questions 033
Notes for Win 98SE/ME/2000 034
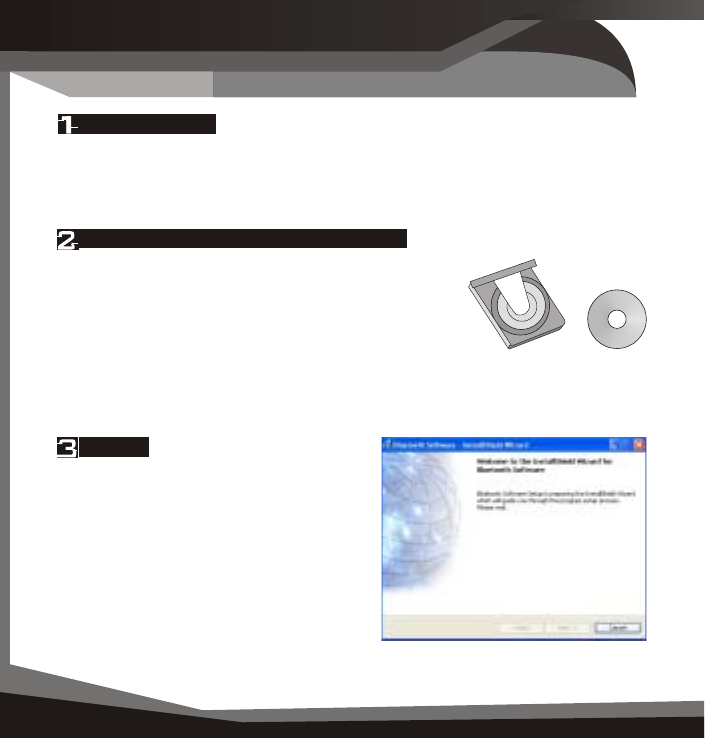
Software Installation
Hardware Installation
Initial Setup
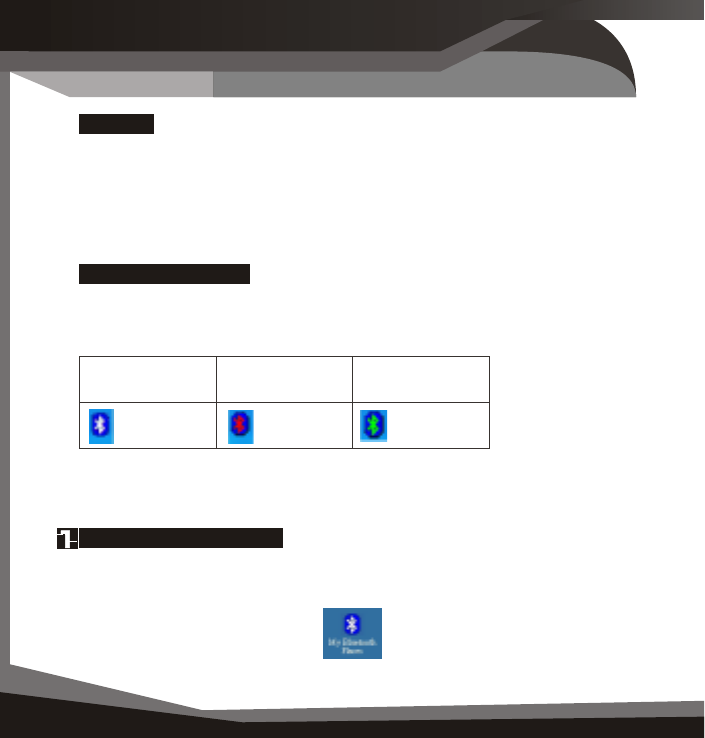
My Bluetooth Places
Pairing
Contents
Contents 00
3
Note: Please do not insert USB Bluetooth Adaptor
before installation of software.
Screenshots have been taken in Windows XP, and
will slightly differ to Windows ME or Windows 98SE.
See Notes for Win 98SE/ME/2000
WinME and Win98SE may require the original
Installation CD.
Some computers have the original setup directory
placed on their computer when the software was
installed.
Briefing
Briefing 00
5
Installation
Welcome
The software will automatically begin.
The window welcomes you to the
InstallShield Wizard for Bluetooth
Software.
0
06 Installation
Insert USB Bluetooth Adaptor Software CD
Please insert the USB Bluetooth Adaptor
software/application CD-Rom into your CD-Rom
Drive.
The USB Bluetooth Adaptor is also referred to as a
USB Bluetooth Dongle.
Restart Computer
If your computer is on already, please restart before beginning installation.
Figure 1.1 Welcome to InstallShield
Wizard
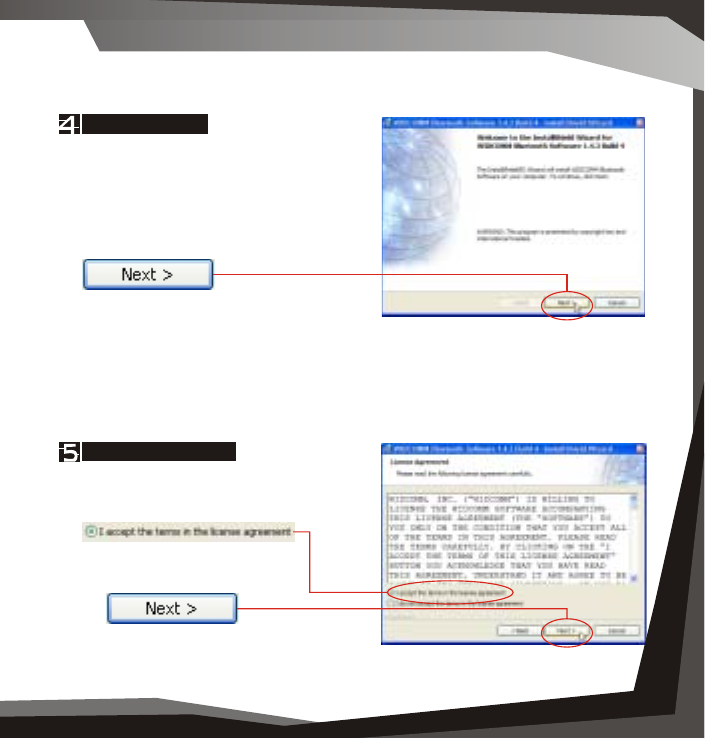
STEP 1 Software Installation
Installation 005
License Agreement
Read the license agreement, If you
accept, select the check button.
To continue, click
Ready to Begin
The software is ready to begin installation
for the WIDCOMM Bluetooth Software.
To continue, click
Figure 1.2 WIDDCOMM Software
InstallShield Wizard
Installation 00
7
Installation
0
08 Installation
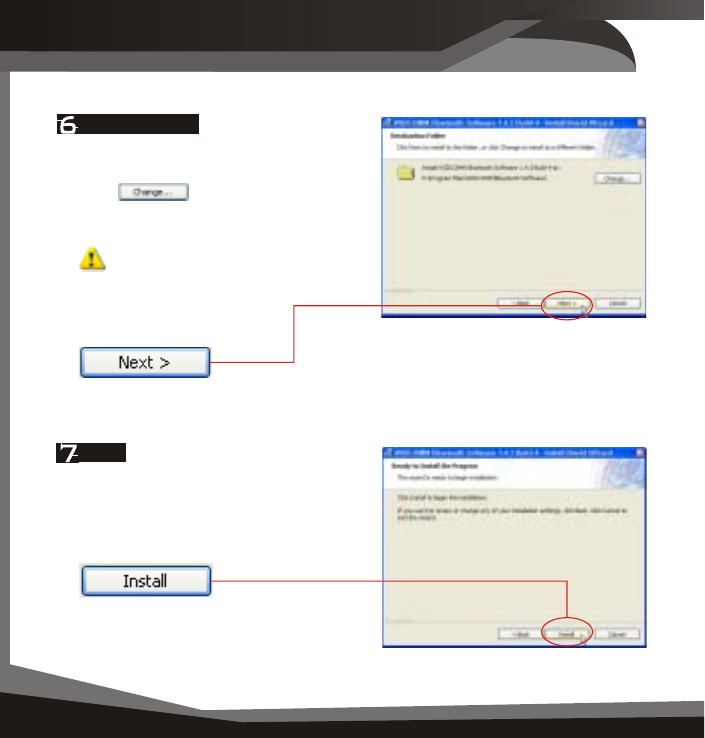
Install Location
If you wish to select another location
where the software will be installed,
Click and select or enter a
new location.
Note: The default location is
recommended.
To continue, click
Install Location
Install
You are now ready to install.
To continue, click
Figure 1.5 Ready to Install
Installation 005
Installation 00
9
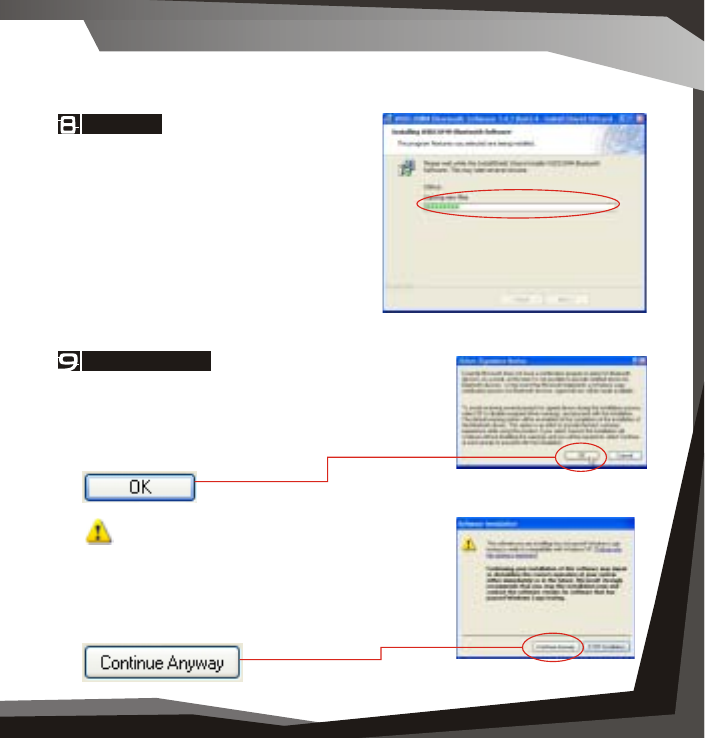
Driver Signature
(Windows XP only)
You will be prompted with a Driver Signature Notice.
To continue, click
Note: If you are prompted with Software
Installation prompt. This indicates that the
Bluetooth software has not been tested by
Microsoft for the Windows Logo Test. As with
most companies, we have tested the software
and recommend that you click
Copying...
The installation process will now begin.
Please wait while files are being copied
to your computer.
The progress bar (see Figure 1.6) will
indicate the portion that has been
completed.
Figure 1.7 Driver Signature
Notice
Figure 1.8 Compatibility
Figure 1.6 Installation Progress
STEP 2 Hardware Installation
Installation
0
10 Hardware Installation
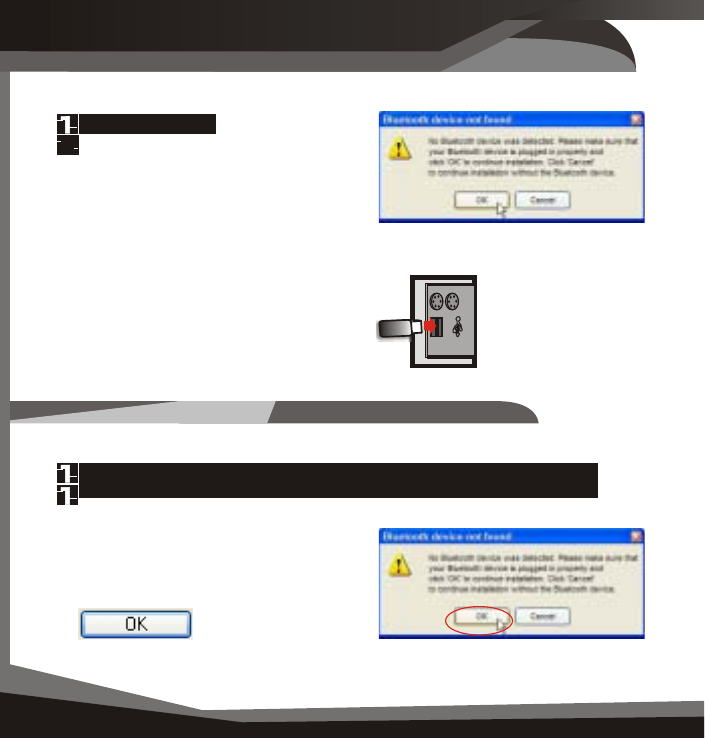
Device Not Found
At the Bluetooth device not found
prompt (see Figure 1.9), directly plug
the USB Bluetooth Adaptor into an
available USB port. See Figure 2.1 for
insertion example. (See section USB?
for details on USB)
Please continue with STEP 2- Hardware
Installation.
Figure 1.9 Bluetooth device not
found
0
Figure 2.1 Desktop
USB port example
Ps2
USB
If you have successfully inserted the USB Bluetooth Adaptor please
continue.
The green LED (light) on the device will
be lit, if USB Bluetooth Adaptor is
successfully inserted.
To continue, click (Figure 1.9)
Figure 1.9 Bluetooth device not
found
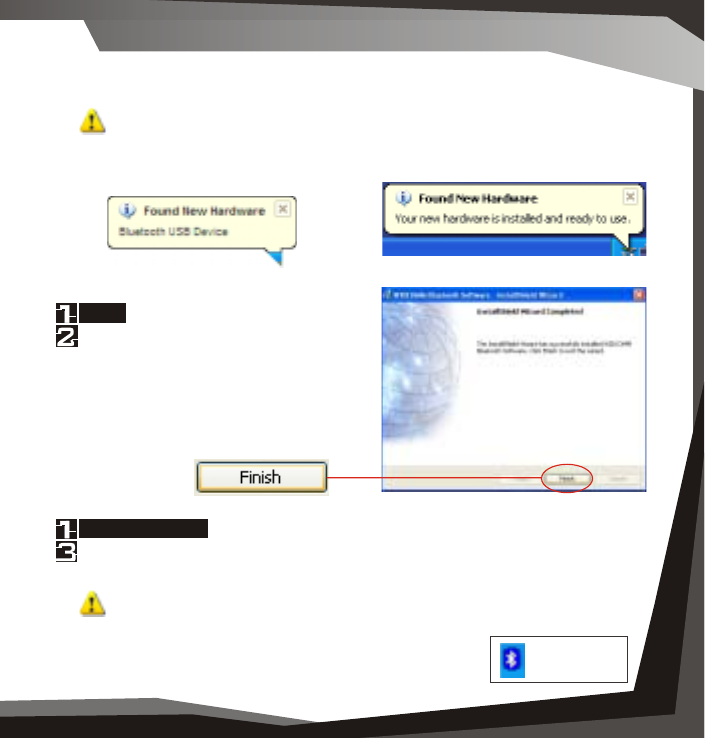
Note: Part of the Install process you may see Found New
Hardware. This indicates a successful part of the Installation.
Finish
Restart Windows
Now you have completed the installation
of the USB Bluetooth Adaptor software.
To finish the installation click
If you have not been prompted, please restart windows. Windows XP
users don’t have to restart windows.
Figure 1.10 WIDDCOMM Software
InstallShield Wizard
Note: If the software and hardware installation are successful, you’ll
see a blue with white Bluetooth icon in the Windows
System Tray. A blinking green LED on the USB Bluetooth
Adaptor is also a successful part of the installation. Blue with White
Installation 01
1
0
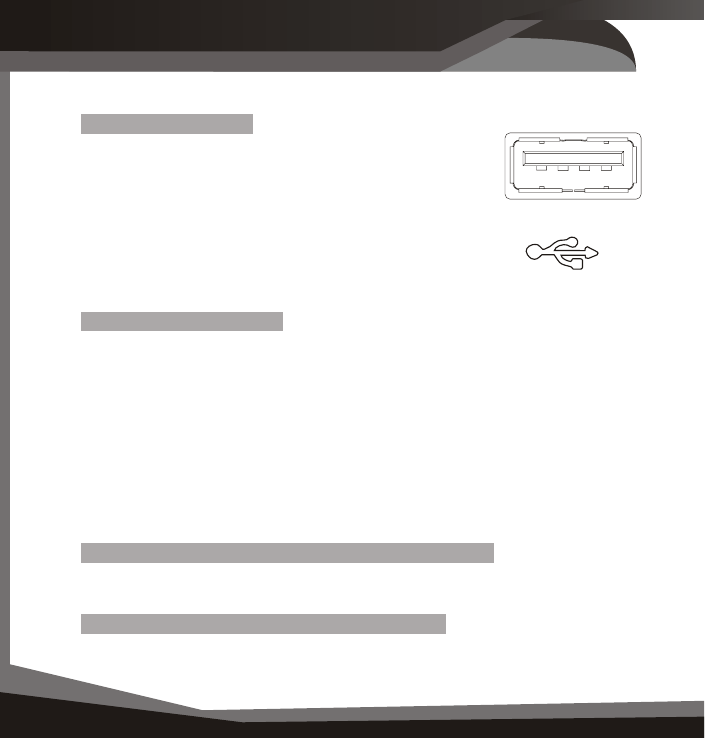
12 USB
Fig 2.2 USB Port
Fig 2.3 USB Logo
What are USB ports?
Where are my USB ports?
Can I connect to any USB port? I have more that one.
My computer has USB, but they are all used up.
All current computers now sold have generally at least
two USB ports. Many devices today use USB ports, for
example, mouse, keyboards, digital cameras, web
cameras etc... Hence you need to check if your USB ports
have all been used up by these devices.
The diagram is a USB port (about 1.2cm wide) and the Logo
Associated with the port.
Desktop Computers.
They are usually two USB ports next to the PS2 mouse(green round connector)
and keyboard (purple round connector) ports (refer to Figure 2.1).
Some desktops have two or more on one of the metal parallel plates below the
monitor, keyboard, mouse, printer connections.
Laptop/Notebook Computer.
These vary and can be on the back or on the sides of the unit. Certain models
have them vertically directly next to each other.
Yes, you may connect to any available USB port.
You can purchase a USB hub that will provide you with more ports. See your
retailer for details.
USB?
STEP 3 Initial Setup
Installation 005
Initial Setup 01
3
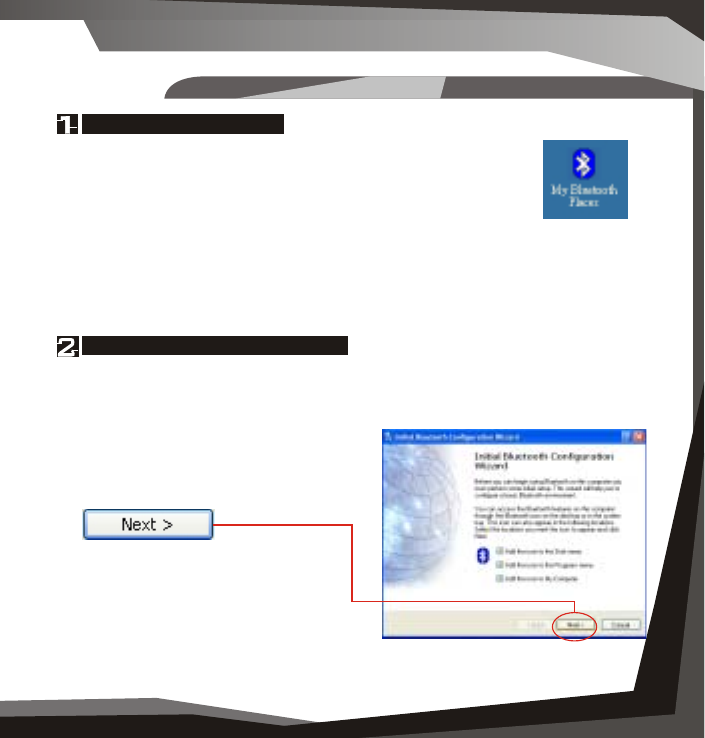
Run Initial Bluetooth Configuration
The Initial Bluetooth Configuration Wizard will appear.
The default options are recommended. You may uncheck them respectively if
you do not wish the My Bluetooth Places
icon to be placed.
To continue, click
Open My Bluetooth Places
Double-click the My Bluetooth Places on your desktop.
Figure 3.1 My
Bluetooth
Places Icon
Figure 3.2 Initial Bluetooth
Configuration Wizard
Initial Setup
Initial Setup
0
14 Initial Setup
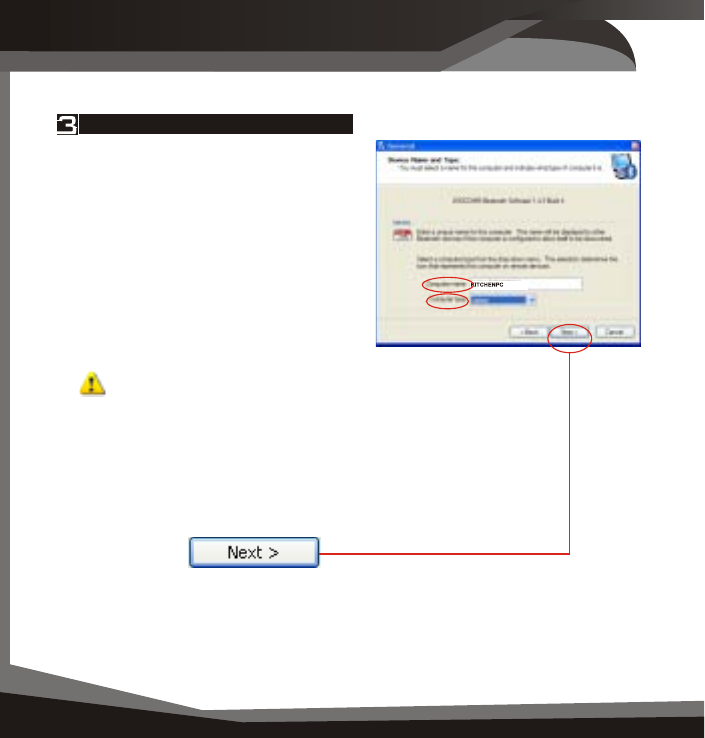
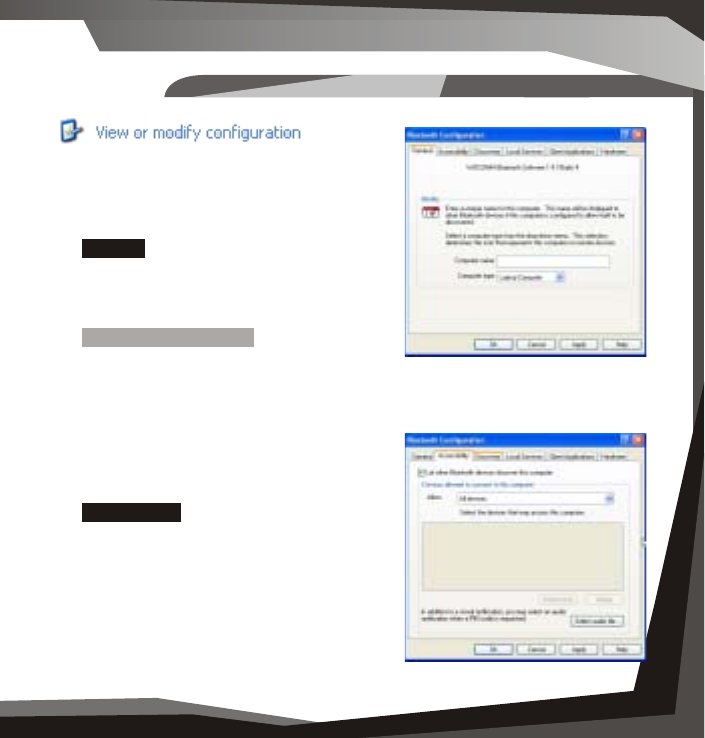
Give your computer a Device Name
The General window will allow you to
identify your Bluetooth enabled
computer with a name.
Enter a unique Computer name.
There may be one given here, you may
change it if you wish.
Select the computer type. This will only
affect the icon in which you will appear
to another Bluetooth user.
Note: Each Bluetooth device that
wishes to connect to your computer
must have a unique Computer name
(different to all other users connecting).
To continue, click
Figure 3.3 Device Name
And Type
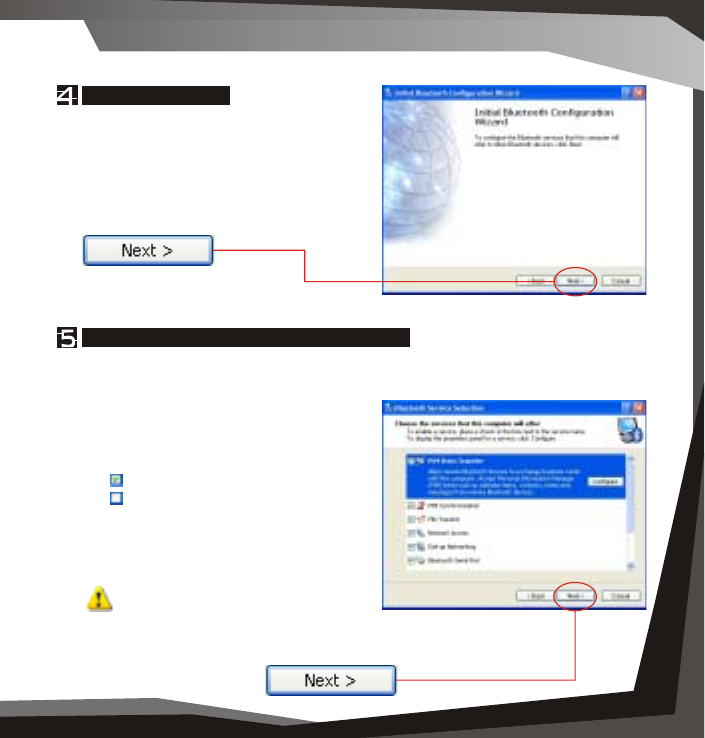
Figure 3.5 Enable/Disable Services
Figure 3.4 Bluetooth Services
Installation 005
Initial Setup 01
5
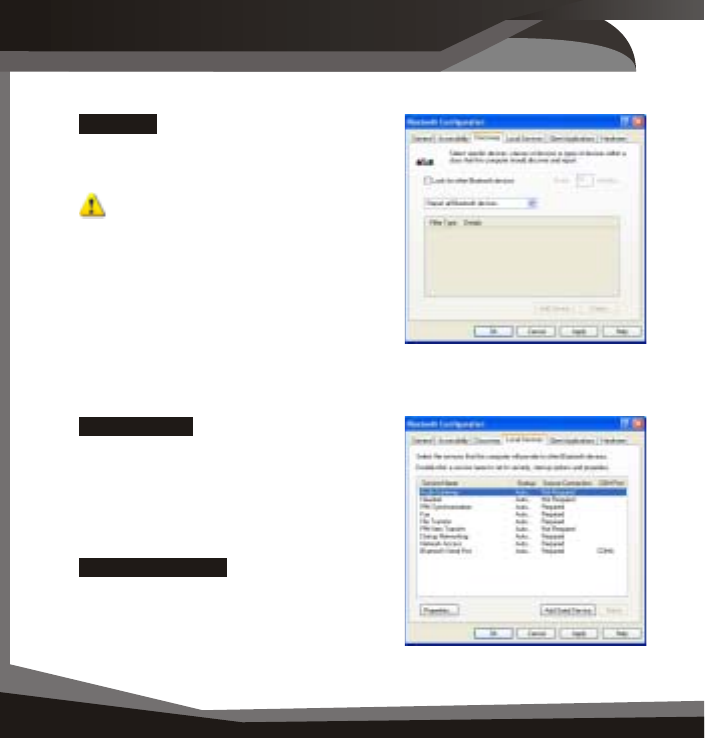
Enable/Disable or View Bluetooth Services
The Bluetooth Services Selection will allow you to disable or enable any
services that you do not wish to offer.
Disable or enable by clicking on the
check box next to the name of the
service you wish to alter
Enabled Service
Disabled Service
By default all services are enabled (all
check boxes ticked), this is
recommended.
Note: You can choose to disable or
enable services at anytime.
To continue and click
Bluetooth Services
The Initial Bluetooth Configuration
Wizard window will now allow you to
enable or disable Bluetooth Services.
(Refer to the Bluetooth Services section
for information on services)
To continue, click
Initial Setup
Initial Setup
0
16 Initial Setup
Figure 3.6 Configuration
Wizard
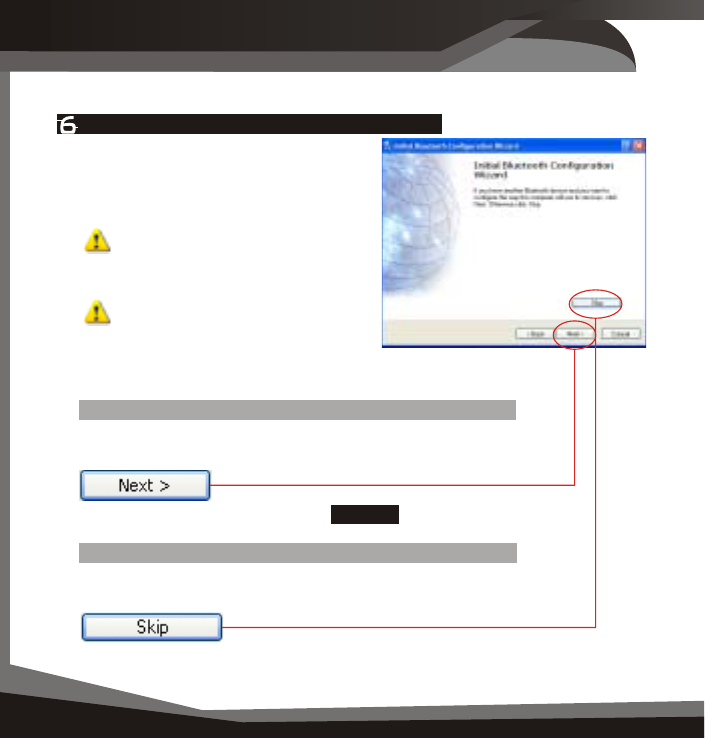
Search and configure other Bluetooth Devices
----OR----
The Initial Bluetooth Configuration
Wizard will allow you to choose whether
to search and configure other Bluetooth
devices.
Note: If your other Bluetooth device
is supplied with or requires additional
software, setup the software first.
Note: You can configure connecting
Bluetooth devices at anytime.
You have two options
Option 1.) Search and configure a Bluetooth Device now.
To search and configure device(s) click
Option 2.) Search and configure Bluetooth Devices Later
(Recommended) To continue, click
Now skip to Step 11
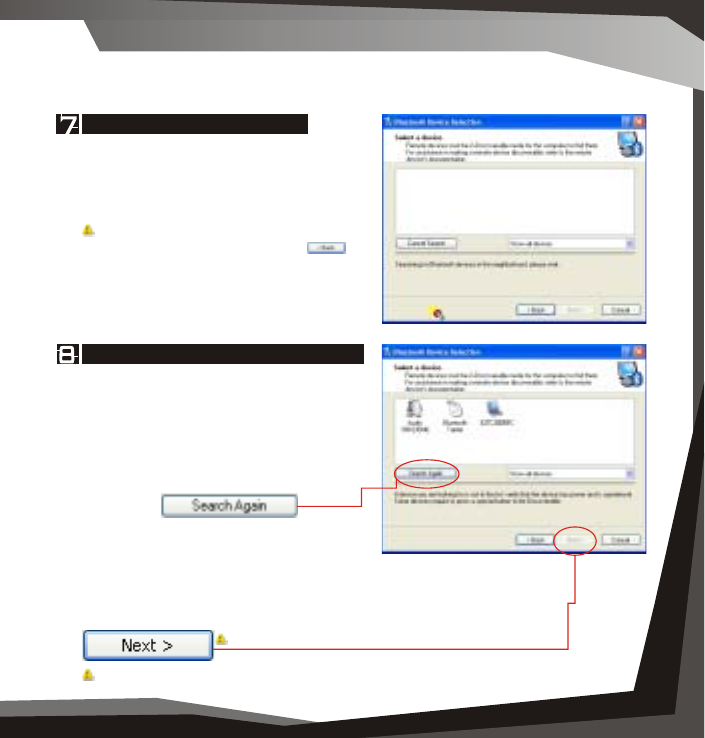
Figure 3.8 Found Devices
Installation 005
Initial Setup 01
7
Select Bluetooth Device to configure
If devices have been found, they will be
shown as an icon corresponding to the
type of device.
If the device you are searching for is not
turned on, you may switch the device on
and click
The drop down menu will allow you to
reduce the search to a specific group,
unless you are sure of the group your
device is in, (recommended) select Show All Devices.
Select the icon of the device you wish to connect to and click
Note: You can only select one at a time, you will be able to
repeat this process later.
Note: A device needs to be selected before Next button can be clicked on.
Search for Bluetooth Devices
The Bluetooth Device Selection window
will attempt to search for any Bluetooth
devices in the area.
Note: If you wish not to continue
searching now, you may click and
go back to Step 6
Figure 3.7 Device Selection
Initial Setup
Initial Setup
0
18 Initial Setup
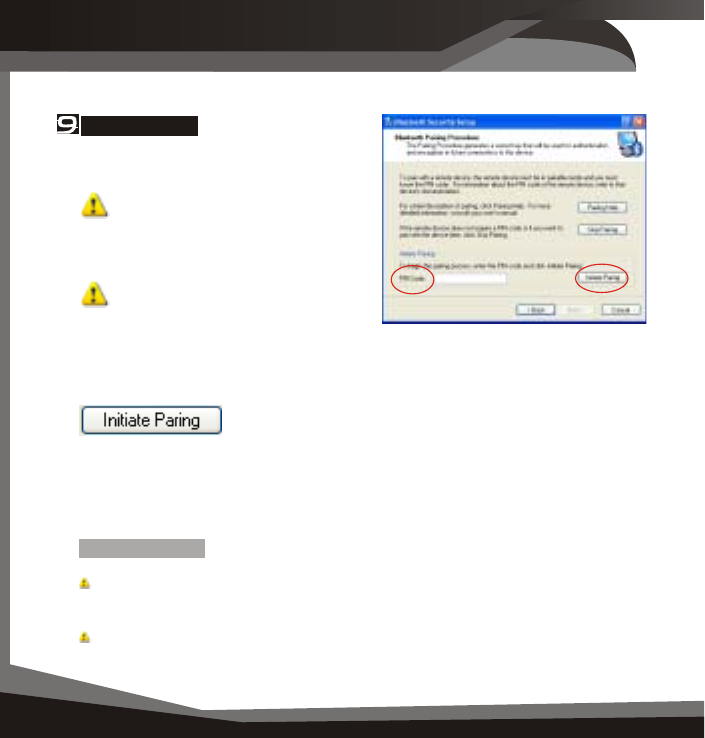
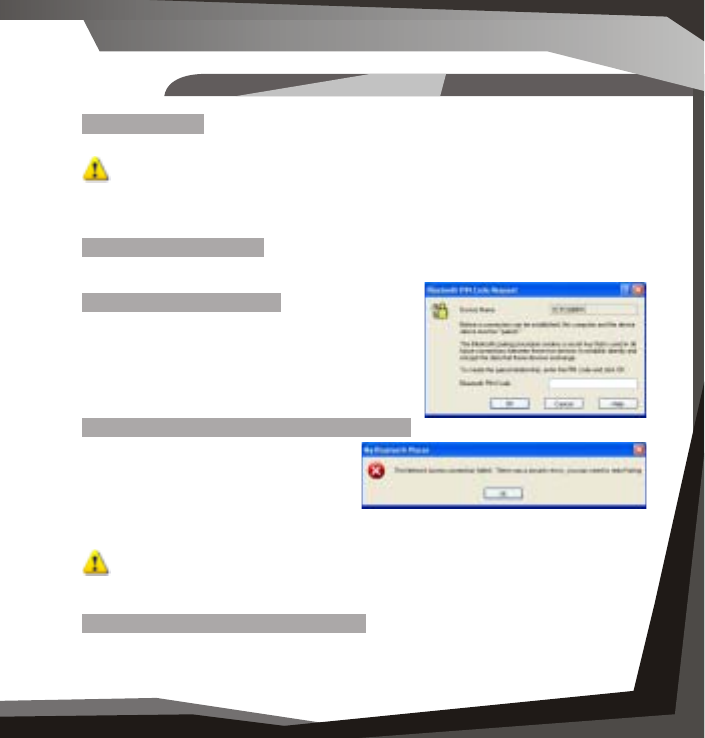
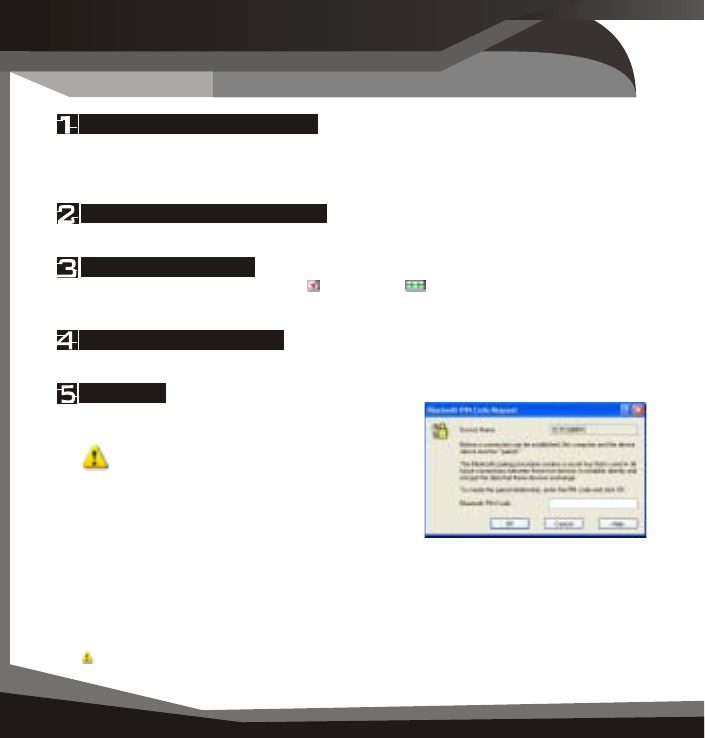
Enter PIN Code
The Bluetooth Security Setup screen
requires you to set a PIN code.
The PIN code is required by other
device. Incorrect PIN will result in a
failed connection. This also prevents
unauthorized access.
Note: Your PIN can be
alphanumerical (up to 16 characters).
For example sam12
To continue and initiate communication
and paring with other Bluetooth user click
The other user will now be informed that you wish to connect to their computer
or device and use their services. If they enter the correct PIN code, a
connection will be made and a pairing has also been established.
What is Pairing? - Pairing allows two devices to be setup and will recognize
each other whenever these two devices meet again.
Note: Some devices do not require pairing. If unsure, check user manual of
other Bluetooth Device, otherwise you will be prompted when pairing is
necessary.
Note: You may unpair a pairing later if you wish.
Figure 3.9 Initiate Pairing
Installation 005
Initial Setup 01
9
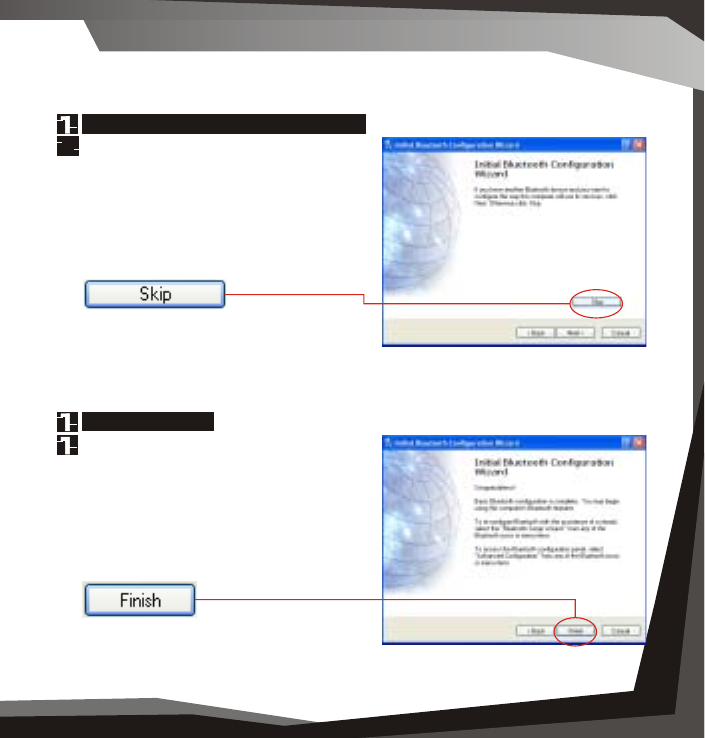
Search and configure another device
You will return to the Initial Bluetooth
Configuration Wizard, if you wish to
search for more Bluetooth devices you
may by repeating Step 6 to 10.
Otherwise, to continue click
Completed Setup
You have now completed the initial setup.
Your USB Bluetooth Adaptor is ready to
be used.
To finish, click
Figure 3.11 Finished
Figure 3.10 Configuration Wizard
Initial Setup
0
My Bluetooth
0
20 My Bluetooth Places
STEP 4 My Bluetooth Places
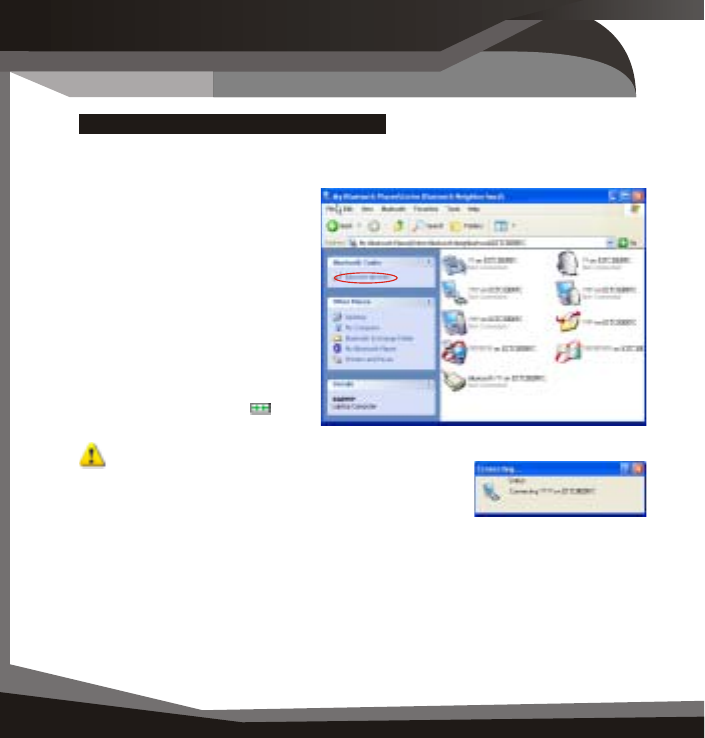
Open My Bluetooth Places
To open My Bluetooth Places, go to your windows desktop and double-click the
icon
BluetoothSystem Tray
The Bluetooth icon in the Windows System Tray indicates the USB Bluetooth
Adaptors Status.
Overview
Your USB Bluetooth Adaptor can be setup and controlled through your My
Bluetooth Places. My Bluetooth Places allows you to search for other users,
enable/disable services, explore yours or another users’ files.
Figure 4.1 My Bluetooth Places Icon
Enabled Disabled Connected
Blue with White Blue with Red Blue with Green
Help setup your Bluetooth
Environment
Enable, Disable or view services
that you offer
Search and connect to nearby
Bluetooth enabled devices
Change Bluetooth Settings
(Advanced Setup)
Bluetooth Tasks 02
1
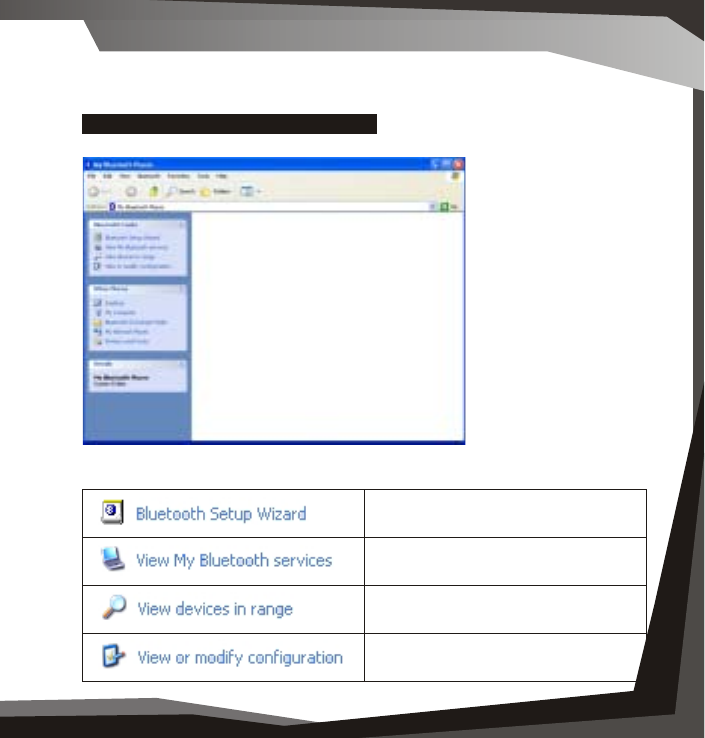
My Bluetooth Places - Bluetooth Tasks
Figure 4.2 Bluetooth Software Interface (Windows XP only)
Please see notes for Win98SE/ME/2000
Bluetooth Tasks
Bluetooth Tasks
0
22 Bluetooth Tasks
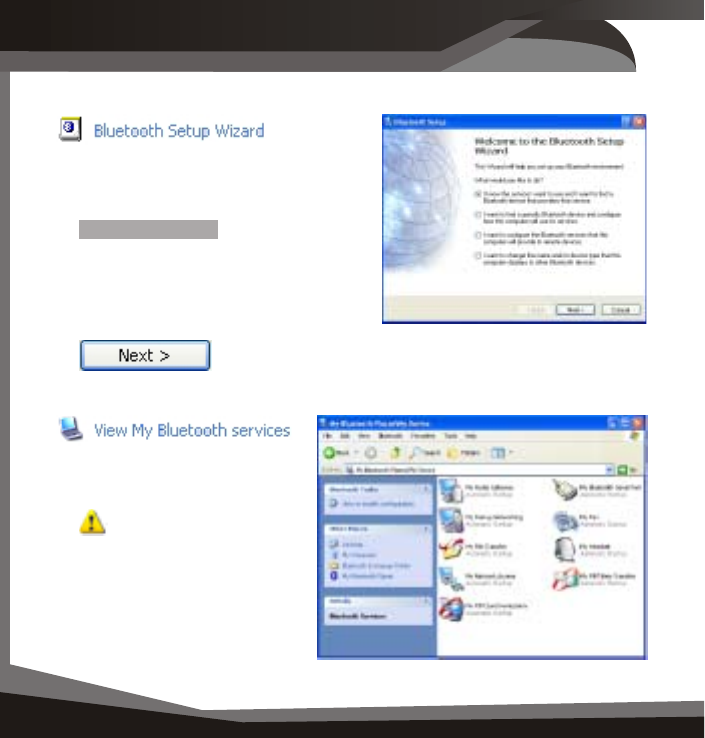
The Bluetooth Setup Wizard has four
Wizards.
What is a Wizard? A Wizard is a step-
by-step process, that assists you to
complete a task.
Click on the radio button next to the task
that you wish to complete and click
These are the services that you
are currently offering.
You can disable or enable
any service by right-clicking
on that service and select
from the context menu
enable or disable.
Double-click on the service icon
to see Fig 4.5
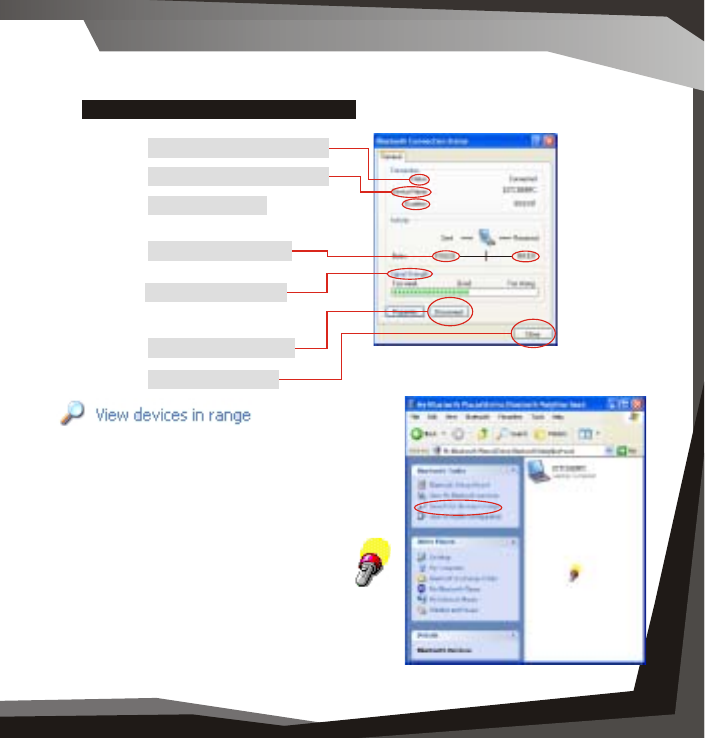
Bluetooth Connection Status.
Figure 4.3 Bluetooth Setup Wizard
Figure 4.4 My Bluetooth Services
Installation 005
Bluetooth Tasks 02
3
Bluetooth Conncection Status Window
View devices in range allows you to search
and connect to any searchable device.
The window will indicate that it is searching
with the icon.
Found devices will appear and
represented by an associated icon.
You may click Search for devices in range
again to start another search.
Figure 4.5 Bluetooth
Connection Status
Connected/Disconnected
Connected Device Name
Connected Time (H:M:S)
Data Sent/Received
Connection Quality
Disconnect/Connect
Close the Window
Figure 4.6 Searching for devices
Bluetooth Tasks
Installation
0
24 Connect to Bluetooth Devices
Connect to another Bluetooth device
Connecting to another Bluetooth Device
Once you see the device you would like to connect to (refer to Figure 4.6),
double-click on the associated icon.
Click on Discover Services to
refresh the services available.
Double click on any of the
services to initiate a connection.
You will see the Connecting...
Window. (Refer to Fig 4.8)
The other user will be prompted
with your connection. If
successful, you will see next
to the service.
Note: You will only see
Services that are offered by the other Bluetooth
device, not all services may appear
Figure 4.7 Discover Services
Figure 4.8 Connecting
ConfigurationAdvanced
Installation 005
Advanced Configuration 02
5
Accessibility tab - This allows you either
allow to not allow other users to discover
(find or search for you).
You may also specify which device you
would like to be able to discover your unit.
You may also specify a sound to be played
when another user requests a PIN.
The Bluetooth Configuration is divided into
six categories, represented by the tabs, to
change categories, click on the
corresponding tab.
tab - This category allows you to
change your unique Computer Name and
the Computer Type (Desktop or Laptop
Computer).
When will I need this?
During initial setup you would have already
given your computer a name; however, if
you need to change it you may do so here. You may need to change it if you
happen to connect to another Bluetooth device that has the same name as
yours. You can not connect to a device that
has the same name.
General
Figure 4..10 Accessibility
Figure 4.9 General Tab
Advanced Config
Advanced Config
0
26 Advanced Configuration
Local Services
Client Applications
Tab - allows you to configure
each service that you offer.
To view or change settings, select the
service and click
Tab - is similar to Local
Services Tab; however, these are the
settings for devices that you connect to.
Discovery Tab - allows you to enable auto
seek for other Bluetooth devices. You can
set the interval between each seek.
Note: For mobile devices, it is not
recommended unless necessary, due to
extra consumption of power.
Figure 4.11 Discovery Tab
Figure 4.12 Local Services Tab
STEP 5 Pairing
Installation 005
Pairing 02
7
Figure 5.1 Pin Code Request
Figure 5.2 Network Access Connection
Failed
What is Paring? - Paring allows two devices to be setup and will recognize
each other whenever these two devices meet again.
Note: Some devices do not require pairing. If unsure, check the user
manual of other Bluetooth Device, otherwise you will be prompted when
pairing is necessary.
When do I need to Pair?
There are several different ways that you will be required to pair.
Case 1.) Enter a PIN Code
The Bluetooth PIN Code Request window will
automatically appear when you double click on
a service of another Bluetooth device when a
PIN is required.
Case 2.) Network Access connection failed
If you see this message, you will need
to repair.
To repair follow steps to Manual
Paring.
Note: This message usually occurs if the PIN was entered incorrectly, or
other Bluetooth device did not respond to pairing initiation.
Case 3.) You wish to unpair or repair
If you wish to unpair, Refer to Manual Paring, Step 2 and 3.
Pairing
Pairing
0
28 Pairing Manually
Manual Pairing
Figure 5.3 Bluetooth PIN Code
Request
Ensure that you are not paired.
Click on View Devices in Range.
If Paired, select unpair
Right click and select Pair
Enter a PIN
To check whether you are paired or not, you will need to go to your desktop,
and double-click My Bluetooth Places icon, (see My Bluetooth Places section
for more details).
Search for the unit you wish to pair with.
If you are paired, you will see a (paired), or (connected) on the icon. If so,
right click on the icon, and select unpair from the context menu.
Right-click on the icon again, and from context menu click pair.
You will be prompted with PIN Code Request.
Enter a PIN and click OK to continue.
PIN code is required by other device.
Incorrect PIN will result in a failed
connection. This also prevents unauthorized
access. Your PIN can be alphanumerical.
For example sam12
The other user will now be informed that you
wish to connect to their computer and use their
services. If they enter the correct PIN code, a connection will be made and a
pairing has also been established.
Please note that the , otherwise
the Pairing will fail and Paring Manually will need to be repeated.
other device needs to enter the PIN promptly
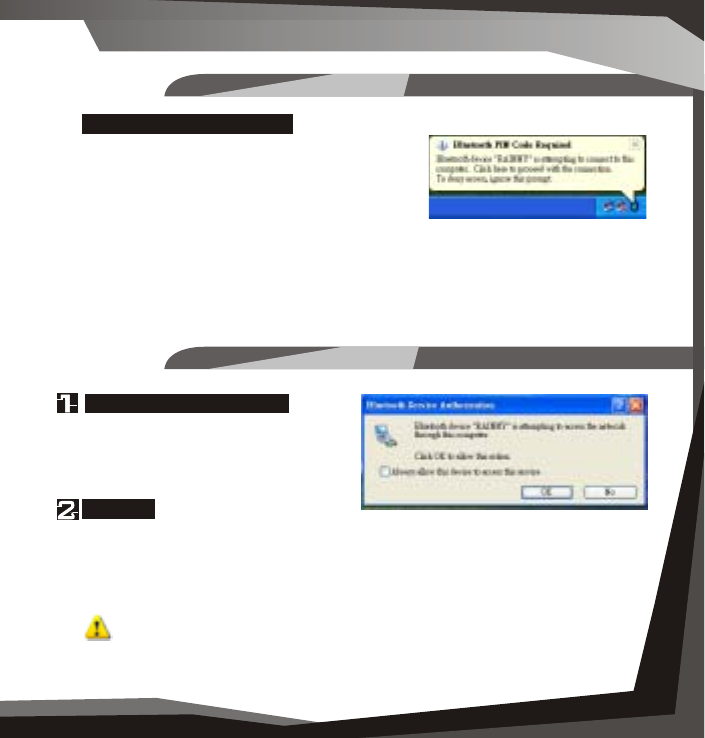
Accepting a Pairing
Receiving a Pariring
Installation 005
Receiving a Paring Request 02
9
Click the prompt to accept
Enter PIN
If you want to allow another
Bluetooth device to connect to your
computer, click the prompt to accept.
You will then need to enter the correct
PIN to allow a successful connection.
If you do not wish to allow access, simply ignore the text bubble.
Note: You will be prompted each time a paired device wishes to access a
service you provide.
Receiving a Paring request.
If another Bluetooth Device wishes to
connected to your USB Bluetooth Adaptor, you
will be prompted with a text bubble, Bluetooth
PIN Code Required, in the bottom right hand
corner of your screen (Windows System Tray)
Figure 5.5 Bluetooth Service
Authorization
Figure 5.4 PIN Code
Required
Pairing
Services
0
30 Bluetooth Services
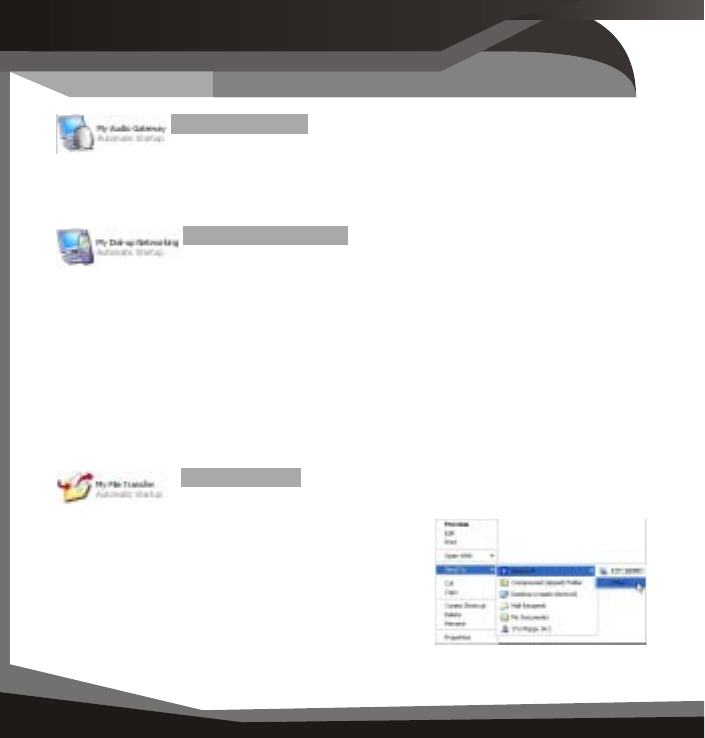
My Bluetooth Services
My File Transfer allows you to wirelessly and conveniently
access or send files with other Bluetooth devices.
Example Use: You can send files to another Bluetooth device,
like a handheld device, phone, or another
computer.
Usage: To send a file, right-click on the file(s) or
directory you wish to send, and select Send To ->
Bluetooth -> Other...
Find the device that you wish to send to.
My Audio Gateway allows you to use your Bluetooth enabled
computer as a headset for another Bluetooth Device.
Example use: If you have speakers and microphone attached to
your computer, you can use it to answer a Bluetooth enabled phone.
My Dial-up Networking allows you to wirelessly use another
Bluetooth device that is capable, to dial-up (internet access).
Example use: If you wish to use your Bluetooth enabled phone to
dial-up (internet access) wirelessly and your phone is in your bag, or in your
pocket.
You can also wirelessly use another Bluetooth enabled and capable computer
or device to dial-up.
Example use: Your desktop computer has a modem attached and Bluetooth
enabled, you can use your Bluetooth laptop/notebook computer.
Figure 6.1 WIDDCOMM
Software InstallShield Wizard
Installation 005
Bluetooth Services 03
1
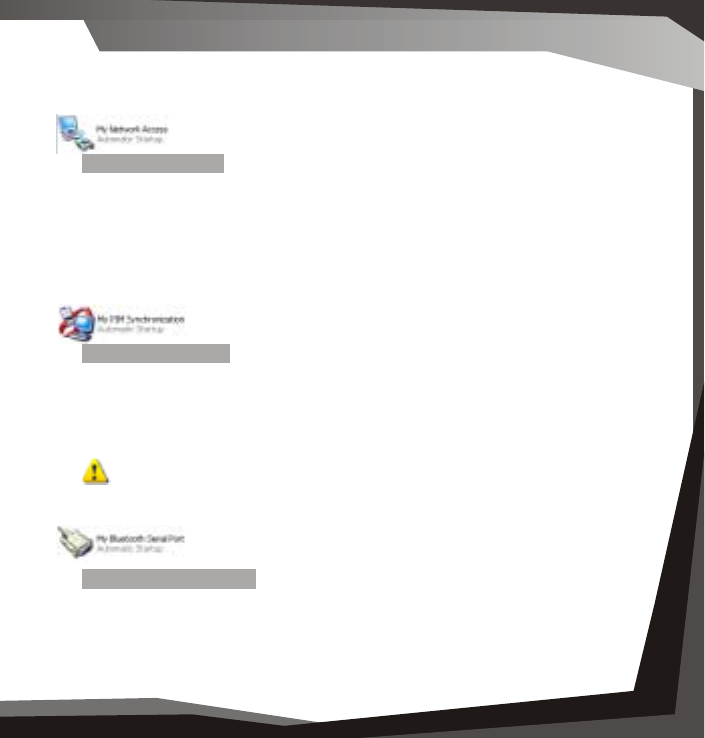
My Network Access allows you to use the service to act as a virtual network
connection.
Example Use: If you have two Bluetooth enabled computers and you wish to
connect (network) them without (or can not) physically running a network cable
between them, you can use this service. You can also share the internet using
this service.
PIM Synchronization allows you to synchronize your contacts, email, address
book, calendar or notes with a compatible Bluetooth device.
Example Use: Commonly used with PDAs, Laptop/Notebook computers,
phones and other mobile devices to ensure two copies are identical and
updated.
Note: Outlook will only synchronize the defaulted contacts folder and not
sub-folders.
My Bluetooth Serial Port allows you to create a virtual Serial Port on your
computer.
Example Use: Many mobile devices do not have serial ports anymore, if you
require to attach a device that can only be connected by a serial port, you can
use the serial port of a Bluetooth enabled computer.
Services

Services
0
32 Bluetooth Services
My Fax is a service that allows you to use the fax facility of a remote Bluetooth
modem, phone or computer.
Example Use: You have a Bluetooth enabled desktop computer with a
fax/modem capable of sending and receiving faxes. You can use this service to
send faxes through this computer from your Bluetooth enabled computer. You
can also use your Bluetooth enabled phone.
My Headset service is used to connect to a Bluetooth enabled headset.
Example Use: You can attach a wireless Bluetooth headset to your computer to
listen to music, or communicate over the Internet.
PIM Item Transfer is a service that allows you to send or request PIM Items
(contacts, email, calendar or notes)
Example Use: Some mobile devices will be setup to send a business card if you
connect to their PIM Item Transfer Service.

Frequently Asked Questions
Installation 005
Frequently Asked Question 03
3
What is the WIDCOMM software that I am installing?
Many Bluetooth Adaptors use the WIDCOMM software to work with the adaptor
and connect with other Bluetooth devices.
The Bluetooth Device that I am connecting to has the same device name.
You may change the device name of your device (See page 25).
When I search, devices appear that I do not recognize.
Because Bluetooth has a range that could possibly exceed the area you are in,
you will detect devices beyond those that you are seeking. For example, people
passing by; however, this does not necessarily mean you will be able to access
their device without their permission.
Is my data encrypted?
Data transferred between Bluetooth device can be set to enable secure
connection. Secure connections are encrypted using the PIN. You can enable
or disable secure connections by going to Local Services and selecting the
property of the service you wish to secure. (See page 20).
My Bluetooth connection drops out when I use my cordless phone.
Bluetooth uses the 2.4Ghz unlicensed ISM band, which is the same as some
high end cordless phones, video transmitters, and some other wireless devices.
Even though Bluetooth uses frequency hopping to prevent interference with
these devices, at times it may interfere.
My Bluetooth Device requires a PIN, and I do not think it has one.
Some Bluetooth devices (for example headsets) are set to a default PIN 0000.
My computer does not detect the USB Bluetooth Adaptor.
You may need to get a technician to make sure your USB port drivers are
installed correctly.
F.A.Q.

Win98SE/ME/2K
0
34 Notes for Win98SE/ME/2000
There are slight differences if you
are using your USB Bluetooth
Adaptor under these Operating
Systems, these are noted below.
If you are using Windows
98SE/ME/2000 you will not see
Figure 4.2 when you Double-Click
the My Bluetooth Places icon on
your desktop, instead you will see
Figure 7.1
The equivalent Windows XP and
Win 98SE/ME/2000 is shown
below.
Right-Click on the
Bluetooth icon in the
System Tray and
select configuration.
Use View Devices in
Range. And press
F5 to refresh.
Windows XP Windows 98SE, ME, 2000
Figure 7.1 My Bluetooth Places (Win
98SE/ME/2000
Notes for Windows 98SE / ME / 2000
Federal Communications Commission (FCC) Statement
15.21
You are cautioned that changes or modifications not expressly approved by the part
responsible for compliance could void the user’s authority to operate the equipment.
15.105(b)
This equipment has been tested and found to comply with the limits for a Class B
digital device, pursuant to part 15 of the FCC rules. These limits are designed to
provide reasonable protection against harmful interference in a residential installation.
This equipment generates, uses and can radiate radio frequency energy and, if not
installed and used in accordance with the instructions, may cause harmful interference
to radio communications. However, there is no guarantee that interference will not
occur in a particular installation. If this equipment does cause harmful interference to
radio or television reception, which can be determined by turning the equipment off
and on, the user is encouraged to try to correct the interference by one or more of the
following measures:
-Reorient or relocate the receiving antenna.
-Increase the separation between the equipment and receiver.
-Connect the equipment into an outlet on a circuit different from that to which the
receiver is connected.
-Consult the dealer or an experienced radio/TV technician for help.
You are cautioned that changes or modifications not expressly approved by the party
responsible for compliance could void your authority to operate the equipment.
FCC RF Radiation Exposure Statement:
This equipment complies with FCC radiation exposure limits set forth for an
uncontrolled environment. End users must follow the specific operating instructions
for satisfying RF exposure compliance. This transmitter must not be co-located or
operating in conjunction with any other antenna or transmitter.
Notice: Any changes or modification not expressly approved by the party responsible
could void the user's authority to operate the device.