Mobile Technologies 150-00118 Digital lock User Manual
Merchandising Technologies Inc. Digital lock
User Manual

MTI LOCKS™ PRODUCT MANUAL
1
MTI P/N 063-00168 rev D ©2017 MTI All Rights Reserved
MTI 1050 NE 67th Avenue Hillsboro, OR 97124 T:800.426.6844 www.mobiletechinc.com
2
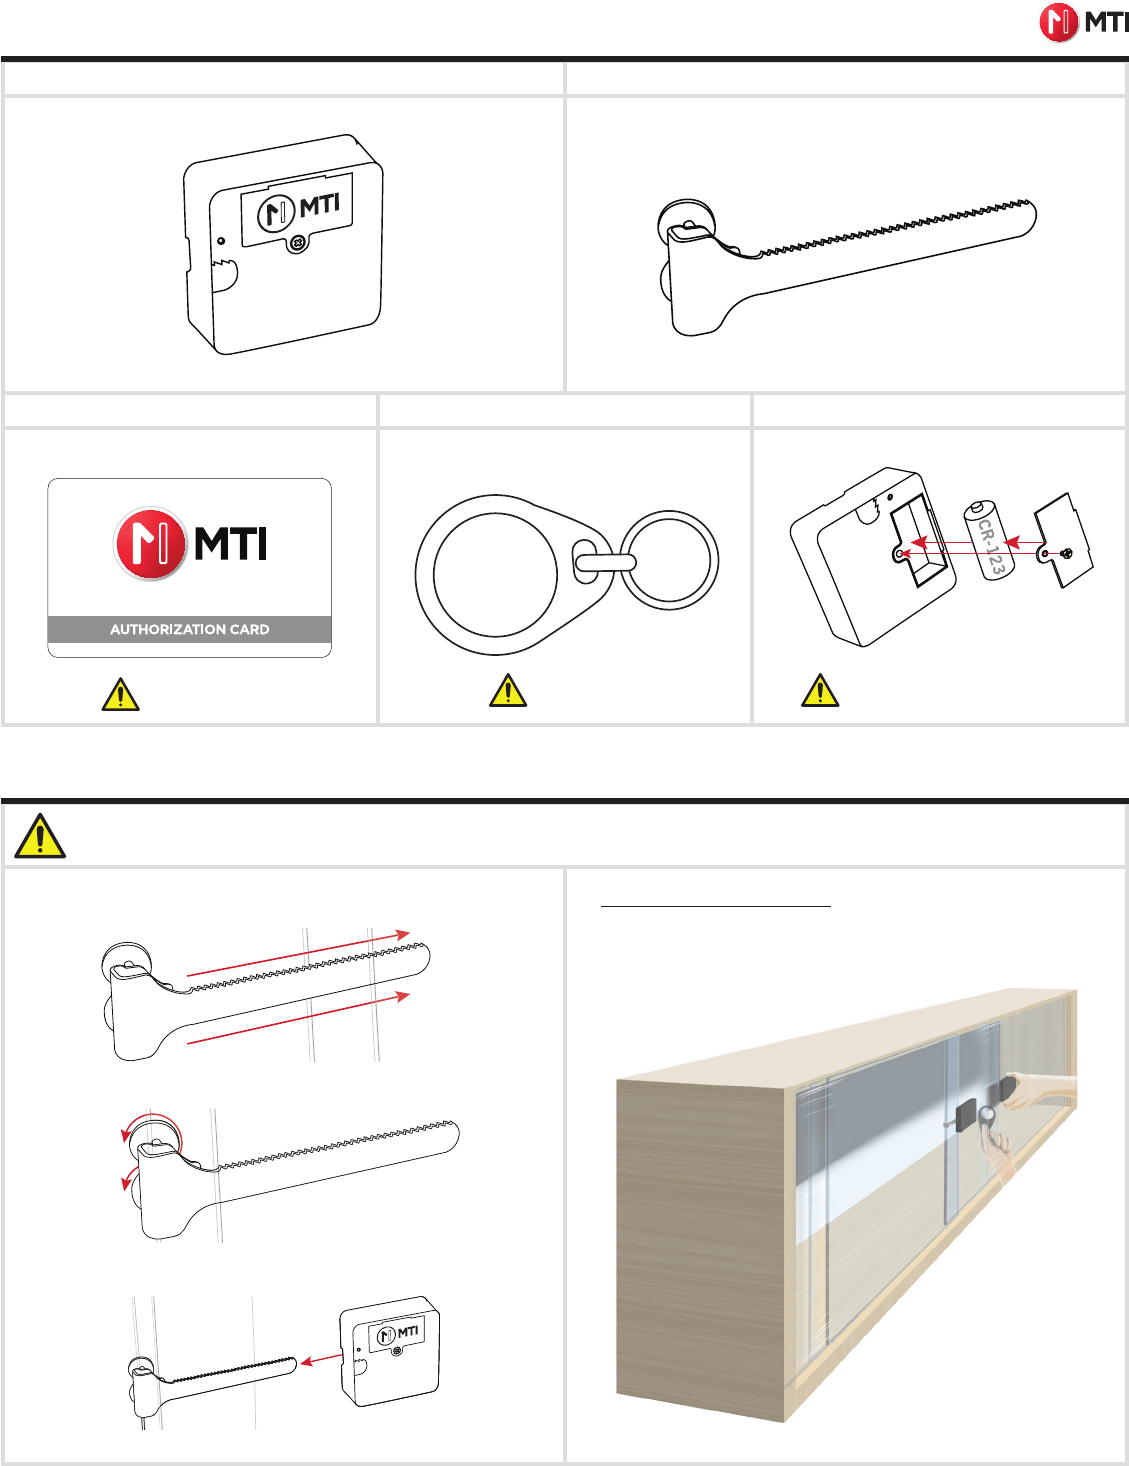
2DOOR/DRAWER INSTALLATION
Authorization Card - 401-00002
Screw Kit - 010-00011Battery - 410-00003User Key - 401-00001
Strike Plate - 165-00383Door/Drawer Lock - 165-00444
Sold separately.
Sold separately.
DOOR/DRAWER LOCK PARTS
Required Items:
See the last page of this manual for a mounting template.
• #1 Phillips Screwdriver
• #2 Phillips Screwdriver
• 3/32” Drill Bit
• 9/32” Socket (Optional)
Lock
Cabinet Door
48mm
10
Latch
42mm
50mm
Sliding Doors Install
For sliding doors, the 90° bracket can be removed from the latch (using
the #2 Phillips Screwdriver and the 9/32” socket) and hard mounted to a
fixture with wood screws.
Use #1 Phillips
screwdriver
19
48mm13.8
Use only CR-123 / 3VDC batteries.
NOTES BEFORE INSTALLING: Space devices at least 4” apart. Install the lock using hand tools only. Use of power tools
could lead to damage of the fixture. Uninstalled locks should be stored without batteries. Operating temp.: 41-95° F.

MTI LOCKS™ PRODUCT MANUAL
2
MTI P/N 063-00168 rev D ©2017 MTI All Rights Reserved
MTI 1050 NE 67th Avenue Hillsboro, OR 97124 T:800.426.6844 www.mobiletechinc.com
2
USING THE DOOR/DRAWER LOCK
MOUNTING TEMPLATE
Print or Photocopy at 100% to assist in placing the Door/Drawer Lock.
Self-closing hinges may prevent proper
function of the door/drawer lock.
Door/Drawer Locks (For initial lock setup prior to use, please see page 4):
Place the User Key within 30 mm of where the lock is placed. One you hear a click, open the door or drawer. Close door or drawer to relock.
Door Open Mode
If a door/drawer has been left open for 5 minutes, the lock will emit a continuous on and off beep tone for 10 minutes or until the door is closed.
Stuck Lock:
If a lock is jammed or unable to unlock, the lock will emit a slow beep tone to indicate that the lock is stuck.
Low Battery:
If the lock battery is low and needs replacement, the lock will emit a long single beep on every key swipe.
After install, but before closing the door/drawer, be sure to program locks.
Once programmed, swipe programmed key on lock to test the lock. The lock motor should spin, opening
the lock.
Note: If the lock emits a slow, low beep tone, then the motor is stuck due to overtightening the mount-
ing screws. Slowly unscrew the screw to the left of the battery door (when the MTI logo is right-side-
up) one-quarter turn at a time until the motor can spin, opening the lock.
DOOR/DRAWER INSTALLATION, CONTINUED
MTI LOCKS™ PRODUCT MANUAL
3
MTI P/N 063-00168 rev D ©2017 MTI All Rights Reserved
MTI 1050 NE 67th Avenue Hillsboro, OR 97124 T:800.426.6844 www.mobiletechinc.com
2
2
Glass Latch Bracket
GLASS DOOR LOCK PARTS
Authorization Card - 401-00002 Battery - 410-00003User Key - 401-00001
Sold separately. Sold separately.
Use #1 Phillips
screwdriver
Use only CR-123 / 3VDC batteries.
Thin (3-10mm) - 165-00476 or
Thick (10-19mm) - 165-00477
GlassDoor Lock - 165-00445
1. Slide the lock mount over the back sliding glass door while it is in its
closed position.
2. Tighten the knobs on the back of the mount.
3. Slide the front glass door into its closed position and slide the lock
over the lock mount blade.
NOTES BEFORE INSTALLING: Space devices at least 4” apart.
GLASS DOOR INSTALLATION & USE
Using the Glass Door Locks:
Place the User Key on the lock. Once you hear a click, slide the lock off
of the Glass Latch Bracket to slide the glass doors open. Slide the glass
doors closed and replace the lock on the Latch Bracket to relock.
MTI LOCKS™ PRODUCT MANUAL
4
MTI P/N 063-00168 rev D ©2017 MTI All Rights Reserved
MTI 1050 NE 67th Avenue Hillsboro, OR 97124 T:800.426.6844 www.mobiletechinc.com
2
2CAUTIONS
RFID PROGRAMMING
Entering Registration Mode (Initial Setup)
1. Swipe Authorization Card on the Lock (this will be the Authorization Card’s ID in the lock’s memory). The lock will emit 2 double beeps, indicating the
lock is ready to receive User Keys.
2. Each lock will stay in registration mode until it is closed with a swipe of the Authorization Card (emitting 2 quadruple beeps to indicate a closed session)
or is left idle for 3 minutes.
Registering User Keys to Each Lock
1. Individually swipe each User Key (up to 251) over the lock until all User Keys have been entered into the lock’s whitelist.
a. After each User Key swipe, the lock will emit a 2 beep ascending tone to confirm the key has been added.
b. Should a User Key add error occur, the lock will emit 4 fast beeps to indicate a key add error.
2. Swipe Authorization Card to close the registration session.
Deleting User Keys Whitelist on Locks
1. Place Authorization Card on the lock for 5 seconds until it emits a slow ticking signal.
2. Remove Authorization Card (ticking will continue).
3. Swipe the Authorization Card on the lock during this period to delete the entire whitelist of User Keys.
a. Lock will delete the whitelist and then emit an ascending 2 beep tone, indicating success.
b. Should a User Key delete error occur, the lock should emit 4 fast beeps to indicate a key delete error.
c. Note: Authorization Card’s information is not deleted.
Reset Locks to Default Mode
1. Remove lock from installed position
2. Press and hold the button on the back of the lock until it emits a 2 beep ascending tone (~3 seconds).
3. After tone is heard, release button
4. Lock will be reset
a. This deletes all User Keys, including the Authorization Card.
Correct Disposal of Product
This marking indicates that this product should not be disposed
with other household wastes throughout the EU. To prevent
possible harm to the environment or human health from
uncontrolled waste disposal, recycle it responsibly to promote
the sustainable reuse of material resources. To dispose of used
devices contact MTI Global Services Contact Center at
503-648-6500 or contact local recycling company for proper
recycling instructions for electronic devices.
Battery Caution
Risk of explosion if battery is replaced by an incorrect type.
Dispose of used batteries according to the instructions.
FCC Statement
This device complies with Part 15 of the FCC Rules.
Operation is subject to the following two conditions: (1) This device may not cause harmful interference, and (2) This device must accept any
interference received, including interference that may cause undesired operation.
The grantee is not responsible for any changes or modifications not expressly approved by the party responsible for compliance. Such modifications
could void the user’s authority to operate the equipment.
The RF Exposure Compliance distance is 20 millimeters.
NOTE: This equipment has been tested and found to comply with the limits for a Class B digital device, pursuant to part 15 of the FCC Rules.
These limits are designed to provide reasonable protection against harmful interference in a residential installation. This equipment generates, uses
and can radiate radio frequency energy and, if not installed and used in accordance with the instructions, may cause harmful interference to radio
communications. However, there is no guarantee that interference will not occur in a particular installation. If this equipment does cause harmful
interference to radio or television reception, which can be determined by turning the equipment off and on, the user is encouraged to try to correct
the interference by one or more of the following measures:
- Reorient or relocate the receiving antenna.
- Increase the separation between the equipment and receiver.
- Connect the equipment into an outlet on a circuit different from that to which the receiver is connected.
- Consult the dealer or an experienced radio/TV technician for help.