MobileTek Communication L600A IOT module User Manual
Shanghai MobileTek Communication Ltd. IOT module Users Manual
Users Manual

L600 Hardware Design
Copyright © Shanghai Mobiletek Communication Ltd 1
L600 Hardware Design
IoT LTE Module Series
Version: V1.0
Date: 2017-06-06
Shanghai Mobiletek Communication Ltd

L600 Hardware Design
Copyright © Shanghai Mobiletek Communication Ltd 2
Notice
Some features of the product and its accessories described herein rely on the software installed,
capacities and settings of local network, and therefore may not be activated or may be limited by local
network operators or network service providers.
Thus, the descriptions herein may not exactly match the product or its accessories which you purchase.
Shanghai Mobiletek Communication Ltd reserves the right to change or modify any information or
specifications contained in this manual without prior notice and without any liability.
Copyright
This document contains proprietary technical information which is the property of Shanghai Mobiletek
Communication Ltd. copying of this document and giving it to others and the using or communication
of the contents thereof, are forbidden without express authority. Offenders are liable to the payment of
damages. All rights reserved in the event of grant of patent or the registration of a utility model or
design. All specification supplied herein are subject to change without notice at any time.
DISCLAIMER
ALL CONTENTS OF THIS MANUAL ARE PROVIDED “AS IS”. EXCEPT AS REQUIRED BY
APPLICABLE LAWS, NO WARRANTIES OF ANY KIND, EITHER EXPRESS OR IMPLIED,
INCLUDING BUT NOT LIMITED TO, THE IMPLIED WARRANTIES OF MERCHANTABILITY
AND FITNESS FOR A PARTICULAR PURPOSE, ARE MADE IN RELATION TO THE
ACCURACY, RELIABILITY OR CONTENTS OF THIS MANUAL.
TO THE MAXIMUM EXTENT PERMITTED BY APPLICABLE LAW, IN NO EVENT SHALL
SHANGHAI MOBILETEK COMMUNICATION LTD BE LIABLE FOR ANY SPECIAL,
INCIDENTAL, INDIRECT, OR CONSEQUENTIAL DAMAGES, OR LOSS OF PROFITS,
BUSINESS, REVENUE, DATA, GOODWILL SAVINGS OR ANTICIPATED SAVINGS
REGARDLESS OF WHETHER SUCH LOSSES ARE FORSEEABLE OR NOT.

L600 Hardware Design
Copyright © Shanghai Mobiletek Communication Ltd 3
Version History
Date Version Description of change Author
2017-06-06 V1.0 Initial

L600 Hardware Design
Copyright © Shanghai Mobiletek Communication Ltd 4
Contents
1 ABOUT THIS DOCUMENT ...................................... 7
1.1Applicable scope ....................................................................................................................................... 7
1.2 Writing purpose ....................................................................................................................................... 7
1.3 Support and reference documents list .................................................................................................... 7
1.4 Terms and Abbreviations ........................................................................................................................ 8
2 PRODUCT OVERVIEW ........................................ 10
2.1 Package Dimensions .............................................................................................................................. 11
2.2 Product Function Outline ..................................................................................................................... 12
2.2.1 Hardware Diagram ....................................................... 12
2.2.2 Radio frequency function ............................................... 13
3 INTERFACE DESCRIPTION ................................... 16
3.1 PIN Definition ...................................................................................................................................... 16
3.1.1 Pin I/O parameter definition ........................................... 16
3.1.2 Pin Map ................................................................ 16
3.1.3 PIN Definition and function description ................................ 17
3.2 Operating condition ............................................................................................................................. 22
3.3 Digital I/O characteristics ..................................................................................................................... 22
3.4 Power Interface ...................................................................................................................................... 23
3.4.1 Power supply pin description ........................................... 23
3.4.2 Power supply requirements .............................................. 23
3.4.3 Power Supply Design Guide .............................................. 24
3.4.4 Recommended Power supply circuit ....................................... 25
3.4.5 Power Supply Layout guide .............................................. 25
3.5 UIM interface ......................................................................................................................................... 26
3.5.1 Pin definition ......................................................... 26
3.5.2 Design Guide ........................................................... 26
3.5.3 UIM interface reference circuit ........................................ 27
3.6 PCM interface ........................................................................................................................................ 27
3.6.1 PCM interface definition ............................................... 27
3.6.2 PCM interface application .............................................. 29
3.7 USB2.0 interface .................................................................................................................................... 30
3.7.1 USB interface pin definition ........................................... 30
3.7.2 USB Interface application .............................................. 30
3.8 UART Interface ...................................................................................................................................... 31
3.8.1 Pin description ........................................................ 31
3.8.2 UART interface application ............................................. 32
3.9 Power on/off and reset interface ........................................................................................................... 34

L600 Hardware Design
Copyright © Shanghai Mobiletek Communication Ltd 5
3.9.1 Pin definition ......................................................... 34
3.9.2 Power on sequence ...................................................... 34
3.9.3 Power off sequence ..................................................... 35
3.9.4 Reset sequence ......................................................... 36
3.9.5 Power on/off and reset interface application ........................... 37
3.10 Interactive interface ............................................................................................................................. 38
3.10.1 Pin definition ........................................................ 38
3.10.2 interactive interface application ..................................... 39
3.11 Net Light interface ............................................................................................................................... 40
3.11.1 Pin define ............................................................ 40
3.11.2 Net light application ................................................. 40
3.12 System boot configuration and download ................................................................................... ....... 41
3.12.1 Pin definition ........................................................ 41
3.12.2 Boot configuration and force USB interface application ................ 41
3.13 Analog and Digital conversion (ADC) interface ................................................................................ 41
3.14 I2C interface ......................................................................................................................................... 42
3.14.1 I2C pin definition .................................................... 42
3.15 Antenna interface ................................................................................................................................. 43
3.15.1 RF signal PCB layout guide ............................................ 43
3.15.2 applications .......................................... 错误!未定义书签。
4 PRODUCT CHARACTERISTICS ................................. 45
4.1 Absolute parameters .............................................................................................................................. 45
4.2 Operation condition ............................................................................................................................... 45
4.2.1 Operation voltage ...................................................... 45
4.2.2 Work mode(TBD) ......................................................... 45
4.2.3 current consumption(TBD) ............................................... 46
4.3 Working and storage temperature ....................................................................................................... 47
4.4 ESD performance .................................................................................................................................. 47
5 DESIGN GUIDELINE ........................................ 49
5.1 General design rules and requirements ............................................................................................... 49
5.2 Reference circuit .................................................................................................................................... 49
5.3 RF part design guideline ....................................................................................................................... 50
5.3.1 Early antenna design considerations ................................................................................................. 50
5.4 EMC and ESD design advice ................................................................................................................ 50
5.5 PCB Recommended land pattern ......................................................................................................... 51
5.6 Products recommended upgrade .......................................................................................................... 51
6 MANUFACTURERS ........................................... 52
6.1 Steel mesh design ................................................................................................................................... 52
6.2 Temperature curve ................................................................................................................................. 53

L600 Hardware Design
Copyright © Shanghai Mobiletek Communication Ltd 6
6.3 The Moisture Sensitivity Level (MSL) ................................................................................................. 54
6.4 Baking Requirements ............................................................................................................................ 55
7 PACKAGE STORAGE INFORMATION(TBD) ........................ 56
7.1 Package information(TBD) ................................................................................................................... 56
7.1.1 Tape and reel information .............................................. 56
7.1.1 Package information .................................................... 56
7.2 Bagged storage conditions ..................................................................................................................... 56

L600 Hardware Design
Copyright © Shanghai Mobiletek Communication Ltd 7
1 About this document
1.1Applicable scope
This document describes the L600 series 4G LTE CAT-M1 and NB-IoT LCC Module (hereinafter
referred to as L600), the basic specifications, product electrical characteristics, design guidance and
hardware interface development guidance. Users need to follow this documentation requirements and
guidance for design.
This document applies only to L600 series products in the application development.
1.2 Writing purpose
This document provides the design and development basis for the product users. By reading this
document, users can have a whole understanding of the product, the technical parameters of the
product have a clear understanding, and can be used in this document to complete the development of
wireless LTE CAT-M1 and NB-IOT Internet access functions.
This hardware development document not only provides the product functional features and
technical parameters, but also provides product reliability testing and related testing standards,
business functions to achieve process, RF performance indicators and user circuit design guidance.
1.3 Support and reference documents list
In addition to the hardware development documentation, we also provide a guide to the
development board based on this product manual and software development instruction manual, 1-1 is
supported as a list.
Table 1-1 support document list
No. Documents
1 《L600 AT Command User Guide》
2 《L600_SPEC.docx》
3 《L600 EVB User Manual》
4 《L600 Schematic checklist》
5 《L600 Layout checklist》
6 《L600_Reference Design_V1.pdf》
7 《L600_V1_DECAL.sch》
L600 Hardware Design
Copyright © Shanghai Mobiletek Communication Ltd 8
8 《L600_V1_DECAL.PCB》
1.4 Terms and Abbreviations
Table 1-2 is the Document relative Terms and Abbreviations。
Table 1-2 Terms and Abbreviations
Abbreviation Descriptions
ESD Electro-Static discharge
USB Universal Serial Bus
UART Universal Asynchronous Receiver Transmitter
SDCC Secure Digital Card Controller
USIM Universal Subscriber Identification Module
SPI Serial Peripheral Interface
I2C Inter-Integrated Circuit
PCM Pulse-coded Modulation
I/O Input/output
LED Light Emitting Diode
GPIO General-purpose Input/Output
GSM Global Standard for Mobile Communications
GPRS General Packet Radio Service
WCDMA Wideband Code Division Multi Access
UMTS Universal Mobile Telecommunication System
HSDPA High Speed Downlink Packet Access
HSUPA High Speed Uplink Packet Access
AGPS Assisted Global Positioning System
BER Bit Error Rate
DL Downlink
COEX WLAM/LTE-ISM coexistence
SMPS Switched-mode power supplies
LTE Long Term Evolution
FDD Frequency Division Duplexing
TDD Time Division Duplexing

L600 Hardware Design
Copyright © Shanghai Mobiletek Communication Ltd 9
DPCH Dedicated Physical Channel
DPCH_Ec Average energy per PN chip for DPCH. DPCH
IoT Internet of Things
L600 Hardware Design
Copyright © Shanghai Mobiletek Communication Ltd 10
2 Product Overview
L600 is a series of LTE CAT M1 and CAT NB1 module and special design for global IoT market,
and it’s have integrated rich peripheral interface. User can choose the module based on the wireless
network configuration. In this document, the supported radio band is described in the following items.
This product is a LCC interface of 4G wireless internet module, with the high speed, small size, light
weight, high reliability can be widely used in various products and devices with wireless internet
access:
Table 2-1 L600 series module type correspond band
Support band L600-V L600-A L600-C
LTE CAT M1 B1 ●
B2 ●
B4 ● ●
B8 ●
B12 ●
B13 ●
Data transmission specifications
LTE-FDD CAT M1
- Uplink up to 375k bps,
- Downlink up to 375K bps
LTE-FDD CAT NB-IoT
- Uplink up to 70k bps,
- Downlink up to 32K bps
Interface
USB2.0
UART
USIM (3V/1.8V)
GPIO
ADC
PCM
SPI
I2C
NETLIGHT
POWER KEY
RESET
Dimensions(L×W×H):25mm×21.5mm×2.6mm
L600 Hardware Design
Copyright © Shanghai Mobiletek Communication Ltd 11
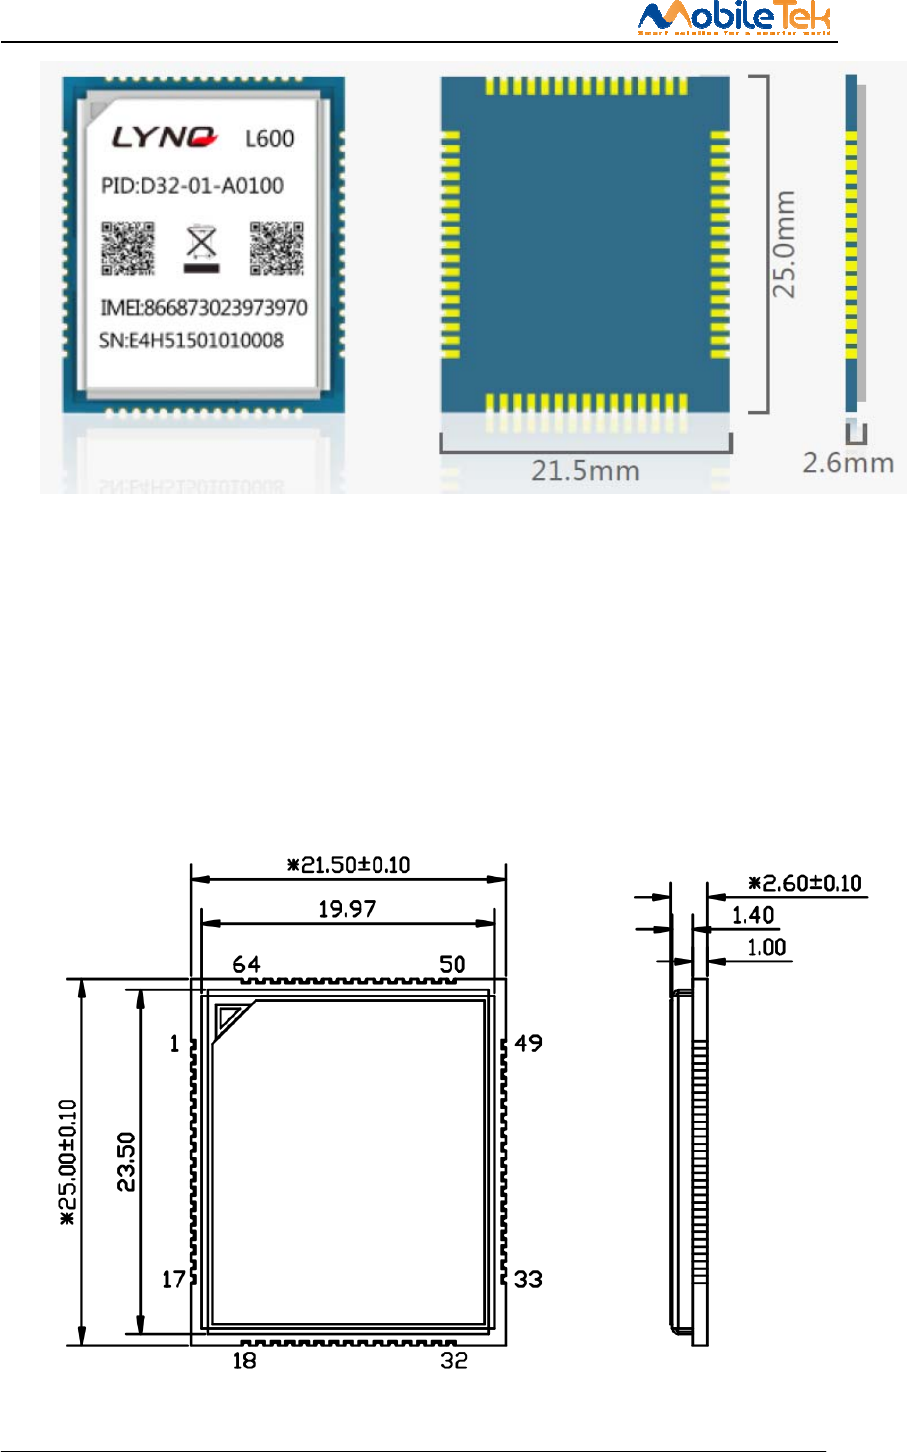
TOP VIEW BOTTOM VIEW SIDE VIEW
Figure 2-1 Product Physical Map
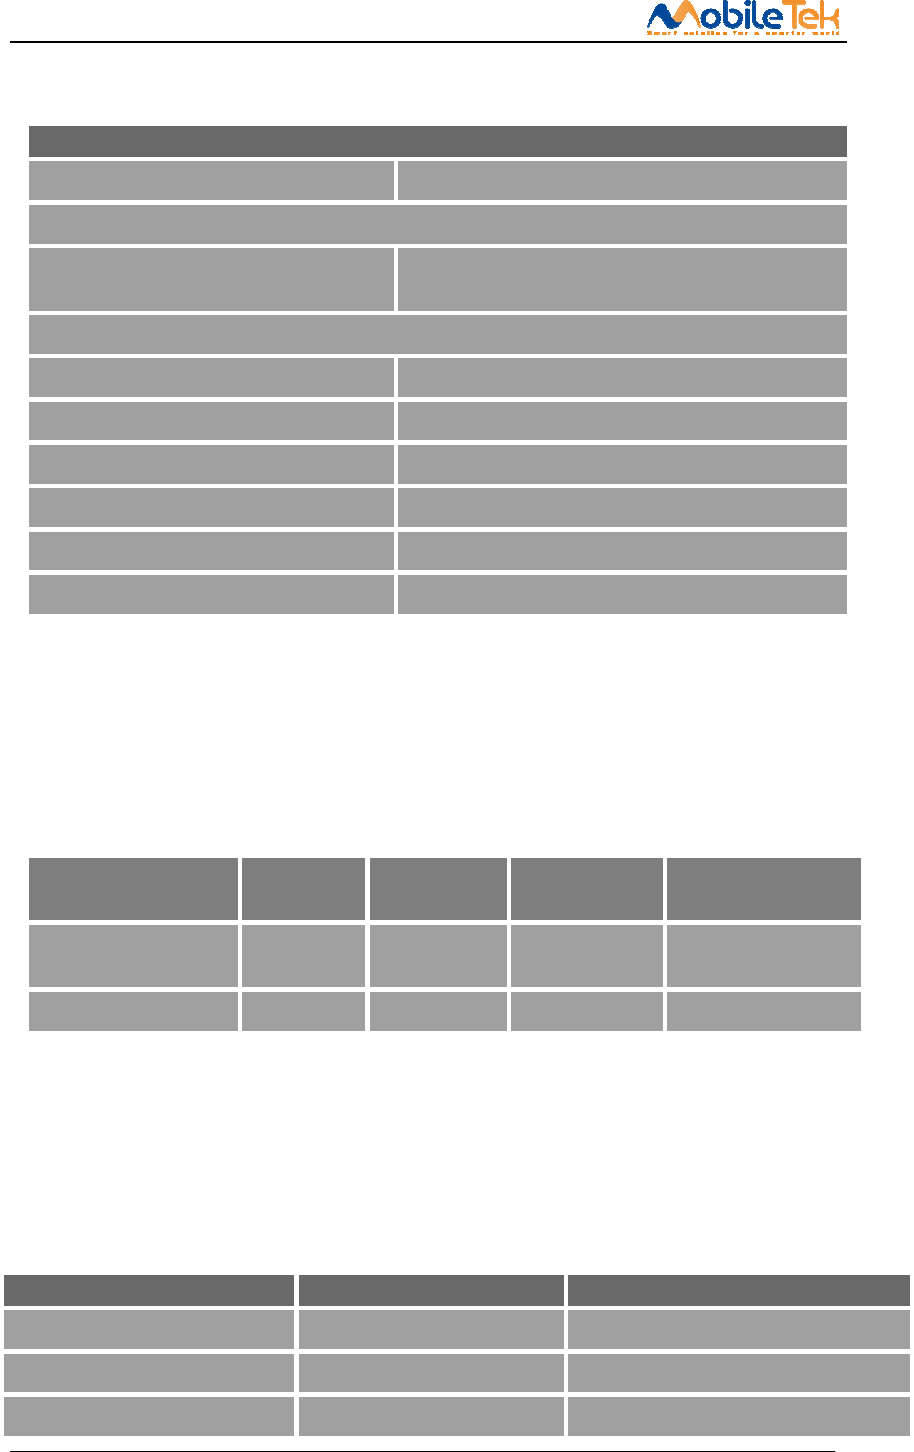
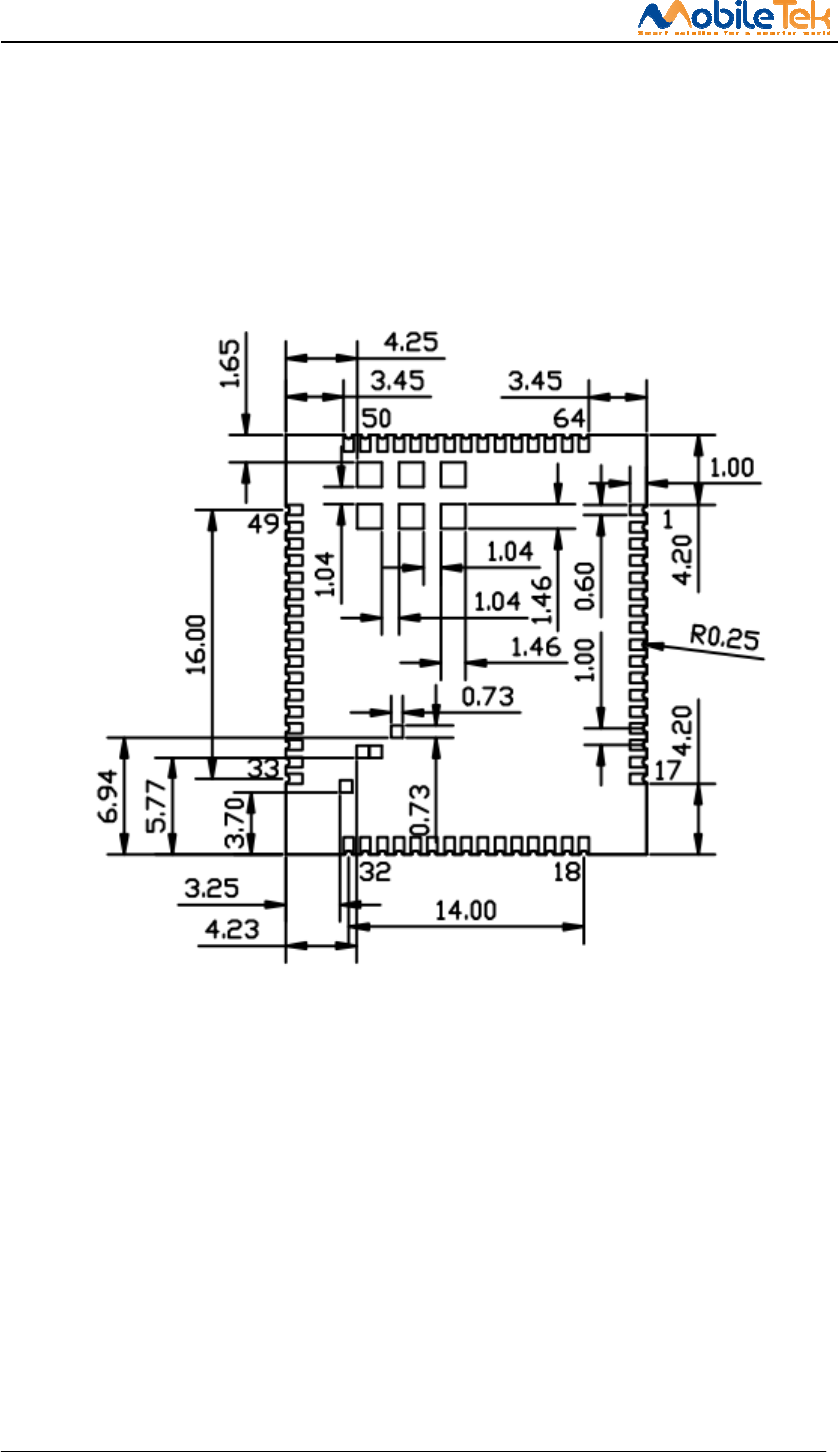
2.1 Package Dimensions
The product module is 64-PIN LCC package module. The size of L600 is extremely small, it is only
21.5.0 x 25.0 x 2.6 mm with LCC package, It is cost competitive and high integrated which make it
convenient for customer to design their own application products. Pin 1 position from the bottom of
the belt angle welding plate to identify, the missing corner where the direction of the corresponding
module angle pad, figure 2-2 is the product dimension type map:
L600 Hardware Design
Copyright © Shanghai Mobiletek Communication Ltd 12
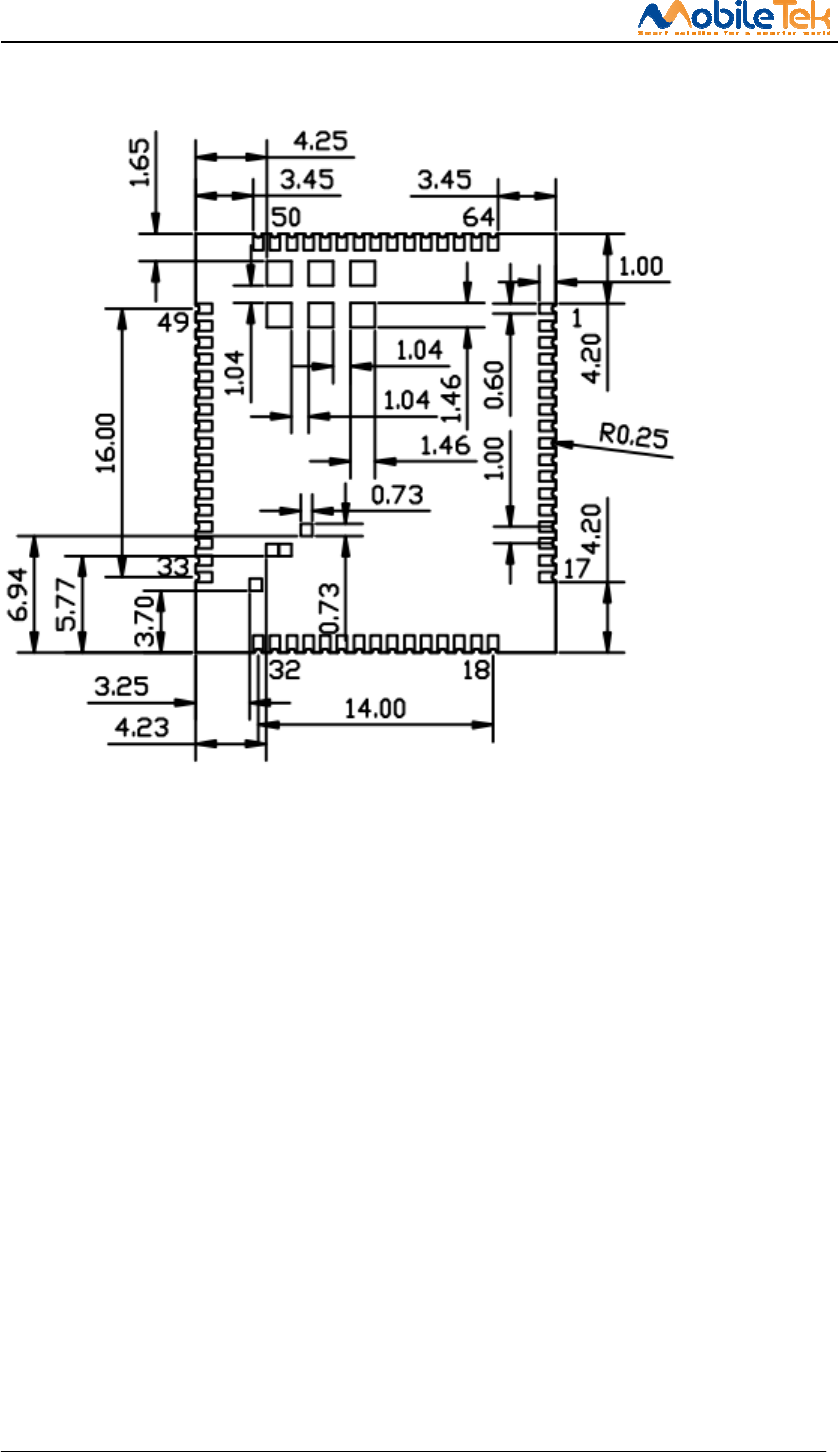
(a)Top Dimensions (Unit mm) (b)Side View (Unit mm)A
(c)Bottom Dimensions (Unit mm)
Note: BGA test pin in actual use of the customers don't need (PCB assembly, the stencil file).
Figure 2-2 Module Dimensions
2.2 Product Function Outline
2.2.1 Hardware Diagram
This product mainly includes the following signal group:USB Interface signal、USIM card Interface
signal、I2C Interface signal、UART Interface signal、PCM Interface signal、SPI interface、Module
startup、Module control signal、Power supply and ground. The global architecture of the L600 module
is described in the figure below.

L600 Hardware Design
Copyright © Shanghai Mobiletek Communication Ltd 13
RF
Transceiver
Baseband
FLASH
DDR
19.2
MHZXO
Power on/off
PMIC
LTE CATM1/NB1
MAIN ANT
GNSS IQ
VBAT
VBAT
LDO
UART/SPI
SIM CARD
PCM
I/O STATUS
VDD_RF
DATA
RF IQ
CLK
Reset
ASM
Figure 2-3 L600 System Functional Architecture
2.2.2 Radio frequency function
RF Function Overview:
Dual -Band FULL Duplex FDD-LTE CATM1
Dual -Band FULL Duplex FDD-LTE CATNB1
The operating frequency range of the transmitter is shown in table 2-2.
Table 2-3 RF frequency band
Working band Upstream band(Uplink) Downlink frequency(Downlink)
FDD_LTE B1 1920 MHz~1980 MHz 2110 MHz~2170 MHz
FDD_LTE B2 1850 MHz — 1910 MHz 1930 MHz — 1990MHz
FDD_LTE B3 1710 MHz~1785 MHz 1805 MHz~1880 MHz
FDD_LTE B4 1710 MHz~1755 MHz 2110 MHz~2155 MHz
FDD_LTE B5 824 MHz~849 MHz 869 MHz~894 MHz
FDD_LTE B8 880 MHz~915 MHz 925 MHz~960 MHz
FDD_LTE B12 699 MHz~716 MHz 729 MHz~746 MHz
FDD_LTE B13 777 MHz~787 MHz 746 MHz~756 MHz
FDD_LTE B17 704 MHz~716 MHz 734 MHz~746 MHz
FDD_LTE B18 815 MHz~830 MHz 860 MHz~875 MHz
L600 Hardware Design
Copyright © Shanghai Mobiletek Communication Ltd 14
FDD_LTE B19 830 MHz~845 MHz 875 MHz~890 MHz
FDD_LTE B20 832 MHz~862 MHz 791 MHz~821 MHz
FDD_LTE B26 814 MHz~849 MHz 859 MHz~894 MHz
FDD_LTE B28 703 MHz~748 MHz 758 MHz~803 MHz
TDD_LTE B39 1880 MHz~1920 MHz 1880 MHz~1920 MHz
Table 2-4 Conducted transmission power
Working Band Max Power Min Power
FDD_LTE B1 23dBm +/-2.7dB <-40dBm
FDD_LTE B2 23dBm +/-2.7dB <-40dBm
FDD_LTE B3 23dBm +/-2.7dB <-40dBm
FDD_LTE B4 23dBm +/-2.7dB <-40dBm
FDD_LTE B5 23dBm +/-2.7dB <-40dBm
FDD_LTE B8 23dBm +/-2.7dB <-40dBm
FDD_LTE B12 23dBm +/-2.7dB <-40dBm
FDD_LTE B13 23dBm +/-2.7dB <-40dBm
FDD_LTE B17 23dBm +/-2.7dB <-40dBm
FDD_LTE B18 23dBm +/-2.7dB <-40dBm
FDD_LTE B19 23dBm +/-2.7dB <-40dBm
FDD_LTE B20 23dBm +/-2.7dB <-40dBm
FDD_LTE B26 23dBm +/-2.7dB <-40dBm
FDD_LTE B28 23dBm +/-2.7dB <-40dBm
TDD_LTE B39 23dBm +/-2.7dB <-40dBm
Table 2-6 Reference sensitivity (QPSK)
Channel bandwidth
E-UTRA
Band
200 KHz (CAT NB1)
REF SENS
(Total)
200 KHz(CAT NB1)
REF SENS
(EPRE @15KHz)
200 KHz(CAT NB1)
NB-PDSCH
repetitions
(Total)
200 KHz(CAT NB1)
NB-PDSCH
repetitions
(EPRE
@15KHz)
1.4 MHz
(CAT M1)
Duplex
Mode
1 -110 -120.8 TBD = Total – 10.8dBm -105 FDD
2 -110 -120.8 TBD = Total – 10.8dBm -103 FDD
3 -110 -120.8 TBD = Total – 10.8dBm -102 FDD
4 -- -- -- -- -105 FDD
5 -111 -121.8 TBD = Total – 10.8dBm -104 FDD
8 -111 -121.8 TBD = Total – 10.8dBm -103 FDD
12 -111 -121.8 TBD = Total – 10.8dBm -103 FDD
13 -111 -121.8 TBD = Total – 10.8dBm -103 FDD
17 -111 -121.8 TBD = Total – 10.8dBm -- FDD

L600 Hardware Design
Copyright © Shanghai Mobiletek Communication Ltd 15
18 -111 -121.8 TBD = Total – 10.8dBm -105 FDD
19 -111 -121.8 TBD = Total – 10.8dBm -105 FDD
20 -111 -121.8 TBD = Total – 10.8dBm -103 FDD
26 -111 -121.8 TBD = Total – 10.8dBm -104 FDD
28 -111 -121.8 TBD = Total – 10.8dBm -104 FDD
39 -- -- -- -- -105 TDD

L600 Hardware Design
Copyright © Shanghai Mobiletek Communication Ltd 16
3 Interface Description
3.1 PIN Definition
3.1.1 Pin I/O parameter definition
The I/O parameter definition of the product is shown in table 3-1.
Table 3-1 I/O parameter definitions
Pin attribute symbol Description
PI Power input PIN
PO Power output PIN
AI Analog input
AIO Analog signal input/output PIN
I/O Digital signal input/output PIN
DI Digital signal input
DO Digital signal output
DOH Digital output with high level
DOL Digital output with low level
PD Pull down
PU Pull up
AO Analog output
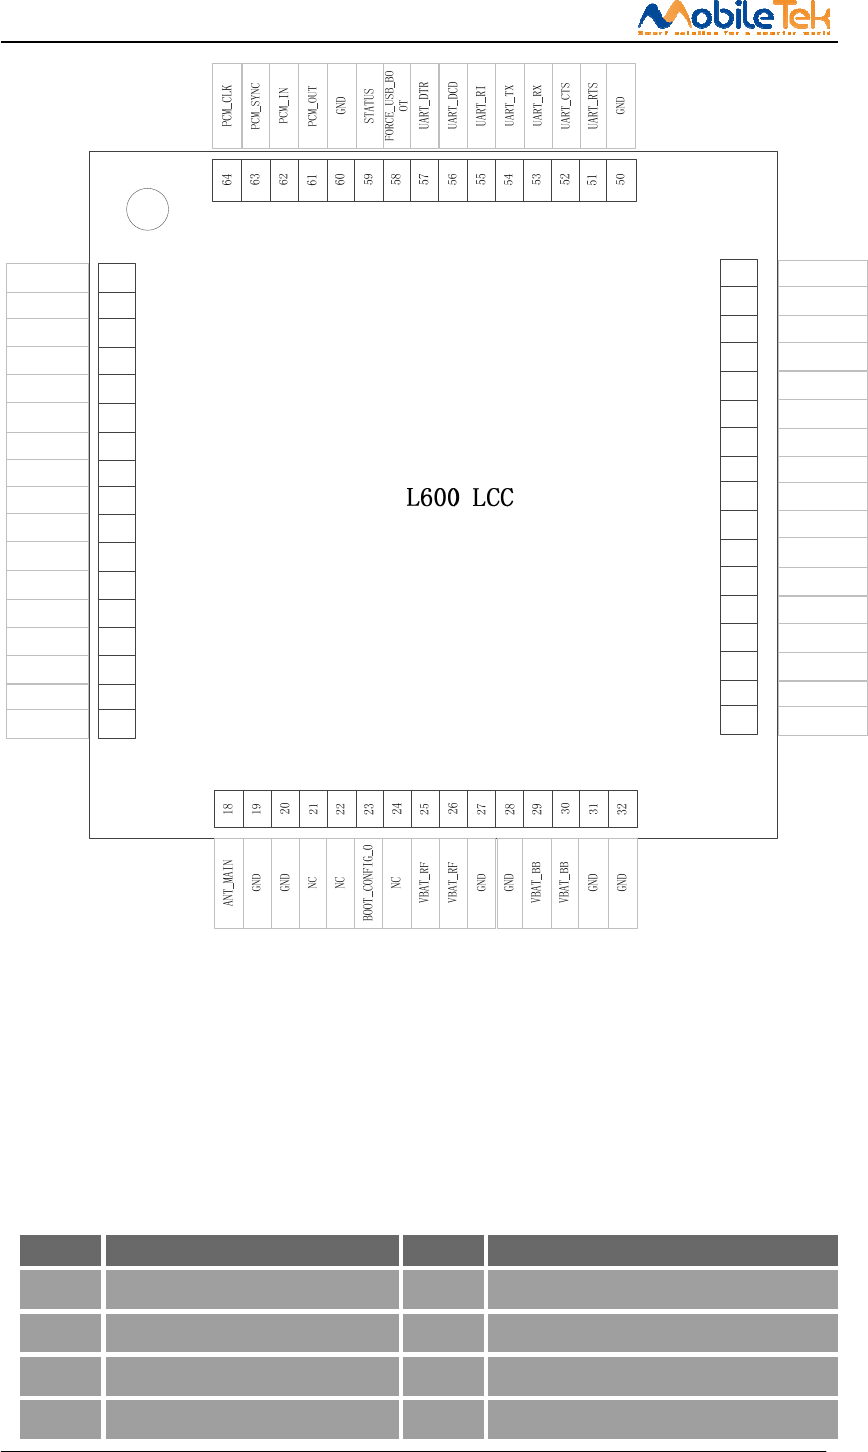
3.1.2 Pin Map
L600 is a extremely small LCC package module and special design for the IoT marketing, and it’s
have integrated rich peripheral interface. Such as USIM, USB ,PCM ,UART and interactive interface,
detail description show as below chart. All hardware interfaces which connect L600 to customers’
application platform are through 64 pins pads (Metal half hole). Figure 3-1 is L600 PIN outline
diagram.
L600 Hardware Design
Copyright © Shanghai Mobiletek Communication Ltd 17
1
2#
3#
4
6
7
8
9
10
11
12
13
14
15
16
5
17
SPI_CS
SPI_MOSI
SPI_MISO
SPI_CLK
GND
USB_HS_DM
USB_HS_DP
GND
USB_VBUS
USB_ID
GND
UIM_CLK
UIM_RESET
UIM_DATA
UIM_PRESENT
VREG_L6_UIM
GND
49
48
47
45
44
43
42
41
40
39
38
37
36
35
34
46
33
NC
FLIGHTMODE
WAKEUP_OUT
WAKEUP_IN
GND
I2C_SDA
I2C_SCL
MB_GPIO_0
GND
VREG_L11_1P8
NETLIGHT
NC
RESET_N
PHONE_ON_N
ADC1
ADC2
NC
Top View
Figure 3-1 Pin Map View (Top View)
Note:1. # flag Pin standard this pin is a Multi-function pin and it’s integrated different function in
different system status, and the detail function please refer to the correspond chapter.
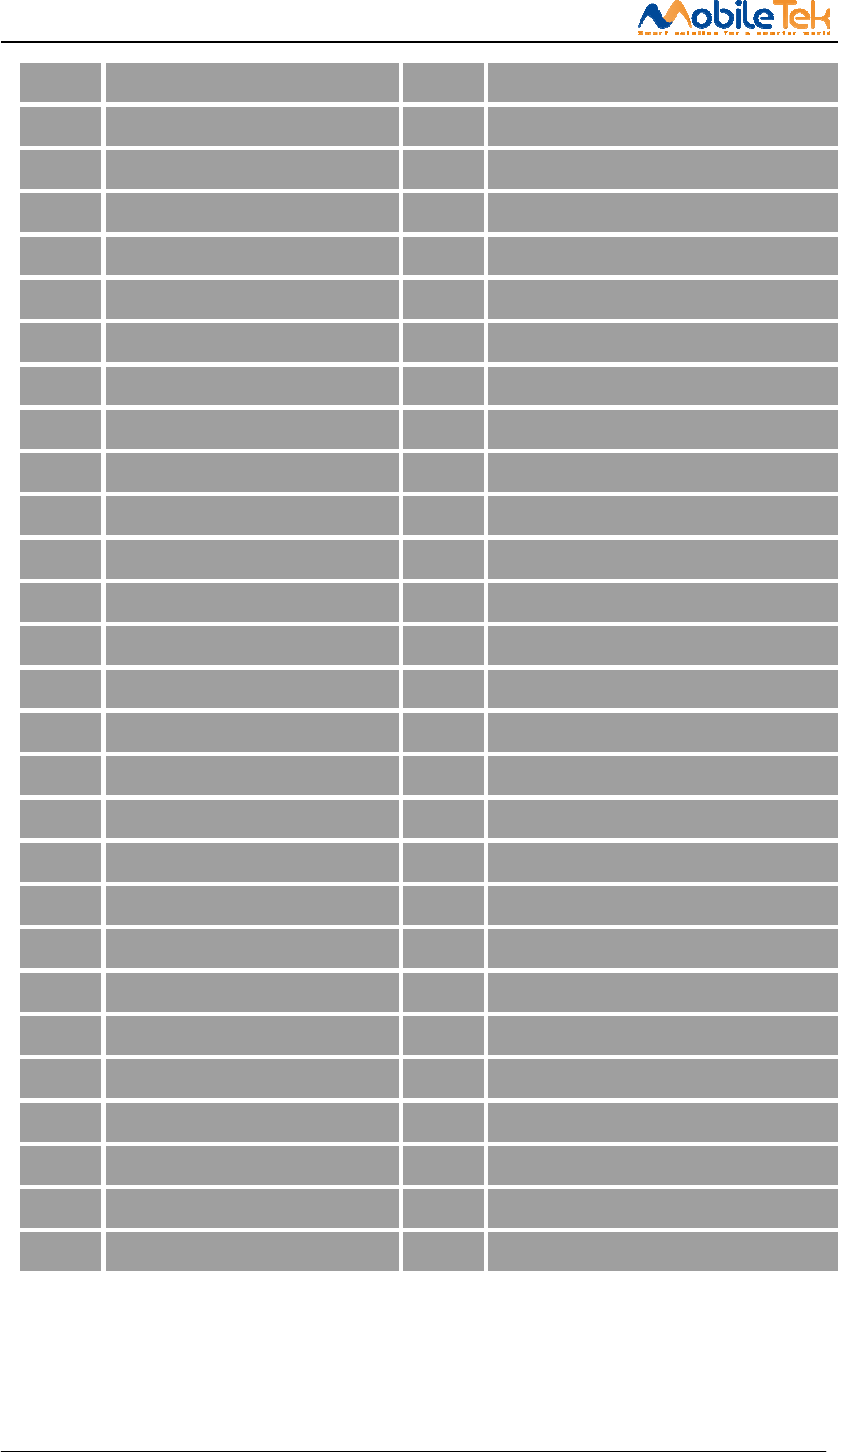
3.1.3 PIN Definition and function description
Table 3-2 Pin definition
Pin No. Pin description Pin No. Pin description
1 SPI_CS 2 SPI_MOSI
3 SPI_MISO 4 SPI_CLK
5 GND 6 USB_HS_DM
7 USB_HS_DP 8 GND
L600 Hardware Design
Copyright © Shanghai Mobiletek Communication Ltd 18
9 USB_VBUS 10 USB_ID
11 GND 12 UIM_CLK
13 UIM_RESET 14 UIM_DATA
15 UIM_PRESENT 16 VREG_L6_UIM
17 GND 18 ANT_MAIN
19 GND 20 GND
21 NC 22 NC
23 BOOT_CONFIG_0 24 NC
25 VBAT_RF 26 VBAT_RF
27 GND 28 GND
29 VBAT_BB 30 VBAT_BB
31 GND 32 GND
33 NC 34 ADC2
35 ADC1 36 PHONE_ON_N
37 RESET_N 38 NC
39 NETLIGHT 40 VREG_L11_1P8
41 GND 42 MB_GPIO_0
43 I2C_SCL 44 I2C_SDA
45 GND 46 WAKEUP_IN
47 WAKEUP_OUT 48 FLIGHTMODE
49 NC 50 GND
51 UART_RTS_N 52 UART_CTS_N
53 UART_RX 54 UART_TX
55 UART_RI 56 UART_DCD
57 UART_DTR 58 FORCE_USB_BOOT
59 STATUS 60 GND
61 PCM_OUT 62 PCM_IN
63 PCM_SYNC 64 PCM_CLK

L600 Hardware Design
Copyright © Shanghai Mobiletek Communication Ltd 19
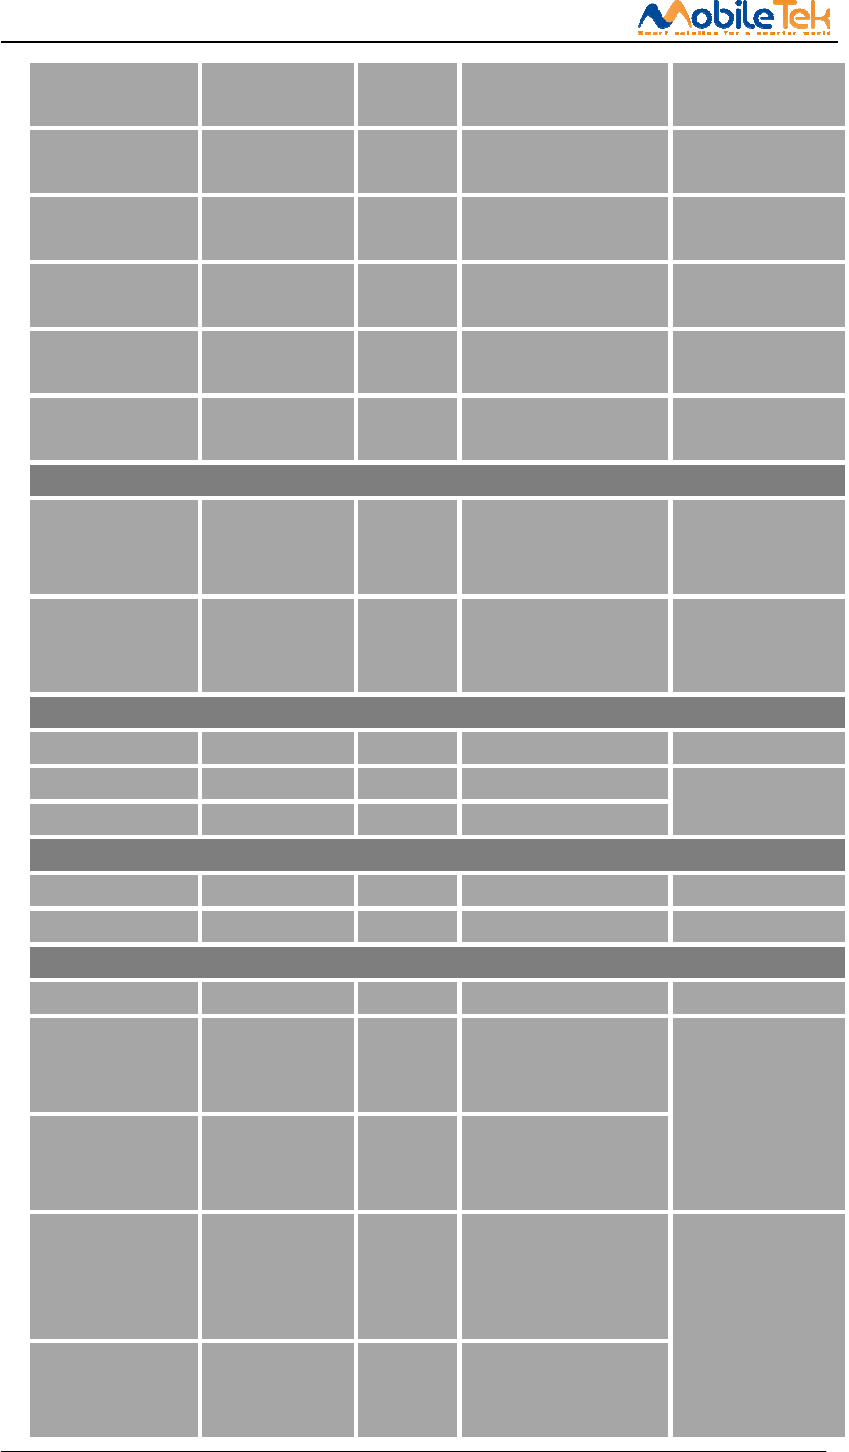
Table 3-3 Pin Function Description
Power interface
Pin Name Pin No. I/O Description Content
VBAT_BB 29,30 PI
Power supply voltage,
VBAT=3.4V~4.2V.
The power supply
for system Maximum
load current must
above 2A. Keep
de-cap capacitor
close to the this
Net.
VBAT_RF 25,26 PI Power supply voltage,
VBAT=3.4V~4.2V.
VREG_L6_UIM 16 PO
Module LDO output
power, dual-voltage
output, Max current
300mA.
Only use for
external SIM Card
VDD.
VREG_L11_1P8 40 PO
Module LDO output
power for MCP and
accessories
If not use please
let it open or add
a 10 uF de-cap
capacitor to
ground.
GND
5,8,11,17,19,2
0,27,28,31,32,
41,45,50,60
-- Ground.
System control interface
Pin Name Pin No. I/O Description Content
PHONE_ON_N 36 DI System power on/off
input, active low.
RESET_N 37 DI System reset input,
active low.
FLIGHTMODE 48 DI, PU
The input signal, used
to control the system
into flight mode, L:
flight mode; H: normal
mode
Pull UP to
VDD_1V8(PIN 40)
with 10K resistor
Interactive interface
Pin Name Pin No. I/O Description Content
NETLIGHT 51 DO Identify the system
network status.
STATUS 40 DO
Module status
identify: High level
power on, low level

L600 Hardware Design
Copyright © Shanghai Mobiletek Communication Ltd 20
power off.
WAKEUP_IN 46 DI AP weak up module
WAKEUP_OUT 47 DO Module wake up AP
SIM interface
Pin Name Pin No. I/O Description Content
UIM_PRESENT 15 DI,PU
Input pin as USIM card
detect pin.
H: UIM is removed
L: UIM is inserted
If not use keep it
open.
UIM_DATA 14 I/O
USIM Card data I/O,
which has been
pulled up with a 10KR
resistor to
UIM_VDD in module. Do
not pull
up or pull down in
users’ application
circuit. All signals of
USIM
interface should
be protected with
ESD/EMC.
UIM_RESET 13 DO UIM Reset
UIM_CLK 12 DO UIM Clock
UIM_VDD 16 PO
UIM Card Power output,
output
Voltage depends on UIM
mode
automatically, and
one is
3.0V±10%, another is
1.8V±10%.
Current is less than
50mA.
PCM interface
Pin Name Pin No. I/O Description Content
PCM_CLK 64 DO PCM data bit clock.
If not use keep it
open.
PCM_SYNC 63 DO PCM data frame sync
signal.
PCM_IN 62 DI PCM data input.
PCM_OUT 61 DO PCM data output.
FULL UART
Pin Name Pin No. I/O Description Content
RTS 51 DI DET Request to send. If not use keep it
open.
L600 Hardware Design
Copyright © Shanghai Mobiletek Communication Ltd 21
CTS 52 DO Clear to Send. If not use keep it
open.
RX 53 DI Receive Data. If not use keep it
open.
RI 55 DO Ring Indicator. If not use keep it
open.
DCD 56 DO Carrier detects. If not use keep it
open
TX 54 DO Transmit Data. If not use keep it
open.
DTR 57 DI DTE get ready. If not use keep it
open.
DEBUG PORT(Multiplex)
SPI_MOSI(MDM_DBG
_UART_TX) 2 DI
Before system On:
module UART debug port
System On: SPI_MOSI
Suggest add test
point
SPI_MISO(MDM_DBG
_UART_RX) 3 DO
Before system On:
module UART debug port
System On: SPI_MISO
Suggest add test
point
I2C interface
Pin Name Pin No. I/O Description Content
I2C_SCL 43 DO I2C clock output. If not use keep it
open.
I2C_SDA 44 I/O I2C data input/output.
RF port
Pin Name Pin No. I/O Description Content
MAIN _ANT 18 AIO Main Antenna
Others
Pin Name Pin No. I/O Description Content
ADC1 35 AI
Analog conversion
digital input
interface1 If not use keep it
open.
ADC2 34 AI
Analog conversion
digital input
interface2
FORCE_USB_BOOT 58 I/O
Pull up to 1.8V (L600
VDD_1V8) with 10K
resistor force module
in USB download mode
Recommend placing
test points for
debug.
BOOT_CFG0 23 DI, PD
Pull up to 1.8V (L600
VDD_1V8) with 10K
resistor force module
L600 Hardware Design
Copyright © Shanghai Mobiletek Communication Ltd 22
in fastboot mode
3.2 Operating condition
Table 3-4 module recommended operating condition
Parameter Description Min. Typ. Max. Unit
VBAT Main power supply for
the module
3.4 3.8 4.2 V
3.3 Digital I/O characteristics
Table 3-5 1.8V Digital I/O characteristics
Parameter Description Min. Typ. Max. Unit
VIH High level input voltage 0.7*VDD_PX VDD_PX VDD_PX+0.3 V
VIL Low level input voltage -0.3 0 0.2* VDD_PX V
VOH High level output voltage VDD_PX-0.45 - VDD_PX V
VOL Low level output voltage 0 0 0.45 V
IOH
High-level output current
(no pull down resistor) - 2 - mA
IOL
Low-level output current
(no pull up resistor) - -2 - mA
IIH
Input high leakage
current (no
pull down resistor)
- - 1 uA
IIL
Input low leakage current
(no pull up resistor) -1 - - uA
*Note: 1. These parameters are for digital interface pins, such as SPI, I2C,GPIOs
UART, PCM, BOOT_CFGn.
2. L600 USIM card signal (USIM_CLK, USIM_DATA, USIM_RST) support dual-voltage (1.8V
and 3.0V) mode, and the DC character show in corresponding function block.
L600 Hardware Design
Copyright © Shanghai Mobiletek Communication Ltd 23
3.4 Power Interface
3.4.1 Power supply pin description
Table 3-6 DC Power Characteristics
Pin No. Net Name Description
DC Characteristic(V)
Min. Typ. Max.
25,26 VBAT_RF Power supply for
the module RF 3.4 3.8 4.2
29,30 VBAT_BB Power supply for
the module BB 3.4 3.8 4.2
5,8,11,17,19,20,27
,28,31,32,41,45,50
,60
GND GND - - -
3.4.2 Power supply requirements
L600 power supply requirement as below table:
Table 3-7 VBAT power supply interface characteristics
Symbol Description Min Typ Max Unit
VBAT Power supply
voltage 3.4 3.8 4.2 V
IVBAT(peak) Power supply p
current - 460* - mA
IVBAT(average,
Power Saving Mode
disabled,
Module registered
with network)
Power supply
average
current
- 9 - mA
IVBAT(power-off) Power supply
current
in power off
mode
- - 8 uA
IVBAT(power-save
mode)
Power supply
current
in power save
mode(Deep
sleep mode)
- - 8 uA
L600 Hardware Design
Copyright © Shanghai Mobiletek Communication Ltd 24
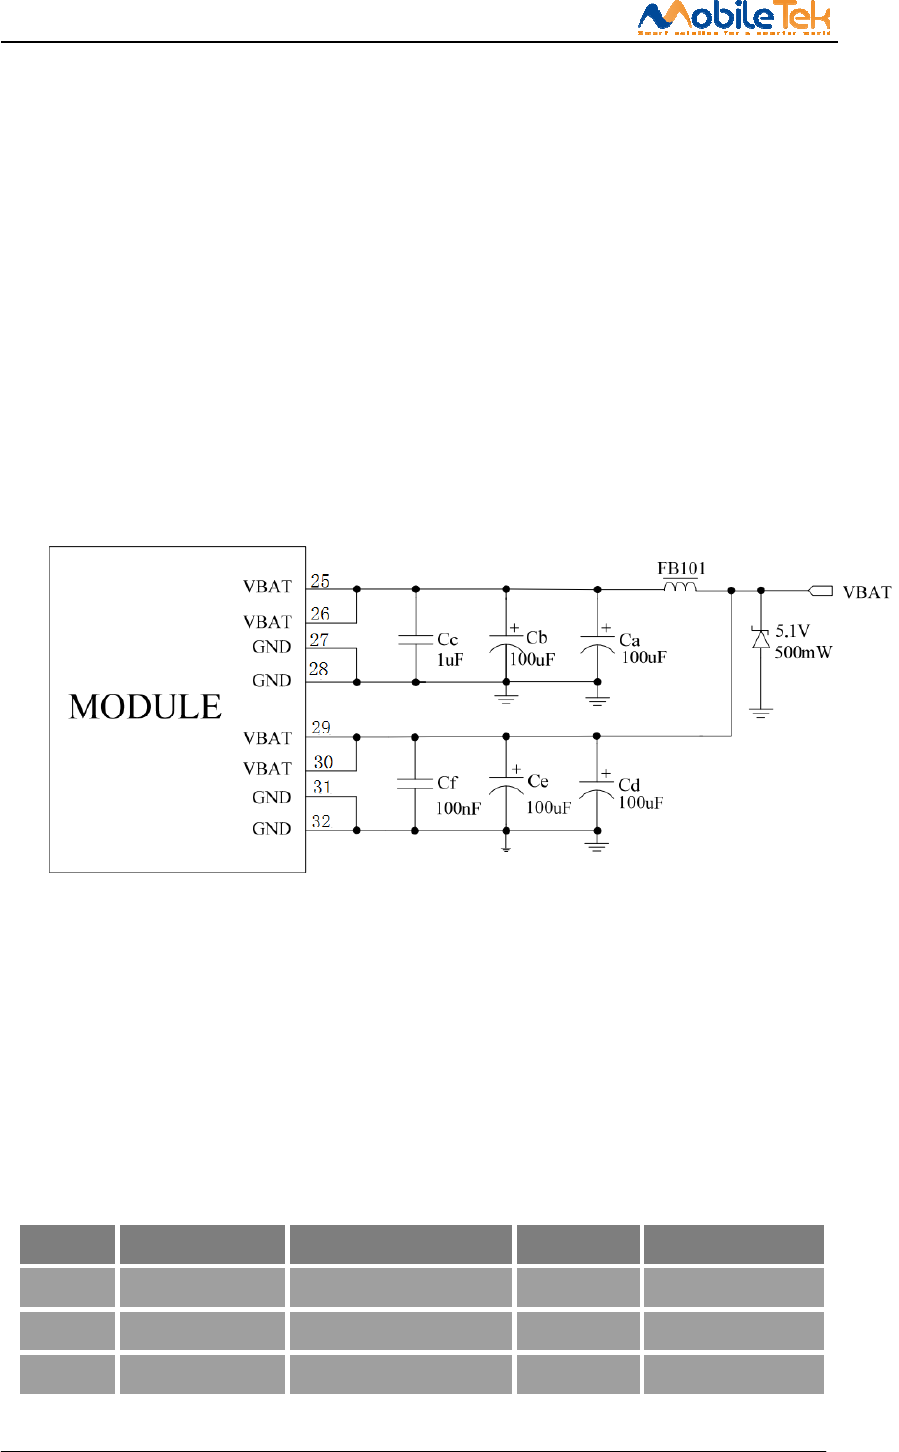
3.4.3 Power Supply Design Guide
Make sure that the input voltage at the VBAT pin will never drop below 3.4V even during a
transmit burst when the current consumption rises up to more than 800mA. If the power voltage drops
below 3.4V, the RF performance of module may be affected. Using large tantalum capacitors (above
300uF) will be the best way to reduce the voltage drops. If the power current cannot support up to 800
mA, users must introduce larger capacitor (typical 1000uF) to storage electric power. For the
consideration of RF performance and system stability, some multi-layer ceramic chip (MLCC)
capacitors (0.1/1uF) need to be used for EMC because of their low ESR in high frequencies. Note that
capacitors should be put beside VBAT pins as close as possible. Also User should keep VBAT net
wider than 2 mm to minimize PCB trace impedance on circuit board. The following figure is the
recommended circuit.
Figure 3-3 VBAT input application circuit
Note: The Cd, Ce, Cb, Cc and Cf are recommended being mounted for L600, but the Ca, Cb, Ce, Cc
and Cf for tune.
In addition, in order to get a stable power source, it is suggested to use a Zener diode of which
reverse Zener voltage is 5.1V and dissipation power is more than 500mW.
Table 3-8: Recommended Zener diode models
NO. Manufacturer Part Number Power Package
1 On semi MMSZ5231BT1G 500mW SOD123
2 Prisemi PZ3D4V2H 500mW SOD123
3 Vishay MMSZ4689-V 500mW SOD123
L600 Hardware Design
Copyright © Shanghai Mobiletek Communication Ltd 25
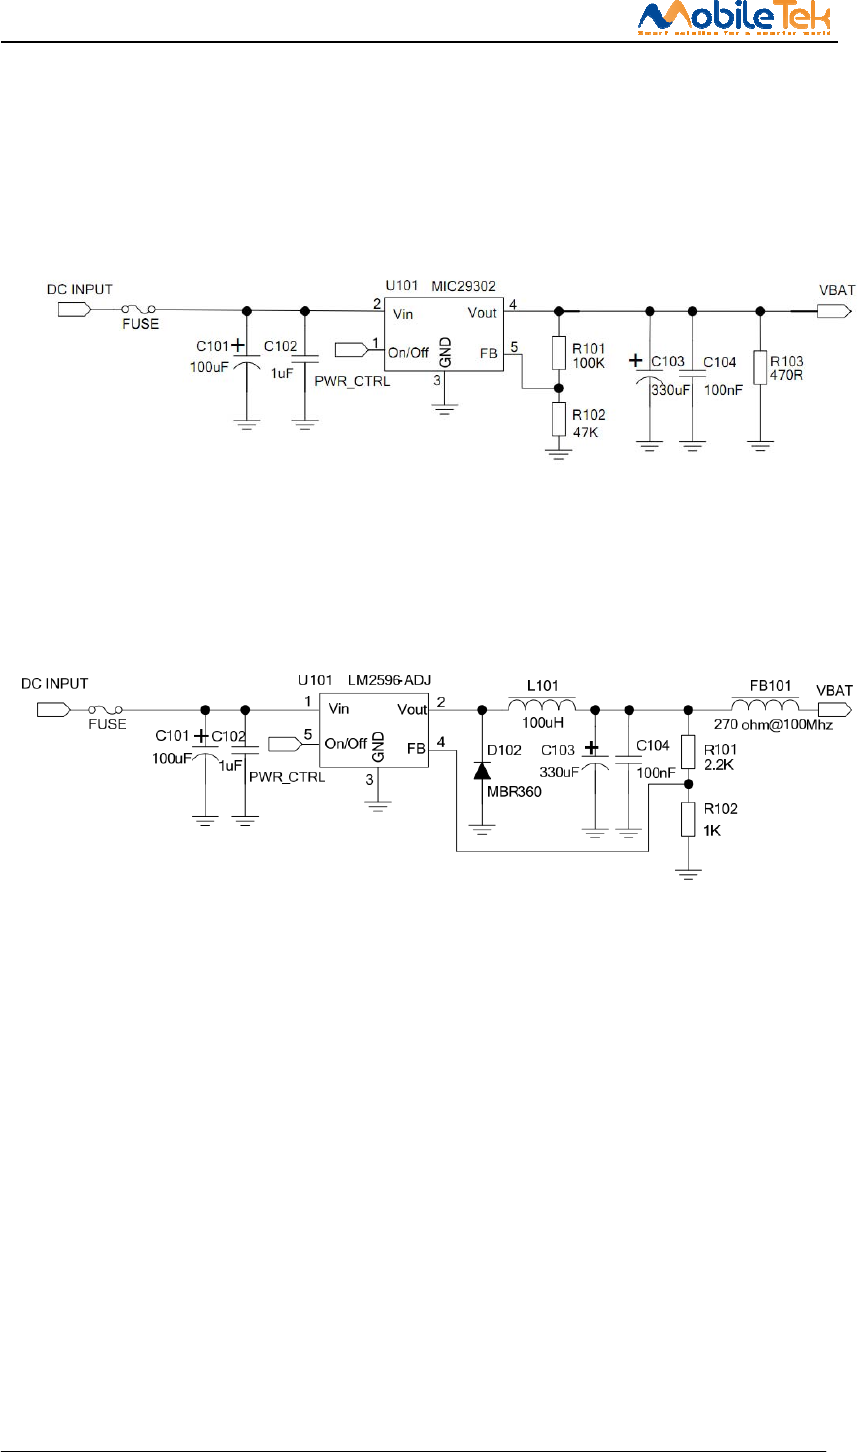
3.4.4 Recommended Power supply circuit
If the voltage difference is not big, we recommend LDO is used for the power supply of the module,
make sure that the peak current of power components can rise up to more than 800A. The following
figure is the reference design of +5V input linear regulator power supply. The designed output for the
power supply is 3.8V.
Figure 3-4 Reference circuit of the LDO power supply
If there is a big difference between the input voltage and the desired output (VBAT) or better
efficiency is more important, a switching converter power (DC/DC) supply will be preferable. The
following figure is the reference circuit.
Figure 3-5 Reference circuit of the DCDC power supply
Note: DCDC may deprave RF performance because of ripple current intrinsically.
3.4.5 Power Supply Layout guide
The layout of the power supply section and the related components is of vital importance in the
power module design. If processes this part layout is not good, will lead to various effects, such as bad
EMC, effective the emission spectrum and receiving sensitivity, etc. So the power supply part design
is very important, when you design this part you should notes below contents: 1. DC/DC switch power
should place away from the antenna and other sensitivity circuit; 2. Consider the voltage drop and the
module current requirement, the layout line should better above 100mil. If conditions allow should add
a power shape plane.
L600 Hardware Design
Copyright © Shanghai Mobiletek Communication Ltd 26
3.5 UIM interface
3.5.1 Pin definition
The L600 integrated a ISO 7816-2 standard USIM port, and the module can automatic identify the
voltage demo according the USIM to allow the mobile equipment to attach to the network. Both 1.8V
and 3.0V SIM Cards are supported.
Table 3-9 UIM Electronic characteristic in 1.8V mode (USIM_VDD =1.8V)
Symbol Parameter Min. Typ. Max. Unit
UIM_VDD LDO power output 1.75 1.8 1.95 V
VIH High-level input voltage 0.65·UIM
_VDD -
UIM_VD
D +0.3
V
VIL Low-level input voltage -0.3 0 0.35·UIM
_VDD V
VOH High-level output voltage UIM_VD
D -0.45 -- UIM_VD
D V
VOL Low-level output voltage 0 0 0.45 V
Table 3-10: USIM Electronic characteristic 3.0V mode (USIM_VDD =3.0V)
Symbol Parameter Min. Typ. Max. Unit
UIM_VDD LDO power output 2.75 3.0 3.05 V
VIH High-level input voltage 0.65*UIM
_VDD - UIM_VD
D +0.3 V
VIL Low-level input voltage -0.3 0 0.25·UIM
_VDD V
VOH High-level output voltage UIM_VD
D -0.45 - UIM_VD
D V
VOL Low-level output voltage 0 0 0.45 V
3.5.2 Design Guide
UIM electronic characteristics as the table 3-9,3-10 show.
In order to meet the 3 GPP TS 51.010 1 protocol and EMC certification requirements. Suggest
UIM slot near the location of the module USIM card interface, to avoid running for too long, lead to
serious deformation of waveform and effect signal integrity, UIM_CLK and UIM_DATA signal lines
suggest ground protect. Between the UIM VCC & GND add a 1uF and a 33pF capacitor in parallel,
Between the SIM_CLK& GND, UIM_RST& GND, UIM DATA& GND add a 33pF capacitor in
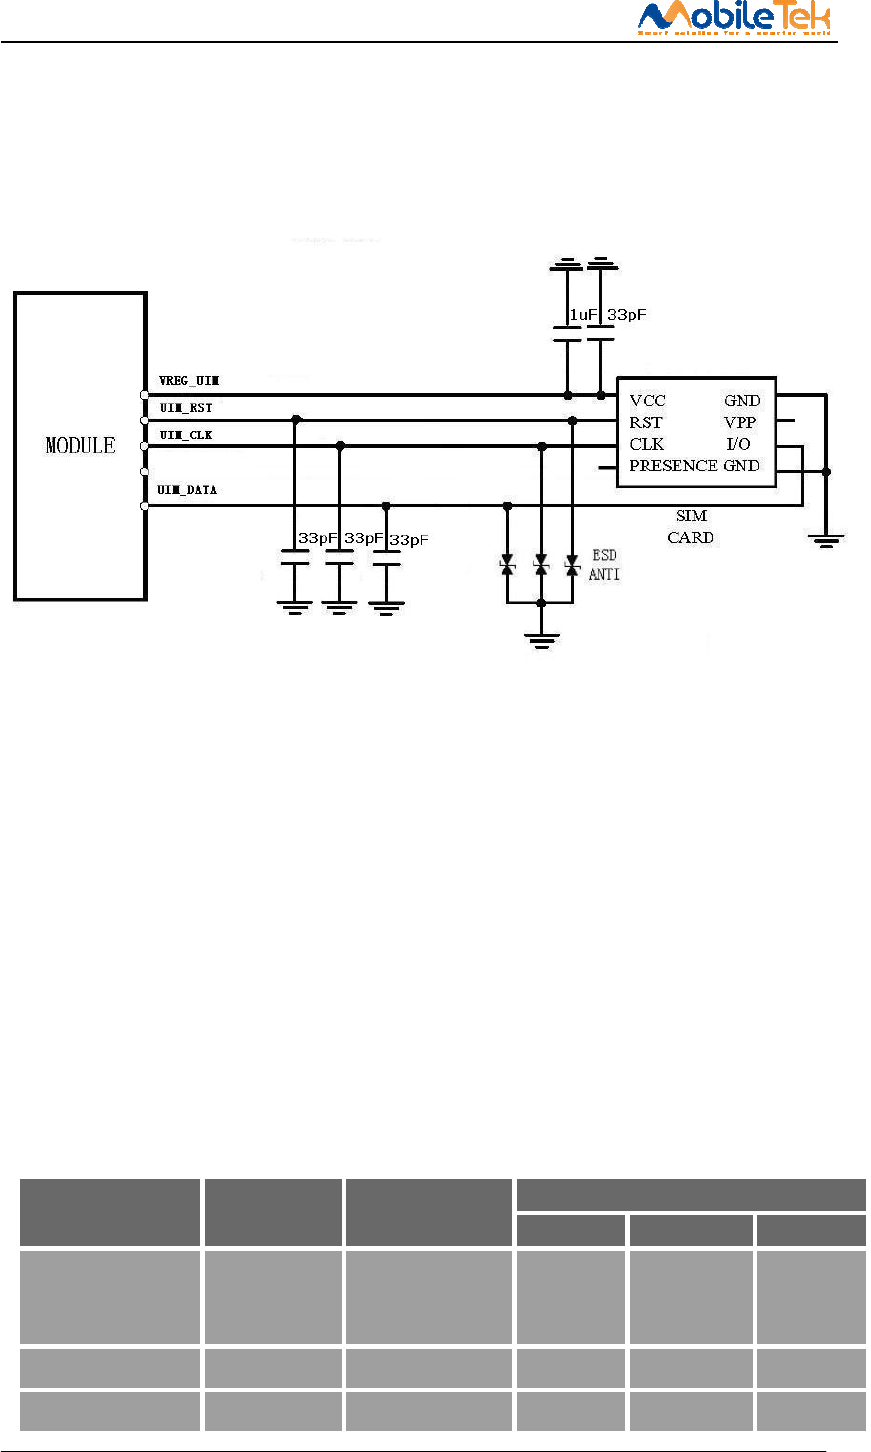
L600 Hardware Design
Copyright © Shanghai Mobiletek Communication Ltd 27
parallel, for filter the RF signal interference.
3.5.3 UIM interface reference circuit
Figure 3-6 UIM Reference circuit
Note:1. UIM_DATA should have added the10K pull-up resistance to VREG_UIM in your design.
2. L600 support hot-plug detect, if need the function, please add this pin, detail as the L600
reference design .
3.6 PCM interface
3.6.1 PCM interface definition
L600 provides hardware PCM interface for external codec. L600 PCM interface can be used in short
sync master mode only, and only supports 16 bits linear format:
Table 3-11 PCM interface definition
Pin No. Signal name I/O Type
DC Characteristics(V)
Min. Typ. Max.
63 PCM_SYNC
PCM
synchronizing
signal
-0.3 1.8 1.9
62 PCM_DIN PCM data input -0.3 1.8 1.9
61 PCM_DOUT PCM Data output -0.3 1.8 1.9
L600 Hardware Design
Copyright © Shanghai Mobiletek Communication Ltd 28
64 PCM_CLK PCM Data clock -0.3 1.8 1.9
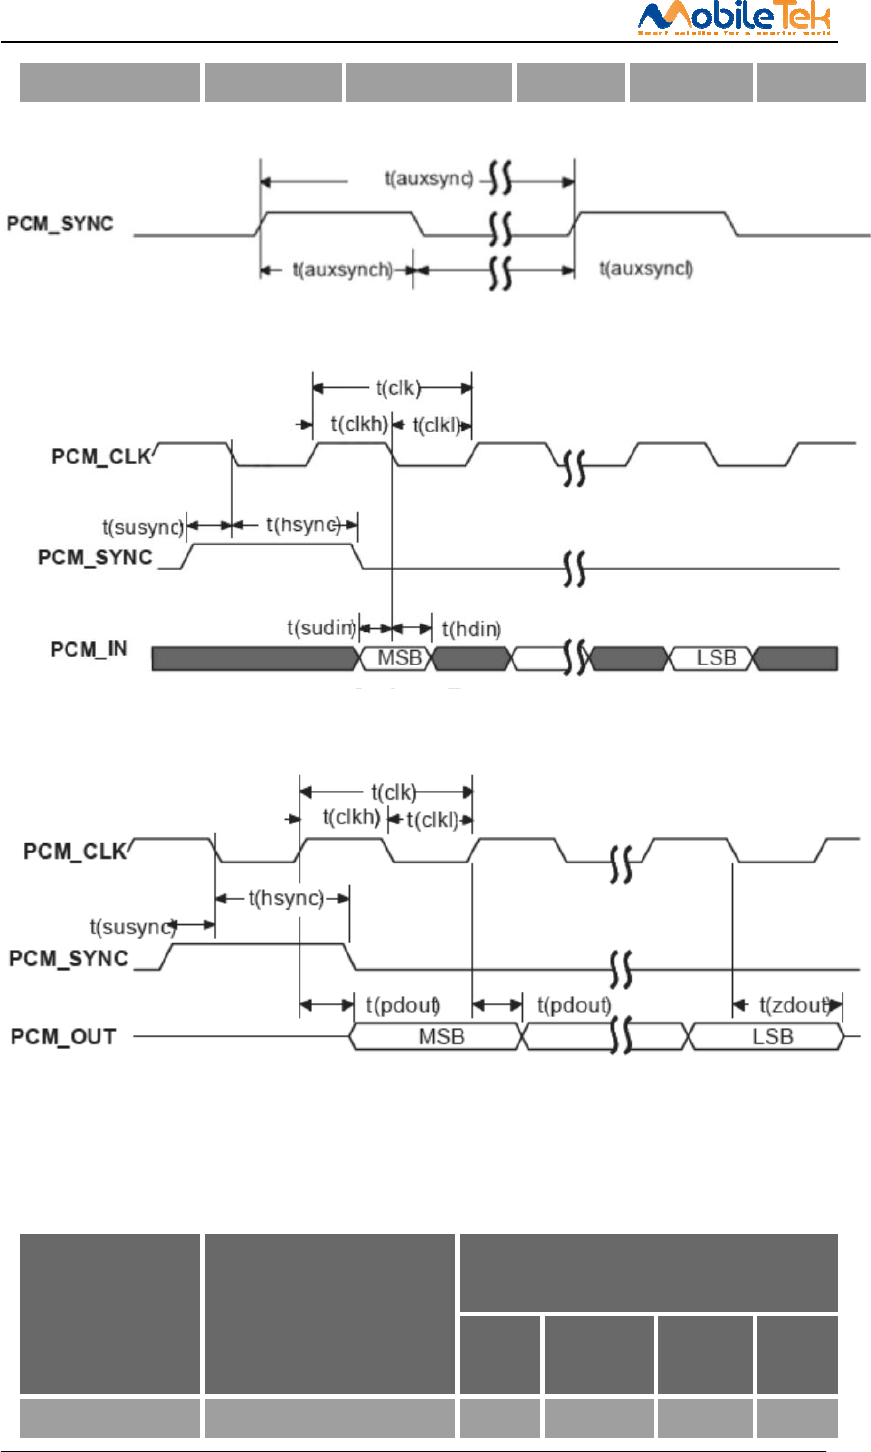
Figure 3-7 PCM_SYNC timing
Figure 3-8 Codec to L600 module timing
Figure 3-9 L600 to codec module timing
Table 3-12 PCM interface Timing
Parameter Descriptions
DC characters
Min. Typ. Max. Unit
T(sync) PCM_SYNC cycle - 125 - us
L600 Hardware Design
Copyright © Shanghai Mobiletek Communication Ltd 29
T(synch) PCM_SYNC high level hold
time
- 488 - ns
T(syncl) PCM_SYNC low level hold
time
- 124.5 - us
T(clk) PCM_CLK cycle - 488 - ns
T(clkh) PCM_CLK high level hold
time
- 244 - ns
T(clkl) PCM_CLK low level hold time - 244 - ns
T(susync) PCM_SYNC establish time - 122 - ns
T(hsync) PCM_SYNC hold time - 366 - ns
T(sudin) PCM_IN establish time 60 - - ns
T(hdin) PCM_IN hold time 60 - - ns
T(pdout) From PCM_CLK rising edge to
PCM_OUT valid time
- - 60 ns
T(zdout)
From PCM_CLK falling edge
to PCM_OUT high
impendence delay time
- - 60 ns
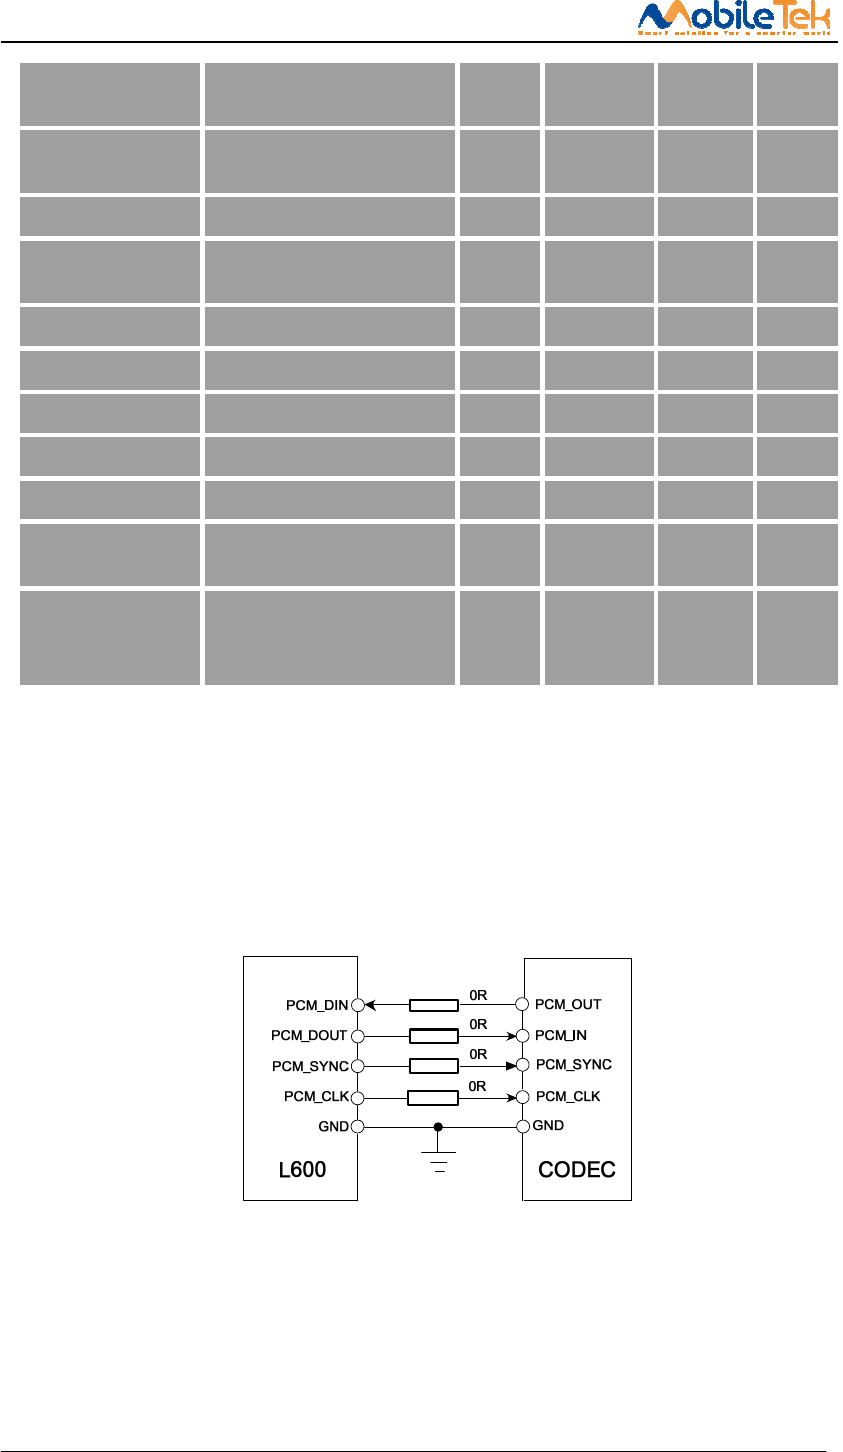
3.6.2 PCM interface application
L600 only support the host mode, PCM_SYNC,PCM_CLK is the output pin,PCM_SYN as the
synchronizing output 8kHz sync signal. PCM Data support 8bit or 16bit data.
Figure 3-10 PCM application circuit(L600 in host mode)
Note:1. L600 PCM port DC character is base on 1.8 voltage, please pay attention the voltage
matching.
2. If your design need this function, you should add the crystal for PCM clock. About the
crystal type please contact our market.
3. L600 default design base on NAU8814 as the codec chip, the detail design please refer to
《
L600 reference design
》
.
L600 Hardware Design
Copyright © Shanghai Mobiletek Communication Ltd 30
3.7 USB2.0 interface
3.7.1 USB interface pin definition
L600 module include a high-speed USB 2.0 compliant interface with maximum 480 Mb/s data
rate according to USB 2.0 specification, representing the main interface for transferring high speed
data with a host application processor. The module itself acts as a USB device and can be connected to
any USB host equipped with compatible drivers.
The USB is the most suitable interface for transferring high speed data between module and a
host processor, available for AT commands, data communication, FW upgrade, below table is the
module USB pin definition:
Table 3-13 USB interface pin definition
Pin No. Signal name I/O type
DC characteristic(V)
Min. Typ. Max.
6 USB_DM USB2.0 date D- - - -
7 USB_DP USB2.0 data D+ - - -
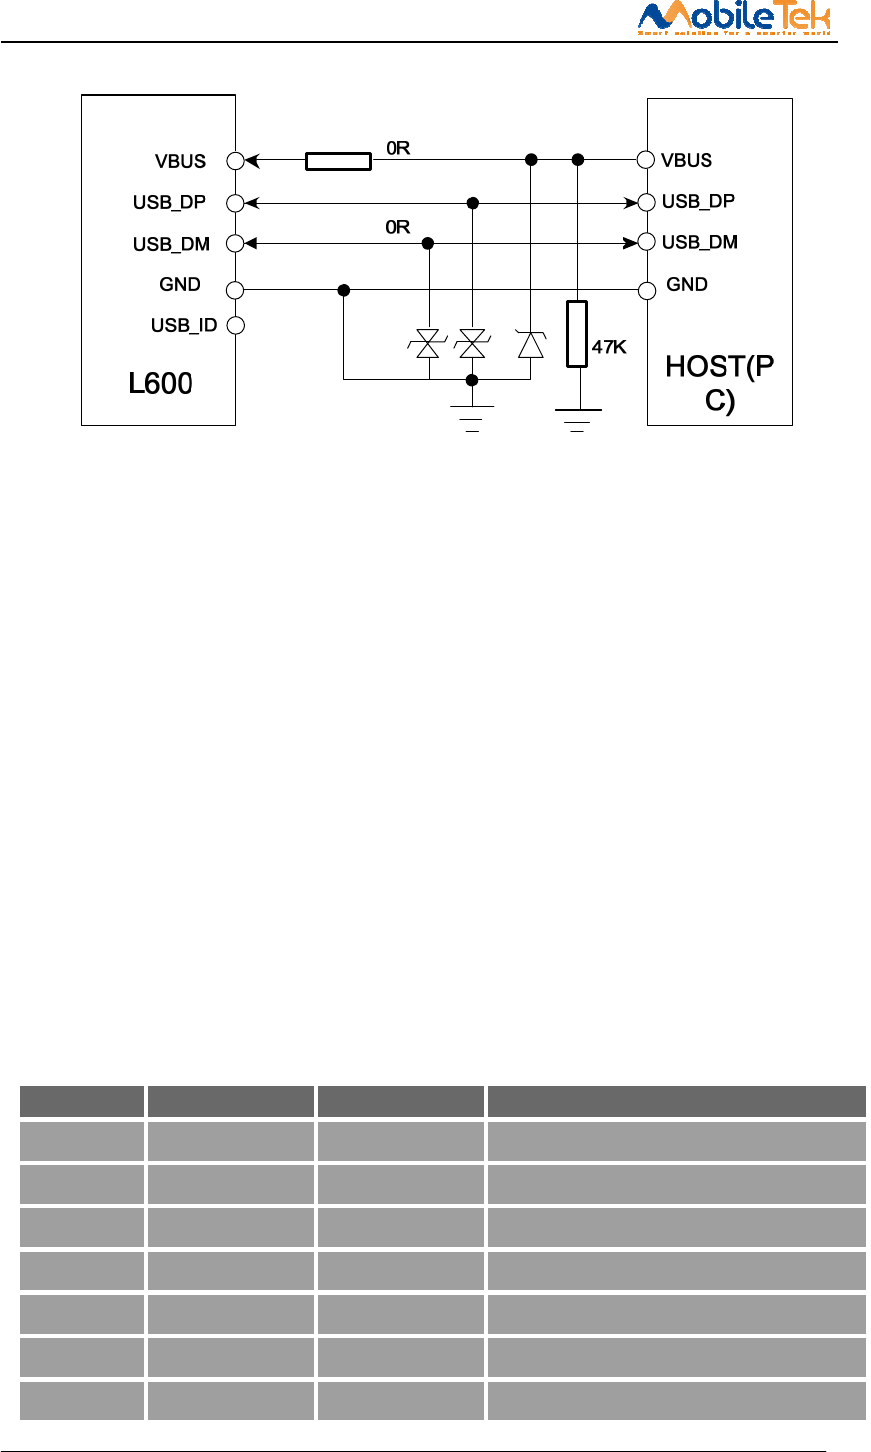
3.7.2 USB Interface application
USB bus is mainly used for data transmission, software upgrading, module testing. Work in the
high-speed mode of the USB line, if you need ESD design, ESD protection device must meet the
junction capacitance value <5pf, otherwise the larger junction capacitance will cause waveform
distortion, the impact of bus communication. Differential impedance of differential data line in 90ohm
+ 10%. In your application must add a 47Kohm resistor between USB_VBUS to ground.
L600 Hardware Design
Copyright © Shanghai Mobiletek Communication Ltd 31
Figure 3-11 USB application
3.8 UART Interface
3.8.1 Pin description
L600 module provides a flexible 7-wire UART (universal asynchronous serial transmission)
interface. UART as a full asynchronous communication interface, Support the standard modem
handshake signal control, Comply with the RS - 232 interface protocols. And also support four wire
serial bus interface or the 2-wire serial bus interface mode, and the module can be through the UART
interface for serial communication with the outside (DET) and the AT command input, etc. L600
module is a DCE (Data Communication Equipment) and client PC is a DTE (Data Terminal
Equipment).AT commands are entered and serial communication is performed through UART
interface. The pin signal is defined as shown in below table.
Table 3-14 UART pin definition
Pin No. Pin I/O type Descriptions
54 UART_TX DO UART data transmission
53 UART_RX DI UART data receive
55 UART_RI DO Ring Indicator.
51 UART_RTS DO UART DET request to send
57 UART_DTR DI DTE get ready.
52 UART_CTS DI UART Clear to Send.
56 UART_DCD DO UART Carrier detects.
L600 Hardware Design
Copyright © Shanghai Mobiletek Communication Ltd 32
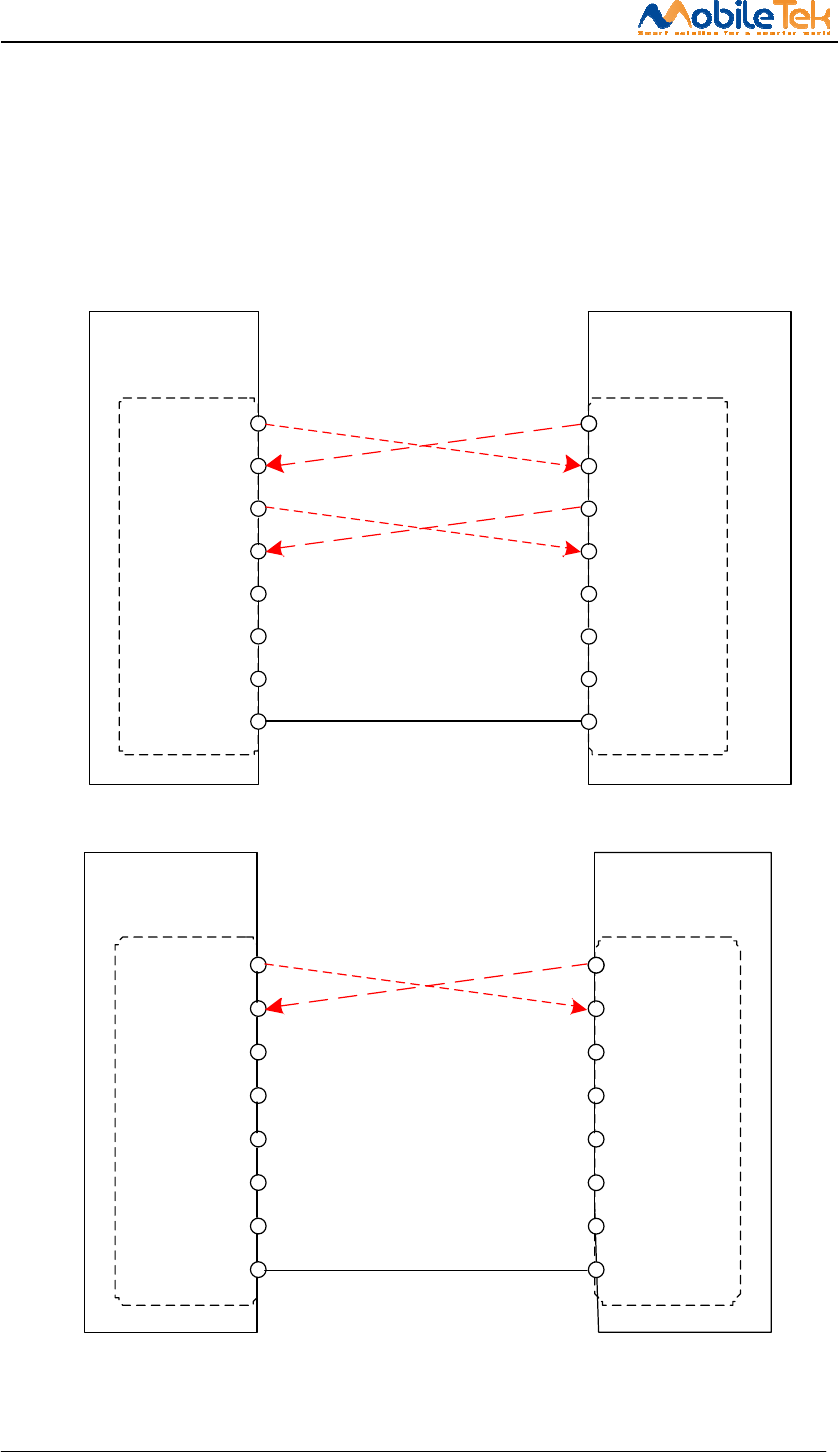
3.8.2 UART interface application
L600 UART is COMS 1.8V level, Complete serial port with RS-232 functionality conforming to the
ITU-T V.24 Recommendation, with CMOS compatible signal levels (0 V for low data bit or ON state
and 1.8 V for high data bit or OFF state), if the AP voltage level is not the 1.8V should add a voltage
transfer module in your application. Below is RS-232 voltage transfer module application diagram
TXD1
RXD1
RTS1
CTS1
DTR1
DCD1
RING1
TXD
RXD
RTS
CTS
DTR
DCD
RING
Serial Port Serial Port
L600 DCE Client(DET)
GND GND
Figure 3-12 UART 4 Line connection mode
TXD1
RXD1
RTS1
CTS1
DTR1
DCD1
RING1
TXD
RXD
RTS
CTS
DTR
DCD
RING
Serial Port Serial Port
L600(DCE) Client (DTE)
GND GND
Figure 3-13 UART 2 Line connection mode
L600 Hardware Design
Copyright © Shanghai Mobiletek Communication Ltd 33
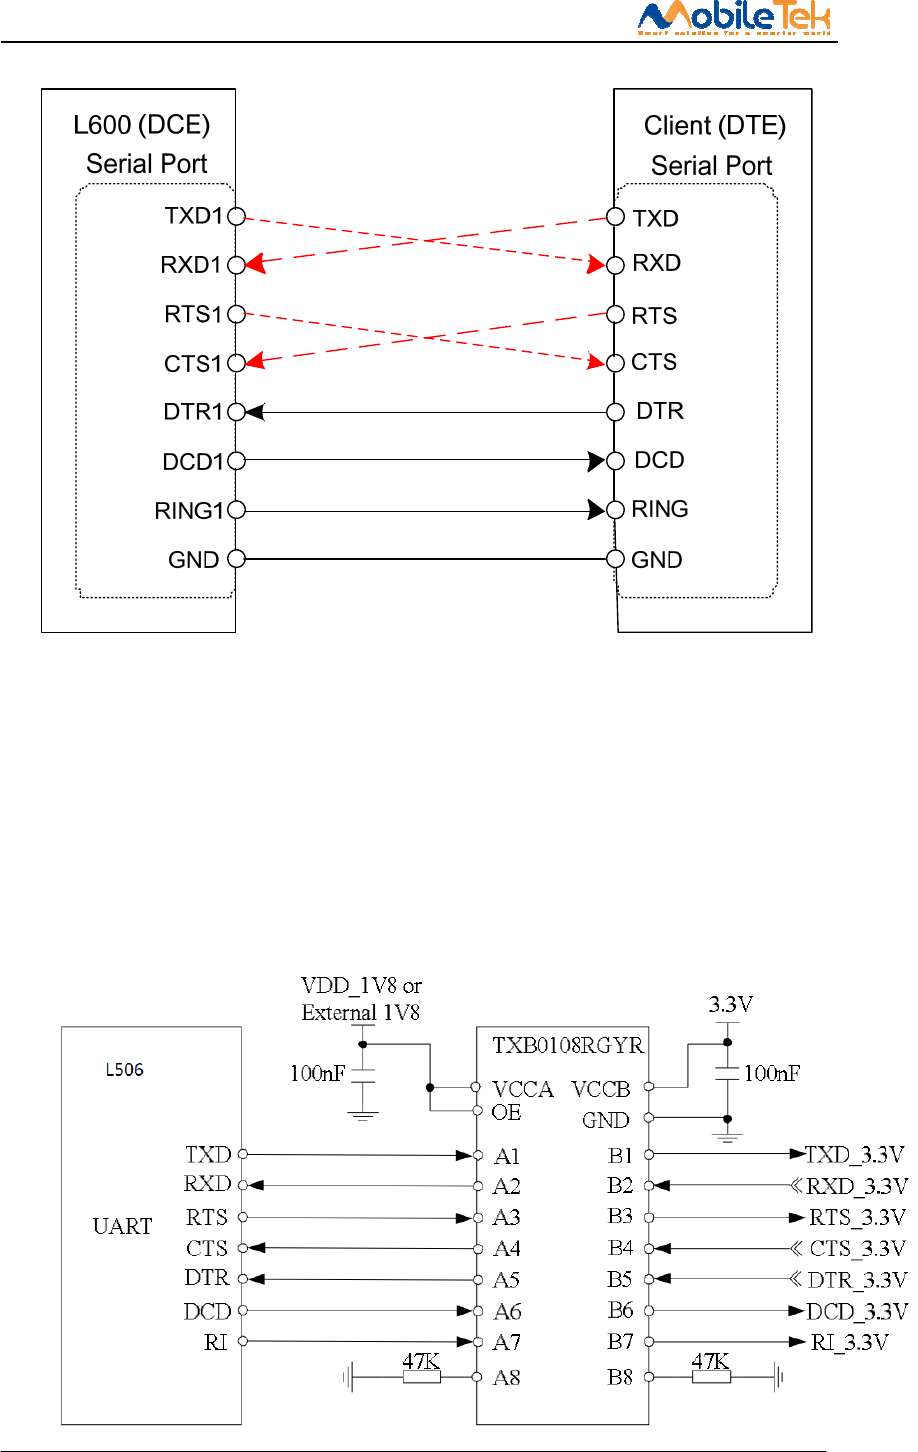
Figure 3-14 UART Full mode
The L600 UART is 1.8V interface. A level shifter should be used if user’s application is equipped
with a 3.3V UART interface. The level shifter TXB0108RGYR provided by Texas Instruments is
recommended. The reference design of the TXB0108RGYR is in the following figures. About the
application as below:

L600 Hardware Design
Copyright © Shanghai Mobiletek Communication Ltd 34
Figures 3-16 Voltage transfer Reference Circuit
3.9 Power on/off and reset interface
3.9.1 Pin definition
L600 can be powered on by pulling PWRKEY pin down to ground. This pin is already internal
pulled up to 1.8V in module (because the internal resistance divided voltage, so in actual measure
voltage is approximately 800mV), so external pull-up resistor is not necessary. Placing a100nF
capacitor and an ESD protection diode close to the PWRKEY pin is strongly recommended. Please
refer to the following figure for recommended reference circuit.
Table 3-15 power on/off and reset key define
Pin No. Net name I/O Typ. descriptions
36 PHONE_ON_N(PWRKEY) DI L600 power on/off pin (internal pull-up to
1.8V)
37 RESET_N DI L600 RESET pin (internal pull-up to 1.8V)
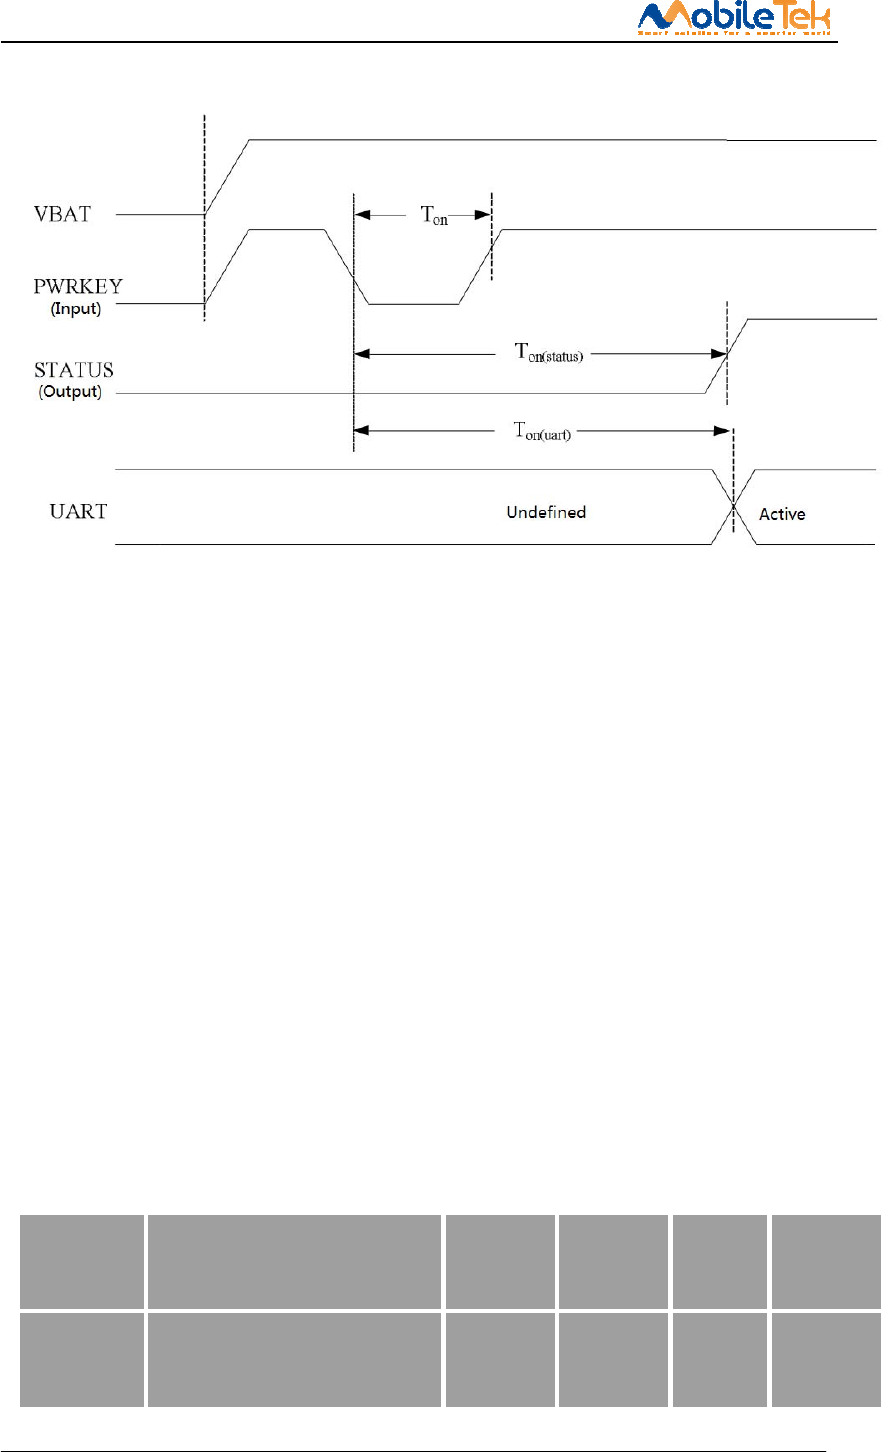
3.9.2 Power on sequence
Table 3-16 power on timing chart.
Ton Power on low level pulse 100 500 -- ms
Ton(status) Power on time (According to the
STATUS pin judgment)
15 -- 25 s
Ton(uart) Power on time (according the UART
pin judgement)
10 -- 20 s
VIH Input high level voltage of
PWRKEY pin
1.17 1.8 2.1 V
VIL Input low level voltage of PWRKEY
pin
-0.3 0 0.3 V
L600 Hardware Design
Copyright © Shanghai Mobiletek Communication Ltd 35
Figures 3-17 Power on Timing sequence
Note: the STATUS pin can be used to identify whether has been power on, when the module has
access to electricity and initialization is completed, the STATUS output high level, or has
maintained low level.
3.9.3 Power off sequence
The following methods can be used to power down. These procedures will make module
disconnect from the network and allow the software to enter a safe state, and then save data before
completely powering the module off.
● Method 1: Power off L600 by pulling the PWRKEY pin down
● Method 2: Power off L600 by AT command “AT+CPOF”
● Method 3: over-voltage or under-voltage automatic power down.
● Method 4: over-temperature or under-temperature automatic power down.
Note: 1. About the AT command “AT+CPOF” detail please refer document [1].
2. Over-voltage or under-voltage may cause automatic power down.
3. Over-temperature or under-temperature may cause automatic power down.
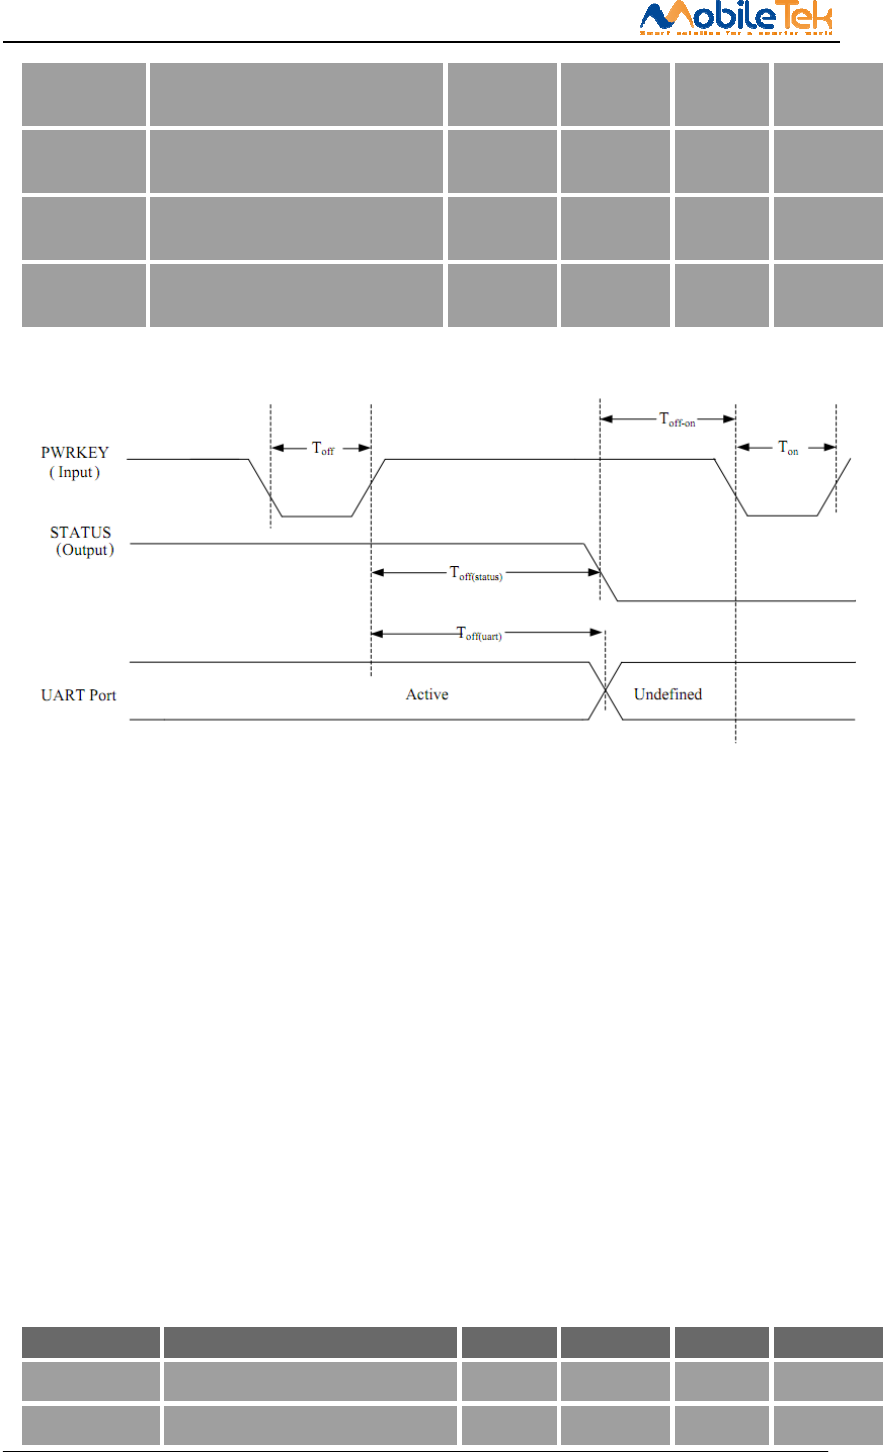
Table 3-17 Power off timing chart.
Toff The time of active low level
pulse on PWRKEY pin to power off
module
2.5 -- -- s
Toff(status
)
The time from power-off issue to
STATUS pin output low level
(indicating power off)
6 -- -- s
L600 Hardware Design
Copyright © Shanghai Mobiletek Communication Ltd 36
Toff(uart) The time from power-off issue to
UART port off
6 -- -- s
Toff-on The buffer time from power-off
issue to power-on issue
0 -- -- V
VIH Input high level voltage of
PWRKEY pin
1.17 1.8 2.1 V
VIL Input low level voltage of PWRKEY
pin
-0.3 0 0.3 V
User can power off the L600 by pulling PWRKEY down to ground for a specific time. The
power off scenario is illustrated in the following figure.
Figures 3-18 Power off Timing sequence
Note: the STATUS pin can be used to identify whether has been power on, when the module has
access to electricity and initialization is completed, the STATUS output high level, or has
maintained low level.
3.9.4 Reset sequence
L600 also have a RESET pin to reset module. This function is used as an emergency reset only
when AT command “AT+CPOF” and the PWRKEY pin has no effect. User can pull RESET pin to
ground, and then pull down the PWRKEY, the module will reset. This pin is already pulled up with a
40KΩ resistor to 1.8V in module, so external pull-up resistor is not necessary. Placing a100nF
capacitor and an ESD protection diode close to the RESET pin is strongly recommended. Please refer
to the following figure for recommended reference circuit, you can pull-down this pin to ground and
hold about 200 MS and then release will force the module enter reset state.
Table 3-18 Reset pin electrical properties
Symbol Net name Min. Typ. Max. Unit
Treset Reset pin low level hold time 50 100 500 ms
VIH Reset pin input high level 1.17 1.8 2.1 V
L600 Hardware Design
Copyright © Shanghai Mobiletek Communication Ltd 37
VIL Reset pin input low level -0.3 0 0.3 V
Note: it is recommended that only in an emergency, such as module without response, use the
RESET pin. In addition, under the module power off status the RESET pin is invalid.
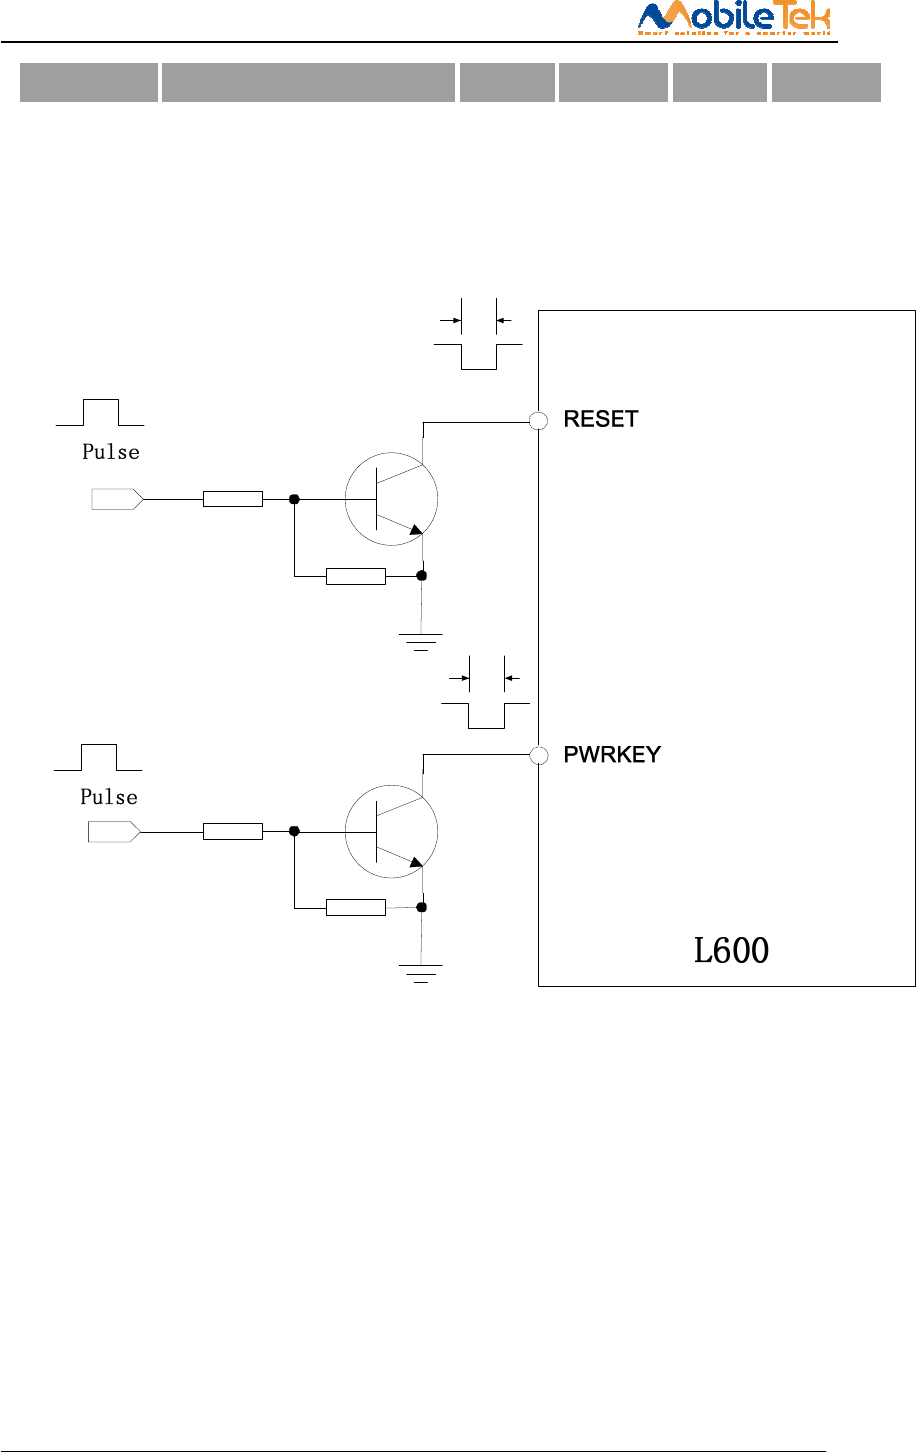
3.9.5 Power on/off and reset interface application
4.7K
47K
4.7K
47K
37
36
500mS
500mS
Figure 3-19: Reference power on/off reset circuit
Another way to control the PWRKEY pin is directly using a push button switch. Need to set a
button near the TVS to ESD protection. The image below for reference circuit:
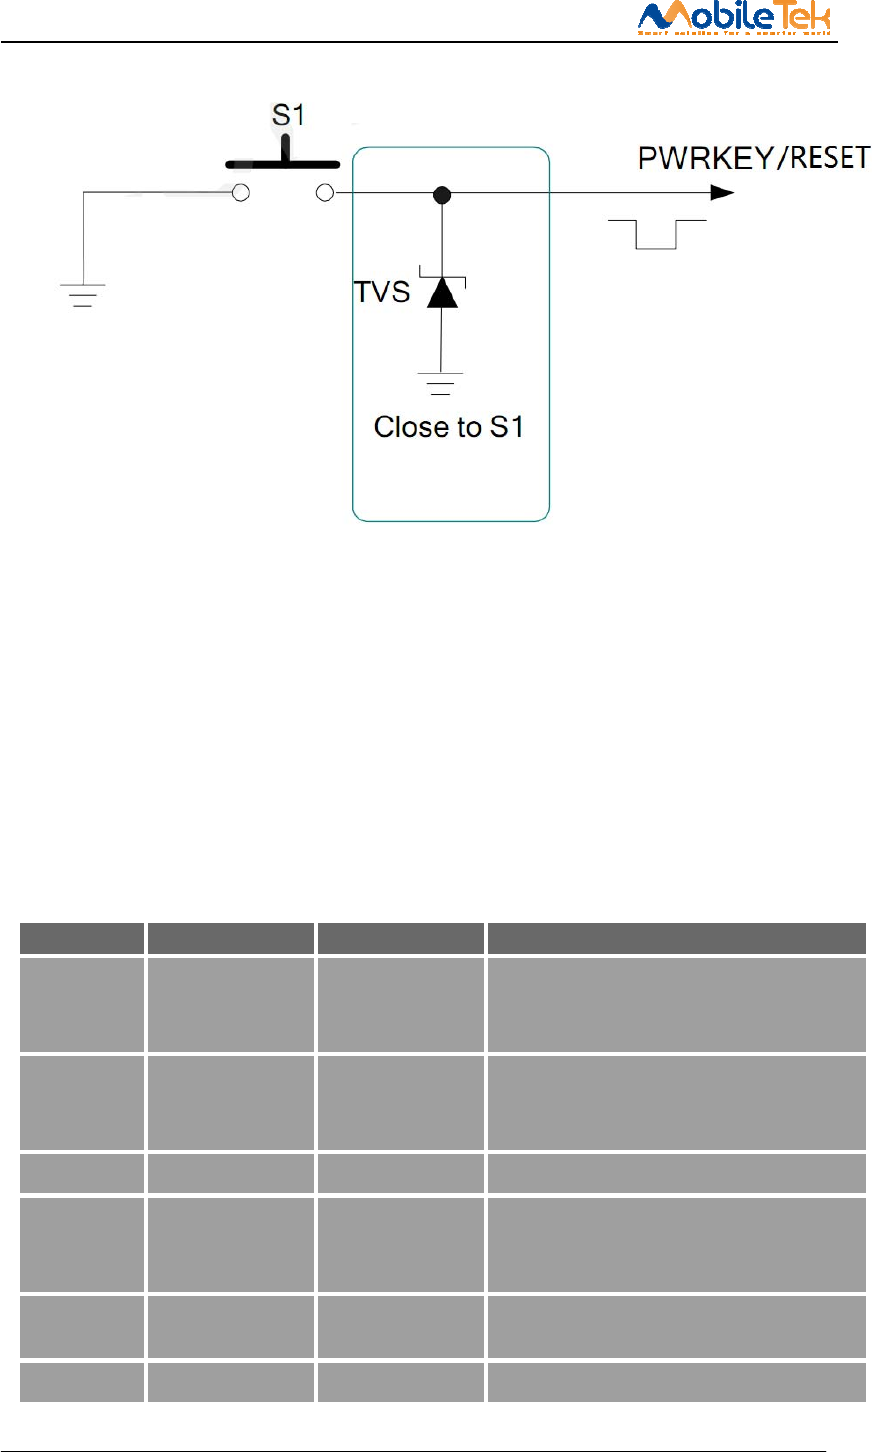
L600 Hardware Design
Copyright © Shanghai Mobiletek Communication Ltd 38
Figure 3-20: power on/off and reset recommended circuit (physical buttons)
3.10 Interactive interface
3.10.1 Pin definition
Table 3-19 list the interface is mainly with the application processor interactive interface,
including query, wake up four types, status indication, flight mode interface.
Table 3-19 Interactive interface
Pin No. Signal I/O type Descriptions
46 GPIO_2/WAKEUP_IN DI Default: GPIO
Optional: Input pin as wake up interrupt
signal to module from host.
47 GPIO_1/WAKEUP_OU
T
DO Default: GPIO
Optional: Output pin as the module wake up
the AP
59 STATUS DO AP inquire the module status
48 FLGHTMODE DI Pull up to 1.8V made the system enter in
flight mode, at this mode will tune off all
the wireless function
42 GPIO_0 DO General GPIO module output (used for
keyboard backlighting, etc.)
28 GPIO_3 I/O GPIO
L600 Hardware Design
Copyright © Shanghai Mobiletek Communication Ltd 39
3.10.2 interactive interface application
L600 provides three shook hands with application processor communication signals. Application
processor can query whether the module boot normal work through STATUS. Through the
WAKEUP_OUT query module is in sleep mode, and sleep in the module, through WAKEUP_IN
wake module. Similarly, when application processor in the sleep state, the L600 modules can through
WAKEUP_OUT wake application processor.
STATUS:Module sleep instructions, high level indicator to sleep, low level instructions for the
awakened state;
WAKEUP_IN: The host can lower the signal awakens the module,If, low level has maintained,
module can't sleep.
WAKEUP_OUT: when L600 need to communicate with the AP, module can be set this pin for low
level to awaken application processor.
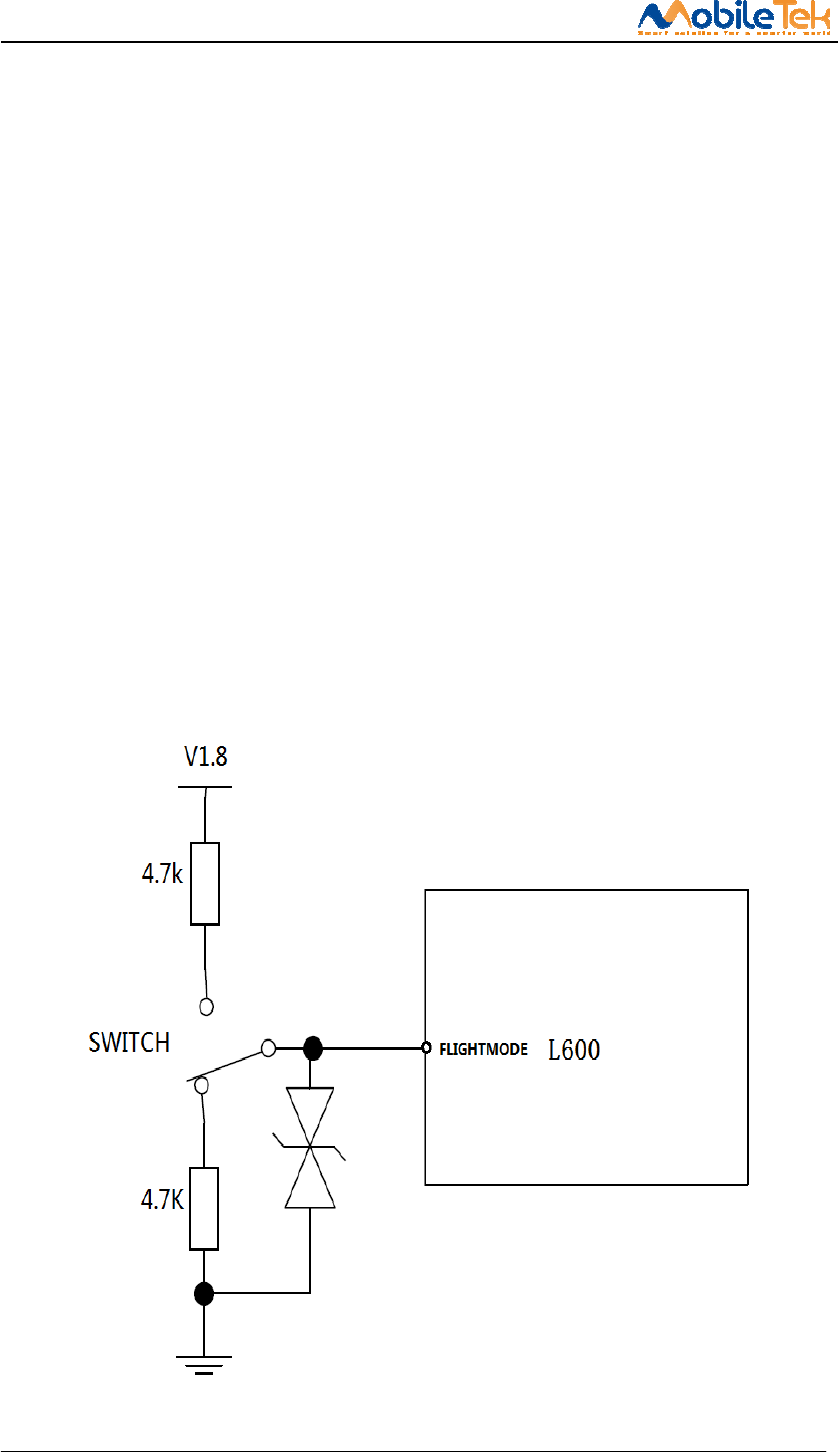
FLGHTMODE:Through the external output high level module into flight mode;
FLIGHTMODE pin can be used to control module to enter or exit the flight mode. In flight mode, L600 internal
radio frequency circuit is closed. FLIGHTMODE reference circuit as shown in the figure below:
Figure 3-21: Flight mode recommended circuit (physical buttons)
L600 Hardware Design
Copyright © Shanghai Mobiletek Communication Ltd 40
3.11 Net Light interface
3.11.1 Pin define
Table 3-20 LED pin definitions
Pin No. Net name I/O type description
39 NETLIGHT DO Module net state identify control LED port
3.11.2 Net light application
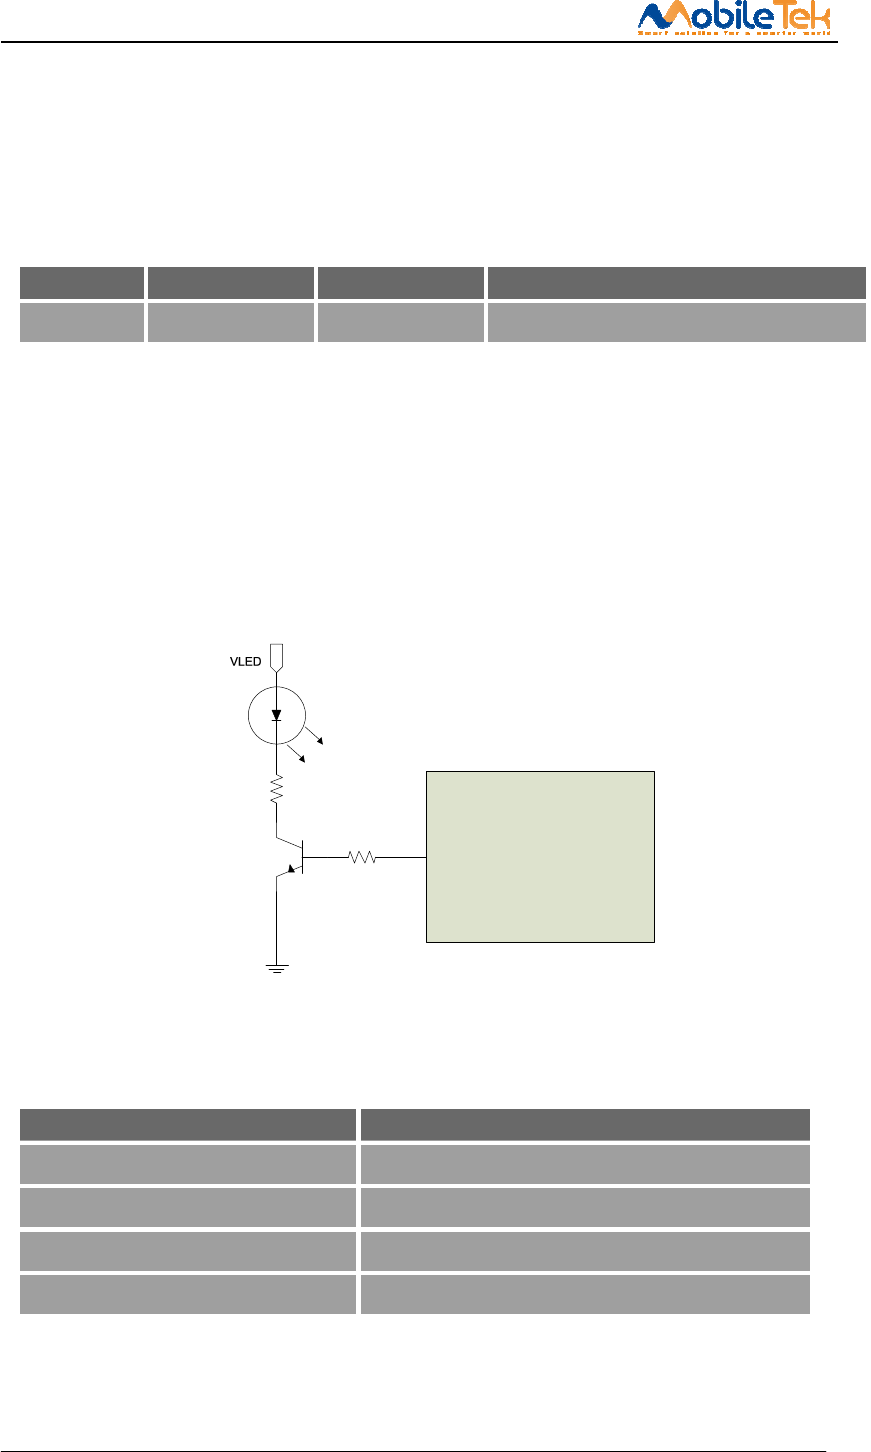
The L600 module has 1 pins for controlling the LED display, which can be used as an indicator
of network connection status. Different network states are represented by the mode of the flashing
light. This pin is an GPIO,with An external NPN Transistor,External connect VBAT can directly
drive LED. Drive current capacity varies according to external NPN model,recommend use
DTC143ZEBTL,Drive current biggest can reach 100 mA, below is the reference circuit.
L600
LED
R2
R1
Figure 3-22 Status indicator reference circuit
Note: R1, R2 value according to the voltage VLED and LED working current.
Table 3-21 NETLIGHT status
Net Status Module working status
Always on Searching Network/Call Connect
200ms ON, 200ms OFF Data Transmit
800ms ON, 800ms OFF Registered network
OFF Power off / Sleep
Note: NETLIGHT output low level as “ON”, and high level as “OFF”.
L600 Hardware Design
Copyright © Shanghai Mobiletek Communication Ltd 41
3.12 System boot configuration and download
3.12.1 Pin definition
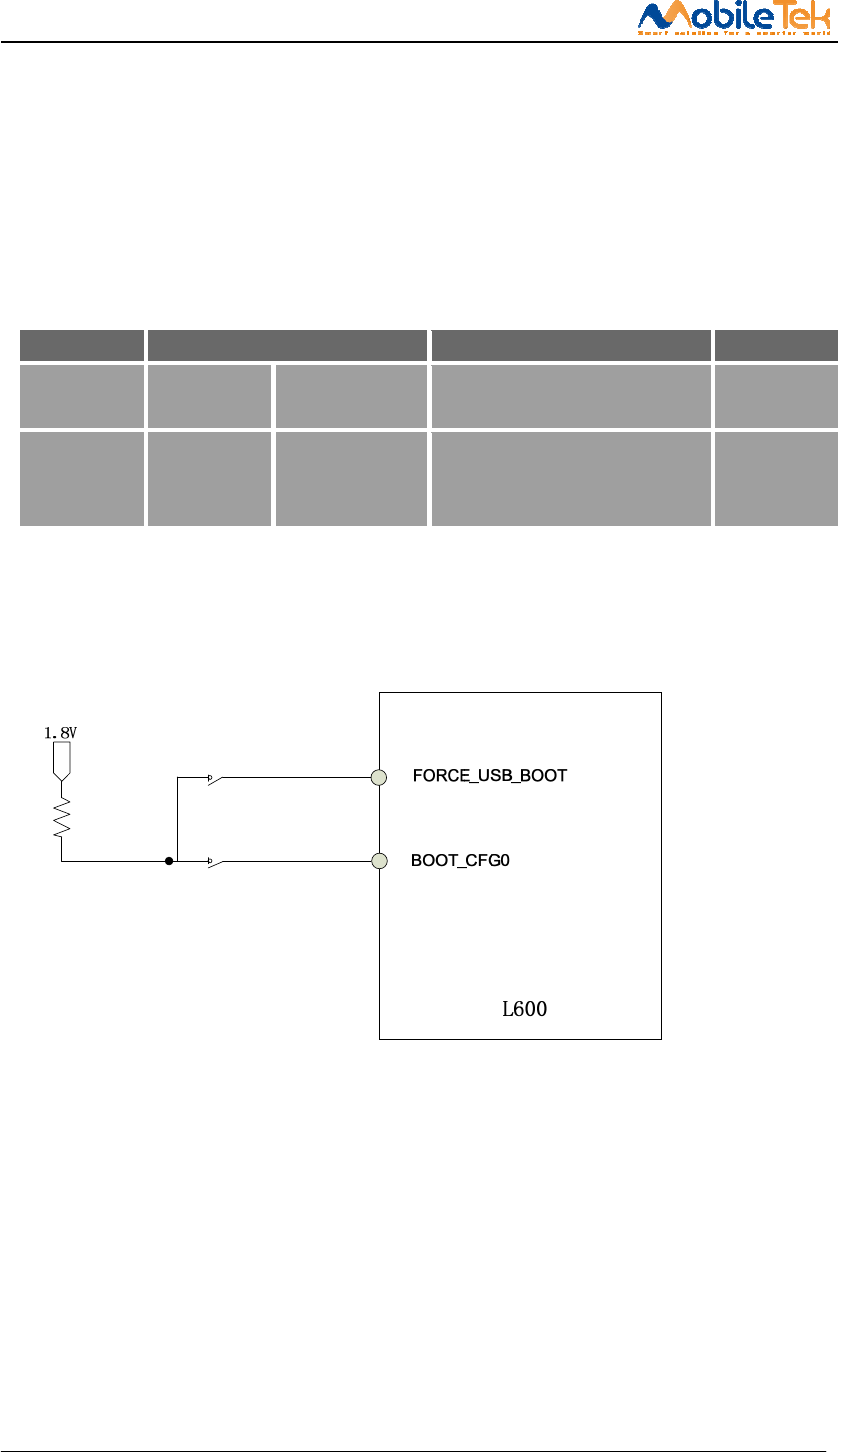
L600 can configure BOOT_CONFIG (Boot Configuration) pin to Configuration module power-on
mode and the forced entry USB download mode.
Table 3-23 Boot configuration and force USB download
Pin No. Net name Function description note
23 GPIO(System
on)
BOOT_CFG0(befo
re system on)
Pull up this pin change boot
configuration register value
Multiplex
pin
58 GPIO(System
on)
FOCE_USB_BOOT
(before system
on)
Pull up this pin change boot
configuration register value
Multiplex
pin
3.12.2 Boot configuration and force USB interface application
10K
SW1
SW2
Figure 3-25 boot configuration and force USB download recommended circuit
3.13 Analog and Digital conversion (ADC) interface
L600 integrated two analog-to-digital conversion interface, specific parameters are as follows:
Table 3-25 ADC1, ADC2 characters
L600 Hardware Design
Copyright © Shanghai Mobiletek Communication Ltd 42
characters Min. Typ. Max. Unit
ADC resolution -- 15 -- Bits
Transfer time -- 442 -- ms
Input voltage range 0.3 -- VBAT V
Input resistance 1 -- -- MΩ
Note: 1. use "AT + CADC" and "AT + CADC2" can read ADC1 and ADC2 voltage on the pin.
More information please refer to the document [1].
2. The need for special software version to support access to the ADC.
3.14 I2C interface
3.14.1 I2C pin definition
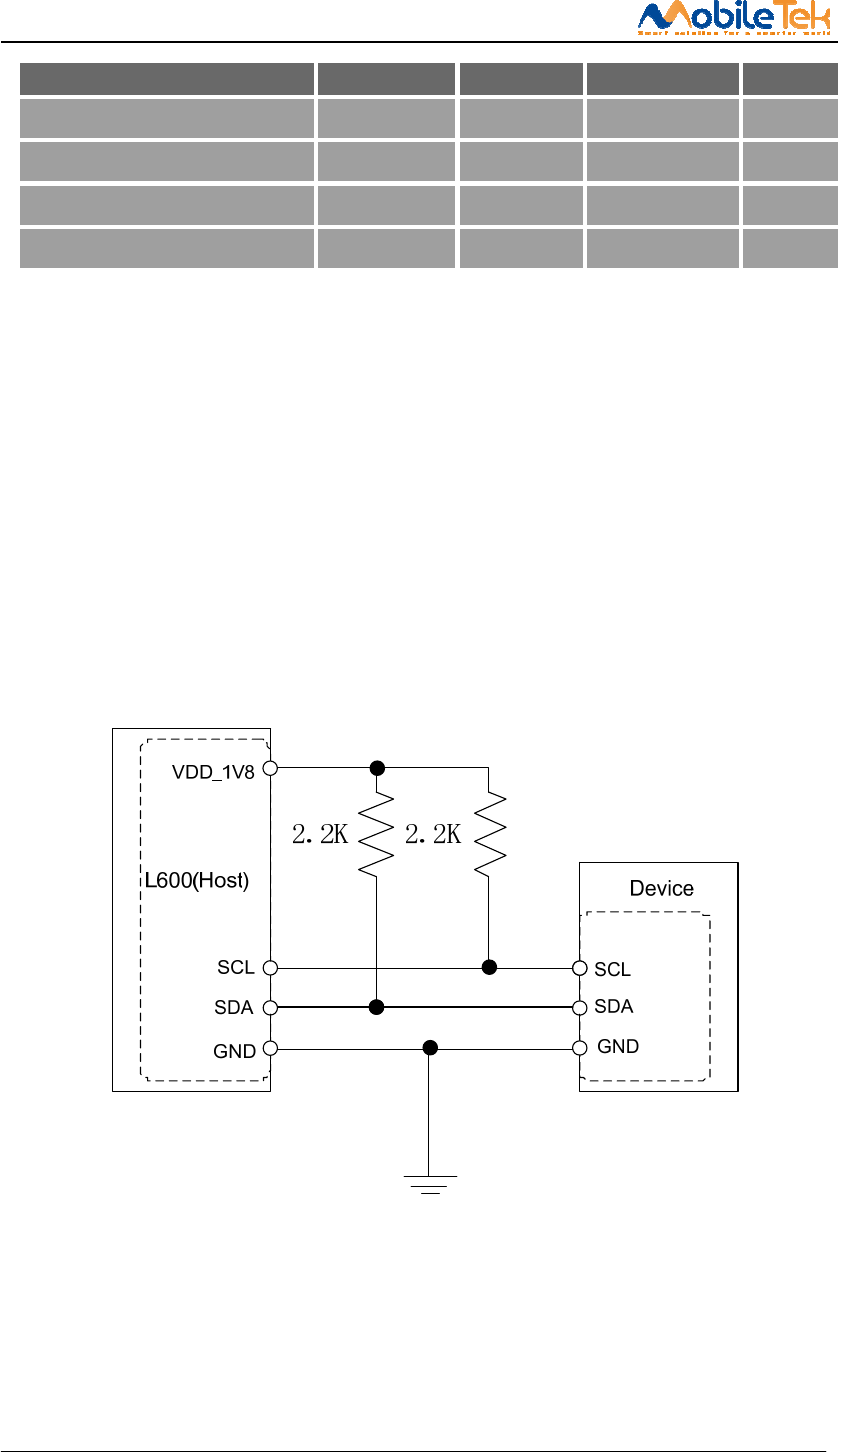
I2C is used to communicate with peripheral equipment and can be operated as either a transmitter or
receiver, depending on the device function. Both SDA and SCL are bidirectional lines connected with
I2C interface. Its operation voltage is 1.8V. High speed mode transmission rate can reach 400 KBPS,
Because L600 haven’t internal pulled up to the I2C interface, so in your design need pull up. Below
figure is the reference design:
Figure 3-28 I2C reference design
Note: 1. L600 I2C only support host mode.
2. Only special software version support inquire the I2C.

L600 Hardware Design
Copyright © Shanghai Mobiletek Communication Ltd 43
3.15 Antenna interface
3.15.1 RF signal PCB layout guide
a) Trace layout and dimensions including specific designs for each type:
1) Customer’s antenna should be located in the host board and connected to module’s antenna pad
through micro-strip line or other types of RF trace and the trace impedance must be controlled in 50Ω.
RF antenna interface type can be SMA , RF connector and so on. And isolation is required greater than
35 dB.
2) In layout design, antenna RF transmission line must ensure the characteristic impedance = 50 ohm.
The characteristic impedance depend on substrate board, line width and the distance from the ground
plane.
3) For convenience of antenna tuning and certification test, should increase RF connectors and the
antenna matching circuit, below is a recommended circuit:
Figure 3-29 Main antenna matching circuit diagram(MAIN_ANT)
In this figure, the components R1, C1, C2 and R2 is used for antenna matching, the value of
components can only be got after the antenna tuning, usually, they are provided by antenna vendor. By
default, the R1, R2 are 0 Ohm resistors, and the C1, C2 are reserved for tuning.
The RF test connector in the figure is used for the conducted RF performance test, and should be
placed as close as to the module’s antenna pin. The traces impedance between components must be
controlled in 50ohm. And antenna gain is required not less than 3 dBi.
4) As shown in figure 3-20 is the layout of antenna feed point of reference for clearance area.
L600 Hardware Design
Copyright © Shanghai Mobiletek Communication Ltd 44
Figure 3-33 antenna feed point
b) To facilitate the antenna tuning and certification test, a RF connector and an antenna matching
circuit should be added. The following figure is the recommended circuit.
The antenna feed point is defined as shown in below table:
Table 3-26 antenna pin definition
Pin No. Signal I/O Typ. Description
18 MAIN_ANT AI/AO Module main antenna
c) we recommends that the total insertion loss between the antenna pad and antenna should meet the
following requirements and test procedures for design verification:
● LTE (F<1GHz) <0.5dB
● LTE (1GHz<F<2GHz) <0.9dB
● LTE (2GHz<F) <1.2dB

L600 Hardware Design
Copyright © Shanghai Mobiletek Communication Ltd 45
4 Product characteristics
4.1 Absolute parameters
The following table shows the state of the absolute maximum work in abnormal situation. Exceed the limit
value will likely result in permanent damage to the module.
Table 4-1 L600 absolute parameters
Parameter Min. Max. Unit
VBAT absolute voltage parameter -0.5 6.0 V
USB_VBUS absolute voltage parameter -0.5 5.25 V
I/O absolute voltage parameter:
PWRKEY, RESET, SPI, GPIO, I2C, PCM, UART, USIM_DET
-0.3 2.1 V
I/O absolute voltage parameter:
USIM
-0.3 3.05 V
4.2 Operation condition
4.2.1 Operation voltage
This product is a DC input voltage range of 3.4 V to 4.2 V, the typical value of 3.8 V, as shown in below
table.
Table 4-2 Input DC voltage
Parameter Min. Typ. Max. Unit
VBAT Voltage 3.4 3.8 4.2 V
USB_VBUS Votage 2.0 5.0 5.25 V
About L600 dc electric property, please refer to part 3.3 digital I/O characteristics.
4.2.2 Work mode(TBD)
Table 4-3 work mode
Mode Description
Normal operation
mode
(LTE)Sleep In this case, the current consumption of module
will be reduced to the minimal level.
In sleep mode, the module can still receive paging
message and SMS.
(LTE)
Idle
Software is active. Module is registered to the
GSM/WCDMA/TD-SCDMA/EVDO/LTE network, and the

L600 Hardware Design
Copyright © Shanghai Mobiletek Communication Ltd 46
module is ready to communicate.
(LTE) taking Connection between two subscribers is in progress.
In this case, the power consumption depends on
network settings such as DTX off/on, FR/EFR/HR,
hopping sequences, antenna.
(LTE) Standby Module is ready for
GPRS/EDGE/WCDMA/TD-SCDMA/EVDO/LTE
data transfer, but no data is currently sent or
received. In this case, power consumption depends
on network settings and EDGE/HSPA+ /LTE
configuration.
(LTE) Data transfer There is GPRS/EDGE/WCDMA/TD-SCDMA/EVDO/LTE
data transfer in progress. In this case, power
consumption is related to network settings (e.g.
power control level); uplink/downlink data rates
and GPRS configuration (e.g. used multi-slot
settings).
Minimum mode AT command “AT+CFUN” can be used to set the module
to a minimum functionality mode without removing
the power supply. In this mode, the RF
part of the module will not work or the USIM card
will not be accessible, or both RF part and USIM
card will be closed, and the serial port is still
accessible. The power consumption in this mode is
lower than normal mode.
Flight mode Use the "AT + CFUN = 7" command or lower FLIGHTMODE
pins, the module can be configured to flight mode
under without removing the power supply condition.
In this case, the RF part does not work, but still
can use the serial port and USB, the power
consumption is lower than normal working mode.
Power off Through the "AT + CPOF" command or lower PWRKEY pin
can power off L600. At this mode, the module of
internal power supply will be closed, and the
system is stop running also. The UART and USB are
unavailable.
Sleep mode In sleep mode, the module power consumption to a
minimum, but the module is still able to receive
paging information and SMS.
4.2.3 current consumption(TBD)
The power consumption in suspended mode and without USB connection is listed in the table below.
L600 Hardware Design
Copyright © Shanghai Mobiletek Communication Ltd 47
Table 4-4 working current consumption (VBAT=3.8V)
Power off
Power off current 8uA
LTE Sleep/Idle
LTE supply current Sleep mode typical:TBD
Idle mode typical:TBD
LTE Data transmission
FDD B2 @1.4Mbps typical:TBD
FDD B4 @1.4Mbps typical:TBD
FDD B12 @1.4Mbps typical:TBD
FDD B13 @1.4Mbps typical:TBD
FDD B8 @180Kbps typical:TBD
FDD B20 @180Kbps typical:TBD
4.3 Working and storage temperature
The operating temperature and storage temperature of L600 is listed in the following table.
Table 4-5 Operating temperature
Parameter
Min. Typ. Max. Unit
Extended operation
temperature*
-40 25 85 ℃
Storage temperature -45 25 90 ℃
4.4 ESD performance
L600 is electrostatic sensitive device, therefore, the user in the production, assembly and
operation of the module must pay attention to the electrostatic protection. L600 ESD performance
parameters in the following table:
Table 4-6 ESD performance parameters (temperature 25 ℃, humidity: 45%)
Net contact air
VBAT GND ±5KV ±10KV
Antenna port ±4KV ±8KV
UART ±2KV ±4KV

L600 Hardware Design
Copyright © Shanghai Mobiletek Communication Ltd 48
USB ±3KV ±6KV
Other PADS ±2KV ±4KV

L600 Hardware Design
Copyright © Shanghai Mobiletek Communication Ltd 49
5 Design guideline
This chapter provides a general design of the products instruction, the user can refer to design
guidance for design, make products to achieve better performance.
5.1 General design rules and requirements
Users in the design of this product is peripheral circuit, the first to ensure the external power
supply circuit can provide enough power supply capacity, And the requirements for high speed signal
lines USB control 90 ohm + / - 10% difference impedance. For general signal interface, require the
user to us in strict accordance with the requirements of design, in line with the interface signal level
matching, in case the level of damage to the module. This product its own radio frequency index is
good, customers need to design in accordance with the requirements the mainboard side antenna
circuit and corresponding impedance control, otherwise it will affect the whole RF index.
5.2 Reference circuit
Request system board VPH_PWR side power supply ability of power supply to achieve more
than 1 A, meet the demand of modules, peak current, and the system side the power of the average
current will reach more than 0.9 A. System board side power supply cord shall ensure enough line
width, and wants to form a good return with the ground plane, moreover should increase in the power
supply circuit design the method of micro level energy storage capacitor, guarantee the instantaneous
power supply capacity, and the power supply ripple control within the 100 mv, the specific function of
each functional module can be found in the corresponding description, overall reference circuit design
please refer《L600 reference design》.

L600 Hardware Design
Copyright © Shanghai Mobiletek Communication Ltd 50
5.3 RF part design guideline
5.3.1 Early antenna design considerations
Pre-project evaluation
The selection of the antenna position must first ensure that the antenna and the base station are
kept in the horizontal direction, this produces the highest efficiency; Secondly, try to avoid placing the
switch in the power supply or data line, chip and other devices or chips that produce electromagnetic
interference. At the same time, the position of the hand can be avoided, so as to prevent the human
body to produce attenuation; But also to reduce the radiation and the structure of the realization of the
need to take into account. So, At the beginning of the design need to structure, ID, circuit, antenna
engineers together to evaluate the layout.
Antenna matching circuit
If the module's radio frequency port and the antenna interface need to be transferred, the main
board circuit design, The design of microstrip line or strip line between the module RF test base and
the antenna interface between the microstrip line or the strip line by characteristic impedance 50 ohm,
at the same time, reserved double L type matching circuit; If the antenna's RF connector can be
directly stuck in the module's RF test base, can save the module of the RF port and the antenna
interface between the transfer.
5.4 EMC and ESD design advice
Users should take full account of the EMC problem caused by signal integrity and power integrity
in the design of the whole machine, In the module of the peripheral circuit layout, for power and signal
lines, etc., to maintain the spacing of 2 times line width. Can effectively reduce the coupling between
the signal, so that the signal has a clean, the return path. When the peripheral power supply circuit is
designed, the decoupling capacitor should be placed close to the module power supply pin, High
frequency high speed circuit and sensitive circuit should be far from the edge of PCB, and the layout
of the layout as far as possible to reduce the interference between each other, and the sensitive signal is
protected. The circuit or device that may interfere with the operation of the system board is designed.
This product is embedded in the system board side, design, need to pay attention to the ESD
protection, the key input and output signal interface, such as (U) SIM card interface need to be placed
close to the protection of ESD devices. In addition to the
motherboard side, the user is required to design the structure and PCB layout, ensure that the
metal shield is fully grounded, and set up an unobstructed discharge passage for the electrostatic
discharge.
L600 Hardware Design
Copyright © Shanghai Mobiletek Communication Ltd 51
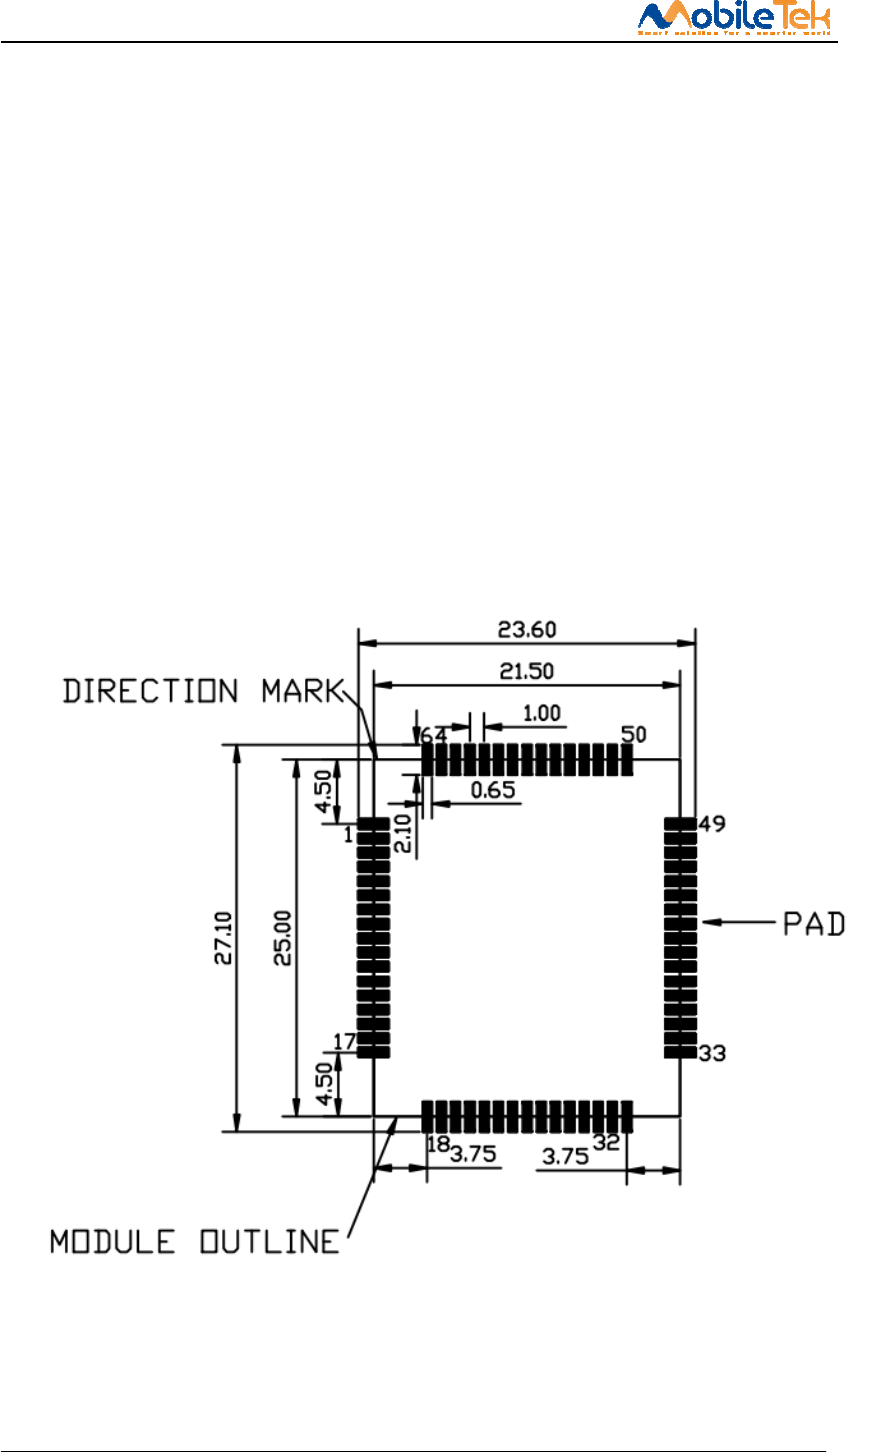
5.5 PCB Recommended land pattern
Recommended at 64 of peripheral signal pads to the module with a length of 1.0 mm.
Recommended PCB pads as shown in below.
Figure 5-1 RECOMMENDED LAND PATTERN (Unit: mm)
5.6 Products recommended upgrade
L600 default through the USB firmware updates, so products to facilitate the software update,
when the design proposal to set aside the USB test points or interface to facilitate subsequent product
of the firmware upgrade.
L600 Hardware Design
Copyright © Shanghai Mobiletek Communication Ltd 52
6 Manufacturers
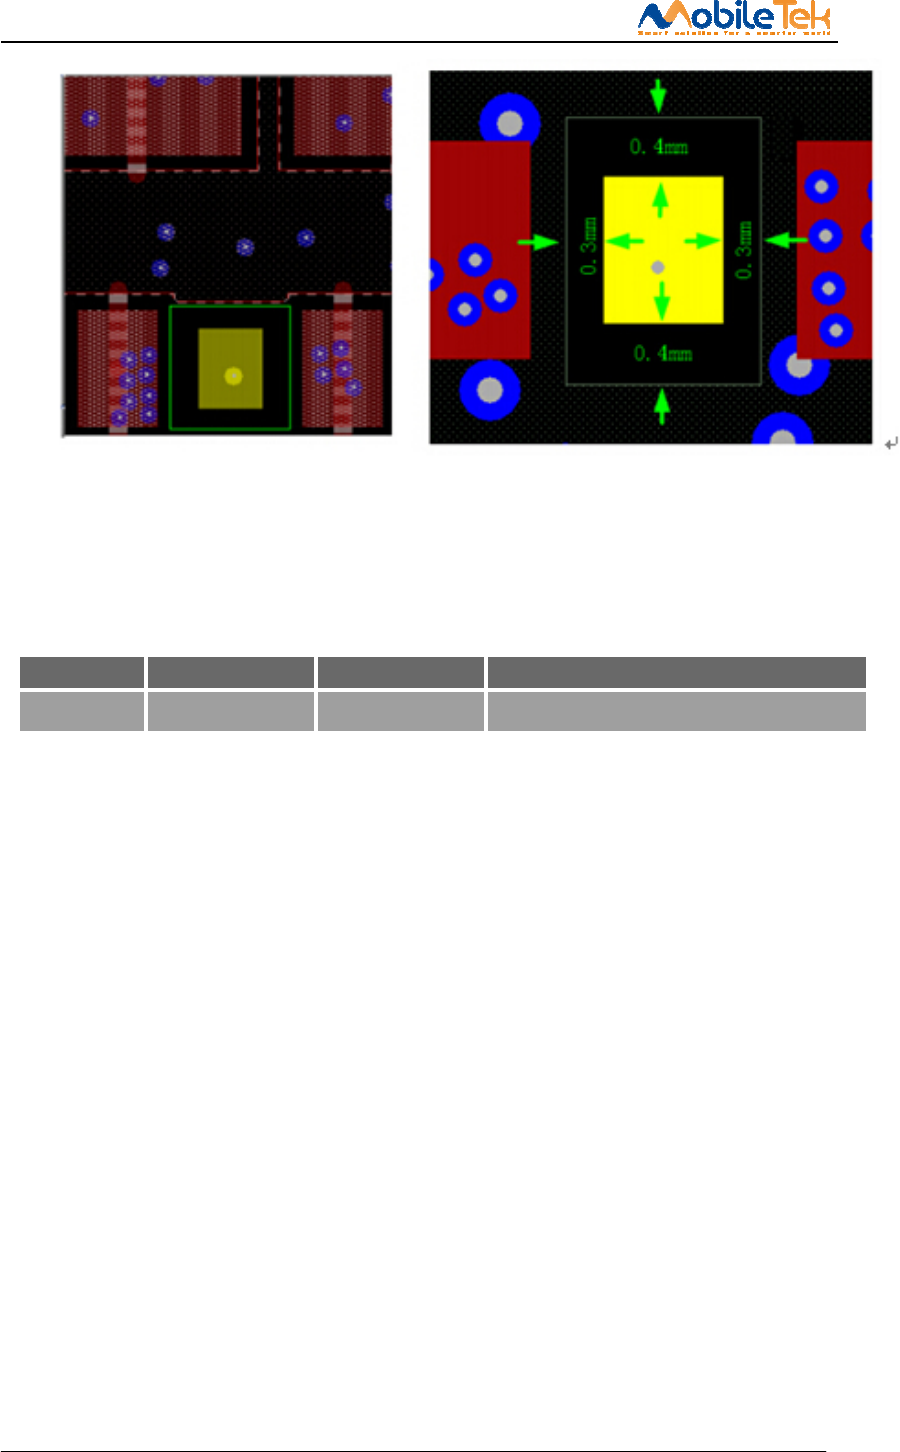
6.1 Steel mesh design
At the bottom of the module pad thermal, can be reduced by way of steel mesh
openings, reduce the risk of short circuit between the thermal and the module of the module Pin, have
certain effect;
Module pad thermal welded steel mesh openings are recommended for reference. Figure
6-1 is recommended for steel mesh and size.
Figure 6-1 Steel mesh (unit mm)
L600 Hardware Design
Copyright © Shanghai Mobiletek Communication Ltd 53
Note: The direction mark point only for identify the pin 1 position, should not embody in the steel
mesh file.
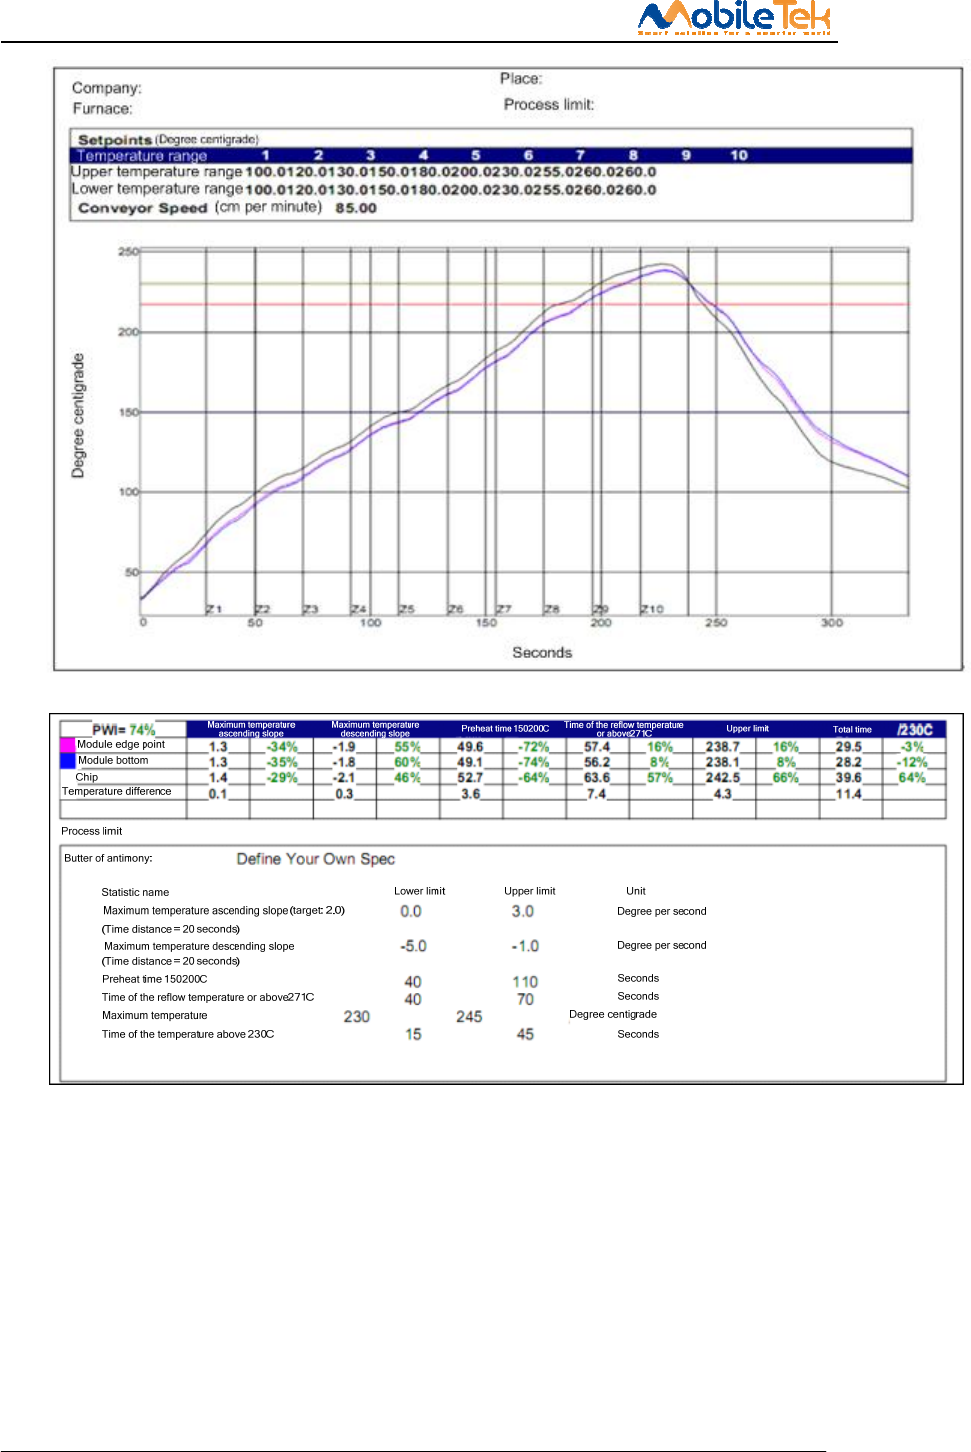
6.2 Temperature curve
The temperature curve of the welding quality and material status influence, please pay special
attention. Temperature rise speed should not be too fast, from room temperature to 150, the
temperature rise rate is less than 3s. At the same time in more than 217 degrees, please try to keep time
no more than 70 seconds, at intermediate values of 55 seconds is appropriate. The thermal shock
strength is too general will lead to part of the device failure, resulting in a decline in yield and
maintenance difficulty. And please control the maximum temperature of no more than 245 degrees,
partial material, such as crystal at high temperature easy to occur the package rupture, cause unable to
play the problem, and then affect the function of the product, The temperature can be set using the
curve shown in table 6-1.
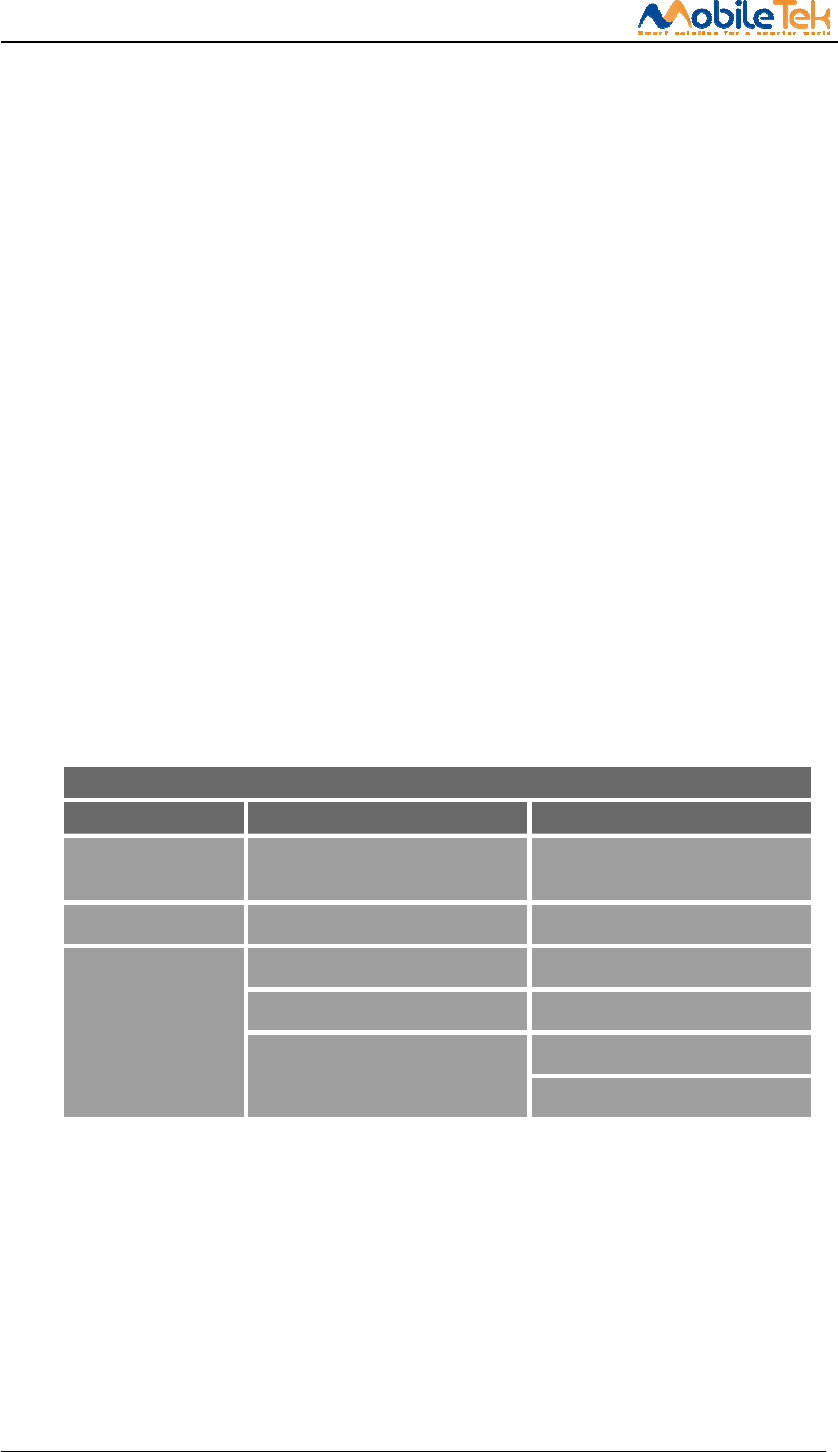
Table 6-1 Temperature curve
Lead-free process temperature curve
Stage Temperature time
Preheat Temperature rise from room
temperature to 150
rate of temperature rising
<3 / ℃ s
keep warm 150℃~200℃ 40~110 s
Welding
< 217℃ 40~70 s
< 230℃ 15~45 s
Peak temperature
MAX:245℃
MIN:230℃
L600 Hardware Design
Copyright © Shanghai Mobiletek Communication Ltd 54
Figure 6-2 The reference temperature curve
6.3 The Moisture Sensitivity Level (MSL)
L600 module complies with the humidity level 3. At a temperature of <30 degrees and relative
humidity of <60% of the environmental conditions, dry pack to perform J-STD-020C specification
according to IPC / JEDEC standard. At a temperature of <40 degrees and a relative humidity of <90%
L600 Hardware Design
Copyright © Shanghai Mobiletek Communication Ltd 55
of the environmental conditions, in the case of unopened shelf life of at least six months. After
unpacking, Table 6-2 shows the module shelf life at different times corresponding to the level of
humidity.
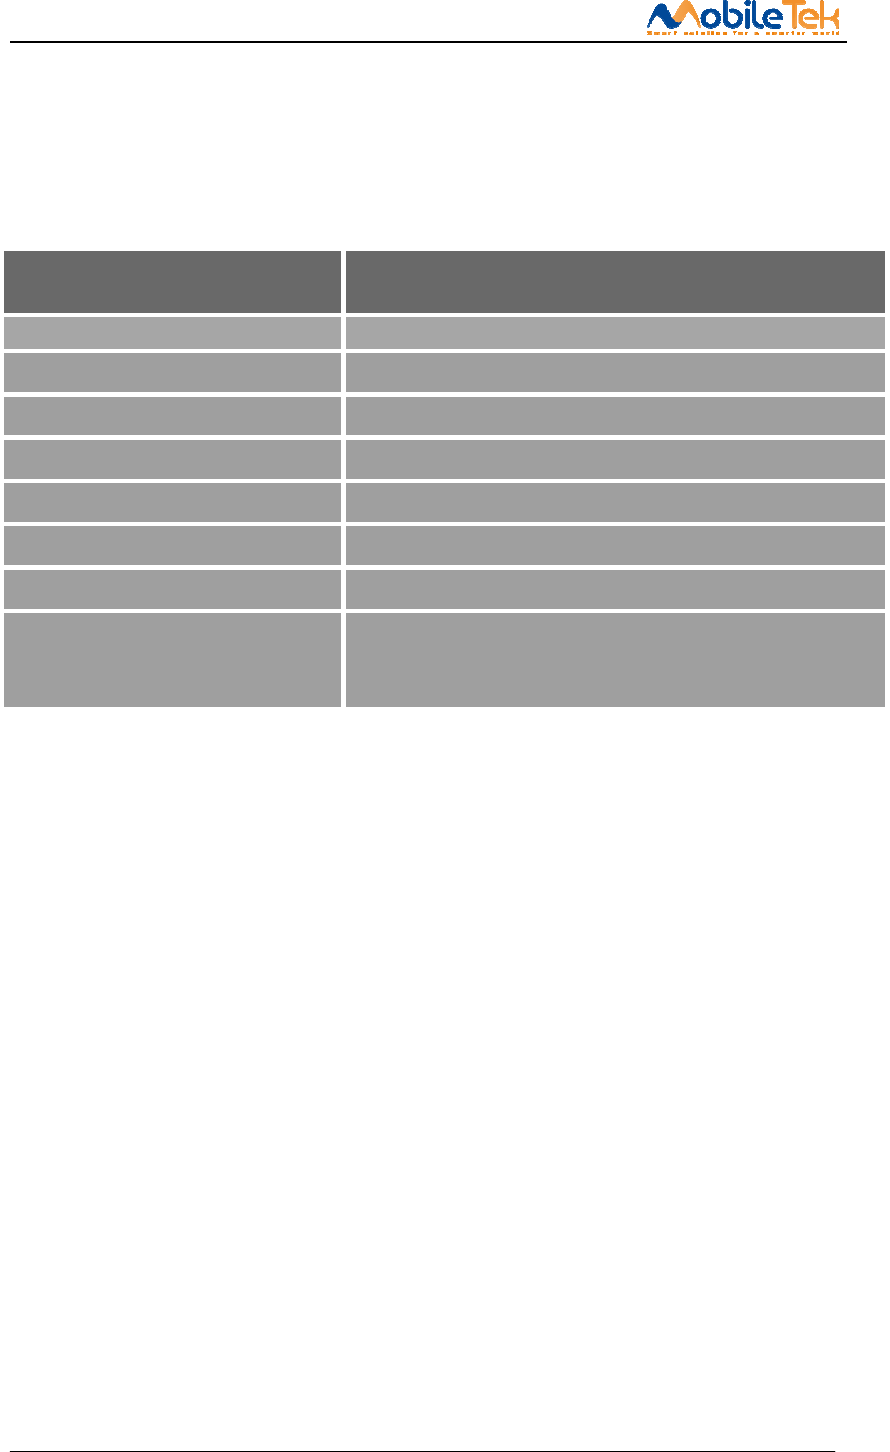
Table6-2: Moisture sensitivity level and floor life
The Moisture Sensitivity Level
(MSL)
Floor Life(out of bag) at factory ambient≦+30
/60%RH
1 Unlimited at ≦+30 /85%
2 1 Year
2a 4 weeks
3 168 hours
4 72 hours
5 48 hours
5a 24 hours
6
Mandatory bake before use. After bake, it must be
reflowed within the time limit specified on the
label.
After unpacking,<30 degrees in temperature and relative humidity <60% environmental
conditions, 168 hours in the SMT patch. If not meet the above conditions need to be baked.
NOTES: For product handling, storage, processing, IPC / JEDEC J-STD-020C must be
followed
6.4 Baking Requirements
Due to the humidity sensitive characteristics of the L600 module, the L600 is a vacuum
packaging, which can be stored for 6 months without damage to the package, and the ambient
temperature is less than 40 C and the relative humidity is less than 90%. To meet one of the following
conditions, the process of reflow soldering should be performed before the full bake (if trays are used,
please note whether the tray is heat-resistant.), or the module may cause permanent damage to the
process.
L600 Hardware Design
Copyright © Shanghai Mobiletek Communication Ltd 56
1、Vacuum packing damage or leakage
2、The module is exposed in the air for 168 hours or more
3、The module is exposed in air for 168 hours, not meet the temperature <30 degrees and
relative humidity of the environment conditions <60%
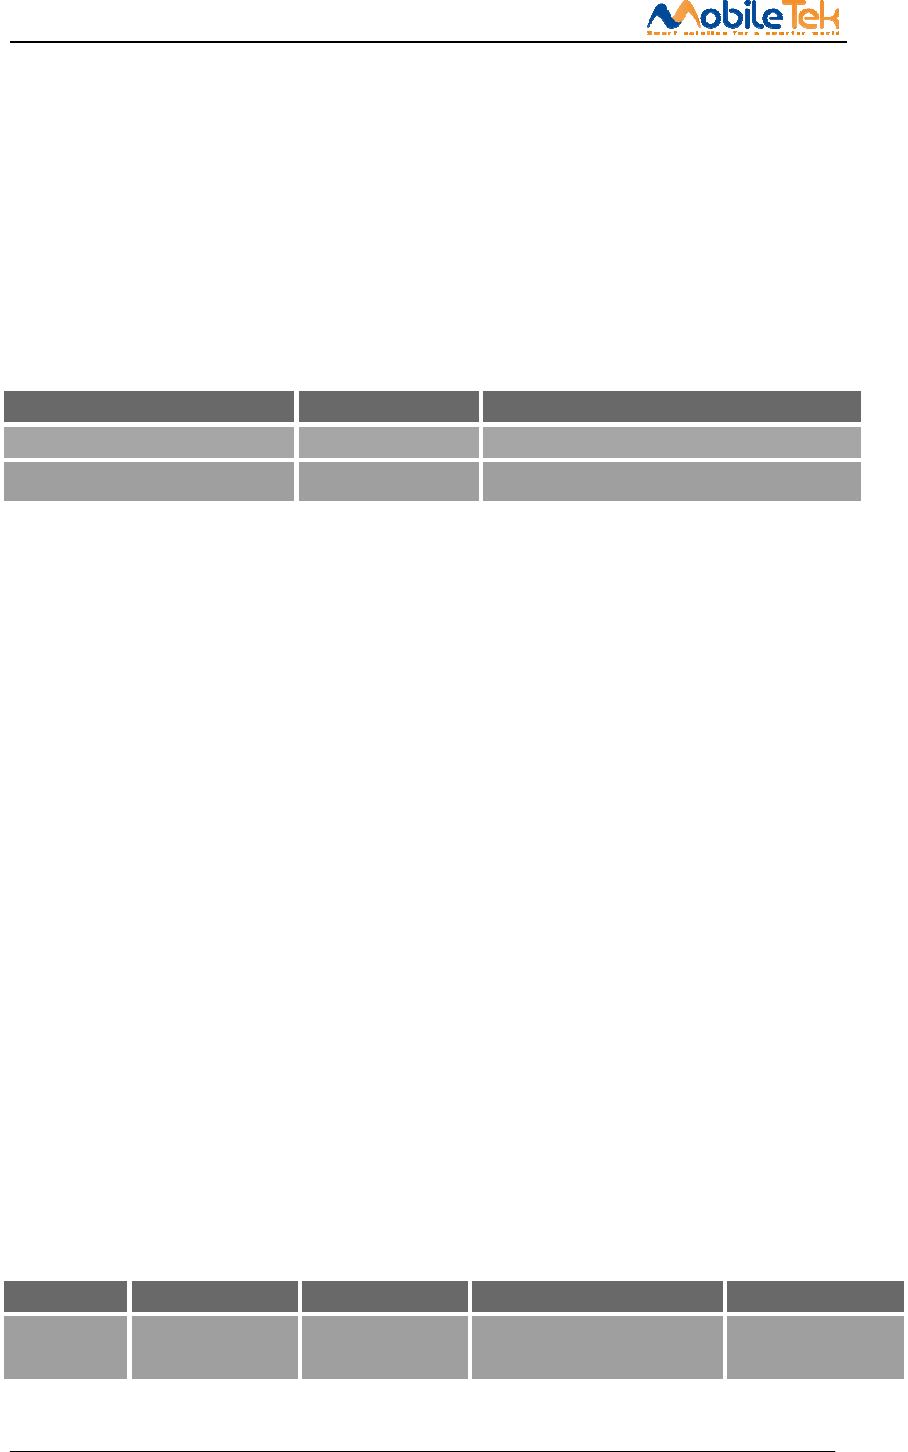
Table6-3: Baking requirements
Baking temperature Humidity Baking time
40°C±5°C <5% 192 Hours
120°C±5°C <5% 4 Hours
7 Package Storage information(TBD)
7.1 Package information(TBD)
7.1.1 Tape and reel information
7.1.1 Package information
7.2 Bagged storage conditions
L600 shipments in the form of vacuum sealing anti-static bag. Module of storage need to follow the following
conditions: Environment below 40 Degrees Celsius temperature, air humidity is less than 90% of cases, the
module can be in vacuum sealed bags for 12 months. Conditions set the storage environment Suggestions
with reference to the following form.
Table 7-1 Storage conditions (less than 90% humidity of the air vacuum sealed packaging)
Parameter Min. Typ. Max. Unit
Storage
temperature
-45 25 90 ℃
When on the vacuum bags, if meet the following conditions, the module can be directly for reflow soldering
(furnace temperature setting reference 6.2 furnace temperature curve) or other high temperature process:

L600 Hardware Design
Copyright © Shanghai Mobiletek Communication Ltd 57
Module temperature below 30 degrees c, the air humidity is less than 60%, factory within 72 hours to
complete the SMT.
The humidity is less than 10%.
If the module is in the following conditions, to be baked before SMT:
When the environment temperature is 23 degrees Celsius (allow upper and lower volatility of 5 degrees
Celsius), humidity index greater than 10%.
When open vacuum bags, module temperature below 30 degrees Celsius, air humidity is less than 60%,
but the factory have not finished the SMT within 72 hours.
When open the vacuum bags, module storage air humidity is more than 10%.
FCC Certification Requirements.
According to the definition of mobile and fixed device is described in Part 2.1091(b), this device
is a mobile device.
And the following conditions must be met:
1. This Modular Approval is limited to OEM installation for mobile and fixed applications only.
The antenna installation and operating configurations of this transmitter, including any applicable
source-based time- averaging duty factor, antenna gain and cable loss must satisfy MPE categorical
Exclusion Requirements of 2.1091.
2. The EUT is a mobile device; maintain at least a 20 cm separation between the EUT and the
user’s body and must not transmit simultaneously with any other antenna or transmitter.
3.A label with the following statements must be attached to the host end product: This device
contains FCC ID: 2AK9DL600A.
4.To comply with FCC regulations limiting both maximum RF output power and human
exposure to RF radiation, maximum antenna gain (including cable loss) must not exceed:
❒LTE band 2 <=3dBi
❒LTE band 4 <=3dBi
❒LTE band 12 <=3dBi
5. This module must not transmit simultaneously with any other antenna or transmitter
6. The host end product must include a user manual that clearly defines operating requirements
and conditions that must be observed to ensure compliance with current FCC RF exposure guidelines.
For portable devices, in addition to the conditions 3 through 6 described above, a separate
approval is required to satisfy the SAR requirements of FCC Part 2.1093
If the device is used for other equipment that separate approval is required for all other operating
configurations, including portable configurations with respect to 2.1093 and different antenna
configurations.
For this device, OEM integrators must be provided with labeling instructions of finished products.
Please refer to KDB784748 D01 v07, section 8. Page 6/7 last two paragraphs:
A certified modular has the option to use a permanently affixed label, or an electronic label. For a

L600 Hardware Design
Copyright © Shanghai Mobiletek Communication Ltd 58
permanently affixed label, the module must be labeled with an FCC ID - Section 2.926 (see 2.2
Certification (labeling requirements) above). The OEM manual must provide clear instructions
explaining to the OEM the labeling requirements, options and OEM user manual instructions that are
required (see next paragraph).
For a host using a certified modular with a standard fixed label, if (1) the module’s FCC ID is not
visible when installed in the host, or (2) if the host is marketed so that end users do not have straight
forward commonly used methods for access to remove the module so that the FCC ID of the module is
visible; then an additional permanent label referring to the enclosed module:“Contains Transmitter
Module FCC ID:2AK9DL600A” or “Contains FCC ID: 2AK9DL600A” must be used. The host OEM
user manual must also contain clear instructions on how end users can find and/or access the module
and the FCC ID.
The final host / module combination may also need to be evaluated against the FCC Part 15B
criteria for unintentional radiators in order to be properly authorized for operation as a Part 15 digital
device.
The user’s manual or instruction manual for an intentional or unintentional radiator shall caution
the user that changes or modifications not expressly approved by the party responsible for compliance
could void the user's authority to operate the equipment. In cases where the manual is provided only in
a form other than paper, such as on a computer disk or over the Internet, the information required by
this section may be included in the manual in that alternative form, provided the user can reasonably
be expected to have the capability to access information in that form.
This device complies with part 15 of the FCC Rules. Operation is subject to the following two
conditions: (1) This device may not cause harmful interference, and (2) this device must accept any
interference received, including interference that may cause undesired operation.
Changes or modifications not expressly approved by the manufacturer could void the user’s
authority to operate the equipment.
To ensure compliance with all non-transmitter functions the host manufacturer is responsible for
ensuring compliance with the module(s) installed and fully operational. For example, if a host was
previously authorized as an unintentional radiator under the Declaration of Conformity procedure
without a transmitter certified module and a module is added, the host manufacturer is responsible for
ensuring that the after the module is installed and operational the host continues to be compliant with
the Part 15B unintentional radiator requirements.