Modern 1702A-CH IJUKE CD, IPOD PLAYER User Manual 10202 CETL FH10
Hong Kong Modern Marketing Manufacturing Limited IJUKE CD, IPOD PLAYER 10202 CETL FH10
Modern >
USERS MANUAL
IMPORTANT SAFETY INSTRUCTION
PLEASE READ CAREFULLY ALL THE FOLLOWING IMPORTANT SAFEGUARDS
THAT ARE APPLICABLE TO YOUR EQUIPMENT
1. Read Instructions - All the safety and operating instructions should be read before the product is operated.
2. Retain instructions - The safety and operating instructions should be retained for future reference.
3. Heed Warnings - All warnings on the product and in the operating Instructions should be adhered to.
4. Follow Instructions - All operating and use instructions should be followed.
5. Cleaning - Unplug this product from the wall outlet before cleaning. Do not use liquid cleaners or aerosol cleaners.Use
a damp cloth for cleaning.
6. Attachments - Do not use attachments not recommended by the product manufacturer as they may cause hazards.
7. Water and Moisture - Do not use this product near water - for example, near a bath tub, wash bowl, kitchen sink, or
laundry tub; in a wet basement; or near a swimming pool; and the like.
8. A product and cart combination should be moved with care. Quick stops, excessive force, and uneven
surfaces may cause the product and cart combination to overturn.
9. Ventilation - Slots and openings in the cabinet are provided for ventilation and to ensure reliable
operation of the product and to protect it from overheating, and these openings must not be blocked
or covered, The openings should never be blocked by placing the product on a bed, sofa, rug, or
other similar surface. This product should not be placed in a built - in installation such as a bookcase
or rack unless proper ventilation is provided or the manufacturer's instructions have been adhered to.
10. Power Sources - This product should be operated only from the type of power source indicated on the marking label,
if you are not sure of the type of power supply to your home. Consult your product dealer or local power company.For
products intended to operate from battery power, or other sources, refer to the operating instructions.
11. Grounding or Polarization - This product may be equipped with a three end line plug This plug will fit into the power
outlet only one way. This is a safety feature. If you are unable to insert the plug fully into the outlet try reversing the
plug, If the plug should still fail to fit, contact your electrician to replace your obsolete outlet. Do not defeat the safety
purpose of the polarized plug.
12. Power - Cord Protection - Power - supply cords should be routed so that they are not likely to
be walked on or pinched by items placed upon or against them, paying particular attention to
cords at plugs, convenience receptacles, and the point where they exit from the product.
13. Lightning - For added protection for this product during a lightning storm, or when it is left
unattended and unused for long periods of time, unplug it from the wall outlet and disconnect
the antenna or cable system. This will prevent damage to the product due to lightning and power - line surges.
14. Power Lines - An outside antenna system should not be located in the vicinity of overhead power lines or other electric
light or power circuits, or where it can fall into such power lines or circuits. When installing an outside antenna system,
extreme care should be taken to keep from touching such power lines or circuits as contact with them might be fatal.
15. Overloading - Do not overload wall outlets, extension cords, or integral convenience receptacles as this can result
in a risk of fire or electric shock.
16. Object and Liquid Entry - Never push objects of any kind into this product through openings as they may touch
dangerous voltage points or short - out parts that could result in a fire or electric shock. Never spill liquid of any kind
on the product.
17. Servicing - Do not attempt to service this product yourself as opening or removing covers may expose you to dangerous
voltage or other hazards. Refer all servicing to qualified service personnel.
18. Damage Requiring Service - Unplug this product from the wall outlet and refer servicing to qualified service personnel
under the following conditions;
a. When the power-supply cord or plug is damaged.
b. If liquid has been spilled, or objects have fallen into the product.
c. If the product has been exposed to rain or water.
d. If the product does not operate normally by following the operating instructions. Adjust only those controls that
are covered by the operating instructions as an improper adjustment of other controls may result in damage and
will often require extensive work by a qualified technician to restore the product to its normal operation.
e. If the product has been dropped or damaged in any way.
f. When the product exhibits a distinct change in performance - this indicates a need for service.
19. Replacement Parts - When replacement parts are required, be sure the service technician has used replacement
parts specified by the manufacturer or have the same characteristics as the original part. Unauthorized substitutions
may result in fire, electric shock, or other hazards.
20. Safety Check - Upon completion of any service or repairs to this product, ask the service technician to perform safety
checks to determine that the product is in proper operating condition.
21. Wall or ceiling Mounting - The product should be mounted to a wall or ceiling only as recommended by the manufacturer.
22. Heat - The product should be situated away from heat sources such as radiators. Heat registers, stoves, or other
products (including amplifiers) that produce heat.
WARNING: Changes or modifications to this unit not expressly approved by the party responsible for compliance could
void the users authority to operate the equipment.
NOTE: This equipment has been tested and found to comply with the limits for a Class B digital device, pursuant to Part
18 of the FCC Rules. These limits are designed to provide reasonable protection against harmful interference in a residential
installation. This equipment generates, uses, and can radiate radio frequency energy and, if not installed and used in
accordance with the instructions, may cause harmful interference to radio communications. However, there is no guarantee
that interference will not occur in a particular installation. If this equipment does cause harmful intereference to radio or
television reception, which can be determined by turning the equipment off and on , the user is encouraged to try to correct
the interference by one or more of the following measures:
- Reorient or relocate the receiving antenna.
- Increase the separation between the equipment and receiver.
- Connect the equipment into an circuit different from that to which the receiver is connected.
-Consult the dealer or an experienced radio TV technician for help.
NOTE: The manufacturer is not responsible for any radio or TV interference caused by unauthorized modifications
to this equipment. Such modifications could void the User's authority to operate the equipment.
AC
Polarized Plug
1
iJuke Premier
CR1702A
Manuel de lUtilisateur
www.crosleyradio.com
2
The exclamation point
within an equilateral
triangle is intended to
alert user to the
presence of important
operating and
maintenance (servicing)
instruction in the
literature accompanying
the appliance.
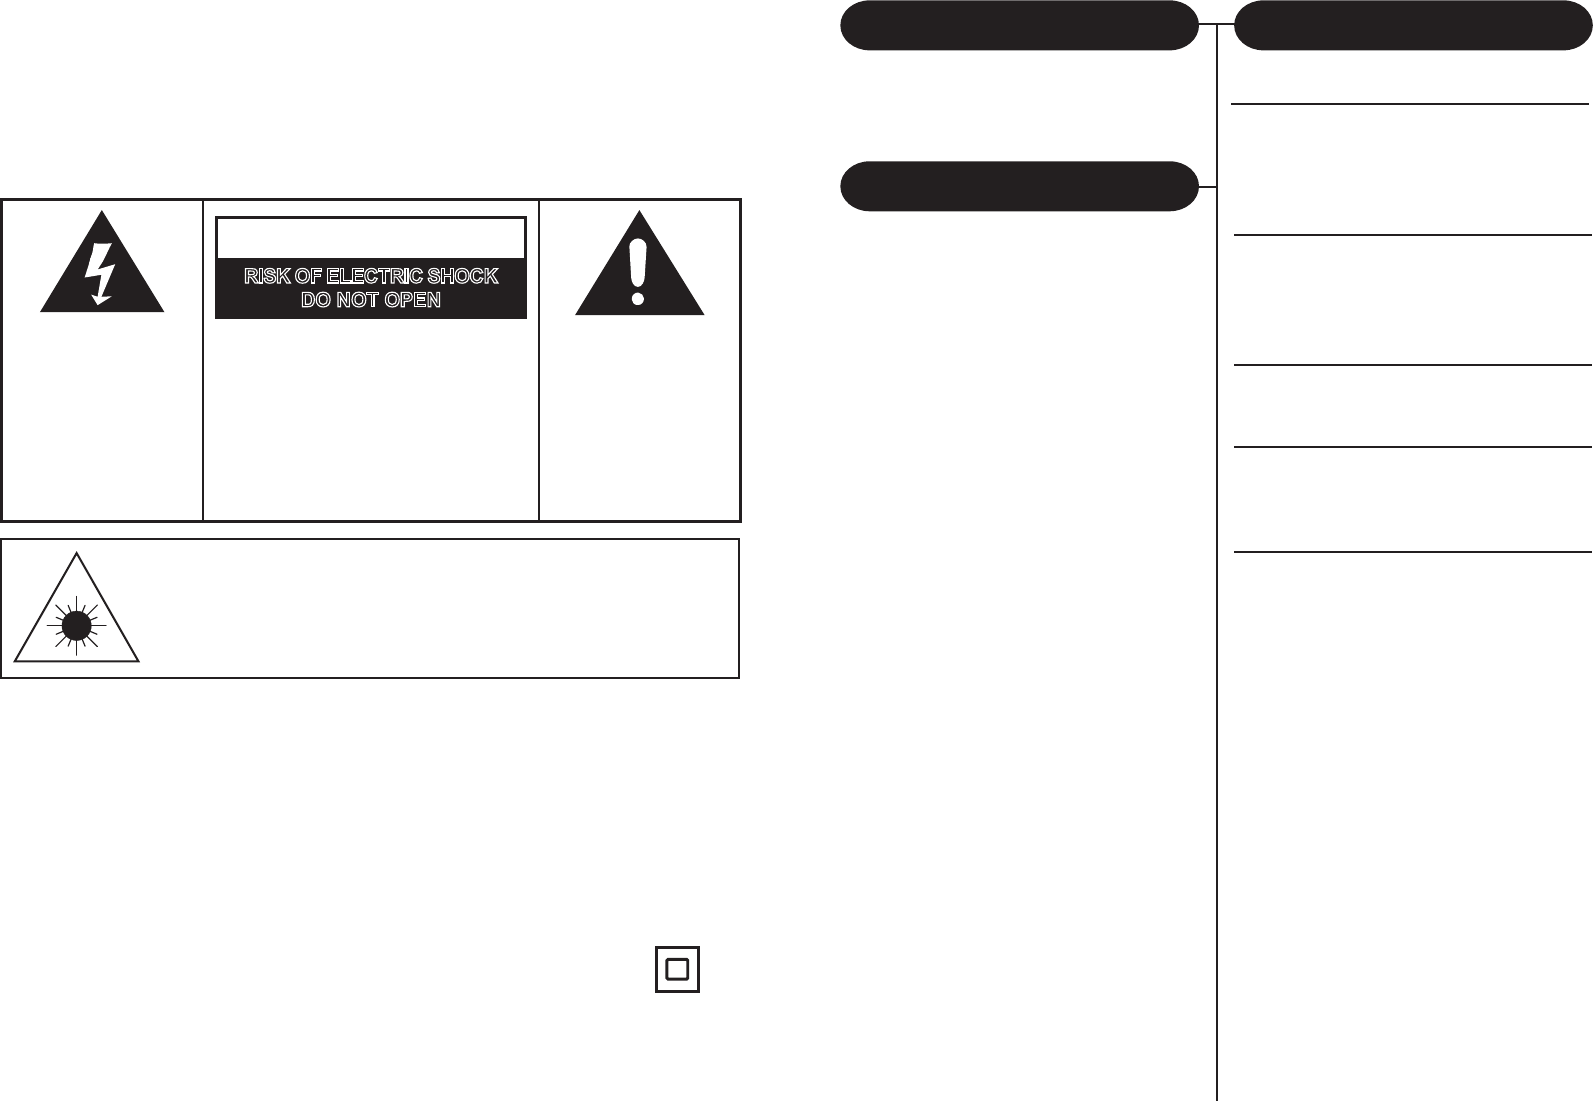
RISK OF ELECTRIC SHOCK
DO NOT OPEN
CAUTION
The lighting flash with
arrowhead symbol, within
an equilateral triangle, is
intended to alert user to
the presence of uninsulated
"dangerous voltage" within
the product's enclosure
that may be of sufficient
magnitude to constitute
risk of electric shock
to persons.
CAUTION: TO REDUCE
THE RISK OF ELECTRIC
SHOCK, DO NOT REMOVE
COVER (OR BACK). NO
USER - SERVICEABLE
PARTS INSIDE. REFER
SERVICING TO QUALIFIED
SERVICE PERSONNEL.
CAUTION
For Compact Disc Units Only:
INVISBLE LASER RADIATION WHEN OPEN AND INTERLOCK FAILED
OR DEFEATED. AVOID DIRECT EXPORSURE TO LASER BEAM.
Specification
Power Source : AC 120V ~ 60Hz
Power Consumption : 30W
Speaker : 4 Dynamic Type x 2
Speaker Wattage : 5 W
Speaker Ohm : 4 Ohm
Output Wattage : 2W per channel
WARNING:
TO PREVENT FIRE OR SHOCK HAZARD, DO NOT EXPOSE THIS
APPLIANCE TO RAIN OR MOISTURE. DO NOT REMOVE COVER.
PILOT LAMPS SOLDERED IN PLACE. NO USER SERVICEABLE
PARTS INSIDE. REFER SERVICING TO QUALIFIED SERVICE
PERSONNEL.
*DESIGN AND SPECIFICATIONS SUBJECT TO CHANGE WITHOUT NOTICE.
Getting Started
Control Locators...................... 4,5
Unpacking................................ 6
Power Source.......................... 6
Basic Operation
Lights ...................................... 7
Remote Control....................... 7
External Speakers................... 7
Connecting Optional Equipment
Using your iJuke..................... 8
CD Operation
CD Player................................9
Programmed CD Playback..... 9
General
Troubleshooting Guide........... 10
Warranty.................................. 11
Thank you for purchasing the the Crosley iJuke
Premier (CR1702A). Before operating this unit,
please read this manual thoroughly and retain it for
future reference.
Instuctions in this manual describe the control
functions of the CR1702A.
About This Manual
Welcome Table of Contents
3
5
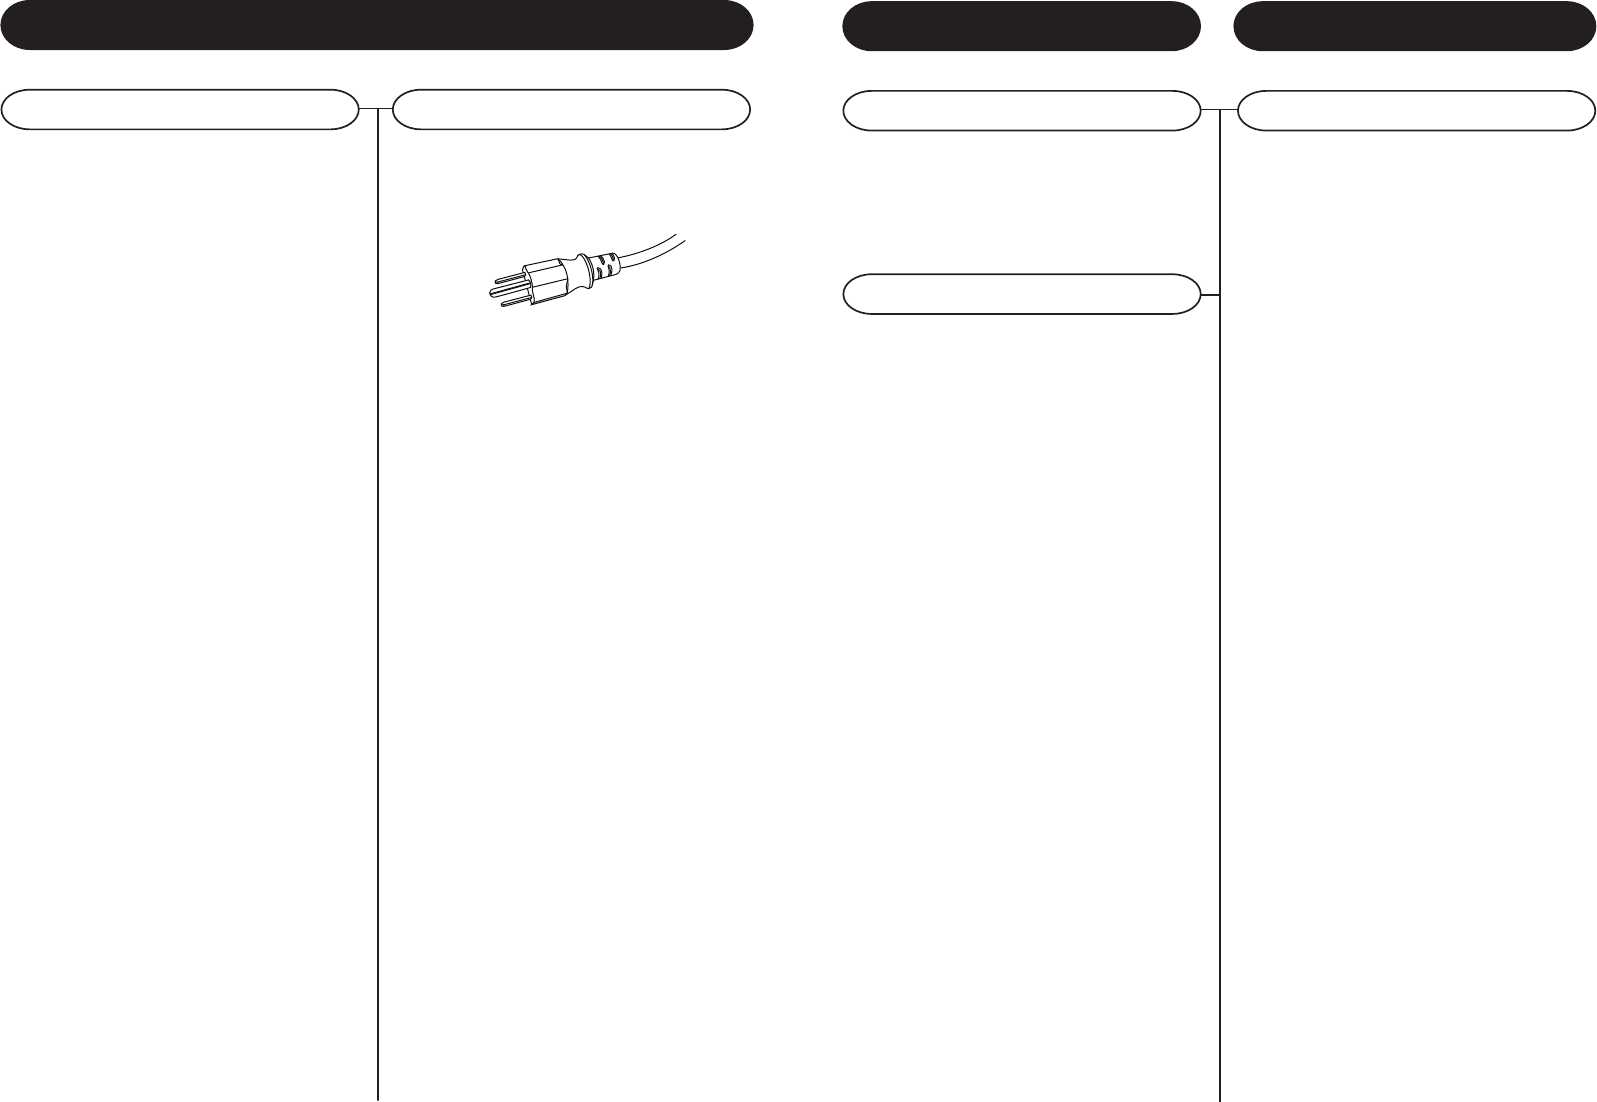
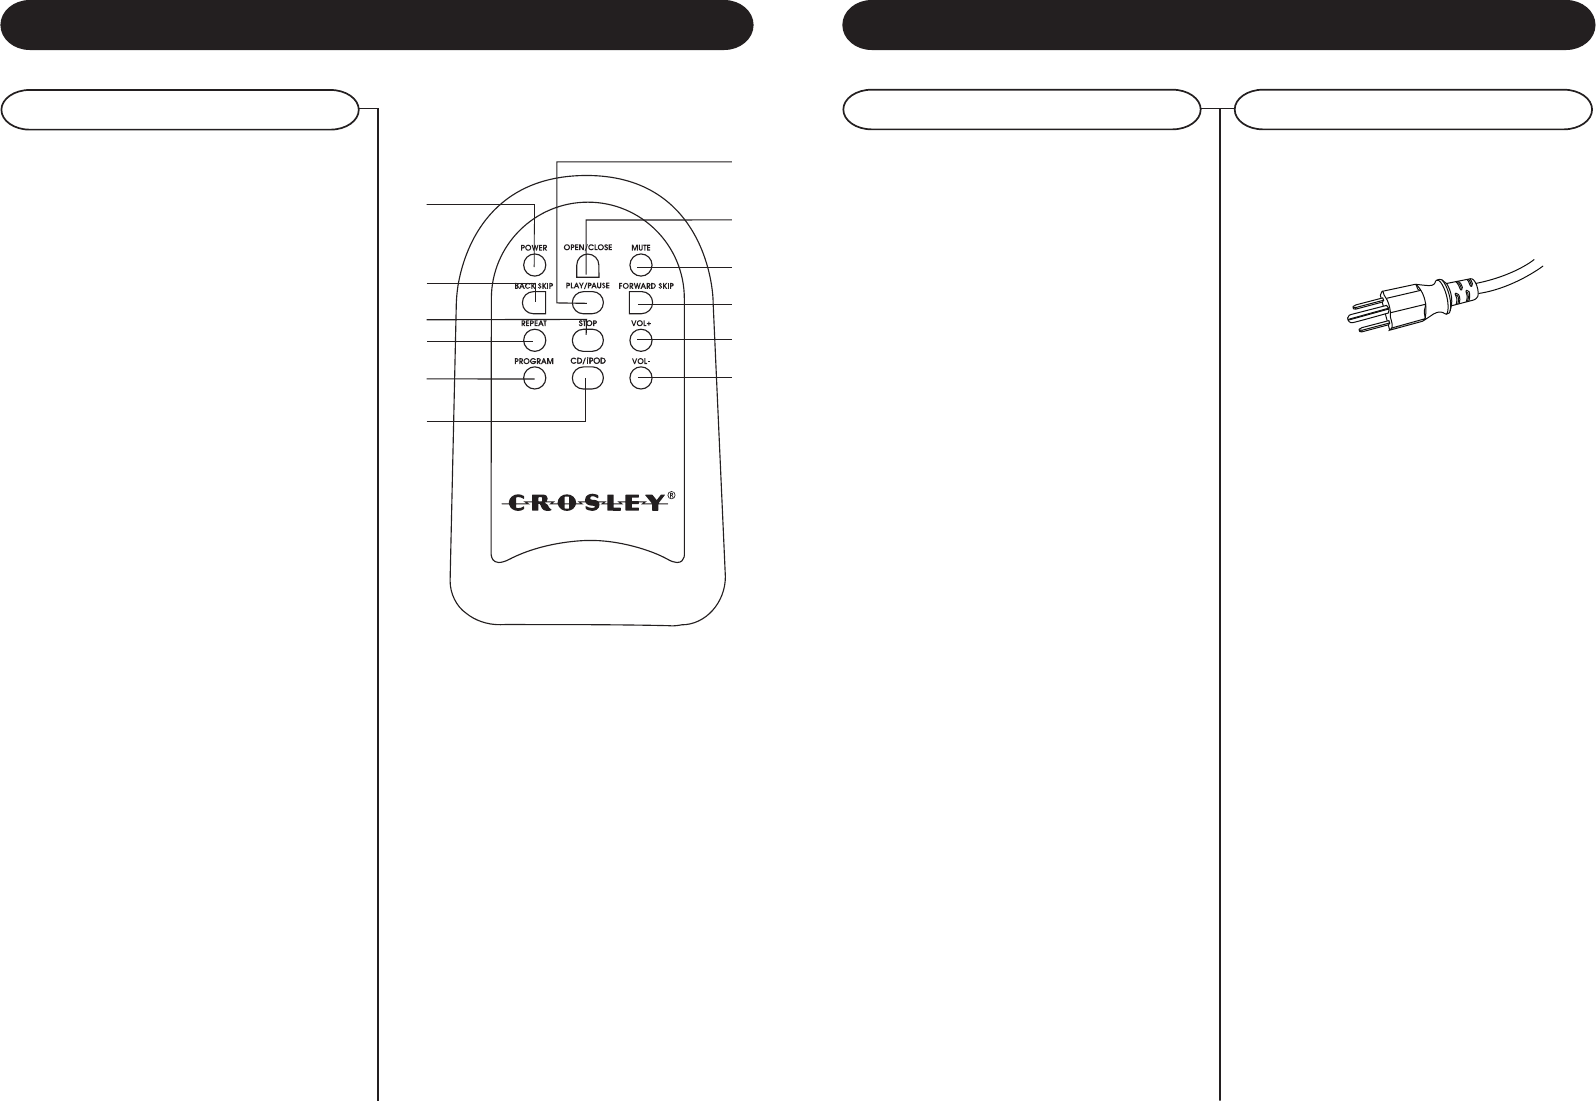
Control Locators
Remote Controls
17 Power
18 Back Skip
19 Stop
20 Repeat
21 Program
22 CD / iPod
23 Play / Pause
24 Open / Close
25 Mute
26 Forward Skip
27 Volume Up
28 Volume Down
17
18
19
20
21
22
23
24
25
26
27
28
4
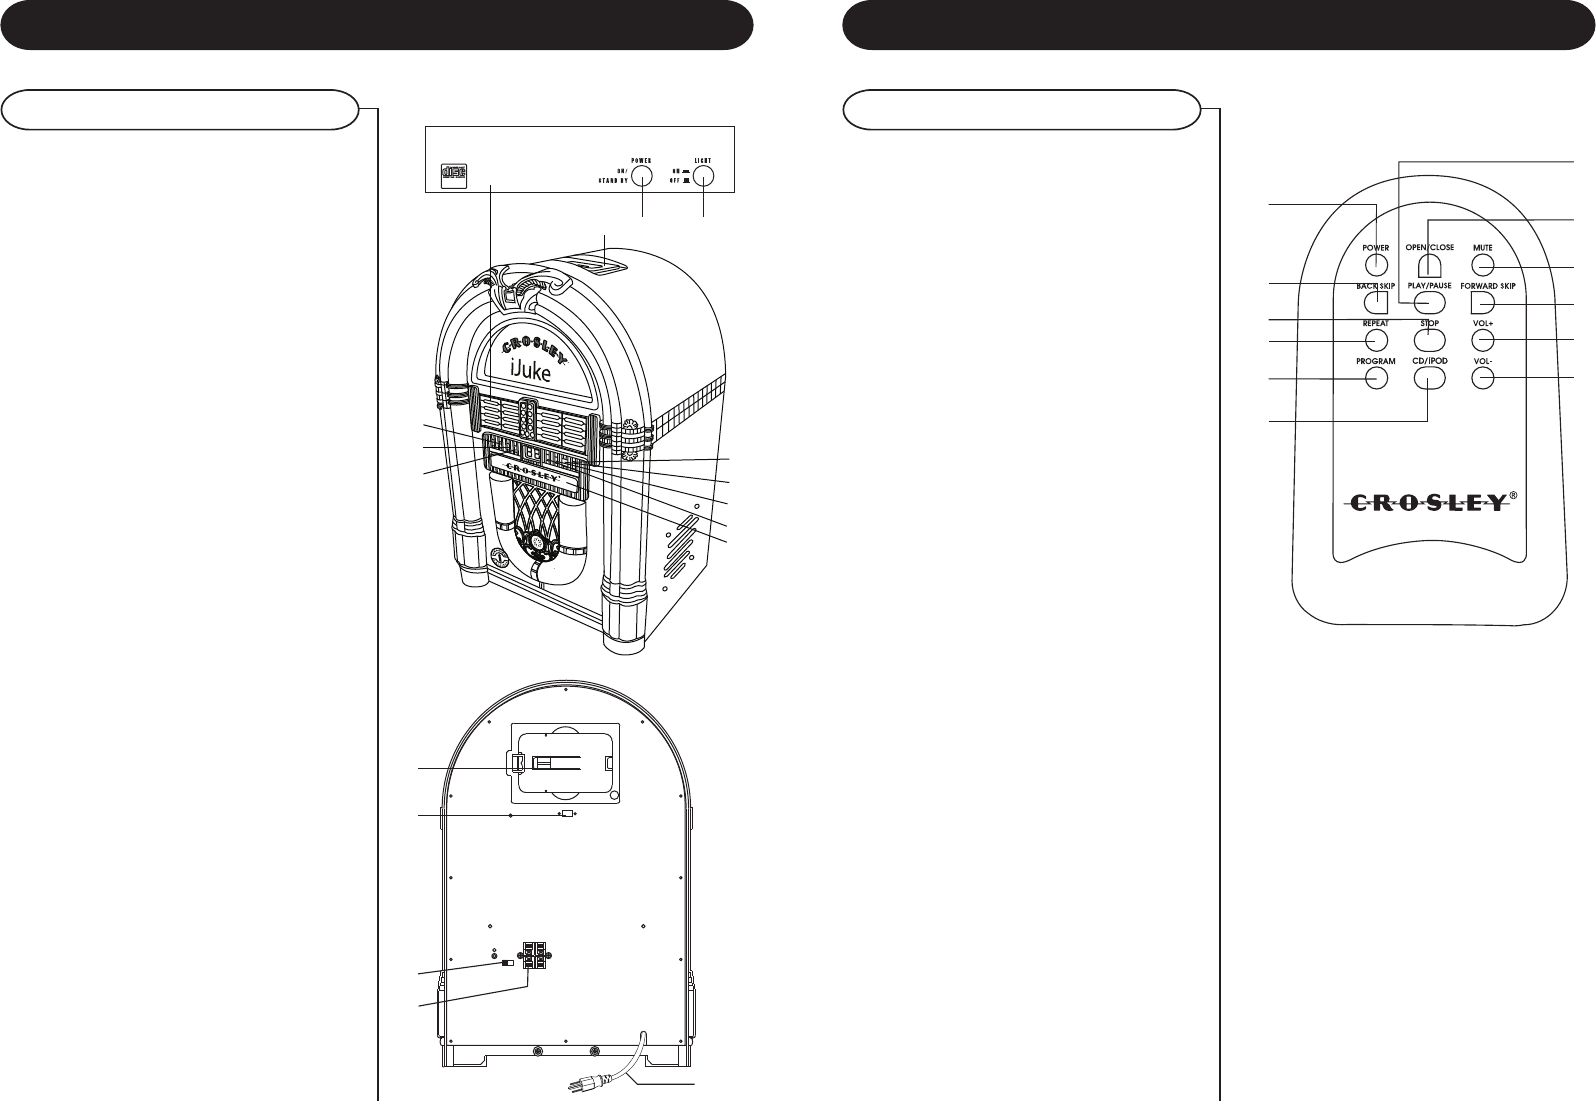
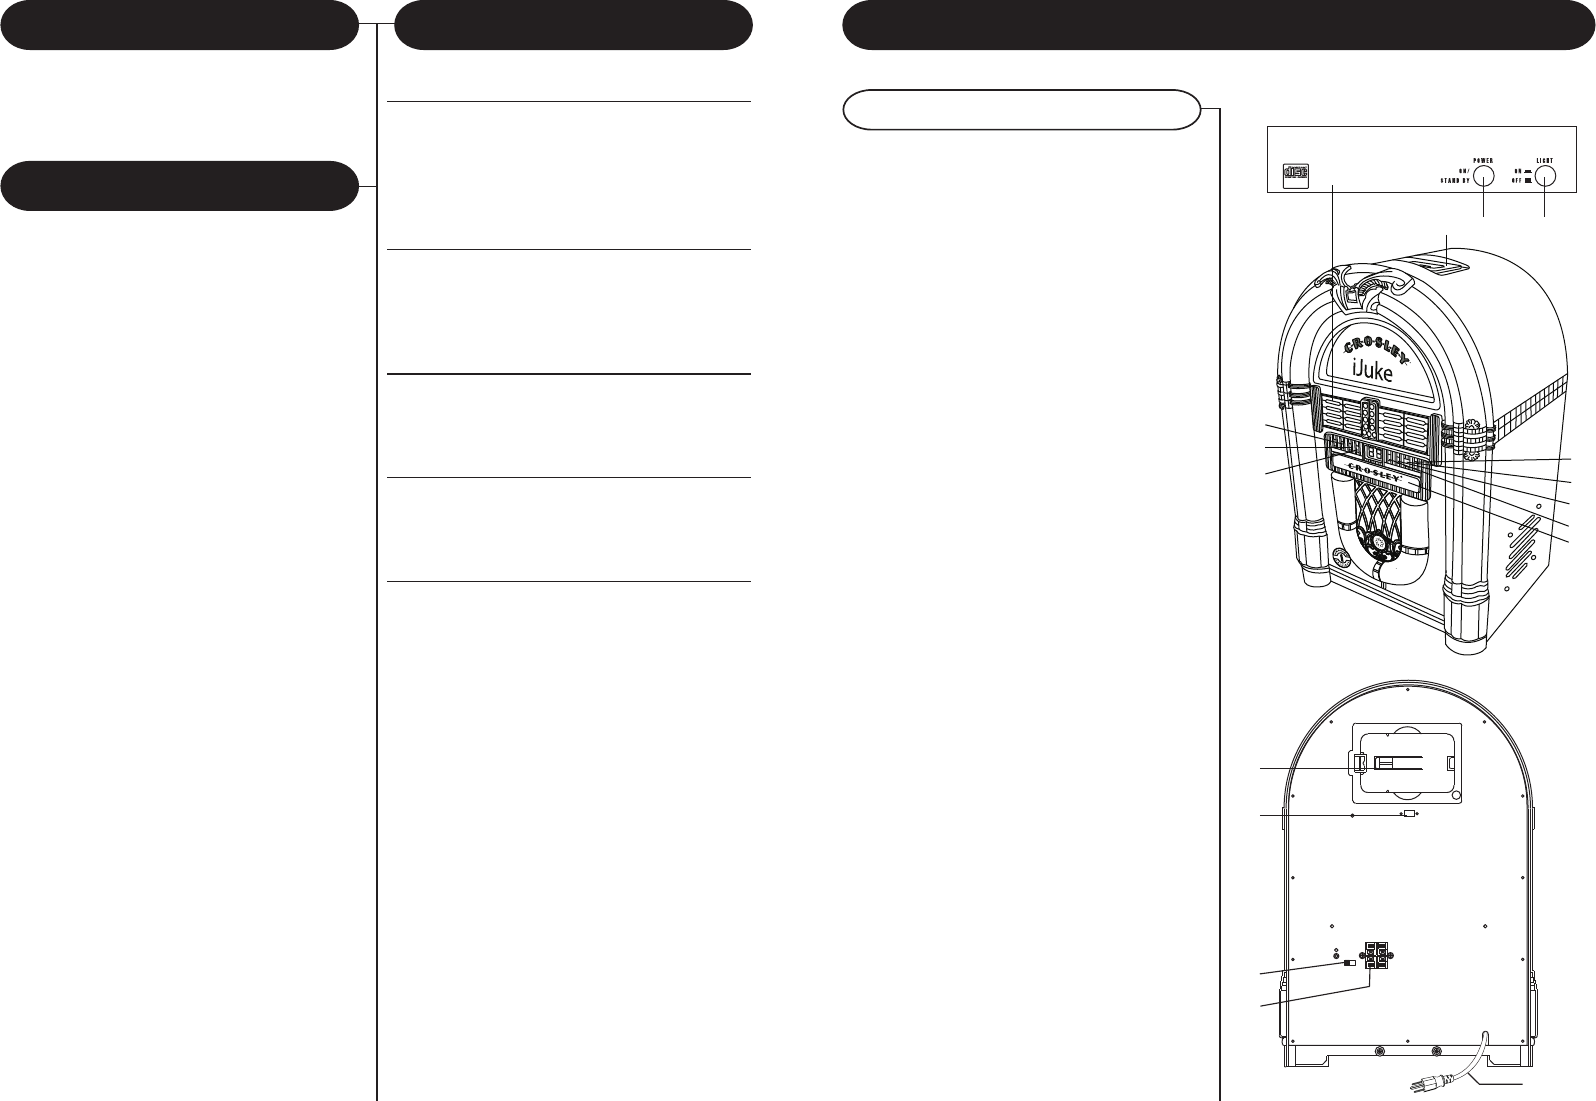
Control Locators
Unit Controls
1iPod Dock
2Power
3Light On / Off
4Program Indicator
5Repeat Indicator
6Play / Pause Indicator
7Mute Indicator
8Remote Sensor
9Stand By Indicator
10 Power Indicator
11 CD Drawer
12 Remote Holder
13 Stage light Stop & Run Switch
14 Int./Ext. Speaker Switch
15 Speaker Jacks
16 A/C Power Cord
SPEAKER
R SP- L
INT.EXT.
STOP RUN
STAGE LIGHT
R SP+ L
15
14
12
16
13
23
1
4
5
67
8
9
10
11
7
1This unit is equipped with external speaker
outputs.
2The speaker jacks for external speakers are
located on the back of the unit. Beside the
speaker jacks is a switch labeled (int./ext.) When
using external speakers, this switch must be
switched to the ext. position. Doing this turns off
the internal speakers in the unit and redirects
to power to the external speakers.
3If you decide not to use the external speakers,
be sure the switch is on int. or the internal
speakers will not work.
External Speakers
Lights
Remote Control
Basic Operation
Connecting Optional Equipment
1Gently pull on top right side of tuner door to open.
2Press light button in to turn lights on.
1Press the Power (17) button to turn the power
ON/OFF.
2Press CD/iPod (22) to select CD player or iPod
mode.
3Use VOL+ (27) and VOL- (28) to adjust the
volume level.
4Press the MUTE (25) button to mute the volume
completely.
5The remaining controls are specific to the CD
player. See CD OPERATION for information on
CD player.
Getting Started
Unpacking
1Remove styrafoam packing materials.
2Remove plastic bags covering the jukebox and
the power cord.
3Untie power cord and remove the plastic safety
cover from the plug end.
4Remove remote from its storage and remove
the plastic bag covering it.
5Store all packing materials in the box.
Note:Save all packing materials in case the
units need to be moved or returned.
Power Source
1
Unwind the AC POWER CORD (16) at the back
of the unit and connect it to a power outlet.
2Plug A/C cord into appropriate outlet.
Note: This product may be equipped with a three
end line plug. This plug will fit into the power
outlet only one way. This is a safety
feature. If you are unable to insert the plug
fully into the outlet try reversing the plug,
if the plug should still fail to fit, contact
your electrician to replace your obsolete
outlet. Do not defeat the safety purpose
of the polarized plug.
3Install 2 AAA batteries (not included) in
remote control.
4Plug A/C cord into appropriate outlet.
6
AC
Polarized Plug

9
CD Player
Programmed CD Playback
1Make sure the power is on.
2Press CD / iPod BUTTON (22). The CD
display (- -) will flash, then show (0 0) .
3Press OPEN / CLOSE BUTTON (24) to open
CD DRAWER (11) .
4Insert CD in tray with the label side of CD
facing up.
5Press the OPEN / CLOSE BUTTON (24) again
to close the CD DRAWER (11).
6Press PLAY / PAUSE BUTTON (23) to begin
playing the CD.
7To stop playing, press the STOP BUTTON
(19).
8To skip to a different track, press the BACK
SKIP (18) or the FORWARD SKIP (26) button.
9By pressing and holding either the BACK SKIP
(18) or FORWARD SKIP BUTTON (26), you
can rewind or fast forward through each
individual tack. The track will fast forward or
rewind as long as you are holding the button.
Once you let off the button, regular playback
resumes.
10 During playback, you can use the repeat
function to repeat a single song or the whole
CD.
11 While the song you want to repeat is playing,
press the REPEAT (20) button once. You will
see the REPEAT INDICATOR (5) on the
jukebox start to flash. The song will start over
once it is finished.
12 Press the REPEAT (20) button a second time
to repeat the whole CD. The REPEAT
INDICATOR (5) will stay on without flashing.
13 Pressing the REPEAT (20) button a third time
will disable the repeat function.
CD Operation
This CD player is programmable which allows you
to program it to play only selected tracks. To program,
follow the steps below.
1Insert disc and close CD DRAWER (11). Do
not press play yet.
2Press the PROGRAM (21) button. The
PROGRAM INCICATOR (4) on the jukebox
will start to flash.
3Use the BACK SKIP (18) or FORWARD SKIP
BUTTON (26) to select a track you want to
program.
4Once you have selected a track, press the
program button again. This stores the track
into memory.
5Use the BACK SKIP (18) or FORWARD SKIP
BUTTON (26) to select the next track you want
to program. Once selected, press the program
button again.
6Repeat step number 5 until you have
programmed all desired tracks.
7Press PLAY / PAUSE BUTTON (23) to begin
playing the selected tracks. The program light
will stop flashing and the selected tracks will
begin playing. They will play in the order that
they were programmed.
8Using the BACK SKIP (18) or FORWARD
SKIP BUTTON (26) will only skip through the
programmed tracks.
9To clear programmed tracks, press the stop
button twice until the program light goes out.
10 Programmed tracks will also be erased from
memory when the CD DRAWER (11) is opened
or when the power is turned off.
8
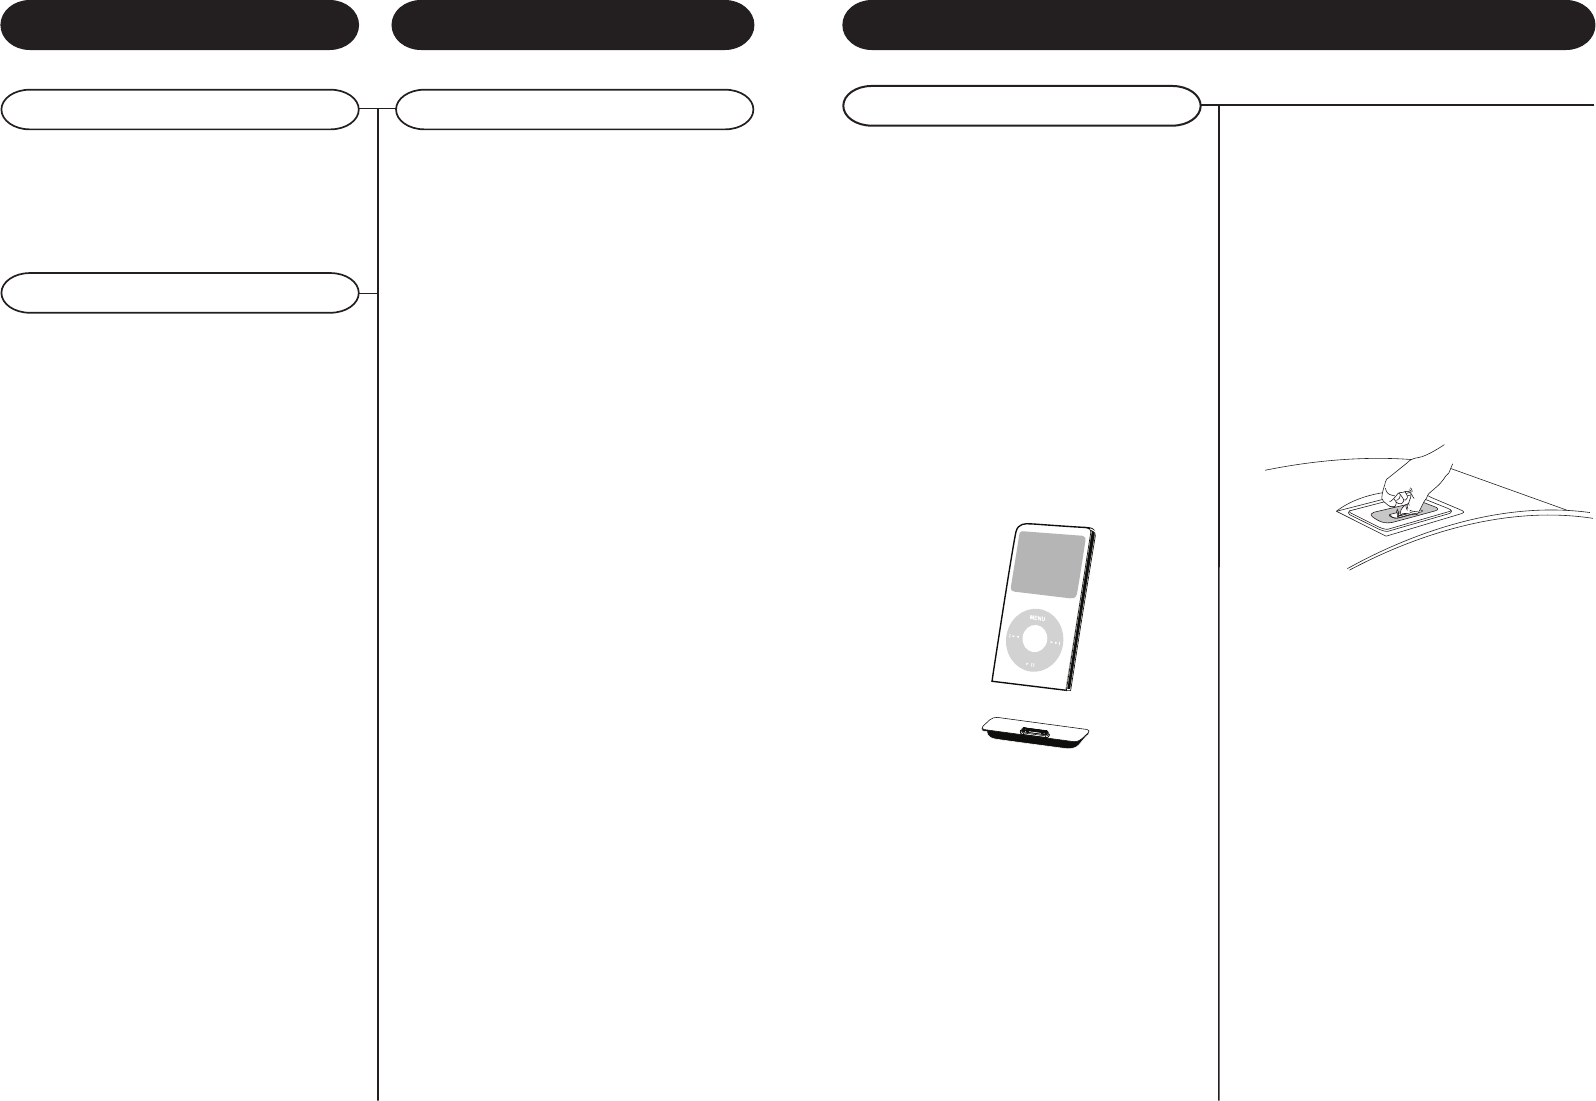
Using Your iJuke
Basic Operation
The iJuke features the Universal iPod Dock that
uses dock adapters that come with newer iPod
models. Before inserting your iPod, you will need
to install the correct dock adapter. By using the
correct dock adapter, you can insert any iPod with
a dock connector. While docked, the iJuke will also
charge your iPod. To connect your iPod, follow the
steps below.
1Insert the correct dock adapter that fits your
iPod. Your iPod should fit snugly into the correct
adapter. Gently press the adapter until it snaps
firmly in place.
2Connect your iPod as shown in the illustration
below.
3Press the Power button to turn iJuke on.
4Push CD / iPod BUTTON (22), to select the
iPod function
5Browse your iPod for songs and press the
Play/Pause button. Your music should begin to
play.
6Adjust the volume to your desired listening level.
7To remove the dock adapter, push your fingernail
into the slot in the back of the adapter and lift
up.
Note: When using the jukebox in iPod mode,
the remote control will only control the volume
and will not control the functions of your iPod.

10
Troubleshooting
Theres no sound?
1Make sure the mute function is turned off.
2Check that the volume is turned up by pressing
vol.+ button on remote.
3Make sure EXT. / INT. switch on back of the unit
is on int.
(unless you are using external speakers, in which
case it should be on ext.)
4Check to make sure power is turned on.
CD does not play?
1Check to make sure CD is inserted correctly
(label side facing up).
2Check to see that surface of CD is clean.
3Make sure the unit is on CD function by pressing
CD / iPod button.
Remote not working?
1Replace batteries.
2Be sure and point remote towards remote sensor
when using.
3Remove obstacles in the path of the remote and
the unit so that remote signal has a straight
path to the unit.
General
Crosley Radio, Inc. warrants the product to be free from defects in material and
workmanship under normal use for a period of one year from the original date of
purchase. This warranty is not transferable. If the product is determined to be defective
during the warranty period, the unit will be repaired or replaced at Crosley Radios sole
discretion. This warranty covers manufacturing defects and normal consumer use and
does NOT cover damage or failure as a result of abuse, accident, alterations, misuse,
neglect, abnormal wear and tear, inadequate maintenance, commercial or unreasonable
use, damage caused by power surges, mishandling, accident, acts of God or attempted
repair by an unauthorized service agent. Also not covered are cosmetic damages,
cords and antennas.
Should this product fail to function in a satisfactory manner, it is best to first return it
to the store or retailer where it was originally purchased. If additional service is still
needed, the original purchaser must FIRST contact our offices to obtain an RA (Return
Authorization) Number.
TO OBTAIN AN RA NUMBER
CALL: 1.888.CROSLEY
(1.888.276.7539)
Send the unit prepaid to the address below in the original packaging (or reasonable
substitute to prevent damage). Clearly mark your RA number on the outside packaging
and include the original sales receipt (or a copy) indicating date of purchase, amount
paid, and place of purchase. You must also include your full name, shipping address
and daytime contact number. Please include a check or money order in the amount
of $19.95, made payable to Crosley Radio, to cover handling and return shipping
charges. Returned products will not be shipped to PO Boxes. Crosley Radio will not
be responsible for delays or unprocessed claims resulting from a purchasers failure
to provide any or all of the necessary information.
CROSLEY RADIO
ATTN: RETURNS DEPT
2001 PRODUCTION DRIVE
Louisville, KY 40299
For additional support: Crosley Radio Consumer Service Department
24 hours a day / 7 days a week
Telephone: 1.888.CROSLEY (1.888.276.7539)
There are no express warranties except as listed above.
The purchasers bill of sale is the only proof of warranty entitlement.
This warranty gives the purchaser specified legal rights in addition to any rights which
may vary from state to state.
In accordance with the Moss-Magnuson Warranty Act of July 10, 1975, this is termed
a limited warranty which in no way compromises Crosley Radios high standards of
quality and workmanship.
LIMITED MANUFACTURERS WARRANTY
11
Information to the user
Information on the following matters shall be provided
to the user in the instruction manual or on the
packaging if an instruction manual is not provided
for any type of ISM equipment:
(a) The interference potential of the device or system
(b) Maintenance of the system
(c) Simple measures that can be taken by the user
to correct interference.
(d) Manufacturers of RF lighting devices must provide
an advisory statement, either on the product
packaging or with other user documentation,
similar to the following: This product may cause
interference to radio equipment and should not
be installed near maritime safety communications
equipment or other critical navigation or
communication equipment operating between
0.45-30 MHz. Variations of this language are
permitted provided all the points of the statement
are addressed and may be presented in any
legible font or text style.
Le point dexclamation à
lintérieur dun triangle
équilatéral a pour but
dalerter lutilisateur de la
présence dinstructions
importantes sur lopération
et lentretien dans le
manuel de lutilisateur livré
avec lappareil.
RISQUES DE CHOC ÉLECTRIQUE
NE PAS OUVRIR
ATTENTION !
ATTENTION !
POUR RÉDUIRE LES RISQUES DE
CHOC ÉLECTRIQUE, NENLEVEZ PAS
LE COUVERCLE (OU LE DOS).
LINTÉRIEUR NE CONTIENT AUCUN
COMPOSANT À RÉPARER PAR
LUTILISATEUR. CONFIEZ VOTRE
APPAREIL SEULEMENT AU
PERSONNEL DE SERVICE QUALIFIÉ
ATTENTION !
Sapplique seulement aux appareils avec CD
RAYONNEMENT LASER INVISIBLE SI OUVERT ET VERROUILLAGE DE SECURITÉ
DÉJOUÉ. ÉVITEZ TOUTE EXPOSITION DIRECTE AU FAISCEAU LASER
Spécifications techniques
Source dalimentation : CA 120V ~ 60Hz
Consommation : 30W
Haut-parleur : 4 po.
Type dynamique X 2
Puissance : 5 W
Résistance : 8 Ohm
Puissance sortie : 2 W par piste
* LE FABRICANT RÉSERVE LE DROIT DE CHANGER LA CONCEPTION ET LES SPÉCIFICATIONS
SANS PRÉAVIS.
12 13
AVIS IMPORTANT DE SÛRETÉ
VEUILLEZ LIRE ATTENTIVEMENT LES PRÉCAUTIONS SUIVANTES QUI SAPPLIQUENT À VOTRE ÉQUIPEMENT.
1.Lisez les instructions Il faut lire toutes les instructions sur lopération et les avis de sûreté avant de mettre lappareil en marche.
2. Conservez les instructions Il faut garder les instructions en lieu sûr pour utilisation ultérieure.
3. Respectez les avertissements Il faut suivre tous les avertissements de sûreté imprimés sur lappareil et sur les nstructions
écrites.
4. Suivez les instructions Il faut suivre toutes les instructions pour lopération de lappareil.
5. Nettoyage Débranchez lappareil de la prise murale avant de le nettoyer. Nemployez pas de produits de nettoyage liquides
ou aérosols. Utilisez un chiffon sec.
6. Accessoires Nutilisez pas daccessoires qui ne sont pas autorisés par le fabricant du produit car ils peuvent provoquer des
dangers.
7. Eau et humidité Nutilisez pas ce produit à proximité de leau par exemple, près dune baignoire, dun lavabo,
dun évier, dune cuve à lessive, dans une cave humide ou près dune piscine ou toute situation similaire.
8. Il faut déplacer lappareil avec précaution au cas où il se trouverait sur une base. Des arrêts
trop vifs, la force excessive ou des surfaces inégales peuvent provoquer une chute de lappareil.
9. Ventilation Le coffret de lappareil est équipé de fentes et douvertures pour la ventilation, pour
assurer une opération fiable et pour empêcher quil ne surchauffe. Il ne faut pas boucher ou couvrir
ces ouvertures. Il ne faut pas placer lappareil sur un lit, un sofa, une moquette ou nimporte quelle
autre surface qui puisse boucher ces ouvertures. Il ne faut pas placer lappareil sur une étagère ou
dans un rack à moins dassurer une ventilation adéquate et suivre les instructions du fabricant.
10. Sources dalimentation Cet appareil doit être alimenté seulement par le type dalimentation indiqué sur létiquette. Au cas
où vous ne seriez pas sûr du type dalimentation disponible à votre domicile, veuillez consulter votre revendeur ou votre société
fournisseur dénergie. Dans le cas de produits conçus pour opérer avec des piles ou dautres sources dénergie, rapportez-
vous à lavis dopération.
11. Mise à la terre ou polarisation Cet appareil est équipé dune fiche à trois broches de cordon dalimentation en courant
alternatif (une fiche sert de mise à terre). Cette fiche ne peut être branchée sur la prise murale que dans un seul sens. Ceci
est un dispositif de sûreté. Si la fiche ne rentre pas dans la prise, contactez votre électricien afin de remplacer votre prise
désuète. Ne cherchez pas à déjouer le dispositif de sûreté de la fiche polarisée.
12. Alimentation Protection des cordons Placez les cordons dalimentation de telle façon que
lon ny marche pas dessus ou quils ne soient pas coincés par des objets à proximité ou placés
en-dessous de ceux-ci. Il faut prêter une attention particulière aux cordons là où ils rentrent
dans des prises, dans des multiprises, et là où ils sortent du produit même.
13. Foudre Pour donner plus de protection à votre appareil lors dorages avec éclairs ou bien quand il
se trouve sans utilisation pendant des périodes prolongées, veuillez le débrancher du secteur et aussi débranchez lantenne
ou le système du câble. Ceci évitera des dommages au produit dus à la foudre ou aux surcharges dalimentation.
14. Lignes de transmission Il ne faut pas situer un système dantenne extérieure dans le voisinage des lignes de transmission
électriques ou dautres circuits de tension ou de lumière ou là où le système dantenne risque de tomber sur de telles lignes.
Lors de linstallation dun système dantenne extérieure il faut faire très attention à ne pas venir contacter ces lignes, ce qui
pourrait causer danger de mort.
15. Surcharge Ne surchargez pas les prises murales, les rallonges ou les multiprises. Tout manquement à cet avertissement
peut provoquer un incendie ou un choc électrique.
16. Introduction dobjets ou de liquide. Nintroduisez jamais dobjet quelconque par les fentes ou les ouvertures qui risque dentrer
en contact avec des points de voltage ou de faire un court-circuit qui peut provoquer un incendie ou un choc électrique.Ne
déversez jamais de liquide quelconque sur lappareil.
17. Réparation Ne cherchez pas à réparer cet appareil vous-même car à louverture du coffret vous risquez dentrer en contact
avec le voltage ou dautres dangers. Confiez toute réparation au personnel de service qualifié.
18. Dommages qui demandent une réparation Débranchez lappareil de la prise murale et adressez-vous au personnel de
service qualifié dans les circonstances suivantes:
a. Quand le cordon dalimentation est endommagé.
b. Quand on a déversé du liquide ou des objets sont tombés à lintérieur.
c. Quand lappareil a été exposé à la pluie ou à leau.
d. Quand lappareil ne marche pas normalement en suivant le mode demploi. Réglez seulement les contrôles qui sont
mentionnés dans le mode demploi, car tout maniement des autres contrôles peut provoquer des dommages et peut
souvent demander lintervention dun technicien qualifié pour remettre lappareil en marche.
e. Quand on a fait tomber lappareil ou quand il a été endommagé autrement.
f. Quand lappareil change abruptement de performance ceci indique le besoin de réparation.
19. Pièces de rechange Au cas où vous auriez besoin de pièces de rechange, veuillez vérifier que le technicien sest servi de
pièces spécifiées par le fabricant ou que ces pièces ont les mêmes caractéristiques des pièces dorigine. Des substitutions
non autorisées peuvent provoquer un incendie, un choc électrique ou dautres dangers.
20. Vérification de sécurité lors du service ou des réparations sur cet appareil, demandez au technicien de service de bien
vouloir faire une vérification de sécurité pour confirmer que lappareil est en bon état de marche.
21. Montage sur mur ou plafond Lappareil doit être monté seulement selon les conseils du fabricant.
22. Chaleur Lappareil doit être situé à distance de sources de chaleur telles que radiateurs, bouches dair chaud, cuisinières
ou autres appareils (y compris les amplificateurs) qui dégagent de la chaleur.
AVERTISSEMENT: Tout changement ou modification à cet appareil qui nest pas spécifiquement approuvé par la personne
responsable peut annuler lautorité de lutilisateur à se servir de léquipement.
AVIS: Cet équipement fait lobjet dessais et a été déclaré conforme aux limites dun appareil numérique de Classe B, selon la
Section 15 du règlement FCC. Ces limites sont conçues pour protéger contre les émissions parasites dans une installation
résidentielle. Cet équipement génère, utilise et peut émettre de lénergie à fréquence radio et peut être à la source démissions
parasites qui brouillent les communications radio au cas où il ne serait pas installé et utilisé selon les instructions. Ceci dit, il
nest pas garanti que des émissions parasites ne résultent pas dune installation particulière. Au cas où des émissions parasites
à la réception radio ou télévision en résulteraient, on peut confirmer que lappareil en est la source en activant la touche marche/arrêt.
Lutilisateur peut ensuite éliminer ces émissions en choisissant une ou plusieurs des méthodes suivantes:
- réorienter lantenne de réception ou la changer de place
- éloigner léquipement du receveur
- brancher léquipement sur un circuit différent de celui sur lequel le receveur est branché
- consulter le revendeur ou un technicien de télévision qualifié pour des conseils.
AVIS: Le fabricant nest pas responsable de toute interférence de radio ou télévision qui résulterait de modifications non-autorisées
à cet appareil. De telles modifications peuvent annuler lautorité de lutilisateur à se servir de léquipement.
Fiche Polarisée CA
ATTENTION !
POUR RÉDUIRE LES RISQUES DE CHOC ÉLECTRIQUE, NEXPOSEZ
PAS CET APPAREIL À LA PLUIE NI À LHUMIDITÉ. NENLEVEZ PAS
LE COUVERCLE. LES VOYANTS SONT SOUDÉS SUR PLACE.
LINTÉRIEUR NE CONTIENT AUCUN COMPOSANT À RÉPARER PAR
LUTILISATEUR. CONFIEZ VOTRE APPAREIL SEULEMENT AU
PERSONNEL DE SERVICE QUALIFIÉ.
Le symbole de léclair
avec la pointe de flèche à
lintérieur dun triangle
équilatéral a pour but
dalerter lutilisateur de la
présence de «voltage
dangereux» non isolé à
lintérieur du coffret du
produit qui est
suffisamment grave pour
causer un risque du choc
électrique aux personnes.
Merci de votre achat de Crosley iJuke Premier
(CR1702A). Avant de mettre votre appareil en
marche, veuillez bien lire ce manuel complètement
et gardez-le en lieu sûr pour toute utilisation
ultérieure.
Les instructions dans ce manuel décrivent les
fonctions de ccommande du modèle CR1702A.
À propos de ce manuel
Bienvenue Table des matières
14 15
Emplacement des Commandes
Commandes sur lAppareil
1Station daccueil iPod
2Alimentation
3Lumières Marche / Arrêt
4Indicateur Programmer
5Indicateur Répéter
6Indicateur Jouer / Pause
7Indicateur Muet
8Cellule de Réception de télécommande
9Indicateur en Attente
10 Indicateur sous Tension
11 Tiroir CD
12 Casier Télécommande
13 Sélecteur de Lumières Ambiance Marche / Arrêt
14 Sélecteur de Haut-Parleurs Int./Ext.
15 Jacks Haut-Parleurs
16 Cordon dAlimentation CA
SPEAKER
R SP- L
INT.EXT.
STOP RUN
STAGE LIGHT
R SP+ L
15
14
12
16
13
23
1
4
5
67
8
9
10
11
Comment commencer
Emplacement des
Commandes ..15, 16
Déballage .. 17
Source dalimentation .. 17
Opération de Base
Lumières . 18
Télécommande .. 18
Haut-parleurs externes ...
18
Connexion dÉquipement Auxiliaire
Comment vous servir
de votre iJuke
................ 19
Opération Lecteur de CD
Jouer un CD................... 20
Opération Programmée.... 20
Généralités
Guide pour résoudre les
problèmes... 21
Garantie.............. 22
Comment commencer
Déballage Source dalimentation
16 17
Emplacement des Commandes
Commandes sur la Télécommande
17 Alimentation
18 Sauter en Arrière
19 Arrêt
20 Répéter
21 Programmer
22 CD / iPod
23 Jouer / Pause
24 Ouvrir / Fermer
25 Mute
26 Sauter en Avant
27 Augmenter le niveau de son
28 Réduire le niveau de son
17
18
19
20
21
22
23
24
25
26
27
28
Prise Polarisée CA
1Enlevez les matériaux demballage de lappareil.
2Enlevez la housse en plastique de lappareil et
du cordon dalimentation.
3Enlevez lattache du cordon dalimentation et
enlevez la protection en plastique de la fiche
CA.
4Sortez la télécommande et enlevez la housse
en plastique.
5Gardez tous les matériaux demballage dans
le carton.
NB: Gardez tous les matériaux demballage au cas
où il faudrait déménager ou retouner lappareil.
1 Déroulez le CORDON DALIMENTATION CA
(16) du dos de lappareil.
2 Branchez le cordon dalimentation CA sur une
prise appropriée.
NB:Cet appareil est équipé dune fiche polarisée de
cordon dalimentation en courant alternatif (une
fiche à trois broches). Cette fiche ne peut être
branchée sur la prise murale que dans un seul
sens. Ceci est un dispositif de sûreté. Si la fiche
ne rentre pas dans la prise, contactez votre
électricien afin de remplacer votre prise désuète.
Ne cherchez pas à déjouer le dispositif de sûreté
de la fiche polarisée.
3 Mettez 2 piles AAA (non fournies) dans la
télécommande.
18 19
1Cet appareil est équipé de sorties pour haut-
parleurs externes.
2Les jacks sorties pour haut-parleurs externes
sont situés sur le dos de lappareil. À côté des
jacks haut-parleurs se trouve un sélecteur
indiqué « int./ext. » Il faut régler ce sélecteur à
la position « ext » lors de lutilisation des haut-
parleurs externes. Ceci coupe les haut-parleurs
dans lappareil et renvoie le son aux haut-
parleurs externes.
3Au cas où vous décideriez de ne pas utiliser les
haut-parleurs externes, vérifiez que le sélecteur
se trouveà la position « int » sinon les haut-
parleurs internes ne fonctionneront pas.
Haut-Parleurs Externes
Lumières
Télécommande
Opération de Base
Connecting Optional Equipment
1Tirez doucement en haut du côté droit de la
porte de tuner pour ouvrir.
2Poussez le bouton lumière pour allumer les
lumières.
1Poussez le bouton Alimentation (17) pour activer
lappareil MARCHE/ARRÊT.
2Poussez la touche CD/iPod (22) pour
sélectionner le lecteur de CD ou le mode iPod.
3Servez-vous du VOL+ (27) et du VOL- (28) pour
régler le niveau de son.
4Poussez la touche MUTE (25) pour couper le
son complètement.
5Les commandes restantes sont spécifiques à
lopération du lecteur de CD. Voyez OPÉRATION
CD pour plus de renseignements sur le lecteur
de CD.
Comment utiliser votre iJuke
Opération de Base
Le iJuke comprend la fonctionalité station daccueil
universelle iPod qui utilise les adaptateurs daccueil
qui sont livrés avec les modèles plus récents diPod.
Avant dinserrer votre iPod, il faut dabord faire
linstallation de ladaptateur daccueil convenable.
Moyennant lemploi de ladaptateur convenable,
vous pouvez inserrer nimporte quel iPod avec un
connecteur daccueil. Pendant le temps daccueil,
le iJuke aussi chargera votre iPod. Pour brancher
votre iPod, il faute suivre les étapes pas à pas.
1Inserrez ladaptateur daccueil convenable qui
correspond à votre iPod. Votre iPod devrait
sadapter bien dans ladaptateur convenable.
Poussez ladaptateur doucement jusquà ce
quil se mette bien en place.
2Connectez votre iPod selon lillustration ci-
dessous.
3Poussez la touche alimentation pour mettre le
iJuke sous tension.
4Poussez la touche CD / iPod (22), afin de
sélectionner la fonction iPod.
5Parcourez votre iPod pour chercher les
chansons et poussez la touche Jouer/Pause.
Votre musique devrait commencer à jouer.
6 Réglez le niveau de son au volume souhaité.
7Pour enlever ladaptateur daccueil, introduisez
votre ongle dans la fente au dos de ladaptateur
et tirez vers le haut.
NB: Lors de lutilisation du iJuke dans le mode
iPod, la télécommande contrôlera
seulement le niveau de son et ne contrôlera
pas les fonctions de votre iPod.

20 21
Lecteur de CD
Lecture de CD Programm
ée
1Vérifiez que lappareil est sous tension.
2Poussez la touche CD / iPod (22). Lécran CD
(- -) va clignoter, puis va afficher (0 0) .
3Poussez la touche OUVRIR / FERMER (24)
afin douvrir le tiroir CD (11) .
4Mettez le CD dans le tiroir avec le côté étiquette
du CD vers le haut.
5Poussez la touche OUVRIR / FERMER (24)
une deuxième fois pour fermer le tiroir CD (11).
6Poussez la touche JOUER / PAUSE (23) pour
lancer le CD.
7Pour arrêter la musique, poussez la touche
ARRÊT (19).
8Pour sauter à une piste différente, poussez la
touche SAUTER EN ARRIÈRE (18) ou la touche
SAUTER EN AVANT (26).
9Si vous maintenez la pression sur la touche
SAUTER EN ARRIÈRE (18) ou la touche
SAUTER EN AVANT (26). Vous pouvez
rétrograder ou avancer par piste individuelle.
La piste va avancer ou retrograder autant que
vous mantiendrez pression sur la touche. Une
fois que vous lâchez la touche, le lecteur de
CD va recommencer à jouer normalement.
10 Pendant la lecture, vous pouvez vous servir de
la fonction répéter afin de faire répéter une
chanson individuelle ou le CD tout entier.
11 Pendant la lecture de la chanson que vous
voulez répéter, poussez la touche RÉPÉTER
(20) une fois. Vous verrez lindicateur RÉPÉTER
(5) sur le iJuke commencer à clignoter. Une fois
que la chanson termine, elle commencera à
jouer de nouveau.
12 Poussez la touche RÉPÉTER (20) une
deuxième fois pour répéter le CD tout entier.
Lindicateur RÉPÉTER (5) restera illuminé sans
clignoter.
13 Poussez la touche RÉPÉTER (20) une troisième
fois pour annuler la fonction RÉPÉTER.
Opération CD
Ce lecteur de CD est programmable ce qui vous
permet de le programmer pour jouer seulement les
pistes sélectionnées. Pour faire la programmation,
suivez les étapes ci-dessous.
1Mettez le CD et fermez le tiroir CD (11). Ne
poussez pas encore la touche JOUER.
2Poussez la touche PROGRAMMER (21).
Lindicateur PROGRAMMER (4) sur le iJuke
commencera à clignoter.
3Servez-vous de la touche SAUTER EN
ARRIÈRE (18) ou la touche SAUTER EN
AVANT (26) pour sélectionner une piste que
vous voulez programmer.
4Une fois que vous aurez sélectionné une piste,
poussez la touche PROGRAMMER encore une
fois. Ceci met la piste en mémoire.
5Servez-vous de la touche SAUTER EN
ARRIÈRE (18) ou la touche SAUTER EN
AVANT (26) pour sélectionner la piste suivante
que vous voulez programmer. Une fois
séctionnée, poussez la touche PROGRAMMER
encore une fois.
6Répétez létape numéro 5 jusquà ce que vous
ayez programmé toutes les pistes souhaitées.
7Poussez la touche JOUER / PAUSE (23) pour
commencer à jouer les pistes sélectionnées.
Lindicateur PROGRAMMER (4) sur le iJuke
arrêtera de clignoter et les pistes sélectionnés
commenceront à jouer. Elles vont jouer dans
lordre dans lequel elles ont été programmées.
8Vous pouvez vous servir de la touche SAUTER
EN ARRIÈRE (18) ou la touche SAUTER EN
AVANT (26) pour naviguer parmi les pistes
programmées.
9Pour enlever les pistes programmées de la
mémoire, poussez la touche ARRÊT deux fois
jusquà ce que lindicateur PROGRAMMER
séteigne.
10 Les pistes programmées seront également
purgées de la mémoire lorsque le tiroir CD (11)
est ouvert ou quand la tension est coupée à
lappareil.
Guide pour résoudre les problèmes
Il ny a pas de son?
1Vérifiez que la fonction Mute (25) est réglée à
la position ARRÊT.
2Vérifiez le niveau de son en poussant la touche
vol.+ sur la télécommande.
3Vérifiez que le sélecteur EXT. / INT. au dos
du iJuke est réglé à la position « int. »
(à moins que vous vouliez vous servir des haut-
parleurs externes, dans quel cas il doit
être réglé à la position « ext.)
4Vérifiez que lappareil est mis sous tension.
Le CD ne joue pas?
1Vérifiez le bon positionnement du CD
(côté étiquette vers le haut).
2Vérifiez que la surface de lecture du CD est
propre.
3Vérifiez que lappareil est réglé à la fonction
CD en poussant la touche CD / iPod
La télécommande ne fonctionne pas?
1Remplacez les piles.
2Soyez sûr de viser la cellule de réception du
iJuke lorsque vous utilisez la télécommande.
3Enlevez tous les obstacles du chemin de la
télécommande et de lappareil afin de donner
un chemin droit au signal de la télécommande
vers lappareil.
Généralités

22
GARANTIE LIMITÉE DU FABRICANT
Les produits de Crosley Radio sont garantis contre les défauts de matériaux et de
fabrication sous des conditions dutilisation normale pour une période dun an à partir de
la date de vente à lacheteur dorigine. Cette garantie ne peut pas être transférée. Au cas
où lappareil cesserait de fonctionner pendant la période de garantie, lappareil sera réparé
ou remplacé à la seule discrétion de Crosley Radio. Cette garantie couvre les défauts
de fabrication et dutilisation normale du consommateur et NE COUVRE PAS les dommages
ou défauts survenus dabus, daccidents, daltérations, de mauvaise utilisation, de
négligences, dusure anormale, par manque dentretien, dutilisation commerciale ou
déraisonnée, des dommages survenus de surcharges, de mauvais maniement, daccidents,
dans les cas de force majeure ou par suite de tentative de réparation par toute personne
autre quun agent de service après vente autorisée par Crosley Radio à réparer le produit.
Cette garantie ne couvre pas les dommages dordre cosmétique, aux cordons et aux
antennes.
Au cas où lappareil cesserait de fonctionner de façon satisfaisante, il est conseillé de le
retourner dabord au magasin ou au détaillant où il a été acheté. Si lappareil a besoin
de service supplémentaire, lacheteur dorigine doit DABORD déposer une demande
dAUTORISATION DE RENVOI («R.A») avant de renvoyer lappareil.
AFIN DOBTENIR UN NUMÉRO DE RA
APPELER AU: 1.888.CROSLEY
(1.888.276.7539)
Quand vous aurez le numéro dautorisation de renvoi du service clients, veuillez emballer votre
appareil dans son emballage dorigine (ou un ersatz raisonnable pour éviter les dommages). Écrivez
le numéro dautorisation de renvoi («R.A.») à lextérieur du carton et à lintérieur mettez le bon
dachat dorigine (ou une copie conforme) indiquant la date dachat, le prix dachat et ladresse du
vendeur. Vous devez aussi inclure votre nom, votre adresse pour renvoyer lappareil et votre numéro
de téléphone où lon peut vous contacter pendant les heures ouvrables. Veuillez ajouter un chèque
ou un mandat postal dun montant de $19.95 payable à Crosley Radio pour les frais demballage
et de réexpédition. Les produits renvoyés ne seront pas réexpédiés aux Boîtes Postales. Crosley
Radio nest pas redevable pour les délais ou des réclamations survenant par manque de lacheteur
à fournir les éléments de renseignements requis.
CROSLEY RADIO
ATTN: RETURNS DEP'T
2001 PRODUCTION DRIVE
LOUISVILLE, KY 40299
Pour une assistance supplémentaire: Service aux Consommateurs Crosley Radio
24 heures par jour / 7 jours par semaine
Appeler au : 1.888.CROSLEY (1.888.276.7539)
Il ny a pas de garantie implicite sauf comme il est décrit ci-dessus.
Le bon dachat de lacheteur est la seule preuve de son droit à la garantie.
Cette garantie donne à lacheteur certains droits spécifiques outre les droits qui peuvent varier détat
à état et de province à province.
Conforme au texte de « lActe de Garantie Moss-Magnuson » en date du 10 juillet 1975, la présente
garantie sappelle « garantie limitée » mais cette appellation ne compromet en rien les standards
appréciables de Qualité et Fabrication de Crosley Radio.