Modern 1703A BLUETOOTH TABLETOP JUKEBOX User Manual
Hong Kong Modern Marketing Manufacturing Limited BLUETOOTH TABLETOP JUKEBOX
Modern >
User manual
iJuke Premier
CR1703A
Instruction Manual
www.crosleyradio.com

1
IMPORTANT SAFETY INSTRUCTION
PLEASE READ CAREFULLY ALL THE FOLLOWING IMPORTANT SAFEGUARDS
THAT ARE APPLICABLE TO YOUR EQUIPMENT
1. Read Instructions - All the safety and operating instructions should be read before the product is operated.
2. Retain instructions - The safety and operating instructions should be retained for future reference.
3. Heed Warnings - All warnings on the product and in the operating Instructions should be adhered to.
4. Follow Instructions - All operating and use instructions should be followed.
5. Cleaning - Unplug this product from the wall outlet before cleaning. Do not use liquid cleaners or aerosol cleaners.Use
a damp cloth for cleaning.
6. Attachments - Do not use attachments not recommended by the product manufacturer as they may cause hazards.
7. Water and Moisture - Do not use this product near water - for example, near a bath tub, wash bowl, kitchen sink, or
laundry tub; in a wet basement; or near a swimming pool; and the like.
8. A product and cart combination should be moved with care. Quick stops, excessive force, and uneven
surfaces may cause the product and cart combination to overturn.
9. Ventilation - Slots and openings in the cabinet are provided for ventilation and to ensure reliable
operation of the product and to protect it from overheating, and these openings must not be blocked
or covered, The openings should never be blocked by placing the product on a bed, sofa, rug, or
other similar surface. This product should not be placed in a built - in installation such as a bookcase
or rack unless proper ventilation is provided or the manufacturer's instructions have been adhered to.
10. Power Sources - This product should be operated only from the type of power source indicated on the marking label,
if you are not sure of the type of power supply to your home. Consult your product dealer or local power company.For
products intended to operate from battery power, or other sources, refer to the operating instructions.
11. Grounding or Polarization - This product may be equipped with a polarized alternating-current line plug (a plug having
one blade wider than the other). This plug will fit into the power outlet only one way. This is a safety feature. If you
are unable to insert the plug fully into the outlet try reversing the plug, If the plug should still fail to fit, contact your
electrician to replace your obsolete outlet. Do not defeat the safety purpose of the polarized plug.
12. Power - Cord Protection - Power - supply cords should be routed so that they are not likely to
be walked on or pinched by items placed upon or against them, paying particular attention to
cords at plugs, convenience receptacles, and the point where they exit from the product.
13. Lightning - For added protection for this product during a lightning storm, or when it is left
unattended and unused for long periods of time, unplug it from the wall outlet and disconnect
the antenna or cable system. This will prevent damage to the product due to lightning and power - line surges.
14. Power Lines - An outside antenna system should not be located in the vicinity of overhead power lines or other electric
light or power circuits, or where it can fall into such power lines or circuits. When installing an outside antenna system,
extreme care should be taken to keep from touching such power lines or circuits as contact with them might be fatal.
15. Overloading - Do not overload wall outlets, extension cords, or integral convenience receptacles as this can result
in a risk of fire or electric shock.
16. Object and Liquid Entry - Never push objects of any kind into this product through openings as they may touch
dangerous voltage points or short - out parts that could result in a fire or electric shock. Never spill liquid of any kind
on the product.
17. Servicing - Do not attempt to service this product yourself as opening or removing covers may expose you to dangerous
voltage or other hazards. Refer all servicing to qualified service personnel.
18. Damage Requiring Service - Unplug this product from the wall outlet and refer servicing to qualified service personnel
under the following conditions;
a. When the power-supply cord or plug is damaged.
b. If liquid has been spilled, or objects have fallen into the product.
c. If the product has been exposed to rain or water.
d. If the product does not operate normally by following the operating instructions. Adjust only those controls that
are covered by the operating instructions as an improper adjustment of other controls may result in damage and
will often require extensive work by a qualified technician to restore the product to its normal operation.
e. If the product has been dropped or damaged in any way.
f. When the product exhibits a distinct change in performance - this indicates a need for service.
19. Replacement Parts - When replacement parts are required, be sure the service technician has used replacement
parts specified by the manufacturer or have the same characteristics as the original part. Unauthorized substitutions
may result in fire, electric shock, or other hazards.
20. Safety Check - Upon completion of any service or repairs to this product, ask the service technician to perform safety
checks to determine that the product is in proper operating condition.
21. Wall or ceiling Mounting - The product should be mounted to a wall or ceiling only as recommended by the manufacturer.
22. Heat - The product should be situated away from heat sources such as radiators. Heat registers, stoves, or other
products (including amplifiers) that produce heat.
WARNING: Changes or modifications to this unit not expressly approved by the party responsible for compliance could
void the user’s authority to operate the equipment.
NOTE: This equipment has been tested and found to comply with the limits for a Class B digital device, pursuant to Part
15 of the FCC Rules. These limits are designed to provide reasonable protection against harmful interference in a residential
installation. This equipment generates, uses, and can radiate radio frequency energy and, if not installed and used in
accordance with the instructions, may cause harmful interference to radio communications. However, there is no guarantee
that interference will not occur in a particular installation. If this equipment does cause harmful interference to radio or
television reception, which can be determined by turning the equipment off and on , the user is encouraged to try to correct
the interference by one or more of the following measures:
- Reorient or relocate the receiving antenna.
- Increase the separation between the equipment and receiver.
- Connect the equipment into an circuit different from that to which the receiver is connected.
-Consult the dealer or an experienced radio TV technician for help.
AC
Polarized Plug
Specification
Power Source : AC 100~240V 50/60Hz
DC 12V
1200mA Switching Adaptor
Speaker : 4" Dynamic Type x 2
Speaker Wattage : 5 W
Speaker Ohm : 4 Ohm
*DESIGN AND SPECIFICATIONS SUBJECT TO CHANGE WITHOUT NOTICE.
2
WARNING:
TO PREVENT FIRE OR SHOCK HAZARD, DO NOT EXPOSE THIS APPLIANCE TO RAIN OR MOISTURE.
DO NOT REMOVE COVER. PILOT LAMPS SOLDERED IN PLACE. NO USER SERVICEABLE PARTS
INSIDE. REFER SERVICING TO QUALIFIED SERVICE PERSONNEL.
FCC Statement
This device complies with part 15 of the FCC Rules. Operation is subject to the following two conditions:
(1) This device may not cause harmful interference, and (2) this device must accept any interference received,
including interference that may cause undesired operation.
This device must not be co-located or operating in conjunction with any other antenna or transmitter.
This equipment has been tested and found to comply with the limits for a Class B digital device, pursuant
to part 15 of the FCC Rules. These limits are designed to provide reasonable protection against harmful
interference in a residential installation. This equipment generates, uses and can radiate radio frequency
energy and, if not installed and used in accordance with the instructions, may cause harmful interference
to radio communications. However, there is no guarantee that interference will not occur in a particular
installation. If this equipment does cause harmful interference to radio or television reception, which can
be determined by turning the equipment off and on, the user is encouraged to try to correct the interference
by one or more of the following measures:
Reorient or relocate the receiving antenna.
Increase the separation between the equipment and receiver.
Connect the equipment into an outlet on a circuit different from that to which the receiver is connected.
Consult the dealer or an experienced radio/TV technician for help.
To comply with FCC's RF radiation exposure limits for general population/uncontrolled exposure, this device
must be installed to provide a separation distance of at least 20cm from all persons.
WARNING: Any changes or modifications to this unit not expressly approved by the party responsible for
compliance could void the user's authority to operate the equipment.
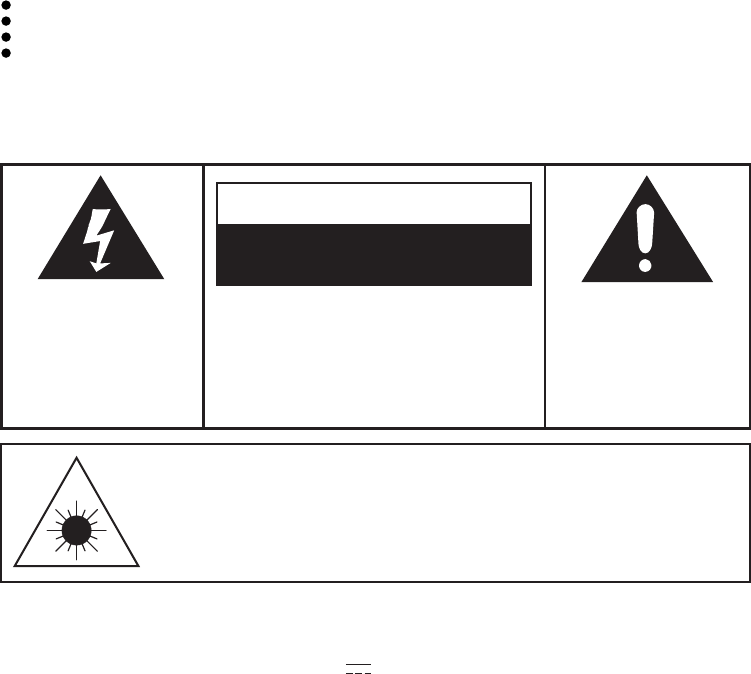
CAUTION
For Compact Disc Units Only:
INVISBLE LASER RADIATION WHEN OPEN AND INTERLOCK FAILED
OR DEFEATED. AVOID DIRECT EXPORSURE TO LASER BEAM.
The exclamation point within
an equilateral triangle is
intended to alert user to the
presence of important
operating and maintenance
(servicing) instruction in the
literature accompanying
the appliance.
RISK OF ELECTRIC SHOCK
DO NOT OPEN
CAUTION
The lighting flash with arrowhead
symbol, within an equilateral
triangle, is intended to alert user
to the presence of uninsulated
"dangerous voltage" within the
product's enclosure that may be
of sufficient magnitude to
constitute risk of electric shock
to persons.
CAUTION: TO REDUCE THE RISK OF
ELECTRIC SHOCK, DO NOT
REMOVE COVER (OR BACK). NO
USER - SERVICEABLE PARTS
INSIDE. REFER SERVICING TO
QUALIFIED SERVICE PERSONNEL.

iJuke Bluetooth
Manual
AC Adaptor
Remote Control
3
Getting Started
Control Locators...................... 4,5
Unpacking................................ 6
Power Source.......................... 6
Basic Operation
Lights ...................................... 7
Remote Control....................... 7
Using your Bluetooth............. 7
CD Operation
CD Player................................ 8
Programmed CD Playback..... 8
Connecting Optional Equipment
External Speakers................... 9
General
Troubleshooting Guide........... 10
Warranty.................................. 11
Thank you for purchasing the the Crosley iJuke
Bluetooth (CR1703A). Before operating this unit,
please read this manual thoroughly and retain it for
future reference.
About This Manual
Welcome Table of Contents
Instructions in this manual describe the control
functions of the CR1703A.
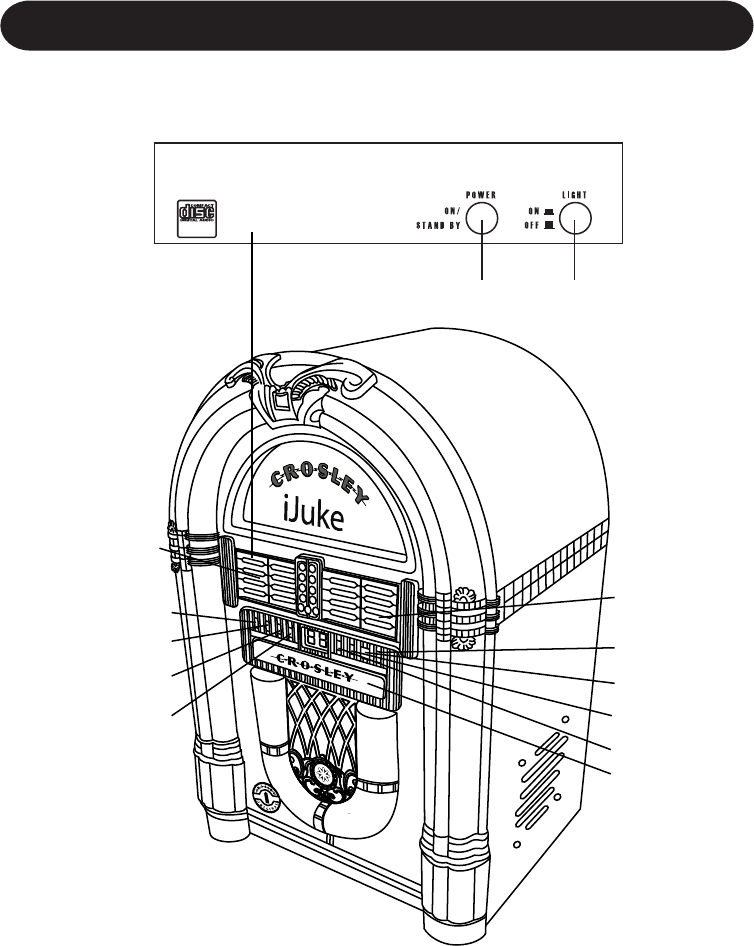
Control Locators
Unit Controls
4
Power Light On / Off
Program Indicator
Repeat Indicator
Play / Pause Indicator
Mute Indicator
Remote Sensor
Stand By Indicator
Power Indicator
CD Tray
Bluetooth LED Indicator
Song List Panel
Song List Panel
Unit Controls
5
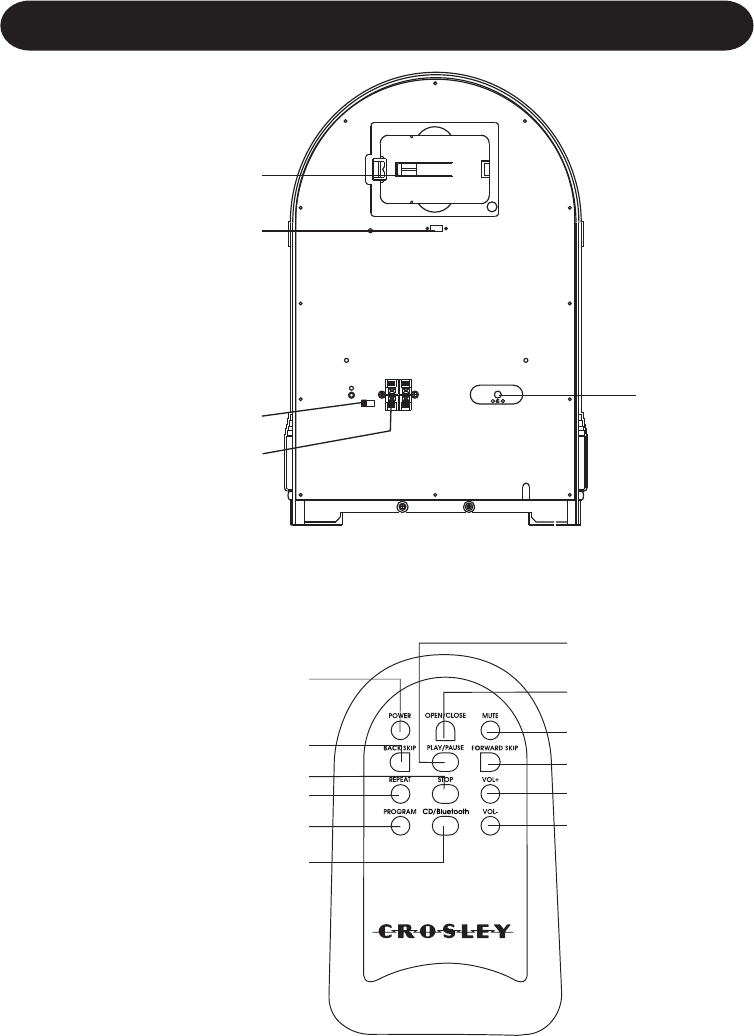
Control Locators
Remote Controls
Power
Back Skip
Stop
Repeat
Program
CD / Bluetooth
Play / Pause
Open / Close
Mute
Forward Skip
Volume Up
Volume Down
SPEAKER
R SP- L
INT.EXT.
STOP RUN
STAGE LIGHT
R SP+ L
Speaker Jacks
Int./Ext. Speaker Switch
Remote Holder
DC Jack
Stage light Stop & Run Switch
DC 12V 1200mA
6
Getting Started
Unpacking
1Remove styrofoam packing materials.
2Remove plastic bags covering the jukebox.
3Remove remote from its storage and remove
the plastic bag covering it.
4Store all packing materials in the box.
Note: Save all packing materials in case the
units need to be returned.
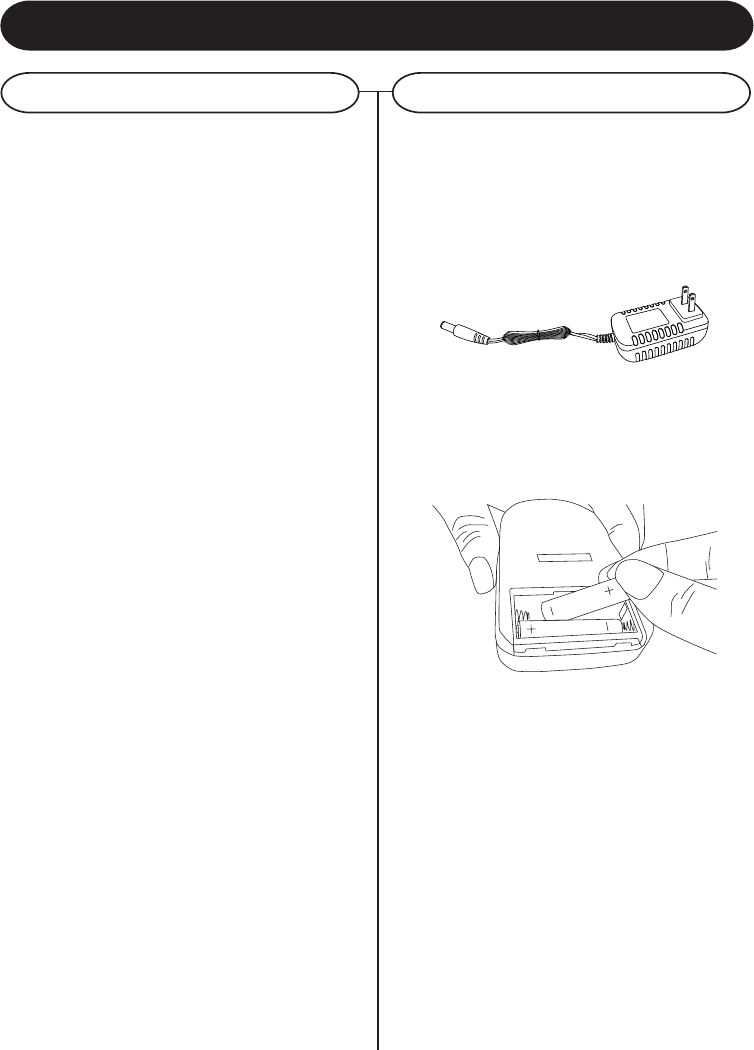
Set Up
1AC Switching Adaptor (output 12V 1.2A) into
appropriate wall outlet
2Plug the small end of the adapter into the DC
Jack on the back of the unit.
3Remove battery cover from remote control and
install 2 AAA batteries (not included). Note the
correct battery orientation.
A/C Adapter

7
Basic Operation
Lights
Remote Control
1Gently pull down the song list panel from the
top right corner to reveal the controls.
2Press light button in to turn lights on.
1Press the Power button to turn the power
ON/OFF.
2Press CD/BT to select CD player or BT mode.
3Use VOL+ and VOL- to adjust the volume level.
4Press the MUTE button to mute the volume
completely.
5The remaining controls are specific to the CD
player. See CD OPERATION for information on
CD player.
Using your Bluetooth
Bluetooth enables a wireless connection between
a device (such as a smart phone) and the Jukebox,
enabling the user to play and control tracks direct
from their Bluetooth enabled device.
The user must ensure that they have a compatible
Bluetooth enabled device (with media playing
capabilities) such as an Android® Smartphone or
Apple iPhone® with Bluetooth capability. The user
must also ensure that they have loaded compatible
audio files on to the device in order to play through
the Jukebox. Once these have both been confirmed,
the user can connect their device to the Jukebox.
1Press POWER button to on the unit.
2Press the function button to the BT mode.
3The LED indicator will flash indicating that it
is searching for a nearby Bluetooth enabled
device to connect too.
4On your Bluetooth enabled device, search for
nearby devices. When your device finds
BT-16201 connect to this device. There should
be no requirement for a PIN.
5When the Jukebox has connected to your
Bluetooth enabled device successfully, your
device will indicate that they are connected
and the indicator light on the Bluetooth.
Jukebox will stop flashing and continuously
illuminate.

8
CD Operation
CD Player
Programmed CD Playback
1Make sure the power is on.
2Press CD / BT BUTTON to select the CD
function. The CD display (- -) will flash, then
show (0 0) .
3Press OPEN / CLOSE BUTTON to open CD
TRAY.
4Insert CD in tray with the label side of CD facing
up.
5Press the OPEN / CLOSE BUTTON again to
close the CD TRAY.
6Press PLAY / PAUSE BUTTON to begin playing
the CD.
7To stop playing, press the STOP BUTTON.
8To skip to a different track, press the BACK SKIP
or the FORWARD SKIP button.
9By pressing and holding either the BACK SKIP
or FORWARD SKIP BUTTON, you can rewind
or fast forward through each individual tack.
The track will fast forward or rewind as long as
you are holding the button. Once you release
the button, regular playback resumes.
10During playback, you can use the repeat
function to repeat a single song or the whole
CD.
11While the song you want to repeat is playing,
press the REPEAT button once. You will see the
REPEAT INDICATOR on the jukebox start to
flash. The song will start over once it is finished.
12Press the REPEAT button the second time to
repeat the whole CD. The REPEAT INDICATOR
will stay on without flashing.
13Pressing the REPEAT button a the third time
will disable the repeat function.
This CD player is programmable which allows you
to program it to play only selected tracks. To
program, follow the steps below.
1Insert disc and close CD TRAY. Do not press
play yet.
2Press the PROGRAM button. The PROGRAM
INCICATOR on the jukebox will start to flash.
3Use the BACK SKIP or FORWARD SKIP
BUTTON to select a track you want to program.
4Once you have selected a track, press the
program button again. This stores the track into
memory.
5Use the BACK SKIP or FORWARD SKIP
BUTTON to select the next track you want to
program. Once selected, press the program
button again.
6Repeat step number 5 until you have
programmed all desired tracks.
7Press PLAY / PAUSE BUTTON to begin playing
the selected tracks. The program light will stop
flashing and the selected tracks will begin
playing. They will play in the order that they
were programmed.
8Using the BACK SKIP or FORWARD SKIP
BUTTON will only skip through the programmed
tracks.
9To clear programmed tracks, press the stop
button twice until the program light goes out.
10Programmed tracks will also be erased from
memory when the CD TRAY is opened or when
the power is turned off.

9
External Speakers
1This unit is equipped with external speaker
outputs.
2The speaker jacks for external speakers are
located on the back of the unit. Beside the
speaker jacks is a switch labeled (int./ext.)
When using external speakers, this switch must
be switched to the ext. position. Doing this turns
off the internal speakers in the unit and redirects
the power to the external speakers.
3If you decide not to use the external speakers,
be sure the switch is on int. or the internal
speakers will not work.
Connecting Optional Equipment

10
General
Troubleshooting
There’s no sound?
1Make sure power is turned on.
2Check that the volume is turned up by pressing
vol.+ button on remote.
3Make sure EXT. / INT. switch on back of the
unitis on int.
(unless you are using external speakers, in which
case it should be on ext.)
4Check to make sure power is turned on.
CD does not play?
1Check to make sure CD is inserted correctly
(label side facing up).
2Make sure surface of CD is Clean.
3Make sure the unit is under CD mode.
Remote does not work?
1Replace batteries.
2Be sure to point remote towards remote sensor
when using.
3Remove obstacles in the path between the
remote and the unit so that remote signal has
a straight path to the unit.
Bluetooth does not conntction?
1Make sure the function to BT mode.
2Power off to reboot this unit.

Crosley Radio, Inc. warrants the product to be free from defects in material and
workmanship under normal use for a period of one year from the original date of
purchase. This warranty is not transferable. If the product is determined to be defective
during the warranty period, the unit will be repaired or replaced at Crosley Radio’s sole
discretion. This warranty covers manufacturing defects and normal consumer use and
does NOT cover damage or failure as a result of abuse, accident, alterations, misuse,
neglect, abnormal wear and tear, inadequate maintenance, commercial or unreasonable
use, damage caused by power surges, mishandling, accident, acts of God or attempted
repair by an unauthorized service agent. Also not covered are cosmetic damages,
cords and antennas.
Should this product fail to function in a satisfactory manner, it is best to first contact
our technical support team for assistance to ensure it is being operated properly.
Tech Support and Product Questions
CALL TOLL FREE: 1.888.CROSLEY
(1.888.276.7539)
If it is indeed determined that the unit is no longer operational, please contact the
retailer from which it was purchased. In many cases, your retailer will be able to provide
a replacement unit at no charge within the scope of their return policy. If the retail return
period has expired, please contact Crosley Radio directly to participate in the one year
protection program.
Crosley 1 Year Warranty Program
CALL TOLL FREE: 1.800.926.7801
You will need to contact our offices M-F 8am-5pm EST to obtain an RA (Return
Authorization) Number. You will be instructed to send the unit (at your cost) to our
offices in its original packaging (or reasonable substitute to prevent damage.) You will
need to clearly mark your RA number on the outside packaging and include the original
sales receipt (or a copy) indicating date of purchase, amount paid, and place of
purchase. You will also need to include your full name, shipping address and daytime
contact number. You will be instructed to include a check or money order for any
applicable return shipping and handling fees. A Crosley advisor will confirm the fees
associated with your product’s shipping size/weight. Returned products will not be
shipped to PO Boxes. Crosley Radio will not be responsible for delays or unprocessed
claims resulting from a purchaser’s failure to provide any or all of the necessary
information.
There are no express warranties except as listed above.
The purchaser’s bill of sale is the only proof of warranty entitlement.
This warranty gives the purchaser specified legal rights in addition to any rights which may vary
from state to state.
In accordance with the “Moss-Magnuson Warranty Act” of July 10, 1975, this is termed a “limited
warranty” which in no way compromises Crosley Radio’s high standards of quality and workmanship.
LIMITED MANUFACTURERS WARRANTY