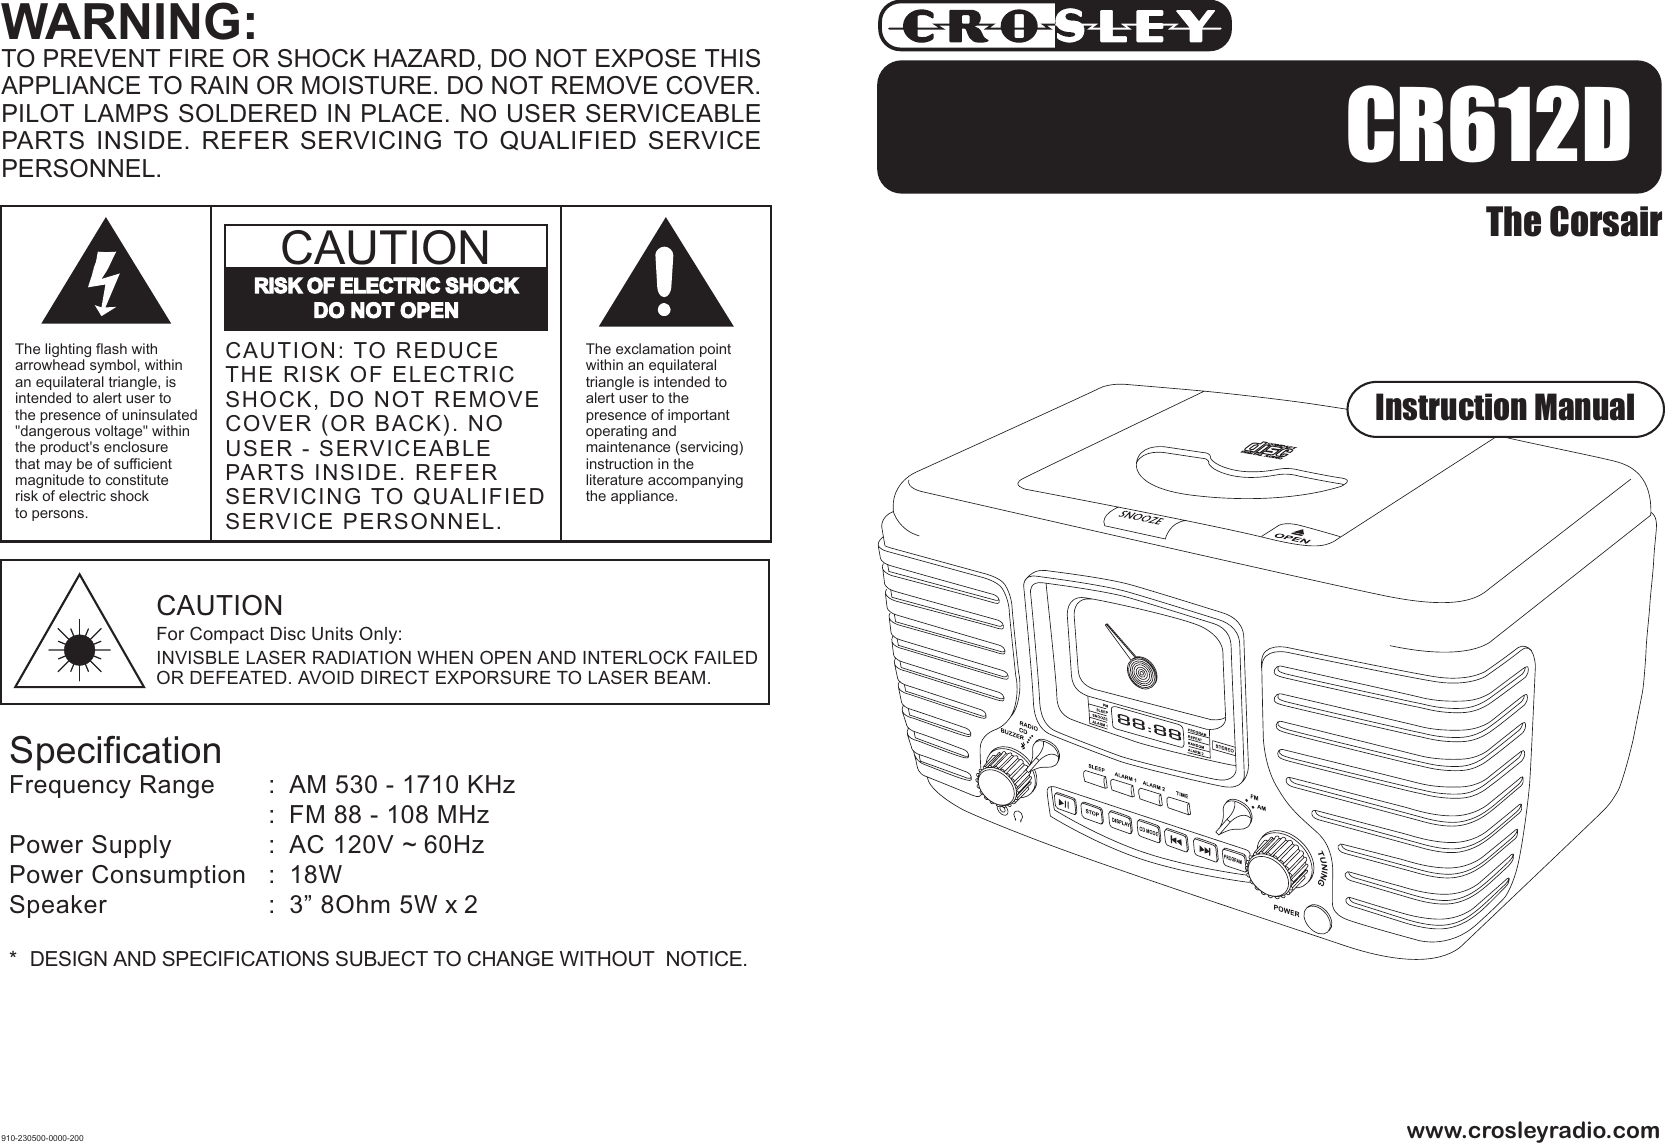
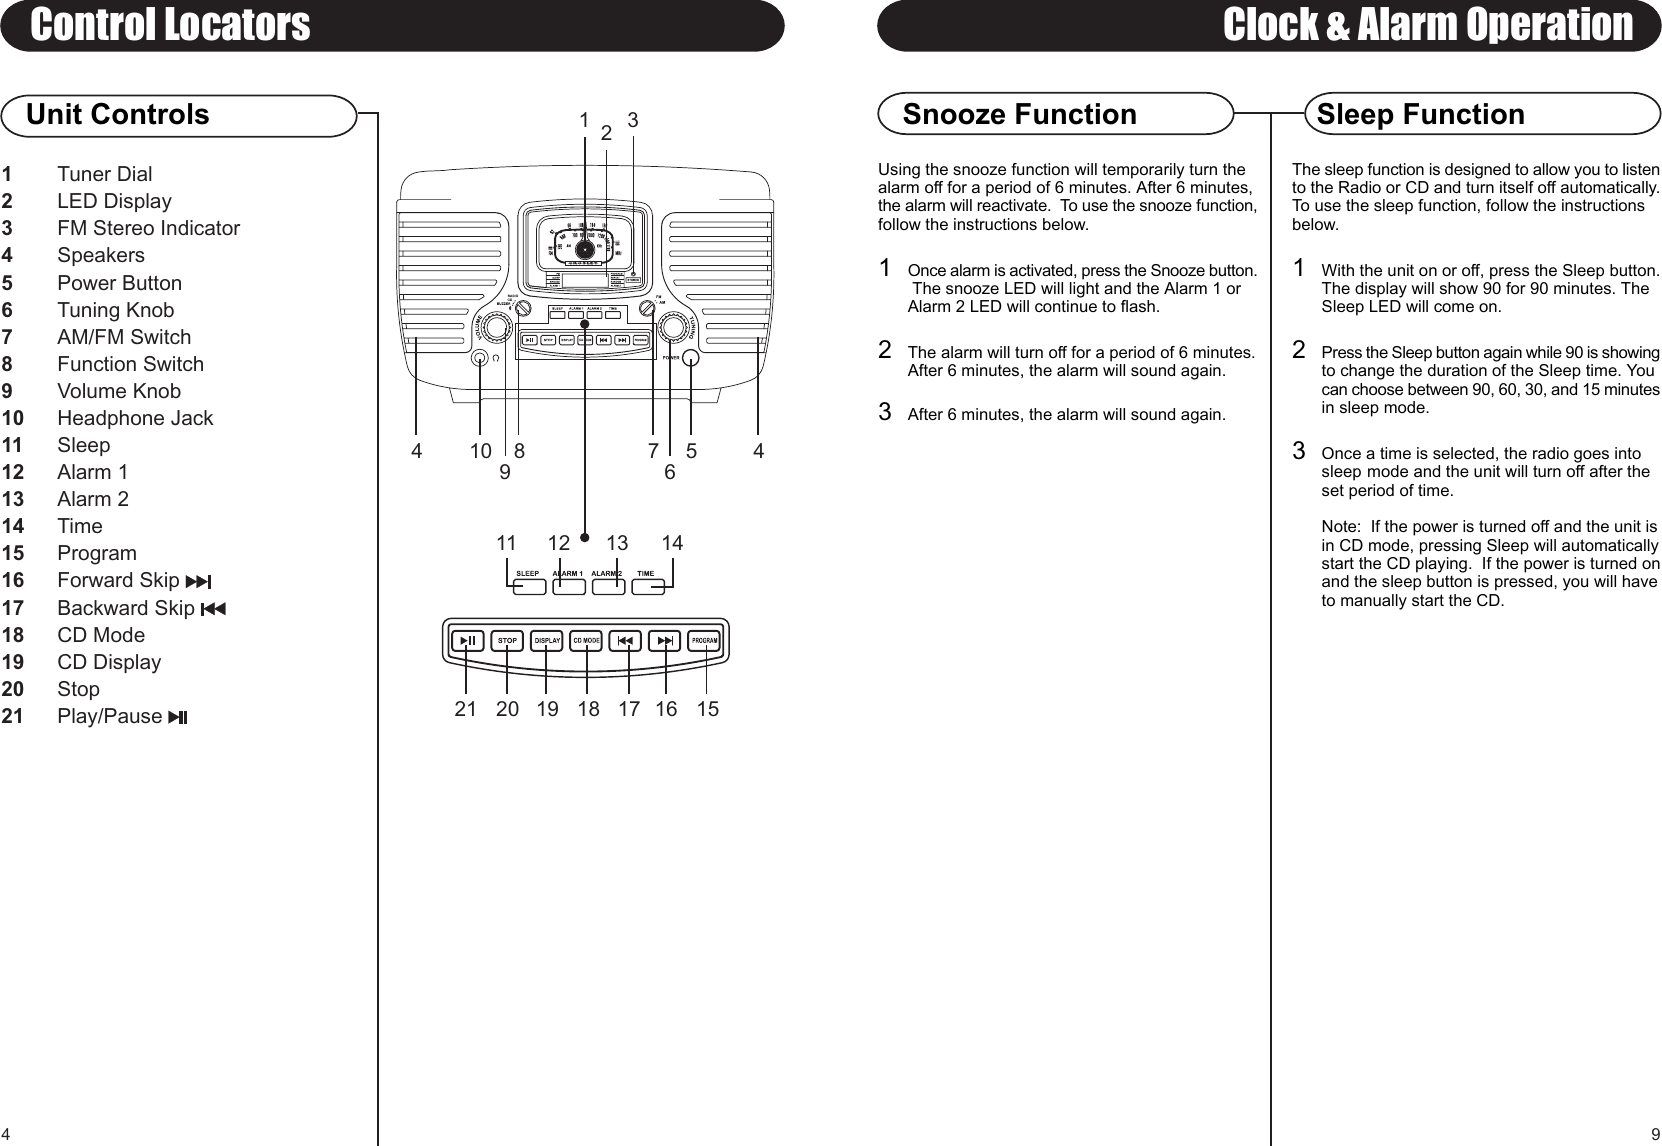
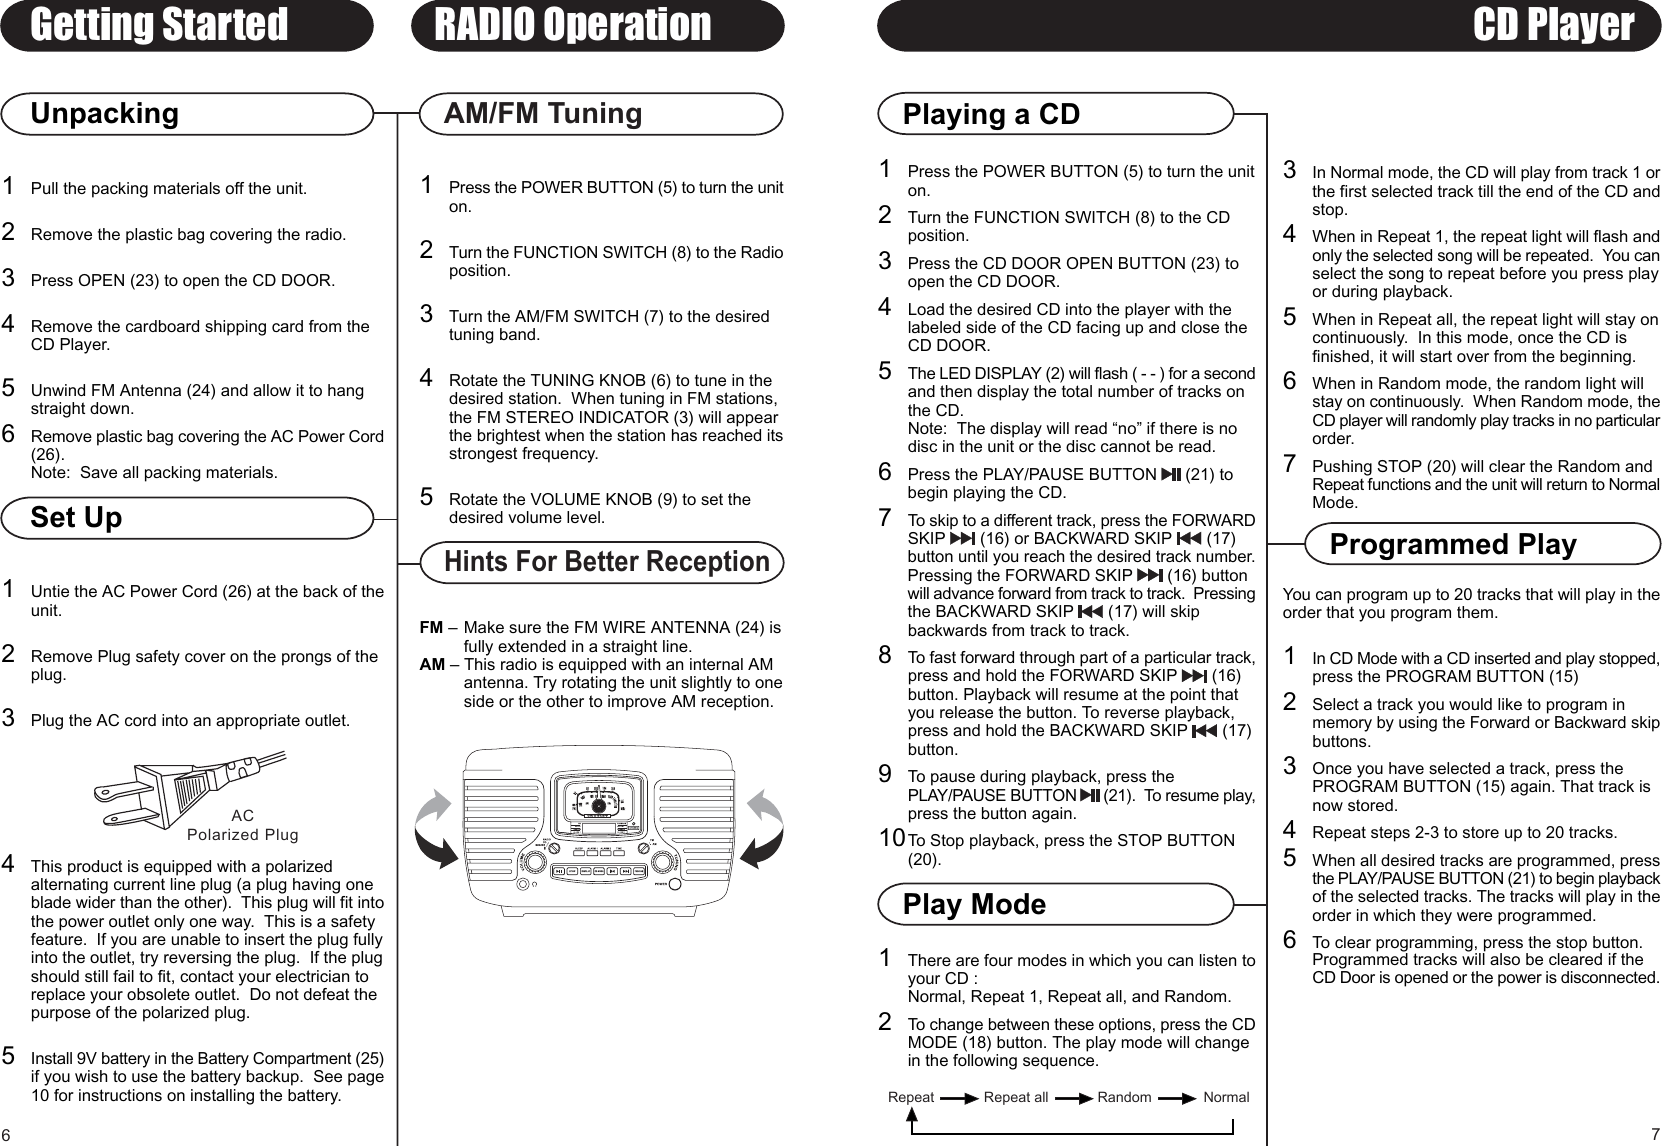
Modern AUSCR612 Alarm Clock CD Radio Corsair with Bluetooth User Manual 910 230500 0000 200

Hong Kong Modern Marketing Manufacturing Ltd. Alarm Clock CD Radio Corsair with Bluetooth 910 230500 0000 200

User Manual

910-230500-0000-200CR612DThe CorsairThe exclamation pointwithin an equilateraltriangle is intended toalert user to thepresence of importantoperating andmaintenance (servicing)instruction in theliterature accompanyingthe appliance.RISK OF ELECTRIC SHOCKDO NOT OPENCAUTIONThe lighting flash witharrowhead symbol, withinan equilateral triangle, isintended to alert user tothe presence of uninsulated"dangerous voltage" withinthe product's enclosurethat may be of sufficientmagnitude to constituterisk of electric shockto persons.CAUTION: TO REDUCETHE RISK OF ELECTRICSHOCK, DO NOT REMOVECOVER (OR BACK). NOUSER - SERVICEABLEPARTS INSIDE. REFERSERVICING TO QUALIFIEDSERVICE PERSONNEL.CAUTIONFor Compact Disc Units Only:INVISBLE LASER RADIATION WHEN OPEN AND INTERLOCK FAILEDOR DEFEATED. AVOID DIRECT EXPORSURE TO LASER BEAM.SpecificationFrequency Range : AM 530 - 1710 KHz: FM 88 - 108 MHzPower Supply : AC 120V ~ 60HzPower Consumption : 18WSpeaker : 3” 8Ohm 5W x 2* DESIGN AND SPECIFICATIONS SUBJECT TO CHANGE WITHOUT  NOTICE.WARNING:TO PREVENT FIRE OR SHOCK HAZARD, DO NOT EXPOSE THISAPPLIANCE TO RAIN OR MOISTURE. DO NOT REMOVE COVER.PILOT LAMPS SOLDERED IN PLACE. NO USER SERVICEABLEPARTS INSIDE. REFER SERVICING TO QUALIFIED SERVICEPERSONNEL.www.crosleyradio.comInstruction Manual
12IMPORTANT SAFETY INSTRUCTIONSPLEASE READ CAREFULLY ALL THE FOLLOWING IMPORTANT SAFEGUARDS THAT ARE APPLICABLE TO YOUR EQUIPMENT1. Read Instructions - All the safety and operating instructions should be read before the product is operated.2. Retain instructions - The safety and operating instructions should be retained for future reference.3. Heed Warnings - All warnings on the product and in the operating Instructions should be adhered to.4. Follow Instructions - All operating and use instructions should be followed.5. Cleaning - Unplug this product from the wall outlet before cleaning. Do not use liquid cleaners or aerosol cleaners.Cleanonly with dry cloth.6. Attachments - Do not use attachments not recommended by the product manufacturer as they may cause hazards.7. Water and Moisture - Do not use this product near water - for example, near a bath tub, wash bowl, kitchen sink, orlaundry tub; in a wet basement; or near a swimming pool; and the like.8. A product and cart combination should be moved with care. Quick stops, excessive force, and unevensurfaces may cause the product and cart combination to overturn.9. Ventilation - Slots and openings in the cabinet are provided for ventilation and to ensure reliableoperation of the product and to protect  it from overheating, and these openings must not be blockedor covered, The openings should never be blocked by placing the product on a bed, sofa, rug, orother similar surface. This product should not be placed in a built - in installation such as a bookcaseor rack unless proper ventilation is provided or the manufacturer's instructions have been adhered to.10. Power Sources - This product should be operated only from the type of power source indicated on the marking label,if you are not sure of the type of power supply to your home. Consult your product dealer or local power company.Forproducts intended to operate from battery power, or other sources, refer to the operating instructions.11. Grounding or Polarization - This product may be equipped with a polarized alternating-current line plug (a plug havingone blade wider than the other). This plug will fit into the power outlet only one way. This is a safety feature. If you are unable to insert the plug fully into the outlet try reversing the plug, If the plug should still fail to fit, contact your electrician to replace your obsolete outlet. Do not defeat the safety purpose of the polarized plug.12. Power - Cord Protection - Power - supply cords should be routed so that they are not likely tobe walked on or pinched by items placed upon or against them, paying particular attention tocords at plugs, convenience receptacles, and the point where they exit from the product.13. Lightning - For added protection for this product during a lightning storm, or when it is leftunattended and unused for long periods of time, unplug it from the wall outlet and disconnectthe antenna or cable system. This will prevent damage to the product due to lightning and power - line surges.14. Power Lines - An outside antenna system should not be located in the vicinity of overhead power lines or other electriclight or power circuits, or where it can fall into such power lines or circuits. When installing an outside antenna system,extreme care should be taken to keep from touching such power lines or circuits as contact with them might be fatal.15. Overloading - Do not overload wall outlets, extension cords, or integral convenience receptacles as this can result in a risk of fire or electric shock.16. Object and Liquid Entry - Never push objects of any kind into this product through openings as they may touch dangerous voltage points or short - out parts that could result in a fire or electric shock. Never spill liquid of any kind on the product.17. Servicing - Do not attempt to service this product yourself as opening or removing covers may expose you to dangerousvoltage or other hazards. Refer all servicing to qualified service personnel.18. Damage Requiring Service - Unplug this product from the wall outlet and refer servicing to qualified service personnelunder the following conditions;a. When the power-supply cord or plug is damaged.b. If liquid has been spilled, or objects have fallen into the product.c. If the product has been exposed to rain or water.d. If the product does not operate normally by following the operating instructions. Adjust only those controls that are covered by the operating instructions as an improper adjustment of other controls may result in damage and will often require extensive work by a qualified technician to restore the product to its normal operation.e. If the product has been dropped or damaged in any way.f. When the product exhibits a distinct change in performance - this indicates a need for service.19. Replacement Parts - When replacement parts are required, be sure the service technician has used replacement parts specified by the manufacturer or have the same characteristics as the original part. Unauthorized substitutions may result in fire, electric shock, or other hazards.20. Safety Check - Upon completion of any service or repairs to this product, ask the service technician to perform safetychecks to determine that the product is in proper operating condition.21. Wall or ceiling Mounting - The product should be mounted to a wall or ceiling only as recommended by the manufacturer.22. Heat - The product should be situated away from heat sources such as radiators. Heat registers, stoves, or other products (including amplifiers) that produce heat.WARNING: Changes or modifications to this unit not expressly approved by the party responsible for compliance couldvoid the user’s authority to operate the equipment.NOTE: This equipment has been tested and found to comply with the limits for a Class B digital device, pursuant to Part15 of the FCC Rules. These limits are designed to provide reasonable protection against harmful interference in a residentialinstallation. This equipment generates, uses, and can radiate radio frequency energy and, if not installed and used inaccordance with the instructions, may cause harmful interference to radio communications. However, there is no guaranteethat interference will not occur in a particular installation. If this equipment does cause harmful intereference  to radio ortelevision reception, which can be determined by turning the equipment off and on , the user is encouraged to try to correctthe interference by one or more of the following measures:- Reorient or relocate the receiving antenna.- Increase the separation between the equipment and receiver.- Connect the equipment into an circuit different from that to which the receiver is connected.-Consult the dealer or an experienced radio TV technician for help.ACPolarized PlugLIMITED MANUFACTURERS WARRANTYCrosley Radio, Inc. warrants the product to be free from defects in material andworkmanship under normal use for a period of one year from the original date ofpurchase. This warranty is not transferable. If the product is determined to be defectiveduring the warranty period, the unit will be repaired or replaced at Crosley Radio’s solediscretion. This warranty covers manufacturing defects and normal consumer use anddoes NOT cover damage or failure as a result of abuse, accident, alterations, misuse,neglect, abnormal wear and tear, inadequate maintenance, commercial or unreasonableuse, damage caused by power surges, mishandling, accident, acts of God or attemptedrepair by an unauthorized service agent. Also not covered are cosmetic damages,cords and antennas.Should this product fail to function in a satisfactory manner, it is best to first contactour technical support team for assistance to ensure it is being operated properly.Tech Support and Product QuestionsCALL TOLL FREE: 1.888.CROSLEY(1.888.276.7539)If it is indeed determined that the unit is no longer operational, please contact theretailer from which it was purchased. In many cases, your retailer will be able to providea replacement unit at no charge within the scope of their return policy. If the retail returnperiod has expired, please contact Crosley Radio directly to participate in the one yearprotection program.Crosley 1 Year Warranty ProgramCALL TOLL FREE: 1.800.926.7801You will need to contact our offices M-F 8am-5pm EST to obtain an RA (ReturnAuthorization) Number. You will be instructed to send the unit (at your cost) to ouroffices in its original packaging (or reasonable substitute to prevent damage.) You willneed to clearly mark your RA number on the outside packaging and include the originalsales receipt (or a copy) indicating date of purchase, amount paid, and place ofpurchase. You will also need to include your full name, shipping address and daytimecontact number. You will be instructed to include a check or money order for anyapplicable return shipping and handling fees. A Crosley advisor will confirm the feesassociated with your product’s shipping size/weight. Returned products will not beshipped to PO Boxes. Crosley Radio will not be responsible for delays or unprocessedclaims resulting from a purchaser’s failure to provide any or all of the necessaryinformation.There are no express warranties except as listed above.The purchaser’s bill of sale is the only proof of warranty entitlement.This warranty gives the purchaser specified legal rights in addition to any rights which may varyfrom state to state.In accordance with the “Moss-Magnuson Warranty Act” of July 10, 1975, this is termed a “limitedwarranty” which in no way compromises Crosley Radio’s high standards of quality and workmanship.
Connect your stereo headphones (not included) tothe HEADPHONE JACK (10).  While headphonesare connected, the internal speakers will be disabled.COMPACT DISC CARETo remove a disc from its storage case, press downon the center of the case and lift the disc out, holding it carefully by the edges.Fingerprints and dust should be carefully wiped offthe disc’s recorded surface with a soft cloth. Unlikeconventional record, compact discs have no groovesto collect dust and microscopic debris, so gently wiping with a soft cloth should remove most particles.Wipe in a straight line from the inside to the outside of the disc. Small dust particles and lightstains will have absolutely no effect on reproductionquality.Clean the disc periodically with a soft, lint-free, drycloth. Never use detergents or abrasive cleaners to clean the disc. If necessary, use a CD cleaningkit.Never write on or affix labels to the surface of compactdiscs.CARE OF THE CANBINETIf the cabinet becomes dusty wipe it with with a softdry dust cloth. Do not use any wax, polish sprays,or abrasive cleaners on the cabinet.CAUTIONNever allow any water or other liquids to get insidethe unit while cleaning. 11GeneralThere is no Power1Make sure the radio is plugged in correctly.2Check to see that the power button ispushed in.There is no Sound1Check the volume level by turning the volumeknob.CD does not play1Check to make sure CD is inserted correctly(label side facing up).2Check that the surface of the CD is clean3Make sure function switch is set to CD.Care and MaintenanceHeadphone Jack TroubleshootingBENZENECLEANERIMPORTANT SAFETY INSTRUCTIONS• Minimum distances 5 cm around the apparatus for sufficient ventilation.Gardez une distance de 5 cm minimum autour de l’appareil pour une ventilationsuffisante.• The ventilation should not be impeded by covering the ventilation openings with items, such as newspapers, table-cloths, curtains, etc.La ventilation ne doit pas etre obstruée, ne pas couvrie les ouvertures de ventilation avec des objets, comme des journaux, tissus, mapes, rideaux etc.• No naked flame sources, such as lighted candles, should be placed on the apparatus.Aucune source inflammable ne doit etre placée sur l’appareil.• Attention should be drawn to the environmental aspects of battery disposal;La mise au rebu de la batterie doit etre faite dans les normes environnementales.• The use of apparatus in moderate climates.Utilisez l’appareil dans une climat modéré.• Batteries (battery pack or batteries installed) shall not be exposed to excessive heatsuch as sunshine, fire or the like.La batterie ou les piles ne doivent pas etre exposées à des temperatures excessive, comme les rayons du soleil, ou flammes.• Where the MAINS plug or an appliance coupler is used as the disconnect device, the disconnect device shall remain readily operable;Lorsque la prise SECTEUR ou un coupleur d'appareil est utilisé comme dispositif de déconnexion, le dispositif de déconnexion doit rester facilementaccessible;•The apparatus shall not be exposed to dripping or splashing and that no objectsfilled with liquids, such as vases, shall be placed on the apparatus.L’appareil ne doit pas etre exposé à l’eau ou aux eclaboussures et aucun objets contenant de l’eau tel qu’un vase ne doivent etre placés sur l’appareil.
Using your BluetoothThis Model includes a battery back-up circuit.  Thebattery will maintain the clock and alarm settings inthe event of a power failure.  The battery back-uprequires one 9V battery (not included).  The batterycompartment is located on the back of the radio.  Toinstall/replace the battery, follow the instructions below.1 Press in on the locking tab to remove the BATTERYCOVER (25).2 Attach a 9V battery to the battery contacts as shown.3 Tuck the battery back into the battery compartmentand replace the battery cover.If the power is interrupted, the clock and alarm timeswill remain stored but the display will be blank toconserve power.  The display will come back on andshow the correct time once power has been restored.Note:  In the event of a power failure, the alarm willdefault to buzzer mode until power is restored.The life of the battery will depend on how often youlose power and the length of power outages.  It isrecommended to replace the battery every 9-12months.About This ManualThank you for purchasing the Crosley Corsair(CR612D). Before operating this unit, please readthis manual thoroughly and retain it for futurereference.Instructions in this manual describe the controlfunctions of the CR612D.Welcome Table of Contents10Clock & Alarm OperationBattery Compartment(For Clock Backup)Battery Back-Up Getting StartedControl Locators....................... 4 - 5Unpacking ................................ 6Set up ....................................... 6RadioAM/FM Tuning  ........................ 6CD PlayerPlayer a CD  ............................ 7Programmed Play  .................. 7Clock & Alarm OperationSetting the Clock  ..................... 8Setting the Alarm ..................... 8Snooze ..................................... 9Sleep function ......................... 9Battery Back-Up ...................... 10Using your Bluetooth.............. 10GeneralHeadphone Jack ..................... 11Care and Maintenance ............ 11Troubleshooting Guide ............. 11Warranty ................................... 12Bluetooth enables a wireless connection betweena device (such as a smart phone) and the unit,enabling the user to play and control tracks directfrom their Bluetooth enabled device.The user must ensure that they have a compatibleBluetooth enabled device (with media playingcapabilities) such as an Android® Smartphone orApple iPhone® with Bluetooth capability. The usermust also ensure that they have loaded compatibleaudio files on to the device in order to play throughthe unit. Once these have both been confirmed,the user can connect their device to the unit.1Press POWER button to on the unit.2Turn the FUNCTION SWITCH (8) to the(Bluetooth) mode.3The LED Display indicator will flash indicatingthat it is searching for a nearby Bluetooth enabled device to connect too.4On your Bluetooth enabled device, search fornearby devices. When your device finds CR612D connect to this device. There shouldbe no requirement for a PIN.5When the unit has connected to your Bluetooth enabled device successfully, your device will indicate that they are connected and the indicator light on the Bluetooth.the unit will stop flashing and continuously illuminate.
145678910411 12 13 1421 20 18 1619 17 1523The sleep function is designed to allow you to listento the Radio or CD and turn itself off automatically.To use the sleep function, follow the instructionsbelow.1With the unit on or off, press the Sleep button.The display will show 90 for 90 minutes. The Sleep LED will come on.2Press the Sleep button again while 90 is showingto change the duration of the Sleep time. You can choose between 90, 60, 30, and 15 minutesin sleep mode.3Once a time is selected, the radio goes into sleep mode and the unit will turn off after the set period of time.Note:  If the power is turned off and the unit isin CD mode, pressing Sleep will automaticallystart the CD playing.  If the power is turned onand the sleep button is pressed, you will haveto manually start the CD.Snooze FunctionUsing the snooze function will temporarily turn thealarm off for a period of 6 minutes. After 6 minutes,the alarm will reactivate.  To use the snooze function,follow the instructions below.1Once alarm is activated, press the Snooze button. The snooze LED will light and the Alarm 1 or Alarm 2 LED will continue to flash.2The alarm will turn off for a period of 6 minutes.After 6 minutes, the alarm will sound again.3After 6 minutes, the alarm will sound again.Control LocatorsUnit Controls1Tuner Dial2LED Display3FM Stereo Indicator4Speakers5Power Button6Tuning Knob7AM/FM Switch8Function Switch9Volume Knob10 Headphone Jack11 Sleep12 Alarm 113 Alarm 214 Time15 Program16 Forward Skip 17 Backward Skip 18 CD Mode19 CD Display20 Stop21 Play/Pause4 9Clock & Alarm OperationSleep Function
22232524 26The clock time can be set with the power turned onor off as long as the unit is plugged in.  To set theclock, follow the instructions below.1Press the TIME (14) button.  The clock display will begin to flash.2Press the FORWARD SKIP   (16) button to set the hour.Note:  There is a PM indicator light that will comeon to denote PM hours.3Press the BACKWARD SKIP    (17) button toset the minutes.4Once the correct time is set, press the TIME (14)button again to store the time.5To switch between 12H and 24H mode, press and hold the TIME (14) button.This unit features dual alarms.  You can set eachalarm to wake you at different times. The alarms canbe set with the power turned on or off as long as theunit is plugged in.  To set the alarm(s), follow theinstructions below.To set Alarm 11Press Alarm 1.  The clock display will switch to alarm time and start to flash.  The Alarm 1 LEDwill come on.2Press the FORWARD SKIP   (16) button to set the hour.Note : There is a PM indicator light that will comeon to denote PM hours.3Press the BACKWARD SKIP   (17) button toset the minutes.4Once you have the correct alarm time set for Alarm 1, press the Alarm 1 button again to turn the alarm on. The Alarm 1 LED with stay lit.5To turn the alarm off, press the Alarm 1 button again. The alarm will turn off and the LED light will go off.6Once set, the alarm will sound once the clock reaches the set alarm time for Alarm 1. The Alarm1 LED will begin to Flash.7To turn the alarm off while it is going off, press the Alarm 1 button.To set Alarm 21 Press Alarm 2. The clock display will switch to alarm time and start to flash. The Alarm 2 LED will come on.2Press the FORWARD SKIP   (16) button to set the hour.Note : There is a PM indicator light that will comeon to denote PM hours.3Press the BACKWARD SKIP   (17) button toset the minutes.4Once you have the correct alarm time set for Alarm 2, press the Alarm 2 button again to turn the alarm on. The Alarm 2 LED with stay lit.5To turn the alarm off, press the Alarm 2 button again. The alarm will turn off and the LED light will go off.6Once set, the alarm will sound once the clock reaches the set alarm time for Alarm 2. The Alarm 2 LED will begin to flash.7To turn the alarm off while it is going off, press the Alarm 2 button.Note : The alarm will wake you to Radio, CD orBuzzer. Turn the FUNCTION SWITCH to your desired wake up mode. You can set this mode with the radio on or off. In the case of power outage, the alarm will wake you to Buzzer if thebattery is installed. The alarm will sound for 60 minutes if not stopped manually by pressing Snooze or by turning the alarm off.Clock & Alarm Operation Control LocatorsUnit Controls22 Snooze23 CD Door Open24 FM Wire Antenna25 Battery Cover26 AC Power Cord8 5Setting The ClockSetting The Alarm
1Press the POWER BUTTON (5) to turn the uniton.2Turn the FUNCTION SWITCH (8) to the Radioposition.3Turn the AM/FM SWITCH (7) to the desired tuning band.4Rotate the TUNING KNOB (6) to tune in the desired station.  When tuning in FM stations, the FM STEREO INDICATOR (3) will appear the brightest when the station has reached itsstrongest frequency.5Rotate the VOLUME KNOB (9) to set thedesired volume level.FM – Make sure the FM WIRE ANTENNA (24) isfully extended in a straight line.AM – This radio is equipped with an internal AM antenna. Try rotating the unit slightly to oneside or the other to improve AM reception.Repeat Repeat all Random NormalAM/FM TuningRADIO OperationGetting Started1Press the POWER BUTTON (5) to turn the uniton.2Turn the FUNCTION SWITCH (8) to the CD position.3Press the CD DOOR OPEN BUTTON (23) to open the CD DOOR.4Load the desired CD into the player with the labeled side of the CD facing up and close the CD DOOR.5The LED DISPLAY (2) will flash ( - - ) for a secondand then display the total number of tracks on the CD.Note:  The display will read “no” if there is no disc in the unit or the disc cannot be read.6Press the PLAY/PAUSE BUTTON   (21) to begin playing the CD.7To skip to a different track, press the FORWARDSKIP  (16) or BACKWARD SKIP   (17) button until you reach the desired track number.Pressing the FORWARD SKIP   (16) button will advance forward from track to track.  Pressingthe BACKWARD SKIP   (17) will skip backwards from track to track.8To fast forward through part of a particular track,press and hold the FORWARD SKIP   (16) button. Playback will resume at the point that you release the button. To reverse playback, press and hold the BACKWARD SKIP   (17)button.9To pause during playback, press the PLAY/PAUSE BUTTON   (21).  To resume play,press the button again.10To Stop playback, press the STOP BUTTON (20).1There are four modes in which you can listen toyour CD :Normal, Repeat 1, Repeat all, and Random.2To change between these options, press the CDMODE (18) button. The play mode will change in the following sequence.3In Normal mode, the CD will play from track 1 orthe first selected track till the end of the CD andstop.4When in Repeat 1, the repeat light will flash andonly the selected song will be repeated.  You canselect the song to repeat before you press playor during playback.5When in Repeat all, the repeat light will stay oncontinuously.  In this mode, once the CD is finished, it will start over from the beginning.6When in Random mode, the random light will stay on continuously.  When Random mode, theCD player will randomly play tracks in no particularorder.7Pushing STOP (20) will clear the Random and Repeat functions and the unit will return to NormalMode.You can program up to 20 tracks that will play in theorder that you program them.1In CD Mode with a CD inserted and play stopped,press the PROGRAM BUTTON (15)2Select a track you would like to program in memory by using the Forward or Backward skipbuttons.3Once you have selected a track, press the PROGRAM BUTTON (15) again. That track is now stored.4Repeat steps 2-3 to store up to 20 tracks.5When all desired tracks are programmed, pressthe PLAY/PAUSE BUTTON (21) to begin playbackof the selected tracks. The tracks will play in theorder in which they were programmed.6To clear programming, press the stop button. Programmed tracks will also be cleared if the CD Door is opened or the power is disconnected.Play ModeHints For Better ReceptionACPolarized Plug67UnpackingSet UpCD PlayerPlaying a CDProgrammed Play1Pull the packing materials off the unit.2Remove the plastic bag covering the radio.3Press OPEN (23) to open the CD DOOR.4Remove the cardboard shipping card from the CD Player.5Unwind FM Antenna (24) and allow it to hang straight down.6Remove plastic bag covering the AC Power Cord(26).Note:  Save all packing materials.1Untie the AC Power Cord (26) at the back of theunit.2Remove Plug safety cover on the prongs of the plug.3Plug the AC cord into an appropriate outlet.4This product is equipped with a polarized alternating current line plug (a plug having one blade wider than the other).  This plug will fit intothe power outlet only one way.  This is a safety feature.  If you are unable to insert the plug fullyinto the outlet, try reversing the plug.  If the plugshould still fail to fit, contact your electrician to replace your obsolete outlet.  Do not defeat the purpose of the polarized plug.5Install 9V battery in the Battery Compartment (25)if you wish to use the battery backup.  See page10 for instructions on installing the battery.

Navigation menu