Motorola Mobility MDV850T Set Top Box User Manual 521852 005 B
Motorola Mobility LLC Set Top Box 521852 005 B
Manual
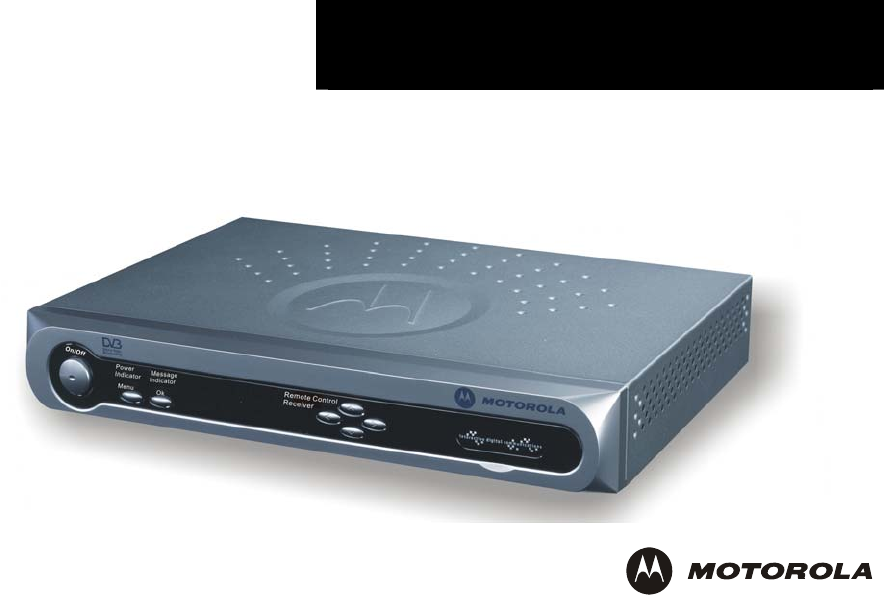
MDV850T
User’s Manual
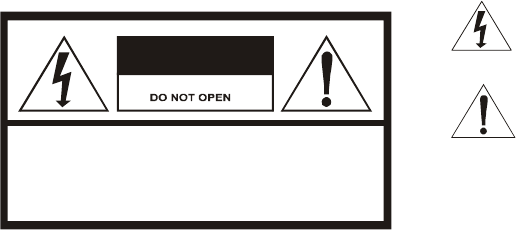
The lightning symbol with an arrow inside the equilateral
triangle indicates that the user should pay attention to
“dangerous voltage" un-insulated in the frame, which is
sufficient to be harmful to humans.
The exclamation mark inside the equilateral triangle indicates
that there is important operation and service (maintenance)
instructions in the attached printed documents.
CAUTION
RISK OF ELECTRIC SHOCK
REFER SERVICING TO QUALIFIED SERVICE PERSONNEL.
TO REDUCE THE RISK OF ELECTRIC SHOCK,
DO NOT REMOVE COVER (OR BACK).
NO USER-SERVICEABLE PARTS INSIDE.
CAUTION:
Symbols and supplementary warning on the terminal button.
Note:
No extension cord, socket, or other lead wire should be used with the plug, to
avoid electrical shock. The plug should be fully plugged in, with no part exposed.
Never place the device where fluids may drop or splash. Never place any object
with fluids, such as vases, on the device.
Alert
To prevent fire or shock hazard, do not expose this device to rain or
moisture.
In line with IS15245: 2002- BIS Rules
Repair
Please contact your cable TV operator to have it repaired or replaced,
if necessary.
The installation shall be performed by qualified service personnel in line with local
rules and laws.
Important Safety Measures
1 Reading Instructions
Read through all safety and operation
instruction prior to operating the device.
2 Keeping Instructions
Keep all safety and operation instructions
for future reference.
3 Note & Warning Description
All warning descriptions on the device
and in the operation instructions should
be followed.
4 Operate according to Instructions
All operation instructions should be
followed.
5 Cleaning
Unplug the device from its power supply
prior to cleaning. Never use fluid
detergent or aerosol. Instead, simply
clean with a wet cloth.
6 Accessories
Any accessory not recommended should
not be used, and may result in danger.
7 Water and Moisture
Do not use this device near a bathtub,
basin, sink, washtub, swimming pool or
other place near a water supply, nor in a
damp basement; any of which may cause a
“grounding” effect.
8 Supporting Equipment
Don’t place the device on an unstable cart,
block, tripod, bracket, or table. It may fall,
resulting in serious personal injuries or
damage to the device.
9 Ventilation
Openings and drilled holes in the cabinet are
for ventilation to ensure its reliable operation
and to prevent overheating. Do not place the
device on a bed, sofa, carpet, or similar
surface; otherwise, the openings may be
blocked. Do not place the device near or on a
radiator or hot air vent, nor inside a bookcase
or shelf, unless proper ventilation is provided.
Never stack other electronic equipment on the
device.
10 Power Supply (110V)
Only the power designated on the tab can be
used (110V). If you are not sure what voltage
your outlets support, please consult your local
power supply company.
11 Protection of Power Cord
The power cord should not be walked upon
nor overlaid by other cords or connectors.
12 Lightning Strike
To properly protect the device in a
lightning strike, or when unattended or
not in use for a long time, please unplug
from the power supply or disconnect the
antenna or cable network. By doing so,
the damage to the video product from
lightning strikes or the over-loading of
the power supply (surge) can be
prevented.
13 Overloading
Never overload the power supply circuit
with other appliances, for it might lead
to fire or electrical shock.
14 Inflow of Articles or Fluids
Never insert anything into the device,
because foreign articles may contact
dangerous high-voltage points or
lead to a short circuit, causing fire or
electrical shock. Never drop any fluid
on the device.
15 Repair
Do not try to repair device yourself, for
you may be exposed to dangerous
voltage or other risks after removing or
opening the cover. Have it repaired by
experienced professional repair
personnel.
16 Damage to Be Repaired
Unplug the device from the wall socket
and have it repaired by qualified repair
personnel if any of the following should
occur:
a The power cord or plug is damaged.
b The device is exposed to rain or
flooded with water.
c Fluids or foreign objects fall into it.
d The device does not operate properly
after following the directions for use
described in this manual. If this occurs,
adjust only the controls introduced in the
instructions, because any improper
adjustment of other controls may result in
damage, and, in most cases, may require
work by a qualified technician to have it
work properly again.
e The device falls or the cabinet is
damaged.
f Its performance undergoes obvious
changes, which indicate a repair is
required.
17 Replacing Parts
When it is necessary to replace a part, be
sure to have it replaced by service
technicians with the part stipulated by the
manufacturer or one having the same
features as the original. Using unauthorized
replacement parts may result in fire, electrical
shock, or other dangers.
18 Safety Inspection
Whenever the device has been
serviced or repaired, have it
inspected for safety by a service
technician (insulation standard
testing) to ensure its proper
operation.

FCC Compliance
This device is intended to be attached to a receiver that is not used to receive over-the-air broadcast signals. Connection of this device in any other fashion may cause
harmful interference to radio communications and is in violation of the FCC Rules, Part 15.
This device complies with Part 15 of the FCC Rules. Operation is subject to the following two conditions: (1) this device may not cause harmful interference, and (2) this
device must accept any interference received, including interference that may cause undesired operation.
CAUTION: Any changes or modifications not expressly approved by the grantee of this device could void the user’s authority to operate the equipment.
NOTE: This equipment has been tested and found to comply with the limits for a Class B digital device, pursuant to Part 15 of the FCC Rules. These limits are designed to
provide reasonable protection against harmful interference in a residential installation. This equipment generates, uses and can radiate radio frequency energy and, if not
installed and used in accordance with the instructions, may cause harmful interference to radio communications. However, there is no guarantee that interference will not
occur in a particular installation.
If this equipment does cause harmful interference to radio or television reception, which can be determined by turning the equipment off and on, the user is encouraged to try
to correct the interference by one or more of the following measures:
-- Reorient or relocate the receiving antenna.
-- Increase the separation between the equipment and receiver.
-- Connect the equipment into an outlet on a circuit different from that to which the receiver is connected.
-- Consult the dealer or an experienced radio/TV technician for help.
Copyright © 2007 Motorola, Inc. All Rights Reserved. No part of this publication may be reproduced in any form or by any means or used to make any
derivative work (such as translation, transformation or adaptation) without written permission from Motorola, Inc.
Motorola reserves the right to revise this publication and to make changes in content from time to time without obligation on the part of Motorola to provide notification
of such revision or change. Motorola provides this guide without warranty of any kind, express or implied, including, but not limited to, the implied warranties of
merchantability and fitness for a particular purpose. Motorola may make improvements or changes in the product(s) described in this manual at any time. MOTOROLA
and the Stylized M logo are registered trademarks of Motorola, Inc. All other products or service names are the sole property of their respective owners.

CONTENTS
Introduction ...........................................................2
Front Panel .......................................................3
Back Panel........................................................5
Remote Control .....................................................7
Main Service...................................................11
Basic Front Panel Operations............................12
Power On/Off..................................................12
Change Channel............................................. 12
Rear Panel Audio-Video Connections ..............13
Record Connections...........................................14
Rear Panel Connection — Mono........................15
Rear Panel Connection — Stereo......................16
Troubleshooting..................................................18

2
INTRODUCTION
Congratulations on your purchase of a Motorola MDV850T Set-top
Box. The MDV850T brings a series of interactive applications for your
TV program viewing that allow you to enjoy digital TV programs with
quality sound and video at home.
This manual describes the basic features of the MDV850T and
provides several solutions for integrating the box with your current
entertainment audio and video system. Please contact your service
provider to ensure that the service is provided in your area. Your
service provider also provides instructions on optional services.
With other available applications and networks, the MDV850T can
provide hundreds of digital and analogue video channels.
If you encounter any difficulty in using this set-top box, please refer to
the related part of the manual or consult your network program
provider.
3
INTRODUCTION
Front Panel
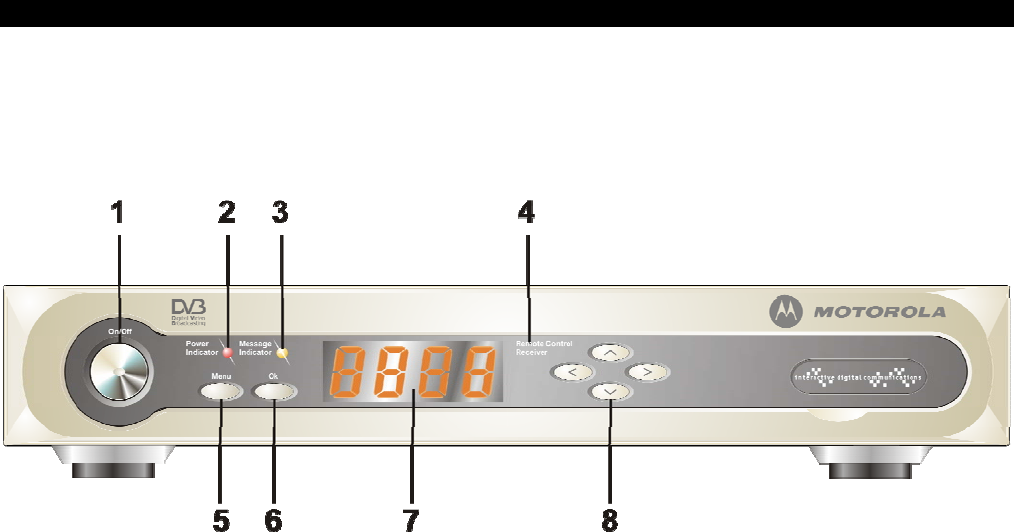
There are 7 keys and 2 indicators on the front panel of the MDV850T.
The keys perform basic functions. Each control and their possible
functions are described in the following figure and table.
4
INTRODUCTION
Functions Description
1 On/Off Enter or exit the start-up mode
2 Power Indicator Indicator, meaning the MDV850T has been started
3 Message Indicator Indicator, meaning there is a message
4 Remote Control Receiver Receives the remote control’s signal
5 Menu Press to display the Settings menu
6 Ok Used to select or cancel while editing favorites; also used to confirm a selection
7 Display Displays channel number, error message
8 Four-direction Moving Key Used to change channels and scroll through selections
5
INTRODUCTION
NOTE:
SOME UNITS MAY HAVE A DIFFERENT
BACK PANEL CONFIGURATION FROM
THE FIGURE SHOWN BELOW.
CONTACT YOUR SERVICE PROVIDER
TO ENSURE YOUR CONNECTION IS
SUPPORTED BY THE SYSTEM.
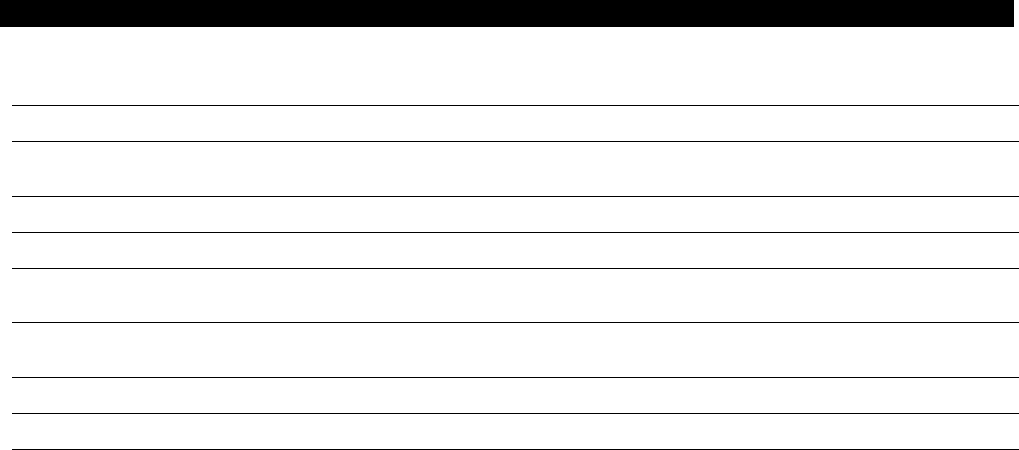
Back Panel
The MDV850T is designed to connect with several standard TV sets.
The back panel includes audio and video connectors and a Smart
Card slot. The connecting terminals and their possible functions are
described in the following figure and table.
6
INTRODUCTION
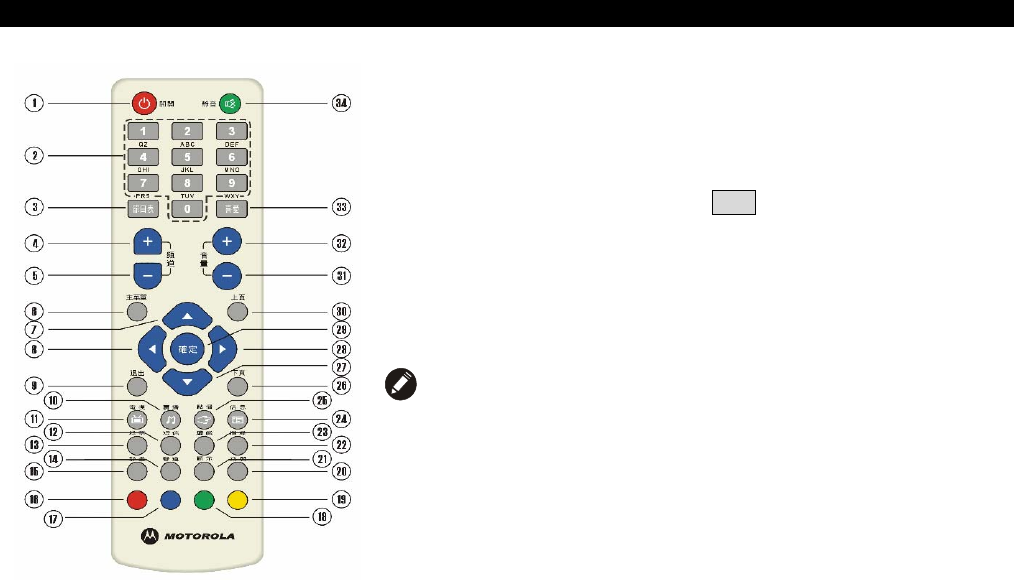
Functions Description
1 RF INPUT The coaxial input terminal provides the receiving signal from your service provider.
2 RF OUTPUT The coaxial output terminal is used to link your MDV850T to a standard TV set or a video
recorder.
3 S-terminal This is a single channel connector to provide video for your TV set or video recorder.
4 VIDEO This is a single channel video connector to provide video for your TV set or video recorder.
5 Left Sound
Channel The single channel connector is used to provide the left channel audio signal to your stereo
receiver.
6 Right Sound
Channel The single channel connector is used to provide the right channel audio signal to your stereo
receiver.
7 RS232 Port The RS232 Port is used by your service provider to offer quick solutions to you.
8 Smart Card Slot The TV service card can be inserted into this Smart Card slot.
9 Power Cord This is 2-core power cord, with which the plug is connected with the socket.
7
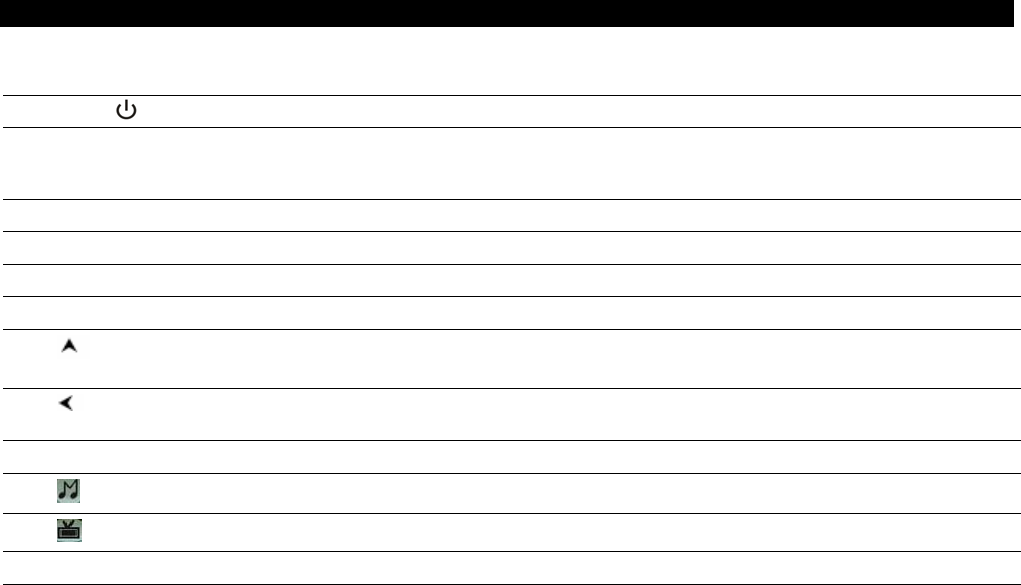
REMOTE CONTROL
The MDV850T’s remote control is specially designed to enable you
to enjoy your service. All functions of the MDV850T can be achieved
with this remote control; some functions can be realized on the front
panel of the unit as well.
When you use the menu, except when in installation and
reinstallation mode, simply press the exit key whenever you wish to
return the normal TV/Radio mode. The download of new software
which can be executed in “system update” may change some
functions of the unit.
The functions of the remote control are listed in the following table.
NOTE:
The remote control style may vary in different areas.
8
REMOTE CONTROL
Key Description
1 On/Off Enter or exit the stand-on mode.
2 Numerical Key Key-in numbers corresponding to channel 0-9. Each key also has its corresponding letters for entering
Chinese or English. The details are as follows: 1-punctuation marks (including @), 2-ABC, 3-DEF, 4-
GHI, 5-JKL, 6-MNO, 7-PQRS, 8-TUV, 9-WXYZ, 0-“__”.
3 Program Schedule Enters the program schedule of the current channel.
4 Channel + Shifts to the nearest channel higher than the current channel.
5 Channel - Shifts to the nearest channel lower than the current channel.
6 Main Menu Displays the main menu.
7 Up/Increase
Channel
Menu cursor moving and selection parameter adjustment. Shifts up or down to the next program.
8 Left/Lower
Volume Menu cursor moving and selection parameter adjustment. In the video playing or audio state, it can be
used to lower the volume.
9 Exit Exits the menu mode or returns to the information homepage in the radio mode.
10 Radio Shortcut to enter the digital radio program schedule.
11 TV Shortcut to enter the digital TV program schedule.
12 SMS Shortcut to enter TV mailbox (reserved).
13 Stock Shortcut to enter the financial and stock system.

9
REMOTE CONTROL
Key Description
14 Sound Channel Sound selection to shift between left, right, and stereo sound.
15 Screen Freezing Freeze screen/cancel screen freezing, in which the audio continues while an icon appears on
the upper right corner of the screen to indicate that the screen is frozen.
16 Red Function Key
In the TV/video/audio service mode, it displays channel and program information/supporting
functions.
17 Blue Function Key In the TV/video/audio service mode, it enters the system setup menu/supporting functions.
18 Green Function Key In the video/audio service mode, it shifts between video, audio, and your favorites/supporting
function.
19 Yellow Function
Key In the video/audio service mode, it is connected twice in two seconds to check signal
operation/supporting function.
20 Tab Returns to the upper layer of the menu to the last channel watched.
21 Display Displays information on the current program, including EPG information such as channel
name, program information, and next program. Pressing the button twice displays a brief
introduction of the current program. EPG information disappears after 5 minutes.
22 Search The search interface appears, in which a user may select to search or not. Press “ok" to
search, and “exit” not to search.
23 Game Shortcut to enter game interface (reserved).
24 Information Shortcut to enter the homepage for digital broadcasting.
10
REMOTE CONTROL
Key Description
25 VOD Shortcut to enter NVOD.
26 Page down Turns page down (previous) in the EPG menu.
27 Down/decrease
channel
Menu cursor moving and selection parameter adjustment. Shift to next program.
28 Right/increase volume Menu cursor moving and selection parameter adjustment. In the video playing or audio
state, it can be used to increase volume input.
29 OK Confirms your selection, reserved for play/pause.
30 Page up Turns to previous (back) page in the EPG menu.
31 Volume - Lowers volume in playing video or audio.
32 Volume + Increases volume in playing video or audio.
33 Favorites Enters the favorites and shifts between favorite channels, TV channel list, and radio
channel list.
34 Mute Mute/cancel mute sound function.

11
Main Service
In the watching mode, press Main Service to enter the main service
menu, which includes the following services (these may vary
depending upon your service provider): select with up/down keys and
press OK to enter; after entering, press Program + or Program – to
change to your desired channel.

12
BASIC FRONT PANEL OPERATIONS
NOTE:
Power cord’s plug should be inserted
fully into the power socket.
If the “RF output” connector of the
MDV850T is connected to the "CABLE
IN” coaxial connection of your TV set,
the TV set must be adjusted to the
output channel of the MDV850T. The
information is provided by your service
provider.
Power On/Off
Press the “On/Off” key on the front panel.
Change Channel
Press the “4-direction moving key” on the front panel of the MDV850T
to select your desired channel.

13
REAR PANEL AUDIO-VIDEO CONNECTIONS
NOTE:
NEVER PLACE ANYTHING ON
TOP OF YOUR MDV850T,
ESPECIALLY OTHER HOME
VIDEO EQUIPMENT.
THE PROPER OPERATION OF
THE MDV850T REQUIRES
SUFFICIENT VENTILATION AND
AIR FLOW TO AVOID
OVERHEATING.
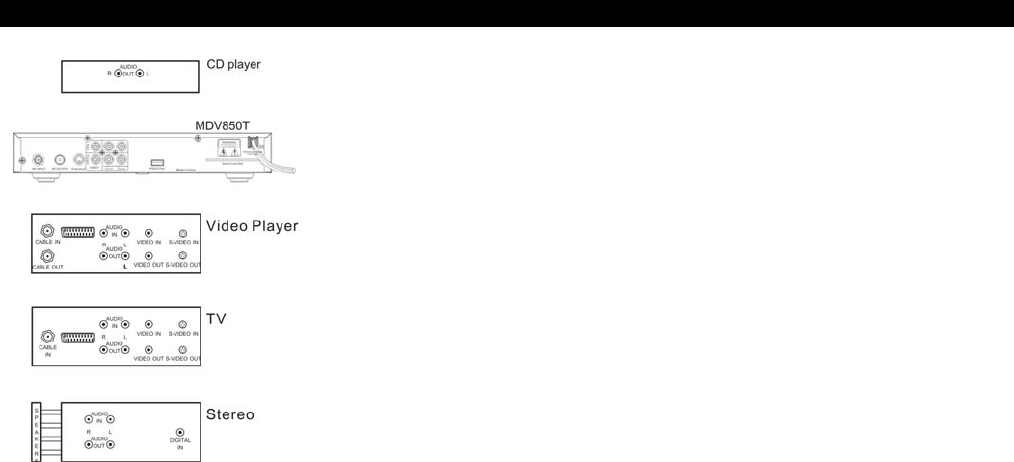
When you move or change any component of your entertainment
system, please read through the following:
• For basic cable connection, please use the equipped 75-ohm
F connector coaxial cable. (The coaxial connection between
the “RF output” terminal of the MDV850T and a standard TV
set or video recorder cannot provide the stereo effect for the
digital channel.)
• Please use the supplied cable of the single-channel connector
for the audio or video output.
• Shut off the power supply of the MDV850T prior to moving the
device or changing the cable connection.
14
RECORD CONNECTIONS
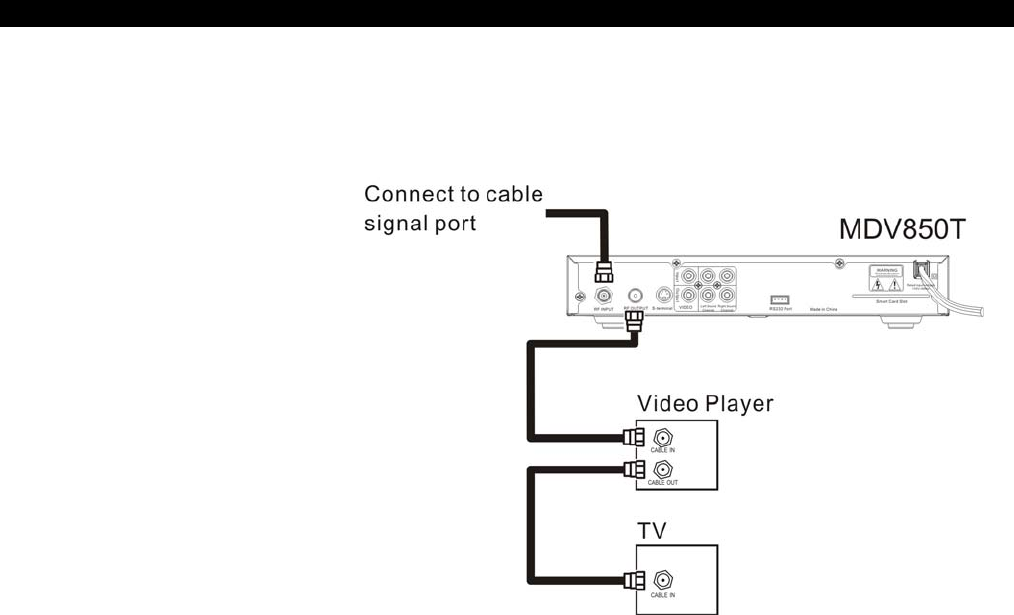
Please record the rear panel connections prior to using the
MDV850T. Prior to re-connecting the system in the future, please
refer to this connection diagram for reference.
15
REAR PANEL CONNECTION — MONO
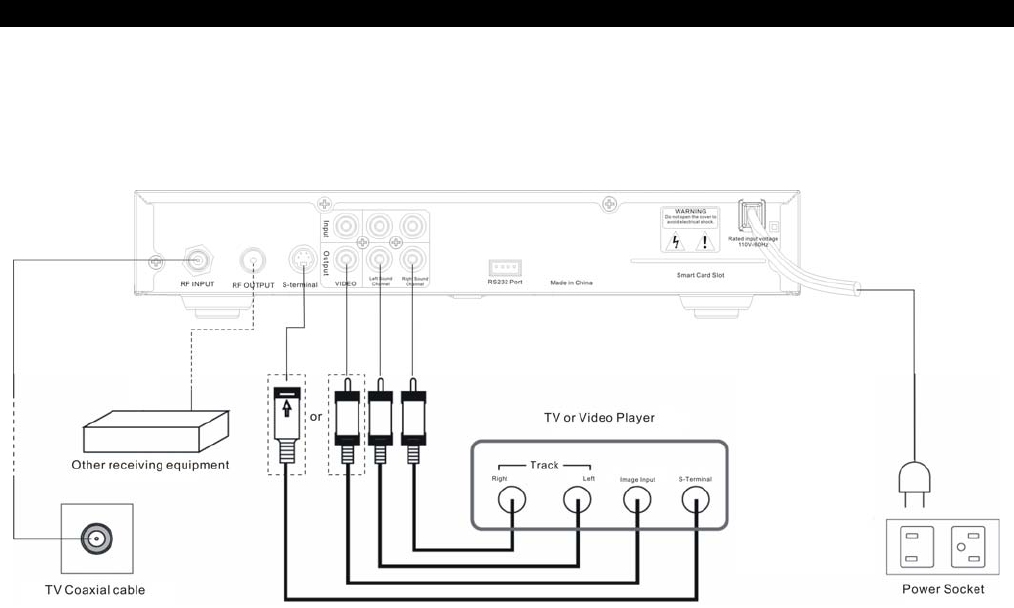
Mono
Use this connection when you connect the MDV850T to your TV set
or video player. This method only provides monophonic sound.
16
REAR PANEL CONNECTION — STEREO
Stereo
Follow this diagram when connecting a stereo TV or VCR. Link the
MDV850T to the video connector and left/right sound channel
connector of your TV set or video player.

17
TROUBLESHOOTING
Please read through the troubleshooting guidelines before calling your service provider. The information is to help
you quickly solve your problems. If they remain unsolved, please contact your service provider.
Problem Reasons Possible Solutions
No sound Pressed the “mute key” on the
remote control accidentally. Press the “mute” key on the remote control to resume the volume.
The sound selection on the stereo
equipment is set to a wrong
component.
Check to ensure the input source of the stereo equipment is
correct.
The video player output is the TV
output. If you want to watch video using your TV set, please ensure the
video player is on.
No Video The cable signal may have not been
transmitted to your house. Check to ensure all cables are connected properly and the TV set
is set to the cable TV channel designated by your service provider.
If necessary, tighten the cable TV signal cable.
The signal cable of cable TV is not
correct. If you use base band video connection, ensure the cable is
connected properly.
The video player output is in the TV
output. If you want to watch video using your TV set, please ensure the
video player is on.
The MDV850T may be receiving
software updates from your cable
TV provider.
Please wait for the completion of the download. After download,
MDV850T should return to the channel you were watching before
the download began.

18
TROUBLESHOOTING
Problem Reasons Possible Solutions
Video is unclear or
accompanied by noise. The signal cable is
disconnected or the
connection is loose.
Check the connection; if necessary, tighten the connection
manually.
Only one stereo speaker
produces sound The signal cable is
disconnected or the
connection is loose.
Check the connections; if necessary, tighten the connection
manually, or reconnect the signal cable correctly. Ensure the
signal cable is not worn, and the plug is not twisted or broken.
No Power The power cord is
disconnected. Reconnect the power cord. Ensure the power socket in which
the plug of the MDV850T is inserted always has a power
supply.
The remote control does not
work. The battery is out of power. Install fresh batteries in the remote control.
There is a barrier between
the remote control and the
cable terminal.
Make sure there is nothing blocking the signal transfer
between the MDV850T and its remote control.

20
521852-005 Rev. B
08/07
English MGBI