Motorola Mobility P56HB1 Portable Cellular/ PCS GSM/ EDGE Transceiver w/ BT User Manual Exhibit 8 Users Manual
Motorola Mobility LLC Portable Cellular/ PCS GSM/ EDGE Transceiver w/ BT Exhibit 8 Users Manual
Contents
- 1. Exhibit 8 Users Manual
- 2. Exhibit 8A Supplemental Users Manual
Exhibit 8 Users Manual

INSTRUCTION MANUAL
A preliminary draft of the User’s Manual follows this page.
The text on the following three pages will be added to the user manual.
APPLICANT: MOTOROLA,INC.
FCC ID: IHDP56HB1
EXHIBIT 8

SAR Data
Specific Absorption Rate Data
SAR Da ta
This model wireless phone meets the
government’s requirements for exposure to radio
waves.
Your wireless phone is a radio transmitter and receiver. It is
designed and manufactured not to exceed limits for exposure to
radio frequency (RF) energy set by the Federal Communications
Commission (FCC) of the U.S. Government and by the Canadian
regulatory authorities. These limits are part of comprehensive
guidelines and establish permitted levels of RF energy for the
general population. The guidelines are based on standards that
were developed by independent scientific organizations through
periodic and thorough evaluation of scientific studies. The
standards include a substantial safety margin designed to assure
the safety of all persons, regardless of age or health.
The exposure standard for wireless mobile phones employs a unit
of measurement known as the Specific Absorption Rate, or SAR.
The SAR limit set by the FCC and by the Canadian regulatory
authorities is 1.6 W/kg.
1
Tests for SAR are conducted using
standard operating positions accepted by the FCC and by Industry
Canada with the phone transmitting at its highest certified power
level in all tested frequency bands. Although the SAR is
determined at the highest certified power level, the actual SAR
level of the phone while operating can be well below the
maximum value. This is because the phone is designed to operate
at multiple power levels so as to use only the power required to
reach the network. In general, the closer you are to a wireless
base station, the lower the power output.
Before a phone model is available for sale to the public in the U.S.
and Canada, it must be tested and certified to the FCC and Industry
Canada that it does not exceed the limit established by each
government for safe exposure. The tests are performed in
positions and locations (e.g., at the ear and worn on the body)
reported to the FCC and available for review by Industry Canada.
The highest SAR value for this model phone when tested for use at
the ear is 1.02 W/kg, and when worn on the body, as described in
this user guide, is 0.85W/kg.2
While there may be differences between the SAR levels of various
phones and at various positions, they all meet the governmental
requirements for safe exposure. Please note that improvements to
this product model could cause differences in the SAR value for
later products; in all cases, products are designed to be within the
guidelines.

SAR Data
Additional information on Specific Absorption Rates (SAR) can be
found on the Cellular Telecommunications & Internet Association
(CTIA) Web site:
http://www.phonefacts.net
or the Canadian Wireless Telecommunications Association (CWTA)
Web site:
http://www.cwta.ca
1. In the United States and Canada, the SAR limit for mobile phones used
by the public is 1.6 watts/kg (W/kg) averaged over one gram of tissue.
The standard incorporates a substantial margin of safety to give
additional protection for the public and to account for any variations in
measurements.
2. The SAR information includes the Motorola testing protocol,
assessment procedure, and measurement uncertainty range for this
product.

FCC Notice
FCC Notice To Users
FCC Notice
Motorola has not approved any changes or modifications to this
device by the user. Any changes or modifications could void the
user’s authority to operate the equipment. See 47 CFR Sec. 15.21.
This device complies with part 15 of the FCC Rules. Operation is
subject to the following two conditions: (1) This device may not
cause harmful interference, and (2) this device must accept any
interference received, including interference that may cause
undesired operation. See 47 CFR Sec. 15.19(3).
If your mobile device or accessory has a USB connector, or is
otherwise considered a computer peripheral device whereby it can
be connected to a computer for purposes of transferring data, then
it is considered a Class B device and the following statement
applies:
This equipment has been tested and found to comply with the
limits for a Class B digital device, pursuant to part 15 of the FCC
Rules. These limits are designed to provide reasonable protection
against harmful interference in a residential installation. This
equipment generates, uses and can radiate radio frequency energy
and, if not installed and used in accordance with the instructions,
may cause harmful interference to radio communications.
However, there is no guarantee that interference will not occur in a
particular installation. If this equipment does cause harmful
interference to radio or television reception, which can be
determined by turning the equipment off and on, the user is
encouraged to try to correct the interference by one or more of the
following measures:
•
Reorient or relocate the receiving antenna.
•
Increase the separation between the equipment and the
receiver.
•
Connect the equipment to an outlet on a circuit different
from that to which the receiver is connected.
•
Consult the dealer or an experienced radio/TV technician
for help.

MOTOROKR E8
User’s Guide
1
HELLOMOTO
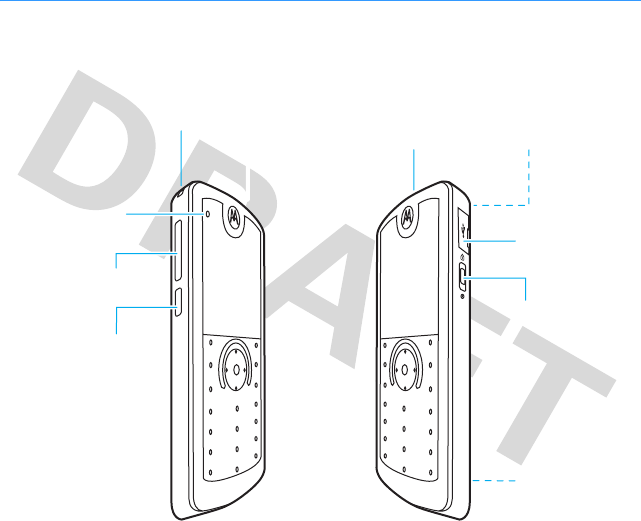
Introducing your new MOTO
ROKR™
E8 GSM wireless phone. Here’s a quick anatomy lesson.
Lanyard Hook Headset Jack
(on top of phone)
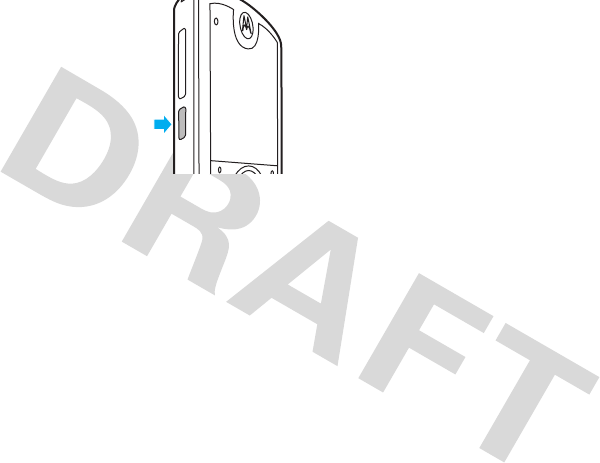
Side Select Key
Handsfree Speaker
(on back of phone)
Volume Keys
Power Key &
Lock Key
Micro-USB Port
Bluetooth
®
Indicator
Light
Camera Lens
(on back of phone)
2
Note:
This is the standard home screen and main menu layout.
Your phone’s home screen and
main menu may be different.
To change your home screen shortcuts and main menu appearance,
see your Quick Start Guide.
Service Provider 10:10
Options Main Menu
10/15/2008
Contacts
Options Back
Main Menu
Home Screen Main Menu
Press the
center key
s
to select it.
4
Press the
navigation key
S
up/down/
left/right to
scroll to a
menu feature.
3
Slide down &
hold the power
key (on the side
of your phone)
until the display
lights up, to
turn the phone
on.
1
Press the
center key
s
to open the
Main Menu
.
2

3
Motorola, Inc.
Consumer Advocacy Office
1307 East Algonquin Road
Schaumburg, IL 60196
www.hellomoto.com
1-800-331-6456 (United States)
1-888-390-6456 (TTY/TDD United States for hearing
impaired)
1-800-461-4575 (Canada)
Certain mobile phone features are dependent on the
capabilities and settings of your service provider’s
network. Additionally, certain features may not be
activated by your service provider, and/or the provider’s
network settings may limit the feature’s functionality.
Always contact your service provider about feature
availability and functionality. All features, functionality,
and other product specifications, as well as the
information contained in this user’s guide are based upon
the latest available information and are believed to be
accurate at the time of printing. Motorola reserves the
right to change or modify any information or specifications
without notice or obligation.
MOTOROLA and the Stylized M Logo are registered in the
US Patent & Trademark Office. The Bluetooth trademarks
are owned by their proprietor and used by Motorola, Inc.
under license. Java and all other Java-based marks are
trademarks or registered trademarks of Sun
Microsystems, Inc. in the U.S. and other countries.
Microsoft and Windows are registered trademarks of
Microsoft Corporation; and Windows XP and Windows
Media are trademarks of Microsoft Corporation.
Macintosh is a registered trademark of Apple Computer,
Inc. All other product or service names are the property of
their respective owners.
© Motorola, Inc. 2007.
Caution:
Changes or modifications made in the radio
phone, not expressly approved by Motorola, will void the
user’s authority to operate the equipment.
Software Copyright Notice
The Motorola products described in this manual may
include copyrighted Motorola and third-party software
stored in semiconductor memories or other media. Laws in
the United States and other countries preserve for
Motorola and third-party software providers certain
exclusive rights for copyrighted software, such as the
exclusive rights to distribute or reproduce the copyrighted
software. Accordingly, any copyrighted software
contained in the Motorola products may not be modified,
reverse-engineered, distributed, or reproduced in any
manner to the extent allowed by law. Furthermore, the
purchase of the Motorola products shall not be deemed to
grant either directly or by implication, estoppel, or
otherwise, any license under the copyrights, patents, or
patent applications of Motorola or any third-party
software provider, except for the normal, non-exclusive,
royalty-free license to use that arises by operation of law
in the sale of a product.
Manual Number: 68XXXXX229-O

4
contents
contents
Use and Care. . . . . . . . . . . . . . . . . . . . . . . . . 6
EU Conformance. . . . . . . . . . . . . . . . . . . . . . 7
essentials . . . . . . . . . . . . . . . . . . . . . . . . . . . 8
about this guide . . . . . . . . . . . . . . . . . . . . . 8
battery . . . . . . . . . . . . . . . . . . . . . . . . . . . . 8
basics. . . . . . . . . . . . . . . . . . . . . . . . . . . . . . 11
display . . . . . . . . . . . . . . . . . . . . . . . . . . . 11
text entry . . . . . . . . . . . . . . . . . . . . . . . . . 13
volume . . . . . . . . . . . . . . . . . . . . . . . . . . . 16
side select key . . . . . . . . . . . . . . . . . . . . . 17
voice commands . . . . . . . . . . . . . . . . . . . 17
talking phone . . . . . . . . . . . . . . . . . . . . . . 18
handsfree speaker . . . . . . . . . . . . . . . . . . 19
codes & passwords . . . . . . . . . . . . . . . . . 19
lock & unlock phone . . . . . . . . . . . . . . . . . 20
customize . . . . . . . . . . . . . . . . . . . . . . . . . . 21
profiles. . . . . . . . . . . . . . . . . . . . . . . . . . . 21
time & date . . . . . . . . . . . . . . . . . . . . . . . 23
themes . . . . . . . . . . . . . . . . . . . . . . . . . . 24
display appearance . . . . . . . . . . . . . . . . . 25
answer options . . . . . . . . . . . . . . . . . . . . 25
calls . . . . . . . . . . . . . . . . . . . . . . . . . . . . . . . 26
turn off a call alert . . . . . . . . . . . . . . . . . . 26
recent calls . . . . . . . . . . . . . . . . . . . . . . . 26
redial . . . . . . . . . . . . . . . . . . . . . . . . . . . . 27
return a call . . . . . . . . . . . . . . . . . . . . . . . 27
caller ID . . . . . . . . . . . . . . . . . . . . . . . . . . 27
emergency calls . . . . . . . . . . . . . . . . . . . 28
voicemail . . . . . . . . . . . . . . . . . . . . . . . . . 28
messages . . . . . . . . . . . . . . . . . . . . . . . . . . 29
text messaging . . . . . . . . . . . . . . . . . . . . 29
instant messaging . . . . . . . . . . . . . . . . . . 32

5
contents
connections. . . . . . . . . . . . . . . . . . . . . . . . . 33
file manager . . . . . . . . . . . . . . . . . . . . . . . 33
cable connections . . . . . . . . . . . . . . . . . . 34
Bluetooth® wireless . . . . . . . . . . . . . . . . 35
phone updates . . . . . . . . . . . . . . . . . . . . . 39
other features . . . . . . . . . . . . . . . . . . . . . . . 40
advanced calling . . . . . . . . . . . . . . . . . . . . 40
contacts . . . . . . . . . . . . . . . . . . . . . . . . . . 42
personalize . . . . . . . . . . . . . . . . . . . . . . . . 45
call times & costs. . . . . . . . . . . . . . . . . . . 46
handsfree . . . . . . . . . . . . . . . . . . . . . . . . . 47
network . . . . . . . . . . . . . . . . . . . . . . . . . . 48
personal organizer . . . . . . . . . . . . . . . . . . 48
security. . . . . . . . . . . . . . . . . . . . . . . . . . . 51
fun & games. . . . . . . . . . . . . . . . . . . . . . . 51
service & repairs . . . . . . . . . . . . . . . . . . . . . 52
SAR Data . . . . . . . . . . . . . . . . . . . . . . . . . . . 53
OSS Information . . . . . . . . . . . . . . . . . . . . . 54
index . . . . . . . . . . . . . . . . . . . . . . . . . . . . . . 55

6
Use and Care
Use and Care
Use and Ca re
To care for your Motorola phone, please keep it away from:
liquids of any kind dust and dirt
Don’t expose your phone to water,
rain, extreme humidity, sweat, or other
moisture. If it does get wet, don’t try
to accelerate drying with the use of an
oven or dryer, as this may damage the
phone.
Don’t expose your phone to dust, dirt,
sand, food, or other inappropriate
materials.
extreme heat or cold cleaning solutions
Avoid temperatures below 0°C/32°F
or above 45°C/113°F.
To clean your phone, use only a dry
soft cloth. Don’t use alcohol or other
cleaning solutions.
microwaves the ground
Don’t try to dry your phone in a
microwave oven.
Don’t drop your phone.
7
EU Conformance
European Union Directives Conformance Statement
EU Conformance
Hereby, Motorola declares that this
product is in compliance with:
•
The essential requirements and other relevant
provisions of Directive 1999/5/EC
•
All other relevant EU Directives
The above gives an example of a typical Product Approval
Number.
You can view your product’s Declaration of Conformity
(DoC) to Directive 1999/5/EC (to R&TTE Directive) at
www.motorola.com/rtte
. To find your DoC, enter the Product
Approval Number from your product’s label in the
“Search” bar on the Web site.
0168
Product
Approval
Number
8
essentials
essentials
about this guide
This guide shows how to locate a menu feature
as follows:
Find it:
s
>
g
Messages
>
Create Message
This means that, from the home screen:
1
Press the center key
s
to open the
menu.
2
Press the navigation key
S
to scroll to
g
Messages
, and press
s
to select it.
3
Press the navigation key
S
to scroll to
Create Message
, and press
s
to select it.
This guide uses the following symbols:
battery
battery charging
Tip:
Motorola batteries have circuitry that
protects the battery from damage from
overcharging.
Note:
You can charge your battery
by connecting a cable from your
phone’s micro-USB port to a USB
CAUTION: Before using the phone
for the first time, read the
Important Safety and Legal
Information guide included in the
box.
symbols
This means a feature is network,
SIM card, or subscription
dependent and may not be available
in all areas. Contact your service
provider for more information.
This means a feature requires an
optional accessory.

9
essentials
port on a computer. Both your phone and the
computer must be turned on, and your
computer must have the correct software
drivers installed. A Motorola Original USB cable
and supporting software may be included with
your phone. These tools are also sold
separately.
Battery Use & Battery Safety
• Motorola recommends you always
use Motorola-branded batteries and
chargers.
The warranty does not cover
damage caused by non-Motorola
batteries and/or chargers.
Caution:
Use
of an unqualified battery or charger may
present a risk of fire, explosion,
leakage, or other hazard. Improper
battery use, or use of a damaged
battery, may result in a fire, explosion,
or other hazard.
•
Battery usage by children should be
supervised.
• Important:
Motorola mobile devices
are designed to work best with
qualified batteries. If you see a
message on your display such as
Invalid Battery
or
Unable to Charge
, take the
following steps:
•
Remove the battery and inspect it
to confirm that it bears a Motorola
“Original Equipment” hologram;
•
If there is no hologram, the battery
is not a qualified battery;
•
If there is a hologram, replace the
battery and retry charging it;
•
If the message remains, contact a
Motorola Authorized Service
Center.
•
New batteries or batteries stored for a
long time may take more time to
charge.

10
essentials
• Charging precautions:
When charging
your battery, keep it near room
temperature. Never expose batteries to
temperatures below 0°C (32°F) or
above 45°C (113°F) when charging.
Always take your mobile device with
you when you leave your vehicle.
•
When storing your battery, keep it in a
cool, dry place.
•
It is normal over time for battery life to
decrease, and for the battery to exhibit
shorter runtime between charges or
require more frequent or longer
charging times.
• Avoid damage to battery and mobile
device.
Do not disassemble, open,
crush, bend, deform, puncture, shred,
or submerge the battery or mobile
device. Avoid dropping the battery or
mobile device, especially on a hard
surface. If your battery or mobile device
has been subjected to such
damage, take it to a Motorola
Authorized Service Center before
using. Do
not
attempt to dry it with an
appliance or heat source, such as a hair
dryer or microwave oven.
• Use care when handling a charged
battery
—particularly when placing it
inside a pocket, purse, or other
container with metal objects. Contact
with metal objects (such as jewelry,
keys, beaded chains) could complete an
electrical circuit (short circuit), causing
the battery to become very hot, which
could cause damage or injury.
Promptly dispose of used batteries in
accordance with local regulations.
Contact your local recycling center for
proper battery disposal.
Warning:
Never dispose of batteries in a fire
because they may explode.
11
basics
basics
display
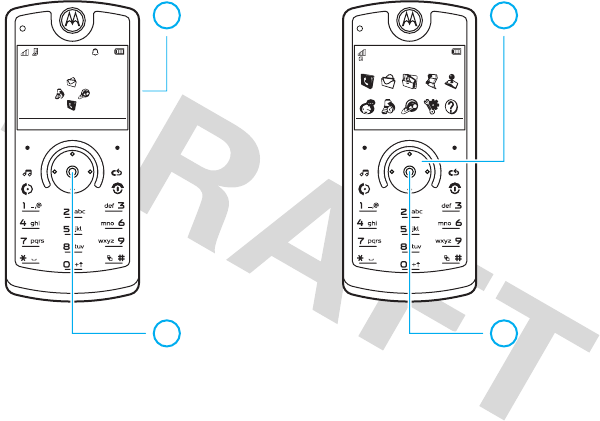
The home screen appears when you turn on
the phone.
Note:
Your home screen may look different,
depending on your service provider.
To dial a number from the home screen, press
number keys and
N
.
Press the center key
s
or the
Main Menu
soft key to open the main menu.
Press
Options
in the home screen to change the
alert profile, send a message, change the
wallpaper, create a contact, or find a
Bluetooth® device.
Press the navigation key
S
up, down, left, or
right in the home screen to open basic
features. To show, hide, or change feature icons
in the home screen, see your Quick Start
Guide.
Tip:
Want some help? Press
Main Menu
>
V
Help
.
Select a
Help
topic to find information about
phone features.
DateClock
Left Soft
Key Label
Right Soft
Key Label
Service Provider 10:10
Options Main Menu
Feature
Icons
10/15/2008
12
basics
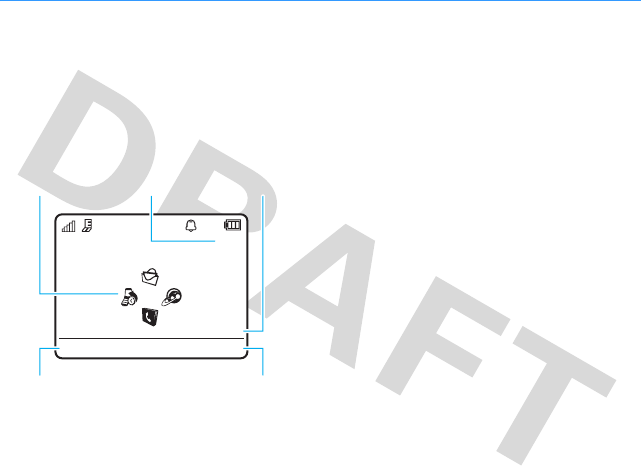
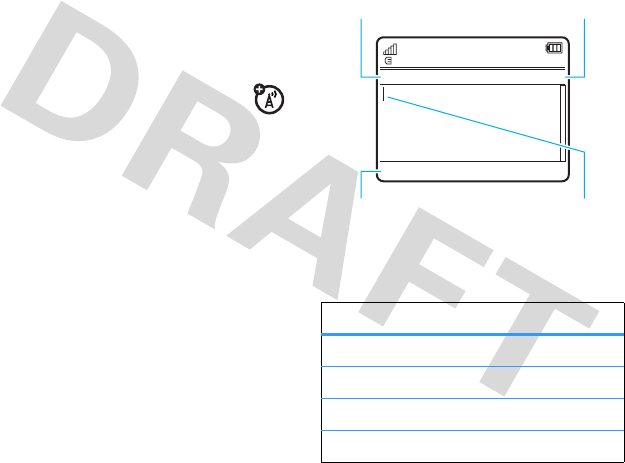
Status indicators appear at the top of the home
screen:
1Signal Strength Indicator –
Show the
strength of the wireless network
connection.
2EDGE/GPRS Indicator –
Shows
when your phone is using a
high-speed Enhanced Data for GSM
Evolution (EDGE) network connection
Z
,
or General Packet Radio Service (GPRS)
network connection
g
.
3Bluetooth Indicator –
Shows Bluetooth
status:
4Messaging Presence Indicator –
Shows your instant messaging (IM)
status:
5IM Indicator –
Shows when you
receive a new IM message.
6Message Indicator –
Shows when
you receive a new text or voice
message. Other indicators can include:
7Location Indicator –
Shows
P
when your phone is providing
location information to the network, or
Q
when location information is turned off.
&
(solid blue) = Bluetooth powered on
&
(solid green) = Bluetooth connected
&
(flashing blue) = Bluetooth
discoverable mode
210613 9
8
45 7
0
(green) = online
2
= offline
Y
= busy
4
= discrete
3
(gray) = invisible to
IM
V
= email
message
(
= voicemail
message
13
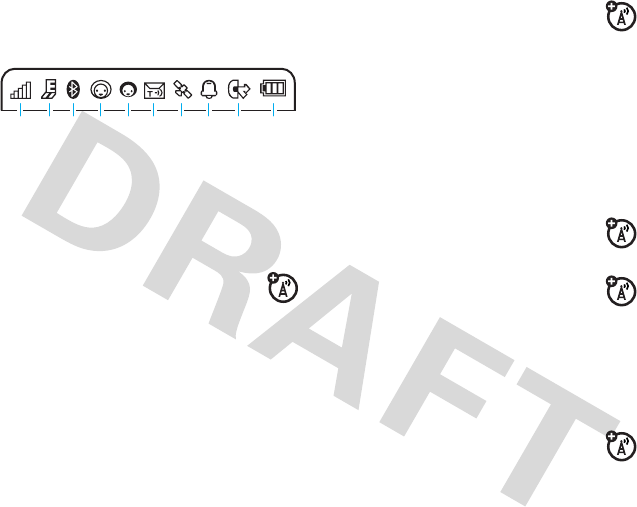
basics
8Profile Indicator –
Shows the alert profile
setting:
9Active Line Indicator –
Shows
B
to indicate an active call, or
E
to
indicate when call forwarding is on.
10 Battery Level Indicator –
Vertical bars
show the battery charge level. Recharge
the battery when your phone shows
Low Battery
.
text entry
Some features let you enter text.
N
= ring only
K
= ring and vibrate
H
= vibrate
only
I
= vibrate then
ring
J
= silent
text entry modes
Ê
“word” mode (see page 14)
É
“abc” mode (see page 15)
È
numeric mode (see page 16)
Ã
symbol mode (see page 16)
Character Counter
Press
#
to select a
text entry mode.
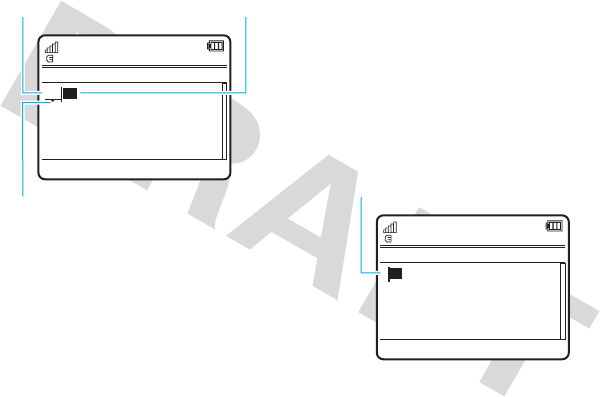
Flashing cursor
indicates insertion
point.
Change text entry
options.
Options Send To
Create Message
SMS:0
ÊË

14
basics
To
change
your global text entry settings or
languages:
Find it:
s
>
u
Settings
>
Phone Settings
>
Text Entry
Change text case:
In a text entry screen, press
0
to change text case to all capital letters
(
Ä
), next letter capitalized (
Í
), or next letter
lowercase (no symbol).
Set word learning:
Your phone can learn the
words you enter, to improve text prediction and
completion. In a text entry screen, press
Options
>
Text Entry
>
Set Text Prediction
>
Learn My Words
. Your
phone shows
Ç
when word learning is active.
Set text completion:
Set your phone to
complete words based on the characters you
enter. In a text entry screen, press
Options
>
Text Entry
>
Set Text Prediction
>
Offer Completions
. Your
phone shows
Æ
when text completion is
active.
Enter punctuation:
In a text entry screen,
press and hold
*
to enter punctuation or
other characters.
Edit or delete text:
In a text entry screen,
press
S
to move the cursor to the right of
text you want to edit. Press the
clear/back key
D
to delete the character left
of the cursor. Hold
D
to delete word by word.
word mode
Press
#
in a text entry screen to switch to
“word” predictive text entry mode. Your phone
shows
Ê
in the display.
Word mode lets you enter words using one
keypress per letter. The phone predicts each
word as you enter it.
15
basics
For example, if you press
7
7
6
4
,
your display might show:
Tip:
Need to enter a symbol or punctuation in
word mode? Press and hold
*
to see and
choose from a list of available symbols.
abc mode
Press
#
in a text entry screen to switch to
“abc” text entry mode. Your phone shows
É
in the display.
To enter text, press a keypad key repeatedly to
cycle through the letters and number on the
key. Repeat this step to enter each letter.
For example, if you press
7
one time, your
display might show:
Options Send To
Create Message
SMS:4
ÊÆ
Prog ram
You can turn text
completion on (
Æ
)
or off (
Ç
).
Press
D
to delete
character to left of
cursor.
Press
*
to enter
Prog
& a space.
Press
S
up/down
to see other words.
Press
s
to select
a word.
Options Send To
Create Message
SMS:1
ÉÆ
P rog
Character displays at
insertion point.
After two seconds, the character is
accepted and the cursor moves to
the next position.

16
basics
When text completion is activated, your phone
tries to guess the rest of the word:
•
Press
s
to select the suggested
word.
•
Press
S
right to enter the suggested
word and a space.
•
If you want a different word, press
keypad keys to enter the remaining
letters.
numeric mode
Press
#
in a text entry screen until you see
È
. Press the number keys to enter the
numbers you want.
Tip:
Just need one number? To enter a number
quickly, press and hold a number key until the
number appears.
symbol mode
Press
#
in a text entry screen until you see
Ã
. The display shows the symbol associated
with each keypad key. Press
S
up/down
repeatedly to see different symbols. To insert a
symbol, press its key, or scroll to it and
press
s
.
volume
Press the volume keys
to:
•
turn off an
incoming call
alert
•
change
earpiece or
speakerphone volume during a call
•
change playback volume for a song or
video
•
change radio volume
•
set your phone’s alert profile in the
home screen (press the volume keys to
scroll to a profile, then press
s
or
side select key to select it)
17
basics
side select key
The side select key
gives you another way
to do things. For
example, when you
scroll to a menu item,
you can press the side
select key to select it
(instead of pressing
s
).
voice commands
You can use voice commands to tell your phone
what to do.
Note:
Not all languages support voice
commands.
voice dial a call
You can dial a contact list entry by speaking its
name, or dial any phone number by speaking its
digits.
1
Press and hold
N
. The phone loads the
voice recognition software, then prompts
you to say a command or name.
2
Wait for the beep, then say the name of an
entry as it appears in your contact list. Your
phone confirms the name and makes the
call.
or
Say “Dial Number.” Your phone prompts
you to speak the digits in the phone
number. Speak the digits. Your phone
confirms the number and makes the call.
Tips:
•
You can say a contact’s name and
number type together. For example,
say “John Smith mobile” to call the
mobile number stored for John Smith.
•
For voice command help, press and
hold
N
, then press
Help
.

18
basics
voice activate phone functions
You can use voice commands to open
applications and perform many basic phone
functions.
1
Press and hold
N
. The phone prompts
you to say a command.
2
Wait for the beep, then say a command
from the list.
Tip:
Press and hold
N
to see the list of voice
commands.
talking phone
You can set your phone to recite incoming caller
ID information, read the names of menu
features or contact list entries, read messages
you receive, and provide audio feedback for
phone functions.
Find it:
s
>
u
Settings
>
Phone Settings
>
Talking Phone
voice commands
“
<Name>
”
“
Dial Number
”
“
Send Message To <Name>
”
“
Check Calendar
”
“
Check New Message
”
“
Check New Email
”
“
Add New Contact
”
“
Talking Phone
”
“
Check Battery
”
“
Check Signal
”
“
Check Time
”
“
Check Date
”
“
Open Setup
”
“
Open Recent Calls
”
“
Open Theme
”
“
Open Camera
”
“
Open Web Access
”
“
Set Normal
”
“
Set Vibrate
”
“
Set Silent
”
“
Set Ring
”
“
Set Airplane
”
“
Set Airplane Off
”
voice commands

19
basics
Shortcut:
Press and hold
N
. When the
phone prompts you to say a command, say
“Talking Phone.”
handsfree speaker
During a call, press
Options
>
Speaker On
to turn the
handsfree speaker on. Your display shows the
speakerphone indicator until you turn it off
(press
Options
>
Speaker Off
) or end the call.
Note:
The use of wireless phones while driving
may cause distraction. Discontinue a call if you
can’t concentrate on driving. Additionally, the
use of wireless devices and their accessories
may be prohibited or restricted in certain areas.
Always obey the laws and regulations on the
use of these products.
codes & passwords
Your phone’s four-digit
unlock code
is originally
set to
1234
. The six-digit
security code
is
originally set to
000000
. If your service provider
didn’t change these codes, you should change
them:
Find it:
s
>
u
Settings
>
Security
>
Change Passwords
You can also change your
SIM PIN
codes or call
barring password.
If you forget your unlock code:
At the
Please verify the Unlock Code
prompt, try entering 1234
or the last four digits of your phone number. If
that doesn’t work, press
#
to enter your
six-digit security code instead.
If you forget other codes:
If you forget your
security code, SIM PIN code, PIN2 code, or call
barring password, contact your service
provider.

20
basics
lock & unlock phone
You can lock your phone to keep others from
using it. To lock or unlock your phone, you need
the four-digit unlock code.
To
manually lock
your phone:
Find it:
s
>
u
Settings
>
Security
>
Phone Lock
>
Lock Now
To
automatically lock
your phone whenever
you turn it off:
Find it:
s
>
u
Settings
>
Security
>
Phone Lock
>
Lock at Power On
>
On

21
customize
customize
profiles
You can quickly change your phone’s alert style
or profile to match your activity or environment.
Each profile uses a different set of ringtones or
vibrations for incoming calls and other events.
The alert profile indicator shows at the top of
the home screen (see indicators on page 13).
To change your profile:
From the home
screen, press the volume keys on the side of
your phone. Alternatively, from the home
screen press
Options
>
Change Alert Style
or
Change Profile
.
The
Silent
profile silences your phone until you
set another profile.
Shortcut:
From the home screen, press and
hold
#
to quickly set the profile to
Vibrate Only
.
change alert style settings
You can change the ringtones that a standard
alert style uses to notify you of incoming calls
and other events. Additionally, you can change
the alert style’s ring volume, keypad tone
volume, and media playback volume settings.
For dual-line-enabled SIM cards, you can set
different ringtones to identify incoming calls on
line 1 or line 2.
Note:
You can’t edit the
Silent
alert style, or
change some settings for some alert styles.
Find it:
s
>
u
Settings
>
Profiles
>
Alert Style
> alert style
1
Press
S
left/right to select the
alerts
tab
[
,
volume
tab
i
,
messages
tab
]
,
or
settings
tab
#
.
N
Ring Only
K
Ring and Vibrate
H
Vibrate Only
I
Vibrate then Ring
J
Silent

22
customize
2
Press
S
up/down to scroll to the alert or
volume setting you want to change, then
press
s
.
3
Select the setting value you want.
4
Press
Back
to exit and save your changes.
To
reset
the default settings for all alert styles:
Find it:
s
>
u
Settings
>
Profiles
, press
Options
>
Reset
create a new profile
To create a
new
profile with the ringtones and
volume settings you specify:
Find it:
s
>
u
Settings
>
Profiles
>
Alert Style
> alert style
1
Change alert style settings as described in
the previous section.
2
Press
Options
>
Save as Profile
.
3
Enter a name for the profile, then press
Save
to save it.
To c r e a t e
additional
profiles:
Find it:
s
>
u
Settings
>
Profiles
, press
Options
>
Create Profile
Note:
Profile alert settings also can be set by
the theme. When you apply a new theme, you
can choose to apply the theme’s alert settings
to the current profile. Selecting this option
changes
the current profile to use the theme
alert settings.
edit or delete profiles
To
edit
a profile:
Find it:
s
>
u
Settings
>
Profiles
, scroll to the
profile, press
Options
>
Edit
Note:
You can’t edit the
Silent
profile, or change
some settings for some profiles.
To
delete
a user-defined profile:
Find it:
s
>
u
Settings
>
Profiles
, scroll to the
profile, press
Options
>
Delete

23
customize
restore alert style settings
To delete all user-defined profiles and restore
your phone’s original alert style settings:
Find it:
s
>
u
Settings
>
Profiles
, press
Options
>
Restore Sound Settings
time & date
Your phone can automatically update the time
and date. It uses the time and date for the
Calendar
.
To
synchronize
time and date with the
network:
Find it:
s
>
u
Settings
>
Phone Settings
>
Time & Date
>
Auto-Update Time
>
On
To
manually
set the time and date:
Find it:
s
>
u
Settings
>
Phone Settings
>
Time & Date
>
Auto-Update Time
>
Off
, then scroll to
and select
Time
and
Date
To adjust time and date, press
S
left/right to
scroll to a setting, then press
S
up/down to
change it. Press
Set
to save your settings.
To show a
12-hour or 24-hour
digital clock in
the home screen:
Find it:
s
>
u
Settings
>
Phone Settings
>
Time & Date
>
Time Format
>
12 Hour Clock
or
24 Hour Clock
To set the
date format
in the home screen:
Find it:
s
>
u
Settings
>
Phone Settings
>
Time & Date
>
Date Format
To set your
time zone
:
Find it:
s
>
u
Settings
>
Phone Settings
>
Time & Date
>
Time Zone
, then select a city in your
time zone
Shortcut:
Press keypad keys to enter the first
letters of the city you want.

24
customize
themes
Use a phone theme to personalize the
look and sound of your phone. Most
themes include a wallpaper image, screensaver
image, and ringtones.
To
apply
a theme:
Find it:
s
>
u
Settings
>
Themes
> theme
To
download
a theme using your phone’s
browser, see your Quick Start Guide.
To
delete
a theme:
Find it:
s
>
u
Settings
>
Themes
, scroll to the
theme, then press
Options
>
Manage
>
Delete
Note:
You can delete only downloaded themes
or custom themes you create.
modify a theme
Find it:
s
>
u
Settings
>
Themes
, scroll to the
theme, press
Options
>
Edit
1
Press
S
left/right to select the
sounds
tab
[
or
images
tab
$
.
2
Press
S
up/down to scroll to the setting
you want to change, then press
s
.
3
Scroll to the image or sound file you want,
then select it.
4
Press
Save
to save your theme changes.
The
Wallpaper
appears as a background image in
your home screen.
The
Screensaver
appears in the display after a
specified period of inactivity.
Skins
set the look and feel of your phone’s
display.
To
reset
the standard settings for a modified
theme:
Find it:
s
>
u
Settings
>
Themes
> theme,
press
Options
>
Manage
>
Reset
To
restore
the default theme on your phone:
Find it:
s
>
u
Settings
>
Themes
, press
Options
>
Manage
>
Restore to Default
create a new theme
Find it:
s
>
u
Settings
>
Themes
, press
Options
>
Create Theme
or
Create a Copy
25
customize
display appearance
To set your display
brightness
:
Find it:
s
>
u
Settings
>
Phone Settings
>
Display Settings
>
Brightness
To save battery life, the
display
can turn off
when you’re not using your phone. To set the
display timeout delay interval:
Find it:
s
>
u
Settings
>
Phone Settings
>
Display Settings
>
Display Timeout
To turn the display
screensaver
on or off:
Find it:
s
>
u
Settings
>
Phone Settings
>
Display Settings
>
Screensaver
>
On
or
Off
Tip:
To extend battery life, turn off the
screensaver.
answer options
You can use different ways to answer an
incoming call. To turn on or turn off an answer
option:
Find it:
s
>
u
Settings
>
Call Settings
>
In-Call Setup
>
Answer Options
Note:
You always can press
N
to answer a
call.
option
Any Key Answer
Answer by pressing any key.

26
calls
calls
turn off a call alert
Press the volume keys on the side of your
phone to turn off the ringer before answering a
call.
recent calls
Your phone keeps lists of incoming and
outgoing calls, even for calls that didn’t
connect. The most recent calls are listed first.
The oldest calls are deleted as new calls are
added.
Shortcut:
Press
N
in the home screen to see
the
Dialed Calls
list, then press
S
left/right to see
the other call lists.
Find it:
s
>
q
Recent Calls
1
Press
S
left/right to select a call list:
All Calls
,
Dialed Calls
,
Answered Calls
,
Missed Calls
, or
Frequent Calls
.
2
Press
S
up/down to scroll to a phone
number.
Icons indicate if the call was incoming
-
,
outgoing
+
, or missed
=
. A check mark next
to the icon indicates a connected call.
•
To call the number, press
N
.
•
To see call details (like time and date),
press
s
.
•
Press
Options
to perform other operations
on the number (send a message, save
to contacts), or to set recent call
options.

27
calls
redial
1
Press
N
from the home screen to see
the
Dialed Calls
list.
2
Scroll to the number you want to call, then
press
N
.
If you hear a
busy signal
and see
Call Failed
, press
N
or
Retry
to redial the
number. When the call goes through, your
phone shows
Connected
and connects the call.
return a call
Your phone keeps a record of your unanswered
calls, and shows
X Missed Calls
, where
X
is the
number of missed calls.
When you see the
X Missed Calls
message, press
s
to see the
Missed Calls
list. Scroll to the call
you want to return, then press
N
.
caller ID
Calling line identification (caller ID)
shows the phone number for an
incoming call in your phone’s display.
Your phone shows the caller’s name and picture
when they’re stored in your contact list, or
Incoming Call
when caller ID information isn’t
available.
Note:
Picture IDs aren’t available for contacts
stored on the SIM card.
Tip:
Want to know who’s calling without even
looking at your phone? To give one of your
contacts a special ringtone, see page 43.
To show or hide your phone number for the
next outgoing call, enter the number you want
to call, then press
Options
>
Show ID
or
Hide ID
.
To show or hide
your phone number
for all
calls:
Find it:
s
>
u
Settings
>
Call Settings
>
Dialing Setup
>
My Caller ID
>
All Calls
>
Show ID
or
Hide ID

28
calls
emergency calls
Your service provider programs one or more
emergency phone numbers, such as 911 or
112, that you can call at any time, even when
your phone is locked or the SIM card is not
inserted.
Note:
Check with your service provider, as
emergency numbers vary by country. Your
phone may not work in all locations, and
sometimes an emergency call cannot be placed
due to network, environmental, or interference
issues. Do not solely rely on your wireless
phone for essential communications such as
medical emergencies.
To make an emergency call:
Turn your phone
on, exit any open application such as games,
dial the emergency number, then press the
send key
N
to call the emergency number.
voicemail
Your network stores the voicemail
messages you receive. To listen to your
messages, call your voicemail number.
Note:
Your service provider may include
additional information about using this feature.
When you
receive
a voicemail message, your
phone display shows
New Voicemail
and the new
message indicator
U
.
To
check
voicemail messages:
Find it:
s
>
g
Messages
>
Call Voicemail
Shortcut:
Your service provider may store your
voicemail phone number in speed dial
location #1. If so, you can press and hold
1
in
the home screen to listen to your voicemail
message(s).

29
messages
messages
text messaging
send a message
A message can contain text and
pictures, sounds, or other media
objects. You can add multiple pages to a
message and put text and media objects on
each page. You can send a message to other
compatible phones or to email addresses.
Find it:
s
>
g
Messages
>
Create Message
1
Press keypad keys to enter text on the
page (for more information about text
entry, see page 13).
To insert a
picture, sound, or other
media object
on the page, press
Options
>
Insert
. Select the file type and the file.
(
Note:
File size restrictions may apply to
pictures and videos sent in a message.)
To insert
another page
, press
Options
>
Insert
>
Page
. You can enter more text and objects
on the new page.
2
When you finish the message, press
Options
>
Sending Options
to set message options
(such as
Subject
and
Priority
).
3
When you finish setting message options,
press
Done
.
4
Press
Send To
to select message recipients.
Yo u c a n :
•
Select one or more entries from your
contact list (press
S
to scroll to an
entry, and press
s
to select it).
•
Enter a new number or email address
(press
Options
>
Enter Number
or
Enter Email
).
5
Press
Send
to send the message.
Your phone might tell you that this is a
multimedia message, if it contains multiple
pages or media objects. Some phones or
30
messages
networks don’t support multimedia
messages. Press
Yes
to send the message.
To save or cancel the message, press
Options
>
Save to Drafts
or
Cancel Message
.
receive a message
When you receive a message, your
phone plays an alert, and the display
shows
New Message
with the new message
indicator
U
.
To
read
the message, press
View
. If the
message contains media objects:
•
Pictures and animations show as you
read the message.
•
Sound files play as you read the
message. Press the volume keys on
the side of your phone to change the
sound volume.
•
Attached files are added to the end of
the message. To open an attachment,
select the file indicator or file name.
To
answer
the message, press
Options
>
Reply
.
advanced message & email
features
features
send a prewritten quick note
s
>
g
Messages
>
Templates
>
Text Templates
> quick note, press
Options
>
Send
To create a new quick note:
s
>
g
Messages
>
Templates
>
Text Templates
,
press
Options
>
Create Template
set up email accounts
You can set up and use multiple email
accounts on your phone:
s
>
g
Messages
>
Email
>
Add Account
Note:
Your display shows a separate folder
for each email account.
send email
s
>
g
Messages
>
Email
31
messages
use a multimedia template
Open a multimedia template with
pre-installed media:
s
>
g
Messages
>
Templates
>
Multimedia Templates
read new message or email
When your display shows
New Message
,
press
Read
.
read old messages
s
>
g
Messages
>
Inbox
Icons next to each message show if it is
read
>
,
unread
]
,
urgent
<
, or has an
attachment
*
. Press
Options
to perform
various operations on a message.
read old email
s
>
g
Messages
>
Email
Press
Options
to perform various operations on
a message.
features
store message objects
Go to a multimedia message page,
then press
Options
>
Store
.
create folder
Create a personal folder to store your
messages.
s
>
g
Messages
>
My Folders
, press
Options
>
Create Folder
browser messages
Read messages received by your
browser:
When your display shows
New Message
, press
View
.
To activate browser messages and adjust
browser message settings:
s
>
g
Messages
, press
Options
>
Settings
>
Browser Messages
features
32
messages
instant messaging
Use instant messaging to share
messages with your friends in real time.
Find it:
s
>
a
IM
, scroll to your IM
account, press
Log In
If you don’t have an IM account, select
[New Account]
to create one.
To
find others
online, select
Contact List
to see a
list of other users.
To
start a conversation
, scroll to a name in the
Online Contacts
list and press
Send IM
.
To
open an active conversation
, scroll to a
name in the
Conversations
list and press
View
.
To end a conversation, press
Options
>
End Conversation
.
To
log out
from your instant messaging
session, press
Options
>
Log Out
.
create or edit an IM account
To create a new IM account:
Find it:
s
>
a
IM
>
[New Account]
To edit an existing IM account:
Find it:
s
>
a
IM
, scroll to an account,
press
Options
>
Edit Account
info services
Read subscription-based information
services messages:
When your display shows
New Message
, press
View
.
To activate information services and adjust
info services settings:
s
>
g
Messages
, press
Options
>
Settings
>
Info Services
features

33
connections
connections
file manager
Manage music and sound files, photos, videos,
and other files stored on your phone, and on an
optional removable microSD memory card.
Find it:
s
>
m
Office Tools
>
File Manager
Select a folder or
Memory Card
to see its contents.
To
play
a sound file or voice note, or
view
a
photo or video, just scroll to the file and select
it.
To
edit
a file: Scroll to the file and press
Options
>
Manage
to copy, move, or rename it. Other
options let you delete, send, or apply the file.
You can’t perform some operations on some
copyrighted or pre-installed files.
To
copy files
between your phone and a
computer, you can use a cable connection (see
following section) or a Bluetooth® connection
(see page 36).
format memory card
To
format
the memory card or see memory
card
properties
(such as name and available
memory):
Find it:
s
>
m
Office Tools
>
File Manager
1
Press
S
to scroll to the memory card.
2
Press
Options
>
Memory Card
>
Format
or
Properties
.
move or copy files between
the phone and memory card
Caution:
When you
move
a file to a new
location, the file is
deleted
from its original
location.
Find it:
s
>
m
Office Tools
>
File Manager
1
Scroll to the file you want to move or copy.
34
connections
2
Press
Options
>
Manage
>
Move
or
Copy
.
Note:
The
Move
and
Copy
options do not
appear if the file is copyright-protected.
3
Scroll to the destination location, then
press
Place
.
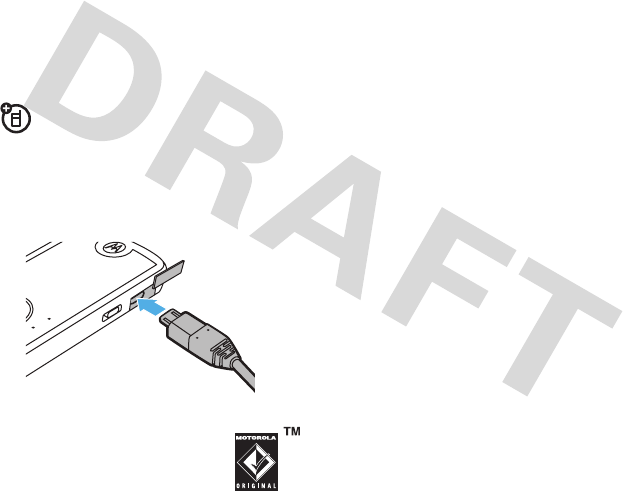
cable connections
To transfer data between your phone
and a computer, insert the micro-USB
port connector plug from a USB cable into your
phone’s micro-USB port. Connect the other end
of the cable to the computer.
Note:
A Motorola Original USB
cable and supporting software may
be included with your phone.
These tools are also sold separately. Check your
computer to determine the type of cable you
need.
To use your phone as a
modem
: Use the
modem connection setting on your phone
(press
s
>
u
Settings
>
Connections
>
USB Setting
>
Modem
). Connect your phone to the computer.
To
transfer contact lists and calendar entries
between your phone and computer: Run the
optional Motorola Phone Tools accessory
application on your computer. The Phone Tools
software automatically switches your phone to
the proper connection setting required to sync
your phone. See the Phone Tools user’s guide
for more information.
To ma k e
data calls
through a computer: Use
the modem connection setting on your phone
(press
s
>
u
Settings
>
Connections
>
USB Setting
>
Modem
). Connect your phone to the computer.
Use the computer application to place or
answer the call.
To create a
new data connection
on your
phone, press
s
>
u
Settings
>
Connections
>
Data Connections
>
Add a Connection
).

35
connections
To
transfer files
between your phone and
computer, see the instructions for manually
transferring music files to the phone in your
Quick Start Guide.
To
print
an image over a USB PictBridge
connection: Use the print connection setting on
your phone (press
s
>
u
Settings
>
Connections
>
USB Setting
>
USB Printing
). Connect your phone to
a PictBridge-compatible printer. Select the
image(s) you want to print, then press
Options
>
Print via
>
USB
.
Bluetooth® wireless
Your phone supports Bluetooth wireless
connections. You can connect your
phone with an optional Bluetooth headset or
Bluetooth car kit to make handsfree calls, or
with a set of Bluetooth stereo headphones to
listen to music stored on your phone. Connect
your phone with a device that supports
Bluetooth connections to exchange files,
connect with a printer that supports Bluetooth
connections to print images, or use your phone
as a Bluetooth wireless modem to connect to
the Internet.
For maximum Bluetooth security
, you should
always connect Bluetooth devices in a safe,
private environment.
turn Bluetooth power on or off
Your phone automatically turns Bluetooth
power on when you use a Bluetooth feature.
To turn Bluetooth power on or off at any time:
Find it:
s
>
u
Settings
>
Connections
>
Bluetooth
,
press
Options
>
Setup Bluetooth
>
Bluetooth Power
>
On
Note:
To extend battery life and maximize
Bluetooth security, use this procedure to set
Bluetooth power to
Off
when not in use. Your
phone will not connect to another device until
you use a Bluetooth feature again, or set
Bluetooth power back to
On
.

36
connections
use a Bluetooth headset or
handsfree car kit
Before you try to connect your phone to a
handsfree device for the first time
, make
sure the device is
on
and
ready
in pairing or
bonding mode (see the device user’s guide).
You can connect your phone with only one
device at a time.
Find it:
s
>
u
Settings
>
Connections
>
Bluetooth
,
press
Options
>
Search For Device
>
Headset
Your phone lists the Bluetooth audio devices it
finds within range.
1
Scroll to a device in the list.
2
Press
s
to connect with the highlighted
device.
copy files to another device
You can copy a media file, contact, calendar
event, or bookmark to another phone or
computer that supports Bluetooth connections.
Note:
You can’t copy some copyrighted
objects.
Before you try to copy a file to another
device
, make sure the receiving device is
on
and
ready
in discoverable mode. Also, make
sure the device is not busy with another
Bluetooth connection.
1
On your phone, scroll to the object that you
want to copy to the other device.
2
Press
Options
, then select:
•
Send To
>
Bluetooth
for an image or sound
file.
•
Share
> contact >
Bluetooth
for a contact.
•
Share Via
>
Bluetooth
for a calendar event or
bookmark.
3
Select a recognized device name.
or
Select
[Search For Devices]
to search for new
devices, then select the device where you
want to copy the object.
4
Press
Options
>
Send
.

37
connections
5
If necessary, enter a mutually agreed upon
passkey (such as
0000
) on your phone and
the device, then press
OK
to connect to the
device.
receive files from another
device
Before you try to receive a file from another
device
, make sure your phone’s Bluetooth
power is
on
(see page 35).
Place your phone within range (approximately
10 meters/30 feet) of the other Bluetooth
device, and send the file from the device.
If your phone and the sending device were not
previously paired, place your phone in
discoverable mode so the sending device can
locate it. Press
s
>
u
Settings
>
Connections
>
Bluetooth
, press
Options
>
Discoverable On 3 Minutes
.
The Bluetooth indicator
&
in the home screen
flashes when your phone is in discoverable
mode.
Your phone notifies you when file transfer is
complete and saves the file.
send a photo to a printer
You can send a photo to a printer that supports
Bluetooth connections.
Note:
You can print A4, US Letter, and 4x6 size
pages. To print another size, copy the image to
a linked computer and print it from there.
1
On your phone, take a new photo or scroll
to a stored image that you want to print,
then press
Options
>
Print via
>
Bluetooth
.
Note:
If you see
Service Not Supported
when you
try to print, select
Send To
>
Bluetooth
instead.
(The
Send To
option does not print the image
name or date stamp.)
2
Select a recognized printer name, or press
Options
>
Search For Printers
to search for another
printer where you want to send the image.
3
If available, modify print options.
38
connections
advanced Bluetooth features
Note:
A device is recognized after you connect
to it once (see page 36).
features
pair with recognized device
Press
s
>
u
Settings
>
Connections
>
Bluetooth
, press
S
left to select the
My Devices
tab, press
S
up/down to scroll to
the device name, press
s
to connect.
drop connection with device
Scroll to the connected device name
and press
s
to disconnect.
remove device from device list
Scroll to the device name and press
Options
>
Manage
>
Remove Device
.
Note:
You can’t remove a device from the list
while your phone is connected to the device.
switch audio to Bluetooth®
headset or Bluetooth car kit during
call
Press
Options
>
Use Bluetooth
.
To switch audio back to the phone, press
Options
>
Use Handset
.
edit properties of recognized
device
Scroll to the device name, press
Options
>
Manage
>
Edit Device
.
set Bluetooth® options
Press
s
>
u
Settings
>
Connections
>
Bluetooth
, press
Options
>
Manage
>
Setup Bluetooth
.
features

39
connections
phone updates
Sometimes, we think of ways to make your
phone’s software faster or more efficient after
you’ve purchased your phone. You can find out
if your phone can be updated at:
www.hellomoto.com/update
Note:
Software updates do not affect your
contact list or other personal entries or files. If
you receive a software update but choose to
install it later, see page 48.
40
other features—advanced calling
other features
advanced calling
To use voice commands for calling, see
page 17.
features
speed dial
Your phone can store nine phone numbers
that you can call with a single keypress. To
store
a speed dial phone number:
s
>
L
Contacts
, press
Options
>
Setup
>
Speed Dial List
> speed dial location
To
call
a speed dial number, press and hold
the single-digit speed dial number for one
second.
international calls
If your phone service includes
international dialing, press and hold
0
to
insert your local international access code
(indicated by
+
). Then, press number keys to
dial the country code and phone number.
hold a call
Press
Options
>
Hold
to put all active calls on
hold.
mute a call
Press
Options
>
Mute
to put all active calls on
mute.
call waiting
When you’re on a call, you’ll hear an
alert if you receive a second call. Press
N
to answer the new call.
•
To switch between calls, press
Switch
.
•
To connect the two calls, press
Link
.
•
To end the call on hold, press
Options
>
End Call On Hold
.
To turn call waiting on or off:
s
>
u
Settings
>
Call Settings
>
In-Call Setup
>
Call Waiting
>
On
or
Off
features
41
other features—advanced calling
conference call
During a call:
Dial next number, press
N
, press
Options
>
Link Calls
transfer a call
During a call:
Dial next number, press
N
, press
Options
>
Transfer Call
call forwarding
Set up call forwarding:
s
>
u
Settings
>
Call Settings
>
Call Forward
>
Voice Calls
>
Forward Calls
>
All Calls
or
If Unavailable
,
select
To
, specify the forwarding number
Cancel call forwarding:
s
>
u
Settings
>
Call Settings
>
Call Forward
>
Cancel All
call barring
Restrict outgoing or incoming calls:
s
>
u
Settings
>
Call Settings
>
Call Barring
features
TTY calls
Set up your phone for use with an
optional TTY device:
s
>
u
Settings
>
Phone Settings
>
TTY Settings
>
TTY
change phone line
If you have a dual-line-enabled SIM
card, you can change your line to make and
receive calls from your other phone number:
s
>
u
Settings
>
Call Settings
>
Active Line
The active line indicator shows the active
phone line (see illustration on page 13).
features
42
other features—contacts
contacts
For basic contact list features, see your
Quick Start Guide.
fixed dial
When you turn on fixed dialing, you
can call only numbers stored in the fixed dial
list.
Note:
You must enter your SIM PIN2 code to
turn fixed dialing on or off. If you forget your
PIN2 code, contact your service provider.
Turn fixed dialing on or off:
s
>
u
Settings
>
Call Settings
>
Fixed Dialing
>
On
or
Off
Use the fixed dial list:
s
>
m
Office Tools
>
Dialing Services
>
Fixed Dial
service dial
Dial service phone numbers stored by
your service provider:
s
>
m
Office Tools
>
Dialing Services
>
Service Dial
features
DTMF tones
Activate DTMF tones:
s
>
u
Settings
>
Call Settings
>
Dialing Setup
>
DTMF
>
Long
or
Short
To send DTMF tones during a call, just press
the number keys.
features
add new contact
s
>
L
Contacts
, press
Options
>
Create Contact
Press
S
left/right to select the
details
tab
w
,
address
tab
u
,
ID
tab
<
, or
notes
tab
x
. Press
S
up/down to scroll to
information you want to change, then press
s
to select it.
features
43
other features—contacts
call contact
s
>
L
Contacts
, scroll to the contact,
press
N
to call
Note:
If a contact has multiple phone
numbers or email addresses, press
S
left/right to select the number or email
address you want.
send message to contact
s
>
L
Contacts
, scroll to the contact, press
Options
>
Send Message
add additional phone number or email
address to contact
s
>
L
Contacts
, scroll to the contact, press
Options
>
Edit
, press
S
left/right to select the
details
tab
w
, press
S
up/down to scroll
to an empty
Number
or
Email
field, press
s
to
select it
features
set picture ID for contact
Assign a photo or picture to show in the
display when you receive a call from a
contact:
s
>
L
Contacts
, scroll to the contact, press
Options
>
Edit
, press
S
left/right to select the
ID
tab
<
, press
S
up/down to scroll to
Picture ID
, press
s
to select it
set ring ID for contact
Assign a distinctive call alert (ring ID) for a
contact:
s
>
L
Contacts
, scroll to the contact, press
Options
>
Edit
, press
S
left/right to select the
ID
tab
<
, press
S
up/down to scroll to
Ring ID
, press
s
to select it
assign contact to category
s
>
L
Contacts
, scroll to the contact, press
Options
>
Edit
, press
S
left/right to select the
details
tab
w
, press
S
up/down to scroll
to
Category
, press
s
to select it
features
44
other features—contacts
set category view
s
>
L
Contacts
, press
Options
>
Filter By
You can show contacts in a predefined
category (
Email
,
Family
,
Friends
,
Work
), or contacts
in a category that you create (select
Create Category
).
create group mailing list
Assign contacts to a group message list or
email list:
s
>
L
Contacts
, press
Options
>
Create List
>
Message
or
Email
show contact photos
Show contacts with picture ID photos, or as
a text list:
s
>
L
Contacts
, press
Options
>
Setup
>
Default View
>
Thumbnail
or
List
set contact list sort order
s
>
L
Contacts
, press
Options
>
Default Sort Order
>
First Name
or
Last Name
features
create and use private contacts
Identify one or more contacts as private
contacts. You must enter your six-digit
security code to see the private contacts on
your contact list.
s
>
L
Contacts
, press
Options
>
Setup
>
Private Contacts
import contacts to phone memory
Import all contacts to phone memory, from
the SIM card or from another location:
s
>
L
Contacts
, press
Options
>
Import Contacts
>
SIM Card
or
File Manager
manage SIM card contacts
s
>
L
Contacts
, press
Options
>
Setup
>
SIM Card Manager
Delete contacts stored on your SIM card, or
import contact to the SIM card from phone
memory, or from another location.
features
45
other features—personalize
personalize
send contact(s) to another device
Send one or more contacts to another
phone, computer, or device:
s
>
L
Contacts
, scroll to the contact, press
Options
>
Share
, press
s
to select the current
contact, press
S
up/down to scroll to
Bluetooth
,
Messaging
, or
Email
transfer method,
press
Select
to select it
To send multiple contacts, press
Options
>
Share
>
Multiple Contacts
(instead of the current
contact).
delete contact(s)
Delete one or more contacts from your
contact list:
s
>
L
Contacts
, scroll to the contact, press
Options
>
Delete
, press
s
to select the current
contact, press
Yes
to confirm deletion
To delete multiple contacts, press
Options
>
Delete
>
Multiple Contacts
(instead of the current
contact).
features
features
language
Set menu language:
s
>
u
Settings
>
Phone Settings
>
Language
reminders
Set the reminder alert for event notifications:
s
>
u
Settings
>
Profiles
, press
S
left/right
to select the
settings
tab
#
, >
Reminder Alert
reset settings
Reset default settings for all options
except
the unlock code, security code, and lifetime
timer:
s
>
u
Settings
>
Phone Settings
>
Reset
>
Reset All Settings
46
other features—call times & costs
call times & costs
Network connection time
is the elapsed time
from the moment you connect to your service
provider's network to the moment you end the
call by pressing
O
. This time includes busy
signals and ringing.
The amount of network connection time
you track on your resettable timer may not
equal the amount of time for which you are
billed by your service provider. For billing
information, contact your service provider.
delete data
Caution:
This option
erases all information
you have entered
(including contacts and
calendar entries)
and content you have
downloaded
(including photos and sounds)
stored in your phone’s memory. After you
erase the information, you can’t recover it.
This option does
not
delete SIM card or
memory card information.
s
>
u
Settings
>
Phone Settings
>
Reset
>
Delete All Data
delete memory card information
Caution:
This option
erases all information
you have entered
(including contacts and
calendar entries)
and content you have
downloaded
(including photos and sounds)
stored on your memory card and/or SIM
card. After you erase the information, you
can’t recover it.
s
>
u
Settings
>
Phone Settings
>
Reset
>
Delete Memory Cards
features
features
call times
See call timers:
s
>
q
Recent Calls
, press
Options
>
Call Times
in-call timer
Show call time information during a
call:
s
>
u
Settings
>
Call Settings
>
In-Call Setup
>
In-Call Timer
47
other features—handsfree
handsfree
Note:
The use of wireless phones while driving
may cause distraction. Discontinue a call if you
can’t concentrate on driving. Additionally, the
use of wireless devices and their accessories
may be prohibited or restricted in certain areas.
Always obey the laws and regulations on the
use of these products.
call cost
See call cost trackers and credit
information:
s
>
q
Recent Calls
, press
Options
>
Call Costs
call cost setup
Set a credit limit:
s
>
q
Recent Calls
, press
Options
>
Call Costs
>
Call Cost Setup
data times
See data call timers:
s
>
q
Recent Calls
, press
Options
>
Data Times
data volumes
See data volume meters:
s
>
q
Recent Calls
, press
Options
>
Data Volumes
features
features
auto answer
(headset)
Automatically answer calls when
connected to a car kit or headset:
s
>
u
Settings
>
Phone Settings
>
Headset Settings
>
Auto-Answer
voice dial
(headset)
Enable voice dial with headset
send/end key:
s
>
u
Settings
>
Phone Settings
>
Headset Settings
>
Voice Dial
48
other features—network
network personal organizer
features
network settings
See network information and adjust
network settings:
s
>
u
Settings
>
Network
software update
Your service provider can send
updated phone software over-the-air to your
phone. When your phone receives a
software update, you can install it
immediately, or defer installation until later.
To install a deferred software update:
s
>
u
Settings
>
Phone Settings
>
OTA Updates
>
Update Software
features
set alarm
s
>
m
Office Tools
>
Alarm Clock
turn off alarm
When the display shows an alarm:
To turn off the alarm, press
Dismiss
or
O
.
To set an eight-minute delay, press
Snooze
.
set calendar default view
s
>
m
Office Tools
>
Calendar
, press
Options
>
Calendar Setup
>
Default View
add new calendar event
s
>
m
Office Tools
>
Calendar
, scroll to the day
and/or start time, press
s
, enter event
details
You can set a music or sound file, voice note,
or video as a calendar event reminder. When
creating a calendar event, select
Alarm Style
> alarm type, scroll to the file (or create a
new file), press
Insert
.
49
other features—personal organizer
see calendar event
s
>
m
Office Tools
>
Calendar
> event
To edit event details, press
Options
>
Edit
.
calendar event reminder
When the display shows and sounds an
event reminder:
To see reminder details, select
Open Event
.
To close the reminder, press
Dismiss
.
send calendar event to another device
Send a calendar event to another phone,
computer, or device:
s
>
m
Office Tools
>
Calendar
> event, press
Options
>
Share via
>
Bluetooth
or
Message
manage downloaded files
Manage files and applications that you’ve
downloaded onto your phone from the
browser or over a Bluetooth® connection:
s
>
m
Office Tools
>
Download Manager
features
world clock
Show time and date information for multiple
cities around the world:
s
>
m
Office Tools
>
World Clock
task list
Create a checklist of tasks you need to
perform, and set your phone to notify you
when task deadlines arrive:
s
>
m
Office Tools
>
Task List
notes
Write and store notes on your phone:
s
>
m
Office Tools
>
Notes
features
50
other features—personal organizer
record voice note
Record a voice note reminder to yourself, or
record a phone call in progress:
s
>
j
Multimedia
>
Voice Recorder
, press
s
to
start recording, press
Stop
to stop recording
To save the voice note, press
Save
.
To perform various operations on the voice
note, press
Options
.
Note:
Recording of phone calls is subject to
varying State and Federal laws regarding
privacy and recording of phone
conversations. Always obey the laws and
regulations on the use of this feature.
play voice note
Play back a voice note you’ve recorded:
s
>
j
Multimedia
>
Media Finder
>
Voice Notes
> voice note
calculator
s
>
m
Office Tools
>
Calculator
features
currency converter
s
>
m
Office Tools
>
Calculator
, press
Options
>
Set Exchange Rate
, enter exchange rate, press
Set
, enter amount, press
Options
>
Convert Currency
features
51
other features—security
security fun & games
features
SIM PIN
Caution:
If you enter an incorrect PIN code
three times before the correct code, your
SIM card is disabled, and your display shows
SIM Blocked
.
Lock or unlock the SIM card:
s
>
u
Settings
>
Security
>
SIM Lock
lock application
s
>
u
Settings
>
Security
>
Application Lock
manage certificates
Enable or disable Internet access
certificates stored on your phone:
s
>
u
Settings
>
Security
>
Certificates
Certificates are used to verify the identity
and security of Web sites when you
download files or share information.
features
start a game or application
Start a Java™ game or application:
s
>
T
Games
> game or application
airplane mode
Turn off your phone’s calling features in
locations where wireless phone use is
prohibited. This lets you use the music player
and other non-network features while you
are on an airplane, without interfering with
airplane communications.
s
>
u
Settings
>
Phone Settings
>
Airplane Mode
>
On
To reactivate your phone’s calling features,
turn off airplane mode.

52
service & repairs
service & repairs
If you have questions or need assistance, we're
here to help.
Go to
www.motorola.com/consumer/support
,
where you can select from a number of
customer care options. You can also contact
the Motorola Customer Support Center at
1-800-331-6456 (United States),
1-888-390-6456 (TTY/TDD United States for
hearing impaired), or 1-800-461-4575 (Canada).

53
SAR Data
Specific Absorption Rate Data
SAR Data
This model meets international guidelines
for exposure to radio waves.
Your mobile device is a radio transmitter and receiver. It is
designed not to exceed the limits for exposure to radio
waves recommended by international guidelines. These
guidelines were developed by the independent scientific
organization ICNIRP and include safety margins designed
to assure the protection of all persons, regardless of age
and health.
The guidelines use a unit of measurement known as the
Specific Absorption Rate, or SAR. The ICNIRP SAR limit for
mobile devices used by the general public is 2 W/kg and
the highest SAR value for this device when tested at the
ear is ___ W/kg.
1
As mobile devices offer a range of
functions, they can be used in other positions, such as on
the body as described in this user’s guide.
2
In this case,
the highest tested SAR value is ___ W/kg.
1
As SAR is measured utilizing the device’s highest
transmitting power, the actual SAR of this device while
operating is typically below that indicated above. This is
due to automatic changes to the power level of the device
to ensure it only uses the minimum level required to reach
the network.
While there may be differences between the SAR levels of
various phones and at various positions, they all meet the
governmental requirements for safe exposure. Please note
that improvements to this product model could cause
differences in the SAR value for later products; in all
cases, products are designed to be within the guidelines.
The World Health Organization has stated that present
scientific information does not indicate the need for any
special precautions for the use of mobile devices. They
note that if you want to reduce your exposure then you can
do so by limiting the length of calls or using a “handsfree”
device to keep the mobile phone away from the head and
body.
Additional Information can be found on the websites of
the World Health Organization (
http://www.who.int/emf
) or
Motorola, Inc. (
http://www.motorola.com/rfhealth
).
1. The tests are carried out in accordance with international
guidelines for testing. The limit incorporates a substantial
margin for safety to give additional protection for the public
and to account for any variations in measurements. Additional
related information includes the Motorola testing protocol,
assessment procedure, and measurement uncertainty range
for this product.
2. Please see the Safety and General Information section about
body worn operation.

54
OSS Information
OPEN SOURCE SOFTWARE INFORMATION
OSS Info rmat ion
For instructions on how to obtain a copy of any source
code being made publicly available by Motorola related to
software used in this Motorola mobile device you may
send your request in writing to:
The Motorola website
opensource.motorola.com
also
contains information regarding Motorola’s use of open
source.
Motorola has created the
opensource.motorola.com
to
serve as a portal for interaction with the software
community-at-large.
To view additional information regarding licenses,
acknowledgments and required copyright notices for open
source packages used in this Motorola mobile device,
please select “Legal Notices” from Phone Settings.
MOTOROLA, INC.
OSS Management
600 North US Hwy 45
Libertyville, IL 60048
USA

55
index
index
A
abc mode 15
accessories 8, 35, 47
active line indicator 13
active line, change 41
airplane mode 18, 51
alarm clock 48
alert
set 21, 24
turn off 16, 26
alert profile 21
alert style profiles 13
answer a call 25
B
battery 8
battery charge indicator light
8
battery indicator 13
battery life, extend 9, 25, 35
Bluetooth indicator 12
Bluetooth indicator light 1
Bluetooth wireless 35
bonding. See Bluetooth
wireless
brightness 25
browser 31, 49
browser messages 31
C
calculator 50
calendar
add event 48
send event 49
set view 48
call
answer 25
waiting 40
call alert 43
call barring 19, 41
call forward indicator 13
call forwarding 41
call timers 46, 47
caller ID 27, 43
camera 1
car kit 47
center key 8
certificate management 51
clear/back key 14
clock 23
codes 19, 20
conference call 41
contact list
add entry 42
filter 44
picture ID 27
send contact 45
view 44
costs, track 47
customer support 52
D
data call 47
date 23
delete data 46
delete text 14

56
index
dial a phone number 42
dialed calls 26
display 2, 11, 25
download manager 49
download media objects 31
drafts folder 30
DTMF tones 42
E
earpiece volume 16
EDGE indicator 12
email
create folder 31
read 31
send 30
setup 30
email address 42
emergency number 28
Enter Unlock Code message
19
F
file manager 33
filter contacts 44
fixed dial 42
forward calls 41
G
GPRS indicator 12
group mailing list 44
H
handsfree speaker 1, 19
headset 47
headset jack 1
hold a call 40
home screen 2, 11
I
IM 32
IM indicators 12
in-call indicator 13
Incoming Call message 27
information services 32
instant messaging. See IM
international access code 40
K
keypad 25
keypad volume, adjust 21, 22
L
language 45
lanyard hook 1
linking. See Bluetooth
wireless
location indicator 12
lock
application 51
phone 20
SIM card 51
lock key 1
Low Battery message 13
M
media playback 21, 22
media volume, adjust 21, 22
memory card 33
menu 2, 11
menu icons 11
menu key 8
message
read 30, 31
send 29
message indicator 12, 30
message reminders 45
messaging. See IM

57
index
micro-USB port 1, 8
Missed Calls message 27
multimedia message 29, 31
mute a call 40
N
navigation key 8
network settings 48
notes 49
numeric entry mode 16
O
optional accessory 8
optional feature 8
P
pairing. See Bluetooth
wireless
passwords. See codes
personalize 45
phone number
store 42
your number 41
picture ID 27, 43
PIN code 19, 51
PIN2 code 19, 42
power key 1
predictive text entry 14
printing 35, 37
profile indicator 13
profiles 13, 21
Q
quick note 30
R
radio 16
received calls 26
recent calls 26
redial 27
reminders 45
repairs 52
reset settings 45
return a call 27
ring ID 43
ringer ID 27
ringer volume, adjust 21, 22
ringtone 21, 24
S
screensaver 24, 25
security code 19
service dial 42
side select key 1, 17
signal strength indicator 12
silent profile 21
SIM Blocked message 51
SIM card 19, 42, 51
SIM card, delete information
46
skin 24
soft keys 11
software update 39, 48
speakerphone 47
speed dial 40
store phone numbers 42
support 52
symbol entry mode 16
T
task list 49
technical support 52
text edit 14
text entry 13
text entry mode 15
text message 29
text messaging 29

58
index
text templates 30
theme 24
time 23
timers 46, 47
transfer a call 41
TTY device 41
U
unlock
application 51
phone 19, 20
SIM card 51
unlock code 19, 20
V
vibrate profile 21
voice commands 17
voice dial 17, 47
voice note 50
voicemail 28
voicemail message indicator
28
volume 16, 21, 22
volume keys 1, 16
W
wallpaper 24
word text entry mode 14
world clock 49
U.S. patent Re. 34,976

www.motorola.com
68XXXXX229-O