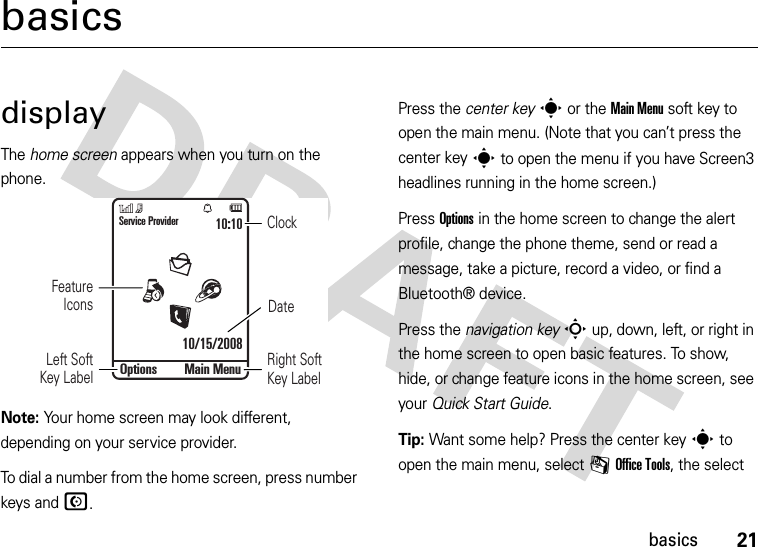
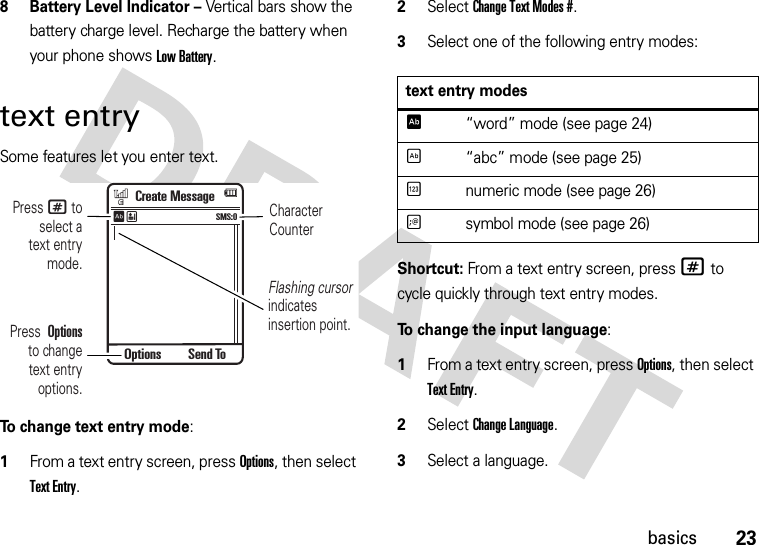
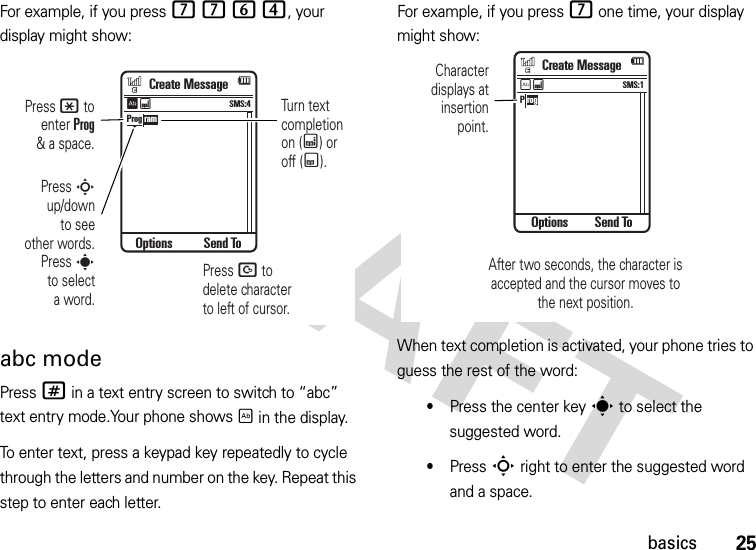
Motorola Mobility P56HH2 GSM Transceiver with WLAN and Bluetooth User Manual

Motorola Mobility LLC GSM Transceiver with WLAN and Bluetooth

Contents

Exhibit 8 Users Manual
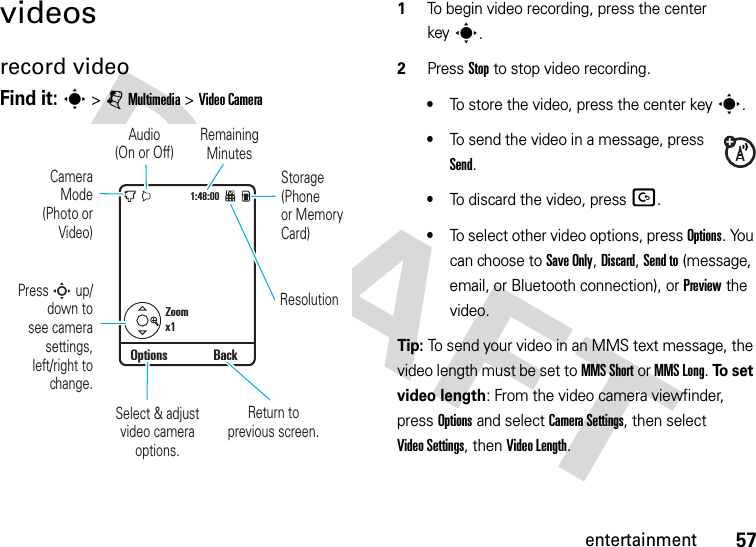
        INSTRUCTION MANUAL  A preliminary draft of the User’s Manual follows this page. The text on the following three pages will be added to the user manual.  APPLICANT: MOTOROLA,INC.                              FCC ID: IHDP56HH2                                            EXHIBIT 8
SAR DataSpecific Absorption Rate DataSAR Da taThis model wireless phone meets the government’s requirements for exposure to radio waves.Your wireless phone is a radio transmitter and receiver. It is designed and manufactured not to exceed limits for exposure to radio frequency (RF) energy set by the Federal Communications Commission (FCC) of the U.S. Government and by the Canadian regulatory authorities. These limits are part of comprehensive guidelines and establish permitted levels of RF energy for the general population. The guidelines are based on standards that were developed by independent scientific organizations through periodic and thorough evaluation of scientific studies. The standards include a substantial safety margin designed to assure the safety of all persons, regardless of age or health.The exposure standard for wireless mobile phones employs a unit of measurement known as the Specific Absorption Rate, or SAR. The SAR limit set by the FCC and by the Canadian regulatory authorities is 1.6 W/kg.1 Tests for SAR are conducted using standard operating positions accepted by the FCC and by Industry Canada with the phone transmitting at its highest certified power level in all tested frequency bands. Although the SAR is determined at the highest certified power level, the actual SAR level of the phone while operating can be well below the maximum value. This is because the phone is designed to operate at multiple power levels so as to use only the power required to reach the network. In general, the closer you are to a wireless base station, the lower the power output.Before a phone model is available for sale to the public in the U.S. and Canada, it must be tested and certified to the FCC and Industry Canada that it does not exceed the limit established by each government for safe exposure. The tests are performed in positions and locations (e.g., at the ear and worn on the body) reported to the FCC and available for review by Industry Canada. The highest SAR value for this model phone when tested for use at the ear is 0.98 W/kg, and when worn on the body, as described in this user guide, is 0.49 W/kg.2 While there may be differences between the SAR levels of various phones and at various positions, they all meet the governmental requirements for safe exposure. Please note that improvements to this product model could cause differences in the SAR value for later products; in all cases, products are designed to be within the guidelines.
SAR DataAdditional information on Specific Absorption Rates (SAR) can be found on the Cellular Telecommunications & Internet Association (CTIA) Web site:http://www.phonefacts.netor the Canadian Wireless Telecommunications Association (CWTA) Web site:http://www.cwta.ca1. In the United States and Canada, the SAR limit for mobile phones used by the public is 1.6 watts/kg (W/kg) averaged over one gram of tissue. The standard incorporates a substantial margin of safety to give additional protection for the public and to account for any variations in measurements.2. The SAR information includes the Motorola testing protocol, assessment procedure, and measurement uncertainty range for this product.
User’s GuideMOTO Z6wCMYCMMYCYCMYKv463387.A6.UG.Front.eps   9/11/2007   8:53:48 AM
1HELLOMOTOFeel It, See It, Hear It! Your MOTO Z6w phone is made to be held, and made to be seen!•Make and receive calls over the Internet (instead of a cellular network) through a WiFi CERTIFIED® wireless connection.•Transfer your favorite music quickly and easily to your phone with Microsoft® Windows® Media Player 11. •Snap pictures automatically with your 2-megapixel multi-shot camera (page 53).•Capture key moments in high-definition video, then upload to your blog (page 57).•Access any Web site just like you do on your computer, with your phone’s full HTML browser (page 52).•Check your personal email accounts (like Hotmail®, GmailTM webmail service, or Yahoo!®)  on the Web (see your Quick Start Guide). Or read and sync your corporate email (Microsoft Outlook) with MOTOSYNC (page 66).•Yo u r  phone can recite text messages, incoming caller ID information, and menu items (page 29).For more information: To read feature instructions on your phone, press the center keys to open the main menu, then select VHelp. To learn more about your phone and accessories, go to www.hellomoto.com.
2Introducing your new MOTO Z6w GSM wireless phone. Here’s a quick anatomy lesson.Center Select KeyOpen main menu &  select menu items.Power/End KeyTurn  on/off, hang up, exit menus.Right Soft KeyLeft Soft KeyPlay music or go online.Push BarPush down to close slider.Send KeyMake & answer calls.Navigation KeyScroll up, down, left, or right.Clear/Back Key
3Camera Lens(on back of phone)IVoice KeyUse voice commands to make calls & perform basic phone functions.Volume KeysSmart KeyMini-USB PortInsert battery charger & phone accessories.IPush BarPush to open slider.Camera Key
4Note: This is the standard home screen and main menu layout. Your phone’s home screen and main menu may be different. To change your home screen shortcuts and main menu appearance, see your Quick Start Guide. Home Screen Main MenuPress the Navigation Key up, down, left, or right (S) to highlight a menu feature.3Press the Center Key (s) to select it.4 Press and hold the Power Key O for a few seconds, or until the display lights up, to turn on your phone.1Press the Center Key (s) to open the Main Menu.2Service Provider10/15/200810:10Options Main MenuOptions BackContacts6
5Motorola, Inc.Consumer Advocacy Office1307 East Algonquin RoadSchaumburg, IL 60196www.hellomoto.com1-800-331-6456 (United States)1-888-390-6456 (TTY/TDD United States for hearing impaired)1-800-461-4575 (Canada)Certain mobile phone features are dependent on the capabilities and settings of your service provider’s network. Additionally, certain features may not be activated by your service provider, and/or the provider’s network settings may limit the feature’s functionality. Always contact your service provider about feature availability and functionality. All features, functionality, and other product specifications, as well as the information contained in this user’s guide are based upon the latest available information and are believed to be accurate at the time of printing. Motorola reserves the right to change or modify any information or specifications without notice or obligation.MOTOROLA and the Stylized M Logo are registered in the US Patent & Trademark Office. The Bluetooth trademarks are owned by their proprietor and used by Motorola, Inc. under license. Java and all other Java-based marks are trademarks or registered trademarks of Sun Microsystems, Inc. in the U.S. and other countries. Microsoft and Windows are registered trademarks of Microsoft Corporation; and Windows XP and Windows Media are trademarks of Microsoft Corporation. Hotmail is a registered trademark of Microsoft Corporation. Macintosh and iTunes are registered trademarks of Apple Computer, Inc. Yahoo! and the Yahoo! logo are trademarks and/or registered trademarks of Yahoo! Inc. Gmail is a trademark of GOOGLE Inc. All other product or service names are the property of their respective owners.© Motorola, Inc., 2007.Caution: Changes or modifications made in the radio phone, not expressly approved by Motorola, will void the user’s authority to operate the equipment.Software Copyright Notice The Motorola products described in this manual may include copyrighted Motorola and third-party software stored in semiconductor memories or other media. Laws in the United States and other countries preserve for Motorola and third-party software providers certain exclusive rights for copyrighted software, such as the exclusive rights to distribute or reproduce the copyrighted software. Accordingly, any copyrighted software contained in the Motorola products may not be modified, reverse-engineered, distributed, or reproduced in any manner to the extent allowed by law. Furthermore, the purchase of the Motorola products shall not be deemed to grant either directly or by implication, estoppel, or otherwise, any license under the copyrights, patents, or patent applications of Motorola or any third-party software provider, except for the normal, non-exclusive, royalty-free license to use that arises by operation of law in the sale of a product.Manual Number: 68XXXXXxxx-O
6contentscontentsmenu map . . . . . . . . . . . . . . . .  8Safety Information  . . . . . . . .  10FCC Notice . . . . . . . . . . . . . . .  14Use and Care . . . . . . . . . . . . .  15Recycling Information . . . . . .  16essentials . . . . . . . . . . . . . . . .  17about this guide  . . . . . . . . .  17battery. . . . . . . . . . . . . . . . .  18basics . . . . . . . . . . . . . . . . . . .  21display. . . . . . . . . . . . . . . . .  21text entry  . . . . . . . . . . . . . .  23adjust volume . . . . . . . . . . .  26handsfree speaker  . . . . . . .  26voice commands. . . . . . . . .  27talking phone  . . . . . . . . . . .  29codes & passwords  . . . . . .  29lock & unlock external keys. . . . . . . . . . . . . . . . . . . 30lock & unlock phone  . . . . . .  30customize . . . . . . . . . . . . . . . . 31profiles  . . . . . . . . . . . . . . . .  31display appearance . . . . . . .  33themes . . . . . . . . . . . . . . . .  34time & date . . . . . . . . . . . . .  36answer options . . . . . . . . . .  37calls. . . . . . . . . . . . . . . . . . . . . 38calls over a WiFi Internet connection. . . . . . . . . . . . . .  38turn off a call alert . . . . . . . .  41recent calls  . . . . . . . . . . . . .  41redial . . . . . . . . . . . . . . . . . .  42return a call . . . . . . . . . . . . .  42caller ID . . . . . . . . . . . . . . . .  42emergency calls  . . . . . . . . . 43voicemail . . . . . . . . . . . . . . . 44entertainment. . . . . . . . . . . . . 45music player  . . . . . . . . . . . . 45browser . . . . . . . . . . . . . . . . 52camera. . . . . . . . . . . . . . . . . 53videos  . . . . . . . . . . . . . . . . . 57messages  . . . . . . . . . . . . . . . . 61text messaging  . . . . . . . . . . 61connections  . . . . . . . . . . . . . . 66MOTOSYNC. . . . . . . . . . . . . 66file manager. . . . . . . . . . . . . 67cable connections . . . . . . . . 69Bluetooth wireless connections . . . . . . . . . . . . . 70phone updates. . . . . . . . . . . 75
contents7other features. . . . . . . . . . . . .  76advanced calling  . . . . . . . . .  76contacts. . . . . . . . . . . . . . . . 79personalize  . . . . . . . . . . . . . 84call times & costs . . . . . . . . 85handsfree  . . . . . . . . . . . . . . 86network . . . . . . . . . . . . . . . . 87personal organizer . . . . . . . .  88security . . . . . . . . . . . . . . . . 91fun & games . . . . . . . . . . . . 91service & repairs  . . . . . . . . . . 93SAR Data  . . . . . . . . . . . . . . . . 94EU Conformance . . . . . . . . . . 95WHO Information. . . . . . . . . . 96Privacy and Data Security . . . 96OSS Information  . . . . . . . . . . 97Driving Safety. . . . . . . . . . . . . 98index . . . . . . . . . . . . . . . . . . . 100
8menu mapmenu mapmain menuqRecent CallsLContactsmOffice Tools• Calendar•MOTOSYNC• Download Manager• File Manager• Memory Card• My Blog*• Music and Sounds•Pictures• Videos•VoiceNote• Application Downloads• Unrecognizable Files• My Documents•Alarm Clock• World Clock•Calculator• Dialing Services• Task List• Notes•Help1Web Access•Browser• My Bookmarks• My Web Pages•History•Go to URL•Browser SetupgMessages• Create Message• Inbox• My Folders• Templates•Drafts• Outbox•Email• Call VoicemailjMultimedia• Media Finder•Games•Camera• Video Camera• Voice Recorder6WiFi• Current Connection• Available Networks• Saved Networks• Quick Connect• Set Up WiFiVHelpuSettings• (see next page)This is the standard main menu layout. Your phone’s menu may be different.To change your home screen shortcuts and your main menu appearance, see yourQuick Start Guide.Tip: Press D to exit the current menu, or press O to exit all menus.* optional features
menu map9settings menu•Profiles•Themes• Home Screen• Navigation Keys• Change Wallpaper•ClockStyle•Date• Screen3*• Connections• Bluetooth®• USB Setting• Media Synchronization• Memory Card• Modem•USBPrinting• Tools• Voice Networks• Voice Over IP• Network Settings• Data Connections• Add a Connection• Edit a Connection• Remove a Connection• Call Settings• Speed Dial•CallForward•In-CallSetup• My Caller ID• In-Call Timer• Answer Options• In-Call Message Alert•RoamAlert• Call Waiting• Auto-Redial• Call Drop Tone• Dialing Setup• My Caller ID•DTMF• Dialing Prefix• Call Barring*• Fixed Dialing• My SIM Number• Active Line *• Phone Settings• Display Settings• Display Timeout• Screensaver• Brightness• Airplane Mode• Battery Meter•Time&Date• Slide Closed•(continued next column)• Phone Settings (continued)• Language• Talking Phone•TextEntry•Reset• Reset All Settings• Delete All Data• Delete Memory Cards• View Memory• Properties• Legal Notices• Java™ System• OTA Updates• Headset Settings• Auto-Answer• Voice Dial• TTY Settings•Security• Phone Lock• Keypad Lock• Application Lock•SIMLock• Change Passwords• Certificates•Network• Current Network• Scan Avail. Networks• Search for New Network• My Network List•Search Setup• Service Tone* optional features
10Safety InformationSafety and General InformationSafet y In formati onThis section contains important information on the safe and efficient operation of your mobile device. Read this information before using your mobile device.*Exposure to Radio Frequency (RF) EnergyYour mobile device contains a transmitter and receiver. When it is ON, it receives and transmits RF energy. When you communicate with your mobile device, the system handling your call controls the power level at which your mobile device transmits.Your Motorola mobile device is designed to comply with local regulatory requirements in your country concerning exposure of human beings to RF energy.Operational PrecautionsFor optimal mobile device performance and to be sure that human exposure to RF energy does not exceed the guidelines set forth in the relevant standards, always follow these instructions and precautions.External Antenna CareIf your mobile device has an external antenna, use only a Motorola-supplied or approved replacement antenna. Use of unauthorized antennas, modifications, or attachments could damage the mobile device and/or may result in your device not complying with local regulatory requirements in your country.DO NOT hold the external antenna when the mobile device is IN USE. Holding the external antenna affects call quality and may cause the mobile device to operate at a higher power level than needed.Product OperationWhen placing or receiving a phone call, hold your mobile device just like you would a landline phone.If you wear the mobile device on your body, always place the mobile device in a Motorola-supplied or approved clip, holder, holster, case, or body harness. If you do not use a body-worn accessory supplied or approved by Motorola—or if you hang your mobile device from a lanyard around your neck—keep the mobile * The information provided in this document supersedes the general safety information in user’s guides published prior to May 1, 2007.
Safety Information11device and its antenna at least 2.5 centimeters (1 inch) from your body when transmitting.When using any data feature of the mobile device, with or without an accessory cable, position the mobile device and its antenna at least 2.5 centimeters (1 inch) from your body.Using accessories not supplied or approved by Motorola may cause your mobile device to exceed RF energy exposure guidelines. For a list of Motorola-supplied or approved accessories, visit our Web site at: www.motorola.com.RF Energy Interference/CompatibilityNearly every electronic device is subject to RF energy interference from external sources if inadequately shielded, designed, or otherwise configured for RF energy compatibility. In some circumstances your mobile device may cause interference with other devices.Follow Instructions to Avoid Interference ProblemsTurn off your mobile device in any location where posted notices instruct you to do so.In an aircraft, turn off your mobile device whenever instructed to do so by airline staff. If your mobile device offers an airplane mode or similar feature, consult airline staff about using it in flight.Implantable Medical DevicesIf you have an implantable medical device, such as a pacemaker or defibrillator, consult your physician before using this mobile device.Persons with implantable medical devices should observe the following precautions:•ALWAYS keep the mobile device more than 20 centimeters (8 inches) from the implantable medical device when the mobile device is turned ON.•DO NOT carry the mobile device in the breast pocket.•Use the ear opposite the implantable medical device to minimize the potential for interference.•Turn OFF the mobile device immediately if you have any reason to suspect that interference is taking place.Read and follow the directions from the manufacturer of your implantable medical device. If you have any questions about using your mobile device with your implantable medical device, consult your health care provider.Driving PrecautionsCheck the laws and regulations on the use of mobile devices in the area where you drive. Always obey them.When using your mobile device while driving, please:
12Safety Information•Give full attention to driving and to the road. Using a mobile device may be distracting. Discontinue use if you can’t concentrate on driving.•Use handsfree operation, if available.•Pull off the road and park before making or answering a call if driving conditions so require.•Do not place a mobile device in the airbag deployment area.Responsible driving practices can be found in the “Smart Practices While Driving” section in this user’s guide and/or at the Motorola Web site: www.motorola.com/callsmart.Note: The use of wireless phones while driving may cause distraction. Discontinue a call if you can’t concentrate on driving. Additionally, the use of wireless devices and their accessories may be prohibited or restricted in certain areas. Always obey the laws and regulations on the use of these products.Operational WarningsObey all posted signs when using mobile devices in public areas.Potentially Explosive AtmospheresAreas with potentially explosive atmospheres are often but not always posted and can include fueling areas such as below decks on boats, fuel or chemical transfer or storage facilities, or areas where the air contains chemicals or particles, such as grain dust, or metal powders.When you are in such an area, turn off your mobile device, and do not remove, install, or charge batteries. In such areas, sparks can occur and cause an explosion or fire.Symbol KeyYour battery, charger, or mobile device may contain symbols, defined as follows:Symbol DefinitionImportant safety information follows.Do not dispose of your battery or mobile device in a fire.Your battery or mobile device may require recycling in accordance with local laws. Contact your local regulatory authorities for more information.Do not throw your battery or mobile device in the trash.Your mobile device contains an internal lithium ion battery.Do not let your battery, charger, or mobile device get wet.032374o032376o032375o032378oLi Ion BATT
Safety Information13Batteries and ChargersCaution: Improper treatment or use of batteries may present a danger of fire, explosion, leakage, or other hazard. For more information, see the “Battery Use & Battery Safety” section in this user’s guide.Choking HazardsYour mobile device or its accessories may include detachable parts, which may present a choking hazard to small children. Keep your mobile device and its accessories away from small children.Glass PartsSome parts of your mobile device may be made of glass. This glass could break if the product is dropped on a hard surface or receives a substantial impact. If glass breaks, do not touch or attempt to remove. Stop using your mobile device until the glass is replaced by a qualified service center.Seizures/BlackoutsSome people may be susceptible to epileptic seizures or blackouts when exposed to flashing lights, such as when playing video games. These may occur even if a person has never had a previous seizure or blackout.If you have experienced seizures or blackouts, or if you have a family history of such occurrences, please consult with your physician before playing video games or enabling a flashing-lights feature (if available) on your mobile device.Discontinue use and consult a physician if any of the following symptoms occur: convulsion, eye or muscle twitching, loss of awareness, involuntary movements, or disorientation. It is always a good idea to hold the screen away from your eyes, leave the lights on in the room, take a 15-minute break every hour, and stop use if you are very tired.Caution About High Volume UsageListening at full volume to music or voice through a headset may damage your hearing.Repetitive MotionWhen you repetitively perform actions such as pressing keys or entering finger-written characters, you may experience occasional discomfort in your hands, arms, shoulders, neck, or other parts of Listening at full volume to music or voice through a headset may damage your hearing.Symbol Definition
14FCC Noticeyour body. If you continue to have discomfort during or after such use, stop use and see a physician.FCC Notice to UsersFCC NoticeThe following statement applies to all products that have received FCC approval. Applicable products bear the FCC logo, and/or an FCC ID in the format FCC-ID:xxxxxx on the product label.Motorola has not approved any changes or modifications to this device by the user. Any changes or modifications could void the user’s authority to operate the equipment. See 47 CFR Sec. 15.21.This device complies with part 15 of the FCC Rules. Operation is subject to the following two conditions: (1) This device may not cause harmful interference, and (2) this device must accept any interference received, including interference that may cause undesired operation. See 47 CFR Sec. 15.19(3).This equipment has been tested and found to comply with the limits for a Class B digital device, pursuant to part 15 of the FCC Rules. These limits are designed to provide reasonable protection against harmful interference in a residential installation. This equipment generates, uses and can radiate radio frequency energy and, if not installed and used in accordance with the instructions, may cause harmful interference to radio communications. However, there is no guarantee that interference will not occur in a particular installation. If this equipment does cause harmful interference to radio or television reception, which can be determined by turning the equipment off and on, the user is encouraged to try to correct the interference by one or more of the following measures:•Reorient or relocate the receiving antenna.•Increase the separation between the equipment and the receiver.•Connect the equipment to an outlet on a circuit different from that to which the receiver is connected.•Consult the dealer or an experienced radio/TV technician for help.
Use and Care15Use and CareUse and Ca reTo care for your Motorola phone, please keep it away from:liquids of any kind dust and dirtDon’t expose your phone to water, rain, extreme humidity, sweat, or other moisture. If it does get wet, don’t try to accelerate drying with the use of an oven or dryer, as this may damage the phone.Don’t expose your phone to dust, dirt, sand, food, or other inappropriate materials.extreme heat or cold cleaning solutionsAvoid temperatures below 0°C/32°F or above 45°C/113°F.To clean your phone, use only a dry soft cloth. Don’t use alcohol or other cleaning solutions.microwaves the groundDon’t try to dry your phone in a microwave oven.Don’t drop your phone.
16Recycling InformationCaring for the Environment by RecyclingRecycli ng Infor mationThis symbol on a Motorola product means the product should not be disposed of with household waste.Disposal of your Mobile Device and AccessoriesPlease do not dispose of mobile devices or electrical accessories (such as chargers, headsets, or batteries) with your household waste. These items should be disposed of in accordance with the national collection and recycling schemes operated by your local or regional authority. Alternatively, you may return unwanted mobile devices and electrical accessories to any Motorola Approved Service Center in your region. Details of Motorola approved national recycling schemes, and further information on Motorola recycling activities can be found at: www.motorola.com/recyclingDisposal of your Mobile Device Packaging and User’s GuideProduct packaging and user’s guides should only be disposed of in accordance with national collection and recycling requirements. Please contact your regional authorities for more details.
17essentialsessentialsabout this guideThis guide shows how to locate a menu feature as follows:Find it: s >uSettings >ProfilesThis means that, from the home screen:  1Press the center keys to open the menu.2Press the navigation keyS to scroll to uSettings, and press the center keys to select it.3Press the navigation keyS to scroll to Profiles, and press the center keys to select it.Note: You can’t press the center keys to open the menu if you have Screen3 headlines running in the home screen. When Screen3 headlines are active, press the Main Menu soft key to open the menu.This guide uses the following symbols:symbolsThis means a feature is network, SIM card, or subscription dependent and may not be available in all areas. Contact your service provider for more information.This means a feature requires an optional accessory.
18essentialsbatterybattery chargingTip: Motorola batteries have circuitry that protects the battery from damage from overcharging.Note: You can charge your battery by connecting a cable from your phone’s mini-USB port to a USB port on a computer. Both your phone and the computer must be turned on, and your computer must have the correct software drivers installed. A Motorola Original USB cable and supporting software may be included with your phone. These tools are also sold separately.Battery Use & Battery Safety• Motorola recommends you always use Motorola-branded batteries and chargers. The warranty does not cover damage caused by non-Motorola batteries and/or chargers. Caution: Use of an unqualified battery or charger may present a risk of fire, explosion, leakage, or other hazard. Improper battery use, or use of a damaged battery, may result in a fire, explosion, or other hazard.•Battery usage by children should be supervised.• Important: Motorola mobile devices are designed to work best with qualified batteries. If you see a message on your display such as Invalid Battery or UnabletoCharge, take the following steps:•Remove the battery and inspect it to confirm that it bears a Motorola “Original Equipment” hologram;•If there is no hologram, the battery is not a qualified battery;
19essentials•If there is a hologram, replace the battery and retry charging it;•If the message remains, contact a Motorola Authorized Service Center.•New batteries or batteries stored for a long time may take more time to charge.• Charging precautions: When charging your battery, keep it near room temperature. Never expose batteries to temperatures below 0°C (32°F) or above 45°C (113°F) when charging. Always take your mobile device with you when you leave your vehicle.•When storing your battery, keep it in a cool, dry place.•It is normal over time for battery life to decrease, and for the battery to exhibit shorter runtime between charges or require more frequent or longer charging times.• Avoid damage to battery and mobile device. Do not disassemble, open, crush, bend, deform, puncture, shred, or submerge the battery or mobile device. Avoid dropping the battery or mobile device, especially on a hard surface. If your battery or mobile device has been subjected to such damage, take it to a Motorola Authorized Service Center before using. Do not attempt to dry it with an appliance or heat source, such as a hair dryer or microwave oven.• Use care when handling a charged battery—particularly when placing it inside a pocket, purse, or other container with metal objects. Contact with metal objects (such as jewelry, keys, beaded chains) could complete an electrical circuit (short circuit), causing the battery to become very hot, which could cause damage or injury.
20essentialsPromptly dispose of used batteries in accordance with local regulations. Contact your local recycling center for proper battery disposal.Warning: Never dispose of batteries in a fire because they may explode.
21basicsbasicsdisplayThe home screen appears when you turn on the phone.Note: Your home screen may look different, depending on your service provider.To dial a number from the home screen, press number keys and N.Press the center keys or the Main Menu soft key to open the main menu. (Note that you can’t press the center keys to open the menu if you have Screen3 headlines running in the home screen.)Press Options in the home screen to change the alert profile, change the phone theme, send or read a message, take a picture, record a video, or find a Bluetooth® device.Press the navigation keyS up, down, left, or right in the home screen to open basic features. To show, hide, or change feature icons in the home screen, see your Quick Start Guide.Tip: Want some help? Press the center keys to open the main menu, select mOffice Tools, the select DateClockLeft Soft Key LabelRight Soft Key LabelService Provider10/15/200810:10Options Main MenuFeature Icons
22basicsHelp. Select a Help topic to find information about phone features.Status indicators appear at the top of the home screen: 1 Signal Strength Indicator – Show the strength of the wireless network connection.2 EDGE/GPRS Indicator – Shows when your phone is using a high-speed Enhanced Data for GSM Evolution (EDGE) network connection Z, or General Packet Radio Service (GPRS) network connection g.3 Bluetooth Indicator – Shows Bluetooth status:4Roam Indicator – Shows when you are not using your home calling network.5 Message Indicator – Indicates you have a new text or voice message. Other indicators can include:6 Profile Indicator – Shows the alert profile setting:7 Active Line Indicator – Shows B to indicate an active call, or E to indicate when call forwarding is on.&(solid blue) = Bluetooth powered on&(solid green) = Bluetooth connectedW6A2813 7645EN&(flashing blue) = Bluetooth discoverable modeU= email message(= voicemail messageN= ring onlyK= ring and vibrateH= vibrate onlyI= vibrate then ringJ= silent
23basics8 Battery Level Indicator – Vertical bars show the battery charge level. Recharge the battery when your phone shows Low Battery.text entrySome features let you enter text.To change text entry mode:  1From a text entry screen, press Options, then select Text Entry.2Select Change Text Modes #. 3Select one of the following entry modes:Shortcut: From a text entry screen, press # to cycle quickly through text entry modes.To change the input language:  1From a text entry screen, press Options, then select Text Entry.2Select Change Language. 3Select a language.CharacterCounterPress # toselect atext entrymode.Flashing cursor indicatesinsertion point.Press  Optionsto changetext entryoptions.Create MessageSMS:0ÊËOptions Send Totext entry modesÊ“word” mode (see page 24)É“abc” mode (see page 25)Ènumeric mode (see page 26)Ãsymbol mode (see page 26)
24basicsShortcut: From a text entry screen, press and hold#, then select a language.To change text case, press 0 from a text entry screen to change to all capital letters (Ä), next letter capitalized (Í), or next letter lowercase (no symbol).Your phone can learn the words you enter, which improves text prediction and completion. To  s e t  wo r d  learning:  1From a text entry screen, press Options, then select Text Entry.2Select SetTextPrediction, then select Learn My Words. Your phone shows Ç when word learning is active.You can set your phone to complete words based on the characters you enter. To set text completion:   1Press Options. then select Text Entry.2Select SetTextPrediction, then select Offer Completions.Your phone shows Æ when text completion is active.To enter punctuation while entering text, press1 repeatedly to enter a punctuation mark or other character.To edit or delete text while entering text, press S to move the cursor to the right of text you want to edit. Press the clear/back keyD to delete the character left of the cursor. HoldD to delete the entire work.word modePress # in a text entry screen to switch to “word” predictive text entry mode. Your phone shows Ê in the display.Word mode lets you enter words using one keypress per letter. The phone predicts each word as you enter it.
25basicsFor example, if you press 7764, your display might show:abc modePress # in a text entry screen to switch to “abc” text entry mode.Your phone shows É in the display.To enter text, press a keypad key repeatedly to cycle through the letters and number on the key. Repeat this step to enter each letter.For example, if you press 7 one time, your display might show:When text completion is activated, your phone tries to guess the rest of the word:•Press the center keys to select the suggested word.•Press S right to enter the suggested word and a space.Turn textcompletionon (Æ) oroff (Ç).Press D todelete characterto left of cursor.Press * toenter Prog& a space.Press Sup/downto seeother words.Press sto selecta word.Prog ramCreate MessageOptions Send ToSMS:4ÊÆP rogCreate MessageOptions Send ToSMS:1ÉÆCharacterdisplays atinsertionpoint.After two seconds, the character isaccepted and the cursor moves tothe next position.
26basics•If you want a different word, press keypad keys to enter the remaining letters.numeric modePress # in a text entry screen until you see È. Press the number keys to enter the numbers you want.Tip: Just need one number? To enter a number quickly, press and hold a number key until the number appears.symbol modePress # in a text entry screen until you see Ã. The display shows the symbol associated with each keypad key. Press S up/down repeatedly to see different symbols. To insert a symbol, press its key, or scroll to it and press the center keys.adjust volumePress the volume keys to:•turn off an incoming call alert•change the earpiece volume during calls with the slider open•change the ringer volume from the main screen (with slider open)Tip: Sometimes silence really is golden. That’s why you can quickly set your ringer to Ring Only, Vibrate Only, Silent, Ring and Vibrate, or Vibrate then Ring, by holding the down volume key while in the main screen.handsfree speakerNote: The use of wireless phones while driving may cause distraction. Discontinue a call if you can’t concentrate on driving. Additionally, the use of
27basicswireless devices and their accessories may be prohibited or restricted in certain areas. Always obey the laws and regulations on the use of these products.To turn on the handsfree speaker:•After you dial a number and press the Send keyN, but before the call connects, press Speaker.• During an active call, press Options and select Speaker On. While the handsfree speaker is on, your display shows the speakerphone indicator.To turn off the handsfree speaker, do any of the following:•End the call.• If the slider is open, press Speaker.• If the slider is closed, press Options and select Speaker Off.voice commandsYou can use voice commands to tell your phone what to do.Note: Not all languages support voice commands.voice dialYou can dial a contact list entry by speaking its name, or dial any phone number by speaking its digits.  1Press the external voice command key on the side of your phone. The phone loads the voice recognition software, then prompts you to say a command or name.2Wait for the beep, then say the name of an entry as it appears in your contact list. Your phone confirms the name and makes the call.or
28basicsSay “Dial Number.” Your phone prompts you to speak the digits in the phone number. Speak the digits. Your phone confirms the number and makes the call.Tips:•You can say a contact’s name and number type together. For example, say “John Smith mobile” to call the mobile number stored for John Smith.•For voice command help, press the voice command key on the side of your phone, then press Help.voice activate phone functionsYou can use voice commands to open applications and perform many basic phone functions.  1Press the external voice command key on the side of your phone. The phone prompts you to say a command.2Wait for the beep, then say a command from the list:voice commands“contact name”“Dial Number”“Send Message tocontact name”“Check Calendar”“Check New Message”“Check New Email”“Add New Contact”“Talking Phone”“Check Battery”“Check Signal”“Check Time”“Check Date”“Open Setup”“Open Recent Calls”“Open Theme”“Open Camera”
29basicsTip: Press and release the voice command key on the side of your phone to see the list of voice commands.talking phoneYou can set your phone to speak incoming caller ID information, names of menu features or contact list entries, numbers (digits) you press, or messages you receive.Find it: s >uSettings >Phone Settings >Talking PhoneShortcut: Press and hold the external voice command key on the side of your phone. When the phone prompts you to say a command, say “Talking Phone.”codes & passwordsYour phone’s four-digit unlock code is originally set to 1234. The six-digit security code is originally set to 000000. If your service provider didn’t change these codes, you should change them:Find it: s >uSettings >Security >Change PasswordsYou can also change your SIM PIN codes or call barring password.If you forget your unlock code:At the Please verify the Unlock Code prompt, try entering 1234 or the last four digits of your phone number. If that doesn’t work, press# to enter your six-digit security code instead.“Open Web Access”“Set Normal”“Set Vibrate”“Set Silent”“Set Ring”“Set Airplane”“Set Airplane Off”voice commands
30basicsIf you forget other codes: If you forget your security code, SIM PIN code, PIN2 code, or call barring password, contact your service provider.lock & unlock external keysYou can lock the external phone keys when the slider is closed to prevent accidental key presses while playing music or carrying the phone in a purse or pocket.To automatically lock the external keys when the phone is idle and the slider is closed:Find it: s >uSettings >Security >KeypadLock >TimerSet the time delay for locking the external keys (2seconds, 4 seconds, or 8 seconds. The keys lock when you close the slider. The keys unlock when you open the slider. To turn off the automatic lock, select Off.To unlock the external keys when the slider is closed, press Unlock, then press OK.Find it: s >uSettings >Security >Phone Lock >Lock at Power On >Onlock & unlock phoneYou can lock your phone to keep others from using it. To lock or unlock your phone, you need the four-digit unlock code.To manually lock your phone:Find it: s >uSettings >Security >Phone Lock >Lock NowTo automatically lock your phone whenever you turn it off:Find it: s >uSettings >Security >Phone Lock >Lock at Power On >On
31customizecustomizeprofilesYou can quickly change your phone’s alert style or profile to match your activity or environment. Each profile uses a different set of ringtones or vibrations for incoming calls and other events. The alert profile indicator shows at the top of the home screen (see indicators on page 22).To change your profile: From the home screen, press the external volume keys on the side of your phone. Alternatively, from the home screen press Options and select Change Alert Style or Change Profile.The Silent profile silences your phone until you set another profile.Shortcut: From the home screen, press and hold # to quickly set the profile to Vibrate Only.change alert style settingsYou can change the ringtones that a standard alert style uses to notify you of incoming calls and other events. Additionally, you can change the alert style’s ring volume, keypad tone volume, and media playback volume settings. For dual-line-enabled SIM cards, you can set different ringtones to identify incoming calls on line 1 or line 2.Note: You can’t set a ringtone for the Silent alert style, or change some settings for some alert styles.NRing OnlyKRing and VibrateHVibrate OnlyIVibrate then RingJSilent
32customizeFind it: s >uSettings >Profiles >Alert Style >alert style  1Press S left/right to select the alerts tab[, volume tabi, messages tab], or settings tab#.2Press S up/down to scroll to the alert or volume setting you want to change, then press the center keys.3Select the setting value you want.4Press Back to exit and save your changes.To reset the default settings for an alert style:Find it: s >uSettings >Profiles >Alert Style >alert stylePress Options and select Reset.create new profileTo create a new profile with the ringtones and volume settings you specify:Find it: s >uSettings >Profiles >Alert Style >alert style  1Change alert style settings as described in the previous section.2Press Options and select Save asProfile.3Enter a name for the profile, then press Save to save it.Note: Profile alert settings also can be set by the theme. When you apply a new theme, you can choose to apply the theme’s alert settings to the current profile. Selecting this option changes the current profile to use the theme alert settings.
33customizeedit or delete profilesTo edit a profile:Find it: s >uSettings >Profiles  1Scroll to the profile.2Press Options and select Edit.Note: You can’t edit the Silent profile, or change some settings for some profiles.To delete a user-defined profile:Find it: s >uSettings >Profiles  1Scroll to the profile.2Press Options and select Delete.restore alert style settingsTo delete all user-defined profiles and restore your phone’s original alert style settings:Find it: s >uSettings >ProfilesPress Options and select Restore Sound Settings.display appearanceTo set the brightness of your display:Find it: s >uSettings >Phone Settings >Display Settings >BrightnessTo save battery life, the display can turn off when you’re not using your phone. To set the display timeout delay interval:Find it: s >uSettings >Phone Settings >Display Settings >Display TimeoutTo turn the display screensaver on or off:Find it: s >uSettings >Phone Settings >Display Settings >Screensaver >On or OffTip: To extend battery life, turn off the screensaver.
34customizeTo show a 12-hour or 24-hour digital clock in the home screen:Find it: s>uSettings >Phone Settings >Time & Date >Time Format >12Hour Clock or 24 Hour ClockTo set the date format in the home screen:Find it: s>uSettings >Phone Settings >Time & Date >Date FormatthemesUse a phone theme to personalize and manage the overall look and sound of your phone. Most themes include the following:To apply a theme:Find it: s >uSettings >Themes > themeTo download a theme, see page 52.sounds settings[images settings$Ringtone—notifies you of incoming callWallpaper—background image in home screenMessage Alert—indicates new text or multimedia message receivedWallpaper Layout— wallpaper position (Tile, Center, Fit-to-Screen)Email Alert—indicates new Email receivedScreen Saver—appears in display after specified period of inactivityVoicemail Alert—indicates new voicemail message receivedPower On Screen—appears as phone powers onSlide Tone—plays when you open or close sliderPower Off Screen—appears as phone powers offCalendar Alarm—reminds you of calendar eventSkins—overall look and feel of phone’s displaysounds settings[images settings$
35customizeTo  d e l e te  a  t h e m e:Find it: s >uSettings >Themes  1Scroll to the theme.2Press Options and select Manage. 3Select Delete.Note: You can delete only downloaded themes or custom themes you create.modify themeFind it: s >uSettings >Themes  1Scroll to the theme.2Press Options and select Edit.3Press S left/right to select the sounds tab[ or images tab$.4Press S up/down to scroll to the setting you want to change, then press the center key .s.5If changing Ringtone, Message Alert, Email Alert, Voicemail Alert, or Calendar Alarm, scroll to Music (to select a saved song), New Voice Note (to record and apply a new voice note), Voice Notes (to select a saved voice note), or Ringtones (to select or download a ringtone) and press Select. If changing an image setting, you may first need to select a location where image files are stored, or you may have the option to take a new photo to use as an image.6Scroll to the image file, sound file, or setting you want, then select it.7Press Save to save your theme changes.To reset the standard settings for a modified theme:Find it: s >uSettings >Themes > theme  1Press Options and select Manage.2Select Reset.
36customizeTo restore the default theme on your phone:Find it: s >uSettings >Themes  1Press Options and select Manage.2Select Restore to Default.create new themeFind it: s >uSettings >Themes, press Options >Create Theme or Create aCopytime & dateYour phone can automatically update the time and date. It uses the time and date for the Calendar.To synchronize time and date with the network:Find it: s>uSettings >Phone Settings >Time & Date >Auto-Update Time >OnTo manually set the time and date:Find it: s>uSettings >Phone Settings >Time & Date >Auto-Update Time   1Scroll to Off and press Select.2Scroll to Time and press the center keys.3To adjust the time, pressS left/right to scroll to a setting, then pressS up/down to change it. Press Set to save your settings.4Scroll to Date and press the center keys.5To adjust the date, pressS left/right to scroll to a setting, then pressS up/down to change it. Press Set to save your settings.To set your time zone:Find it: s>uSettings >Phone Settings >Time & Date >Time ZoneSelect a city in your time zone.
37customizeShortcut: Press keypad keys to enter the first letters of the city you want.answer optionsYou can use different ways to answer an incoming call. To turn on or turn off an answer option:Find it: s >uSettings >Call Settings >In-Call Setup >Answer OptionsNote: You always can pressN to answer a call.optionsAny Key AnswerAnswer by pressing any key.Open to AnswerAnswer by opening the phone slider.
38callscallscalls over a WiFi Internet connectionYou can use your phone to make and receive calls over an Internet connection (instead of a cellular network connection). To use an Internet connection, you must connect to your service provider through a WiFi CERTIFIED® wireless connection to a network access point.Note: Your phone's WiFi features are not allowed for outdoor operation in France. To avoid unlawful interference with radio signals, do not use the WiFi features in France unless you are indoors.WiFi setup wizardWhen you power on your phone, the WiFi Setup Wizard application automatically launches to help you connect your phone to your home access point. Follow the on-screen prompts to set up a WiFi connection to the access point.available networks listTo see a list of available access points within range of your phone:Find it: s>6 >WiFi >Available Networks
39callsYour phone lists available access points. The orange WiFi signal strength indicator À shows the strength of each WiFi connection. Other indicators can include:Scroll to the network access point you want to use, then press the Options key >Connect.create secure network connectionTo create and save a secure connection with a network access point:Find it: s>6 >WiFi >Available Networks  1If necessary, read the on-screen instructions and press Next to begin scanning for an access point.2If necessary, scroll to the network you want to secure, then press the center keys.3If prompted, enter a passcode.4On your phone, press Continue.Your phone creates a secure connection with the network, and saves the network profile in the Saved Networks list.Note: Your phone automatically connects to a network in the Saved Networks list when the phone is within range of the network access point.quick connectTo have your phone automatically locate and connect to an open (non-secure) network access point:Find it: s>6 >WiFi >Quick ConnectYour phone connects to the network access point with the best signal strength within range of your phone. If the first connection fails, the phone connects to the next available network.Á= saved networkÄ= secure access pointÃ= active network connectionÂ= active saved network connection
40callsTip: From the home screen, press Options and select Quick Connect to connect to an open access point.saved networks listTo see the network connection profiles you’ve saved on your phone:Find it: s>6>WiFi >Saved NetworksNote: Your phone automatically connects to a network in the Saved Networks list when the phone is within range of the network access point.add network to listTo manually set up a network access point and add it to the list:Find it: s>6WiFi >Saved Networks >Add New NetworkYou must enter the following configuration settings:view or edit network profileFind it: s>6>WiFi >Saved Networks  1Scroll to the network and press Options.2Select View Details or Edit Profile.send network profileTo send a network profile to another phone or PC in an SMS text message:Find it: s>6 >WiFi >Saved Networks  1Scroll to the network and press Options.optionsSSIDEnter the broadcast name that identifies the wireless access point.Profile NameEnter the name you want to use to identify the access point in the Saved Networks list.Security TypeSet to None, WEP, WPA-PSK, or WPA2-PSK.Non Broadcast SSIDSelect if the Access Point (AP) is a non-broadcasting AP.
41calls2Select Send To.receive network profileYour phone notifies you when you receive a network profile message from another phone or PC.Press Options, then press Save to save the network profile to your Saved Networks list.Tip: Press Options, then press View to see network details before you save the network profile to your phone.turn WiFi power on or offFind it: s>6 >WiFi >Set Up WiFi >WiFi PowerSelect On or Off.Note: To extend battery life, use this procedure to turn off WiFi power when not in use.turn off a call alertPress the external volume keys on the side of your phone to turn off the ringer before answering a call.recent callsYour phone keeps lists of incoming and outgoing calls, even for calls that didn’t connect. The most recent calls are listed first. The oldest calls are deleted as new calls are added.Shortcut: Press N in the home screen to see the Dialed Calls list.Find it: s >qRecent Calls  1Press S left/right to select a call list: All Calls, Dialed Calls, Answered Calls, Missed Calls, or Frequent Calls.2Press S up/down to scroll to a phone number.
42callsIcons indicate if the call was incoming-, outgoing+, or missed=. A check mark next to the icon indicates a connected call.•To call the number, press N.•To see call details (like time and date), press the center keys.•Press Options to perform other operations on the number (send a message, save to contacts, delete), or to set recent call options.redial  1Press N from the home screen to see the Dialed Calls list.2Scroll to the number you want to call and pressN.If you hear a busy signal and see Call Failed, pressN or Retry to redial the number. When the call goes through, your phone shows Connected and connects the call.return a callYour phone keeps a record of calls you did not answer and shows them on a Notifications list. When you see the list, scroll to the call you want to return and pressN.caller IDCalling line identification (caller ID) shows the phone number for an incoming call in your phone’s display.Your phone shows the caller’s name and picture when they’re stored in your contact list, or Incoming Call when caller ID information isn’t available.
43callsNote: Picture IDs aren’t available for contacts stored on the SIM card.Tip: Want to know who’s calling without even looking at your phone? To give one of your contacts a special ringtone, see page 80.To show or hide your phone number:Find it: s >uSettings >Call Settings >In-Call Setup >My Caller ID   1Select All Calls or Next Call Only.2Select Show IDorHide ID.Shortcut: To show or hide your phone number for the next call only, enter the number and (before you press the Send keyN) press Options, then select Show IDorHide ID.emergency callsYour service provider programs one or more emergency phone numbers, such as 911 or 112, that you can call at any time, even when your phone is locked or the SIM card is not inserted.Note: Check with your service provider, as emergency numbers vary by country. Your phone may not work in all locations, and sometimes an emergency call cannot be placed due to network, environmental, or interference issues. Do not solely rely on your wireless phone for essential communications such as medical emergencies.To make an emergency call: Turn your phone on, exit any open application such as games, dial the emergency number, then press the send keyN to call the emergency number.
44callsvoicemailYour network stores the voicemail messages you receive. To listen to your messages, call your voicemail number.Note: Your service provider may include additional information about using this feature.When you receive a voicemail message, your phone display shows New Voicemail and the new message indicator (.To check voicemail messages:Find it: s >gMessages >Call VoicemailShortcut: Your service provider may store your voicemail phone number in speed dial location #1. If so, you can press and hold 1 in the home screen to listen to your voicemail message(s).
45entertainmententertainmentmusic playerFor basic music player instructions, see your Quick Start Guide.Note: The unauthorized copying of copyrighted materials is contrary to the provisions of the Copyright Laws of the United States and other countries. This device is intended solely for copying non-copyrighted materials, materials in which you own the copyright, or materials which you are authorized or legally permitted to copy. If you are uncertain about your right to copy any material, please contact your legal advisor.set default song format & bit rate on computerMicrosoft® Windows® Media Player 11 lets you adjust format and bit rate settings to optimize sound quality or increase the number of song files you can store on your phone.Windows Media Audio format offers the optimal balance between file size and sound quality. Song files in this format tend to require more storage space than files that use Windows Media Audio Pro format.Windows Media Audio Pro format is designed for use in portable devices with limited storage capacity. The format provides improved sound quality at lower bit rates.
46entertainmentTo set the default file format and bit rate:  1Insert the music CD in your computer’s CD drive.2Launch Windows Media Player 11.3Select the “Rip” tab in Windows Media Player 11.4Click the “Rip “tab down arrow, select “Format,” then select “Windows Media Audio” or “Windows Media Audio Pro.”5Click the “Rip “tab down arrow again, select “Bit Rate,” then select the bit rate you want.convert iTunes® AAC files to MP3 files on computerUse the iTunes desktop application to convert standard iTunes AAC files to MP3 files that are compatible with Windows Media Player 11.Note: The iTunes desktop application can only convert AAC files ripped from a music CD. It can’t convert music files purchased from the iTunes store.  1Open the iTunes desktop application on your computer.2Select “Edit” and then “Preferences.” 3Click the “Advanced” tab and select “Importing.”4Open the “Import Using” pop-up menu, then select the “MP3 Encoder” option. Click “OK” to save your settings.5Select one or more songs in your iTunes music library, then select “Advanced” and then “Convert Selection to MP3.”The converted MP3 file copies appear in your computer’s music library alongside the original AAC files.When you load a song, information about the album, artist, genre (type of music), and composer is loaded into the Albums, Artists, Genres, and Composers folders in your music player. If this information is not available for a song, this
47entertainmentinformation loads into those folders as “Unknown.”manually transfer music to phone or memory cardWithout using Windows Media Player 11, you can manually copy or sync music files from the computer to phone memory, or to an optional microSD memory card in the phone. (To insert a memory card, your Quick Start Guide).Before you copy files to your phone, make sure the files are in a format that the phone recognizes. Your phone’s music player can play the following types of audio files: AAC, AAC+, MP3, WAV, WMA, Real Audio G2/8/10.on your phoneFind it: s >uSettings >Connections >USB Setting >Memory CardAttach the Motorola Original USB cable to the mini-USB port on your phone and to an available USB port on your computer. A Motorola Original USB cable and supporting software may be included with your phone. These tools are also sold separately.on your computerYour phone and memory card appear as removable disks on your computer.  1Find where your phone and memory card appear as “Removable Disk” icons (the “My Computer” window on a Windows PC, the desktop on a Macintosh® computer).2Double-click the “Removable Disk” icon for your phone or memory card.3To copy the desired files onto the phone or memory card, drag and drop them onto the appropriate removable disk icon.
48entertainment4When you finish, remove the phone safely from your computer:• If you are using a PC, right-click the “Safely Remove Hardware” icon in the system tray at the bottom of your computer screen, then select “USB Mass Storage Device.”• If you are using a Mac, select and drag the “Removable Disk” icon to the Trash.play musicTo play music on your phone:Find it: s>jMultimedia >MediaFinder >Music LibraryYour phone displays the My Music menu:The My Music menu includes:optionRecently PlayedView & play songs you played recently.Shuffle SongsPlay all songs in random order.Music LibraryOptions BackRecently PlayedShuffle SongsAll SongsPlaylistsArtistsAlbumsGenres
49entertainmentTip: Play it now! Press and hold the smart key (on the left side of the phone). The music player will begin playing the last song played.Note: If you receive a call during a song, the music player pauses the song until the call is over.Control song playback with the navigation key S:All SongsFind & play a song.Note: All songs are listed here. Some songs do not have Artist, Album, Genre, or Composer information (see page 46), so that information is not included.PlaylistsCreate or play a playlist.ArtistsFind & play music by an artist.AlbumsFind & play music from a specific album.GenresFind & play music from a specific genre (type of music) such as rock or jazz.ComposersFind & play music by a composer.optionmusic player controlspause/playPress Sup.fast forwardPress & holdSright (for at least two seconds).skip to next songPress & releaseSright.rewindPress & holdSleft (for at least two seconds).skip back to previous songWithin first two seconds of song, press & release Sleft.
50entertainmentWhile a song is playing, press Options to select music player options:return to song beginningAfter first two seconds of song, press & release Sleft.stop playbackPress Sdown.turn off music playerPress Back repeatedly until you return to the home screen.orPress O.optionsHideHide the music player while music plays. To see the music player again, go to the home screen, then pressSup.music player controlsManageShow song Properties, such as file name, type, and size.DeleteDelete the song file.Send toSend the song in a message or email, or send it to another device over a Bluetooth® connection.Apply toAdd the song to a playlist or make it a ringtone.options
51entertainmentDuring a song, the music player shows the song title, artist, album, and artwork, if available. To see a larger image of the artwork, press the center keys (press the center keys again to return to the music player).customize music playerFind it: s >jMultimedia >MediaFinder >Music LibraryPress Options and select Setup. Then select one of the following options:Use Bluetooth/ Use HandsetTo send the audio to a Bluetooth headset, turn on Bluetooth power, then select Use Bluetooth to connect to a recognized Bluetooth headset or search for a new headset.When a Bluetooth audio connection is active, select Use Handset to drop the Bluetooth connection and switch the audio back to the phone.Note: This option appears only when Bluetooth power is turned on.SetupCustomize settings.optionsoptionsShufflePlay songs in a random order.EqualizerCustomize music playback by turning on Bass Boost, Rock, Treble Boost, Vocal Boost, or Vocal Reducer.Auto- RepeatReplay the song or playlist when the last file finishes playing.Stereo EffectsSet Spatial Audio and Bass Boost to customize sound.Internet ConnectionSet your Internet connection preferences.
52entertainmentWhen you scroll to a song in a list and press Options, you may see additional options for the song and list, such as Delete, Send to, and Apply to.browserUse your phone’s full HTML browser to surf to your favorite Web sites, upload videos to a video blog, and download files and applications to your phone. Log on to your Internet-based email account to check your email on the go.To launch the browser:Find it: s >1Web Access >BrowserPress S up/down/left/right to scroll through Web pages. Scroll to a link and press s to select it. PressBack at any time to return to the previous screen.Some Web pages may contain a text entry window for exchanging information with a Web site. Scroll to the window, select it, and enter text as usual (for more information about text entry, see page 23).To bookmark the current Web page, press Options and select Active Page, then select Add Bookmark.To upload a video to a video blog site, see page 58.To download a media file, theme, or Java™ game or application to your phone, go to the page that links to the file, scroll to the link, and select it.To exit the browser, press Options and select Exit.To access all Web Access menu options:Find it: s >1Web AccessSelect one of the following options:optionsBrowserLaunch the browser.My BookmarksLaunch the browser and go to the bookmarked Web page you select.
53entertainmentcameraThe 2-megapixel digital camera on your phone can take photos at up to 1200 x 1600 pixels resolution. Just aim and shoot to take a photo, then press Send to share it with your friends.take photoFind it: s >jMultimedia >CameraShortcut: From the home screen, press the camera key on the lower right side of the phone (see page 3).My Web Pages????HistoryView your browsing history.Go to URLGo to a Web address that you enter.Browser SetupCreate and manage browser profiles and modify other browser settings.options370Zoomx1Options BackStorage(Phoneor MemoryCard)CameraMode(Photo orVideo)Remaining ShotsReturn to previous screen.ResolutionTimerSelect & adjust camera options.Press S up/down tosee camerasettings,left/right tochange.
54entertainmentTo take the photo in the viewfinder, press the center keys.•To store the photo, press the center keys.•To send the photo in a message, press Send (see page 61).•To discard the photo, press D.•To select other photo options, press Options. You can choose to Save Only, Discard, Send to (message, email, or Bluetooth connection), Apply to (wallpaper, screensaver, new or existing contact), Edit, or Print via (Bluetooth connection, USB connection, or memory card).When the camera viewfinder is active, press Options to set camera options: optionsCaptureTake a photo.Go To My MediaSee, edit, and delete stored pictures and photos.Video ModeSwitch to the video camera.Auto-TimerSet a timer for the camera to take a photo.Multi-ShotSet the camera to take multiple photos in sequence.options
55entertainmentview photoTo view a stored photo that you’ve taken:Find it: s >jMultimedia >MediaFinder >Pictures >Captured Pictures > photoauto-sendYou can set up your phone to automatically send the photos you take to a list of contacts you specify.First, activate the auto-save feature:Find it: s >jMultimedia >Camera  1Press Options and select CameraSettings. 2Select Auto-Save. 3Select Enable.Next, set the storage location for auto-saved photos:Find it: s >jMultimedia >CameraCamera SettingsCustomize camera settings: •Review Time •Tag •Default Name •Storage Location •Auto-Save •Auto-Send •Message Recipients •Picture Settings •Resolution •Shutter Tone •Quality •Video Settings •Resolution •Video Capture Tone •Quality •Video Length options
56entertainment  1Press Options and select CameraSettings. 2Select Storage Location. 3Select Phone or Memory Card.Then, activate auto-send:Find it: s >jMultimedia >Camera  1Press Options and select CameraSettings. 2Select Auto-Send.3Select Enable.To specify message recipients for the photos you take:Find it: s >jMultimedia >Camera  1Press Options and select CameraSettings.2Select Message Recipients.Tip: To send your photo in an MMS text message, the picture resolution must be set to X-Small, Small, or Medium. To set resolution: Press the center keys to open the main menu, select jMultimedia, then select Camera. Press Options and select CameraSettings, then select Picture Settings, then Resolution.
57entertainmentvideosrecord videoFind it: s >jMultimedia >Video Camera  1To begin video recording, press the center keys.2Press Stop to stop video recording.•To store the video, press the center keys.•To send the video in a message, press Send.•To discard the video, press D.•To select other video options, press Options. You can choose to Save Only, Discard, Send to (message, email, or Bluetooth connection), or Preview the video.Tip: To send your video in an MMS text message, the video length must be set to MMS Short or MMS Long. To  s e t  video length: From the video camera viewfinder, press Options and select CameraSettings, then select Video Settings, then Video Length.1:48:00Zoomx1Options BackStorage(Phoneor MemoryCard)Remaining MinutesResolutionAudio(On or Off)CameraMode(Photo orVideo)Return to previous screen.Select & adjustvideo camera options.Press S up/down tosee camerasettings,left/right tochange.
58entertainmentWhen the video camera viewfinder is active, press Options to set video recording options:upload video to blogUpload a video you’ve recorded to your video blog site:  1Launch your phone’s browser (press the center keys to open the menu, select1Web Access, then select Browser).2Go to a video blogging service Web site.3Log in to your account.4Scroll to UploadVideos and press the center keys.5Follow the browser prompts to scroll to the video you want to upload, then press the center keys.6Scroll to Upload and press the center keys.Your phone uploads the video to the blog.play videoYour phone can play the following types of video files: MPEG4 + AAC, H.263 + AAC, and Real Video + Audio.optionsCaptureBegin video recording.Go To My MediaSee, edit, and delete stored videos.Picture ModeSwitch to the photo camera.Audio On/OffTurn audio recording on/off.Camera SettingsCustomize camera settings (see page 55).
59entertainmentFind it: s >jMultimedia >MediaFinder >Videos  1Select Captured Videos, Downloaded Videos, All Videos, or By Date.2Scroll to a video and press the center keys.When a video is playing, press Options to select video options.Note: Your phone’s options may vary. Most options apply only to user-recorded videos, and are not available for pre-installed videos.video   name00:06 00:1210/15/2008-78KBTimer Shows % PlayedReturn toprevious screen.Select & adjust video camera options.Options BackPress S to pause/play,stop, or skipto previous/next video.Press s toswitch between actual size &full screen view.optionsPlay FullscreenShow the video in full screen. (Press the center keys to return to actual size.)ManageShow video Properties, such as file name, type, and size.DeleteDelete the video.ZoomShow the video at actual size, or scale the video to fit the viewing area.Send ToSend the video in a message or email, or send it to another device over a Bluetooth connection.
60entertainmentUse Bluetooth/ Use HandsetTo send the audio soundtrack to a Bluetooth headset, turn on Bluetooth power, then select Use Bluetooth to connect to a recognized Bluetooth headset or search for a new headset.When a Bluetooth audio connection is active, select Use Handset to drop the Bluetooth connection and switch the audio back to the phone.Note: This option appears only when Bluetooth power is turned on.SetupAdjust video settings.options
61messagesmessagestext messagingsend messageA message can contain text and pictures, sounds, or other media objects. You can add multiple pages to a message and put text and media objects on each page. You can send a message to other compatible phones or to email addresses.Find it: s >gMessages >Create Message  1Press keypad keys to enter text on the page (for more information about text entry, see page 23).To insert a picture, sound, or other media object on the page, press Options and select Insert. Select the file type and the file. (Note: File size restrictions may apply to pictures and videos sent in a message.)To insert another page, press Options and select Insert, then select Page. You can enter more text and objects on the new page.2When you finish the message, press Options and select Sending Options to set message options (such as Subject and Priority).3When you finish setting message options, press Done.4Press Send To to select message recipients. You can:
62messages•Select one or more entries from your contact list (press S to scroll to an entry, and press the center keys to select it).•Enter a new number or email address (press Options and select Enter Number or Enter Email).5Press Send to send the message.Your phone might tell you that this is a multimedia message, if it contains multiple pages or media objects. Some phones or networks don’t support multimedia messages. Press Yes to send the message.To save or cancel the message, press Options and select Save to Drafts or Cancel Message.receive messageWhen you receive a message, your phone plays an alert, and the internal display shows New Message with the new message indicatorU.To read the message, press View. If the message contains media objects:•Pictures and animations show as you read the message.•Sound files play as you read the message. Press the external volume keys on the side of your phone to change the sound volume.•Attached files are added to the end of the message. To open an attachment, select the file indicator or file name.To answer the message, press Options and select Reply.
63messagesadvanced message & email featuresfeaturessend a prewritten text templates >gMessages >Templates >Text Templates >text templatePress Options and select Send.set up email accountsYou can set up and use multiple email accounts on your phone:s >gMessages >Email >Add AccountNote: Your display shows a separate folder for each email account.send emails >gMessages >Emailuse a multimedia templateOpen a multimedia template with pre-installed media:s >gMessages >Templates >MM Templatesread new message or emailWhen your display shows New Message, press Read.read old messagess >gMessages >InboxAn icon beside each message shows if it is read>, unread], urgent<, or has an attachment*. Press Options to perform more actions on a message.read old emails >gMessages >EmailPress Options to perform more actions on a message.features
64messagesstore message objectsGo to a multimedia message page, then press Options and select Save/Use Content.create folderCreate a personal folder to store your messages.s >gMessages >My FoldersPress Options and select Create Folder.featuresbrowser messagesTo read messages received by your browser:When your display shows New Message, press View.To activate browser messages and adjust browser message settings:s >gMessagesPress Options and select Settings, then select Browser Messages.features
65messagesinfo servicesTo read subscription-based information services messages:When your display shows New Message, press View.To activate information services and adjust info services settings:s >gMessagesPress Options and select Settings, then select Info Services.features
66connectionsconnectionsMOTOSYNCYou can use several different over-the-air connection methods to synchronize information between your phone and a remote server.MOTOSYNC with Exchange ActiveSyncUse the Internet to synchronize your phone’s contact list, calendar entries, and email with an email account on a Microsoft® Exchange 2003 server.set up Exchange ActiveSyncConfirm that the Mobility option is enabled on the email account, and that data service is activated with your phone service provider (additional fees may apply for this service).To set up an ActiveSync partner:Find it: s>mOffice Tools >MOTOSYNC >Exchange ActiveSyncEnter your email account and server information, including Server Address, Domain, Username, Password, and DataConnection details. If necessary, contact your system administrator to obtain the information you need, or to help you connect your phone to the server.use Exchange ActiveSyncTo schedule your phone to automatically synchronize data with an Exchange ActiveSync partner:Find it: s>mOffice Tools >MOTOSYNC >Exchange ActiveSync
67connections  1Press Options, then select Auto Sync.2Select On.3Press OK to enter the time and days you want to synchronize.To manually synchronize your contacts, calendar, and email:Find it: s>mOffice Tools >MOTOSYNC >Exchange ActiveSync >Synchronize NowThe first synchronization may take several minutes, depending on the amount of data in your contacts list, calendar, and email on the Exchange 2003 server.MOTOSYNC with SyncMLCall a SyncML Internet server and synchronize your phone’s contact list and calendar entries with the server.To synchronize files with a partner you set up:Find it: s>mOffice Tools >MOTOSYNC >SyncMLIf no SyncML profile is stored on your phone, the phone prompts you to create a profile. Contact your IT system administrator to obtain the information you need to set up a profile.Note: If your phone can’t connect to the server, verify that your phone’s network service provider has data service activated on your phone (additional fees may apply for this service).file managerManage music and sound files, photos, videos, and other files stored on your phone, and on an optional removable microSD memory card.Find it: s >mOffice Tools >File ManagerNext, select a folder or Memory Card to see its contents.
68connectionsTo play a sound file or voice note, or view a photo or video, just scroll to the file and select it.To copy, move, or rename a file, scroll to the file and press Options, then select Manage. Other options let you delete, send, or apply the file. You can’t perform some operations on some copyrighted or pre-installed files.To copy files between your phone and a computer, you can use a cable connection (see page 69) or a Bluetooth® connection (see page 72).format memory cardTo format the memory card or see memory card properties (such as name and available memory):Find it: s >mOffice Tools >File Manager  1Scroll to the memory card.2Press Options, then select Memory Card.3Select FormatorProperties.move or copy files between phone and memory cardCaution: When you move a file to a new location, the file is deleted from its original location.Find it: s >mOffice Tools >File Manager  1If necessary, select the folder with the file you want to move or copy.2Scroll to the file you want to move or copy.3Press Options, then select Manage.4Select Move or Copy.Note: The Move and Copy options do not appear if the file is copyright-protected.5Scroll to the destination location, then press Place.
69connectionscable connectionsTo transfer data between your phone and a computer, insert the mini-USB port connector plug from a USB cable into your phone’s mini-USB port. Connect the other end of the cable to the computer.Note: A Motorola Original USB cable and supporting software may be included with your phone. These tools are also sold separately. Check your computer to determine the type of cable you need.To use your phone as a modem:Find it: s >uSettings >Connections >USB Setting >ModemNext, connect your phone to the computer.To transfer contact lists and calendar entries between your phone and computer: Run the optional Motorola Phone Tools accessory application on your computer. The Phone Tools software automatically switches your phone to the proper connection setting required to sync your phone. See the Phone Tools user’s guide for more information.To make data calls through a computer:Find it: s >uSettings >Connections >USB Setting >ModemNext, connect your phone to the computer and use the computer application to place or answer the call.To create a new data connection on your phone:Find it: s >uSettings >Connections >DataConnections >Add aConnection
70connectionsTo transfer files between your phone and a computer:See the instructions for manually transferring music files to the phone on page 47.To print an image over a USB PictBridge connection:Find it: s>uSettings >Connections >USB Setting >USB Printing  1Connect your phone to a PictBridge-compatible printer.2Select the image(s) you want to print, then press Options.3Select Print via, then select USB.Bluetooth® wireless connectionsYour phone supports Bluetooth wireless connections. You can connect your phone with an optional Bluetooth headset or Bluetooth car kit to make handsfree calls, or with a set of Bluetooth stereo headphones to listen to music stored on your phone. Connect your phone with a device that supports Bluetooth connections to exchange files, connect with a printer that supports Bluetooth connections to print images, or use your phone as a Bluetooth wireless modem to connect to the Internet.For maximum Bluetooth security, you should always connect Bluetooth devices in a safe, private environment.turn Bluetooth power on or offYour phone automatically turns Bluetooth power on when you use a Bluetooth feature.
71connectionsTo turn Bluetooth power on or off at any time:Find it: s >uSettings >Connections >Bluetooth  1Press Options, then select Setup Bluetooth.2Select Bluetooth Power, then select On,Note: To extend battery life and maximize Bluetooth security, use this procedure to set Bluetooth power to Off when not in use. Your phone will not connect to another device until you use a Bluetooth feature again, or set Bluetooth power back to On.place phone in discoverable modeAllow an unknown Bluetooth device to discover your phone:Find it: s >wSettings >Connections >Bluetooth >Options >Discoverable: On 3 MinutesThe Bluetooth indicator & in the home screen flashes when your phone is in discoverable mode.pair with other deviceNote: If you want to use your Motorola Bluetooth headset with both an audio device and your phone, use your phone’s Bluetooth menus to connect the phone with the headset. If you establish the connection by pressing a button on the headset, or if you allow the headset to connect automatically by turning it on, you may experience unexpected results. Before you try to connect your phone to a handsfree device for the first time, make sure the device is on and ready in pairing or bonding mode (see the device user’s guide). You can connect your phone with only one device at a time.Find it: s >uSettings >Connections >Bluetooth  1Press Options and select Search For Device.2Select the device type: All, Headset. Computer, Phone, PDA, Printer.
72connectionsYour phone lists the Bluetooth devices it finds within range.3Scroll to a device in the list.4Press the center keys to connect with the highlighted device.5If necessary, enter a mutually agreed upon passkey (such as 0000) on your phone and the device, then press OK to connect to the device.copy files to another deviceYou can copy a media file, contact, calendar event, or bookmark to another phone or computer that supports Bluetooth connections.Note: You can’t copy some copyrighted objects.Before you try to copy a file to another device, make sure the receiving device is on and ready in discoverable mode. Also, make sure the device is not busy with another Bluetooth connection.  1Pair with the other device (see page 71).2On your phone, scroll to the object that you want to copy to the other device.3Press Options, then:•For an image or sound file, select Send To, then select Bluetooth.•For a contact, select Share, select the contact, then select Bluetooth.•For a calendar event or bookmark, select Share Via, then select Bluetooth.4Select a recognized device name.orSelect [Search For Devices] to search for new devices, then select the device where you want to copy the object.5Press Options, then select Send.
73connections6If necessary, enter a mutually agreed upon passkey (such as 0000) on your phone and the device, then press OK to connect to the device.receive files from another deviceBefore you try to receive a file from another device, make sure your phone’s Bluetooth power is on (see page 70).  1Place your phone within range (approximately 10 meters/30 feet) of the other Bluetooth device, and send the file from the device. (If necessary, refer to the user manual for the device for additional instructions.)If your phone and the sending device were not previously paired, place your phone in discoverable mode so the sending device can locate it:2When prompted to accept the sent object, scroll to Yes or Grant and press the center keys.Your phone notifies you when file transfer is complete, and saves the file.send photo to printerYou can send a photo to a printer that supports Bluetooth connections.Note: You can print A4, US Letter, and 4x6 size pages. To print another size, copy the image to a linked computer and print it from there.  1On your phone, take a new photo or scroll to a stored image that you want to print.2Press Options and select Print via, then select Bluetooth.Note: If you see Service Not Supported when you try to print, select instead Send To, then Bluetooth. (The Send To option does not print the image name or date stamp.)
74connections3Select a recognized printer name, or press Options and select Search For Printers to search for another printer where you want to send the image.4If available, modify print options.advanced Bluetooth featuresNote: A device is recognized after you connect to it once (see page 71).featuresdrop connection with deviceScroll to the connected device name and press the center keys to disconnect.remove device from device listScroll to the device name and press Options. Select Manage, then select Remove Device.Note: You can’t remove a device from the list while your phone is connected to the device.switch audio to Bluetooth headset or Bluetooth car kit during callPress Options and select Use Bluetooth.To switch audio back to the phone, press Options and select Use Handset.edit properties of recognized deviceScroll to the device name, press Options and select Manage, then select Edit Device.set Bluetooth optionss >uSettings >Connections >BluetoothPress Options and select Manage, then select Setup Bluetooth.features
75connectionsphone updatesSometimes, we think of ways to make your phone’s software faster or more efficient after you’ve purchased your phone. You can find out if your phone can be updated at: www.hellomoto.com/updateNote: Software updates do not affect your contact list or other personal entries or files. If you receive a software update but choose to install it later, see page 87.
76other features—advanced callingother featuresadvanced callingTo use voice commands for calling, see page 27.featureshold a callPress Options and select Hold to put all active calls on hold.mute a callPress Option and select Mute to place all active calls on mute.call waitingWhen you’re on a call, you’ll hear an alert if you receive a second call. Press N to answer the new call.•To switch between calls, press Switch.•To connect the two calls, press Link.•To end the call on hold, press Options and select End Call On Hold.To turn call waiting on or off:s>uSettings >Call Settings >In-Call Setup >Call Waiting >OnorOfffeatures
other features—advanced calling77make another call during a callDuring a call:Press Options and select New Call. Enter a number to call or press Options and select Browse Contacts.conference callDuring a call:Press Options and select New Call. Dial the next number and press N, then press Options and select Link Calls.transfer a callDuring a call:Press Options and select Transfer Call. Dial the transfer number and pressN.call forwardingSet up or cancel call forwarding:s >uSettings >Call Settings >Call Forwardfeaturescall barringRestrict outgoing or incoming calls:s >uSettings >Call Settings >Call Barringspeed dialYour phone can store nine phone numbers that you can call with a single key press. To store a speed dial number:s >LContactsPress Options and select Setup. Select Speed DialList, then a speed dial location. To assign the speed dial number to contact, select Assign Contact. To assign the speed dial number to a number you enter, select Enter Number.To  call a speed dial number, press and hold the single-digit speed dial number for one second.features
78other features—advanced callinginternational callsIf your phone service includes international dialing, press and hold 0 to insert your local international access code (indicated by +). Then, press number keys to dial the country code and phone number.TTY callsSet up your phone for use with an optional TTY device:s >uSettings >Phone Settings >TTY Settingsfeaturesfixed dialWhen you turn on fixed dialing, you can call only numbers stored in the fixed dial list.Note: You must enter your SIM PIN2 code to turn fixed dialing on or off. If you forget your PIN2 code, contact your service provider.Turn fixed dialing on or off:s >uSettings >Call Settings >Fixed Dialing >On or OffUse the fixed dial list:s >mOffice Tools >Dialing Services >Fixed DialDTMF tonesActivate DTMF tones:s >uSettings >Call Settings >Dialing Setup >DTMFSend DTMF tones during a call:Press number keysfeatures
other features—contacts79contactsFor basic contact list features, see your Quick Start Guide.featuresadd new contacts >LContacts >Create ContactPress S left/right to select the details tabw, address tabu, ID tab<, or notes tabx. PressS up/down to scroll to information you want to enter or change, then press the center keys to select it.call contacts >LContactsScroll to the contact and pressN.Note: If a contact has multiple phone numbers or email addresses, press S left/right to select the number or email address you want.send message to contacts >LContactsScroll to the contact and press Options, then select Send Message.features
80other features—contactsadd additional phone number or email address to contacts >LContactsScroll to the contact and press Options, then select Edit. Select the details tabw, then scroll up/down to an empty Number or Email field and press the center keys to select it.set picture ID for contactAssign a photo or picture to show in the display when you receive a call from a contact:s >LContactsScroll to the contact and press Options, then select Edit. Select the ID tab<, then scroll up/down to Picture ID and press the center keys to select itfeaturesset ring ID for contactAssign a distinctive call alert (ring ID) for a contact:s >LContactsScroll to the contact and press Options, then select Edit. Select the ID tab<, then scroll up/down to Ring ID and press the center keys to select it.assign contact to categorys >LContactsScroll to the contact and press Options, then select Edit. Select the details tabw, then scroll up/down to Category and press the center keys to select it.features
other features—contacts81set category views >LContactsPress Options and select Filter By.You can display contacts by predefined category (Email, Family, Friends, Work), or contacts in a category that you create (select Create Category).create group mailing listAssign contacts to a group message list or email list:s >LContactsPress Options and select Create List, then select Message or Email.featuresshow contact photosShow contacts with picture ID photos, or as a text list:s >LContactsPress Options and select Setup, then select Default View. Next, select Thumbnail or List.set contact list sort orders >LContactsPress Options and select Setup, then select Default Sort Order. Next, select First Name or Last Name.features
82other features—contactscreate and use private contactsIdentify one or more contacts as private contacts. You must enter your six-digit security code to access the private contacts on your contact list.s >LContactsPress Options and select Setup, then select Private Contacts.import contacts to phone memoryImport all contacts to phone memory, from the SIM card or from another location:s >LContactsPress Options and select Import Contacts, then select SIM Card or File Manager.featuresmanage SIM card contactss >LContactsPress Options and select Setup, then select SIM Card Manager.Delete contacts stored on your SIM card, or import contact to the SIM card from phone memory, or from another location.features
other features—contacts83send contact(s) to another deviceSend one or more contacts to another phone, computer, or device:s >LContactsScroll to the contact and press Options, then select Share. Press the center keys to select the current contact. Press S up/down to scroll to Bluetooth, Messaging, or Email transfer method, then press Select to select it.To send multiple contacts, press Options and select Share, then select Multiple Contacts (instead of the current contact).featuresdelete contact(s)Delete one or more contacts from your contact list:s >LContactsScroll to the contact and press Options, then select Delete. Press the center keys to select the current contact, then press Yes to confirm deletion.To delete multiple contacts, press Options and select Delete, then select Multiple Contacts (instead of the current contact).features
84other features—personalizepersonalizefeatureslanguageSet menu language:s >uSettings >Phone Settings >LanguageremindersSet the reminder alert for event notifications:s >uSettings >Profiles, press S left/right to select the settings tab#, >Reminder Alertreset settingsReset default settings for all options except the unlock code, security code, and lifetime timer:s >uSettings >Phone Settings >Reset >Reset All SettingsNote: This option requires you to enter your six-digit security code (see page 29).delete dataCaution: This option erases all information you have entered (including contacts and calendar entries) and content you have downloaded (including photos and sounds) stored in your phone’s memory. After you erase the information, you can’t recover it.This option does not delete SIM card information:s >u Settings >Phone Settings >Reset >Delete All DataNote: This option requires you to enter your six-digit security code (see page 29).features
other features—call times & costs85call times & costsNetwork connection time is the elapsed time from the moment you connect to your service provider's network to the moment you end the call by pressingO. This time includes busy signals and ringing.The amount of network connection time you track on your resettable timer may not equal the amount of time for which you are billed by your service provider. For billing information, contact your service provider.delete memory card informationCaution: This option erases all information you have entered (including contacts and calendar entries) and content you have downloaded (including photos and sounds) stored On your memory card and/or SIM card. After you erase the information, you can’t recover it.s >u Settings >Phone Settings >Reset >Delete Memory CardsNote: This option requires you to enter your six-digit security code (see page 29).featuresfeaturescall timesSee call timers:s >qRecent CallsPress Options and select Call Times.
86other features—handsfreehandsfreeNote: The use of wireless phones while driving may cause distraction. Discontinue a call if you can’t concentrate on driving. Additionally, the use of wireless devices and their accessories may be prohibited or restricted in certain areas. Always obey the laws and regulations on the use of these products.in-call timerShow call time information during a call:s >uSettings >Call Settings >In-Call Setup >In-Call TimerSelect Display to view call Time, Cost, Total Cost, or Credit Available.Select Beep to set your phone to play an audible tone every sixty seconds during a call, or at intervals you specify.call costSee call cost trackers and credit information:s >qRecent CallsPress Options and select Call Costs.featuresdata volumesSee data volume meters:s >qRecent CallsPress Options and select DataVolumes.features
other features—network87networkfeaturesauto answer (headset)Automatically answer calls when connected to a car kit or headset:s >uSettings >Phone Settings >Headset Settings >Auto-Answervoice dial (headset)Enable voice dial with headset send/end key:s >uSettings >Phone Settings >Headset Settings >Voice Dialfeaturesnetwork settingsSee network information and adjust network settings:s >uSettings >Networksoftware updateYour service provider can send updated phone software over-the-air to your phone. When your phone receives a software update, you can install it immediately, or defer installation until later. To install a deferred software update:s >uSettings >Phone Settings >OTA Updates >Update Software
88other features—personal organizerpersonal organizerfeaturesset alarms >mOffice Tools >Alarm ClockShortcut: From the home screen, press Options and select Set Alarm.turn off alarmWhen the display shows an alarm: To turn off the alarm, press Dismiss or O.To set an eight-minute delay, press Snooze.set calendar default views >mOffice Tools >Calendar, press Options >Switch Viewadd new calendar events >mOffice Tools >CalendarScroll to and select the day, then the start time.Scroll left/right to select different tabs, and enter the appropriate information for each. When finished, press Save.You can set a music or sound file, voice note, or video as a calendar event reminder. When creating a calendar event, select Alarm Style, then alarm type. Scroll to the file (or create a new file) and press Insert.see calendar events >mOffice Tools >Calendar > eventTo edit event details, press Options and select Edit.features
other features—personal organizer89calendar event reminderWhen the display shows and sounds an event reminder:To see reminder details, select Open Event.To close the reminder, press Dismiss.send calendar event to another deviceSend a calendar event to another phone, computer, or device:s >mOffice Tools >Calendar > eventPress Options and select Share via, then select Bluetooth or Message.featuresmanage downloaded filesManage files and applications that you’ve downloaded onto your phone from the browser or over a Bluetooth® connection:s >mOffice Tools >DownloadManagerworld clockShow time and date information for multiple cities around the world:s >mOffice Tools >World Clocktask listCreate a checklist of tasks you need to perform, and set your phone to notify you when task deadlines arrive:s >mOffice Tools >Task Listfeatures
90other features—personal organizernotesWrite and store notes on your phone:s >mOffice Tools >Notesrecord voice notes >jMultimedia >Voice RecorderPress the center keys to start recording. Press Stop to stop recording. To save the voice note, press Save.To perform various actions on the voice note, press Options.Note: Recording of phone calls is subject to varying State and Federal laws regarding privacy and recording of phone conversations. Always obey the laws and regulations on the use of this feature.featuresplay voice notePlay back a voice note you’ve recorded:s >jMultimedia >MediaFinder >Voice Notes >voice notecalculators >mOffice Tools >Calculatorcurrency converters >mOffice Tools >CalculatorPress Options and select Set Exchange Rate. Enter exchange rate and press Set. Enter the amount to be converted and press Options, then select Convert Currency.features
other features—security91securityfun & gamesfeaturesSIM PINCaution: If you enter an incorrect PIN code three times before the correct code, your SIM card is disabled, and your display shows SIM Blocked.Lock or unlock the SIM card:s >uSettings >Security >SIM LockWhen prompted, enter your SIM PIN code.lock applications >uSettings >Security >Application LockWhen prompted, enter your unlock code (see page 29).manage certificatesEnable or disable Internet access certificates stored on your phone:s>uSettings >Security >CertificatesCertificates are used to verify the identity and security of Web sites when you download files or share information.featuresstart a game or applicationStart a Java™ game or application:s >jMultimedia >Games > game or applicationfeatures
92other features—fun & gamesairplane modeTurn off your phone’s calling features in locations where wireless phone use is prohibited. This lets you use the music player and other non-network features while you are on an airplane, without interfering with airplane communications.s >uSettings >Phone Settings >Airplane Mode >OnTo reactivate your phone’s calling features, turn off airplane mode.features
93service & repairsservice & repairsIf you have questions or need assistance, we're here to help.Go to www.motorola.com/consumer/support, where you can select from a number of customer care options. You can also contact the Motorola Customer Support Center at 1-800-331-6456 (United States), 1-888-390-6456 (TTY/TDD United States for hearing impaired), or 1-800-461-4575 (Canada).
94SAR DataSpecific Absorption Rate DataSAR DataThis model meets international guidelines for exposure to radio waves.Your mobile device is a radio transmitter and receiver. It is designed not to exceed the limits for exposure to radio waves recommended by international guidelines. These guidelines were developed by the independent scientific organization ICNIRP and include safety margins designed to assure the protection of all persons, regardless of age and health.The guidelines use a unit of measurement known as the Specific Absorption Rate, or SAR. The ICNIRP SAR limit for mobile devices used by the general public is 2 W/kg and the highest SAR value for this device when tested at the ear is ___ W/kg.1 As mobile devices offer a range of functions, they can be used in other positions, such as on the body as described in this user’s guide.2 In this case, the highest tested SAR value is ___ W/kg.1As SAR is measured utilizing the device’s highest transmitting power, the actual SAR of this device while operating is typically below that indicated above. This is due to automatic changes to the power level of the device to ensure it only uses the minimum level required to reach the network.While there may be differences between the SAR levels of various phones and at various positions, they all meet the governmental requirements for safe exposure. Please note that improvements to this product model could cause differences in the SAR value for later products; in all cases, products are designed to be within the guidelines.The World Health Organization has stated that present scientific information does not indicate the need for any special precautions for the use of mobile devices. They note that if you want to reduce your exposure then you can do so by limiting the length of calls or using a “handsfree” device to keep the mobile phone away from the head and body.Additional Information can be found on the websites of the World Health Organization (http://www.who.int/emf) or Motorola, Inc. (http://www.motorola.com/rfhealth).1. The tests are carried out in accordance with international guidelines for testing. The limit incorporates a substantial margin for safety to give additional protection for the public and to account for any variations in measurements. Additional related information includes the Motorola testing protocol, assessment procedure, and measurement uncertainty range for this product.2. Please see the Safety and General Information section about body worn operation.
EU Conformance95European Union Directives Conformance StatementEU ConformanceHereby, Motorola declares that this product is in compliance with:•The essential requirements and other relevant provisions of Directive 1999/5/EC•All other relevant EU DirectivesThe above gives an example of a typical Product Approval Number.You can view your product’s Declaration of Conformity (DoC) to Directive 1999/5/EC (to R&TTE Directive) at www.motorola.com/rtte. To find your DoC, enter the Product Approval Number from your product’s label in the “Search” bar on the Web site.Information from the World Health OrganizationWHO InformationPresent scientific information does not indicate the need for any special precautions for the use of mobile phones. If you are [France Only]0168 Product Approval Number
96Privacy and Data Securityconcerned, you may want to limit your own or your children’s RF exposure by limiting the length of calls or by using handsfree devices to keep mobile phones away from your head and body.Source: WHO Fact Sheet 193Further information: http://www.who.int./peh-emfPrivacy and Data SecurityPrivacy and Data SecurityMotorola understands that privacy and data security are important to everyone. Because some features of your mobile device may affect your privacy or data security, please follow these recommendations to enhance protection of your information:• Monitor access—Keep your mobile device with you and do not leave it where others may have unmonitored access. Lock your device’s keypad where this feature is available.• Keep software up to date—If Motorola or a software/application vendor releases a patch or software fix for your mobile device which updates the device’s security, install it as soon as possible.• Erase before recycling—Delete personal information or data from your mobile device prior to disposing of it or turning it in for recycling. For step-by-step instructions on how to delete all personal information from your device, see the section entitled “master clear” or “delete data” in this user’s guide.Note: For information on backing up your mobile device data before erasing it, go to www.motorola.com and then navigate to the “downloads” section of the consumer Web page for “Motorola Backup” or “Motorola Phone Tools.”• Understanding AGPS—In order to comply with emergency caller location requirements of the FCC, certain Motorola mobile devices incorporate Assisted Global Positioning System (AGPS) technology. AGPS technology also can be used in non-emergency applications to track and monitor a user’s location—for example, to provide driving directions. Users who prefer not to permit such tracking and monitoring should avoid using such applications.If you have further questions regarding how use of your mobile device may impact your privacy or data security, please contact Motorola at privacy@motorola.com, or contact your service provider.
OSS Information97OPEN SOURCE SOFTWARE INFORMATIONOSS InformationFor instructions on how to obtain a copy of any source code being made publicly available by Motorola related to software used in this Motorola mobile device you may send your request in writing to:The Motorola website opensource.motorola.com also contains information regarding Motorola’s use of open source.Motorola has created the opensource.motorola.com to serve as a portal for interaction with the software community-at-large.To view additional information regarding licenses, acknowledgments and required copyright notices for open source packages used in this Motorola mobile device, please select “Legal Notices” from Phone Settings.MOTOROLA, INC.OSS Management600 North US Hwy 45Libertyville, IL 60048USA
98Driving SafetySmart Practices While DrivingDriving SafetyDrive Safe, Call Smart SMCheck the laws and regulations on the use of mobile devices and their accessories in the areas where you drive. Always obey them. The use of these devices may be prohibited or restricted in certain areas. Go to www.motorola.com/callsmart for more information.Your mobile device lets you communicate by voice and data—almost anywhere, anytime, wherever wireless service is available and safe conditions allow. When driving a car, driving is your first responsibility. If you choose to use your mobile device while driving, remember the following tips:• Get to know your Motorola mobile device and its features such as speed dial and redial. If available, these features help you to place your call without taking your attention off the road.• When available, use a handsfree device. If possible, add an additional layer of convenience to your mobile device with one of the many Motorola Original handsfree accessories available today.• Position your mobile device within easy reach. Be able to access your mobile device without removing your eyes from the road. If you receive an incoming call at an inconvenient time, if possible, let your voice mail answer it for you.• Let the person you are speaking with know you are driving; if necessary, suspend the call in heavy traffic or hazardous weather conditions. Rain, sleet, snow, ice, and even heavy traffic can be hazardous.• Do not take notes or look up phone numbers while driving. Jotting down a “to do” list or going through your address book takes attention away from your primary responsibility—driving safely.• Dial sensibly and assess the traffic; if possible, place calls when your car is not moving or before pulling into traffic. If you must make a call while moving, dial only a few numbers, check the road and your mirrors, then continue.• Do not engage in stressful or emotional conversations that may be distracting. Make people you are talking with aware you are driving and suspend conversations that can divert your attention away from the road.
Driving Safety99• Use your mobile device to call for help. Dial 911 or other local emergency number in the case of fire, traffic accident, or medical emergencies.*• Use your mobile device to help others in emergencies. If you see an auto accident, crime in progress, or other serious emergency where lives are in danger, call 911 or other local emergency number, as you would want others to do for you.*• Call roadside assistance or a special non-emergency wireless assistance number when necessary. If you see a broken-down vehicle posing no serious hazard, a broken traffic signal, a minor traffic accident where no one appears injured, or a vehicle you know to be stolen, call roadside assistance or other special non-emergency wireless number.** Wherever wireless phone service is available.
100indexindexAabc mode  25access point connection  38accessories  17, 70, 86active line indicator  22airplane mode  29, 92alarm clock  88alertset  26, 31, 34turn off  26, 41alert profile  31alert style profiles  22answer a call  37audio file formats  47audio player  45Bbattery  18battery charge indicator light  18battery indicator  23battery life, extend  18, 33, 41, 71blog  58Bluetooth connectionsmake phone discoverable  71Bluetooth indicator  22Bluetooth wireless  70bonding. See Bluetooth wirelessbrightness  33browser  52, 64, 89browser messages  64Ccables, using  69calculator  90calendaradd event  88send event  89set view  88synchronize  66, 67callanswer  37waiting  76call alert  80call barring  29, 77call forward indicator  22call forwarding  77call timers  85, 86caller ID  42, 80camera  53, 57car kit  86
index101center key  17certificate management  91clear/back key  2, 24clock  36codes  29, 30conference call  77contact listadd entry  79filter  81picture ID  43send contact  83synchronize  66, 67view  81costs, track  86customer support  93Ddata call  86date  36delete data  84delete text  24dial a phone number  78dialed calls  41digital audio  45display  4, 21, 33download files  52download manager  89download media objects  64drafts folder  62DTMF tones  78Eearpiece volume  26EDGE indicator  22emailcreate folder  64read  63send  63setup  63synchronize  66email address  79emergency number  43Enter Unlock Code message  29Ffile manager  67filter contacts  81fixed dial  78forward calls  77GGPRS indicator  22group mailing list  81Hhandsfree speaker  26headset  86hold a call  76home screen  4, 21Iin-call indicator  22Incoming Call message  43
102indexinformation services  65international access code  78Internet connection  38Kkeypad  37keypad volume, adjust  31, 32Llanguage  84linking. See Bluetooth wirelesslocation indicator  22lockapplication  91external keys  30phone  30SIM card  91Low Battery message  23Mmedia playback  31, 32media volume, adjust  31, 32memory card  68menu  4, 21menu icons  21menu key  17messageread  62, 63send  61message indicator  22, 62message reminders  84mini-USB port  3, 18, 69Missed Calls message  42MOTOSYNC  66, 67MP3 sound files  45multimedia message  61, 63music player  45albums  49artists  49composers  49genres  49My Music menu  48playlists  49recently played  48shuffle songs  48songs  49mute a call  76Nnavigation key  2, 17network settings  87notes  90numeric entry mode  26Oopen to answer  37optional accessory  17optional feature  17Ppairing. See Bluetooth wirelesspasswords. See codes
index103personalize  84phone numberstore  79photo  53picture ID  43, 80PIN code  29, 91PIN2 code  29, 78power/end key  2predictive text entry  24printing  70, 73profile indicator  22profiles  22, 31push bar  2, 3Rreceived calls  41recent calls  41redial  42reminders  84repairs  93reset settings  84resolution  55return a call  42ring ID  80ring style, setting  26ringer ID  43ringer volume  26ringer volume, adjust  31, 32ringtone  31, 34, 50Ssafety information  10safety tips  98saved networks  39Screen3  17, 21screensaver  33, 34security code  29send key  2signal strength indicator  22silent profile  31SIM Blocked message  91SIM card  29, 78, 91SIM card, delete information  85skin  34slider  37smart key  3soft keyleft  2right  2soft keys  21software update  75, 87speakerphone  86speakerphone key  3speed dial  77store phone numbers  79support  93symbol entry mode  26synchronize  66, 67Ttask list  89technical support  93text edit  24
104indextext entry  23text entry mode  25text message  61text messaging  61text templates  63theme  34time  36timers  85, 86transfer a call  77TTY device  78Uunlockapplication  91external keys  30phone  29, 30SIM card  91unlock code  29, 30USB cables  69Vvibrate profile  31video  57video blog  58video file formats  58voice command key  27voice commands  27voice dial  27, 87voice key  3voice note  90voicemail  44voicemail message indicator  44volume  26, 31, 32volume keys  3Wwallpaper  34Web pages  52WHO information  96WiFi  38WiFi signal strength indicator  39word text entry mode  24world clock  89U.S. patent Re. 34,976
www.motorola.comCMYCMMYCYCMYKv467108.A6.UG.Back.eps   9/11/2007   8:56:39 AM

Navigation menu