Motorola Mobility P56JF1 Portable Cellular/ PCS CDMA Transceiver with Bluetooth User Manual
Motorola Mobility LLC Portable Cellular/ PCS CDMA Transceiver with Bluetooth
UserManual.wiki
>
Motorola Mobility
>
P56JF1 User Manual
Exhibit 8 Users Manual
Navigation menu
Upload a User Manual
Namespaces
Wiki Guide
HTML
PDF
Info
Views
User Manual
Discussion / Help
Navigation
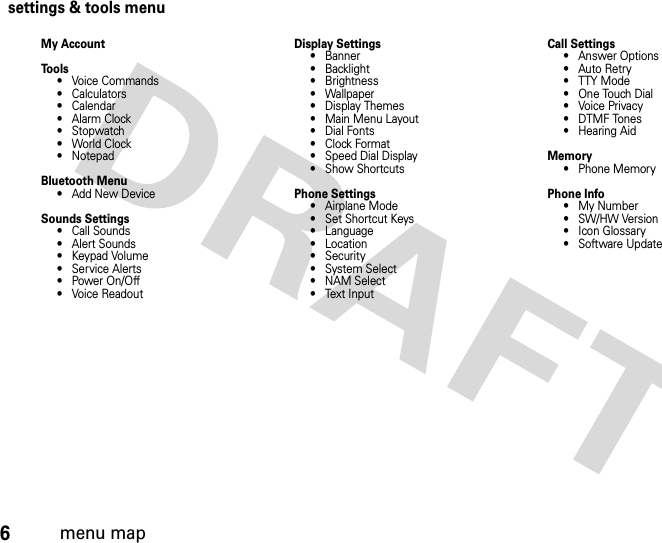
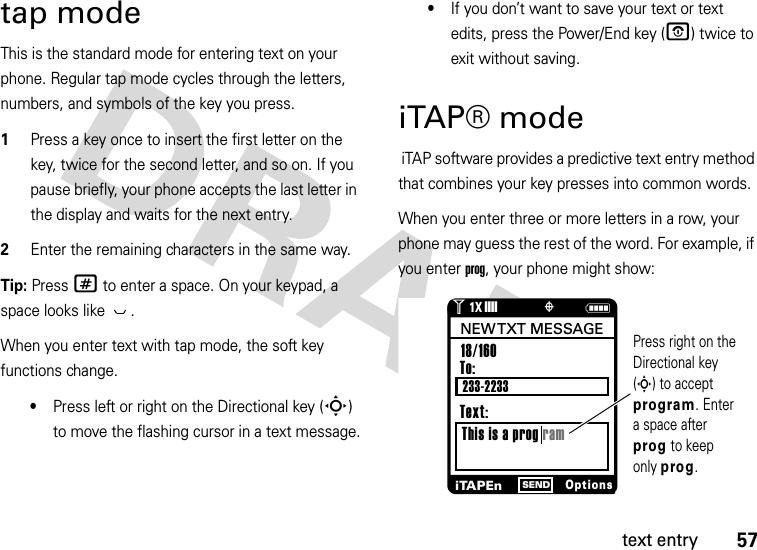
![menu map5menu mapmain menu]MEDIA CENTER *• Music & Tones•Picture•Games• Mobile Web• Browse & Download• Extras)MESSAGING• New Message• Inbox• Sent•Drafts•Voicemail• Mobile IM *•Email*•Chat*[CONTACTS• New Contact• Contact List• Groups• Speed Dials• In Case of Emergency*RECENT CALLS• Missed• Received•Dialed•All•View Timers(SETTINGS & TOOLS• (see next page)* optional services This is the standard main menu layout. Your phone’s menu may be a little different.](https://usermanual.wiki/Motorola-Mobility/P56JF1/User-Guide-983792-Page-7.png)

![30personalize2Use the Directional key (S) to scroll to (SETTINGS & TOOLS and press the Center Select key (s).3Scroll to Sound Settings and press the Center Select key (s) (OK).4Scroll to Power On/Off and press the Center Select key (s) (OK).5Scroll to Power On or Power Off and press the Center Select key (s) (OK).6Select On or Off and press the Center Select key (s) (OK).Note: Master Volume must be set to High, Med High, Med, Med Low, or Low.7Press the Power/End key (O) to return to the main screen.get ringtones 1Press the Center Select key (s) to open the menu.2Use the Directional key (S) to scroll to ]MEDIA CENTER and press the Center Select key (s).3Select Music & Tones by pressing the Center Select key (s) (OK).4Use the Directional key (S) to scroll to Get New Ringtones and press the Center Select key (s) (OK).5On the GET NEW RINGTONES screen, select Get New App and press the Center Select key (s) (OK).Your phone connects to the ringtone collections site. Follow the prompts on the screen to browse ringtone lists and to select and download a ringtone.](https://usermanual.wiki/Motorola-Mobility/P56JF1/User-Guide-983792-Page-32.png)

![47callsreturn missed callsYour phone keeps a record of your missed calls, and displays [Number] Missed Calls. 1When you see the missed call alert, select View Now and press the Center Select key (s) (OK) to see the missed calls list.orSelect View Later and press the Center Select key (s) (OK). The missed call indicator (s) appears on the bottom of the main screen until you view recent calls by pressing the Send key (N).2Use the Directional key (S) to scroll to the call you want to return.3Press the Send key (N) to make the call.speed dialNote: Speed dial number 1 is already assigned to your voicemail number.To assign a speed dial number to an entry: 1Press the Center Select key (s) to open the menu at [CONTACTS, and then press the Center Select key (s). EraseDelete the selected entry (if the entry is not locked).LockLock selected entry so it cannot be erased.Erase AllDelete all unlocked entries.View TimersGo to the View Timers screen to see the length of each call.options](https://usermanual.wiki/Motorola-Mobility/P56JF1/User-Guide-983792-Page-49.png)


![69entertainmentdownload pictures 1Press the Center Select key (s) to open the menu.2Use the Directional key (S) to scroll to ]MEDIA CENTER and press the Center Select key (s).3Scroll to Picture and press the Center Select key (s) (OK).4Scroll to Get New Pictures and press the Center Select key (s) (OK).5With Get New App highlighted, press the Center Select key (s) (OK) to connect to the picture catalog.Note: Normal airtime and/or carrier usage charges apply.manage pictures 1Press the Center Select key (s) to open the menu.2Use the Directional key (S) to scroll to ]MEDIA CENTER and press the Center Select key (s).3Scroll to Picture and press the Center Select key (s) (OK).4Scroll to My Pictures and press the Center Select key (s) (OK) to view a list of pictures.To view a picture, scroll to the picture and press the Center Select key (s) (VIEW).MultishotSet your camera to take 4, 6, or 8 photos in rapid succession.Fun FrameGo to ADD FUN FRAME to select a custom frame for your photo.option](https://usermanual.wiki/Motorola-Mobility/P56JF1/User-Guide-983792-Page-71.png)
![70entertainmentWhile looking at a picture, press the Right Soft key (p) (Options) to see the following options: Send, Set As, To Online Album, Zoom, Edit, Rename, Lock, or File Info.Note: The OPTIONS menu includes different options for locked or preloaded images. You will also see different options if you are looking at a picture in the My Pictures screen.fun & gamesNote: A lock (9) icon next to a picture or sound means that the file is protected, and you cannot send, copy, or delete it.launch game or application 1Press the Center Select key (s) to open the menu.2Use the Directional key (S) to scroll to ]MEDIA CENTER and press the Center Select key (s).3Scroll to Games and press the Center Select key (s) (OK).4Scroll to the game or application you want to launch and press the Center Select key (s) (OK).download game or applicationDownload a game or application: 1Press the Center Select key (s) to open the menu.2Use the Directional key (S) to scroll to ]MEDIA CENTER and press the Center Select key (s).](https://usermanual.wiki/Motorola-Mobility/P56JF1/User-Guide-983792-Page-72.png)

![84connectionsNote: Breaking the link with your computer does not turn off Bluetooth power on your phone. Turning Bluetooth power off conserves battery charge.connect with another phoneYou can use a Bluetooth connection to transfer a contact or file to another phone. To transfer a contact to another phone:Note: Make sure the phone receiving the entry has Bluetooth power on and is in Find Me mode. The receiving device must also be capable of receiving a vCard. Not all Bluetooth devices have this capability. 1From the main screen, press the Right Soft key (p) (Contacts) to open the Contact List.2Use the Directional key (S) to scroll to the entry you want to transfer and press the Right Soft key (p) (Options).3Scroll to Send Name Card and press the Center Select key (s) (OK).4Scroll to Bluetooth and press the Center Select key (s) (OK).Note: If your phone does not already have Bluetooth power turned on, it prompts you to turn it on.5Select the name card and press the Center Select key (s) (SEND).6Select [Add New Device] or select the destination phone.7When prompted, enter the default PIN code 0000 or accept the transfer.When the phones connect, the entry transfers to the other phone.](https://usermanual.wiki/Motorola-Mobility/P56JF1/User-Guide-983792-Page-86.png)
![85connectionsTo transfer a file to another phone:Note: Make sure the phone receiving the entry has Bluetooth power on and is in Find Me mode. 1On your phone, select the file (such as a picture or sound) you want to transfer and press the Right Soft key (p)(Options).2Use the Directional key (S) to scroll to Send and press the Center Select key (s) (OK).3Scroll to Bluetooth and press the Center Select key (s) (OK).Note: If your phone does not already have Bluetooth power turned on, it prompts you to turn it on.4Select [Add New Device] or select the destination phone.5When prompted, enter the default PIN code 0000 or accept the transfer.make phone visible to other deviceAllow an unknown Bluetooth device to discover your phone: 1Press the Center Select key (s) to open the menu.2Use the Directional key (S) to scroll to (SETTINGS & TOOLS and press the Center Select key (s).3Scroll to Bluetooth Menu and press the Center Select key (s) (OK).4Press the Right Soft key (p)(Options).5Scroll to Discovery Mode and press the Center Select key (s) (OK).6Scroll to On, and press the Center Select key (s) (OK).](https://usermanual.wiki/Motorola-Mobility/P56JF1/User-Guide-983792-Page-87.png)
![86connectionsNote: To ensure the best Bluetooth connection, always connect to Bluetooth devices using your phone’s menus rather than making your device discoverable.connect to recognized device 1Press the Center Select key (s) to open the menu.2Use the Directional key (S) to scroll to (SETTINGS & TOOLS and press the Center Select key (s).3Scroll to Bluetooth Menu and press the Center Select key (s) (OK).4Scroll to the device name and press the Center Select key (s) (OK).Note: Your phone will prompt you to turn Bluetooth on if it is not already on. If you have previously connected with the device, select the device name and press the Left Soft key (p) (On) to connect with the device.5If prompted, enter the passkey (0000 by default) and press the Center Select key (s) (OK).connect to handsfree device during a callNote: You cannot switch to a headset or car kit if you are already connected to a Bluetooth device. 1During a call, press the Right Soft key (p) (Options), then select Bluetooth Menu.2Use the Directional key (S) to scroll to [Add New Device] or select the name of your handsfree device if you have paired with it previously.3Press the Center Select key (s) (OK).4If connecting to a new device, place the new device in discoverable mode and press the Center Select key (s) (OK) on your phone.](https://usermanual.wiki/Motorola-Mobility/P56JF1/User-Guide-983792-Page-88.png)