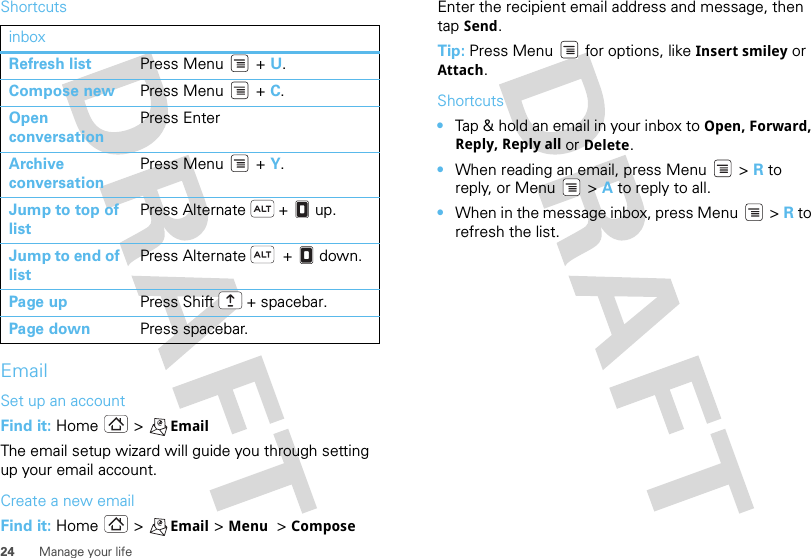
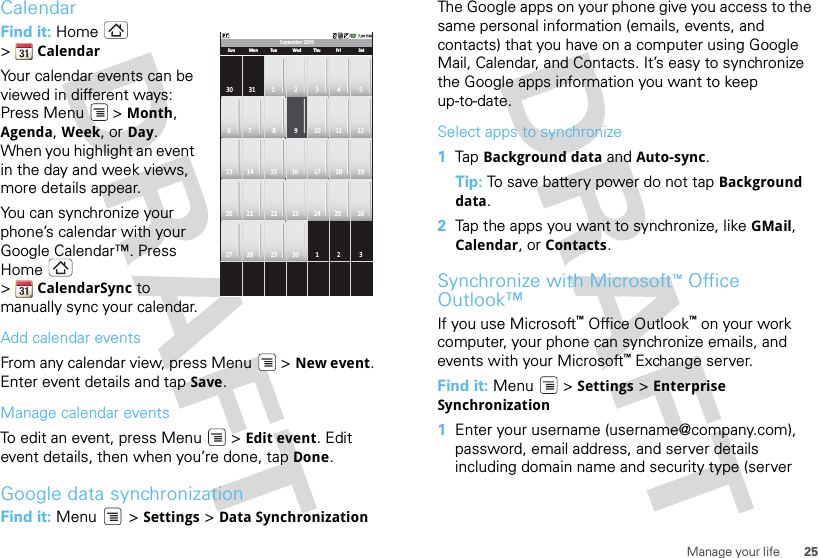
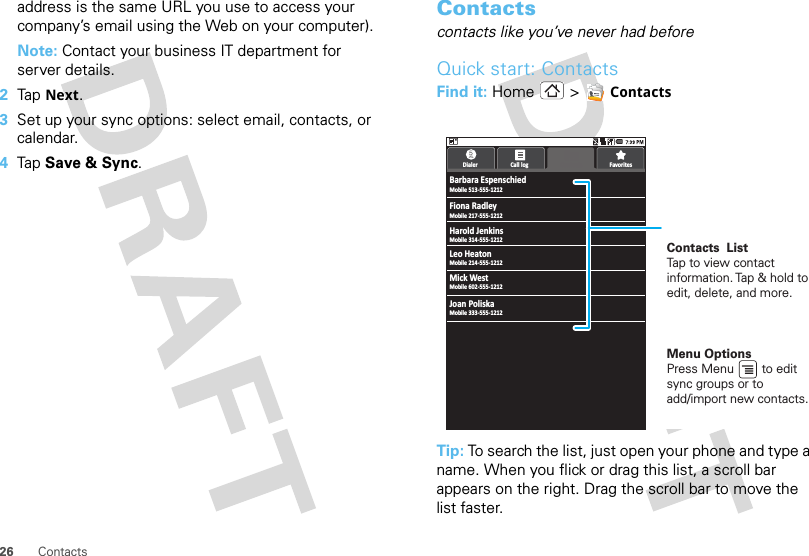
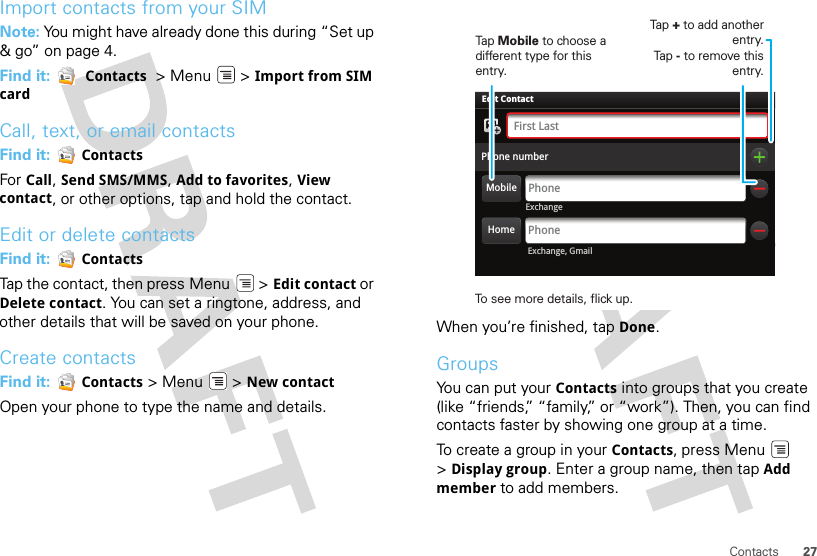
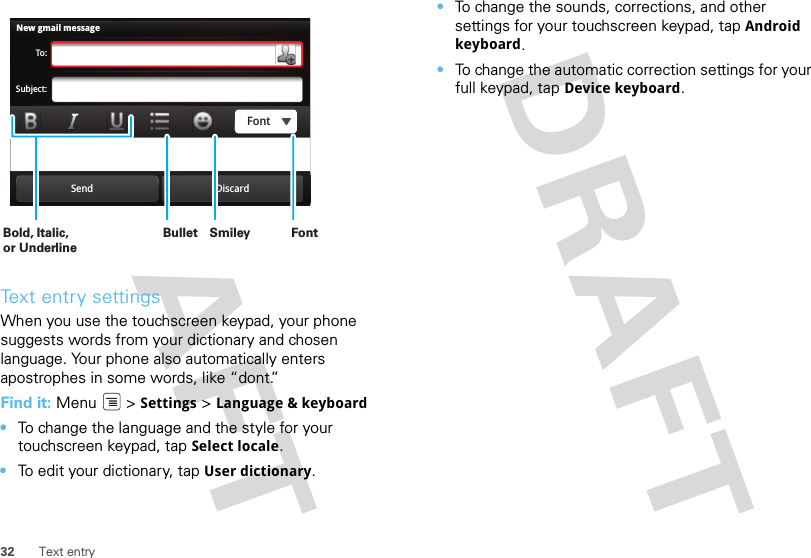
Motorola Mobility P56KC2 Portable Cellular/ PCS GSM/ EDGE Transceiver with WLAN and Bluetooth User Manual Exhibit 8 Users Manual

Motorola Mobility LLC Portable Cellular/ PCS GSM/ EDGE Transceiver with WLAN and Bluetooth Exhibit 8 Users Manual

Exhibit 8 Users Manual

Dummy Page - To be discarded before printingUse this template with A6MotoLandscapeProduct1 StructApps. See the Reference Pages for template user instructions.MILESTONE User Guide 9/14/09
Please note:This draft documents features as they were available and functioning at the time of production.Any screen captures are preliminary.This draft uses an A6-size template.
1CongratulationsCongratulationsMOTOROLA MILESTONETMMOTOROLA MILESTONETM gives you a premium browsing and messaging experience with the very latest from GoogleTM, all in the thinnest touch QWERTY slider around.• Browsing. Get more from the Web, with a huge screen and full HTML. Search, browse, everything you want to do, all made easier.• Organization. Unify your work and personal life with calendar, email, and contacts.• Maps, entertainment, and more. The latest technology and apps. Google Maps™ mapping service to find your way. YouTube™ to stay entertained. Easy access to Google and thousands of Android applications to expand your world.Caution: Before assembling, charging or using your phone for the first time, please read the important legal and safety information packaged with your phone. Once your phone is up and running, press Menu  > Settings > Aboutphone > Safety & Regulatory to read the full information.More informationOn your phone—Press Home > Help Center.On your computer—Go to www.motorola.com/support.So, whether you want to read, watch, or play, we can help.
2CongratulationsYour phonethe important keys & connectorsPress to put thedisplay to sleep,or hold to turn off3.5mm Headset JackHome KeyBack KeyMicrophoneMenu KeyTo u chscreenCamera KeyPower KeyVolume KeysPress to open menu options.Press to closeany menu or app& return to thehome screen.Press to goback.Search KeyPress for textsearch or holdfor voice search.Micro USB ConnectorCharge or connect to PC.Note: Your phone might look a little different.When you open or turn your phone, the screen adjusts for you.Scroll &ReturnSpaceAlternateShiftPress for text search or press & hold for voice search.SelectDeleteSearchMenu
3Let’s goTOC to be developed Let’s golet’s get you up and runningAssemble & charge  Caution: Please read “Battery Use & Safety” on page 52.1cover off 2SIM in3microSD in (may already be inserted)4battery in5cover on 6charge up3H
4Let’s goSet up & goThe first time you turn on your phone, a setup wizard guides you through signing in to your existing Google™ account. If you don’t have a Google account, you can create one using the wizard.Note: Be sure to enter the date and time so that certain key features work on your phone.Tip: Remember to write down your username and password, and keep them in a safe place.Turn it on & offTo turn on your phone, press and hold Power  (on top of the phone).To turn off your phone, press and hold Power , then tap Power off.Wi-Fi connectIf you want to use a Wi-Fi computer network for even faster Internet access, press Menu  > Settings >Wireless & networks > Wi-Fi settings.Cool content & moreBrowse and download thousands of the coolest apps on the planet from Android MarketTM. Learn more about downloading new apps with “Android MarketTM” on page 22. Your phone comes with a microSD memory card installed—you can load it up with photos, videos, and music from your computer using “USB drag & drop” on page 46.
5Touchscreen & keysTouchscreen & keysa few essentialsTouch tipsHere are some tips on how to navigate around your phone.TapTo choose an icon or option, tap it. Tap & holdTo open special options, tap and hold an icon or other item. Try it: In the home screen, tap and hold a shortcut or widget to move or delete (there’s more in “Widgets” on page 8).Dialer Contacts BrowserBarbara EspenschiedMobile 513-555-1212Dialer Call log FavoritesFavoritesMobile 217-555-1212Mobile 314-555-1212Fiona RadleyHarold JenkinsDragTo scroll through a list or move slowly, drag across the touchscreen. Try it: in the home screen, tap and hold the App Tray icon ( ) and drag up.Tip: When you drag or flick a list, a scroll bar appears on the right. Drag the scroll bar to move the list to a letter A - Z.FlickTo scroll through a list or move quickly, flick across the touchscreen (drag quickly and release).Tip: When you flick a long list, tap the screen to stop it from scrolling.ZoomGet a closer look at maps or web pages. To zoom in, double-tap the screen, or tap the screen with two fingers and then slide them apart. To zoom out, double tap the screen again, or drag your fingers together.BBarbara EspenschledMobile 513-555-1212Dialer Call log FavoritesFavorite sMobile 217-555-1212Mobile 314-555-1212Flona RadleyHarold JenkinsMobile 214-555-1212Mobile 602-555-1212Leo HeatonMick WestMobile 607-555-1212Sandra Poliska
6Touchscreen & keysGesturesDraw on your screen to get to your favorite apps. To open Gestures, tap the Gestures icon on the home screen or in the App Tray. Draw the gesture for the action you want. For example, draw a “V” to go to voicemail.To see which actions are already assigned to gestures, press Menu . You’ll also see several gestures that are unassigned. To assign an action to a gesture, press Menu , tap the unassigned gesture, then tap an app from the list.Call Voicemail*86Key tipsMenu, home, & backPress Home  to close any menu or app and return to the home screen. Press and hold Home  to show the last few apps you used, then tap an app to open it. In the home screen, press Home  to open or close the main menu.Press Menu  to open menu options, or Back  to go back.Sleep & wake upTo save your battery, prevent accidental taps, or when you want to wipe smudges off your touchscreen, put the touchscreen to sleep by pressing Power . To wake up the touchscreen, just press Power  again, or open the phone.Home KeyBack Key Menu Key
7Home screenTo change how long your phone waits before the screen goes to sleep automatically, press Menu  >Settings > Location & security > Screen timeout.Tip: To make the screen lock when it goes to sleep, use “Screen lock” on page 49.Power key menuPress and hold Power  to open the power key menu, where you can turn off the phone (Power off), or turn Airplane mode or Silent mode on or off.Adjust volumePress the volume keys to change the ring volume (in the home screen), or the earpiece volume (during a call).Spin the screenThe touchscreen can rotate 90 degrees to stay right-side up when you rotate your phone:Find it: Menu  > Settings > Sound & display >OrientationHome screenquick access to the things you need mostQuick start: Home screenThe home screen gives you all your latest information in one place. It’s what you see when you turn on the phone or press Home  from a menu. It’s basically like this:The home screen extends beyond what you see on the screen to give you more room for adding Status BarFlick or drag this bar down to see details.Status IndicatorsShortcutsTap to open. Drag up to seeall your apps. App Tr ay
8Home screenshortcuts, widgets, and more. Flick the home screen left and right to see more panels.WidgetsAdd a widget such as a clock, music player, or a calendar that shows upcoming appointments.To open a widget, tap it. To add widgets, press Menu  > Add > Widgets.Note: If you install apps from Android Market that have widgets, those widgets appear on the home screen.ShortcutsThe shortcut icons at the bottom of your home screen are the first apps in your main menu.To add shortcuts to the home screen, open the apps tray, then drag the app to the home screen. Or, press Menu > Add > Shortcuts.AppsYour phone comes with some applications already, and you can download and install more (see “Download apps” on page 15 and “Browse & install apps” on page 22. To open an app, tap it. App trayAll the apps on your phone, including the apps that came with your phone, and the ones you download and install, are on your App Tray. To open the App Tray, tap  and drag up.
9Home screenRunning multiple appsNo need to close an app before opening another one. Your runs multiple apps, all at once. To open a new app while already running another, press Home  to to return to the home screen, drag the App Tray open, and tap the app you want. To switch from one running app to another, press and hold Home  to see what apps are already open, and tap the one you want.SearchTo search, use a Search widget (if you have one on your home screen), or open your phone and press Search . Tip: In your main menu or Contacts, you can open your phone (or press and hold Menu  to open a display keypad), then type an entry name to find it.Phone status & notificationsAt the top of the screen, icons on the left notify you about new messages or events (flick the bar down for details). Icons on the right tell you about phone status:Google SearchTap the icon, then speak for a voice search.Type, then tap the icon for a text search.
10 CallsTip: To see today’s date, tap and hold the status indicators.Bluetooth™ active  network (full signal)GPS active network (roaming)Wi-Fi active GPRS (fast data)downloading  EDGE (faster data)vibrate  3G (fastest data)silent flight modemute call battery (charging)speakerphone active battery (full charge)alarm set Callsit’s good to talkQuick start: CallsDialing optionsFind it:  Dialer
11CallsIn-call optionsDuring a call, press Menu  to use Bluetooth, or to put the call on Hold.Tip: You can press Home or Back  to leave the active call display. To reopen it, tap  Dialer.Make & answer callsTo make a call, tap   Dialer, enter a number, then tap Dial.To answer a call, drag Answer to the left.To end a call, tap End call.To ignore a call, drag Ignore to the right.HandsfreeNote: Using a mobile device or accessory while driving may cause distraction and may be illegal. Always obey the laws and drive safely.During a call:•To use the speakerphone, tap Speaker.•To use a Bluetooth™ device, press Menu  >Bluetooth.Enter numbers during a callTo enter numbers during a call, tap , then tap the dial pad.Mute & holdDuring a call:•To mute the call, tap Mute.•To put the call on hold, press Menu  > Hold.Recent callsFind it:  Dialer > Call log.•To call a number, tap it.End callSpeakerMute
12 Calls•To send a text message, create a contact, view a contact, add the call to speed dial, or other options, tap and hold an entry.•To filter the list, tap the view name (like All calls) at the top.•To clear the list, press Menu  > Clear call logFrequent callsFind it:  Dialer > Favorites•To call a number, tap it.•To send a text message, view a contact, share a contact, or other options, tap and hold an entry.Conference callsTo start a conference call, call the first number. After they answer, press Menu  > New call and call the next number. When the next number answers, press Menu  > Merge calls.During a conference call, press Menu  > Manage conference to end the call with a participant, or to talk privately to a participant.Your phone numberFind it: Menu  > Settings > About phone > Status >My phone numberYour caller IDTo hide your number from the people you call, press Menu > Settings > Call settings >Additional settings > Caller ID.Emergency callsNote: Your service provider programs one or more emergency phone numbers (such as 911 or 112) that you can call under any circumstances, even when your phone is locked. Emergency numbers vary by country. Your pre-programmed emergency number(s) may not work in all locations, and sometimes an emergency call cannot be placed due to network, environmental, or interference issues.  1Tap Dialer (if your phone is locked, tap Emergency Call).2Enter the emergency number.3Tap Dial to call the emergency number.Note: Your mobile device can use AGPS satellite signals to help emergency services find you (“GPS & AGPS” on page 54).Call forwarding & waitingYou can forward calls all the time, or only when your phone is busy, unanswered, or unreachable (not on the network):
13WebFind it: Menu  > Settings > Call settings >Call forwardingWhen you’re on a call and a second call comes in, Call waiting lets you answer it. You can turn off Call waiting, to send second calls straight to your voicemail:Find it: Menu > Settings > Call settings >Additional settings > Call waitingRestrict outgoing callsTo restrict your phone so that it can only dial a few numbers: Find it: Menu > Settings > Call settings >Fixed dialing numbers•To turn fixed dialing on, tap Disable FDN.•To add or delete the allowed numbers, tap FDN list.Webyou don’t need a PC, surf the web with your phoneQuick start: BrowserFind it: Home >  BrowserNote: If you can’t connect, contact your service provider.www.google.com:GoogleWeb ImagesNew! Try My LocaƟon to find restaurants, shops, and bars nearyou!Sign IniGoogle   Preferences    HelpView Google in Mobile   Classic©2009 GoogleLocal News moreGoogle SearchGo to URL SearchRefresh MoreBookmarksNew WindowConnectionOver the air:     LinksTap to open.Web AddressTo go to a URL,press      > Go. Drag or flick to scroll.- Wi-Fi.(EDGE),     (GPRS) or      .Press     to displayoptions.
14 WebConnectYour phone uses the mobile phone network (over the air) to automatically connect to the Web.Note: Your service provider may charge to surf the Web or download data.To use a wireless network, press Menu  > Settings >Wireless & networks. Tap Wi-Fi to turn it on and tap Wi-Fi settings to search for nearby wireless networks. Tap a network to connect. Web touch tipsZoom & magnifyIn Web pages, when you scroll (drag or flick), zoom icons appear at the bottom of your screen.Do you have comments? First youwww.ohiohistorycentral.org: Darwin Wings Baseball Team - Ohio History Central  -  A product of the Ohio Historical...Darwin Wings Baseball TeamHome   History   OrganizaƟons    Darwin   Wings    Baseball    TeamTime PeriodsRegionsTopicsCitaƟonFeedbackThe Darwin Wings was a minor league baseball club in Darwin, Ohio, beginning inthe 1939 season.The Wings played in the Middle AtlanƟc League and were affiliates of the ChicagoPanthers. They were renamed the Ducks before the 1941 season. The Ducksmoniker was a reference to Ducky Heinz, the team’s manager and club owner.1925-1945Southern OhioSports and RotaƟons“Darwin Wings Baseball Team”.  Ohio History Central. January 31, 2009. hƩp//www.Related EntriesBaseballDarwin, OhioWingsZoom In/Out MagnifyTap to open a magnifying window that you can drag.Select linksWhen you tap a link, your phone outlines it and goes to that page. If you tap and hold the link, your phone shows options, like Open in new window or Bookmark link.Browser optionsPress Menu  to see browser options:www.ohiohistorycentral.orgBaseball Dayton Team - NJ.comDayton Flyers Baseball rosters, game schedules, photos, arƟcles ...Get the latest Baseball Dayton high school Baseball news, rankings, schedules, stats, scaores, results & athletes. . .highschoolsports.nj.com/school/... - OpƟonsDayton Flyers Baseball are ranked #2306 on Fanbase. Find arƟcles, photos, videos, rosters, and results for seasons...www.fanbase.com/Dayton-Flyers-B... - OpƟonsDayton Wings Baseball Team - Ohio History Central - A product of ...Get the latest Baseball Dayton high school Baseball news, rankings, schedules, stats, scaores, results & athletes. . .www.ohiohistorycentral.org/entr... - OpƟonsSearches related to: dayton baseball
15WebDownload appsWarning: Apps downloaded from the Web can be from unknown sources. To protect your phone and personal data, only download apps from sources you trust, like Android Market (“Android MarketTM” on page 22).optionsGo Enter the Web address (URL) you want.Tip: Some sites are optimized for mobile phones, and they use an “m” in the URL instead of “www” (like m.youtube.com).Refresh Reloads the current page.Add bookmark Add the current page to your bookmark list.Back/Forward Navigate to previously viewed pages.More Shows browser options, like Find on page, Select text, Page info, Share page, Downloads, and Settings.Note: All apps downloaded are stored in your phone memory.To download apps:  1If you want to download apps from any Web page, press Menu  > Settings > Applications >Unknown sources.2To launch the browser, press Home > Browser.3Find the app you want to download and tap the download link.After you download an app, the icon for that app appears on you App Tray (see “Apps” on page 8).Manage your downloadsTo view files or applications you have downloaded, press Home > Browser > >More >Downloads. To clear your download history, tap Clear list. To cancel, tap Cancel all downloads.
16 Personal navigationPersonal navigationwhere you are, where you’re goingQuick start: Personal navigatorToss away your maps. Your phone gives you the MOTONAVTM GPS navigation system, which shows you the way with accurate maps and routing.Find it: Voice guided, turn-by-turn directions. You don’t need to look at your phone, and you’ll never wonder where to turn.3-d lane guidance. Preview your route and destination. You can look around to see landmarks and turns.Connected navigation. Get live traffic reports and alerts. Select alternate routes.Navigation linked to contacts. Store an address or location information, you’re two clicks away from seeing it on a map.More detailsFor step-by-step instructions, go to www.motorola.com/motonav.Google Maps™where you are, where you’re goingQuick start: Google MapsWhere am I? Where do I want to go? Don’t worry—let Google Maps™ mapping service find out for you.Find it: Home > MapsGoogle Maps™ mapping service opens by default in “Map mode”. To learn more about the different map modes, go to “Select map mode” on page 17.Search Directions Map modeMy Location Clear Map MorePress       > My Location to show options. Press       > Directions to show options. Map ViewDrag or flick to scroll.Tap to show zoom.
17Google Maps™Set your location sourcesSet your phone to determine your location using GPS satellite signals (highly accurate, but uses battery power) or using the mobile network (less accurate, but conserves battery power).To set your location, press Menu  > Settings >Security & location > Enable GPS satellites and/or Use wireless networks.Find your locationFind it: Home >  MapsNote: Don’t forget to set your location sources.From the main Map screen, press Menu  > My Location. Your location is shown on the map as  . The bigger the circle the less accurate the location.Find any location  1Press Menu  > Search.2Enter text in the search box, like an address, business, or city, then tap Search.Tip: If it’s an address you have visited before, select History from the menu.3Highlight the result you want, then tap Show map.4Tap the result balloon   to see location details.Get directions  1Press Menu  > Directions.2Enter a starting point address or tap   and select My current location, Contacts, or History.3Enter a destination address or tap   to choose a location.4Tap  Route. Your directions are shown as a list. To view your directions on a map, tap Show map.5When you have finished, press Menu  > Clear map. Your destination is saved in History.Select map modePress Menu  > Map mode to select from Map, Satellite, Traffic or Street View.Map viewShows a map, complete with names of streets, rivers, lakes, mountains, and borders. This is the default view.Satellite viewShows map on top of aerial photo.Traffic viewIf available in your area, real-time traffic conditions are shown over the roads as color-coded lines.
18 Google Maps™Street View™In some areas, a street-level photo view is available. If the display switches to a view that shows blue outlined streets, then you are viewing an area that supports Street View.To move your street position, tap and hold the person icon .Use the bulls-eye to pinpoint your desired position  . Release when the icon is where you want it.Street View will then find a view for you. Tap the address balloon to view the street.Touch the screen, then drag to move around, or tap the arrows to move your position. Or, you can press Menu  to step forward, backward, zoom, or return to the map.Tip: To change your view to your actual position as you turn, press Menu  > Compass mode.Map historyFind it: Menu  > More > HistoryAll recent searches, viewed positions  , and directions   are displayed. Tap an item to open it on the map.Map shortcutsmap screenDirections Press Menu  + D.Select Map modePress Menu  + M.History Press Menu  + H.My Location Press Menu  + 0 (zero).Open zoom controlsPress Menu  + Z.Zoom in Press Menu  + I.Zoom out Press Menu  + O.Go to top/bottom of listPress   +   up or down.search result screenClear search Press Menu  + Q.Previous result on mapPress Menu  + M.Next result on mapPress Menu  + K.
19Latitudedirections screenPrevious direction pointPress Menu  + I.Next direction pointPress Menu  + K.Cancel directionsPress Menu  + Q.Latitudewhere are your friends & family?Join LatitudeSee where your friends and family are on Google Maps™. Plan to meet up, check that your parents got home safely, or just stay in touch.Don’t worry, your location is not shared unless you agree to it. You need to join Latitude, and then invite your friends to view your location or accept their invitations. When using Google Maps (in any mode except in Street View), press Menu  > Latitude. Read the privacy policy and if you agree with it, tap Agree & share.Add & remove friendsFind it: Home > Maps  >Menu  >LatitudeTo add friends:  1Press Menu  > Add friends.2Tap  Select from Contacts or Add via email address, then tap a contact and Add friends >OK.If your friends already use Latitude, they’ll receive an email request and a notification. If they have not yet joined Latitude, they’ll receive an email request that invites them to sign in to Latitude with their Google account.
20 YouTube™To remove friends:  1Press Menu  > Latitude to show your friend’s list, then tap a friend in your list.2Tap  Remove.Share locationWhen you receive a request to share location details you can choose to:•Accept and share back—see your friend’s location, and your friend can see yours.•Accept, but hide my location—see your friend's location, but they can't see yours.•Don't accept—location information is not shared between you and your friend.Hide your locationPress Menu  > Latitude to show your friend’s list. Tap your contact name, then press Menu  >Privacy > Hide your location.Turn off LatitudePress Menu  > Latitude to show your friend’s list. Tap M enu  > Privacy > Turn off Latitude.Yo u Tu b e ™go and create your own classicQuick start: YouTubePost that great video you’ve taken and see how many hits you get.Find it: Home >  YouTubeYouTube user-generated content website lets you share videos with YouTube users everywhere. You LoadingFeaturedLatest video:Most popularSearch Favorites CategoriesMy account Upload SettingsCategoriesTap a video to play.Press       to show options.
21YouTube™don’t need a YouTube account to browse and view videos.Note: If you don’t have a YouTube account, visit www.youtube.com to find out more. To create an account or sign in, go to “Your account” on page 21.Watch videosSee popular video categories, like Featured, Most viewed, and Top rated. Tap a category, then tap the video to start playing it. To see more video categories, press Menu  > Categories.Search for videosFind it: Menu  > SearchEnter text, then tap Search.To clear your search history, press Menu  > Settings > Clear search history.Share videosSend someone a link to a video that you are watching.  1Press Menu  > Share.Tip: Just tap and hold a video to open the Share menu.2Address and complete your email, then tap Send.Your accountLog in or create accountFind it: Menu  > My account  1To create your YouTube account, tap the “Don’t have a YouTube account? Click here to create one” link.If you already have a YouTube account, enter your username, password and tap Sign in.2For a new account, enter a username, and complete the fields, then tap I accept.Upload videosFind it: Menu  > Upload  1Tap the video you want to upload. You can change the video title, description, set the access, and add tags.2Tap  Upload.
22 Apps for allApps for allget the app you wantAndroid MarketTMFind it: Home > MarketGet all the fun games and cool apps you want! Market provides you with access to software developers everywhere, so you can find the app you want. If you need help or have questions about Android Market, press Menu  > Help.Browse & install appsScroll to and tap the app you want to install. Then, tap Install (if app is free) or Buy.Warning: If an app you are downloading requires access to your data or control of functions on your phone, you’ll be asked to give your permission. After selecting Install, the app will download. After selecting Buy, you may be asked to sign in to an additional Google account. Sign in and select Purchase now to proceed. Follow the on-screen instructions. To see the download progress, open the notifications window.After you download an app, the icon for that app appears on you App Tray (see “Apps” on page 8).Manage & restore appsTo view downloads in progress, from your phone’s home screen press Menu  > My downloads. Progress is shown at the top of the screen.To view your downloaded apps, press Menu  >My downloads. Tap the app to open the details screen—from here you can review, uninstall, and more.To reinstall any downloaded items, press Home >  Market. All previously installed apps are listed and available for download.
23Manage your lifeManage your lifestay on top of thingsWhat can you manage?Email, contacts, and calendar on your phone give you access to the same personal information that you add, view, and edit on your computer with the use of Microsoft™ Office Outlook™. You can:•view Google™ and Exchange contacts in one list.•schedule and respond to meeting requests.•access your company directory.For more information, see “Synchronize with Microsoft™ Office Outlook™” on page 25. If you lose your phone, your company’s IT department can send a command to the phone that will reset all content and information. Check with your IT department for more information.GmailCreate a new emailFind it: Home > Gmail >Menu  >ComposeEnter the recipient email address and message, then tap Send. Tip: Press Menu  for options, like Attach.Tips•To  search for messages, tap Menu > Search. •To  set new email notifications, such as having a special sound play when you receive a message, tap Menu > Settings, then select the Email notifications check box.•To label an email thread, tap and hold a message, then tap Change labels.
24 Manage your lifeShortcutsEmailSet up an accountFind it: Home > EmailThe email setup wizard will guide you through setting up your email account.Create a new emailFind it: Home > Email >Menu  >ComposeinboxRefresh list Press Menu  + U.Compose new Press Menu  + C.Open conversationPress EnterArchive conversationPress Menu  + Y.Jump to top of listPress Alternate  +   up.Jump to end of listPress Alternate   +   down.Page up Press Shift  + spacebar.Page down Press spacebar.Enter the recipient email address and message, then tap Send. Tip: Press Menu  for options, like Insert smiley or Attach.Shortcuts•Tap & hold an email in your inbox to Open, Forward, Reply, Reply all or Delete.•When reading an email, press Menu  > R to reply, or Menu  > A to reply to all.•When in the message inbox, press Menu  > R to refresh the list.
25Manage your lifeCalendarFind it: Home  >CalendarYour calendar events can be viewed in different ways: Press Menu > Month, Agenda, Week, or Day. When you highlight an event in the day and week views, more details appear.You can synchronize your phone’s calendar with your Google Calendar™. Press Home  >CalendarSync to manually sync your calendar.Add calendar eventsFrom any calendar view, press Menu  > New event. Enter event details and tap Save.Manage calendar eventsTo edit an event, press Menu  > Edit event. Edit event details, then when you’re done, tap Done.Google data synchronizationFind it: Menu  > Settings > Data SynchronizationSeptember 2009Sun30 31 1 2 3 4 56 7 8 9 10 11 1213 14 15 16 17 18 1920 21 22 23 24 25 2627 28 29 30 1 2 3Mon Tue Wed Thu Fri SatThe Google apps on your phone give you access to the same personal information (emails, events, and contacts) that you have on a computer using Google Mail, Calendar, and Contacts. It’s easy to synchronize the Google apps information you want to keep up-to-date.Select apps to synchronize  1Tap  Background data and Auto-sync.Tip: To save battery power do not tap Background data.2Tap the apps you want to synchronize, like GMail, Calendar, or Contacts.Synchronize with Microsoft™Office Outlook™If you use Microsoft™Office Outlook™ on your work computer, your phone can synchronize emails, and events with your Microsoft™ Exchange server.Find it: Menu  > Settings > Enterprise Synchronization  1Enter your username (username@company.com), password, email address, and server details including domain name and security type (server
26 Contactsaddress is the same URL you use to access your company’s email using the Web on your computer).Note: Contact your business IT department for server details.2Tap  Next.3Set up your sync options: select email, contacts, or calendar. 4Tap  Save & Sync.Contacts contacts like you’ve never had beforeQuick start: ContactsFind it: Home >  ContactsTip: To search the list, just open your phone and type a name. When you flick or drag this list, a scroll bar appears on the right. Drag the scroll bar to move the list faster.Barbara EspenschiedMobile 513-555-1212Dialer Call log FavoritesContactsMobile 217-555-1212Mobile 314-555-1212Fiona RadleyHarold JenkinsMobile 214-555-1212Mobile 602-555-1212Leo HeatonMick WestMobile 333-555-1212Joan PoliskaMenu OptionsPress Menu        to edit sync groups or to add/import new contacts.Contacts  ListTap to view contact information. Tap & hold to edit, delete, and more.
27ContactsImport contacts from your SIMNote: You might have already done this during “Set up & go” on page 4.Find it:   Contacts  > Menu  > Import from SIM cardCall, text, or email contactsFind it:   ContactsFor Call, Send SMS/MMS, Add to favorites, View contact, or other options, tap and hold the contact.Edit or delete contactsFind it:   ContactsTap the contact, then press Menu  > Edit contact or Delete contact. You can set a ringtone, address, and other details that will be saved on your phone.Create contactsFind it:   Contacts >Menu  >New contactOpen your phone to type the name and details.When you’re finished, tap Done.GroupsYou can put your Contacts into groups that you create (like “friends,” “family,” or “work”). Then, you can find contacts faster by showing one group at a time.To create a group in your Contacts, press Menu  >Display group. Enter a group name, then tap Add member to add members.ExchangeAdam AaronsonPhone numberPhoneFirst LastPhoneEdit Contact Exchange, GmailHomeMobileTap Mobile to choose a different type for this entry.Tap + to add another entry.Tap - to remove this entry.To see more details, flick up.
28 MessagingMessaging sometimes it’s best 2 text, or IM, or email . . .Quick start: MessagingFind it: Home >  MessagingTip: To see more messages, flick or drag up.Read & reply to messages•To open a message and all of its replies, tap it.•To respond to a message, just open it and enter your response in the text box at the bottom.•To open options, tap and hold a message.Tip: Try the Messages widget in “Widgets” on page 8. Create messagesFind it:  Messaging > New messageEnter the recipient and message. In text messages and emails, press Menu  for options, like Insert smiley or Attach.Send & receive attachmentsTo send a file in a message, open a new message and press Menu  > Attach.When you receive a message with an attachment, open the message and tap the file name to do0wnload it. Then, tap the name again to open it. Some file formats can be converted to HTML for faster viewing, and your phone will show a button that says Get HTML version.Tip: To send and receive large attachments faster, use a Wi-Fi connection, in “Wi-Fi” on page 45.Set up an email accountTo add email accounts, press Home > Email.The email setup wizard will guide you through setting up your email account.
29Messaging•Exchange account is for Exchange server work email accounts. Enter details from your IT administrator.Tip: You might need to enter your domain name with your user name (like domain/username).Note: Some work accounts might require you to add a password lock to your phone, for security.•POP3/IMAP4 account is for most personal email accounts. For account details, contact the account provider.To change your settings, press Home  > Email > >More > Account settings.Instant messagesTo send and receive instant messages, you can use an instant messaging app or your browser.•To download and use an instant messaging app, press Home > Market > Applications >Communication, then choose an app for your provider. Once you download the app, you’ll see it on your App Tray (see “Apps” on page 8).•If you don’t see an app for your IM provider, you can use your Web browser. Press Home  >Browser, then enter your provider’s Web site and tap Go. Once you’re there, follow the link to sign in.Note: Your IM options will depend on your IM provider. To browse instant messaging apps from your computer, go to www.android.com/market.VoicemailWhen you have a new voicemail,  shows at the top of your screen. To hear the voicemail, tap Dialer, then tap and hold .If you need to change your voicemail number, in the home screen press Menu  > Settings > Call settings > Voicemail.
30 Text entryText entrythink keyboard, now think smallerTyping tipsTo use the full keypad, slide open your phone (there’s a keypad diagram in “Your phone” on page 2):To use the full keypad, slide open your phone:To...Choose symbols from a list Press SymbolsEnter alternate characters in the corners of keysPress AlternateEnter several alternate characters, until you press Alternate  againPress Alternate  twiceEnter one capital letter Press ShiftEnter only capital letters, until you press Shift  againPress Shift  twiceSelect text (Scroll left/right), or skip pages (Scroll up/down)Press Shift  + ScrollCut or Copy selected text Tap & hold text > Cut or CopyPaste cut or copied text Tap & hold > PasteDelete a character (hold to delete more)Press DeleteDelete the current line Press Alternate  + DeleteJump to the beginning/end of a linePress Alternate  + Scroll
31Text entryTo change your text entry settings and see the dictionary of terms you’ve used, from the home screen, press Menu  > Settings > Language & keyboard > Select locale.Touchscreen keypadWhen your phone is closed, you can open a display keypad by tapping a text field, or pressing and holding Menu . To close the keypad, press Back .Start a new line (email) or send the message (text messages) Press ReturnTo . ..To change your settings for this keypad, from the home screen, press Menu  > Settings > Language & keyboard > Android keyboard.Format text in emailsWhen you create an email, you can format your message. To select text for formatting, press and hold Shift , then press Scroll  left or right.DeleteReturnSpaceSymbols/NumbersTap to open a keypad for symbols and numbers.ShiftText EntryTap to open the touchscreen keypad.
32 Text entryText entry settingsWhen you use the touchscreen keypad, your phone suggests words from your dictionary and chosen language. Your phone also automatically enters apostrophes in some words, like “dont.”Find it: Menu  > Settings > Language & keyboard•To change the language and the style for your touchscreen keypad, tap Select locale.•To edit your dictionary, tap User dictionary.New gmail messageTo:Subject:Send DiscardFontBold, Italic, or UnderlineBullet FontSmiley •To change the sounds, corrections, and other settings for your touchscreen keypad, tap Android keyboard.•To change the automatic correction settings for your full keypad, tap Device keyboard.
33Tips & tricksTips & tricksa few handy hintsTo . ..Return to the home screenPress Home .See recently dialed numbersTap  Dialer > Call log.Sleep/wake your phonePress Power . Set screen timeout Press Menu  > Settings >Location & security >Screen timeout. Search Press Search .Show last few apps usedPress and hold Home .turn sound on/off Press and hold Power  >Silent mode.Tur n  airplane mode on/offPress and hold Power  >Airplane mode.Go to the top of a listPress Alternate  > Scroll  up.Go to the bottom of a listPress Alternate  > Scroll  down.Scroll list up one screenPress Shift  > Scroll  up.Scroll list down one screenPress Shift  > Scroll  down.To...
34 PersonalizePersonalizeadd your personal touchWidgetsTo create a new widget:  1Find an empty spot on your home screen where you want to add a widget. You can flick left or right to open other panels on your home screen.2Tap and hold the empty spot until you see the Add to Home screen menu.3Tap  Widgets.4Tap the type of widget. If necessary, enter the widget settings.You can personalize widgets with content that you choose.RingtonesTo personalize your ringtones:Find it: Menu > Settings >Sound & display >Phone ringtone or Notification ringtoneTo set your vibrate options:Find it: Menu  > Settings > Sound & display >Phone vibrateWallpaperTo apply a new wallpaper:  1Find an empty spot on your home screen, then tap and hold until you see the Add to Home screen menu.2Tap and hold the empty spot until you see the Add to Home screen menu.3Tap  Wallpapers.4Tap  Media gallery to select a photo as your wallpaper, or tap Wallpaper gallery to choose a wallpaper that comes with your phone.
35PersonalizeSoundsDisplay settingsQuick launch shortcutsfeaturesset volume for media and videosMenu  > Settings > Sound & display > Media volumeplay tones when using dial padMenu  > Settings > Sound & display > Audible touch tonesplay sound on screen selectionMenu  > Settings > Sound & display > Audible selectionfeaturesset display brightnessMenu  > Settings > Sound & display > Brightnessset orientationMenu  > Settings > Sound & display > Orientationset animationMenu  > Settings > Sound & display > AnimationTo set keyboard shortcuts to launch your favorite app, press Menu  > Settings > Applications > Quick launch > Assign application.To use a quick launch shortcut, press Search  and the assigned key, like Search  and B to launch the browser.Date & timeSet date, time, time zone, and formats:Find it: Menu  > Settings > Date & timeLanguage & regionSet your menu language and region:Find it: Menu  > Settings > Language & keyboard >Select locale
36 Photos & videosPhotos & videossee it, capture it, share it!PhotosTake & share photosTake that family photo, and post it online for everyone to see.Find it: Press CameraNote: Photos are stored on your microSD memory card. Picture Resolution is 5MP, unless you change it.2455MPNew York, New York 10006United StatesAutofocus Box Tap the screen to show a thumbnail of your last photo.To take the photo, lightly press Camera  halfway until the autofocus box turns green, then press all the way to take the photo.A thumbnail of the photo you’ve just taken is shown on the right. Tap the thumbnail, then press Menu :•To  set the photo as a wallpaper or contact photo, tap Set as.•To  send the photo in a message or post it online, tap Share. For more info on sharing your photos, see “Share your photo gallery” on page 37.•To  delete the photo, tap Delete.Photo optionsIn the viewfinder, press Menu  > Settings to open the camera menu:
37Photos & videosView your photosFind it: Home  > Media galleryoptionsStore location in picturesSave the details of where the photo was taken.Select picture sizeSet the size of your photo.Select picture qualityChoose between Fine and Super fine.Select focus modeChoose between Fine and Super fine.Select flash modeChoose between Auto and On.Play a slideshowPress Home  > Media Gallery, tap a picture, then press Menu  > More > Slideshow to start a slideshow. To stop the slideshow, tap the display. To return to the gallery, press Back .Share your photo galleryFind it: Home  > Media GalleryFind it: To send your photo in a message or post it online:  1Tap & hold a photo, then tap Share.2Choose how you want to share—like Bluetooth, Email, or Text Messaging.
38 Photos & videosManage your photosFind it: Home  > Media GalleryTap and hold a photo, then:•To delete the photo, tap Delete.•To set the photo as a contact picture or wallpaper, tap Set as.•To tag the photo, tap Tag.Tip: To automatically assign your tagged photos to your contact names, press Menu > Settings >Tag with contacts.Tip: To copy photos to/from a computer, go to “USB drag & drop” on page 46.Edit your photosFind it: Home  > Media Gallery > picture > Menu  > EditTo crop a photo, tap Crop, stretch and drag the crop square to the image you want, then tap Save.VideosRecord & share videosFind it: Home  > CamcorderTip: To send your video in a message, set the video quality to Low (for MMS messages): Press Menu > Settings > Select Video Quality.To record the video, press Camera . To stop the video recording, press Camera  again.A thumbnail of the video you’ve just taken is shown on the right. Tap the thumbnail, then press Menu :•To  send the video in a message or post it online, tap Share. For more info on sharing your photos, see “Share your photo gallery” on page 37.•To  play the video, tap Play.•To  delete the video, tap Delete.0:00Tap the screen to show a thumbnail of your last recording.
39Photos & videosPlay your videosFind it: Home  > Media Gallery > videoShare your video galleryFind it: Home  > Media GalleryTo send your video in a message or post online:  1Tap & hold a video, then tap Share.2Choose how you want to share—like Bluetooth, Email, or Text Messaging.Manage your videosFind it: Home  > Media Gallery1:14 3:45Video ControlsProgress BarTo delete a video, tap and hold a video, then tap Delete.
40 MusicMusicwhen music is what you need...Quick start: MusicTap, tap, play—instant music. Just open your music library, then select what you want to play.Find it: Home >  MusicTip: When a song is playing, you can add it to a playlist by pressing Menu  > Add to playlist.Music ArtistAlbum TitleSong Title1:14 3:45Artists AlbumsSongs PlaylistsMusicMusic ControlsCategories                Tap a category, then tap a song or playlist.Set up musicWhat music transfer tools do I need?To put music on your computer and then load it on your phone, you need:•A Microsoft™ Windows™ PC or Apple™ Macintosh™•A USB data cable.You need a memory cardYour music is stored on your memory card. Your phone supports removable microSD memory cards up to 32 GB capacity. To make sure your memory card is installed, go to “Assemble & charge” on page 3.Tip: To see the available memory on your memory card, press Menu  > Settings > SD card & phone storage.What music file formats can I play?Your phone can play many types of files: MP3, M4A, AAC, ACC+, MIDI, WAV, and OGG Vorbis.Note: Your phone does not support any DRM protected files. What headphones can I use?Your phone has a 3.5mm headset jack for wired stereo listening. You can go wireless with Bluetooth™ stereo
41Musicheadphones or speakers (see “Bluetooth™ wireless” on page 43).Get musicTransfer music using USBTransfer music files from a computer to your memory card.   1With a memory card inserted, and your phone showing the home screen, connect a Motorola micro USB data cable from your phone’s micro USB port to a USB port on your computer. Your phone should show   in the status bar.Note: Your phone supports Microsoft™ Windows™ XP, Windows Vista™, and Apple™Macintosh™. Other operating systems may not be compatible.2Your phone shows a USB connection dialog. Tap USB connection. You can’t use the files on your memory card while it is connected.3Find “Removable Device” (your memory card) in the “My Computer” window.4Drag and drop your music to a folder on your memory card.Tip: To help manage your music, create a “Music” folder on your memory card.5When you’re done, use the “Safely Remove Hardware” feature to finish.Play musicMusic libraryOpen your music library, then select what you want to play.Find it: Home >  MusicYour music is stored by artists, albums, songs, and playlists. Tap a category, then tap the song or playlist Artists AlbumsSongs PlaylistsMusicMusic ArtistSong Title CategoriesTap to list songs or playlists.Last PlayedTap to play again.
42 Musicyou want to play. Press Menu  > Party shuffle to randomly play all your songs, or tap Search to look for a song.Music playerJust tap a song or playlist to get going.Music ArtistAlbum TitleSong Title1:14 3:45Open PlaylistShuffle On/OffRepeat Off/All/CurrentArtistAlbumSong T itleMusic ControlsTo t al Song T imeProgress BarMusic player controlsHide, wake, turn offPress Home  to use another app. Your music continues to play.controlsplay/pause Tap  / .previous/next Tap / .fast forward/rewind Tap & hold  / .view playlist Tap .shuffle Tap  .repeat Tap  .volume Press the side volume keys.view library Press Menu  > Library.turn shuffle on/off Press Menu    > Party shuffle.add to playlist Press Menu  > Add to playlist.use as ringtone Press Menu  > Use as ringtone.delete Press Menu  > Delete.
43Bluetooth™ wirelessWhen you see   in the status bar a song is playing, flick down to see details. Tap the song to return to the music controls.To turn off your music tap .PlaylistsTo add a song from the music library to a playlist, tap and hold the song then tap Add to playlist. Choose an existing playlist, or tap New to create a new playlist.To add a song to the playlist you're playing, press Menu  > Add to playlist in the music player.To edit, delete and rename playlists, tap and hold the playlist, in the music library.Bluetooth™ wirelesslose the wires and go wirelessQuick start: Bluetooth wirelessFind it: Menu  > Settings > Wireless & networks >Bluetooth settingsTurn Bluetooth power on or offFind it: Press Menu  > Settings > Wireless & networks > Bluetooth.Note: To extend battery life, turn Bluetooth power off when not in use.Bluetooth devicesBluetooth settings(#########) 38.4 MHz Class 1.5Device namePair with this device(found device name)Make device discoverableDiscoverableScan for devicesBluetooth Tap to turn on & scan.Tap to re-scan.Tap to connect.
44 Bluetooth™ wirelessConnect new devicesNote: This feature requires an optional accessory.To connect with a new device, you need to pair with it. You only need to do this once for each device—to connect again, see “Reconnect devices” on page 44.  1Make sure the device you are pairing with is in discoverable mode.Note: Refer to the guide that came with the device for details.2Press Menu  > Settings > Wireless & networks >Bluetooth settings.3Tap  Bluetooth to turn on and scan. If Bluetooth is already on, tap Scan for devices.4Tap a device to connect.5If necessary, tap OK, or enter the device passkey (like 0000) to connect to the device. When the device is connected, the Bluetooth indicator   appears in the status bar.Note: Using a mobile device or accessory while driving may cause distraction and may be illegal. Always obey the laws and drive safely.Reconnect devicesTo automatically reconnect your phone with a paired device, simply turn on the device.To manually reconnect your phone with a paired device, tap the device name in the Bluetooth devices list.Disconnect devicesTo automatically disconnect your phone from a paired device, simply turn off the device.To manually disconnect your phone from a paired device, tap the device name in the devices list, then press Menu  > Disconnect.Edit propertiesTo edit the device name, press Menu  > Settings >Wireless & networks > Bluetooth settings > Device name. Enter a name and tap OK.
45Wi-FiWi-Fihome, office, or hotspotQuick start: Wi-FiFind it: Menu  > Settings > Wireless & networks >Wi-Fi settingsNote: Your phone's Wi-Fi features and power levels are not allowed for outdoor operation in France. To avoid unlawful interference with radio signals, do not use the Wi-Fi features in France unless you are indoors.Use a wireless network for fast Internet access and to download data.Wi-Fi networksWi-Fi settingsNotify me when an open network is availableNetwork notificationYour networkAdd Wi-Fi networkWi-Fi Tap to turn on & scan.Tap to connect.Turn Wi-Fi on or offFind it: Menu  > Settings > Wireless & networks >Wi-Fi.Note: To extend battery life, turn off Wi-Fi power when not in use.Wi-Fi search & connectTo find networks in your range:  1Press Menu  > Settings > Wireless & networks >Wi-Fi settings.2Tap  Wi-Fi to turn on and scan. If Wi-Fi is already on, press Menu  > Scan. Your phone lists the networks it finds within range.Tip: To see your phone’s MAC address or other Wi-Fi details, press Menu  > Advanced.3Tap a network to connect.4If necessary, enter Network SSID, Security, and Wireless password, and tap Connect. When your phone is connected to the network, the wireless indicator   appears in the status bar.Tip: When you are in range and Wi-Fi is on, you will automatically reconnect to available networks you’ve connected to before.
46 USB & memory cardUSB & memory cardconnect your phone and computer, then drag & dropUSB drag & dropNote: This feature requires an optional accessory.You can transfer your pictures, videos, music, ringtones, and more, from your computer to your phone’s memory card.   1With a memory card inserted, and your phone showing the home screen, connect a Motorola micro USB data cable from your phone’s micro USB port to a USB port on your computer. Your phone should show   in the status bar.Note: Make sure to connect the phone to a high power USB port. Typically, these are located directly on your computer.2Your phone shows a USB connection dialog. Tap USB drive. You can’t use the files on your memory card while it is connected.3On your computer, use the “My Computer” window to find “Removable Disk”.4Click on the “Removable Disk” icon to access the memory card.5Drag and drop your pictures, videos, music, ringtones, and more, to your phone folder. To help manage your files, you can create more folders in your phone folder.6When you’re done, use the “Safely Remove Hardware” feature to finish.Memory cardNote: You need the memory card installed for some features on your phone, like Camera.Manage filesFind it: Home  > Quickoffice > Memory cardTap a file or folder to open, tap and hold a file to Delete or Share.To manage your folders and move stuff around use your USB connection, see “USB & memory card” on page 46.Remove or format your memory cardBefore you remove or format your memory card you need to unmount it. Press Menu  > Settings > SD card & phone storage > Unmount SD card.To format your memory card, tap Format SD card.Warning: All data on your memory card will be deleted.
47ToolsTo o l sstay on top of thingsAlarm clockFind it: Home > Alarm ClockTo turn on an alarm, tap the check box.When an alarm sounds, tap Dismiss to turn it off or Snooze to delay.To add an alarm, press Menu  >Add alarm, then enter alarm details.To set a snooze period, tap the alarm, then press Menu  >Snooze time.CalculatorFind it: Home  >  CalculatorYour calculator has two views: basic and advanced. To change your views, press Menu  > Advanced panel or Basic panel. To clear history, press Menu  >Clear history.Alarm7:00amWake Up8:30am Tuesday9:00am Tue, FriAlarm ClockQuickofficeUse Quickoffice to view recent documents and files on your memory card.Find it: Home  > Quickoffice
48 ManagementManagementstay in controlBackup & manage phone contentMotorola Media Link (MML) bridges your digital world by connecting your phone, PC, and the Web so you can manage the media on your phone. You can back up your media to your PC to keep it secure. Note: You must use a Wi-Fi connection to the Internet to use this feature (see “Wi-Fi” on page 45).•Transfer and organize photos, videos, and music.•Upload photos and videos to your favorite social networking sites or to photo sharing sites.•Back up your music, photos, and videos to your computer.•Access your phone’s content and features from your computer.•Back up your phone and synchronize contacts.To install MML, use your computer’s browser to go to www.motorola.com/support/MML (see “Web” on page 13). When you select this link, an installation wizard begins, guiding your through the quick and easy installation. When installation is complete, the MML icon appears on your desktop.To use MML:  1With a memory card inserted, and your phone showing the home screen, connect a Motorola micro USB data cable from your phone’s micro USB port to a USB port on your computer. Your phone should show   in the status bar.Note: Make sure to connect the phone to a high power USB port. Typically, these are located directly on your computer.2Double-click on the MML icon on your computer’s desktop.3When you see the MML screen, select the feature you want to use:Manage photos, videos, or music by selecting MEDIA > PHOTOS, MUSIC, VIDEOS, or RSS FEED.Safeguard your phone’s important information by selecting UTILITIES > Backup, Restore, Export Address Book, or Import Address Book.Wireless managerFind it: Menu  > Settings > Wireless & networksManage all your wireless connections: Wi-Fi, Bluetooth™, airplane mode, & mobile networks (see “Network” on page 49).
49SecurityAirplane modeUse airplane mode to turn all your wireless connections off—useful when flying. Update my phoneTo keep your phone current, software updates may be available. Press Menu  > Settings > About phone >Check for update to see if your phone is up to date. If it isn’t, tap Update.NetworkYou should not need to change any network settings. Contact your service provider for help.Press Menu  > Settings > Wireless & networks >Mobile networks to show options for roaming networks, network selection, operator selection, and access point names.Securityhelp keep your phone safeQuick start: SecurityFind it: Menu  > Settings > Location & securityYou have lots of ways to keep your phone safe.Screen lockSet your phone to display a lock screen, and prevent accidental key presses, press Menu  > Settings >Location & security > Security lock. You can also set a security lock to prevent others from using your phone.To set your security level, press Menu  > Settings >Location & security > Security lock > Security lock type:Screen unlock paƩernRequire security lockUse visible paƩernChange unlock paƩernPasswordsSelect paƩern or passcode security lockVisible passwordsShow password as you type
50 Security•None - press Menu , then Menu  again to unlock.•Password - press Menu , then enter a code to unlock.•Pattern - press Menu , then draw a pattern to unlock.Note: You can make emergency calls on a locked phone. A locked phone still rings, but you need to unlock it to answer.Lock patternTo set the lock pattern, press Menu  > Settings >Location & security > Security lock > Security lock type > Pattern. Follow the instructions to draw your lock pattern. When prompted, draw the pattern to unlock the phone.Passcode lockTo set the passcode, press Menu  > Settings >Location & security > Security lock > Security lock type > Password.Enter a password, then re-enter the password to confirm it, and tap Enter.When prompted, enter the password to unlock the phone.Personalize your lock screenTo change your timeout, press Menu  > Settings >Location & security > Screen timeout. If you don't tap the screen or press any keys for this amount of time, the screen locks automatically. To unlock, see “Screen lock” on page 49.Lock & unlockTo lock the screen/phone: •Let the screen time out (don’t press anything).•Switch the power off.To unlock the screen/phone: •Press Menu  or switch the phone on to display the lock screen.•Press Menu  to unlock—if you’ve set a lock pattern or passcode, you'll be asked to enter it.Lock your SIMLock SIMTo lock your SIM (the next time you power up the phone you will need to enter your SIM PIN), press Menu  > Settings > Location & security > Set up SIM card lock > Lock SIM card. Enter your SIM PIN code.
51TroubleshootingCaution: If you enter an incorrect PIN code three times, your phone locks your SIM card and asks for your PIN unlock code.Change SIM PINTo change your SIM PIN, press Menu  > Settings >Location & security > Set up SIM card lock >Change SIM PIN.PUK codeTo unlock your SIM PIN, you need to enter your PIN unlock code (PUK code) when prompted.Note: Your PUK code is provided by your service provider.ResetTo reset your phone to factory settings and erase all the data on your phone, press Menu  > Settings >SD card & phone storage > Factory data reset >Reset phone.Warning: All data on your phone will be deleted.Troubleshootingwe’re here to helpCrash recoveryIn the unlikely event that your phone stops responding to taps and key presses, try a quick reset. Remove the back cover and battery (“Assemble & charge” on page 3), then replace and switch your phone on as usual.ResetTo reset your phone to factory settings and erase all the data on your phone, press Menu  > Settings >SD card & phone storage > Factory data reset >Reset phone.Warning: All data on your phone will be deleted.Service & repairsIf you have questions or need assistance, go to www.motorola.com/support, where you can select from a number of customer care options. You can also contact the Motorola Customer Support Center at 1-800-331-6456 (United States), 1-888-390-6456 (TTY/TDD United States for hearing impaired), or 1-800-461-4575 (Canada).
52Safety, Regulatory & LegalBattery Use & SafetyBatter y Use & SafetyImportant: Handle and store batteries properly to avoid injury or damage. Most battery issues arise from improper handling of batteries, and particularly from the continued use of damaged batteries.DON’Ts• Don’t disassemble, crush, puncture, shred, or otherwise attempt to change the form of your battery.• Don’t let the phone or battery come in contact with water. Water can get into the phone’s circuits, leading to corrosion. If the phone and/or battery get wet, have them checked by your carrier or contact Motorola, even if they appear to be working properly.• Don’t allow the battery to touch metal objects. If metal objects, such as jewelry, stay in prolonged contact with the battery contact points, the battery could become very hot.• Don’t place your battery near a heat source. Excessive heat can damage the phone or the battery. High temperatures can cause the battery to swell, leak, or malfunction. Therefore:•Do not dry a wet or damp battery with an appliance or heat source, such as a hair dryer or microwave oven.•Avoid leaving your phone in your car in high temperatures.DOs• Do avoid dropping the battery or phone. Dropping these items, especially on a hard surface, can potentially cause damage.• Do contact your service provider or Motorola if your phone or battery has been damaged from dropping or high temperatures.Important: Use Motorola Original products for quality assurance and safeguards. To aid consumers in identifying authentic Motorola batteries from non-original or counterfeit batteries (that may not have adequate safety protection), Motorola provides holograms on its batteries. Consumers should confirm that any battery they purchase has a “Motorola Original” hologram.Motorola recommends you always use Motorola-branded batteries and chargers. Motorola mobile devices are designed to work with Motorola batteries. If you see a message on your display such as Invalid Battery or Unable to Charge, take the following steps:•Remove the battery and inspect it to confirm that it has a “Motorola Original” hologram;•If there is no hologram, the battery is not a Motorola battery;•If there is a hologram, replace the battery and retry charging it;•If the message remains, contact a Motorola authorized service center.Important: Motorola’s warranty does not cover damage to the phone caused by non-Motorola batteries and/or chargers.Warning: Use of a non-Motorola battery or charger may present a risk of fire, explosion, leakage, or other hazard.Proper and safe battery disposal and recycling: Proper battery disposal is not only important for safety, it benefits the environment. Consumers may recycle their used batteries in many retail or service provider locations. Additional information on proper disposal and recycling may be found on the Web:•www.motorola.com/recycling•www.rbrc.org/call2recycle/ (in English only)Disposal: Promptly dispose of used batteries in accordance with local regulations. Contact your local recycling center or national recycling organizations for more information on how to dispose of batteries.Warning: Never dispose of batteries in a fire because they may explode.Battery ChargingBatter y Chargi ngNotes for charging your phone’s battery:•When charging your battery, keep it near room temperature. Never expose batteries to temperatures below 0°C (32°F) or above 45°C (113°F) when charging.•New batteries are not fully charged.•New batteries or batteries stored for a long time may take more time to charge.•Motorola batteries and charging systems have circuitry that protects the battery from damage from overcharging.032375o
54other countries preserve for Motorola and third-party software providers certain exclusive rights for copyrighted software, such as the exclusive rights to distribute or reproduce the copyrighted software. Accordingly, any copyrighted software contained in Motorola products may not be modified, reverse-engineered, distributed, or reproduced in any manner to the extent allowed by law. Furthermore, the purchase of Motorola products shall not be deemed to grant either directly or by implication, estoppel, or otherwise, any license under the copyrights, patents, or patent applications of Motorola or any third-party software provider, except for the normal, non-exclusive, royalty-free license to use that arises by operation of law in the sale of a product.Content CopyrightContent  CopyrightThe unauthorized copying of copyrighted materials is contrary to the provisions of the Copyright Laws of the United States and other countries. This device is intended solely for copying non-copyrighted materials, materials in which you own the copyright, or materials which you are authorized or legally permitted to copy. If you are uncertain about your right to copy any material, please contact your legal advisor.Open Source Software InformationOSS InformationFor instructions on how to obtain a copy of any source code being made publicly available by Motorola related to software used in this Motorola mobile device, you may send your request in writing to the address below. Please make sure that the request includes the model number and the software version number.MOTOROLA, INC.OSS Management600 North US Hwy 45Libertyville, IL 60048USAThe Motorola website opensource.motorola.com also contains information regarding Motorola's use of open source.Motorola has created the opensource.motorola.com website to serve as a portal for interaction with the software community-at-large.To view additional information regarding licenses, acknowledgments and required copyright notices for open source packages used in this Motorola mobile device, please press Menu Key >Settings >About Phone >Legal information >Open source licenses. In addition, this Motorola device may include self-contained applications that present supplemental notices for open source packages used in those applications.GPS & AGPSGPS & AGPSYour mobile device can use Global Positioning System (GPS) signals for location-based applications. GPS uses satellites controlled by the U.S. government that are subject to changes implemented in accordance with the Department of Defense policy and the Federal Radio Navigation Plan. These changes may affect the performance of location technology on your mobile device.Your mobile device can also use Assisted Global Positioning System (AGPS), which obtains information from the cellular network to improve GPS performance. AGPS uses your wireless service provider's network and therefore airtime, data charges, and/or additional charges may apply in accordance with your service plan. Contact your wireless service provider for details.Your LocationLocation-based information includes information that can be used to determine the approximate location of a mobile device. Mobile phones which are connected to a wireless network transmit location-based information. Devices enabled with GPS or AGPS technology also transmit location-based information. Additionally, if you use applications that require location-based information (e.g. driving directions) such applications transmit location-based information. This location-based information may be shared with third parties, including your wireless service provider, applications providers, Motorola, and other third parties providing services.Emergency CallsWhen you make an emergency call, the cellular network may activate the AGPS technology in your mobile device to tell the emergency responders your approximate location.AGPS has limitations and might not work in your area. Therefore:•Always tell the emergency responder your location to the best of your ability; and
55•Remain on the phone for as long as the emergency responder instructs you.Performance Tips•Go outside and away from underground locations, covered vehicles, structures with metal or concrete roofs, tall buildings, and foliage. Indoor performance might improve if you move closer to windows, but some window sun shielding films can block satellite signals.•Move away from radios, entertainment equipment, and other electronic devices.Safety & General InformationSafety InformationThis section contains important information on the safe and efficient operation of your mobile device. Read this information before using your mobile device.Exposure to Radio Frequency (RF) EnergyYour mobile device contains a transmitter and receiver. When it is ON, it receives and transmits RF energy. When you communicate with your mobile device, the system handling your call controls the power level at which your mobile device transmits.Your mobile device is designed to comply with local regulatory requirements in your country concerning exposure of human beings to RF energy.Operational PrecautionsFor optimal mobile device performance, and to be sure that human exposure to RF energy does not exceed the guidelines set forth in the relevant standards, always follow these instructions and precautions.Product OperationWhen placing or receiving a phone call, hold your mobile device just like you would a landline phone.If you wear the mobile device on your body, always place the mobile device in a Motorola-supplied or approved clip, holder, holster, case, or body harness. If you do not use a body-worn accessory supplied or approved by Motorola, keep the mobile device and its antenna at least 2.5 centimeters (1 inch) from your body when transmitting.Using accessories not supplied or approved by Motorola may cause your mobile device to exceed RF energy exposure guidelines. For a list of Motorola-supplied or approved accessories, visit our Web site at: www.motorola.com.RF Energy Interference/CompatibilityNearly every electronic device is subject to RF energy interference from external sources if inadequately shielded, designed, or otherwise configured for RF energy compatibility. In some circumstances, your mobile device may cause interference with other devices.Follow Instructions to Avoid Interference ProblemsTurn off your mobile device in any location where posted notices instruct you to do so.In an aircraft, turn off your mobile device whenever instructed to do so by airline staff. If your mobile device offers an airplane mode or similar feature, consult airline staff about using it in flight.Implantable Medical DevicesIf you have an implantable medical device, such as a pacemaker or defibrillator, consult your physician before using this mobile device.Persons with implantable medical devices should observe the following precautions:•ALWAYS keep the mobile device more than 20 centimeters (8 inches) from the implantable medical device when the mobile device is turned ON.•DO NOT carry the mobile device in the breast pocket.•Use the ear opposite the implantable medical device to minimize the potential for interference.•Turn OFF the mobile device immediately if you have any reason to suspect that interference is taking place.Read and follow the directions from the manufacturer of your implantable medical device. If you have any questions about using your mobile device with your implantable medical device, consult your healthcare provider.Driving PrecautionsThe use of wireless phones while driving may cause distraction. Discontinue a call if you can’t concentrate on driving.
56Additionally, the use of wireless devices and their accessories may be prohibited or restricted in certain areas. Always obey the laws and regulations on the use of these products.For more information, see “Smart Practices While Driving.”Operational WarningsObey all posted signs when using mobile devices in public areas.Potentially Explosive AtmospheresAreas with potentially explosive atmospheres are often, but not always, posted and can include fueling areas, such as below decks on boats, fuel or chemical transfer or storage facilities, or areas where the air contains chemicals or particles, such as grain dust, or metal powders.When you are in such an area, turn off your mobile device, and do not remove, install, or charge batteries. In such areas, sparks can occur and cause an explosion or fire.Batteries & ChargersCaution: Improper treatment or use of batteries may present a danger of fire, explosion, leakage, or other hazard. For more information, see “Battery Use & Safety.”Symbol KeyYour battery, charger, or mobile device may contain symbols, defined as follows:Keep Your Mobile Device & Its Accessories Away From Small ChildrenThese products are not toys and may be hazardous to small children. For example:•A choking hazard may exist for small, detachable parts.•Improper use could result in loud sounds, possibly causing hearing injury.•Improperly handled batteries could overheat and cause a burn.Symbol DefinitionImportant safety information follows.Do not dispose of your battery or mobile device in a fire.Your battery or mobile device may require recycling in accordance with local laws. Contact your local regulatory authorities for more information.Do not throw your battery or mobile device in the trash.Do not let your battery, charger, or mobile device get wet.Listening at full volume to music or voice through a headset may damage your hearing.032374o032376o032375o
57Seizures/BlackoutsSome people may be susceptible to epileptic seizures or blackouts when exposed to flashing lights, such as when playing video games. These may occur even if a person has never had a previous seizure or blackout.If you have experienced seizures or blackouts, or if you have a family history of such occurrences, please consult with your physician before playing video games or enabling a flashing-lights feature (if available) on your mobile device.Discontinue use and consult a physician if any of the following symptoms occur: convulsion, eye or muscle twitching, loss of awareness, involuntary movements, or disorientation. It is always a good idea to hold the screen away from your eyes, leave the lights on in the room, take a 15-minute break every hour, and stop use if you are tired.Glass PartsSome parts of your mobile device may be made of glass. This glass could break if the product is dropped on a hard surface or receives a substantial impact. If glass breaks, do not touch or attempt to remove. Stop using your mobile device until the glass is replaced by a qualified service center.Caution About High Volume UsageWarning: Exposure to loud noise from any source for extended periods of time may affect your hearing. The louder the volume sound level, the less time is required before your hearing could be affected. To protect your hearing:•Limit the amount of time you use headsets or headphones at high volume.•Avoid turning up the volume to block out noisy surroundings.•Turn the volume down if you can’t hear people speaking near you.If you experience hearing discomfort, including the sensation of pressure or fullness in your ears, ringing in your ears, or muffled speech, you should stop listening to the device through your headset or headphones and have your hearing checked.For more information about hearing, see our Web site at direct.motorola.com/hellomoto/nss/AcousticSafety.asp (in English only).Repetitive MotionWhen you repetitively perform actions such as pressing keys or entering finger-written characters, you may experience occasional discomfort in your hands, arms, shoulders, neck, or other parts of your body. If you continue to have discomfort during or after such use, stop use and see a physician.[Apr0109]FCC Notice to UsersFCC NoticeThe following statement applies to all products that have received FCC approval. Applicable products bear the FCC logo, and/or an FCC ID in the format FCC-ID:xxxxxx on the product label.Motorola has not approved any changes or modifications to this device by the user. Any changes or modifications could void the user’s authority to operate the equipment. See 47 CFR Sec. 15.21.This device complies with part 15 of the FCC Rules. Operation is subject to the following two conditions: (1) This device may not cause harmful interference, and (2) this device must accept any interference received, including interference that may cause undesired operation. See 47 CFR Sec. 15.19(3).This equipment has been tested and found to comply with the limits for a Class B digital device, pursuant to part 15 of the FCC Rules. These limits are designed to provide reasonable protection against harmful interference in a residential installation. This equipment generates, uses and can radiate radio frequency energy and, if not installed and used in accordance with the instructions, may cause harmful interference to radio communications. However, there is no guarantee that interference will not occur in a particular installation. If this equipment does cause harmful interference to radio or television reception, which can be determined by turning the equipment off and on, the user is encouraged to try to correct the interference by one or more of the following measures:•Reorient or relocate the receiving antenna.•Increase the separation between the equipment and the receiver.•Connect the equipment to an outlet on a circuit different from that to which the receiver is connected.•Consult the dealer or an experienced radio/TV technician for help.
58service & repairsSpecific Absorption Rate DataSAR DataThis model wireless phone meets the government’s requirements for exposure to radio waves.Your wireless phone is a radio transmitter and receiver. It is designed and manufactured not to exceed limits for exposure to radio frequency (RF) energy set by the Federal Communications Commission (FCC) of the U.S. Government and by the Canadian regulatory authorities. These limits are part of comprehensive guidelines and establish permitted levels of RF energy for the general population. The guidelines are based on standards that were developed by independent scientific organizations through periodic and thorough evaluation of scientific studies. The standards include a substantial safety margin designed to assure the safety of all persons, regardless of age or health.The exposure standard for wireless mobile phones employs a unit of measurement known as the Specific Absorption Rate, or SAR. The SAR limit set by the FCC and by the Canadian regulatory authorities is 1.6 W/kg.1 Tests for SAR are conducted using standard operating positions accepted by the FCC and by Industry Canada with the phone transmitting at its highest certified power level in all tested frequency bands. Although the SAR is determined at the highest certified power level, the actual SAR level of the phone while operating can be well below the maximum value. This is because the phone is designed to operate at multiple power levels so as to use only the power required to reach the network. In general, the closer you are to a wireless base station, the lower the power output.Before a phone model is available for sale to the public in the U.S. and Canada, it must be tested and certified to the FCC and Industry Canada that it does not exceed the limit established by each government for safe exposure. The tests are performed in positions and locations (e.g., at the ear and worn on the body) reported to the FCC and available for review by Industry Canada. The highest SAR value for this model phone when tested for use at the ear is 0.45 W/kg, and when worn on the body, as described in this user guide, is 0.34 W/kg. (Body-worn measurements differ among phone models, depending upon available accessories and regulatory requirements).2While there may be differences between the SAR levels of various phones and at various positions, they all meet the governmental requirements for safe exposure. Please note that improvements to this product model could cause differences in the SAR value for later products; in all cases, products are designed to be within the guidelines.
58Use & CareUse & CareTo care for your Motorola phone, please keep it away from:liquids of any kindDon’t expose your phone to water, rain, extreme humidity, sweat, or other moisture. If it does get wet, don’t try to accelerate drying with the use of an oven or dryer, as this may damage the phone.extreme heat or coldAvoid temperatures below 0°C/32°F or above 45°C/113°F.microwavesDon’t try to dry your phone in a microwave oven.dust and dirtDon’t expose your phone to dust, dirt, sand, food, or other inappropriate materials.cleaning solutionsTo clean your phone, use only a dry soft cloth. Don’t use alcohol or other cleaning solutions.the groundDon’t drop your phone.Motorola Limited Warranty for the United States and CanadaWa rr a n t yWhat Does this Warranty Cover?Subject to the exclusions contained below, Motorola, Inc. warrants its mobile telephones (“Products”), Motorola-branded or certified accessories sold for use with these Products (“Accessories”), and Motorola software contained on CD-ROMs or other tangible media and sold for use with these Products (“Software”) to be free from defects in materials and workmanship under normal consumer usage for the period(s) outlined below. This limited warranty is a consumer's exclusive remedy, and applies as follows to new Motorola Products, Accessories, and Software purchased by consumers in the United States or Canada, which are accompanied by this written warranty:Products and AccessoriesExclusions (Products and Accessories)Normal Wear and Tear. Periodic maintenance, repair and replacement of parts due to normal wear and tear are excluded from coverage.Batteries. Only batteries whose fully charged capacity falls below 80% of their rated capacity and batteries that leak are covered by this limited warranty.Products Covered Length of CoverageProducts and Accessories as defined above, unless otherwise provided for below.One (1) year from the date of purchase by the first consumer purchaser of the product unless otherwise provided for below.Decorative Accessories and Cases. Decorative covers, bezels, PhoneWrap™ covers and cases.Limited lifetime warranty for the lifetime of ownership by the first consumer purchaser of the product.Monaural Headsets. Ear buds and boom headsets that transmit mono sound through a wired connection.Limited lifetime warranty for the lifetime of ownership by the first consumer purchaser of the product.Products and Accessories that are Repaired or Replaced.The balance of the original warranty or for ninety (90) days from the date returned to the consumer, whichever is longer.
59Abuse & Misuse. Defects or damage that result from: (a) improper operation, storage, misuse or abuse, accident or neglect, such as physical damage (cracks, scratches, etc.) to the surface of the product resulting from misuse; (b) contact with liquid, water, rain, extreme humidity or heavy perspiration, sand, dirt or the like, extreme heat, or food; (c) use of the Products or Accessories for commercial purposes or subjecting the Product or Accessory to abnormal usage or conditions; or (d) other acts which are not the fault of Motorola, are excluded from coverage.Use of Non-Motorola Products and Accessories. Defects or damage that result from the use of non-Motorola branded or certified Products, Accessories, Software or other peripheral equipment are excluded from coverage.Unauthorized Service or Modification. Defects or damages resulting from service, testing, adjustment, installation, maintenance, alteration, or modification in any way by someone other than Motorola, or its authorized service centers, are excluded from coverage.Altered Products. Products or Accessories with (a) serial numbers or date tags that have been removed, altered or obliterated; (b) broken seals or that show evidence of tampering; (c) mismatched board serial numbers; or (d) nonconforming or non-Motorola housings, or parts, are excluded from coverage.Communication Services. Defects, damages, or the failure of Products, Accessories or Software due to any communication service or signal you may subscribe to or use with the Products Accessories or Software is excluded from coverage.SoftwareExclusions (Software)Software Embodied in Physical Media. No warranty is made that the software will meet your requirements or will work in combination with any hardware or software applications provided by third parties, that the operation of the software Products Covered Length of CoverageSoftware. Applies only to physical defects in the media that embodies the copy of the software (e.g. CD-ROM, or floppy disk).Ninety (90) days from the date of purchase.products will be uninterrupted or error free, or that all defects in the software products will be corrected.Software NOT Embodied in Physical Media. Software that is not embodied in physical media (e.g. software that is downloaded from the Internet), is provided “as is” and without warranty.Who is Covered?This warranty extends only to the first consumer purchaser, and is not transferable.What Will Motorola Do?Motorola, at its option, will at no charge repair, replace or refund the purchase price of any Products, Accessories or Software that does not conform to this warranty. We may use functionally equivalent reconditioned/refurbished/pre-owned or new Products, Accessories or parts. No data, software or applications added to your Product, Accessory or Software, including but not limited to personal contacts, games and ringer tones, will be reinstalled. To avoid losing such data, software, and applications, please create a back up prior to requesting service.How to Obtain Warranty Service or Other InformationYou will receive instructions on how to ship the Products, Accessories or Software, at your expense, to a Motorola Authorized Repair Center. To obtain service, you must include: (a) a copy of your receipt, bill of sale or other comparable proof of purchase; (b) a written description of the problem; (c) the name of your service provider, if applicable; (d) the name and location of the installation facility (if applicable) and, most importantly; (e) your address and telephone number.USA All Products, Accessories, and Software: 1-800-331-6456Canada All Products: 1-800-461-4575TTY1-888-390-6456
60What Other Limitations are There?ANY IMPLIED WARRANTIES, INCLUDING WITHOUT LIMITATION THE IMPLIED WARRANTIES OF MERCHANTABILITY AND FITNESS FOR A PARTICULAR PURPOSE, SHALL BE LIMITED TO THE DURATION OF THIS LIMITED WARRANTY, OTHERWISE THE REPAIR, REPLACEMENT, OR REFUND AS PROVIDED UNDER THIS EXPRESS LIMITED WARRANTY IS THE EXCLUSIVE REMEDY OF THE CONSUMER, AND IS PROVIDED IN LIEU OF ALL OTHER WARRANTIES, EXPRESS OR IMPLIED. IN NO EVENT SHALL MOTOROLA BE LIABLE, WHETHER IN CONTRACT OR TORT (INCLUDING NEGLIGENCE) FOR DAMAGES IN EXCESS OF THE PURCHASE PRICE OF THE PRODUCT, ACCESSORY OR SOFTWARE, OR FOR ANY INDIRECT, INCIDENTAL, SPECIAL OR CONSEQUENTIAL DAMAGES OF ANY KIND, OR LOSS OF REVENUE OR PROFITS, LOSS OF BUSINESS, LOSS OF INFORMATION OR DATA, SOFTWARE OR APPLICATIONS OR OTHER FINANCIAL LOSS ARISING OUT OF OR IN CONNECTION WITH THE ABILITY OR INABILITY TO USE THE PRODUCTS, ACCESSORIES OR SOFTWARE TO THE FULL EXTENT THESE DAMAGES MAY BE DISCLAIMED BY LAW.Some states and jurisdictions do not allow the limitation or exclusion of incidental or consequential damages, or limitation on the length of an implied warranty, so the above limitations or exclusions may not apply to you. This warranty gives you specific legal rights, and you may also have other rights that vary from state to state or from one jurisdiction to another.Information from the World Health OrganizationWHO InformationPresent scientific information does not indicate the need for any special precautions for the use of mobile phones. If you are concerned, you may want to limit your own or your children’s RF exposure by limiting the length of calls or by using handsfree devices to keep mobile phones away from your head and body.Source: WHO Fact Sheet 193Further information: http://www.who.int/peh-emfCaring for the Environment by RecyclingRecycli ng Inform ationThis symbol on a Motorola product means the product should not be disposed of with household waste.Disposal of your Mobile Device & AccessoriesPlease do not dispose of mobile devices or electrical accessories (such as chargers, headsets, or batteries) with your household waste. Do not dispose of your battery or mobile device in a fire. These items should be disposed of in accordance with the national collection and recycling schemes operated by your local or regional authority. Alternatively, you may return unwanted mobile devices and electrical accessories to any Motorola Approved Service Center in your region. Details of Motorola approved national recycling schemes, and further information on Motorola recycling activities can be found at: www.motorola.com/recyclingDisposal of your Mobile Device Packaging & Product GuideProduct packaging and product guides should only be disposed of in accordance with national collection and recycling requirements. Please contact your regional authorities for more details.Privacy & Data SecurityPriva cy & Data Secur ityMotorola understands that privacy and data security are important to everyone. Because some features of your mobile device may affect your privacy or data security, please follow these recommendations to enhance protection of your information:• Monitor access—Keep your mobile device with you and do not leave it where others may have unmonitored access. Lock your device’s keypad where this feature is available.• Keep software up to date—If Motorola or a software/application vendor releases a patch or software fix for your mobile device that updates the device’s security, install it as soon as possible.• Erase before recycling—Delete personal information or data from your mobile device prior to disposing of it or turning it in for recycling. For instructions 032376o
61on how to delete all personal information from your device, see your product guide.Note: For information on backing up your mobile device data before erasing it, go to www.motorola.com and navigate to the “downloads” section of the consumer Web page for “Motorola Backup” or “Motorola Phone Tools.”• Location-based information—Location-based information includes information that can be used to determine the approximate location of a mobile device. Mobile phones which are connected to a wireless network transmit location-based information. Devices enabled with GPS or AGPS technology also transmit location-based information. Additionally, if you use applications that require location-based information (e.g. driving directions) such applications transmit location-based information. This location-based information may be shared with third parties, including your wireless service provider, applications providers, Motorola, and other third parties providing services.• Other information your device may transmit—Your device may also transmit testing and other diagnostic (including location-based) information, and other non-personal information to Motorola or other third-party servers. This information is used to help improve products and services offered by Motorola.If you have further questions regarding how the use of your mobile device may impact your privacy or data security, please contact Motorola at privacy@motorola.com, or contact your service provider.Smart Practices While DrivingDrivi ng SafetyDrive Safe, Call SmartCheck the laws and regulations on the use of mobile devices and their accessories in the areas where you drive. Always obey them. The use of these devices may be prohibited or restricted in certain areas—for example, handsfree use only. Go to www.motorola.com/callsmart (in English only) for more information.Your mobile device lets you communicate by voice and data—almost anywhere, anytime, wherever wireless service is available and safe conditions allow. When driving a car, driving is your first responsibility. If you choose to use your mobile device while driving, remember the following tips:• Get to know your Motorola mobile device and its features such as speed dial and redial. If available, these features help you to place your call without taking your attention off the road.• When available, use a handsfree device. If possible, add an additional layer of convenience to your mobile device with one of the many Motorola Original handsfree accessories available today.• Position your mobile device within easy reach. Be able to access your mobile device without removing your eyes from the road. If you receive an incoming call at an inconvenient time, if possible, let your voicemail answer it for you.• Let the person you are speaking with know you are driving; if necessary, suspend the call in heavy traffic or hazardous weather conditions. Rain, sleet, snow, ice, and even heavy traffic can be hazardous.• Dial sensibly and assess the traffic; if possible, place calls when your car is not moving or before pulling into traffic. If you must make a call while moving, dial only a few numbers, check the road and your mirrors, then continue.• Do not take notes or look up phone numbers while driving. Jotting down a “to do” list or going through your address book takes attention away from your primary responsibility—driving safely.• Do not engage in stressful or emotional conversations that may be distracting. Make people you are talking with aware you are driving and suspend conversations that can divert your attention away from the road.• Use your mobile device to call for help. Dial 911 or other local emergency number in the case of fire, traffic accident, or medical emergencies (wherever wireless phone service is available).• Use your mobile device to help others in emergencies. If you see an auto accident, crime in progress, or other serious emergency where lives are in danger, call 911 or other local emergency number (wherever wireless phone service is available), as you would want others to do for you.• Call roadside assistance or a special non-emergency wireless assistance number when necessary. If you see a broken-down vehicle posing no serious hazard, a broken traffic signal, a minor traffic accident where no one appears injured, or a vehicle you know to be stolen, call roadside
62assistance or other special non-emergency wireless number (wherever wireless phone service is available). Motorola, Inc.Consumer Advocacy Office600 N US Hwy 45Libertyville, IL 60048www.hellomoto.com1-800-331-6456 (United States)1-888-390-6456 (TTY/TDD United States for hearing impaired)1-800-461-4575 (Canada)Certain mobile phone features are dependent on the capabilities and settings of your service provider’s network. Additionally, certain features may not be activated by your service provider, and/or the provider’s network settings may limit the feature’s functionality. Always contact your service provider about feature availability and functionality. All features, functionality, and other product specifications, as well as the information contained in this guide, are based upon the latest available information and believed to be accurate at the time of printing. Motorola reserves the right to change or modify any information or specifications without notice or obligation.MOTOROLA and the Stylized M Logo are registered in the US Patent & Trademark Office. The Bluetooth trademarks are owned by their proprietor and used by Motorola, Inc. under license. Microsoft, Windows, Windows Me, and Windows Vista are registered trademarks of Microsoft Corporation in the United States and other countries. Macintosh is a registered trademark of Apple Computer, Inc. Google, Google Maps, Google Calendar, YouTube, Picasa, Gmail, and the Google logo are trademarks of Google, Inc.  is a Certification Mark of the Wireless Fidelity Alliance, Inc. All other product or service names are the property of their respective owners.© 2009 Motorola, Inc. All rights reserved.Caution: Changes or modifications made in the radio phone, not expressly approved by Motorola, will void the user’s authority to operate the equipment.Bluetooth ID: B 015537Manual Number: 68XXXXX368-AU.S. patent Re. 34,976

Navigation menu