Motorola Mobility P56MM8 MOBILE PHONE User Manual
Motorola Mobility LLC MOBILE PHONE
Contents
- 1. USERS MANUAL 1
- 2. USERS MANUAL 2
- 3. USERS MANUAL 3
USERS MANUAL 2
22 Contacts
Contacts
contacts like you’ve never had before
Keep each friend’s email, phone number, and even
address all in your Contacts for quick access.
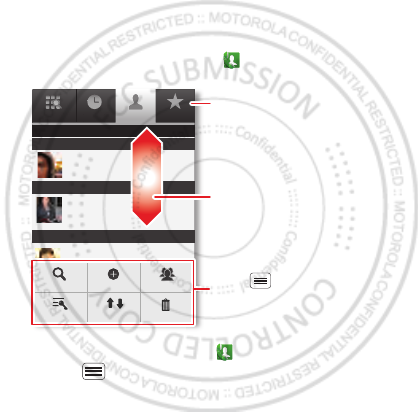
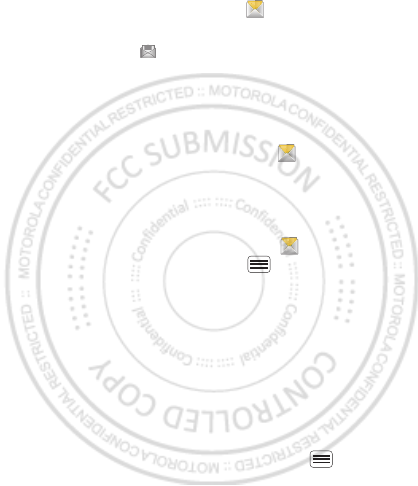
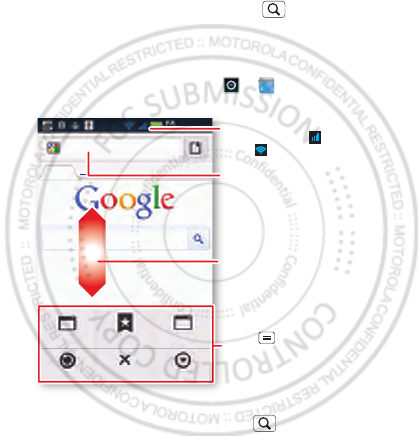
Quick start: Contacts
From the home screen, touch Phone > Contacts
•To create a contact, touch Phone > Contacts >
Menu > New contact, choose where you want to
Ph
o
n
e
Displaying 20 contacts
Contacts
Favor
i
te
s
Call lo
g
A
B
C
Arthur Baudo
Barry Smyth
Cheyenne Medina
Christine Fanning
Search New contact
Accounts Import/Export
Display options
Delete contacts
Drag or flick to scroll.
Switch to the dialer, recent calls,
or favorites.
Touch to search, create, and
more.
30th. January, 2012
23Contacts
store the contact, then enter details (to close the
display keyboard, touch Back ).
Contacts shows the contacts from your Google™
account, which you can open from any computer at
contacts.google.com (or open your contacts within
mail.google.com). To stop synchronizing with your
account, touch Phone > Contacts > Menu >
Accounts, touch your Google account, then uncheck
Sync Contacts.
•To call, text, or email a contact, touch Phone
>Contacts, touch the contact, then touch (call),
(text), or (email).
•To edit or delete a contact, touch Phone
>Contacts, touch the contact, then touch Menu .
Favorites
For quick access to a favorite contact, open the contact,
then touch the star next to their name. To show your
favorites, touch Phone and touch Favorites at the
top.
To add a shortcut to your favorites, touch and hold a
blank spot on your home screen, then touch Folders >
Starred contacts. You can also add a shortcut for an
individual contact: Touch and hold a blank spot on your
home screen, then choose Shortcuts > Contact.
30th. January, 2012
24 Contacts
Storage & transfer
When you create a new contact, your phone asks if you
want to store it in your Google™ account, phone
memory, or SIM card. Contacts in all three places appear
in your Contacts list, but if you change phones:
•Contacts in your Google™ account can download
when you log into your Google account on a new
Android™ device. You can open these contacts from
any computer at contacts.google.com.
•Contacts on your SIM card can load to a new device
when you insert your SIM card.
•Contacts in your phone memory stay in your old
phone, unless you export them.
To import or export contacts between your phone
memory and a SIM or memory card, touch Phone
>Contacts, then touch Menu > Import/Export.
30th. January, 2012
25Messaging
Messaging
sometimes it’s best to text or email...
Send and receive text with photos or other attachments,
in quick text messages or full emails.
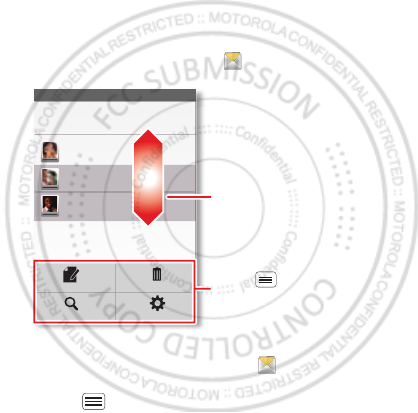
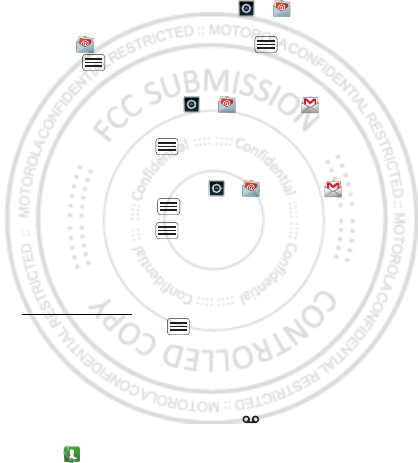
Quick start: Text messaging
From the home screen, touch Messaging.
Tip: To see more messages, flick or drag up.
•To create a text message, touch Messaging >
New message. For options like attaching files, touch
Menu .
Messaging
New message
Compose new message
12254558787
14447772222
You had 1 missed call from
122545458787 ... 17 Aug
Wanna catch something to eat tonight? How about ...
17 Aug
12223334545
Ha! Thanks.
16 Aug
Settings
Delete threads
Search
Compose
Drag or flick to scroll.
Touch to change settings
and more.
30th. January, 2012
26 Messaging
•To open text messages, touch Messaging, then
touch the sender’s name.
When you see in the status bar at the top of your
screen, flick down the status bar and touch the new
message to open it.
•To respond to a text message, just open it and enter
your response in the text box at the bottom.
•To forward, copy, and more, touch Messaging,
touch the sender’s name, then touch and hold the
message.
Attachments
To send a file in a text message, touch Messaging >
New message, then touch Menu > Attach.
When you open a message with an attachment, touch
Download to download it. Touch the downloaded
attachment to open it, then touch it again to save it,
share it, and more.
Tip: To send and receive large attachments faster, use
“Wi-Fi networks” on page 50.
Email
•To set up Google or Corporate (Microsoft™
Exchange server) accounts, touch Menu >
30th. January, 2012
27Messaging
Settings > Accounts & sync > Add account. For
details, contact the account provider.
To set up standard email accounts (not Gmail™ or
Microsoft™ Exchange), touch > Email and
follow the wizard. To add more standard accounts,
open Email and touch Menu > Accounts >
Menu > Add account. For details, contact the
account provider.
•To open email, touch > Email or Gmail.
Touch a message to open it.
Tip: Touch Menu for options like Refresh or
Search.
•To create an email, touch > Email or Gmail,
then touch Menu > Compose.
Tip: Touch Menu for options, like Attach or Add
Cc/Bcc.
Gmail synchronizes with your Google™ account mail,
which you can open from any computer at
mail.google.com. To stop synchronizing with your
account, touch Menu > Settings > Accounts &
sync, touch your Google account, then uncheck Sync
Gmail.
Voicemail
When you have a new voicemail, shows in the status
bar at the top of your screen. To hear voicemails,
touch Dialer then touch and hold 1.
30th. January, 2012
28 Messaging
If you need to change your voicemail number, in the
home screen touch Menu > Settings > Call
settings > Voicemail service. For your voicemail
number or other details, contact your service provider.
30th. January, 2012
29Text entry
Text entry
keys when you need them
When you enter text, like in a message or search, you
have keyboard options.
Quick start: Text entry
To change the keyboard, touch and hold a blank spot in
a text box. A menu opens, where you can choose Input
Method > Multi-touch keyboard or Swype.
Note: Swype is not available in all regions. Your
keyboard might change depending on what you’re
entering.
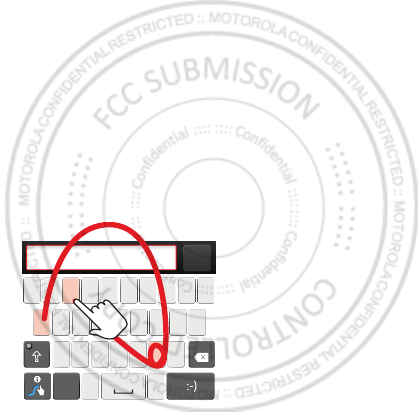
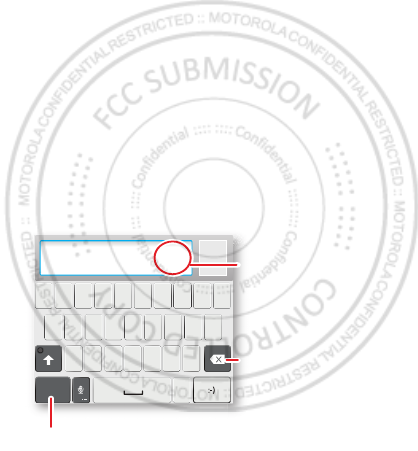
Swype lets you drag your finger over the letters of a
word, in one continuous motion.
•To move the cursor, touch and hold a word you
entered. This opens a magnifier where you can drag
the cursor.
Send
:-)
asdfghj k l
qwe r t y u i op
zxcvbnm
EN @# 12 3
_
%()
!7890 /?
&$456+:;
“
,.
SYM
To enter a word, just
trace a path through
the letters.
To capitalize, go above
the keypad.
For double letters,
circle the letter.
To enter a word, just
trace a path through
the letters.
To capitalize, go above
the keypad.
For double letters,
circle the letter.
AnneAnneAnne
a
e
n
a
e
n
30th. January, 2012
30 Text entry
•To copy and paste, double-tap a word to highlight it
(if needed, drag the ends of the highlight). Then touch
and hold a blank spot for the copy and paste menu.
•To add a word to your dictionary, double-tap the
word to highlight it. Then touch and hold a blank spot
to open the menu where you can add the word.
•To enter the small number or symbol at the top of a
key, touch and hold the key.
To enter several numbers or symbols, touch SYM.
•If Swype doesn’t know a word, touch individual letters
to enter it. Swype remembers, so next time you can
just drag over the letters.
Multi-touch keyboard lets you enter letters by
touching them one at a time.
Send
:-)
ASDFGHJKL
QWE R T Y U I OP
ZXCVBNM
123 7890
456
?123
.
Touch and hold an
empty spot to open a
menu.
Delete
Symbols/Numbers
30th. January, 2012
31Text entry
Text entry dictionary
Your phone’s dictionary stores special words or names
to recognize when you enter them.
To open your dictionary, from the home screen touch
Menu > Settings > Language & keyboard > User
dictionary.
•To add a word, touch Menu > Add.
•To edit or delete a word, touch and hold it.
30th. January, 2012
32 Schedule
Schedule
helping you stay in control
Yo ur Calendar events can synchronize with your
Google™ account, and the Clock can wake you up!
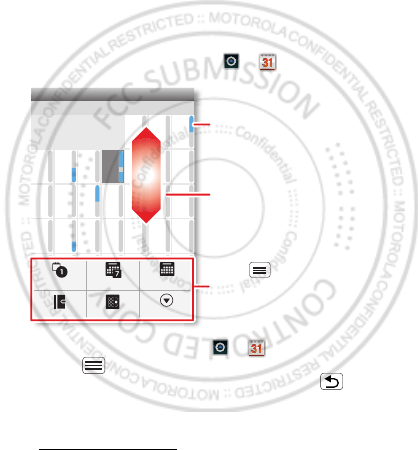
Quick start: Schedule
From the home screen, touch > Calendar.
•To create an event, touch > Calendar >
Menu > More > New event, then enter details
(to close the display keyboard, touch Back ).
Calendar synchronizes with your Google account
calendar, which you can open from any computer at
calendar.google.com (or open your calendar within
Sun
Mon Tue Wed Thu Sat
Fri
28 29 30 31 123
456 8910
11 12 13 15 16 17
18 19 20 22 23 24
25 26 27 29 30 31
123 567
7
14
21
28
4
June 2012
Day Week
Agenda Today More
Month
Drag or flick to scroll.
Color indicates events.
Touch to choose the
calendar view. Choose More to
create an event or change
settings.
30th. January, 2012
33Schedule
mail.google.com). To stop synchronizing with your
account, touch Menu > Settings > Accounts &
sync, touch your Google account, then uncheck Sync
Calendar.
•To edit or delete an event, touch > Calendar,
touch the event to open it, then touch Menu >
Edit event or Delete event.
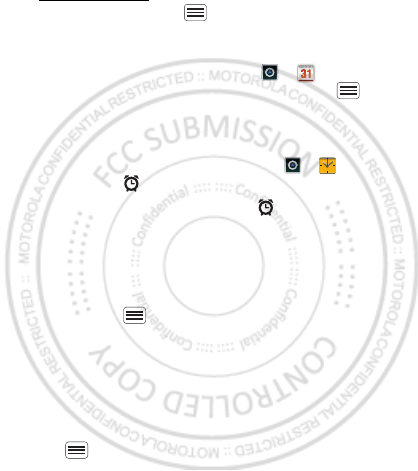
Alarm clock
To set an alarm (like to wake up), touch > Clock,
then touch the alarm.
•To turn an alarm on or off, touch next to it.
•To add an alarm, touch Add alarm, then enter alarm
details.
•To change an alarm, touch the time.
•To set a snooze period, in the Alarm Clock list
touch Menu > Settings > Snooze duration.
When an alarm sounds, touch Dismiss to turn it off or
Snooze to delay it. To cancel a snoozed alarm, drag
down the status bar bar and touch the alarm name.
Date & time
To set the date, time, time zone, and formats, touch
Menu > Settings > Date & time.
30th. January, 2012
34 Web
Web
surf the web with your phone
Open Browser or just touch Search to find a page,
then bookmark it, send it, or just explore.
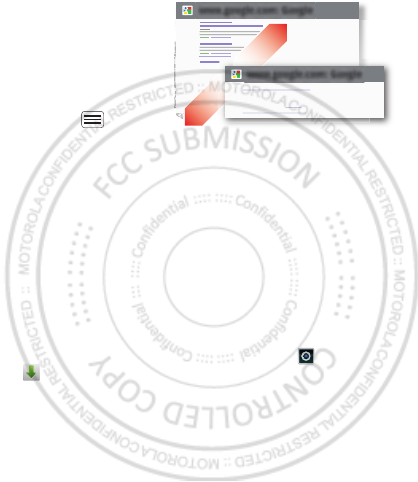
Quick start: Web
From the home screen, touch > Browser.
•To ent e r a website address in the browser or your
home screen, just touch Search .
New window
Refresh
Bookmarks
Exit
Windows
More
Web Images Local News more
Google
Drag or flick to scroll.
Enter a web page URL.
Touch to open bookmarks,
windows, and more.
Connection
Mobile Network:
Wi-Fi:
30th. January, 2012
35Web
•To zoom in or out,
pinch two fingers
together or apart.
•To send the website
address in a
message, touch
Menu > More >
Share page.
Note: Your phone automatically uses your mobile phone
network to connect to the web. Your service provider
may charge to surf the web or download data. If you
can’t connect, contact your service provider.
Tip: You can connect to the web with “Wi-Fi networks”
on page 50.
Downloads
To download files in your browser, touch a file link or
touch and hold a picture to choose Save image.
To show the files you downloaded, touch >
Downloads. Touch and hold an item to open it, see
details, or remove it from the list.
You can download “Apps” on page 12.
www.google.com: Google
www.google.com: Google
Android | Official Website
Official site for the development of the open source project.
Provides a directory of applications and links to download ..
www.android.com/ - Options
More from www.android.com »
30th. January, 2012

36 Location
Location
where you are, and where you’re going
Open Maps or just touch Search to find an address,
then get directions, check in, or save the location.
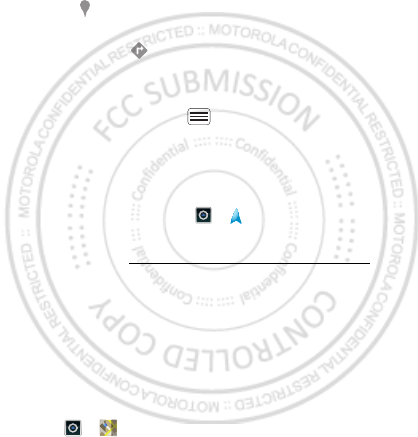
Quick start: Location
From the home screen, touch > Maps.
Google Maps™ offers powerful, user-friendly mapping
technology and local business information—including
business locations, contact information, and driving
directions.
•To find an addres, enter it in the search box at the top.
The map moves to show the address.
Chicago, IL
N Clark St
Wacker Dr
M
E Ontario St
E Ohio St
N Rush St
N Park St
N New St
N Wabash Ave
N Dearborn St
E Grand Ave
E Randolph St
N Micigan Ave
N Micigan Ave
rD submuloC N
W Lake St W Lake St
E Wacker Pl
State/Lake
Grand Red
Lake
Randolph
St Metra
Randolph/
Wabash
Washington-Blue
E S WaterSt
M
M
M
M
Ontario St
D
D
D
e
e
e
e
e
a
a
a
r
r
b
b
b
o
o
r
r
n
n
S
S
S
t
44 West Street
A
Search
More
Directions
Settings
Clear Map
Help
Touch to open, then touch
to add to Starred Places.
Drag or flick to scroll.
Find nearby places.
Show your location.
Show layers on the map.
Touch to get directions, open
your starred places, windows,
and more.
30th. January, 2012
37Location
Tip: You can touch and hold a spot on the map to
show the nearest address.
•To find stores, restaurants, and other places near you,
touch at the top.
•To get directions, find an address on the map, touch
it, then touch .
•To save an address for later, touch it, then touch the
star by its name to add it to your Starred Places.
•For help, touch Menu > More > Help.
Google Maps™ Navigation
Google Maps Navigation is an Internet-connected GPS
navigation system with voice guidance.
To open navigation, touch > Navigation. Follow
the prompts to speak or type your destination.
For more, go to www.google.com/mobile/navigation.
Google Latitude™
Google Latitude™ lets you see where your friends and
family are on Google Maps™. Plan to meet up, check
that they got home safely, or just stay in touch. Don’t
worry, your location is not shared unless you agree to it.
After you join Google Latitude, you can invite your
friends to view your location, or accept their invitations.
Touch > Maps and then:
30th. January, 2012
38 Location
•To join Google Latitude, touch Menu > Join
Latitude. Read the privacy policy and, if you agree
with it, choose to continue.
•To add friends, touch Menu > Latitude >
Menu > Add friends.
Touch Select from Contacts or Add via email
address, then touch a contact and Add friends. Your
friend will receive an email notice.
•To remove friends, touch Menu > Latitude to
show your friends list. Touch a name, then touch
Remove.
•To share your location when you receive a request,
you can choose Accept and share back (show your
location and see theirs), Accept, but hide my
location (hide your location, but see theirs), or Don’t
accept (hide both locations).
•To hide your location, touch Menu > Latitude to
show your friends list. Touch your contact name, then
touch Menu > Settings > Do not detect your
location.
•To sign out, touch Menu > Latitude to show
your friends list. Touch Menu > Settings > Sign
out of Latitude.
30th. January, 2012