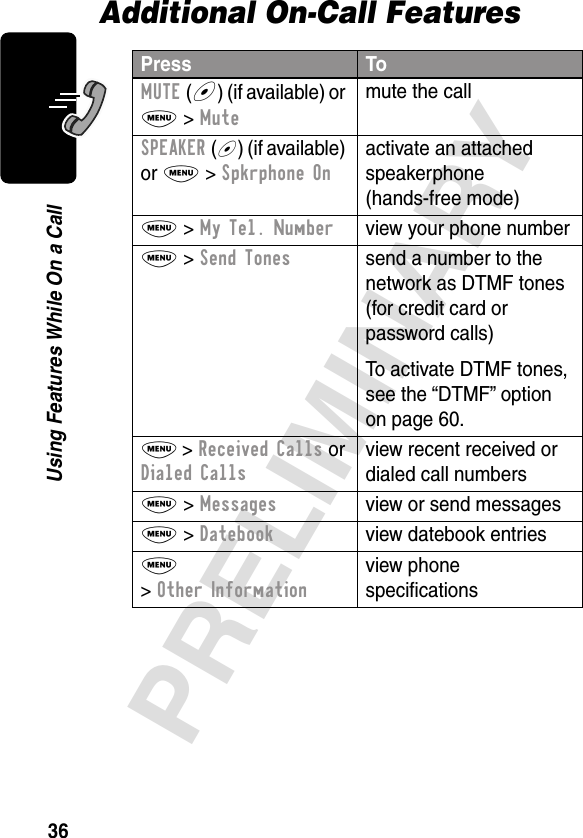
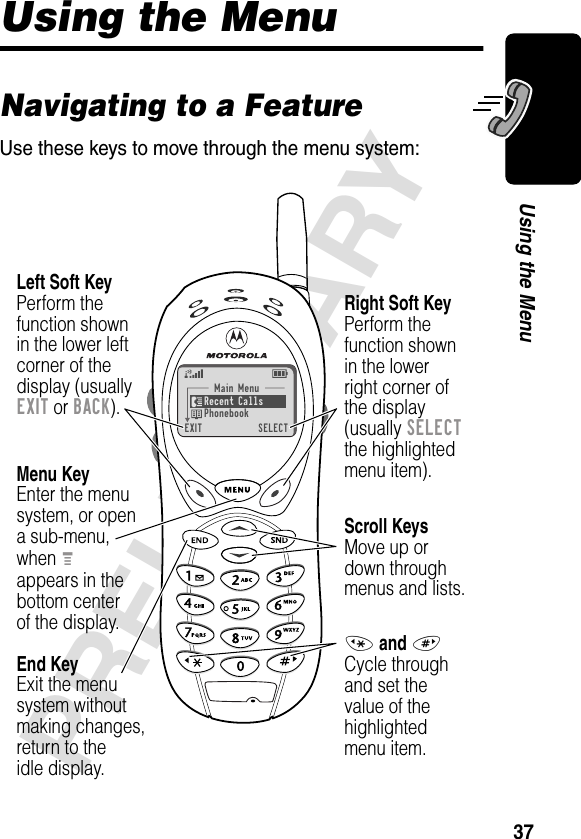
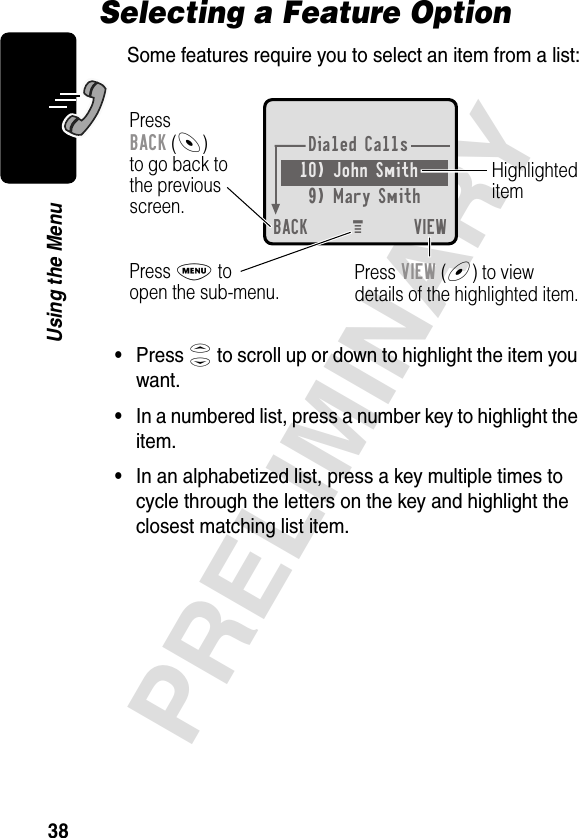
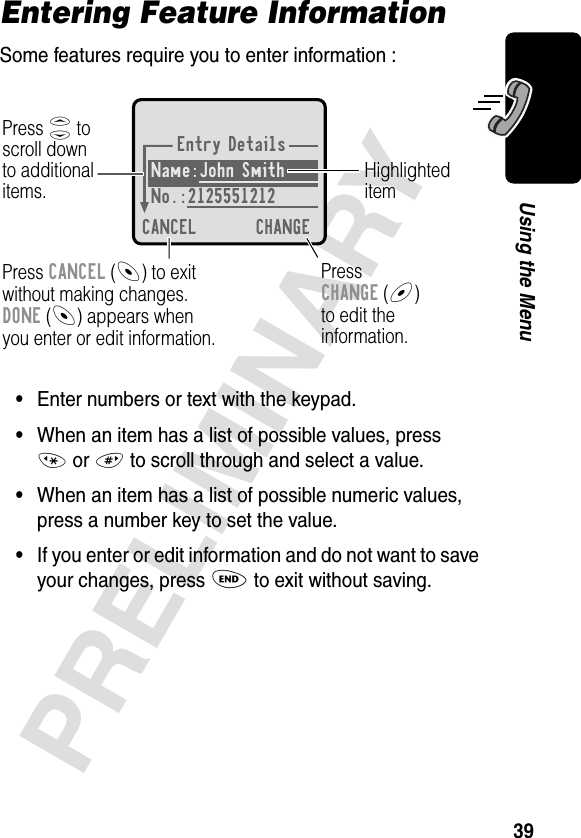
Motorola Mobility T56CA1 Portable Cellular/PCS Transceiver (AMPS/TDMA) User Manual CC EX08
Motorola Mobility LLC Portable Cellular/PCS Transceiver (AMPS/TDMA) CC EX08
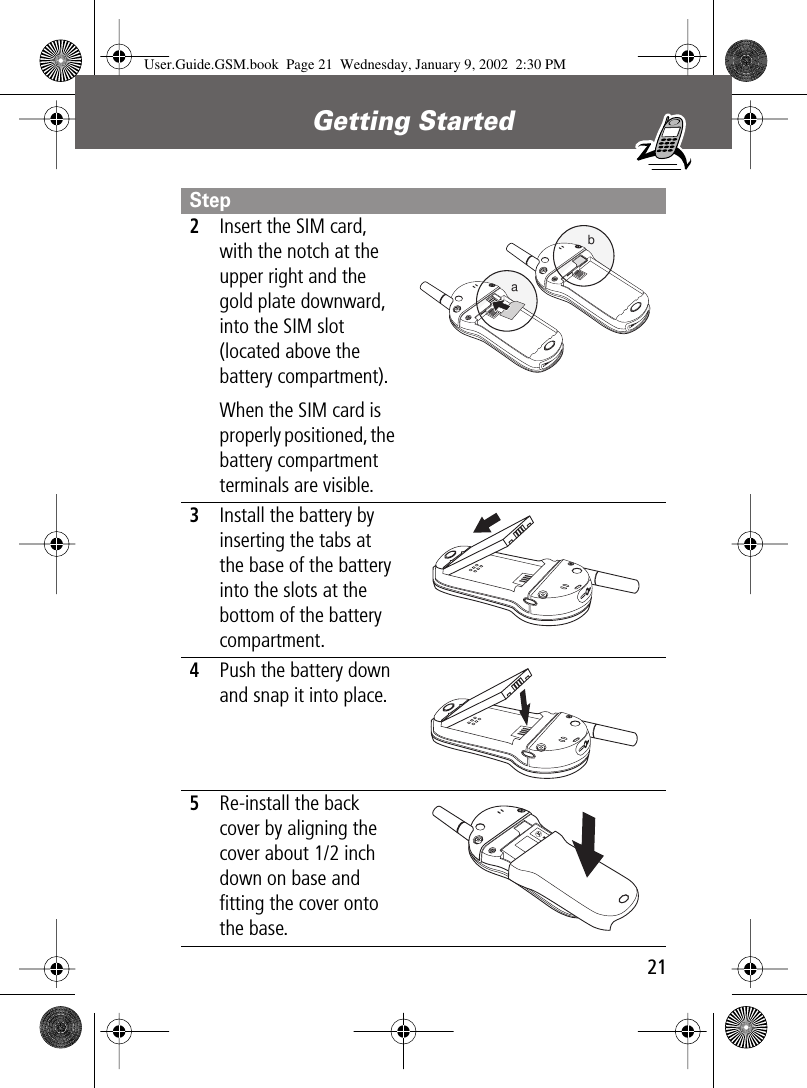
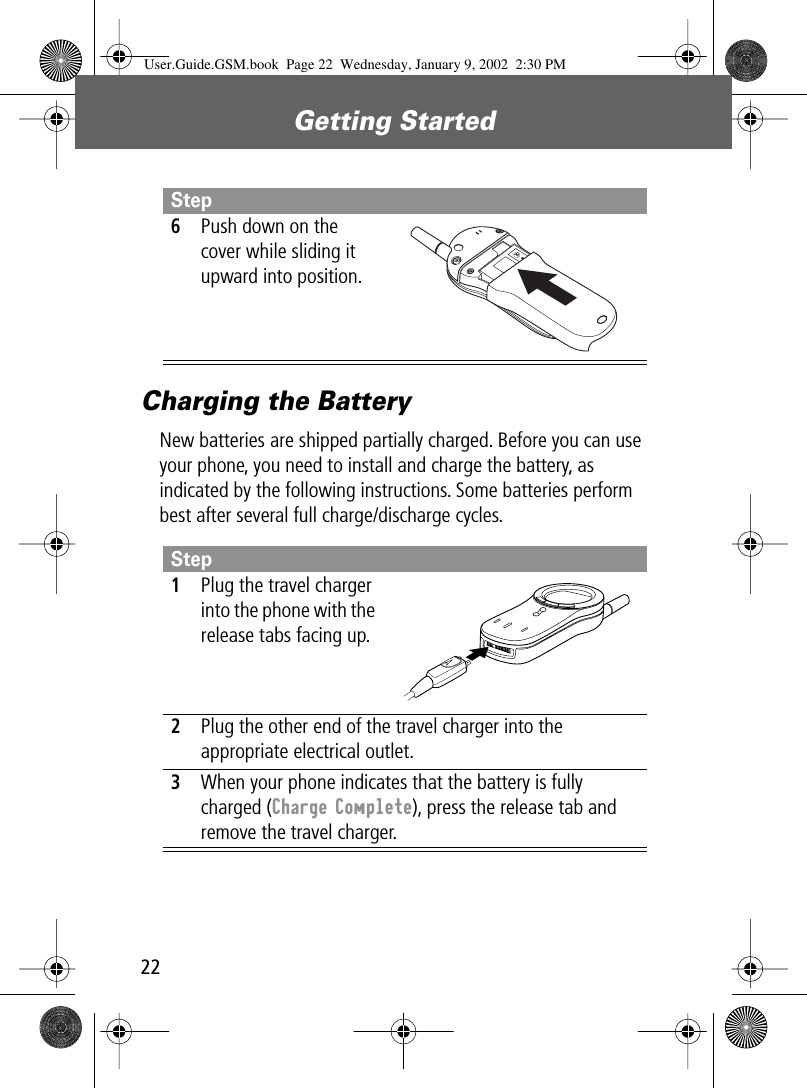
Contents
- 1. Exhibit 8 Users Manual
- 2. Exhibit 08a Amendment Users Manual
Exhibit 8 Users Manual

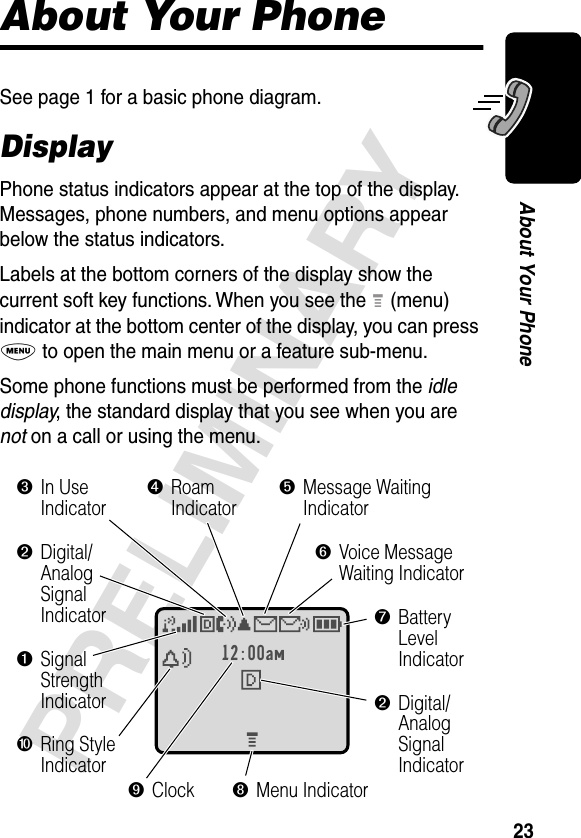

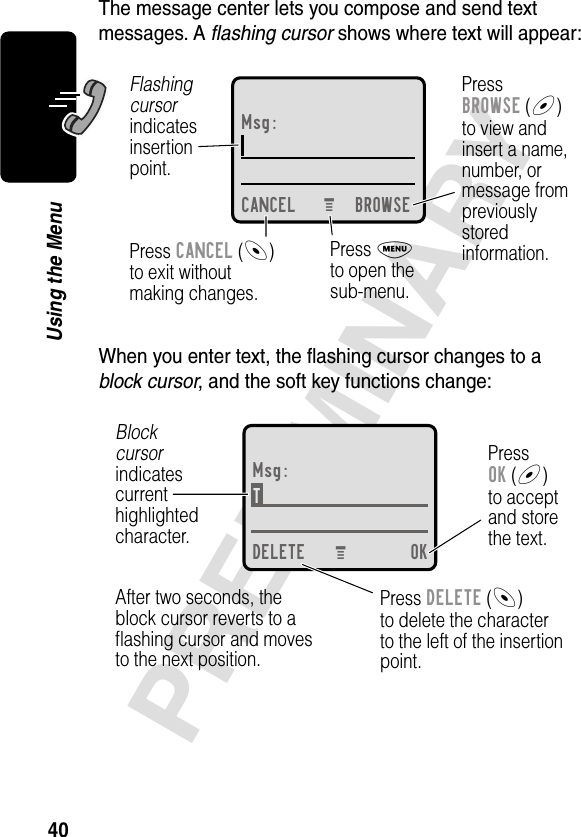

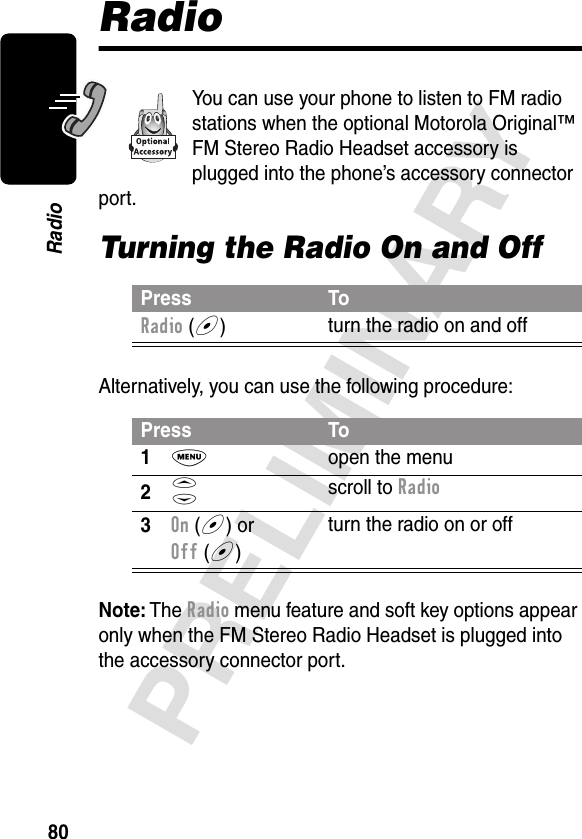
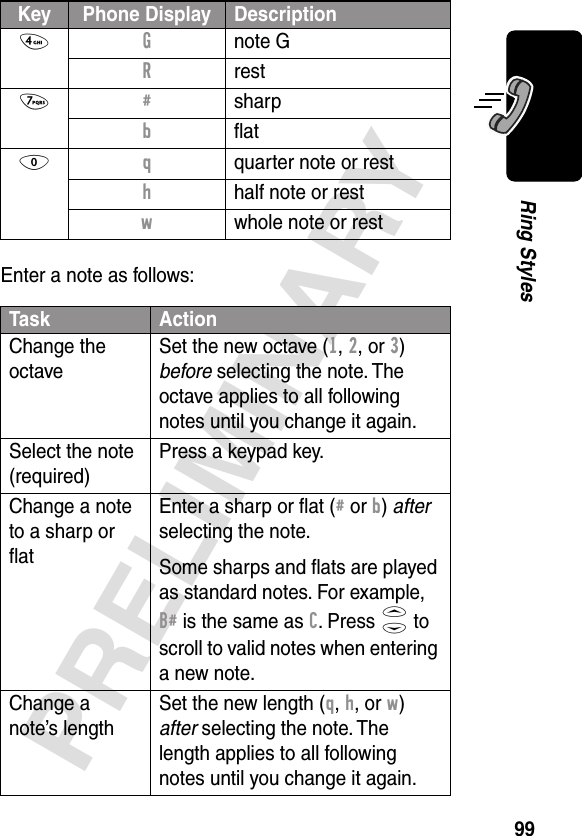
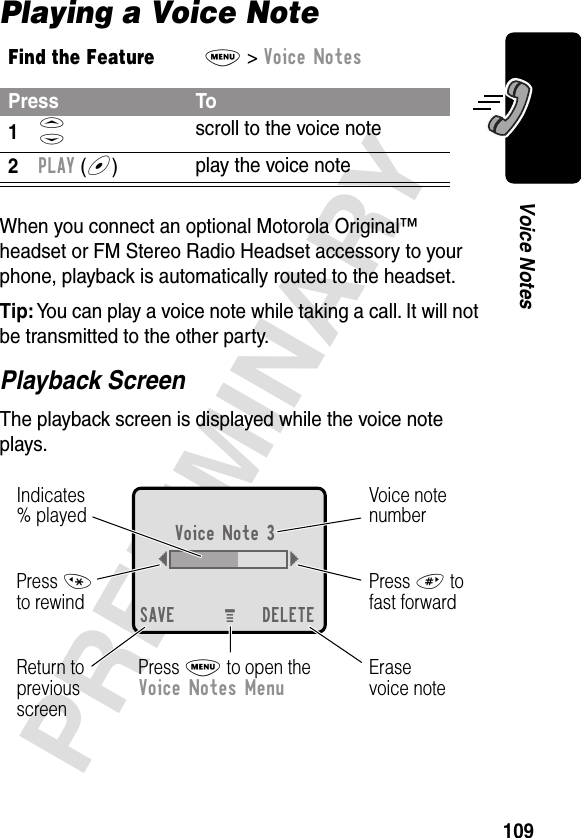
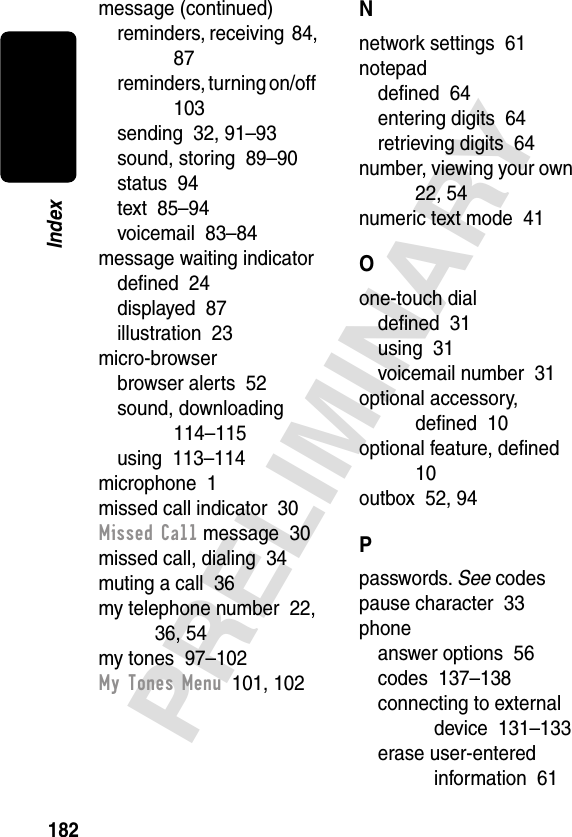
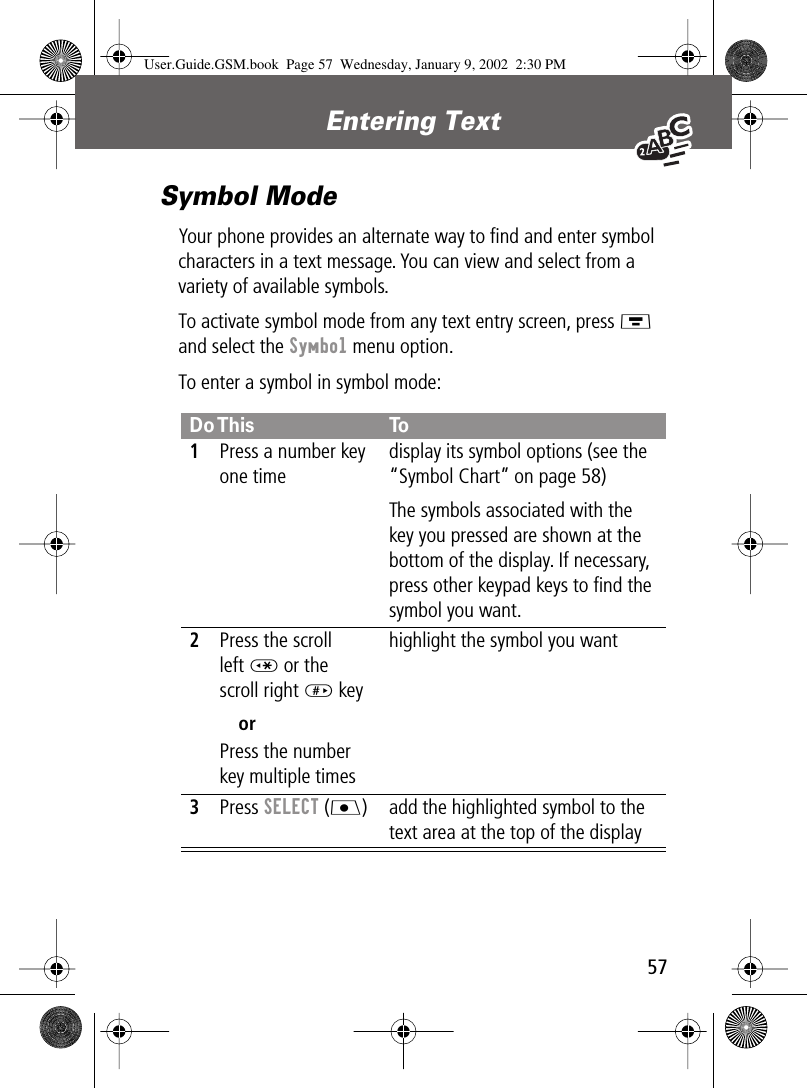
![44PRELIMINARYEntering Text•The first character of every sentence is capitalized. (Press S down to force the character to lowercase while it is highlighted by the block cursor).•Your phone may support multiple languages. The current language setting determines whether a new message begins on the left or right side of the display.You can switch languages within a message. Press M to select the text mode and language you want to use.Character ChartUse this chart as a guide for entering spaces, letters, numbers, and symbols with the tap method.Note: This chart may not reflect the exact character set available on your phone.1 space . 1 ? ! , @ _ & ~ : ; "- ( ) ' ¿ ¡ % £ $ ¥ 2 a b c 2 ä å á à ã α β ç3 d e f 3 δ é è ê φ4 g h i 4 í γ5 j k l 5 λ6 m n o 6 ñ ö ø ó ò ô õ ω7 p q r s 7 π ß σ8 t u v 8 θ ü ú ù9 w x y z 9 ξ ψ0 + - 0 x * / \ [ ] = > < # §](https://usermanual.wiki/Motorola-Mobility/T56CA1.Exhibit-8-Users-Manual/User-Guide-235445-Page-49.png)
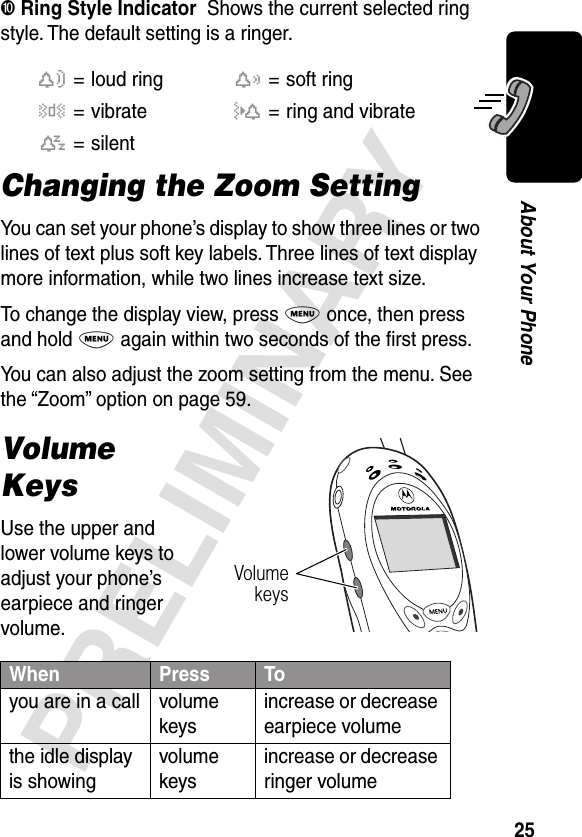
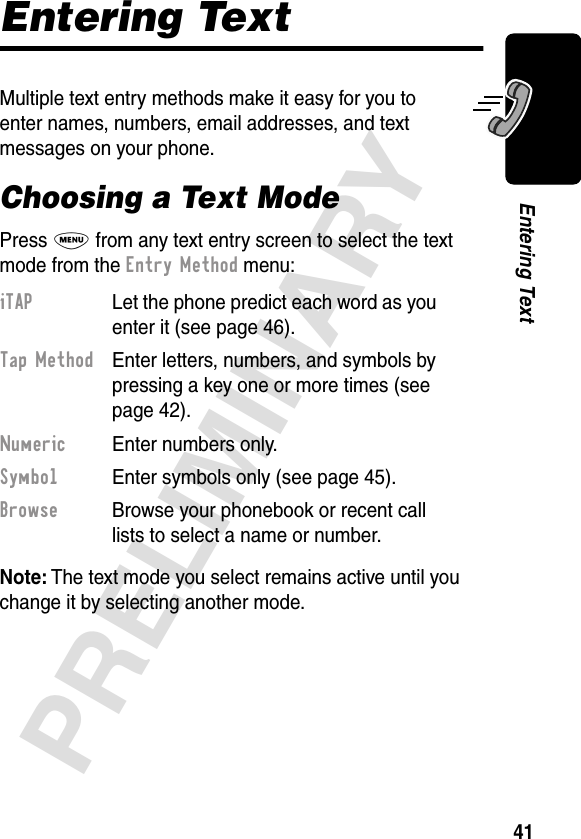
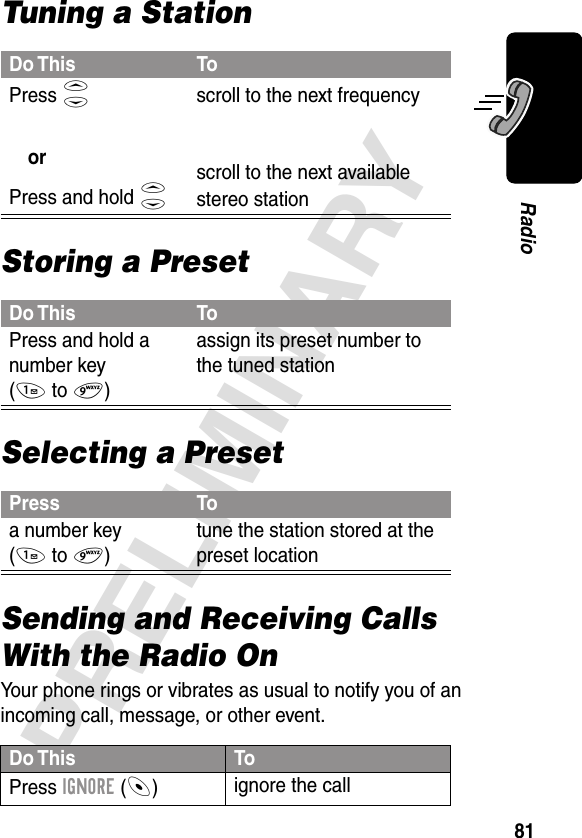
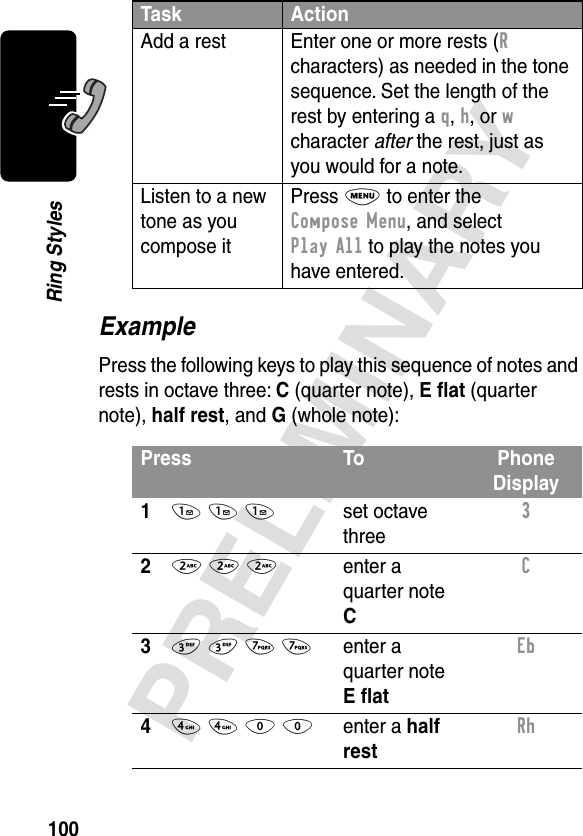
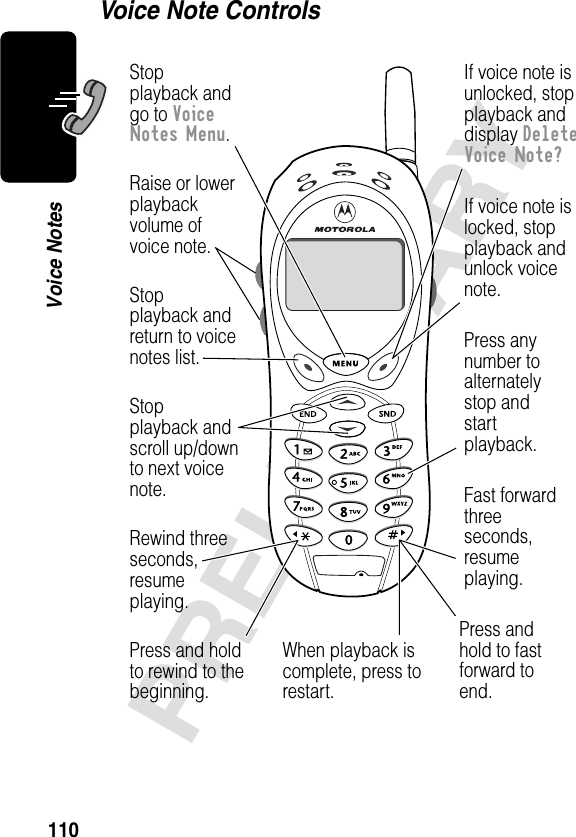
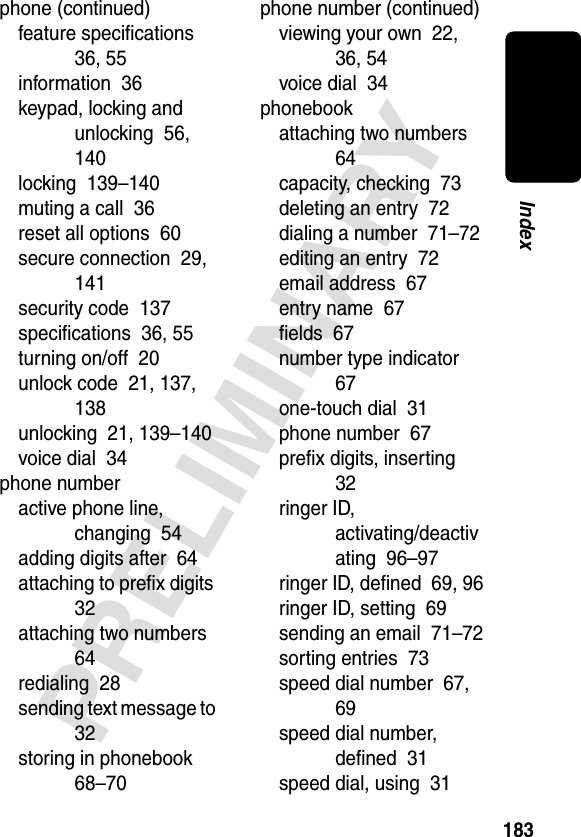
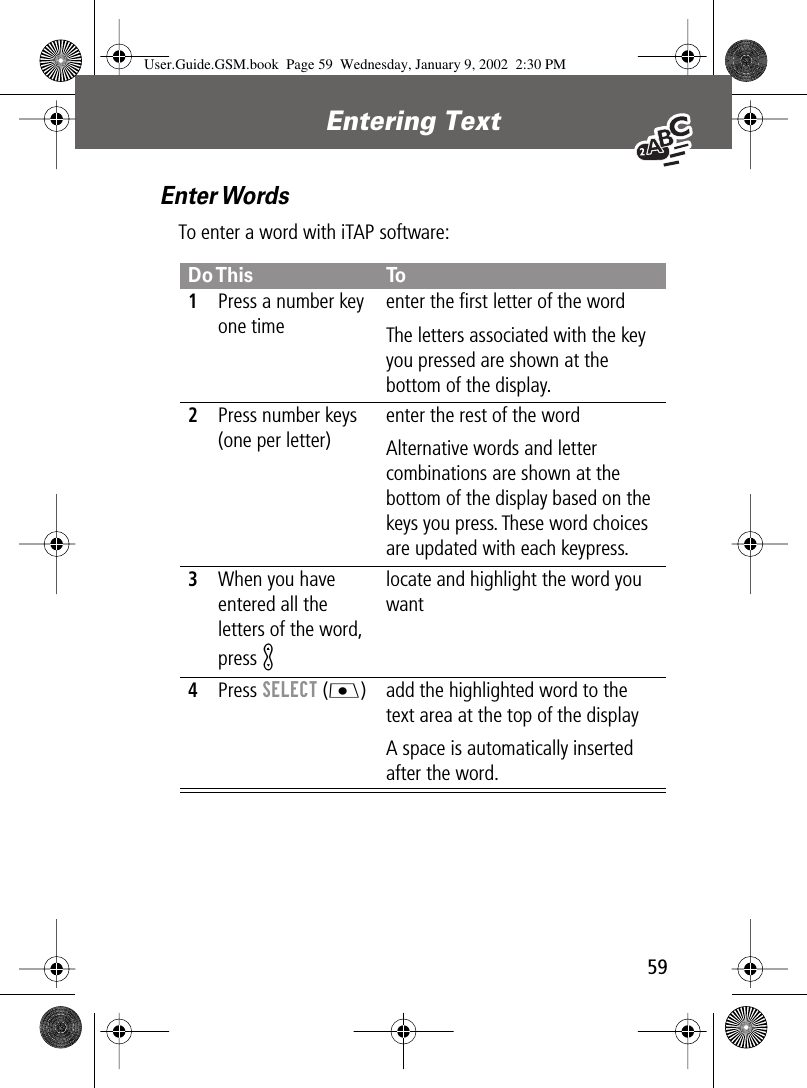
![45PRELIMINARYEntering TextSymbol ModePress M from any text entry screen and select the Symbol menu option.Symbol ChartUse this chart as a guide for entering symbols in symbol mode.Do This To1Press a number key one timedisplay its symbol options at the bottom of the display (see “Symbol Chart” on page 45)2Press * or #orPress the number key multiple timeshighlight the symbol you want3Press SELECT (+)enter the symbol at the flashing cursor location1 space . ? ! , @ _& ~ : ; " - ( ) ' ¿¡ % £ $ ¥ 2 @ _ \3 / : ;4 " & '5 ( ) [ ] { }6 ¿ ¡ ~](https://usermanual.wiki/Motorola-Mobility/T56CA1.Exhibit-8-Users-Manual/User-Guide-235445-Page-50.png)
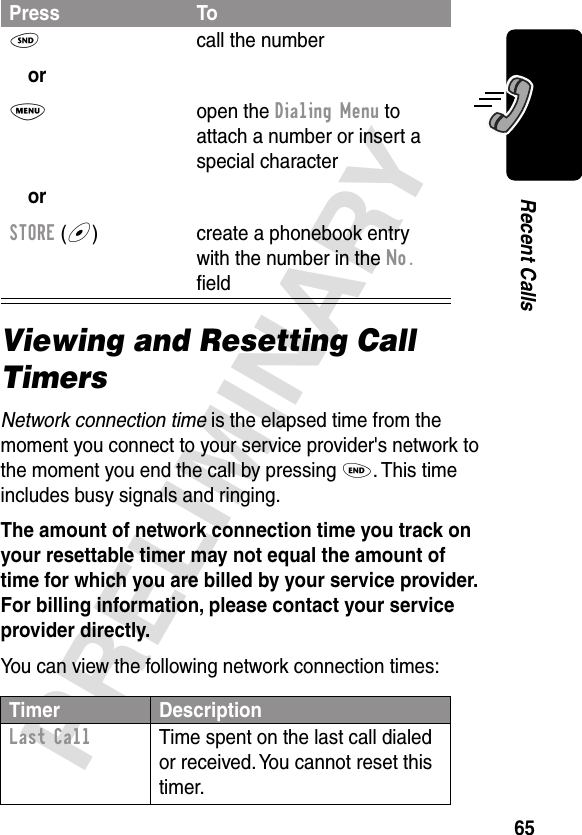

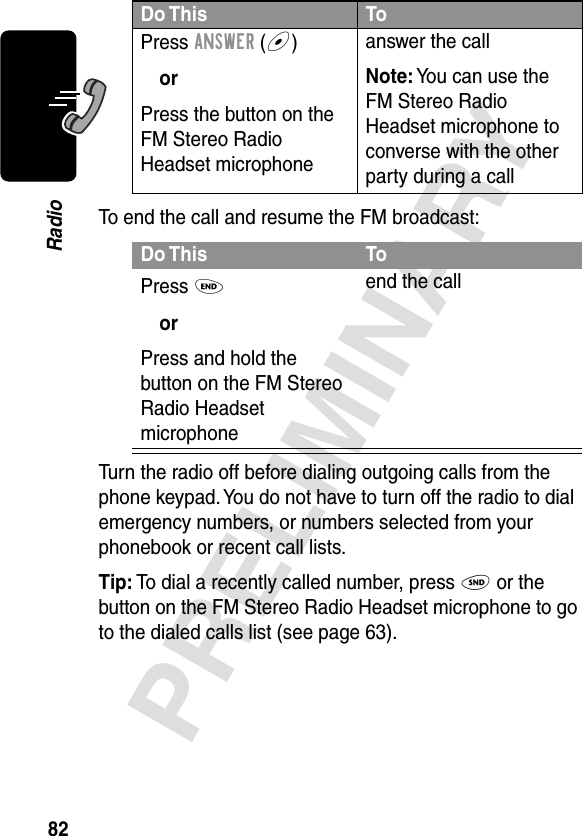

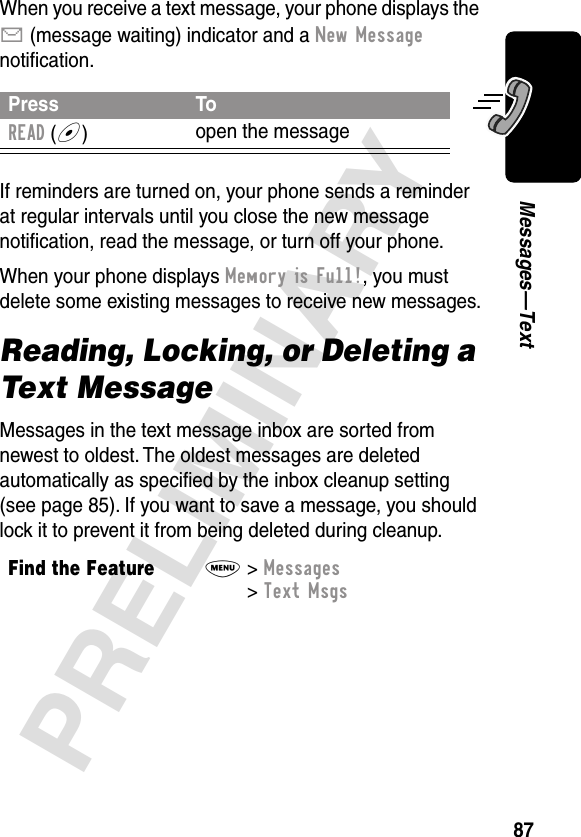

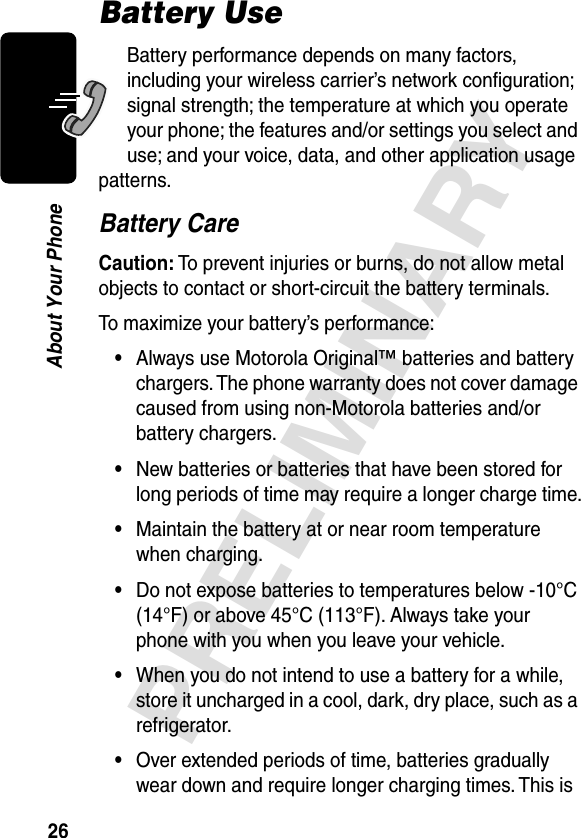
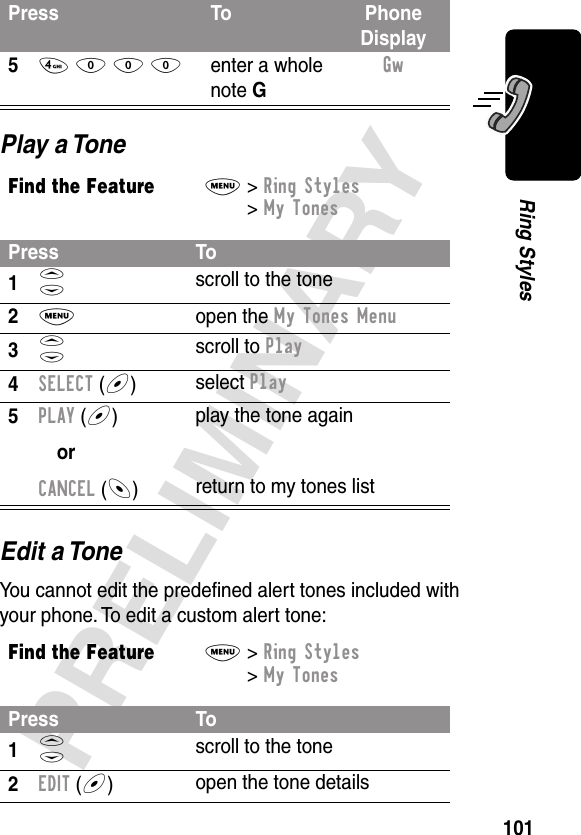
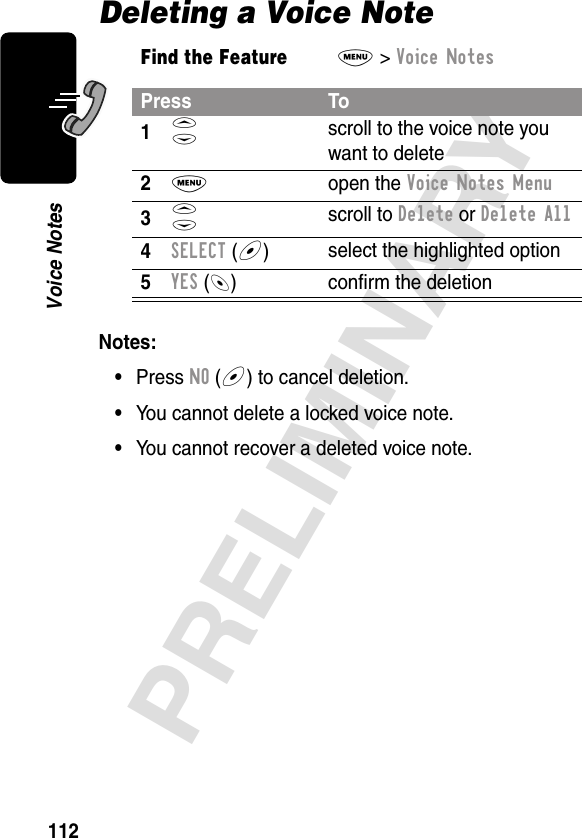
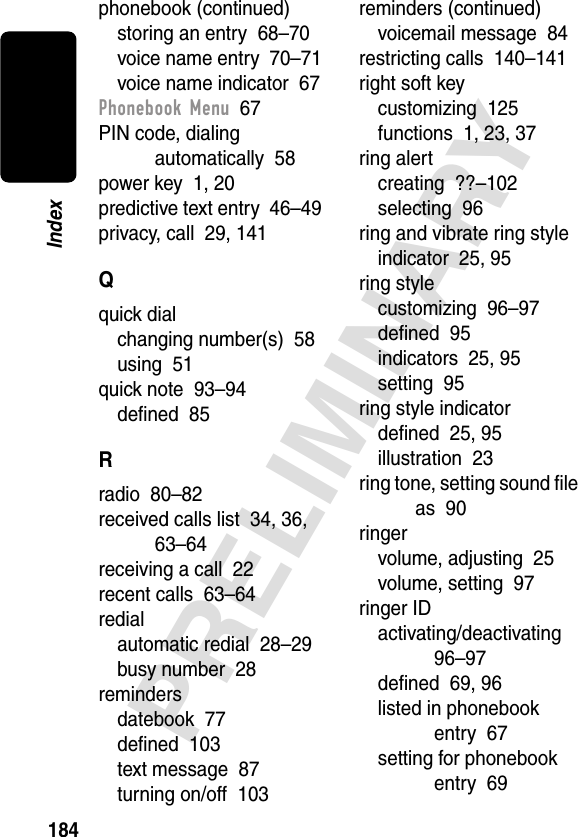
![98PRELIMINARYRing StylesEnter NotesUse the keypad keys to enter each note. Press a key multiple times to cycle through its notes or options (pitch, octave, or length). The default setting for a new tone is a quarter note in octave two.Press To1S scroll to [New Tone]2SELECT (+)select [New Tone]3CHANGE (+)select Notes4keypad keys enter notes (see page 98)5OK (+)store the notes6CHANGE (+)select Name7keypad keys enter a name for the tone8OK (+)store the name9DONE (-)store the toneKey Phone Display Description1 1 set octave one2 set octave two3 set octave three2 A note AB note BC note C3 D note DE note EF note F](https://usermanual.wiki/Motorola-Mobility/T56CA1.Exhibit-8-Users-Manual/User-Guide-235445-Page-103.png)
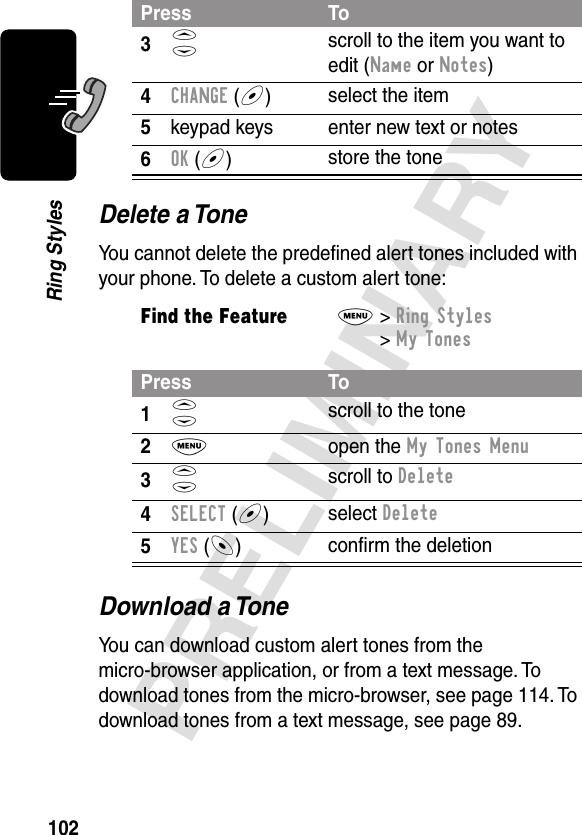


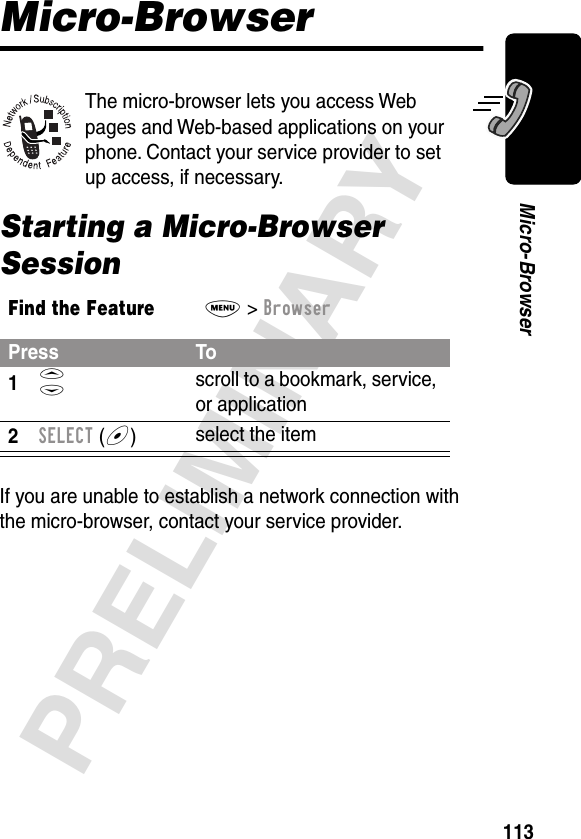


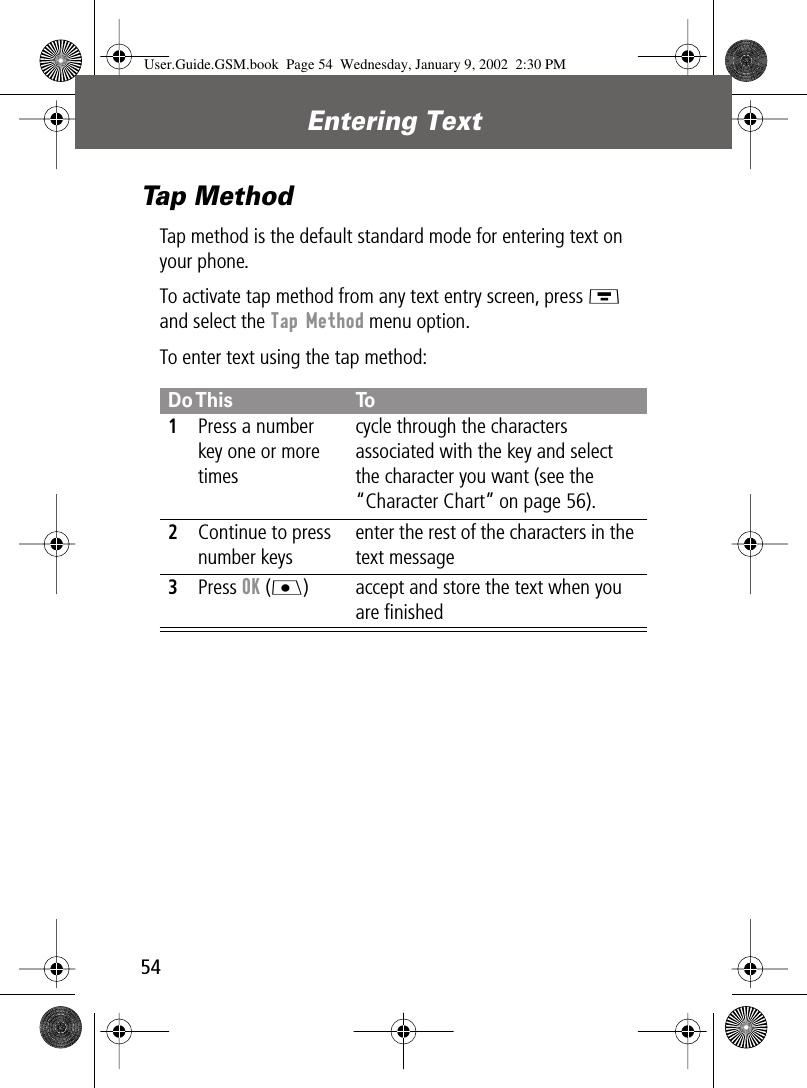
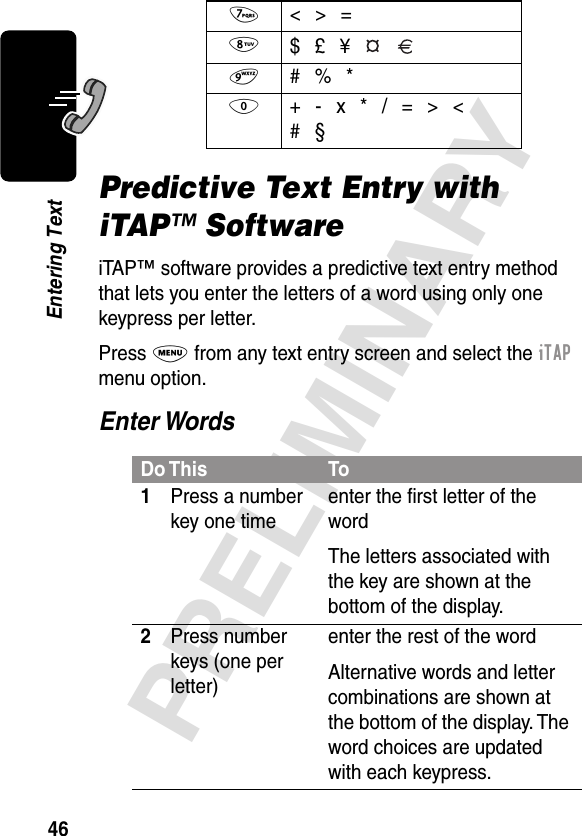
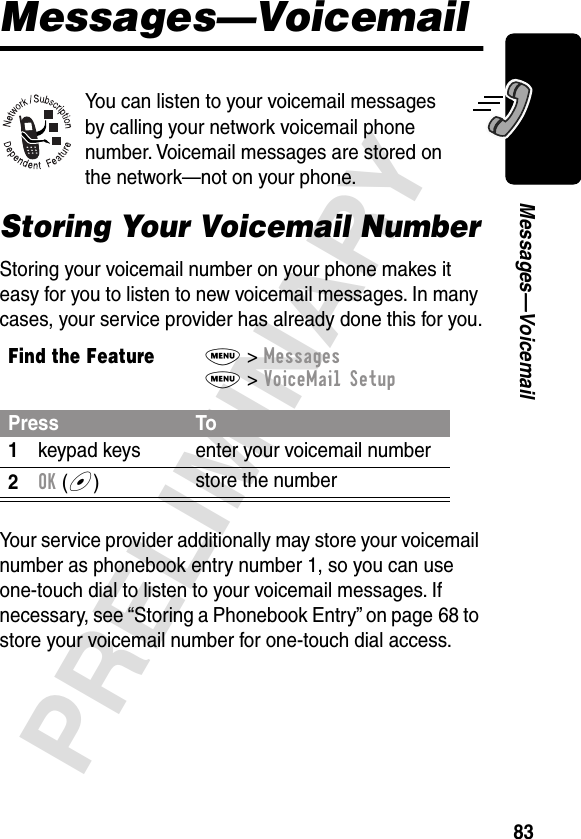
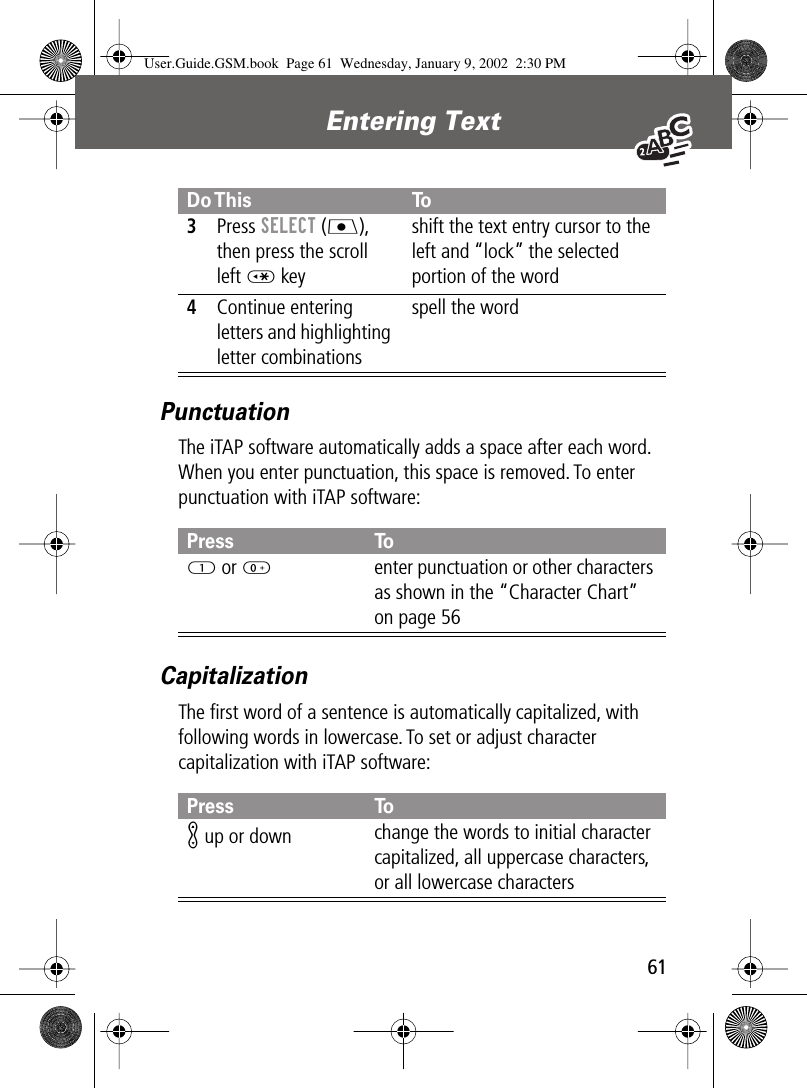
![Entering Text 56 • The first character of each sentence is capitalized unless you manually change it. (Press K down to force the character to lowercase while it is highlighted by the block cursor.) Character Chart Use this chart as a guide for entering spaces, numbers, letters, symbols, and other characters with the tap method. Note: Your phone model may not include all of the characters shown in the above chart.1 space . 1 ? ! , @ _ & ~ : ; " - ( ) '¿ ¡ % £ $ ¥ €2 A B C 2 Ä Å Á À Â Ã α β Ça b c 2 ä å á à ã α β ç3 D E F 3 ∆ Ë É È Ê φ d e f 3 δ é è ê φ4 G H I 4 Ï Í Î ¬g h i 4 ï í î γ5 J K L 5 Λ j k l 5 λ6 M N O 6 Ñ ö Ø ó ò ô õ Ω m n o 6 ñ ö ø ó ò ô õ ω7 P Q R S 7 ∏ β ∑ p q r s 7 π β σ8 T U V 8 θ Ü Ú Ù Ût u v 8 θ ü ú ù9 W X Y Z 9 Ξ ψ w x y z 9 ξ ψ0 + - 0 x * / \ [ ] = > < # § User.Guide.GSM.book Page 56 Wednesday, January 9, 2002 2:30 PM](https://usermanual.wiki/Motorola-Mobility/T56CA1.Exhibit-8-Users-Manual/User-Guide-235445-Page-253.png)
![Entering Text58Symbol ChartUse this chart as a guide for entering symbols in symbol mode.Predictive Text Entry with iTAP™ SoftwareiTAP™ software provides a predictive text entry method that lets you enter the letters of a word using only one keypress per letter.You must activate iTAP software prior to entering letters. You can do this from any text entry screen by pressing M to open the Entry Method menu and selecting the iTAP menu option.1 space . ? ! , @ _ & : ; " - ( ) ' ¿¡ % £ $ ¥ €2 @ _ \3 / : ;4 " & '5 ( ) [ ] { }6 ¿ ¡ ~7 < > =8 $ £ ¥ €9 # % *0 + - x * / => < # §User.Guide.GSM.book Page 58 Wednesday, January 9, 2002 2:30 PM](https://usermanual.wiki/Motorola-Mobility/T56CA1.Exhibit-8-Users-Manual/User-Guide-235445-Page-255.png)


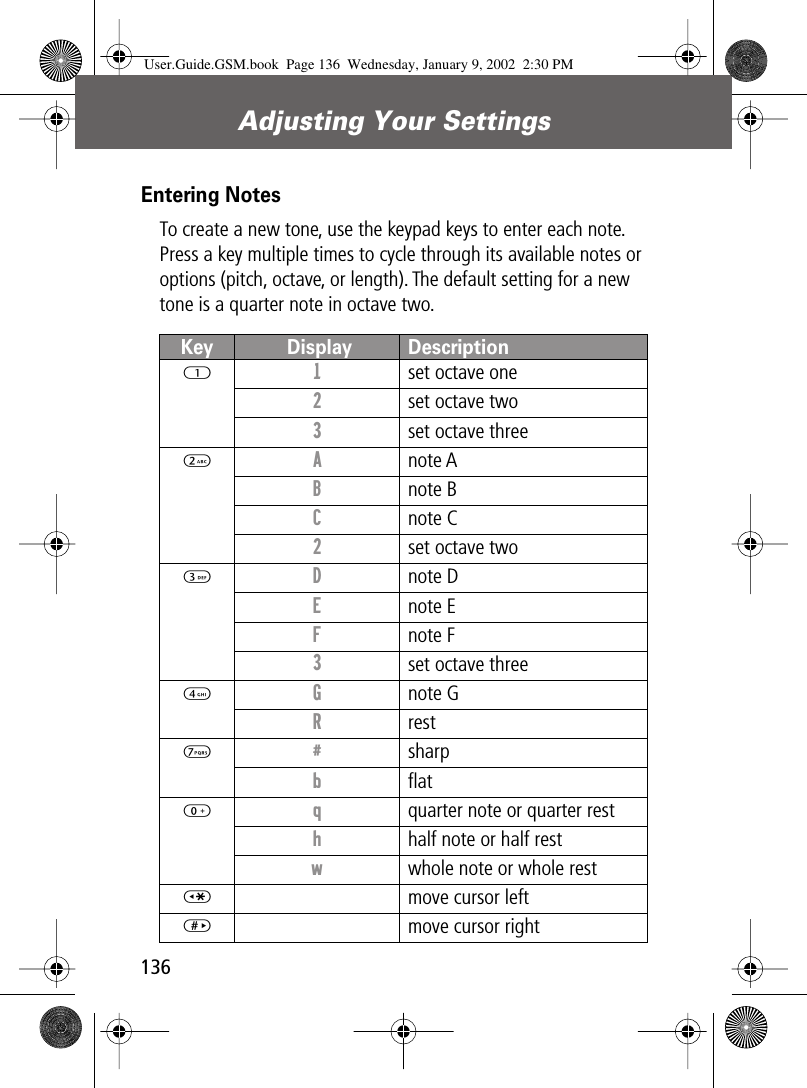
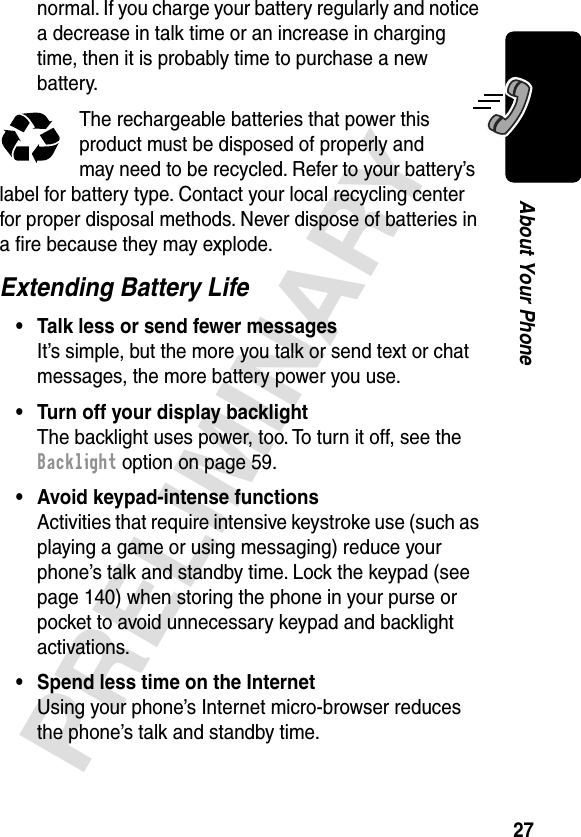
![135Adjusting Your Settings Use the My Tones FeatureThe my tones feature lets you create up to 32 custom alert tones for your phone. The tones you create appear in the list of available alerts (see “Customize an Alert Profile” on page 134).Creating a ToneFind the FeatureM > Settings > Ring/Vibrate> My TonesPress To1K scroll to [New Tone]2SELECT (J) select [New Tone]3CHANGE (J) select Notes4keypad keys enter notes for the tone (see “Entering Notes” on page 136)5OK (J) store the notes6CHANGE (J) select Name7keypad keys enter the name for the tone8OK (J) store the name9DONE (L) store the toneUser.Guide.GSM.book Page 135 Wednesday, January 9, 2002 2:30 PM](https://usermanual.wiki/Motorola-Mobility/T56CA1.Exhibit-8-Users-Manual/User-Guide-235445-Page-332.png)