Motorola Mobility T56DH1 Portable Cellular/PCS Transceiver (AMPS/CDMA) User Manual E365 Eng crop
Motorola Mobility LLC Portable Cellular/PCS Transceiver (AMPS/CDMA) E365 Eng crop
UserManual.wiki
>
Motorola Mobility
>
T56DH1 User Manual
Exhibit 8 Preliminary Users Manual Draft
Navigation menu
Upload a User Manual
Namespaces
Wiki Guide
HTML
PDF
Info
Views
User Manual
Discussion / Help
Navigation


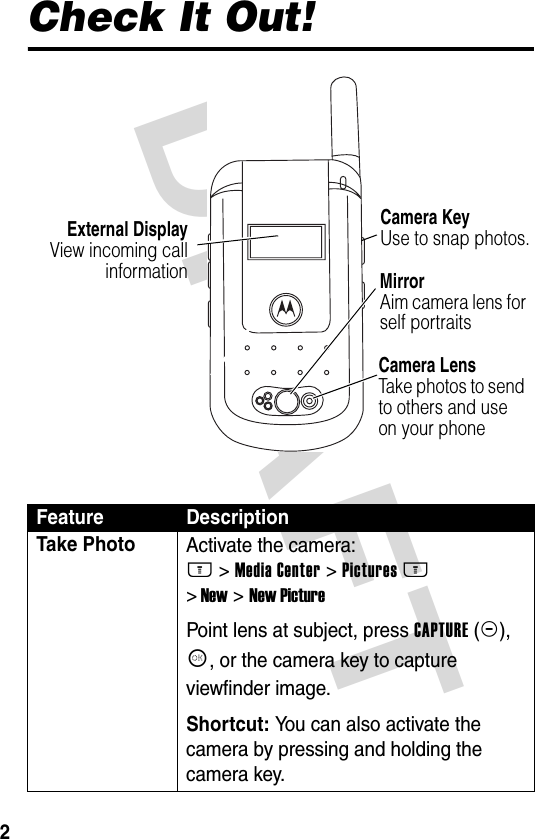


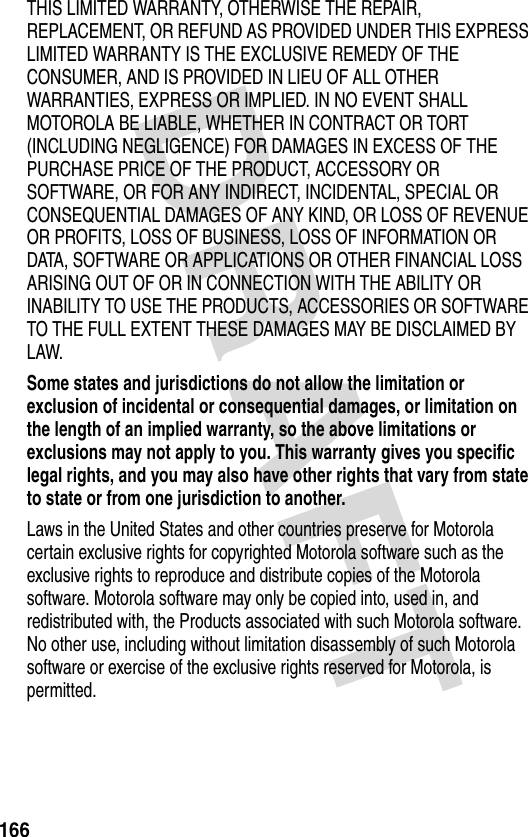
![DRAFT 28Highlight Features4Scroll to the desired entry from your Contacts list and press K.orAdd anew contact:aScroll to [New Contact] and press K.bScroll to and select Phone Number or Email Address.cEnter and store 1 or more phone numbers and/or email addresses.5Press NEXT(+) toproceed to the Send screen, and complete the desired entries:Subject:—Type the subject and press OK(+).Cc:—Press K to begin entering message copy recipient(s).BCC:— Press K to begin entering recipient(s) of message copy who are not to be known to other recipient(s).Priority:—Set to Normal or Urgent.Read Reply:—Receipt:—Specify whether you want to receive an indication that message is delivered.Attachment:—Press K to begin adding a picture, animation, or sound.6Press SEND(-) to send the messageAction](https://usermanual.wiki/Motorola-Mobility/T56DH1/User-Guide-371022-Page-31.png)


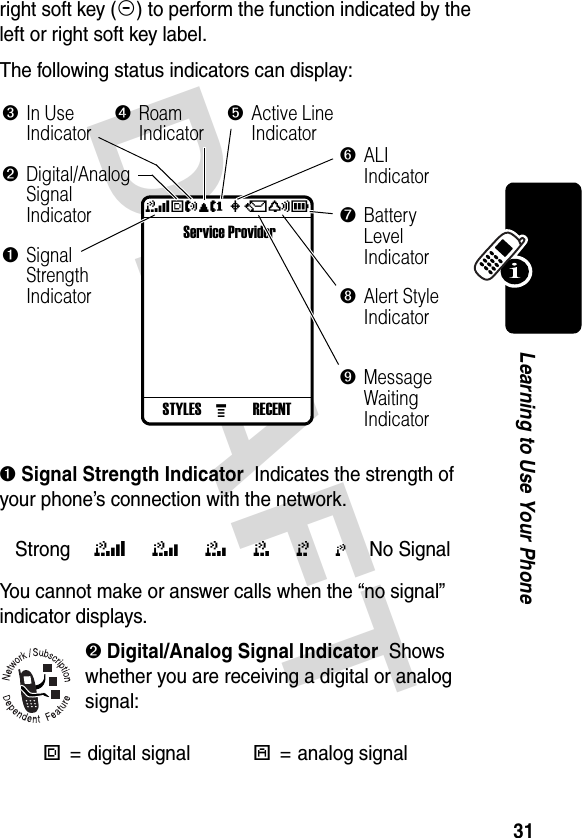
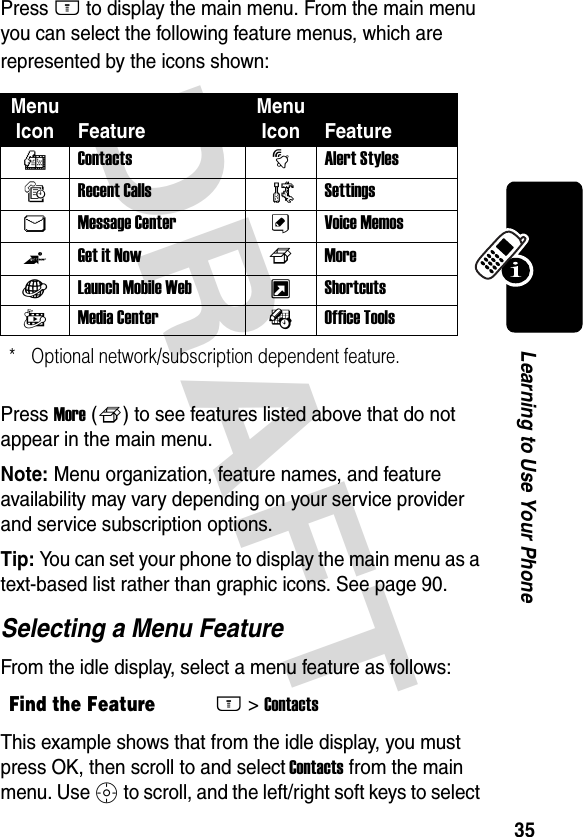
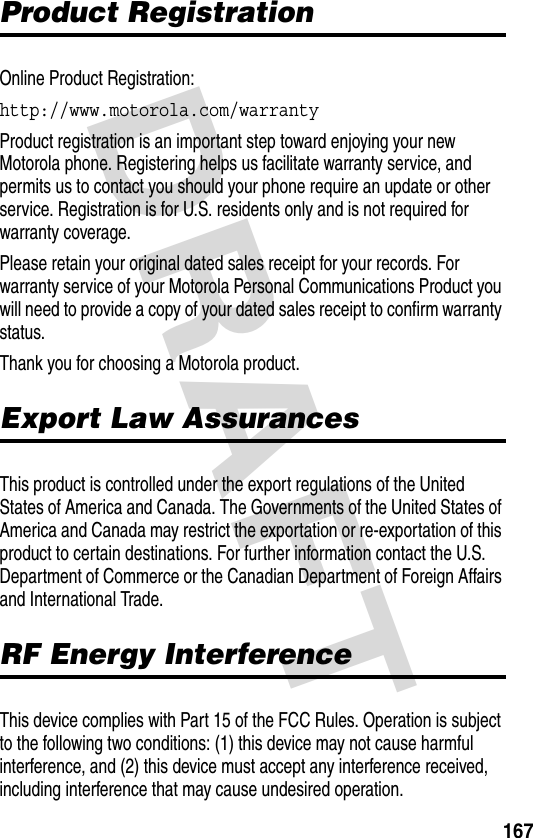
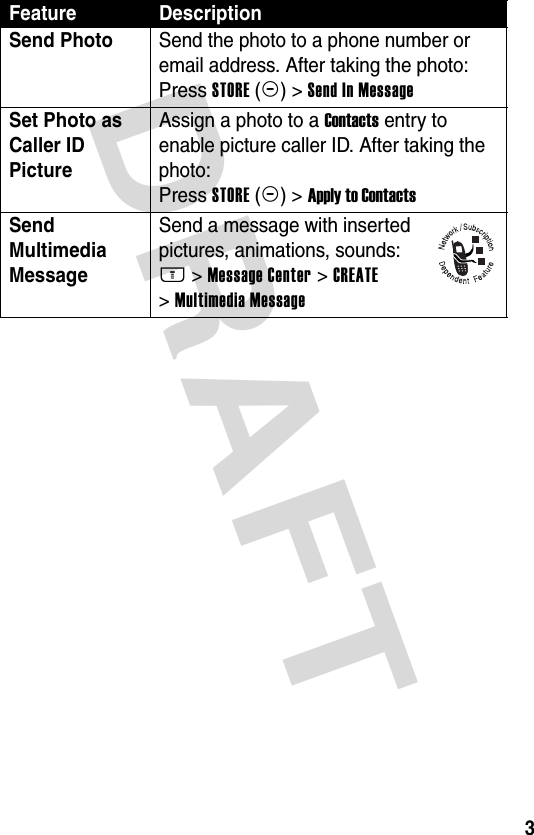
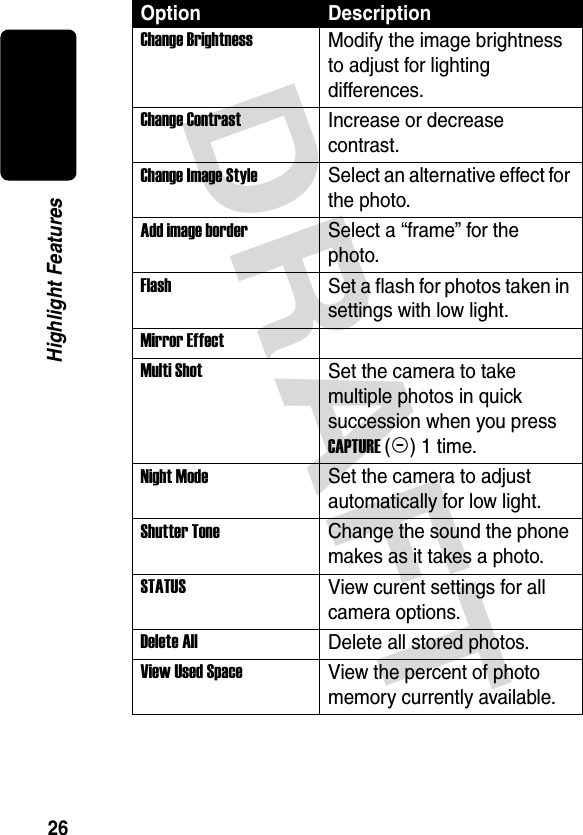
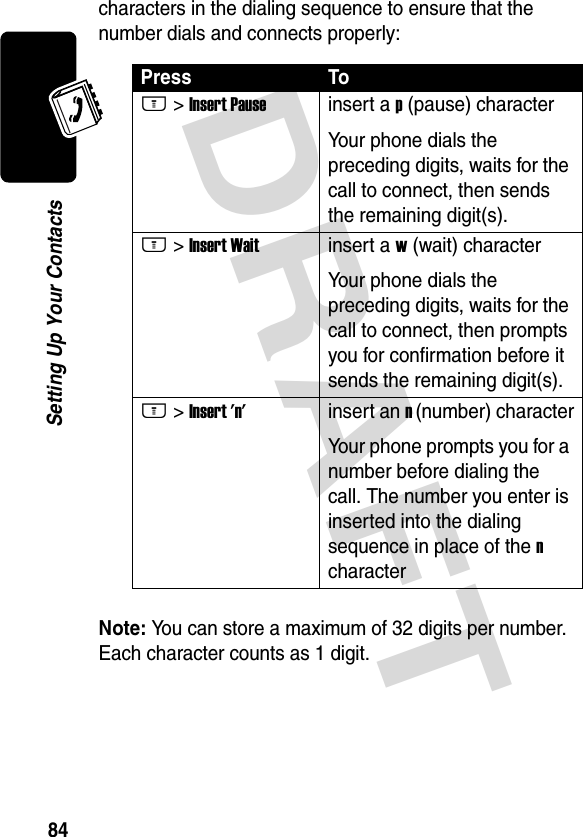
![DRAFT 41Learning to Use Your PhoneCharacter ChartUse this chart as a guide for entering characters with the tap method.Note: This chart may not reflect the exact character set available on your phone.Using iTAP™ Software Predictive Text Entry MethodiTAP™ software is a predictive text entry method that lets you enter a word using 1 keystroke per letter.Press M>Entry Setup from any text entry screen and select the iTAP menu option.Note: You can switch languages within a message in iTAP text mode. Press M>Entry Setup to select the language you want to use.1 space . 1 ? ! , @ _ & ~ : ; " -( ) ' ¿ ¡ % £ $ ¥ 2 a b c 2 ä å á à â ã α β ç3 d e f 3 δ ë é è ê ε φ4 g h i 4 ï í î γ η ι5 j k l 5 κ λ6 m n o 6 ñ ö ø ó ò ô õ µ υ ω7 p q r s 7 π ß σ8 t u v 8 θ ü ú ù û τ9 w x y z 9 ξ ψ0 + - 0 x * / \ [ ] = > < # §](https://usermanual.wiki/Motorola-Mobility/T56DH1/User-Guide-371022-Page-46.png)

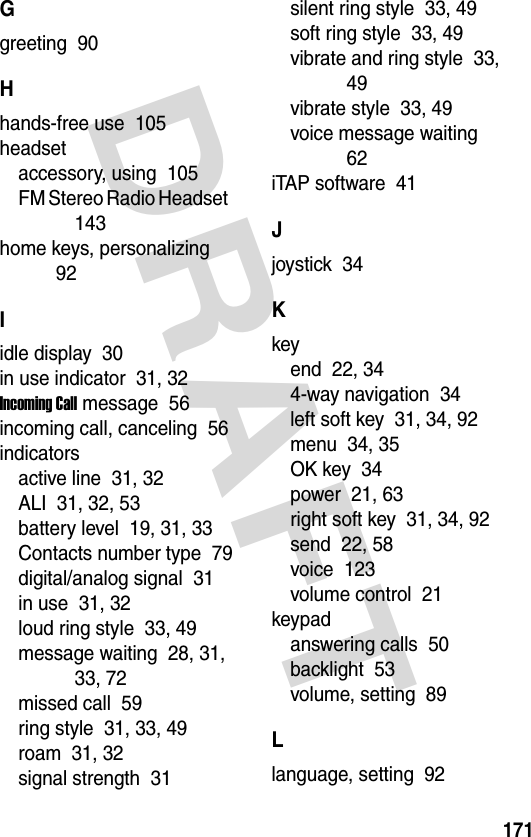
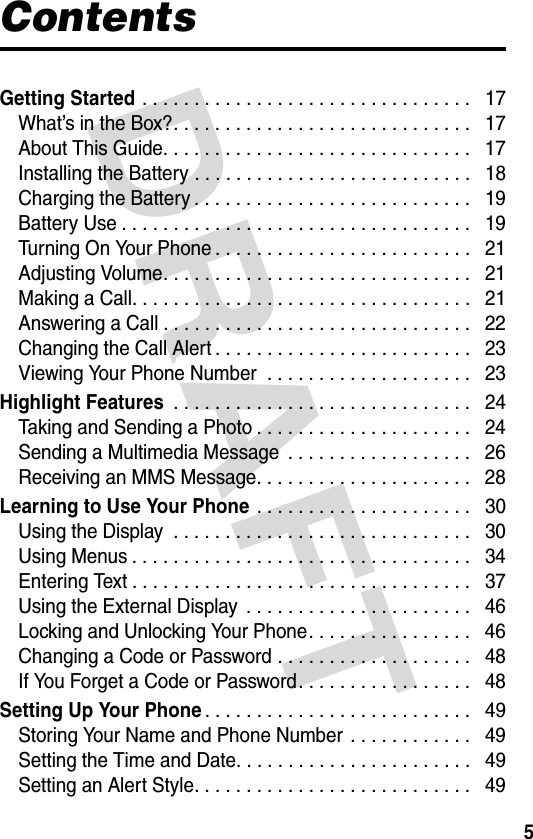
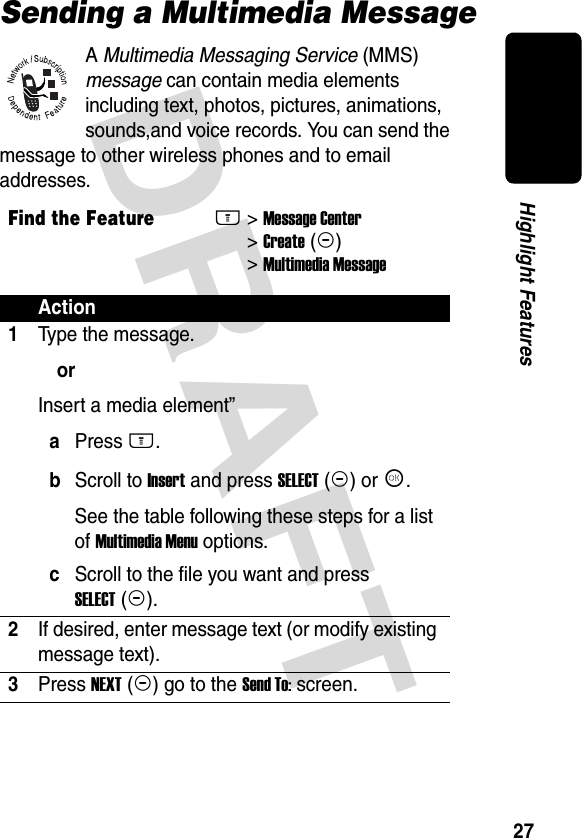
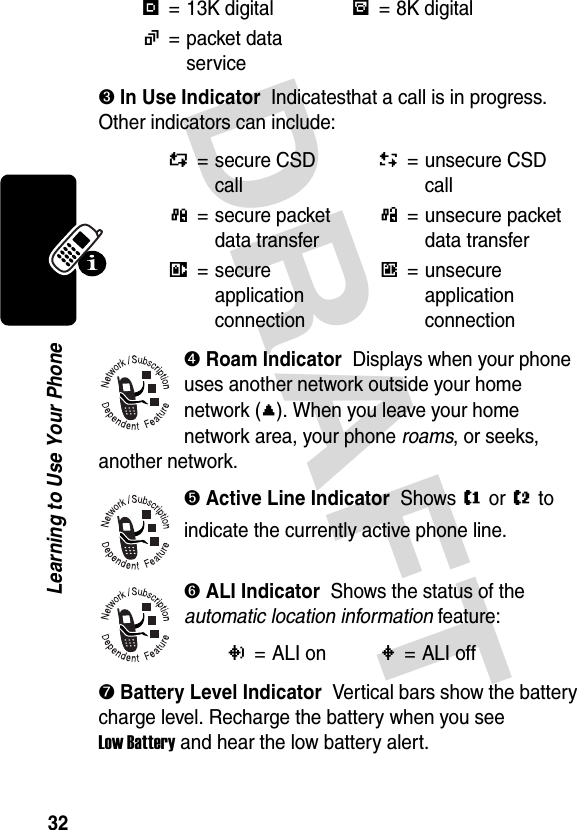
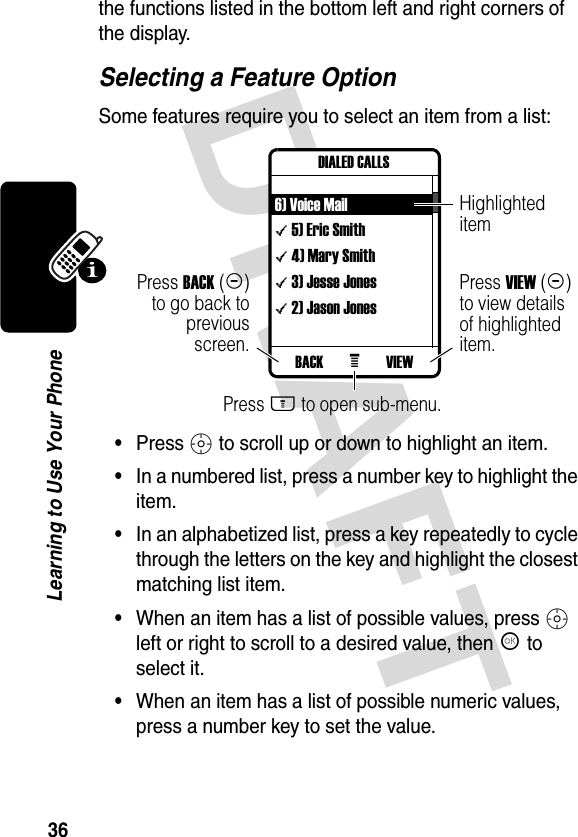
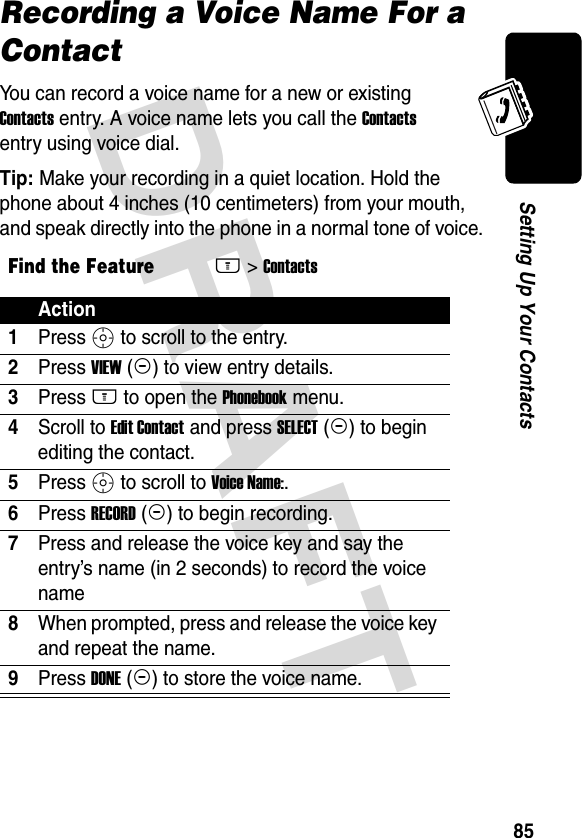
![DRAFT 45Learning to Use Your PhoneUsing Symbol ModeAs an alternate way to enter symbol characters in a message, press M>Entry Mode from any text entry screen and select Symbol.Symbol ChartUse this chart as a guide for entering characters in symbol mode.Action1Press a number key 1 time to display its symbol options at the bottom of the display.See the “Symbol Chart” on page 45.2Press S, or press the number key multiple times, to highlight the symbol you want.3Press SELECT(+) to enter the symbol at the flashing cursor location.1 space . ? ! , @ _ & ~ : ; "- ( ) ' ¿ ¡ % £ $ ¥ 2 @ _ \3 / : ;4 " & '5 ( ) [ ] { }6 ¿ ¡ ~7 < > =8 $ £ ¥](https://usermanual.wiki/Motorola-Mobility/T56DH1/User-Guide-371022-Page-50.png)


![DRAFT 67Messages3Scroll to the desired entry from your Contacts list and press K.orAdd a new contact:aScroll to [New Contact] and press K.bScroll to and select Phone Number or Email Address.cEnter and store 1 or more phone numbers and/or email addresses.4Press NEXT (+) go to the Send screen, and make the desired entries:Subject:—Type the subject and press OK (+).Cc:—Press K to begin entering message copy recipient(s).BCC:— Press K to begin entering recipient(s) of message copy who are not to be known to other recipient(s).Priority:—Set to Normal or Urgent.Read Reply:—Receipt:—Specify whether you want to receive an indication that message is delivered.Attachment:—Press K to begin adding a picture, animation, or sound.5Press SEND (+) to send the message.Action](https://usermanual.wiki/Motorola-Mobility/T56DH1/User-Guide-371022-Page-73.png)

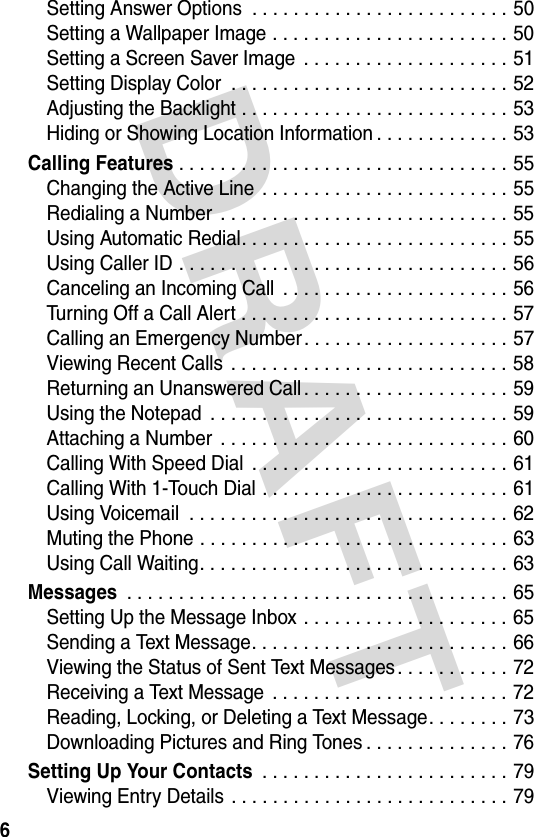
![DRAFT 69MessagesSending a Multimedia MessageFind the FeatureM> Message Center > Create (+) > Multimedia MessageAction1Type the message.2When you want to insert a media element, press M.3Scroll to Insert and press SELECT (+), or press K.See the table following these steps for a list of media elements that you can insert.4After you insert a media element, Press NEXT (+) to go to the Send To: screen.5Scroll to the desired entry from your Contacts list and press K.orAdd a new contact:aScroll to [New Contact] and press K.bScroll to and select Phone Number or Email Address.cEnter and store 1 or more phone numbers and/or email addresses.](https://usermanual.wiki/Motorola-Mobility/T56DH1/User-Guide-371022-Page-75.png)
![DRAFT 80Setting Up Your ContactsCreating a Contacts EntryEntering InformationTo create or edit a Contacts entry:Shortcut: Enter a phone number in the idle display, then press STORE (+) to create a Contacts entry with the number in the No. field.Find the FeatureM> Contacts > [Create New Contact] > Phone Number or Email AddressAction1Enter the desired information for the entry. See the table following these steps for a description of the information types you can enter.Note: A phone number or email address is required for a Contacts entry. All other information is optional.2When you have entered all information for the entry, press DONE (-) to store the entry.](https://usermanual.wiki/Motorola-Mobility/T56DH1/User-Guide-371022-Page-86.png)


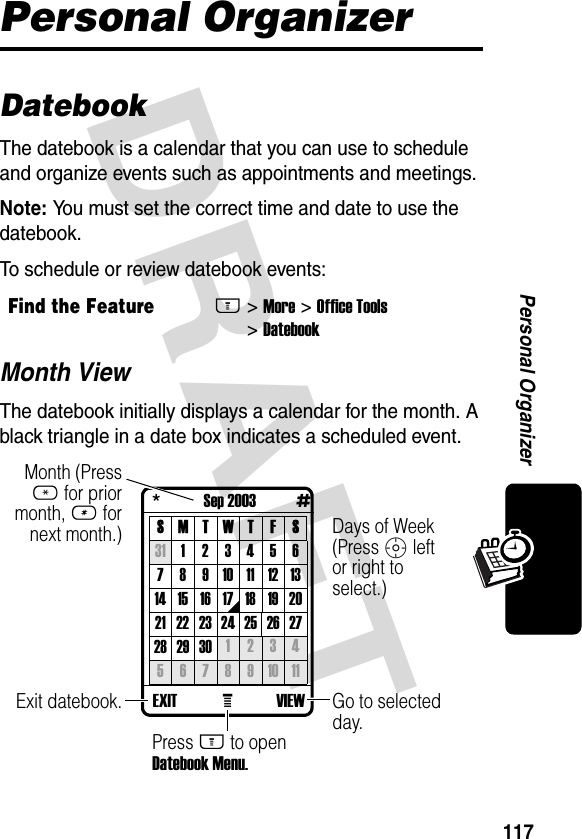
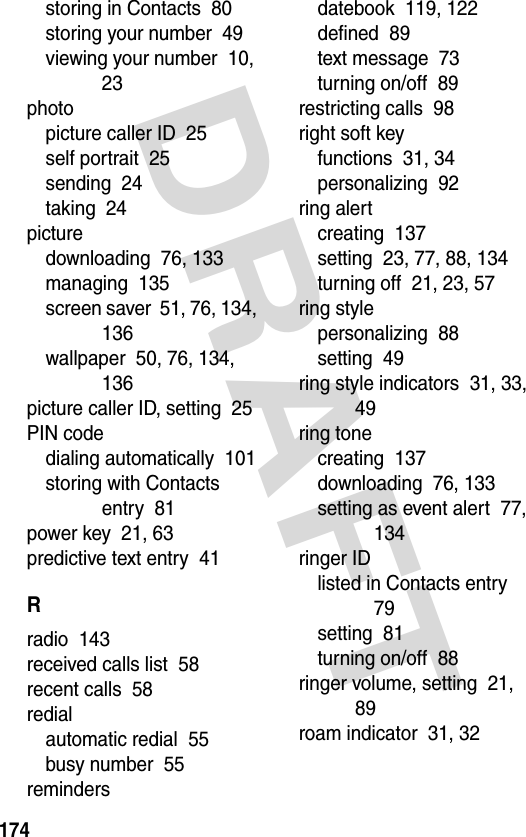
![DRAFT 118Personal OrganizerDay ViewSelect a day and press VIEW (+) to see the day’s events.Event ViewSelect an event and press VIEW (+) to see event details.Wed 17-Sep1:00 A Staff Meeting3:30 Dr. Appt[New Event]View event details.DateTitles of EventsReturn to previous screen. Press M to open Datebook Menu.VIEWBACK eWed 1:00pm• Joe's Birthday Staff Meeting(2 hours)A 5 min before noneShow event details.Reminder AlertEvent DurationDay and Start Time of EventEvent TitleReturn to previous screen. Press M to open Datebook Menu.EDITBACK eEvent Repetition](https://usermanual.wiki/Motorola-Mobility/T56DH1/User-Guide-371022-Page-126.png)
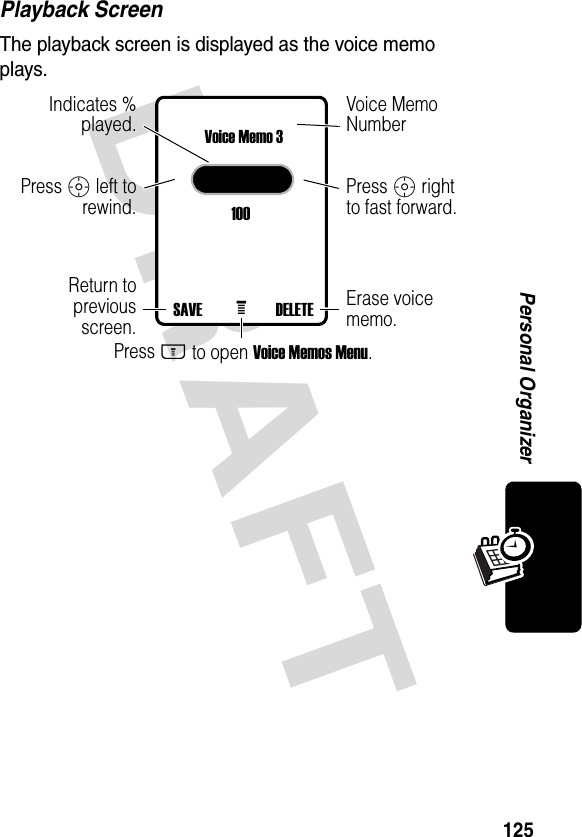
![DRAFT 124Personal OrganizerViewing the Voice Memos ListPlaying a Voice MemoWhen you connect an optional Motorola Original™ headset or FM Stereo Radio Headset accessory to your phone, playback is automatically routed to the headset.Tip: You can play a voice note while taking a call. It will not be transmitted to the other party.Find the FeatureM> More > Voice MemosFind the FeatureM> More > Voice MemosPress To1S scroll to the voice memo2PLAY (+)play the voice memoVoice Memosf 2)17:50pm 09/09/031)10:30am 09/17/03.[New Voice Memo]Locked Voice NoteReturn to previous screen.Press M to open Voice Memos Menu.Play highlighted voice memo.Time/Date RecordedPLAYEXIT e](https://usermanual.wiki/Motorola-Mobility/T56DH1/User-Guide-371022-Page-132.png)


![DRAFT 137News and EntertainmentTo adjust your phone’s wallpaper and screen saver images, see page 51 and page 52.Creating Ring TonesYou can create and store custom ring tones on your phone. The ring tones appear in the list of available alerts.Creating a Ring ToneEntering NotesTo create a new ring tone, use the keypad keys to enter notes. For each note, you must specify the octave (optional), pitch, length, and a length modifier (optional). Press a key multiple times to cycle through its available Find the FeatureM> Media Center > My TonesPress To1S scroll to [New Tone]2SELECT (+)select [New Tone]3CHANGE (+)select Notes4keypad keys enter notes (see following section)5OK (+)store the notes6CHANGE (+)select Name7keypad keys enter a name for the ring tone8OK (+)store the name9DONE (-)store the ring tone](https://usermanual.wiki/Motorola-Mobility/T56DH1/User-Guide-371022-Page-145.png)