Motorola Mobility T56FK1 Portable Cellular / PCS GSM Transceiver User Manual Exhibit 8 Users Manual
Motorola Mobility LLC Portable Cellular / PCS GSM Transceiver Exhibit 8 Users Manual
UserManual.wiki
>
Motorola Mobility
>
T56FK1 User Manual
Exhibit 8 Users Manual
Navigation menu
Upload a User Manual
Namespaces
Wiki Guide
HTML
PDF
Info
Views
User Manual
Discussion / Help
Navigation


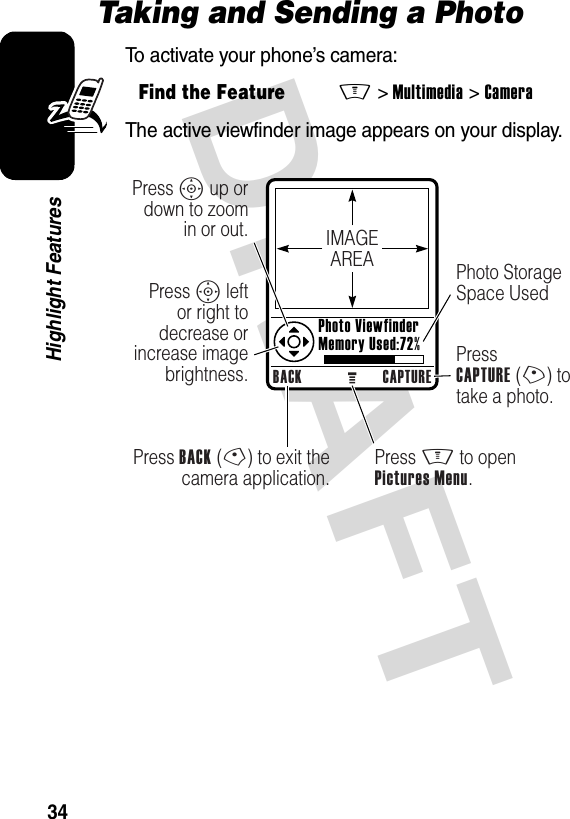
![DRAFT 2Check It Out!Feature DescriptionConnect to a Personal Area Network Pair your phone with an access point for a personal area network:M >Settings >Connection >Bluetooth Link >Access Points >[Look For Devices]Bluetooth® Wireless PairingPair your phone with a Bluetooth® headset, car kit, or computer:M >Settings >Connection >Bluetooth Link >Setup >Power >On, press BACK(-), press >Handsfree >[Look For Devices]Camera LensRecord video clips & take photos.Handsfree Speaker(on back of phone)External DisplayView incoming call information. MirrorAim camera lens for self portraits.](https://usermanual.wiki/Motorola-Mobility/T56FK1/User-Guide-540548-Page-4.png)
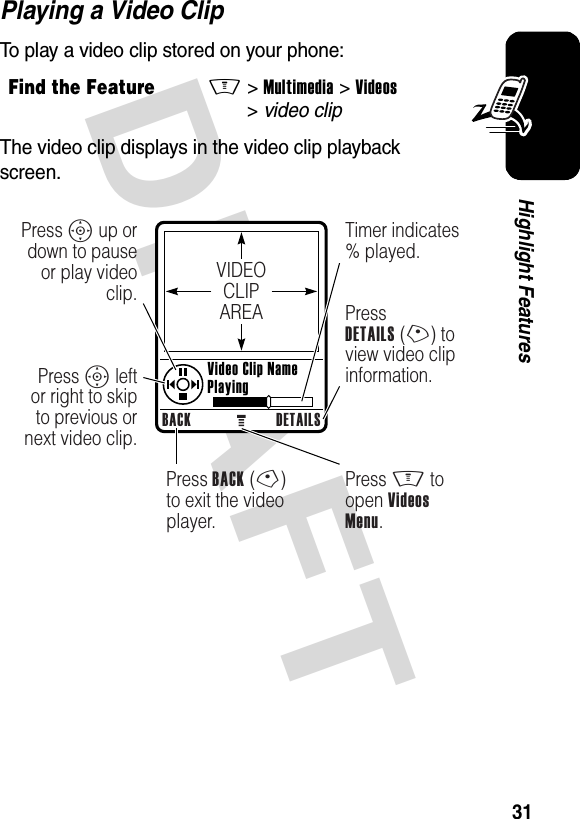
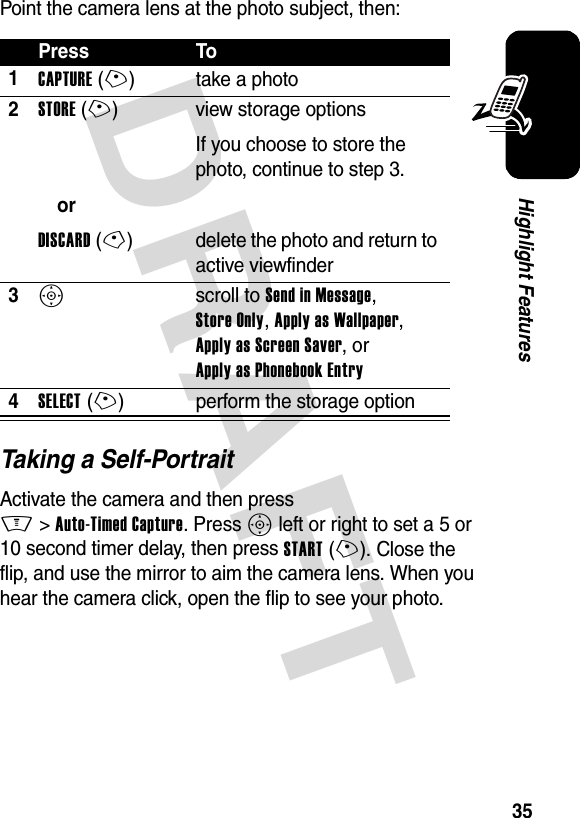
![DRAFT 3Record Video Clip Record a video clip:Press M >Multimedia >Videos >[New Video], point lens at subject, press CAPTURE(+) to begin recording, press STOP(+) to stop recording.Play Video Clip Play a video clip:M >Multimedia >Videos > video clipTake Photo Press M >Multimedia >Camera, point lens at subject, press CAPTURE(+) to take a photo.Send Photo Send a photo to a phone number or email address:Take photo, then press STORE(+) >Send In Message.Set Photo as Picture ID Assign a photo to a phonebook entry to allow picture caller ID:Take photo, then press STORE(+) >Apply as Phonebook Entry.Send Multimedia Message Send a multimedia message with pictures, animations, sounds, and videos:M >Messages >Create Message >New Multimedia MsgFeature Description032380o](https://usermanual.wiki/Motorola-Mobility/T56FK1/User-Guide-540548-Page-5.png)


![DRAFT 15European Union Directives Conformance StatementHereby, Motorola declares that this product is in compliance with:•The essential requirements and other relevant provisions of Directive 1999/5/EC•All other relevant EU DirectivesThe above gives an example of a typical Product Approval Number.You can view your product’s Declaration of Conformity (DoC) to Directive 1999/5/EC (the R&TTE Directive) at www.motorola.com/rtte - to find your DoC, enter the product Approval Number from your product’s label in the “Search” bar on the Web site.[France Only]0168 ProductApprovalNumber](https://usermanual.wiki/Motorola-Mobility/T56FK1/User-Guide-540548-Page-17.png)

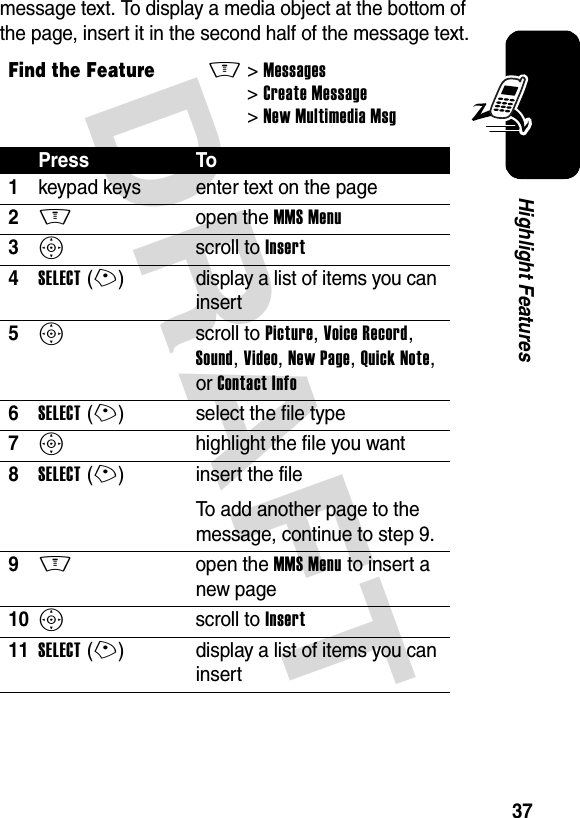
![DRAFT 27Highlight Featuresmode (see the user’s guide for the access point). You can pair your phone with only one access point at a time.Your phone lists the access points within range of the phone.1Highlight an access point in the list and press SELECT(+).2Press YES(-) to pair with the access point.3Enter the access point passkey and press OK(+).When your phone is paired, the Bluetooth indicator à displays in the home screen. After pairing with the access point, the personal area network indicator ò displays when you are connected to the personal area network. For more information about the personal area network indicator, see page 47.Tip: For specific information about an access point device, see the instructions that came with it.Pairing With Recognized Access PointsYour phone stores the names of previously paired access points, and lists the recognized access points located within range of the phone when you open the Access Points menu. If your phone is already paired with an access point, the phone identifies it with an in-use indicatoro.Find the FeatureM>Settings >Connection >Bluetooth Link >Access Points >[Look For Devices]](https://usermanual.wiki/Motorola-Mobility/T56FK1/User-Guide-540548-Page-29.png)

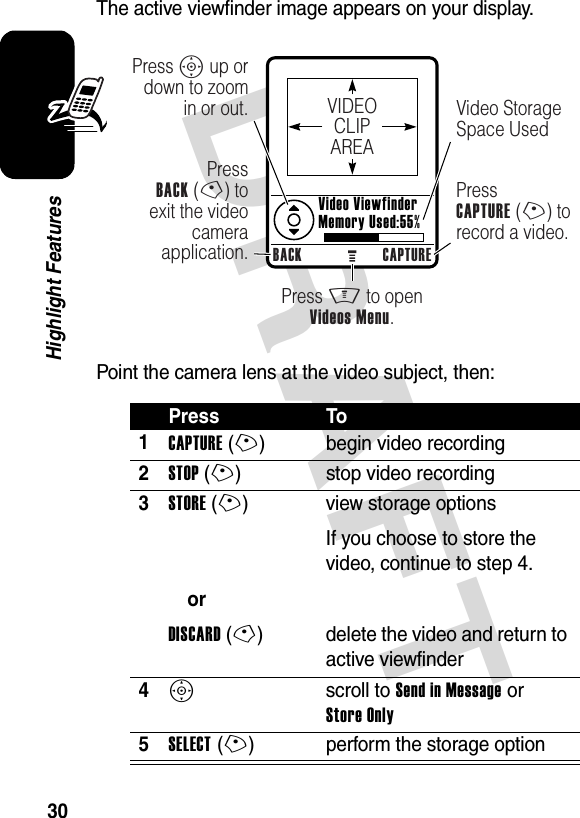
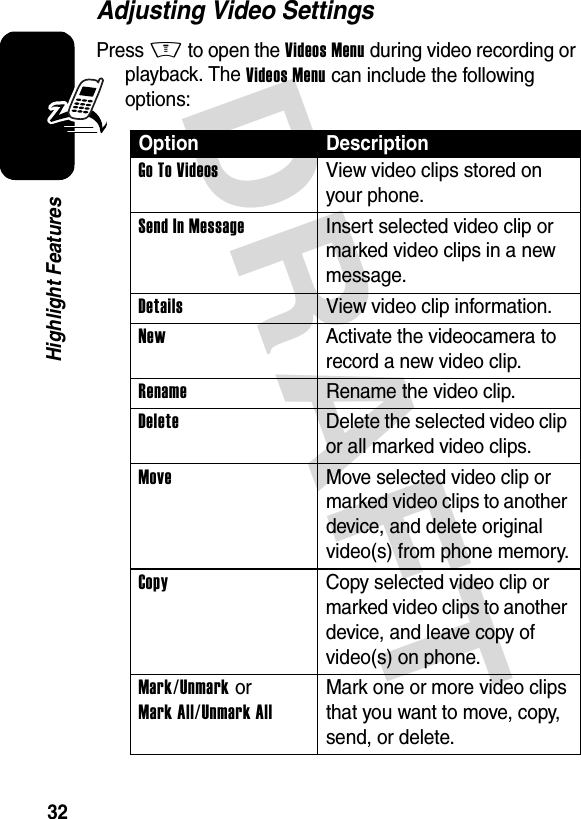
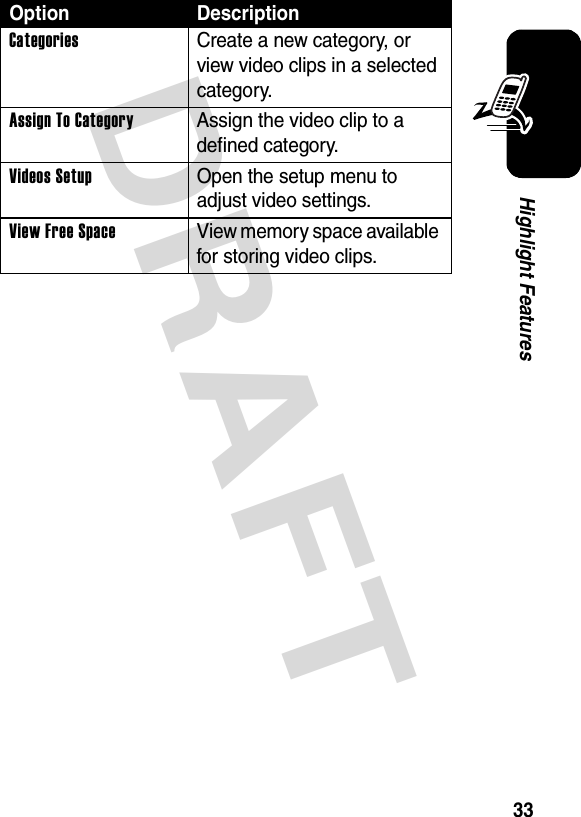
![DRAFT 29Highlight FeaturesNote: If Bluetooth power is turned off, your phone automatically turns Bluetooth power on when you set access point priority to Access Point Preferred, GSM Preferred, or Access Point Only. To turn Bluetooth power off, you must set access point priority to GSM Only.Recording and Playing Video ClipsYou can record a video clip with your phone, and send it to other wireless phone users in a multimedia message.Recording a Video ClipTo activate your phone’s video camera:Access Point Only Automatically connect with an access point when available. Do not use a GSM network connection.GSM Only Do not connect with an available access point.Find the FeatureM>Multimedia >Videos >[New Video]Option Description](https://usermanual.wiki/Motorola-Mobility/T56FK1/User-Guide-540548-Page-31.png)
![DRAFT 38Highlight FeaturesWhen you finish composing the multimedia message:12S scroll to New Page13SELECT(+) insert a new page after the current pageRepeat steps 1 to 8 to enter contents for the new page.Press To1OK(+) store the message2S scroll to a Send To option:Highlight an existing phonebook entry.Or highlight [One Time Entry] to enter one or more phone numbers or email addresses.Or highlight [New Phonebook Entry] to enter a number/address and add it to the phonebook.Press To](https://usermanual.wiki/Motorola-Mobility/T56FK1/User-Guide-540548-Page-40.png)
![DRAFT 39Highlight Features3ADD(+)orSELECT(+)add a phonebook entry to the list of recipientsRepeat steps 2 and 3 to add additional phonebook entries to the list.select [One Time Entry] or [New Phonebook Entry]4DONE(+) store the numbers/addresses5S scroll to Subject6CHANGE(-)select Subject7keypad keys enter the subject8OK(+) store the subject9CHANGE(-)select Attachments to attach a file to the message, if desired10S scroll to Picture, Sounds, or Video11SELECT(+) select the file type12S highlight the file you want13SELECT(+) attach the file14BACK(-) return to the message editor15S scroll to Receipt to request a receipt, if desired16CHANGE(-)select ReceiptPress To032380o](https://usermanual.wiki/Motorola-Mobility/T56FK1/User-Guide-540548-Page-41.png)
![DRAFT 41Highlight FeaturesTurning Bluetooth Power On or OffTo turn Bluetooth power on:When Bluetooth power is on, your phone can automatically pair with the handsfree device you have used before, when you turn on the device and move it within range of the phone.Note: To extend battery life, use the above procedure and set Bluetooth power to Off when not in use. Your phone will not pair with devices until you set Bluetooth power back to On and pair your phone with the devices again.Pairing With a Headset or Handsfree DeviceBefore you try to pair your phone with a device, make sure your phone’s Bluetooth power is on and the device is on and ready in pairing or bonding mode (see the user’s guide for the device). You can pair your phone with only one device at a time.If Bluetooth power is turned off, your phone asks if you want to Temporarily Power On? the Bluetooth power setting. Press YES(-) to proceed. Alternatively, set Power to On in the Setup menu to turn Bluetooth power on and leave it on.Find the FeatureM>Settings >Connection >Bluetooth Link >Setup >Power >OnFind the FeatureM>Settings >Connection >Bluetooth Link >Handsfree >[Look For Devices]](https://usermanual.wiki/Motorola-Mobility/T56FK1/User-Guide-540548-Page-43.png)
![DRAFT 42Highlight FeaturesYour phone lists the devices within range of the phone.1Highlight a device in the list and press SELECT(+).2Press YES(-) to pair with the device.3If necessary, enter the device passkey (such as 0000) and press OK(+).When your phone is paired, the Bluetooth indicator à displays in the home screen.Tip: For specific information about a device, see the instructions that came with it.Copying Objects to Another DeviceYou can use Bluetooth pairing to copy a media object, phonebook entry, datebook event, or bookmark from your phone to a computer or other device.Sending a Picture, Sound, or VideoHighlight the media object on your phone that you want to send to the other device, then press M>Copy.Select a recognized device name listed in the Object Exchange menu, or [Look For Devices] to search for the device to which you want to send the object.Sending a Phonebook Entry, Datebook Event, or BookmarkHighlight the item on your phone that you want to send to the other device, then press M>Send.](https://usermanual.wiki/Motorola-Mobility/T56FK1/User-Guide-540548-Page-44.png)
![DRAFT 43Highlight FeaturesSelect a recognized device name listed in the Object Exchange menu, or [Look For Devices] to search for the device to which you want to send the item.Advanced Bluetooth® FeaturesFeature DescriptionMake Phone Visible to Other Device Allow a Bluetooth device to discover your phone:M >Settings >Connection >Bluetooth Link >Setup >Find MePair With Recognized Device Pair your phone with a recognized handsfree device:M >Settings >Connection >Bluetooth Link >Handsfree >device nameDrop Pairing With Device Highlight the device name and press DROP(+).Switch to Device During Call Switch to a headset or car kit during a call:M>Use BluetoothMove Multimedia Object to Device Move a multimedia object to another device:Highlight the object, press M>Move, select the device name.Caution: Moving an object deletes the original object from your phone.](https://usermanual.wiki/Motorola-Mobility/T56FK1/User-Guide-540548-Page-45.png)


![DRAFT 62Learning to Use Your PhoneCharacter ChartUse this chart as a guide for entering characters with Tap Extended mode.Note: This chart may not reflect the exact character set available on your phone. In an email or Web address editor, 1 first shows common characters for that editor.1 . 1 ? ! , @ _ & ~ : ; " - ( ) '¿ ¡ % £ $ ¥ + x * / \ [ ]= > < # §2 a b c 2 ä å á à â ã α β ç3 d e f 3 δ ë é è ê φ4 g h i 4 ï í î γ5 j k l 5 λ6 m n o 6 ñ ö ø ó ò ô õ ω7 p q r s 7 π ß σ8 t u v 8 θ ü ú ù û9 w x y z 9 ξ ψ0 change text case, for capital letters * enter a space (hold to enter a return) # change text entry mode (hold for default)](https://usermanual.wiki/Motorola-Mobility/T56FK1/User-Guide-540548-Page-64.png)
![DRAFT 64Learning to Use Your PhoneSymbol ChartUse this chart as a guide for entering characters with symbol mode.Note: This chart may not reflect the exact character set available on your phone. In an email or Web address editor, 1 first shows common characters for that editor.Deleting Letters and WordsPlace the cursor to the right of the text you want to delete, and then:1 . ? ! , @ _ & ~ : ; " - ( ) ' ¿¡ % £ $ ¥ 2 @ _ \3 / : ;4 " & '5 ( ) [ ] { }6 ¿ ¡ ~7 < > =8 $ £ ¥ 9 # % *0 + - x * / = > < # §* enter a space (hold to enter a return) # change text entry mode (hold for default) ActionPress DELETE(-) to delete one letter at a time.Hold DELETE(-) to delete the entire message.](https://usermanual.wiki/Motorola-Mobility/T56FK1/User-Guide-540548-Page-66.png)


![DRAFT 110Phone FeaturesEdit Sounds With MotoMixer Edit MIDI-based sound files that you can use with your phone:M >Multimedia >MotoMixer >[New Mix] or mix file nameStart Micro-Browser Start a micro-browser session:M >Web Access >BrowserDownload Objects from Web Page Download a picture, sound, or phone theme from a Web page:Highlight the file, press SELECT(+), press STORE(+).Note: Normal airtime and/or carrier usage charges apply.Web Sessions Select or create a Web session:M >Web Access >Web SessionsDownload Game or Application Download a Java™ game or application with the micro-browser:M >Web Access >Browser, highlight the application, press SELECT(+), press DWNLOAD(+).Note: Normal airtime and/or carrier usage charges apply.Feature Description032380o032380o032380o032380o](https://usermanual.wiki/Motorola-Mobility/T56FK1/User-Guide-540548-Page-112.png)
![DRAFT 111Phone FeaturesStart Game or Application Launch a Java game or application:M >Games & Apps, highlight the application, press SELECT(+).Create Ring Tones Create ring tones that you can use with your phone:M >Multimedia >Sounds >[New iMelody]Feature Description032380o](https://usermanual.wiki/Motorola-Mobility/T56FK1/User-Guide-540548-Page-113.png)