Motorola Mobility T56HF1 i876 iDEN, MOTOtalk, BT User Manual i876 Taos
Motorola Mobility LLC i876 iDEN, MOTOtalk, BT i876 Taos
UserManual.wiki
>
Motorola Mobility
>
T56HF1 User Manual
users manual
Navigation menu
Upload a User Manual
Namespaces
Wiki Guide
HTML
PDF
Info
Views
User Manual
Discussion / Help
Navigation

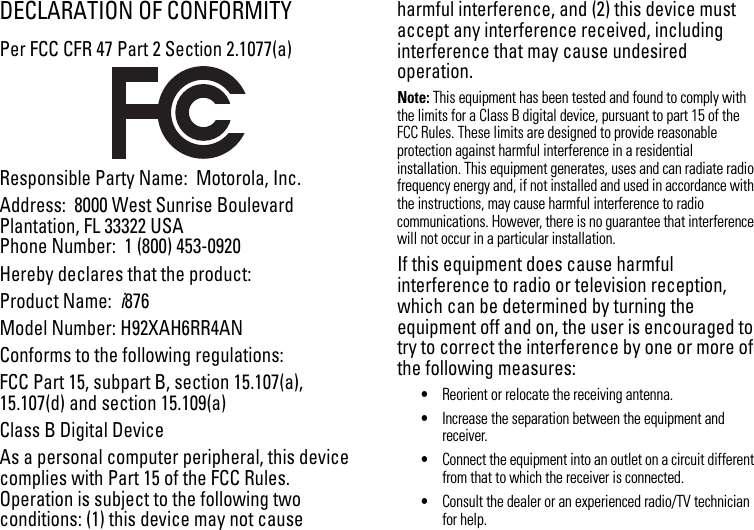

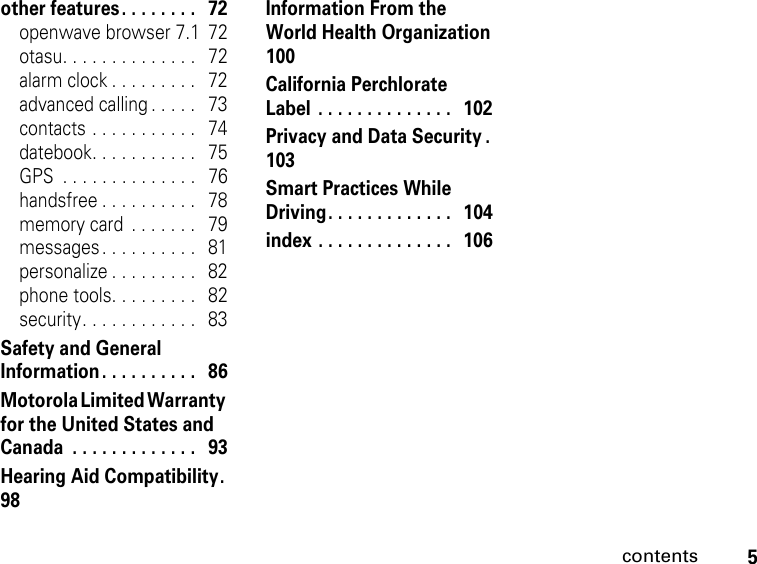
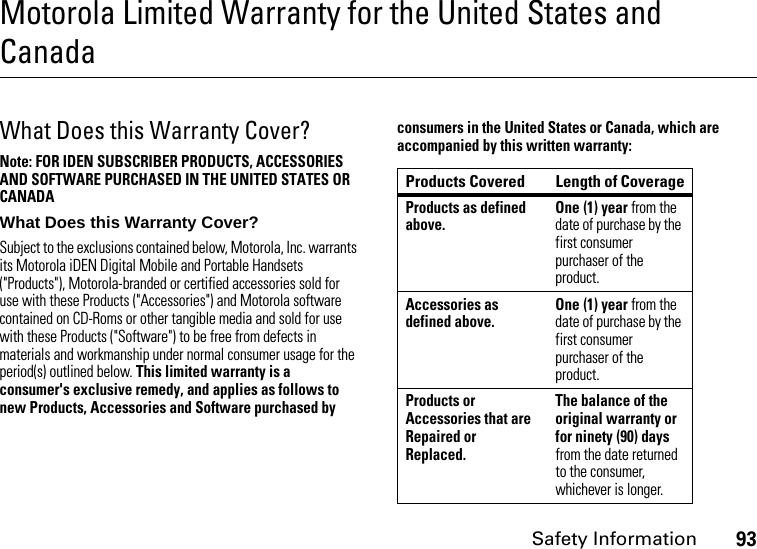
![6menu mapmenu mapmain menuBRecent CallsLContacts• [New Contact]• [New SDG List]EMessages• Create Message•Voice Mail• Inbox•Drafts• Sent Items• Net Alert•SMSqWebjMultimedia• Media Center•Camera• Audio Player• Ring Tones•VoiceRecordpPush To Talk• Call Alert• PT Manager• Quick PTT• PTT OptionsTGames and Apps• Photo Editor• TeleNav Navigator• Calculator SuitemTools•My Info•My Name• Line 1• Line 2• Private ID• Group ID• Carrier IP• IP1 Address• IP2 Address• Profiles• [New Profile]• Standard•Car• Meeting• Office• Outdoors• Headset•PRVT Only•CNTCS Only• Alarm Clock Plus• Bluetooth•GPS• Datebook•Call Timers•MemobSettings• (see next page)This is the standard main menu layout. Your phone’s menu may be a little different.](https://usermanual.wiki/Motorola-Mobility/T56HF1/User-Guide-796528-Page-12.png)
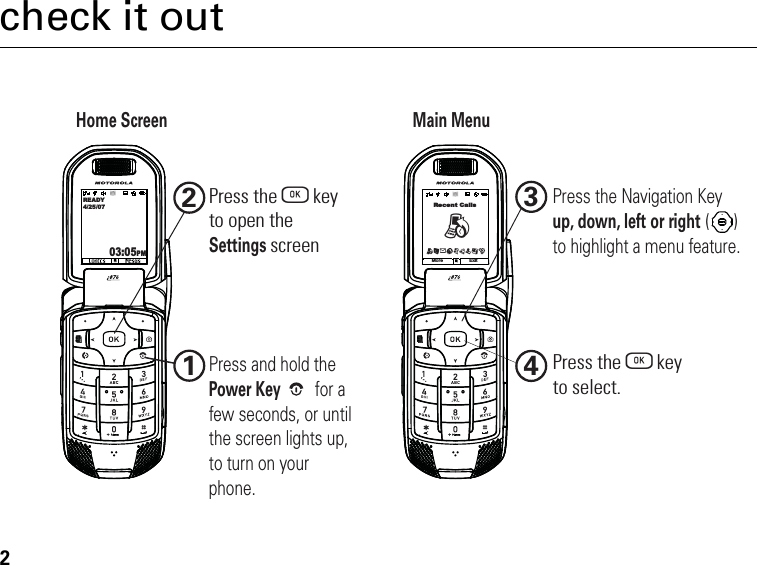
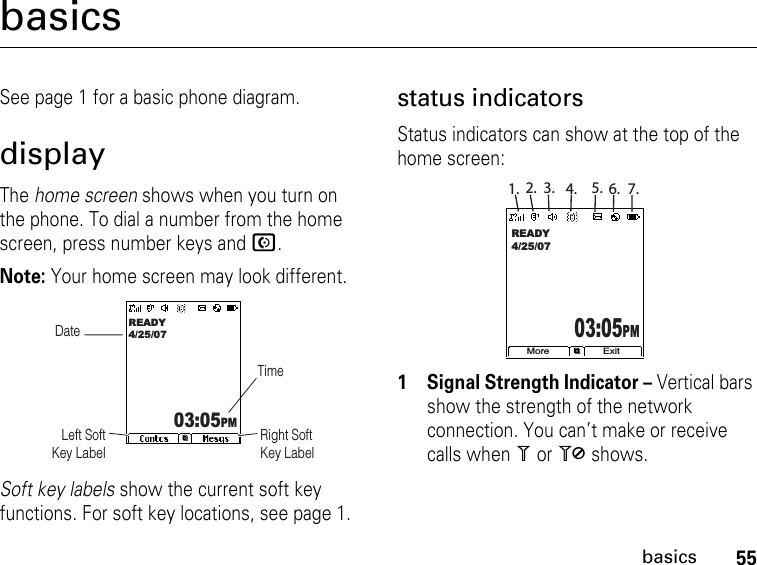
![12essentialsBefore using your phone, read the battery safety information in the Safety and General Information section included in this guide.turn it on & offTo turn on your phone, press and hold O for a few seconds or until the display turns on. If prompted, enter your four-digit unlock code.To turn off your phone, press and hold O for two seconds.make a callEnter a phone number and press N to make a call.To hang up, close the flip or press O.answer a callWhen your phone rings and/or vibrates, just open the flip or press N to answer.To hang up, close the flip or press O.store a phone numberYou can store a phone number in Contacts:1PressM > Contacts > r > [New Contact].2Enter a name for the new entry and pressr. Each entry’s name can contain 24 characters. 3Select a specific Ring Tone/Picture and pressr.4Select a type for the entry (Mobile, Private, Work1, Work2, Home, Email, Fax, Pager, Talkgroup, IP or Other) and pressr.5Enter the number for the entry and pressr.](https://usermanual.wiki/Motorola-Mobility/T56HF1/User-Guide-796528-Page-18.png)
![14main attractionsmain attractionsmusic playerUnder constructionYour i876 phone includes an audio player that you can use to play audio files stored in your phone’s memory or on the memory card inserted in your phone. The audio player groups the audio files into folders and lists. When you select an audio file to play, the audio player plays this audio file, then plays the other audio files grouped with it. The audio player also plays podcasts you download to your computer and then save on your phone’s memory card. You can mark highlights within a podcast file to help you find the parts you most want to listen to. If your service provider offers MMS, you can send details of the podcast to a friend and send feedback to the podcast creator using MMS messages. Supported file formats include MP3, AAC, AAC+ and WMA.play music files Find it: M > Multimedia > Media Center > Scroll to Media: Audio using * or # > [Music Player].1Scroll to a folder.Tip: The Songs folder contains all the music files on the memory card in a single list. 2To play the first music file in the folder, press Play. (If the selected folder contains](https://usermanual.wiki/Motorola-Mobility/T56HF1/User-Guide-796528-Page-20.png)
![15main attractionssubfolders, this plays the first music file in the first of the subfolders.)Press r to view the folder’s contents. Scroll to a music file and press Play, or scroll to a folder and press Play to play the first music file in it. Any time you are viewing a list of folders with the music player, you can scroll to a folder and press Play to start playing the contents of that folder or press r to view the contents of the folder. Any time you are viewing a list of music files, you can scroll to a music file and press Play to play it. To stop viewing a folder and return to the folder or list that contains it, press Back. play music while loading filesThe first time the music player finds music files on your memory card, it loads and organizes these files. This may take a long time for a large number of files. To play music while files are loading:Find it: M > Multimedia > Media Center > Scroll to Media: Audio using * or # > [Music Player].1From the main screen, scroll to Songs and press r. 2Scroll to a music file and press Play or r. While music is playing, file loading is suspended.pause and resumeTo pause a playing music file, press Pause or r. To resume playing a paused music file, press Play or r.](https://usermanual.wiki/Motorola-Mobility/T56HF1/User-Guide-796528-Page-21.png)
![16main attractionsskip to next or previous To skip to the next music file, press and release S right. To skip to the previous music file, press and release S left. (Do not hold the left side of the navigation key.) fast-forward and rewind Press and hold S right for 2 seconds to fast forward. Press and hold S left for 2 seconds to rewind.repeat and shuffle The repeat feature lets you set the music player to play all the music files in a list or folder, without pausing or stopping. It also lets you set the music player to play one music file repeatedly. Find it: M > Setup > Repeat > All or OneThe shuffle feature lets you set the music player to play the music files in a list or folder in random order, until you stop it. Find it: M > Setup > Shuffle > On or Offwork with playlists Playlists are lists of music files you create from the files already available through the music player. Playlists enable you to organize music files, but they do not change anything in other folders or on the memory card. Adding or deleting a file on a playlist does not copy, delete or move it. create a playlist Find it: M > Multimedia > Media Center > Scroll to Media: Audio using * or # > [Music Player].1Select Playlists.](https://usermanual.wiki/Motorola-Mobility/T56HF1/User-Guide-796528-Page-22.png)
![17main attractions2Select [Create New]. 3Enter a playlist name and press r. Note: If you do not assign a name, the playlist is named Playlist followed by a number. For example, the first playlist you create without naming is automatically named Playlist-1.4Select [Add Songs]. A list of all music files on the memory card appears. Tip: For options to help you sort through this list, press M. 5Select each file you want on the playlist. A checkmark appears by each selected file. Tip: To deselect a selected item, scroll to a selected file and press r.6When you are finished selecting files, press Done. 7Select Save. edit a playlist After you create a playlist, you can change its name, add music files, remove music files, and change the order of the music files. Find it: M > Multimedia > Media Center > Scroll to Media: Audio using * or # > [Music Player].1Select Playlists.2Scroll to the playlist you want to edit.3Press M.4Select Edit Playlist.5Make changes.6Select Save. reorder songs in a playlist You can change the order of the music files while creating or editing the playlist. Find it: M > Multimedia > Media Center > Scroll to Media: Audio using * or # > [Music Player].](https://usermanual.wiki/Motorola-Mobility/T56HF1/User-Guide-796528-Page-23.png)
![18main attractions1Scroll to highlight any playlist and press r.2Press M > Edit the playlist > r.3Select Reorder Songs > r.4Scroll to the song you want to move.5Press Grab.6Scroll to the place where you want the song to appear.7Press Insert.8Repeat step 4 through step 7 for all the items you want to move.9Press Done.10Press Save.remove music files You can remove some or all music files while creating or editing a playlist. 1Before you have saved a new playlist or while editing a playlist, press M.2Scroll to the music file you want to remove.3Press M.4Select Remove Song.5Press Save.or6Select Remove All Songs.7Press Yes to confirm.8Press Save. reorder playlists You can change the order of the playlists in the Playlists folder. Find it: M > Multimedia > Media Center > Scroll to Media: Audio using * or # > [Music Player].](https://usermanual.wiki/Motorola-Mobility/T56HF1/User-Guide-796528-Page-24.png)
![21main attractionswork with podcastsFind it: M > Multimedia > Media Center > Scroll to Media: Audio using * or # > [Music Player].1Select Podcasts.Note: The Podcasts folder is empty until you download podcasts from your computer.2Scroll to view individual podcast episodes or folders containing multiple episodes of the same program. 3Press r to view the podcast episodes within a folder or the details screen of an individual podcast episode. You can pause, resume, fast-forward, and rewind just as with any other music file.Some functions differ when playing a podcast:•Pressing r when you have scrolled to a podcast displays a screen showing podcast details, but does not play the podcast. To play the podcast, press Play. After you begin playing the podcast, pressing r pauses and resumes the podcast.•If the podcast you are playing contains highlights, pressing and releasing the right or left r skips to the next or previous highlight within the podcast, or to the beginning or end of the podcast.highlights Highlights are portions of a podcast that are marked to help you find them more easily. Some podcasts you download may already have highlights marked. You can use the music player to add and delete highlight markers.](https://usermanual.wiki/Motorola-Mobility/T56HF1/User-Guide-796528-Page-27.png)
![24main attractionsTo hide the music player in the background:Find it: M > Multimedia > Media Center > Scroll to Media: Audio using * or # > [Music Player].1From the main screen, scroll to Songs and press r. 2Scroll to a music file and press Play or r. 3Press M. 4Select Hide Player.The music player will minimize and the home screen will show.To jump back to the music player, simply press the right softkey now labeled PLAYER.browser / messaging on iDEN/WiDEN networkThe feature shall allow you to play music during web browsing, reading news, weather info, etc... Also, it is possible to listen to the music with MMS/SMS message client.The music will not pause even through access to a wireless website, or sending a message. voice call (phone call, dispatch, and initiate call alert, ptx)When you receive an incoming call, the audio player shall be paused automatically. Also, when you initiate a call (when you push "send" key, or PTT key), the audio player shall be paused automatically.mototalkThe audio player and background music capability shall be also available in mototalk mode. When you receive an incoming call, the functionality shall be same as “voice call (phone call, dispatch, and initiate call alert, ptx)”.](https://usermanual.wiki/Motorola-Mobility/T56HF1/User-Guide-796528-Page-30.png)

![32main attractionsIf these options do not appear on the context-sensitive menu, the Private ID you are engaged in the Private call with is not able to receive messages. From the Contacts or the Recent Calls list:Press M > Use PTT Feature > Send Message.If these options do not appear on the context-sensitive menu, the Private ID you chose is not able to receive messages.The PT Manager lets you select the Private ID you want to send the message to from Contacts or the Recent Calls list.Find it: Press M > Push To Talk > Press r > Push To... > Press r > Send MessageAfter you have begun a message and chosen a recipient, a screen appears that lets you create the text of the message you want to send. Your message may be up to 400 characters long. You can choose from a list of ready-made words or short phrases called Quick Notes. You can use Note for this message only and will not change the Quick Note on the list. Find it: M > Push To Talk > Push To... > Send Message1Select A Contact or A Recent Call.2Select [New Messages].3Enter your message or select a Quick Note.4Press > r > and the PTT button.receive messages When you receive a message, a message notification appears on the display. To view the message: Press Read. To dismiss the message press Back.](https://usermanual.wiki/Motorola-Mobility/T56HF1/User-Guide-796528-Page-38.png)
![38main attractionsbetween the two; some names of menu items and the steps you take to access features may differ.create a message To begin creating a message press M > Messages > [Create Message] or Create (left softkey).Note: You can also create a message from Contacts, Recent Calls, or the idle screen.To address the message: 1Select To2Add the phone number or email address.or3Select from Contacts or Recent Calls.4Press > r.Tip: To remove a phone number or email address from the list of message recipients, scroll to the phone number or email address and press Remove (left softkey).When you are finished addressing the message, press Back (right softkey).To enter or edit the body of the message: 1Select Message.2Enter text or use a Quick Note and press r.3Press Send.more message options View more message fields in a message you are creating, select More.To create or edit the subject line, select Subject.1Enter text and press r.or2Select Quick Note >r.To set the priority of the message, select Priority and select the priority you need. To receive a report confirming your message delivery, select Report > On Delivery.](https://usermanual.wiki/Motorola-Mobility/T56HF1/User-Guide-796528-Page-44.png)
![39main attractionsTo set a date after which attempts to deliver the message end, select Valid Until.1Select a date by scrolling or entering numbers.or2Select No Date > r.3Press Send or M > Send. reply to a message You can reply to a message while you are viewing it, or while a previously viewed message is highlighted in the message center. You cannot reply to unread messages. To reply to a message: 1View the message you want to reply to.2To reply to the sender only, press Reply or Reply All. 3A list of short phrases appears. Select any of these phrases to add it to your messages or select [Create Reply].4Edit any message fields you want to change. 5Send the message. quick notesWhen you are filling in the Message and Subject message fields, you can add ready-made words or short phrases called Quick Notes. After you add these words or phrases, you can edit them as you would any other text. 1While you are creating a message, scroll to or select Message or Subject. 2Press QNotes or M > Insert QuickNotes.3Select the Quick Note you want to insert into the message.](https://usermanual.wiki/Motorola-Mobility/T56HF1/User-Guide-796528-Page-45.png)
![40main attractionsinsert a picture, video, and audio recording from the media center You can insert one or more pictures, videos, and audio recordings from the media center into the body of the message. You can include text in the body of your message in addition to these items. insert items While you are filling in the Message field, press M > Insert Picture, Insert Video, Insert Audio, Capture Video, Capture Picture or Record Voice.A list of available pictures, videos, and audio recordings appears. Select the picture, video, or audio recording you want to insert. Tip: To view or listen to the item before inserting it, highlight it and press Preview. remove an inserted item To remove an item from the message you are creating: 1Highlight the item. 2Press Delete.attach a picture, video, and audio recording from the media center You can attach one or more pictures, videos, and audio recordings from the media center. attach items To attach an item while creating a message:1Select Attach > [New Attachment].2Select Browse Pictures, Capture Picture, Browse Audio, Record Voice, Browse Video, or Record Video.](https://usermanual.wiki/Motorola-Mobility/T56HF1/User-Guide-796528-Page-46.png)
![41main attractionsA list of available pictures, videos, and audio recordings appears.3Select the picture, video, or audio recording you want to attach. Tip: To view or listen to the item before attaching it, highlight it and press Preview. If you want to attach more items, select [New Attachment]. 4When you are finished, press Done. take a new picture 1While you are creating a message, scroll to any message field and press M or select Attach > [New Attachment].2Select Capture Picture. This accesses the camera. Tip: If you want to adjust the zoom, spotlight, picture quality, picture size, or a timer, set these options before taking the picture. 3Take the picture. 4When you have captured the picture you want, press Save. This will automatically save it to your media and attaches it to your message.To discard the picture, press Discard. You can then take another picture. 5When you are finished, press Done. The picture is attached to the message and saved to the default storage location. record a videoYou can record a video to send with a message:1Select Attach > [New Attachment]. 2Record and adjust video.](https://usermanual.wiki/Motorola-Mobility/T56HF1/User-Guide-796528-Page-47.png)
![42main attractions3To save the video, press e or press r.To view the video without saving it, press Review.To discard the video without saving it, press Discard.The picture is attached to the message and saved to the default storage location. create a new voice record You can create a new voice record to send with a message:1Press M or select Attach > [New Attachment].2Select Record Voice. 3Say the message you want to record into the microphone. 4When you are finished recording, press Save. 5When you are finished, press Done. The voice record is attached to the message and saved to the media center and the list of voice records. remove an attachment To remove an attachment in a message you are creating: 1Select Attach.2Scroll to the attachment you want to remove. 3Press M. 4Select Unattach. drafts While you are creating a message, you can save it in the MMS drafts folder before you send it. You can view, edit, send, or delete saved drafts.](https://usermanual.wiki/Motorola-Mobility/T56HF1/User-Guide-796528-Page-48.png)
![47main attractions3Highlight the Talkgroup ID you want to call. 4Select Talkgroup. 5Press the PTT button. store message information to contacts If a message you receive contains a phone number, Private ID, Talkgroup ID, or an email address in the From field, the To field, the Cc field, the subject line, or the body of the message, you can store this information to Contacts. 1View the message. 2Highlight the number or email address you want to save. 3Press M. 4Select Save Number or Save Email. 5To store the number or email address as a new entry, select [New Contact].To store the number or email address to an existing entry, select the entry. 6With the Contacts type field highlighted, scroll left or right to display the Contacts type you want to assign the number or email address. 7Press Save. go to a website If a message contains one or more website URLs, you can go to that website. 1View the message. 2Highlight the website URL you want to go to. 3Press M. 4Select Go To Website.](https://usermanual.wiki/Motorola-Mobility/T56HF1/User-Guide-796528-Page-53.png)

![58basicsTo accept a word completion (such as Billion when you entered Bill), press S right.alpha modeTo enter characters by tapping the keypad: 1Select the Alpha mode.2Press the corresponding keys repeatedly until the desired letter appears. (For example, to enter the word Bill, press 2 twice, 4 three times, 5 three times, and 5 three times again. If you make a mistake, press Delete to erase a single character. Press and hold Delete to erase an entire word.)By default, the first letter of an entry is capitalized and the following letters are lowercased. After a character is entered, the cursor automatically advances to the next space after two seconds or when you enter a character on a different key.Characters scroll in the following order: characters1 ? ! , @ ' - _ : ; ( ) & " 1 0 ^ ` % + * / \ | ~ [ ] = > < #2A B C 23D E F 34G H I 45J K L 56M N O 67P Q R S 78T U V 89W X Y Z 90(no characters)#Space*Shift](https://usermanual.wiki/Motorola-Mobility/T56HF1/User-Guide-796528-Page-64.png)

![82other features—personalizepersonalize phone toolsfeaturelanguageSet menu language:Press r > Settings > Display/Info > Languagebacklight time lengthSelect how long the display screen and keypad are backlit:Press r > Settings > Display/Info > Backlightmenu styleShow the main menu as graphic icons or a text-based list:Press r > Settings > Display/Info > Menu Viewclock displayPress r > Settings > Display/Info > Clockfeatureadd new calendar eventTo add a new calendar event:Press M > Tools > Datebook > [New Event] > Donesee calendar eventTo see a calendar event:Press M > Tools > Datebook > S left or right to day > S up or down to event > revent reminderWhen an event reminder happens:To see the event details, press View > Back (to close the reminder)](https://usermanual.wiki/Motorola-Mobility/T56HF1/User-Guide-796528-Page-88.png)