Motorola Mobility T56HS1 Portable Cellular/ PCS CDMA Transceiver with BT User Manual Q 9m UG

Motorola Mobility LLC Portable Cellular/ PCS CDMA Transceiver with BT Q 9m UG

Contents

Exhibit 8 Users Manual
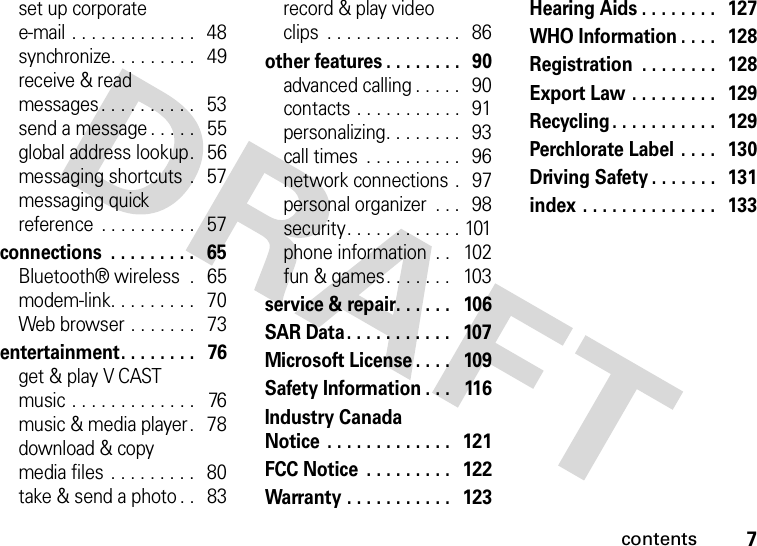
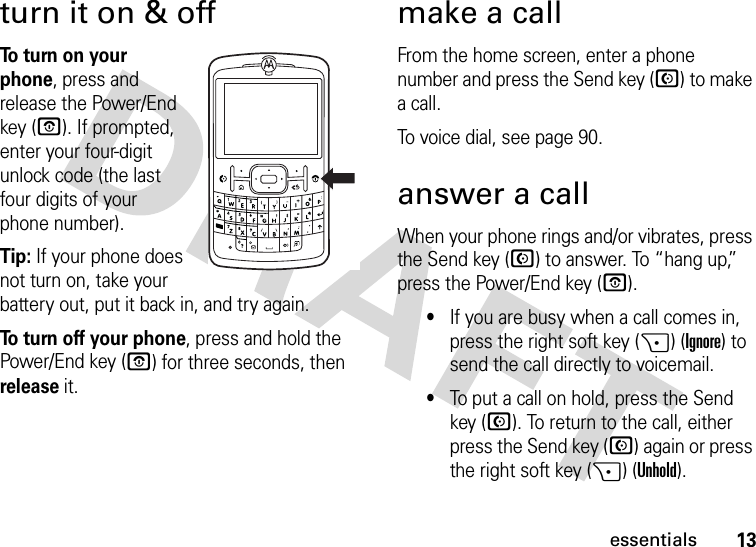
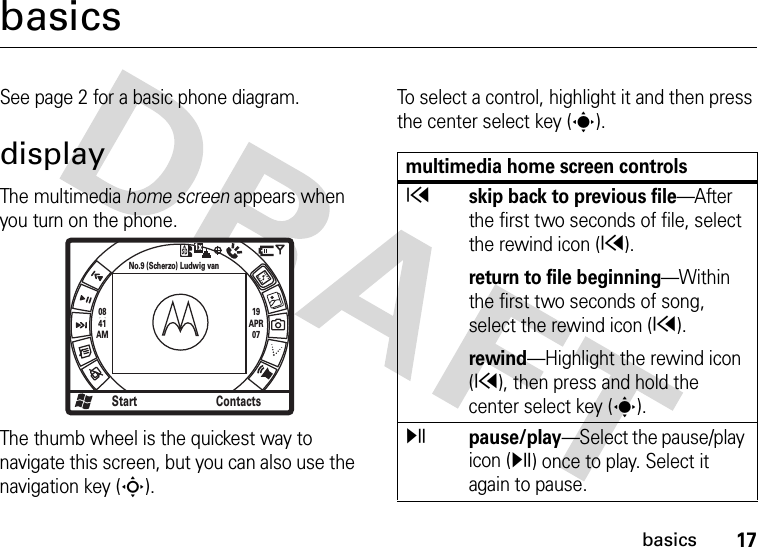
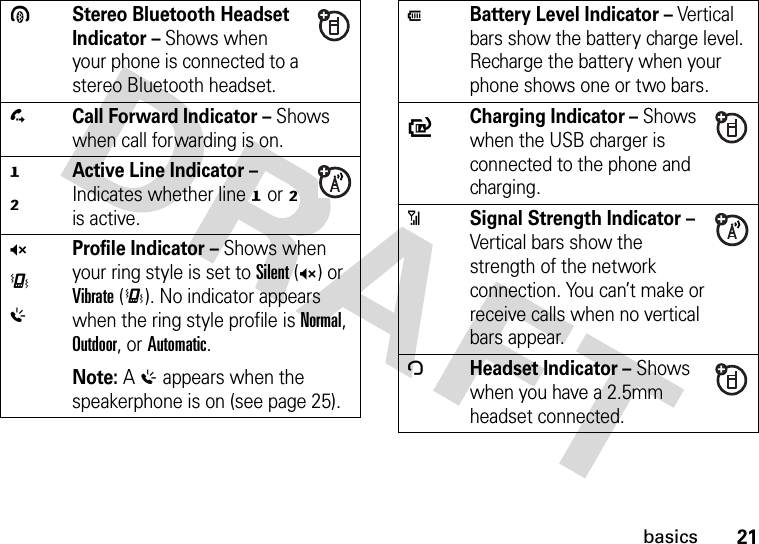
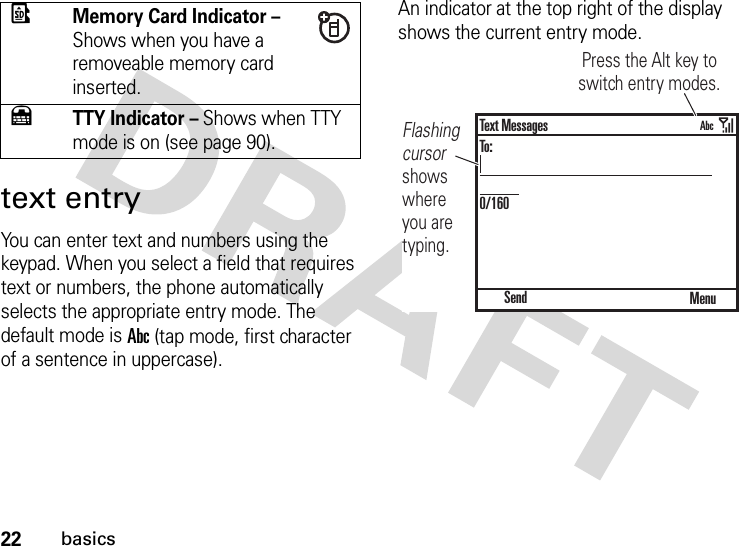
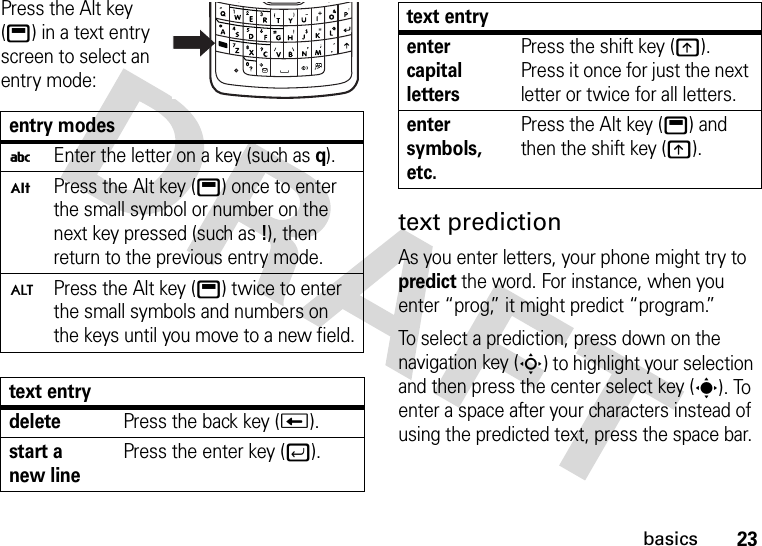
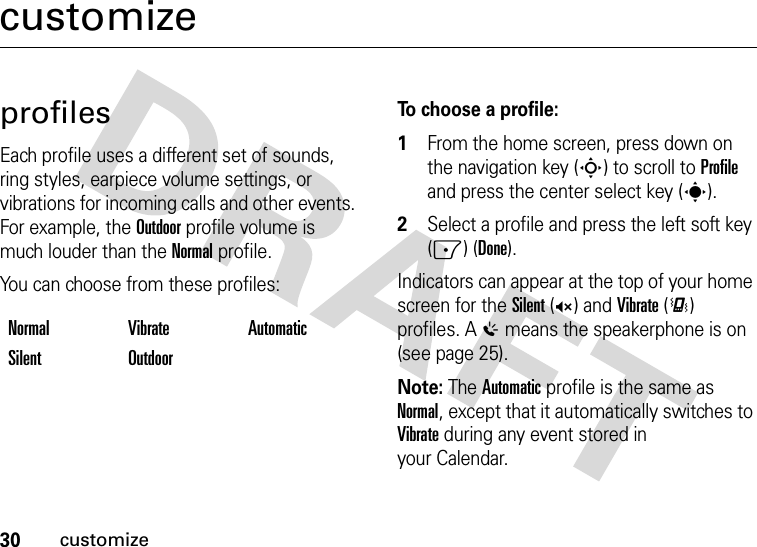
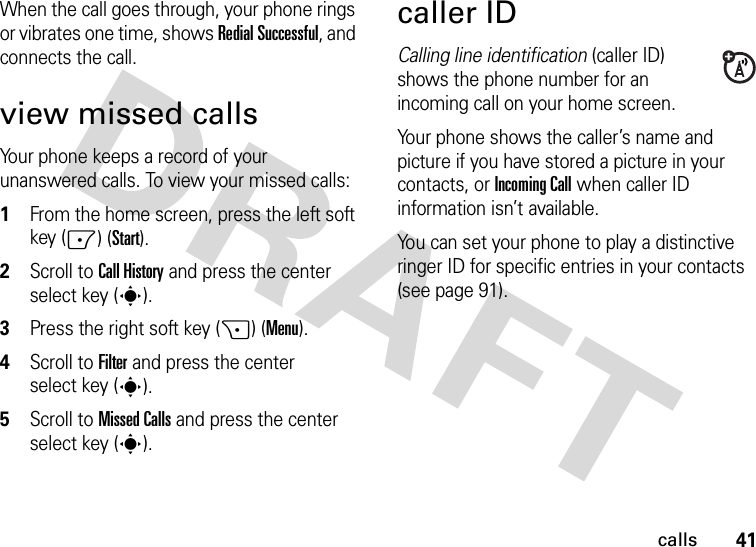
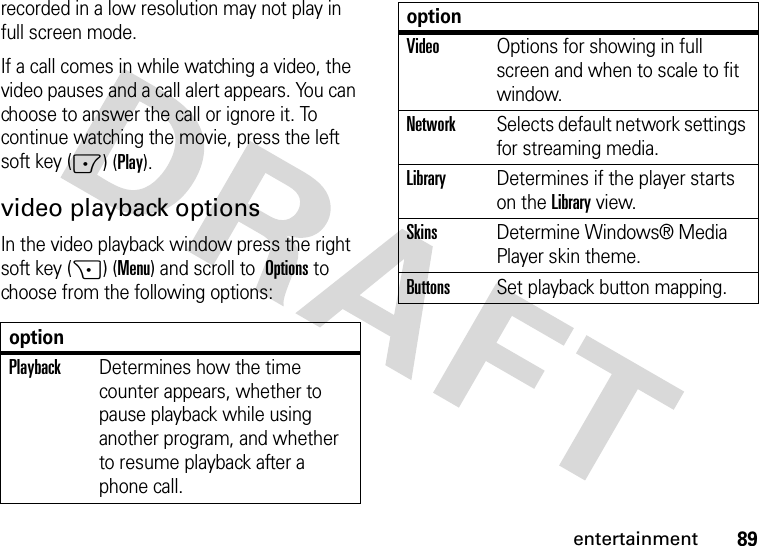
        INSTRUCTION MANUAL  A preliminary draft of the User’s Manual follows this page. The text on the following three pages will be added to the user manual.  APPLICANT: MOTOROLA,INC.                              FCC ID: IHDT56HS1                                            EXHIBIT 8
SAR DataSpecific Absorption Rate DataSAR Da taThis model wireless phone meets the government’s requirements for exposure to radio waves.Your wireless phone is a radio transmitter and receiver. It is designed and manufactured not to exceed limits for exposure to radio frequency (RF) energy set by the Federal Communications Commission (FCC) of the U.S. Government and by the Canadian regulatory authorities. These limits are part of comprehensive guidelines and establish permitted levels of RF energy for the general population. The guidelines are based on standards that were developed by independent scientific organizations through periodic and thorough evaluation of scientific studies. The standards include a substantial safety margin designed to assure the safety of all persons, regardless of age or health.The exposure standard for wireless mobile phones employs a unit of measurement known as the Specific Absorption Rate, or SAR. The SAR limit set by the FCC and by the Canadian regulatory authorities is 1.6 W/kg.1 Tests for SAR are conducted using standard operating positions accepted by the FCC and by Industry Canada with the phone transmitting at its highest certified power level in all tested frequency bands. Although the SAR is determined at the highest certified power level, the actual SAR level of the phone while operating can be well below the maximum value. This is because the phone is designed to operate at multiple power levels so as to use only the power required to reach the network. In general, the closer you are to a wireless base station, the lower the power output.Before a phone model is available for sale to the public in the U.S. and Canada, it must be tested and certified to the FCC and Industry Canada that it does not exceed the limit established by each government for safe exposure. The tests are performed in positions and locations (e.g., at the ear and worn on the body) reported to the FCC and available for review by Industry Canada. The highest SAR value for this model phone when tested for use at the ear is 1.28 W/kg, and when worn on the body, as described in this user guide, is 1.29 W/kg.2 While there may be differences between the SAR levels of various phones and at various positions, they all meet the governmental requirements for safe exposure. Please note that improvements to this product model could cause differences in the SAR value for later products; in all cases, products are designed to be within the guidelines.
SAR DataAdditional information on Specific Absorption Rates (SAR) can be found on the Cellular Telecommunications & Internet Association (CTIA) Web site:http://www.phonefacts.netor the Canadian Wireless Telecommunications Association (CWTA) Web site:http://www.cwta.ca1. In the United States and Canada, the SAR limit for mobile phones used by the public is 1.6 watts/kg (W/kg) averaged over one gram of tissue. The standard incorporates a substantial margin of safety to give additional protection for the public and to account for any variations in measurements.2. The SAR information includes the Motorola testing protocol, assessment procedure, and measurement uncertainty range for this product.
User’s Guide9mMOTO
1HELLOMOTOThanks for purchasing the MOTOQ™ 9m wireless phone! It's a phone with a distinct edge—personalization, music, videos, and e-mail—all in a streamlined, intelligent, must-have device.Anytime Entertainment – Can't live without your favorite movies or music? Purchase V CAST music or videos. Transfer video and music files from your computer to your phone and instantly a media library is available anytime.Freedom from Wires – Your life just got a little less wired. With Bluetooth™ wireless technology, streaming video and wireless stereo sound is now a reality.Work Remotely – Tired of being connected to your desk or computer? With Windows Mobile, now you can keep on top of work e-mail and edit Microsoft Office® documents from wherever you are in the world.Help & QuickStart Tour – On-phone help is available anytime. Just press Start > VHelp and Quickstart.
2Here’s a quick anatomy lesson.Navigation KeyNavigate menus.Center Select KeySelect menu items.Messaging KeyPress to open messaging.Thumb WheelPress to select items.Back KeysEnter KeyCaps KeyRight Soft KeySpeakerphone/Voice Recognition KeyMultimedia KeySend KeyMake & answer calls.Left Soft KeyHome KeyHold to open a quick list of options.Alt KeyMicrophonePower/End KeyBack Key
3To avoid damaging your phone, carry it in an approved protective sleeve or case rather than a pocket, purse, or bag.USB PortCharge battery and connect phone accessoriesStorage Card SlotInsert MiniSD memory cardCamera LensCamera FlashBattery Door ReleaseSpeakers
4From the home screen, press Start to open the main menu.To change your home screen shortcuts and main menu appearance, see page 34.For help while using your phone, press Start >1Help and QuickStart to open the in-device help. Also see the MOTO Q 9m Support Web site at http://www.motorola.com/support/q9m.0841AM19APR07Start ContactsNo.9 (Scherzo) Ludwig van1xMutimedia Home Screen Menu Screen Press and release the Power/End Key (O) to turn on your phone.1Press the Start key (left soft key) to open the main menu.2Press up, down, left, or right on the the Navigation Key (S) to highlight a menu feature.3Press the Center Select Key (s)) to select the highlighted feature.4g 9 c @  x u ( C Note: To open the regular home screen, press and hold the multimedia key (see page 2).
5 Motorola, Inc.Consumer Advocacy Office1307 East Algonquin RoadSchaumburg, IL 60196www.hellomoto.comCertain mobile phone features are dependent on the capabilities and settings of your service provider’s network.  Additionally, certain features may not be activated by your service provider, and/or the provider's network settings may limit the feature’s functionality.  Always contact your service provider about feature availability and functionality. All features, functionality, and other product specifications, as well as the information contained in this user's guide are based upon the latest available information and are believed to be accurate at the time of printing.  Motorola reserves the right to change or modify any information or specifications without notice or obligation.MOTOROLA and the Stylized M Logo are registered in the US Patent & Trademark Office. All other product or service names are the property of their respective owners. The Bluetooth trademarks are owned by their proprietor and used by Motorola, Inc. under license. Microsoft, Windows and Windows Me are registered trademarks of Microsoft Corporation; and Windows XP is a trademark of Microsoft Corporation. © Motorola, Inc., 2007.Caution: Changes or modifications made in the radio phone, not expressly approved by Motorola, will void the user’s authority to operate the equipment.Software Copyright Notice The Motorola products described in this manual may include copyrighted Motorola and third-party software stored in semiconductor memories or other media. Laws in the United States and other countries preserve for Motorola and third-party software providers certain exclusive rights for copyrighted software, such as the exclusive rights to distribute or reproduce the copyrighted software. Accordingly, any copyrighted software contained in the Motorola products may not be modified, reverse-engineered, distributed, or reproduced in any manner to the extent allowed by law. Furthermore, the purchase of the Motorola products shall not be deemed to grant either directly or by implication, estoppel, or otherwise, any license under the copyrights, patents, or patent applications of Motorola or any third-party software provider, except for the normal, non-exclusive, royalty-free license to use that arises by operation of law in the sale of a product.Manual Number: 6809513A32-O
6contentscontentsstart menu . . . . . . . . . . . .  8use and care. . . . . . . . . . .  9essentials . . . . . . . . . . . .  10about this guide. . . . . .  10battery . . . . . . . . . . . . .  10turn it on & off . . . . . . .  13make a call. . . . . . . . . .  13answer a call . . . . . . . .  13store a phone number .  14call a stored number . .  14see your phone number . . . . . . . . . . . .  15tips & tricks . . . . . . . . . .  16basics . . . . . . . . . . . . . . .  17display . . . . . . . . . . . . .  17text entry . . . . . . . . . . .  22volume. . . . . . . . . . . . .  24handsfree speaker. . . .  25lock & unlock phone  . .  25storage card. . . . . . . . . 26flight mode  . . . . . . . . .  27file manager. . . . . . . . . 28task manager. . . . . . . .  28customize. . . . . . . . . . . .  30profiles. . . . . . . . . . . . .  30home screen . . . . . . . .  32home screen shortcuts . . . . . . . . . . .  34start menu. . . . . . . . . .  35time & date . . . . . . . . .  36backlight  . . . . . . . . . . .  37answer options . . . . . .  37third-party applications . . . . . . . . .  38calls. . . . . . . . . . . . . . . . . 39turn off a call alert  . . . .  39recent calls  . . . . . . . . . 39redial . . . . . . . . . . . . . .  40view missed calls  . . . . 41caller ID . . . . . . . . . . . .  41emergency calls  . . . . .  42international calls . . . . .  42speed dial  . . . . . . . . . . 42voicemail . . . . . . . . . . .  44three-way calling . . . . . 45messages . . . . . . . . . . . .  46set up personal e-mail (such as Yahoo or Gmail)  . . . . . . . . . . . . . 46set up MSN or Hotmail e-mail. . . . . . . . . . . . . . 47
contents7set up corporate e-mail . . . . . . . . . . . . .   48synchronize. . . . . . . . .   49receive & read messages. . . . . . . . . .   53send a message . . . . .   55global address lookup.   56messaging shortcuts  .   57messaging quick reference  . . . . . . . . . .   57connections  . . . . . . . . .   65Bluetooth® wireless  .   65modem-link. . . . . . . . .   70Web browser . . . . . . .   73entertainment. . . . . . . .   76get & play V CAST music . . . . . . . . . . . . .   76music & media player.   78download & copy media files . . . . . . . . .   80take & send a photo . .   83record & play video clips  . . . . . . . . . . . . . .   86other features . . . . . . . .   90advanced calling . . . . .   90contacts . . . . . . . . . . .   91personalizing. . . . . . . .   93call times  . . . . . . . . . .   96network connections .   97personal organizer  . . .   98security. . . . . . . . . . . . 101phone information  . .   102fun & games. . . . . . .   103service & repair. . . . . .   106SAR Data. . . . . . . . . . .   107Microsoft License . . . .   109Safety Information . . .   116Industry Canada Notice  . . . . . . . . . . . . .   121FCC Notice  . . . . . . . . .  122Warranty . . . . . . . . . . .   123Hearing Aids . . . . . . . .   127WHO Information . . . .  128Registration  . . . . . . . .  128Export Law . . . . . . . . .  129Recycling. . . . . . . . . . .   129Perchlorate Label . . . .   130Driving Safety . . . . . . .  131index . . . . . . . . . . . . . .   133
8start menustart menuTo open the menu from the home screen, press Start(left soft key). These menu items can appear in grid or circular view.gWeb9Pictures & VideoscWindows Media@Get ApplicationsiWireless Sync)Settings• Phone• Sounds• Profiles• Home Screen•Clock & Alarm• Connections• Security• Remove Programs• Power Management• Accessibility• Regional Settings• Owner Information• Text Input Settings• About• Error Reporting• TTY Settings• Unread Message Alert]Bluetooth(V CAST MusicPMessaging• Text Messages•E-mail•MMSzPersonalize My QTGames/File Manager%Calendar>Documents To GoAActiveSyncÅCall HistoryHCamera(ContactsVHelp and QuickStart8Keypad Lock[Media CenterWMessenger3Speed Dial$Ta s k sÄVoi c e  N o tes\Voice Recognition7Windows Live-Accessories?Debug Apps9System ToolsTo change your home screen appearance, shortcuts, and main menu appearance, see page 32.To select menu items, scroll to the icon and press the center select key (s). In the circular view, select More (&) to see more features.
use and care9Use and Careuse and careTo care for your Motorola phone, please keep it away from:liquids of any kind dust and dirtDon’t expose your phone to water, rain, extreme humidity, sweat, or other moisture.Don’t expose your phone to dust, dirt, sand, food, or other inappropriate materials.extreme heat or cold cleaning solutionsAvoid temperatures below -10°C/14°F or above 45°C/113°F.To clean your phone, use only a dry soft cloth. Don’t use alcohol or other cleaning solutions.microwaves the groundDon’t try to dry your phone in a microwave oven.Don’t drop your phone.
10essentialsessentialsabout this guidebatterybattery installation  symbolsThis means a feature is network or subscription dependent and may not be available in all areas. Contact your service provider for more information.This means a feature requires an optional accessory.CAUTION: Before using the phone for thefirst time, read the Important Safety and Legal Information included in the gray-edged pages at the back of this guide.032259o1234
11essentialsbattery chargingNew batteries are not fully charged. Plug the battery charger into your phone and an electrical outlet. It might take several seconds to start charging. When finished, your phone displays a full battery icon J.Tip: Relax, you can’t overcharge your battery. It will perform best after you fully charge and discharge it a few times.Unless your battery is completely drained, you can also charge your battery by using a USB cable plugged into a computer. Use a wall charger or car charger for completely drained batteries. Some USB ports charge faster than others.battery tipsBattery life depends on the network, signal strength, temperature, features, and accessories you use.•Always use Motorola Original batteries and chargers. The warranty does not cover damage caused by non-Motorola batteries and/or chargers.•New batteries or batteries stored for a long time may take more time to charge.
12essentials•When charging your battery, keep it near room temperature.When storing your battery, keep it uncharged in a cool, dark, dry place.•Never expose batteries to temperatures below -10°C (14°F) or above 45°C (113°F). Always take your phone with you when you leave your vehicle.•It is normal for batteries to gradually wear down and require longer charging times. If you notice a change in your battery life, it is probably time to buy a new battery.Contact your local recycling center for proper battery disposal.Warning: Never dispose of batteries in a fire because they may explode.Before using your phone, read the battery safety information in the “Safety and General Information” section included in this guide.conserve battery chargeUsing certain features can quickly deplete your battery’s charge. These features can include downloading music, using the camera, replaying video clips, and using Bluetooth® wireless connections.You can conserve your battery’s charge by doing the following:•Adjust the backlight to turn off more quickly (see page 37).•Turn off Bluetooth power when you are not using it (see page 65).032375o
13essentialsturn it on & offTo  t u rn  o n  y o u r  phone, press and release the Power/End key (O). If prompted, enter your four-digit unlock code (the last four digits of your phone number).Tip: If your phone does not turn on, take your battery out, put it back in, and try again.To turn off your phone, press and hold the Power/End key (O) for three seconds, then release it.make a callFrom the home screen, enter a phone number and press the Send key (N) to make a call.To voice dial, see page 90.answer a callWhen your phone rings and/or vibrates, press the Send key (N) to answer. To “hang up,” press the Power/End key (O).•If you are busy when a call comes in, press the right soft key (+) (Ignore) to send the call directly to voicemail.•To put a call on hold, press the Send key (N). To return to the call, either press the Send key (N) again or press the right soft key (+) (Unhold).
14essentials•If you are on a call and another call comes in, you can send the new call to voicemail by pressing the right soft key (+) (Ignore) or answer the new call and put the current call on hold by pressing the Send key (N). Press either the Send key (N) or the left soft key (-) (Swap) to switch between the two calls.store a phone numberYou can store a phone number in Contacts:  1Enter a phone number in the home screen and press the left soft key (-) (Save).2Select <New Contact> by pressing the center select key (s).3Enter a name and other details for the phone number and press the left soft key (-) (Save) to store the number. Tip: While entering the number, you can tell your phone to pause and then dial more digits (for example, for a voicemail password or PIN). Press press the right soft key (+) (Menu) and scroll to Insert Pause to insert a 2-second pause (shows as a p) or scroll to Insert Wait to tell your phone to prompt you before dialing the remaining digits (shows as aw).Tip: If you get a call from someone who isn't in your contacts, you can add them to your contacts from Call History by pressing the left soft key (-) (Save).call a stored number  1From the home screen, press the right soft key (+) (Contacts) to open Contacts.2Scroll to the number and press the center select key (s).
15essentials3Press the Send key (N) to call the entry.Tip: If you stored more than one number for a contact, select the contact to see the other numbers. To dial a number, scroll to it and press the Send key (N).see your phone numberTo view your phone number:  1From the home screen, press the left soft key (-) (Start).2Press down on the navigation key (S) to scroll Settings and press the center select key (s).3Select Phone and press the center select key (s).4Scroll to Call Options and press the center select key (s).5Scroll to Phone number to view your phone number.
16tips & trickstips & tricksFrom the home screen (page 17), you can use the following shortcuts:To... Do this...view recent callsPress the Send key (N).switch to regular home screen viewPress and hold the multimedia key (?). From the regular home screen view, you can appointments, profiles, etc.use shortcut iconsIcons for features appear across the top of the regular home screen. Use the navigation keys to select them or customize them (see page 34).lock phoneBe sure you know your password, then press the home key (X) and the space bar. access messagingAccess messaging features by pressing the messaging key ( ). When you are in a message, press and hold 0 for shortcuts.change flight mode Press and hold the home key (X) to open the quick list, select the Wireless Manager to turn off Bluetooth and phone networking for flight safety.To... Do this...
17basicsbasicsSee page 2 for a basic phone diagram.displayThe multimedia home screen appears when you turn on the phone. The thumb wheel is the quickest way to navigate this screen, but you can also use the navigation key (S). To select a control, highlight it and then press the center select key (s). 0841AM19APR07Start ContactsNo.9 (Scherzo) Ludwig van1xmultimedia home screen controlsxskip back to previous file—After the first two seconds of file, select the rewind icon (x).return to file beginning—Within the first two seconds of song, select the rewind icon (x).rewind—Highlight the rewind icon (x), then press and hold the center select key (s).ypause/play—Select the pause/play icon (y) once to play. Select it again to pause.
18basicszskip to the next file—Select the forward icon (z).fast forward—Highlight the forward icon (z), then press and hold the center select key (s).TBDshuffle—Select this icon to shuffle all the items that you are playing.repeat—Select this icon to repeat all the items that you are playing.library—Select either the video & music ( ) or pictures ( ) icon and then select this icon to view the libraries for either types of files. When you are finished, press the back key (D).multimedia home screen controlsfull screen mode—Select this icon to view your video or picture in full screen. Press any key to return to regular viewing mode.video & music files—Select this icon and scroll through video and music files by pressing left or right on the navigation key (S). To select a file, press the center select key (s).picture files—Select this icon and scroll through picture files by pressing left or right on the navigation key (S). To select a file, press the center select key (s).Note: After you select pictures, you can use the play/pause, rewind, and forward keys to view a slideshow of your pictures.multimedia home screen controls
19basicsPress and hold the multimedia key (see page 2 for key location) to toggle the home screen to the regular home screen view. You can customize this screen in a variety of ways (see page 32).Press the navigation key (S) up, down, left, or right to scroll to basic menu items or text in ecamera—Select this icon to open the camera in full screen mode. Press the center select key (s) to take a picture or press the left soft key (-) or right soft key (+) to view camera options (see page 85).V CAST Music—Select this icon to browse and purchase V CAST music. (You must be in EVDO coverage area. Additional service charges may apply.)Àvolume—Select this icon and then use the thumb wheel or navigation key (S) to adjust the level. When finished, press the center select key (s). Note: Press the space bar to quickly mute the volume.multimedia home screen controlsStartHome ServiceText Messages (0)No upcoming appointments.Profile: Normal12:00 PM12/31/07Contacts)
20basicsthe home screen. Press the home key (X) to return to the home screen.Status indicators can appear at the top of the home screen:wVoicemail Indicator – Shows when you have new voicemail.CMessage Indicator – Shows when you receive new e-mail or text messages.Left Soft Key Right Soft KeyNavigation & Center Select KeySend Key Home Key Undo/Back KeyPower/End KeyG/JRoam Indicator – Shows G when your phone is seeking or using a network outside your home network. :EVDO indicator shows when phone is in EVDO coverage area (necessary for V CAST services). 1X indicator shows when phone is in 1x-RTT coverage area. The number of bars show the strength of each signal.EBluetooth™ Indicator – Shows when Bluetooth power is on.ÓBluetooth Pairing Indicator – Shows when your phone is paired with another Bluetooth device.ÔBluetooth Handsfree Indicator – Shows when your phone is connected to a Bluetooth handsfree device.
21basicsÕStereo Bluetooth Headset Indicator – Shows when your phone is connected to a stereo Bluetooth headset.DCall Forward Indicator – Shows when call forwarding is on.HIActive Line Indicator – Indicates whether line H or I is active.Q<%Profile Indicator – Shows when your ring style is set to Silent (Q) or Vibrate (<). No indicator appears when the ring style profile is Normal, Outdoor, or Automatic.Note: A % appears when the speakerphone is on (see page 25). JBattery Level Indicator – Vertical bars show the battery charge level. Recharge the battery when your phone shows one or two bars. ÙCharging Indicator – Shows when the USB charger is connected to the phone and charging.0Signal Strength Indicator – Vertical bars show the strength of the network connection. You can’t make or receive calls when no vertical bars appear.ÒHeadset Indicator – Shows when you have a 2.5mm headset connected.
22basicstext entryYou can enter text and numbers using the keypad. When you select a field that requires text or numbers, the phone automatically selects the appropriate entry mode. The default mode is Abc (tap mode, first character of a sentence in uppercase).An indicator at the top right of the display shows the current entry mode.ÖMemory Card Indicator – Shows when you have a removeable memory card inserted.ÚTTY Indicator – Shows when TTY mode is on (see page 90).Flashing cursor shows where you are typing.Press the Alt key to switch entry modes. SendText MessagesTo:0/160MenuAbc
23basicsPress the Alt key (b) in a text entry screen to select an entry mode:text predictionAs you enter letters, your phone might try to predict the word. For instance, when you enter “prog,” it might predict “program.”To select a prediction, press down on the navigation key (S) to highlight your selection and then press the center select key (s). To enter a space after your characters instead of using the predicted text, press the space bar. entry modesiEnter the letter on a key (such asq).ÃPress the Alt key (b) once to enter the small symbol or number on the next key pressed (such as!), then return to the previous entry mode.ÄPress the Alt key (b) twice to enter the small symbols and numbers on the keys until you move to a new field.text entrydeletePress the back key (w).start a new linePress the enter key (j).enter capital lettersPress the shift key (k). Press it once for just the next letter or twice for all letters.enter symbols, etc.Press the Alt key (b) and then the shift key (k).text entry
24basicsTo turn off text prediction:  1From the home screen, press the left soft key (-) (Start).2Scroll to Settings and press the center select key (s).3Scroll to Text Input Settings and press the center select key (s).4Uncheck Suggest words when typing, and press the left soft key (-) (Done).Tip: While entering the number, you can tell your phone to pause and then dial more digits (for example, for a voicemail password or PIN). Press press the right soft key (+) (Menu) and scroll to Insert Pause to insert a 2-second pause (shows as a p) or scroll to Insert Wait to tell your phone to prompt you before dialing the remaining digits (shows as aw).volumeTo set the earpiece volume, press and hold the thumb wheel. Your phone uses this same volume setting for its speaker or a headset.•Want to change profiles? On the home screen, scroll to and select  Profile. Choose from Normal, Silent, and others.•Want to turn off a sound? Press press the left soft key (-) (Start). Scroll to Settings, thenSounds, and select None.Tip: You can eliminate the ringer volume instantly when an incoming call comes in—just use the thumb wheel to turn the ringer off.
25basicshandsfree speakerNote: The use of wireless phones while driving may cause distraction. Discontinue a call if you can’t concentrate on driving. Additionally, the use of wireless devices and their accessories may be prohibited or restricted in certain areas. Always obey the laws and regulations on the use of these products.To use your phone’s handsfree speaker, press the speaker key (A). For key location, see page 2.Note: The handsfree speaker won’t work when your phone is connected to a car kit or headset. With a Bluetooth headset press the right soft key (+) (Menu), scroll to Handsfree Off. Press the right soft key (+) (Menu) and scroll toSpeakerphone On.lock & unlock phoneYou can manually lock your phone to prevent accidental key presses.To lock your phone, press the home key (X) and then the space bar. Your left soft key becomes Unlock. To unlock your phone, press the left soft key () (Unlock) and then*. Then, enter your password and pressUnlock again. Your phone uses * if you have not set a password.To keep others from using your phone, change your password:  1From the home screen, press the left soft key (-) (Start).2Scroll to Security and press the center select key (s).3Scroll to Device Lock and press the center select key (s).
26basics4Select Prompt if device unused for, and select the time you want the phone to be inactive before automatically locking.5Choose either a simple (4-digit number) or strong password (a mixture of at least 7 uppercase and lowercase letters, numbers, and punctuation).6Enter and confirm your password.7Press the left soft key (-) (Done). To unlock the phone, press the left soft key (-) (Unlock). At the prompt, enter your password and press the left soft key (-)(Done).Caution: Make your password something you will remember! Without your password, you can reset your phone, but you will lose your personalized settings and all content stored in phone memory. To perform a hard reset, hold down the center select key (s) for 5 seconds while turning the phone on.Note: You can make emergency calls on a locked phone (see page 42). A locked phone still rings or vibrates for incoming calls or messages, but you do not need to unlock it to answer.storage cardNote: A storage card is not included with your phone. It is sold separately.You can use a removable miniSD storage card with your phone to store content music, pictures, videos, applications, and files.Caution: Do not remove your storage card while your phone is using or writing files on it.
27basicsTo insert a miniSD storage card:  1Open the card slot cover by putting your fingernail on the ridge of cover and gently pulling it away.2Insert the storage card into the slot with the metal contacts facing down. Press the card until it clicks into place.3Replace the storage card cover.Caution: Don’t bend or scratch your storage card. Keep it away from static electricity, water, and dirt.Note: Your phone supports miniSD cards up to 4 GB. To save storage space on your phone, move media files (pictures, videos, music) to a storage card as often as possible.flight modeIn flight mode, you turn off your phone’s network and Bluetooth services to safely access your address book, games, camera, and music in areas where cellular network access is prohibited (such as during flights, when allowed, and in hospitals).   1Press and hold the home key (X) until the Quick List appears.2Scroll to Wireless Manager and press the center select key (s).3Scroll to All and press the left soft key (-) (Done).
28basicsUse the same steps to turn Bluetooth and phone mode on After a pause, Bluetooth changes to On, and then Phone changes to On.file managerYou can use File Manager to sort, view, copy, and move files, such as text, pictures, music, and video files, on your phone or storage card. To find File Manager:   1From the home screen, press the left soft key (-) (Start).2Scroll to File Manager and press the center select key (s).task managerWant to see what programs are running on your phone? Use the Task Manager to see or stop a program. To find the Task Manager:   1From the home screen, press the left soft key (-) (Start).2Scroll to System Tools and press the center select key (s).3Scroll to Task Manager and press the center select key (s).Tip: Need to stop running program? In Task Manager, select the program and press the right soft key (+) (Menu), scroll to Kill and press the center select key (s).
29basicsNote: To completely remove a program from your phone, from the home screen, press the left soft key (-) (Start), then scroll to and select Settings, and then scroll toRemove Programs. Select the program and press the right soft key (+) (Menu) and then select Remove and press the center select key (s).
30customizecustomizeprofilesEach profile uses a different set of sounds, ring styles, earpiece volume settings, or vibrations for incoming calls and other events. For example, the Outdoor profile volume is much louder than the Normal profile.You can choose from these profiles:To choose a profile:  1From the home screen, press down on the navigation key (S) to scroll to Profile and press the center select key (s).2Select a profile and press the left soft key (-) (Done).Indicators can appear at the top of your home screen for the Silent (Q) and Vibrate (<) profiles. A % means the speakerphone is on (see page 25).Note: The Automatic profile is the same as Normal, except that it automatically switches to Vibrate during any event stored in your Calendar.Normal Vibrate AutomaticSilent Outdoor
31customizechange ring tones in profileYou can change the ring tones for incoming calls and other events. Your changes are saved in the current ring style profile.Note: Changes made to the alert settings have no effect when using the Silent profile.  1From the home screen, press the left soft key (-) (Start).2Scroll to Settings and press the center select key (s).3Scroll to Sounds and press the center select key (s).4Scroll to the sound you want to change, press left or right on the navigation key (S) to change it, and then press the left soft key (-) (Done).Note: Downloading a sound file for a ring tone does not automatically save it in the Sounds location. To move your sound file:  1From the home screen, press the left soft key (-) (Start).2Scroll to File Manager and press the center select key (s).3Scroll to My Documents and press the center select key (s). If the sound file is not located in the My Documents folder, go to the folder where the sound file is stored and copy it to the Sounds folder.4Highlight the sound file you want to copy to the Sounds location and press the right soft key (+) (Menu).5Scroll to File and press the center select key (s).
32customize6Scroll to Copy to and press the center select key (s).7Scroll to Application Data and press the center select key (s).8Select Sounds and press the left soft key (-) (Done). ITip: You can also change your sounds from the Sounds Settings screen. To find Sounds Settings, press the left soft key (-) (Start), selectPersonalizeMyQ, and selectSounds Settings.home screenSet a photo, picture, or animation as a wallpaper (background) image or change your layout and color scheme on your home screen.  1From the home screen, press the left soft key (-) (Start).2Scroll to Personalize My Q and press the center select key (s).3Scroll to Homescreen Settings and press the center select key (s).You can change the following settings: optionsHome screen layoutSelect a layout for the home screen from various predefined schemes that you can customize further.Color schemeSelect a color scheme for the display.Background imageSelect a picture for your wallpaper image, or None for no wallpaper.
33customize4When you are done, press the left soft key (-) (Done).change background image Want to copy an image from your computer to your phone to use as a background image? Note: The image file format must be GIF, JPG, or BMP.   1Copy the image file you want from your computer to your phone: •To use Bluetooth®, see page 65.•To use Microsoft ActiveSync® or Windows® Mobile Device Center, see page 50.2On your phone, press the left soft key (-) (Start).3Scroll to Pictures & Videos and press the center select key (s).4Highlight the picture you want and press the center select key (s).5With the picture open, press the right soft key (+) (Menu), scroll toUse as Home Screen, and press the center select key (s). For some pictures you can crop the area and adjust the transparency. 6Press the right soft key (+) (Finish) to set the picture as the home screen background image.Time outSelect the time interval before the display will go inactive orNever.options
34customizeNote: Downloading a picture file on your phone does not automatically save it in the My Pictures folder. To move your image file:  1From the home screen, press the left soft key (-) (Start).2Scroll to File Manager and press the center select key (s).3Scroll to My Documents and press the center select key (s). If the file is not in My Documents, go to the folder where the sound file is stored and copy it to the My Pictures folder.4Highlight the file you want to copy and press the right soft key (+) (Menu).5Scroll to File and press the center select key (s).6Scroll to Copy to and press the center select key (s).7Scroll to Application Data and press the center select key (s).8Select My Pictures and press the left soft key (-) (Done). Ihome screen shortcutsYou can use the shortcut icons across the top of the home screen or, depending on the layout, customize them:  1From the home screen, press the left soft key (-) (Start).2Scroll to Personalize My Q and press the center select key (s).3Scroll to Home Screen Shortcuts and press the center select key (s).4Scroll to Define Shortcuts and press the center select key (s).
35customize5Use the navigation key (S) to select shortcuts, and then press the left soft key (-) (Done).You can also customize the right soft key as a shortcut to your favorite feature. For soft key location, see page 2.  1From the home screen, press the left soft key (-) (Start).2Scroll to PersonalizeMyQ and press the center select key (s).3Scroll to Home Screen Right Soft Key and press the center select key (s).4Press the right soft key (+) (Menu) to select a feature and enter a label for your new right soft key function and then press the left soft key (-) (Done).Note: This option might be restricted or unavailable if your home screen shows scrolling headlines from your service provider.start menuYou can customize your start menu.  1From the home screen, press the left soft key (-) (Start).2Scroll to PersonalizeMyQ and press the center select key (s).3Scroll to Start Menu View and press the center select key (s) to choose from these options:optionsMenuSelect the menu you want to customize, then select which icons to appear when you open the start menu.ViewSelect list, grid, small circular, or large circular view.
36customize4When you are done, press the left soft key (-) (Done).time & dateYour service provider usually sets the time and date on your phone. However, if you change time zones while your phone is roaming, you might need to change your clock manually. To change it manually:  1From the home screen, press the left soft key (-) (Start).2Scroll to Settings and press the center select key (s).3Scroll to Clock & Alarm and press the center select key (s).4Select Date and Time and press the center select key (s).5Use the navigation key (S) to scroll to Time Zone, Date, and Time to edit them.Tip: Update your time zone when you travel to make sure your phone’s calendar events appear at the right time.6Press the left soft key (-) (Done) to save the clock and date settings.You can specify the date and time style by changing the regional settings. To find Regional Settings, selectRegional Settings from the Settings screen.BackgroundSelect a picture for your start menu background image.options
37customizebacklightTo save battery life, your backlight turns off when you’re not using your phone. The backlight turns back on when you press a key. To set how long your phone waits before the backlight turns off:  1From the home screen, press the left soft key (-) (Start).2Scroll to Settings and press the center select key (s).3Scroll to Power Management and press the center select key (s).4Edit the backlight setting fields and press the left soft key (-) (Done) to save the settings.answer optionsTo us e  any key to answer an incoming call:  1From the home screen, press the left soft key (-) (Start).2Scroll to Settings and press the center select key (s).3Select Phone and press the center select key (s).4Scroll to Call Options and press the center select key (s).5Check Any key answer and press the left soft key (-) (Done).
38customizethird-party applicationsThird-party applications, or add-on programs, can include e-mail, security, mobile office, and productivity software. These products can typically be downloaded and installed immediately. Compatible commercial and free applications are available on the Internet. For more information, see the downloads catalog on the Motorola Support Web site at: www.motorola.com/consumer/support, or see your service provider’s Web site.Note: Applications written for previously released devices or older versions of Windows Mobile® may not function reliably on this phone. Contact the application provider to check compatibility before installing the application on this phone.
39callscallsTo make and answer calls, see page 13.turn off a call alertYou can scroll the thumb wheel down (or press it) to turn off the ringer.recent callsYour phone keeps a list of incoming and outgoing calls, even for calls that didn’t connect. The most recent calls are listed first. The oldest calls are deleted as new calls are added.To see recent calls:  1From the home screen, press the left soft key (-) (Start).2Scroll to Call History and press the center select key (s).You can select a call and then:•To call the number, press the Send key (N).•To see call details (like time and date), press the center select key (s).
40calls•To see options, press the right soft key (+) (Menu):redial  1Press the Send key (N) from the home screen to see the dialed calls list.2Highlight the entry you want to call, then press the Send key (N).If you hear a busy signal and you see Call Failed, Number Busy, press the Send key (N) or the RETRYkey to redial the number. optionsFind ContactFind this phone number in your Contacts.Send Text MessageSend a text message to this phone number.E-mailSend an e-mail message to this contact (if you already have the contact’s e--mail address).View TimersView the call times for this call and all calls.Delete/ Delete ListDelete a call from the Call History. Select Delete List to delete all calls from the call history.Save to ContactsSave this number to a contact.FilterFilter all calls in the Call History list. Filtering calls allows you to group calls in a specific matter. For example, if you filter the list for all Missed Calls, all the incoming phone calls that you did not answer will be listed first.options
41callsWhen the call goes through, your phone rings or vibrates one time, shows Redial Successful, and connects the call.view missed callsYour phone keeps a record of your unanswered calls. To view your missed calls:  1From the home screen, press the left soft key (-) (Start).2Scroll to Call History and press the center select key (s).3Press the right soft key (+) (Menu).4Scroll to Filter and press the center select key (s).5Scroll to Missed Calls and press the center select key (s).caller IDCalling line identification (caller ID) shows the phone number for an incoming call on your home screen.Your phone shows the caller’s name and picture if you have stored a picture in your contacts, or Incoming Call when caller ID information isn’t available.You can set your phone to play a distinctive ringer ID for specific entries in your contacts (see page 91).
42callsemergency callsYour service provider programs one or more emergency phone numbers, such as 911 or 112, that you can call under any circumstances, even when your phone and keypad are locked.Note: Emergency numbers vary by country. Your phone’s preprogrammed emergency number(s) may not work in all locations, and sometimes an emergency call cannot be placed due to network, environmental, or interference issues.  1Press the keypad keys to dial the emergency number.2Press the Send key (N) to call the emergency number.international callsIf your phone service includes international dialing, press and hold 0 to insert your local international access code (indicated by +). Then, press the keypad keys to dial the country code and phone number.speed dialYou can use speed dialing in two ways: quick access for up to 98 phone numbers and shortcuts to features found in the Start menu including e-mail, calendar, and Bluetooth® Manager.
43callsTo access speed dial entries, press and hold the single-digit speed dial number for one second. If the speed dial is two digits, press the first digit, then press and hold the second digit. The phone dials the phone number, opens a new e-mail message, or goes to the Web page. phone numbersYou can set the speed dial to call the entries in your phone’s contact list:  1From the home screen, press the right soft key (+) (Contacts).2Scroll to the desired contact and press the center select key (s).3Select the phone number or e-mail address you want to add to speed dial.4Press the right soft key (+) (Menu). 5Scroll to Add to Speed Dial. and press the center select key (s).6In the Keypad Assignment, select the speed dial number to use and press the left soft key (-) (Done).Note: Speed dial 1 is reserved for calling your voicemail.To delete a speed dial entry, press the left soft key (-) (Start) and selectSpeed dial. Scroll to the entry, press  the right soft key (+) (Menu), and selectDelete.menu shortcutsYou can set a shortcut speed dial to open an application on your phone:  1Press the left soft key (-) (Start).2Scroll to the icon of the application you want a shortcut for and press right soft key (+) (Menu).
44calls3Scroll to Add to Speed Dial and press the center select key (s).4In the Keypad Assignment, select the speed dial number to use and press the left soft key (-) (Done).Note: Speed dial 1 is reserved for calling your voicemail.To delete a shortcut, press the left soft key (-) (Start) and selectSpeed dial. Scroll to the entry, press  the right soft key (+) (Menu), and selectDelete. Your service provider might add a Voicemail shortcut you cannot delete.voicemailNote: Your service provider may include additional information about using this feature.Your network stores the voicemail messages you receive.When you receive a voicemail message, your phone shows the voicemail message indicator w and New Voicemail. To check voicemail messages, press and hold 1.Note: You can’t store a pause (p) or wait (w) character in your voicemail number. If you want to store a voicemail number with these characters, create a contact for your voicemail number (see page 14) and use the contact to call your voicemail.
45callsthree-way callingWhile connected to a call:  1Place your current call on hold by pressing the Send key (N).2Enter the number of the other person you want to connect to a three-way call and press the Send key (N).3After you are connected to the other phone, you can press the left soft key (-) (Swap) to switch between the calls, or the right soft key (+) (Menu) and selectConference to combine them.If you receive a second call while you are already on a call:•To answer the second call and put the first call on hold, press the left soft key (-) (Answer). Then, you can press the left soft key (-) (Swap) to switch between the calls, or the right soft key (+) (Menu) and selectConference to combine them.•To send the second call to your voicemail, press the right soft key (+) (Ignore).
46messagesmessagesIf you have problems setting up e-mail or synchronizing, visit www.motorola.com/support/q9m or call the Motorola Customer Support Center at 1-800-657-7576 (United States and Canada) or 1-888-390-6456 (TTY/TDD United States for hearing impaired).Note: Proxy must be set up before you set up your e-mail. If you have the information to set it up, find the connections screen by pressing the left soft key (-) (Start). SelectSettings, thenConnections. Otherwise contact your service provider.set up personal e-mail (such as Yahoo or Gmail)Note: These steps vary depending on your e-mail provider. For example, for Gmail, you need to enable POP. If your e-mail provider does not provide IMAP or POP access, you can still use the Web browser to access e-mail.After you know your e-mail address:  1Press the left soft key (-) (Start).2Scroll to Messaging and press the center select key (s).
47messages3Scroll to New E-Mail Account and press the center select key (s).4Enter your e-mail address, select Try to get e-mail server settings from internet, and press the right soft key (+) (Next). 5Enter your e-mail user name and password.Note: If your phone finds your account settings, it automatically fills in the following screens. Enter your name, password and press the right soft key (+) (Next) for each screen. If your phone cannot find your settings, ask your e-mail provider for your settings.6Press right soft key (+) (Finish) to download e-mail now.set up MSN or Hotmail e-mailAfter you know your e-mail address and password:  1Press the left soft key (-) (Start).2Scroll to Windows Live and press the center select key (s).3Scroll to Sign in to Windows Live and press the center select key (s).4When prompted, enter your e-mail address and password and press the right soft key (+) (Next). 5Choose the options you want and press the right soft key (+) (Next). 6When synchronization is complete, press the right soft key (+) (Done).
48messagesset up corporate e-mailNote: If you don’t have some of the information requested in these steps, contact your company’s system administrator.To set up corporate e-mail:  1Press the left soft key (-) (Start).2Scroll to ActiveSync and press the center select key (s).3Press the right soft key (+) (Menu), selectAdd Server Source, and press the center select key (s).4In Server Address, enter the exchange server address and press the right soft key (+) (Next). Note: You might be required to check This server requires an encrypted (SSL) connection.5In User Name, enter your user name for the e-mail account6In Password, enter the password for the account.7In Domain, enter the server's domain name (if necessary).Tip: If you don’t want to enter your password each time you synchronize, check Save Password.8Press the right soft key (+) (Next). 9Choose the data you want to synchronize, such as Contacts, Calendar, Email, andTasks.10Press the left soft key (-) (Finish).11Press the left soft key (-) (Sync) to synchronize your phone with the Exchange server and then go to the next steps in “sync over the air” on page 49.
49messagesAfter you configure your synchronization settings, you can modify your settings, synchronization schedule, and connections. To find the settings, press the left soft key (-) (Start), selectActiveSync, and then press the right soft key (+) (Menu).synchronizeSynchronize your phone to make sure you have all of your most recent messages. You can synchronize either over the air (OTA) or by using a cable and your computer.sync over the airTo sync your phone OTA, you must sync it directly with your company’s e-mail server (such as Microsoft® Information Server or Microsoft® Exchange Server). For details, see the support information on page 106 and the MOTO Q 9m support Web site at: www.motorola.com/support/q9mYou can also contact your system administrator to set up this synchronization.Note:  If you are out of network coverage, and your phone tries to sync 3 times without finding a network, your synchronization settings automatically revert to manual synchronization. To set your synchronization schedule back to the desired frequency, you need to reset the Schedule option in the ActiveSync settings on your phone. To find these settings, press the left soft key (-) (Start), selectActiveSync, and then press the right soft key (+) (Menu). Then select Schedule.
50messagessync with a computerNote: For information about connections (Bluetooth® wireless and the Web browser), see page 65. You can use Microsoft®ActiveSync version 4.5 or above, or Windows®Mobile Device Center to synchronize information between your phone and desktop computer. ActiveSync compares your phone’s contact information, calendar appointments, e-mail messages, and media files with those on your computer and then updates to the most recent information.To install & set up ActiveSync or Windows Mobile Device CenterTo synchronize information on your phone with a computer, you must install Microsoft ActiveSync (on a computer running Windows® XP™ or earlier) or Windows Mobile Device Center (on a computer running Windows Vista™).Note: Synchronization software is included on the GettingStartedCD packed with your phone. Before installing the software, verify that your computer and operating system meet the minimum requirements stated on the CD-ROM sleeve or Microsoft Windows® Mobile Web site http://www.microsoft.com/windowsmobile. This Web site also lets you download the latest software.  1Install Microsoft ActiveSync (for Windows® XP™ or earlier) or Windows Mobile Device Center (for Windows Vista) on your computer.2After setup completes, connect your phone to the computer. The phone drivers install on your computer and then the Setup Wizard automatically starts.
51messages3Follow the instructions on the screen to complete the wizard. The wizard prompts you for the Exchange Server’s name, your user name, your password, and the domain name. If you don’t have this information, contact the server’s system administrator. For general questions about your phone, see page 106.When you finish the wizard, synchronization with your phone automatically starts.Note: After synchronization completes, you can disconnect your phone from your computer, and you may need to restart your computer.To synchronize with a cable connectionIf you cannot sync your phone over the air, you can use a USB cable connection. First, install Microsoft ActiveSync or Windows Mobile Device Center on your computer.   1Turn on the phone.2Connect your phone to your computer using a USB cable. Note: For more detailed information, see “Connecting a mobile device to a PC” in ActiveSync Help on your computer, the Microsoft Web Site for ActiveSync or the MOTO Q 9m Support Web site at www.motorola.com/support/q9m.
52messagesTo synchronize with a Bluetooth® connectionAfter you install Microsoft® ActiveSync or Windows Mobile Device Center on your computer, you can connect it to your phone and sync with a Bluetooth connection.Note: To use this feature, your computer must be equipped with Bluetooth wireless or a Bluetooth PC adaptor accessory.  1Follow the instructions in ActiveSync Help for configuring Bluetooth connections on your computer to support ActiveSync.2Turn on the phone and verify that Bluetooth wireless is turned on (see page 65).3Press the left soft key (-) (Start), scroll toActiveSync, and press the center select key (s).4Select the right soft key (+) (Menu), scroll to Connect via Bluetooth, and press the center select key (s).Ensure that the phone and computer are near each other. If this is the first time you have connected to this computer using Bluetooth wireless, you must complete the Bluetooth wizard on the phone and set up a Bluetooth partnership with the computer before synchronizing.5Select the left soft key (-) (Sync).6When finished, select the right soft key (+) (Menu), scroll toDisconnect Bluetooth, and press the center select key (s).Note: To conserve battery power on your phone, turn off Bluetooth power (see page 65).
53messagesreceive & read messagesWhen you receive a message your phone plays an alert and shows New Message with a message indicator, such as C.  1Press the left soft key (-) (Start).2Scroll to Messaging and press the center select key (s).3Scroll to the e-mail account name and press the center select key (s).If you do not see a list of messages, press the right soft key (+) (Menu), scroll to Folders, and selectInbox. To return to the folder list, press the right soft key (+) (Menu), and selectFolders.To read a message: Press the navigation key (S) to scroll to the message and press the select keys to open it.When you have a message open, you can press the navigation key (S) right to open the next message, or left to open the previous message.Tip: Want to switch inboxes quickly? Press left or right on the navigation key (S) to jump from one inbox to another.message attachmentsYou can send, read, and receive PDF, ZIP, Microsoft® Word, Excel, and PowerPoint files attached to e-mail. You can edit all Microsoft files on your phone, but you can only view other files such as PDF and ZIP.To see a ZIP file’s contents, select the file. You can select files in the contents to view them, if they are a format your phone supports.
54messagesTo  transfer attachments to your computer for editing, use Microsoft® ActiveSync or Windows® Mobile Device Center.message optionsUse these steps from the Inbox with a message selected or when viewing a message: send a messageYou can send SMS (text messages), MMS (multimedia messages), e-mail messages, or instant messages (IM, see page ).To open messaging:  1Press the left soft key (-) (Start).message optionsDeletePress the left soft key (-) (Delete). When viewing a message, press the right soft key (+) (Menu), scroll to Delete, and press the center select key (s).ReplyPress the left soft key (-) (Reply). Enter your message and press the left soft key (-) (Send).ForwardPress the right soft key (+) (Menu). Scroll to Forward and press the center select key (s). Enter your message and press the left soft key (-) (Send).Create contact cardPress the right soft key (+) (Menu). Scroll to Save to Contacts and press the center select key (s).message options
55messages2Scroll to Messaging and press the center select key (s).3Scroll to Text Messages, MMS, or (e-mail account) and press the center select key (s).To send a message:  1Open text messaging, MMS, or your e-mail account, and press the right soft key (+) (Menu).2Scroll to New and press the center select key (s).3For e-mail, in To, Cc, and/or Bcc, enter e-mail addresses. Insert a semicolon (;) between multiple numbers or addresses.For text messages, enter the contact telephone number or e-mail address.Tip: You can quickly enter phone numbers or e-mail addresses from your contact cards. In To, press the Enter key (j) and select a recipient from the list. Then select the recipient's phone number or e-mail address. 4Use the keypad to compose a message.5Press the left soft key (-) (Send).Tip: You can insert a picture, voice note or file in an e-mail or MMS message. When you are in a message, press the right soft key (+) (Menu), scroll toInsert , selectPicture, Voice Note, or File.To set the priority for an e-mail message, press the right soft key (+) (Menu) and scroll to Message Options. Use the navigation key (S) to set the priority, and then press the left soft key (-) (Done).To cancel a message, press the right soft key (+) (Menu) and scroll toCancel Message.
56messagesglobal address lookupFrom your phone, you can search the global address list (GAL) stored on your company's Exchange Server. This means that you can find a contact’s phone number or e-mail without having to store the information directly to your phone.Note: GAL information can only be viewed during a data transfer session; the entire GAL cannot be stored for viewing offline.To search for a contact:  1Press the right soft key (+) (Contacts).2Press the right soft key (+) (Menu). 3Scroll to Company Directory and press the center select key (s).4Enter a name and press Search. 5Scroll through the list of entries that appears. When you locate your contact, press the Send key (N) to make a call. Note: Although the entire GAL cannot be stored on your phone, after you find the contact, you can add the single contact to your contact list.Tip: To send a message, SMS, or e-mail to a contact found using GAL, open the company directory, scroll to the contact name, and press the center select key (s). The e-mail information is populated into the To: field.
57messagesmessaging shortcutsYou can use these shortcuts when you have an inbox or a message open:messaging quick referenceNote: Some features might not work if you set up your e-mail account manually (without the e-mail setup wizard).send a text message  1Press the left soft key (-) (Start).2Scroll to Messaging and press the center select key (s).3Scroll to Text Messages and press the center select key (s).4Press the right soft key (+) (Menu), scroll to New, and press the center select key (s).5Enter a recipient and enter your message.key function0 (H)list shortcuts1 (A)reply all2 (R)reply3 (K) mark read or unread5 (M)move6 (O)forward7 (D) delete8 (L) download message9 (S) send/receive
58messages6When you are finished, press the left soft key (-) (Send).get text message delivery reportWhile composing a text message:  1Press the right soft key (+) (Menu).2Scroll to Message Options and press the center select key (s).3Check Request message delivery notification and press the left soft key (-) (Done).create & send e-mail  1Press the left soft key (-) (Start).2Scroll to Messaging and press the center select key (s).3Scroll to your e-mail account and press the center select key (s).4Press the right soft key (+) (Menu), scroll to New and press the center select key (s).Note: You must have your e-mail set up to send an e-mail (see page 46).To add a picture, voice note, or file to an e-mail message, open the message area and press the right soft key (+) (Menu), scroll to Insert, and then select toPicture,Voice Note,orFile to choose a file.Tip: You can save a draft of a message that you are composing to finish and send later. Press the right soft key (+) (Menu) and selectSave to Drafts. A draft of the message is stored in the Drafts folder of the account you are in.
59messagescreate and add an e-mail signature  1Press the left soft key (-) (Start).2Scroll to Messaging and press the center select key (s).3Scroll to your e-mail account and press the center select key (s).4Press the right soft key (+) (Menu), scroll to Tools and press the center select key (s).5Scroll to Options and press the center select key (s).6Scroll to Signatures and press the center select key (s).7Scroll to the account for which you are creating the signature and check Use signature with this account.8Scroll the Signature box, enter your signature, and press the left soft key (-) (Done).Tip: To insert a signature in every message you send, select Include when replying and forwarding. Otherwise, a signature is inserted only in new messages. read new messages To quickly view new messages, scroll to the message notification area on the home screen and press the center select key (s).view attachment While viewing a message, use the center select key (s) to select the attachment. Note: You can view attachments only for file types that are supported by the phone.
60messagesread old messages   1Press the left soft key (-) (Start).2Scroll to Messaging and press the center select key (s).3Scroll to your e-mail account and press the center select key (s).Icons next to each message show if it is read, unread, urgent, or has an attachment (read or unread).4Scroll to a message and press the center select key (s) to open it.reply, reply all, or forward messages   1From your inbox or an open message, press the right soft key (+) (Menu).2Scroll to Reply, Reply All, or Forward and press the center select key (s).3Compose your message and the left soft key (-) (Send). Tip: If you are replying to an e-mail message, you will send less data if you do not edit the original message. This may reduce data transfer costs based on your rate plan.download message objects If an e-mail message includes an attachment, the name of the attachment is highlighted when you open the message. To download the attachment, press the center select key (s) to select the highlighted attachment name. The attachment is downloaded the next time you synchronize or connect to your e-mail server.Note: If there are multiple attachments in the message, all attachments are downloaded.
61messagesinsert a media object in an e-mail To add a picture, voice note, or file in an e-mail message:  1 In the composing message area of the message, press the right soft key (+) (Menu).2Scroll to Insert and press the center select key (s).3Scroll to Picture, Voice Note, orFile and press the center select key (s).4Scroll to Picture orFile and press the center select key (s), or follow the on-screen prompts to record a voice note.download complete e-mail messages  1Press the left soft key (-) (Start).2Scroll to Messaging and press the center select key (s).3Scroll to your e-mail account and press the center select key (s).4Scroll to the message and press the right soft key (+) (Menu).5Scroll to Download Message and press the center select key (s).The complete message is retrieved the next time you synchronize or connect to your e-mail server and send and receive e-mail.mark a folder for synchronizationWhen you synchronize your e-mail account with your computer, the same Inbox folders that are in Outlook on your computer are created on your phone.  1Press the left soft key (-) (Start).
62messages2Scroll to Messaging and press the center select key (s).3Scroll to your e-mail account and press the center select key (s).4Press the right soft key (+) (Menu), scroll to Folders and press the center select key (s).5Press the right soft key (+) (Menu), scroll to Show all Folders and press the center select key (s).6Press the right soft key (+) (Menu), scroll to Manage Folders and press the center select key (s).7Highlight each folder you want to synchronize and press the right soft key (+) (Sync).Note: Be sure to mark your e-mail sent folder for synchronization, or you won’t be able to view sent message status.view status of sent e-mail  1Press the left soft key (-) (Start).2Scroll to Messaging and press the center select key (s).3Scroll to your e-mail account and press the center select key (s).4Press the right soft key (+) (Menu), scroll to Folders and press the center select key (s).5Scroll to Outbox and press the center select key (s).Messages in the outbox have not been sent. To send a message, scroll to it and press the right soft key (+) (Menu) and selectSend/Receive.
63messagesreceive e-mailIf your phone is set up to automatically check for new messages, your phone will show e when a new message arrives.Scroll to the message and press the center select key (s) to read it.delete e-mailFrom the Inbox, press the left soft key (-) (Delete).From an open message, press the right soft key (+) (Menu), scroll to  Delete, and press the center select key (s).manually send and receive e-mail  1Press the left soft key (-) (Start).2Scroll to Messaging and press the center select key (s).3Scroll to your e-mail account and press the center select key (s).4Press the right soft key (+) (Menu), scroll to Send/Receive and press the center select key (s).call a phone number in e-mailHighlight a phone number in a message and press the Send key (N).move e-mail to personal folder  1After you’ve read the message, press the right soft key (+) (Menu).2Scroll Move and press the center select key (s).
64messages3Scroll to the folder you want to move the message to and press the center select key (s).delete a mail account  1Press the left soft key (-) (Start).2Scroll to Messaging and press the center select key (s).3Scroll to your e-mail account and press the right soft key (+) (Menu).4Scroll to Delete and press the center select key (s).empty deleted items folder  1Press the left soft key (-) (Start).2Scroll to Messaging and press the center select key (s).3Scroll to your e-mail account and press the center select key (s).4Press the right soft key (+) (Menu), scroll to Folders, and press the center select key (s).5Scroll to Deleted Items and press the center select key (s).6Press the right soft key (+) (Menu), scroll to Tools and press the center select key (s).7Scroll to Empty Deleted Items and press the center select key (s).
65connectionsconnectionsBluetooth® wirelessYour phone supports Bluetooth wireless pairing (also called linking or bonding). You can pair your phone with a Bluetooth headset or car kit, or pair your phone with a computer to exchange and synchronize files.Note: Your phone's Bluetooth features and Bluetooth Class 1 power levels are not allowed for outdoor operation in France. To avoid unlawful interference with radio signals, do not use the Bluetooth features in France unless you are indoors.turn Bluetooth power on or offIf BluetoothPower is On, your phone can automatically pair with the handsfree device you have used before. Just turn on the device or move it near the phone.To turn Bluetooth on:   1Press the left soft key (-) (Start).2Scroll to Bluetooth and press the center select key (s).3Scroll to Bluetooth Manager and press the center select key (s).4Scroll to Settings and press the center select key (s).
66connections5Toggle Status to Bluetooth ON and press the left soft key (-) (Done).The Bluetooth indicator O appears in the home screen.Note: To extend battery life, set BluetoothPower to OFF when not in use. Your phone will not pair with devices until you set BluetoothPower back to ON and pair your phone with the devices again.pair with a headset or handsfree deviceBefore you try to pair your phone with a device, make sure your phone’s Bluetooth power is on and the device is on and ready in pairing or bonding mode (see the device user’s guide). You can pair your phone with multiple devices, but only use it with one headset device at a time. Your phone lists the devices it finds within range.  1Press the left soft key (-) (Start).2Scroll to Bluetooth and press the center select key (s).3Scroll to Bluetooth Manager and press the center select key (s).4Select Hands-free and press the center select key (s).5Put the device (handsfree headset, stereo headset, keyboard, etc.) in pairing mode.6Press the left soft key (-) (Add). The phone prompts you to verify your device is ready. 7Press the left soft key (-) (Search). 8Select the device from the list.
67connections9If prompted, enter the device passkey (such as 0000) and press the left soft key (-) (Accept). When the devices are paired, an icon appears on the home screen.Tip: For specific information about the Bluetooth device you are using with your phone, refer to the instructions that came with it.send objects to another deviceYou can use Bluetooth pairing to send e-mail, contacts, tasks, calendar items, audio, ring tones, pictures, video, and voice notes from your phone to a computer or other device.  1Press the left soft key (-) (Start).2Scroll to Bluetooth and press the center select key (s).3Scroll to BT Send Object and press the center select key (s).4Press left or right on the navigation key (S) to select the object type and then scroll down to select the object you want to send.5To select an item, press the center select key (s).6Press the left soft key (-) (Send).7Select the name of the device to send the file and press the center select key (s).Tip: To cancel sending an item, press the right soft key (+) (Menu) and scroll to Cancel.
68connectionsuse your phone as a computer remoteYou can use Bluetooth wireless and your phone as a remote control for your computer. For example, want to watch a video on your computer and use your phone as a remote control? Use PC Remote to control when the video plays, stops, or pauses.   1 On your computer, turn Bluetooth power on.2 On your phone, press the left soft key (-) (Start).3Scroll to Bluetooth and press the center select key (s).4Scroll to BT PC Remote and press the center select key (s). If necessary, press Yes to turn on Bluetooth power.5Press the left soft key (-) (Add).6 On your computer, right-click the Bluetooth indicator O in the system tray in the lower right corner of your display and select Bluetooth Setup Wizard.Note: Your computer might be a little different.7In the wizard, indicate that you know the service you want to use, and you want to find a Bluetooth device that provides the service. Click Next.8In the next window, choose Human Interface Device and click Next.9In the next window, make sure that “Show all devices” selected. Your computer should find your “SmartPhone.” Select your phone, and click Next.10If prompted, enter the device passkey (such as 0000) and click Accept.
69connectionsWhen PC Remote is connected, your phone display shows a key map that tells you what your keys control on the computer. To determine which program on your computer to control, on your phone, press the right soft key (+) (Menu) and select a program.advanced Bluetooth featuresmake phone visible to other devicesAllow a Bluetooth device to discover your phone:  1Press the left soft key (-) (Start).2Scroll to Bluetooth and press the center select key (s).3Scroll to Bluetooth Manager and press the center select key (s).4Select Settings and press the center select key (s).5Check Allow other Bluetooth devices to see this phone and press the left soft key (-) (Done).connect to recognized device  1Press the left soft key (-) (Start).2Scroll to Bluetooth and press the center select key (s).3Scroll to Bluetooth Manager and press the center select key (s).4Select Hands-free and press the center select key (s).5Select the device name and press the center select key (s).drop pairing with device  1Press the left soft key (-) (Start).2Scroll to Bluetooth and press the center select key (s).
70connections3Scroll to Bluetooth Manager and press the center select key (s).4Select Hands-free and press the center select key (s).5Select the device name and press the left soft key (-) (Disconnect).edit device properties / change device nameEdit the properties of a recognized device:  1Press the left soft key (-) (Start).2Scroll to Bluetooth and press the center select key (s).3Scroll to Bluetooth Manager and press the center select key (s).4Select Hands-free and press the center select key (s).5Select the device name and press the right soft key (+) (Menu).6Scroll to Properties and press the center select key (s).7Scroll to Nickname and press the center select key (s).Tip: To change the Bluetooth name of your phone, from the Bluetooth Manager screen, scroll to and select Settings, enter the name in My Bluetooth name, and press the right soft key (+) (Done).modem-linkYou can use your phone as a modem to dial in to a network. You can do this using Bluetooth or using a USB cable. When your phone is a modem, e-mail, web browsing, ActiveSync, and text messaging services are suspended until the modem-link is deactivated.Note: You must have Multiple Network Access Identifier (MNAI) software on your
71connectionsphone and MNAI service enabled in your account for dial up networking functionality to work on your phone. Call your phone service provider for more information regarding account services.using BluetoothTo use Bluetooth to link to a network:Note: You must have a computer that has Bluetooth capabilities for modem-link.  1On your phone, make sure Bluetooth is turned on.2On your computer, launch the Bluetooth devices applet from the task bar.Note: Not all computers have the same procedure to locate the Bluetooth window and set up dial-up networking. 3On your computer, in the Bluetooth window menu bar, select the “Connections” menu, “Dial-up Networking” and then “Find devices.”4The computer finds your phone and displays the dial up networking window. using a cableTo use a USB cable with your phone to connect with modem-link to a network, first install networking drivers onto your computer:  1Place the provided Companion CD into the CD Drive on your computer. The Companion CD Installation wizard window automatically displays.2On your computer, click “Applications” and then “Dial-Up Networking Software.”3Follow the prompts as directed to install the drivers onto your computer.Next, enable modem-link on your phone and install phone drivers:
72connections  1On your phone, press the left soft key (Start), scroll to ACTIUI and press the right soft key (+) (Activate).2Using the USB data cable, connect the phone to your PC. 3When a window displays prompting for the device driver, select “Install the software automatically” and press “Next.”The driver is installed on your computer and ready for setting up a network connection.Note: If you do not have the Companion CD, or want the latest version of the device and computer drivers, go to http://www.motorola.com/support/Q and the User Support Dial-up Networking section.To establish a new network connection, on your computer:Note: Not all computers have the same procedure to setup of dial-up networking. Please refer to your computer operating help system for more information.  1Click “Start” and then “Control Panel.”2Double-click “Network Connections” and then “New Network Connection Wizard.”3Follow the prompts to connect to the Internet using a modem: •Network Connection Type: Connect to the Internet •Getting Ready: Set up My Connection •Internet Connection: Manually connect using a dial-up modem •Select a Device: Smartphone wireless USB Modem •Connection Name: Type a connection name.•Number to Dial: #777
73connections•Connection Availability: Anyone's Use •User Name: your mobile phone number@vzw3g.com (for example: 1235551212@vzw3g.com)•Password: vzw Note: Be aware of these items:•If you do not plan to use your phone as the default Internet connection, then do not check Make this the default Internet connection.•If Microsoft Windows firewall is not enabled, do not check Turn on Internet connection firewall for this connection.•You can use dial-up networking with Windows 2000, but you must have VZ Access Manager.Web browserTo browse the Web with Internet Explorer® Mobile:  1Press the left soft key (-) (Start).2To se l ec t  Web, press the center select key (s).Note: Not all Web file formats are supported.Favoritesfile://\windows\default.htmHistoryMenuhInternet Explorer MobileMicrosoft®Favoritesä>> >>>
74connectionsgo to Web page  1With the browser open, press the right soft key (+) (Menu).2Scroll to Address Bar and press the center select key (s).3Enter the Web address (URL) and press the left soft key (-) (Go).go to link on Web pageWhile viewing a Web page, highlight a link and press the center select key (s).change Web connection  1With the browser open, press the right soft key (+) (Menu).2Scroll to Tools and press the center select key (s).3Scroll to Options and press the center select key (s).4Scroll to Connections and press the center select key (s). 5Adjust the settings and press the left soft key (-) (Done).show/hide pictures  1With the browser open, press the right soft key (+) (Menu).2Scroll to View and press the center select key (s).3Scroll to Show Pictures and press the center select key (s) to select or unselect it.add a Favorite  1While viewing a Web page, press the right soft key (+) (Menu).
75connections2Scroll to Add to Favorites and press the center select key (s).browser shortcutsUse shortcut keys for browsing the Web:key functionUpage upDpage downTgo to the top of the pageBgo to the bottom of the pageFswitch to full screen or normal view
76entertainmententertainmentHave fun with your phone!get & play V CAST musicWith V CAST Music, you can:•get new music and tones•play music in your MUSIC LIBRARY•record new sounds•set music or tones as your ringtonedownload V CAST music directly to your phone  1Press the left soft key (-) (Start).2Scroll to VCAST Music and press the center select key (s) (OK).Note: Your phone must be in an EVDO coverage area to download music. If you are in an EVDO coverage area, your phone displays the EV symbol with at least one signal strength bar in the status area of the screen (see page 17).3Browse or search the catalog to find the songs you want.To preview a song, highlight the song, press the center select key (s) (OK), and then press the left soft key (-) (Preview).4To buy a song, highlight the song and select the center select key (s) (Buy).
77entertainmentAfter you press Buy your phone shows song details and price.5Press the center select key (s) (BUY) to confirm your selection.6When you see a confirmation that your purchase was successful and your music is available for download, press the center select key (s) (OK) to continue, or choose to download later.7When prompted to select a storage location, scroll to Phone Memory or Memory Card and press the center select key (s) (OK) to begin downloading.Your phone displays a status indicator. After downloading, you must wait for the phone to acquire the content license.8Press the right soft key (+) (Play) to play the downloaded song immediately.buy music from V CAST Music Store  1 On your computer, launch Windows Media Player.2In the Windows Media Player window, select the “V CAST Music” option.3Click on the “Log In” button, then log in by entering your mobile phone number and password.If you have not registered yet, click on the “Register” button, then follow the instructions to register and get your password.4Browse or search the store to find the songs you want.To preview a song, click on the headset icon next to the song title.
78entertainment5To buy a song, click on the “Purchase” or “Buy” button next to the song title.6Repeat steps 4 and 5 to add more songs to your shopping cart.7When you finish shopping, click on “MY PURCHASES,” then follow the on-screen instructions to complete your purchase(s) and download the song(s) you have purchased.Downloading can take several minutes. When downloading is complete, click on the “Library” tab in the Windows Media Player window to see the songs you purchased.To transfer music files to your phone, see “download & copy media files” on page 80.music & media playerYou can play audio and video files.To play audio or video files:  1From the multimedia home screen, scroll to the music library icon ( ) and press the center select key (s).Note: If you switch back to normal view while you are playing a file, the files stops playing.2Select All Media, Music, or Videos and press the center select key (s).3Use the navigation key (S) to find the file you want and press the center select key (s) to play it.Note: If you don’t see your file, you might have to update the Library by selecting Update Library. For descriptions of the control keys, see page 17.
79entertainmentTo listen through a stereo Bluetooth headset, see page 66.Your phone also has Windows® Media Player Mobile for Smartphone version 10.2 or higher, which can play the following types of files: Windows Media Audio (WMA), Windows Media Video (WMV), MP3, AAC, and WAV.To open the media player:  1Press the left soft key (-) (Start).2Scroll to Windows Media and press the center select key (s).Tip: Do you want to play a song or video on the Internet or network? Use the Open URL command. From the Library view, press the media player controls (regular view)play/pauseTo play or pause a music or video file, press the enter key (j).skip ahead or go backTo skip to the previous or next file, press the navigation key (S) left or right.volumeTo change the volume, use the thumb wheel or press the navigation key (S) up or down.Tip: To turn the sound off quickly, press #. Press # to turn the sound back on.switch to full screenTo switch to full screen video playback, press 0. To switch back, press 0 again.fast forward/rewindTo fast forward or rewind, press and hold the navigation key (S) left or right.mute/unmuteTo quickly turn the sound on or off, press the space bar.media player controls (regular view)
80entertainmentright soft key (+) (Menu) and scroll toOpen URL. For more information about downloading or copying video files, see page 80.set video controlsYou can customize keys on your phone to control the media player.  1From the media player, press the right soft key (+) (Menu).2Scroll to Options and press the center select key (s).3Scroll to Buttons and press the center select key (s).4Scroll to the media player action you want to assign a button or key press.5Press the right soft key (+) (Menu), scroll to Assign, Reset, or None, and press the center select key (s).6When you are done, press the left soft key (-) (OK) and the left soft key (-) (Done) to complete the set up.download & copy media filesYou can copy or download media files from your computer or the Internet onto your phone. transfer files from your computerYou can transfer files from a computer to your phone with a USB cable connection. You can purchase songs from the V CAST Music Store (see page 76) or import them from your CD collection.
81entertainmentNote: You can use Windows Media Player 11 to transfer music, picture, and video files. You can use Windows Media Player 10 to transfer music files, but will need Microsoft®  ActiveSync or Windows® Mobile Device Center to transfer video and picture files.computer system requirementsTo access the V CAST Music Store from a computer or to transfer files from a computer to your phone, you need the Windows® XP operating system, Windows Media Player 10 or later version, and an active internet connection.If you have the Windows XP operating system and an internet connection, you can download Windows Media Player. From your computer’s Web browser, go to http://www.microsoft.com.import songs from an audio CD  1 On your computer, launch Windows Media Player.2Insert an audio CD into your computer’s CD ROM drive.3Click on the “Rip” tab in the Windows Media Player window.4Highlight the songs you want to import and click on the “Rip Music” icon.The songs are imported to the Windows Media Player Library.To transfer the songs to your phone, see “transfer files to your phone” on page 82.If you do not see songs you downloaded in Windows Media Player Library:  1On your computer, launch Windows Explorer.
82entertainment2In the Windows Explorer window, open the My Documents folder, then open the My Music folder and look for the songs you downloaded.3Right-click on each song and select “Add To Now Playing List.”The songs are added to the Windows Media Player Library.transfer files to your phone  1 On your computer, launch Windows Media Player.2On your computer, click on the “Library” tab in the Windows Media Player window.3On your computer:• If using Windows Media Player 11, click on the “Sync” tab in the Windows Media Player window.• If using Windows Media Player 10, click on the “Select list options” selection (to the right of “Library Options”) in the Windows Media Player window. Then select “Sync List” from the pull-down menu.4 On your computer, drag the desired file(s) from the Library to the Sync list in the Windows Media Player window.5Connect the USB cable to your phone and to an available USB port on your computer.If this is the first time you have connected the phone to a computer with a USB cable, additional software drivers may be installed. (For more details about using a USB cable connection, see page 71.)6Resync your phone and computer (see page 50).
83entertainment7Disconnect the cable from the phone and the computer.You can now view or play the files you transferred from your computer.transfer video & picture files from your computerNote: Use these steps if you do not have Windows Media Player 11. You must have Microsoft®  ActiveSync or Windows® Mobile Device Center installed on your computer, as described on page 50.To copy video and picture files from your computer to your phone:  1Connect the phone to your computer. 2 On your computer in ActiveSync (or Windows Mobile Device Center), select Explore and double-click My Windows Mobiledevice.3On your computer, find the files you want to copy to your phone and paste the files into the My Windows Mobilefolder.4Resync your phone and computer (see page 50).5View the picture or video on your phone by pressing the left soft key (-) (Start) and selectingPictures & Videos.take & send a photoTo start the camera:From the multimedia view, scroll to the camera icon (e), and select it to start the camera. Or from the home screen, press the left soft key (-) (Start), scroll to Camera, and press the center select key (s).
84entertainmentAfter a pause, the camera viewfinder opens:Tip: Press the right soft key (+) (Menu) to adjust picture settings, such as Mode, Brightness, Resolution, Zoom, White Balance, and Flash or switch to the video camera.To take a photo:  1Aim the camera lens at the photo subject.2Press the center select key (s). Your phone saves the picture and shows it in the viewfinder.To close the viewfinder, press the Power/End key (O). You can see your stored picture by pressing the left soft key (-) (Start) and selectingPictures & Videos.Tip: Did you save other pictures somewhere else or on a storage card? Press the left soft key (-) (Start) and selectPictures & Videos. Then, press the right soft key (+) (Menu) and scroll toFolders to browse for the folder that contains your pictures.ThumbnailsPictures & VideosMenu877 1.0xIMAGEAREA
85entertainmentpicture optionsWhen viewing the Pictures & Videos screen, to see other picture options, press the right soft key (+) (Menu):If you highlight a photo and press the center select key (s), you can choose from these additional options:optionSend via BluetoothSend a photo via Bluetooth wirelessSendSend a photo with e-mail.Save to ContactAssign the photo to a contact.DeleteHighlight a photo and then delete it.EditEdit a picture.Play Slide ShowPlay a slide show of all of your photos.FoldersBrowse folders for other pictures.OptionsSelect from these options:General—Determine default picture sizes for e-mail and rotating picture settings.Slide Show—Select default slide show settings.Camera—Select default locations to store pictures, filename prefixes, and image compression.Video—Determine audio settings and time limits for video files.ExitExit back to the home screen.option
86entertainment•To use the photo as the home screen, select Use as Home Screen.•To view image properties, like the filename, select Properties.•To see closer photo details, select Zoom.self portrait  1With the camera active, press the right soft key (+) (Menu).2Scroll to Mode and press the center select key (s).3Scroll to Timer and press the center select key (s).4Press the center select key (s) to start the 5 second delay.5Aim the camera lens (on the back of the phone) at yourself.6When you hear the camera shutter sound, your phone takes the photo and shows it in the viewfinder.record & play video clipsrecord a video clipTo start the video camera:From the multimedia view, scroll to the camera icon (e), and select it to start the still photo camera. Then press the right soft key (+) (Menu) and scroll to Video.Or from the home screen, press the left soft key (-) (Start), scroll to Camera, and press the
87entertainmentcenter select key (s). Then press the right soft key (+) (Menu) and scroll to Video.Tip: In the video viewfinder, press the right soft key (+) (Menu) to adjust video settings such as Still, Brightness, Quality, and White Balance, or switch to Full Screenmode.To record a video:  1Point the camera lens at the photo subject.2Press the center select key (s) to begin recording a video. The viewfinder shows what the video is recording.3Press  the left soft key (-) (Stop) to end recording the video altogether, or press the right soft key (+) (Pause) to pause recording and the right soft key (+) (Resume) to continue recording.Note: Videos are automatically stored in your phone. To view them, press the left soft key (-) (Start) and select Pictures & Videos. Select the video to view and press Play or the select keys.Tip: To view videos located in a folder other than the default video folder, including a storage card, press the left soft key (-) (Start) and selectPictures & Videos. Press the right soft key (+) (Menu), selectFolder, and then select the folder that contains the stored videos.00:05 43:20StopPictures & VideosPauseVIDEOAREARemaining recording timeCurrent recording length
88entertainmentvideo optionsIn the video viewfinder press the right soft key (+) (Menu) and scroll toOptions to open the video options menu:Note: General and Slideshow options are also available in this menu, however these settings are specific to picture files only.play a video clipFor more video playback and Windows® Media Player features, see page 89.To play a video:  1Press the left soft key (-) (Start).2Scroll to Pictures & Videos and press the center select key (s).3Select the video clip and press the center select key (s).The video clip plays in the Windows Media Player.Tip: To play video in full screen mode, while the video is playing, press the right soft key (+) (Menu) and selectFull Screen. Videos optionCameraSelect default save locations, video filename prefixes, and image compression.VideoDetermine audio and time limit settings for video files.00:00 70%Now PlayingWindows MediaMenu
89entertainmentrecorded in a low resolution may not play in full screen mode.If a call comes in while watching a video, the video pauses and a call alert appears. You can choose to answer the call or ignore it. To continue watching the movie, press the left soft key (-) (Play).video playback optionsIn the video playback window press the right soft key (+) (Menu) and scroll to Options to choose from the following options:optionPlaybackDetermines how the time counter appears, whether to pause playback while using another program, and whether to resume playback after a phone call.VideoOptions for showing in full screen and when to scale to fit window.NetworkSelects default network settings for streaming media.LibraryDetermines if the player starts on the Library view.SkinsDetermine Windows® Media Player skin theme.ButtonsSet playback button mapping.option
90other features—advanced callingother featuresadvanced callingvoice dial  1To voice dial, press and hold the speaker key (A). 2When prompted, say “Call,” followed by a number or contact name.TTY callsSet up your phone for use with an optional TTY device:  1Press the left soft key (-) (Start).2Scroll to Settings and press the center select key (s).3Scroll to More and press the center select key (s) twice until you see TTY Settings.4Scroll to TTY Settings and press the center select key (s).5Press left or right on the navigation key (S) to change the settings, and then press the left soft key (-) (Done).call a phone number in a messageE-mail or text messages can contain phone numbers that have an underline like a Web site hyperlink. To dial one of these numbers, highlight it and press the Send key (N).
other features—contacts91contactsTo store and call contacts, see page 14.search for contactFrom the home screen, enter the first few letters of the contact's first or last name. The phone searches through the contact list and shows the name.edit contact  1Press the right soft key (+) (Contacts).2Scroll to a contact and press the right soft key (+) (Menu).3Scroll to Edit and press the center select key (s).4Edit the contact information and then press the left soft key (-) (Done).set ringer ID for a contactTo easily identify who is calling you by the ring tone, you can assign a custom ring tone to each contact.   1Press the right soft key (+) (Contacts).2Scroll to a contact and press the right soft key (+) (Menu).3Scroll to Edit and press the center select key (s).4Scroll toCustom Ring Tone, press left or right on the navigation key (S), and then press the left soft key (-) (Done).set picture ID for contactAssign a photo or picture to appear when you receive a call from an entry:  1Press the right soft key (+) (Contacts).
92other features—contacts2Scroll to a contact and press the right soft key (+) (Menu).3Scroll to Edit and press the center select key (s).4Scroll toPicture and press the center select key (s).5Select a picture, or select the left soft key (-) (Camera) to take a new picture for the contact, and then press the left soft key (-) (Done).Tip: Want to remove a picture ID? Press the right soft key (+) (Contacts) and scroll to a contact. Press the right soft key (+) (Menu) and scroll toEdit. Scroll to Picture, press the right soft key (+) (Menu), and selectRemove Picture.set category for contact  1Press the right soft key (+) (Contacts).2Scroll to a contact and press the right soft key (+) (Menu).3Scroll to Edit and press the center select key (s).4Scroll toCategories and press the center select key (s).5Press left or right on the navigation key (S) to select a category, and then press the left soft key (-) (Done).set category view  1Press the right soft key (+) (Contacts).2Scroll to a contact and press the right soft key (+) (Menu).3Scroll to Filter and press the center select key (s).4Scroll toAll Contacts, Recent, or No Categories and press the center select key (s).
other features—personalizing93send contact to another deviceUse a Bluetooth connection to send a contact to another phone, computer, or device:  1Press the right soft key (+) (Contacts).2Scroll to a contact and press the right soft key (+) (Menu).3Select Send via Bluetooth by pressing the center select key (s).If necessary, your phone asks you to turn on Bluetooth power. Your phone searches for Bluetooth devices.4Select the device you want and press the center select key (s). Your phone tells you when the transfer is complete.For more information about Bluetooth connections, see page 65.personalizinglanguageSet menu language:  1Press the left soft key (-) (Start).2Scroll to Settings and press the center select key (s).3Scroll to Regional Settings and press the center select key (s).4Scroll to Language and press the center select key (s).5Press left or right on the navigation key (S) to select a language, and then press the left soft key (-) (Done).Note: You must turn your phone off and on again for the changes to take effect.
94other features—personalizingaccessibilityYou can set system font size, multipress timeout, confirmation timeout, and in-call alerts:  1Press the left soft key (-) (Start).2Scroll to Settings and press the center select key (s).3Scroll to Accessibility and press the center select key (s).4Use the navigation key (S) to modify the settings and then press the left soft key (-) (Done).ring volume  1Press the left soft key (-) (Start).2Scroll to Settings and press the center select key (s).3Scroll to Profiles and press the center select key (s).4Highlight the desired profile, then press the right soft key (+) (Menu).5Select Edit by pressing the center select key (s).6Under Ring Volume, press the navigation key (S) left or right to adjust the volume for that profile, and then press the left soft key (-) (Done).Tip: You can eliminate the ringer volume instantly when an incoming call comes in—just use the thumb wheel to turn the ringer off. Note: The system volume (pressing and holding the thumb wheel) overrides the media player volume keys.
other features—personalizing95soundsTo change the default sounds for ring tone, reminders, new messages, alarm clock, or keypad controls:  1Press the left soft key (-) (Start).2Scroll to Settings and press the center select key (s).3Scroll to Sounds and press the center select key (s).4Use the navigation key (S) to modify the sound settings and then press the left soft key (-) (Done).alarm  1Press the left soft key (-) (Start).2Scroll to Settings and press the center select key (s).3Scroll to Clock & Alarm and press the center select key (s).4Scroll to Alarm and press the center select key (s).5Press number keys to adjust the time. Use any number key to switch from am to pm. 6When you are done, press the left soft key (-) (Done).Tip: Need to change or set the alarm alert style? Press the left soft key (-) (Start), scroll to Settings, scroll to Sounds, and scroll to Alarm clock. Use the navigation key (S) to modify the alarm sound and then press the left soft key (-) (Done).
96other features—call timesowner informationIt’s a good idea to enter and check your owner information. It lets someone return the phone to you if you lose it:  1Press the left soft key (-) (Start).2Scroll to Settings and press the center select key (s).3Scroll to Owner Information and press the center select key (s).4Modify the owner information and then press the left soft key (-) (Done).master resetTo return your phone to original settings:   1Press the left soft key (-) (Start).2Scroll to System Tools and press the center select key (s).3Scroll to Master Reset and press the center select key (s).Note: The default master reset code is 000000(6 zeroes). Master reset does not reset the unlock code, security code, and lifetime timer.call timesNetwork connection time is the elapsed time from the moment you connect to your service provider's network to the moment you end the call by pressing the Power/End key (O). This time includes busy signals and ringing.The amount of network connection time you track on your resettable timer may not equal the amount of time for which you are billed by your service provider. For
other features—network connections97billing information, contact your service provider.see call timersShow call timers:  1Press the left soft key (-) (Start).2Scroll to Call History and press the center select key (s).3Press the right soft key (+) (Menu), scroll to View Timers, and press the center select key (s).reset call timersTo reset all call timers to zero (0), except for the Lifetime calls timer:  1Press the left soft key (-) (Start).2Scroll to Call History and press the center select key (s).3Press the right soft key (+) (Menu), scroll to View Timers, and press the center select key (s).4Press the right soft key (+) (Menu), scroll to Reset Timers, and press the center select key (s).network connectionscreate proxy or dial-up network   1Press the left soft key (-) (Start).2Scroll to Settings and press the center select key (s).3Scroll to Connections and press the center select key (s).4Select a connection type and press the center select key (s).
98other features—personal organizer5Select a policy to open a connection, or enter a new policy definition and press the left soft key (-) (Done).Note: To close the secure connection, press the left soft key (-) (Logoff).personal organizeradd new calendar event   1Press the left soft key (-) (Start).2Scroll to Calendar and press the center select key (s).3Press the right soft key (+) (Menu), scroll to New Appointment, and press the center select key (s).4Enter appointment information and press the left soft key (-) (Done).Note: To schedule an all-day event, select the All day event check box under End time. All-day events do not occupy blocks of time in the calendar; instead, they appear in banners at the top of the calendar.view calendar event  1Press the left soft key (-) (Start).2Scroll to Calendar and press the center select key (s).•To see days before or after today, press left or right on the navigation key (S).•To quickly see a specific date, press the right soft key (+) (Menu) and scroll to Go to Date.•To see your whole week’s events, press the right soft key (+) (Week).
other features—personal organizer99Shortcut: Today’s events appear on your home screen. To see event details, scroll to it and press the select key (s).calendar event reminder The default reminder time for tasks and calendar items is 15 minutes. To change this default:  1Press the left soft key (-) (Start).2Scroll to Calendar and press the center select key (s).3Press the right soft key (+) (Menu), scroll to Tools, and press the center select key (s).4Scroll to Options and press the center select key (s).5Scroll to Set Reminders and press the left soft key (-) (Done).send calendar event to another deviceUse a Bluetooth connection to send a calendar event to another phone, computer, or device:  1From the calendar item, press the right soft key (+) (Menu).2Scroll to Send via Bluetooth and press the center select key (s).Note: Your phone prompts you to turn on Bluetooth if it is not already on.3Select the device to which you want to send the item and press the left soft key (-) (Send).For more information about Bluetooth connections, see page 65.
100other features—personal organizerrespond to a meeting request You can receive and respond to meeting requests on your phone just like you do in Outlook on your computer.  1Press the left soft key (-) (Start).2Scroll to Messaging and press the center select key (s).3Scroll to your e-mail account and press the center select key (s).4Scroll to the meeting request and press the center select key (s).5Press the left soft key (-) (Accept); or press the right soft key (+) (Menu), scroll to Declineor Tentative, and press the center select key (s).calculator  1Press the left soft key (-) (Start).2Scroll to Accessories and press the center select key (s).3Scroll to Calculator and press the center select key (s).Use the keypad to enter numbers and use the navigation key (S) for math functions. For more operators, press the right soft key (+) (Menu).To enter a decimal, press *. To change positive or negative, press #.converterTo quickly convert currency, time, or other measurements:  1Press the left soft key (-) (Start).
other features—security1012Scroll to Accessories and press the center select key (s).3Scroll to Converter and press the center select key (s).4Select a unit of measurement to convert and press the center select key (s).5Enter numbers to convert and press the left soft key (-) (Done).memo padTo jot quick notes to yourself:  1Press the left soft key (-) (Start).2Scroll to Accessories and press the center select key (s).3Scroll to Memopad and press the center select key (s).4To create a new note, press the left soft key (-) (New), enter your note, and press the left soft key (-) (Done).Note: The memo pad lists your notes with the most recently written note at the top of the page. To sort the notes alphabetically, press the right soft key (+) (Menu), scroll to Sort, and select Name.securitymanage certificatesEnable or disable Internet access certificates stored on your phone:  1Press the left soft key (-) (Start).2Scroll to Settings and press the center select key (s).
102other features—phone information3Scroll to Security and press the center select key (s).4Scroll to Certificates and press the center select key (s).5Select the type of certificate and press the center select key (s).6Scroll to a certificate, view or delete it, and press the left soft key (-) (Done).Certificates are used to verify the identity and security of Web sites when you download files or share information.phone informationsoftware versionTo view your phone software version:  1Press the left soft key (-) (Start).2Scroll to Settings and press the center select key (s).3Scroll to About and press the center select key (s).4View your phone information and then press the left soft key (-) (Done).memory & storageTo see the total, used, and available memory on your phone and storage card:  1Press the left soft key (-) (Start).2Scroll to System Tools and press the center select key (s).3Select Memory Manager by pressing the center select key (s).4View the memory information and then press the right soft key (+) (Exit).
other features—fun & games103fun & gamesmanage pictures & videos  1Press the left soft key (-) (Start).2Scroll to Pictures & Videos and press the center select key (s).3Highlight a picture or video and press the right soft key (+) (Menu) to manage pictures and videos, such as edit or send them to other devices. For more details, see “picture options” on page 85 or “video options” on page 88.record a sound or voice note  1Press the left soft key (-) (Start).2Scroll to Voice Notes and press the center select key (s).3Press the left soft key (-) (Record) to begin recording.4To stop recording, press the left soft key (-) (Stop).You can rename your sound recording by pressing the right soft key (+) (Menu) and scrolling to Rename.manage soundsManage ring tones and music that you have downloaded or composed:  1Press the left soft key (-) (Start).2Scroll to Windows Media and press the center select key (s).From the Library view, you can create a playlist of your music; or listen to music by artist, album, or genre.
104other features—fun & gamesNote: If you don’t see your sound or music files in the Library, press the right soft key (+) (Menu) and scroll to Update Library.For more information about Windows® Media, see page 78.start Web browser  1Press the left soft key (-) (Start).2Scroll to Web and press the center select key (s).For more information about Internet Explorer Mobile, see page 73.close Web browser  1In the browser, press the right soft key (+) (Menu).2Scroll to Exit and press the center select key (s).download objects from Web page   1On a Web page, highlight the file you want to download and press the left soft key (-) (Select).2Scroll to Select and press the center select key (s).To download a picture or other object from a Web page, highlight the item, press the right soft key (+) (Menu), and choose an option such as Save image.download applications & gamesYou can purchase and download applications (programs) and games for your phone. Go to http://www.motorola.com/support/
other features—fun & games105q9m and click on “Application Catalog” or visit http://www.handango.com.Warning: Downloading and installing numerous third-party applications can negatively affect memory usage and the performance of the phone. Proceed with moderation.Note: Your phone does not support Java applications or games.play games on your phoneTo access games on your phone:  1Press the left soft key (-) (Start).2Scroll to Games and press the center select key (s).
106service & repairservice & repairTip: Motorola Software Update is an easy way to update your phone. Make sure you have the latest available software updates at www.hellomoto.com/support/update.If you have questions or need assistance, we're here to help.Motorola Support:Go to www.motorola.com/support/q9m, where you can select from a number of customer care options. You can also contact the Motorola Customer Support Center at 1-800-657-7576 (United States and Canada) or 1-888-390-6456 (TTY/TDD United States for hearing impaired).Microsoft® Windows® Mobile, ActiveSync, and Windows Mobile Device Center Support:Windows Smartphone: http://www.microsoft.com/windowsmobile/help/smartphone/
SAR Data107Specific Absorption Rate DataSAR Da taThis model wireless phone meets the government’s requirements for exposure to radio waves.Your wireless phone is a radio transmitter and receiver. It is designed and manufactured not to exceed limits for exposure to radio frequency (RF) energy set by the Federal Communications Commission (FCC) of the U.S. Government and by the Canadian regulatory authorities. These limits are part of comprehensive guidelines and establish permitted levels of RF energy for the general population. The guidelines are based on standards that were developed by independent scientific organizations through periodic and thorough evaluation of scientific studies. The standards include a substantial safety margin designed to assure the safety of all persons, regardless of age or health.The exposure standard for wireless mobile phones employs a unit of measurement known as the Specific Absorption Rate, or SAR. The SAR limit set by the FCC and by the Canadian regulatory authorities is 1.6 W/kg.1 Tests for SAR are conducted using standard operating positions accepted by the FCC and by Industry Canada with the phone transmitting at its highest certified power level in all tested frequency bands. Although the SAR is determined at the highest certified power level, the actual SAR level of the phone while operating can be well below the maximum value. This is because the phone is designed to operate at multiple power levels so as to use only the power required to reach the network. In general, the closer you are to a wireless base station, the lower the power output.Before a phone model is available for sale to the public in the U.S. and Canada, it must be tested and certified to the FCC and Industry Canada that it does not exceed the limit established by each government for safe exposure. The tests are performed in positions and locations (e.g., at the ear and worn on the body) reported to the FCC and available for review by Industry Canada. The highest SAR value for this model phone when tested for use at the ear is _.__  W/kg, and when worn on the body, as described in this user guide, is _.__ W/kg. (Body-worn measurements differ among phone models, depending upon available accessories and regulatory requirements).2While there may be differences between the SAR levels of various phones and at various positions, they all meet the governmental requirements for safe exposure. Please note that improvements to this product model could cause differences in the SAR value for later products; in all cases, products are designed to be within the guidelines.
108SAR DataAdditional information on Specific Absorption Rates (SAR) can be found on the Cellular Telecommunications & Internet Association (CTIA) Web site:http://www.phonefacts.net or the Canadian Wireless Telecommunications Association (CWTA) Web site:http://www.cwta.ca1. In the United States and Canada, the SAR limit for mobile phones used by the public is 1.6 watts/kg (W/kg) averaged over one gram of tissue. The standard incorporates a substantial margin of safety to give additional protection for the public and to account for any variations in measurements.2. The SAR information includes the Motorola testing protocol, assessment procedure, and measurement uncertainty range for this product.
Microsoft License109Microsoft End User License AgreementMicrosoft LicenseYou have acquired a device (“DEVICE”) that includes software licensed by Motorola, Inc. (“Motorola”) from Microsoft Licensing Inc. or its affiliates (“Microsoft”), for use in connection with wireless network services provided under separate agreement between you and a wireless telecommunications provider (“Mobile Operator”). Those installed software products of Microsoft origin, as well as associated media, printed materials, and “online” or electronic documentation (“SOFTWARE”) are protected by international intellectual property laws and treaties. SOFTWARE includes software already installed on the DEVICE (“DEVICE Software”) and Microsoft software contained on any CD-ROM disk accompanying the DEVICE (“Desktop Software”).The SOFTWARE is licensed, not sold. All rights reserved.IF YOU DO NOT AGREE TO THIS END USER LICENSE AGREEMENT (“EULA”), DO NOT USE THE DEVICE OR COPY THE SOFTWARE. INSTEAD, PROMPTLY CONTACT MOTOROLA FOR INSTRUCTIONS ON RETURN OF THE UNUSED DEVICE(S) FOR A REFUND. ANY USE OF THE SOFTWARE, INCLUDING BUT NOT LIMITED TO USE ON THE DEVICE, WILL CONSTITUTE YOUR AGREEMENT TO THIS EULA (OR RATIFICATION OF ANY PREVIOUS CONSENT).1. GRANT OF SOFTWARE LICENSE. This EULA grants you the following license:1.1. DEVICE Software. You may use the DEVICE Software as installed on the DEVICE (including as installed on removable media installed in the DEVICE). All or certain portions of the DEVICE Software may be inoperable if a proper account is not established or maintained with an appropriate Mobile Operator, or if the Mobile Operator’s network facilities are not operating or configured to operate with the DEVICE software.1.2. Desktop Software. Desktop Software is included with your DEVICE, and you may install and use the Microsoft ActiveSync® 3.7.1 component on one (1) or more computers to exchange information with one (1) or more computing devices that contain a compatible version of the Microsoft Windows® for Smartphone 2003 Software. For other software component(s) contained in the Desktop Software, you may install and use such components only in accordance with the terms of the printed or online end user license agreement(s) provided with such component(s). In the absence of an end user license agreement for particular component(s) of the Desktop Software, you may install and use only one (1) copy of such component(s) on the DEVICE or a single computer with which you use the DEVICE.1.3. Back-up Copy. If Motorola has not included a back-up copy of the DEVICE Software with the DEVICE, you may make a single back-up copy of the DEVICE Software. You may use the back-up copy solely for archival purposes.
110Microsoft License1.4. Microsoft Windows® 2003. If Microsoft Outlook® 2002 is included with your Device, the following terms apply to your use of Microsoft Outlook® 2002: (i) regardless of the information contained in “Software Installation and Use” section of the online EULA you may install one (1) copy of Microsoft Outlook® 2002 on one (1) computer to use, exchange data, share data, access and interact with the DEVICE, and (ii) the EULA for Microsoft Outlook® 2002 is between Motorola and the end user - not between the PC manufacturer and end user.2. Speech/Handwriting Recognition. If the Software includes speech and or handwriting recognition component(s), you should understand that speech and handwriting recognition are inherently statistical processes; that recognition errors are inherent in the processes; that it is your responsibility to provide for handling such errors and to monitor the recognition processes and correct any errors. Neither Motorola nor its suppliers shall be liable for any damages arising out of errors in the speech and handwriting recognition processes.3. Limitations on Reverse Engineering, Decompilation and Disassembly. You may not reverse engineer, decompile, or disassemble the SOFTWARE, except and only to the extent that such activity is expressly permitted by applicable law notwithstanding this limitation.4. Single DEVICE. The Device Software is licensed with the DEVICE as a single integrated product. The DEVICE Software may only be used as part of the DEVICE, notwithstanding any installation of the DEVICE Software on removable media.5. Single EULA. The package for the DEVICE may contain multiple versions of this EULA, such as multiple translations and/or multiple media versions (e.g., in the user documentation and in the software). Even if you receive multiple versions of the EULA, you are licensed to use only one (1) copy of the DEVICE Software.6. Rental. You may not rent or lease the SOFTWARE.7. Software Transfer. You may not permanently transfer any of your rights under this EULA with regard to the DEVICE Software or Desktop Software, except as permitted by the applicable Mobile Operator. In the event that the Mobile Operator permits such transfer, you may permanently transfer all of your rights under this EULA only as part of a sale or transfer of the DEVICE, provided you retain no copies, you transfer all of the SOFTWARE (including all component parts, the media and printed materials, any upgrades or backup copies, this EULA and, if applicable, the Certificate(s) of Authenticity), and the recipient agrees to the terms of this EULA. If the Software is an upgrade, any transfer must include all prior versions of the SOFTWARE.8. Termination. Without prejudice to any other rights, Motorola or Microsoft may terminate this EULA if you fail to comply with the terms and conditions of this EULA. In such event, you must destroy all copies of the SOFTWARE and all of its component parts.9. Security Updates. The SOFTWARE may include digital rights management technology. If SOFTWARE does contain digital rights management technology, content providers are using the digital rights management technology (“Microsoft DRM”) contained in the SOFTWARE to protect the integrity of their content (“Secure
Microsoft License111Content”) so that their intellectual property, including copyright, in such content is not misappropriated. Owners of such Secure Content (“Secure Content Owners”) may, from time to time, request Microsoft, Microsoft Corporation or their subsidiaries to provide security related updates to the Microsoft DRM components of the SOFTWARE (“Security Updates”) that may affect your ability to copy, display and/or play Secure Content through Microsoft software or third party applications that utilize Microsoft DRM. You therefore agree that, if you elect to download a license from the Internet which enables your use of Secure Content, Microsoft Corporation or their subsidiaries may, in conjunction with such license, also download onto your DEVICE such Security Updates that a Secure Content Owner has requested that Microsoft, Microsoft Corporation or their subsidiaries distribute. Microsoft, Microsoft Corporation or their subsidiaries will not retrieve any personally identifiable information, or any other information, from your DEVICE by downloading such Security Updates.10. Consent to Use of Data. You agree that Microsoft, Microsoft Corporation and their affiliates may collect and use technical information gathered in any manner as part of product support services related to the SOFTWARE. Microsoft, Microsoft Corporation and their affiliates may use this information solely to improve their products or to provide customized services or technologies to you. Microsoft, Microsoft Corporation and their affiliates may disclose this information to others, but not in a form that personally identifies you.11. Internet Gaming/Update Features. If the SOFTWARE provides, and you choose to utilize, the Internet gaming or update features within the SOFTWARE, it is necessary to use certain computer system, hardware, and software information to implement the features. By using these features, you explicitly authorize Microsoft, Microsoft Corporation and/or their designated agent to use this information solely to improve their products or to provide customized services or technologies to you. Microsoft or Microsoft Corporation may disclose this information to others, but not in a form that personally identifies you.12. Internet-Based Services Components. The SOFTWARE may contain components that enable and facilitate the use of certain Internet-based services. You acknowledge and agree that Microsoft Corporation or their affiliates may automatically check the version of the SOFTWARE and/or its components that you are utilizing and my provide upgrades or supplements to the SOFTWARE that may be automatically downloaded to your Device.13. Links to Third Party Sites. The SOFTWARE may provide you with the ability to link to third party sites through the use of the SOFTWARE. The third party sites are NOT under the control of Motorola, Microsoft, Microsoft Corporation or their affiliates. Neither Motorola, Microsoft nor Microsoft Corporation nor their affiliates are responsible for (i) the contents of any third party sites, any links contained in third sites, or any changes or updates to third party sites, or (ii) webcasting or any other form of transmission received from any third party sites. If the SOFTWARE provides links to third party sites, those links are provided to you only as a convenience, and the inclusion of any link does not imply
112Microsoft Licensean endorsement of the third party site by Motorola, Microsoft, Microsoft Corporation or their affiliates.14. Additional Software/Services. The SOFTWARE may permit Motorola, Microsoft, Microsoft Corporation or their affiliates to provide or make available to you SOFTWARE updates, supplements, add-on components, or Internet-based services components of the SOFTWARE after the date you obtain your initial copy of the SOFTWARE (“Supplemental Components”).14.1. If Motorola provides or makes available to you Supplemental Components and no other EULA terms are provided along with the Supplemental Components, then the terms of this EULA shall apply.14.2.If Microsoft, Microsoft Corporation or their affiliates make available Supplemental Components, and no other EULA terms are provided, then the terms of this EULA shall apply, except that the Microsoft, Microsoft Corporation or affiliate entity providing the Supplemental Component(s) shall be the licensor of the Supplemental Component(s).14.3. Motorola, Microsoft, Microsoft Corporation and their affiliates reserve the right to discontinue any Internet-based services provided to you or made available to you through the use of the SOFTWARE.15. UPGRADES AND RECOVERY MEDIA.15.1. DEVICE Software. If the DEVICE Software is provided by Motorola separate from the DEVICE on media such as a ROM chip, CD ROM disk(s) or via web download or other means, and is labeled “For Upgrade Purposes Only” or “For Recovery Purposes Only”, you may install one copy of such DEVICE Software on the DEVICE as a replacement copy for the existing DEVICE Software and use it in accordance with the Grant of Software License section of this EULA.15.2. Desktop Software. If any Desktop Software component(s) is provided by Motorola separate from the DEVICE on CD ROM disk(s) or via web download or other means, and labeled “For Upgrade Purposes Only” or “For Recovery Purposes Only”, you may (i) install and use one copy of such component(s) on the computer(s) you use to exchange data with the DEVICE as a replacement copy for the existing Desktop Software component(s).16. COPYRIGHT. All title and intellectual property rights in and to the SOFTWARE (including but not limited to any images, photographs, animations, video, audio, music, text and “applets”, incorporated into the SOFTWARE), the accompanying printed materials, and any copies of the SOFTWARE, are owned by Microsoft or its suppliers (including Microsoft Corporation). You may not copy the printed materials accompanying the SOFTWARE. All title and intellectual property rights in and to the content which may be accessed through use of the SOFTWARE is the property of the respective content owner and may be protected by applicable copyright or other intellectual property laws and treaties. This EULA grants you no rights to use such content. All rights not specifically granted under this EULA are reserved by Microsoft and its suppliers (including Microsoft Corporation).17. EXPORT RESTRICTIONS. You acknowledge that SOFTWARE is subject to U.S. export jurisdiction. You agree to comply with all applicable international and national laws that apply to the
Microsoft License113SOFTWARE, including the U.S. Export Administration Regulations, as well as end-user, end-use and destination restrictions issued by U.S. and other governments. For additional information, see http://www.microsoft.com/exporting/.18. PRODUCT SUPPORT. Product support for the SOFTWARE is NOT provided by Microsoft, its parent corporation, Microsoft Corporation, or their affiliates or subsidiaries.19. NO LIABILITY FOR CERTAIN DAMAGES. EXCEPT AS PROHIBITED BY LAW, MICROSOFT SHALL HAVE NO LIABILTIY FOR ANY INDIRECT, SPECIAL, CONSEQUENTIAL OR INCIDENTAL DAMAGES ARISING FROM OR IN CONNECTION WITH THE USE OR PERFORMANCE OF THE SOFTWARE. THIS LIMITATION SHALL APPLY EVEN IF ANY REMEDY FAILS OF ITS ESSENTIAL PURPOSE.20. FOR APPLICABLE LIMITED WARRANTIES AND SPECIAL PROVISIONS PERTAINING TO YOUR PARTICULAR JURISDICTION, PLEASE REFER TO YOUR WARRANTY BOOKLET INCLUDED WITH THIS PACKAGE OR PROVIDED WITH THE SOFTWARE PRINTED MATERIALS.
114Microsoft License
115Important Safety and Legal Information
116Safety InformationSafety and General InformationSafe ty Infor mationThis section contains important information on the safe and efficient operation of your mobile device. Read this information before using your mobile device.*Exposure to Radio Frequency (RF) EnergyYour mobile device contains a transmitter and receiver. When it is ON, it receives and transmits RF energy. When you communicate with your mobile device, the system handling your call controls the power level at which your mobile device transmits.Your Motorola mobile device is designed to comply with local regulatory requirements in your country concerning exposure of human beings to RF energy.Operational PrecautionsFor optimal mobile device performance and to be sure that human exposure to RF energy does not exceed the guidelines set forth in the relevant standards, always follow these instructions and precautions.External Antenna CareIf your mobile device has an external antenna, use only a Motorola-supplied or approved replacement antenna. Use of unauthorized antennas, modifications, or attachments could damage the mobile device and/or may result in your device not complying with local regulatory requirements in your country.DO NOT hold the external antenna when the mobile device is IN USE. Holding the external antenna affects call quality and may cause the mobile device to operate at a higher power level than needed.Product OperationWhen placing or receiving a phone call, hold your mobile device just like you would a landline phone.If you wear the mobile device on your body, always place the mobile device in a Motorola-supplied or approved clip, holder, * The information provided in this document supersedes the general safety information in user’s guides published prior to May 1, 2006.
Safety Information117holster, case, or body harness. If you do not use a body-worn accessory supplied or approved by Motorola, keep the mobile device and its antenna at least 2.5 centimeters (1 inch) from your body when transmitting.When using any data feature of the mobile device, with or without an accessory cable, position the mobile device and its antenna at least 2.5 centimeters (1 inch) from your body.Using accessories not supplied or approved by Motorola may cause your mobile device to exceed RF energy exposure guidelines. For a list of Motorola-supplied or approved accessories, visit our Web site at: www.motorola.com.RF Energy Interference/CompatibilityNearly every electronic device is subject to RF energy interference from external sources if inadequately shielded, designed, or otherwise configured for RF energy compatibility. In some circumstances your mobile device may cause interference with other devices.Follow Instructions to Avoid Interference ProblemsTurn off your mobile device in any location where posted notices instruct you to do so. These locations include hospitals or health care facilities that may be using equipment that is sensitive to external RF energy.In an aircraft, turn off your mobile device whenever instructed to do so by airline staff. If your mobile device offers an airplane mode or similar feature, consult airline staff about using it in flight.PacemakersIf you have a pacemaker, consult your physician before using this device.Persons with pacemakers should observe the following precautions:•ALWAYS keep the mobile device more than 20 centimeters (8 inches) from your pacemaker when the mobile device is turned ON.•DO NOT carry the mobile device in the breast pocket.•Use the ear opposite the pacemaker to minimize the potential for interference.•Turn OFF the mobile device immediately if you have any reason to suspect that interference is taking place.Hearing AidsSome mobile devices may interfere with some hearing aids. In the event of such interference, you may want to consult your hearing aid manufacturer or physician to discuss alternatives.
118Safety InformationOther Medical DevicesIf you use any other personal medical device, consult your physician or the manufacturer of your device to determine if it is adequately shielded from RF energy.Driving PrecautionsCheck the laws and regulations on the use of mobile devices in the area where you drive. Always obey them.When using your mobile device while driving, please:•Give full attention to driving and to the road. Using a mobile device may be distracting. Discontinue a call if you can’t concentrate on driving.•Use handsfree operation, if available.•Pull off the road and park before making or answering a call if driving conditions so require.Responsible driving practices can be found in the “Smart Practices While Driving” section at the end of this guide and/or at the Motorola Web site: www.motorola.com/callsmart.Operational WarningsObey all posted signs when using mobile devices in public areas, such as health care facilities or blasting areas.Automobile Air BagsDo not place a mobile device in the air bag deployment area.Potentially Explosive AtmospheresAreas with potentially explosive atmospheres are often but not always posted, and can include fueling areas such as below decks on boats, fuel or chemical transfer or storage facilities, or areas where the air contains chemicals or particles, such as grain, dust, or metal powders.When you are in such an area, turn off your mobile device, and do not remove, install, or charge batteries. In such areas, sparks can occur and cause an explosion or fire.Damaged ProductsIf your mobile device or battery has been submerged in water, punctured, or subjected to a severe fall, do not use it until you take it to a Motorola Authorized Service Center. Do not attempt to dry it with an external heat source, such as a microwave oven.
Safety Information119Batteries and ChargersIf jewelry, keys, beaded chains, or other conductive materials touch exposed battery terminals, this could complete an electrical circuit (short circuit), become very hot, and could cause damage or injury. Be careful when handling a charged battery, particularly when placing it inside a pocket, purse, or other container with metal objects. Use only Motorola Original batteries and chargers.Caution: To avoid risk of personal injury, do not dispose of your battery in a fire.Your battery, charger, or mobile device may contain symbols, defined as follows:Choking HazardsYour mobile device or its accessories may include detachable parts, which may present a choking hazard to small children. Keep your mobile device and its accessories away from small children.Glass PartsSome parts of your mobile device may be made of glass. This glass could break if the product is dropped on a hard surface or receives a substantial impact. If glass breaks, do not touch or attempt to remove. Stop using your mobile device until the glass is replaced by a qualified service center.Symbol DefinitionImportant safety information follows.Do not dispose of your battery or mobile device in a fire.Your battery or mobile device may require recycling in accordance with local laws. Contact your local regulatory authorities for more information.032374o032376o032375oDo not throw your battery or mobile device in the trash.Your mobile device contains an internal lithium ion battery.Do not let your battery, charger, or mobile device get wet.Listening at full volume to music or voice through a headset may damage your hearing.Symbol Definition032378oLi Ion BATT
120Safety InformationSeizures/BlackoutsSome people may be susceptible to epileptic seizures or blackouts when exposed to flashing lights, such as when playing video games. These may occur even if a person has never had a previous seizure or blackout.If you have experienced seizures or blackouts, or if you have a family history of such occurrences, please consult with your physician before playing video games or enabling a flashing-lights feature (if available) on your mobile device.Discontinue use and consult a physician if any of the following symptoms occur: convulsion, eye or muscle twitching, loss of awareness, involuntary movements, or disorientation. It is always a good idea to hold the screen away from your eyes, leave the lights on in the room, take a 15-minute break every hour, and stop use if you are very tired.Caution About High Volume UsageListening at full volume to music or voice through a headset may damage your hearing.Repetitive MotionWhen you repetitively perform actions such as pressing keys or entering finger-written characters, you may experience occasional discomfort in your hands, arms, shoulders, neck, or other parts of your body. If you continue to have discomfort during or after such use, stop use and see a physician.
Industry Canada Notice121Industry Canada Notice to UsersIndustry Canada NoticeOperation is subject to the following two conditions: (1) This device may not cause interference and (2) This device must accept any interference, including interference that may cause undesired operation of the device. See RSS-GEN 7.1.5.
122FCC NoticeFCC Notice to UsersFCC NoticeThe following statement applies to all products that have received FCC approval. Applicable products bear the FCC logo, and/or an FCC ID in the format FCC-ID:xxxxxx on the product label.Motorola has not approved any changes or modifications to this device by the user. Any changes or modifications could void the user’s authority to operate the equipment. See 47 CFR Sec. 15.21.This device complies with part 15 of the FCC Rules. Operation is subject to the following two conditions: (1) This device may not cause harmful interference, and (2) this device must accept any interference received, including interference that may cause undesired operation. See 47 CFR Sec. 15.19(3).If your mobile device or accessory has a USB connector, or is otherwise considered a computer peripheral device whereby it can be connected to a computer for purposes of transferring data, then it is considered a Class B device and the following statement applies:This equipment has been tested and found to comply with the limits for a Class B digital device, pursuant to part 15 of the FCC Rules. These limits are designed to provide reasonable protection against harmful interference in a residential installation. This equipment generates, uses and can radiate radio frequency energy and, if not installed and used in accordance with the instructions, may cause harmful interference to radio communications. However, there is no guarantee that interference will not occur in a particular installation. If this equipment does cause harmful interference to radio or television reception, which can be determined by turning the equipment off and on, the user is encouraged to try to correct the interference by one or more of the following measures:•Reorient or relocate the receiving antenna.•Increase the separation between the equipment and the receiver.•Connect the equipment to an outlet on a circuit different from that to which the receiver is connected.•Consult the dealer or an experienced radio/TV technician for help.
Warranty123Motorola Limited Warranty for the United States and CanadaWar r an t yWhat Does this Warranty Cover?Subject to the exclusions contained below, Motorola, Inc. warrants its telephones, pagers, messaging devices, and consumer and professional two-way radios (excluding commercial, government or industrial radios) that operate via Family Radio Service or General Mobile Radio Service, Motorola-branded or certified accessories sold for use with these Products (“Accessories”) and Motorola software contained on CD-ROMs or other tangible media and sold for use with these Products (“Software”) to be free from defects in materials and workmanship under normal consumer usage for the period(s) outlined below. This limited warranty is a consumer's exclusive remedy, and applies as follows to new Motorola Products, Accessories and Software purchased by consumers in the United States or Canada, which are accompanied by this written warranty:Products and AccessoriesProducts Covered Length of CoverageProducts and Accessories as defined above, unless otherwise provided for below.One (1) year from the date of purchase by the first consumer purchaser of the product unless otherwise provided for below.Decorative Accessories and Cases. Decorative covers, bezels, PhoneWrap™ covers and cases.Limited lifetime warranty for the lifetime of ownership by the first consumer purchaser of the product.Monaural Headsets. Ear buds and boom headsets that transmit mono sound through a wired connection.Limited lifetime warranty for the lifetime of ownership by the first consumer purchaser of the product.
124WarrantyExclusionsNormal Wear and Tear. Periodic maintenance, repair and replacement of parts due to normal wear and tear are excluded from coverage.Batteries. Only batteries whose fully charged capacity falls below 80% of their rated capacity and batteries that leak are covered by this limited warranty.Abuse & Misuse. Defects or damage that result from: (a) improper operation, storage, misuse or abuse, accident or neglect, such as physical damage (cracks, scratches, etc.) to the surface of the product resulting from misuse; (b) contact with liquid, water, rain, extreme humidity or heavy perspiration, sand, dirt or the like, extreme heat, or food; (c) use of the Products or Accessories for commercial purposes or subjecting the Product or Accessory to abnormal usage or conditions; or (d) other acts which are not the fault of Motorola, are excluded from coverage.Use of Non-Motorola Products and Accessories. Defects or damage that result from the use of Non-Motorola branded or certified Products, Accessories, Software or other peripheral equipment are excluded from coverage.Unauthorized Service or Modification. Defects or damages resulting from service, testing, adjustment, installation, maintenance, alteration, or modification in any way by someone other than Motorola, or its authorized service centers, are excluded from coverage.Altered Products. Products or Accessories with (a) serial numbers or date tags that have been removed, altered or obliterated; (b) broken seals or that show evidence of tampering; (c) mismatched board serial numbers; or (d) nonconforming or non-Motorola housings, or parts, are excluded from coverage.Communication Services. Defects, damages, or the failure of Products, Accessories or Software due to any communication service or signal you may subscribe to or use with the Products Accessories or Software is excluded from coverage.SoftwareConsumer and Professional Two-Way Radio Accessories.Ninety (90) days from the date of purchase by the first consumer purchaser of the product.Products and Accessories that are Repaired or Replaced.The balance of the original warranty or for ninety (90) days from the date returned to the consumer, whichever is longer.Products Covered Length of CoverageProducts Covered Length of CoverageSoftware. Applies only to physical defects in the media that embodies the copy of the software (e.g. CD-ROM, or floppy disk).Ninety (90) days from the date of purchase.
Warranty125ExclusionsSoftware Embodied in Physical Media. No warranty is made that the software will meet your requirements or will work in combination with any hardware or software applications provided by third parties, that the operation of the software products will be uninterrupted or error free, or that all defects in the software products will be corrected.Software NOT Embodied in Physical Media. Software that is not embodied in physical media (e.g. software that is downloaded from the internet), is provided “as is” and without warranty.Who Is Covered?This warranty extends only to the first consumer purchaser, and is not transferable.What Will Motorola Do?Motorola, at its option, will at no charge repair, replace or refund the purchase price of any Products, Accessories or Software that does not conform to this warranty. We may use functionally equivalent reconditioned/refurbished/pre-owned or new Products, Accessories or parts. No data, software or applications added to your Product, Accessory or Software, including but not limited to personal contacts, games and ringer tones, will be reinstalled. To avoid losing such data, software and applications please create a back up prior to requesting service.How to Obtain Warranty Service or Other InformationYou will receive instructions on how to ship the Products, Accessories or Software, at your expense, to a Motorola Authorized Repair Center. To obtain service, you must include: (a) a copy of your receipt, bill of sale or other comparable proof of purchase; (b) a written description of the problem; (c) the name of your service provider, if applicable; (d) the name and location of the installation facility (if applicable) and, most importantly; (e) your address and telephone number.USA Phones1-800-331-6456Pagers1-800-548-9954Two-Way Radios and Messaging Devices1-800-353-2729Canada All Products1-800-461-4575TTY1-888-390-6456For Accessories and Software, please call the telephone number designated above for the product with which they are used.
126WarrantyWhat Other Limitations Are There?ANY IMPLIED WARRANTIES, INCLUDING WITHOUT LIMITATION THE IMPLIED WARRANTIES OF MERCHANTABILITY AND FITNESS FOR A PARTICULAR PURPOSE, SHALL BE LIMITED TO THE DURATION OF THIS LIMITED WARRANTY, OTHERWISE THE REPAIR, REPLACEMENT, OR REFUND AS PROVIDED UNDER THIS EXPRESS LIMITED WARRANTY IS THE EXCLUSIVE REMEDY OF THE CONSUMER, AND IS PROVIDED IN LIEU OF ALL OTHER WARRANTIES, EXPRESS OR IMPLIED. IN NO EVENT SHALL MOTOROLA BE LIABLE, WHETHER IN CONTRACT OR TORT (INCLUDING NEGLIGENCE) FOR DAMAGES IN EXCESS OF THE PURCHASE PRICE OF THE PRODUCT, ACCESSORY OR SOFTWARE, OR FOR ANY INDIRECT, INCIDENTAL, SPECIAL OR CONSEQUENTIAL DAMAGES OF ANY KIND, OR LOSS OF REVENUE OR PROFITS, LOSS OF BUSINESS, LOSS OF INFORMATION OR DATA, SOFTWARE OR APPLICATIONS OR OTHER FINANCIAL LOSS ARISING OUT OF OR IN CONNECTION WITH THE ABILITY OR INABILITY TO USE THE PRODUCTS, ACCESSORIES OR SOFTWARE TO THE FULL EXTENT THESE DAMAGES MAY BE DISCLAIMED BY LAW.Some states and jurisdictions do not allow the limitation or exclusion of incidental or consequential damages, or limitation on the length of an implied warranty, so the above limitations or exclusions may not apply to you. This warranty gives you specific legal rights, and you may also have other rights that vary from state to state or from one jurisdiction to another.Laws in the United States and other countries preserve for Motorola certain exclusive rights for copyrighted Motorola software such as the exclusive rights to reproduce and distribute copies of the Motorola software. Motorola software may only be copied into, used in, and redistributed with, the Products associated with such Motorola software. No other use, including without limitation disassembly of such Motorola software or exercise of the exclusive rights reserved for Motorola, is permitted.
Hearing Aids127Hearing Aid Compatibility with Mobile PhonesHearing AidsSome Motorola phones are measured for compatibility with hearing aids. If the box for your particular model has “Rated for Hearing Aids” printed on it, the following explanation applies.When some mobile phones are used near some hearing devices (hearing aids and cochlear implants), users may detect a buzzing, humming, or whining noise. Some hearing devices are more immune than others to this interference noise, and phones also vary in the amount of interference they generate.The wireless telephone industry has developed ratings for some of their mobile phones, to assist hearing device users in finding phones that may be compatible with their hearing devices. Not all phones have been rated. Phones that are rated have the rating on their box or a label on the box.The ratings are not guarantees. Results will vary depending on the user’s hearing device and hearing loss. If your hearing device happens to be vulnerable to interference, you may not be able to use a rated phone successfully. Trying out the phone with your hearing device is the best way to evaluate it for your personal needs.M-Ratings: Phones rated M3 or M4 meet FCC requirements and are likely to generate less interference to hearing devices than phones that are not labeled. M4 is the better/higher of the two ratings.T-Ratings: Phones rated T3 or T4 meet FCC requirements and are likely to be more usable with a hearing device’s telecoil (“T Switch” or “Telephone Switch”) than unrated phones. T4 is the better/higher of the two ratings. (Note that not all hearing devices have telecoils in them.)Hearing devices may also be measured for immunity to this type of interference. Your hearing device manufacturer or hearing health professional may help you find results for your hearing device. The more immune your hearing aid is, the less likely you are to experience interference noise from mobile phones.
128WHO InformationInformation from the World Health OrganizationWHO Info rmationPresent scientific information does not indicate the need for any special precautions for the use of mobile phones. If you are concerned, you may want to limit your own or your children’s RF exposure by limiting the length of calls or by using handsfree devices to keep mobile phones away from your head and body.Source: WHO Fact Sheet 193Further information: http://www.who.int./peh-emfProduct RegistrationRegistrationOnline Product Registration:direct.motorola.com/hellomoto/ Motosupport/source/registration.aspProduct registration is an important step toward enjoying your new Motorola product. Registering helps us facilitate warranty service, and permits us to contact you should your product require an update or other service. Registration is for U.S. residents only and is not required for warranty coverage.Please retain your original dated sales receipt for your records. For warranty service of your Motorola Personal Communications Product you will need to provide a copy of your dated sales receipt to confirm warranty status.Thank you for choosing a Motorola product.
Export Law129Export Law AssurancesExport LawThis product is controlled under the export regulations of the United States of America and Canada. The Governments of the United States of America and Canada may restrict the exportation or re-exportation of this product to certain destinations. For further information contact the U.S. Department of Commerce or the Canadian Department of Foreign Affairs and International Trade.Wireless: The New RecyclableRecyclingYour wireless mobile device can be recycled. Recycling your mobile device reduces the amount of waste disposed in landfills and allows recycled materials to be incorporated into new products.The Cellular Telecommunications Industry Association (CTIA) and its members encourage consumers to recycle their mobile devices and have taken steps to promote the collection and environmentally sound recycling of end-of-life devices.As a mobile device user, you have an important role in ensuring that this device is recycled properly. When it comes time to give this mobile device up or trade it in for a new one, please remember that the mobile device, the charger, and many of its accessories can be recycled. It's easy. To learn more about CTIA's Recycling Program for Used Wireless Devices, please visit us at: recycling.motorola.young-america.com/ index.html
130Perchlorate LabelCalifornia Perchlorate LabelPerchlorate LabelSome mobile phones use an internal, permanent backup battery on the printed circuit board that may contain very small amounts of perchlorate. In such cases, California law requires the following label:“Perchlorate Material – special handling may apply. See www.dtsc.ca.gov/hazardouswaste/ perchlorate.”There is no special handling required by consumers.
Driving Safety131Smart Practices While DrivingDrivin g Sa fet yDrive Safe, Call Smart SMCheck the laws and regulations on the use of mobile devices and their accessories in the areas where you drive. Always obey them. The use of these devices may be prohibited or restricted in certain areas. Go to www.motorola.com/callsmart for more information.Your mobile device lets you communicate by voice and data—almost anywhere, anytime, wherever wireless service is available and safe conditions allow. When driving a car, driving is your first responsibility. If you choose to use your mobile device while driving, remember the following tips:• Get to know your Motorola mobile device and its features such as speed dial and redial. If available, these features help you to place your call without taking your attention off the road.• When available, use a handsfree device. If possible, add an additional layer of convenience to your mobile device with one of the many Motorola Original handsfree accessories available today.• Position your mobile device within easy reach. Be able to access your mobile device without removing your eyes from the road. If you receive an incoming call at an inconvenient time, if possible, let your voice mail answer it for you.• Let the person you are speaking with know you are driving; if necessary, suspend the call in heavy traffic or hazardous weather conditions. Rain, sleet, snow, ice, and even heavy traffic can be hazardous.• Do not take notes or look up phone numbers while driving. Jotting down a “to do” list or going through your address book takes attention away from your primary responsibility—driving safely.• Dial sensibly and assess the traffic; if possible, place calls when your car is not moving or before pulling into traffic. If you must make a call while moving, dial only a few numbers, check the road and your mirrors, then continue.• Do not engage in stressful or emotional conversations that may be distracting. Make people you are talking with aware you are driving and suspend conversations that can divert your attention away from the road.
132Driving Safety• Use your mobile device to call for help. Dial 911 or other local emergency number in the case of fire, traffic accident, or medical emergencies.*• Use your mobile device to help others in emergencies. If you see an auto accident, crime in progress, or other serious emergency where lives are in danger, call 911 or other local emergency number, as you would want others to do for you.*• Call roadside assistance or a special non-emergency wireless assistance number when necessary. If you see a broken-down vehicle posing no serious hazard, a broken traffic signal, a minor traffic accident where no one appears injured, or a vehicle you know to be stolen, call roadside assistance or other special non-emergency wireless number.** Wherever wireless phone service is available.
index133indexAaccessibility  94accessories  10connector port  2, 3ActiveSync  50alarms  95alertssetting  30, 31turning off  24, 39animation  103answering a call  13, 37attachments  59auto-lock, phone  26automatic e-mail setup  46Bbackground  32backlight  37battery  10, 11conserving  12extending battery life  11, 37, 66indicator  21Bluetoothconnection  93, 99indicator  20, 21remote  68wireless  65bonding (See Bluetooth wireless)browser  105disconnecting  105shortcut keys  75Ccalculator  100calendar  98, 99call timers  97call waiting  45caller ID  41, 91callsanswering  13, 37ending  13making  13camera  83, 86camera key  2, 3cancel message  56
134indexcenter key  3certificate management  101, 102charging indicator  21codes  25computer remote  68conference calls  45conserve battery  12contacts  42, 91converter  100copying files  67, 80currency  100Ddate, setting  36deleting programs  29dialed calls  39dialing phone numbers  13display  17, 37downloadinge-mail messages  61files  80message objects  60Ee-mail  46, 57, 58, 59attachments  59setup  46, 47, 48signature  59emergency number  42end key  2, 3, 13ending a call  13enteringnumbers  23text  22, 23exchange server  48export regulations  129Ffile manager  28filter  40flight mode  27forwarding calls  60Ggames  105global access look up  56Hhandsfreespeaker  25handsfree indicator  20headsetjack  2, 3headset indicator  21hearing aids  127home screen  17, 32, 34hyperlink phone number  90
index135IIncoming Call message  41international access code  42ISP  57Llanguage  93linking (See Bluetooth wireless)locking phone  25Low Battery message  21Mmaking calls  13, 90master reset  96media player  78, 95, 103buttons  80controls  80memo pad  101memory card indicator  22menu key  2, 3menusicons  19shortcuts  43message indicator  20messages  46, 57, 59, 60delivery  58e-mail  46reminders  95text  46text messages  59Microsoft license agreement  109missed calls  41Missed Calls message  41Mobile Device Center  50mode flight  27modem  70multimedia messages  46, 59, 60music  103music player  78Nnavigation key  2, 3netowrking  70network settings  97note pad  101number. See phone numbernumbers  23Oobject exchange  67operator hosted e-mail  46optionalaccessories  10features  10over the air (OTA)  49owner information  96
136indexPpairing (See Bluetooth wireless)pairing indicator  20pause button  79PC Remote  68perchlorate label  130personalizing  93phone numbers  15photos  83, 103picture ID  41, 91pictures  103playing music  79playing video  79power key  2, 3, 13priority  56profiles  30, 31Qquick notes  101Rreceived calls  39recent calls  39recycling  129redial  40reminders  95remote control  68removing programs  29replying  60returning a call  41ring stylesindicators  21settings  30ring tones  103ringer ID  41, 91ringer volume  94roam indicator  20Ssafety information  116safety tips  131security, locking  26select key  2send key  2, 3, 13sending & receiving messages  53setting up e-mail  46, 47shortcuts  16, 43side scroll keys  3signal strength indicator  21signature  59soft keys  2, 3, 34sounds  95, 103speed dial  42start menucustomizing  35stereo Bluetooth indicator  21storing your number  15
index137synchronizing  49Bluetooth  52cable  51with computer  50Ttask manager  28telephone number. See phone numbertemperature  100text  23entry  22messages  57, 59, 60messages, delivery  58third party applications  38three way calling  45thumb wheel  2, 3time zones  100time, setting  36timers  40, 97tips & tricks  16transfer music from computer  80TTY calls  90turning on/off  13Uunlock code  25unlocking phone  25, 26Vvideo  103clip  86controls  80voice key  2, 3voicemail  44voicemail message indicator  44volume  24, 94volume keys  2, 3Wwallpaper  32warranty  123Web  105browser  104, 105browser, disconnecting  105page  104phone number  90shortcut keys  75weights & measurements  100WHO information  128Windows Mobile Device Center  50Wireless Manager  16Yyour phone number  15
138indexU.S. patent Re. 34,976

Navigation menu