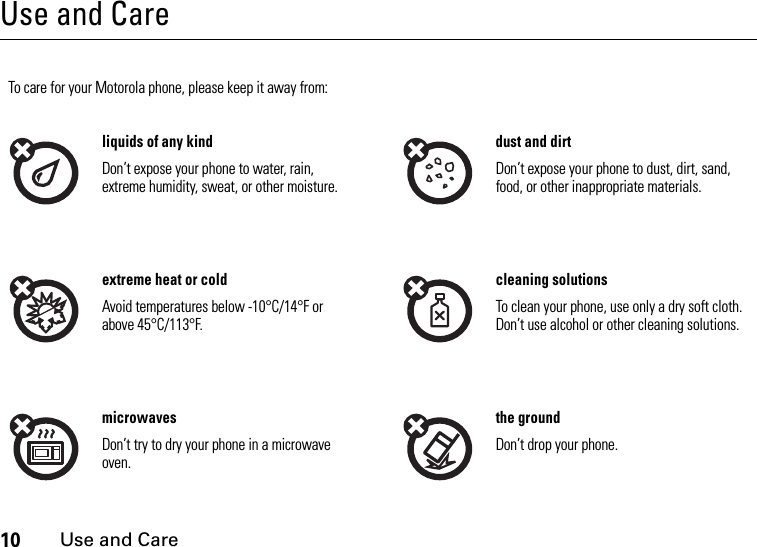
Motorola Mobility T56JE1 Portable Cellular/PCS/AWS CDMA Transceiver with BT User Manual
Motorola Mobility LLC Portable Cellular/PCS/AWS CDMA Transceiver with BT
UserManual.wiki
>
Motorola Mobility
>
T56JE1 User Manual
Exhibit 8 Users Manual
Navigation menu
Upload a User Manual
Namespaces
Wiki Guide
HTML
PDF
Info
Views
User Manual
Discussion / Help
Navigation


![41messagesmessagessend a multimedia messageA multimedia message contains embedded media objects (possibly including photos, pictures, animations, sounds, and voice records). You can send a multimedia message to other wireless phones with multimedia messaging capabilities and to email addresses.create & send messageFind it: s >e >Messaging >Create Message >New Picture Message 1Enter message text. 2Press Options to open the Picture Msg Menu (see page 42). 3Scroll to Insert and press Select.4To insert a stored multimedia object, scroll to Picture, Voice Record, Sound, or Video, and press Select. Then scroll to the desired object and press Insert.orTo take and insert a new photo, scroll to New Picture and press Select. Take the photo and press Insert.5Press Send To.6Scroll to and select the entry to receive the message.orScroll to and select [New Number] or [New Email Address], then enter the recipient’s phone number or email address and press Ok.7Press Send to send the message.or](https://usermanual.wiki/Motorola-Mobility/T56JE1/User-Guide-917738-Page-43.png)
![45messagescreate quick textEnter and store Quick Text (prewritten) messages that you can select and send later.s>eMessaging >Quick Text >[New Quick Text]Enter the new message and press Ok to save it.send quick texts>eMessaging >Quick TextScroll to the quick text you want to send and press Options, then scroll to Send and press Select.view sent messages>eMessaging >OutboxScroll to the message you want to view and press the center keys.Press Options to perform other actions on the message.featuresread received messages > eMessaging >Message InboxScroll to the message you want to view and press the center keys.Press Options to perform other actions on the message.drafts s > eMessaging >DraftsScroll to the message you want to view and press the center keys. You can edit the message when you view it.Press Options to perform other actions on the message.features](https://usermanual.wiki/Motorola-Mobility/T56JE1/User-Guide-917738-Page-47.png)
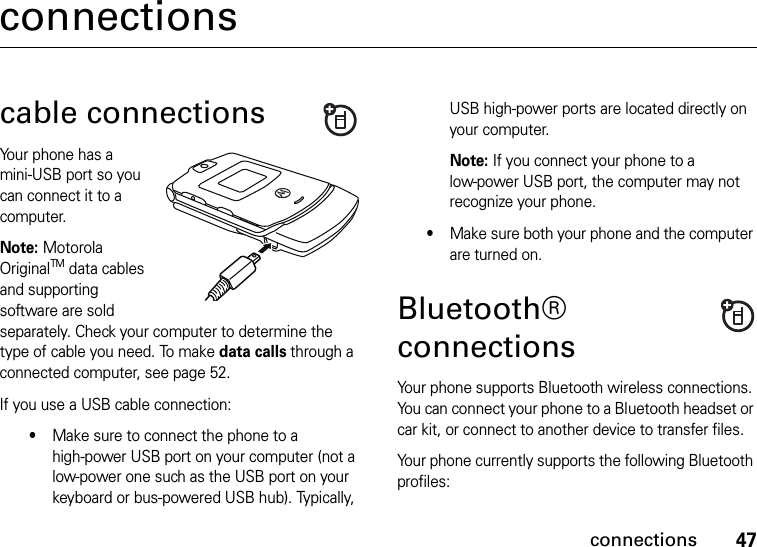

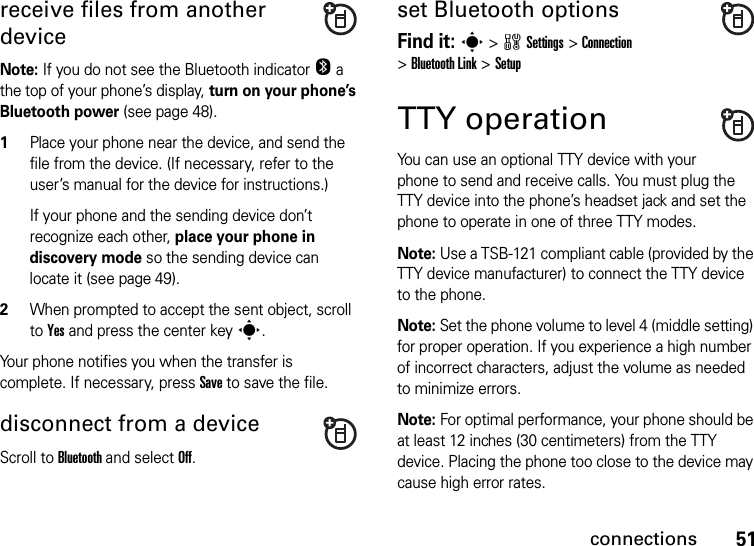
![49connectionsplace phone in discovery modeAllow an unknown Bluetooth device to discover your phone:Find it: s >wSettings >Connection >Bluetooth Link >Find MeIf the device requests permission to bond with your phone, press YES and enter the device PIN code to create a secure connection with the device. (The PIN code is typically set to 0000.)Note: See the instructions that came with your device for the device’s PIN code and other information about the device.pair with headset, handsfree device, or computerNote: If you want to use your Motorola Bluetooth headset with both an audio device and your phone, use your phone’s Bluetooth menus to connect the phone with the headset. If you establish the connection by pressing a button on the headset, or if you allow the headset to connect automatically by turning it on, you may experience unexpected results. Before you try to connect to another Bluetooth device, make sure your phone’s Bluetooth power is On and the device is in pairing or bonding mode (see the user guide for the device you are attempting to pair with). You can connect your phone with only one device at a time.Find it: s >wSettings >Connection >Bluetooth Link >Handsfree >[Look For Devices]Note: If your Bluetooth power is not turned on, your phone will prompt you to turn it on.Your phone lists the devices it finds within its range. If your phone is already connected to a device, your phone lists that device and identifies it with a % (in-use indicator). 1Scroll to a device in the list.2Press the center keys to connect the device.3If the device requests permission to bond with your phone, press YES and enter the device PIN](https://usermanual.wiki/Motorola-Mobility/T56JE1/User-Guide-917738-Page-51.png)
![50connectionscode to create a secure connection with the device. (The PIN code is typically set to 0000.)Note: See the instructions that came with your device for the device’s PIN code and other information about the device.When the connection is made, the à (Bluetooth) indicator or a Bluetooth message displays in the home screen.connect to handsfree device during a callNote: You must have already paired with the device (see page 49).Press Options, then select Connect Bluetooth.Note: You can’t switch to a headset or car kit if you are already connected to a Bluetooth device.copy files to another deviceYou can move or copy a multimedia object (such as a picture or sound file), or copy a Contacts entry, from your phone to a computer or other device.Note: You can’t copy or move some copyrighted objects. 1Connect to the other device (see page 49).2On your phone, scroll to the object or Contacts entry that you want to copy.3Press Options.4For multimedia objects, scroll to the object and press the center keys. Press Options, then scroll to Move or Copy and press Select.orFor a Contacts entry, scroll to the entry and press Options. Scroll to Share Phonebook Entry and press Select.5Select the device name, or select [Look For Devices] to search for the device where you want to copy the file.If your phone could not copy the file to the other device, make sure the device is on and ready in discoverable mode (see the user’s guide for the device). Also, make sure the device is not busy with another similar Bluetooth connection.](https://usermanual.wiki/Motorola-Mobility/T56JE1/User-Guide-917738-Page-52.png)
![54other features—contactscontactsDTMF TonesYour phone can send Dual Tone Multi Frequency (DTMF) tones for calling card calls or other automated touch-tone calls.Set up DTMF tones:s>w >Settings >Initial SetupScroll to DTMF and press Change, then select Short, Long, or Off.Switch between voice calls and DTMF calls:s>w >Settings >Personalize >Sound Settings >Number Dialing >DTMF or Voicefeaturesfeaturescreate entrys >nContacts >[New Entry]view entryTo view an entry, scroll to the entry and press the center keys.To perform other actions on an entry, scroll to the entry and press Options to open the Phonebook Menu.call entrys >nContactsScroll to the entry you want to call and pressN.](https://usermanual.wiki/Motorola-Mobility/T56JE1/User-Guide-917738-Page-56.png)


![58other features—personalizepersonalizevoice commandsYou can place calls and complete other actions by speaking commands to your phone. 1Press and release the voice key on the right side of the phone.Your phone displays and speaks Say a command, followed by a list of voice commands.check contacts memory spaces>nContactsPress Options, then scroll to Ph Book Capacity and press Select.create mailing listCreate a mailing list as a single phonebook entry:s >nContacts >[New Entry] >Mailing ListEnter a name for the list and press Ok. Scroll to Members and press the center keys.Scroll to each entry you want to add and press the center keys. When you are finished adding members, press Ok. Press Done to save the mailing list.When you send a message to a mailing list, the message goes to all entries in that list.featuresadd entries to mailing lists>nContactsScroll to the desired mailing list name and press Options, then scroll to Edit and press Select.Scroll to Members and press the center keys. Scroll to each entry you want to add and press the center keys. When you are finished adding members, press Ok. Press Done to save the mailing list.features](https://usermanual.wiki/Motorola-Mobility/T56JE1/User-Guide-917738-Page-60.png)


![other features—security67securitycreate voice recordNote: Recording phone calls is subject to varying state and federal laws regarding privacy and recording of conversations.s >ÉTools >Voice Records >[New Voice Record]Press the center keys, then press and hold the voice key (on the right side of the phone) and begin recording. Release the voice key when finished.play voice records >ÉTools >Voice RecordsScroll to the voice record you want to play and press the center keys.calculator Calculate numbers:s >ÉTools >Calculatorfeaturesconvert currencys >ÉTools >CalculatorPress Options, then scroll to Exchange Rate and press Select. Enter the desired exchange rate and press Ok. Enter the amount to be converted am press Options. Scroll to Convert Currency and press Select.featureslock applications >wSettings >Security >Lock ApplicationWhen prompted, enter the unlock code and press Ok. Then scroll to the application you want to lock and press Change.features](https://usermanual.wiki/Motorola-Mobility/T56JE1/User-Guide-917738-Page-69.png)