Motorola Mobility T56ZV1 Portable Cellular Transceiver User Manual ZV EX08

Motorola Mobility LLC Portable Cellular Transceiver ZV EX08
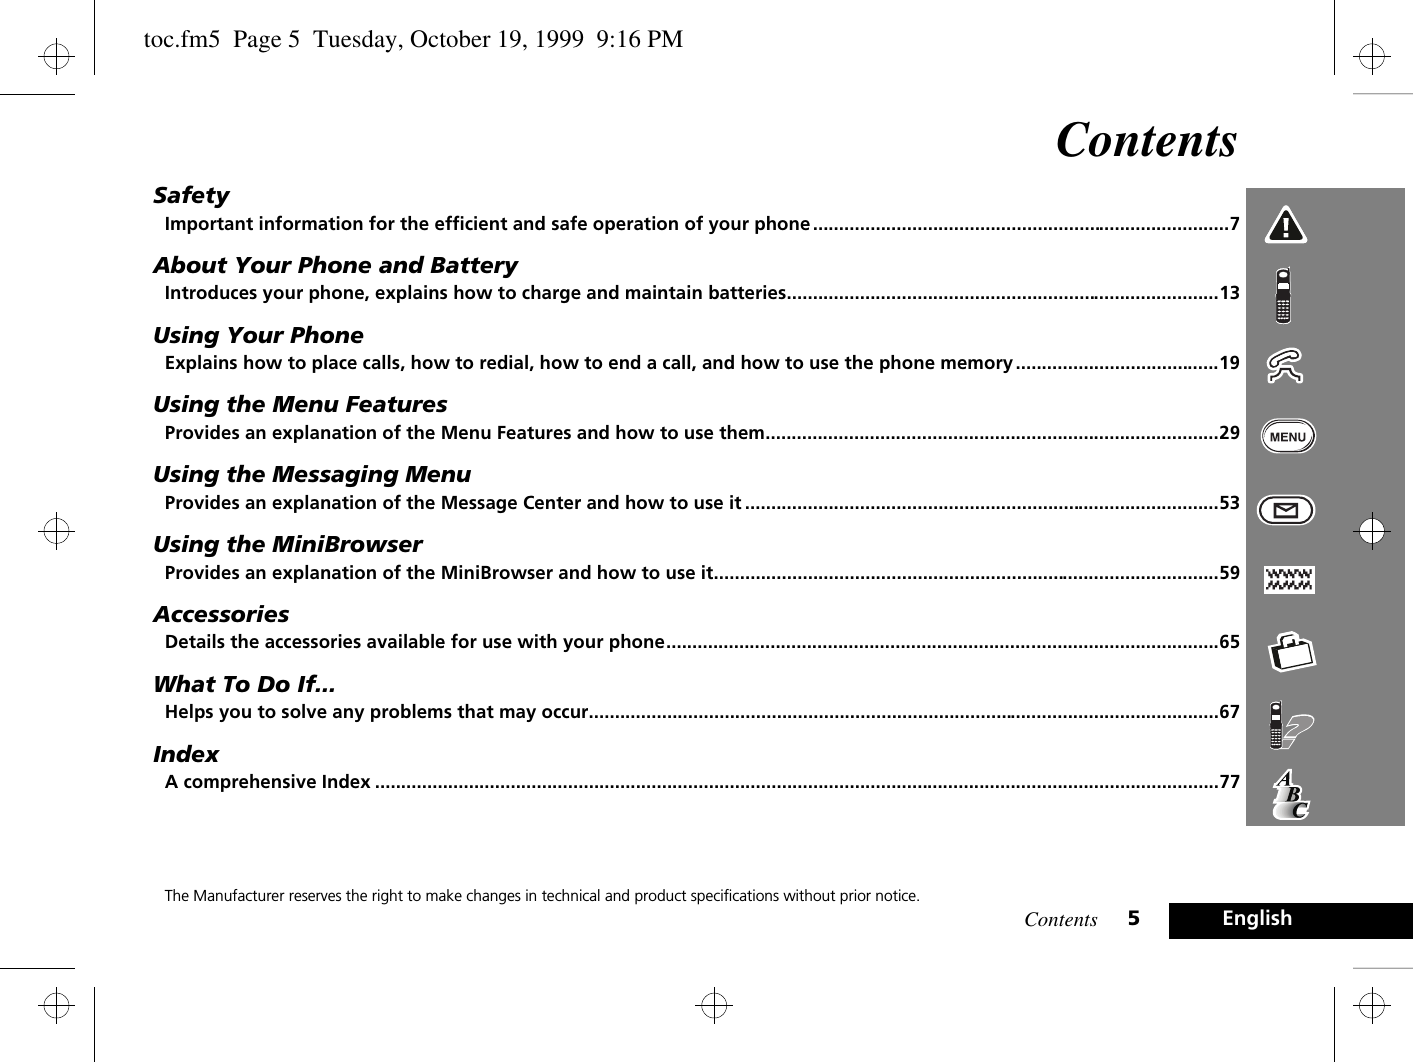
Contents

Motorola Exhibit 8 Users Manual
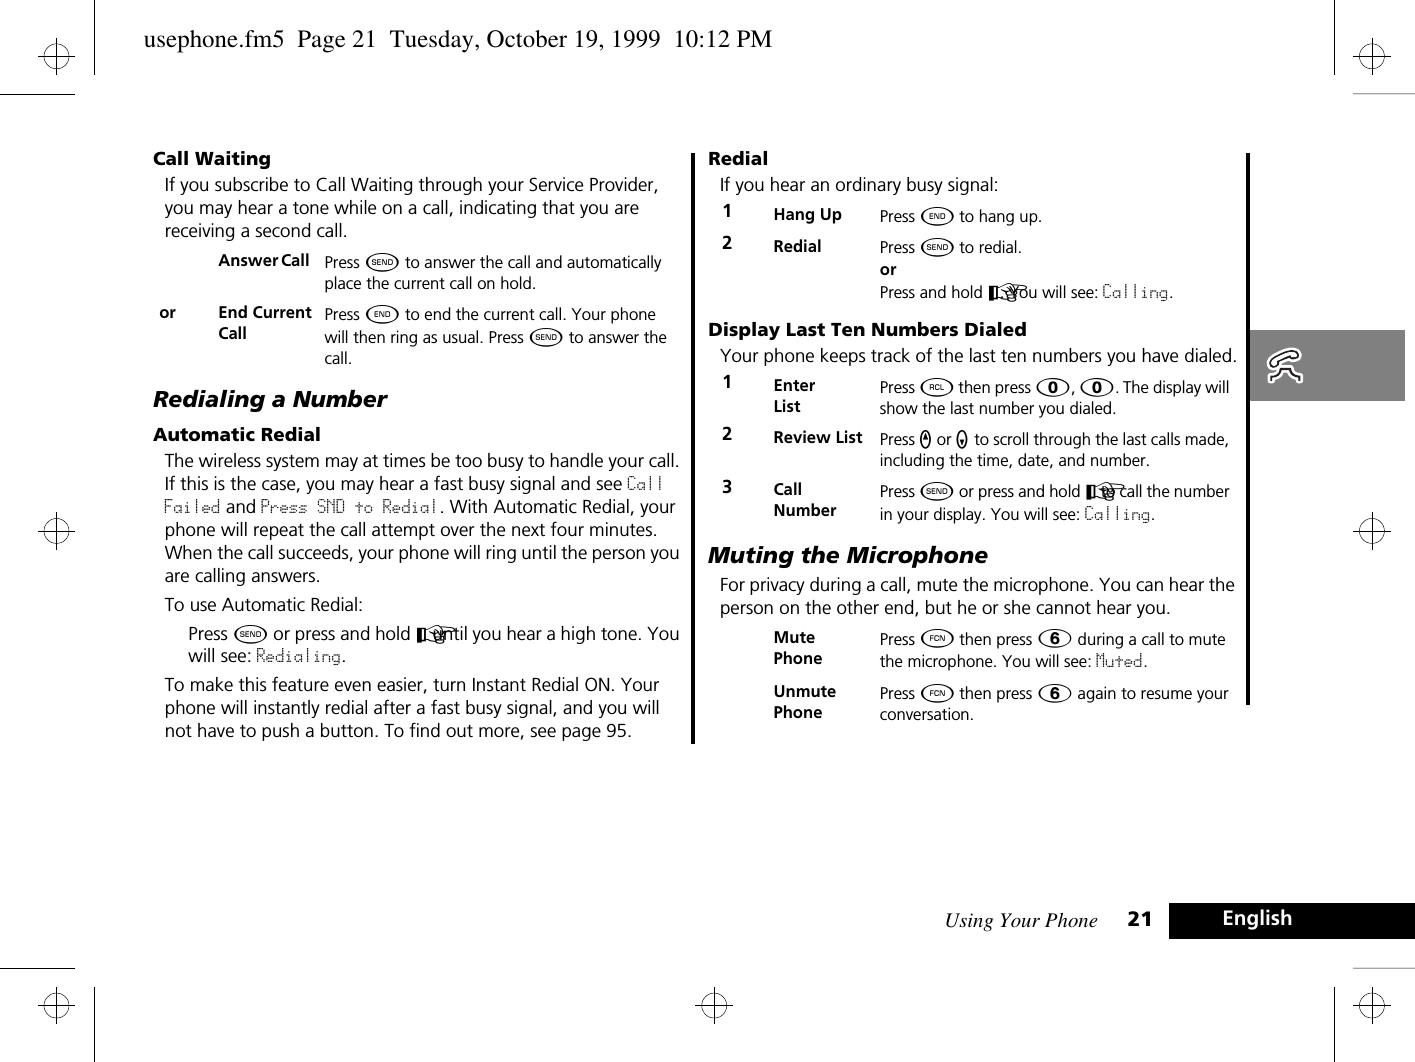
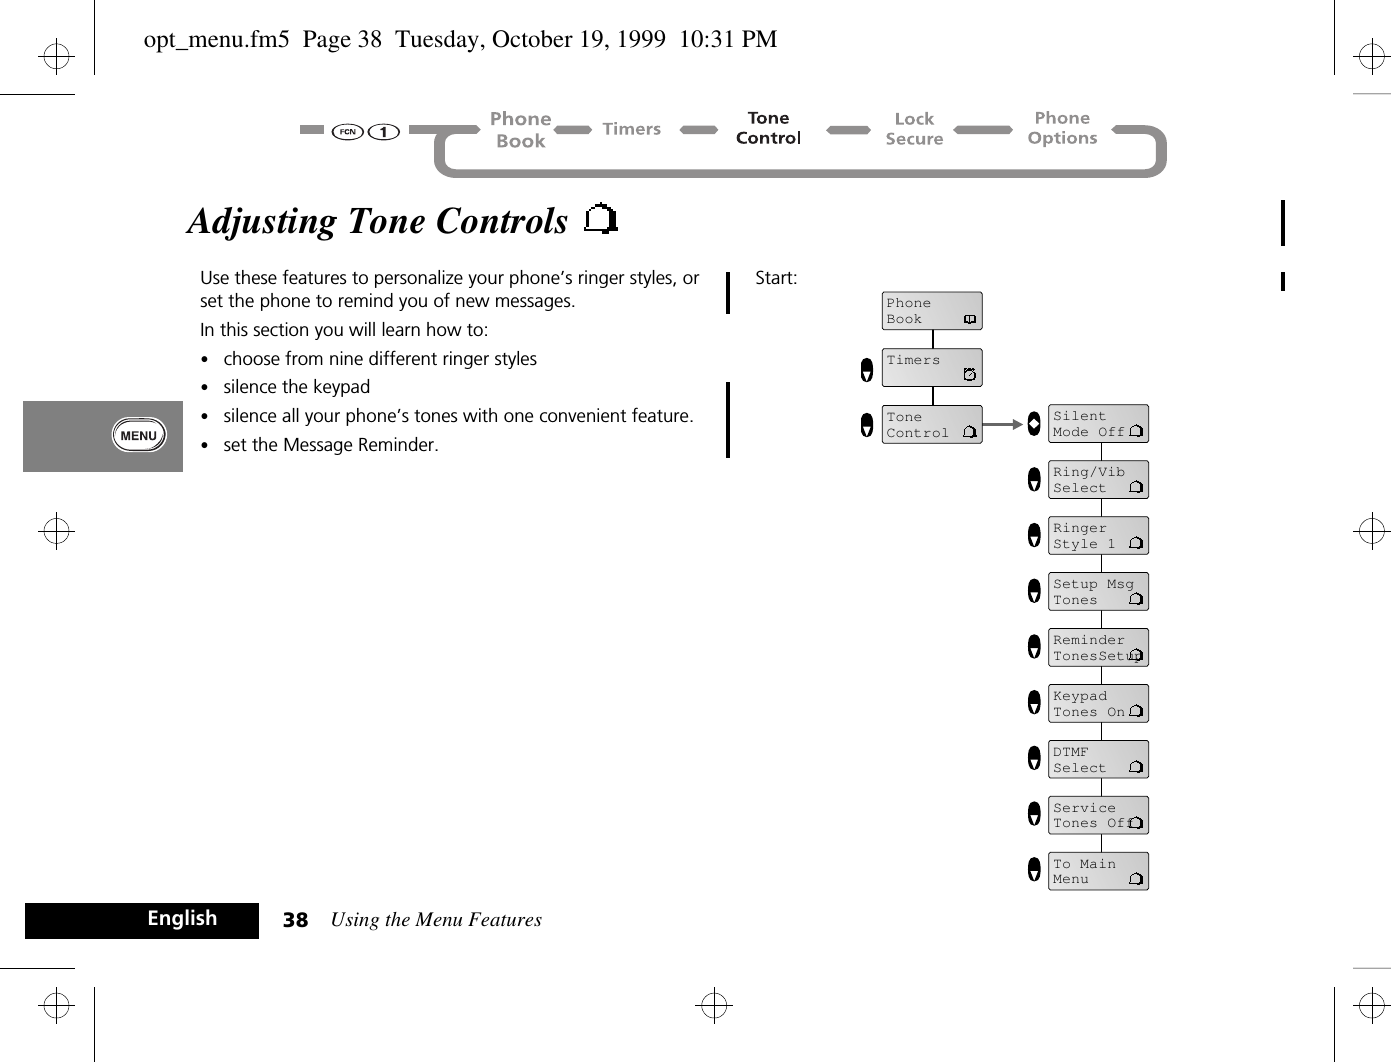
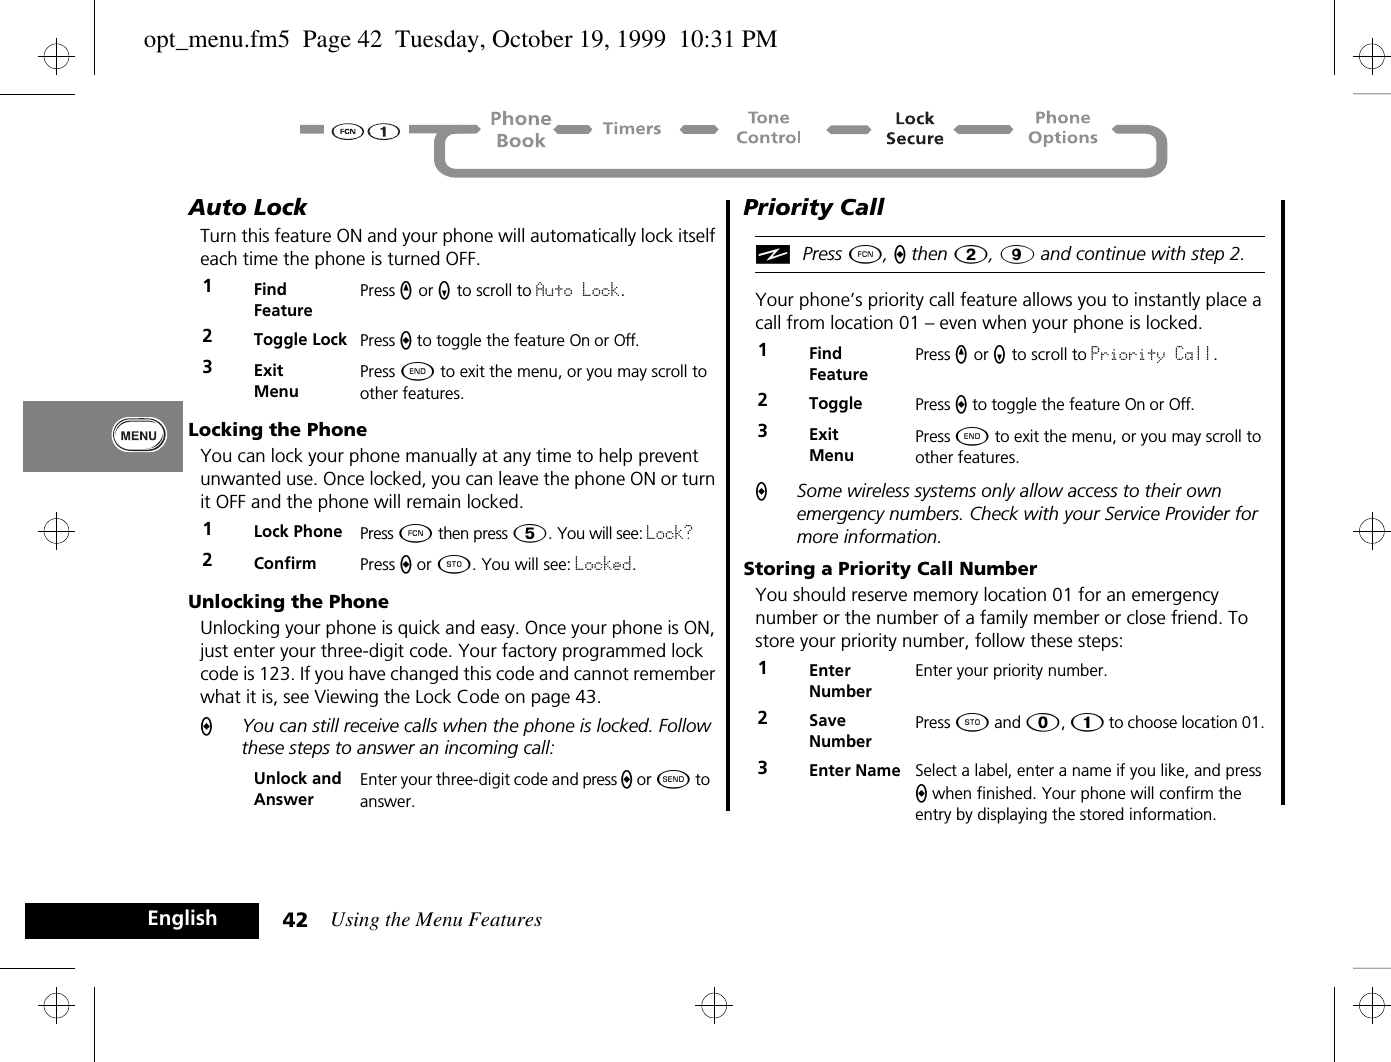
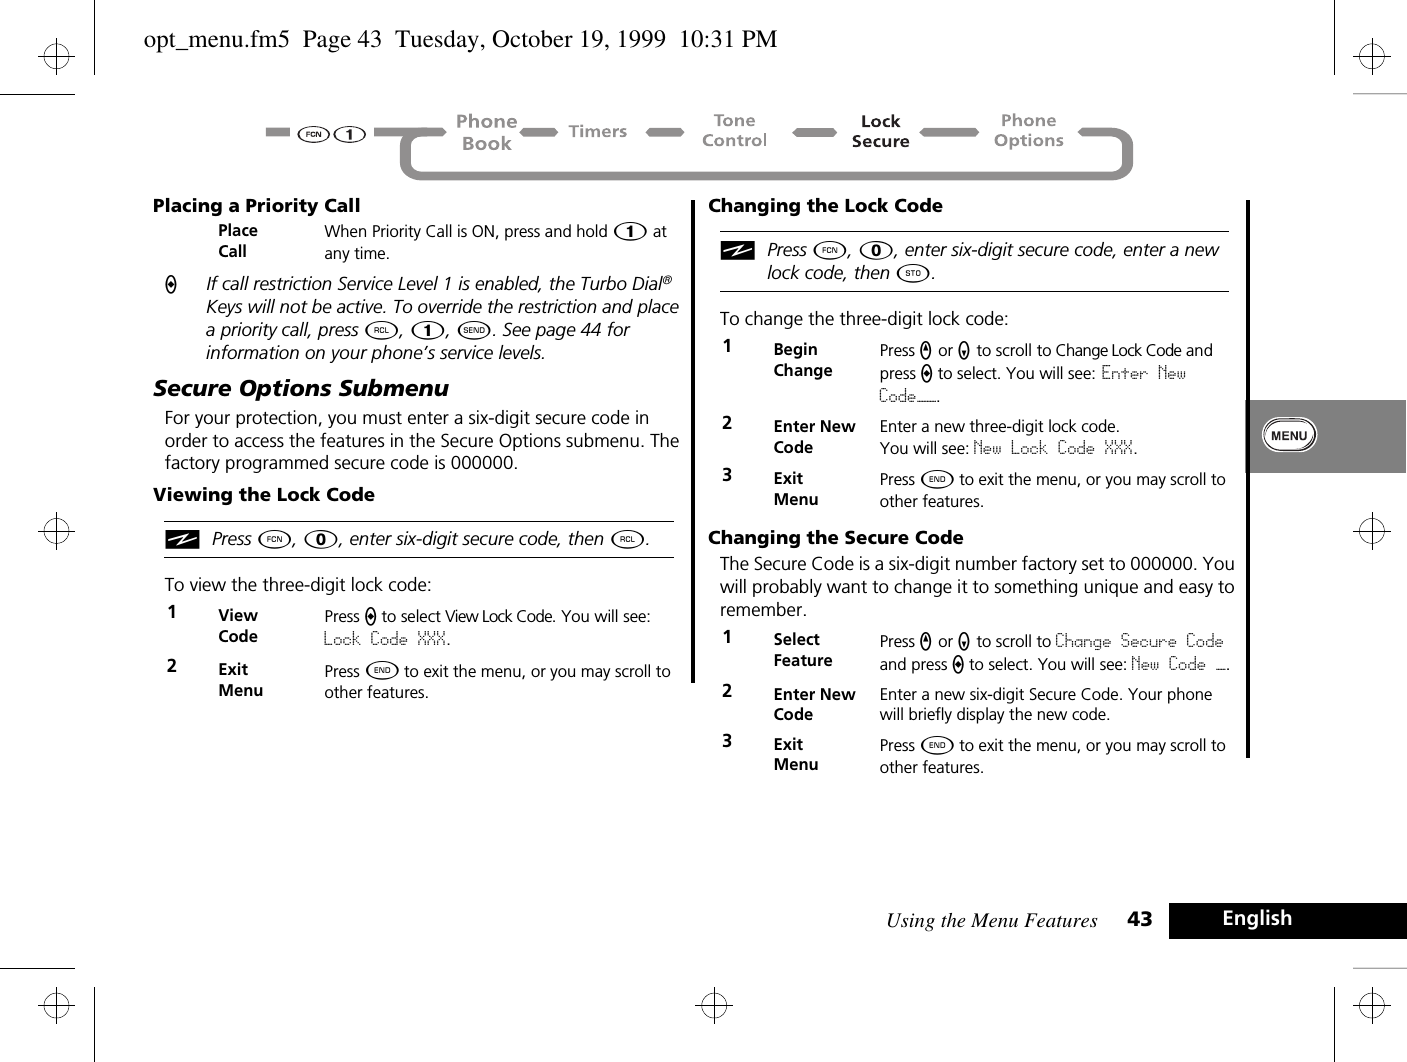
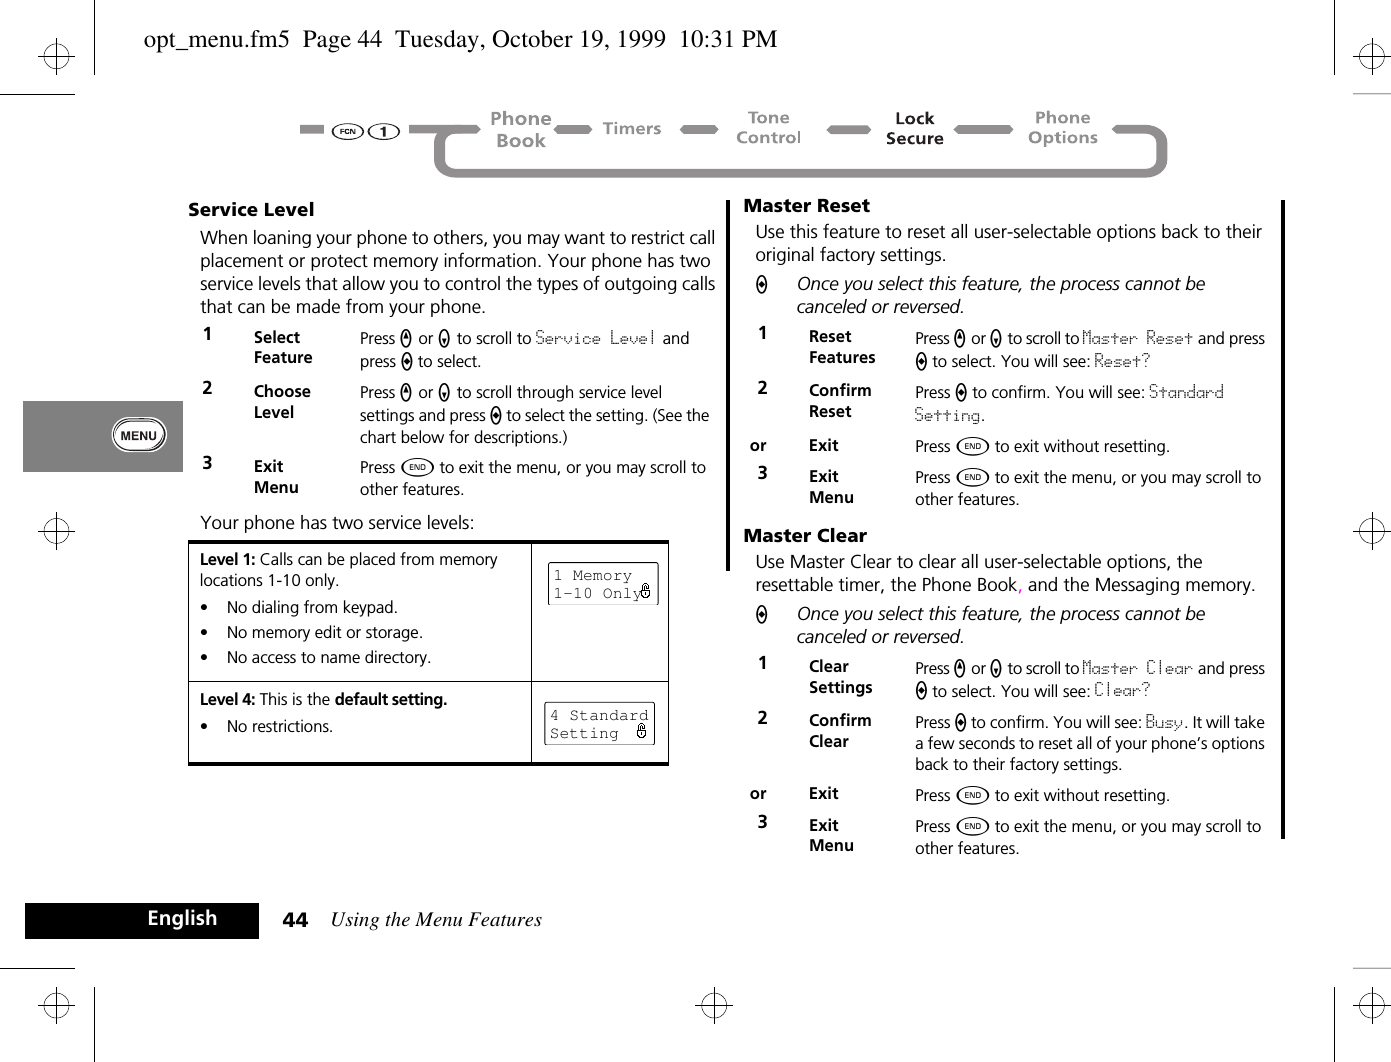
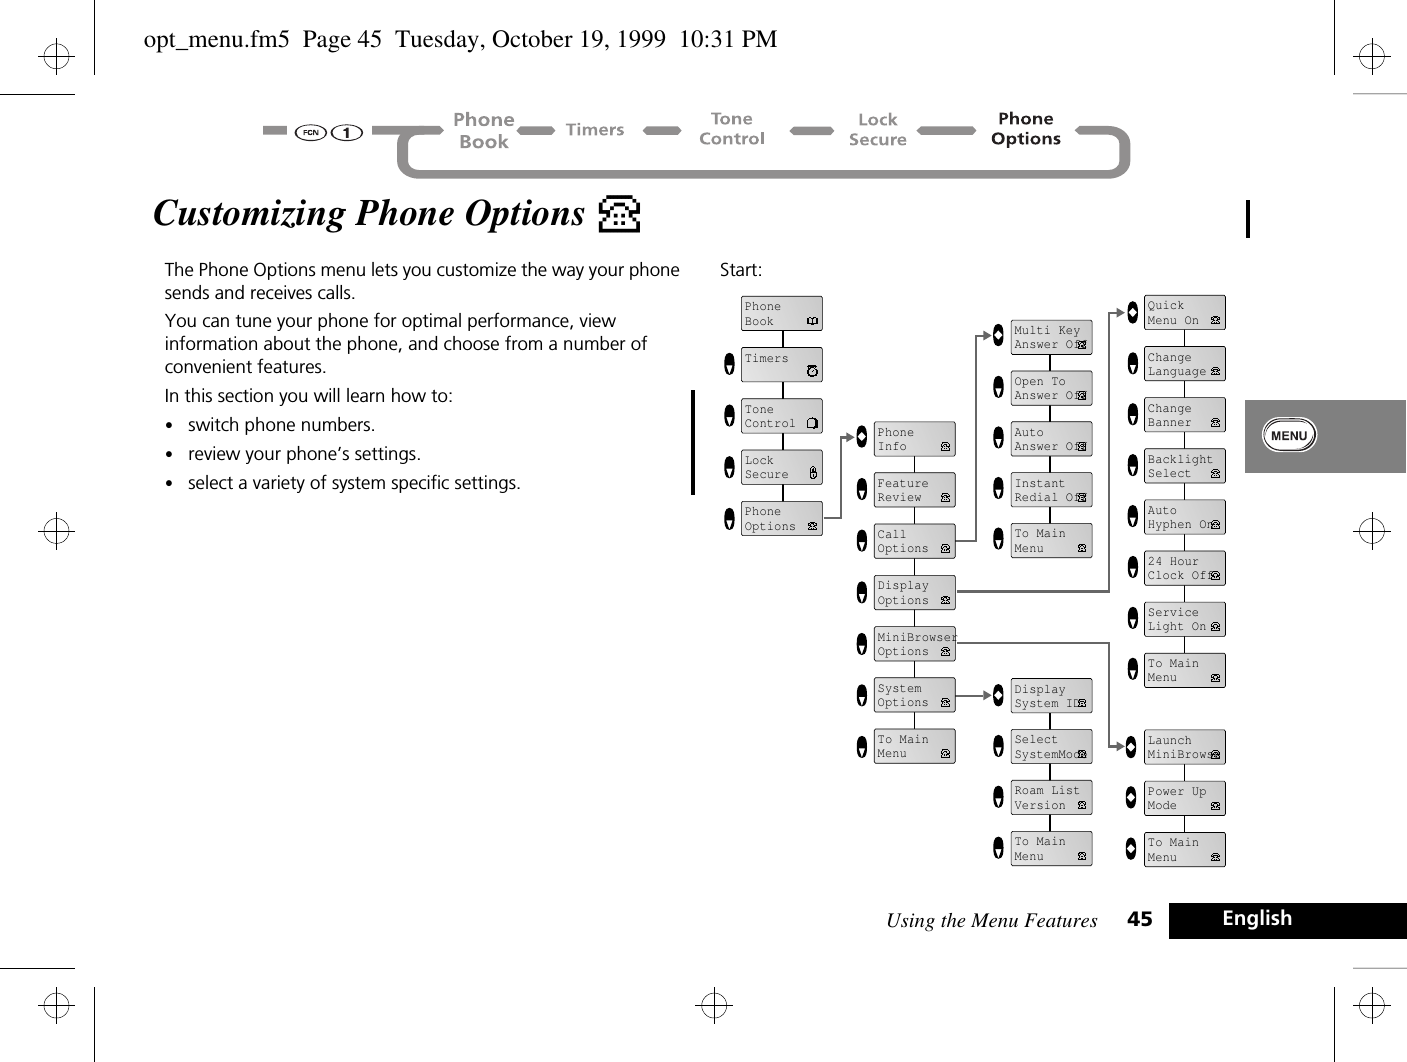
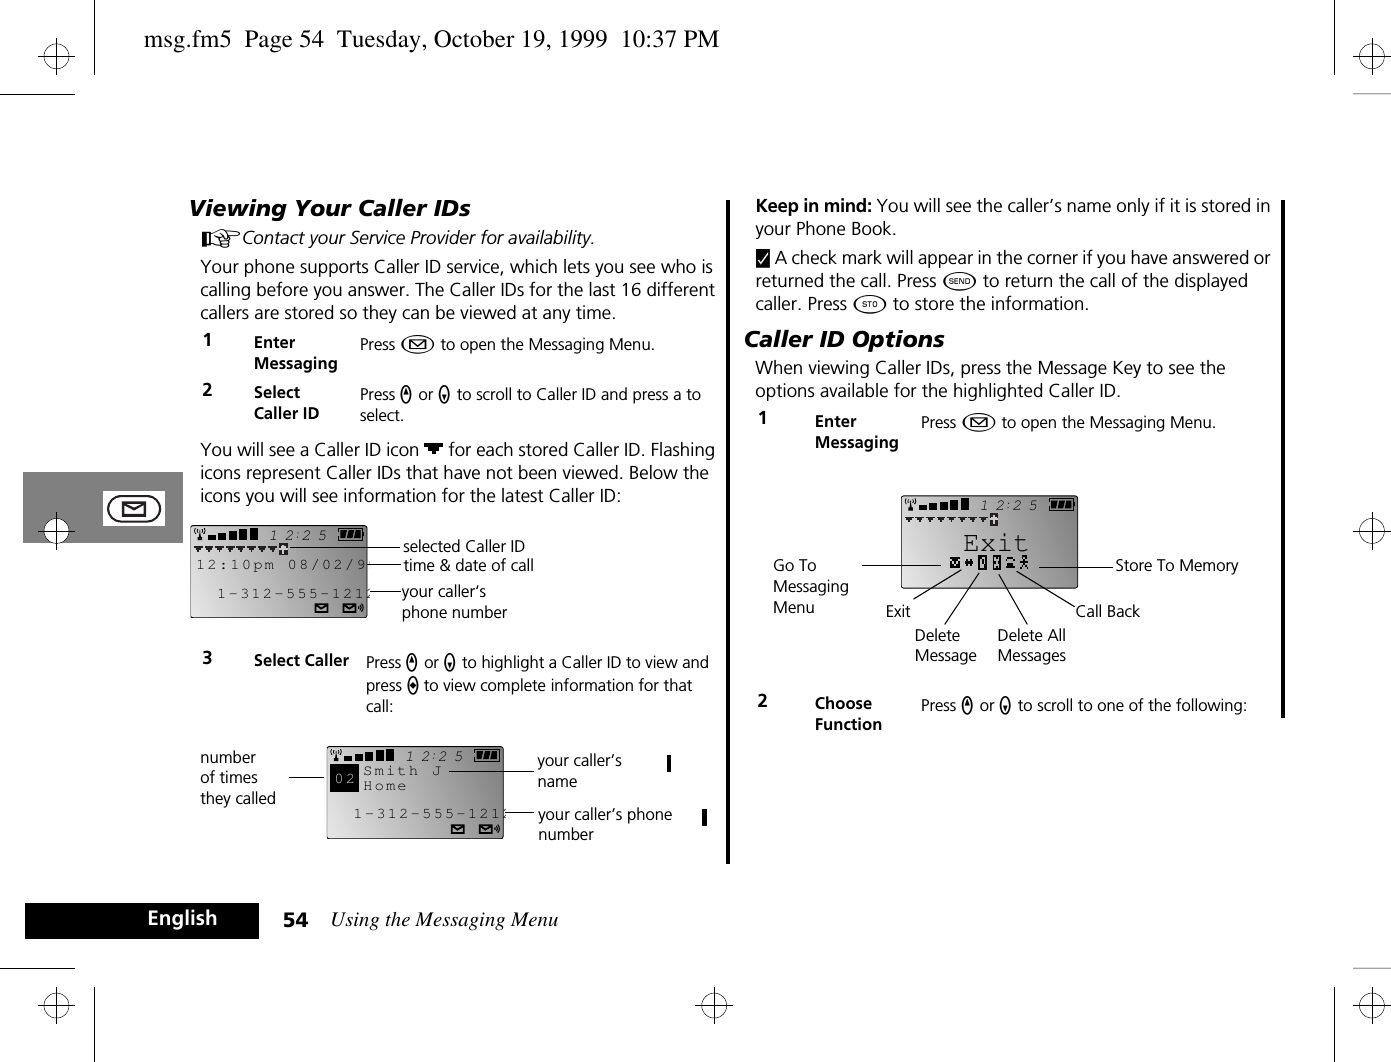
APPLICANT:  MOTOROLA, INC. FCC ID: IHDT56ZV1EXHIBIT 8INSTRUCTION MANUALA preliminary draft copy of the Users Manual follows:
Introduction 1EnglishIntroductionWelcomeThank you for choosing your Motorola phone from a global leader in communications technology. All Motorola digital cellular phones are designed and manufactured to meet Motorola’s rigorous specifications and world-class quality standards. During development, our laboratory testing team took your cellular phone through rigorous durability tests including temperature, humidity, shock, dust, vibration, and drop tests—and the phone still worked! We are confident that the phone you purchased will meet your own exacting standards. Enjoy your Motorola phone.PHONE GRAPHIC TO BE SUPPLIEDOR ON INSIDE OF FRONT COVERintro.fm5  Page 1  Tuesday, October 19, 1999  9:14 PM
Introduction2EnglishUnderstanding this ManualMany of your phone options are accessed by a simple menu system. A full description of the menus and how to move around them is covered in the next section Menu Navigation. When the manual describes the use of each menu item, it will be assumed that you are familiar with the menu system.Key PressesKey presses are represented in this manual using symbols so that you may locate and use the required sequence quickly. A sequence of key presses may be shown as follows:Ä â 7 CThis means you should press Ä followed by â, 7, and then C, in sequence, not simultaneously.Prompts and MessagesYour phone responds to key presses by displaying either easy to understand prompts that guide you to the next action, or simple messages confirming that your action is complete. Prompts and messages are represented in this manual in LCD style, for example:Enter 1st Letter or Location __Other SymbolsYou will find the following symbols used throughout this manual:AA Note contains additional information which is relevant to the feature/item.!A Caution contains important additional information which is relevant to the efficient and/or safe usage of your phone.iThis symbol indicates a short key sequence for the feature.intro.fm5  Page 2  Tuesday, October 19, 1999  9:14 PM
Introduction 3EnglishMenu NavigationA large number of your phone's options are accessed by using menus which use a common approach for selection, change and cancellation.Please read this section carefully before attempting to access a menu option. When you understand the common approach to menu navigation and how the menus are shown on the page, you will be able to access and change options with ease.Menus and Sub-menusA menu is a simple list of options. Some of these options provide access to a further list of options called a sub-menu. When navigating through the menus you may find it is helpful to think in terms of menu levels - the ‘parent’ menu being on one level and its sub-menus being on a lower level.Navigating the MenusYou can navigate through the menu system using the three keys located on the left side of the phone. Use the upper and lower volume keys to scroll to sub-menus and to control volume. Use the middle Smart Button to choose menus and functions.Follow these symbols as a guide for using the keys on the side of your phone:Press q to scroll up.Press a to select.Press Z to scroll down.You can also use your phone’s Ç and È keys to scroll through the menu system.Leaving the MenusPress ¼ to exit the menu.Menu Options with Security CodesSome options are protected from misuse by requiring you to entry one of the security codes. To use these options, you must enter the requested code before proceeding.intro.fm5  Page 3  Tuesday, October 19, 1999  9:14 PM
Introduction4EnglishTotal Customer SatisfactionAt Motorola, Total Customer Satisfaction is a top priority. If you have a question, a suggestion or a concern about your Motorola Cellular Phone, Motorola wants to hear from you.Please contact the Motorola Cellular Response Center by fax on: +44 (0) 131 458 6732, or use one of the local phone numbers in the following countries:Austria 0660 7246Belgium  0800 72 370Czech Republic 00420 2 21 85 21 01Denmark 4348 8005Egypt 02 3411800Eire 01 402 6887Finland  0800 117 036France  0 803 303 302Germany 0180 35050Greece  00800 441 28150Italy  02 696 333 16Jordan 06 863750Kuwait  484 2000 Ext 1177Lebanon 01 744156Luxembourg  0800 21 99Netherlands  0800 022 27 43Norway  22 55 10 04Oman 790925Portugal 01 318 0051Qatar 418999Saudi Arabia  01 2303294South Africa  0800 11 48 49Spain 902 100 077Sweden  08 445 1210Switzerland 0800 553 109Turkey 0212 425 9090UK 0500 55 55 55United Arab Emirates  04 32 11 66Hong Kong 852 25063888People’s Republic of China 86 10 68466060Singapore 65 4855 333Taiwan 886 2 87731746United States of America 1 800 331 6456Canada 1 800 461 4575For e-mail questions contact:mcrc@ei.css.mot.comFor Internet questions contact:http://www.mot.comintro.fm5  Page 4  Tuesday, October 19, 1999  9:14 PM
Contents 5EnglishContentsSafetyImportant information for the efficient and safe operation of your phone ................................................................................7About Your Phone and BatteryIntroduces your phone, explains how to charge and maintain batteries...................................................................................13Using Your PhoneExplains how to place calls, how to redial, how to end a call, and how to use the phone memory .......................................19Using the Menu FeaturesProvides an explanation of the Menu Features and how to use them.......................................................................................29Using the Messaging MenuProvides an explanation of the Message Center and how to use it ...........................................................................................53Using the MiniBrowserProvides an explanation of the MiniBrowser and how to use it.................................................................................................59AccessoriesDetails the accessories available for use with your phone..........................................................................................................65What To Do If...Helps you to solve any problems that may occur.........................................................................................................................67IndexA comprehensive Index ..................................................................................................................................................................77The Manufacturer reserves the right to make changes in technical and product specifications without prior notice.toc.fm5  Page 5  Tuesday, October 19, 1999  9:16 PM
Contents6Englishtoc.fm5  Page 6  Tuesday, October 19, 1999  9:16 PM
Safety 7EnglishSafetyWireless Phone Safety Tips“Safety is your most important call!”Your Motorola wireless telephone gives you the powerful ability to communicate by voice - almost anywhere, anytime, wherever wireless phone service is available and safe conditions allow. But an important responsibility accompanies the benefits of wireless phones, one that every user must uphold.When driving a car, driving is your first responsibility. If you find it necessary to use your wireless phone while behind the wheel of a car, practice good common sense and remember the following tips:1. Get to know your Motorola wireless phone and its features such as speed dial and redial. If available, these features help you to place your call without taking your attention off the road.2. When available, use a hands-free device. If possible, add an additional layer of convenience to your wireless phone with one of the many Motorola Original hands-free accessories available today.3. Position your wireless phone within easy reach. Be able to access your wireless phone without removing your eyes from the road. If you receive an incoming call at an inconvenient time, if possible, let your voice mail answer it for you.4. Let the person you are speaking with know you are driving; if necessary, suspend the call in heavy traffic or hazardous weather conditions. Rain, sleet, snow, ice, and even heavy traffic can be hazardous. 5. If you receive an incoming call at an inconvenient time do not take notes or look up phone numbers while driving. Jotting down a “to do” list or going through your address book takes attention away from your primary responsibility—driving safely.6. Dial sensibly and assess the traffic; if possible, place calls when you are not moving or before pulling into traffic. Try to plan calls when your car will be station-ary. If you need to make a call while moving, dial only a few numbers, check the road and your mir-rors, then continue.7. Do not engage in stressful or emotional conversa-tions that may be distracting. Make people you are talking with aware you are driving and suspend con-versations which have the potential to divert your attention away from the road.8. Use your wireless phone to call for help. Dial 9-1-1 or other local emergency number in the case of fire, traffic accident or medical emergencies.19. Use your wireless phone to help others in emergen-cies. If you see an auto accident, crime in progress or other serious emergency where lives are in danger, call 9-1-1 or other local emergency number, as you would want others to do for you.110. Call roadside assistance or a special non-emergency wireless assistance number when necessary. If you see a broken-down vehicle posing no serious hazard, a broken traffic signal, a minor traffic accident where no one appears injured, or a vehicle you know to be stolen, call roadside assistance or other special non-emergency wireless number.11. Wherever wireless phone service is available.safety.fm5  Page 7  Tuesday, October 19, 1999  9:17 PM
Safety8EnglishCheck the laws and regulations on the use of wireless telephones and their accessories in the areas where you drive. Always obey them. The use of these devices may be prohibited or restricted in certain areas.For more information, please call 1-888-901-SAFE or visit the CTIA website at www.wow-com.com ™ .safety.fm5  Page 8  Tuesday, October 19, 1999  9:17 PM
Safety 9EnglishHand-Held Portable PCS TelephoneIMPORTANTRead this information before using your PCS TelephoneExposure To Radio Frequency SignalsYour wireless handheld portable telephone is a low power radio transmitter and receiver. When it is ON, it receives and also sends out radio frequency (RF) signals.In August 1996, the Federal Communications Commission (FCC) adopted RF exposure guidelines with safety levels for hand-held wireless phones. Those guidelines are consistent with the safety standards previously set by both U.S. and international standard bodies:•ANSI C95.1 (1992)1•NCRP Report 86 (1986)1•ICNIRP (1996)11. American National Standard Institute: National Council on radiation Protection and Measurements; International Commission on Non-Ionizing Radiation ProtectionThese standards are based on comprehensive and periodic evaluations of relevant scientific literature. For example, over 120 scientists, engineers and physicians from universities, government health agencies and industry reviewed the available body of research to develop the updated ANSI Standard (C95.1).The design of your phone complies with the FCC guidelines (and these standards).Antenna CareUse only the supplied or approved replacement antenna. Unauthorised antennas, modifications or attachments could damage the phone and may violate FCC regulations.Phone OperationNormal Position: Hold the phone as you would any other telephone with the antenna pointed up and over your shoulder.Tips on Efficient Operation: For your phone to operate most efficiently:•Extend your antenna fully (if applicable).•Do not touch the antenna unnecessarily when the phone is in use. Contact with the antenna affects call quality and may cause the phone to operate at a higher power level than otherwise needed.safety.fm5  Page 9  Tuesday, October 19, 1999  9:17 PM
Safety10EnglishBatteries!All batteries can cause property damage, injury or burns if a conductive material such as jewelry, keys or beaded chains touches exposed terminals. The material may complete an electrical circuit and become quite hot. To protect against such unwanted current drain, exercise care in handling any charged battery, particularly when placing it inside your pocket, purse or other container with metal objects. When the battery is detached from the phone, your batteries are packed with a protective battery cover; please use this cover for storing your batteries when not in use.DrivingCheck the laws and regulations on the use of wireless telephones in the areas where you drive. Always obey them. Also, if using your phone while driving, please:•give full attention to driving - driving safely is your first responsibility•use hands-free operation, if available•pull off the road and park before making or answering a call if driving conditions so require.Electronic DevicesMost modern electronic equipment is shielded from RF signals. However, certain electronic equipment may not be shielded against the RF signals from your wireless phone.PacemakersThe Health Industry Manufacturers Association recommends that a minimum separation of six (6”) inches be maintained between a handheld wireless phone and a pacemaker to avoid potential interference with the pacemaker. These recommendations are consistent with the independent research by and recommendations of Wireless Technology Research.Persons with pacemakers:•Should ALWAYS keep the phone more than six inches from their pacemaker when the phone is turned on.•Should not carry the phone in a breast pocket.•Should use the ear opposite the pacemaker to minimise the potential for interference.If you have any reason to suspect that interference is taking place, turn your phone OFF immediately.Hearing AidsSome digital wireless phones may interfere with some hearing aids. In the event of such interference you may want to consult your hearing aid manufacturer to discuss alternatives.Other Medical DevicesIf you use any other personal medical device, consult the manufacturer of your device to determine if they are adequately shielded from external RF energy. Your physician may be able to assist you in obtaining this information.Turn your phone OFF in health care facilities when any regulations posted in these areas instruct you to do so. Hospitals or health care facilities may be using equipment that could be sensitive to external RF energy.safety.fm5  Page 10  Tuesday, October 19, 1999  9:17 PM
Safety 11 EnglishVehiclesRF signals may affect improperly installed or inadequately shielded electronic systems in motor vehicles. Check with the manufacturer or its representative regarding your vehicle. You should also consult the manufacturer of any equipment that has been added to your vehicle.Posted FacilitiesTurn your phone OFF in any facility where posted notices so require.AircraftFCC regulations prohibit using your phone while in the air. Switch OFF your phone before boarding an aircraft.Blasting AreasTo avoid interfering with blasting operations, turn your phone OFF when in a “blasting area” or in areas posted: “turn off two-way radio”. Obey all signs and instructions.Potentially Explosive AtmospheresTurn your phone OFF and do not remove the battery when in any area with a potentially explosive atmosphere and obey all signs and instructions. Sparks, from your battery, in such areas could cause an explosion or fire resulting in bodily injury or even death.Areas with a potentially explosive atmosphere are often, but not always clearly marked. They include fueling areas such as gasoline stations; below deck on boats; fuel or chemical transfer or storage facilities; areas where fuel odors are present, i.e. if a gas/propane leak occurs in a car or home; areas where the air contains chemicals or particles, such as grain, dust, or metal powders; and any other area where you would normally be advised to turn off your vehicle engine.For Vehicles Equipped with an Air BagAn air bag inflates with great force. DO NOT place objects, including both installed or portable wireless equipment, in the area over the air bag or in the air bag deployment area. If in-vehicle wireless equipment is improperly installed and the air bag inflates, serious injury could result.safety.fm5  Page 11  Tuesday, October 19, 1999  9:17 PM
Safety12Englishsafety.fm5  Page 12  Tuesday, October 19, 1999  9:17 PM
About Your Phone and Battery 13 EnglishAbout Your Phone and BatteryPhone Overview See the inside front cover of this manual for a diagram of the components described below.Retractable Antenna—Provides superior connectability. Extend for best performance.Earpiece—Ultra-compact phone speaker.Accessory Connector Port—Provides the connections for an external power supply and vehicular and optional accessories.Headset Jack—Provides the connection for an optional headset.Microphone—Positioned for convenient conversation.Alphanumeric Display—Displays your input from the keypad, information recalled from memory, and other messages.Function KeysÁ—Turns the phone On and Off.Ä—Acts as a “shift” key to access the secondary functions of other keys.ä—Recalls phone numbers from memory and acts as the left soft key for MiniBrowser navigation.—Stores phone numbers into memory and acts as the right soft key for MiniBrowser navigation.C—Clears characters from the screen.¼—Ends phone calls.¾—Places or answers calls.Ç and È—Can be used to scroll through memory entries and menu features.¿ Messaging Menu button—Opens messaging menus.A Smart Button—Use the Smart Button to place and end calls, enter menus, toggle features on and off, and select items in the display. See qZ Volume Keys—The upper and lower volume keys can adjust keypad, earpiece, and ringer volume. After pressing the Smart Button, the volume keys also scroll through memory entries and menu features.Using the Smart ButtonUse the Smart Button to place and end calls, enter menus, toggle features on and off, and select items in the display. The Smart Button is the middle key on the left side—easy to feel, easy to find, and easy to use.The symbol § in your display represents the Smart Button.Selecting Items in the DisplayThe primary use of the Smart Button is to make selections. Whenever the phone offers you a choice, such as setting a ringer style, press A to select it. You will see: Press § to Select.Toggling Features On and OffSome of your phone’s features toggle on and off. Use the upper or lower volume key to scroll to the desired feature, then press the Smart Button to select it. You will see: Press § to Toggle.Entering the Menu SystemPress Ä, then press A to enter the phone’s menu system.AYou can also enter the menu system by pressing Ä Ú.abtphone.fm5  Page 13  Tuesday, October 19, 1999  10:21 PM
About Your Phone and Battery14EnglishPlacing and Ending a CallTo place a call when the number you want to call is on the display, press and hold A. Press and hold A again to end a call. See “Using Your Phone” on page 19.Opening the Quick MenuWhen your phone is idle, press A to display a menu containing shortcuts to your phone’s most popular features. See page 22.Opening Your Phone BookTo open the Phone Book with all your names and numbers, press A twice. See page 23.Controlling VolumeUse the upper and lower volume keys to adjust earpiece, keypad, and ringer volume. When you press these keys, the phone’s speaker demonstrates the current volume level.Adjusting Earpiece and Keypad VolumeThe audio feedback your phone gives you when you press a key is called keypad tones. To adjust the volume of the keypad tones, use the volume keys when your phone is idle. ATo silence the keypad tones, see page 39To adjust the volume of your conversation (the earpiece volume) use the volume keys during a call.Press q to raise the volume or press Z to lower the volume.Adjusting Ringer VolumeTo adjust ringer volume:Press Ä q to raise the volume or press Ä Z to lower the volume.The DisplayThe display on your phone can show alphanumeric characters as well as useful information symbols.The various elements of the display are as follows1. rx Signal Strength. The more segments displayed in the bar graph, the better the signal strength.2. D Digital Indicator. If you are in a digital coverage area, the digital indicator appears. Your phone operates more efficiently in Digital mode.3. IU In Use Indicator. Displayed when a call is in progress.4. Rm Roam. Lights up when your phone accesses a wireless service outside of your home system. When you leave your wireless Service Area, your phone roams (seeks another wireless system).2512Rm NSIU07/07/99234 5 6 7981abtphone.fm5  Page 14  Tuesday, October 19, 1999  10:21 PM
About Your Phone and Battery 15 English*The availability of this feature depends on your service provider.Your BatteryInstalling the BatteriesNew batteries are supplied uncharged and fitted within a protective battery carrier. To remove the batteries, press the release catch on the battery carrier and open the cover.To install the batteries in your phone:1Press the release catch of the phone battery cover and slide the battery cover towards the bottom of the phone.2Align the positive and negative (+ and -) connections on the battery with the positive and negative (+ and -) connections within the phone.3Press the battery towards the connections and push it downwards until it clicks into place. 4Replace the phone battery cover.5. NS No Service Indicator. If you travel beyond the range of a cellular system, the No Service Indicator appears to let you know that calls cannot be placed or received from your location.6. oShort Message Service*. Displayed when the phone has received a message. The symbol will flash when your message storage area is full.7. pVoicemail Waiting Indicator*. Displayed when you have a voice message waiting.8. qBattery Charge Indicator. The more segments displayed, the greater the battery charge.9. 12:00 Clock. When your phone is using a CDMA digital network, the display shows the current local time and date. You can set your clock for 12- or 24-hour format. See page 99 for more information.abtphone.fm5  Page 15  Tuesday, October 19, 1999  10:21 PM
About Your Phone and Battery16EnglishImportant Battery Information!Always treat your batteries with care. See ‘Batteries’, at the beginning of this manual. !Never leave your battery in extremely high temperatures (over 60°C), for example behind glass in very hot, direct sunlight.!Only Motorola Original Accessory batteries can be charged in the phone. This is to protect you and your phone from the risks of incorrect charging.Charging a New BatteryNew batteries are supplied in a totally uncharged state.To ensure maximum battery performance, a new battery (or battery that has not been used for several months) should be charged for at least 14 hours before use.AA new battery will require several full charge/discharge cycles in order to achieve its optimum performance.AA new battery, or a battery that has not been used for several months, may cause a premature fully charged indication. Ignore this indication and let the battery charge for several more hours, remove and re-insert the battery into the charger, and charge for an additional 14 hours.!Your batteries will not charge if they are not matched properly to the phone connection markings (+ and -). Please ensure that you have installed the batteries properly before initiating a charge.To ensure that you enjoy maximum battery life and use your battery to its fullest capacity:•The battery should be at or near room temperature when charging.Battery Performance and Maintenance•Best battery performance will be achieved when you regularly charge and discharge batteries as instructed in this manual.•Battery performance is greatly affected by network coverage.•Set Battery Saving Mode to On (see ‘Phone Setup Menu’) and/or Frequency of Search to Slow or Medium (see ‘Network Selection Menu’).•If left unused, a fully charged battery will discharge itself in approximately one month.•When not in use, store your battery uncharged in a cool, dark and dry place.abtphone.fm5  Page 16  Tuesday, October 19, 1999  10:21 PM
About Your Phone and Battery 17 EnglishRemoving Your Batteries!Switch off your phone before removing batteries. Failure to do so may damage your phone memory.1Press the release catch of the phone battery cover and slide the battery cover towards the bottom of the phone.2Remove the batteries.Charging Your Battery Using the Travel ChargerThe travel charger can power the phone and charge a fitted battery. !Ensure that the local mains voltage at your location matches that of your travel charger.Install the batteries into your phone (see ’Installing the Batteries’).To charge your battery:1Attach the correct adapter plug to the travel charger.2Connect the travel charger to the phone.AThe connector is keyed and can only be inserted one way.3Insert the travel charger plug into a suitable mains power socket. A beep-tone is heard and the battery icon flashes when charging begins. AThe beep-tone on the phone will not occur if the batteries are installed improperly. The beep-tone may take two minutes to occur with new or fully drained batteries. abtphone.fm5  Page 17  Tuesday, October 19, 1999  10:21 PM
About Your Phone and Battery18EnglishThe state of charging is monitored and displayed by your phone. See ‘Battery Meter Indicators’ later in this section for details.Low Battery WarningWhen the battery level is low and only a few minutes of talk time remain, a warning signal (two double beeps) will sound, and Low Battery will be displayed.For a detailed battery level reading: Press Ä Ý.The more segments filled on the battery gauge (Bx), the greater the charge.When the battery is completely discharged, your phone will turn off.Battery IndicatorsYour phone monitors and displays information about your battery. The following message will appear on the display, as the condition occurs:Battery Meter IndicatorsThe battery meter displays different messages depending on the batteries attached, and whether or not there is an external power source. The battery meter is found in the Call Related Features part of the Options Menu.AWhen the battery is completely discharged, you must charge the battery for one minute before you can make or accept a phone call.Low Battery The battery charge is low. The battery should be recharged. Charging BatteryThe battery is being charged.Charging CompleteCharging is complete. abtphone.fm5  Page 18  Tuesday, October 19, 1999  10:21 PM
Using Your Phone 19 EnglishUsing Your PhonePlacing and Receiving CallsThis section explains how to:•turn your phone ON and OFF•place calls, end calls, and receive calls.•redial phone numbers•mute your phoneTurning Your Phone On and OffTo turn the phone on:To turn the phone off, press and hold Á again. Powering off will be displayed, and you will hear an audible alert.What You Will SeeWhen you turn on your phone, it performs a self-test to let you know it is operational and then it scans for a service. While the phone scans, the display reads: Searching.When your phone finds a CDMA digital system, you will see the time and date and the   icon.Power Save ModeIf you travel outside the range of available networks, your phone continues to search for a signal. To save power, it stops searching every couple of minutes.Your phone will automatically begin searching again in a minute or two – if you would like it to start searching immediately, just press any key.Standby ModeTo conserve energy, your phone enters standby mode and turns off the backlight when you have not touched a key for a few seconds. The backlight will come back on as soon you press a key or open the phone.Placing a CallTo place a call:1Extend AntennaExtend the antenna completely for best performance.2Open PhoneOpen the phone to expose the keypad.3Turn ONPhonePress and hold Á until the display appears and you hear an audible alert.1Extend AntennaExtend the antenna completely for best performance.2Open PhoneOpen the phone to expose the keypad. If necessary, press Á to turn the phone ON.3EnterNumberEnter the number you want to call, for example: 555-1212. CorrectErrorsPress C to erase one digit at a time if you make a mistake. Press and hold C to erase the entire entry and start again.usephone.fm5  Page 19  Tuesday, October 19, 1999  10:12 PM
Using Your Phone20EnglishAYou can also recall a previously dialed or stored number. (See “Using Phone Memory” on page 23 for details on storing or recalling.)You can dial phone numbers with up to 32 digits, but only the last 20 digits appear in the display.Press ä to see the entire phone number.Your phone will display the first 24 digits, then a second screen will show the digits remaining in the phone number.Ending a CallThere are three ways to end a call:Receiving a CallYour phone must be powered on to receive calls.To answer a call:Caller IDIf Caller ID* is active on your phone, you will be able to see who is calling before you answer. The display will show either your caller’s name (if in your Phone Book) or your caller’s number. If you prefer to always see your caller’s number, see page 32 to turn Number Preference ON.The Caller IDs for your last 16 callers will be saved. See page 54 to learn how to view your stored Caller IDs.Unanswered Call IndicatorEven with the latest wireless technology, sometimes you are unavailable to answer calls. If your phone is ON, it keeps a count of unanswered calls. For example, if you miss two calls, your display will show: 2 Calls Unanswered.If you subscribe to Caller ID service, you can easily return the calls that you missed. See page 50 to learn how to return the calls you missed.* Contact your Service Provider for availability.4Place CallPress ¾ to place the call.orPress and hold A until you hear a high tone. You will see: Calling 555-1212.Close Close the phone to end a call.or Press Key Press ¼. or Hold Smart ButtonPress and hold A until you hear a high tone. You will see: Press § to End Call.Press A again to end the call.1Extend AntennaExtend the antenna completely for bestperformance.2Open PhoneOpen the phone to expose the keypad.orPress ¾ if the phone is already open.Clear DisplayPress C or press ¼ to clear the display, and you can begin placing calls again.2512Smith, Janeusephone.fm5  Page 20  Tuesday, October 19, 1999  10:12 PM
Using Your Phone 21 EnglishCall WaitingIf you subscribe to Call Waiting through your Service Provider, you may hear a tone while on a call, indicating that you are receiving a second call.Redialing a NumberAutomatic RedialThe wireless system may at times be too busy to handle your call. If this is the case, you may hear a fast busy signal and see Call Failed and Press SND to Redial. With Automatic Redial, your phone will repeat the call attempt over the next four minutes. When the call succeeds, your phone will ring until the person you are calling answers.To use Automatic Redial:Press ¾ or press and hold A until you hear a high tone. You will see: Redialing.To make this feature even easier, turn Instant Redial ON. Your phone will instantly redial after a fast busy signal, and you will not have to push a button. To find out more, see page 95.RedialIf you hear an ordinary busy signal:Display Last Ten Numbers DialedYour phone keeps track of the last ten numbers you have dialed.Muting the MicrophoneFor privacy during a call, mute the microphone. You can hear the person on the other end, but he or she cannot hear you.Answer Call  Press ¾ to answer the call and automatically place the current call on hold.or End Current CallPress ¼ to end the current call. Your phone will then ring as usual. Press ¾ to answer the call.1Hang Up Press ¼ to hang up.2Redial Press ¾ to redial. or Press and hold A. You will see: Calling.1Enter ListPress ä then press â, â. The display will show the last number you dialed.2Review List Press q or Z to scroll through the last calls made, including the time, date, and number.3Call NumberPress ¾ or press and hold A to call the number in your display. You will see: Calling.Mute PhonePress Ä then press ß during a call to mute the microphone. You will see: Muted.Unmute PhonePress Ä then press ß again to resume your conversation.usephone.fm5  Page 21  Tuesday, October 19, 1999  10:12 PM
Using Your Phone22EnglishUsing the Quick MenuThroughout this guide you will see shortcuts that point out simple ways to reach some of your phone’s features. If you have owned a Motorola phone before, some of these shortcuts will already be familiar to you. The Quick MenuPress the Smart Button and the Quick Menu opens on the display. The Quick Menu contains shortcuts to your phone’s most popular features. Press the volume keys to scroll through the options shown below and press the Smart Button to choose one.The Usual ShortcutsThe words “menu,” “batt,” “lock,” and “mute” appear on the Ú, Ý, Þ, and ß buttons. Press the Ä key first, then any one of these buttons, and your phone will perform that function.Phone Book The Phone Book is the place to find all your personal names and numbers. See page 32.Messaging If you subscribe to messaging, you can use this shortcut or the one on page 53.Last 10 DialedYour phone remembers the last ten numbers you dialed. Turn to page 21 to learn more.Main MenuSelect this option to access your phone’s menu system. See page 29 to find out more.Exit Select this option or press ¼ to exit the Quick Menu at any time.Enter MenuPress Ä then press Ú to enter the menu system.Display MeterPress Ä then press Ý to display the battery meter.Lock PhonePress Ä then press Þ. You will see: Lock? Press  to lock. Mute PhonePress Ä then press ß to toggle mute ON and OFF during a conversation.usephone.fm5  Page 22  Tuesday, October 19, 1999  10:12 PM
Using Your Phone 23 EnglishUsing Phone MemoryUse your phone’s internal Phone Book to store up to 99 names and numbers for easy access.In this section you will learn how to:•store names and numbers into the Phone Book•recall phone numbers from memory•clear names and numbers•dial a number with Speed Dial and Turbo Dial™•make notes on the scratchpad•store numbers with pause dialing•store calling card sequences for easy accessUsing Your Phone’s Built-in Phone BookEach phone number in your phone book is stored in a memory location numbered 01-99.Arrange numbers for easy recall by storing related numbers in groups. If you store the numbers you call most in locations 01-09, then you can use Turbo Dial™ to call those numbers with a single key. (See “Using the Turbo Dial™ Function” on page 25 for details.) You could store business contacts in locations 10-19, family in 20-29, friends in 30-39, and so on.You can also store names to identify phone numbers. Later, you can recall a number by the name that corresponds to it.Storing Names and NumbersEach memory location can store up to four numbers. For a single contact, you can store every number you need, like home, mobile, fax, and more.Keep in mind: Your Phone Book sorts alphabetically by the first letter in the entry. If you store an entry without a name it will be placed at the back of the Phone BookHow to Store Phone Numbers1EnterNumberEnter the phone number you want to store. You can store up to 32 digits per phone number entry.2Begin StoringPress  to begin storing. You will see: Location xx?. ‘XX’ is the number of the lowest available location. 3AcceptLocationPress  or Ç to store the sequence in the displayed location.or Enter New  Press C to erase the location number and enter a new two-digit location number.or SelectRange of TenEnter the first digit of the memory location, then press Ç to store the sequence in the first available location beginning with that digit. For example, if you store personal numbers in the twenties, press 2Ç.4Enter Name Enter a name to identify the phone number. (See the following section for details on entering names.)Press a or  when finished. Your phone will confirm the entry by displaying the information stored.usephone.fm5  Page 23  Tuesday, October 19, 1999  10:12 PM
Using Your Phone24EnglishHow to Enter NamesWhen the display shows Alpha Or §, you can press the numeric keys one or more times to produce any letter or number in the alphabet. Use the letters printed on each key as a guide. For example, press Û to enter “A,” “B,” “C,” or “2” as shown: Recalling an Entry by NameAfter storing names and numbers, you can recall them alphabetically and immediately place calls.1Enter LetterPress a key as many times as necessary to enter a letter. The next letter on the key will appear with each press.Toggle Case Press q or z to switch between upper and lowercase.2Advance CursorAfter each character, press È to advance the cursor to the next space.Clear LetterPress C to erase a letter if you make a mistake.Back Space Press Ç to move the cursor backward if you would like to insert a letter earlier in the sequence.3Choose LabelPress 0 to scroll through the available labels. After 0, you will see Home, Mobile, Pager, or Work. 4Enter Marks Press Ú to scroll through the available punctuation marks: <space>  1 ! " $ % & ' @ ( ) + , - . / \ : ; < = > ? [ ] _ * #.5Finish StoringEnter up to 20 letters. Press a when you are finished. Your phone will confirm the entry by displaying the information stored.1Enter  Press a twice to enter your name directory.2Scroll to NamePress q or z to scroll to the name you are looking for.or Search for NameEnter the first letter of the name. The display will show the name and memory location of the first entry beginning with that letter, and an icon for each number stored in the entry (up to four).3Place CallPress and hold a or press ¾ to call the number. You will see: Calling.4End CallPress ¼ or close the phone.orPress and hold a until you hear a high tone.You will see: Press § to End Call.thenPress a again.usephone.fm5  Page 24  Tuesday, October 19, 1999  10:12 PM
Using Your Phone 25 EnglishRecalling an Entry by Memory LocationEach name and number you store is placed in a memory location numbered 01-99. Once you have stored names and numbers, you can recall them by memory location:Clearing a Phone Memory EntryTo erase a memory entry:Shortcuts for Recalling Phone Book EntriesUsing Speed DialIf you know the memory location of the number you want to call, try the Speed Dial function:Using the Turbo Dial™ FunctionThe Turbo Dial™ function enables you to dial numbers stored in locations 01-09 with the push of a single button:Your phone’s Priority Call feature gives you fast access to any number stored in location 01. To learn more about this feature, see “Priority Call” on page 42.1Begin  Press ä to begin recalling.2Enter LocationEnter the two-digit memory location of the phone number you are looking for. 3Place CallPress and hold a or press ¾ to call the number. You will see: Calling.4End CallPress ¼ or close the phone.orPress and hold a until you hear a high tone.You will see: Press § to End Call.thenPress a again.1Recall Entry  Press a twice and then press q or z to scroll to the name you are looking for.orPress ä and the two digit location number of the entry.2Clear Entry Press C to clear the entry.You will see: To Delete Press STO.3ConfirmErasePress  to confirm that you want toerase the entry.1Enter LocationEnter the two-digit memory location of the phone number you are looking for. 2Place CallPress and hold a or press ¾ to call the number. You will see: Calling.Turbo DialPress and hold the memory location number of the entry you want to call, Ú through á, and your call is placed. You will see: Calling.usephone.fm5  Page 25  Tuesday, October 19, 1999  10:12 PM
Using Your Phone26EnglishMaking Notes on the ScratchpadIn addition to your internal phone book, you also have a built-in scratchpad for making quick notes. The scratchpad remembers the last phone number shown on your display. Entering a Number in the ScratchpadIf you are on the phone and your party gives you another number to call, enter the number on the scratchpad so you can place the call later.Pause DialingWhen you call automated systems like Voice Mail or bank by phone, a recorded message prompts you for PIN numbers, account numbers, etc. Pause Dialing can make using automated systems easy by allowing you to store these numbers in the same memory location as the automated system’s access number. Separate each set of numbers with a “pause”– a special character that tells your phone to wait before sending additional numbers. Storing a Number with Pause DialingThe pause occupies a one-digit space in your phone’s memory. Once you have entered a string of numbers and pauses, store the string in the same way you store other entries.You can store up to 32 digits, including pauses.1Enter NumberEnter the number with the keypad. (The person on the line will hear tones as you dial.)2Store NumberPress Â, enter a two-digit location, enter a name with the keypad, and press  to finish. See page 23 for more details.or End CallPress ¼ to end your current call if necessary. and Place CallPress ¾ to call the number in the Scratchpad.1EnterNumberEnter the phone number you use to access the automated system.2InsertPausePress Ä and press ¾. You will see: Insert Pause o. Press a. You will see a pause circle o inserted into the number entry.3EnterPINEnter the next group of numbers, for example, your PIN number. If the automated system requires a * or #, enter those symbols, too.4Insert More PausesRepeat steps 2 and 3 as many times as necessary.5StoreSequencePress Â. Enter a two-digit location, select a label, enter a name if you like, and press  or a when finished. Your phone will confirm the entry by displaying the information you stored.usephone.fm5  Page 26  Tuesday, October 19, 1999  10:12 PM
Using Your Phone 27 EnglishUsing Pause DialingOnce stored, you may recall the entry and place the call. All of the digits you have stored will be recalled, but your phone will only send the tones for the set of numbers before the first pause.Using Memory LinkingEach memory location holds up to 32 digits, including pauses. Some automated systems, however, may require you to enter more than 32 digits. If this is required, split the numbers into two memory locations and recall the second set of digits as you need them.Using Calling CardsStoring Calling Card NumbersNumber Characters are another way your phone can save you time in dialing. The Number Character saves a place in the memory sequence for whatever number you are calling when you use your calling card. For best results, you may use the Number Character along with Pause Dialing.AYou can protect your calling card information with your phone’s call restriction features. See page 86 for details.1Place CallEnter the two-digit memory location of the Pause Dialing number and press and hold a or press ¾ . Your phone will dial the access number and wait for your input when it reaches the first pause.2Send More NumbersWhen the automated system prompts you for information, press a or ¾ to send the next group of numbers. Repeat this step to send each group of numbers that you have stored.3End CallPress ¼, close the phone, or press and hold a until you hear a high tone and press a again.1Recall 2ndLocationOnce you have sent the tones from the 1st location, press ä and the two-digit memory location where you stored the second set of digits.2Send Tones Press ä and ¾ to send the tones in the 2nd location. If you have stored a pause in the 2nd location, your phone will pause as usual when it reaches the pause character. 1Enter Access NumberEnter the phone number you use to access the calling card system, usually a 1-800 phone number. Skip this step if you only dial 0.2Insert PausePress Ä then press ¾ . You will see: Insert Pause o. Press a.3Insert Number CharacterPress Ä then press ¾. Press q or Z to scroll to Insert Number 'N. Press a. You will see the number character 'N inserted into the sequence. This special character saves a place for the number you will be calling when you use your calling card.4Insert PausePress Ä then press ¾ then a as in step 2.5Enter CodeWhen you use your calling card, the system prompts you for an access code, usually a PIN code. Enter this number. Repeat steps 4 & 5 if your card requires more access codes.6StoreSequencePress Â. Enter a two-digit location, select a label, enter a name if you like, and press  or a when finished. Your phone will confirm the entry by displaying the information you stored.usephone.fm5  Page 27  Tuesday, October 19, 1999  10:12 PM
Using Your Phone28EnglishPlacing a Calling Card CallOnce you have stored your calling card information, recall the information and place the call whenever you want to use your calling card. Before your phone begins dialing, it will prompt you for the number you want to call. Once you have entered the number, your phone will automatically insert the number in place of the Number Character you stored.1RecallEntryPress ä then enter the location number where your calling card sequence is stored.2EnterNumberPress ¾. You will see: Enter Number. Enter the phone number you are calling. You may enter the number manually or recall it by location.3PlaceCallPress and hold a to place the call. Your phone will dial the number to access your long distance provider, then wait for your input when it reaches the first pause.4SendMoreNumbersPress a or press ¾ to send the next group of numbers when the recording prompts you. The phone will automatically insert the number to call at the appropriate spot in the sequence. Press a to send each set of numbers until finished.5End CallPress ¼, close the phone, or press and hold a until you hear a high tone, and press a again to end the call.usephone.fm5  Page 28  Tuesday, October 19, 1999  10:12 PM
Using the Menu Features 29 EnglishUsing the Menu FeaturesUsing the Menu SystemYour cellular phone includes many features that can help make life easier and more productive. The phone’s user-friendly menu system helps you find what you need quickly and easily.In this section you will learn:•what are the main menu features•how to navigate through the menus•how to read a menu road mapIntroducing the Menu FeaturesAs you scroll through the menu system, you will see the following icons, each representing a high-level menu. Navigating the MenuYou can navigate through the menu system using the three keys located on the left side of the phone. Use the upper and lower volume keys to scroll to sub-menus and to control volume. Use the middle Smart Button to choose menus and functions.Follow these symbols as a guide for using the keys on the side of your phone:Press q to scroll up.Press A to select.Press Z to scroll down.You can also use your phone’s Ç and È keys to scroll through the menu system.Road MapsTo help you navigate through the phone’s menu system, each section begins with an easy-to-follow visual “road map.” To enter the menu features:Detailed instructions within each section describe how each feature works.BPhone Book Lock/SecureTTimersPPhone OptionsTone Control1Enter MenuPress Ä, then press A.orPress Ä Ú. “menu” is printed on the Ú key as a reminder.2Scroll through MenuPress qZ to scroll through the menu’s top level.3Exit MenuPress ¼ to exit the menu.opt_menu.fm5  Page 29  Tuesday, October 19, 1999  10:31 PM
Using the Menu Features30EnglishManaging the Phone Book BIn “Using Phone Memory”  you learned how to store and recall phone numbers with the internal Phone Book. You can access the same features, along with several advanced features, using your phone’s convenient menu system. In this section you will learn how to:•recall and store phone numbers using the menu system•edit your memory information•add numbers to existing entries.•view your own phone number.AYou can also recall phone numbers without using the Phone Book. See “Recalling an Entry by Name” on page 24 or “Recalling an Entry by Memory Location” on page 25.Start:PhoneBookRecall ByNameRecall ByLocationPhone BookStatusStore NewNumberEdit MemoryView My NumberNumberPrefer OffTo MainMenuopt_menu.fm5  Page 30  Tuesday, October 19, 1999  10:31 PM
Using the Menu Features 31 EnglishRecalling an Entry by NameOnce you have stored entries, you can recall them alphabetically with the Phone Book menu. Find the name, choose the number, and instantly place a call.Recalling an Entry by LocationEach name and number you store is placed in a memory location numbered 01-99. After storing names and numbers, you can recall them by memory location with the Phone Book menu.ATo place a quick call just enter the two-digit location and press ¾.Phone Book StatusYou can use this feature to see how many of your Phone Book’s 99 locations have been used. 1BeginRecallingPress a to select Recall By Name. You will see: Enter 1st Letter.2EnterFirst LetterPress the appropriate digit key as many times as necessary to enter the first letter of the name. (See page 24 for help entering letters.) You will see the first entry with that letter.3Find NameIf necessary, press q or Z to scroll to the name you are looking for. 4Place Call Press and hold a or press ¾ to call the displayed number. You will see: Calling.5End CallPress ¼ or close the phone.orPress and hold a until you hear a high tone.You will see: Press § to End Call.thenPress a again.1BeginRecallingPress q or Z to scroll to Recall By Location and press a to select. 2EnterLocationEnter the two-digit memory location of the number you are looking for. You will see the name, location number, and an icon for each number stored in the entry.3Place Call Press and hold a or press ¾ to call the displayed number. You will see: Calling.4End CallPress ¼ or close the phone.orPress and hold a until you hear a high tone.You will see: Press § to End Call.thenPress a again.1Select FeaturePress q or Z to scroll to Phone Book Status and press a to select. You will see: XX Full XX Empty.2ExitMenuPress ¼ to exit menu, or you may scroll to other features.opt_menu.fm5  Page 31  Tuesday, October 19, 1999  10:31 PM
Using the Menu Features32EnglishStoring a New NumberThis feature allows you to create a new entry in the internal Phone Book. To add a number to an existing entry, turn to Editing a Memory Location on page 33.AAlways store your Voice Mail number in location 98.Viewing Your NumberiPress ä È.Use this feature to view your phone’s currently active number.Number PreferenceWhen Placing Calls:If you prefer to see the number (Calling 555-1212) instead of the name (Calling Jane Smith) when you place a call from the internal Phone Book, turn Number Preference ON.When Receiving Calls:If you subscribe to Caller ID, your phone automatically looks up callers in your Phone Book and displays the name stored in the entry. If you prefer to see the caller’s number (555-1212), then turn Number Preference ON.1BeginStoringPress q or Z to scroll to Store New Number and press a to select. You will see: Enter Number.2EnterNumberEnter the number you want to store and press a. You will see: Location XX?. ‘XX’ is the number of the lowest available location.3EnterLocationPress  or Ç to store the number in the displayed location or enter a new two-digit location and press Â.or SelectRange of TenEnter the first digit of the memory location and press Ç to store it in the first available location beginning with that digit.4Enter NameEnter a name to identify the phone number(s) or continue with step 5. See page 24 for details on entering names.5StoreNumberPress  or a. Your phone will confirm the entry by displaying: Stored At XX. If the name or number is already in your Phone Book, you will see: Duplicate Name or Number.6ExitMenuPress ¼ to exit menu, or you may scroll to other features.1ViewNumberPress q or Z to scroll to View My Number and press a to select. The display will show the currently active number.2Exit MenuPress ¼ to exit the menu, or you may scroll to other features.1Find FeaturePress q or Z to scroll to Number Prefer.2ToggleFeaturePress a to toggle the feature On or Off.3Exit MenuPress ¼ to exit the menu, or you may scroll to other features.opt_menu.fm5  Page 32  Tuesday, October 19, 1999  10:31 PM
Using the Menu Features 33 EnglishEditing a Memory LocationYou can use this feature to add a number to an entry, change an old number, or duplicate an entry to make a similar one. 1BeginEditingPress q or Z to scroll to Edit Memory and press a to select.2Find by Location Press q or Z to scroll to Edit By Location and press a to select. You will see: Location——. Enter the two-digit memory location of the phone number you want to edit. Press a or  and continue with Step 3.or Find by NamePress q or Z to scroll to Edit By Name and press a to select. You will see: Enter 1st Letter. Enter the first letter of the name you want to edit. (See page 24 for information on entering letters. You will see the first entry beginning with that letter. Press q or Z to scroll to the name you are looking for. Press a or  and continue with Step 3.3Edit /AddPhone NumberEnter digits. Press C to erase a digit at a time, or press and hold C to erase the entire number. Press Ç to move the cursor backward.4Finish NumberPress a or  when you finish the phone number. 5Change OriginalIf you would like to save your changes in the same location, then press a or Â. You will see the name associated with the entry.or CopyEntryIf you would like to move the entry to a new location and keep the original entry, then press and hold   to erase the location and enter a new two-digit location. You will see the name associated with the entry.6EditNamePress C to erase one letter at a time, or press and hold C to erase the entire name. Press Ç to move the cursor backward. (See page 24 for details on entering names.) Skip this step to leave the name unchanged.7ConfirmChangesPress a or  when you finish editing the name. You will see: Location XX is Full. The display wil then show the new information and you will see: Change? Press a or  again to save your changes. You will see: Stored At XX.8ExitMenuPress ¼ to exit the menu, or you may scroll to other features.opt_menu.fm5  Page 33  Tuesday, October 19, 1999  10:31 PM
Using the Menu Features34EnglishTiming Your Calls TYour phone is equipped with three visual and three audible call timers. You can monitor or record the length of individual calls, set a timer to track monthly usage, or have the phone alert you at intervals that you specify.In this section you will learn how to:•monitor the length of your calls•set and view the resettable timer for long-term monitoring•program audible timers for your individual needsStart:PhoneBookTimers Individual00:00:00CumulativeTime 00000ResetTimerIndividualTimer OffOne MinuteTimer OffRepeatingTimer OffSingleTimer OffTo MainMenuResettableTime 00000opt_menu.fm5  Page 34  Tuesday, October 19, 1999  10:31 PM
Using the Menu Features 35 EnglishViewing the Individual Timeri1) Press ä then È two times.or 2) Press Ä, a then Ý, 5.The individual timer records the air-time of your most recent call in hours, minutes, and seconds. It resets before you place the next call. You can have the timer display automatically while calls are in progress. See “Auto Display Individual Timer” on page 36.Viewing the Resettable Timeri1) Press ä then È three times.or 2) Press Ä, a then Ý, 5.You can track how much air-time you have accumulated during any time period you choose. For example, reset this timer at the beginning of each billing period to know where you stand at any given moment. Use this feature to view the time elapsed, and follow the instructions on page 35 to reset the timer.Viewing the Cumulative Timeri1) Press ä then È four times.or 2) Press Ä, a then Ý, 7.This is a non-resettable timer that keeps track of your phone’s total air-time (in minutes) since your phone was activated. Resetting the TimeriPress Ä, a then Ý, Ü and continue with step 2.iPress Ä then â, à, C to reset the timer.This feature allows you to monitor elapsed air-time over a period of time that you choose. After you reset the timer, it will continue to keep track of your air-time (in minutes) until you reset it again.1ViewTimerWhen you enter the Call Timers menu, you will see: Individual XX:XX:XX.2ExitMenuPress ¼ to exit the menu, or you may scroll to other features.1ViewTimerPress q or Z to scroll to Resettable Time. You will see the air-time in minutes since you last reset the timer.2ExitMenuPress ¼ to exit the menu, or you may scroll to other features.1ViewTimerPress q or Z to scroll to Cumulative Time. You will see the total air-time in minutes.2ExitMenuPress ¼ to exit the menu, or you may scroll to other features.1Find FeaturePress q or Z to scroll to Reset Timer.2ResetTimerPress a to reset. You will see: Resettable Time 00000.3ExitMenuPress ¼ to exit the menu, or you may scroll to other features.opt_menu.fm5  Page 35  Tuesday, October 19, 1999  10:31 PM
Using the Menu Features36EnglishAuto Display Individual TimeriPress Ä, a then Ý, 8 and continue with step 2.When you turn this feature ON, your phone will automatically display your air-time in minutes and seconds during and after each call.AActivating the Auto Display Timer may reduce standby-time and talk-time.One Minute Audible TimeriPress Ä, a then Ý, 4 and continue with step 2.Turn this feature ON to hear an audible beep 10 seconds before the end of every minute during a call. The party on the other end will not hear the beeps.Repeating Audible TimeriPress Ä, a then Ý, 1 and continue with step 2.You can set this timer to beep during your calls at an interval that you select—from 11-999 seconds. Like the One Minute Timer, you will hear the beep 10 seconds before the end of each interval, and the party on the other end will not hear the beeps.1Find FeaturePress q or Z to scroll to Individual Timer.2ToggleDisplayPress a to toggle On or Off the automatic display of the individual timer.3ExitMenuPress ¼ to exit the menu, or you may scroll to other features.1Find FeaturePress q or Z to scroll to One Minute Timer.2ToggleTimerPress a to toggle the timer On or Off.3ExitMenuPress ¼ to exit the menu, or you may scroll to other features.1Find FeaturePress q or Z to scroll to Repeating Timer.2ToggleTimerPress a to toggle the timer On or Off.3Enter SecondsIf you toggle the timer ON, you will see: Enter Seconds. Enter the number of seconds you would like between beeps and press a to set the timer. You will see: Set At XXX Secs.4ExitMenuPress ¼ to exit the menu, or you may scroll to other features.opt_menu.fm5  Page 36  Tuesday, October 19, 1999  10:31 PM
Using the Menu Features 37 EnglishSingle Audible TimeriPress Ä, a then Ý, 2 and continue with step 2.You can set the Single Timer to beep during your calls at a time that you select–from 11-999 seconds. It will beep once during each call, 10 seconds before the end of the preset time. The party on the other end will not hear the beeps.1Find FeaturePress q or Z to scroll to Single Timer.2ToggleTimerPress a to toggle the timer On or Off.3Enter SecondsIf you toggle the timer ON, you will see: Enter Seconds. Enter the number of seconds you would like before the beep and press a to set the timer. You will see: Set At XXX Secs.4ExitMenuPress ¼ to exit the menu, or you may scroll to other features.opt_menu.fm5  Page 37  Tuesday, October 19, 1999  10:31 PM
Using the Menu Features38EnglishAdjusting Tone Controls Use these features to personalize your phone’s ringer styles, or set the phone to remind you of new messages.In this section you will learn how to:•choose from nine different ringer styles•silence the keypad•silence all your phone’s tones with one convenient feature.•set the Message Reminder.Start:PhoneBookTimersToneControlSilentMode OffRing/VibSelectRinger Style 1Setup MsgTonesReminderTonesSetupKeypadTones OnDTMFSelectServiceTones OffTo MainMenuopt_menu.fm5  Page 38  Tuesday, October 19, 1999  10:31 PM
Using the Menu Features 39 EnglishSelecting a Ringer StyleYour new phone offers nine different ringer styles. After you choose a style, the phone will give you a brief sample of your new alert sound.Setup Message TonesWhen you receive a new Voice Mail or alphanumeric message, your phone beeps three times. To change the number of beeps or to turn them OFF, use this feature.Reminder Tones SetupIf you subscribe to messaging services, this feature can help you remember to check your messages. Turn Message Reminder Tones ON and your phone will remind you of unread messages by beeping every two minutes. This feature is especially helpful if you are busy or away from your phone. Keypad TonesiPress Ä, a then 3, 2 and continue with step 2.Keypad Tones are the sounds you hear when you press any key on the phone. If you want to be discreet, use this feature to silence the audio feedback from the keypad. ATurning Keypad Tones OFF does not silence the tones your phone sends across the line. See “Transmit Tones” on page 40 for more information.1Enter FeaturePress q or Z to scroll to Ringer Style and press A to select.2SelectRingerPress q or Z to scroll through the ringer styles. As you scroll, your phone will give an audible sample of the currently displayed style. Press A to select the displayed option.3ExitMenuPress ¼ to exit the menu, or you may scroll to other features.1Enter FeaturePress q or Z to scroll to Setup Msg Tones and press A to select.2Select Msg TypePress q or Z to scroll to Text Msg Tone or Voicemail Tone and press A to select.3Toggle TonePress A to toggle between 3Beep, 1Beep, or Off.To make new messages easy to recognize, try making the number of beeps unique to each message type.4ExitMenuPress ¼ to exit the menu, or you may scroll to other features.1Find FeaturePress q or Z to scroll to Reminder TonesSetup and press A to select. You will see: CallRemind Tone.2Toggle FeaturePress A to toggle the feature On or Off.3ExitMenuPress ¼ to exit the menu, or you may scroll to other features.opt_menu.fm5  Page 39  Tuesday, October 19, 1999  10:31 PM
Using the Menu Features40EnglishTransmit TonesiPress Ä, a then 3, 3 and continue with step 2.Your phone transmits tones to communicate with automated calling systems like Voice Mail or bank by phone. These tones are called DTMF tones (Dual Tone Multi-Frequency tones), and this feature allows you to control the length of the tone your phone sends. For most systems, you should use the default setting of short tones, which sends the tones for a preset length of time. If you choose long tones, your phone will transmit the tones for as long as you press and hold the key. To silence the tones during conversations, turn the tones OFF.AIf you turned the DTMF tones OFF, but you want to access a tone-activated system like Voice Mail, place your call, enter the numbers you need to transmit and:Service TonesWhen Service Tones are ON, you will be instantly alerted to any change in your wireless service. You will hear two short beeps when your phone (1) starts to roam, (2) returns to a home system after roaming, (3) loses service, or (4) finds service.AYour phone will always beep if a call is dropped.1Find FeaturePress q or Z to scroll to Keypad Tones.2Toggle FeaturePress A to toggle the feature On or Off.3ExitMenuPress ¼ to exit the menu, or you may scroll to other features.1Enter FeaturePress q or Z to scroll to DTMF Select and press A to select.2Select SettingPress q or Z to scroll to Transmit DTMF Long, Transmit DTMF Short, or Transmit DTMF Off and press A to select.3ExitMenuPress ¼ to exit the menu, or you may scroll to other features.Send Tones Press ä then press ¾ to send the tones if DTMF tones are OFF.1Find FeaturePress q or Z to scroll to Service Tones.2Toggle FeaturePress A to toggle the feature On or Off.3ExitMenuPress ¼ to exit the menu, or you may scroll to other features.opt_menu.fm5  Page 40  Tuesday, October 19, 1999  10:31 PM
Using the Menu Features 41 EnglishUsing Lock/Security Features While you probably would not want to leave your phone unattended, your phone has a number of built-in security features to prevent unauthorized use. In this section you will learn how to:•lock and unlock your phone•place priority calls•view and change your lock code•restrict call placement and memory access•reset or clear your phone’s settingsStart: AutoLock OffPriorityCall OnSecure OptionsView Lock CodeChangeLock CodeChangeSecureCodeServiceLevel 4MasterResetMasterClearSecureCode______To MainMenuTo MainMenuPhoneBookTimersLockSecureToneControlopt_menu.fm5  Page 41  Tuesday, October 19, 1999  10:31 PM
Using the Menu Features42EnglishAuto LockTurn this feature ON and your phone will automatically lock itself each time the phone is turned OFF.Locking the PhoneYou can lock your phone manually at any time to help prevent unwanted use. Once locked, you can leave the phone ON or turn it OFF and the phone will remain locked.Unlocking the PhoneUnlocking your phone is quick and easy. Once your phone is ON, just enter your three-digit code. Your factory programmed lock code is 123. If you have changed this code and cannot remember what it is, see Viewing the Lock Code on page 43.AYou can still receive calls when the phone is locked. Follow these steps to answer an incoming call:Priority Call iPress Ä, a then 2, 9 and continue with step 2.Your phone’s priority call feature allows you to instantly place a call from location 01 – even when your phone is locked. ASome wireless systems only allow access to their own emergency numbers. Check with your Service Provider for more information.Storing a Priority Call NumberYou should reserve memory location 01 for an emergency number or the number of a family member or close friend. To store your priority number, follow these steps:1Find FeaturePress q or Z to scroll to Auto Lock.2Toggle Lock Press A to toggle the feature On or Off.3ExitMenuPress ¼ to exit the menu, or you may scroll to other features.1Lock Phone Press Ä then press Þ. You will see: Lock?2Confirm  Press A or Â. You will see: Locked.Unlock and AnswerEnter your three-digit code and press a or ¾ to answer.1Find FeaturePress q or Z to scroll to Priority Call.2Toggle Press A to toggle the feature On or Off.3ExitMenuPress ¼ to exit the menu, or you may scroll to other features.1Enter NumberEnter your priority number.2Save NumberPress  and â, Ú to choose location 01. 3Enter Name Select a label, enter a name if you like, and press A when finished. Your phone will confirm the entry by displaying the stored information.opt_menu.fm5  Page 42  Tuesday, October 19, 1999  10:31 PM
Using the Menu Features 43 EnglishPlacing a Priority CallAIf call restriction Service Level 1 is enabled, the Turbo Dial® Keys will not be active. To override the restriction and place a priority call, press ä, Ú, ¾. See page 44 for information on your phone’s service levels.Secure Options SubmenuFor your protection, you must enter a six-digit secure code in order to access the features in the Secure Options submenu. The factory programmed secure code is 000000.Viewing the Lock CodeiPress Ä, 0, enter six-digit secure code, then ä.To view the three-digit lock code:Changing the Lock CodeiPress Ä, 0, enter six-digit secure code, enter a new lock code, then Â.To change the three-digit lock code:Changing the Secure CodeThe Secure Code is a six-digit number factory set to 000000. You will probably want to change it to something unique and easy to remember.Place CallWhen Priority Call is ON, press and hold Ú at any time.1View CodePress A to select View Lock Code. You will see: Lock Code XXX.2Exit MenuPress ¼ to exit the menu, or you may scroll to other features.1BeginChangePress q or Z to scroll to Change Lock Code and press a to select. You will see: Enter New Code——.2Enter New CodeEnter a new three-digit lock code. You will see: New Lock Code XXX.3Exit MenuPress ¼ to exit the menu, or you may scroll to other features.1Select FeaturePress q or Z to scroll to Change Secure Code and press A to select. You will see: New Code —.2Enter New CodeEnter a new six-digit Secure Code. Your phone will briefly display the new code.3ExitMenuPress ¼ to exit the menu, or you may scroll to other features.opt_menu.fm5  Page 43  Tuesday, October 19, 1999  10:31 PM
Using the Menu Features44EnglishService LevelWhen loaning your phone to others, you may want to restrict call placement or protect memory information. Your phone has two service levels that allow you to control the types of outgoing calls that can be made from your phone.Your phone has two service levels:Master ResetUse this feature to reset all user-selectable options back to their original factory settings. AOnce you select this feature, the process cannot be canceled or reversed.Master ClearUse Master Clear to clear all user-selectable options, the resettable timer, the Phone Book, and the Messaging memory.AOnce you select this feature, the process cannot be canceled or reversed.1Select FeaturePress q or Z to scroll to Service Level and press A to select. 2ChooseLevelPress q or Z to scroll through service level settings and press A to select the setting. (See the chart below for descriptions.)3ExitMenuPress ¼ to exit the menu, or you may scroll to other features.Level 1: Calls can be placed from memory locations 1-10 only.•  No dialing from keypad.•  No memory edit or storage.•  No access to name directory.Level 4: This is the default setting.•  No restrictions.1 Memory1-10 Only4 StandardSetting1ResetFeaturesPress q or Z to scroll to Master Reset and press A to select. You will see: Reset?2ConfirmResetPress A to confirm. You will see: Standard Setting.or Exit Press ¼ to exit without resetting.3ExitMenuPress ¼ to exit the menu, or you may scroll to other features.1ClearSettingsPress q or Z to scroll to Master Clear and press A to select. You will see: Clear?2ConfirmClearPress A to confirm. You will see: Busy. It will take a few seconds to reset all of your phone’s options back to their factory settings.or Exit Press ¼ to exit without resetting.3ExitMenuPress ¼ to exit the menu, or you may scroll to other features.opt_menu.fm5  Page 44  Tuesday, October 19, 1999  10:31 PM
Using the Menu Features 45 EnglishCustomizing Phone Options PThe Phone Options menu lets you customize the way your phone sends and receives calls. You can tune your phone for optimal performance, view information about the phone, and choose from a number of convenient features.In this section you will learn how to:•switch phone numbers.•review your phone’s settings.•select a variety of system specific settings.Start: PhoneBookTimersLockSecureToneControlPhoneOptionsPhoneInfoFeatureReviewCallOptionsSystemOptionsTo MainMenuTo MainMenuTo MainMenuMulti KeyAnswer OffOpen ToAnswer OffAutoAnswer OffInstantRedial OffDisplay System IDSelectSystemModeRoam List VersionDisplayOptionsMiniBrowserOptions To MainMenuQuick Menu OnChangeLanguageChangeBannerBacklightSelectAutoHyphen On24 HourClock OffServiceLight OnLaunchMiniBrowsePower UpModeTo MainMenuopt_menu.fm5  Page 45  Tuesday, October 19, 1999  10:31 PM
Using the Menu Features46EnglishDisplaying Phone InformationThis feature allows you to view information about your phone. If you require technical assistance, you may be asked to check here.Feature ReviewiPress Ä, then 0, 9, ä.After you have spent some time adjusting your phone’s settings, use this feature to review the changes you have made. When you enter Feature Review, your phone will display any features that you have changed from their default factory settings.AFeature Review is simply an opportunity to review – but not change – your current settings.Call Options SubmenuThis submenu gives you control over the way your phone places and receives calls.Multiple Key AnswerWith Multiple Key Answer ON, you can answer calls by pressing A or any key in the center of the keypad, Ú through È.AIf there are any digits in your Scratchpad or if your phone is locked, this feature will not work.1Find FeaturePress q or Z to scroll to Phone Info then press A to select.2Scroll Press q or Z to scroll through the the information.3ExitMenuPress ¼ to exit the menu, or you may scroll to other features.1Begin ReviewPress q or Z to scroll to Feature Review and press A to enter.2BrowseFeaturesPress q or Z to scroll through any features you have changed from their default settings. If all features are set to their default factory settings, the display will show: Standard Setting.3ExitMenuPress ¼ to exit the menu, or you may scroll to other features.1Find FeaturePress q or Z to scroll to Multi Key Answer.2Toggle FeaturePress A to toggle the feature On or Off.3ExitMenuPress ¼ to exit the menu, or you may scroll to other features.opt_menu.fm5  Page 46  Tuesday, October 19, 1999  10:31 PM
Using the Menu Features 47 EnglishOpen to AnswerThis feature allows you to set whether or not your phone automatically answers when opened. If you subscribe to Caller ID, you will probably want to set this feature OFF so you can open the phone and check who is calling before you answer. ATo answer calls with Open to Answer OFF, press ¾.Automatic AnsweriPress Ä, a then 2, 6 and continue with step 2.Turn Auto Answer ON to have your phone automatically answer incoming calls after two ring cycles.  AWe recommend you use this feature only with vehicle accessories and with your phone’s ringer active. See page 75. Otherwise, your phone may answer a call in your absence.Instant RedialWhen placing calls, you may hear a fast busy signal and see Press SND to Redial. This probably means the network is temporarily busy. If you turn Instant Redial ON, your phone will redial for the next four minutes or until the call goes through.AThis feature redials only when the network is busy. If you hear a normal busy signal, this feature will not work. See page 21 for more redialing options.1Find FeaturePress q or Z to scroll to Open to Answer.2Toggle FeaturePress A to toggle the feature On or Off.3ExitMenuPress ¼ to exit the menu, or you may scroll to other features.1Find FeaturePress q or Z to scroll to Auto Answer.2Toggle FeaturePress A to toggle the feature On or Off.3ExitMenuPress ¼ to exit the menu, or you may scroll to other features.1Find FeaturePress q or Z to scroll to Instant Redial.2Toggle FeaturePress A to toggle the feature On or Off.3ExitMenuPress ¼ to exit the menu, or you may scroll to other features.opt_menu.fm5  Page 47  Tuesday, October 19, 1999  10:31 PM
Using the Menu Features48EnglishDisplay Options SubmenuThis submenu allows you to customize your phone’s display.Activating the Quick MenuPress the Smart Button once and the Quick Menu appears on the display, offering shortcuts to the most popular features. This feature turns the Quick Menu OFF if you would rather use the Smart Button to go straight into the Phone Book. See page 22 for more information.Changing the LanguageThis feature allows you to select the language in the display.Changing the BannerYou may create your own message banner for the phone to display when it is idle. Your banner can be up to 12 characters long.Customizing the BacklightYour phone’s backlight illuminates when you open the phone, press a key, or your phone receives an incoming call signal. This feature allows you to choose how long it remains ON.AThe backlight will always be illuminated when your phone is connected to an external power supply, like a charger or vehicle accessory.1Toggle FeatureWhen you enter Display Options, you will see: Quick Menu. Press A to toggle the feature On or Off.2ExitMenuPress ¼ to exit the menu, or you may scroll to other features.1BeginSelectionPress q or Z to scroll to Change Language and press a to select.2Choose OptionPress q or Z to scroll through the available languages and press a to select.3ExitMenuPress ¼ to exit the menu, or you may scroll to other features.1Enter FeaturePress q or Z to scroll to Change Banner and press a to select. You will see the current banner or Alpha or Press §.2Enter MessageEnter your message using the alphanumeric keypad. Press A when your message is complete.3ExitMenuPress ¼ to exit the menu, or you may scroll to other features.1Find FeaturePress q or Z to scroll to Backlight Select and press A to select.2Toggle FeaturePress q or Z to scroll to Backlight 15 Seconds, Backlight 30 Seconds, or Backlight Always On and press A to select the displayed option.3ExitMenuPress ¼ to exit the menu, or you may scroll to other features.opt_menu.fm5  Page 48  Tuesday, October 19, 1999  10:31 PM
Using the Menu Features 49 EnglishAuto HyphenJust turn Auto Hyphen ON to have all phone numbers automatically hyphenated on the display. This allows you to easily distinguish between area codes, call prefixes, and other numbers.Displaying the 24-Hour ClockYour phone can display the current time in 12-hour or 24-hour format. Use this feature to turn the 24-hour clock On or Off.MiniBrowser Options* This submenu offers several options for customizing the way your phone accesses information with the MiniBrowser.Launching the MiniBrowser Select this feature to launch the MiniBrowser and access sports scores, stock reports, weather reports, and more.AYou can also launch the MiniBrowser with the Quick Menu. See page 22.Power Up ModeWhen you turn ON your phone, you can begin with the MiniBrowser or the regular phone features.* Contact your Service Provider for availability.1Find FeaturePress q or Z to scroll to Auto Hyphen.2Toggle FeaturePress A to toggle the feature On or Off.3ExitMenuPress ¼ to exit the menu, or you may scroll to other features.1Find FeaturePress q or Z to scroll to 24 Hour Clock.2Toggle FeaturePress A to toggle the feature On or Off.3ExitMenuPress ¼ to exit the menu, or you may scroll to other features.1Find FeaturePress q or Z to scroll to Launch MiniBrowser. 2Select Press and hold A to select.3ExitMenuPress ¼ to exit the menu, or you may scroll to other features.1Find FeaturePress q or Z to scroll to Power Up Mode. and press A to select.2Select OptionPress q or Z to scroll to Power Up Phone or Power Up MiniBrowse and press A to select.3ExitMenuPress ¼ to exit the menu, or you may scroll to other features.opt_menu.fm5  Page 49  Tuesday, October 19, 1999  10:31 PM
Using the Menu Features50EnglishConfirm at Start-upYour phone can display reminders when you launch the MiniBrowser to indicate that your time browsing may be charged. This feature toggles the reminder ON or OFF.System Options SubmenuThe System Options submenu offers a couple features that will help you use your phone and wireless network.Displaying the System IDUse this feature to determine the unique System ID for your wireless phone.Selecting a System ModeiPress ä then Ç and continue with step 2.Your Service Provider configures Select System Mode when you receive your phone. This feature allows you to select the type of system your phone will attempt to access. See below for a chart of available settings.1Find FeaturePress q or Z to scroll to Confirm at Start.2Toggle Press A to toggle between On and Off.3ExitMenuPress ¼ to exit the menu, or you may scroll to other features.1View SID Press A to select Display System ID. You will see the System ID for your phone.2ExitMenuPress ¼ to exit the menu, or you may scroll to other features.1BeginSelectionPress q or Z to scroll to Select SystemMode and press a to enter. The display will show your phone’s current System Mode setting.2Choose ModePress q or Z to scroll through the System Mode settings (see chart on next page). Press a to select the displayed setting.3ExitMenuPress ¼ to exit the menu, or you may scroll to other features.opt_menu.fm5  Page 50  Tuesday, October 19, 1999  10:31 PM
Using the Menu Features 51 EnglishDisplaying the Roam List VersionThis feature displays the Roam List Version used by your phone. If you require technical assistance, you may be asked to check this feature.Standard Mode:Your phone first seeks a home type system, then a non-home type system.Home Only Mode:Phone will not operate outside its home system.1View Roam ListPress q or Z to scroll to Roam List Version then press A to select. You will see: Version XXXX.2ExitMenuPress ¼ to exit the menu, or you may scroll to other features.Standard ScanHomeOnlyopt_menu.fm5  Page 51  Tuesday, October 19, 1999  10:31 PM
Using the Menu Features52Englishopt_menu.fm5  Page 52  Tuesday, October 19, 1999  10:31 PM
Using the Messaging Menu 53 EnglishUsing the Messaging Menu*The dedicated Message Key provides access to your phone’s new and easy Messaging Menu. Through this menu, you can check your Voice Mail, read your pager-like alphanumeric Messages, access MiniBrowser alerts, and view the Caller IDs of your most recent callers.In this section you will learn how to:•view your Caller IDs.•check your Voice Mail.•read your Messages.•explore your options with the Function Menus.Receiving MessagesIf your phone is ON and you receive a Voice Mail, MiniBrowser alert, or alphanumeric message: an indicator appears on the display:•o Appears on the lower line of the display when you receive an alphanumeric message. It will stay on the display until you have read the message. •Urgent o Appears in the main display when you receive an urgent message and your phone is in idle mode. After a few seconds, the screen will change to Press o and begin flashing. •Msg Mem Low Appears when your phone’s message memory is almost full (at approximately 85% capacity). * Contact your Service Provider for availability.Your Service Provider holds your messages and will forward them after you have made room. See page 60 to learn how to delete messages.•Msg Mem Full Appears in the main display when the message memory is completely full and your phone is in idle mode.AYour Service Provider holds your messages and will forward them after you have made room. See page 57 to learn how to delete messages.•p Appears on the lowe line of the display when you receive a Voice Mail message. It will stay on the display until you have listened to the message. Your Service Provider will then signal your phone to turn the indicator OFF.AFor information on MiniBrowser alerts, see page106.Press ¿ to open the Messaging Menu:When you open the Messaging Menu, the icon of the message type you received will be flashing.2512Voice MailMessagesCaller IDMiniBrowse AlrtVoice Mail IndicatorMessage Indicatormsg.fm5  Page 53  Tuesday, October 19, 1999  10:37 PM
Using the Messaging Menu54EnglishViewing Your Caller IDsAContact your Service Provider for availability.Your phone supports Caller ID service, which lets you see who is calling before you answer. The Caller IDs for the last 16 different callers are stored so they can be viewed at any time.You will see a Caller ID icon   for each stored Caller ID. Flashing icons represent Caller IDs that have not been viewed. Below the icons you will see information for the latest Caller ID:Keep in mind: You will see the caller’s name only if it is stored in your Phone Book.y A check mark will appear in the corner if you have answered or returned the call. Press ¾ to return the call of the displayed caller. Press  to store the information.Caller ID OptionsWhen viewing Caller IDs, press the Message Key to see the options available for the highlighted Caller ID.1Enter MessagingPress ¿ to open the Messaging Menu.2SelectCaller IDPress q or Z to scroll to Caller ID and press a to select.3Select Caller Press q or Z to highlight a Caller ID to view and press a to view complete information for that call:251212:10pm 08/02/991-312-555-1212selected Caller IDtime & date of callyour caller‘s phone number2512Smith JHome1-312-555-121202number of times they called your caller’s phone numberyour caller’s name1Enter MessagingPress ¿ to open the Messaging Menu.2Choose FunctionPress q or Z to scroll to one of the following:2512ExitStore To MemoryCall BackGo To Messaging Menu ExitDelete MessageDelete AllMessagesmsg.fm5  Page 54  Tuesday, October 19, 1999  10:37 PM
Using the Messaging Menu 55 EnglishChecking Your Voice MailAContact your Service Provider for availability.When you receive Voice Mail, your Service Provider sends a notification to your phone and your phone displays an indicator. That way, you will be able to check for new Voice Mail simply by glancing at your phone’s display.If you have one or more Voice Mail messages, you will see:To listen to your messages, dial your access number. Your phone will do this automatically with one key press.See the following page for more options.ASome Service Providers send the Voice Mailbox number to your phone automatically. If the number has not been sent, then store it in location 98 of your Phone Book. To learn how, see Pause Dialing on page 26.iPress and hold ¿ to call your Voice Mail number.If you have no new messages, you will see:Go To Msg MenuPress a to return your phone to the Messaging Menu.Exit Press a to exit Messaging to idle mode.Delete MessagePress a to delete the currently selected Caller ID. Press a again to confirm.Delete AllMsgsPress a to delete all your Caller IDs. Press a again to confirm.CallBack Press a to return the call.Store To MemPress a to begin storing the number. Enter a two-digit location, select a label, enter a name, and press  again.1Enter MessagingPress ¿ to open the Messaging Menu.2Select Voice MailPress q or Z to scroll to Voice Mail and press a to select.Dial NumberWhen viewing notifications, press ¾ or press and hold a to call your Voice Mail box.2512Voice MailYou Have2512Voice MailNomsg.fm5  Page 55  Tuesday, October 19, 1999  10:37 PM
Using the Messaging Menu56EnglishVoice Mail OptionsWhen checking Voice Mail, press the Message Key to see options for the highlighted Voice Mail notification.Reading Your Messages AContact your Service Provider for availability.Your phone can receive alphanumeric messages like a pager. The message memory stores up to 60 messages, depending on the size of each.3Access OptionsPress ¿ to open the Voice Mail Function Menu.4Choose FunctionPress q or Z to scroll to one of the following:Go To Msg MenuPress a to return your phone to the Messaging Menu.Exit Press a to exit Messaging to idle mode.Delete Message Press a to delete the currently selected Voice Mail notification. Press a to confirm.CallBack Press a to dial your Voice Mail box number.2512ExitCall BackGo To Messaging MenuExit Delete Message1Enter MessagingPress ¿ to open the Messaging Menu.2Select MessagesPress q or Z to scroll to Messages and press a to select.Flashing icons represent messages that have not been viewed. Select a MessagePress q or Z to highlight a message to read and press a to select the message.Once a message is selected, the following keys will help you read through your messages:Scroll Press a or Z to scroll through the selected message.2512M: Happy B-day!1: F:847555121212:34pm 07/07/99selected messagemore messages (right)time and date of messagetext of messagemore messages (left)urgent messagelocked messagesender’s numbermore textmessagenumbermsg.fm5  Page 56  Tuesday, October 19, 1999  10:37 PM
Using the Messaging Menu 57 EnglishMessage OptionsWhen reading your messages, press the Message Key to see the options available for the highlighted message. Previous MessagePress q or Ç to go to the previous message.NextMessagePress È to go to the next message.If the message includes a number in parentheses (a Call Back number) you can use the following shortcuts:Call Back Press ¾ to dial the Call Back number (in parentheses if included).If the Call Back number matches one in your Phone book, you will see the name of the caller when you view the message. Store Press  to store the Call Back number (in parentheses if included) in your Phone Book.3Access OptionsPress ¿ to open the Message Function Menu.2512ExitStore To MemoryCall BackGo To Messaging Menu ExitDelete MessageDelete AllMessagesLock(Unlock)4Choose FunctionPress q or Z to scroll to one of the following:Go To Msg MenuPress a to return your phone to the Messaging Menu.Exit Press a to exit Messaging to idle mode.Delete MessagePress a to delete the currently selected message. Press a again to confirm.Delete AllMsgsPress a to delete all messages. Press a again to confirm.Lock MessagePress a to lock or unlock the message. Lock important messages to protect them from accidental deletion.Unlock MessageMessages must be unlocked before they can be deleted.If the message contains a Call Back number (in parentheses), you will also see these options:CallBack Press a to dial the sender’s number.Store To MemPress a to begin storing the number. Enter a two-digit location, select a label, enter a name, and press  again.msg.fm5  Page 57  Tuesday, October 19, 1999  10:37 PM
Using the Messaging Menu58Englishmsg.fm5  Page 58  Tuesday, October 19, 1999  10:37 PM
Using the MiniBrowser 59 EnglishUsing the MiniBrowser*Your phone can give you instant access to valuable resources. With a subscription and wireless service, you can retrieve sports scores, weather and traffic reports, stock prices, and more. In this section you will learn how to:•launch the MiniBrowser.•navigate using your phone.•bookmark your favorite sitesFollow these symbols as a guide for using the MiniBrowser.Press q to scroll up.Press Z to scroll down.Press ä for Soft KeyPress  for Soft KeyPress C to go back or stop, hold to return to home pagePress ¼ to exit* Contact your Service Provider for availability.Getting Started BrowsingTo get started with you MiniBrowser, you will need an IP address for your phone. The IP address is the location of a server provided by your Service Provider, and it will be loaded into your phone by your Service Provider when you subscribe to this service. Contact your Service Provider for more information.Launching the MiniBrowserIf your IP address is already set, then you are ready to go. Just follow these simple steps:For more setup options and another way to launch the browser, turn to page 49.1Open Quick MenuPress a to open the Quick Menu. 2SelectBrowserPress q or Z to scroll to Launch Browser and press a to select.When you launch the MiniBrowser, you will see the last page you accessed with the MiniBrowser. If this is your first time, you will see your home page.2512MessagingLast 10 DialedPhone BookLaunch Browserbrowse.fm5  Page 59  Tuesday, October 19, 1999  10:45 PM
Using the MiniBrowser60EnglishMiniBrowser NavigationIf you know the keys to navigate your phone’s other features, then you already have a head start at navigating with the MiniBrowser. Scrolling and SelectingWhen browsing, you will see a list of options on the phone’s display. Each of the items on the list is assigned a number. Just press the matching numeric key to select that item. Or you can scroll to the item with the volume keys and use the Smart Button to select.MiniBrowser NavigationSoft KeysIn addition to the familiar keys for scrolling and selecting, the MiniBrowser makes uses of “soft keys.” Soft keys are keys that change their function according to the screen. Read the lower line of the display (above the indicators) to find out what the soft keys can do on that screen.You will see two functions, one on the left and one on the right, each with an icon: SelectItemPress the key matching the number of the list item. In the above example, press à for Email.Scroll Press q or z to scroll up and down the page. You can also use Ç or È. Above, press z once to scroll to Email, twice to scroll to To-Do List.Select Press a or the left soft key (see the next page) to select the highlighted item. Above, press a to select Web Sites.Go Back One PageWhile navigating, press C to return to the previous page.Stop When sending and receiving data, press C to interrupt transmission.25127 EMail8 To-Do List6 Web SitesOK InboxScroll bar (more options up and down)OptionsReturn to HomePress and hold C to return to your home page.Left Soft KeyPress ä to choose the option on the left. In the above example, press ä to select OK and accept the highlighted option: Web SitesYou can also press a to select the left option.Right Soft Key Press  to choose the option on the right. In the above example, press  to select Inbox.Press ä for left soft key25127 EMail8 To-Do List6 Web SitesOK InboxPress  for right soft keybrowse.fm5  Page 60  Tuesday, October 19, 1999  10:45 PM
Using the MiniBrowser 61 EnglishDisplay MessagesWhile you navigate, the lower line of the display will show you messages to let you know what your phone is doing. You will see: Sending))))), Receiving(((((, or Waiting.....BookmarksBookmarks make it easy to quickly jump to the sites you use most often. You can assign up to nine bookmarks, one for each of the numeric keys on the keypad. See page 62 to learn how to make a bookmark. Once you bookmark the site, press and hold the key and you will automatically jump to the page. ABookmarks are only available while browsing.MiniBrowser AlertsTo stay current with changing information, like stock prices or sports scores, you can subscribe to MiniBrowser alerts through your Service Provider. If your phone is ON and you receive a MiniBrowser alert:•An alert sounds: Your phone will beep three times. See Setup Message Tones on page 39 to set your phone’s alert. See page 39 to learn about Reminder Tones.•An indicator appears: o Appears on the lower line of the display. It will stay on the display until you have checked the alert. Receiving CallsMost of the time, while browsing you will not be able to receive calls (depending on your service, callers will probably get your Voice Mail).ALook for the IU indicator on the lower line of the display. If you see it, your phone is online and you will not be able to receive calls.Occasionally, when you access a page that you have recently visited and the information on the page has not changed, your phone may use a version of the page stored in its memory. When this is the case and you receive a call, your phone’s alerts will sound and the display will show the Caller ID (if available). Entering WordsAt times you may need to enter information while browsing, like a keyword for searching or a message. If you see a flashing cursor, you can use the keypad to enter letters and punctuation in the same way you do for the internal Phone Book. See page 24 for more information.1Check MessagePress ¿ to open the messaging menu. The icon of the message type received will be flashing.2Select Alert Press q or z to scroll to MiniBrowse Alrt and press a to select.Answer CallPress ¾ to answer the call. Your browsing session will be put on hold while the call lasts. Once the call is complete, your phone will return to the same site.browse.fm5  Page 61  Tuesday, October 19, 1999  10:45 PM
Using the MiniBrowser62EnglishSecurityTo find out if the information you are sending is secure, just look at the lower line of the display. A key icon denotes a secure transmission. If the key has a slash through it, then the transmission is not secure.The MiniBrowser MenuThrough this menu, you can set Bookmarks, read MiniBrowser alerts, refresh the display, and other advanced features. AThis menu is only available while browsing.HelpIf you need assistance while browsing, select this option. ASome sites do not have help available.HomeSelect this option to return to the home page set up by your Service Provider.Mark SiteTo add a page to your bookmark list, choose this feature. Once bookmarked, press and hold the corresponding key to jump to the bookmarked page. There are nine bookmarks available so your favorites are never more than a keypress away.Show URLTo see the address of the current page, choose this feature.Reset UPThis features relaunches the MiniBrowser.About UPThis feature offers information on the company that helps to provide the web browsing service.Select Press a to select Help. You will see a help screen specific to the site.Select Press a to select Home. You will see the home screen of your Service Provider.Secure Non-Secure1Select Press a to select Mark Site. You will see: Select Number.2Select NumberPress a key, Ú through á, to choose the bookmark number.Select Press a to select Show URL. You will see the address of the current page.Refresh DisplayPress a to select Reset UP. You will see the start-up screen and then the first menu.View PagePress a to select About UP. You will see a page with information.browse.fm5  Page 62  Tuesday, October 19, 1999  10:45 PM
Using the MiniBrowser 63 EnglishAdvanced SettingsThis submenu contains a couple features for advanced users, like security and technical settings.1Select Press a to select Advanced. 2Scroll Press q or z to scroll to Set.UP Link or Security and press a to select.browse.fm5  Page 63  Tuesday, October 19, 1999  10:45 PM
Using the MiniBrowser64Englishbrowse.fm5  Page 64  Tuesday, October 19, 1999  10:45 PM
Accessories 65 EnglishAccessoriesThe following accessories have been designed to work with your phone. Additional accessories may be available and are packaged separately. Please refer to your local service provider or retail outlet for more information.Vehicular Power AdapterThe Vehicular Power Adapter connects to your phone and allows you to charge your phone's battery while driving. When the phone is in use, the adapter overrides the battery therefore preserving battery life. The adapter also provides dead battery operation.AIn some cars, the engine must be running in order for the Vehicular Power Adapter to operate.Personal Handsfree SystemThe convenient headset provides both an earphone and microphone for simple handsfree and private telephone conversations. The headset plugs directly into the jack on the top of your phone, so that you can wear your phone and move freely. Place the foam cover on the earpiece for a more comfortable fit..Zero Install Car KitFor the quickest and easiest mobile solution, use the Zero Install Car Kit. Just plug it in, attach the microphone, and you are ready to go.Accessory Limited Warranty InformationWe recommend that you use Motorola original batteries and accessories. Under its limited cellular telephone warranty, Motorola specifically disclaims any responsibility for damage caused by the use of portable cellular telephone accessories not manufactured by Motorola.For details on the complete line of Motorola cellular accessories, see your dealer or visit our Web site athttp://www.mot.com/m3cd_us.bk : access.fm5  Page 65  Tuesday, October 19, 1999  10:47 PM
Accessories66Englishm3cd_us.bk : access.fm5  Page 66  Tuesday, October 19, 1999  10:47 PM
What to do if... 67 EnglishWhat to do if...I pressed the power button, but nothing happened. What’s wrong with my phone?Make sure that you press and hold the power button until the display appears and you hear an audible alert. If nothing still happens, then check that you have installed a battery and that the battery is charged. For more information about batteries and charging see “Your Battery” on page 15.My battery didn’t last as long as I expected. What can I do to extend battery life?Your battery’s “talk-time” and “standby-time” are relative measurements of the battery’s capacity. The more you talk on the phone, the less standby-time you have, and vice versa.You can also turn on the Power Save Mode feature to extend battery life. However, the LED Power/Status Indicator does not light when this feature is activated. Certain features demand power from your battery and reduce battery life. If you have selected the Automatic Display of Individual Call Timer feature, the display uses battery power to remain active during each call. Turn this feature off to conserve battery energy. (See “Auto Display Individual Timer” on page 36 for more information on this feature.)Make sure that you are using batteries that are compatible with your phone.Exposing your battery to extreme temperatures—below -10°C (14°F) or above 45°C (113°F)—can shorten battery life. Batteries are especially sensitive to high temperature extremes. As a good rule, always take your phone with you when you leave your car.The display says, “Locked.” How do I unlock my phone?Enter the last three digits of your cellular number. If that doesn’t work, use the factory preset lock code: 123. If all else fails, call your service provider (the company that sends you your monthly cellular bill) for assistance. (See “Using Lock/Security Features” on page 41 for more information on Security Features.)I tried to place a call and received a fast busy signal.This sound means that the cellular system did not process your call. For example, the cellular system may be overloaded with call attempts. To redial the number, press ¾ before ending your call attempt, or press ¼ and try the call again later. (See “Redialing a Number” on page 21 for more information on redialing.)I tried to place a call and received an alternating high/low tone.This sound means your call did not reach the cellular system. You may have dialed the number too soon after turning the phone on. Wait until the “NS” light stops blinking before placing a call.An alternating tone may also indicate that your phone’s signal is blocked. Make sure the antenna is fully extended and you’re clear of any obstructions such as bridges, parking garages, or tall buildings.My phone was stolen. What should I report and to whom?Report a stolen phone to the police and to your service provider (the company that sends you your monthly cellular service bills).m3cd_us.bk : notes.fm5  Page 67  Tuesday, October 19, 1999  10:47 PM
What to do if...68EnglishI tried to listen to my Voice Mail (or use a paging service, a calling card, etc.) but nothing happened.You have probably turned off the transmit tones. Place your call, enter the access numbers when prompted by the recording, then press ä ¾. To avoid this problem in the future, follow the directions in “Transmit Tones” on page 40 to turn the transmit tones on.I tried to place a calling card call using the internal Phone Book, but it didn’t work.You may have turned off your transmit tones. Follow the directions in “Transmit Tones” on page 40 to turn the transmit tones on. Check that you stored your calling card information in the correct order, and make sure the groups of numbers are separated by pauses. The easiest way to correct the sequence may be to start from scratch. Follow the instructions on “Storing Calling Card Numbers” on page 27, enter your calling card information again, and store it in the same memory location as your previous attempt.Also keep in mind that when using your calling card, you must enter the number you are calling with the area code, but without the initial “1.” Check with your long distance carrier for details on using your calling card.My phone started beeping, and the display says: 1 Call Unanswered. What happened?Someone tried to call you while you were in an area where the signal was weak. Press C to clear your display, extend your phone’s antenna, and avoid obstructions like tunnels, parking garages and tall buildings whenever possible.I launched the MiniBrowser but the display says: Service Not Available. What is wrong?You are in an area without service. If you have wireless service, look in the display for the Digital indicator. If you don’t see it you may have only Analog service or no service at all. If you do see the Digital indicator, you may be connected to digital network that does not support Internet access.I launched the MiniBrowser but the display says: Data Server Unavailable. What is wrong?Try again in a few minutes. The servers may be temporarily busy.m3cd_us.bk : notes.fm5  Page 68  Tuesday, October 19, 1999  10:47 PM
Patent Information 69 EnglishPatent InformationManufactured under one or more of the following patents:4121218 4127824 4128740 4138681 4193036 42543824302845 4312074 4327319 4329666 4369516 43695224378603 4390963 4398265 4400584 Re.31470 44319774434461 4455534 4462098 4484153 4485486 44866244491972 4504834 D278708 4523155 4546329 45493114550426 4551696 4564821 D282169 4571595 45730174574243 4585957 4602218 D284759 4616314 46175204626309 4628529 4629829 4630304 4630305 46331414636593 4636741 4644351 D288432 4648125 4649543D288683 4654655 4654867 4662691 4667333 46689174670747 4672502 4692726 4704588 D292578 4706036D292920 4710724 4711361 4715063 4716319 47163914723305 D294257 4727306 4727583 4730195 47346354737976 4740794 4741018 4741034 4742562 D295627D295975 4751737 4761621 4764737 D297734 D297735D297736 4777564 Re.32768 4783697 D299232 47979294798975 4800348 4802236 4803726 4809356 48113774811404 4816774 4817157 4823098 D300742 D3008274827226 4827507 4829274 4829543 4837534 48436214845772 4851966 4868576 4872196 4873683 48765524876740 D304189 4879533 4885553 4887050 4890199D305427 4896124 4896361 4897873 D305717 4903327D306163 4904549 4905288 4905301 D306299 49104704912602 4916262 4918403 4918732 4922209 49241944930126 D309301 D309451 4945570 4954796 49568544963812 4963843 4965537 4970475 4972355 49724324972455 4975808 4982108 4984219 4989230 D3141734992753 4998289 D315330 D315543 5004992 50089255010309 5010570 5014294 5014346 D316859 50178565018188 5020076 5020091 5020092 5020093 50235805023866 5023911 5025387 5028859 5029233 50365325040127 5042071 5045824 5053924 5055800 50558025055803 5057762 5058136 5059885 5060264 50602945063340 5065408 5067139 5068625 5070310 50777575081674 5083304 5093632 D325028 5107487 51095365111162 5113400 5113436 5117441 5117449 51210475121288 5121412 5122722 D327062 5124889 51270405127042 5128834 5130682 5130683 5133010 51361355140286 5142551 5142696 5148471 5150075 51503595150384 5152006 5152007 5153590 5157693 51592835160898 5163159 5164652 5166596 5166642 51701735170492 5173672 5175759 5175874 5177458 51827495185566 5187640 5187809 5192924 5193223 51951065195108 5198887 5200655 5201069 5202654 5203009D334746 5204977 5205751 5208566 5210793 52115815212815 5212826 5214675 5214774 5220290 52220785222104 5222251 5224122 5230007 5230093 52335065233633 5235492 5237257 5237570 5239127 52392945241545 5241548 5241592 5241650 5241688 5241693D338887 5242767 D339127 D339335 D339336 D3393375247544 D339578 5249302 5250916 5251331 5253292m3cd_us.bk : patent.fm5  Page 69  Tuesday, October 19, 1999  10:47 PM
Patent Information70English5255292 5257414 5259005 5260170 5260988 52611195262710 5263052 5263055 5265219 D341589 5271042D342248 5276685 5276707 5276913 5278527 52788325278994 5280637 5280644 D343615 D343616 D343834D343835 5287553 5287555 5287556 5289505 D3445125297142 5299232 5301364 5301365 5308716 53127055321847 5323421 5325429 D348250 D348427 5327642D348665 D348666 D348668 5331123 D349273 53369845338909 D350113 D350348 D350349 D350350 53495885351245 D351375 5359696 5361400 5363071 5365549D352503 5366826 5367538 5367558 5371791 D3531315373101 D353361 5375143 5375258 D353587 D3535885379324 5384825 5392000 5392023 5396654 D3563095402447 5404120 5404582 5406146 5406562 D357224D357457 5410275 5414711 D358148 5420759 54246895428820 5428836 5430416 5432017 5434947 54365895436802 5438684 D361070 5444764 5446763 54487635448770 5448771 5453997 D362840 D362852 54616435463628 5465412 5469177 5475752 D365094 5477192D365817 5486843 5487184 5488335 5490177 54931985493700 5493714 5495206 5497126 5497383 D3676405499273 5504812 5506490 D368696 5508709 55106935511235 5513078 5513382 D369359 5513996 D369598D369797 5519303 5519346 5519506 5519777 D370016D370463 5526398 D370672 5530922 5539360 55421035542106 5544250 D372481 5546380 D372896 55510785555550 5559471 D374013 5561436 D374227 D3744245565881 5570453 5572223 5572224 5577267 5577268D375932 D375952Other patents pendingm3cd_us.bk : patent.fm5  Page 70  Tuesday, October 19, 1999  10:47 PM
Motorola Limited Warranty 71 EnglishMotorola Limited WarrantyI. What This Warranty Covers And For How Long:Motorola Inc. (Motorola) warrants the Motorola PCS Subscriber Radiotelephone products and accessories against defects in material and workmanship under normal use and service for a period of time specified by the product’s serial number from the date of installation.AA Installation, in the case of radiotelephones, accessories or batteries that are not installed in a vehicle, means the date that the product is placed into subscriber service. Installation will be deemed to be no later than thirty (30) days from date of delivery of the Product to you the owner.The warranty time period is specified by the last digit of the mechanical serial number found on each PCS product. Products sold under this warranty may have either a “P”, “Y”, “A”, “B”, “C”, or “D” or nothing in the eleventh position of the serial number. If there is no letter or an “A”, the product comes with a (1) one year warranty. Products that have a “D” have a (2) two year warranty. Products that have a “Y” or a “B” have a (3) three year warranty, and products that have a “P” or a “C” have a (5) five year warranty commencing from the date of installation. The warranty time period for radiotelephone accessories and batteries is as follows:PCS portable telephone batteries 1 yearCarrying cases Defect free at time of shipmentOther radiotelephone accessories 1 yearMotorola, at its option, will, at no charge, either repair, replace, or refund the purchase price of the PCS Subscriber Radiotelephone Product during the warranty period, provided it is returned in accordance with the terms of this warranty to the Motorola National Service Center or Service Providers service shop qualified by Motorola. Repair, at Motorola’s option, may include the replacement of parts or boards with functionally equivalent reconditioned or new parts or boards. Replaced parts or accessories, batteries or boards are warranted for the balance of the original time period. All returned accessories, batteries, parts and PCS telephone equipment shall become the property of Motorola.m3cd_us.bk : warrant.fm5  Page 71  Tuesday, October 19, 1999  10:47 PM
Motorola Limited Warranty72EnglishII. Warranty Conditions:This express limited warranty is extended by Motorola to the original subscriber buyer or lessee only and is not assignable or transferrable to subsequent subscriber buyers or lessees. This is the complete warranty for PCS Subscriber Radiotelephone Products by Motorola. Motorola assumes no obligation or liability for additions or modifications to this warranty unless made in writing and signed by an officer of Motorola. Unless made in separate written agreement between Motorola and you, Motorola does not warrant the installation, maintenance or service of the equipment, accessories, batteries or parts. Rechargeable batteries are warranted only if battery capacity falls below 80% of rated capacity, or the battery develops leakage. This warranty becomes void for all types of batteries if:a. the batteries are charged by other than Motorola approved battery chargers specified for the charging of the battery.b. any of the seals on the battery are broken or show evidence of tampering.c. the battery is used in equipment or service other than the PCS radiotelephone equipment for which it is specified.Motorola cannot be responsible in any way for any ancillary equipment not furnished by Motorola which is attached to or used in connection with Motorola’s PCS Subscriber Radiotelephone Products, or for operation of our equipment with any ancillary equipment and all such equipment is expressly excluded from this warranty. Furthermore, Motorola cannot be responsible for any damage to Motorola equipment resulting from the use of ancillary equipment not furnished by Motorola for use with PCS subscriber equipment.When the product is used in conjunction with ancillary or peripheral equipment not manufactured by Motorola, Motorola does not warrant the operation of the product/ peripheral combination, and Motorola will honor no warranty claim where the product is used in such a combination and it is determined by Motorola that there is no fault with the Motorola product. Motorola specifically disclaims any responsibility for any damage caused in any way by the use of portable radiotelephone accessories and peripherals (specific examples include, but are not limited to: batteries, chargers, adapters, and power supplies) when such accessories and peripherals are not manufactured or supplied by Motorola. Motorola disclaims liability for range, coverage, availability, or operation of the PCS System which is provided by the Service Provider.m3cd_us.bk : warrant.fm5  Page 72  Tuesday, October 19, 1999  10:47 PM
Motorola Limited Warranty 73 EnglishIII. What This Warranty Does Not Cover:(a) Defects or damage resulting from use of the product in other than its normal and customary manner. (b) Defects or damage from misuse, accident or neglect.(c) Defects or damage from improper testing, operation, maintenance, installation, adjustment, or any alteration or modification of any kind. (d) Breakage or damage to antennas unless caused directly by defects in material or workmanship. (e) Products disassembled or repaired in such a manner as to adversely affect performance or prevent adequate inspection and testing to verify any warranty claim. (f) Products which have had the serial number removed or made illegible. (g) Defects or damage due to spills of food or liquid. (h) All plastic surfaces and all other externally exposed parts that are scratched or damaged due to customer normal use. (i) Products rented on a month- to- month basis. (j) The portable phone keypad assembly and displays are not covered after the first year. IV. How To Get Warranty Service:To receive warranty service, present your equipment to the facility described below, along with your bill of sale or comparable substitute proof of sale or lease bearing the date of purchase, transceiver serial number and place of purchase or installation if applicable.Warranty service is available by returning Motorola branded Radiotelephone Products to a Motorola Service Center, authorized in writing by a Motorola Area Service Manager to perform warranty work on Motorola PCS Subscriber Radiotelephone products. A Carrier or Distributor branded Radiotelephone Product may be returned to either (a) the specific service shop qualified by Motorola’s National Service Center in writing and operated by or affiliated with the PCS Service Provider, or (b) a Motorola Authorized PCS Service Center. In most cases the service shop which sold your PCS Radiotelephone and accessories will provide warranty service. If you need additional information, contact that shop, the customer service department of your Service Provider, or Motorola at the address at the end of this document. The unit or accessories, together with any detachable parts such as antennas, battery packs, and chargers, must be delivered to a qualified Motorola Service Center, or a Motorola- qualified service shop, transportation and insurance prepaid. When sent or brought to the servicer, the Radiotelephone Product must be accompanied by your name, address, and telephone number, name of Service Provider, and a description of the problem.m3cd_us.bk : warrant.fm5  Page 73  Tuesday, October 19, 1999  10:47 PM
Motorola Limited Warranty74EnglishV. General Provisions:This warranty sets forth our responsibilities regarding this product. Repair, replacement or refund of the purchase price at Motorola’s option, is your exclusive remedy. This warranty is given in lieu of all other express warranties, implied warranties, including without limitation implied warranties of merchantability and fitness for a particular purpose, are limited to the duration of this limited warranty. Further, as the Service Provider is not controlled by Motorola, no warranty is made as to coverage, availability or grade of service provided by the Service Provider. In no event shall Motorola be liable for damages in excess of the purchase price of the PCS radiotelephone product, for any loss of use, loss of time, inconvenience, commercial damages arising out of the use or inability to use such product, to the full extent such may be disclaimed by law. VI. Patent And Software Provisions:Motorola will defend at its own expense, any suit brought against you to the extent that it is based on a claim that the PCS Subscriber Radiotelephone Product parts infringes a United States patent, and Motorola will pay those costs and damages finally awarded against you in any such suit which are attributable to any such claim, but such defense and payments are conditioned on the following:(i) that Motorola will be notified promptly in writing by you of any notice of such claim; and (ii) that Motorola will have sole control of the defense of such suit and all negotiations for its settlement or compromise; and (iii) should the PCS Radiotelephone, accessory, battery or parts become, or in Motorola’s opinion be likely to become the subject of a claim of infringement of a United States patent that you will permit Motorola, at its option and expense, either to procure for you the right to continue using the PCS Radiotelephone or parts or to replace or modify the same so that it becomes non- infringing or to grant you a credit for such PCS Radiotelephone or parts as depreciated and accept its return. The depreciation will be an equal amount per year over the lifetime of the PCS Subscriber Radiotelephone, accessories, battery or parts as established by Motorola.Motorola will have no liability to you with respect to any claim of patent infringement which is based upon the combination of the PCS Radiotelephone or parts furnished hereunder with software, apparatus or devices not furnished by Motorola, nor will Motorola have any liability for the use of ancillary equipment or software not furnished by Motorola which is attached to or used in connection with the PCS Radiotelephone. The foregoing states the entire liability of Motorola with respect to infringement of patents by the PCS Radiotelephone, accessories, batteries or any parts thereof.Laws in the United States and other countries preserve for Motorola certain exclusive rights for copyrighted Motorola software such as the exclusive rights to reproduce in copies and distribute copies of such Motorola software. Motorola software may be copied into, used in and redistributed with only the PCS Subscriber Radiotelephone Product associated with such Motorola software. No other use, including without limitation disassembly, of such Motorola software or exercise of exclusive rights in such Motorola software is permitted.m3cd_us.bk : warrant.fm5  Page 74  Tuesday, October 19, 1999  10:47 PM
Motorola Limited Warranty 75 EnglishVII. State Law Rights:Some states do not allow the exclusion or limitation of incidental or consequential damages, or limitations on how long an implied warranty lasts, so the above limitations or exclusions may not apply to you.This warranty gives you specific legal rights, and you may also have other rights which vary from state to state. m3cd_us.bk : warrant.fm5  Page 75  Tuesday, October 19, 1999  10:47 PM
Motorola Limited Warranty76Englishm3cd_us.bk : warrant.fm5  Page 76  Tuesday, October 19, 1999  10:47 PM
Index 77 EnglishIndexAAccessories ..........................................65accessory connector port ......................13adjusting volume ..................................14answering callsautomatic answer ............................47multiple key answer .........................46antenna ...............................................13audible timersone minute ......................................36repeating .........................................36single ..............................................37Authentication Entry ............................44auto display timer ................................36auto lock ..............................................42automated systemscalling ...................................... 26–27storing number ......................... 26–27automatic answer ................................47automatic redial ...................................21Bbanner .................................................48BatteriesCharging .........................................16Installing the Batteries .....................15Low battery warning .......................18Maintaining .....................................16Removing ........................................17batterylife ...................................................67Battery charge indicator .......................15Bookmark ............................................62Bookmarks ...........................................61browsing the web ......................... 59–63busy signal ...........................................67buttonMessage ..........................................13Smart ..............................................13Ccallending .............................................20placing ..................................... 14, 19receiving ..........................................20Call Back messages ..............................57Call Options .................................. 46–47Call Timers .................................... 34–37road map ........................................34Caller ID ...............................................20deleting ...........................................54number preference ..........................32options ............................................54viewing ...........................................54calling cardstoring information ..........................68calling cardsstoring numbers ..............................27using ...............................................28changing lock code ..............................43changing secure code ..........................43changing the banner ............................48checking your voice mail ......................55Clear, Master .......................................44clearingCaller ID ..........................................54Messages ........................................57settings ...........................................43Voice Mail notification .....................56clearing a memory entry ......................25clockdisplay format .................................49Confirm at Start-up ..............................50connector port .....................................13cumulative call timer ............................35m3cd_us.bk : m3cd_us.IX  Page 77  Tuesday, October 19, 1999  10:47 PM
Index78EnglishDdeletingCaller ID ......................................... 54Messages ........................................ 57Voice Mail notification .................... 56dialingpriority call ...................................... 42restricting ....................................... 44digitalindicator ......................................... 14Display ................................................ 14displayindividual call timer ...................35, 36last ten numbers dialed ................... 21lock code ........................................ 43system ID ........................................ 50your number ................................... 32Display Options ............................. 48–49displayingcaller’s numbers .............................. 32displaying phone information .............. 46displaying the 24-Hour Clock .............. 49DTMF tones ......................................... 40storing ...................................... 26–28Eearpiece .............................................. 13editing memory ................................... 33ending a call ........................................ 20FFault finding ..................................67, 69function keys ........................................13Hheadset jack .........................................13Home Only Mode .................................51IIn Use Indicator ....................................14indicatorDigital ..............................................14In Use ..............................................14No Service .......................................15indicatorsRoam ...............................................14individual call timer ..............................35auto display .....................................36Installing the Batteries ..........................15Instant Redial .......................................47Internet ......................................... 59–63Jjack, headset ........................................13KKeypad Tones .......................................39Llast ten numbers dialed ........................21lockautomatically ...................................42manually .........................................42messages .........................................57lock codechanging .........................................43viewing ...........................................43Lock/Security ................................. 41–44road map ........................................41Low battery warning ............................18m3cd_us.bk : m3cd_us.IX  Page 78  Tuesday, October 19, 1999  10:47 PM
Index 79 EnglishMMaster Clear ........................................44Master Reset ........................................43memoryediting .............................................33Phone Book .............................. 30–32recalling ..........................................31storing .............................................32memory locationusing phone book ...........................23menu features ......................................29menusentering ..........................................13navigating .................................. 3, 29MessagesCall Back .........................................57lock/unlock ......................................57options ............................................57reading ............................................56Messaging Menu button ......................13microphone .........................................13MiniBrowserIn-Box ..............................................62launching ................................. 49, 59Menu ....................................... 62–63using ........................................ 59–63MiniBrowser Alerts ...............................61MiniBrowser Navigation .......................60MiniBrowser Options ..................... 49–50multiple key answer .............................46Nnamesrecalling ..........................................31viewing ...........................................32navigating the web ....................... 59–63No Service Indicator .............................15numberviewing others .................................32viewing yours ..................................32number character .......................... 27–28Number Preference ..............................32Oone minute timer .................................36outgoing callscontrolling .......................................44PPause Dialing ................................ 26–27personalizable banner ..........................48Phone Book .................................. 30–32editing .............................................33recalling ..........................................31road map ........................................30status ..............................................31storing .............................................32phone bookclearing entry ..................................25entering a name ..............................24entering letters ................................24entryrecalling by location ...............31recalling with short cuts .........25recalling entryby location ............................25by name ................................24storing names and numbers ............23using ...............................................23phone information ...............................46phone lockautomatically ...................................42manually .........................................42phone numberviewing others .................................32viewing yours ..................................32Phone Options .............................. 45–51road map ........................................45phone overview ...................................13placing a call ................................. 14, 19placing callspriority call ......................................42redial ...............................................21power button ............................... 13, 67Power Up Mode ...................................49Priority Call ..........................................25priority call ...........................................42m3cd_us.bk : m3cd_us.IX  Page 79  Tuesday, October 19, 1999  10:47 PM
Index80EnglishRreading your messages ........................ 56recallingby name ......................................... 31recalling entry by location .................... 25recalling entry by name ....................... 24receiving callprocedure ....................................... 20receiving callsautomatic answer ........................... 47multiple key answer ........................ 46receiving messages .............................. 53redial ................................................... 21automatic ....................................... 21Instant ............................................ 47last ten numbers dialed ................... 21redialing a number .............................. 21Removing your battery ........................ 17repeating timer ................................... 36Reset URL ............................................ 62Reset, Master ...................................... 43resettable call timerresetting ......................................... 35viewing ........................................... 35retractable antenna ............................. 13ringerstyle ................................................ 39volume ........................................... 14road map ............................................ 29road mapsCall Timers .......................................34Lock/Security ...................................41Phone Book .....................................30Phone Options .................................45Tone Control ...................................38Roam Indicator .....................................14roam list version ...................................51Sscratchpad notes ..................................26Scratchpad Tones .................................40secure code, changing ..........................43Secure Options .............................. 43–44security ......................................... 41–44selecting ringer style .............................39service level ..........................................44Service Tones .......................................40Short message service symbol ...............15Show URL ............................................62Signal strength symbol .........................14single timer ..........................................37Smart Button ........................................13Soft Keys ..............................................60Speed Dial ............................................25Standard Mode ....................................51storing .................................................32Call Back number ............................57names and numbers ........................23Symbols ...............................................14system ID, viewing ................................50system mode ........................................50System Options ............................. 50–51Ttimersaudible ..................................... 36–37cumulative .......................................35individual ..................................35, 36one minute ......................................36repeating .........................................36resettable ........................................35single ..............................................37Tone Controls ............................... 38–40road map ........................................38volume ............................................14tonesalternating high/low ........................67keypad ............................................39service .............................................40storing ...................................... 26–28Transmit Tones .....................................40storing ...................................... 26–28transmit tones ......................................68Troubleshooting ............................ 67, 69Turbo Dial® keyspriority call ......................................42Turbo Dial™ ................................. 23, 25turning the phone off ..........................19turning the phone ONmode ..............................................49turning the phone on ...........................19m3cd_us.bk : m3cd_us.IX  Page 80  Tuesday, October 19, 1999  10:47 PM
Index81 68P   To be  advisedEnglishUunanswered call indicator .................... 20unlock phone ...................................... 67unlock/lock .......................................... 42Using Messaging ........................... 53–57Using the MiniBrowser .................. 59–63VviewingCaller IDs ........................................ 54cumulative call timer ....................... 35individual call timer ...................35, 36lock code ........................................ 43resettable call timer ......................... 35your number ................................... 32Voice Mailcalling ....................................... 26–27checking ......................................... 55deleting notification ........................ 56options ........................................... 56storing number ......................... 26–27voice mail ............................................ 68volumeadjusting ........................................ 14muting ........................................... 21volume keys ........................................ 13WWhat to do if... .............................67, 69ZZero Install Car Kit ............................... 65m3cd_us.bk : m3cd_us.IX  Page 81  Tuesday, October 19, 1999  10:47 PM
Index82Englishm3cd_us.bk : m3cd_us.IX  Page 82  Tuesday, October 19, 1999  10:47 PM

Navigation menu