Motorola Mobility T6GF1 Portable PCS GSM Transceiver with Bluetooth User Manual Brit01 EN User guide
Motorola Mobility LLC Portable PCS GSM Transceiver with Bluetooth Brit01 EN User guide
Contents
- 1. Exhibit 8a Users Manual
- 2. Exhibit 8b Users Manual
- 3. Supplemental Response to IHD0071
Exhibit 8a Users Manual

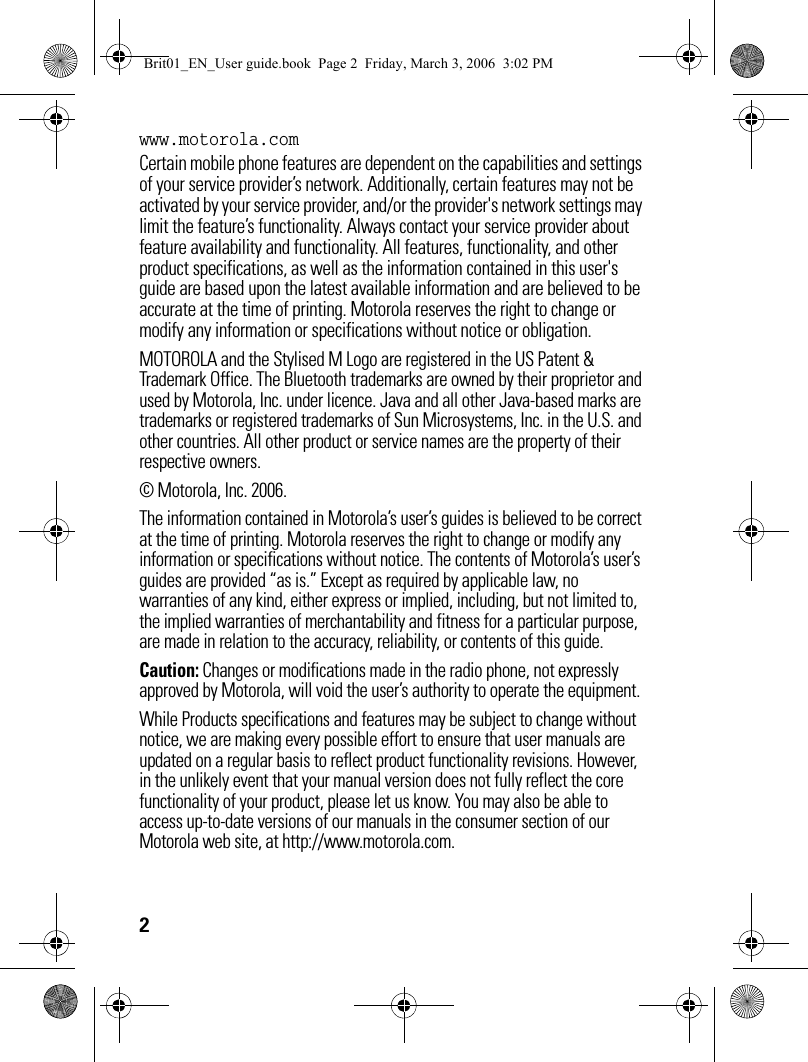

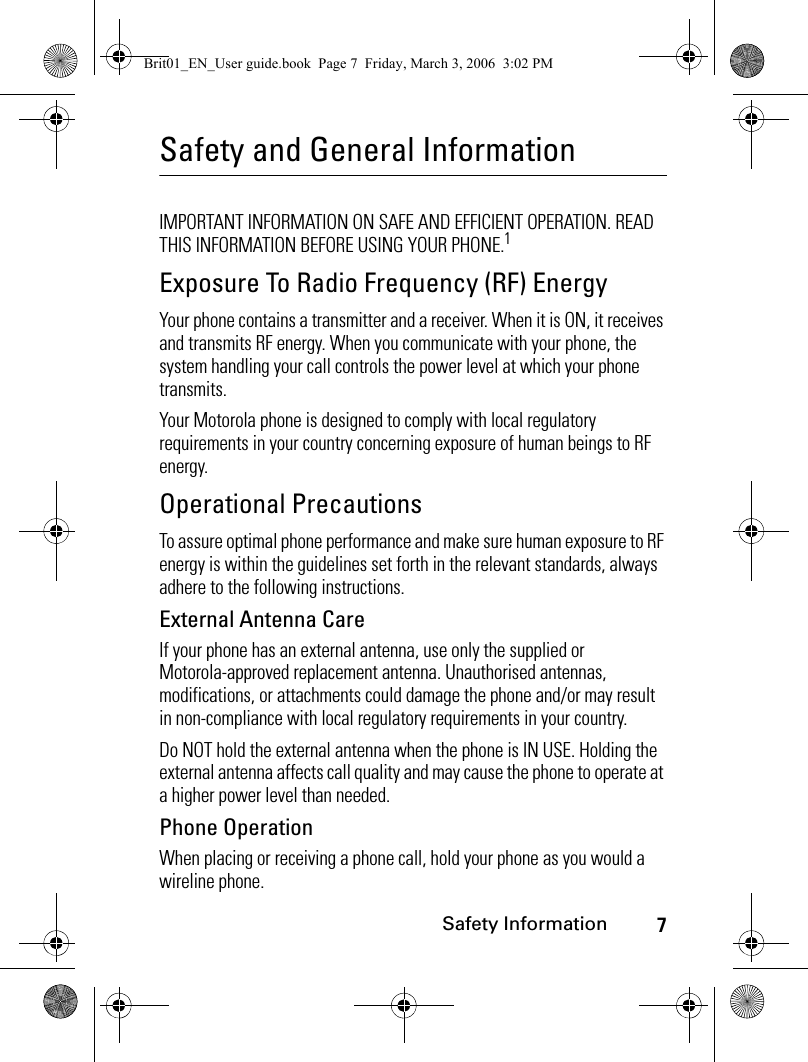

![18YOUR xxxxxYOUR xxxxxHow to use your XXXXKey mapping[ Right] soft keyTo Exit th e cu rre n t m enu.Navigatio n keyTo scroll Up, Down, Right orLeft according to the context.[Menu] key To access the Opti ons menuwhen is shown on the display. Alphanumeric keysPress the 1 to 9 keys to accessthe requiered menu.[Left] softkeyQuick access to M ail from the idle s creen (s hort p re ss) and to Messa ges (l ong p re ss).Co n text u al act i on in oth er scree ns.[ Right ] soft keyQuick a ccess to thei-mode from the standbydis play (s hort press) a ndto Games & Applications(long press)[O n/O ff, E nd] keyTo turn th e phone On or Off (long press), To end a call/reject a call and return (short press)to t he id le scre e n.[Menu] keyAccess to the 9 Menu icon s fr om th e i dle sc reen .Access to Option s whe n is shown on the screen.[Call/Send] keyTo l au n ch o r an sw er a ca ll .Contextual action in other scree ns.Brit01_EN_User guide.book Page 18 Friday, March 3, 2006 3:02 PM](https://usermanual.wiki/Motorola-Mobility/T6GF1.Exhibit-8a-Users-Manual/User-Guide-665288-Page-18.png)
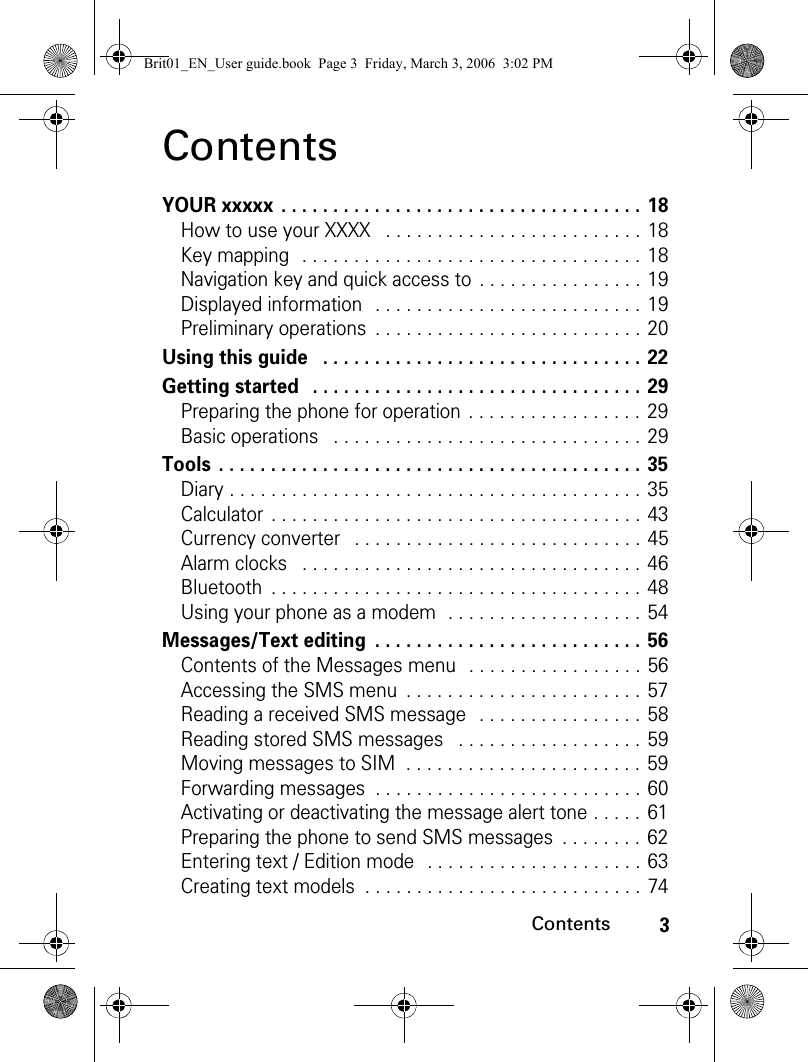
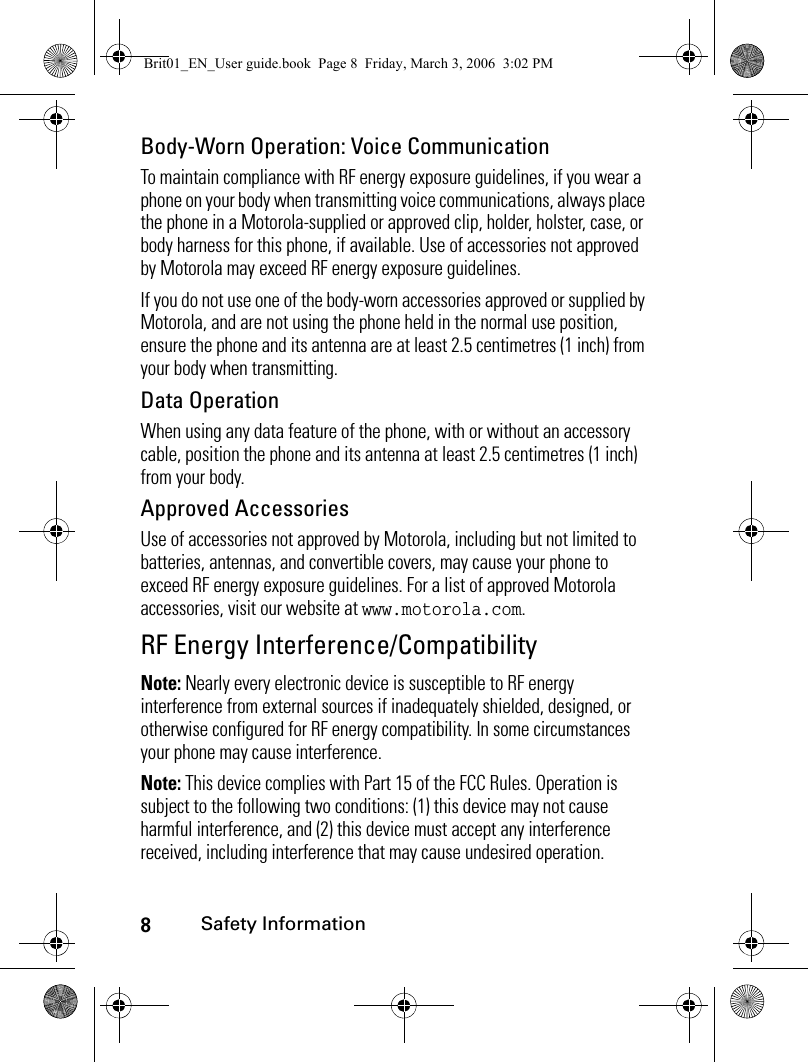
![19YOUR xxxxxNavigation key and quick access toDisplayed informationNew SM SFun & Media boxPhonebookAlert tones settingsPress on the left softkey to select mail.Press on the [Menu] key to access the Options list. Press on the [OK] key to capture the picture.Press on the [Right] softkey to select i-mode.Press on the [Right], [Left], [Up] and [Down] navigation keys to access the settings.Brit01_EN_User guide.book Page 19 Friday, March 3, 2006 3:02 PM](https://usermanual.wiki/Motorola-Mobility/T6GF1.Exhibit-8a-Users-Manual/User-Guide-665288-Page-19.png)

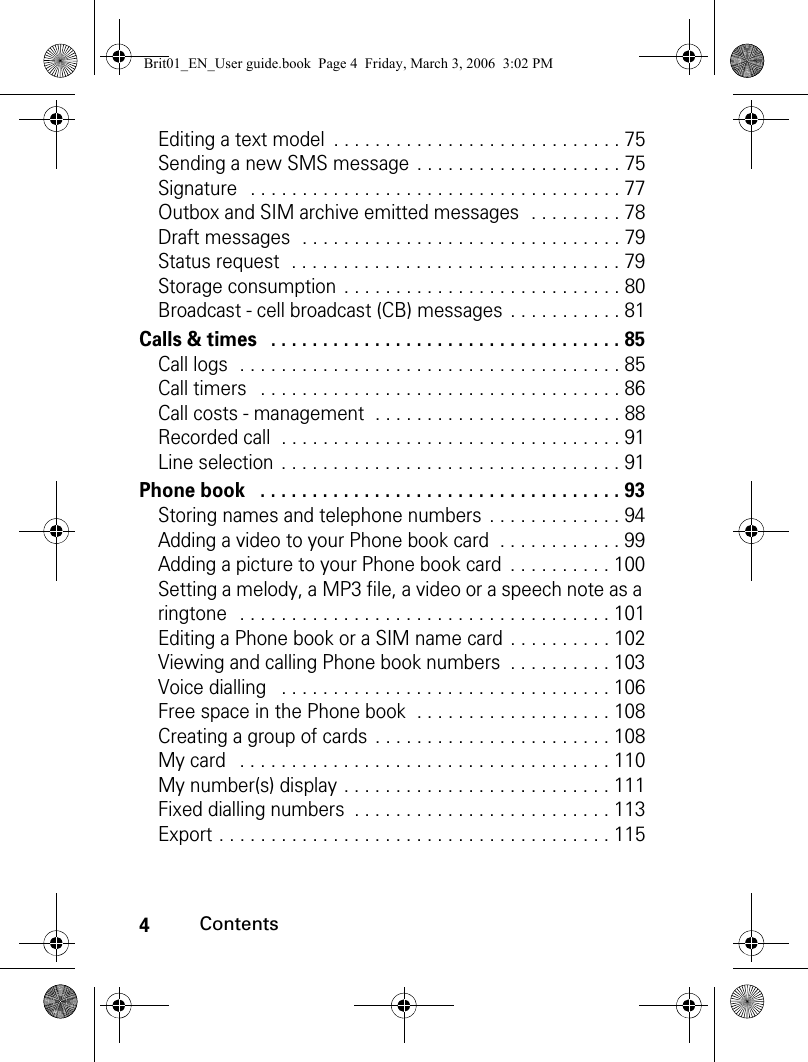
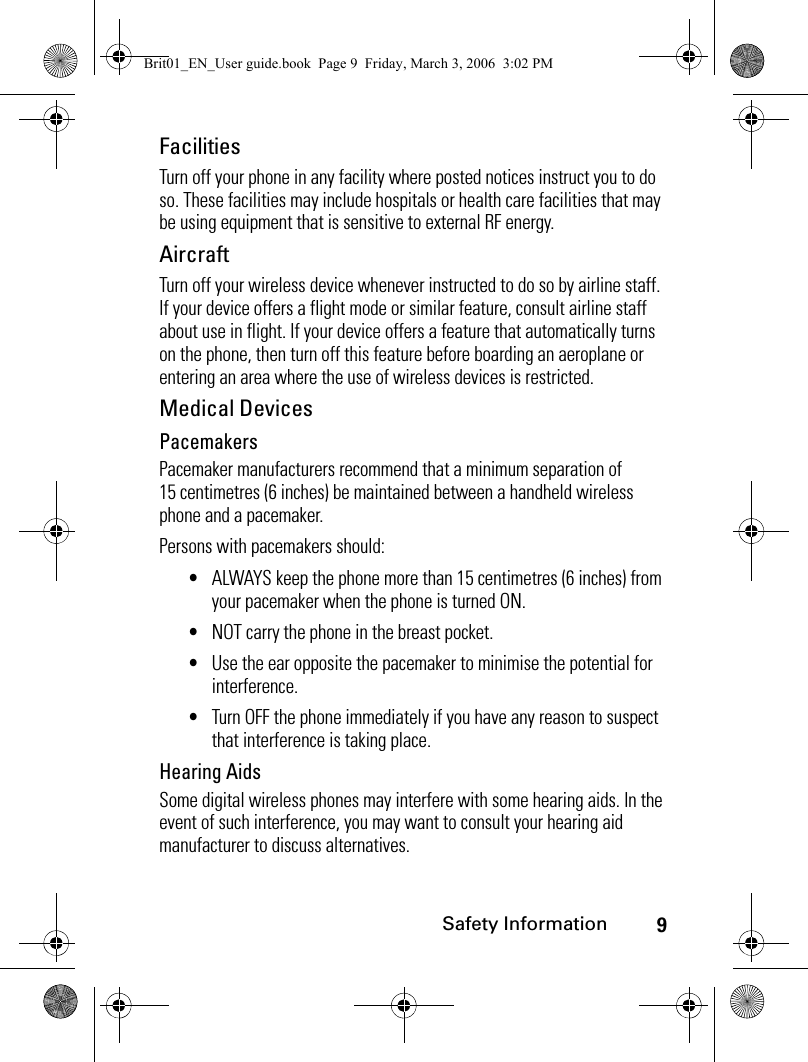
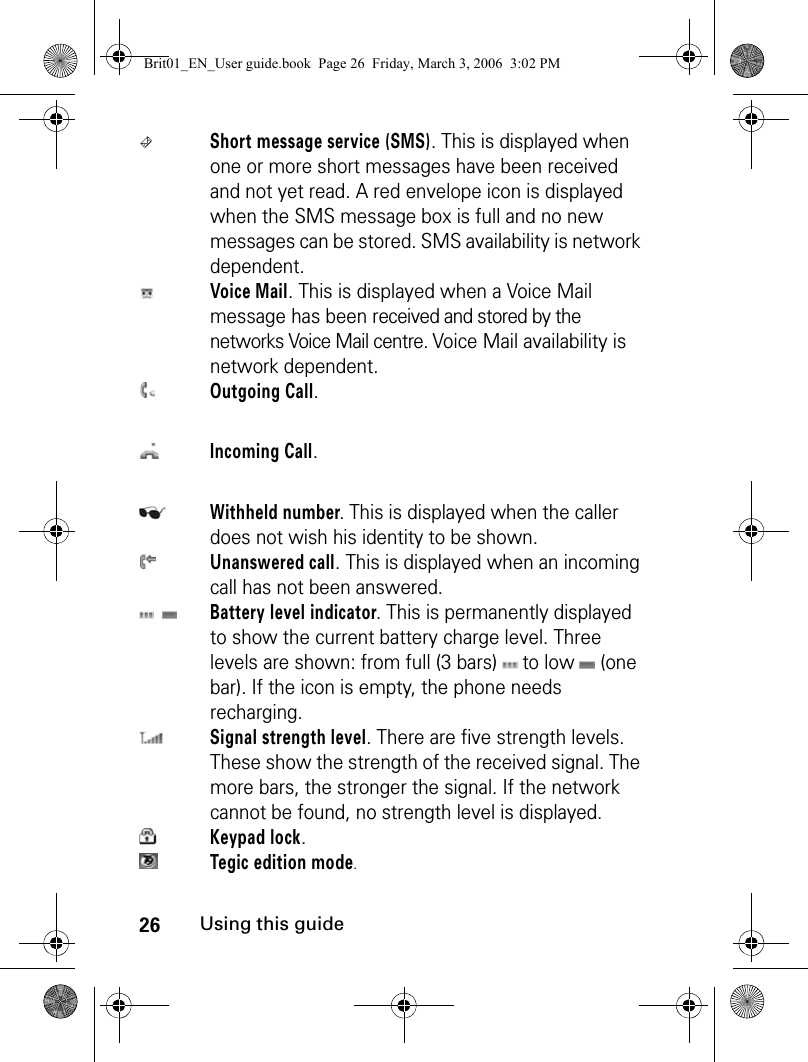
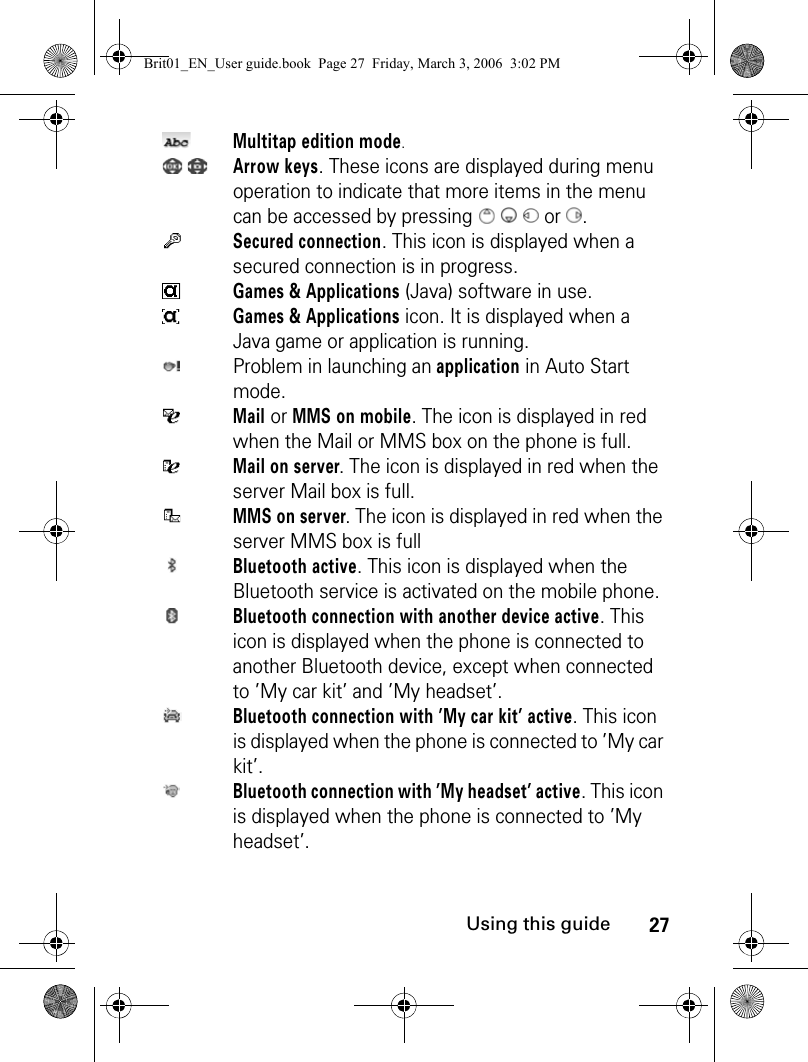
![22Using this guideUsing this guidePlease read this user guide carefully. It contains information about your phone and the way that it operates on the network. Some of the features described in this user guide are network dependent. Do not forget to check with your service provider which of these you can use. You may need to take out additional subscriptions to activate certain features.Key actionsTo help you quickly familiarise yourself with your phone, these are the keypad and side keys symbols used throughout the guide.[OK] key in the middle of the cursor key (to validate actions).[Left] softkey (to validate the item above (usually an action), give direct access to the Messages menu (long press) and to the Mail menu (short press) from the idle screen).[Right] softkey (to validate the action above: usually Exit - and direct access to the i-mode browser (short press) and to the Java™ applications (long press) from the idle screen).[Menu] key (to access the nine icons Main menu, and to access the Options menu when indicated by the icon).[Right arrow] on cursor key.[Left arrow] on cursor key.[Up arrow] on cursor key.Brit01_EN_User guide.book Page 22 Friday, March 3, 2006 3:02 PM](https://usermanual.wiki/Motorola-Mobility/T6GF1.Exhibit-8a-Users-Manual/User-Guide-665288-Page-22.png)
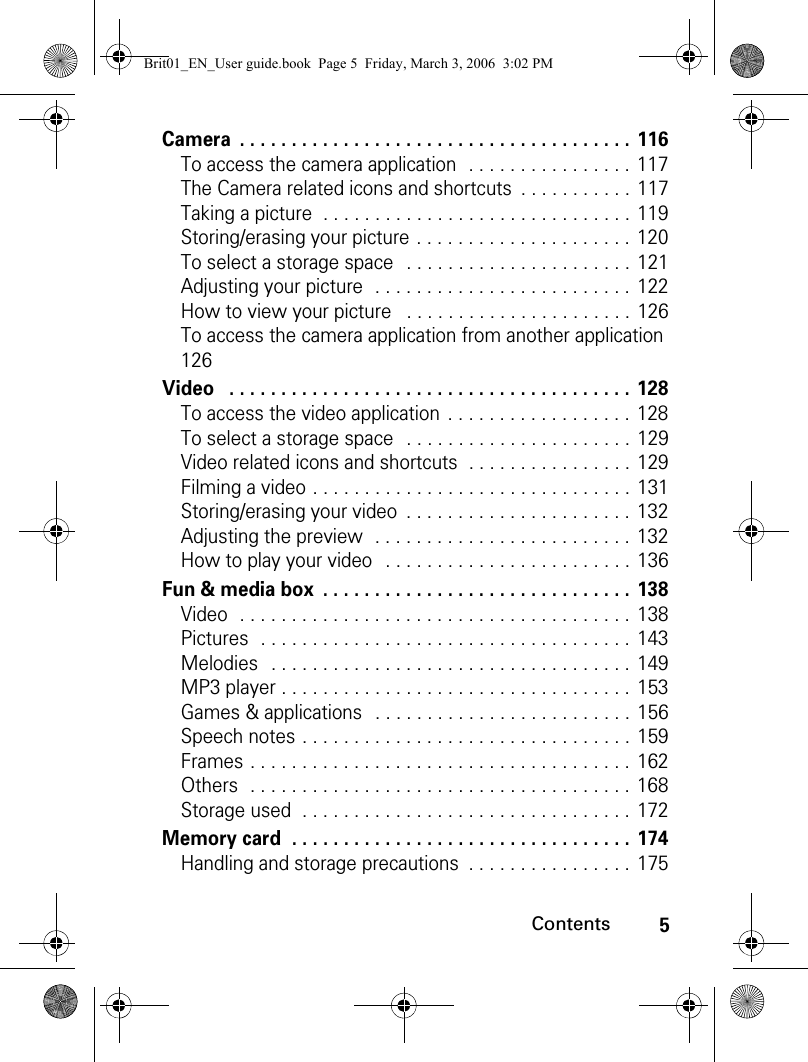
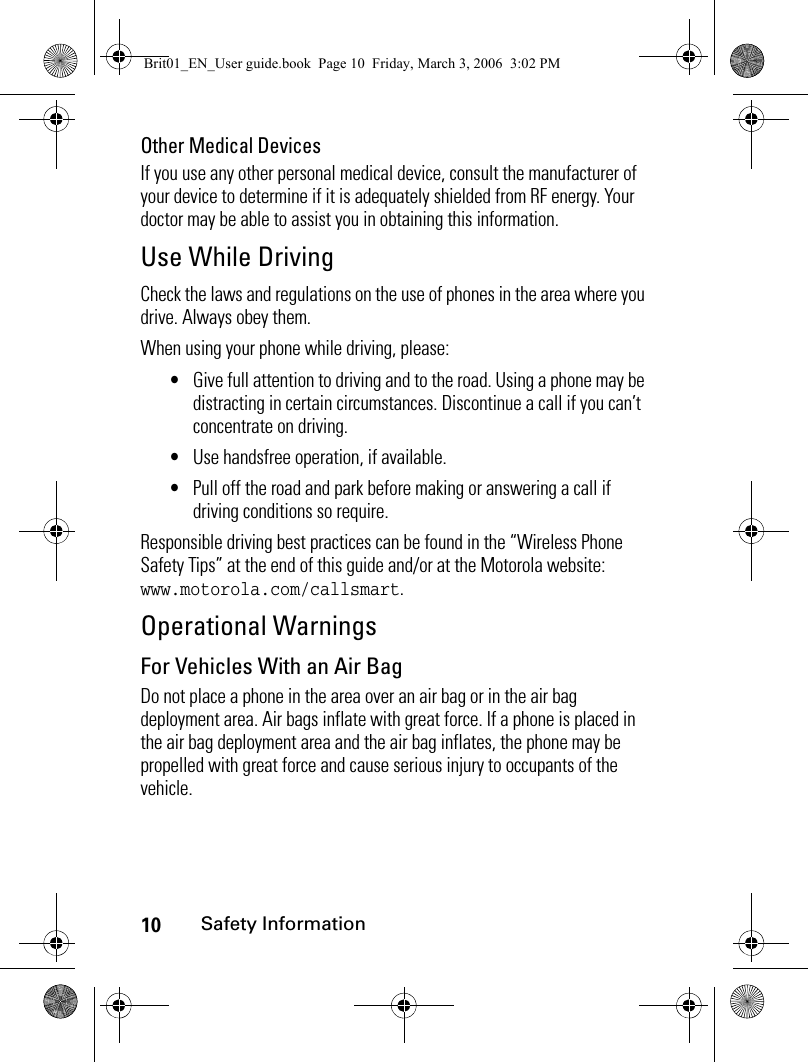
![23Using this guideIcons menuNote: The availability of the Calendar or Network services menu depends on your SIM card.User guide notesHere is how to follow the instructions contained in this user guide and use your phone. These are examples. The bold text stands for information displayed while using your phone.[Down arrow] on cursor key.[Send/Call] key.[End, On/Off] key. [Up] side key.[Down] side key.[MP3] side key: operator dependent.[Camera] side key: operator dependent.user guide information typesactions to performPress OKPress the key (middle of the round cursor key).Press the [Menu] key. Select Settings.From the idle screen press the key to access the main menu, scroll Up, Down, Left or Right to the Settings menu item and press OK to access the sub-menu.Select Read (item above [Left] softkey)Press the key underneath Read.Brit01_EN_User guide.book Page 23 Friday, March 3, 2006 3:02 PM](https://usermanual.wiki/Motorola-Mobility/T6GF1.Exhibit-8a-Users-Manual/User-Guide-665288-Page-23.png)
![24Using this guideUsing the dynamic scroll panelsWhen scrolling the menu, the following scroll panel type gives you a clear view of the information to be entered.Note: The arrow keys displayed at the bottom of the screen show the scrolling possibilities.Select Exit (item above [Right] softkey)From the 9 icons menu screen press the key underneath Exit once to return to the previous screen. Press and hold to return to the idle screen (except whilst in the i-mode menu).Insert The indicates that more options or sub-menus are available when pressing OK.... The ... at the beginning or at the end of an Options menu indicates that more options or sub-menus are available by scrolling up or down.1The list of elements to be entered is displayed. Scroll down to the field(s) you want to fill in and press OK. 2Enter the requested information or select the requested item and select OK to validate. 3Fill in as many fields as necessary and select Save to store all the information entered.user guide information typesactions to performBrit01_EN_User guide.book Page 24 Friday, March 3, 2006 3:02 PM](https://usermanual.wiki/Motorola-Mobility/T6GF1.Exhibit-8a-Users-Manual/User-Guide-665288-Page-24.png)

![29Getting startedGetting startedPreparing the phone for operationPlease refer to the "Preliminary operations", page 20.Basic operationsTurning the phone OnNote: Please refer to "Security features", page 239 for more details on your PIN and lock codes.If an image is set as a Welcome screen and/or a melody has been set as a Welcome melody, the phone first requests the PIN code then shows the selected image and plays the selected melody before showing the idle screen (please see "Setting a still or animated image as an Idle screen as a Welcome screen or as a Goodbye screen from the Pictures folder", page 147 and "Melodies", page 149).1Press and hold the [On/Off] key. A beep sounds at phone activation. When switching the phone On for the first time or if the phone has been incorrectly switched off may be displayed.2If your SIM card is PIN protected, Enter PIN is displayed. Enter the PIN code and select OK.3If prompted, enter the date & time or select Exit if the information is correct.Brit01_EN_User guide.book Page 29 Friday, March 3, 2006 3:02 PM](https://usermanual.wiki/Motorola-Mobility/T6GF1.Exhibit-8a-Users-Manual/User-Guide-665288-Page-29.png)
![30Getting startedMaking a callThe phone can make and receive calls only when it is switched on, when a valid SIM card is inserted and when it is connected to a GSM, DCS or PCS network service. If the keypad is locked you can receive calls but you cannot make any (see "Keypad lock", page 33) except emergency calls.To make a call:Whilst in conversation an Options list (Menu, Speaker On or Speaker Off, AutoDTMF, Hold, Retrieve, Mute or Unmute, End call and Record) and Sp.on (Speaker On)/Sp.off (Speaker Off, after the speaker has been set to On) is available by pressing on the [Menu] (indicated by the icon).You can also activate/deactivate the speaker by pressing on the [Right] softkey and set the phone to Mute/unmute by pressing on the [Left] softkey.You can set the conversation volume by pressing the [Up] side and [Down] side keys.1Dial the phone number or select one from your Phone book (press the [Down arrow] key from the idle screen and select one of the available names).2Press the [Call/Send] key ( is displayed).In compliance with European regulations, you are obliged to inform your correspondent before recording a phone conversation.Brit01_EN_User guide.book Page 30 Friday, March 3, 2006 3:02 PM](https://usermanual.wiki/Motorola-Mobility/T6GF1.Exhibit-8a-Users-Manual/User-Guide-665288-Page-30.png)
![31Getting startedNote: When using the hands free mode, do not put the phone to your ear.Note: The option Route to phone or Route to headset may appear if a bluetooth device is connected.Answering a callWhen receiving a phone call ( is displayed):Note: If a Bluetooth accessory (headset or car kit) is connected to the phone and you wish to take the call on the handset, press the Menu key and select Route to phone.Note: Pressing on the [Up] side or [Down] side keys on an incoming call sets the ringtone volume to Silent.When a phone call is received the caller name, number (see "Receiving caller ID", page 235), picture/video (see "Storing names and telephone numbers", page 94) may be displayed if you created a Phone book card corresponding to this caller.Rejecting a callWhen receiving a phone call:1Press the [Call/Send] key.1Press the [On/Off] key (the call is then forwarded to your mailbox).Brit01_EN_User guide.book Page 31 Friday, March 3, 2006 3:02 PM](https://usermanual.wiki/Motorola-Mobility/T6GF1.Exhibit-8a-Users-Manual/User-Guide-665288-Page-31.png)
![32Getting startedEnding a callTo stop the ringtoneWhen receiving a phone call you have the possibility to stop the ringtone.The idle screenWhen switched On, the phone searches for connection with the network. Once the connection has been established, a beep sounds and the network and/or service provider name are displayed together with the time and date, the signal strength and the battery charge level. If the phone cannot find a valid network, the signal strength and the operator name are not displayed.On the screen, the displayed icons that features can be accessed via the four arrows on the cursor key.Mail and i-mode indicate that you can directly access the mailer and the i-mode service by pressing the softkeys. indicates that your phone is connected to a GPRS network.1Press the [On/Off] key.1Select No ring or press on the [Up] or [Down] side keys.Brit01_EN_User guide.book Page 32 Friday, March 3, 2006 3:02 PM](https://usermanual.wiki/Motorola-Mobility/T6GF1.Exhibit-8a-Users-Manual/User-Guide-665288-Page-32.png)
![33Getting startedKeypad lockWhen activated, the keypad lock feature prevents accidental actions occurring (e.g. call sending) whilst the phone is being carried in a pocket or a bag for instance. Incoming calls can however be received and answered. Once the call is over, the keypad lock is automatically reactivated. To activate the keypad lock from the idle screen:To activate the automatic keypad lock from the main menu:To deactivate the keypad lock:Turning the phone OffA tone sounds to confirm your action and a Goodbye screen is displayed whilst the phone switches off. You can set a melody and/or a picture to be played/displayed when the phone is switched off (please see "Setting a still or animated image as an Idle screen as a Welcome screen or as a Goodbye screen from the Pictures folder", page 147 and "Melodies", page 149).1Press and hold the key. Keypad locked is displayed.1Press the [Menu] key. Select Settings.2Select Keypad, then select Keypad lock. When the phone has not been used for more than one minute, the keypad lock is automaticaly activated.1Select Unlock and press the key or press and hold the key. Keypad unlocked is displayed.1Press and hold the [On/Off] key.Brit01_EN_User guide.book Page 33 Friday, March 3, 2006 3:02 PM](https://usermanual.wiki/Motorola-Mobility/T6GF1.Exhibit-8a-Users-Manual/User-Guide-665288-Page-33.png)

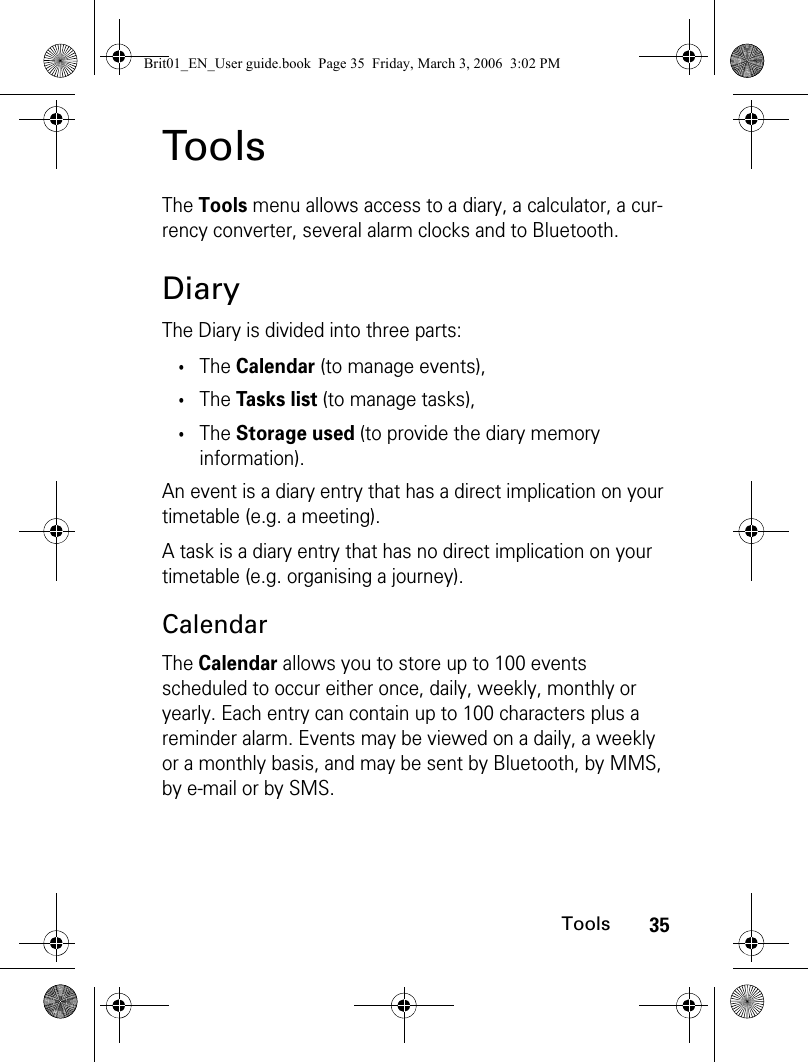
![36ToolsTo enter an event:An empty new event card is displayed with the following fields: Title (up to 10 characters), Description (up to 100 characters), Start date & time, End date & time, Alarm, Location, Repetition.To view the current day’s entries:In the Today view each event is displayed on one line as follows: a graphic representation ( ) if an alarm has been set, the event starting time, the first part of the event title,Red events indicated that two or more events clash.1Press the [Menu] key. Select Tools.2Select Diary.3Select Calendar. A Monthly or Daily view is displayed (the Daily view is displayed if an event is related to the current day).4Press on the [Menu] key.5Select New event.6Enter or select the requested data. Confirm each entry by pressing OK.7Select Save to confirm data storage.1Press the [Menu] key. Select Tools.2Select Diary.3Select Calendar. 4Press on the [Menu] key.5Select View... and then Today to view the current day’s entries or select Day view to view the selected day’s entries.Brit01_EN_User guide.book Page 36 Friday, March 3, 2006 3:02 PM](https://usermanual.wiki/Motorola-Mobility/T6GF1.Exhibit-8a-Users-Manual/User-Guide-665288-Page-36.png)
![37ToolsThe following actions are available:An Options list is available. It allows you to change the current View..., create a New event or Modify an event, Send it by... Bluetooth, MMS, Mail and SMS, Export... the Events in a defined period/All events, Delete one event or Delete all events.To view weekly entries:The week’s events are displayed in chronological order. Each event is represented as a bar (its length depends on its duration. Red indicates clashes. Purple indicates that the alarm has been activated). actions purposeTo move down to the next event or loop back to the first one.To move up to the previous event or loop to the last one.To move to the previous day.To move to the next day.1Press the [Menu] key. Select Tools.2Select Diary.3Select Calendar. 4Press on the [Menu] key.5Select View... and then Week view. Brit01_EN_User guide.book Page 37 Friday, March 3, 2006 3:02 PM](https://usermanual.wiki/Motorola-Mobility/T6GF1.Exhibit-8a-Users-Manual/User-Guide-665288-Page-37.png)
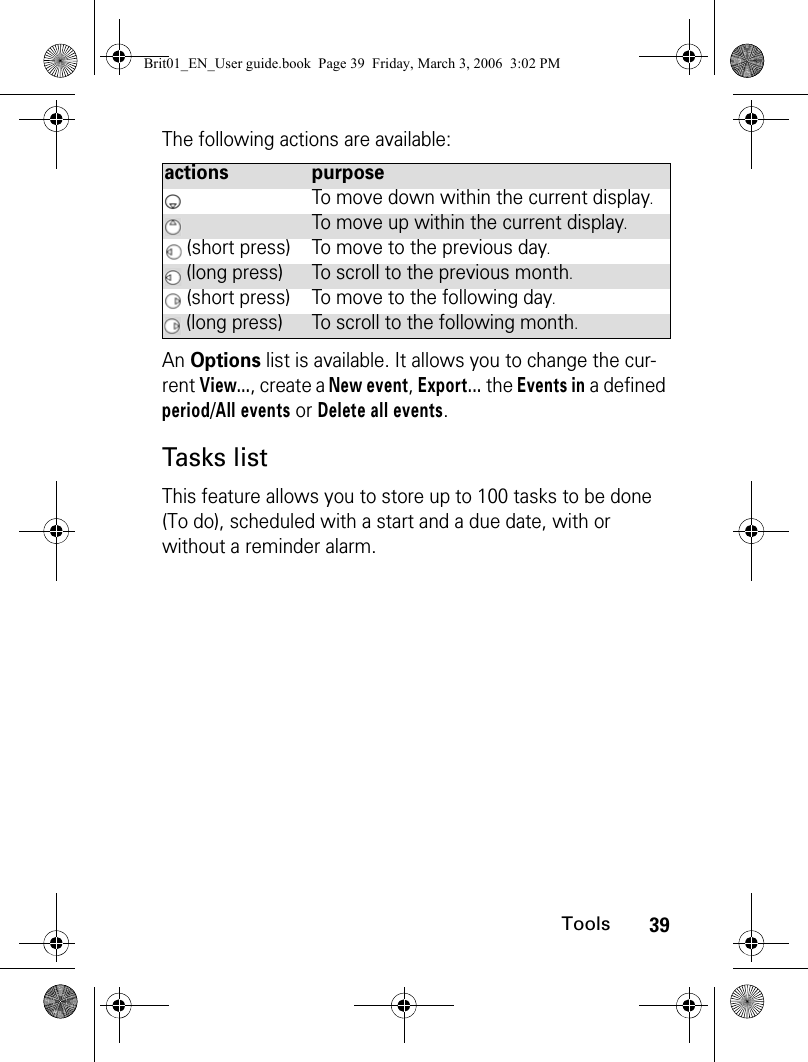
![38ToolsThe following actions are available:An Options list is available. It allows you to change the current View..., create a New event, Export... the Events in a defined period/All events or Delete all events.To view monthly entries:The whole month is displayed. If the selected month is the current one, the date is displayed in a different colour. Colours are used to indicate the days (and alarm activation) of the stored events. actions purposeTo move down to the next time interval.To move up to the previous time interval. (short press) To move to the previous day. (long press) To scroll to the previous week. (short press) To move to the following day. (long press) To scroll to the following week.1Press the [Menu] key. Select Tools.2Select Diary.3Select Calendar. 4Press on the [Menu] key.5Select View... and Month view. Brit01_EN_User guide.book Page 38 Friday, March 3, 2006 3:02 PM](https://usermanual.wiki/Motorola-Mobility/T6GF1.Exhibit-8a-Users-Manual/User-Guide-665288-Page-38.png)
![40ToolsTo enter a new task:An empty task card is displayed with the following fields: a title (up to 10 characters), a description (up to 100 characters), a start date, a due date, an audio alarm which can be activated at your specified time.To display a tasks list:The tasks are displayed in a list, ordered by date. If an alarm is activated for a task is displayed.An Options list is available. It allows you to create a New task, Modify the current task, Senda task by... Bluetooth, MMS, Mail or SMS, to Export... Tasks in period or All tasks, to Delete the current task or to Delete all tasks period. 1Press the [Menu] key. Select Tools.2Select Diary.3Select Tasks list. 4Select New task and enter the required information.5Enter or select the requested data. Confirm each entry by pressing OK.6Select Save to confirm data storage.1Press the [Menu] key. Select Tools.2Select Diary.3Select Tasks list.4Select Current tasks or Elapsed tasks.Brit01_EN_User guide.book Page 40 Friday, March 3, 2006 3:02 PM](https://usermanual.wiki/Motorola-Mobility/T6GF1.Exhibit-8a-Users-Manual/User-Guide-665288-Page-40.png)
![41ToolsSending an event/a taskThe Send by... option allows you to directly send the selected file via Bluetooth, by MMS, by SMS or by Mail.Exporting an event/a taskThe Export... option allows you to create a file so as to exchange events or tasks with another device such as a PC or another phone. The created file can contain all the events or tasks stored in the calendar or in the tasks list (select All events/tasks) or in a time interval (SelectEvents/Tasks in period).Note: The exported calendar or tasks list item is stored as a .vcs file.1Press on the [Menu] key (from the Day view). Scroll down and select Send by...2Select Bluetooth, MMS, SMS or Mail (if available), then proceed as usual when using these features (please see "Sending a new SMS message", page 75, "Bluetooth", page 48 and "Mail system", page 196.1Press on the [Menu] key (from the Day, Week or Month view). Scroll down and select Export...2Select All events/tasks or select Events/Tasks in period then define the time period (Between / And) and select Export.3The exported file is stored in the Others folder of the Fun & Media box menu. You can then send it to another device (please see "Others", page 168).Brit01_EN_User guide.book Page 41 Friday, March 3, 2006 3:02 PM](https://usermanual.wiki/Motorola-Mobility/T6GF1.Exhibit-8a-Users-Manual/User-Guide-665288-Page-41.png)
![43ToolsThe following actions are available in the Options menu (Press on the [Menu] key):CalculatorThis feature allows you to make simple calculations using + (plus), - (minus), * (multiplication), / (division) and % (percentage) functions.The +, -, *, / functions are to be reached by pressing on the matching round cursor key. A drawing of the round cursor key and its related functions is displayed on the screen.If the currency converter is activated, numbers can be converted during calculations.To use the calculator:Press keys to to enter numbers. Press the key to get the % function. Press the key to enter decimal points. actions purposeDelete eventsTo delete the events of the defined time period.Delete tasksTo delete the tasks of the defined time period.Delete all eventsTo delete all the events stored in Calendar.Delete all tasksTo delete the tasks stored in the Diary.1Press the [Menu] key. Select Tools.2Select Calculator.The phone is ready to perform simple calculations.Brit01_EN_User guide.book Page 43 Friday, March 3, 2006 3:02 PM](https://usermanual.wiki/Motorola-Mobility/T6GF1.Exhibit-8a-Users-Manual/User-Guide-665288-Page-43.png)
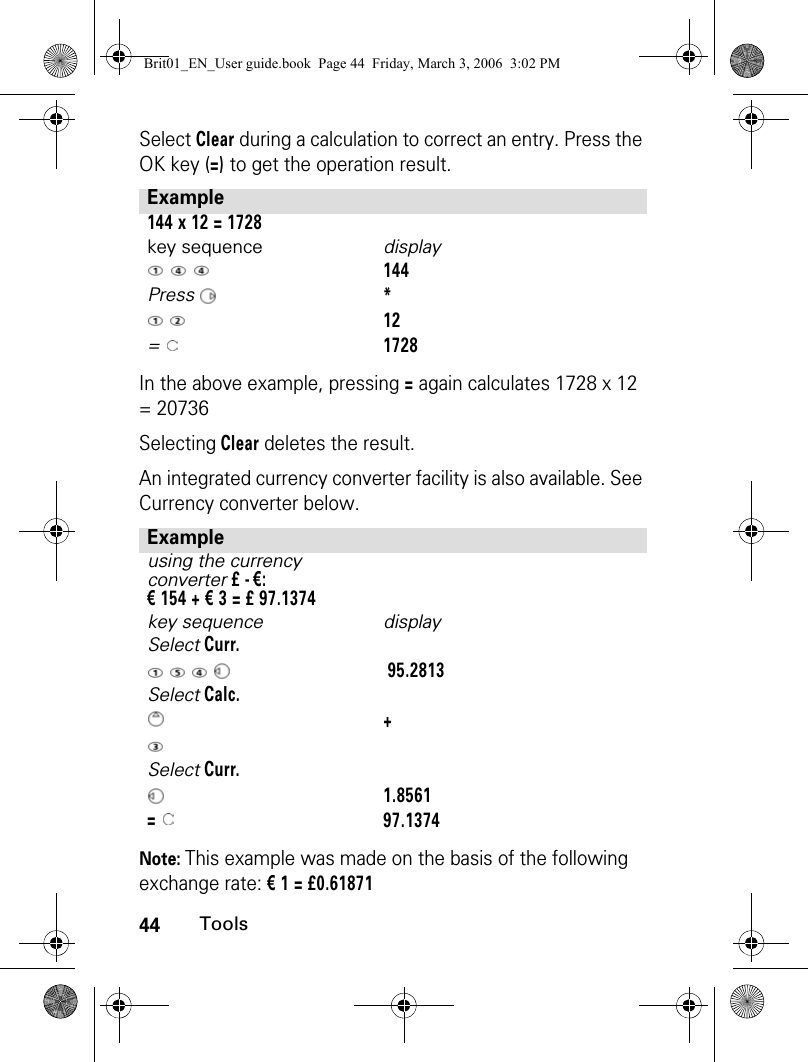
![45ToolsNote: The Currency converter feature can be accessed from the Calculator and from the Currency converter submenus.Currency converterThis feature allows currency conversion. The currencies and exchange rates must be entered prior to use. The conversion is calculated on the per unit exchange rate of the second selected currency.To select the currencies and the exchange rate:1Press the [Menu] key. Select Tools.2Select Currency converter.3Select Settings.4Enter the first currency name (e.g. Euro). Press OK.Enter the second currency name (e.g. Dollar). Press OK.Enter the exchange rate using to enter a decimal point.5Press OK to validate the entry. Press Save to confirm data storage.Brit01_EN_User guide.book Page 45 Friday, March 3, 2006 3:02 PM](https://usermanual.wiki/Motorola-Mobility/T6GF1.Exhibit-8a-Users-Manual/User-Guide-665288-Page-45.png)
![46ToolsTo calculate the conversion between the selectedcurrencies:Alarm clocksThis feature allows you to set up to three alarm clocks. These alarms can be set to be played at different times and to be played once, daily, or on selected days.To set alarms: If the phone is off at alarm time, it automatically switches on.1Press the [Menu] key. Select Tools.2Select Currency converter.3Select one of the first two options.4Enter the amount to be converted. Press to insert a decimal point if needed.5Press OK. The converted amount and the exchange rate information are displayed.1Press the [Menu] key. Select Tools.2Select Alarm clocks.3Select Alarm 1, Alarm 2 or Alarm 3. Select On then enter the alarm time or press OK to validate the displayed time. 4Select Repetition (1, 2 or 3 according to the Alarm you have previously set). Select Once (the alarm will be played once only), Daily (the alarm will be played every day at the same time) or Weekdays to choose the required day(s) by pressing OK, then select Valid to return to the Alarm clocks screen. is immediately displayed. Brit01_EN_User guide.book Page 46 Friday, March 3, 2006 3:02 PM](https://usermanual.wiki/Motorola-Mobility/T6GF1.Exhibit-8a-Users-Manual/User-Guide-665288-Page-46.png)
![47ToolsIf the phone is locked or if the PIN setting is on, the phone returns to this locked state after the alarm has rung until you use it again.If the alarm is acknowledged but not validated after the 3rd (and final) alarm, the alarm indicators remain on the display for up to 15 minutes (the phone then either goes back its previous state, 'on' or 'off').Note: If a call is in progress at alarm time a 'Call in progress' alert beep sounds and a visual alert is displayed every 3 minutes. Validate or acknowledge the alarm in the usual way.Note: If several alarms are set to be played at the same time, the alarm tone is played once only. Any action performed on the phone to acknowledge the alarm tone is then applied to all the alarms.To use the alarm as a Reminder or a Snooze Alarm:To turn the alarm Off:1Press No ring, or any other key (except Valid. and OK) to snooze the alarm. The alarm icon remains on the display and the alarm starts ringing again 3 minutes later.Or press Valid or OK to acknowledge the alarm and stop the alarm clock process.1Press the [Menu] key. Select Tools.2Select Alarm clocks.3Select Off. Brit01_EN_User guide.book Page 47 Friday, March 3, 2006 3:02 PM](https://usermanual.wiki/Motorola-Mobility/T6GF1.Exhibit-8a-Users-Manual/User-Guide-665288-Page-47.png)
![48ToolsBluetoothBluetooth connections are radio connections. Bluetooth connections allow to exchange data and to launch wireless connections between the mobile phone and another phone, a computer, a headset, a car kit or other devices (provided they are Bluetooth compatible). You can for instance receive or send files such as videos, images for your Standby display (see "Pictures", page 143 ), send or receive name cards, bookmark files, melodies, use a Bluetooth headset...You can send files via Bluetooth from several menus or sub-menus (e.g. by pressing on the [Menu] key after having captured a picture, then by selecting Send by... Bluetooth).To initiate a connection via Bluetooth, your phone must be close to another Bluetooth compatible device.Both ports can then be opened and synchronised. The requested connection can then be performed. Files (e.g name cards or pictures) are transferred one by one.Opening a Bluetooth connectionTo launch a connection with another device, the Bluetooth connection must be activated on your phone:1Press the [Menu] key. Select Tools.2Select Bluetooth then select Settings.3Select Bluetooth activation. Select ON. The Bluetooth connection is launched.Brit01_EN_User guide.book Page 48 Friday, March 3, 2006 3:02 PM](https://usermanual.wiki/Motorola-Mobility/T6GF1.Exhibit-8a-Users-Manual/User-Guide-665288-Page-48.png)
![49ToolsAllowing handset detectionThis option allows to define whether the handset can be detected and connected to any device or to paired devices only:Note: To allow detection by another device, Bluetooth must be activated on your phone. Please see above (Opening a Bluetooth connection).Naming your handset for other devices detection1Press the [Menu] key. Select Tools.2Select Bluetooth then select Settings.3Select By all devices or Only by paired devices. 1Press the [Menu] key. Select Tools.2Select Bluetooth then select Settings.3Select Phone name then type the required name into the edition screen. Brit01_EN_User guide.book Page 49 Friday, March 3, 2006 3:02 PM](https://usermanual.wiki/Motorola-Mobility/T6GF1.Exhibit-8a-Users-Manual/User-Guide-665288-Page-49.png)
![50ToolsExporting a file to another deviceWhen on one or several files you wish to export: Adding Bluetooth devicesYou may wish to search connections with surrounding Bluetooth devices (provided their Bluetooth connection is open and the connection is allowed):1Press the [Menu] key. Select Send by.... Bluetooth. You then have to search your addressee via Bluetooth.2If no search has previously been performed, the ’Send to’ list is empty. Select the type of device to send the file to (A phone, A computer, Other device).Your phone then searches for Bluetooth devices in its close environment.2’If a search has already been performed and the required device was acknowledged, select the required addressee from the the list. If the required addressee is not displayed in the list, select Search to find the Bluetooth connection with the other device.3The handset launches a Bluetooth connection with the required device, and the file is transferred.1Press the [Menu] key. Select Tools.2Select Bluetooth.Brit01_EN_User guide.book Page 50 Friday, March 3, 2006 3:02 PM](https://usermanual.wiki/Motorola-Mobility/T6GF1.Exhibit-8a-Users-Manual/User-Guide-665288-Page-50.png)
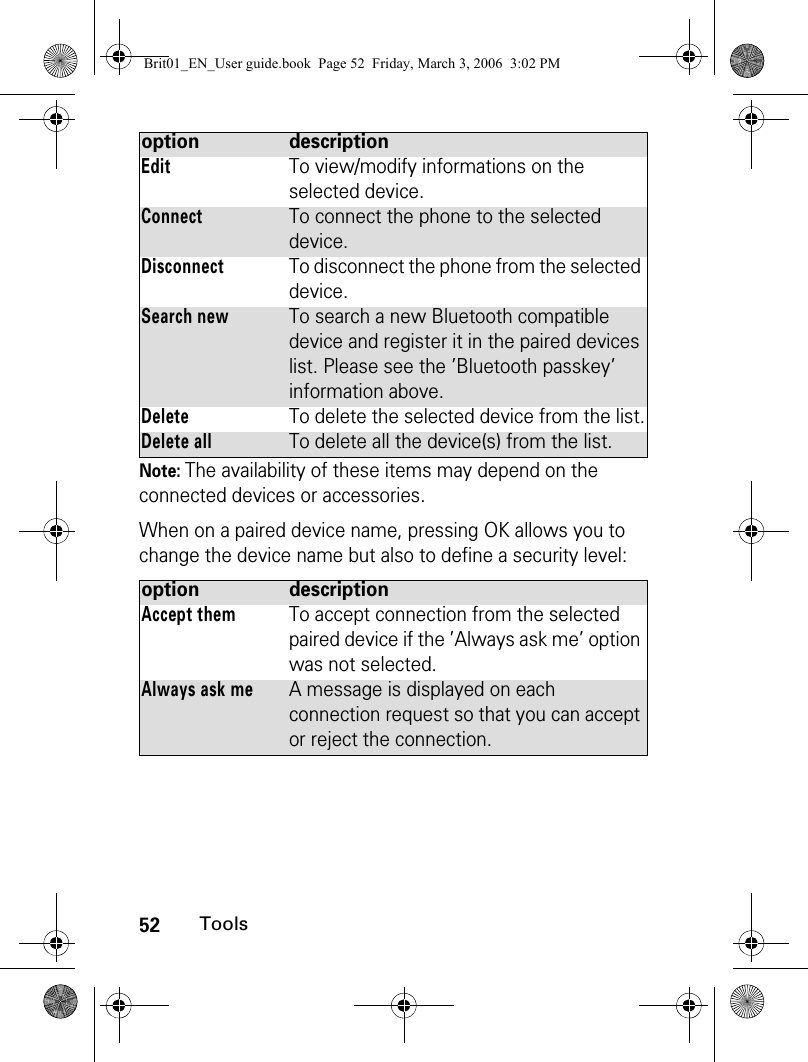
![51ToolsNote: A ’Bluetooth passkey’ may be required by one or the other devices. The connection cannot be established if the typed code is wrong.Accessing the list of paired device(s)The paired devices are other Bluetooth compatible devices that you have registered in your handset for an easy and secure access:2’Select Paired devices. Press Search then choose the kind of device to be searched (My headset, My car kit, A phone, A computer, Other device).3 The list of the found devices is displayed or the ’No peer found’ message is displayed if no Bluetooth device was found.4Select the required device. Press Add to add it to the list of Paired devices.1Press the [Menu] key. Select Tools.2Select Bluetooth.3Select Paired devices. The list of registered paired devices is displayed. The following option menu is available if devices names are registered into the list:Brit01_EN_User guide.book Page 51 Friday, March 3, 2006 3:02 PM](https://usermanual.wiki/Motorola-Mobility/T6GF1.Exhibit-8a-Users-Manual/User-Guide-665288-Page-51.png)


![56Messages/Text editingMessages/Text editingThis section describes the contents of the Messages menu and contains full information on the Short Message Service. Other types of messages can be sent and received via your phone. The Short Message Service (SMS) allows you to send or receive text messages to or from other mobile phones. You can store, edit and forward messages as well as save any of the numbers, mail addresses, web site addresses they may contain.These SMS are stored on the phone memory; they may also be stored in the SIM card if they are sent by a service provider. You can access the Messages menu by pressing and holding the Mail softkey from the idle screen.This chapter mainly deals with the SMS and Broadcast message types. Please refer to the i-mode section (page 183) for full information on Mail and MMS.Contents of the Messages menuThe Messages menu includes the message types that are available on your phone: SMS, Mail/MMS. To select one of these message types:1Press the [Menu] key. Select Messages.2Select SMS or Mail/MMS.A number is displayed on the SMS and Mail/MMS lines. It indicates the number of unread received messages in the corresponding Inbox folder.Brit01_EN_User guide.book Page 56 Friday, March 3, 2006 3:02 PM](https://usermanual.wiki/Motorola-Mobility/T6GF1.Exhibit-8a-Users-Manual/User-Guide-665288-Page-56.png)
![57Messages/Text editingorAccessing the SMS menuYou can access the SMS menu via three ways. This chapter describes the SMS sub-menu and features via the [Menu] key, but you can use any of the following paths to access this sub-menu.oror1From the idle screen, press and hold the [Left] softkey (underneath Mail).2Select SMS or Mail/MMS.A number is displayed on the SMS and Mail/MMS lines. It indicates the number of unread received messages in the corresponding Inbox folder.1Press the [Menu] key. Select Messages.2Select SMS.1From the idle screen, press and hold the [Left] softkey (underneath Mail).2Select SMS.1From the idle screen, press the [Right] softkey (underneath i-mode).2Select SMS.Brit01_EN_User guide.book Page 57 Friday, March 3, 2006 3:02 PM](https://usermanual.wiki/Motorola-Mobility/T6GF1.Exhibit-8a-Users-Manual/User-Guide-665288-Page-57.png)
![58Messages/Text editingReading a received SMS messageWhen the phone receives an information is displayed. The message is automatically stored in the phone or in the SIM card. A flashing indicates that the SIM or the phone memory are full and cannot store any further messages. Delete messages to allow new messages to be delivered.Note: According to the selected item, another Options list may be available so that you can proceed with the action. Press on the [Menu] key to access this Option menu.Note: If you select a melody as a new SMS alert (please see "Melodies", page 149), press the [OK] key to acknowledge receipt of the new incoming SMS and to stop the melody.1Press Read to read new messages (from the idle screen only).2Press on the [Menu] key to View, Reply, Reply (+text), Delete, Delete all, Forward, Send as mail, Move to SIM, Numbers & addresses (to store or call the number(s) contained in the SMS header or text, or store the mail or web address contained in the message text. All the message characters that are displayed between inverted commas can also be stored on your phone).Brit01_EN_User guide.book Page 58 Friday, March 3, 2006 3:02 PM](https://usermanual.wiki/Motorola-Mobility/T6GF1.Exhibit-8a-Users-Manual/User-Guide-665288-Page-58.png)
![59Messages/Text editingReading stored SMS messagesUnread messages are indicated by the icon + bold text. Messages that have already been read are indicated by .Moving messages to SIMIt is possible to move a message from the Inbox, the Outbox or the Draft folder to the SIM memory. However, according to the message size, the message may be truncated (the 160 first characters only are moved to the SIM memory). The sending date (for sent messages) and the 'Copy to' addressees are lost when moving the message to the SIM memory.To move a message to the SIM memory:1Press the [Menu] key. Select Messages.2Select SMS.3Select Inbox or SIM archive then select Received messages to display the message list. Use the arrow key to scroll up and down and access the message you want to read. 4Select OK or Press on the [Menu] key/View to read the message text.1Press the [Menu] key. Select Messages. 2Select SMS.3Select Inbox or Outbox.4Choose the message to be moved and Press on the [Menu] key.5Select Move to SIM.Brit01_EN_User guide.book Page 59 Friday, March 3, 2006 3:02 PM](https://usermanual.wiki/Motorola-Mobility/T6GF1.Exhibit-8a-Users-Manual/User-Guide-665288-Page-59.png)
![60Messages/Text editingForwarding messagesYou can forward a received message to other people/number(s):1Press the [Menu] key. Select Messages. 2Select SMS.3Select Inbox or SIM archive/Received messages.4Select the message to be forwarded and Press on the [Menu] key.5Select Forward.6Press OK. Select the To field and select one of the displayed names or in the Phone book list Press on the [Menu] key then New or Other folder if you want to send your message to another mobile phone number. Press OK to validate.7In the Text field enter the message text (see "Entering text / Edition mode", page 63) or select one of the models (Models) and press OK. 8If you want to send the message to several addressees, enter one or several phone numbers/names in the Copy to list (up to 4 more addressees) and press OK then Valid to return to the previous screen. 9Press on the [Menu] key.10Select Send, Send without storing or Store. 11A warning message displays the number of SMS needed to send the message if it is more than one. Select Go on if you want to send the message or select Cancel if you do not want to send it or if you want to amend your message.Brit01_EN_User guide.book Page 60 Friday, March 3, 2006 3:02 PM](https://usermanual.wiki/Motorola-Mobility/T6GF1.Exhibit-8a-Users-Manual/User-Guide-665288-Page-60.png)
![61Messages/Text editingActivating or deactivating the message alert toneEach time a message is received, a new SMS alert tone sounds. To activate or deactivate this tone:Note: You can personalise the Message alert tone (please see "Melodies", page 149).1Press the [Menu] key. Select Messages. 2Select SMS.3Select Settings.4Select Reception alert. Select On or Off.5Select Ringtone then select one of the available files from the Melodies, MP3, Videos or Speech notes folders, or select the Default beep.7Select Save to store your setting.Brit01_EN_User guide.book Page 61 Friday, March 3, 2006 3:02 PM](https://usermanual.wiki/Motorola-Mobility/T6GF1.Exhibit-8a-Users-Manual/User-Guide-665288-Page-61.png)
![62Messages/Text editingPreparing the phone to send SMS messagesBefore sending your first SMS or if you want to register a new profile, the network SMS centre number (obtainable from your service provider) must be stored:Note: You may not be allowed to change your sending profile (format and validity period). Please contact your service provider for further details.The SMS centre number may already be available in your SIM card and may be automatically displayed. fields description defaultNameTo enter the profile name. Profile1Message centreTo enter the centre number. EmptyFormatTo set the message format: text, voice, fax or paging.TextValidity periodTime the message remains at the message centre until delivered.Maximum1Press the [Menu] key. Select Messages.2Select SMS.3Select Settings.4Select Sending profile.5Enter the message centre number or select a template (if several available) then enter the following fields (operator dependent).6Select Save to validate.Brit01_EN_User guide.book Page 62 Friday, March 3, 2006 3:02 PM](https://usermanual.wiki/Motorola-Mobility/T6GF1.Exhibit-8a-Users-Manual/User-Guide-665288-Page-62.png)
![63Messages/Text editingIf you want to select a Sending profile for your message:Entering text / Edition modeAll the settings described in this part are to be done from an edition screen.Some features and functions (storing names in the Phone book, typing SMS text messages, writing a mail, Tools, Settings,...) require you to know how to enter and edit text in the display, to insert special characters or i-mode pictographs, to copy and paste text, etc.Four edition modes are available. They are indicated on the left-hand side of the screen by in lower case mode, by in upper case mode, by in next character toggle mode (the first typed character is an upper case then the others are lower cases) and by in numeric mode. Text and figures and alphabet characters can then be entered or edited directly from the keypad.1Press the [Menu] key. Select Messages.2Select SMS.3Select Settings. 4Select Sending profile and select the profile you want to use. Press on the [Menu] key.5Select Select.Brit01_EN_User guide.book Page 63 Friday, March 3, 2006 3:02 PM](https://usermanual.wiki/Motorola-Mobility/T6GF1.Exhibit-8a-Users-Manual/User-Guide-665288-Page-63.png)
![64Messages/Text editingTo switch from one mode to another:Note: When in lower case, on T9 mode or on Multi-tap mode, the Next character toggle mode is automatically set when required, according to the context (i.e. after a full stop or after ? or ! followed by a space for instance).There are three input modes to enter text or figures: the Multi-tap (or Multipress) key method, the quicker intuitive method, called T9 text input and the Numeric mode (to type numbers).To select an edition modeor: When in T9 mode, is displayed on the upper part of the display to indicate that T9 is the current mode. When on Multitap mode, is displayed on the upper part of the display to indicate that Multitap is the current mode. 1Press on the [Menu] key2Select Lowercase if the current mode is upper case mode or select Uppercase if the current mode is lower case.1Press T9 ([Left] softkey) to swap modes (T9 to Multi-tap/Multi-tap to T9).1Press on the [Menu] key.2Select Input mode.3Select T9, Multi-tap or Numeric.Brit01_EN_User guide.book Page 64 Friday, March 3, 2006 3:02 PM](https://usermanual.wiki/Motorola-Mobility/T6GF1.Exhibit-8a-Users-Manual/User-Guide-665288-Page-64.png)

![66Messages/Text editingTo enter text, press the key bearing the required character until it appears in the display. Holding the key displays the figure corresponding to the key. If you need to use two characters from the same key, wait for a few seconds after entering the first character (until the key characters on the upper part of the screen are cleared) or press the [Right arrow] key before pressing the key again.Multitap methodExampleTo type Card:Press the [Menu] key and select Messages.Select SMS.Select Write new.Fill in the To field (see "Sending a new SMSmessage", page 75).In the Text field, press Abc ([Left] softkey) until isdisplayed, or press on the [Menu] key, then selectInput mode and choose Multi-tap. Press briefly three times, C is displayed.Press once, a is displayed.Press three times, r is displayed.Press once, d is displayed. The word Card is nowdisplayed.Brit01_EN_User guide.book Page 66 Friday, March 3, 2006 3:02 PM](https://usermanual.wiki/Motorola-Mobility/T6GF1.Exhibit-8a-Users-Manual/User-Guide-665288-Page-66.png)
![67Messages/Text editingThe T9 methodA press on the [Left] softkey allows you to swap between T9 text entry and the Multitap method.1Press the key bearing the required letter once only (the requested character may not be displayed first).2The active word changes as you enter text. Enter all the word characters up to the end of the word.3If the right word is not displayed when all the characters have been entered, press until you get the required word.4If the requested word does not correspond to the one displayed, press Abc to swap to the Multi-tap mode and enter the correct letters.5Use the [Left arrow] or [Right arrow] keys to move the cursor around the text to insert or delete characters.Brit01_EN_User guide.book Page 67 Friday, March 3, 2006 3:02 PM](https://usermanual.wiki/Motorola-Mobility/T6GF1.Exhibit-8a-Users-Manual/User-Guide-665288-Page-67.png)
![68Messages/Text editingNote: To insert a text symbol such as :) or :-) or press two or three times. Press as many times as necessary to change the symbol to :( or :-( etc.ExampleTo write card:Press the [Menu] key and select Messages.Select SMS.Select Write new.Fill in the To field (see "Sending a new SMSmessage", page 75).In the Text field, press on T9 ([Left] softkey) until is displayed, or press on the [Menu] key, then selectInput mode and choose T9.Press , A appears.Press , Cc appears.Press , Car appears.Press , Case appears.If the displayed word is not the one you want, press as many times as necessary to view Card.Brit01_EN_User guide.book Page 68 Friday, March 3, 2006 3:02 PM](https://usermanual.wiki/Motorola-Mobility/T6GF1.Exhibit-8a-Users-Manual/User-Guide-665288-Page-68.png)
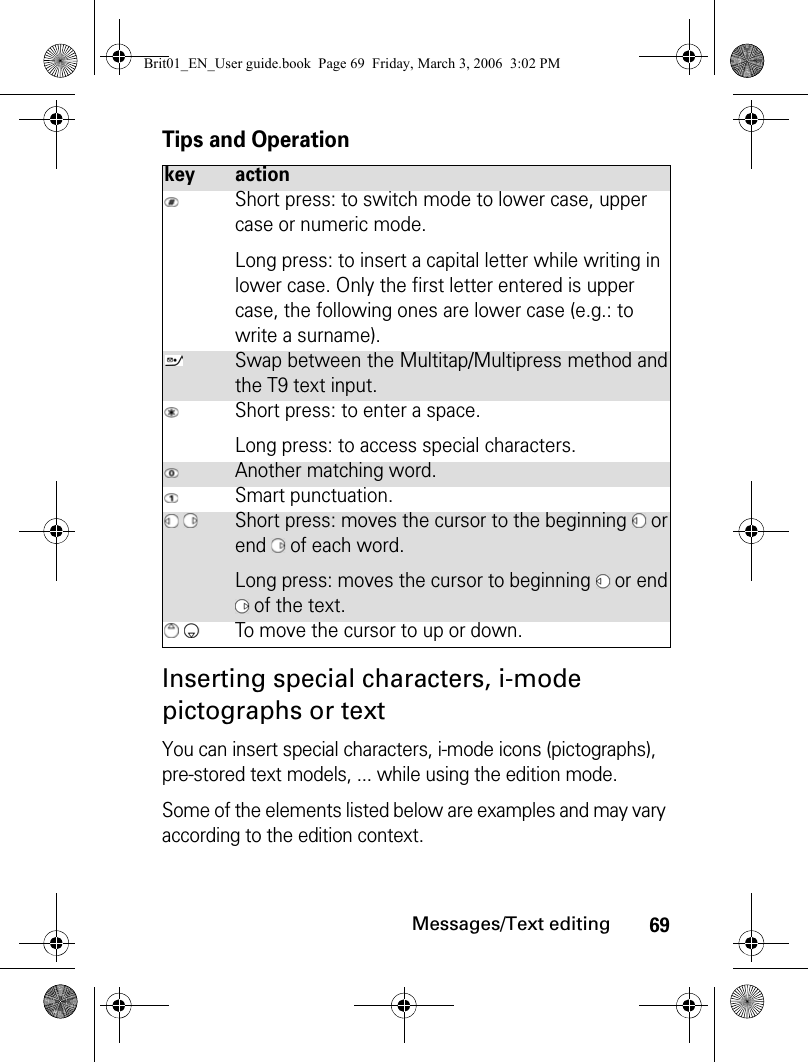
![70Messages/Text editingTo insert special characters:or:Note: The ↵ symbol may not be displayed from all edition modes. It allows you to go to the following line.To insert i-mode pictographs:Note: This option is only available from the Mail and MMS edition modes.1Press on the [Menu] key, then select Insert.2Select Special characters.Scroll up, down, left or right and press OK to select the required special character.1Press and hold the key to display the special characters list.2Scroll up, down, left or right and press OK to select the required special character.1Press on the [Menu] key.2Select Insert.3Select Pictographs. Scroll up, down, left or right as many times as necessary to reach the required icon then press OK to validate your choice. You can choose those icons from any of the six available icons pages (scroll down as many times as necessary to reach the following pages).Brit01_EN_User guide.book Page 70 Friday, March 3, 2006 3:02 PM](https://usermanual.wiki/Motorola-Mobility/T6GF1.Exhibit-8a-Users-Manual/User-Guide-665288-Page-70.png)
![71Messages/Text editingTo insert a text model:Note: This option is only available from the SMS edition modes (it is not available in numeric edition modes, while writing a mail address, etc.)Text copy and pasteYou can copy a text or part of a text so as to paste it into another edition context (or into the source edition context). The copied text remains stored in the phone memory until the phone is turned off or until another Copy action is performed. You can therefore paste it as many times as you wish.To copy part of a text:1Press on the [Menu] key.2Select Insert.3Select Text models. Select one from the list.For more information on this feature, please see "Creating text models", page 74.1From an edition screen (e.g.: while writing a mail, an MMS, an SMS, a Phone book card,...).2Place the cursor at the beginning of the required part of the text. Press on the [Menu] key and scroll down to Copy or press on the [Up] side key.3Scroll right, left, up or down with the arrow keys) to select the required part of the text to be copied (the selected text is displayed in blue colour).Press Copy. The selected text is copied into the phone memory.Brit01_EN_User guide.book Page 71 Friday, March 3, 2006 3:02 PM](https://usermanual.wiki/Motorola-Mobility/T6GF1.Exhibit-8a-Users-Manual/User-Guide-665288-Page-71.png)
![72Messages/Text editingNote: The Copy option is not available in numeric edition modes. It is however available while using the numeric mode in an alpha-numeric edition context.Note: The Copy all option only is available in numeric edition mode. It therefore copies the full displayed number.or:To copy all the text:or:1From an edition screen (e.g.: while writing a mail, an MMS, an SMS, a Phone book card,...), press the [Up] side key.The selected edition screen content is copied into the phone memory.1From an edition screen (e.g.: while writing a mail, an MMS, an SMS, a Phone book card,...), press on the [Menu] key.2Select Copy all.The whole edition screen content is copied into the phone memory.1From an edition screen (e.g.: while writing a mail, an MMS, an SMS, a Phone book card,...), press and hold the [Up] side key.The whole edition screen content is copied into the phone memory.Brit01_EN_User guide.book Page 72 Friday, March 3, 2006 3:02 PM](https://usermanual.wiki/Motorola-Mobility/T6GF1.Exhibit-8a-Users-Manual/User-Guide-665288-Page-72.png)
![73Messages/Text editingTo paste the copied text:or:Note: If the copied text is too long to be inserted into the available space on the target edition mode (e.g. maximum SMS allowed size reached), the text to be copied is not fully pasted.Note: You cannot paste a copied text if the text characters are not supported by the target edition context (e.g. an alphanumeric text in a numeric edition context, such as a phone number, or a text bearing more than 10 i-mode pictograph in an SMS edition screen).Selecting an edition languageYou may wish to select an edition language different from the language set on your phone. Doing so, the required character sets are available while using the keypad. The required T9 editor may also be available.1From an edition screen (e.g.: while writing a mail, an MMS, an SMS, a Phone book card,...), move your cursor to the required location. Press on the [Menu] key.2Select Paste. The previously copied text is pasted.1From an edition screen (e.g.: while writing a mail, an MMS, an SMS, a Phone book card,...), move your cursor to the required location then press the [Down] side key. Brit01_EN_User guide.book Page 73 Friday, March 3, 2006 3:02 PM](https://usermanual.wiki/Motorola-Mobility/T6GF1.Exhibit-8a-Users-Manual/User-Guide-665288-Page-73.png)
![74Messages/Text editingTo choose an edition language:Note: The T9 edition mode may not be available for all languages.Creating text modelsYou can create a set of messages to be used as models. These texts can contain up to 50 characters and text can be added when you want to use them. These templates are stored in the phone memory.To create text models:1From an edition screen (e.g.: while writing a mail, an MMS, an SMS, a Phone book card,...), press on the [Menu] key.2Select Edit. language. A list bearing the available languages is displayed.3Press OK to select the required language and return to the edition screen.1Press the [Menu] key. Select Messages.2Select SMS.3Select Text models.4Choose any blank template ([...]) and press OK.5Enter the template text and press OK.Brit01_EN_User guide.book Page 74 Friday, March 3, 2006 3:02 PM](https://usermanual.wiki/Motorola-Mobility/T6GF1.Exhibit-8a-Users-Manual/User-Guide-665288-Page-74.png)
![75Messages/Text editingEditing a text modelYou can modify a text model:Sending a new SMS messageYou can send message texts (up to 918 characters). The standard size for an SMS is 160 characters (your service provider charges you according to the number of SMS used to send your message). The icon (1 = number of SMS used - it is updated while writing your message and shows the number of SMS needed to send your message) is displayed on the left corner of the screen. To send SMS from the Menu: 1Press the [Menu] key. Select Messages.2Select SMS.3Select Text models.4Select the text model to be modified and press OK.5Edit the text and press OK.1Press the [Menu] key. Select Messages.2Select SMS.3Select Write new.4Select the To field and choose one of the displayed names, or in the Phone book list press on New or on the [Menu] key and then New (if you want to enter the number) or Other folder (if you want to send your message to another phone number). Press OK to validate.Brit01_EN_User guide.book Page 75 Friday, March 3, 2006 3:02 PM](https://usermanual.wiki/Motorola-Mobility/T6GF1.Exhibit-8a-Users-Manual/User-Guide-665288-Page-75.png)
![76Messages/Text editingNote: If you have registered an automatic signature, the number of characters used is automatically added to the message length.To send SMS from the idle screen:or:5In the Text field, enter the message text (see "Entering text / Edition mode", page 63) or select one of the models (Text models) and press OK. 6If you want to send the message to several addressees, enter one or several phone numbers/names in the Copy to list (up to 4 more addressees) and press OK then Valid to return to the previous screen. 7Press Send or press on the [Menu] key and select Send, Send without storing or Store.8A warning message displays the number of SMS needed to send the message if it is more than one. Select Go on if you want to send the message or select Cancel if you do not want to send it or if you want to amend your message.1Press the [Up arrow] key.2Proceed as described above.1Press the [Down arrow] key to access the Phone book. Scroll to one of the available names or numbers.2Press on the [Menu] key.3Scroll down and select Send a message...4Select SMS, then proceed as described above.Brit01_EN_User guide.book Page 76 Friday, March 3, 2006 3:02 PM](https://usermanual.wiki/Motorola-Mobility/T6GF1.Exhibit-8a-Users-Manual/User-Guide-665288-Page-76.png)
![77Messages/Text editingor:SignatureYou can register a signature to be automatically added to your text messages. The signature is not displayed when typing the message text but it is displayed on message reception by the addressee. The maximum size for the signature is 30 characters. If the message text to be sent already contains 918 characters, the signature cannot be added. To register a signature:1Press and hold the [Left] softkey.2Select SMS.3Select Write new, then proceed as described above.1Press the [Menu] key. Select Messages.2Select SMS.3Select Settings.4Select Signature. 5Select Insert in message. Select Yes.6Select Text, enter your signature text and press OK.7Select Save to store your signature.Brit01_EN_User guide.book Page 77 Friday, March 3, 2006 3:02 PM](https://usermanual.wiki/Motorola-Mobility/T6GF1.Exhibit-8a-Users-Manual/User-Guide-665288-Page-77.png)
![78Messages/Text editingOutbox and SIM archive emitted messagesThe Outbox contains stored sent messages (delivered or undelivered). The SIM archive contains unsent draft messages and stored sent messages (delivered or undelivered). These messages can be selected from the outbox or SIM archive menu and can be modified and resent as new SMS messages.To select one of these messages:1Press the [Menu] key. Select Messages.2Select SMS.3Select Outbox or select SIM archive then Emitted messages and use the [Up arrow] or [Down arrow] keys to scroll to the required message. Messages are either 'transmitted' or 'to be sent'.4Press on the [Menu] key to View, Delete, Delete all (for Outbox messages only), Status (for sent messages only), Send, Send as mail, Edit, Move to SIM (for outbox messages only), Move to phone (for SIM archive emitted messages only), Numbers & addresses (to store or call the number(s) contained in the SMS header or text, to store or send the addresses contained in the Mail or MMS header or text) or Details.Brit01_EN_User guide.book Page 78 Friday, March 3, 2006 3:02 PM](https://usermanual.wiki/Motorola-Mobility/T6GF1.Exhibit-8a-Users-Manual/User-Guide-665288-Page-78.png)
![79Messages/Text editingDraft messagesThe Drafts folder contains the written messages that were not sent. You can edit these messages and/or send them.To select one of these messages:Status requestIf a status is requested on a sent message, a status request is sent to the network (must be network supported). If the status is requested on a delivered message, the date and time of delivery may be shown. The network then answers by sending a status report (SR) back to the phone. Press OK to acknowledge it.To activate the status request:1Press the [Menu] key. Select Messages.2Select SMS.3Select Drafts and use the [Up arrow] or [Down arrow] keys to scroll to the required message. 4Press on the [Menu] key to View, Delete, Delete all, Send, Send as mail, Edit, Edit a copy, Move to SIM, Numbers & addresses (to store or call the number(s) contained in the SMS header or text) or Details.1Press the [Menu] key. Select Messages.2Select SMS.3Select Settings. 4Select Message config. 5Select Delivery report and select On.6Select Save. Brit01_EN_User guide.book Page 79 Friday, March 3, 2006 3:02 PM](https://usermanual.wiki/Motorola-Mobility/T6GF1.Exhibit-8a-Users-Manual/User-Guide-665288-Page-79.png)
![80Messages/Text editingTo request a reply:A reply to your message can be requested from your correspondent. If you activate this feature, you will be charged for the cost of the reply message.The availability of this feature is operator dependent.To read the sent message, delete or re-send it when receiving the status:Storage consumptionThe storage status for SMS messages can be consulted. To view the number of messages stored, the total available space on the Phone memory and on the SIM card:1Press the [Menu] key. Select Messages.2Select SMS.3Select Settings. 4Select Message config. 5Select Reply requested and select On.6Select Save. 1Press on the [Menu] key. Send again, Clear, Associated message or Delete message is displayed.2Select the required action.1Press the [Menu] key. Select Messages.Brit01_EN_User guide.book Page 80 Friday, March 3, 2006 3:02 PM](https://usermanual.wiki/Motorola-Mobility/T6GF1.Exhibit-8a-Users-Manual/User-Guide-665288-Page-80.png)
![81Messages/Text editingBroadcast - cell broadcast (CB) messagesThese messages are broadcast by the networks to GSM users and may provide general information about local area dialling codes, weather reports, traffic, news, etc. Each type of message is numbered, allowing you to select the type of information you wish to receive.Up to 5 types of messages can be programmed into the selection list.16 standard message types are pre-programmed into the phone for your selection. New message types can be programmed into the selection list using the 3 digit cell broadcast type number. Contact your service provider for details about the type of messages they broadcast.Before you activate the broadcast message service, you must enter at least one message type in the selection list.2Select SMS.3Select Storage used. The SMS memory used is displayed. Scroll down to access the SIM archive.4Select Details for more information on the Phone or SIM stored messages (use [Up arrow] and [Down arrow] keys to scroll to the required information).Brit01_EN_User guide.book Page 81 Friday, March 3, 2006 3:02 PM](https://usermanual.wiki/Motorola-Mobility/T6GF1.Exhibit-8a-Users-Manual/User-Guide-665288-Page-81.png)
![82Messages/Text editingEntering a message type in the selection listActivating / deactivating the broadcast serviceReading broadcast messagesBroadcast messages are displayed whilst the phone is on standby. If a broadcast message is received whilst in conversation or operating the menu, it only becomes visible once the phone reverts to the idle screen. A message can contain up to 93 characters and may be displayed on several pages.1Press the [Menu] key. Select Messages.2Select SMS then Broadcast.3Select Message types and select one of the empty types ([...]). Select OK.4Select Modify by list (or Modify by code if the type number is known).5Select the message type(s) you wish to receive and select Valid.6Select Save to store your setting.1Press the [Menu] key. Select Messages.2Select SMS then Broadcast.3Select Reception and select On or Off.4Select Save to store your setting.Brit01_EN_User guide.book Page 82 Friday, March 3, 2006 3:02 PM](https://usermanual.wiki/Motorola-Mobility/T6GF1.Exhibit-8a-Users-Manual/User-Guide-665288-Page-82.png)
![83Messages/Text editingOptions on message displaySelect Clear to clear the CB message displayed. Press the [Call] key to dial the number contained in the message. Press on the [Menu] key to display the following menu:Activating/deactivating the alert toneAn alert tone can be set to beep every time a new or updated broadcast message is received.Broadcast languageAll the broadcast messages can be displayed in several languages.To select a language:option actionDeleteTo delete the current message.Delete AllTo delete all the received CB messages.Numbers & addressesTo display all phone numbers contained inthe message text and dial or store them inthe Phone book if required.Broadcast OffTo deactivate cell broadcast.1Press the [Menu] key. Select Messages.2Select SMS then Broadcast.3Select Reception alert and select On or Off.4Select Save to store your setting.1Press the [Menu] key. Select Messages.Brit01_EN_User guide.book Page 83 Friday, March 3, 2006 3:02 PM](https://usermanual.wiki/Motorola-Mobility/T6GF1.Exhibit-8a-Users-Manual/User-Guide-665288-Page-83.png)
![85Calls & timesCalls & timesAccess the Calls & Times menu to check the details of individual incoming and outgoing calls, the duration of the last call, the total call time for all outgoing and incoming calls or to play the recorded calls.Call logsThis feature stores details (identity, time and date and call duration or cost) about the last 20 numbers dialled, the last 20 unanswered calls and the last 20 received calls. The calls log can be activated for Line 1 and Line 2 (Line 1 is your main line. Line 2 availability is subscription dependent).The last number dialled , received or unanswered is displayed at the top of the list. The caller’s name is displayed if it is registered in one of the Phone books (if not the phone number is displayed). If your subscription does not have Caller Line Identification (CLI) ’Unknown number’ is displayed. If the caller has with withheld his number, ’Withheld number’ is displayed.Press the [Call] key to call the selected number. 1Press the [Menu] key. Select Calls & Times.2Select Call logs.3Use the [Up arrow] or [Down arrow] keys to scroll through the calls list.Brit01_EN_User guide.book Page 85 Friday, March 3, 2006 3:02 PM](https://usermanual.wiki/Motorola-Mobility/T6GF1.Exhibit-8a-Users-Manual/User-Guide-665288-Page-85.png)
![86Calls & timesPress on the [Menu] key to access the following menu:Use the [Up arrow] or [Down arrow] keys to select the required option and follow the instructions displayed.Note: Press the [Call] key from the idle screen to access the call logs list. Call timersThe voice, Modem and GPRS call information for Line 1 and Line 2 is stored in the Call timers menu.Note: If the call timers were reset (see "Call timers - reset", page 88) the date of the latest counter reset is displayed.The call type and the accumulated times of outgoing and incoming calls are displayed.item actionCallTo call the selected number.StoreTo store the number in the Phone book.DeleteTo delete the entry.Delete allTo delete all entries.EditTo edit the displayed number.Send a messageTo send an SMS, an MMS or an e-mail to the selected phone number.1Press the [Menu] key. Select Calls & Times.2Select Call timers.3Select Show.4Use the [Up arrow] or [Down arrow] keys to view all the timer information.Brit01_EN_User guide.book Page 86 Friday, March 3, 2006 3:02 PM](https://usermanual.wiki/Motorola-Mobility/T6GF1.Exhibit-8a-Users-Manual/User-Guide-665288-Page-86.png)
![87Calls & timesSelecting Details displays information on calls made on your home network, on National roaming and on International roaming.Note: If Line 2 is active too, 'All Calls' for Line 1 and Line 2 are displayed separately.Balance information (subscription dependent)This service may be supplied by your service provider. It allows you to view the remaining airtime balance on your phone line. Please contact your service provider for more information. If your subscription allows access to this information:When selecting Call, if the balance information number is already stored, a call is sent to the balance information centre. If no number is stored, select Set number and enter it. Press OK to store the number, then select Call to call the information centre number.1Press the [Menu] key. Select Calls & Times.2Select Call timers.3Select Balance information.4Select Call or Set number.Brit01_EN_User guide.book Page 87 Friday, March 3, 2006 3:02 PM](https://usermanual.wiki/Motorola-Mobility/T6GF1.Exhibit-8a-Users-Manual/User-Guide-665288-Page-87.png)
![88Calls & timesReminder - call durationYou can set a duration reminder to beep regularly to remind you of the time spent on your call. The frequency can be any multiple of 1 minute (up to 59 minutes) and a beep is emitted 10 seconds before you reach the set limit. Call timers - resetThis feature allows you to reset the call timers. The 4 digit lock code is required to reset the call timers (default lock code: '0000').Call costs - management Some service providers offer an Advice of Charge (AoC) subscription service allowing you to view the latest call cost, the total calls cost and the remaining balance on your account (once a 'credit limit' has been set ). 1Press the [Menu] key. Select Calls & Times.2Select Call timers.3Select Reminder.4Select On to activate the Reminder.5Enter the reminder interval.6Press OK to validate the entry. 1Press the [Menu] key. Select Calls & Times.2Select Call timers.3Select Reset.4Select Yes.5Enter the phone lock code and press OK. Brit01_EN_User guide.book Page 88 Friday, March 3, 2006 3:02 PM](https://usermanual.wiki/Motorola-Mobility/T6GF1.Exhibit-8a-Users-Manual/User-Guide-665288-Page-88.png)
![89Calls & timesTo display these, you must first set a currency value and enter an average cost per unit (only calls units are displayed if the cost information is not stored).To set a currency value per Unit: To set the call cost type to Units:Note: When the cost type is set to Units, the credit limit and the remaining credit are shown in units.Setting the credit limit (subscription dependent)You may also be able to set a credit limit to your calls. Once the credit limit has been reached, no more chargeable outgoing or incoming calls are allowed. You can however still make emergency calls.1Press the [Menu] key. Select Calls & Times.2Select Call costs.3Select Display cost type.4Select Currency. The current currency unit value is displayed.5Select Modify. Enter your PIN 2 code and press OK.6Enter the currency name (up to 3 letters). Press OK to validate. 7Enter the unit cost (e.g.: 0.15 Euro per minute). Press OK to validate. 1Press the [Menu] key. Select Calls & Times.2Select Call costs.3Select Display cost type.4Select Units.Brit01_EN_User guide.book Page 89 Friday, March 3, 2006 3:02 PM](https://usermanual.wiki/Motorola-Mobility/T6GF1.Exhibit-8a-Users-Manual/User-Guide-665288-Page-89.png)
![90Calls & timesThe PIN2 code is required to set the credit limit.Note: When a credit limit has been set, the selection from the 'Credit limit' display is Edit or Set no limit.Show costsNote: The remaining credit is shown in either units or currency, as set by Cost Type menu above.Call costs - resetting all costs to zeroTo reset all call costs to zero:1Press the [Menu] key. Select Calls & Times.2Select Call costs.3Select Credit limit. The display indicates the current credit limit set.4Select Edit. Enter your PIN 2 code and press OK.5Enter the credit limit. Press OK to validate.1Press the [Menu] key. Select Calls & Times.2Select Call costs.3Select Show.4Use [Up arrow] and [Down arrow] keys to display the Last Call and All Calls and show the Remaining credits.1Press the [Menu] key. Select Calls & Times.2Select Call costs.3Select Reset.4Select Yes. 5Enter the PIN 2 number and press OK.Brit01_EN_User guide.book Page 90 Friday, March 3, 2006 3:02 PM](https://usermanual.wiki/Motorola-Mobility/T6GF1.Exhibit-8a-Users-Manual/User-Guide-665288-Page-90.png)
![91Calls & timesRecorded callThis sub-menu allows you to play the recorded phone calls. If several phone conversations have been recorded, they are played one after another. Line selectionSome operators support the use of a second line. You may then have two mobile phone numbers (e.g. a business line plus a personal line). To use them you need to select the line to be used. Note: The Line selection sub-menu may not be available on your phone. Please contact your service provider for further details about this service.In compliance with European regulations, you are obliged to inform your correspondent before recording a phone conversation.1Press the [Menu] key. Select Calls & Times.2Select Recorded call.1Press the [Menu] key. Select Calls & Times.2Select Line selection.The current line selection is displayed. 3Use the [Up arrow] and [Down arrow] keys to scroll to the required line. Press OK to validate.Brit01_EN_User guide.book Page 91 Friday, March 3, 2006 3:02 PM](https://usermanual.wiki/Motorola-Mobility/T6GF1.Exhibit-8a-Users-Manual/User-Guide-665288-Page-91.png)

![93Phone bookPhone bookPhone numbers can be stored in the phone memory and in the SIM card memory. •The phone memory can store up to 500 'extended' cards (called 'Phone book cards'). These cards allow you to store different information types: family name, first name, home number, mobile phone number, work number, fax number, three mail addresses, postal address, business information, voice tag, group name, card related melody and an associated picture or video. •The SIM card memory capacity may vary according to your operator or service provider. The SIM memory allows you to store one name, one phone number and one voice tag per card.Both the SIM and the phone memories are searched when reading the Phone book contents, unless you have previously selected a folder to be scanned when accessing the Phone book (please see "Sorting the Phone book entries so that they can be viewed as separate folders", page 106). Note: Press the [Down arrow] key to directly access the Phone book from the idle screen.Brit01_EN_User guide.book Page 93 Friday, March 3, 2006 3:02 PM](https://usermanual.wiki/Motorola-Mobility/T6GF1.Exhibit-8a-Users-Manual/User-Guide-665288-Page-93.png)
![94Phone bookStoring names and telephone numbersNames and numbers can be stored directly in the Phone book or copied from different sources such as SMS messages, calls log list, etc.There are several ways to store numbers in the Phone books:Phone names cardFrom the idle screen:Via the menu:Note: The Groups field allows you to identify the caller’s type according to entries you have previously set (see "Creating a group of cards", page 108).1Enter the number. Select Store. 2Select New phone name.3The Home number, Mobile number, work number, or FAX number list is displayed, thereby allowing you to select a number type.4Enter the card requested data and select Save to store the information. 1Press the [Menu] key. Select Phone Book.2Select Add name. 3Select New Phone name.4Enter the card requested data and select Save to store the information. Brit01_EN_User guide.book Page 94 Friday, March 3, 2006 3:02 PM](https://usermanual.wiki/Motorola-Mobility/T6GF1.Exhibit-8a-Users-Manual/User-Guide-665288-Page-94.png)
![95Phone bookUpdating a stored phone names card from the phone book:SIM names cardFrom the idle screen:Via the menu:1Press the [Menu] key. Select Phone Book.2Select Read. 3Select the required phone name card from the displayed list, then update the required information. Select Save to store your settings. 1Enter the number. Select Store. 2Select New SIM name.3Fill in the available fields and select OK to validate your entries.4Select Save to store the card.1Press the [Menu] key. Select Phone Book.2Select Add name. 3Select New SIM names.4Enter the name and select OK.5Enter the number and select OK.6Select Save to store the card.Brit01_EN_User guide.book Page 95 Friday, March 3, 2006 3:02 PM](https://usermanual.wiki/Motorola-Mobility/T6GF1.Exhibit-8a-Users-Manual/User-Guide-665288-Page-95.png)
![96Phone bookStoring a received numberNumbers stored in the calls log list and SMS message locations can also be stored in the Phone book:Note: While entering a number, selecting Clear once deletes the last character. Holding the key underneath Clear key deletes the whole number.Note: You can use _ (wild card spaces) to store numbers (wild card spaces cannot be obtained when registering a number from the idle screen).Note: When calling a number containing wild card spaces, select the number from the Phone book, press on the [Menu] key or press on the [Call/Send] key and enter the number corresponding to the wild card spaces (=missing figures).Note: The +, p (pause) and _ characters - which are accessible by pressing and holding the key when registering a number - can be stored as part of numbers. 1With a number from the calls log list or an SMS message press on the [Menu] key.2For an SMS message, select Numbers & address. if the number is contained in an SMS. The message number(s) is/are displayed. Select one if several numbers are available. Press on the [Menu] key and select Store.2’For received and unanswered calls, Press on the [Menu] key and select Store.3Follow the above mentioned procedure to create or to update a phone name or a SIM name card then select Save to store the card.Brit01_EN_User guide.book Page 96 Friday, March 3, 2006 3:02 PM](https://usermanual.wiki/Motorola-Mobility/T6GF1.Exhibit-8a-Users-Manual/User-Guide-665288-Page-96.png)
![97Phone bookNote: If the SIM card or phone memory are full, a warning message is displayed on the Phone book selection.Copying names and numbersWhen consulting your Phone book you can copy any SIM or phone card to another directory.Note: When copying an item with more than one number to the SIM names or SIM fixed directories, you have to select the number to be copied.Note: When copying an item to the SIM names or SIM fixed directories, the mail address, the video and picture are not kept.Copying all names and numbersWhen consulting your Phone book for the first time the ’Copy all SIM names to phone?’ message is displayed. Select Yes.1Press the [Down arrow] key or press the [Menu] key then select Phone Book and select Read.2Scroll to one of the items from the displayed list. Press on the [Menu] key.3Select Copy, then select one of the available destination directories (Phone names, SIM names, SIM fixed, My card). The card content is then automatically copied to the required location.Brit01_EN_User guide.book Page 97 Friday, March 3, 2006 3:02 PM](https://usermanual.wiki/Motorola-Mobility/T6GF1.Exhibit-8a-Users-Manual/User-Guide-665288-Page-97.png)
![98Phone bookYou can also, at any time, copy all the names cards from the Phone to the SIM card and from the SIM card to the Phone.Note: If your Phone book cards bear more than one number (home, mobile phone, work, fax numbers), the first available number from the list is copied to the corresponding SIM card entry. Moving names and numbersWhen consulting your Phone book you can move any SIM or phone card to another directory.1Press the [Down arrow] key or press the [Menu] key then Select Phone Book and select Read.2Press on the [Menu] key.3Select Copy all.4Select Phone to SIM or SIM to phone.All the names are copied unless the SIM card memory does not bear enough free space when copying the Phone entries to the SIM card. A warning message is then displayed.1Press the [Down arrow] key or press the [Menu] key then select Phone Book and select Read. 2Scroll to one of the items from the displayed list. Press on the [Menu] key.3Select Move, then select one of the available destination directories (Phone names, SIM names, SIM fixed, My card). The card content is then automatically moved to the required location.Brit01_EN_User guide.book Page 98 Friday, March 3, 2006 3:02 PM](https://usermanual.wiki/Motorola-Mobility/T6GF1.Exhibit-8a-Users-Manual/User-Guide-665288-Page-98.png)
![99Phone bookAdding a video to your Phone book cardYou can add a video to each of your Phone book cards. This video is played on receipt of an incoming call.Note: If you add a video and a ringtone to your Phone book card, the video sequence only is played and the ringtone is deactivated on receipt of an incoming call.Note: You can only select a video with an audio track. Otherwise the video is not played on receipt of an incoming call and a warning message is displayed.Note: You can modify or delete the videos one after the other via the Phone book cards (see "Editing a Phone book or a SIM name card", page 102).1Press the [Menu] key. Select Phone Book.2Select Read then choose one of the phonebook cards from the list.3Select Add name and then Phone names.4Scroll Down and select Video to display the Video folder content.5Select the required video from the displayed list. Press OK to confirm your selection or press New to film a new video.6Select Save to store your settings.Brit01_EN_User guide.book Page 99 Friday, March 3, 2006 3:02 PM](https://usermanual.wiki/Motorola-Mobility/T6GF1.Exhibit-8a-Users-Manual/User-Guide-665288-Page-99.png)
![100Phone bookAdding a picture to your Phone book cardYou can add a picture to each of your Phone book cards.The picture is then displayed together with the caller’s name on incoming or outgoing calls.Note: You can link about 150 images with your Phone book cards. If the images folder is full, the «images too big» error message is displayed.Note: The images remain attached to the Phone book cards even if you have deleted them from the Pictures folder memory. You can modify or delete them one after the other via the Phone book cards (see "Editing a Phone book or a SIM name card", page 102).Note: When sending a Phone book card by Bluetooth, the image is automatically sent unless the file is protected.Note: The Image failure icon is displayed on incoming or outgoing calls if a problem related to the image has been detected by the phone.1Press the [Menu] key. Select Phone Book.2Select Read then choose one of the phonebook cards from the list.3Scroll down and select Picture to display the Picture folder content.4Select the required pictures.Press OK to confirm your selection or press New to capture a new picture.5Select Save to store your settings.Brit01_EN_User guide.book Page 100 Friday, March 3, 2006 3:02 PM](https://usermanual.wiki/Motorola-Mobility/T6GF1.Exhibit-8a-Users-Manual/User-Guide-665288-Page-100.png)
![101Phone bookNote: The picture is not displayed on icoming or outgoing call if a video was also linked to the card.Setting a melody, a MP3 file, a video or a speech note as a ringtoneYou can set a melody, a video or a speech note as a ringtone for each of your Phone book cards. If you set a video as a ringtone the audio track of the video sequence only is played. This ringtone is played on receipt of an incoming call. Note: If no melody is set as a ringtone for your Phone book card (No sound selection), the default ringtone or the group ringtone (please see "Ringtone selection", page 216) is played on receipt of an incoming call.1Press the [Menu] key. Select Phone Book.2Select Add name and then Phone names.3Scroll Down and select Ringtone to display the Ringtone folder content.4Select Melodies (to set a melody as a ringtone), MP3 (to set an MP3 file as a ringtone), Videos (to set the audio track of a video sequence as a ringtone), Speech notes (to set a speech note as a ringtone) or No sound (to keep the default ringtone). Press OK to confirm your selection.5Select the required melody, MP3 file, video (audio track) or speech note. Press OK to confirm your selection.6Select Save to store your settings.Brit01_EN_User guide.book Page 101 Friday, March 3, 2006 3:02 PM](https://usermanual.wiki/Motorola-Mobility/T6GF1.Exhibit-8a-Users-Manual/User-Guide-665288-Page-101.png)
![102Phone bookEditing a Phone book or a SIM name cardFrom the idle screen:Via the menu: You can create a voice dialling pattern on Phone book cards. This voice dialling pattern can only be recorded in edition mode.1Press the [Down arrow] key to access the Phone book.2Scroll down to the card you want to access and select OK.3Scroll down to the field(s) you want to modify and amend it/them. Select Save to store the changes.1Press the [Menu] key. Select Phone Book.2Select Read.3Select one of the stored cards.4Press on the [Menu] key.5Select View.6Scroll down to the field(s) you want to modify and amend it/them. Select Save to store the changes.Brit01_EN_User guide.book Page 102 Friday, March 3, 2006 3:02 PM](https://usermanual.wiki/Motorola-Mobility/T6GF1.Exhibit-8a-Users-Manual/User-Guide-665288-Page-102.png)
![103Phone bookRecording a Voice dialling patternNote: You may have to select the number - the voice dialling pattern has to be attached if several numbers are stored on the card. Select Home number, Mobile phone number or Work number if you have registered several numbers on a Phone book card.Viewing and calling Phone book numbersThere are three ways of viewing and calling entries stored in the Phone book:1Press the [Down arrow] key to access the Phone book.2Scroll down to the card you want to access and select OK or press on the [Menu] key then select View.3Scroll down to the Voice dialling field and select OK. Select New to record the voice pattern or press on the [Menu] key then select Record if a voice pattern is already recorded and you want to change it.Repeat the name until it is stored (minimum = twice). Pronounce it as clearly as possible and in a quiet environment. When the voice patterns match, Stored is displayed.Brit01_EN_User guide.book Page 103 Friday, March 3, 2006 3:02 PM](https://usermanual.wiki/Motorola-Mobility/T6GF1.Exhibit-8a-Users-Manual/User-Guide-665288-Page-103.png)
![104Phone bookDirectly from the idle screen:Note: When typing in the required name in the edition area, the Multitap mode is only available.or:1Press the [Down arrow] key to display the Phone book list.2To access the required name, either scroll up or down or press a numeric key to access the different letters associated with the key (e.g: press twice to reach the names starting with letter ’B’) or type in the required name in the edition area displayed at the top of the screen (you can enter up to 20 characters).3Press the [Call] key or press on the [Menu] key then select Call.1Press the [Down arrow] key to display the Phone book list.2Select one of the displayed names (please see above) and press [OK].3Scroll down to get to the required field (provided it bears a phone number) then press on the [Call] key.Brit01_EN_User guide.book Page 104 Friday, March 3, 2006 3:02 PM](https://usermanual.wiki/Motorola-Mobility/T6GF1.Exhibit-8a-Users-Manual/User-Guide-665288-Page-104.png)
![105Phone bookVia the menu:The list of Phone book entries is displayed in alphabetical order.Note: Selecting a group from the Folder selection displays the names/phone numbers of the corresponding group. This group is then displayed when next reading the Phone book contents. Note: Pressing on the [Menu] key displays the following menu choice: View, Call, Add name, Delete, Delete all (Phone names or SIM names), Copy, Copy all, Move, Folder selection (to select All names, the Phone names only, the SIM names only or the groups members), Send by... Mail, MMS, Bluetooth or SMS, Send a message...(an SMS, a Mail or an MMS). Some of these options may not be available according to the selected folder.Note: If several phone numbers are stored on a Phone name card, scroll down to the required number and select it before activating the call.1Press the [Menu] key. Select Phone Book.2Select Read to display the Phone book list, then scroll up and down to the required name or press a numeric key to access the different letters associated with the key. E.g: press twice to access the names starting with letter 'B'.3Press the [Call] key or press on the [Menu] key then select Call.Brit01_EN_User guide.book Page 105 Friday, March 3, 2006 3:02 PM](https://usermanual.wiki/Motorola-Mobility/T6GF1.Exhibit-8a-Users-Manual/User-Guide-665288-Page-105.png)
![106Phone bookSorting the Phone book entries so that they can be viewed as separate foldersYou can split the Phone book entries into folders and view either the Phone names, the SIM names or a selected group of entries when reaching the Phone book list. Note: The selected folder remains active for further Phone book reading. Please go over the above procedure to select another folder or display the full Phone book list.Voice diallingYou can make a call by using your voice.To create a voice pattern:1Press the [Menu] key. Select Phone Book.2Select Read.3Select Folder or press on the [Menu] key and select Folder selection.4Choose All names (to display all the folders contents), Phone names (to display the phone cards only), SIM names (to display the SIM cards only) or one of the Groups names (see "Creating a group of cards", page 108) if any.1Press the [Menu] key. Select Phone Book.2Select Voice dialling.Brit01_EN_User guide.book Page 106 Friday, March 3, 2006 3:02 PM](https://usermanual.wiki/Motorola-Mobility/T6GF1.Exhibit-8a-Users-Manual/User-Guide-665288-Page-106.png)
![107Phone bookNote: If the voice patterns do not match, Failed is displayed. Repeat the whole voice registration procedure again.To view the voice dialling numbers list:To remove all phone numbers from the voice dialling list:3Select New entry. All name entries are displayed.4Use the [Up arrow] and [Down arrow] keys to select the card you want to use and press OK.If several phone numbers are registered on a card (e.g. Home number, Mobile number or Work number) select one by pressing OK.5You are then prompted to pronounce the name at least twice (pronounce it as clearly as possible). Stored is displayed when both voice patterns match.1Press the [Menu] key. Select Phone Book.2Select Voice dialling.3Select List.4Use the [Up arrow] and [Down arrow] keys to view the requested entry. 5Press on the [Menu] key. To play the voice pattern, select Play Back, to remove voice tag from the voice dialling list, select Erase, or to create a new voice pattern select Record.1Press the [Menu] key. Select Phone Book.2Select Voice dialling.3Select Delete all. Select Yes.Brit01_EN_User guide.book Page 107 Friday, March 3, 2006 3:02 PM](https://usermanual.wiki/Motorola-Mobility/T6GF1.Exhibit-8a-Users-Manual/User-Guide-665288-Page-107.png)
![108Phone bookTo call a phone number using a voice pattern: Free space in the Phone bookTo view the remaining capacity in the Phone book:Note: If available, the free memories in the FDN list are also displayed. Please see "Fixed dialling numbers", page 113 for more information on FDN numbers.Creating a group of cardsGroups of cards can be defined for the Phone book. This feature allows you to group certain cards and to play a specific melody on receiving an incoming call from one of the group members.To create a group: 1From the idle screen, press and hold the [Send/Call] key.2Pronounce the name as clearly as possible.3The name called as well as an animated icon are then displayed and the call proceeds as normal.1Press the [Menu] key. Select Phone Book.2Select Storage used to get to the Phone names Storage used; press the [Down arrow] key to get to the SIM card Storage used. 1Press the [Menu] key. Select Phone Book.2Select Groups.3Select any blank template [...] and select OK. The following items are displayed:Brit01_EN_User guide.book Page 108 Friday, March 3, 2006 3:02 PM](https://usermanual.wiki/Motorola-Mobility/T6GF1.Exhibit-8a-Users-Manual/User-Guide-665288-Page-108.png)
![109Phone bookGroups’ characteristics can be modified or deleted (when in the Groups menu, select OK to amend the settings or select Delete to erase the group).To modify a group:To select a group when storing a number:item functionGroup nameTo enter and store a group name.RingtoneTo select a melody to be used as a ringtone on group member calls (Please see "Setting a melody, a MP3 file, a video or a speech note as a ringtone", page 101).4Enter or select the requested data. Press OK to validate.5Press Save to store the defined group.1Press the [Menu] key. Select Phone Book.2Select Groups.3Select the group to be modified and select OK then select the group name and/or the ringtone. Select the new parameters (name/melody).4Select Save to store your settings.1Repeat the Phone names storage procedure (see "Storing names and telephone numbers", page 94) and fill in the Phone names card.2Scroll down to Groups, select OK.3Select one of the displayed groups from the list or press New to create a new group.4Select Save to store your settings.Brit01_EN_User guide.book Page 109 Friday, March 3, 2006 3:02 PM](https://usermanual.wiki/Motorola-Mobility/T6GF1.Exhibit-8a-Users-Manual/User-Guide-665288-Page-109.png)
![110Phone bookNote: Groups can only be set for the Phone names cards (not for the SIM names cards).To view group members:My cardMy card is a specific storage location where you can enter personal data. You can easily access My card and send its contents to another device by Bluetooth, by Mail, by MMS or by SMS.My card contents is identical to the phone cards contents except for the Groups and Voice dialling fields.To enter My card data set:1Press the [Menu] key. Select Phone Book.2Select Groups.3Select the required group name and select Members or Press on the [Menu] keySelect Members.4The group members list is displayed. Please use the same procedure as when in the phone book to reach the required name.1Press the [Menu] key. Select Phone Book.2Select My card. 3Select View and enter the requested information as for a Phone book card (validate each entry by selecting OK).4Select Save to store your card.Brit01_EN_User guide.book Page 110 Friday, March 3, 2006 3:02 PM](https://usermanual.wiki/Motorola-Mobility/T6GF1.Exhibit-8a-Users-Manual/User-Guide-665288-Page-110.png)
![111Phone bookTo send My card by Bluetooth, by SMS, by Mail or by MMS:My number(s) displayThe phone can display your main line (Line 1) phone number, the phone number for Line 2 (Alternate Line Service) and your data and fax numbers (these are SIM card dependent). These numbers may be stored in the SIM card. You can also enter them manually.To view, name and edit your own number(s):1Press the [Menu] key. Select Phone Book2Select My card. 3Select Send by... then select Bluetooth: (please refer to "Bluetooth", page 48 for more infomation on searching an addressee) the card is automatically sent. Or select SMS, Mail or MMS, then enter the phone number or e-mail address to send the card to or select it via the options list (press on the [Menu] key) then select Names list and press OK.1Press the [Menu] key. Select Phone Book.2Select My numbers. The phone number for Line 1 is displayed if it is stored in the SIM card. If not, select Edit and enter your number and your name (select OK to save the entered information). You can access an options list to help you store the required information.Brit01_EN_User guide.book Page 111 Friday, March 3, 2006 3:02 PM](https://usermanual.wiki/Motorola-Mobility/T6GF1.Exhibit-8a-Users-Manual/User-Guide-665288-Page-111.png)
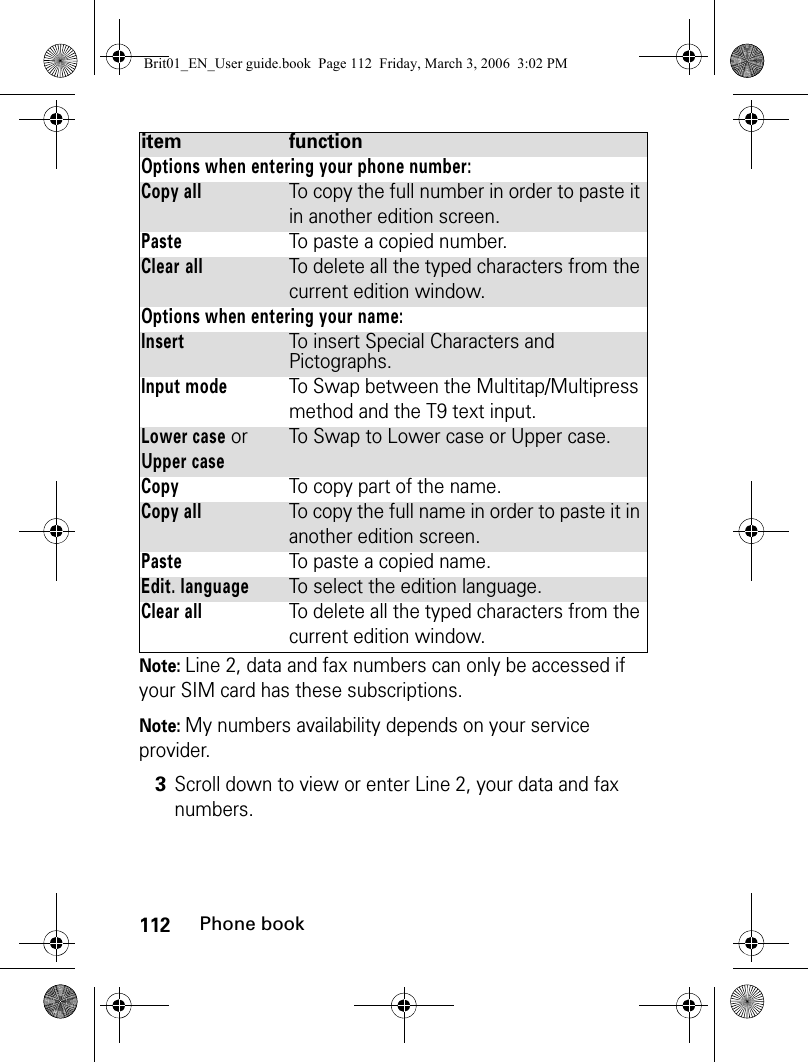
![113Phone bookFixed dialling numbersFixed dialling is a feature that restricts outgoing calls to 'fixed' numbers or 'prefixes' contained in SIM cards that support this feature. When the Fixed Dialling Numbers (FDN) feature is activated, dialling numbers, diverting calls and sending SMS to numbers not registered in the FDN list is forbidden. The number of FDN entries to be stored depends on the SIM card capacity. Activating the FDN feature or registering numbers in the FDN list is PIN 2 protected (contact your service provider to get the PIN 2 number).The following menu (Fixed dialling) and operations are only available on your phone if your SIM card allows fixed dialling.To activate or deactivate FDN operation:Note: The Fixed dialling sub-menu may not be available on your phone. Please contact your service provider for further details.1Press the [Menu] key. Select Phone Book.2Select Fixed dialling. Select Status.3Select On or Off. Enter the PIN2 number.4Select OK to validate.Brit01_EN_User guide.book Page 113 Friday, March 3, 2006 3:02 PM](https://usermanual.wiki/Motorola-Mobility/T6GF1.Exhibit-8a-Users-Manual/User-Guide-665288-Page-113.png)
![114Phone bookTo view the numbers stored in the FDN list:To add a new number to the FDN list:Note: Wild card spaces can be used with the numbers stored in the FDN list. E.g. number +441707 278_ _ 9 allows calls to all numbers from 278009 to 278999 to be dialled. The number can be edited and dialled from the idle screen. Note: You may be asked to enter your PIN2 code.1Press the [Menu] key. Select Phone Book.2Select Fixed Dialling.3Select View to view the FDN list entries. Press on the [Menu] key to view, call, add a name, delete, copy or move numbers to the phone or SIM card memory, but also to send these numbers by Mail, MMS, Bluetooth or SMS, or send a message (an SMS, a Mail or an MMS).1Press the [Menu] key. Select Phone Book.2Select Fixed dialling.3Select Add new.4Enter your PIN2 code and press OK.5Fill in the displayed fields as in any SIM name card (please see "SIM names card", page 95) then select Save to store your settings.Brit01_EN_User guide.book Page 114 Friday, March 3, 2006 3:02 PM](https://usermanual.wiki/Motorola-Mobility/T6GF1.Exhibit-8a-Users-Manual/User-Guide-665288-Page-114.png)
![115Phone bookExportThe purpose of the Export feature is to allow you to send the Phone book contents to another device (e.g. a pc) by Bluetooth, by SMS, by MMS and by e-mail.Note: When exporting a vCard file you can directly send it by Bluetooth, by Mail, by MMQS or by SMS.1Press the [Menu] key. Select Phone Book.2Select Export..., then select Yes. The entire contents of the Phone book are exported and grouped together in a vCard file and stored in Fun & Media box/Others (please see "Others", page 168).Brit01_EN_User guide.book Page 115 Friday, March 3, 2006 3:02 PM](https://usermanual.wiki/Motorola-Mobility/T6GF1.Exhibit-8a-Users-Manual/User-Guide-665288-Page-115.png)
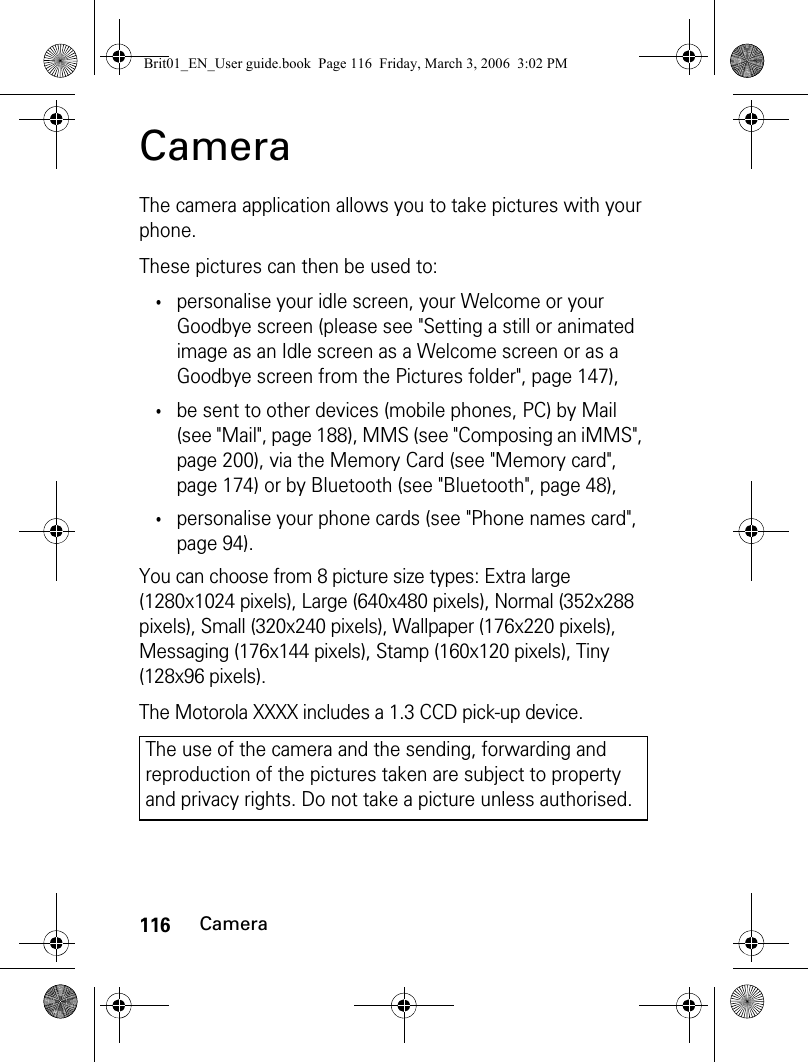
![117CameraTo access the camera applicationThe Camera related icons and shortcutsHere is the way information related to the Camera application and its state while in use is displayed. The screen shot below is a preview example; the Camera related icons described in the table below are the ones which can be displayed while using the Camera features. The features described in this table are further explained in the chapter.Camera related icons1From the idle screen, press the [Menu] key. Select Camera & Video.2Select Capture a photo.Upper part:Camera application activated. Picture resolution (size): Extra large (1280x1024 pixels), Large (640x480 pixels), Normal (352x288 pixels), Small (320x240 pixels), Wallpaper (176x220 pixels), Messaging (176x144 pixels), Stamp (160x120 pixels), Tiny (128x96 pixels).Self timer activated. Image quality modes: Super fine, Fine, Economic. Zoom (= zoom levels).Brit01_EN_User guide.book Page 117 Friday, March 3, 2006 3:02 PM](https://usermanual.wiki/Motorola-Mobility/T6GF1.Exhibit-8a-Users-Manual/User-Guide-665288-Page-117.png)
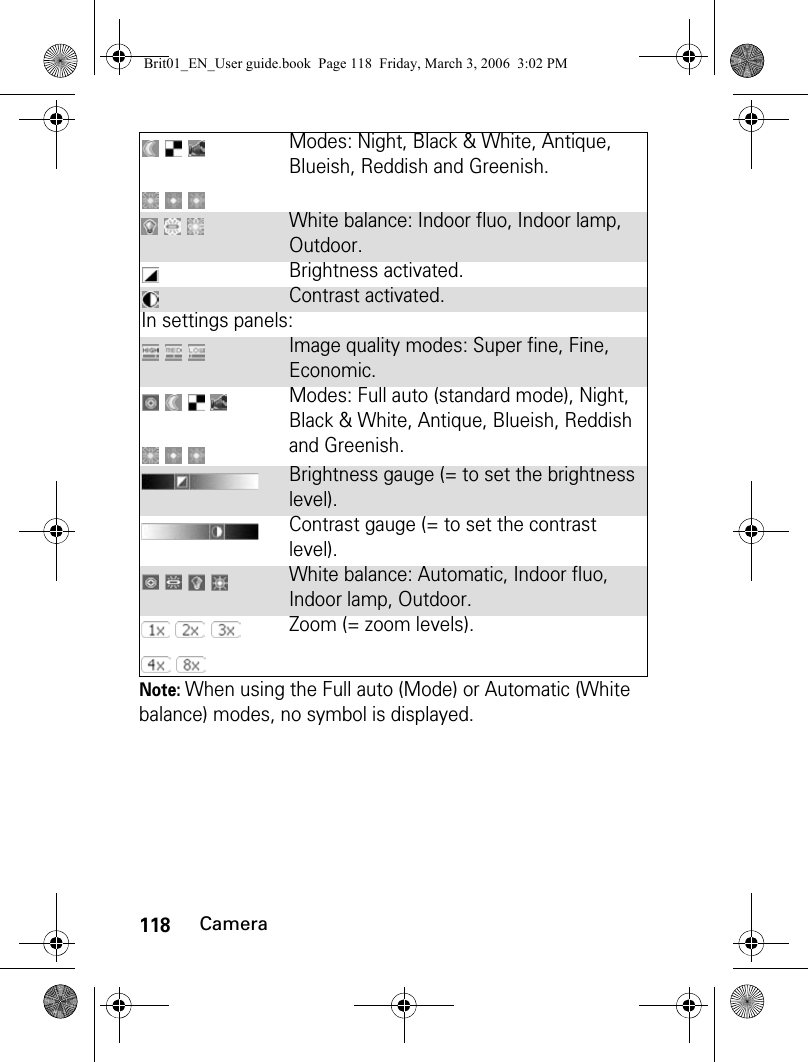
![119CameraAvailable shortcutsEach of the camera-related keys has several functions. While using the camera feature, please use the keypad as follows:Note: The settings described above are to be accessed via the Preview mode only.Note: Please refer to the Adjusting the preview for full details on the setting types and related icons.Taking a pictureThe pictures are stored in the Pictures sub-folder of the Fun & Media box.Note: When a picture is taken the shutter sound is played.Note: The Shutter sound is a ’Camera-like’ sound that is heard when a picture is captured.keys description[OK] key To capture an image (for scenery shots).[Up arrow] key To access the Zoom panel and to scroll to the next setting type.[Down arrow] key To access the Quality panel and to scroll to the next setting type.[Left arrow] key To access the Brightness panel.[Right arrow] key To access the Mode panel.1Place the subject in front of the camera lens.2Press OK to capture your picture. Brit01_EN_User guide.book Page 119 Friday, March 3, 2006 3:02 PM](https://usermanual.wiki/Motorola-Mobility/T6GF1.Exhibit-8a-Users-Manual/User-Guide-665288-Page-119.png)
![120CameraNote: You may not be able to deactivate nor mute the shutter sound option on your phone.Note: You cannot take a picture while a communication is in progress.Storing/erasing your pictureWhen a picture has just been taken, the file name and the «Keep this photo?» message is displayed.The picture is stored in the Pictures folder of the Fun & Media box menu except if you have previously chosen to have it stored on the Memory Card (please see "To select a storage space", page 121). The picture file is stored as a .jpg file (see "Pictures", page 143).An Options list is available (Press on the [Menu] key):1Select OK to store the picture or select Discard to erase it.options descriptionStoreTo store the picture.Send by...To send the picture by Mail, by MMS or by Bluetooth. Set as...To set your picture as an idle screen, as a Welcome screen or as a Goodbye screen.Brit01_EN_User guide.book Page 120 Friday, March 3, 2006 3:02 PM](https://usermanual.wiki/Motorola-Mobility/T6GF1.Exhibit-8a-Users-Manual/User-Guide-665288-Page-120.png)
![121CameraTo select a storage spaceYou can choose, before taking a picture, the space the picture should be stored on (useful if the current storage space is full and prevents you from taking a picture). If you do not choose a storage space, the video is stored on the phone memory by default:Full screenTo view your image in full screen.DeleteTo delete the current picture.DetailsTo display information about the file Name, the Resolution (width x height in pixels), the Size, the File protection status, the Copyright of the picture. The empty fields are not displayed.1From the idle screen, press the [Menu] key. Select Camera & Video.2Select Capture a Photo.3Press the [Menu] key and select Settings.4Scroll to Storage and choose Phone memory or Memory card.All the pictures are then automatically stored on the selected storage space.options descriptionBrit01_EN_User guide.book Page 121 Friday, March 3, 2006 3:02 PM](https://usermanual.wiki/Motorola-Mobility/T6GF1.Exhibit-8a-Users-Manual/User-Guide-665288-Page-121.png)
![122CameraAdjusting your pictureYou can adjust several setting types before taking a picture. These settings can be accessed from the options menu or directly from the preview screen by scrolling with the arrow keys.To select the image size:Note: The Wall paper gives the picture the good resolution to be set as an Idle screen, as a Welcome or a Goodbye screen.Note: If you wish to send your image by Mail or MMS, we advise you choose the Messaging mode.To select the image quality:1Press on the [Menu] key. Select Settings and Resolution.2Select the Extra large (1280x1024 pixels), Large (640x480 pixels), Normal (352x288 pixels), Small (320x240 pixels), Wallpaper (176x220 pixels), Messaging (176x144 pixels), Stamp (160x120 pixels), or the Tiny (128x96 pixels) mode.3Press OK to confirm your selection and then Save to store your settings.Brit01_EN_User guide.book Page 122 Friday, March 3, 2006 3:02 PM](https://usermanual.wiki/Motorola-Mobility/T6GF1.Exhibit-8a-Users-Manual/User-Guide-665288-Page-122.png)
![123CameraThis setting allows you to choose a quality level for your picture. The better the quality (sharpness of the displayed image), the bigger the file size. If you wish to send your image by Mail or by MMS, we advise you choose the Economic mode.To select the zoom setting:Note: The available zoom levels depend on the selected picture resolution.To access the mode setting:This setting allows you to choose the colour and exposure mode before taking the picture in order to optimise the picture quality according to the conditions.1Press on the [Menu] key. Select Settings and Quality. (Or press the [Down arrow] key to access the Quality feature).2Select the Super Fine, the Fine or the Economic mode.3Press OK to confirm your selection and then Save to store your settings.1Scroll up or down. Select Zoom. Or press the [Up arrow] key to access the zoom feature.2Select one of the zoom levels by scrolling left or right.3Press OK to confirm your selection. 1Scroll up or down. Select Mode. Or press the [Right arrow] key to access the mode feature.2Select Full auto, Night, B&W, Antique, Blueish, Reddish or Greenish.3Press OK to confirm your selection.Brit01_EN_User guide.book Page 123 Friday, March 3, 2006 3:02 PM](https://usermanual.wiki/Motorola-Mobility/T6GF1.Exhibit-8a-Users-Manual/User-Guide-665288-Page-123.png)
![124CameraTo set the white balance:To select the brightness:To select the contrast level:To access the self timer:The self timer offers the possibility of taking a delayed picture, thereby enabling you to be in the picture.Note: If an event occurs (Mail, MMS reception...) or the phone's behaviour is modified (any key pressed, ...) after the countdown has started, the self timer is automatically stopped and set to Off. Once the event has been processed, the phone returns to the preview screen.1Scroll up or down. Select White balance.2Select Automatic, Outdoor, Indoor lamp or Indoor fluo.3Press OK to confirm your selection.1Scroll up or down. Select Brightness. Or press the [Left arrow] key to access the brightness feature.2Select one of the seven brightness levels.3Press OK to confirm your selection.1Scroll up or down. Select Contrast.2Select one of the seven contrast levels.3Press OK to confirm your selection.1Press on the [Menu] key. Select Self timer.2Select On.3Press OK to launch the countdown.The 10 seconds countdown is displayed. The capture is automatically performed when the countdown is over.Brit01_EN_User guide.book Page 124 Friday, March 3, 2006 3:02 PM](https://usermanual.wiki/Motorola-Mobility/T6GF1.Exhibit-8a-Users-Manual/User-Guide-665288-Page-124.png)
![125CameraTo adjust the shutter sound level:This option allows you to adjust the shutter sound level.Note: You cannot deactivate or mute the shutter sound Option on your phone.To add a frame to your picture:This option allows you to add a frame before taking a picture:For more details on the frames please refer to the Frame section (page 162).To display/conceal information icons:This option allows you to activate or conceal the phone information status icons display on top of the screen1Press on the [Menu] key. Select Settings and Shutter sound.2Scroll up or down to adjust the shutter sound level.3Press OK to confirm your selection and then Save to store your settings.1Press on the [Menu] key. Select Frame.2Select a frame from the frames list.3Press OK to confirm your selection.1Press on the [Menu] key Select Settings and Info.2Select On (the icons are displayed) or Off (the icons are not displayed).3Press OK to confirm your selection and then Save to store your settings.Brit01_EN_User guide.book Page 125 Friday, March 3, 2006 3:02 PM](https://usermanual.wiki/Motorola-Mobility/T6GF1.Exhibit-8a-Users-Manual/User-Guide-665288-Page-125.png)
![126CameraHow to view your pictureYou can view the pictures that have just been taken or stored on your phone (see "Pictures", page 143) or on the Memory Card. To view the pictures that are stored in the Fun & Media box Pictures folder:To access the camera application from another applicationThe Camera application can be activated from the Options menu whilst using other applications on the phone. In this case, the available resolution types vary according to the application. The camera-accessible applications are the following:1From the idle screen, press the [Menu] key. Select Fun & Media box.2Select Pictures, then select the required picture.3Press OK.applications available resolutionPhone bookWall paper and Messaging.Settings (idle screen welcome or goodbye screen)Wall paper and Messaging.Mail, MMSAll (If you wish to send an image by Mail or MMS, the image may be automatically resized).Brit01_EN_User guide.book Page 126 Friday, March 3, 2006 3:02 PM](https://usermanual.wiki/Motorola-Mobility/T6GF1.Exhibit-8a-Users-Manual/User-Guide-665288-Page-126.png)
![127CameraTo access the camera application from the Phone book:To access the camera application from the Settings menu:To access the camera application from the Mail menu: Note: If a call is in progress, access to the camera is not possible.1Press the [Menu] key. Select Phone Book. 2Select Add name, then Phone names.3Once in the phone card, scroll down to Picture. Press OK.4From the picture browser, press on the [Menu] key and select Camera. Or press New ([Left] softkey).1Press the [Menu] key. Select Settings. Select Display.2Select Idle screen, Welcome screen or Goodbye screen. Scroll down to My Picture.3From the picture browser, press on the [Menu] key and select Camera. Or press New ([Left] softkey).1From the idle screen, select Mail ([Left] softkey) or select i-mode then Mail. 2Select Compose mail, scroll down to the Attachment field, press OK and select Pictures.2’Or select Compose MMS, select SMIL and then Add image.3From the picture browser, press on the [Menu] key and select Camera. Or press New ([Left] softkey).Brit01_EN_User guide.book Page 127 Friday, March 3, 2006 3:02 PM](https://usermanual.wiki/Motorola-Mobility/T6GF1.Exhibit-8a-Users-Manual/User-Guide-665288-Page-127.png)
![128VideoVideoThis application allows you to record and play videos up to 5 MB (about 10 minutes time) with your phone. These videos can bear sound. They can be recorded as several sequences (on a single file) via the Pause mode.You can send those videos to other devices (mobile phones, PC) by Mail, MMS, or by Bluetooth, you can even attach videos to your phone cards (see "Storing names and telephone numbers", page 94). Two video size types are available: Normal (QCIF format: 176x144 pixels) and Small (sub-QCIF: 128x96 pixels). The file extension type supported by the video application is .3gp.To access the video applicationYou can access the video recorder application in the following way:The use of the video recorder and the sending, forwarding and reproducing of the videos are subject to property and privacy rights. Do not make videos unless authorized.1From the idle screen, press the [Menu] key. Select Camera & Video.2Select Film a video.Brit01_EN_User guide.book Page 128 Friday, March 3, 2006 3:02 PM](https://usermanual.wiki/Motorola-Mobility/T6GF1.Exhibit-8a-Users-Manual/User-Guide-665288-Page-128.png)
![129VideoTo select a storage spaceYou can choose, before launching a video recording, the space the video should be stored on (useful if the current storage space is full and prevents you from running the Video application). If you do not choose a storage space, the video is stored on the phone memory by default:Video related icons and shortcutsHere is the way information related to the Video application and its state while in use displayed. The screen shot below is a preview example; the Video related icons described in the table below are the ones which can be displayed while using the Video features. The features described in this table are further explained in the chapter.1From the idle screen, press the [Menu] key. Select Camera & Video.2Select Storage.3Select Video storage, then choose Phone memory or Memory card.All the videos are then automatically stored on the selected storage space.Brit01_EN_User guide.book Page 129 Friday, March 3, 2006 3:02 PM](https://usermanual.wiki/Motorola-Mobility/T6GF1.Exhibit-8a-Users-Manual/User-Guide-665288-Page-129.png)
![130VideoAvailable shortcutsEach of the video-related keys has several functions. While using the video feature, please use the keypad as follows:Note: The settings described above are to be accessed via the Preview mode only.keys description[Up] side key (used for self-filming)To stop the Recording.[Down] side key To launch the Recording in Preview or Pause mode.To launch the Pause mode in Recording.[OK] key To launch the Recording in Preview or Pause mode.To launch the Pause mode in Recording.[Up arrow] key To access the Zoom panel and to scroll to the next one.[Down arrow] key To access the Quality panel and to scroll to the next one.[Left arrow] key To access the Brightness panel.[Right arrow] key To access the Video size limit.[Right] softkey To stop the Recording.Brit01_EN_User guide.book Page 130 Friday, March 3, 2006 3:02 PM](https://usermanual.wiki/Motorola-Mobility/T6GF1.Exhibit-8a-Users-Manual/User-Guide-665288-Page-130.png)