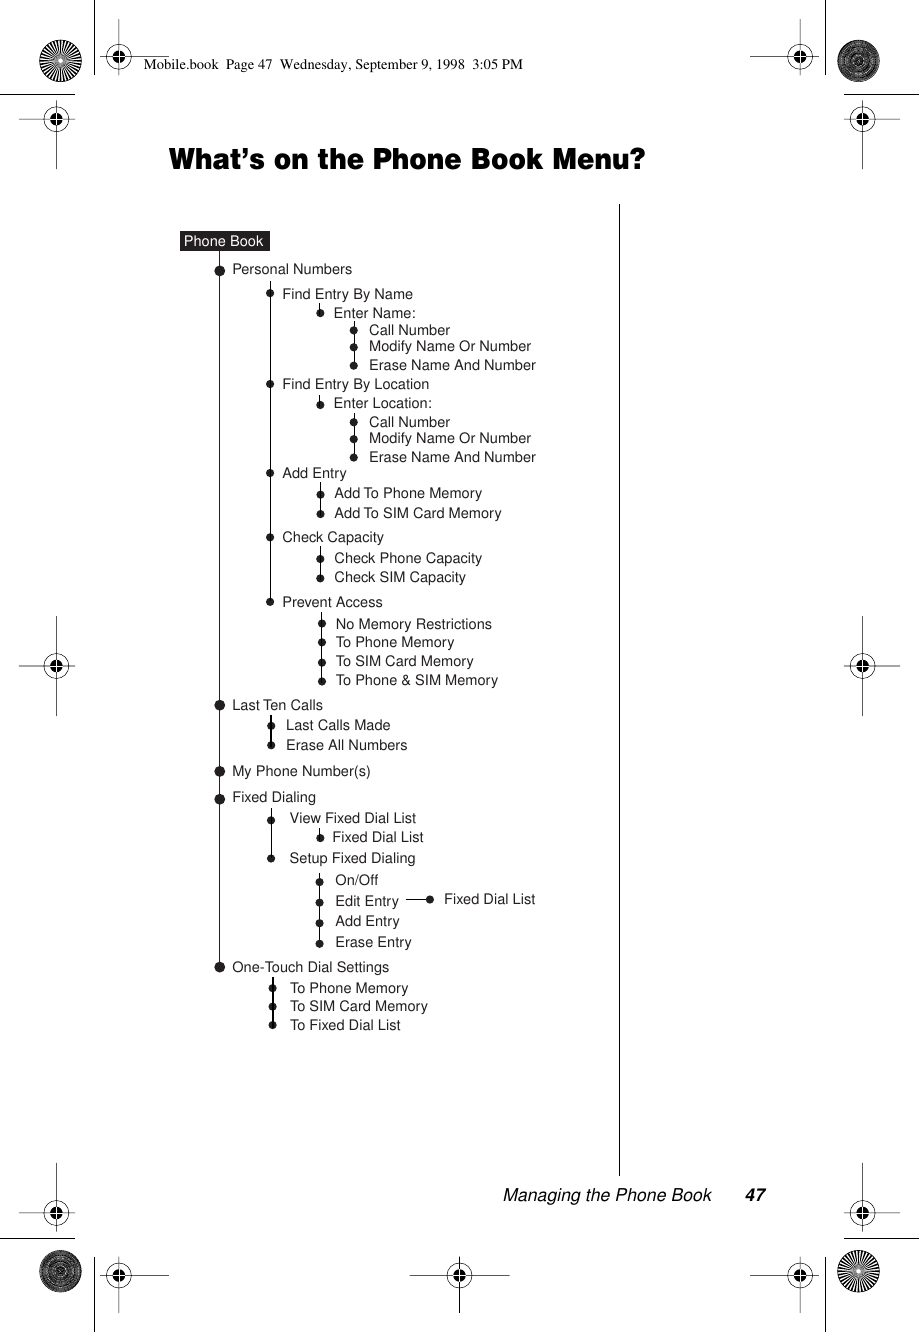
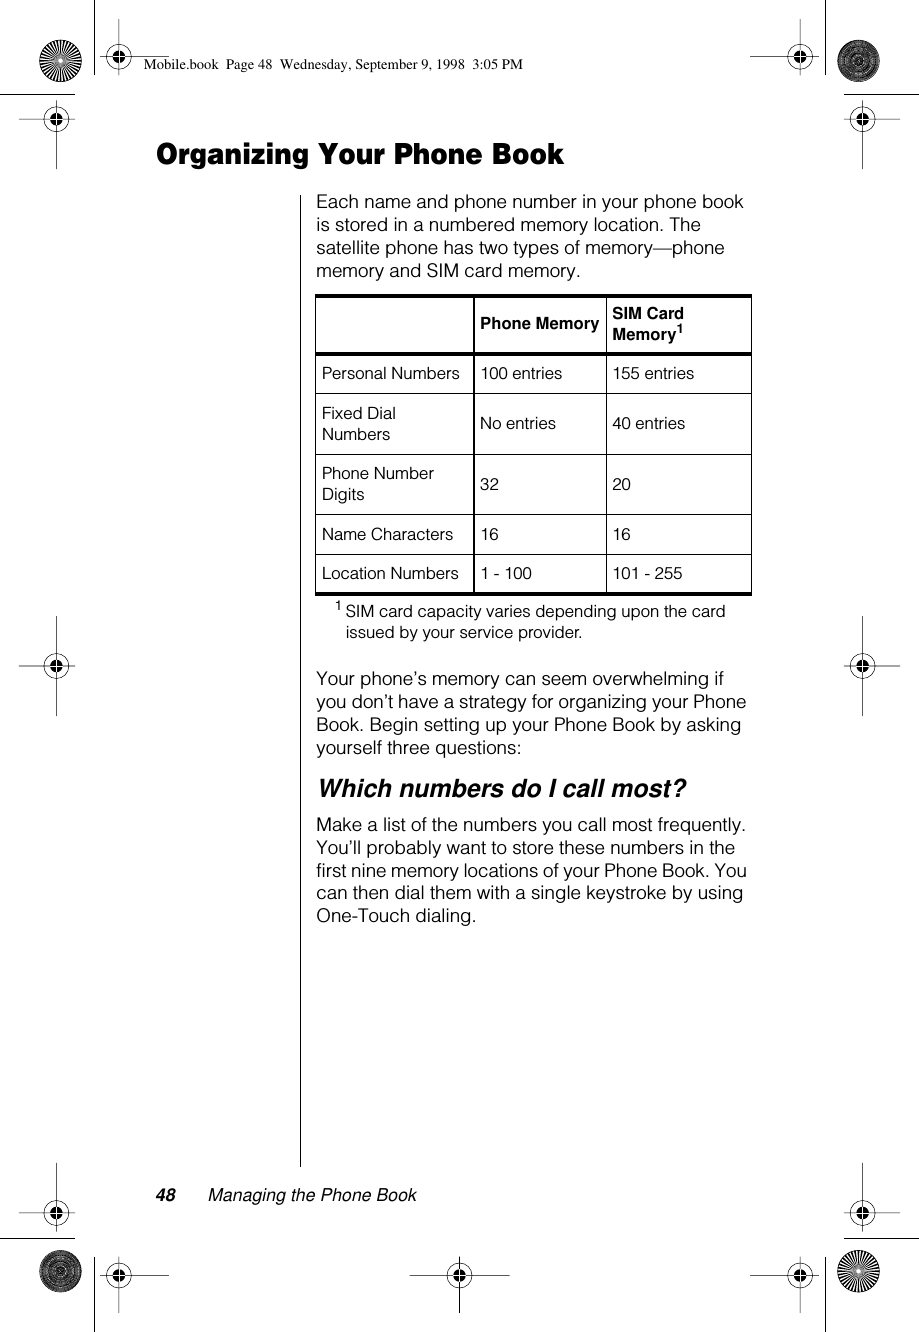
Motorola Mobility T6NE1 Mobile Satellite Transceiver User Manual Mobile

Motorola Mobility LLC Mobile Satellite Transceiver Mobile

Motorola Exhibit 7 Users Manual
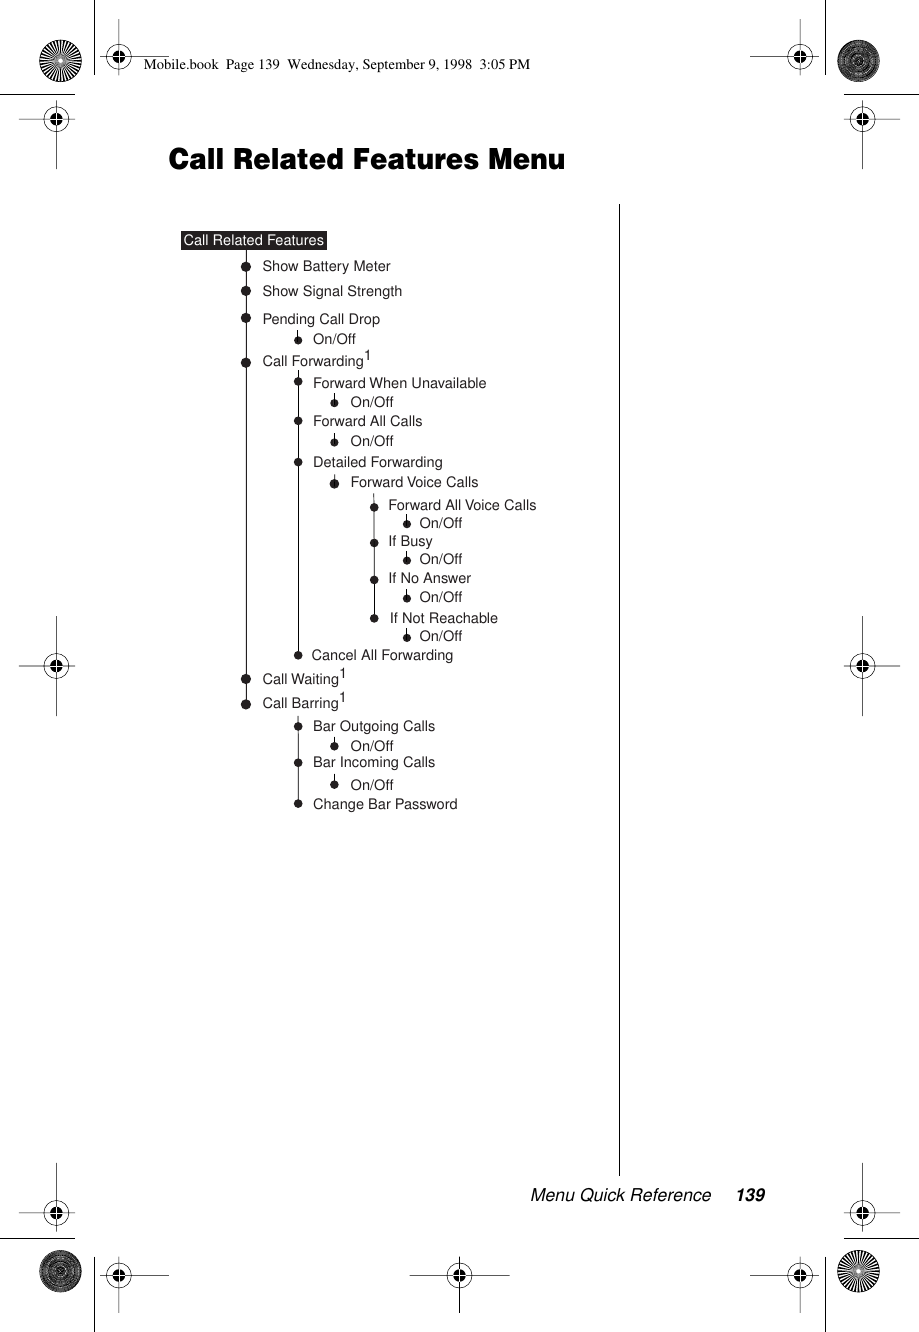
 Welcome The future of global telecommunications is here—a satellite telephone, providing you with communication all over the world.The company that brought you the world’s first commercially available cellular phone has done it again! Motorola proudly introduces its Satellite Series™ 9520 Mobile Phone for the Iridium ®  system.All Motorola wireless phones are designed and manufactured to meet Motorola’s exacting specifications and world-class quality standards. During development, our laboratory testing team took the durable phone through rigorous durability tests including temperature, humidity, shock, dust, vibration, and drop tests—and it still worked! We’re confident that the phone you purchased meets your own exacting standards.Thank you for choosing Motorola, a global leader in communications technology.Enjoy your new Satellite Series™ 9520 Mobile Phone! Mobile.book  Page 1  Wednesday, September 9, 1998  3:05 PM
Personal Communications Sector600 North U.S. Highway 45Libertyville, Illinois 60048In the US & Canada: 1-888-839-4647Outside the US & Canada (Toll-Free Global Number): +1-8000-839-4647Direct Dial: +1-847-523-1898TTY Toll-Free Number: 1-888-390-6456TTY (outside the United States): +1-847-523-1841Monday through Friday7AM to 7PM (CST)+ designates international dialing access code,  , VibraCall, and Satellite Series are registered trademarks of Motorola, Inc.Iridium, the Iridium logo, and Iridium World Service areregistered trademarks and/or service marks of Iridium LLC.©1998 Motorola, Inc.Printed in U.S.A. Mobile.book  Page 2  Wednesday, September 9, 1998  3:05 PM
 iii Contents Welcome . . . . . . . . . . . . . . . . . . . . . . . . . . . . . . . . . . . . . . . . . . . . . . .1 Safety Information . . . . . . . . . . . . . . . . . . . . . . . . . . . . . . . . . . . . . . .7 Overview . . . . . . . . . . . . . . . . . . . . . . . . . . . . . . . . . . . . . . . . . . . . . .11Guide Overview   . . . . . . . . . . . . . . . . . . . . . . . . . . . . . . . . . . . . . .12Phone Overview  . . . . . . . . . . . . . . . . . . . . . . . . . . . . . . . . . . . . . .14Original Satellite Series Accessories  . . . . . . . . . . . . . . . . . . . . . .17 Using Your Phone  . . . . . . . . . . . . . . . . . . . . . . . . . . . . . . . . . . . . . .19Installing the SIM Card  . . . . . . . . . . . . . . . . . . . . . . . . . . . . . . . . .20Powering Up the Phone  . . . . . . . . . . . . . . . . . . . . . . . . . . . . . . . .21Placing Calls . . . . . . . . . . . . . . . . . . . . . . . . . . . . . . . . . . . . . . . . .23Ending a Call   . . . . . . . . . . . . . . . . . . . . . . . . . . . . . . . . . . . . . . . .26What’s My SIM Card Phone Number? . . . . . . . . . . . . . . . . . . . . . .27Receiving Calls . . . . . . . . . . . . . . . . . . . . . . . . . . . . . . . . . . . . . . .28Adjusting Earpiece Volume . . . . . . . . . . . . . . . . . . . . . . . . . . . . . .30Adjusting Ringer Volume   . . . . . . . . . . . . . . . . . . . . . . . . . . . . . . .31 Using In-Call Features . . . . . . . . . . . . . . . . . . . . . . . . . . . . . . . . . . .33Muting a Call . . . . . . . . . . . . . . . . . . . . . . . . . . . . . . . . . . . . . . . . .34Using Call Waiting . . . . . . . . . . . . . . . . . . . . . . . . . . . . . . . . . . . . .35Placing a Call on Hold   . . . . . . . . . . . . . . . . . . . . . . . . . . . . . . . . .36 Using the Menus  . . . . . . . . . . . . . . . . . . . . . . . . . . . . . . . . . . . . . . .39Using the Options Menus  . . . . . . . . . . . . . . . . . . . . . . . . . . . . . . .40Using the Quick Access Menu  . . . . . . . . . . . . . . . . . . . . . . . . . . .42Using The In-Call Menu   . . . . . . . . . . . . . . . . . . . . . . . . . . . . . . . .44 Managing the Phone Book . . . . . . . . . . . . . . . . . . . . . . . . . . . . . . .45Entering the Phone Book Menu   . . . . . . . . . . . . . . . . . . . . . . . . . .46What’s on the Phone Book Menu?   . . . . . . . . . . . . . . . . . . . . . . . .47Organizing Your Phone Book  . . . . . . . . . . . . . . . . . . . . . . . . . . . .48Storing Names and Numbers  . . . . . . . . . . . . . . . . . . . . . . . . . . . .50Entering Names   . . . . . . . . . . . . . . . . . . . . . . . . . . . . . . . . . . . . . .52Using Pauses in Numbers   . . . . . . . . . . . . . . . . . . . . . . . . . . . . . .54Using Phone Number Prefixes  . . . . . . . . . . . . . . . . . . . . . . . . . . .55Recalling Entries . . . . . . . . . . . . . . . . . . . . . . . . . . . . . . . . . . . . . .56Calling, Modifying, or Erasing an Entry   . . . . . . . . . . . . . . . . . . . .58Checking Phone Book Capacity . . . . . . . . . . . . . . . . . . . . . . . . . .59Preventing Access to the Phone Book  . . . . . . . . . . . . . . . . . . . . .60Restricting Phone Use   . . . . . . . . . . . . . . . . . . . . . . . . . . . . . . . . .61 Mobile.book  Page iii  Wednesday, September 9, 1998  3:05 PM
 iv Viewing the Last Ten Numbers Dialed   . . . . . . . . . . . . . . . . . . . . .66Viewing and Modifying Phone Numbers . . . . . . . . . . . . . . . . . . . .67One-Touch Dialing   . . . . . . . . . . . . . . . . . . . . . . . . . . . . . . . . . . . .68 Using Calling Features  . . . . . . . . . . . . . . . . . . . . . . . . . . . . . . . . . .69Entering the Call Related Features Menu  . . . . . . . . . . . . . . . . . . .70What’s on the Call Related Features Menu?  . . . . . . . . . . . . . . . . .71Forward Calls When Unavailable  . . . . . . . . . . . . . . . . . . . . . . . . .72Forward All Your Calls  . . . . . . . . . . . . . . . . . . . . . . . . . . . . . . . . . .73Detailed Call Forwarding   . . . . . . . . . . . . . . . . . . . . . . . . . . . . . . .74Cancel All Forwarding . . . . . . . . . . . . . . . . . . . . . . . . . . . . . . . . . .75Showing Signal Strength . . . . . . . . . . . . . . . . . . . . . . . . . . . . . . . .76Deactivating Pending Call Drop Signal   . . . . . . . . . . . . . . . . . . . .77Activating Call Waiting   . . . . . . . . . . . . . . . . . . . . . . . . . . . . . . . . .78Restricting Calls with Call Barring . . . . . . . . . . . . . . . . . . . . . . . . .79 Using Message Services . . . . . . . . . . . . . . . . . . . . . . . . . . . . . . . . .83Entering the Messages Menu  . . . . . . . . . . . . . . . . . . . . . . . . . . . .84What’s on the Messages Menu?  . . . . . . . . . . . . . . . . . . . . . . . . . .85Checking Your Voicemail   . . . . . . . . . . . . . . . . . . . . . . . . . . . . . . .86Storing Your Voicemail Number   . . . . . . . . . . . . . . . . . . . . . . . . . .87Managing Your Messages   . . . . . . . . . . . . . . . . . . . . . . . . . . . . . .88Accessing Messages  . . . . . . . . . . . . . . . . . . . . . . . . . . . . . . . . . .90 Customizing Phone Features . . . . . . . . . . . . . . . . . . . . . . . . . . . . .93Entering the Phone Setup Menu  . . . . . . . . . . . . . . . . . . . . . . . . . .94What’s on the Phone Setup Menu?  . . . . . . . . . . . . . . . . . . . . . . . .95Setting the Phone to Ring or Vibrate . . . . . . . . . . . . . . . . . . . . . . .97Setting the Ringer Tone   . . . . . . . . . . . . . . . . . . . . . . . . . . . . . . . .98Setting the Keypad Tones    . . . . . . . . . . . . . . . . . . . . . . . . . . . . . .99Locking and Unlocking Your Phone  . . . . . . . . . . . . . . . . . . . . . .100Protecting the SIM Card  . . . . . . . . . . . . . . . . . . . . . . . . . . . . . . .102Managing Other Security Settings  . . . . . . . . . . . . . . . . . . . . . . .104Activating Extended Menus  . . . . . . . . . . . . . . . . . . . . . . . . . . . .106Selecting the Display Language . . . . . . . . . . . . . . . . . . . . . . . . .107Managing Your Phone’s Settings   . . . . . . . . . . . . . . . . . . . . . . . .108 Accessing the Network . . . . . . . . . . . . . . . . . . . . . . . . . . . . . . . . .111Entering the Network Menu . . . . . . . . . . . . . . . . . . . . . . . . . . . . .112What’s on the Network Menu? . . . . . . . . . . . . . . . . . . . . . . . . . . .113Registering With the Satellite Network  . . . . . . . . . . . . . . . . . . . .114 Timing Your Calls . . . . . . . . . . . . . . . . . . . . . . . . . . . . . . . . . . . . . .115Entering the Call Meters Menu  . . . . . . . . . . . . . . . . . . . . . . . . . .116What’s on the Call Meters Menu?  . . . . . . . . . . . . . . . . . . . . . . . .117 Mobile.book  Page iv  Wednesday, September 9, 1998  3:05 PM
 v Showing Call Timers  . . . . . . . . . . . . . . . . . . . . . . . . . . . . . . . . . .118Setting Audible Call Timers   . . . . . . . . . . . . . . . . . . . . . . . . . . . .120Showing the In-Call Timer . . . . . . . . . . . . . . . . . . . . . . . . . . . . . .122Show the Lifetime Timer  . . . . . . . . . . . . . . . . . . . . . . . . . . . . . . .123 Setting Up Your Accessories  . . . . . . . . . . . . . . . . . . . . . . . . . . . .125Entering the Accessory Setup Menu   . . . . . . . . . . . . . . . . . . . . .126What’s on the Accessory Setup Menu?   . . . . . . . . . . . . . . . . . . .127Mute Car Radio . . . . . . . . . . . . . . . . . . . . . . . . . . . . . . . . . . . . . .128Automatic Answer . . . . . . . . . . . . . . . . . . . . . . . . . . . . . . . . . . . .129Safety Timer   . . . . . . . . . . . . . . . . . . . . . . . . . . . . . . . . . . . . . . . .130Auxiliary Alert   . . . . . . . . . . . . . . . . . . . . . . . . . . . . . . . . . . . . . . .131 Customizing the Menu System . . . . . . . . . . . . . . . . . . . . . . . . . . .133Personalizing the Options Menu . . . . . . . . . . . . . . . . . . . . . . . . .134Personalizing the Quick Access Menu  . . . . . . . . . . . . . . . . . . . .136 Menu Quick Reference  . . . . . . . . . . . . . . . . . . . . . . . . . . . . . . . . .137Phone Book Menu . . . . . . . . . . . . . . . . . . . . . . . . . . . . . . . . . . . .138Call Related Features Menu  . . . . . . . . . . . . . . . . . . . . . . . . . . . .139Messages Menu  . . . . . . . . . . . . . . . . . . . . . . . . . . . . . . . . . . . . .140Phone Setup Menu  . . . . . . . . . . . . . . . . . . . . . . . . . . . . . . . . . . .141Network Selection Menu  . . . . . . . . . . . . . . . . . . . . . . . . . . . . . . .142Call Meters Menu  . . . . . . . . . . . . . . . . . . . . . . . . . . . . . . . . . . . .144 Troubleshooting  . . . . . . . . . . . . . . . . . . . . . . . . . . . . . . . . . . . . .  145 Glossary . . . . . . . . . . . . . . . . . . . . . . . . . . . . . . . . . . . . . . . . . . . .  147 Index . . . . . . . . . . . . . . . . . . . . . . . . . . . . . . . . . . . . . . . . . . . . . . .  151 Patent Information . . . . . . . . . . . . . . . . . . . . . . . . . . . . . . . . . . . .  157 Mobile.book  Page v  Wednesday, September 9, 1998  3:05 PM
 vi Mobile.book  Page vi  Wednesday, September 9, 1998  3:05 PM
 Safety Information 7 Safety Information Exposure to Radio Frequency Signals Your wireless handheld portable telephone is a low power radio transmitter and receiver. When it is ON, it receives and also sends out radio frequency (RF) signals. International agencies have set standards and recommendations for the protection of public exposure to RF electromagnetic energy. • International Commission on Non-Ionizing Radiation Protection (ICNIRP) 1996 • Verband Deutscher Elektrotechniker (VDE) DIN-0848 • United States Federal Commission, Radio Frequency Exposure Guidelines (1996) • National Radiological Protection Board of the United Kingdom, GS 11, 1988 • American National Standards Institute (ANSI) IEEE. C95.1-1992 • National Council on Radiation Protection and Measurements (NCRP). Report 86 • Department of Health and Welfare Canada. Safety Code 6These standards are based on extensive scientific review. For example, over 120 scientists, engineers, and physicians from universities, government health agencies, and industry reviewed the available body of research to develop the updated ANSI Standard.The design of your phone complies with these standards when used normally. Antenna Care Use only the supplied or an approved replacement antenna. Unauthorized antennas, modifications, or attachments could damage the phone and may violate local agency regulations. Mobile.book  Page 7  Wednesday, September 9, 1998  3:05 PM
 8 Safety Information Phone Operation NORMAL POSITION: Hold the phone as you would any other telephone. Make sure the antenna is extended fully and rotated to either the left or right detente. The antenna should be vertical to the ground and have a clear view of the sky.TIPS ON EFFICIENT OPERATION: For your phone to operate most efficiently: • Extend and rotate your antenna fully. • Make sure the antenna has a clear view of the sky. • Do not touch the antenna unnecessarily when the phone is in use. Contact with the antenna affects call quality and may cause the phone to operate at a higher power level than otherwise needed. Batteries Caution:  All batteries can cause property damage, injury or burns if a conductive material, such as jewelry, keys or beaded chains, touches exposed terminals. The material may complete an electrical circuit and become quite hot. To protect against such unwanted current drain, exercise care in handling any charged battery, particularly when placing it inside your pocket, purse or other container with metal objects. When the battery is detached from the phone, your batteries are packed with a protective battery cover; please use this cover for storing your batteries when not in use. Driving Check the laws and regulations on the use of wireless telephones in the areas where you drive. Always obey them. Also, if using your phone while driving, please: • Give full attention to driving -- driving safely is your first responsibility; • Use hands-free operation, if available; • Pull off the road and park before making or answering a call if driving conditions so require. Electronic Devices Most modern electronic equipment is shielded from RF signals. However, certain electronic equipment may not be shielded against the RF signals from your wireless phone. Mobile.book  Page 8  Wednesday, September 9, 1998  3:05 PM
 Safety Information 9 Pacemakers The Health Industry Manufacturers Association recommends that a minimum separation of six (6) inches be maintained between a handheld wireless phone and a pacemaker to avoid potential interference with the pacemaker. These recommendations are consistent with the independent research by and recommendations of Wireless Technology Research.Persons with pacemakers: • Should ALWAYS keep the phone more than six inches from their pacemaker when the phone is turned ON; • Should not carry the phone in a breast pocket; • Should use the ear opposite the pacemaker to minimize the potential for interference; • If you have any reason to suspect interference is taking place, turn your phone OFF immediately. Hearing Aids Some digital wireless phones may interfere with some hearing aids. In the event of such interference, you may want to consult your hearing aid manufacturer to discuss alternatives. Other Medical Devices  If you use any other personal medical device, consult the manufacturer of your device to determine if they are adequately shielded from external RF energy. Your physician may be able to assist you in obtaining this information.Turn your phone OFF in health care facilities when any regulations posted in these areas instruct you to do so. Hospitals or health care facilities may be using equipment that could be sensitive to external RF energy. Vehicles RF signals may affect improperly installed or inadequately shielded electronic systems in motor vehicles. Check with the manufacturer or its representative regarding your vehicle. You should also consult the manufacturer of any equipment that has been added to your vehicle. Posted Facilities Turn your phone OFF in any facility where posted notices so require. Mobile.book  Page 9  Wednesday, September 9, 1998  3:05 PM
 10 Safety Information Aircraft Airline regulations prohibit using your phone while in the air.Switch OFF your phone before boarding an aircraft.  Blasting Areas To avoid interfering with blasting operations, turn your phone OFF when in a blasting area or in areas posted:  • Turn off two-way radios. • Obey all signs and instructions. Potentially Explosive Atmospheres Turn your phone OFF and do not remove your battery when you are in any area with a potentially explosive atmosphere. Obey all signs and instructions. Sparks from your battery in such areas could cause an explosion or fire resulting in bodily injury or even death.Areas with a potentially explosive atmosphere are often but not always clearly marked. They include, but are not limited to: fueling areas such as gasoline stations; below deck on boats; fuel or chemical transfer or storage facilities; areas where fuel odors are present (for example, if a gas/propane leak occurs in a car or home); areas where the air contains chemicals or particles, such as grain, dust, or metal powders; and any other area where you normally would be advised to turn off your vehicle engine. For Vehicles Equipped with an Air Bag An air bag inflates with great force. DO NOT place objects, including both installed or portable wireless equipment, in the area over the air bag or in the air bag deployment area. If in-vehicle wireless equipment is improperly installed and the air bag inflates, serious injury could result. Mobile.book  Page 10  Wednesday, September 9, 1998  3:05 PM
 Overview 11 Overview This chapter provides an overview of your new satellite phone. What You’ll Learn • overview of the user’s guide • overview of the satellite phone • overview of the original Satellite Series™ accessories Mobile.book  Page 11  Wednesday, September 9, 1998  3:05 PM
 12 Overview Guide Overview As you explore your 9520 Mobile Phone, use this guide to see what key to press and what happens when you press it. Here is what you’ll learn in each chapter: Chapter Description Using Your PhoneHow do you make your first phone call? We’ll answer this and more in this section. Go to “Using Your Phone” on page 19 for more information. Using the MenusTurn to page 39 to learn about how to use the menu system. This chapter teaches you how to navigate the menu system.Managing the Phone BookTurn to page 45 to learn how to make the most of your phone’s built-in Phone Book.Using Calling FeaturesIf you subscribe to Call Barring or Call Forwarding, turn to page 69 to learn how to use these network features and more.Using Messaging ServicesDid you know that you can be notified of voicemail or receive numeric and text messages through your Personal Mailbox? Turn to page 83.Customizing Phone FeaturesLearn how to customize your phone’s features in this chapter. Go to page 93. Mobile.book  Page 12  Wednesday, September 9, 1998  3:05 PM
 Overview 13 Understanding the Guide Key Presses Key presses are represented in this guide using symbols so that you may locate and use the required sequence quickly. A sequence of key presses may be shown as follows: M ø ç This means you should press  M  followed by  ø  and then  ç , in sequence, not simultaneously. Prompts and Messages Your phone responds to key presses by displaying either a prompt that guides you to the next action or a message confirming that your action is complete. Prompts and messages are represented in this guide in LCD style, for example:  Enter PIN  or  Completed . Tips In the margins of your guide are useful hints and ways to improve your phone’s performance. Accessing the NetworkTurn to page 111 to learn   how to register with the satellite network.Setting Up Your AccessoriesTurn to page 125 to learn how to set up features that make driving a little easier.Timing Your CallsView the time of your last call or set your phone to remind you after you’ve been talking for a certain amount of time. Go to page 115.Customizing MenusOnce you are familiar with the features in your menus, you can then begin to customize your menus to more closely fit your needs. See page 133. Chapter Description Mobile.book  Page 13  Wednesday, September 9, 1998  3:05 PM
 14 Overview Phone Overview Volume Keys The Volume keys are on the side of the phone. They adjust earpiece and ringer volume. For information on adjusting your volume, see page 30. SIM Card Port The SIM card is inserted in the slot in your hang-up cup.89 8816911200000316 8C160S – MF<<      IRIDIUM / GSM1900 Test SIMr x           o    l n     mkDisplaySpecial KeysSpecial KeysSignal StrengthIndicatorDisplayIndicatorsAlphanumericKeypadSIM Card PortHang-up Cup Mobile.book  Page 14  Wednesday, September 9, 1998  3:05 PM
 Overview 15 Special KeysThe Display Your phone’s Liquid Crystal Display (LCD) displays as many as four rows of 16 characters. When your phone has been idle a few seconds, the display’s backlight is turned off.The LCD on your phone may respond slowly to key presses in extremely cold temperatures. This is normal and does not affect the phone operation in any way. Key Function S turns the phone’s power on and off ? displays messages ø selects menu settings or options, or initiates and answers calls I stores numbers in the phone book Q recalls numbers from the phone book E enters the Quick Access Menu M enters the Options Menu and scrolls forward through menu features ç clears characters from the screen or exits the Options Menu µ mutes the handset when you are in a call ß  or  π scrolls through the menu features12:00ABC123Mobile.book  Page 15  Wednesday, September 9, 1998  3:05 PM
16 OverviewDisplay IndicatorsIndicator DescriptionrxSignal Strength Indicator indicates the strength of the signal from the network. The more segments displayed in the bar graph, the stronger the signal. You can also check the strength of the signal at any time through the menu. See page 76.oMessage Indicator appears when you receive a new message. It flashes when the SIM card is full. See “Accessing Messages” on page 90.nHome System Indicator appears when the phone has successfully registered with the Iridium satellite system.mNo Service Indicator appears when your phone is not capable of placing or receiving calls.kIn Use Indicator appears when a call is in progress.sScroll Bar appears on the right of the display when you are in a menu. The button on the scroll bar indicates where you are in the list.zCheck Mark indicates a menu item is currently selected.B...K Quick Access Menu Icons allow you to easily identify Quick Access features as you scroll through the Quick Access Menu.Mobile.book  Page 16  Wednesday, September 9, 1998  3:05 PM
Overview 17Original Satellite Series AccessoriesProduct appearance and specifications are subject to change without notice.Mobile Magnetic or Mobile Permanent Mount AntennaA versatile, larger antenna that delivers improved reception over the Portable Auxiliary Antenna and offers dual mounting options for more permanent installations.•Use either magnetic mount or permanent mount option•Attaches to Motorola Satellite Series 9520 Mobile Phone, 9500 Portable Phone, or 9570 Portable Dock for in-vehicle communication•Attached 5-meter cableFixed Mast AntennaAttaches to Motorola Satellite Series 9520 Mobile Phone, or 9570 Portable Dock to deliver exceptional reception performance for permanent in-building or marine applications.•Marine rated with mast mount capability•Attached 10-meter cableMobile.book  Page 17  Wednesday, September 9, 1998  3:05 PM
18 OverviewMobile.book  Page 18  Wednesday, September 9, 1998  3:05 PM
Using Your Phone 19Using Your PhoneRead this section to learn how to get up and running with your new satellite phone.What You’ll Learn•inserting your SIM card•turning the phone’s power on and off•placing and receiving calls•determining your own phone numberMobile.book  Page 19  Wednesday, September 9, 1998  3:05 PM
20 Using Your PhoneInstalling the SIM CardYour SIM card (Subscriber Identity Module) contains your phone’s number, service details, and memory for storing Phone Book entries and messages. This means you can use your SIM card with any phone for the GSM system or any Motorola product for the Iridium satellite system, and all calls go on your account. Caution: Avoid bending, scratching, or exposing your card to static electricity or water.Make sure your phone is powered off before inserting or removing the SIM card. If you don’t, you may damage the memory on your SIM card. Insert the SIM CardTip: Make sure the side with the gold plate is facing up.1.Turn your phone off by pressing and holding the S key.2.Insert the SIM card into the slot in the hang-up cup. Remove the SIM Card1.Turn your phone off by pressing and holding the S key.2.Pull the SIM card out of the slot in the hang-up cup.IRIDIUMMobile.book  Page 20  Wednesday, September 9, 1998  3:05 PM
Using Your Phone 21Powering Up the PhoneTurn the Power On and OffTo turn your phone’s power on: 1.Insert your SIM card. (See “Installing the SIM Card” on page 20.)2.Press and hold S to turn the phone on and off. When you turn your phone’s power on, it performs a self test to let you know it’s operational. You may see a number of other power-on messages (see below).When the m indicator disappears and the   n appears, you are ready to start calling.Power-On MessagesOnce your phone is powered on, you may see:Message DescriptionSearching...The phone is attempting to establish communications with the satellite network. See “Accessing the Network” on page 111 for more information.RegisteringYour phone is registering with the network. When the process is complete, you will see Registered. See “Accessing the Network” on page 111 for more information.Enter Phone Unlock CodeYour phone was locked after the last use. Enter your four-digit unlock code and press ø to proceed. See “Locking and Unlocking Your Phone” on page 100 for more information. Enter PINEnter the four- to eight-digit SIM card PIN provided by your service provider and press ø to proceed. See “Protecting the SIM Card” on page 102 for more information.Mobile.book  Page 21  Wednesday, September 9, 1998  3:05 PM
22 Using Your PhoneStandbyTo conserve energy, your phone may turn off its backlight when you haven’t pressed a key for a several seconds. The light reappears the next time you press a key.Message DescriptionInsert Card Power off your phone; make sure your SIM card is inserted completely; and then power your phone on again.Check CardThis message indicates that the SIM card is damaged or inserted the wrong way. BlockedIf the SIM card PIN code or PIN2 code is incorrectly entered three times in a row, your phone becomes blocked. See page 103 for information on unblocking it.Bad Card See SupplierYour SIM card has been damaged or incorrectly issued. Contact your service provider for information.Mobile.book  Page 22  Wednesday, September 9, 1998  3:05 PM
Using Your Phone 23Placing CallsTo place a call, your phone must be powered on, have a SIM card inserted, be unlocked, and be in contact with the satellite network. See “Accessing the Network” on page 111 for network information. Dial a Number1.Enter the number using the digit keys. As soon as you begin entering digits, you will see Call?.You must enter the phone number in international format: [international access code or +] [country code] [phone number]If you make a mistake, press ç once to delete the last digit, or press and hold ç to clear all digits.2.Press ø. You will see Calling +18475551212.You will see either the flashing message Calling or the flashing messages Calling, Registering, and the phone will play a series of setup tones.if the call connects and is answered, Connected will appear on the display for a few seconds, followed by End Call?. If the call does not connect, you may see one of the following messages:Message DescriptionCall FailedSystem BusyRestricted Area Weak SignalThe phone is unable to access the network. Try again in a few minutes.Redial? See “Automatic Redial” page 24.Mobile.book  Page 23  Wednesday, September 9, 1998  3:05 PM
24 Using Your PhoneInternational DialingTo make an international phone call:1.Press and hold º.After a few seconds the international dialing prefix + appears in the display. This allows you to call from any country without knowing the local international access code.2.Enter the country code followed by the phone number. The country code follows the conventional format.Automatic RedialIf the number or your network is busy, you will see Redial? for five seconds.Press ø to redial the number automatically.Keep in Mind: The maximum number of redial attempts is set by your service provider. If the call cannot be connected within this maximum, you will see the message Redial Failed.Redial Last Number CalledWhenever your phone is on standby, you can redial the last number called:1.Press ø to display the last number dialed.2.Press ø again to place the call.Dial Special CharactersYou can insert special characters in your numbers:To enter... Then...0Press º*Press ß.+ (for international calls) Press and hold º.Ü (for pause dialing) Press and hold ß.supplementary service numbers, PINs, and unblocking Press π ß.Mobile.book  Page 24  Wednesday, September 9, 1998  3:05 PM
Using Your Phone 25Dial a Number With PausesRefer to “Using Pauses in Numbers” on page 54 for information on dialing numbers with pauses.Dial a Number from the Phone BookYour phone contains a phone book that you can use to store names and telephone numbers. Once you have stored information in your phone book, you can save dialing steps by using:•one-touch dialing•an entry from a location•an entry of a name•one of the last ten numbers calledRefer to “Managing the Phone Book” on page 45.Make an Emergency CallYou can make an emergency call virtually anywhere in the world (without unlocking your phone) by dialing 112. Provided your phone has found a network, you are able to make an emergency call. The emergency call is directed to a central emergency operator.To make an emergency call: Dial ¡ ¡ ™. You will see Emergency CallingIn addition, your Iridium service provider may have provided an additional emergency calling code on your SIM card. Check with your service provider.Call a Number in a MessageDetails on how to call a number embedded in a message are in “Using Message Services” on page 83.Mobile.book  Page 25  Wednesday, September 9, 1998  3:05 PM
26 Using Your PhoneEnding a CallTo end a call, perform one of the following tasks:•Press ø.•Replace the handset in the hang-up cup.•Press ç.Mobile.book  Page 26  Wednesday, September 9, 1998  3:05 PM
Using Your Phone 27What’s My SIM Card Phone Number?You can retrieve and display your phone’s number from your SIM card.Tip: Pressing Q π also brings up your phone’s number.1.Press M until you see Phone Book, and then press ø to select.2.Press M until you see My Phone Number(s), and then press ø to select. You will see your phone number.3.Press and hold ç to exit the menu.Keep in Mind: If you do not see your number(s), they have not be programmed onto your SIM card. Contact your service provider for more information.Mobile.book  Page 27  Wednesday, September 9, 1998  3:05 PM
28 Using Your PhoneReceiving CallsReceive a Phone CallTo receive a call, your phone must be powered on, have a SIM card inserted, be unlocked, and be in contact with the satellite network. See “Accessing the Network” on page 111 for network information.When you receive a call:Tip: See page 97 to set your phone’s alert.•Your phone rings and/or vibrates.•The phone displays Call, followed by Answer? on the next line.To answer the call:Remove the handset from the hang-up cup by pressing in the release buttons on the side of the hang-up cup.orPress O or any digit key (¡-ª, ß or π)You will see Connected.If the call does not connect properly, you may see Call Failed. This message indicates that the antenna is not properly adjusted or the network signal is not strong enough.89 8816911200000316 8C160S – MF<<      IRIDIUM / GSM1900 Test SIMRelease ButtonsMobile.book  Page 28  Wednesday, September 9, 1998  3:05 PM
Using Your Phone 29Unanswered CallsIf you are away from your phone or choose not to answer a call, your phone displays the message Unanswered Call.Personal MailboxCallers who are unable to reach you can leave numeric, text, and voice messages. The next time you register with the satellite network, you will receive these messages. Then you will have the option of returning the call or saving the message for later viewing.For information on retrieving messages, see “Accessing Messages” on page 90.Mobile.book  Page 29  Wednesday, September 9, 1998  3:05 PM
30 Using Your PhoneAdjusting Earpiece VolumeTo adjust earpiece volume:Tip: The volume keys are located on the side of the phone.•Increase the volume by pressing the upper volume key.•Decrease the volume by pressing the lower volume key.As you press the keys, the phone’s speaker demonstrates the new volume level. The bar graph in the display represents the volume level. The higher the graph, the louder the volume.12:00VolumeQuit?-+Mobile.book  Page 30  Wednesday, September 9, 1998  3:05 PM
Using Your Phone 31Adjusting Ringer Volume Use this feature to adjust the volume of the ringer. The phone sounds the new volume level as you adjust it. To adjust the ringer volume in satellite mode:1.Press M until you see Phone Setup, and then press ø.2.Press M until you see Adjust Ring Volume, and then press ø to select.Tip: You can also press E and then the up or down volume key to adjust ringer volume.3.Increase the volume by pressing the upper volume key.orDecrease the volume by pressing the lower volume key.4.Press and hold ç to exit the menu.Mobile.book  Page 31  Wednesday, September 9, 1998  3:05 PM
32 Using Your PhoneMobile.book  Page 32  Wednesday, September 9, 1998  3:05 PM
Using In-Call Features 33Using In-Call FeaturesRead this section to learn how to get up and running with your new satellite phone.What You’ll Learn•Using Call Waiting•Using Call Holding•Using Call MutingMobile.book  Page 33  Wednesday, September 9, 1998  3:05 PM
34 Using In-Call FeaturesMuting a CallFor privacy during a call, try muting the phone. You hear the party on the other end, but the other party does not hear you.While in a call:1.Press µ.orPress M until you see Mute Phone?.2.Press ø to select. You will see Mute.3.Press ø again to resume your conversation.Mobile.book  Page 34  Wednesday, September 9, 1998  3:05 PM
Using In-Call Features 35Using Call WaitingYou must subscribe to this network feature through your service provider(s).If you have subscribed to Call Waiting, you must first activate it through the Options Menu (see page 78). After you activate it, you are notified of incoming calls while you are on the line in two ways. When a call comes in, you hear a beep and see the message Call Waiting followed by Answer?.You may see one of the following messages during call waiting activities:If you want to... Then...accept the waiting callPress ø. Your current call is placed on hold.reject the waiting call  Press ç.end current call before answering the waiting call1.Press M. You will see End Active Call?2.Press ø. Your phone rings and can now be answered normally.Message DescriptionTrying  Your phone is attempting to switch between the current and held call.Hold Failed The attempt to hold a call was unsuccessful.Cannot Hold Second Call A call is already on hold. You can only place one call on hold.Reconnect Failed The held call could not be made active again.Busy Try Later Your phone is working on a previous command. Wait a short time before repeating the new command.Mobile.book  Page 35  Wednesday, September 9, 1998  3:05 PM
36 Using In-Call FeaturesPlacing a Call on HoldYou must subscribe to this network feature through your service provider(s).You can place a call on hold to receive a new call or while making a new call. You can only place one call on hold at a time, so some options may not be accessible if you have already placed a call on hold.To place a call on hold:1.Press M until you will see Call Hold. 2.Press ø. Your current call is put on hold and you will see Call Holding followed by Reconnect?.Once you a call is on hold, you have these options:If you want to... Then...Make a new call1.Press M until you will see Make New Call, and then press ø to select.2.Dial the number as usual, and then press ø to place the call.Switch Between CallsWhen you are connected to either number, you will see 2 Calls followed by Switch?.Press ø to switch to the other call and automatically place the current call on hold.End Both CallsClose the flip cover.or Press M until you will see End Current & Held Call, and then press ø to select.Both calls are disconnected, and the display returns to standby.Mobile.book  Page 36  Wednesday, September 9, 1998  3:05 PM
Using In-Call Features 37You may see one of these messages:End Current Call Press ç at any time.End Call that is on HoldPress M until you will see End Held Call, and then press ø to select.The held call is disconnected, the current call remains connected, and you see End Call?.Message DescriptionTrying  Your phone is attempting to switch between the current and held call.Hold Failed The attempt to hold a call was unsuccessful.Cannot Hold Second Call A call is already on hold. You can only place one call on hold.Reconnect Failed The held call could not be made active again.Busy Try Later Your phone is working on a previous command. Wait a short time before repeating the new command.If you want to... Then...Mobile.book  Page 37  Wednesday, September 9, 1998  3:05 PM
38 Using In-Call FeaturesMobile.book  Page 38  Wednesday, September 9, 1998  3:05 PM
Using the Menus 39Using the MenusMany of your phone’s features are organized into lists of options called menus. There are three menus: the Options Menu, the Quick Access Menu, and the In-Call Menu. Some of these options give you access to additional lists of options called submenus.Learn how to navigate through your phone’s three main menus. Once you become familiar with these menus and their features go to page 133 to personalize your menus.What You’ll Learn•using the Options Menu•using the Quick Access Menu•using the In-Call MenuMobile.book  Page 39  Wednesday, September 9, 1998  3:05 PM
40 Using the MenusUsing the Options MenusThe Options Menu gives you access to the features and options included with your phone. Navigate the Options MenusLearning how to use just a few buttons enables you to move freely through the entire menu system. Keep in Mind: If you press M during a call, you will see the In-Call Menu which is described on page 44.How the Phone RespondsAs you scroll through the Options Menu, you will see one of three questions on the bottom line of the display. If your phone asks:If you want to... Then...Enter the Options MenuPress M to access the Options Menu. You will see the first available submenu.Scroll through the Options Menu•Press M to scroll forward.•Press ß or π to scroll backward or forward.Select Options and SubmenusPress ø to select a menu option or submenu when that option or submenu name is displayed.Exit Features and Menus•Press ç to exit the feature or submenu.•Press and hold ç to exit the Options Menu.If your phone asks... Then...View Options? Press ø to enter the submenu.Select? Press ø to select the displayed feature.Quit? Press ø to exit the feature.Mobile.book  Page 40  Wednesday, September 9, 1998  3:05 PM
Using the Menus 41Display Icons ChartCustomize the Options MenuTo personalize the Options Menu—to hide and move features—see page 134.If you see... Then...y Completed This indicates a feature has been activated.! Failed The display returns to the menu in a few seconds.Enter PIN or Enter NameEnter requested information. Then press ø.u Busy Try LaterYou may have requested information while your phone was completing another task.sThis indicates where you are in a menu.wYour phone may take a few seconds to request settings from the network.Mobile.book  Page 41  Wednesday, September 9, 1998  3:05 PM
42 Using the MenusUsing the Quick Access MenuThe Quick Access Menu is a way to keep your favorite menu options readily accessible. Each digit key, ¡ to ª, has a Quick Access feature assigned to it. See the chart on page 43 for the default setup. If you know the number of the feature, activating that option takes only two button pushes! If you don’t know the number or want to review your options, just scroll through the icon menu and read the tag attached to each option.Activate the Feature DirectlyTo access the feature directly:Press E, and then press the digit key of the feature.Scroll to the FeatureTo scroll to the feature:1.Press E.2.Press M to scroll through the available features.3.Press ø to select a feature.Mobile.book  Page 42  Wednesday, September 9, 1998  3:05 PM
Using the Menus 43Default Quick Access SettingsThe list of icons explained below are the default settings and icons for the Quick Access Menu. Customize the Quick Access MenuSee page 136 to learn how to customize the menu.¡BFind Name searches your Phone Book by the first three letters in a name.™rCheck Signal checks the strength of the signal from the satellite network.£RCall Voicemail calls your Voicemail number to check your Voicemail.¢GBattery Meter displays a fuel gauge indicating charge. The more bars, the greater the charge∞HLock Now locks your phone immediately.§LVibrate On/Off activates or deactivates VibraCall™ depending on the current setting.¶KRead Messages displays the newest message received•eRegister Now initiates a systematic manual search for a network on which to register.ªPForward On/Off activates or deactivates unconditional call forwarding depending on the current setting.Mobile.book  Page 43  Wednesday, September 9, 1998  3:05 PM
44 Using the MenusUsing The In-Call MenuThis menu lets you access specific features while you are in a call. Because this menu is not available until you are actually in a call you, cannot review it off-line. Entering the In-Call MenuWhile you are in a call:Press M to view the In-Call Menu features.In-Call Menu FeaturesThe In-Call menu dynamically changes depending on the type of call you are in.Single Active Call Hold Call? Make New Call? Turn Mute On or Off?Held Call Make New Call? End Active Call? Active Call and a Call WaitingEnd Active Call? Reject Call Waiting? Turn Mute On or Off? Active Call and a Held CallEnd Active Call? Turn Mute On or Off? End Held Call? End Active & Held Call? Held Call and a Call WaitingReconnect Held Call? Reject Call Waiting? End Held Call? Mobile.book  Page 44  Wednesday, September 9, 1998  3:05 PM
Managing the Phone Book 45Managing the Phone BookYour satellite phone can store up to 100 names and numbers, and your SIM card expands memory capacity even more.Use the dedicated keys or the Options Menu to access the same functions. With the Options Menu you can also access Phone Book maintenance and security features.What You’ll Learn•recalling and storing phone numbers•organizing the Phone Book•accessing automated calling systems•storing phone number prefixes•restricting calls with Fixed Dialing •editing the memory information•viewing your own phone numberMobile.book  Page 45  Wednesday, September 9, 1998  3:05 PM
46 Managing the Phone BookEntering the Phone Book MenuTo enter the Phone Book menu:1.Press M to scroll forward.2.Press ø when you see:3.Press M to scroll through the submenu.12:00ABC123Phone BookView Options?Mobile.book  Page 46  Wednesday, September 9, 1998  3:05 PM
Managing the Phone Book 47What’s on the Phone Book Menu?My Phone Number(s)Find Entry By NameFind Entry By LocationAdd EntryPersonal NumbersLast Ten CallsPhone BookAdd To Phone MemoryAdd To SIM Card MemoryCheck CapacityPrevent AccessCheck Phone CapacityCheck SIM CapacityNo Memory RestrictionsTo Phone MemoryTo SIM Card MemoryTo Phone & SIM MemoryFixed DialingFixed Dial ListView Fixed Dial ListSetup Fixed DialingOn/OffAdd EntryOne-Touch Dial SettingsTo Phone MemoryTo SIM Card MemoryTo Fixed Dial ListEdit Entry Fixed Dial ListEnter Name:Enter Location:Call NumberModify Name Or NumberErase Name And NumberCall NumberModify Name Or NumberErase Name And NumberLast Calls MadeErase All NumbersErase EntryMobile.book  Page 47  Wednesday, September 9, 1998  3:05 PM
48 Managing the Phone BookOrganizing Your Phone BookEach name and phone number in your phone book is stored in a numbered memory location. The satellite phone has two types of memory—phone memory and SIM card memory.Your phone’s memory can seem overwhelming if you don’t have a strategy for organizing your Phone Book. Begin setting up your Phone Book by asking yourself three questions:Which numbers do I call most?Make a list of the numbers you call most frequently. You’ll probably want to store these numbers in the first nine memory locations of your Phone Book. You can then dial them with a single keystroke by using One-Touch dialing.Phone Memory SIM Card Memory11SIM card capacity varies depending upon the card issued by your service provider.Personal Numbers 100 entries 155 entriesFixed Dial Numbers  No entries 40 entriesPhone Number Digits 32 20Name Characters 16 16Location Numbers 1 - 100 101 - 255Mobile.book  Page 48  Wednesday, September 9, 1998  3:05 PM
Managing the Phone Book 49When do I use these numbers?Group the numbers on the list according to when you use them. Most people call a different set of numbers during the day than they do in the evening and on weekends. You can switch One-Touch dialing to your phone’s memory (locations 1–9), your SIM card’s memory (locations 101–109), or to your Fixed Dial List (locations 1–9). Store your evening and weekend numbers on one type of memory and your daytime numbers on another.Which numbers do I need to keep secure?Tip:  If you have many entries, group them in blocks of ten to make them easier to find.Use your SIM card to store the numbers you need to keep secure, like the numbers of friends and family members. Because your SIM card is the size of a credit card, you can easily keep it securely in your wallet when you aren’t using it. If you wish, you can even require a PIN code every time your SIM card is inserted into any phone. (To deactivate your PIN code, see page 102.) Store more public numbers, like business associates and travel agents in your phone’s memory.Mobile.book  Page 49  Wednesday, September 9, 1998  3:05 PM
50 Managing the Phone Book1-2-3: Getting to Personal Numbers...1.Press M until you see Phone Book, and then press ø.2.Press M to scroll to Personal Numbers, and then press ø.3.Press M to scroll to one of the features described below.Storing Names and NumbersAdd an Entry Use the Options Menu1.Follow the steps in “1-2-3: Getting to Personal Numbers...” to get to Add Entry, and then press ø. 2.Press M to scroll to Add to Phone Memory or Add to SIM Memory.3.Press ø to select. You will see Enter Number.4.Enter a number, and then press ø. You will see Enter Name.Tip: Numbers must be entered in international format.5.Enter a name (see “Entering Names” on page 52), and then press ø. You will see Enter Location.6.Enter a location number, 1-100 for phone memory or 101-255 for SIM memory, and then press ø. You will see Stored XXX.orPress ø to select the next available location. You will see Stored XXX.7.Press and hold ç to exit the menu.Mobile.book  Page 50  Wednesday, September 9, 1998  3:05 PM
Managing the Phone Book 51Use the Dedicated KeysTip: If you have more than one number for the same person, try attaching a descriptive tag to the name, like Home, Office, or Mobile.1.Enter the phone number you want to store.2.Press I to begin storing.3.Press M to scroll to the desired memory type Add to SIM Card Memory or Add to Phone Memory, and then press ø. You will see Enter Number, followed by the number you entered.4.Press ø to accept the number. You will see Enter Name.5.Enter a name (see “Entering Names” on page 52), and then press ø. You will see Enter Location.6.Enter a three-digit location number, and then press ø. You will see Stored XXX.orPress ø to store the entry in the next empty memory location. You will see Stored XXX.Adding Entry MessagesWhen you enter the location number for your entry, you may see one of these messages:Message DescriptionStored XXX You have stored the entry.Range XXX-XXYou have chosen a memory location outside the appropriate range. Enter a new number within the range listed on the display.Overwrite?You have chosen an occupied location. Press ø to overwrite the location or press any other key to try another location.Mobile.book  Page 51  Wednesday, September 9, 1998  3:05 PM
52 Managing the Phone BookEntering NamesYou can use the keypad to produce any letter in the alphabet. For example, press ™ to enter the letters A, B, or C, as shown:Enter CharactersTip: Press and hold any numeric key to insert a lower case letter.1.Enter a letter by pressing a key as many times as necessary.2.Press M to advance the cursor.3.Repeat steps 1 and 2 as many times as necessary, and then press ø.Correct an EntryTo make a change:1.Press ß or ß to scroll to the character you want to delete. 2.Press ç to delete one character at a time. orPress and hold ç to clear the display.™ press 1 time to insert an Apress 2 times to insert a Bpress 3 times to insert a Cpress 4 times to insert a 2Mobile.book  Page 52  Wednesday, September 9, 1998  3:05 PM
Managing the Phone Book 53Available CharactersUse this chart as a guide for producing characters:¡Space . 1 ? ! , @ _ & : “ ( ) ‘ ¿ ¡ % £ $ Space . 1 ? ! , @ _ & : “ ( ) ‘ ¿ ¡ % £ $ ™A B C 2 Ä Å à AE β Ç a b c 2 ä å à ae β ç £D E F 3 ∆ É È Φ d e f 3 ∆ é è Φ ¢G H I 4 Γ ì g h i 4 Γ ì ∞J K L 5 Λ j k l 5 Λ §M N O 6 Ñ Ö Ø Ò Ω m n o 6 ñ ö ø ò Ω ¶P Q R S 7 Π ß Σ p q r s 7 Π ß Σ •T U V 8 Θ Ü Ù t u v 8 Θ ü ù ªW X Y Z 9 Ξ Ψ w x y z 9 Ξ Ψ º+ - 0 x * / = > < # + - 0 x * / = > < # The upper line for each key shows the upper case characters. The lower line for each key shows the lower case characters.Mobile.book  Page 53  Wednesday, September 9, 1998  3:05 PM
54 Managing the Phone BookUsing Pauses in NumbersWhen you call automated systems, a recorded message prompts you for numbers such as PIN numbers and account numbers. You can store these numbers in the same memory location as the automated system’s access number. Separate the numbers with “pauses”—special characters that tell your phone to wait a few seconds before sending additional numbers—and store the string in the same way you would other numbers.Tip: You can store as many as 16 characters. A pause is equal to one character.Enter Pauses in Numbers1.Enter the phone number you use to access the automated system.2.Press and hold ß. You will see a pause character (Ü) inserted into the number entry.3.Enter the next group of numbers. For example, enter your PIN number. If the automated system requires a * or #, enter those symbols, too.4.Repeat steps 2 to 3 as many times as necessary.5.To store the entry follow the procedures in “Add an Entry” on page 50.Dial Numbers With PausesTo dial a number with pauses:1.Recall the entry. (See “Recalling Entries” on page 56.)2.Press ø to place the call.The first pause in the number waits until the call is answered. When the automated system answers, your phone waits a few seconds and then automatically sends the next set of numbers, then the next, until all numbers are sent.Mobile.book  Page 54  Wednesday, September 9, 1998  3:05 PM
Managing the Phone Book 55Using Phone Number PrefixesYou can save time when you dial by storing the prefixes that you often use. This is sometimes called “postscripting.” Your satellite phone allows you to change or add to Phone Book entries without overwriting them.Store a prefix in your Phone Book just as you would any other number. See “Storing Names and Numbers” on page 50.Use a Stored PrefixTip: Try naming the prefix by area, like Downtown, Suburbs, or Germany.To use a stored prefix: 1.Recall the prefix from your Phone Book. (See “Recalling Entries” on page 56.)2.Add the finishing numbers.3.Press ø to place the call.Change a Similar EntryTo change an entry to a similar number:1.Recall the number from your Phone Book. (See “Recalling Entries” on page 56.)2.Press ç to delete the unwanted digits.3.Enter the replacement digits.4.Press ø to place the call.Mobile.book  Page 55  Wednesday, September 9, 1998  3:05 PM
56 Managing the Phone Book1-2-3: Getting to Personal Numbers...1.Press M until you see Phone Book, and then press ø.2.Press M to scroll to Personal Numbers, and then press ø.3.Press M to scroll to one of the features described below.Recalling EntriesFind an Entry by NameSearch your Phone Book by the first few letters of the entry.Keep in Mind: If you have restricted access to either SIM card or phone memory, those entries won’t be available. For more information, see page 60.1.Follow the steps in “1-2-3: Getting to Personal Numbers...” to get to Find Entry By Name. You will see Find Name?.2.Press ø to select. You will see Enter Name.3.Enter 1 to 3 characters (or as many as needed) of the entry, and then press ø. If necessary, scroll to the entry you are looking for.Tip: Your phone sorts SIM card and phone memory together alphabetically4.Press ø to access options for that entry, and then proceed to “Calling, Modifying, or Erasing an Entry” on page 58.Mobile.book  Page 56  Wednesday, September 9, 1998  3:05 PM
Managing the Phone Book 57Find an Entry by LocationIf you know the location number of the entry, here is an easy way to recall it.Use the Options Menu1.Follow the steps “1-2-3: Getting to Personal Numbers...” to get to Find Entry By Location, and then press ø to select. You will see Enter Location.2.Enter the location number, and then press ø. You will see the entry displayed.If you enter an empty location number, you’ll see Location XXX is Empty. Your phone then selects the next largest available location. If there are no numbers stored, you will see No Numbers Stored.3.Press ø to access options for that entry, and then proceed to “Calling, Modifying, or Erasing an Entry” on page 58.Use the Dedicated Keys1.Press Q.2.Enter the three-digit location number of the entry, and then press ø.If you enter an empty location number, you will see Location XXX is Empty. Your phone then selects the next largest available location. If there are no numbers stored, you will see No Numbers Stored.3.Press ø to call the displayed entry. You will see the number followed by Calling.Mobile.book  Page 57  Wednesday, September 9, 1998  3:05 PM
58 Managing the Phone BookCalling, Modifying, or Erasing an EntryOnce you have selected a Phone Book entry, you can call, change, or erase that entry.Call a Selected Entry1.Find an entry, and then press ø. See “Recalling Entries” on page 56.2.Press M until you see Call Number, and then press ø. You will see Calling followed by the number you dialed.Modify a Name or Number Tip: For help entering letters or changing entries, see “Entering Names” on page 52.1.Find an entry, and then press ø. See “Recalling Entries” on page 56.2.Press M until you see Modify Name or Number, and then press ø. You will see Edit Number, followed by the phone number stored in that entry. 3.Enter changes to the number, and then press ø. You will see the name stored in that entry.4.Enter changes to the name, and then press ø. You will see Modified XXX.Erase a Name and Number1.Find an entry, and then press ø. See “Recalling Entries” on page 56.2.Press M until you see Erase Name and Number, and then press ø. You will see Erased xxx.Mobile.book  Page 58  Wednesday, September 9, 1998  3:05 PM
Managing the Phone Book 591-2-3: Getting to Personal Numbers...1.Press M until you see Phone Book, and then press ø.2.Press M to scroll to Personal Numbers, and then press ø.3.Press M to scroll to one of the features described below.Checking Phone Book CapacityUse this feature to see how many available memory locations you have in either SIM card or phone memory. 1.Follow the steps in “1-2-3: Getting to Personal Numbers...” to get to Check Capacity, and then press ø to select.2.Press M until you see Check Phone Capacity or Check SIM Capacity, and then press ø. You will see XXX Unused Locations.3.Press and hold ç to exit the menu.Mobile.book  Page 59  Wednesday, September 9, 1998  3:05 PM
60 Managing the Phone Book1-2-3: Getting to Personal Numbers...1.Press M until you see Phone Book, and then press ø.2.Press M to scroll to Personal Numbers, and then press ø.3.Press M to scroll to one of the features described below.Preventing Access to the Phone BookYou may want to restrict memory access when loaning your phone to others. You can choose to prevent access to the phone memory, SIM memory, or both.1.Follow the steps in “1-2-3: Getting to Personal Numbers...” to get to Prevent Access, and then press ø to select.2.Press M until you see the restriction type you desire: No Memory Restrictions, To SIM Card Memory, To Phone Memory, or To Phone & SIM Memory.3.Press ø to select the displayed option. You see will Enter Security Code.Tip: The factory default security code is: 000000.4.Enter security code. Enter your six-digit security code. You will see Completed.5.Press and hold ç to exit the menu.Keep in Mind: If you prevent access to both your phone memory and SIM memory and then try to access an entry, you will see Restricted. If you restrict access to either your phone memory or SIM memory and try to access an entry stored in that type of memory, you will see a list of the entries that are not restricted.Mobile.book  Page 60  Wednesday, September 9, 1998  3:05 PM
Managing the Phone Book 611-2-3: Getting to Fixed Dialing...1.Press M until you see Phone Book, and then press ø.2.Press M until you see Fixed Dialing, and then press ø.3.Press M to scroll to one of the features described below.Restricting Phone UseWith the Fixed Dialing feature, you can restrict calling on your phone to a list of numbers that you create. When this feature is active, you can only call numbers or use prefixes (for example, country codes or area codes) that exactly match those that are stored in your list. You can store up to 40 entries on your fixed dial list. These entries are stored on your SIM card.Activate Fixed DialingUse this option to set up your Fixed Dial list.1.Follow the steps in “1-2-3: Getting to Fixed Dialing...” to get to Setup Fixed Dialing, and then press ø to select. You will see Enter PIN2.Tip: You should have received your PIN2 code from your service provider.2.Enter code. Enter your SIM PIN2 code, and then press ø.3.Press M until you see On or Off, and then press ø. You will see Completed.4.Press and hold ç to exit the menu.Mobile.book  Page 61  Wednesday, September 9, 1998  3:05 PM
62 Managing the Phone Book1-2-3: Getting to Fixed Dialing...1.Press M until you see Phone Book, and then press ø.2.Press M until you see Fixed Dialing, and then press ø.3.Press M to scroll to one of the features described below.Add an EntryTo add an entry:1.Follow the steps in “” to get to Setup Fixed Dialing, and then press ø to select. You will see Enter PIN2.2.Enter code. Enter your SIM PIN2 code, and then press ø.Tip: Phone numbers must be in international format.3.Press M until you see Add Entry, and then press ø. You will see Enter Number.4.Enter the number, and then press ø. You will see Enter Name.5.Enter the name, and then press ø. You will see Enter Location.Tip: See “Entering Names” on page 52 for help entering letters.6.Enter a location number, and then press ø. You will see Completed.7.Press and hold ç to exit the menu.Mobile.book  Page 62  Wednesday, September 9, 1998  3:05 PM
Managing the Phone Book 63Erase an EntryTo erase an entry:1.Follow the steps in “” to get to Setup Fixed Dialing, and then press ø to select. You will see Enter PIN2.2.Enter code. Enter your SIM PIN2 code, and then press ø.3.Press M until you see Erase Entry, and then press ø to select. You will see the first entry in your Fixed Dial list.4.Press M to scroll to the number you wish to erase, and then press ø. You will see Erase xxx?.5.Press ø to confirm. You will see Completed.6.Press and hold ç to exit the menu.Mobile.book  Page 63  Wednesday, September 9, 1998  3:05 PM
64 Managing the Phone Book1-2-3: Getting to Fixed Dialing...1.Press M until you see Phone Book, and then press ø.2.Press M until you see Fixed Dialing, and then press ø.3.Press M to scroll to one of the features described below.Edit an EntryTo edit an entry:1.Follow the steps in “” to get to Setup Fixed Dialing, and then press ø to select. You will see Enter PIN2.2.Enter code. Enter your SIM PIN2 code, and then press ø.3.Press M until you see Edit Entry, and then press ø to select. You will see the first entry in your Fixed Dial list.4.Press M to scroll to the entry you want to change, and then press ø. You will see the current number for that location.5.Enter changes to the number, and then press ø. You will see the current name for that location.6.Enter changes to the name, and then press ø. You will see the current location.7.Enter a new location, and then press ø. You will see Completed.8.Press and hold ç to exit the menu.Mobile.book  Page 64  Wednesday, September 9, 1998  3:05 PM
Managing the Phone Book 65View Your Fixed Dial ListThis feature enables you to review, but not change, your Fixed Dial list.1.Follow the steps in “” to get to View Fixed Dial List, and then press ø to select. You will see the first number on your Fixed Dial list.2.Press M to scroll through the numbers on your Fixed Dial list.3.Press and hold ç to exit the menu.Mobile.book  Page 65  Wednesday, September 9, 1998  3:05 PM
66 Managing the Phone Book1-2: Getting to Phone Book Features...1.Press M until you see Phone Book, and then press ø.2.Press M to scroll to one of the features described below. You will see the feature name, along with Select?.Viewing the Last Ten Numbers DialedDon’t worry about forgetting the number you dialed earlier. The last ten numbers you dialed are saved.1.Follow the steps in “1-2: Getting to Phone Book Features...” to get to Last Ten Calls, and then press ø to select. 2.Press M to scroll to Last Calls Made or Erase All Numbers, and then press ø to select.Tip: If you want to add a number from Last Ten Calls to your Phone Book, press I when the number is displayed, then follow the steps in “Storing Names and Numbers” on page 50.3.If you select Last Calls Made, press M to scroll to the number you are looking for, and then press ø to place a call to that number.orIf you select Erase All Numbers, you will see Completed. 4.Press and hold ç to exit the menu.Mobile.book  Page 66  Wednesday, September 9, 1998  3:05 PM
Managing the Phone Book 67Viewing and Modifying Phone NumbersView Your SIM Phone Number(s)Use this feature to view your phone number(s). You can have up to five phone numbers.Tip: Pressing Q π also brings up your phone number1.Follow the steps in “1-2: Getting to Phone Book Features...” to get to My Phone Number(s). 2.Press ø to select. You will see your phone’s voice number followed by Modify?.3.Press M to scroll through your numbers.4.Press and hold ç to exit the menu.Keep in Mind: If you do not see your number(s), they have not be programmed onto your SIM card. Contact your service provider for more information.Modify Your Phone NumbersIf you’ve recently switched your phone number, use this feature to quickly store your most recent information.1.Complete the steps in “View Your SIM Phone Number(s)” on page 67 to get to the number you want to modify.2.Press ø to modify the number. You will see Edit Number followed by the number for the selected entry.3.Enter changes to the number, and then press ø. You will see Edit Name followed by the name for the entry selected.4.Enter changes to the name (see “Entering Names” on page 52) and then press ø. You will see Stored.5.Press and hold ç to exit the menu.Mobile.book  Page 67  Wednesday, September 9, 1998  3:05 PM
68 Managing the Phone Book1-2: Getting to Phone Book Features...1.Press M until you see Phone Book, and then press ø.2.Press M to scroll to one of the features described below. You will see the feature name, along with Select?.One-Touch DialingOne-Touch dialing enables you to place calls instantly. You can choose to dial the phone numbers in the first nine memory locations in either your SIM memory, phone memory, or your Fixed Dial List. You choose which type of memory you want to be active with this feature.Set Up One-Touch Dialing1.Follow the steps in “1-2: Getting to Phone Book Features...” to get to One-Touch Dial Setting, and then press ø to select.2.Press M to scroll through To Phone Memory, To SIM Card Memory, or To Fixed Dial List, and then press ø to select the displayed option. You will see Completed.3.Press and hold ç to exit the menu.Use One-Touch DialingTip: You do not need to press ø to call the number when you’re using One-Touch dialing.Using One-Touch Dial is easy—just press and hold a keypad digit! To use One-Touch dialing:Press and hold the appropriate digit key. For example, press and hold ™ to dial the number stored in location 2 of your phone memory, location 2 of your Fixed Dial list, or 102 of your SIM memory, depending on your setting.Mobile.book  Page 68  Wednesday, September 9, 1998  3:05 PM
Using Calling Features 69Using Calling FeaturesThis chapter describes call-related features. Many of these features are network features that you must subscribe to in order to access.What You’ll Learn•checking battery power level •showing the strength of the signal your phone is receiving•activating/deactivating the Pending Call Drop signal•forwarding calls when you’re not available•restricting use of your phoneMobile.book  Page 69  Wednesday, September 9, 1998  3:05 PM
70 Using Calling FeaturesEntering the Call Related Features MenuTo enter the Call Related Features menu:1.Press M to open the Options Menu.2.Press M to scroll forward.3.Press ø when you see:4.Press M to scroll through the submenu.12:00Call RelatedFeaturesView Options?Mobile.book  Page 70  Wednesday, September 9, 1998  3:05 PM
Using Calling Features 71What’s on the Call Related Features Menu?1 These features are network and subscription dependent.Bar Outgoing CallsBar Incoming CallsChange Bar PasswordCall Barring1Forward When UnavailableForward All CallsDetailed ForwardingCall Forwarding1Call Waiting1Show Battery MeterCall Related FeaturesForward Voice CallsForward All Voice CallsIf BusyIf No AnswerIf Not ReachableCancel All ForwardingOn/OffOn/OffShow Signal StrengthOn/OffPending Call DropOn/OffOn/OffOn/OffOn/OffOn/OffOn/OffMobile.book  Page 71  Wednesday, September 9, 1998  3:05 PM
72 Using Calling Features1-2-3: Getting to Call Forwarding...1.Press M until you see Call Related Features, and then press ø.2.Press M to scroll to Call Forwarding, and then press ø.3.Press M to scroll to one of the features described below.Forward Calls When UnavailableUse this feature when you can’t answer a call. You must subscribe to this network feature through your service provider(s).To activate this feature:1.Follow the steps in “1-2-3: Getting to Call Forwarding...” to get to Forward When Unavailable, and then press ø to select.2.Press M to scroll to On or Off, and then press ø to select. •If you select On, continue with step 3.•If you select Off, continue with step 5.3.Press M to scroll to Voicemail or Other Number, and then press ø to select.•If you select Voicemail, continue with step 5.Tip: If you have not yet stored a voicemail number, go to page 87 to learn how.•If you select Other Number, then you will see Enter Number. Continue with step 4.4.Enter the number you want calls forwarded to, and then press ø. Your phone takes a moment to request the setting from the network, and then you will see Call Forward On.5.Press and hold ç to exit the menu.Mobile.book  Page 72  Wednesday, September 9, 1998  3:05 PM
Using Calling Features 73Forward All Your CallsWhen you select this option, all your calls are forwarded to the number you choose. Your phone does not ring. You must subscribe to this network features through your service provider(s).To activate this feature:1.Follow the steps in “1-2-3: Getting to Call Forwarding...” to get to Forward All Calls, and then press ø to select.2.Press M to scroll to either On or Off, and then press ø to select.•If you select On, continue with step 3.•If you select Off, continue with step 5.3.Press M to scroll to Voicemail or Other Number, and then press ø to select.Tip: If you have not yet stored a voicemail number, go to page 87 to learn how.•If you select Voicemail, continue with step 5.•If you select Other Number, then you will see Enter Number. Continue with step 4.4.Enter the number you want all your calls forwarded to, and then press ø.Your phone takes a moment to request the setting from the network, and then you will see Call Forward On.5.Press and hold ç to exit the menu.Mobile.book  Page 73  Wednesday, September 9, 1998  3:05 PM
74 Using Calling Features1-2-3: Getting to Call Forwarding...1.Press M until you see Call Related Features, and then press O.2.Press M to scroll to Call Forwarding, and then press ø.3.Press M to scroll to one of the features described below.Detailed Call ForwardingTip: Forward When Unavailable and Forward All Calls override these settings.You must subscribe to this network feature through your service provider(s). To activate this feature:1.Follow the steps in “1-2-3: Getting to Call Forwarding...” to get to Detailed Forwarding, and then press ø to select.2.Press M to scroll to Forward Voice Calls, then press ø to select.Tip: For information on retrieving messages, see “Accessing Messages” on page 90.3.Press M to scroll to the option you desire Forward All Voice Calls, If Busy, If No Answer, or If Not Reachable.4.Press ø to select the displayed option. •If you select If Busy or If Not Reachable, your calls are automatically forwarded to your Personal Mailbox. Continue with step 6.Tip: If you have not yet stored a voicemail number, go to page 87 to learn how.•If you select Forward All Voice Calls or If No Answer, continue with step 5.5.Press M to scroll to either Voicemail or Other Number, and then press ø.•If you select Voicemail, continue with step 7.•If you select Other Number, then you will see Enter Number. Continue with step 6.6.Enter the number you want calls forwarded to, then press ø. Your phone takes a moment to request the setting from the network, then displays Call Forward On.7.Press and hold ç to exit the menu.Mobile.book  Page 74  Wednesday, September 9, 1998  3:05 PM
Using Calling Features 75Cancel All ForwardingUse this option to clear all Call Forwarding settings.To cancel Call Forwarding settings:1.Follow the steps in “1-2-3: Getting to Call Forwarding...” to get to Cancel All Forwarding, and then press ø to select.You will see Call Forward Off. All Call Forwarding settings are now set to Off.2.Press and hold ç to exit the menu.Mobile.book  Page 75  Wednesday, September 9, 1998  3:05 PM
76 Using Calling Features1-2: Getting to Call Related Features...1.Press M until you see Call Related Features, and then press ø.2.Press M to scroll to one of the features described below. You will see the feature name, along with Select?.Showing Signal StrengthUse this feature to check the strength of the signal that your phone is receiving from the Iridium satellite network.1.Follow the steps in “Deactivating Pending Call Drop Signal” to get to Show Signal Strength.2.Press ø to select. You will see:After a few seconds, if the phone is able to locate a signal, the signal strength indicator appears in the upper left corner of the display. rxThe signal strength meter remains on the display for several seconds. If the phone cannot locate a signal, you will see Weak Signal.3.Press and hold ç to exit the menu.12:00CheckingSignal ...Mobile.book  Page 76  Wednesday, September 9, 1998  3:05 PM
Using Calling Features 77Deactivating Pending Call Drop SignalUnder rare circumstances, due to system overcapacity or a satellite outage, a satellite may not be available to take your call. When this happens, your phone notifies you with a series of three consecutive tones and displays Pending Call Drop. The tones continue periodically until a new satellite moves into range or the call is dropped.To deactivate the alert tones:1.Follow the steps in the “Deactivating Pending Call Drop Signal” to get to Pending Call Drop, and then press ø to select.2.Press M to scroll to either On or Off, and then press ø to select.3.Press and hold ç to exit the menu.Mobile.book  Page 77  Wednesday, September 9, 1998  3:05 PM
78 Using Calling Features1-2: Getting to Call Related Features...1.Press M until you see Call Related Features, and then press ø.2.Press M to scroll to one of the features described below. You will see the feature name, along with Select?.Activating Call WaitingSubscribers to Call Waiting can use this feature to decide whether or not to take incoming calls while on the line.To activate call waiting:1.Follow the steps in “Deactivating Pending Call Drop Signal” to get to Call Waiting, and then press ø to select.2.Press M to scroll to On or Off, and then press ø to select the desired option.3.Press and hold ç to exit the menu.For information on using call waiting, see “Using Call Waiting” on page 35.Mobile.book  Page 78  Wednesday, September 9, 1998  3:05 PM
Using Calling Features                     791-2-3: Getting to Call Barring...1.Press M until you see Call Related Features, and then press ø.2.Press M to scroll to Call Barring, and then press ø.3.Press M to scroll to one of the features described below. You will see the feature name, along with Select?.Restricting Calls with Call BarringYou can use Call Barring to restrict both incoming and outgoing calls. Call Barring is useful if you’re loaning your phone to others or when you wish to control incoming calls. When you change one of your Call Barring settings, your phone takes a few seconds to request the setting from the network.Bar Outgoing CallsThis setting enables you to receive incoming calls but prevents outgoing calls.To activate this feature:1.Follow the steps in “1-2-3: Getting to Call Barring...” to get to Bar Outgoing Calls, and then press ø to select.2.Press M to scroll to On or Off, and then press ø to select.You will see Enter Password.Tip: Your service provider gives you a bar password.3.Enter your bar password, and then press ø. You will see Completed.4.Press and hold ç to exit the menu.Mobile.book  Page 79  Wednesday, September 9, 1998  3:05 PM
80 Using Calling Features1-2-3: Getting to Call Barring...1.Press M until you see Call Related Features, and then press ø.2.Press M to scroll to Call Barring, and then press ø.3.Press M to scroll to one of the features described below. You will see the feature name, along with Select?.Bar Incoming Calls This setting allows you to place calls, but refuses incoming calls. Callers hear a recording telling them you are unavailable.To be sure not to miss a call see “Detailed Call Forwarding” on page 74.To activate this feature:1.Follow the steps in “1-2-3: Getting to Call Barring...” to get to Bar Incoming Calls, and then press ø to select.2.Press M to scroll to On or Off, and then press ø to select.Tip: Your service provider gives you a bar password.You will see Enter Password.3.Enter your bar password, and then press ø. You will see Completed.4.Press and hold ç to exit the menu.Mobile.book  Page 80  Wednesday, September 9, 1998  3:05 PM
Using Calling Features 81Change Bar PasswordWhen you subscribe to Call Barring, your service provider gives you a four-digit bar password. Use this feature to change it to something easy to remember.1.Follow the steps in “” to get to Change Bar Password, and then press ø to select. You will see Enter Password.Tip: If you are changing the password for the first time, use the password supplied by your service provider.2.Enter bar password, and then press ø. You will see Enter New Password.3.Enter the new bar password, and then press ø.4.Enter the new bar password again to confirm, and then press ø.5.Press and hold ç to exit the menu.Mobile.book  Page 81  Wednesday, September 9, 1998  3:05 PM
82 Using Calling FeaturesMobile.book  Page 82  Wednesday, September 9, 1998  3:05 PM
Using Message Services 83Using Message ServicesDid you know that you can receive voicemail and fax notification messages and numeric and text messages through your Personal Mailbox service—wherever in the world you may be? Wherever you are, you’ll have instant reference to all your communication.What You’ll Learn•checking your voicemail messages•reading, saving and deleting messagesMobile.book  Page 83  Wednesday, September 9, 1998  3:05 PM
84 Using Message ServicesEntering the Messages MenuTo enter the Messages menu:1.Press ? to access the Message submenu directly, and then go on to step 4.orPress M to access the Options Menu and then go on to step 2.2.Press M to scroll forward.3.Press ø when you see:4.Press M to scroll through the submenu.12:00MessagesView Options?Mobile.book  Page 84  Wednesday, September 9, 1998  3:05 PM
Using Message Services 85What’s on the Messages Menu?Voicemail NumberMessage SettingsReceived MessagesCall VoicemailGo to Next MessageDelete MessageReturn CallMessages MenuMobile.book  Page 85  Wednesday, September 9, 1998  3:05 PM
86 Using Message Services1-2:  Getting to Message Features...1.Press ? to enter the Messages menu.2.Press M to scroll to one of the features described below. You will see the feature name, along with Select?.Checking Your VoicemailThis feature makes checking your voicemail simple.1.Follow the steps in “1-2: Getting to Message Features...” to get to Call Voicemail.2.Press ø to select. You will see your voicemail number followed by Calling. If you have not previously stored a Voicemail Number, then you will see No Number Available. See page 87 to enter a number.Mobile.book  Page 86  Wednesday, September 9, 1998  3:05 PM
Using Message Services 87Storing Your Voicemail NumberTo store a voicemail number:1.Follow the steps in “1-2: Getting to Message Features...” to get to Message Settings, and then press ø to select.Tip: Use pause dialing to store your voicemail access and PIN numbers together. See “Using Pauses in Numbers” on page 54.2.Press ø to select Voicemail Number. You will see Enter Voicemail Number followed by your current voicemail number. If this is the first time you have stored a number, continue with to step 4.3.Press ç to clear one digit at a time, or press and hold ç to erase the entire number.4.Enter the new number, and then press ø. You will see Completed.5.Press and hold ç to exit the menu.Mobile.book  Page 87  Wednesday, September 9, 1998  3:05 PM
88 Using Message ServicesManaging Your MessagesHow Your Phone Notifies You of MessagesIf your phone is powered on, it notifies you of received messages in the following ways:•An alert sounds and/or the phone vibrates.Your phone beeps and/or vibrates three times to inform you of an incoming message. See page 98 to set your phone’s alert.•The message icon (o) is displayed.•The message is displayed immediately if the message is a fax or voicemail notification message. The message remains on the display for several seconds.orMMMMeeeessssssssaaaaggggeeee    RRRReeeeaaaadddd    NNNNoooowwww???? is displayed if the message is an alphanumeric, text message of up to 160 characters. For more information see “Read a New Message” on page 90.How Messages Are StoredYour phone stores all messages on your SIM card. The total number of messages that you can store depends on your service provider.If the message indicator is flashing, your SIM card is full. See “Delete Messages” on page 91 to make room for the new message.Mobile.book  Page 88  Wednesday, September 9, 1998  3:05 PM
Using Message Services 89What Messages ContainYou can receive short text or numeric messages in your Personal Mailbox. Text messages may contain up to 160 characters. Numeric messages—typically phone numbers—may contain up to 20 digits. Your Personal Mailbox works along with Call Forwarding. For more information, refer to “Personal Mailbox” on page 29.Messages contain multiple screens with the following information:•the message•the date and time the message was sent•the phone number (if available) from which the message was sentMobile.book  Page 89  Wednesday, September 9, 1998  3:05 PM
90 Using Message Services1-2-3:  Accessing Your Messages...1.Press ? to access the Messages menu.2.Press M until you see Received Messages, and then press ø to select. 3.Press M to scroll to one of the features described below.Accessing MessagesRead a New MessageNotification MessagesWhen you receive an incoming fax or voicemail notification message, it automatically scrolls across your screen. You can:•Press ø to store it on your SIM card.•Press ç to delete it.Text MessagesWhen you receive a new alphanumeric message, you will see Message Read Now? To read it:1.Press ø and continue with step 2.orPress ç to read the message later. See “Read a Stored Message” on page 91."2.Press M to move forward through a message one screen at a time.3.Press ø to access options for that entry, then proceed to page 92.Mobile.book  Page 90  Wednesday, September 9, 1998  3:05 PM
Using Message Services 91Read a Stored MessageTo read a stored message: 1.Follow the steps in “1-2-3: Accessing Your Messages...” to enter the message center. If you have messages you will see the number of messages stored. If you do not have any messages, you will see No Messages.2.Press M to move forward through a message one screen at a time.3.Press ø to access options for that entry, and then proceed to page 92.orPress and hold ç to exit the menu.Delete MessagesUse this option to make room for new messages:1.Follow the steps in “Go to the Next Message” above until you see the message you want to delete, and then press ø.2.Press M until you see Delete Message, and then press ø. You will see Message Deleted.3.Press and hold ç to exit the menu.Mobile.book  Page 91  Wednesday, September 9, 1998  3:05 PM
92 Using Message Services1-2-3:  Accessing Your Messages...1.Press ? to access the Messages menu.2.Press M until you see Received Messages, and then press ø to select. 3.Press M to scroll to one of the features described below.Go to the Next MessageTo go to the next message:1.Follow the steps in “Read a Stored Message” on page 91.2.Press M until you see Go To Next Message and then press ø. You will see the next message. If you are at the end of your message list you will see the first message again.3.Press M to move forward through a message one screen at a time.4.Repeat steps 2 to 3 until you have read all your messages.5.Press and hold ç to exit the menu.Return a CallA callback number appears in quotes within the message. If one is enclosed, you can instantly place a call to that number. If one is not included, your phone selects the first number in the message.1.Follow the steps in “Go to the Next Message” on page 92 to display the desired message, and then press ø.2.Press M until you see Return Call, and then press ø. You will see the number followed by Call?.3.Press ø to place a call to that number. You will see the number followed by Calling.Mobile.book  Page 92  Wednesday, September 9, 1998  3:05 PM
Customizing Phone Features 93Customizing Phone FeaturesOnce you’re comfortable with the basic features of your new phone, use this chapter to set your phone up the way you like it. What You’ll Learn•adjusting your phone’s ringer volume•choosing from ten different ringer styles•choosing your phone’s keypad tones•locking and unlocking your phone•changing and setting codes for security•resetting or clearing your phone’s settings•selecting the language displayed by your phoneMobile.book  Page 93  Wednesday, September 9, 1998  3:05 PM
94 Customizing Phone FeaturesEntering the Phone Setup MenuTo enter the Phone Setup menu:1.Press M to open the Options Menu.2.Press M to scroll forward.3.Press ø when you see:4.Press M to scroll through the submenu.12:00PhoneSetupView Options?Mobile.book  Page 94  Wednesday, September 9, 1998  3:05 PM
Customizing Phone Features 95What’s on the Phone Setup Menu?1 This feature is available when the Extended Menu is active.Status ReviewMaster ResetMaster ClearAutomatic LockLock NowChange Unlock CodePhone LockRing or VibrateSet Ringer ToneRequire SIM Card PINOn/OffChange SIM PIN CodeChange SIM PIN2 CodeNew Security CodeExtended MenusLanguage Selection1Adjust Ring VolumeNo TonesNormal TonesSingle ToneSelect Key Pad Tones1Phone Status1Phone SetupAutomaticTürkçeNo Ring or VibrateRing OnlyVibrate OnlyVibrate Then RingStandard ToneHigh ToneOn/OffOn/OffMobile.book  Page 95  Wednesday, September 9, 1998  3:05 PM
96 Customizing Phone Features1-2: Getting to Phone Setup...1.Press M until you see Phone Setup, and then press ø.2.Press M to scroll to one of the features described below. You will see the feature name, along with Select?.Adjusting the Ringer Volume Use this feature to adjust the volume of the ringer. The phone sounds the new volume level as you adjust it.1.Follow the steps in “1-2: Getting to Phone Setup...” to get to Adjust Ring Volume, and then press ø to select.2.Increase the volume by pressing the upper volume key.Tip: You can also press E, and then the up or down volume key.orDecrease the volume by pressing the lower volume key.3.Press and hold ç to exit the menu.Mobile.book  Page 96  Wednesday, September 9, 1998  3:05 PM
Customizing Phone Features 97Setting the Phone to Ring or VibrateThis feature is ideal for situations where a ringing phone is inappropriate or in noisy places where you might not hear the ringer. The vibrating alert notifies you of incoming calls by discreet vibrations.1.Follow the steps in “1-2: Getting to Phone Setup...” to get to Ring or Vibrate, and then press ø to select.Tip: If you select Vibrate then Ring, your phone vibrates for two cycles, and then rings.2.Press M to scroll to Ring Only, Vibrate Only, Vibrate then Ring, or No Ring or Vibrate, and then press ø to select the displayed option. You will see Completed.3.Press and hold ç to exit the menu.Mobile.book  Page 97  Wednesday, September 9, 1998  3:05 PM
98 Customizing Phone Features1-2: Getting to Phone Setup...1.Press M until you see Phone Setup, and then press ø.2.Press M to scroll to one of the features described below. You will see the feature name, along with Select?.Setting the Ringer Tone Select your favorite tone and you’ll recognize your phone’s ring immediately—even in a crowd.1.Follow the steps in “1-2: Getting to Phone Setup...” to get to Set Ringer Tone, and then press ø to select.2.Press M to scroll through the options Standard Tone, Single Ring Tone, British Tone,  French Tone, German Tone, Bravo Tone, Three Ring Tone, Siren Tone, Quick Tone, or High Tone.You hear a one ring cycle demonstration.3.Press ø to select the desired option.4.Press and hold ç to exit the menu.Mobile.book  Page 98  Wednesday, September 9, 1998  3:05 PM
Customizing Phone Features 99Setting the Keypad Tones Choose the sounds your phone makes when its keys are pressed.1.Follow the steps in “1-2: Getting to Phone Setup...” to get to Select Keypad Tones, and then press M to select.2.Press M to choose Normal Tones, Single Tone, or No Tones, and then press ø.3.Press and hold ç to exit the menu.Mobile.book  Page 99  Wednesday, September 9, 1998  3:05 PM
100 Customizing Phone Features1-2-3: Getting to Phone Lock...1.Press M until you see Phone Setup, and then press ø.2.Press M until you see Phone Lock, and then press ø. 3.Press M to scroll to one of the features described below.Locking and Unlocking Your PhoneThese features can help you prevent unwanted use of your phone. Lock the Phone AutomaticallyUse this feature to set your phone to lock itself every time it is powered on.1.Follow the steps in “1-2-3: Getting to Phone Lock...” to get to Automatic Lock, and then press ø to select.2.Press M to choose On or Off, and then press ø to select. You will see Completed.3.Press and hold ç to exit the menu.Lock the Phone InstantlyUse this feature to lock your phone immediately.1.Follow the steps in “1-2-3: Getting to Phone Lock...” to get to Lock Now. 2.Press ø to select. You will see: Locked.Keep in Mind: Once you unlock your phone, it remains unlocked until you lock it again.Mobile.book  Page 100  Wednesday, September 9, 1998  3:05 PM
Customizing Phone Features 101Unlock the PhoneTip: The factory default unlock code is 1234.1.Enter unlock code. Enter your four-digit phone unlock code.2.Press ø.Change the Unlock Code The lock code is originally set to 1234. You should change it as soon as possible.Tip: The factory default security code is 000000.1.Follow the steps in “1-2-3: Getting to Phone Lock...” to get to Change Unlock Code, and then press ø to select. You will see Enter Security Code.2.Enter security code. Enter your six-digit security code. You will see your current lock code and Enter Phone Unlock Code.3.Press ç to clear one digit at a time, or press and hold ç to clear all the digits.4.Enter new code. Enter a new four-digit unlock code, and then press ø. You will see Phone Lock and the new lock code.5.Press and hold ç to exit the menu.Mobile.book  Page 101  Wednesday, September 9, 1998  3:05 PM
102 Customizing Phone Features1-2-3: Getting to Require SIM Card PIN...1.Press M until you see Phone Setup, and then press ø.2.Press M until you see Require SIM Card PIN, and then press ø. 3.Press M to scroll to one of the features described below. You will see the feature name followed by View Options?.Protecting the SIM CardYou can use a PIN code to protect the information stored on your SIM card even when it is inserted into someone else’s phone. Activate and Deactivate the SIM Card PINWhen you activate the SIM code, your phone requests the code whenever the phone is powered on. To change this setting, you need to enter the PIN that your service provider gave you.1.Follow the steps in “1-2-3: Getting to Require SIM Card PIN...”2.Press M to scroll On or Off, and then press ø. You will see Enter PIN.3.Enter PIN code. Enter the 4- to 8-digit code your service provider gave you, and then press ø. You will see Completed.4.Press and hold ç to exit the menu.Mobile.book  Page 102  Wednesday, September 9, 1998  3:05 PM
Customizing Phone Features 103Change the SIM PIN CodeTo choose your own PIN code:1.Follow the steps in “1-2-3: Getting to Require SIM Card PIN...” to get to Change SIM Card PIN, and then press ø to select. You will see Enter Old PIN.2.Enter the current PIN code, and then press ø. You will see Enter New PIN.3.Enter a new PIN code, and then press ø. You will see Repeat New PIN.4.Re-enter the new code, and then press ø again. You will see Completed.5.Press and hold ç to exit the menu.Unblock the PIN Code If your PIN number is entered incorrectly three times in a row, Blocked appears in the display. You need to enter a PIN unblocking key (PUK), which you can obtain from your service provider. Use the following key sequence to unblock your phone: 1.Press ß, ß, º, ∞, ß.2.Enter unblocking key. Enter the 8-digit unblocking key, and then press ø.3.Enter a new PIN code, and then press ø.4.Re-enter the new PIN code, and then press ø.1-2:   Getting to Phone Setup Features...Mobile.book  Page 103  Wednesday, September 9, 1998  3:05 PM
104 Customizing Phone Features1-2: Getting to Phone Setup...1.Press M until you see Phone Setup, and then press ø.2.Press M to scroll to one of the features described below.You will see the feature name, along with Select?.Managing Other Security SettingsYour phone includes other security features:•a SIM PIN2 code for accessing Fixed Dialing settings and other subscription-dependent features•a security code controls access to security and other menu optionsChange the SIM PIN2 Code Your SIM PIN2 code is used to access Fixed Dialing settings. This four- to eight-digit code is issued to you when you subscribe to the feature. Use this feature to choose a new code.1.Follow the steps in “1-2: Getting to Phone Setup...” to get to Change SIM Card PIN2 Code, and then press ø to select. You will see Enter Old PIN2.2.Enter the current PIN2 code, and then press ø. You will see Enter New PIN2.3.Enter new PIN2 code, and then press ø. You will see Repeat New PIN.4.Re-enter the new PIN2 code, and then press ø again. You will see Completed.5.Press and hold ç to exit the menu.Mobile.book  Page 104  Wednesday, September 9, 1998  3:05 PM
Customizing Phone Features 105Unblock the PIN2 Code If your old PIN2 number is entered incorrectly three times in a row, Blocked appears in the display. You needs to enter a PIN unblocking key (PUK), which you can obtain from your service provider. 1.Press ß, ß, º, ∞, ™, ß.2.Enter unblocking key. Enter the 8-digit unblocking code, and then press ø. Your service provider supplies this code.3.Enter a new PIN2 code, and then press ø.4.Re-enter the new PIN2 code, and then press ø.Change the Security Code The security code is your phone’s primary security number. You use it to reset your phone to its default settings and prevent access to your phone book. It is originally set to 000000.1.Follow the steps in the “1-2: Getting to Phone Setup...” to get to New Security Code, and then press ø to select. You will see Enter Security Code.2.Enter the current security code, and then press ø. You will see Enter New Security Code.3.Enter a new security code, and then press ø. You will see Secur. Code and the six-digit number selected. 4.Press and hold ç to exit the menu. Mobile.book  Page 105  Wednesday, September 9, 1998  3:05 PM
106 Customizing Phone Features1-2: Getting to Phone Setup...1.Press M until you see Phone Setup, and then press ø.2.Press M to scroll to one of the features described below.You will see the feature name, along with Select?.Activating Extended Menus This feature activates and deactivates the Extended Menus. See page 134 to learn how Extended Menus can make your phone even simpler to use.1.Follow the steps in “Selecting the Display Language” to get to Extended Menus, and then press ø to select. 2.Press M to choose On or Off, and then press ø.3.Press and hold ç to exit the menu.Press and hold M to activate the extended menus temporarily. The extended menus are deactivated when you exit the Options Menu.Mobile.book  Page 106  Wednesday, September 9, 1998  3:05 PM
Customizing Phone Features 107Selecting the Display LanguageUse this feature to select the language in which your phone displays messages.1.Follow the steps in “Selecting the Display Language” to get to Language Selection, and then press ø to select.2.Press M to scroll through the choices, and then press ø to select the displayed option.3.Press and hold ç to exit the menu.If you accidentally change the language of your phone’s display message, press M ™ § to return to the language selection menu.Mobile.book  Page 107  Wednesday, September 9, 1998  3:05 PM
108 Customizing Phone Features1-2-3: Getting to Phone Status...1.Press M until you see Phone Setup, and then press ø.2.Press M until you see Phone Status, and then press ø.3.Press M to scroll to one of the features described below.Managing Your Phone’s SettingsView all your phone’s settings that have changed from their defaults, and reset them to their original settings if you like. Review the Phone’s SettingsUse this feature to review but not change your phone’s settings.1.Follow the steps in “1-2-3: Getting to Phone Status...” to get to Status Review, and then press ø.2.Press M to scroll through the list of all the menu items you have changed.3.Press and hold ç to exit the menu.Reset Options to Factory DefaultsUse the Master Reset option to reset all settings to their original default settings. The Master Reset option:•resets audible call timers, the in-call display meter, and the automatic lock•resets Extended Menus to default setting and return language selection to original•restores keypad tones to normal, ringer tones to standard, and the volume level to the middle of its rangeMobile.book  Page 108  Wednesday, September 9, 1998  3:05 PM
Customizing Phone Features 109To reset all settings:1.Follow the steps in “1-2-3: Getting to Phone Status...” to get to Master Reset, and then press ø to select. You will see Enter Security Code.Tip: The factory default security code is 000000.2.Enter your six-digit security code. You will see Reset Complete.3.Press and hold ç to exit the menu.Clear All Stored InformationThe Master Clear option resets the same items as Master Reset, plus the following:•clear phone book entries from phone memory (not from SIM memory)•clear last calls made list •reset resettable call timersMaster Clear does not clear the: •fixed dial list•my number(s) list•received messages listTo clear the settings:1.Follow the steps in “1-2-3: Getting to Phone Status...” to get to Master Clear, and then press ø to select. You will see Enter Security Code.Tip: The factory default security code is 000000.2.Enter your six-digit security code.You will see Reset Complete.3.Press and hold ç to exit the menu.Mobile.book  Page 109  Wednesday, September 9, 1998  3:05 PM
110 Customizing Phone FeaturesMobile.book  Page 110  Wednesday, September 9, 1998  3:05 PM
Accessing the Network 111Accessing the NetworkThis section shows you how to register with the network.What You’ll Learn•accessing the Iridium satellite networkMobile.book  Page 111  Wednesday, September 9, 1998  3:05 PM
112 Accessing the NetworkEntering the Network MenuTo enter the Network Selection menu:1.Press M to open the Options Menu.2.Press M to scroll forward.3.Press ø when you see:4.Press M to scroll through the submenu.12:00ABC123NetworkSelectionView Options?Mobile.book  Page 112  Wednesday, September 9, 1998  3:05 PM
Accessing the Network 113What’s on the Network Menu?Register NowNetwork SelectionMobile.book  Page 113  Wednesday, September 9, 1998  3:05 PM
114 Accessing the Network1-2: Getting to Network Selection...1.Press M until you see Network Selection, and then press ø.2.Press M to scroll to one of the features described below. You will see the feature name, along with Select?.Registering With the Satellite NetworkIf you know your phone is outside the range of your local service, use this feature to access Iridium satellite service.Your phone searches for the Iridium satellite network.1.Rotate and extend the antenna upward. See “Placing Calls” on page 23.2.Follow the steps in “1-2: Getting to Network Selection...” to get to Register Now. 3.Press ø to select. You will see Registering.... This may take a few seconds.If the phone finds the signal, you will see Registered and the signal strength indicator:rxThe n indicator also appears.If the phone is unsuccessful you may see one of these messages: System Busy, Restricted Area or Weak Signal.Mobile.book  Page 114  Wednesday, September 9, 1998  3:05 PM
Timing Your Calls 115Timing Your CallsYour phone’s call meters give you a variety of options for tracking the time you spend on the phone. You can monitor the length of individual calls, set a timer to track monthly usage, or have the phone alert you with tones at specific intervals.What You’ll Learn•viewing your phone’s call timers to monitor your airtime•setting your phone’s audible alerts to sound at intervals you specify•activating an in-call display of the elapsed time of your current call•checking the total airtime of your phone since it was manufacturedMobile.book  Page 115  Wednesday, September 9, 1998  3:05 PM
116 Timing Your CallsEntering the Call Meters MenuTo enter the Call Meters menu:1.Press M to open the Options menu.2.Press M to scroll forward.3.Press ø when you see:4.Press M to scroll through the submenu.12:00CallMetersView Options?Mobile.book  Page 116  Wednesday, September 9, 1998  3:05 PM
Timing Your Calls 117What’s on the Call Meters Menu?1 This feature is availabe when the Extended Menu is active.No In-Call DisplayShow Time Per CallSingle Alert TimerRepetitive TimerSet In-Call DisplayShow Last CallTotal For All CallsReset All TimersShow Call TimersSet Audible Call TimersLifetime Timer1Call MetersOn/Off On/Off Mobile.book  Page 117  Wednesday, September 9, 1998  3:05 PM
118 Timing Your Calls1-2-3: Getting to Show Call Timers...1.Press M until you see Call Meters, and then press ø.2.Press M until you see Show Call Timers, and then press ø.3.Press M to scroll to one of the features described below.Showing Call Timers This submenu helps you track your airtime. Keep a running tab of your monthly usage or view the airtime of your most recent call.Show the Time of the Last Call Use this feature to display the elapsed time of your most recent call.1.Follow the steps in “1-2-3: Getting to Show Call Timers...” to get to Show Last Call, and then press ø to select.You will see the airtime of the most recent call in hours, minutes, and seconds. After several seconds, the display returns to Show Last Call.2.Press and hold ç to exit the menu.Show Total Time for All Calls Use this feature to display your total airtime since you last reset the Call Timer.1.Follow the steps in “1-2-3: Getting to Show Call Timers...” to get to Total For All Calls, and then press ø to select. You will see the airtime accumulated since the timer was last reset. The airtime is displayed in hours, minutes, and seconds. After several seconds, the display returns to Total For All Calls.2.Press and hold ç to exit the menu.Mobile.book  Page 118  Wednesday, September 9, 1998  3:05 PM
Timing Your Calls 119Reset All TimersReset your timers at the beginning of each billing cycle to keep track of your spending.1.Follow the steps in “1-2-3: Getting to Show Call Timers...” to get to Reset All Timers, and then press ø to select. You will see Completed. The display then returns to Reset All Timers.2.Press and hold ç to exit the menu.Keep in Mind: This does not reset the Lifetime Timer described on page 123.Mobile.book  Page 119  Wednesday, September 9, 1998  3:05 PM
120 Timing Your Calls1-2-3: Getting to Audible Call Timers...1.Press M until you see Call Meters, and then press ø.2.Press M until you see Set Audible Call Timers, and then press ø.3.Press M to scroll to one of the features described below.Setting Audible Call Timers Let your phone watch the clock for you. The call timers signal at a set time or interval with beeps only you can hear. Set the Single Alert Timer Use this feature to set your phone to alert you after an elapsed time.1.Follow the steps in “1-2-3: Getting to Audible Call Timers...” to get to Single Alert Timer, and then press ø to select.2.Press M to scroll to On or Off, and then press ø to select.•If you select On, you will see Enter Seconds. Continue with step 3.•If you select Off, you will see Completed. Continue with step 4.3.Press ø to accept the current setting. You will see Seconds XXX.orEnter a number from 11 to 999, and then press ø. You will see Seconds XXX.4.Press and hold ç to exit the menu.Mobile.book  Page 120  Wednesday, September 9, 1998  3:05 PM
Timing Your Calls 121Set the Repetitive TimerUse this feature to set your phone to alert you at specific intervals, for example every 45 seconds.1.Follow the steps in “1-2-3: Getting to Audible Call Timers...” to get to Repetitive Timer, and then press ø to select. 2.Press M to scroll to On or Off, then press ø to select.•If you select On, you will see Enter Seconds. Continue with step 3.•If you select Off, you will see Completed. Continue with step 4.3.Press ø to accept the current setting. You will see Seconds XXX. orEnter a number from 11 to 999, and then press ø. You will see Seconds XXX.4.Press and hold ç to exit the menu.Mobile.book  Page 121  Wednesday, September 9, 1998  3:05 PM
122 Timing Your Calls1-2: Getting to Call Meters...1.Press M until you see Call Meters, and then press ø.2.Press M to scroll to one of the features described below.Showing the In-Call TimerUse this feature to display a running clock of the airtime elapsed while on a call.1.Follow the steps in “1-2: Getting to Call Meters...” to get to Set In-Call Display, and then press ø to select. 2.Press M to scroll to Show Time Per Call or No In-Call Display, and then press ø to select.3.Press and hold ç to exit the menu.Mobile.book  Page 122  Wednesday, September 9, 1998  3:05 PM
Timing Your Calls 123Show the Lifetime TimerUse this feature to show the total time of all calls for the life of your phone. Tip: The Lifetime Meter can’t be reset. Reset All Timers has no effect on this timer.1.Follow the steps in “1-2: Getting to Call Meters...” to get to Lifetime Timer, and then press ø to select. You will see the total airtime of your phone since it was manufactured.2.Press and hold ç to exit the menu.Mobile.book  Page 123  Wednesday, September 9, 1998  3:05 PM
124 Timing Your CallsMobile.book  Page 124  Wednesday, September 9, 1998  3:05 PM
125Setting Up Your AccessoriesThis menu can make using your phone while driving a little easier. You can set your phone to answer automatically after two rings, set a timer to power the phone with the car, automatically mute the radio–even set your car’s horn to beep to let you know you’re receiving a call when you’ve stepped away from your car.What You’ll Learn•muting your car radio automatically when you make or receive a call •setting your phone to answer automatically after two rings•powering down your phone at a set time after you turn your ignition off•setting alerts to notify you of incoming calls when you’re away from the carMobile.book  Page 125  Wednesday, September 9, 1998  3:05 PM
126Entering the Accessory Setup MenuTo enter the Accessory Setup Menu…1.Press M to open the Options Menu.2.Press M to scroll forward.3.Press ø when you see:4.Press M to scroll through the submenu.5.Press ø when prompted View Options?.12:00Accessory SetupView Options?Mobile.book  Page 126  Wednesday, September 9, 1998  3:05 PM
127What’s on the Accessory Setup Menu?Safety TimerAutomatic AnswerAuxiliary AlertMute Car RadioAccessory SetupOn OffOn OffOn OffOn OffMobile.book  Page 127  Wednesday, September 9, 1998  3:05 PM
1281-2: Getting to Accessory Setup...1.Press M until you see Accessory Setup, and then press ø.2.Press M to scroll to one of the features described below. You will see the feature name, along with Select?Mute Car RadioWhen you activate this option, your car radio is automatically muted when you make or receive a call. Keep in Mind: This feature works with your car radio’s mute feature. It must be enabled by your local dealer. Mute Car Radio won’t work if the car kit doesn’t support it or if your radio does not have a mute feature.1.Follow the steps in “1-2: Getting to Accessory Setup...” to get to Mute Car Radio, and then press ø to select.2.Press M to scroll to On or Off, and then press ø to select.3.Press and hold ç to exit the menu.Mobile.book  Page 128  Wednesday, September 9, 1998  3:05 PM
129Automatic AnswerYour phone rings twice when a call is incoming, then the call is live. Make sure you activate Automatic Handsfree also.1.Follow the steps in “1-2: Getting to Accessory Setup...” to get to Automatic Answer, and then press ø to select. You will see Completed.Tip: If this option is active set the Ring or Vibrate feature be set to Ring Only (see page 97).2.Press M to scroll to On or Off, and then press ø to select.3.Press and hold ç to exit the menu.Mobile.book  Page 129  Wednesday, September 9, 1998  3:05 PM
1301-2: Getting to Accessory Setup...1.Press M until you see Accessory Setup, and then press ø.2.Press M to scroll to one of the features described below. You will see the feature name, along with Select?Safety TimerTip: This can be useful if you make frequent driving stops–save battery power when you stop longer than expected.When your phone is mounted in a car kit, it is powered by your car’s battery. Use this feature to keep your phone powered up for a set time after you turn your car’s ignition off.1.Follow the steps in “1-2: Getting to Accessory Setup...” to get to Safety Timer, and then press ø to select. You will see Enter Time.2.Enter the time in minutes, then press ø. 3.Press and hold ç to exit the menu.Tip: The Safety Timer is initially set to 60 minutes, but you can choose any length of time between one and 999 minutes.Keep in Mind: If the safety timer is set to zero, the phone connected to the car kit operates only in conjunction with your vehicle’s ignition.Mobile.book  Page 130  Wednesday, September 9, 1998  3:05 PM
131Auxiliary AlertIf you don’t want to miss calls when you step away from your car, activate this feature. You car’s horn beeps or lights flash to let you know a call is incoming.3.Follow the steps in “1-2: Getting to Accessory Setup...” to get to Auxiliary Alert, and then press ø to select.4.Press and hold ç to exit the menu.Mobile.book  Page 131  Wednesday, September 9, 1998  3:05 PM
132Mobile.book  Page 132  Wednesday, September 9, 1998  3:05 PM
Customizing the Menu System 133Customizing the Menu SystemDo you think your 9520 Mobile Phone has too many features for everyday use? You can do something about it by hiding the features you don’t always need. Is your favorite feature not on the Quick Access menu? It’s easy to change the defaults to your favorite features. By customizing your menus, your favorite features are always quick and easy to find! This chapter shows you how.What You’ll Learn•personalizing the Options Menu•personalizing the Quick Access MenuMobile.book  Page 133  Wednesday, September 9, 1998  3:05 PM
134 Customizing the Menu SystemPersonalizing the Options MenuYou can customize the Options Menu by moving features in and out of the Extended Menu.Move Menu FeaturesTo move menu features:1.Find the feature you want to move.2.Press and hold ø. You will see one of two responses depending on where that menu feature currently is. If you see: Keep in Mind: Some features and submenus cannot be moved. You will see Cannot Move Menu Item.Remove From Short Menus (the feature is in the Short Menu)Press ø to move the feature to the Extended Menu. You will see Menu Item Moved.orPress M scroll to Leave in Short Menus, and then press ø to select. You will see Move Cancelled.Add To Short Menus (the feature is in the Extended Menu)Press ø to move the feature to the Short Menu. You will see Menu Item Moved.orPress M to scroll to Leave in Long Menus, and then press ø to select. You will see Move Cancelled.Mobile.book  Page 134  Wednesday, September 9, 1998  3:05 PM
Customizing the Menu System 135Activate/Deactivate Extended MenusUse the Options Menu to activate and deactivate Extended Menu. Activate it when you need access to every feature. Deactivate it for everyday use.1.Press M until you see Phone Setup, and then press ø to select.2.Press M until you see Extended Menus, and then press ø to select.3.Press M to scroll to either On or Off, and then press ø to select.If you activate the Extended Menu, you will notice that all the hidden features are now accessible.Access Hidden FeaturesIf you want access to a feature hidden in the Extended Menu, but don’t want to leave the Extended Menu active, you can use this shortcut:Press and hold M for a few seconds.All Extended Menu features are accessible until you exit the Options Menu.Mobile.book  Page 135  Wednesday, September 9, 1998  3:05 PM
136 Customizing the Menu SystemPersonalizing the Quick Access MenuYou can put any of the features listed below in the Quick Access Menu instead of the defaults listed on page 43.To change the default quick access features to one of the features listed above, choose the feature you want to replace, and then choose the replacement.1.Press E and then press M to scroll to the feature you wish to change.2.Press and hold ø to access the list of features available.3.Press M to scroll through the list until you find the desired feature.4.Press ø to store the displayed feature in the new location.You will see Completed.DFind by Location recalls Phone Book entries by memory location numbers.FAdd Entry to Phone stores entered numbers in the next available phone memory location.TAdd Entry to SIM stores entered numbers in the next available SIM card location.JPhone Mute on or off mutes the phone.NRing Volume displays and sets the incoming call ring tone volume.VSwitch Memory switches One-Touch dialing between the phone and SIM memories depending on the current setting.YLast Call Timer displays the duration of your last call.Mobile.book  Page 136  Wednesday, September 9, 1998  3:05 PM
Menu Quick Reference 137Menu Quick ReferenceThis section provides a quick reference of the menu structure.What You’ll Learn•Menu Quick ReferenceMobile.book  Page 137  Wednesday, September 9, 1998  3:05 PM
138 Menu Quick ReferencePhone Book MenuMy Phone Number(s)Find Entry By NameFind Entry By LocationAdd EntryPersonal NumbersLast Ten CallsPhone BookAdd To Phone MemoryAdd To SIM Card MemoryCheck CapacityPrevent AccessCheck Phone CapacityCheck SIM CapacityNo Memory RestrictionsTo Phone MemoryTo SIM Card MemoryTo Phone & SIM MemoryFixed DialingFixed Dial ListView Fixed Dial ListSetup Fixed DialingOn/OffAdd EntryOne-Touch Dial SettingsTo Phone MemoryTo SIM Card MemoryTo Fixed Dial ListEdit Entry Fixed Dial ListEnter Name:Enter Location:Call NumberModify Name Or NumberErase Name And NumberCall NumberModify Name Or NumberErase Name And NumberLast Calls MadeErase All NumbersErase EntryMobile.book  Page 138  Wednesday, September 9, 1998  3:05 PM
Menu Quick Reference 139Call Related Features MenuBar Outgoing CallsBar Incoming CallsChange Bar PasswordCall Barring1Forward When UnavailableForward All CallsDetailed ForwardingCall Forwarding1Call Waiting1Show Battery MeterCall Related FeaturesForward Voice CallsForward All Voice CallsIf BusyIf No AnswerIf Not ReachableCancel All ForwardingOn/OffOn/OffShow Signal StrengthOn/OffPending Call DropOn/OffOn/OffOn/OffOn/OffOn/OffOn/OffMobile.book  Page 139  Wednesday, September 9, 1998  3:05 PM
140 Menu Quick ReferenceMessages MenuVoicemail NumberMessage SettingsReceived MessagesCall VoicemailGo to Next MessageDelete MessageReturn CallMessages MenuMobile.book  Page 140  Wednesday, September 9, 1998  3:05 PM
Menu Quick Reference 141Phone Setup Menu1 This feature is available when the Extended Menu is active.Status ReviewMaster ResetMaster ClearAutomatic LockLock NowChange Unlock CodePhone LockRing or VibrateSet Ringer ToneRequire SIM Card PINOn/OffChange SIM PIN CodeChange SIM PIN2 CodeNew Security CodeExtended MenusLanguage Selection1Adjust Ring VolumeNo TonesNormal TonesSingle ToneSelect Key Pad Tones1Phone Status1Phone SetupAutomaticTürkçeNo Ring or VibrateRing OnlyVibrate OnlyVibrate Then RingStandard ToneHigh ToneOn/OffOn/OffMobile.book  Page 141  Wednesday, September 9, 1998  3:05 PM
142 Menu Quick ReferenceNetwork Selection MenuRegister NowNetwork SelectionMobile.book  Page 142  Wednesday, September 9, 1998  3:05 PM
Menu Quick Reference 143Accessory Setup MenuSafety TimerAutomatic AnswerAuxiliary AlertMute Car RadioAccessory SetupOn OffOn OffOn OffOn OffMobile.book  Page 143  Wednesday, September 9, 1998  3:05 PM
144 Menu Quick ReferenceCall Meters Menu1 This feature is availabe when the Extended Menu is active.No In-Call DisplayShow Time Per CallSingle Alert TimerRepetitive TimerSet In-Call DisplayShow Last CallTotal For All CallsReset All TimersShow Call TimersSet Audible Call TimersLifetime Timer1Call MetersOn/Off On/Off Mobile.book  Page 144  Wednesday, September 9, 1998  3:05 PM
145TroubleshootingThis section tells you what to do if you experience one of these problems: Problem SolutionYou can’t make calls.•Check the antenna. Is it fully extended and rotated? Do you have a clear view of the sky?•Did you enter the number in international format? All calls made from the Iridium satellite system must be in international format.•Check the signal strength meter. If the signal is weak, move to an open space or, if you are in a building, move closer to a window.•Check the Network Selection settings.\•Check your Operator coverage map.•Is Restricted displayed? Check the Call Barring setting.•Has a new SIM card been inserted? Check that no new restrictions have been imposed.You can’t receive calls.•Check to see that your phone is powered on.•Check the antenna. Is it fully extended and rotated? Do you have a clear view of the sky?•Check the signal strength. If the signal is weak, move to an open space or, if you are in a building, move closer to a window.•Check the Call Forwarding and Call Barring settings.•Check the Ringer setting. If it is off, there is no audible ringer. You can’t make international calls.Have you included the relevant codes? Press and hold the º key to display the international dialing prefix (+) and then enter the appropriate country code followed by the phone number. Your phone won’t unlock.•Have you inserted a new SIM card? Enter the new PIN code.•Do you have a replacement phone? Enter the default phone unlock code —1234.•Have you forgotten the unlock code? Press M to change the unlock code (you need your security code).Mobile.book  Page 145  Wednesday, September 9, 1998  3:05 PM
146Your PIN is blocked.Enter the PIN unblocking code or contact your service provider.Your PIN2 is blocked.Enter the PIN2 unblocking code or contact your service provider.Your SIM card won’t work.•Is the card inserted the correct way?•Is the gold chip visibly damaged or scratched? Return the card to your service provider.•Check the SIM and phone contacts. If they are dirty, clean them with an antistatic cloth.You can’t cancel Call Forwarding or Call Barring.Wait until you are in an area with good network coverage and try again.The o symbol is flashing.There is not enough memory available to store another message. Use the Messages menu to delete one or more messages.You find your phone becoming warm during use.You may notice this during long calls or during charging. The heat is produced by the electronic components within your phone and is quite normal.Your phone has your SIM card inside but the display says:•Check Card or Insert Card.Check that the SIM card has been inserted correctly. The contacts of the SIM card may be dirty. Turn the phone off, remove the SIM card and rub the gold chip on the card with a clean cloth. Replace the card in the phone.•Blocked or Bad Card See Supplier. Please contact your service provider.You find your phone’s prompts in a language other than your own.Press M, ™, §. This routes you directly to the language selection submenu. Press M until you see your preferred language. Press ø to select.Problem SolutionMobile.book  Page 146  Wednesday, September 9, 1998  3:05 PM
147GlossaryAairtime      The amount of time you spend using a cellular or satellite system. Especially, the time between successfully placing a call and terminating a call.antenna      The devices on your phone that send and receive satellite or cellular signals.Cclear-line-of sight      In order for your phone to communicate to the satellite network, your antenna must have a clear view of the sky.Ddefault      A feature’s original setting as pre-programmed in the factory.DTMF      See Dual Tone Multi-Frequency tones.dual mode phone      A phone designed to operate on a cellular network and the Iridium satellite network.Dual Tone Multi-Frequency Tones      The tones that your phone transmits when you press a key on the keypad. These tones are used to access automated calling systems such as voicemail.EEmergency Call      This feature allows you to make an emergency call even if your phone is locked by dialing 112.Ffringe area      The outermost range of a cellular system or the Iridium satellite system where signals are weak.Hhome system      The local cellular system or satellite network where you obtain your wireless service.home type system      A cellular/satellite system of the same type as your local system. See also non-home type system, and system type.IIn-Call Menu      The menu that appears when you press M during a call. It allows you to access features like call holding. indicator      A light or icon on your phone that gives you information about your phone’s status.Iridium System      A system of 66 satellites that offer global communication.Mobile.book  Page 147  Wednesday, September 9, 1998  3:05 PM
148Llandline      The telephone system used for conventional office and home phones.lock      Use this feature to prevent unauthorized access to your satellite telephone.lock code      A four-digit code used to unlock a locked phone.Mmemory location      A space in the internal Phone Book (both Phone Memory and SIM memory) where you can store a telephone number and a name. Each of the Phone’s memory locations can hold up to 32 digits and 16 letters. The SIM card memory can hold up to 20 digits and 16 letters.menu feature      Any feature that can be accessed through the menu system.menu system      The hierarchical arrangement of your phone’s features that allows for quick, intuitive access.message      A feature that allows the user to view pager-like alphanumeric messages.Nname directory      An alphabetical list of the names and telephone numbers you have stored into your phone’s internal Phone Book.non-home type system      A system type different from your home system. See also home type system and system type.OOne-Touch Dialing      To use this feature, press and hold a number on the keypad, ¡ through ª and your call is placed.Options Menu      The first level of the menu system hierarchy, which contains the six main feature menus: Phone Book, Call-Related Features, Messages, Phone Setup, Network Selection, Call Meters, Accessory Setup.Ppause      A special character that tells your phone to “pause” or wait for your input before sending a group of numbers stored in memory.PIN or PIN2 Code      Personal Identification Network Code. A private numeric password that allows you to access your SIM card and some network services.prompt      A message requesting input.QQuick Access Menu      A set of features that is activated by pressing E and a digit key (¡ to ª).Mobile.book  Page 148  Wednesday, September 9, 1998  3:05 PM
149S scroll      To move backward or forward through a list; for example: to move backward or forward through the menu system or the name directory.security code      A six-digit code used to access sensitive features.service provider      A company affiliated with a cellular or satellite carrier that provides cellular/satellite service to its customers. signal      The radio waves that carry information between your phone and the satellite or cellular system.SMS      Short Messaging Services.standby-time      The amount of time that your phone is left powered on to receive calls.status indicator      See indicator.submenu      A secondary level of your phone’s menu system hierarchy.Ttalk-time      The amount of time that you spend talking on the phone.toggle      To switch between two possible options; for example: on vs. off.Vvolume keys      Located on the side of your phone, the upper and lower volume keys are used to adjust ringer and earpiece volume.Mobile.book  Page 149  Wednesday, September 9, 1998  3:05 PM
150Mobile.book  Page 150  Wednesday, September 9, 1998  3:05 PM
151IndexAaccessing hidden features 135accessing the network 111accessory connector portdefined 147adding an entry 51dedicated keys 50menu 50messages 51adjusting earpiece volume 30adjusting ringer volume 31, 96air bags 10aircraft 10airtimedefined 147antennacare 7defined 147Automatic answer 129automatic redial 31available characters 53Bbatteriessafety considerations 8blasting areas 10Busy Try Later 35buttonsSIM card eject 14CCall Answer? 28call barring 79Call Failed 23, 28call forwardingall calls 73cancelling 75when unavailable 72call holding 36Call Meters menu 115, 116, 144call muting 34Call Related Features menu 139call timersaudible 120lifetime 123repetitive 121resetting all 119showing all calls 118showing last call 118single alert 120viewing in-call 122call waiting 35accepting 35activating 78ending 35rejecting 35calling an entry 58can’t make calls 145Cannot Hold Second Call 35characters 53check mark 16clear key 15clearing stored information 109clear-line-of-sightdefined 147Connected 28connection messages 23correcting an entry 52customizingOptions Menu 134phone features 93Quick Access Menu 43, 136Ddedicated key 51defaultdefined 147detailed call forwarding 74dialing a number 23Mobile.book  Page 151  Wednesday, September 9, 1998  3:05 PM
152dialing numbers with pauses 54dialing special characters 24Display 15driving 8DTMFdefined 147dual mode phonedefined 147Dual Tone Multi-Frequency Tonesdefined 147Eelectronic devices 8emergency calldefined 147placing 27ending a call 26entering characters 52entering names 52entering pauses in numbers 54erasing name and number 58explosive atmospheres 10exposure to radio frequencysignals 7extended menus 135accessing hidden features 135activating 106, 135Ffactory defaults 108finding entry by locationdedicated keys 57menu 57finding entry by name 56fixed dialingadding an entry 62editing an entry 64modifying an entry 63setting up 61viewing list 65fringe areadefined 147function keysdefined 147Gguide overview 12Hhearing aids 9hidden features 135Hold Failed 35holding 35, 36home system 16defined 147home type systemdefined 147Iiconsdisplay 41quick access 16Quick Access Menu custom icons 136Quick Access Menu default icons 43In Use symbol 16In-Call Menu 44call holding 36call muting 34call waiting 35defined 147in-call timer 122indicators 147check mark 16home system 16In Use symbol 16no service 16quick access 16scroll bar 16short message service symbol 16signal strength 16inserting pauses into numbers 27inserting the SIM card 20international calling 24Iridium Systemdefined 147Mobile.book  Page 152  Wednesday, September 9, 1998  3:05 PM
153Kkey presses 13keypad tonesselecting 99keysclear 15memory recall 15memory store 15menu 15message 15power 15quick access key 15scroll 15volume 15, 149Llandlinedefined 148languagesetting 107last ten numbers dialed 66lifetime timer 123lockdefined 148lock codedefined 148locking phoneautomatically 100instantly 100Mmanaging messages 88master clear 109master reset 108medical devices 9memoryphone 48SIM 48memory locationdefined 148memory recall key 15memory store key 15menu 39Call Meters 116, 144Call Related Features 71, 139featuredefined 148key 15Messages 140Network 112Network Selection 111, 142Phone Book 47, 138Phone Setup 141quick reference 137systemdefined 148menuspersonalized menus 134message (SMS)defined 148message key 15messages 83adding an entry 51connection 23deleting 91managing 88notification 88power on 21reading 91returning calls 92storing 88, 91text 89what’s in one 89messages and prompts 13Messages menu 140mode selectionsatellite 114modifying name and number 58muting 34Nname directorydefined 148navigating the Options Menu 40Network Selection menu 112, 142no service 16non-home type systemdefined 148Mobile.book  Page 153  Wednesday, September 9, 1998  3:05 PM
154notification messagesfax 89voicemail 89Oone-touch dialingdefined 148setting up 68using 68Options Menucustomizing 41, 134defined 148display icons 41exiting 40extended menus 135moving features 134navigating 40phone response 40scrolling 40selecting options and submenus 40Ppacemakers 9passwordschanging call bar password 81pausedefined 148pause dialing 27, 54pending call drop signaldeactivating 77Personal Mailbox Service 29Phone Book 25adding an entry 50calling an entry 58checking capacity 59erasing name and number 58find entry by location 57find entry by name 56last ten numbers dialed 66menu 46modifying name and number 58organizing 48preventing access 60storing names and numbers 50Phone Book Menu 138phone callsautomatic redial 31phone memory 48phone number 27, 67phone operation 8Phone Setup menu 141PIN codechanging 103defined 148unblocking 103PIN2 codechanging 104is blocked 146unblocking 105placing callscalling a phone book entry 58dialing a number 23embedded in a message 25, 92emergency calls 27from the phone book 25international 24last ten numbers dialed 66number in a message 25one-touch dialing 68posted facilities 9power key 15power on messages 21powering your phone on 21prefixes 55preventing access to phone book60preventing incoming calls 80preventing outgoing calls 79promptdefined 148prompts and messages 13protecting SIM card with a PINcode 102Protecting Your SIM Card with aPIN Code 102Mobile.book  Page 154  Wednesday, September 9, 1998  3:05 PM
155Qquick access icons 16quick access key 15Quick Access Menu 42activating feature 42custom icons 136customizing 43, 136default icons 43defined 148scrolling 42Rrecalling entries 56receiving callsanswering 28indicators 28Reconnect Failed 35Redial Failed 24Redial? 23, 24redialing last number called 24registering with satellite network114removing the SIM card 20repetitive timer 121resetting options to defaults 108Restricted Area 23restricting calls 79password 81restricting incoming calls 80restricting outgoing calls 79restricting phone use 61ringer tonesetting 98Ssafety information 7Safety timer 130satellite mode 114satellite networkregistering 114scrolldefined 149scroll bar 16scroll keys 15scrollingOptions Menu 40Quick Access Menu 42security codechanging 105defined 149self tests 21service providerdefined 149setting phone to ring or vibrate 97settingsclearing 109reviewing 108Short message service symbol 16signaldefined 149signal strength 76signal strength symbol 16SIM cardchanging PIN code 103changing PIN2 code 104deactivating PIN code 102eject button 14inserting 20messages 146protecting 102removing 20unblock PIN2 code 105unblocking PIN code 103SIM memory 48single alert timer 120SMSdefined 149special characters 24special keys 15standby time 22defined 149status indicatordefined 149storing names and numbers 50submenus 39defined 149System Busy 23Mobile.book  Page 155  Wednesday, September 9, 1998  3:05 PM
156Ttalk-timedefined 149timing calls 115tips 13toggledefined 149troubleshooting 145can’t cancel Call Forwarding or Barring 146can’t make international call 145can’t receive calls 145message symbol is flashing 146phone won’t unlock 145PIN is blocked 146SIM card messages 146SIM card won’t work 146wrong language in the display 146your phone is hot 146Trying 35turning the SIM card PIN On orOff 102Uunanswered calls 29unblocking PIN code 103unblocking SIM PIN2 code 105unconditional call forwarding 43understanding the guide 13unlock codechanging 101unlocking phone 101using your phone 21Vvehicles 9vibrate 97voicemailchecking 86storing number 87volumeearpiece 30ringer 31, 96volume keys 15defined 149WWeak Signal 23what’s my phone number 27, 67Mobile.book  Page 156  Wednesday, September 9, 1998  3:05 PM
157Patent InformationManufactured under one or more of the following U.S. patents:412121841386814193036425438243028454312074432731943296664369516436952243786034390963D269873439826544005844400585D270835D271491Re.314704431977443446144555344462098D275951448415344854864486624D2768094491972D2776674504834D27870845231554546329455042645516964564821D28216945715954573017457424345859574602218D284759D28543946163144617520D28677846263094628529462982946303044630305463314146365934636741D28843246481254649543D2886834654655D2891564662691466733346689174670747467250246807874681476468358546927264704588D2925784706036D292920471072447113614715063471631947163914723305D2942574727306472758347301954734635473627747379764740794474101847410344742562D2956274746242D295973D2959754751737D29618747616214764737D297734D2977354777564Re.32768D29913647979294798975480034848022364809356481137748114044827226482750748292744837534D30147648436214845772D302015485196648685764870686D30365648765524879533D30542748961244897873D305717490454949052884905301D306293D306441D30659449126024918732492217849455704954796495985149638124963843496553749723554972432497245549758084984290D314173D315330D315346D315543D315559D3155655004992D3159075008925D316417D3168595017856501818850200915020092502009350280835028859502904450292335031028503653250539245057762D32078050598855060294D322783D32295550816745083304D324024D3243885095503D325028D3255835109536D32591551134365117450512104751224805122722D3270615128834D328302514255151426965146620514847151484735148961515035951503845152006515769351631595164652516659651757595175874D3322615182749D33278551855665187809519322351951065195108520106952049775210793521467552221045222251D33733252300075230093523363352354925237257523912752415455241548524165052416935242767D33958252493025251331D340710526098852611195262710526305252767075278994D3431735280637D344087528755352875555287556D34451153013655321847D34888053495885359696536140053630715365549D3524975366826D353131D353361537514353752585379324D354055D3540625384825D356084540244754061465406562D357224D3574575410741D357680D3576815428836D359734D359735D3599595432017D3606325438684D36107054426805446763544876354487715453997D362840545774454596405463646546541254691775475752D365094D3658175486843548718454883355488649D3668725493198549371454971265497382D36764054993945506490D36869655106935511235D3691625513078D3693595519303551934655242765524278D370463553092255421165544250D37248155462755546380D37289655510785559471D374424D374872557219355749765577268D375732D375733D375734D375932D375952D37612755880415589796559017755947785594951D377792D37793456040505606730D3783665613229561386356152335621763Other patents pending.Mobile.book  Page 157  Wednesday, September 9, 1998  3:05 PM
158Mobile.book  Page 158  Wednesday, September 9, 1998  3:05 PM

Navigation menu