Motorola Mobility T6NF1 Portable Satellite Transceiver User Manual Exhibit 8

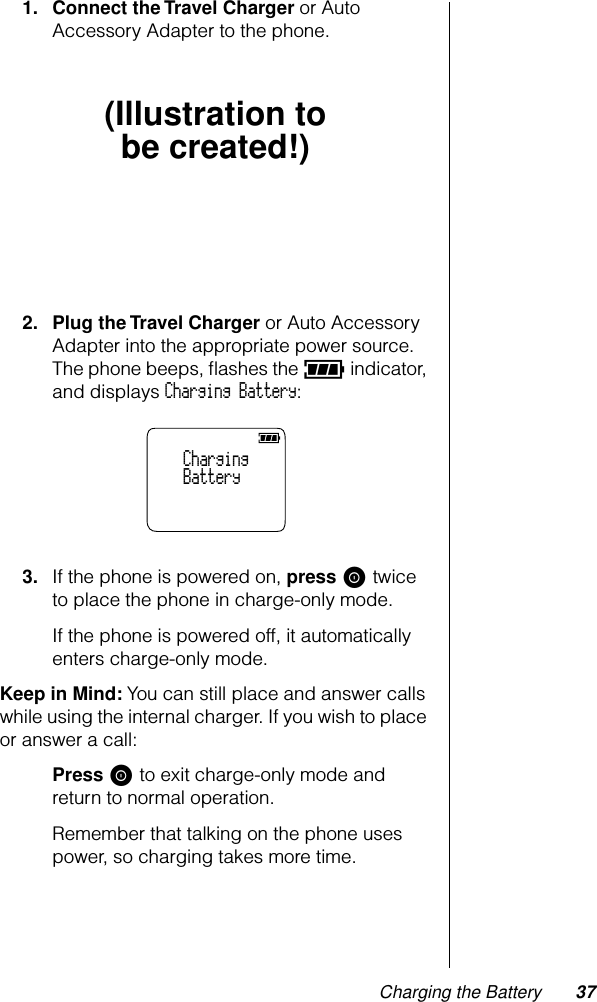
Motorola Mobility LLC Portable Satellite Transceiver Exhibit 8
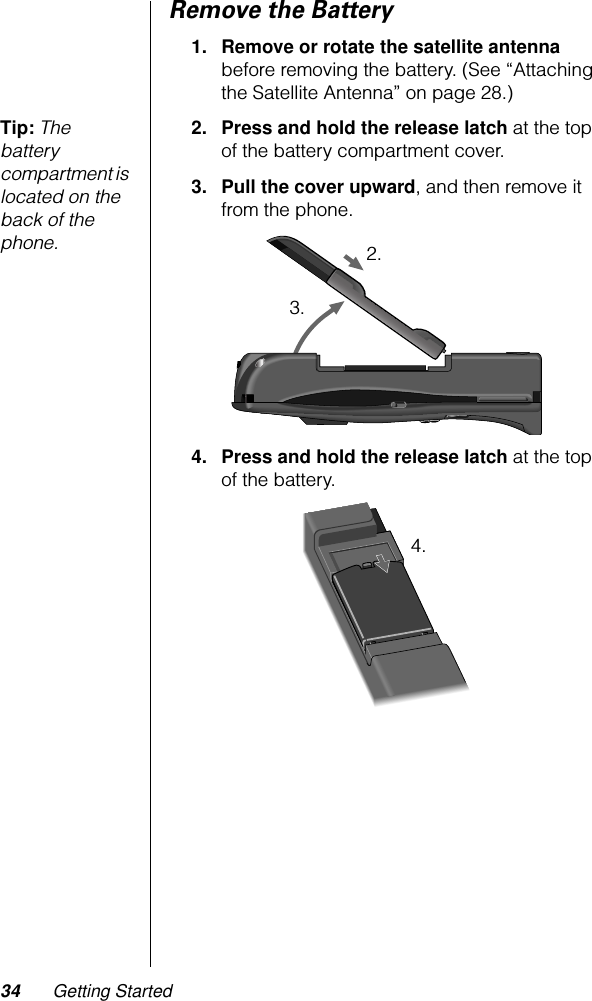
Contents

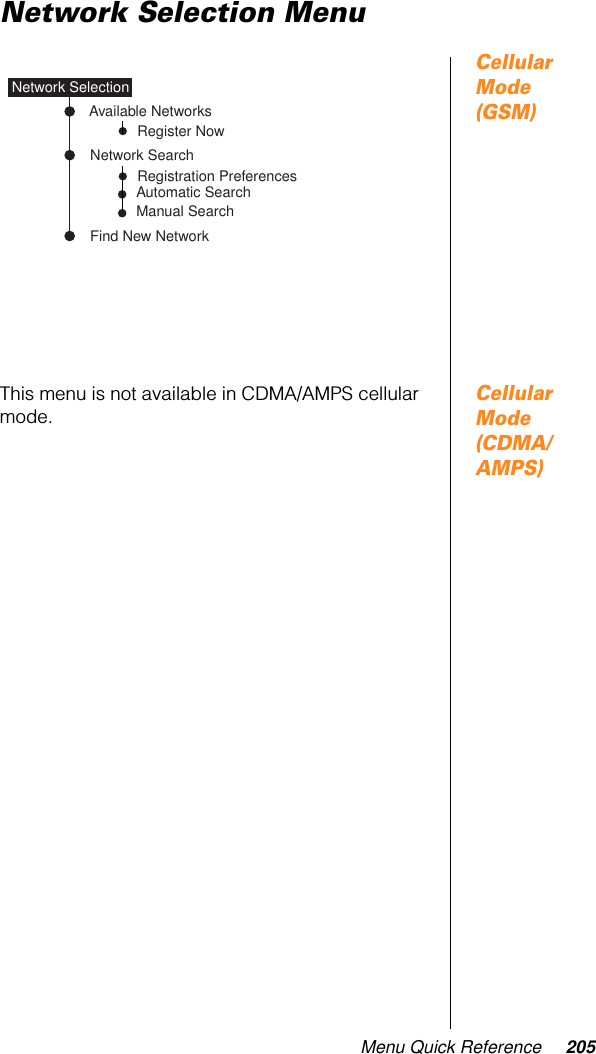
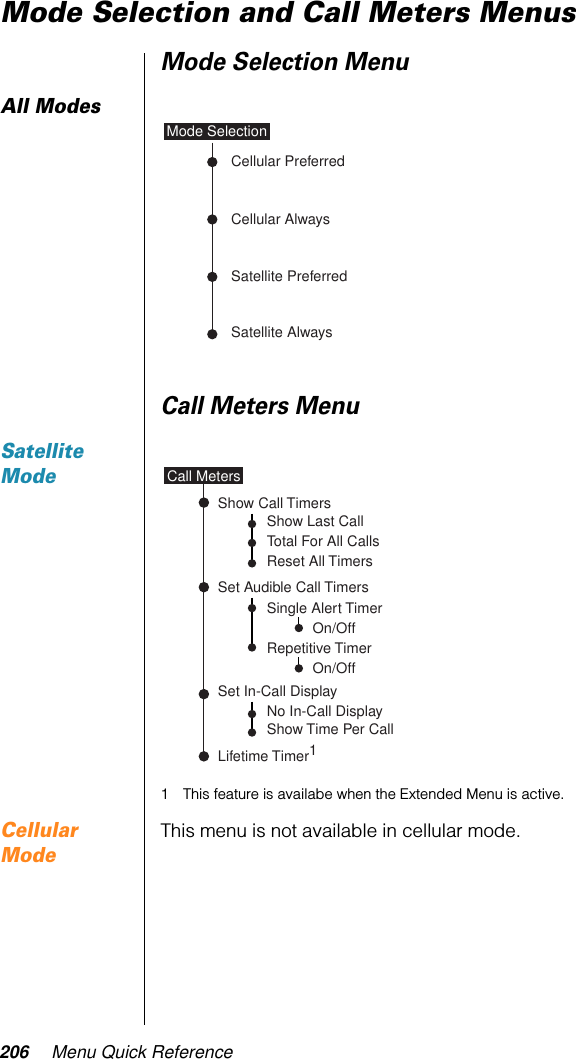
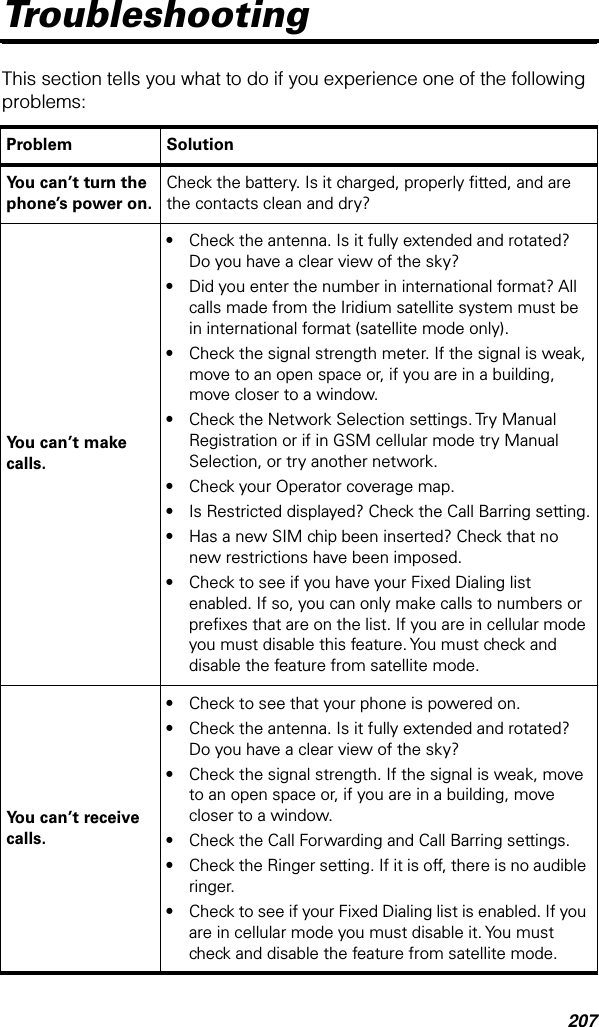
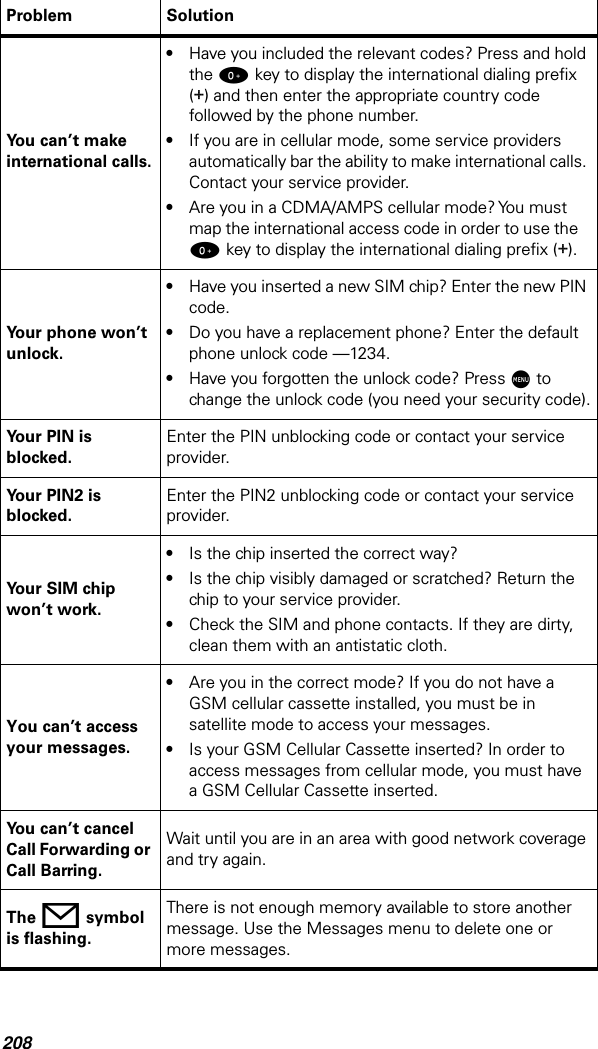
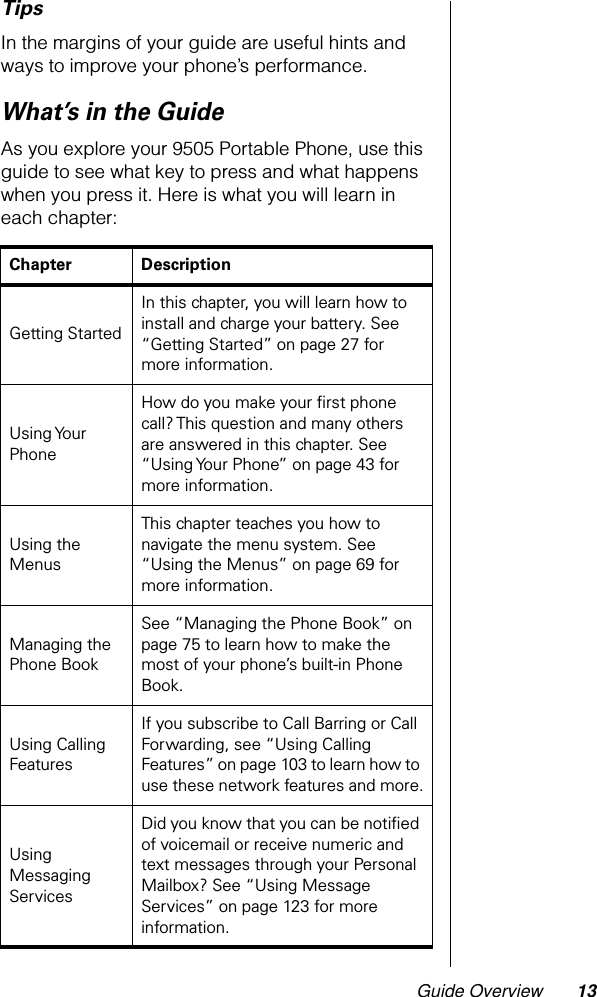
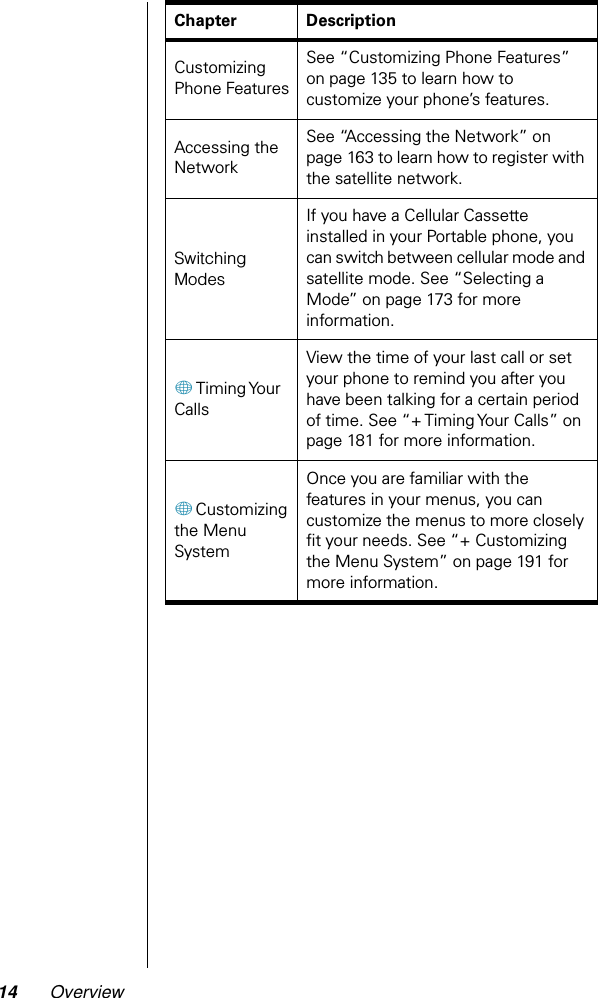
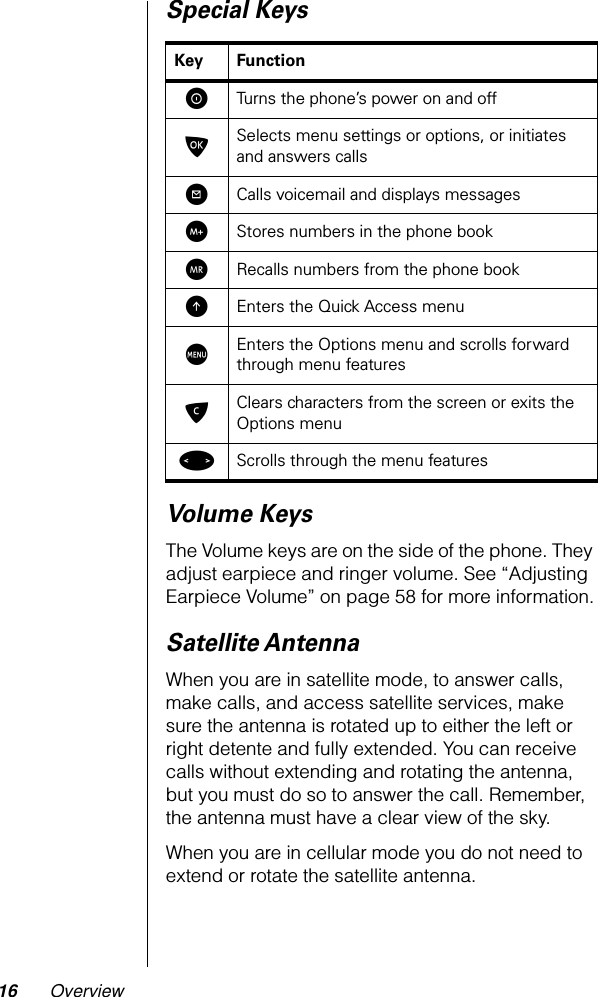
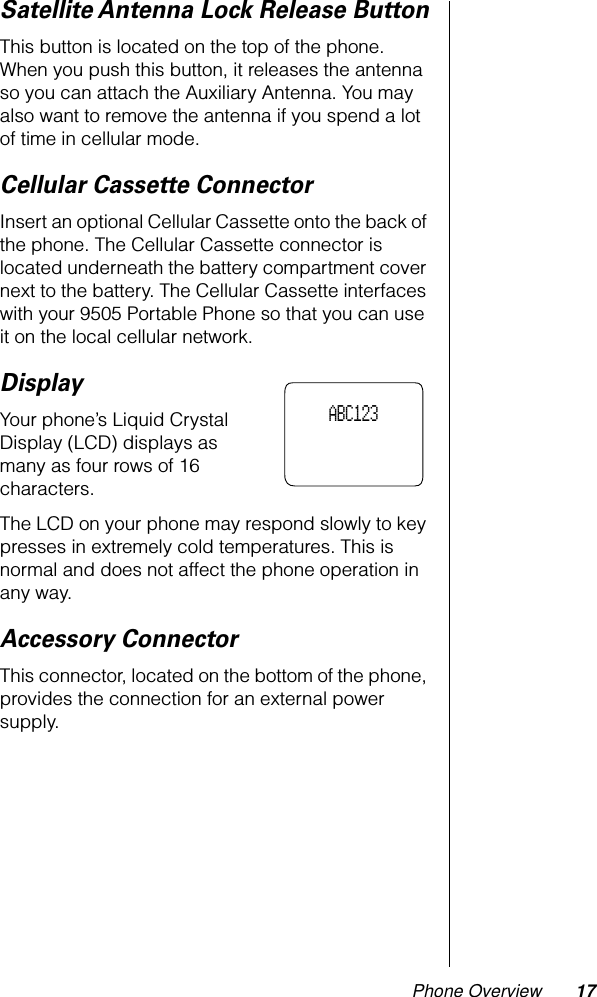
Motorola Exhibit 8 Users Manual
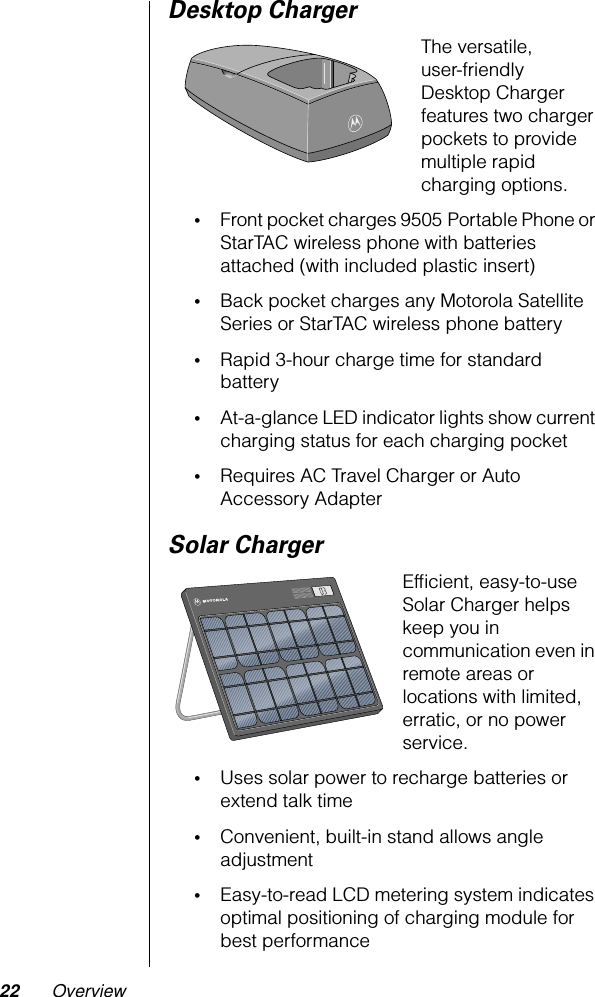
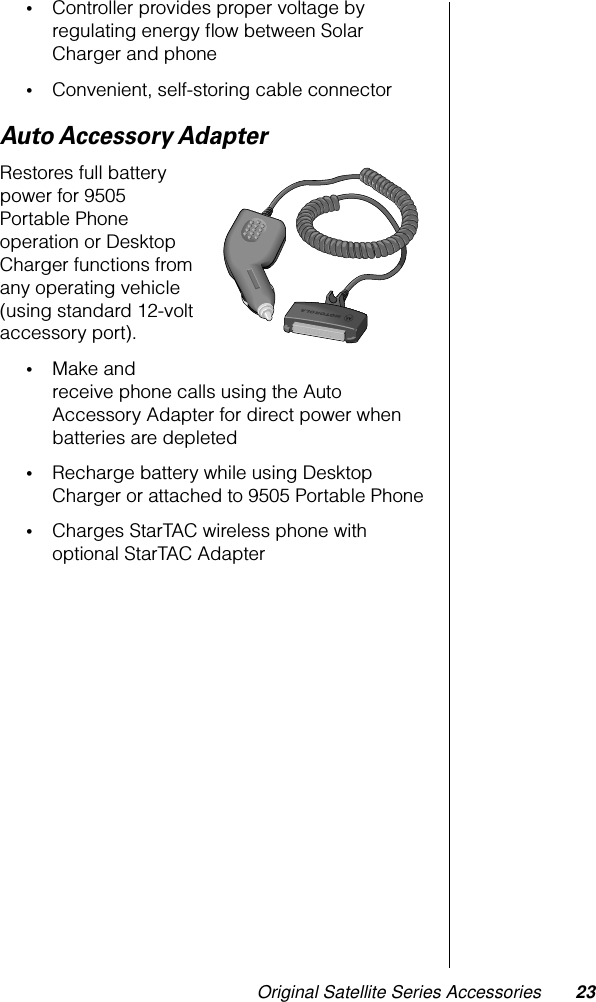
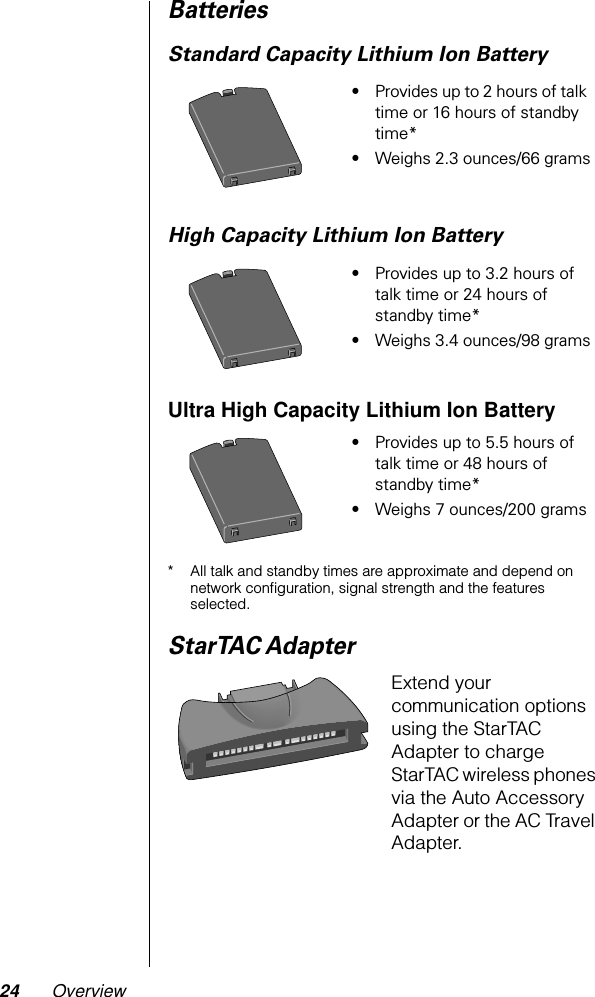
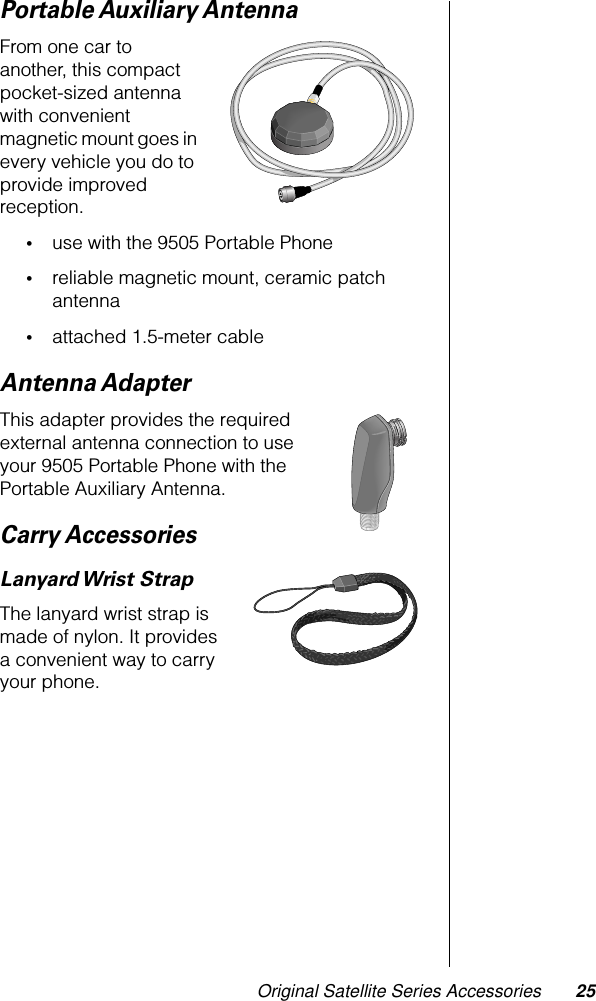
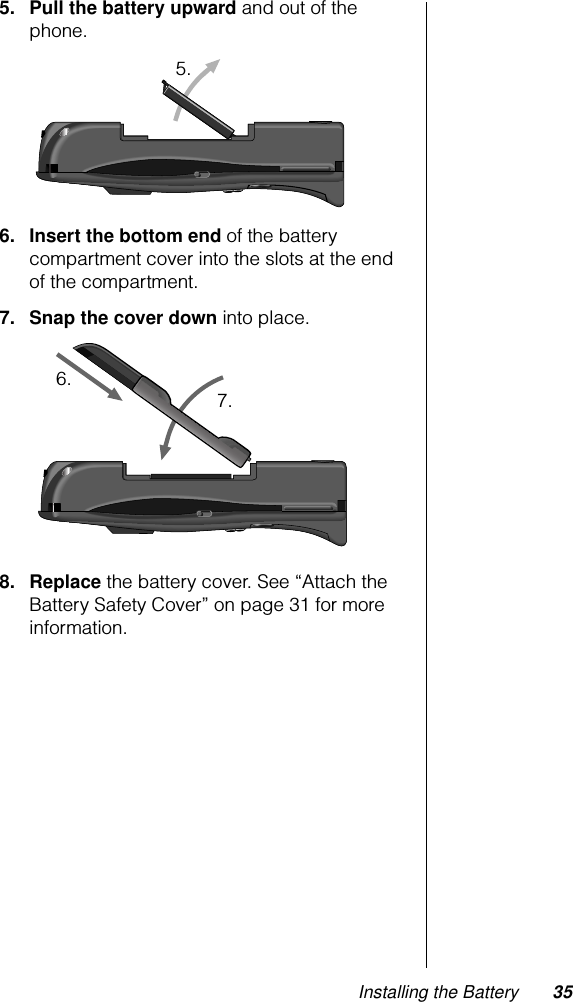
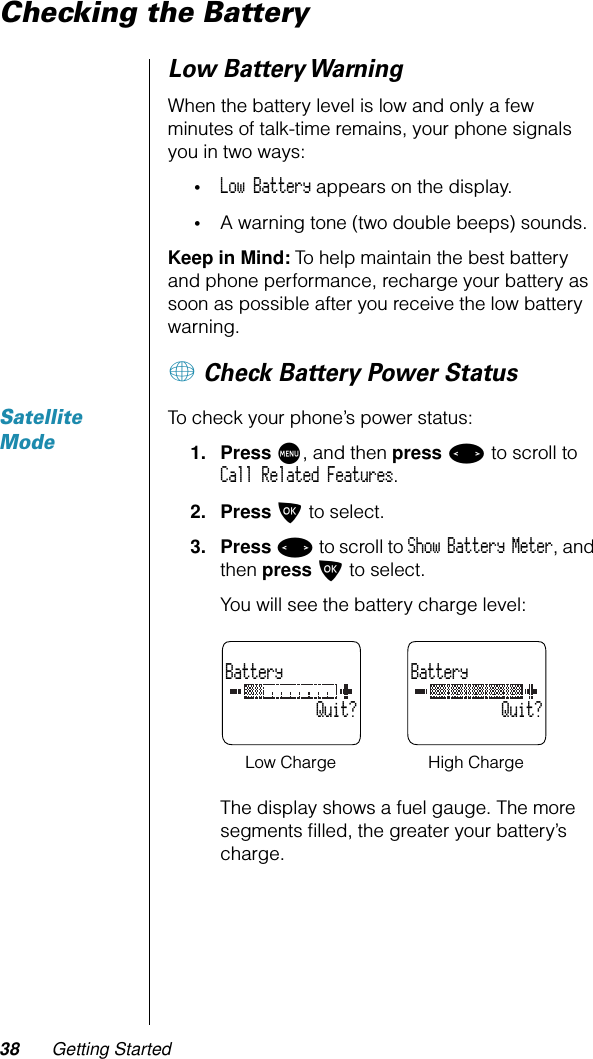
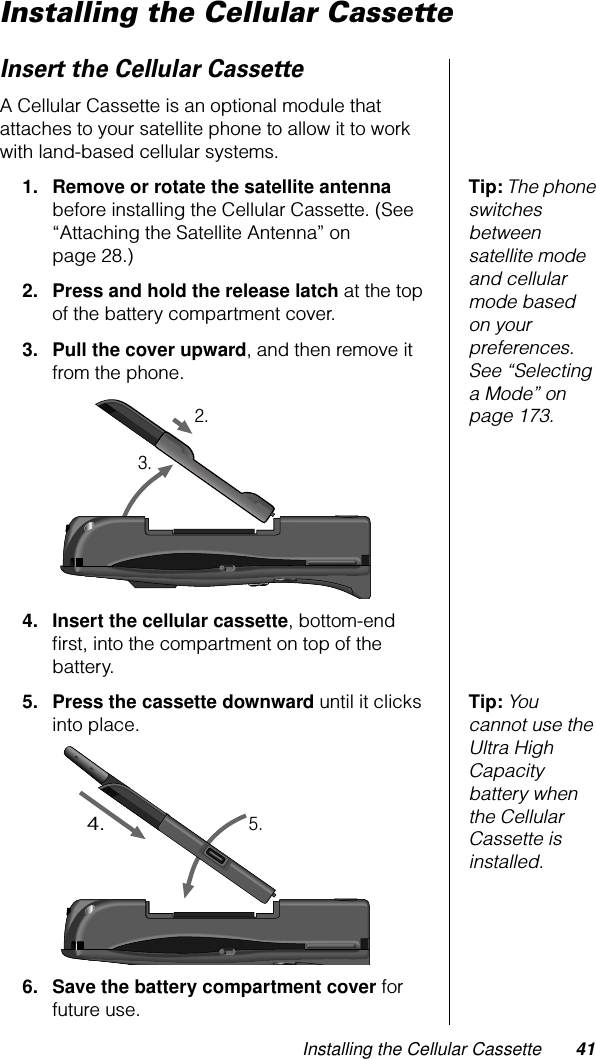
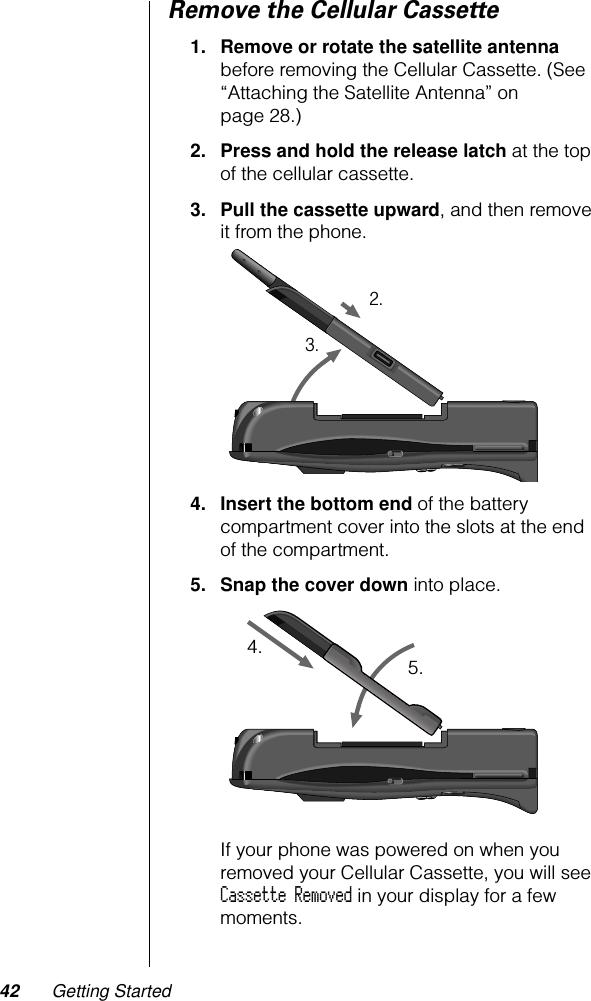
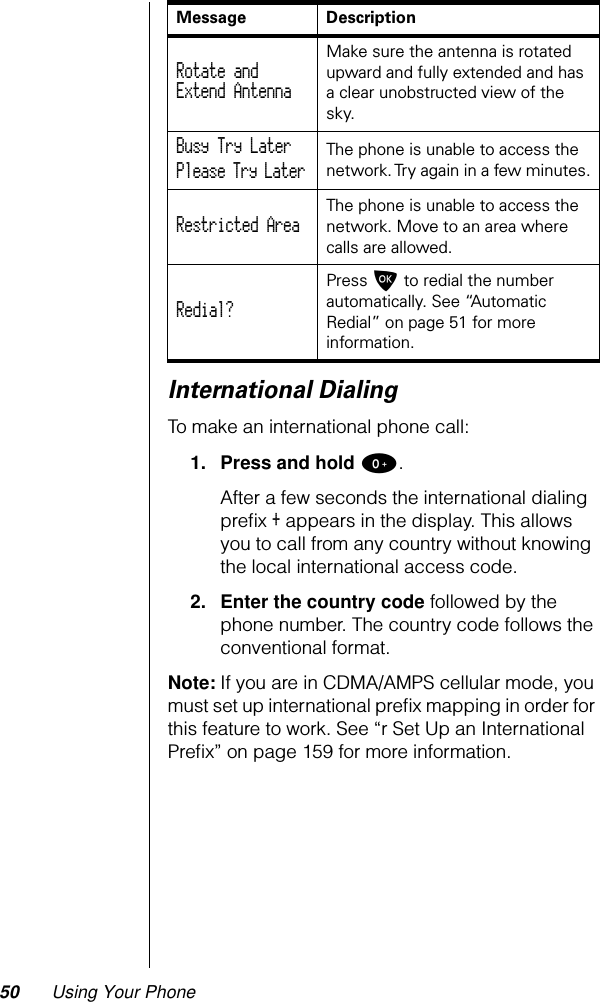
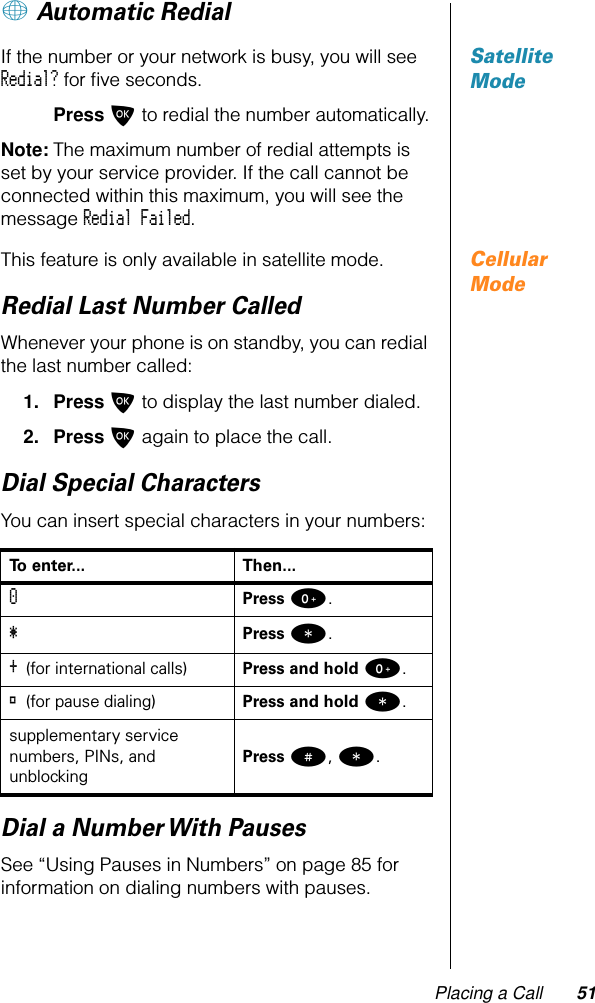
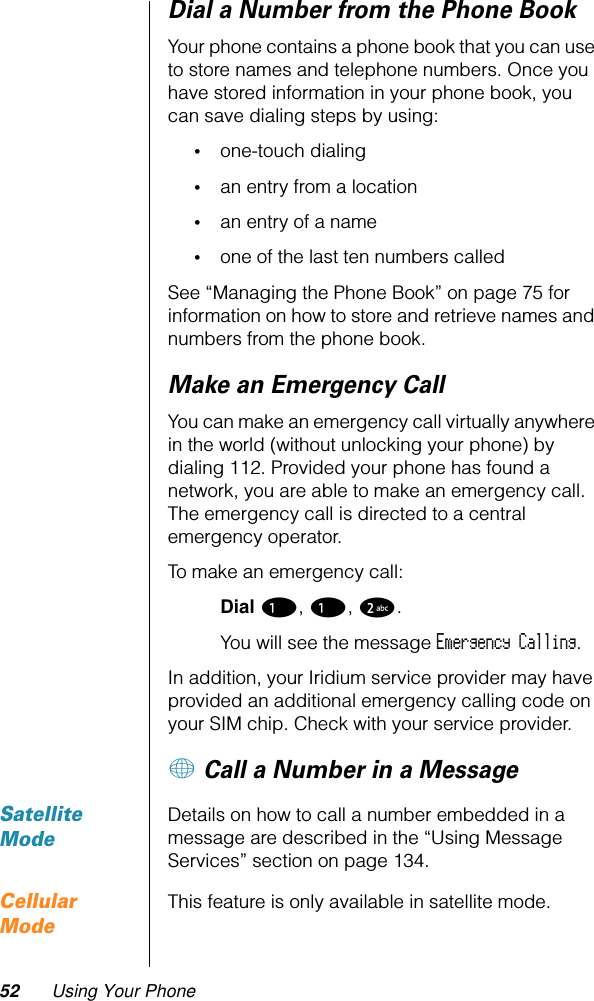
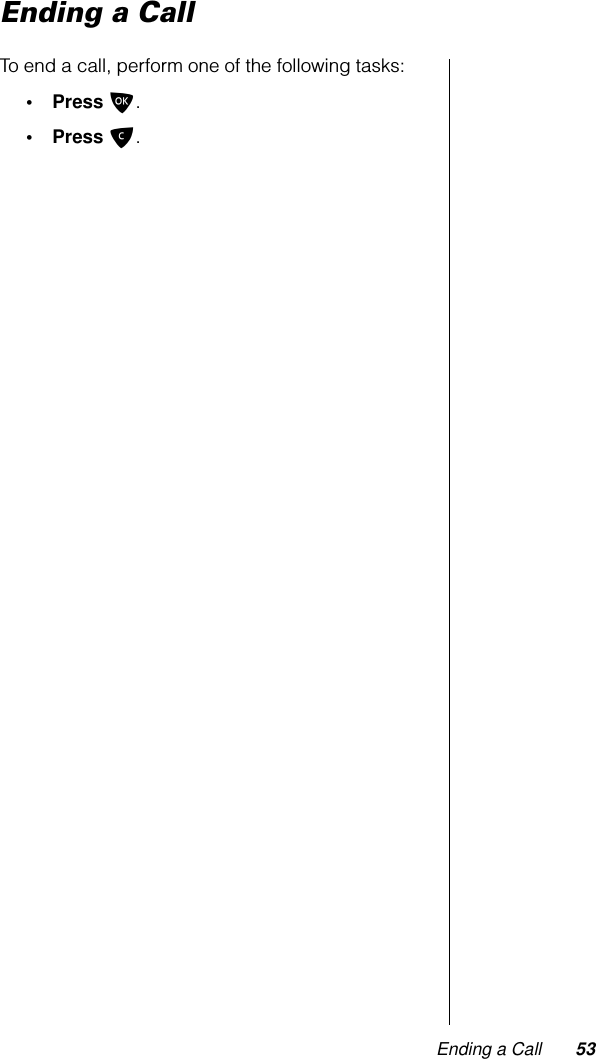
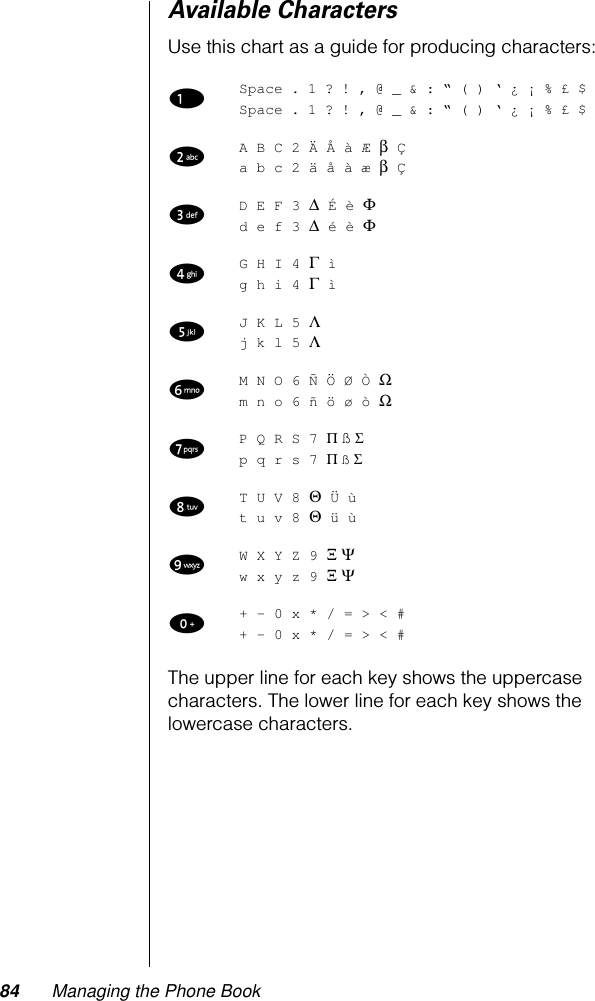
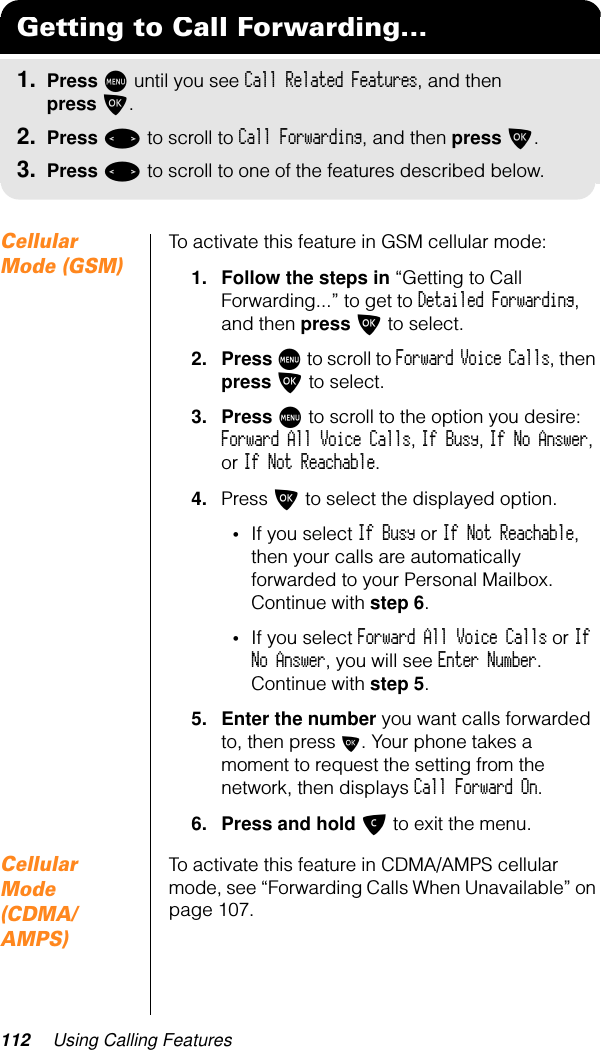
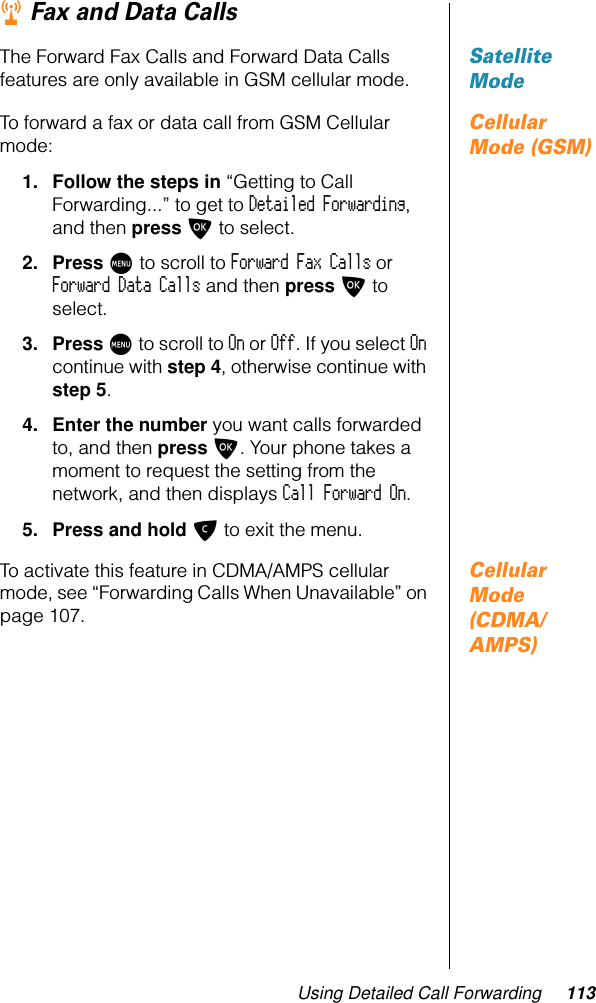
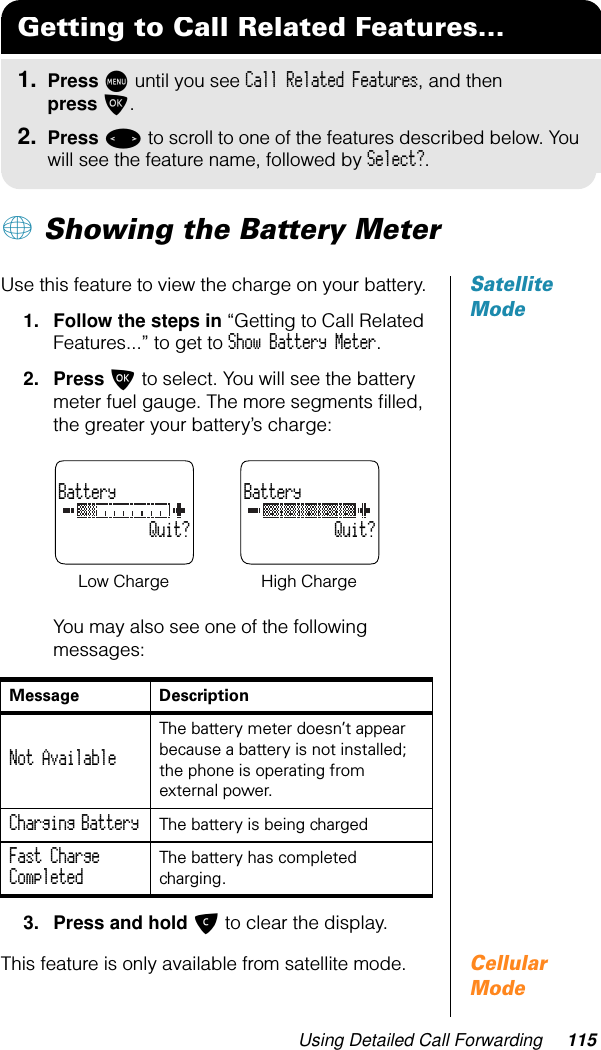
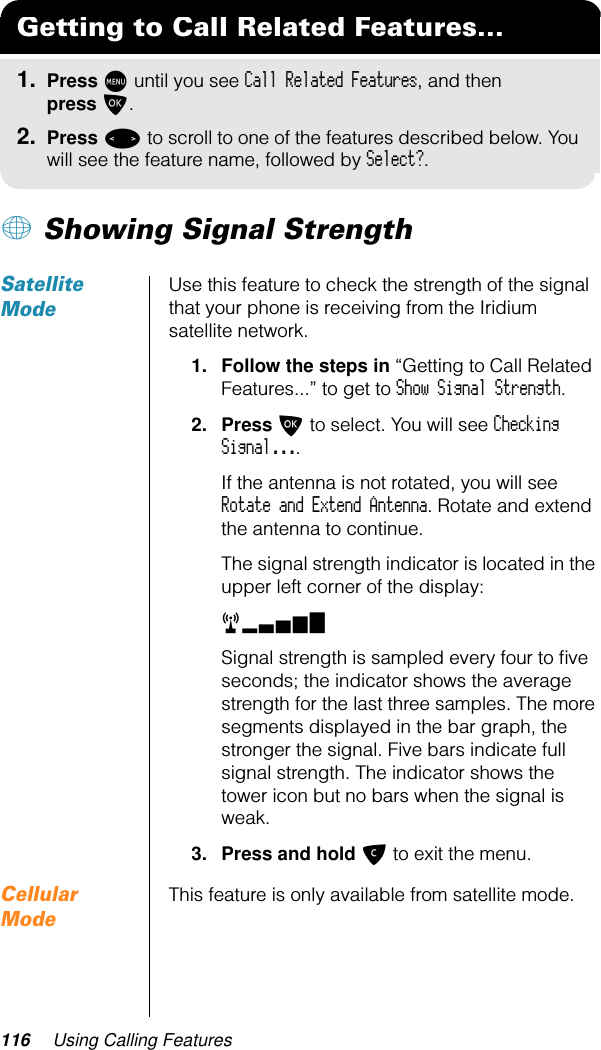
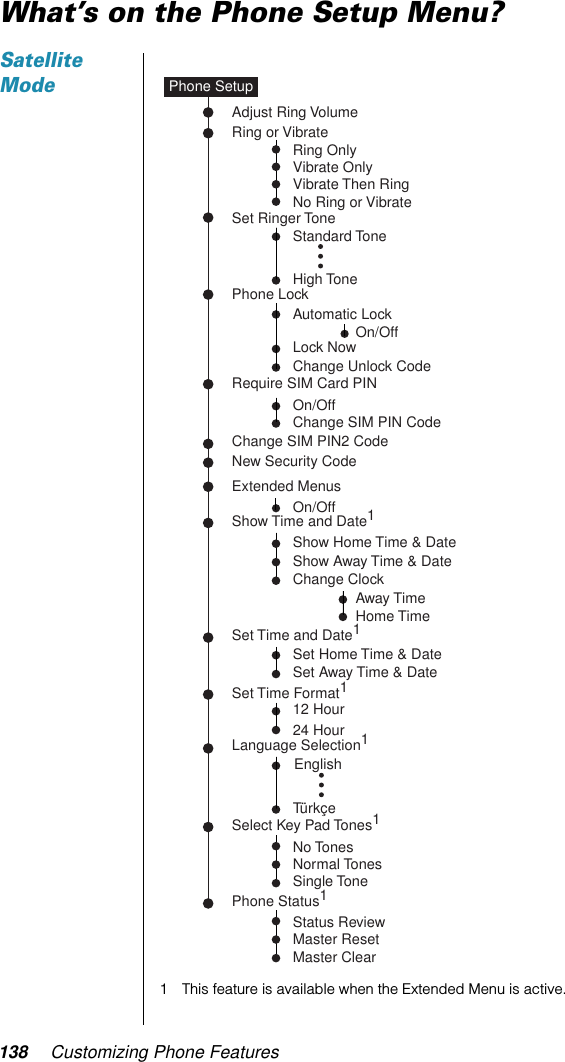
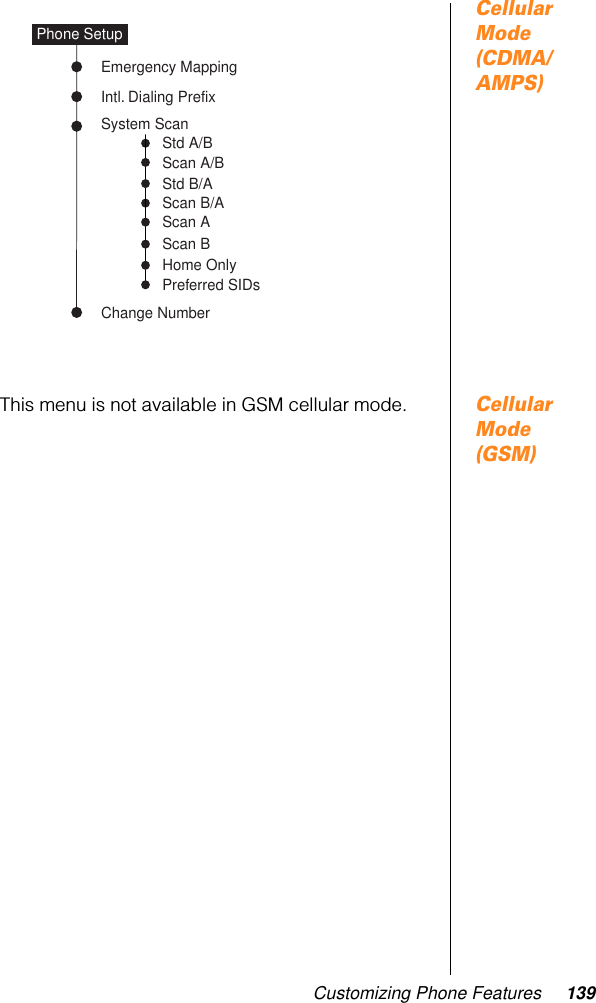
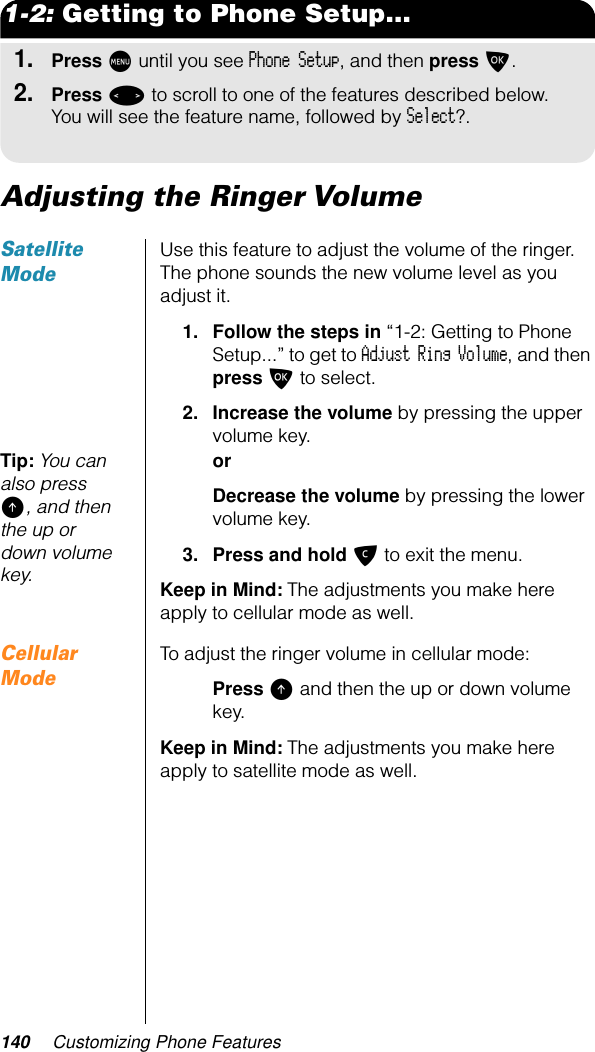
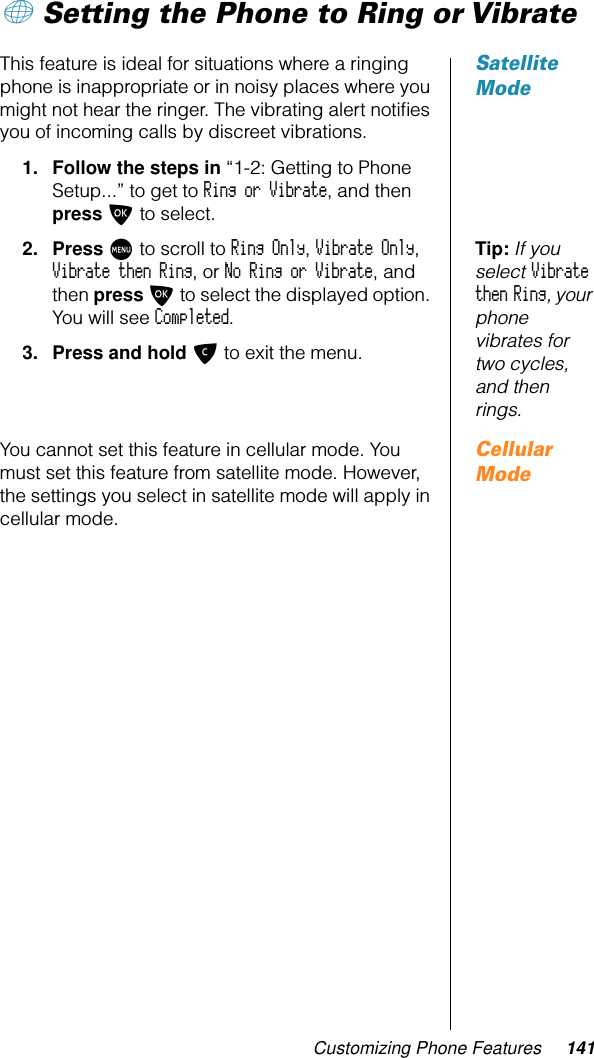
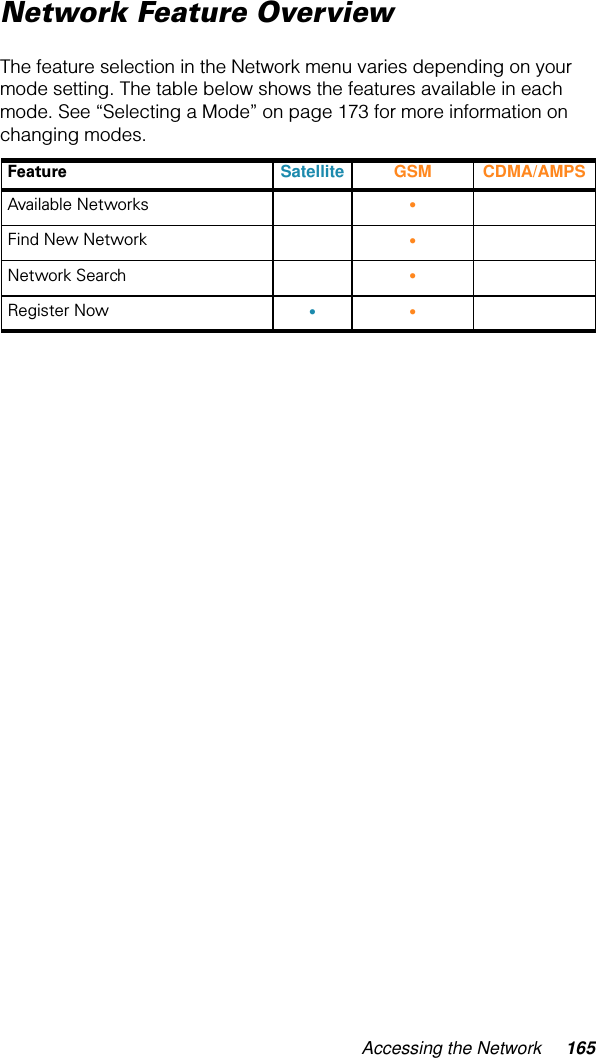
APPLICANT:  MOTOROLA, INC. FCC ID: IHDT6NF1Exhibit 8INSTRUCTION MANUALThe following is a preliminary draft copy of the instruction manual.
 Welcome The future of global telecommunications is here—a satellite telephone, providing you with communication all over the world.The company that brought you the world’s first commercially available cellular phone has done it again! Motorola proudly introduces its Satellite Series 9505 Portable Phone for the Iridium ®  system.All Motorola wireless phones are designed and manufactured to meet Motorola’s exacting specifications and world-class quality standards. During development, our laboratory testing team took the durable phone through rigorous durability tests including temperature, humidity, shock, dust, vibration, and drop tests—and it still worked! We are confident that the phone you purchased meets your own exacting standards.Thank you for choosing Motorola, a global leader in communications technology.Enjoy your new Satellite Series 9505 Portable Phone!
 ii
 iii Contents Safety Information . . . . . . . . . . . . . . . . . . . . . . . . .7 Overview  . . . . . . . . . . . . . . . . . . . . . . . . . . . . . . .11Guide Overview. . . . . . . . . . . . . . . . . . . . . . . . .12Phone Overview  . . . . . . . . . . . . . . . . . . . . . . . .15Indicators. . . . . . . . . . . . . . . . . . . . . . . . . . . . . .18Original Satellite Series Accessories. . . . . . . . .21 Getting Started  . . . . . . . . . . . . . . . . . . . . . . . . . .27Attaching the Satellite Antenna . . . . . . . . . . . . .28What Is a SIM Chip? . . . . . . . . . . . . . . . . . . . . .29Installing the SIM Chip  . . . . . . . . . . . . . . . . . . .30Removing the Battery Cover . . . . . . . . . . . . . . .31Installing the Battery . . . . . . . . . . . . . . . . . . . . .32Charging the Battery . . . . . . . . . . . . . . . . . . . . .36Checking the Battery. . . . . . . . . . . . . . . . . . . . .38Battery Information . . . . . . . . . . . . . . . . . . . . . .40Installing the Cellular Cassette . . . . . . . . . . . . .41 Using Your Phone  . . . . . . . . . . . . . . . . . . . . . . . .43Using Your Phone Feature Overview. . . . . . . . .44Powering Up the Phone. . . . . . . . . . . . . . . . . . .45Holding the Phone. . . . . . . . . . . . . . . . . . . . . . .48Placing a Call  . . . . . . . . . . . . . . . . . . . . . . . . . .49Ending a Call. . . . . . . . . . . . . . . . . . . . . . . . . . .53What’s My SIM Chip Phone Number? . . . . . . . .54Receiving a Call  . . . . . . . . . . . . . . . . . . . . . . . .55Adjusting Earpiece Volume . . . . . . . . . . . . . . . .58Adjusting Ringer Volume. . . . . . . . . . . . . . . . . .59 Using In-Call Features  . . . . . . . . . . . . . . . . . . . .61In-Call Feature Overview. . . . . . . . . . . . . . . . . .62+ Muting a Call . . . . . . . . . . . . . . . . . . . . . . . . .63Using Call Waiting . . . . . . . . . . . . . . . . . . . . . . .64Placing a Call on Hold. . . . . . . . . . . . . . . . . . . .66r Sending a Flash  . . . . . . . . . . . . . . . . . . . . . . .68 Using the Menus . . . . . . . . . . . . . . . . . . . . . . . . .69Using the Options Menus . . . . . . . . . . . . . . . . .70+ Using the Quick Access Menu  . . . . . . . . . . .72
 iv Using The In-Call Menu . . . . . . . . . . . . . . . . . . 74 Managing the Phone Book  . . . . . . . . . . . . . . . . 75Entering the Phone Book Menu . . . . . . . . . . . . 76What’s on the Phone Book Menu?  . . . . . . . . . . 77Organizing Your Phone Book . . . . . . . . . . . . . . 79Storing Names and Numbers. . . . . . . . . . . . . . 81Entering Names . . . . . . . . . . . . . . . . . . . . . . . . 83Using Pauses in Numbers . . . . . . . . . . . . . . . . 85+ Using Phone Number Prefixes . . . . . . . . . . . 87Locating Entries . . . . . . . . . . . . . . . . . . . . . . . . 88Calling, Modifying, or Erasing an Entry  . . . . . . 90+ Checking Phone Book Capacity . . . . . . . . . . 91+ Preventing Access to the Phone Book . . . . . 92+ Restricting Phone Use. . . . . . . . . . . . . . . . . . 93Viewing the Last Ten Numbers Dialed . . . . . . . 98Viewing and Modifying Your Phone Numbers  . 99+ Using One-Touch Dialing  . . . . . . . . . . . . . . 101Viewing Service Dialing Numbers  . . . . . . . . . 102 Using Calling Features  . . . . . . . . . . . . . . . . . . 103Entering the Call Related Features Menu. . . . 104What’s on the Call Related Features Menu?. . 105Forwarding Calls When Unavailable  . . . . . . . 107Forwarding All Your Calls . . . . . . . . . . . . . . . . 109Using Detailed Call Forwarding . . . . . . . . . . . 111Canceling All Forwarding . . . . . . . . . . . . . . . . 114+ Showing the Battery Meter . . . . . . . . . . . . . 115+ Showing Signal Strength. . . . . . . . . . . . . . . 116+ Deactivating Pending Call Drop Signal. . . . 117+ Activating Call Waiting  . . . . . . . . . . . . . . . . 118Restricting Calls with Call Barring  . . . . . . . . . 119 Using Message Services . . . . . . . . . . . . . . . . . 123Entering the Messages Menu. . . . . . . . . . . . . 124Messages Services Feature Overview . . . . . . 125What’s on the Messages Menu?. . . . . . . . . . . 126+   Checking Your Voicemail . . . . . . . . . . . . . . 128+   Storing Your Voicemail Number  . . . . . . . . . 129Managing Your Messages . . . . . . . . . . . . . . . 130Accessing Messages . . . . . . . . . . . . . . . . . . . 132 Customizing Phone Features  . . . . . . . . . . . . . 135Entering the Phone Setup Menu. . . . . . . . . . . 136
 v Phone Setup Feature Overview. . . . . . . . . . . .137What’s on the Phone Setup Menu? . . . . . . . . .138Adjusting the Ringer Volume  . . . . . . . . . . . . .140+   Setting the Phone to Ring or Vibrate . . . . . .141+ Setting the Ringer Tone . . . . . . . . . . . . . . . .142+   Setting the Keypad Tones . . . . . . . . . . . . . .143Locking and Unlocking Your Phone  . . . . . . . .144Protecting the SIM chip. . . . . . . . . . . . . . . . . .146Managing Other Security Settings  . . . . . . . . .148+ Managing Time and Date Settings  . . . . . . .150+   Activating Extended Menus  . . . . . . . . . . . .153+ Selecting the Display Language . . . . . . . . .154+ Managing Your Phone’s Settings . . . . . . . . .155r Cellular Mode Settings . . . . . . . . . . . . . . . . .158 Accessing the Network . . . . . . . . . . . . . . . . . . .163Entering the Network Menu. . . . . . . . . . . . . . .164Network Feature Overview  . . . . . . . . . . . . . . .165What’s on the Network Menu? . . . . . . . . . . . . .166+ Registering With the Satellite Network. . . . .168r Cellular Mode (GSM) Settings. . . . . . . . . . . .169 Selecting a Mode . . . . . . . . . . . . . . . . . . . . . . . .173Entering the Mode Selection Menu . . . . . . . . .174Mode Selection Feature Overview  . . . . . . . . .175What’s on the Mode Selection Menu? . . . . . . .176Selecting a Mode  . . . . . . . . . . . . . . . . . . . . . .177Selecting Satellite Mode . . . . . . . . . . . . . . . . .178 + Timing Your Calls  . . . . . . . . . . . . . . . . . . . . . .181Entering the Call Meters Menu . . . . . . . . . . . .182Call Meters Feature Overview . . . . . . . . . . . . .183What’s on the Call Meters Menu?  . . . . . . . . . .184+ Showing Call Timers  . . . . . . . . . . . . . . . . . .185+ Setting Audible Call Timers . . . . . . . . . . . . .187+ Showing the In-Call Timer . . . . . . . . . . . . . .189+ Show the Lifetime Timer. . . . . . . . . . . . . . . .190 + Customizing the Menu System . . . . . . . . . . .191+ Personalizing the Options Menu . . . . . . . . .192+   Personalizing the Quick Access Menu . . . .194 Menu Quick Reference . . . . . . . . . . . . . . . . . . .195Phone Book Menu . . . . . . . . . . . . . . . . . . . . . .196
 vi Call Related Features Menu . . . . . . . . . . . . . . 198Messages Menu . . . . . . . . . . . . . . . . . . . . . . . 200Phone Setup Menu . . . . . . . . . . . . . . . . . . . . . 202Network Selection Menu. . . . . . . . . . . . . . . . . 204Mode Selection and Call Meters Menus. . . . . 206 Troubleshooting . . . . . . . . . . . . . . . . . . . . . . .   207 Glossary  . . . . . . . . . . . . . . . . . . . . . . . . . . . . .   211 Index  . . . . . . . . . . . . . . . . . . . . . . . . . . . . . . . .   215 Patent Information  . . . . . . . . . . . . . . . . . . . . .   229
 7 Safety Information Important:   Read this information before using your wireless mobile phone. Exposure to Radio Frequency Signals Your wireless mobile telephone is a low power radio transmitter and receiver. When it is ON, it receives and also sends out radio frequency (RF) signals.International agencies have set standards and recommendations for the protection of public exposure to RF electromagnetic energy. • International Commission on Non-Ionizing Radiation Protection (ICNIRP)1996 • Verband Deutscher Elektrotechniker (VDE) DIN-0848 • United States Federal Commission, Radio Frequency Exposure Guidelines (1996) • National Radiological Protection Board of the United Kingdom, GS 11,1988 • American National Standards Institute (ANSI) IEEE. C95. 1-1992 • National Council on Radiation Protection and Measurements (NCRP). Report 86 • Department of Health and Welfare Canada. Safety Code 6These standards are based on extensive scientific review. For example, over 120 scientists, engineers, and physicians from universities, government health agencies, and industry reviewed the available body of research to develop the updated ANSI standard.The design of your phone complies with these standards when used as described under “Phone Operation.” Antenna Care Use only the supplied or an approved replacement antenna. Unauthorized antennas, modifications, or attachments could damage the phone and may violate local agency regulations.
 8 Safety Information Phone Operation NORMAL POSITION: Hold the phone as you would any other telephone. Make sure the antenna is extended fully and rotated to either the left or right detent. The antenna should be vertical to the ground and have a clear view of the sky.TIPS ON EFFICIENT OPERATION: For your phone to operate most efficiently: • Extend and rotate your antenna fully. • Make sure the antenna has a clear view of the sky. • Do not touch the antenna unnecessarily when the phone is in use. Contact with the antenna affects call quality and may cause the phone to operate at a higher power level than otherwise needed. Batteries Caution:  All batteries can cause property damage, injury or burns if a conductive material, such as jewelry, keys or beaded chains, touches exposed terminals. The material may complete an electrical circuit and become quite hot. To protect against such unwanted current drain, exercise care in handling any charged battery, particularly when placing it inside your pocket, purse or other container with metal objects. When the battery is detached from the phone, your batteries are packed with a protective battery cover; please use this cover for storing your batteries when not in use. Driving Check the laws and regulations on the use of wireless telephones in the areas where you drive. Always obey them. Observe the following guidelines when using your phone while driving. • Give full attention to driving—driving safely is your first responsibility. • Use hands-free phone operation, if available. • Pull off the road and park before making or answering a call if driving conditions so require. Electronic Devices Most modern electronic equipment is shielded from RF signals. However, certain equipment may not be shielded against the RF signals from your wireless phone.
 Safety Information 9 Pacemakers The Health Industry Manufacturers Association recommends that a minimum separation of six inches (6") be maintained between a handheld wireless phone and a pacemaker to avoid potential interference with the pacemaker. These recommendations are consistent with the independent research by and recommendations of Wireless Technology Research.Persons with pacemakers: • should ALWAYS keep the phone more than six inches from their pacemaker when the phone is turned ON • should not carry the phone in a breast pocket • should use the ear opposite the pacemaker to minimize the potential for interference • should turn the phone OFF immediately if you have any reason to suspect that interference is taking place Hearing Aids Some digital wireless phones may interfere with some hearing aids. In the event of such interference, you may want to consult your hearing aid manufacturer to discuss alternatives. Other Medical Devices If you use any other personal medical device, consult the manufacturer of your device to determine if it is adequately shielded from external RF energy. Your physician may be able to assist you in obtaining this information.Turn your phone OFF in health care facilities when any regulations posted in these areas instruct you to do so. Hospitals or health care facilities may be using equipment that could be sensitive to external RF energy. Vehicles RF signals may affect improperly installed or inadequately shielded electronic systems in motor vehicles. Check with the manufacturer or its representative regarding your vehicle. You should also consult the manufacturer of any equipment that has been added to your vehicle. Posted Facilities Turn your phone OFF in any facility where posted notices so require.
 10 Safety Information Aircraft Airline regulations prohibit using your phone while in the air.Switch OFF your phone before boarding an aircraft. Blasting AreasTo avoid interfering with blasting operations, turn your phone OFF when in a “blasting area” or in areas posted: “Turn off two-way radio.” Obey all signs and instructions.Potentially Explosive AtmospheresTurn your phone OFF and do not remove your battery when you are in any area with a potentially explosive atmosphere. Obey all signs and instructions. Sparks from your battery in such areas could cause an explosion or fire resulting in bodily injury or even death.Areas with a potentially explosive atmosphere are often but not always clearly marked. They include, but are not limited to: fueling areas such as gasoline stations; below deck on boats; fuel or chemical transfer or storage facilities; areas where fuel odors are present (for example, if a gas/propane leak occurs in a car or home); areas where the air contains chemicals or particles, such as grain, dust, or metal powders; and any other area where you normally would be advised to turn off your vehicle engine.For Vehicles Equipped with an Air BagAn air bag inflates with great force. Do NOT place objects, including both installed or portable wireless equipment, in the area over the air bag or in the air bag deployment area. If in-vehicle wireless equipment is improperly installed and the air bag inflates, serious injury could result.
11OverviewThis chapter provides an overview of your new satellite phone.What You Will  Learn•overview of the user’s guide•overview of the satellite phone•overview of the phone’s indicators•overview of original Satellite Series accessories
12 OverviewGuide OverviewUnderstanding the GuideModesThroughout this guide there are features that apply only to satellite mode and features that apply only to cellular mode (when you have an optional Cellular Cassette installed). For information on switching modes, see “Selecting a Mode” on page 173.These conventions alert you to these features.+ — This symbol next to a feature name indicates that your phone must be in satellite mode to access it.r — This symbol next to a feature name indicates that your phone must be in cellular mode to access it.In addition, look for the labels “Satellite Mode” or “Cellular Mode” in the margins for information related to each mode.Key PressesKey presses are represented in this guide using symbols so that you may locate and use the required sequence quickly. A sequence of key presses may be shown as follows:M, O, CThis means you should press M followed by O and then C, in sequence, not simultaneously.Prompts and MessagesYour phone responds to key presses by displaying either a prompt that guides you to the next action or a message confirming that your action is complete. Prompts and messages are represented in this guide in LCD style, for example: Enter PIN or Completed.
Guide Overview 13TipsIn the margins of your guide are useful hints and ways to improve your phone’s performance.What’s in the GuideAs you explore your 9505 Portable Phone, use this guide to see what key to press and what happens when you press it. Here is what you will learn in each chapter:Chapter DescriptionGetting StartedIn this chapter, you will learn how to install and charge your battery. See “Getting Started” on page 27 for more information.Using Your PhoneHow do you make your first phone call? This question and many others are answered in this chapter. See “Using Your Phone” on page 43 for more information. Using the MenusThis chapter teaches you how to navigate the menu system. See “Using the Menus” on page 69 for more information.Managing the Phone BookSee “Managing the Phone Book” on page 75 to learn how to make the most of your phone’s built-in Phone Book.Using Calling FeaturesIf you subscribe to Call Barring or Call Forwarding, see “Using Calling Features” on page 103 to learn how to use these network features and more.Using Messaging ServicesDid you know that you can be notified of voicemail or receive numeric and text messages through your Personal Mailbox? See “Using Message Services” on page 123 for more information.
14 OverviewCustomizing Phone FeaturesSee “Customizing Phone Features” on page 135 to learn how to customize your phone’s features.Accessing the NetworkSee “Accessing the Network” on page 163 to learn how to register with the satellite network.Switching ModesIf you have a Cellular Cassette installed in your Portable phone, you can switch between cellular mode and satellite mode. See “Selecting a Mode” on page 173 for more information.+ Timing Your CallsView the time of your last call or set your phone to remind you after you have been talking for a certain period of time. See “+ Timing Your Calls” on page 181 for more information.+ Customizing the Menu SystemOnce you are familiar with the features in your menus, you can customize the menus to more closely fit your needs. See “+ Customizing the Menu System” on page 191 for more information.Chapter Description
Phone Overview 15Phone OverviewDisplayIndicatorsCellularCassetteAntennaVolume KeysSignal StrengthIndicatorAlphanumericKeypadEarpieceReal-TimeClockBattery LevelIndicatorDisplayBatteryCompartment/CellularCassetteConnectorSpecial KeysSpecial KeysMicrophoneAccessoryConnector PortSatelliteAntenna
16 OverviewSpecial KeysVolume KeysThe Volume keys are on the side of the phone. They adjust earpiece and ringer volume. See “Adjusting Earpiece Volume” on page 58 for more information.Satellite AntennaWhen you are in satellite mode, to answer calls, make calls, and access satellite services, make sure the antenna is rotated up to either the left or right detente and fully extended. You can receive calls without extending and rotating the antenna, but you must do so to answer the call. Remember, the antenna must have a clear view of the sky.When you are in cellular mode you do not need to extend or rotate the satellite antenna.Key FunctionS  Turns the phone’s power on and offO Selects menu settings or options, or initiates and answers calls?  Calls voicemail and displays messagesI  Stores numbers in the phone bookQ  Recalls numbers from the phone bookE  Enters the Quick Access menuM Enters the Options menu and scrolls forward through menu featuresC Clears characters from the screen or exits the Options menu<   Scrolls through the menu features
Phone Overview 17Satellite Antenna Lock Release ButtonThis button is located on the top of the phone. When you push this button, it releases the antenna so you can attach the Auxiliary Antenna. You may also want to remove the antenna if you spend a lot of time in cellular mode.Cellular Cassette ConnectorInsert an optional Cellular Cassette onto the back of the phone. The Cellular Cassette connector is located underneath the battery compartment cover next to the battery. The Cellular Cassette interfaces with your 9505 Portable Phone so that you can use it on the local cellular network.DisplayYour phone’s Liquid Crystal Display (LCD) displays as many as four rows of 16 characters.The LCD on your phone may respond slowly to key presses in extremely cold temperatures. This is normal and does not affect the phone operation in any way.Accessory ConnectorThis connector, located on the bottom of the phone, provides the connection for an external power supply.     ABC123
18 OverviewIndicatorsCurrent State of Service IndicatorThe current state of service indicator is located at the top of your phone. This LED status indicator provides information on your phone’s current state of service depending on your current mode.If the LED is... Then in satellite mode...Then in cellular mode...Alternating red and green A call is incoming. A call is incoming.Flashing greenYou are receiving a signal from the Iridium satellite network. You  can place and receive calls.You are receiving a signal from the cellular network. You can place and receive calls.Flashing yellowYour phone was not successful in registering with the satellite network and cannot receive incoming calls. Try again in a few minutes.You are roaming.Flashingyellow and red Your SIM chip may be inserted incorrectly, may not be inserted, or you may be in a restricted area.You will not see this indicator in cellular mode.Flashing red Service is not available.This means that service is not available, your SIM chip is inserted incorrectly or not at all, or you may be in a restricted area.
Indicators 19Display IndicatorsIndicator Descriptionrx Signal Strength Indicator indicates the strength of the signal from the network. The signal strength indicator appears continuously in the top left hand corner of the display. The more segments displayed in the bar graph, the stronger the signal. Five bars indicate full signal strength. No bars indicate a weak signal.q Battery Charge Indicator indicates the strength of the battery charge. The more segments displayed, the greater the battery charge. When you are in satellite mode, you can also check the strength of the charge at any time through the menu. See “+ Showing the Battery Meter” on page 115 for more information.12:00 Real Time Clock Indicator displays the time in either 12-hour or 24-hour format when you are in satellite mode. See “+ Change the Time Displayed” on page 151 for more information.o Message Indicator appears when you receive a new message. It flashes when the SIM chip is full. See “Accessing Messages” on page 132 for additional information.+ Satellite Mode Indicator appears when your phone is in satellite mode. See “Selecting a Mode” on page 173 for more information.
20 Overviewn Home System Indicator appears when the phone has successfully registered with the Iridium satellite system.l Roam Indicator appears when you are roaming on a cellular system (when you have the appropriate Cellular Cassette inserted). This indicator does not appear when the phone is in satellite mode.m No Service Indicator appears when your phone is not capable of placing or receiving calls.k In Use Indicator appears when a call is in progress.s Scroll Bar appears on the right of the display when you are in a menu. The button on the scroll bar indicates where you are in the list.z Check Mark indicates a menu item is currently selected.B...P Quick Access Menu Icons allow you to easily identify Quick Access features as you scroll through the Quick Access menu when you are in satellite mode.Indicator Description
Original Satellite Series Accessories 21Original Satellite Series AccessoriesProduct appearance and specifications are subject to change without notice.Note: For maximum performance use only Motorola original accessories.AC Travel Charger with International Plug KitThe AC Travel Charger with International Plug Kit provides rapid charge for optimal performance and can be used to power the phone when the battery is depleted. •Includes four international plug adapters for use in Europe, Australia, India, and the United Kingdom•May be used with both 9505 Portable Phone and Desktop Charger•Allows use of 9505 Portable Phone while recharging the battery•Convenient self-storing cord•Charges StarTAC™ wireless phone when used with optional StarTAC Adapter
22 OverviewDesktop ChargerThe versatile, user-friendly Desktop Charger features two charger pockets to provide multiple rapid charging options.•Front pocket charges 9505 Portable Phone or StarTAC wireless phone with batteries attached (with included plastic insert)•Back pocket charges any Motorola Satellite Series or StarTAC wireless phone battery•Rapid 3-hour charge time for standard battery•At-a-glance LED indicator lights show current charging status for each charging pocket•Requires AC Travel Charger or Auto Accessory AdapterSolar ChargerEfficient, easy-to-use Solar Charger helps keep you in communication even in remote areas or locations with limited, erratic, or no power service.•Uses solar power to recharge batteries or extend talk time•Convenient, built-in stand allows angle adjustment•Easy-to-read LCD metering system indicates optimal positioning of charging module for best performance
Original Satellite Series Accessories 23•Controller provides proper voltage by regulating energy flow between Solar Charger and phone•Convenient, self-storing cable connectorAuto Accessory AdapterRestores full battery power for 9505 Portable Phone operation or Desktop Charger functions from any operating vehicle (using standard 12-volt accessory port).•Make and receive phone calls using the Auto Accessory Adapter for direct power when batteries are depleted•Recharge battery while using Desktop Charger or attached to 9505 Portable Phone•Charges StarTAC wireless phone with optional StarTAC Adapter
24 OverviewBatteriesStandard Capacity Lithium Ion BatteryHigh Capacity Lithium Ion BatteryUltra High Capacity Lithium Ion Battery* All talk and standby times are approximate and depend on network configuration, signal strength and the features selected.StarTAC AdapterExtend your communication options using the StarTAC Adapter to charge StarTAC wireless phones via the Auto Accessory Adapter or the AC Travel Adapter.•Provides up to 2 hours of talk time or 16 hours of standby time*•Weighs 2.3 ounces/66 grams•Provides up to 3.2 hours of talk time or 24 hours of standby time*•Weighs 3.4 ounces/98 grams•Provides up to 5.5 hours of talk time or 48 hours of standby time*•Weighs 7 ounces/200 grams
Original Satellite Series Accessories 25Portable Auxiliary AntennaFrom one car to another, this compact pocket-sized antenna with convenient magnetic mount goes in every vehicle you do to provide improved reception.•use with the 9505 Portable Phone•reliable magnetic mount, ceramic patch antenna•attached 1.5-meter cableAntenna AdapterThis adapter provides the required external antenna connection to use your 9505 Portable Phone with the Portable Auxiliary Antenna.Carry AccessoriesLanyard Wrist  StrapThe lanyard wrist strap is made of nylon. It provides a convenient way to carry your phone.
26 OverviewCellular CassettesCellular Cassettes are modules that attach to the 9505 Portable Phone and provide support for various terrestrial or land-based cellular systems. With an attached Cellular Cassette, you can make and receive calls in various cellular modes, assuming service subscription and coverage are available.Cellular Cassettes create an innovative blend of cellular and satellite technology in one phone.•When attached to the back of the 9505 Portable Phone, Cellular Cassettes enable dual mode satellite and cellular operation.•Cellular Cassettes are designed to give you one flexible product that enables communication compatibility in areas that support cellular service in conjunction with satellite service.•Cellular Cassettes enable flexible usage of cellular technologies and provide call delivery compatibility in areas that support cellular service.
27Getting StartedGetting started with your new satellite phone is easy. Just charge your new batteries and insert your phone’s SIM (Subscriber Identity Module) card. This chapter tells you how.What You Will  Learn•attaching the antenna•installing and charging your battery•installing and using your SIM chip•installing your optional Cellular CassetteNote: If you see a + next to a feature, the phone must be in satellite mode. If you see a r next to a feature, the phone must be in cellular mode. See “Selecting a Mode” on page 173 to change modes.
28 Getting StartedAttaching the Satellite AntennaAttach the Antenna1. Attach the antenna in the down position.2. Press and hold the button at the top of the phone.3. Push the antenna until it clicks into place and release the button.Remove the AntennaYou may want to remove the satellite antenna to attach an auxiliary antenna, place the Portable phone in the 9570 Portable Dock, or if you spend the majority of your time in cellular mode.1. Remove the antenna in the down position.2. Press in the button at the top of the phone.3. Remove the antenna.2.3.2. 3.
What Is a SIM Chip? 29What Is a SIM Chip?Your SIM (Subscriber Identity Module) chip is a small smart card that contains your phone number, service details, and memory for storing Phone Book entries and messages. This means you can use your SIM chip with any phone for the GSM system or any Motorola product for the Iridium satellite system, and all calls go on your account.Note: Your phone has limited functionality without the SIM chip.GSM SIM Chip CapabilityIf you already have a GSM SIM chip and your service provider has a roaming agreement with the Iridium satellite system, you can use it in your satellite telephone. You need an optional Cellular Cassette to access your local cellular/PCS service.Note: If you are using a GSM SIM chip, you may not have access to certain features that are specific to the Iridium satellite system, and vice versa.SIM Chip ProtectionKeep your SIM chip in your wallet or purse when you’re not using it. This helps keep your personal information secure and gives you access to your service even if your phone is not available. If you forget your phone, insert your SIM chip into a friend’s phone to access your personal service.Caution: Avoid bending, scratching, or exposing your card to static electricity, water, or dirt.
30 Getting StartedInstalling the SIM ChipMake sure your phone is powered off before inserting or removing the SIM chip. If you don’t, you may damage the memory on your SIM chip.Insert the SIM ChipTip: (TEXT TO BE WRITTEN!) Remove the SIM Chip(Text tobe written!)(Text tobe written!)
Removing the Battery Cover 31Removing the Battery CoverYour new batteries are shipped uncharged and fitted with protective covers.Save the covers for storing and carrying unused batteries. The covers prevent metal objects from contacting both battery terminals, reducing the risk of injury, or damage from a battery short circuit. Remove the Battery Safety Cover1. Press in the release latch.2. Continue pushing in and upwards until the battery slips free from its cover.Attach the Battery Safety Cover1. Lower the side opposite the latch into the cover.2. Slip the side with the release latch down until it clicks.
32 Getting StartedInstalling the BatteryInsert the BatteryKeep in Mind: Insert only Motorola-approved batteries in your phone. If you insert an unapproved battery you will see Invalid Batt. You are able to discharge the battery, but you cannot recharge it.1. Remove or rotate the satellite antenna before installing the battery. (See “Attaching the Satellite Antenna” on page 28.)Tip: The battery compartment is located on the back of the phone.2. Press and hold the release latch at the top of the battery compartment cover.3. Pull the cover upward, and then remove it from the phone.4. Insert the battery, bottom-end first, into the compartment, and then press the battery downward until it clicks into place.2.3.4.
Installing the Battery 335. Insert the bottom end of the compartment cover into the slots at the end of the compartment.6. Snap the cover down into place.If you have an optional Cellular Cassette, go to “Installing the Cellular Cassette” on page 41.5. 6.
34 Getting StartedRemove the Battery1. Remove or rotate the satellite antenna before removing the battery. (See “Attaching the Satellite Antenna” on page 28.)Tip: The battery compartment is located on the back of the phone.2. Press and hold the release latch at the top of the battery compartment cover. 3. Pull the cover upward, and then remove it from the phone. 4. Press and hold the release latch at the top of the battery.2.3.4.
Installing the Battery 355. Pull the battery upward and out of the phone.6. Insert the bottom end of the battery compartment cover into the slots at the end of the compartment.7. Snap the cover down into place.8. Replace the battery cover. See “Attach the Battery Safety Cover” on page 31 for more information.5.6. 7.
36 Getting StartedCharging the BatteryAny battery that hasn’t been used for a month or more—including new batteries—should be charged for about 3–4 hours before use.Using the Desktop ChargerYou can use the front pocket of the Desktop Charger to charge a battery attached to a phone. You can also charge a spare battery in the rear pocket. The front pocket charges first, then the charger switches to the rear pocket.To charge:1. Connect the Travel Charger to the Desktop Charger.2. Plug the Travel Charger into the appropriate power source.3. Insert your phone with a battery attached.4. Insert a spare battery in the rear pocket, if desired.Using the Internal ChargerA battery charger is built right into your phone. Using either the Travel Charger or Auto Accessory Adapter, you can plug the handset directly into a power source to charge the attached battery.(Illustration tobe created!)
Charging the Battery 371. Connect the Travel Charger or Auto Accessory Adapter to the phone.2. Plug the Travel Charger or Auto Accessory Adapter into the appropriate power source. The phone beeps, flashes the q indicator, and displays Charging Battery:3. If the phone is powered on, press S twice to place the phone in charge-only mode.If the phone is powered off, it automatically enters charge-only mode.Keep in Mind: You can still place and answer calls while using the internal charger. If you wish to place or answer a call:Press S to exit charge-only mode and return to normal operation. Remember that talking on the phone uses power, so charging takes more time.(Illustration tobe created!)    Charging    Battery
38 Getting StartedChecking the BatteryLow Battery WarningWhen the battery level is low and only a few minutes of talk-time remains, your phone signals you in two ways: •Low Battery appears on the display.•A warning tone (two double beeps) sounds.Keep in Mind: To help maintain the best battery and phone performance, recharge your battery as soon as possible after you receive the low battery warning.+ Check Battery Power StatusSatellite ModeTo check your phone’s power status:1. Press M, and then press < to scroll to Call Related Features.2. Press O to select.3. Press < to scroll to Show Battery Meter, and then press O to select.You will see the battery charge level:The display shows a fuel gauge. The more segments filled, the greater your battery’s charge.Battery           Quit?Battery           Quit?Low Charge High Charge
Checking the Battery 39One of the following messages may also appear:4. Press and hold C to exit.Cellular ModeYou can only view the detailed battery meter while you are in satellite mode.Message DescriptionNotAvailable The battery meter doesn’t appear because a battery is not installed; the phone is operating from external power. ChargingBattery The battery is being charged. The q indicator flashes.Fast ChargeCompleted The battery has completed charging. The q indicator stops flashing.Invalid Batt. You have an unapproved battery inserted in your phone. You are able to discharge the battery, but you cannot recharge it.
40 Getting StartedBattery InformationMaximizing Battery LifeCaution: To prevent injuries or burns, do not allow metal objects to contact or short circuit the battery terminals.To ensure maximum battery life and use your battery to its fullest capacity, observe the following guidelines.•Always use Motorola-approved battery chargers.•Always use Motorola-approved batteries (Standard, High Capacity, Ultra High Capacity battery).•Maintain the battery at or near room temperature when charging.•When you don’t plan on using a particular battery for a while, store the battery uncharged in a cool, dark, and dry place.•To prolong the life of your batteries, avoid exposing them to temperatures below -30°C(-22°F) or above 60°C (140°F).•Always take your phone with you when you leave your car.•Use either the Standard or High Capacity battery when the Cellular Cassette is installed; the Ultra High Capacity battery does not fit when the Cellular Cassette is installed.Disposing of BatteriesTo dispose of batteries, check with your local recycling center for a battery recycler near you. Never dispose of batteries in fire.
Installing the Cellular Cassette 41Installing the Cellular CassetteInsert the Cellular CassetteA Cellular Cassette is an optional module that attaches to your satellite phone to allow it to work with land-based cellular systems.Tip: The phone switches between satellite mode and cellular mode based on your preferences. See “Selecting a Mode” on page 173.1. Remove or rotate the satellite antenna before installing the Cellular Cassette. (See “Attaching the Satellite Antenna” on page 28.)2. Press and hold the release latch at the top of the battery compartment cover.3. Pull the cover upward, and then remove it from the phone.4. Insert the cellular cassette, bottom-end first, into the compartment on top of the battery.Tip: You cannot use the Ultra High Capacity battery when the Cellular Cassette is installed.5. Press the cassette downward until it clicks into place.6. Save the battery compartment cover for future use.2.3.4.5.
42 Getting StartedRemove the Cellular Cassette1. Remove or rotate the satellite antenna before removing the Cellular Cassette. (See “Attaching the Satellite Antenna” on page 28.)2. Press and hold the release latch at the top of the cellular cassette.3. Pull the cassette upward, and then remove it from the phone. 4. Insert the bottom end of the battery compartment cover into the slots at the end of the compartment.5. Snap the cover down into place.If your phone was powered on when you removed your Cellular Cassette, you will see Cassette Removed in your display for a few moments.2.3.4. 5.
43Using Your  PhoneRead this section to learn how to get up and running with your new satellite phone.What You Will  Learn•turning the phone’s power on and off•placing and receiving calls•using hands-free features•determining your own phone numberKeep in Mind: If you see a + next to a feature, the phone must be in satellite mode. If you see a r next to a feature, the phone must be in cellular mode. See “Selecting a Mode” on page 173 to change modes.
44 Using Your PhoneUsing Your Phone Feature OverviewYour feature selection varies depending on your mode setting. The table below shows the features available in each mode. See “Selecting a Mode” on page 173 for more information on changing modes.Feature Satellite GSM CDMA/AMPS Adjust Earpiece and Ringer Volume • • • Automatic Redial • Call a Number Embedded in a Message • Dial a Number • • • Dial a Number from the Phone Book • • • Dial Numbers with Pauses • • • Dial Special Characters • • • End a Call • • • Make an Emergency Call • •    •*Make an International Call • •    •*Multiple Key Answer • • • Pending Call Drop • Personal Mailbox • • Power Up the Phone • • • Receive a Call • • • Redial Last Number Called • • • Set to Ring or Vibrate • Standby Mode • • • Unanswered Call Message • What’s My Phone Number • • • * You must set this feature up first in the Phone Setup Menu.
Powering Up the Phone 45Powering Up the PhoneTurn the Power On and OffTo turn your phone’s power on:1. Insert your SIM chip if necessary. (See “Insert the SIM Chip” on page 30.)2. Press and hold S to turn the phone on and off.When you turn your phone’s power on, you will either hear the wakeup tone or feel a vibration and see the wakeup screen. You may see a number of other power-on messages (see below).When the m (no service) indicator disappears and the n (home system) indicator appears, you are ready to start calling.Power-On MessagesOnce your phone is powered on, you may see:Message DescriptionSearching... The phone is attempting to establish communications with the satellite or cellular network. See “Accessing the Network” on page 163 for more information.Rotate andExtend Antenna You also hear a tone when you see this message. Make sure the antenna is rotated upward and fully extended and has a clear unobstructed view of the sky.Rotate AntennaRegistering... Your phone is registering with the network. When the process is complete, you will see Registered. See “Accessing the Network” on page 163 for more information.
46 Using Your PhoneCheck Signal Your phone is unable to locate or establish registration with the satellite network. Move to a location with a clearer view of the sky.Invalid Account  Contact your service provider.Enter PhoneUnlock Code Your phone was locked after the last use. Enter your four-digit unlock code and press O to proceed. See “Locking and Unlocking Your Phone” on page 144 for more information.Enter PIN Enter the four- to eight-digit SIM chip PIN code provided by your service provider and press O to proceed. See “Protecting the SIM chip” on page 146 for more information.Insert Card Power off your phone, make sure your SIM chip is inserted completely, and then power your phone on again.Check Card This message indicates that the SIM chip is damaged or inserted the wrong way.Blocked If the SIM chip PIN code is incorrectly entered three times in a row, your phone becomes blocked. See “Unblock the PIN Code” on page 147 for instructions on how to unblock it.! Blocked If the SIM chip PIN2 code is incorrectly entered three times in a row, your phone becomes blocked. See “+ Unblock the PIN2 Code” on page 149 for instructions on how to unblock it.Bad CardSee Supplier Your SIM chip has been damaged or incorrectly issued. Contact your service provider for information.Message Description
Powering Up the Phone 47StandbyTo conserve energy, your phone may turn off its backlight when you have not pressed a key for several seconds. The light reappears the next time you press a key.
48 Using Your PhoneHolding the Phone1. Extend the antenna by pulling out on the end of it in the down position.2. Rotate the antenna to either the left or right detent (the antenna will stop here).When talking on the phone, the antenna should be vertical to the ground.3. Make sure the antenna has a clear view of the sky.1.2.Right DetentLeft Detent
Placing a Call 49Placing a CallTo place a call, your phone must be powered on, have a SIM chip inserted, be unlocked, and be in contact with the satellite or cellular network (depending on your mode). See “Accessing the Network” on page 163 for network information.You can enter a phone number up to a maximum length of 20 digits. The digits are displayed in two rows, 16 digits in the top line and four digits in the next line.Dial a Number1. First, rotate and fully extend the satellite antenna if you are in satellite mode. See “Holding the Phone” on page 48Tip: If you make a mistake, press C once to delete the last digit, or press and hold C to clear all digits.2. Enter the number using the digit keys. As you begin entering digits, you will see Call?.When you are in satellite mode, you must enter the phone number in international format: [international access code, 00, or +] [country code or Iridium country code] [phone number]Note: If you are calling another Iridium satellite subscriber, use the Iridium code instead of the country code.3. Press O. You will see Calling followed by the number you dialed.You will see either the flashing message Calling or the flashing messages Calling, Registering..., and the phone will play a series of setup tones.If the call connects and is answered, Connected appears on the display for a few seconds, followed by End Call?. If the call does not connect, you may see one of the following messages:
50 Using Your PhoneInternational DialingTo make an international phone call:1. Press and hold 0.After a few seconds the international dialing prefix + appears in the display. This allows you to call from any country without knowing the local international access code.2. Enter the country code followed by the phone number. The country code follows the conventional format.Note: If you are in CDMA/AMPS cellular mode, you must set up international prefix mapping in order for this feature to work. See “r Set Up an International Prefix” on page 159 for more information.Message DescriptionRotate andExtend Antenna Make sure the antenna is rotated upward and fully extended and has a clear unobstructed view of the sky.Busy Try Later Please Try Later The phone is unable to access the network. Try again in a few minutes.Restricted Area The phone is unable to access the network. Move to an area where calls are allowed.Redial? Press O to redial the number automatically. See “Automatic Redial” on page 51 for more information.
Placing a Call 51+ Automatic RedialSatellite ModeIf the number or your network is busy, you will see Redial? for five seconds.Press O to redial the number automatically.Note: The maximum number of redial attempts is set by your service provider. If the call cannot be connected within this maximum, you will see the message Redial Failed.Cellular ModeThis feature is only available in satellite mode.Redial Last Number CalledWhenever your phone is on standby, you can redial the last number called:1. Press O to display the last number dialed.2. Press O again to place the call.Dial Special CharactersYou can insert special characters in your numbers:Dial a Number With PausesSee “Using Pauses in Numbers” on page 85 for information on dialing numbers with pauses.To enter... Then...0 Press 0.*  Press *.+ (for international calls) Press and hold 0.® (for pause dialing) Press and hold *.supplementary service numbers, PINs, and unblockingPress #, *.
52 Using Your PhoneDial a Number from the Phone BookYour phone contains a phone book that you can use to store names and telephone numbers. Once you have stored information in your phone book, you can save dialing steps by using:•one-touch dialing•an entry from a location•an entry of a name•one of the last ten numbers calledSee “Managing the Phone Book” on page 75 for information on how to store and retrieve names and numbers from the phone book.Make an Emergency CallYou can make an emergency call virtually anywhere in the world (without unlocking your phone) by dialing 112. Provided your phone has found a network, you are able to make an emergency call. The emergency call is directed to a central emergency operator.To make an emergency call:Dial 1, 1, 2. You will see the message Emergency Calling.In addition, your Iridium service provider may have provided an additional emergency calling code on your SIM chip. Check with your service provider.+ Call a Number in a MessageSatellite ModeDetails on how to call a number embedded in a message are described in the “Using Message Services” section on page 134.Cellular ModeThis feature is only available in satellite mode.
Ending a Call 53Ending a CallTo end a call, perform one of the following tasks:• Press O.• Press C.
54 Using Your PhoneWhat’s My SIM Chip Phone Number?You can retrieve and display your phone’s number from your SIM chip.Tip: Pressing Q, # also brings up your phone’s number.1. Press M until you see Phone Book, and then press O to select.2. Press M until you see My Phone Number(s), and then press O to select. You will see your phone number.3. Press and hold C to exit the menu.Note: If you do not see your phone number, the number has not been programmed onto your SIM chip. You can program your phone number onto your SIM chip by following the steps described in “+ Modify Your Phone Numbers” on page 100.
Receiving a Call 55Receiving a CallReceive a Phone CallTo receive a call, your phone must be powered on, have a SIM chip inserted, be unlocked, and be in contact with the satellite or cellular network (depending on your mode). See “Accessing the Network” on page 163 for network information.There are two scenarios for receiving calls in satellite mode, depending on the antenna position: (1) antenna raised and fully extended, or (2) antenna stowed or in the down position.Antenna Raised and Fully ExtendedWhen you receive a call:Tip: See page 141 to set your phone’s alert.•Your phone rings and/or vibrates.•The status indicator alternates red and green.•The phone displays Call, followed by Answer? on the next line.To answer the call:Press O or any digit key (1-9, * or #).You will see Connected.If the call does not connect properly, you may see one of the following messages:Message DescriptionOrient AntennaCall Attempt You need to fully extend the antenna upwards with a clear unobstructed view of the sky.Call Failed The antenna is not properly adjusted or the network signal is not strong enough.
56 Using Your PhoneAntenna Stowed or in the Down PositionWhen you receive a call:•The phone chirps up to three times to alert you of an incoming call.•The phone displays Rotate Antenna, followed by Call Attempt on the next line.You must rotate and extend the antenna as quickly as possible to receive the call.Rotate and fully extend the antenna as described in “Placing a Call” on page 49.You will see: Iridium Call Attempt. Do not attempt to answer until the phone rings or vibrates.After several seconds, your phone will ring and display Call followed by Answer? on the next line.To answer the call:Press O or any digit key (1 - 9, * or #).You will see Connected.If the call does not connect properly, you may see one of the following messages:Message DescriptionOrient AntennaCall Attempt Rotate AntennaCall Attempt You need to fully extend the antenna upwards with a clear unobstructed view of the sky.Call Failed The antenna is not properly adjusted or the network signal is not strong enough.
Receiving a Call 57Ending a CallTo end a call, perform one of the following tasks:• Press O.• Press C.Note: If you rotate the satellite antenna down and you are in satellite mode, your call will be dropped.+ Unanswered CallsSatellite ModeIf you are away from your phone or choose not to answer a call, your phone displays the message Unanswered Call.Cellular ModeThis feature is only available in satellite mode.Personal MailboxSatellite Mode/Cellular Mode (GSM)Callers who are unable to reach you can leave numeric, text, and voice messages. The next time you register with the satellite network or GSM cellular network (depending on your mode), you will receive these messages. Then you will have the option of returning the call or saving the message for later viewing.For information on retrieving messages, see “Accessing Messages” on page 132.Cellular Mode (CDMA/AMPS)This feature is not available in CDMA/AMPS cellular mode.
58 Using Your PhoneAdjusting Earpiece VolumeTo adjust earpiece volume:Tip: The volume keys are located on the side of the phone.• Increase the volume by pressing the upper volume key.• Decrease the volume by pressing the lower volume key.As you press the keys, the phone’s speaker demonstrates the new volume level. The bar graph in the display represents the volume level. The higher the graph, the louder the volume.Note: You can also use the volume keys to scroll through Phone Book entries.Volume           Quit?
Adjusting Ringer Volume 59Adjusting Ringer VolumeUse this feature to adjust the volume of the ringer. The phone sounds the new volume level as you adjust it.Note: This feature behaves differently based on the mode you are in. Check your mode settings before using this feature. See “Selecting a Mode” on page 173 for more information.Satellite ModeTo adjust the ringer volume in satellite mode:1. Press M until you see Phone Setup, and then press O.2. Press M until you see Adjust Ring Volume, and then press O to select.Tip: You can also press E and then the up or down volume key to adjust ringer volume.3. Increase the volume by pressing the upper volume key.orDecrease the volume by pressing the lower volume key.4. Press and hold C to exit the menu.Note: The adjustments you make here apply to cellular mode as well.Cellular ModeTo adjust the ringer volume in cellular mode:Press E and then the up or down volume key.Note: The adjustments you make here apply to satellite mode as well.
60 Using Your Phone
61Using In-Call FeaturesRead this section to learn how to use In-Call menu features. The In-Call menu is displayed when you press M during a call. See “Using The In-Call Menu” on page 74 for more information.What You Will  Learn•using call waiting•using call holding•using call mutingKeep in Mind: If you see a + next to a feature, the phone must be in satellite mode. If you see a r next to a feature, the phone must be in cellular mode. See “Selecting a Mode” on page 173 to change modes.
62 Using In-Call FeaturesIn-Call Feature OverviewThe feature selection varies depending on your mode setting. The table below shows the features available in each mode. See “Selecting a Mode” on page 173 for more information on changing modes.Feature Satellite GSM CDMA/AMPS Call Waiting • Service Provider*Call Holding • Service Provider*Call Muting • Phone Flash • * Your service provider may have similar or additional features.
+ Muting a Call 63+ Muting a CallSatellite ModeFor privacy during a call, try muting the phone. You hear the party on the other end, but the other party does not hear you.While in a call:1. Press M until you see Turn Mute on or off.2. Press O to select. You will see Mute.To unmute a call:Press O again to resume your conversation.or1. Press M until you see Turn Mute on or off.2. Press O to select.Cellular ModeThis feature is only available in satellite mode.
64 Using In-Call FeaturesUsing Call WaitingYou must subscribe to this network feature through your service provider(s).Note: This feature behaves differently based your mode. Check your mode settings before using this feature. See “Selecting a Mode” on page 173.Satellite ModeIf you have subscribed to Call Waiting, you must first activate it through the Options menu (see “+ Activating Call Waiting” on page 118). After you activate it, you are notified of incoming calls while you are on the line in two ways. When a call comes in, you hear a beep and see the message Call Waiting followed by Answer?.You may see one of the following messages during call waiting activities:If you want to... Then...accept the waiting callPress O. Your current call is placed on hold.reject the waiting call Press C.end current call before answering the waiting call1. Press M. You will seeEnd Active Call2. Press O. Your phone rings and can now be answered normally.Message DescriptionTrying Your phone is attempting to switch between the current and held call.HoldFailed The attempt to hold a call was unsuccessful.Cannot HoldSecond Call A call is already on hold. You can only place one call on hold.ReconnectFailed The held call could not be made active again.BusyTry Later Your phone is working on a previous command. Wait a short time before repeating the new command.
Using Call Waiting 65Cellular Mode (CDMA/AMPS)CDMA/AMPS cellular users who have subscribed to this feature, are notified of an incoming call by two beeps. You may see a visual message, depending on your service provider.To handle the call waiting, you must send a phone flash (see “Sending a Flash” on page 68 for more information) along with the appropriate feature code provided by your service provider. The current call is put on hold. To return to your initial call you must send another phone flash.To send a phone flash:1. Press M while you are in a call. You will see Flash Options followed by Select?2. Press O. You will see Send Flash?3. Enter the access code for the feature you want to access, if necessary, and then press O to send the flash.orPress C to cancel the flash.Cellular Mode (GSM)This feature is not available in GSM cellular mode.
66 Using In-Call FeaturesPlacing a Call on HoldYou must subscribe to this network feature through your service provider(s).Note: This feature behaves differently based on the mode you are in. Check your mode settings before using this feature. See “Selecting a Mode” on page 173.Satellite ModeYou can place a call on hold to receive a new call or while making a new call. You can only place one call on hold at a time, so some options may not be accessible if you have already placed a call on hold.To place a call on hold:1. Press M until you see Hold Call.2. Press O. Your current call is put on hold and you will see Call Holding followed by Reconnect?.Once your call is on hold, you have these options:If you want to... Then...make a new call1. Press M until you see Make New Call, and then press O to select.2. Dial the number as usual, and then press O to place the call.switch between callsWhen you are connected to either number, you will see 2 Calls followed by Switch?.Press O to switch to the other call and automatically place the current call on hold.end both callsPress M until you see End Active & Held Call, and then press O to select.Both calls are disconnected, and the display returns to standby.end current call Press C at any time.
Placing a Call on Hold 67You may see one of the following messages:Cellular Mode (CDMA/AMPS)To place a call on hold, you must send a phone flash (see “Sending a Flash” on page 68 for more information) along with the appropriate feature code provided by your service provider. To return to your initial call, you must send another phone flash. To send a phone flash, see page 68.Cellular Mode (GSM)This feature is not available in GSM cellular mode.end call that is on holdPress M until you see End Held Call, and then press O to select.The held call is disconnected, the current call remains connected, and you see End Call?.Message DescriptionTrying Your phone is attempting to switch between the current and held call.Hold Failed The attempt to hold a call was unsuccessful.Cannot Hold Second Call A call is already on hold. You can only place one call on hold.Reconnect Failed The held call could not be made active again.Busy Try Later Your phone is working on a previous command. Wait a short time before repeating the new command.If you want to... Then...
68 Using In-Call Featuresr Sending a FlashSatellite ModeThis feature only applies to CDMA/AMPS cellular users.Cellular Mode (CDMA/AMPS)Many CDMA/AMPS network features (for example, Call Waiting, Call Holding, Call Forwarding) require you to send a “flash” over the air during a call to access them. This is similar to when you press the switch hook on your conventional phone in your home or office to switch between calls. The flash alerts the network that you want to use a particular network feature. Your service provider will provide you with the appropriate codes to send with the flash for the features to which you have subscribed.To send a phone flash:1. Press M while you are in a call. You will see Flash Options followed by Select?2. Press O. You will see Send Flash?3. Enter the access code for the feature you want to access, if necessary, and then press O to send the flash.orPress C to cancel the flash.Cellular Mode (GSM)This feature only applies to CDMA/AMPS cellular users.
69Using the MenusMany of your phone’s features are organized into lists of options called menus. There are three menus: the Options menu, the Quick Access menu, and the In-Call menu. Some of these options give you access to additional lists of options called submenus.Learn how to navigate through your phone’s three main menus. Once you become familiar with these menus and their features, go to “+ Customizing the Menu System” on page 191 for instructions on how you can personalize your menus.What You Will  Learn•using the Options menu•using the Quick Access menu•using the In-Call menuKeep in Mind: If you see a + next to a feature, the phone must be in satellite mode. If you see a r next to a feature, the phone must be in cellular mode. See “Selecting a Mode” on page 173 to change modes.
70 Using the MenusUsing the Options MenusThe Options menu gives you access to the features and options included with your phone. The submenus that appear under the Options Menu vary depending on your mode setting. See “Selecting a Mode” on page 173.Navigate the Options MenusLearning how to use just a few keys enables you to move freely through the entire menu system.Note: If you press M during a call, you will see the In-Call menu which is described on page 74.Menu Satellite GSM CDMA/AMPS Phone Book • • • Call Related Features • • • Messages • • Phone Setup • • Network Selection • • Mode Selection • • • Call Meters • If you want to... Then...enter the Options menuPress M to access the Options menu. You will see the first available submenu.scroll through the Options menu• Press M to scroll forward.• Press < to scroll backward or forward.select options and submenusPress O to select a menu option or submenu when that option or submenu name is displayed.exit features and menus• Press C to exit the feature or submenu.• Press and hold C to exit the Options menu.
Using the Options Menus 71How the Phone RespondsAs you scroll through the Options menu, you will see one of three questions on the bottom line of the display.Display Messages and Icons+ Customize the Options MenuSatellite ModeTo personalize the Options menu—to hide and move features—see “+ Move Menu Features” on page 192.Cellular ModeYou can only customize the menus in satellite mode.If your phone asks... Then...View Options? Press O to enter the submenu.Select? Press O to select the displayed feature.Quit? Press O to exit the feature.If you see... Then...y Completed This indicates a feature has been activated.! Failed The display returns to the menu in a few seconds.Enter PIN  orEnter Name Enter requested information. Then press O.uBusyTry Later You may have requested information while your phone was completing another task.s This indicates where you are in a menu.w Your phone may take a few seconds to request settings from the network.
72 Using the Menus+ Using the Quick Access MenuSatellite ModeThe Quick Access menu is a way to keep your favorite menu options readily accessible. Each digit key, 1 to 9, has a Quick Access feature assigned to it. See the chart on page 73 for the default setup.If you know the number of the feature, activating that option takes only two button presses! If you do not know the number or want to review your options, just scroll through the icon menu and read the tag attached to each option.+ Activate the Feature DirectlyTo access the feature directly:Press E, and then press the digit key of the feature.+ Scroll to the FeatureTo scroll to the feature:1. Press E.2. Press < to scroll through the available features.3. Press O to select a feature.
+ Using the Quick Access Menu 73+ Default Quick Access SettingsThe following features (and associated icons) are the default settings for the Quick Access menu.+ Customize the Quick Access MenuSee “+ Personalizing the Quick Access Menu” on page 194 for instructions on how to customize the menu.Cellular ModeThe Quick Access menu is not available in Cellular Mode.Key Icon Quick Access Feature1 B Find Name searches your Phone Book by the full name.2 r Check Signal checks the strength of the signal from the satellite network.3 R Call Voicemail calls your Voicemail number to check your Voicemail.4 G Battery Meter displays a fuel gauge indicating charge. The more bars, the greater the charge.5 H Lock Now locks your phone immediately.6 L Vibrate On/off activates or deactivates VibreCall™ depending on the current setting7 K Read Messages displays the newest message received8 f Register Now initiates a systematic manual search for a network on which to register. You must wait three minutes between registration attempts.9 P Forward On/Off activates or deactivates unconditional call forwarding depending on the current setting.
74 Using the MenusUsing The In-Call MenuThis menu lets you access specific features while you are in a call. The In-Call menu is only available when you are in a call. You cannot review it off-line.Entering the In-Call MenuWhile you are in a call:Press M to view the In-Call menu features.In-Call Menu FeaturesThe In-Call menu dynamically changes depending on the type of call you are in and the mode you have selected.Satellite ModeThe following options appear in satellite mode.Cellular ModeWhen you are in CDMA/AMPS cellular mode and you press M during a call, you will see Flash Options followed by Select?.There is not an in-call menu in GSM cellular mode.Type of call Optionssingle active callHold Call Make New Call Turn Mute on or off held call Make New Call End Active Call active call and a call waitingEnd Active Call Reject Call Waiting Turn Mute on or off active call and a held callEnd Active Call Turn Mute on or off End Held Call End Active & Held Call held call and a call waitingReconnect Held Call Reject Call Waiting End Held Call?
75Managing the Phone BookYour satellite phone can store up to 100 names and numbers, and your SIM chip expands memory capacity even more.Use the dedicated keys or the Options menu to access the same functions. With the Options menu you can also access Phone Book maintenance and security features.What You Will  Learn•recalling and storing phone numbers•organizing the Phone Book•accessing automated calling systems•storing phone number prefixes•restricting calls with fixed dialing •editing the memory information•viewing your own phone numberKeep in Mind: If you see a + next to a feature, the phone must be in satellite mode. If you see a r next to a feature, the phone must be in cellular mode. See “Selecting a Mode” on page 173 to change modes.
76 Managing the Phone BookEntering the Phone Book MenuTo enter the Phone Book menu:1. Press M to open the Options menu.2. Press M to scroll forward.orPress < to scroll backward or forward.3. Press O when you see:4. Press M to scroll through the submenu.orPress < to scroll backward or forward through the submenu.  Phone  Book   View Options?
What’s on the Phone Book Menu? 77What’s on the Phone Book Menu?Satellite ModePersonal NumbersPhone BookCall NumberFind Entry By LocationFind Entry By NameMy Phone Number(s)Fixed DialingEnter NameErase Name And NumberModify Name Or NumberCall NumberFixed Dial ListEnter LocationErase Name And NumberModify Name Or NumberView Fixed Dial ListFixed Dial ListSetup Fixed DialingOn/OffLast Ten CallsLast Calls MadeErase All NumbersOne-Touch Dial SettingsTo Phone MemoryTo SIM Card MemoryTo Fixed Dial ListAdd To Phone MemoryAdd EntryAdd To SIM Card MemoryNo Memory RestrictionsPrevent AccessTo Phone MemoryTo SIM Card MemoryTo Phone & SIM MemoryEdit EntryAdd EntryErase EntryCheck Phone CapacityCheck CapacityCheck SIM CapacityShow Services
78 Managing the Phone BookCellular ModePersonal NumbersPhone BookCall NumberFind Entry By LocationFind Entry By NameMy Phone Number(s)Fixed DialingEnter NameErase Name And NumberModify Name Or NumberCall NumberFixed Dial ListEnter LocationErase Name And NumberModify Name Or NumberView Fixed Dial ListFixed Dial ListSetup Fixed DialingOn/OffLast Ten CallsLast Calls MadeErase All NumbersOne-Touch Dial SettingsTo Phone MemoryTo SIM Card MemoryTo Fixed Dial ListAdd To Phone MemoryAdd EntryAdd To SIM Card MemoryNo Memory RestrictionsPrevent AccessTo Phone MemoryTo SIM Card MemoryTo Phone & SIM MemoryEdit EntryAdd EntryErase EntryCheck Phone CapacityCheck CapacityCheck SIM CapacityShow Services
Organizing Your Phone Book 79Organizing Your Phone BookEach name and phone number in your Phone Book is stored in a numbered memory location. The satellite phone has two types of memory—phone memory and SIM chip memory.Your phone’s memory can seem overwhelming if you do not have a strategy for organizing your Phone Book. Begin setting up your Phone Book by asking yourself three questions:Which numbers do I call most?Make a list of the numbers you call most frequently. You will probably want to store these numbers in the first nine memory locations of your Phone Book. You can then dial them with a single keystroke by using One-Touch dialing (satellite mode only).Phone Memory SIM Chip Memory1Personal Numbers 100 entries 155 entriesFixed Dial Numbers  No entries 40 entriesPhone Number Digits 32 20Name Characters 16 16Location Numbers 1-100 101-2551 SIM chip capacity varies depending upon the card issued by your service provider.
80 Managing the Phone BookWhen do I use these numbers?Group the numbers on the list according to when you use them. Most people call a different set of numbers during the day than they do in the evening and on weekends. You can switch one-touch dialing to your phone’s memory (locations 1–9), your SIM chip’s memory (locations 101–109), or to your fixed dial list (locations 1–9). Store your evening and weekend numbers on one type of memory and your daytime numbers on another.Which numbers do I need to keep secure?Tip: If you have many entries, group them in blocks of ten to make them easier to find.Use your SIM chip to store the numbers you need to keep secure, like the numbers of friends and family members. Because your SIM chip is the size of a credit card, you can easily keep it securely in your wallet when you are not using it. If you wish, you can even require a PIN code every time your SIM chip is inserted into any phone. (To deactivate your PIN code, see “+ Activate and Deactivate the SIM chip PIN” on page 146.) Store more public numbers, like business associates and travel agents in your phone’s memory.* SIM memory is dependent on your SIM chip.
Organizing Your Phone Book 81Storing Names and NumbersAdd an EntryUse the Options Menu1. Follow the steps in “Getting to Personal Numbers...” to get to Add Entry, and then press O. 2. Press M to scroll to Add To Phone Memory or Add To SIM Card Memory.3. Press O to select. You will see Enter Number.4. Enter a number, and then press O. You will see Enter Name.Tip: When in satellite mode, numbers must be entered in international format.5. Enter a name (see “Entering Names” on page 83), and then press O. You will see Enter Location.6. Enter a location number, 1-100 for phone memory or 101-255 for SIM memory*, and then press O. You will see Stored XXX.orPress O to select the next available location. You will see Stored XXX.7. Press and hold C to exit the menu.Getting to Personal Numbers...1. Press M until you see Phone Book, and then press O.2. Press < to scroll to Personal Numbers, and then press O.3. Press < to scroll to one of the features described below.
82 Managing the Phone BookUse the Dedicated KeysTip: If you have more than one number for the same person, try attaching a descriptive tag to the name, like Home, Office, or Mobile.1. Enter the phone number you want to store.2. Press I to begin storing.3. Press < to scroll to the desired memory type Add To Phone Memory or Add To SIM Card Memory, and then press O. You will see Enter Number, followed by the number you entered.4. Press O to accept the number. You will see Enter Name.5. Enter a name (see “Entering Names” on page 83), and then press O. You will see Enter Location.6. Enter a three-digit location number, and then press O. You will see Stored XXX.orPress O to store the entry in the next empty memory location. You will see Stored XXX.Adding Entry MessagesWhen you enter the location number for your entry, you may see one of these messages:Message DescriptionStored XXX  You have stored the entry.Range XXX-XX You have chosen a memory location outside the appropriate range. Enter a new number within the range listed on the display.Overwrite? You have chosen an occupied location. Press O to overwrite the location or press any other key to try another location.
Entering Names 83Entering NamesYou can use the keypad to produce any letter in the alphabet. For example, press 2 to enter the letters A, B, or C, as shown:Enter CharactersTip: Press and hold any numeric key to toggle between uppercase and lowercase characters.1. Enter a letter by pressing a key as many times as necessary.2. Press < to advance the cursor.3. Repeat steps 1 and 2 as many times as necessary, and then press O.Correct an EntryTo make a change:1. Press < to scroll to the character you want to delete. 2. Press C to delete one character at a time. orPress and hold C to clear the display.press 1 time to insert an Apress 2 times to insert a Bpress 3 times to insert a Cpress 4 times to insert a 2
84 Managing the Phone BookAvailable CharactersUse this chart as a guide for producing characters:The upper line for each key shows the uppercase characters. The lower line for each key shows the lowercase characters.1 Space . 1 ? ! , @ _ & : “ ( ) ‘ ¿ ¡ % £ $ Space . 1 ? ! , @ _ & : “ ( ) ‘ ¿ ¡ % £ $ 2 A B C 2 Ä Å à Æ β Ç a b c 2 ä å à æ β Ç 3 D E F 3 ∆ É è Φ d e f 3 ∆ é è Φ 4 G H I 4 Γ ì g h i 4 Γ ì 5 J K L 5 Λ j k l 5 Λ 6 M N O 6 Ñ Ö Ø Ò Ω m n o 6 ñ ö ø ò Ω 7 P Q R S 7 Π ß Σ p q r s 7 Π ß Σ 8 T U V 8 Θ Ü ù t u v 8 Θ ü ù 9 W X Y Z 9 Ξ Ψ w x y z 9 Ξ Ψ 0 + - 0 x * / = > < # + - 0 x * / = > < #
Using Pauses in Numbers 85Using Pauses in NumbersWhen you call automated systems, a recorded message prompts you for numbers such as PIN numbers and account numbers. You can store these numbers in the same memory location as the automated system’s access number. Separate the numbers with “pauses”—special characters that tell your phone to wait a few seconds before sending additional numbers—and store the string in the same way you would other numbers.Tip: You can store 32 characters in a phone memory location, or 20 characters in a SIM chip memory location. A pause is equal to one character.Enter Pauses in Numbers1. Enter the phone number you use to access the automated system.2. Press and hold *. You will see a ® (pause) character inserted into the number entry.3. Enter the next group of numbers. For example, enter your PIN number. If the automated system requires a * or #, enter those symbols, too.4. Repeat steps 2 to 3 as many times as necessary.5. To store the entry follow the procedures in “Add an Entry” on page 81.
86 Managing the Phone BookDial Numbers With PausesSatellite Mode/Cellular Mode (GSM)To dial a number with pauses in satellite mode or in GSM cellular mode:1. Recall the entry. (See “Locating Entries” on page 88.)Tip: Your phone displays up to 32 digits (two rows of 16 digits) when you enter a number with pauses.2. Press O to place the call.The first pause in the number waits until the call is answered. When the automated system answers, your phone waits a few seconds and then automatically sends the next set of numbers, then the next, until all numbers are sent.Cellular Mode (CDMA/AMPS)To dial a number with pauses in CDMA/AMPS cellular mode:1. Recall the entry. (See “Locating Entries” on page 88.)2. Press O to place the call.The first pause in the number waits until the call is answered.The phone then waits for you to send the next set of numbers, You will see Send Digits?.3. Press O to send the next set of digits.4. Repeat step 3 until all the digit sequences are sent.
+ Using Phone Number Prefixes 87+ Using Phone Number PrefixesSatellite ModeYou can save time when you dial by storing the prefixes that you often use. This is sometimes called “postscripting.” Your satellite phone allows you to change or add to Phone Book entries without overwriting them.Store a prefix in your Phone Book just as you would any other number. See “Storing Names and Numbers” on page 81.Use a Stored PrefixTip: Try naming the prefix by area, like Downtown, Suburbs, or Germany.To use a stored prefix: 1. Recall the prefix from your Phone Book. (See “Locating Entries” on page 88.)2. Add the remaining numbers.3. Press O to place the call.Change Entry to a Similar NumberTo change an entry to a similar number:1. Recall the number from your Phone Book. (See “Locating Entries” on page 88.)2. Press C to delete the unwanted digits.3. Enter the replacement digits.4. Press O to place the call.Cellular ModeThis feature is not available in cellular mode.
88 Managing the Phone BookLocating EntriesFind an Entry by NameSearch your Phone Book by the first few letters of the entry.Note: If you have restricted access to either SIM chip or phone memory and you are in satellite mode, those entries will not be available. For more information, see “+ Preventing Access to the Phone Book” on page 92.1. Follow the steps in “Getting to Personal Numbers...” to get to Find Entry By Name, and then press O to select. You will see Enter Name.2. Enter one to three characters of the entry, and then press O. If necessary, scroll to the entry you are looking for.Tip: Your phone sorts SIM chip memory and phone memory together alphabetically.3. Press O to access options for that entry, and then proceed to “Calling, Modifying, or Erasing an Entry” on page 90.Getting to Personal Numbers...1. Press M until you see Phone Book, and then press O.2. Press < to scroll to Personal Numbers, and then press O.3. Press < to scroll to one of the features described below.
+ Using Phone Number Prefixes 89Find an Entry by LocationIf you know the location number of the entry, here is an easy way to recall it.Use the Options Menu1. Follow the steps in “Getting to Personal Numbers...” to get to Find Entry By Location, and then press O to select. You will see Enter Location.2. Enter the location number, and then press O. You will see the entry displayed.If you enter an empty location number, you will see Location XXX is Empty. Your phone then selects the next largest available location. If there are no numbers stored, you will see No Numbers Stored.3. Press O to access options for that entry, and then proceed to “Calling, Modifying, or Erasing an Entry” on page 90.Use the Dedicated Keys1. Press Q. You will see Enter Location.2. Enter the one-, two-, or three-digit location number of the entry, and then press O.If you enter an empty location number, you will see Location XXX is Empty. Your phone then selects the next largest available location. If there are no numbers stored, you will see No Numbers Stored.3. Press O to call the displayed entry. You will see the number followed by Calling.
90 Managing the Phone BookCalling, Modifying, or Erasing an EntryOnce you have selected a Phone Book entry, you can call, change, or erase that entry.Call a Selected Entry1. Find an entry, and then press O. See “Locating Entries” on page 88.2. Press M until you see Call Number, and then press O. You will see Calling followed by the number you dialed.Modify a Name or NumberTip: For help entering letters or changing entries, see “Entering Names” on page 83.1. Find an entry, and then press O. See “Locating Entries” on page 88.2. Press M until you see Modify Name or Number, and then press O. You will see Edit Number, followed by the phone number stored in that entry.3. Enter changes to the number, and then press O. You will see the name stored in that entry.4. Enter changes to the name, and then press O. You will see Modified XXX.Erase a Name and Number1. Find an entry, and then press O. See “Locating Entries” on page 88.2. Press M until you see Erase Name and Number, and then press O. You will see Erased xxx.
Calling, Modifying, or Erasing an Entry 91+ Checking Phone Book CapacitySatellite ModeUse this feature to see how many available memory locations you have in either SIM chip memory or phone memory. 1. Follow the steps in “Getting to Personal Numbers...” to get to Check Capacity, and then press O to select.2. Press M until you see Check Phone Capacity or Check SIM Capacity, and then press O. You will see XXX Unused Locations.3. Press and hold C to exit the menu.Cellular ModeThis feature is only available in satellite mode.Getting to Personal Numbers...1. Press M until you see Phone Book, and then press O.2. Press < to scroll to Personal Numbers, and then press O.3. Press < to scroll to one of the features described below.
92 Managing the Phone Book+ Preventing Access to the Phone BookSatellite ModeYou may want to restrict memory access when loaning your phone to others. You can choose to prevent access to the phone memory, SIM memory, or both.Caution: If you switch to cellular mode these restrictions will not apply.1. Follow the steps in “Getting to Personal Numbers...” to get to Prevent Access, and then press O to select.2. Press M until you see the restriction type you desire: No Memory Restrictions, To SIM Card Memory, To Phone Memory, or To Phone & SIM Memory.3. Press O to select the displayed option. You will see Enter Security Code.Tip: The factory default security code is: 000000.4. Enter security code. Enter your six-digit security code. You will see Completed.5. Press and hold C to exit the menu.Note: If you restrict access to either phone memory or SIM memory and try to access an entry stored in that type of memory, you will see a list of the entries that are not restricted. If you prevent access to both your phone memory and SIM memory and then try to access an entry, you will see Restricted.Cellular ModeThis feature is not available in cellular mode. When you switch to cellular mode, the restrictions you set in satellite mode will not apply.Getting to Personal Numbers...1. Press M until you see Phone Book, and then press O.2. Press < to scroll to Personal Numbers, and then press O.3. Press < to scroll to one of the features described below.
Calling, Modifying, or Erasing an Entry 93+ Restricting Phone UseYou can restrict calling on your phone to a list of numbers that you create. When the fixed dialing feature is active, you can only call numbers or use prefixes (for example, country codes or area codes) that exactly match those stored in your fixed dial list. You can store up to 40 entries on your list. These entries are stored on your SIM chip.+ Activate Fixed DialingSatellite ModeUse this option to activate fixed dialing. For instructions on how to store entries in the fixed dial list, see “Add an Entry” on page 94.Note: The fixed dialing feature restricts access to your SIM memory.1. Follow the steps in “Getting to Fixed Dialing...” to get to Setup Fixed Dialing, and then press O to select. You will see Enter PIN2Tip: You should have received your SIM chip PIN2 code from your service provider.2. Enter code. Enter your SIM chip PIN2 code, and then press O.3. Press M until you see On or Off, and then press O. You will see Completed.4. Press and hold C to exit the menu.Cellular ModeThis feature is not available in cellular mode. You must deactivate this feature from satellite mode in order to make an receive calls in cellular mode.Getting to Fixed Dialing...1. Press M until you see Phone Book, and then press O.2. Press < to scroll to Fixed Dialing, and then press O.3. Press < to scroll to one of the features described below.
94 Managing the Phone Book+ Add an EntrySatellite ModeTo add an entry to the fixed dial list:1. Follow the steps in “Getting to Fixed Dialing...” to get to Setup Fixed Dialing, and then press O to select. You will see Enter PIN2.Tip: Phone numbers must be in international format.2. Enter code. Enter your SIM chip PIN2 code, and then press O.3. Press M until you see Add Entry, and then press O. You will see Enter Number.4. Enter the number, and then press O. You will see Enter Name.Tip: See “Entering Names” on page 83 for help entering letters.5. Enter the name, and then press O. You will see Enter Location.6. Enter a location number, and then press O. You will see Completed.7. Press and hold C to exit the menu.Cellular ModeThis feature is not available in cellular mode. You must deactivate this feature from satellite mode in order to make and receive calls in cellular mode.Getting to Fixed Dialing...1. Press M until you see Phone Book, and then press O.2. Press < to scroll to Fixed Dialing, and then press O.3. Press < to scroll to one of the features described below.
Calling, Modifying, or Erasing an Entry 95+ Erase an EntrySatellite ModeTo erase an entry:1. Follow the steps in “Getting to Fixed Dialing...” to get to Setup Fixed Dialing, and then press O to select. You will see Enter PIN2.2. Enter code. Enter your SIM chip PIN2 code, and then press O.3. Press M until you see Erase Entry, and then press O to select. You will see the first entry in your fixed dial list.4. Press M to scroll to the number you wish to erase. You will see Erase?.5. Press O to confirm. You will see Completed.6. Press and hold C to exit the menu.Cellular ModeThis feature is not available in cellular mode. You must deactivate this feature from satellite mode in order to make and receive calls in cellular mode.
96 Managing the Phone Book+ Edit an EntrySatellite ModeTo edit an entry:1. Follow the steps in “Getting to Fixed Dialing...” to get to Setup Fixed Dialing, and then press O to select. You will see Enter PIN2.2. Enter code. Enter your SIM chip PIN2 code, and then press O.3. Press M until you see Edit Entry, and then press O to select. You will see the first entry in your fixed dial list.4. Press M to scroll to the entry you want to change, and then press O. You will see the current number for that location.5. Enter changes to the number, and then press O. You will see the current name for that location.6. Enter changes to the name, and then press O. You will see the current location.7. Enter a new location, and then press O. You will see Completed.8. Press and hold C to exit the menu.Cellular ModeThis feature is not available in cellular mode. You must deactivate this feature from satellite mode in order to make and receive calls in cellular mode.Getting to Fixed Dialing...1. Press M until you see Phone Book, and then press O.2. Press < to scroll to Fixed Dialing, and then press O.3. Press < to scroll to one of the features described below.
Calling, Modifying, or Erasing an Entry 97+ View Your Fixed Dialing ListSatellite ModeThis feature enables you to review, but not change, your fixed dial list.1. Follow the steps in “Getting to Fixed Dialing...” to get to View Fixed Dial List, and then press O to select. You will see the first number on your fixed dial list.2. Press < to scroll through the numbers on your fixed dial list.3. Press and hold C to exit the menu.Cellular ModeThis feature is not available in cellular mode. You must deactivate this feature from satellite mode in order to make and receive calls in cellular mode.
98 Managing the Phone BookViewing the Last Ten Numbers DialedDon’t worry about forgetting the number you dialed earlier. The last ten numbers you dialed are saved.1. Follow the steps in “Getting to Phone Book Features...” to get to Last Ten Calls, and then press O to select.2. Press M to scroll to Last Calls Made or Erase All Numbers, and then press O to select.Tip: If you want to add a number from Last Ten Calls to your Phone Book, press I when the number is displayed, then follow the steps in “Storing Names and Numbers” on page 81.3. If you select Last Calls Made, press M to scroll to the number you are looking for, and then press O to place a call to that number.orIf you select Erase All Numbers, you will see Completed. 4. Press and hold C to exit the menu.Getting to Phone Book Features...1. Press M until you see Phone Book, and then press O.2. Press < to scroll to one of the features described below. You will see the feature name, followed by Select?.
Viewing and Modifying Your Phone Numbers 99Viewing and Modifying Your Phone NumbersView Your SIM Phone Number(s)You can program fax, data, and other types of phone numbers onto your SIM chip in addition to your voice phone number. Use this feature to view your phone number(s). You can have up to five phone numbers.Tip: Pressing Q # also brings up your phone number.1. Follow the steps in “Getting to Phone Book Features...” to get to My Phone Number(s). 2. Press O to select. You will see your phone’s voice phone number followed by Modify?.3. Press < to scroll through your numbers.4. Press and hold C to exit the menu.Note: If you do not see your phone number(s), they have not been programmed onto your SIM chip. You can program your voice phone number and other phone numbers onto your SIM chip by following the steps described in “Modify Your Phone Numbers” on page 100.
100 Managing the Phone Book+ Modify Your Phone NumbersSatellite ModeUse this feature to modify or program your voice phone number onto your SIM chip. You can also program fax, data, and other types of phone numbers onto your SIM chip. You can have up to five phone numbers.1. Complete the steps in “View Your SIM Phone Number(s)” on page 99 to get to the number you want to modify.2. Press O to modify the number. You will see Edit Number followed by the number for the selected entry.3. Enter changes to the number, and then press O. You will see Edit Name followed by the name for the entry selected.4. Enter changes to the name (see “Entering Names” on page 83) and then press O. You will see Stored.5. Press and hold C to exit the menu.Cellular ModeThis feature is not available in cellular mode. However, the modifications you make to your number(s) in satellite mode are available in cellular mode.
Viewing and Modifying Your Phone Numbers 101+ Using One-Touch DialingSatellite ModeOne-touch dialing enables you to place calls instantly. You can choose to dial the phone numbers in the first nine memory locations in either your SIM memory, phone memory, or your fixed dial list. You choose which type of memory you want to be active with this feature.Set Up One-Touch Dialing1. Follow the steps in “Getting to Phone Book Features...” to get to One-Touch Dial Setting, and then press O to select.2. Press M to scroll through To Phone Memory, To SIM Card Memory, or To Fixed Dial List, and then press O to select the displayed option. You will see Completed.3. Press and hold C to exit the menu.Use One-Touch DialingTip: You do not need to press O to call the number when you are using one-touch dialing.Using one-touch dial is easy—just press and hold a keypad digit! To use one-touch dialing:Press and hold the appropriate digit key. For example, press and hold 2 to dial the number stored in location 2 of your phone memory, location 2 of your fixed dial list, or 102 of your SIM memory, depending on your setting.Cellular ModeOne-touch dialing features are only available from satellite mode.Getting to Phone Book Features...1. Press M until you see Phone Book, and then press O.2. Press < to scroll to one of the features described below. You will see the feature name, followed by Select?.
102 Managing the Phone BookViewing Service Dialing NumbersThe Show Services feature provides a read-only list of service dialing numbers that are pre-programmed by your service provider. This list resides on the SIM chip and allows for call placement only.1. Follow the steps in “Getting to Phone Book Features...” to get to Show Services.2. Press O to select. You will see a list of service phone numbers.3. Press M to scroll to the number you are looking for.4. Press O to place a call to that number.orPress and hold C to exit the menu.Note: If you do not see any service dialing number(s), they have not been programmed onto your SIM chip. Contact your service provider for more information.Getting to Phone Book Features...1. Press M until you see Phone Book, and then press O.2. Press < to scroll to one of the features described below. You will see the feature name, followed by Select?.
103Using Calling FeaturesThis chapter describes call-related features. Many of these features are network features that you must subscribe to in order to access.What You Will  Learn•checking battery power level•showing the strength of the signal your phone is receiving•activating/deactivating the Pending Call Drop signal•forwarding calls when you are not available•restricting use of your phoneKeep in Mind: If you see a + next to a feature, the phone must be in satellite mode. If you see a r next to a feature, the phone must be in cellular mode. See “Selecting a Mode” on page 173 to change modes.
104 Using Calling FeaturesEntering the Call Related Features MenuTo enter the Call Related Features menu:1. Press M to open the Options menu.2. Press M to scroll forward.orPress < to scroll backward or forward.3. Press O when you see:4. Press M to scroll through the submenu.orPress < to scroll backward or forward through the submenu.  Call Related  Features   View Options?
What’s on the Call Related Features Menu? 105What’s on the Call Related Features Menu?Satellite Mode1 These features are network and subscription dependent.2 These features are network and subscription dependent. They are available only when the extended menu is activated.Call Forwarding1Show Battery MeterPending Call DropCall Related FeaturesShow Signal StrengthForward All Voice CallsCancel All ForwardingForward When UnavailableOn/OffCall Waiting1Call Barring2On/OffForward All CallsOn/OffIf No AnswerOn/OffDetailed Forwarding2Forward Voice CallsOn/OffIf Not ReachableOn/OffIf BusyOn/OffBar Outgoing CallsChange Bar PasswordOn/OffBar Incoming CallsOn/OffOn/Off
106 Using Calling FeaturesCellular Mode (GSM)1 This feature is network and subscription dependent.2 These features are network and subscription dependent. They are available only when the extended menu is activated.Cellular Mode (CDMA/AMPS)This menu is not available in CDMA/AMPS cellular mode.Call Forwarding1Call Related FeaturesForward All Voice CallsCancel All ForwardingForward When UnavailableCall Barring2On/OffForward All CallsOn/OffIf No AnswerOn/OffDetailed Forwarding2Forward Voice CallsOn/OffIf Not ReachableOn/OffIf BusyOn/OffBar Outgoing CallsChange Bar PasswordOn/OffBar Incoming CallsOn/OffForward Fax CallsForward Data CallsIntl CallsIntl Calls Except HomeAll CallsAll CallsWhen Roaming
What’s on the Call Related Features Menu? 107Forwarding Calls When UnavailableUse this feature when you can’t answer a call. You must subscribe to this network feature through your service provider(s).Note: This feature behaves differently based on your mode. Check your mode settings before using this feature. See “Selecting a Mode” on page 173.Satellite ModeTo activate this feature in satellite mode:1. Follow the steps in “Getting to Call Forwarding...” to get to Forward When Unavailable, and then press O to select.2. Press M to scroll to On or Off, and then press O to select.•If you select On, continue with step 3.•If you select Off, continue with step 5.3. Press M to scroll to Voicemail or Other Number, and then press O to select.•If you select Voicemail, continue with step 5.Tip: If you have not yet stored a voicemail number, go to page 129 to learn how.•If you select Other Number, then you will see Enter Number. Continue with step 4.4. Enter the number you want calls forwarded to, and then press O. Your phone takes a moment to request the setting from the network, then you will see Call Forward On.5. Press and hold C to exit the menu.Getting to Call Forwarding...1. Press M until you see Call Related Features, and then press O.2. Press < to scroll to Call Forwarding, and then press O.3. Press < to scroll to one of the features described below.
108 Using Calling FeaturesCellular Mode (GSM)1. Follow the steps in “Getting to Call Forwarding...” to get to Forward When Unavailable, and then press O to select.2. Press M to scroll to On or Off, and then press O to select.•If you select On, you will see Enter Number. Continue with step 3.•If you select Off continue with step 4.3. Enter the number you want calls forwarded to, and then press O. Your phone takes a moment to request the setting from the network, then you will see Call Forward On.4. Press and hold C to exit the menu.Cellular Mode (CDMA/AMPS)To activate Call Forwarding features in CDMA/AMPS cellular mode, you must send a phone flash along with the appropriate feature code provided by your service provider. See “Sending a Flash” on page 68 for more information.To send a phone flash:1. Press M while you are in a call. You will see Flash Options followed by Select?2. Press O. You will see Send Flash?3. Enter the access code for the feature you want to access, if necessary, and then press O to send the flash.orPress C to cancel the flash.Getting to Call Forwarding...1. Press M until you see Call Related Features, and then press O.2. Press < to scroll to Call Forwarding, and then press O.3. Press < to scroll to one of the features described below.
Forwarding All Your Calls 109Forwarding All Your CallsWhen you select this option, all your calls are forwarded to the number you choose. Your phone does not ring. You must subscribe to this network feature through your service provider(s).Satellite ModeTo activate this feature in satellite mode:1. Follow the steps in “Getting to Call Forwarding...” to get to Forward All Calls, and then press O to select.2. Press M to scroll to either On or Off, and then press O to select.•If you select On, continue with step 3.•If you select Off, continue with step 5.3. Press M to scroll to Voicemail or Other Number, and then press O to select.Tip: If you have not yet stored a voicemail number, go to page 129 to learn how.•If you select Voicemail, continue with step 5.•If you select Other Number, then you will see Enter Number. Continue with step 4.4. Enter the number you want all your calls forwarded to, and then press O.Your phone takes a moment to request the setting from the network, and then you will see Call Forward On.5. Press and hold C to exit the menu.
110 Using Calling FeaturesCellular Mode (GSM)To activate this feature in GSM cellular mode:1. Follow the steps in “Getting to Call Forwarding...” to get to Forward All Calls, and then press O to select.2. Press M to scroll to either On or Off, and then press O to select.•If you select On, you will see Enter Number. Continue with step 3.•If you select Off, continue with step 4.3. Enter the number you want all your calls forwarded to, and then press O.Your phone takes a moment to request the setting from the network, then you will see Call Forward On.4. Press and hold C to exit the menu.Cellular Mode (CDMA/AMPS)To activate this feature in CDMA/AMPS cellular mode, see “Forwarding Calls When Unavailable” on page 107.Getting to Call Forwarding...1. Press M until you see Call Related Features, and then press O.2. Press < to scroll to Call Forwarding, and then press O.3. Press < to scroll to one of the features described below.
Using Detailed Call Forwarding 111Using Detailed Call ForwardingDetailed Call Forwarding lets you select the specific situations when you want your calls forwarded. The settings you select in Forward When Unavailable and Forward All Calls override the settings you select here.You must subscribe to this network feature through your service provider(s).Note: This feature is available only when the extended menus are activated. See “+ Activating Extended Menus” on page 153 for more information.Voice CallsSatellite ModeTo activate this feature in satellite mode:1. Follow the steps in “Getting to Call Forwarding...” to get to Detailed Forwarding, and then press O to select.Tip: For information on retrieving messages, see “Accessing Messages” on page 132.2. Press M to scroll to Forward Voice Calls, then press O to select.3. Press M to scroll to the option you desire: Forward All Voice Calls, If Busy, If No Answer, or If Not Reachable.4. Press O to select the displayed option.5. Press M to scroll to either Voicemail or Other Number, and then press O.Tip: If you have not yet stored a voicemail number, go to page 129 to learn how.•If you select Voicemail, continue with step 7.•If you select Other Number, then you will see Enter Number. Continue with step 6.6. Enter the number you want calls forwarded to, then press O. Your phone takes a moment to request the setting from the network, then displays Call Forward On.7. Press and hold C to exit the menu.
112 Using Calling FeaturesCellular Mode (GSM)To activate this feature in GSM cellular mode:1. Follow the steps in “Getting to Call Forwarding...” to get to Detailed Forwarding, and then press O to select.2. Press M to scroll to Forward Voice Calls, then press O to select.3. Press M to scroll to the option you desire: Forward All Voice Calls, If Busy, If No Answer, or If Not Reachable.4. Press O to select the displayed option.•If you select If Busy or If Not Reachable, then your calls are automatically forwarded to your Personal Mailbox. Continue with step 6.•If you select Forward All Voice Calls or If No Answer, you will see Enter Number. Continue with step 5.5. Enter the number you want calls forwarded to, then press O. Your phone takes a moment to request the setting from the network, then displays Call Forward On.6. Press and hold C to exit the menu.Cellular Mode (CDMA/AMPS)To activate this feature in CDMA/AMPS cellular mode, see “Forwarding Calls When Unavailable” on page 107.Getting to Call Forwarding...1. Press M until you see Call Related Features, and then press O.2. Press < to scroll to Call Forwarding, and then press O.3. Press < to scroll to one of the features described below.
Using Detailed Call Forwarding 113r Fax and Data CallsSatellite ModeThe Forward Fax Calls and Forward Data Calls features are only available in GSM cellular mode.Cellular Mode (GSM)To forward a fax or data call from GSM Cellular mode:1. Follow the steps in “Getting to Call Forwarding...” to get to Detailed Forwarding, and then press O to select.2. Press M to scroll to Forward Fax Calls or Forward Data Calls and then press O to select.3. Press M to scroll to On or Off. If you select On continue with step 4, otherwise continue with step 5.4. Enter the number you want calls forwarded to, and then press O. Your phone takes a moment to request the setting from the network, and then displays Call Forward On.5. Press and hold C to exit the menu.Cellular Mode (CDMA/AMPS)To activate this feature in CDMA/AMPS cellular mode, see “Forwarding Calls When Unavailable” on page 107.
114 Using Calling FeaturesCanceling All ForwardingUse this option to clear all Call Forwarding settings.Satellite Mode/Cellular Mode (GSM)To cancel Call Forwarding settings:1. Follow the steps in “Getting to Call Forwarding...” to get to Cancel All Forwarding, and then press O to select.You will see Call Forward Off. All Call Forwarding settings are now set to Off.2. Press and hold C to exit the menu.Cellular Mode (CDMA/AMPS)To activate this feature in CDMA/AMPS cellular mode, see “Forwarding Calls When Unavailable” on page 107.Getting to Call Forwarding...1. Press M until you see Call Related Features, and then press O.2. Press < to scroll to Call Forwarding, and then press O.3. Press < to scroll to one of the features described below.
Using Detailed Call Forwarding 115+ Showing the Battery MeterSatellite ModeUse this feature to view the charge on your battery.1. Follow the steps in “Getting to Call Related Features...” to get to Show Battery Meter.2. Press O to select. You will see the battery meter fuel gauge. The more segments filled, the greater your battery’s charge:You may also see one of the following messages:3. Press and hold C to clear the display.Cellular ModeThis feature is only available from satellite mode.Getting to Call Related Features...1. Press M until you see Call Related Features, and then press O.2. Press < to scroll to one of the features described below. You will see the feature name, followed by Select?.Message DescriptionNot Available The battery meter doesn’t appear because a battery is not installed; the phone is operating from external power.Charging Battery The battery is being chargedFast Charge Completed The battery has completed charging. Battery           Quit?Battery           Quit?Low Charge High Charge
116 Using Calling Features+ Showing Signal StrengthSatellite ModeUse this feature to check the strength of the signal that your phone is receiving from the Iridium satellite network.1. Follow the steps in “Getting to Call Related Features...” to get to Show Signal Strength.2. Press O to select. You will see Checking Signal....If the antenna is not rotated, you will see Rotate and Extend Antenna. Rotate and extend the antenna to continue.The signal strength indicator is located in the upper left corner of the display:rx  Signal strength is sampled every four to five seconds; the indicator shows the average strength for the last three samples. The more segments displayed in the bar graph, the stronger the signal. Five bars indicate full signal strength. The indicator shows the tower icon but no bars when the signal is weak.3. Press and hold C to exit the menu.Cellular ModeThis feature is only available from satellite mode.Getting to Call Related Features...1. Press M until you see Call Related Features, and then press O.2. Press < to scroll to one of the features described below. You will see the feature name, followed by Select?.
+ Deactivating Pending Call Drop Signal 117+ Deactivating Pending Call Drop SignalSatellite ModeUnder rare circumstances, due to system overcapacity or a satellite outage, a satellite may not be available to take your call. When this happens, your phone notifies you with a series of three consecutive tones and displays Pending Call Drop. The tones continue periodically until a new satellite moves into range or the call is dropped.To deactivate the alert tones:1. Follow the steps in the “Getting to Call Related Features...” to get to Pending Call Drop, and then press O to select.2. Press M to scroll to either On or Off, and then press O to select.3. Press and hold C to exit the menu.Cellular ModeThis feature only applies in satellite mode.
118 Using Calling Features+ Activating Call WaitingSatellite ModeSubscribers to call waiting can use this feature to decide whether or not to take incoming calls while on the line.To activate call waiting:1. Follow the steps in “Getting to Call Related Features...” to get to Call Waiting, and then press O to select.2. Press M to scroll to On or Off, and then press O to select the desired option.3. Press and hold C to exit the menu.For information on using call waiting, see “Using Call Waiting” on page 64.Cellular Mode (CDMA/AMPS)CDMA/AMPS users do not have to activate Call Waiting through the menu system. For information on using Call Waiting in CDMA/AMPS cellular mode, see “Using Call Waiting” on page 64.Cellular Mode (GSM)This feature is not available in GSM cellular mode.Getting to Call Related Features...1. Press M until you see Call Related Features, and then press O.2. Press < to scroll to one of the features described below. You will see the feature name, followed by Select?.
+ Deactivating Pending Call Drop Signal 119Restricting Calls with Call BarringYou can use call barring to restrict both incoming and outgoing calls. Call barring is useful if you are loaning your phone to others or when you wish to control incoming calls. When you change one of your call barring settings, your phone takes a few seconds to request the setting from the network.Note: This feature is available only when the extended menus are activated. See “+ Activating Extended Menus” on page 153 for more information.Bar Outgoing CallsThis setting enables you to receive incoming calls but prevents outgoing calls.Satellite ModeTo activate this feature in satellite mode:1. Follow the steps in “Getting to Call Barring...” to get to Bar Outgoing Calls, and then press O to select.2. Press M to scroll to On or Off, and then press O to select. You will see Enter Password.Tip: Your service provider gives you a bar password.3. Enter your bar password, and then press O. You will see Completed.4. Press and hold C to exit the menu.Getting to Call Barring...1. Press M until you see Call Related Features, and then press O.2. Press < to scroll to Call Barring, and then press O.3. Press < to scroll to one of the features described below. You will see the feature name, followed by Select?.
120 Using Calling FeaturesCellular Mode (GSM)To activate this feature in GSM cellular mode:1. Follow the steps in “Getting to Call Barring...” to get to Bar Outgoing Calls, and then press O to select.2. Press M to scroll to Intl Calls, Intl Calls Except Home, All Calls, or Off, and then press O to select. You will see Enter Password.3. Enter your bar password, and then press O. You will see Completed.4. Press and hold C to exit the menu.Cellular Mode (CDMA/AMPS)This feature is not available in CDMA/AMPS cellular mode.Getting to Call Barring...1. Press M until you see Call Related Features, and then press O.2. Press < to scroll to Call Barring, and then press O.3. Press < to scroll to one of the features described below. You will see the feature name, followed by Select?.
+ Deactivating Pending Call Drop Signal 121Bar Incoming CallsThis setting allows you to place calls, but refuses incoming calls. Callers hear a recording telling them you are unavailable.To be sure not to miss a call see “Using Detailed Call Forwarding” on page 111.Satellite ModeTo activate this feature in satellite mode:1. Follow the steps in “Getting to Call Barring...” to get to Bar Incoming Calls, and then press O to select.2. Press M to scroll to On or Off, and then press O to select.Tip: Your service provider gives you a bar password.You will see Enter Password.3. Enter your bar password, and then press O. You will see Completed.4. Press and hold C to exit the menu.Cellular Mode (GSM)To activate this feature in GSM cellular mode:1. Follow the steps in “Getting to Call Barring...” to get to Bar Incoming Calls, and then press O to select.Tip: Your service provider gives you a bar password.2. Press M to scroll to When Roaming, All Calls, or Off, and then press O to select. You will see Enter Password.3. Enter your bar password, and then press O. You will see Completed.4. Press and hold C to exit the menu.Cellular Mode (CDMA/AMPS)This feature is not available in CDMA/AMPS cellular mode.
122 Using Calling FeaturesChange Bar PasswordSatellite Mode/Cellular Mode (GSM)When you subscribe to call barring, your service provider gives you a four-digit bar password. Use this feature to change it to something easy to remember.1. Follow the steps in “Getting to Call Barring...” to get to Change Bar Password, and then press O to select. You will see Enter Password.Tip: If you are changing the password for the first time, use the password supplied by your service provider.2. Enter your bar password, and then press O. You will see Enter New Password.3. Enter the new bar password, and then press O.4. Enter the new bar password again to confirm, and then press O.5. Press and hold C to exit the menu.Cellular Mode (CDMA/AMPS)This feature is not available in CDMA/AMPS cellular mode.Getting to Call Barring...1. Press M until you see Call Related Features, and then press O.2. Press < to scroll to Call Barring, and then press O.3. Press < to scroll to one of the features described below. You will see the feature name, followed by Select?.
Using Message Services 123Using Message ServicesDid you know that you can receive voicemail and fax notification messages and numeric and text messages through your Personal Mailbox service—wherever in the world you may be? Wherever you are, you’ll have instant reference to all your communication.Keep in Mind: Message Services are only available in satellite mode and GSM cellular mode unless otherwise indicated.What You Will  Learn•checking your voicemail messages•reading, saving and deleting messagesKeep in Mind: If you see a + next to a feature, the phone must be in satellite mode. If you see a r next to a feature, the phone must be in cellular mode. See “Selecting a Mode” on page 173 to change modes.
124 Using Message ServicesEntering the Messages MenuTo enter the Messages menu:1. Press ? to access the Message submenu directly, and then go on to step 4.orPress M to access the Options Menu and then go on to step 2.2. Press M to scroll forward.orPress < to scroll backward or forward.3. Press O when you see:4. Press M to scroll through the submenu.orPress < to scroll backward or forward through the submenu.12:00MessagesView Options?
Using Message Services 125Messages Services Feature OverviewThe feature selection in the Messages menu varies depending on your mode setting. The table below shows the features available in each mode. See “Selecting a Mode” on page 173 for more information on changing modes.Feature Satellite  GSM CDMA/AMPSCall a Number Embedded in the Message •Check Voice Mail •Delete a Message ••Go to Next Message ••Message Notification ••Read A New Message ••Read A Stored Message ••Store Voice Mail Number •
126 Using Message ServicesWhat’s on the Messages Menu?Satellite ModeVoicemail NumberMessage SettingsReceived MessagesCall VoicemailGo to Next MessageDelete MessageReturn CallMessages Menu
Using Message Services 127Cellular Mode (GSM)Cellular Mode (CDMA/AMPS)This menu is not available in CDMA/AMPS cellular mode.Received MessagesGo to Next MessageDelete MessageMessages Menu
128 Using Message Services1-2:  Getting to Message Features...1.Press ? to enter the Messages menu.2.Press M to scroll to one of the features described below. You will see the feature name, followed by Select?.+ Checking Your  VoicemailSatellite ModeThis feature makes checking your voicemail simple.1. Follow the steps in “1-2: Getting to Message Features...” to get to Call Voicemail.2. Press O to select. You will see your voicemail number followed by Calling. If you have not previously stored a Voicemail Number, then you will see No Number Available. See page 129 to enter a number.Cellular ModeThis feature is not available in cellular mode.
Using Message Services 129+ Storing Your Voicemail  NumberSatellite ModeTo store a voicemail number:1. Follow the steps in “1-2: Getting to Message Features...” to get to Message Settings, and then press O to select.Tip: Use pause dialing to store your voicemail access and PIN numbers together. See “Using Pauses in Numbers” on page 85.2. Press O to select Voicemail Number. You will see Enter Voicemail Number followed by your current voicemail number. If this is the first time you have stored a number, continue with to step 4.3. Press C to clear one digit at a time, or press and hold C to erase the entire number.4. Enter the new number, and then press O. You will see Completed.5. Press and hold C to exit the menu.Cellular ModeThis feature is not available in cellular mode.
130 Using Message ServicesManaging Your  MessagesHow Your Phone Notifies You of MessagesIf your phone is powered on, it notifies you of received messages in the following ways:• An alert sounds and/or the phone vibrates.Your phone beeps and/or vibrates three times to inform you of an incoming message. See page 141 to set your phone’s alert.• The message icon (o) is displayed.• The message is displayed immediately if the message is a fax or voicemail notification message. The message remains on the display for several seconds.orMMMMeeeessssssssaaaaggggeeee    RRRReeeeaaaadddd    NNNNoooowwww???? is displayed if the message is an alphanumeric, text message of up to 160 characters. For more information see “Read a New Message” on page 132.How Messages Are StoredYour phone stores all messages on your SIM chip. The total number of messages that you can store depends on your service provider.If the message indicator is flashing, your SIM chip is full. See “Delete Messages” on page 133 to make room for the new message.
Using Message Services 131What Messages ContainYou can receive short text or numeric messages in your Personal Mailbox. Text messages may contain up to 160 characters. Numeric messages—typically phone numbers—may contain up to 20 digits. Your Personal Mailbox works along with Call Forwarding. For more information, refer to “Personal Mailbox” on page 57.Messages contain multiple screens with the following information:•the message•the date and time the message was sent•the phone number (if available) from which the message was sent
132 Using Message Services1-2-3:  Accessing Your Messages...1.Press ? to access the Messages menu.2.Press < to scroll to Received Messages, and then press O to select. 3.Press < to scroll to one of the features described below.Accessing MessagesSatellite Mode/ Cellular Mode (GSM)Read a New MessageNote: If you are in cellular mode and you remove your GSM Cellular Cassette you are not able to access your messages. Switch to satellite mode or reinsert your GSM Cellular Cassette.Notification MessagesWhen you receive an incoming fax or voicemail notification message, it automatically scrolls across your screen. You can:• Press O to store it on your SIM chip.• Press C to delete it.Text MessagesWhen you receive a new alphanumeric message, you will see Message Read Now? To read it:1. Press O and continue with step 2.orPress C to read the message later. See “Read a Stored Message” on page 133."2. Press M or < to move forward through a message one screen at a time.3. Press O to access options for that entry, then proceed to page 134.Cellular Mode (CDMA/AMPS)This feature is not available in CDMA/AMPS cellular mode.
Using Message Services 133Read a Stored MessageSatellite Mode/ Cellular Mode (GSM)To read a stored message: 1. Follow the steps in “1-2-3: Accessing Your Messages...” to enter the message center. If you have messages you will see the number of messages stored. If you do not have any messages, you will see No Messages.2. Press M or < to move forward through a message one screen at a time.3. Press O to access options for that entry, and then proceed to page 134.orPress and hold C to exit the menu.Cellular Mode (CDMA/AMPS)This feature is not available in CDMA/AMPS cellular mode.Delete MessagesSatellite Mode/ Cellular Mode (GSM)Use this option to make room for new messages:1. Follow the steps in “Go to the Next Message” above until you see the message you want to delete, and then press O.2. Press M until you see Delete Message, and then press O. You will see Message Deleted.3. Press and hold C to exit the menu.Cellular Mode (CDMA/AMPS)This feature is not available in CDMA/AMPS cellular mode.
134 Using Message ServicesGo to the Next MessageSatellite Mode/ Cellular Mode (GSM)To go to the next message:1. Follow the steps in “Read a Stored Message” on page 133.2. Press M until you see Go To Next Message and then press O. You will see the next message. If you are at the end of your message list you will see the first message again.3. Press M or < to move forward through a message one screen at a time.4. Repeat steps 2 to 3 until you have read all your messages.5. Press and hold C to exit the menu.Cellular Mode (CDMA/AMPS)This feature is not available in CDMA/AMPS cellular mode.+ Return a CallSatellite ModeA callback number appears in quotes within the message. If one is enclosed, you can instantly place a call to that number. If a callback number is not included, your phone selects the first number in the message.1. Follow the steps in “Go to the Next Message” on page 134 to display the desired message, and then press O.2. Press M until you see Return Call, and then press O. You will see the number followed by Call?.3. Press O to place a call to that number. You will see the number followed by Calling.Cellular ModeThis feature is not available in cellular mode.
Customizing Phone Features 135Customizing Phone FeaturesOnce you’re comfortable with the basic features of your new phone, use this chapter to set your phone up the way you like it. What You Will  Learn•adjusting your phone’s ringer volume•choosing from ten different ringer styles•choosing your phone’s keypad tones•locking and unlocking your phone•changing and setting codes for security•setting home and away time and date•resetting or clearing your phone’s settings•selecting the language displayed by your phoneKeep in Mind: If you see a + next to a feature, the phone must be in satellite mode. If you see a r next to a feature, the phone must be in cellular mode. See “Selecting a Mode” on page 173 to change modes.
136 Customizing Phone FeaturesEntering the Phone Setup MenuTo enter the Phone Setup menu (satellite mode and CDMA/AMPS cellular mode only):1. Press M to open the Options Menu.2. Press M to scroll forward.orPress < to scroll backward or forward.3. Press O when you see:4. Press M to scroll through the submenu.orPress < to scroll backward or forward through the submenu.12:00PhoneSetupView Options?
Customizing Phone Features 137Phone Setup Feature OverviewThe Phone Setup feature selection varies depending on your mode setting. The table below shows the features available in each mode. See “Selecting a Mode” on page 173 for more information on changing modes.Feature Satellite GSM CDMA/AMPSActivate Extended Menus •Activate/Deactivate PIN Code •Adjust Ringer Volume** •••Change Clock Display •Change PIN Code •Change Unlock Code •Change/Unblock PIN2 Code* •Emergency Number Mapping •International Prefix Mapping •Lock the Phone •Master Clear/Master Reset •Review Phone Settings •Select Display Language •Select Keypad Tones •Select System Mode •Set Phone to Ring or Vibrate •Set Ringer Tone •Set Time and Date Format •Switch Between Numbers •Unblock PIN Code* •••Unlock the Phone* •••View/Set Time and Date •* These features are not accessed through the menu system**  This feature is not available through the menu in cellular mode.
138 Customizing Phone FeaturesWhat’s on the Phone Setup Menu?Satellite Mode1 This feature is available when the Extended Menu is active.Status ReviewMaster ResetMaster ClearAutomatic LockLock NowChange Unlock CodePhone LockRing or VibrateSet Ringer ToneRequire SIM Card PINOn/OffChange SIM PIN CodeChange SIM PIN2 CodeNew Security CodeExtended MenusShow Time and Date1Set Time and Date1Set Time Format1Language Selection1Adjust Ring VolumeNo TonesNormal TonesSingle ToneSelect Key Pad Tones1Phone Status1Phone SetupEnglishTürkçeNo Ring or VibrateRing OnlyVibrate OnlyVibrate Then RingStandard ToneHigh ToneShow Home Time & DateShow Away Time & DateSet Home Time & DateSet Away Time & Date12 Hour24 HourOn/OffOn/OffChange ClockAway TimeHome Time
Customizing Phone Features 139Cellular Mode (CDMA/AMPS)Cellular Mode (GSM)This menu is not available in GSM cellular mode.Phone SetupEmergency MappingSystem ScanIntl. Dialing PrefixStd A/BScan B/AChange NumberScan AScan A/BScan BPreferred SIDsStd B/AHome Only
140 Customizing Phone Features1-2: Getting to Phone Setup...1.Press M until you see Phone Setup, and then press O.2.Press < to scroll to one of the features described below. You will see the feature name, followed by Select?.Adjusting the Ringer Volume Satellite ModeUse this feature to adjust the volume of the ringer. The phone sounds the new volume level as you adjust it.1. Follow the steps in “1-2: Getting to Phone Setup...” to get to Adjust Ring Volume, and then press O to select.2. Increase the volume by pressing the upper volume key.Tip: You can also press E, and then the up or down volume key.orDecrease the volume by pressing the lower volume key.3. Press and hold C to exit the menu.Keep in Mind: The adjustments you make here apply to cellular mode as well.Cellular ModeTo adjust the ringer volume in cellular mode:Press E and then the up or down volume key.Keep in Mind: The adjustments you make here apply to satellite mode as well.
Customizing Phone Features 141+ Setting the Phone to Ring or VibrateSatellite ModeThis feature is ideal for situations where a ringing phone is inappropriate or in noisy places where you might not hear the ringer. The vibrating alert notifies you of incoming calls by discreet vibrations.1. Follow the steps in “1-2: Getting to Phone Setup...” to get to Ring or Vibrate, and then press O to select.Tip: If you select Vibrate then Ring, your phone vibrates for two cycles, and then rings.2. Press M to scroll to Ring Only, Vibrate Only, Vibrate then Ring, or No Ring or Vibrate, and then press O to select the displayed option. You will see Completed.3. Press and hold C to exit the menu.Cellular ModeYou cannot set this feature in cellular mode. You must set this feature from satellite mode. However, the settings you select in satellite mode will apply in cellular mode.
142 Customizing Phone Features1-2: Getting to Phone Setup...1.Press M until you see Phone Setup, and then press O.2.Press < to scroll to one of the features described below. You will see the feature name, followed by Select?.+ Setting the Ringer Tone Satellite ModeSelect your favorite tone and you’ll recognize your phone’s ring immediately—even in a crowd.1. Follow the steps in “1-2: Getting to Phone Setup...” to get to Set Ringer Tone, and then press O to select.2. Press M to scroll through the options Standard Tone, Single Ring Tone, British Tone, French Tone, German Tone, Bravo Tone, Three Ring Tone, Siren Tone, Quick Tone, or High Tone.You hear a one ring cycle demonstration.3. Press O to select the desired option.4. Press and hold C to exit the menu.Cellular ModeYou cannot set this feature in cellular mode. You must set this feature from satellite mode. However, the settings you select in satellite mode will apply in cellular mode.
Customizing Phone Features 143+ Setting the Keypad Tones Satellite ModeChoose the sounds your phone makes when its keys are pressed.1. Follow the steps in “1-2: Getting to Phone Setup...” to get to Select Keypad Tones, and then press M to select.2. Press M to choose Normal Tones, Single Tone, or No Tones, and then press O.3. Press and hold C to exit the menu.Cellular ModeYou cannot set this feature in cellular mode. You must set this feature from satellite mode. However, the settings you select in satellite mode will apply in cellular mode.
144 Customizing Phone Features1-2-3: Getting to Phone Lock...1.Press M until you see Phone Setup, and then press O.2.Press < to scroll to Phone Lock, and then press O. 3.Press < to scroll to one of the features described below.Locking and Unlocking Your PhoneThese features can help you prevent unwanted use of your phone. + Lock the Phone AutomaticallySatellite ModeUse this feature to set your phone to lock itself every time it is powered on.1. Follow the steps in “1-2-3: Getting to Phone Lock...” to get to Automatic Lock, and then press O to select.2. Press M to choose On or Off, and then press O to select. You will see Completed.3. Press and hold C to exit the menu.Cellular ModeYou cannot set this feature in cellular mode. You must set this feature from satellite mode. However, the settings you select in satellite mode will apply in cellular mode.+ Lock the Phone InstantlySatellite ModeUse this feature to lock your phone immediately.1. Follow the steps in “1-2-3: Getting to Phone Lock...” to get to Lock Now. 2. Press O to select. You will see: Locked.Cellular ModeYou cannot set this feature in cellular mode. You must set this feature from satellite mode. However, the settings you select in satellite mode will apply in cellular mode.
Customizing Phone Features 145Unlock the PhoneTip: The factory default unlock code is 1234.1. Enter unlock code. Enter your four-digit phone unlock code.2. Press O.+ Change the Unlock Code Satellite ModeThe lock code is originally set to 1234. You should change it as soon as possible.Tip: The factory default security code is 000000.1. Follow the steps in “1-2-3: Getting to Phone Lock...” to get to Change Unlock Code, and then press O to select. You will see Enter Security Code.2. Enter security code. Enter your six-digit security code. You will see your current lock code and Enter Phone Unlock Code.3. Press C to clear one digit at a time, or press and hold C to clear all the digits.4. Enter new code. Enter a new four-digit unlock code, and then press O. You will see Phone Lock and the new lock code.5. Press and hold C to exit the menu.Cellular ModeYou cannot change this feature in cellular mode. You must change this feature from satellite mode. However, the changes you select in satellite mode will apply in cellular mode.
146 Customizing Phone Features1-2-3: Getting to Require SIM Card PIN...1.Press M until you see Phone Setup, and then press O.2.Press < to scroll to Require SIM Card PIN, and then press O. 3.Press < to scroll to one of the features described below. You will see the feature name, followed by View Options?.Protecting the SIM chipYou can use a PIN code to protect the information stored on your SIM chip even when it is inserted into someone else’s phone. Satellite Mode+ Activate and Deactivate the SIM chip PINWhen you activate the SIM code, your phone requests the code whenever the phone is powered on. To change this setting, you need to enter the PIN that your service provider gave you.1. Follow the steps in “1-2-3: Getting to Require SIM Card PIN...”2. Press M to scroll On or Off, and then press O. You will see Enter PIN.3. Enter PIN code. Enter the 4- to 8-digit code your service provider gave you, and then press O. You will see Completed.4. Press and hold C to exit the menu.Cellular ModeYou cannot activate this feature in cellular mode. You must activate this feature from satellite mode. However, once you activate this feature in satellite mode, it will be active in cellular mode as well.
Customizing Phone Features 147+ Change the SIM PIN CodeSatellite ModeTo choose your own PIN code:1. Follow the steps in “1-2-3: Getting to Require SIM Card PIN...” to get to Change SIM PIN Code, and then press O to select. You will see Enter Old PIN.2. Enter the current PIN code, and then press O. You will see Enter New PIN.3. Enter a new PIN code, and then press O. You will see Repeat New PIN.4. Re-enter the new code, and then press O again. You will see Completed.5. Press and hold C to exit the menu.Cellular ModeYou cannot change this feature in cellular mode. You must change this feature from satellite mode. However, the changes you make in satellite mode will apply in cellular mode.Unblock the PIN Code If your PIN number is entered incorrectly three times in a row, Blocked appears in the display. You need to enter a PIN unblocking key (PUK), which you can obtain from your service provider. Use the following key sequence to unblock your phone: 1. Press *, *, 0, 5, *.2. Enter unblocking key. Enter the 8-digit unblocking key, and then press O.3. Enter a new PIN code, and then press O.4. Re-enter the new PIN code, and then press O.1-2:   Getting to Phone Setup Features...
148 Customizing Phone Features1-2: Getting to Phone Setup...1.Press M until you see Phone Setup, and then press O.2.Press < to scroll to one of the features described below.You will see the feature name, followed by Select?.Managing Other Security SettingsYour phone includes other security features:•a SIM PIN2 code for accessing Fixed Dialing settings and other subscription-dependent features•a security code controls access to security and other menu options+ Change the SIM PIN2 Code Satellite ModeYour SIM PIN2 code is used to access Fixed Dialing settings. This four- to eight-digit code is issued to you when you subscribe to the feature. Use this feature to choose a new code.1. Follow the steps in “1-2: Getting to Phone Setup...” to get to Change SIM Card PIN2 Code, and then press O to select. You will see Enter Old PIN2.2. Enter the current PIN2 code, and then press O. You will see Enter New PIN2.3. Enter new PIN2 code, and then press O. You will see Repeat New PIN2.4. Re-enter the new PIN2 code, and then press O again. You will see Completed.5. Press and hold C to exit the menu.Cellular ModeYou cannot change this feature in cellular mode. You must change this feature from satellite mode. However, the changes you make in satellite mode will apply in cellular mode.
Customizing Phone Features 149+ Unblock the PIN2 Code Satellite ModeIf your old PIN2 number is entered incorrectly three times in a row, Blocked appears in the display. You needs to enter a PIN unblocking key (PUK), which you can obtain from your service provider. 1. Press *, *, 0, 5, 2, *.2. Enter unblocking key. Enter the 8-digit unblocking code, and then press O. Your service provider supplies this code.3. Enter a new PIN2 code, and then press O.4. Re-enter the new PIN2 code, and then press O.Cellular ModeYou cannot unblock the PIN2 code from cellular mode.+ Change the Security Code Satellite ModeThe security code is your phone’s primary security number. You use it to reset your phone to its default settings and prevent access to your phone book. It is originally set to 000000.1. Follow the steps in the “1-2: Getting to Phone Setup...” to get to New Security Code, and then press O to select. You will see Enter Security Code.2. Enter the current security code, and then press O. You will see Enter New Security Code.3. Enter a new security code, and then press O. You will see Secur. Code and the six-digit number selected. 4. Press and hold C to exit the menu. Cellular ModeYou cannot change this feature in cellular mode. However, the changes you make to this feature from satellite mode will apply in cellular mode.
150 Customizing Phone Features1-2: Getting to Phone Setup...1.Press M until you see Phone Setup, and then press O.2.Press < to scroll to one of the features described below.You will see the feature name, followed by Select?.+ Managing Time and Date Settings+ View the Time and DateSatellite ModeUse this feature to view the current time and date in one of two time zones.1. Follow the steps in “1-2: Getting to Phone Setup...” to get to Show Time and Date, and then press O to select. 2. Press M to choose Show Home Time and Date or Show Away Time and Date, and then press O. You will see the current time and date for the location selected in display. 3. Press any key to clear the time and date from the display and return to the menu.4. Press and hold C to exit the menu.Cellular ModeThis feature is not available in cellular mode.
Customizing Phone Features 151+ Change the Time Displayed Satellite ModeUse this feature to determine which time is displayed on your real time clock indicator.1. Follow the steps in “1-2: Getting to Phone Setup...” to get to Show Time and Date, and then press O to select. 2. Press M to scroll to Change Clock, and then press O. 3. Press M to scroll to either Home Time or Away Time, and then press O to select.4. Press and hold C to exit the menu.Cellular ModeThis feature is not available in cellular mode.+ Set the Time FormatSatellite ModeYou can choose a12-hour or 24-hour time format.1. Follow the steps in “1-2: Getting to Phone Setup...” to get to Set Time Format, and then press O. 2. Press M to choose either 12-hour or 24-hour, and then press O to select.3. Press and hold C to exit the menu.Cellular ModeThis feature is not available in cellular mode.
152 Customizing Phone Features1-2: Getting to Phone Setup...1.Press M until you see Phone Setup, and then press O.2.Press < to scroll to one of the features described below.You will see the feature name, followed by Select?.+ Set the Time and DateSatellite ModeTo make it easy to check the local time when you travel, your phone can save the current time and date for two different time zones.Tip: The time displayed (home or away) on the real time clock indicator is the one you selected on page 151.1. Follow the steps in “1-2: Getting to Phone Setup...” to get to Set Time and Date, and then press O to select.2. Press M to choose Set Home Time & Date or Set Away Time & Date, and then press O. You will see Enter Time and the time currently set.3. Press O to accept the displayed time.orEnter the time in 24-hour format, and then press O. You will see Enter Date and the date currently set.4. Press O to accept the displayed date. You will see Completed.orEnter the date in day(dd)-month(mm)-year(yy) form and then press O. You will see Completed.5. Press and hold C to exit the menu.Cellular ModeThis feature is not available in cellular mode.
Customizing Phone Features 153+ Activating Extended Menus Satellite ModeThis feature activates and deactivates the Extended Menus. See page 192 to learn how Extended Menus can make your phone even simpler to use.1. Follow the steps in “1-2: Getting to Phone Setup...” to get to Extended Menus, and then press O to select. 2. Press M to choose On or Off, and then press O. You will see Completed.3. Press and hold C to exit the menu.Press and hold M to activate the extended menus temporarily. The extended menus are deactivated when you exit the Options Menu.Cellular ModeThis feature is not available in cellular mode. You will see all of the available cellular menu options when you are in cellular mode, regardless of whether this feature is active or not.
154 Customizing Phone Features1-2: Getting to Phone Setup...1.Press M until you see Phone Setup, and then press O.2.Press < to scroll to one of the features described below.You will see the feature name, followed by Select?.+ Selecting the Display LanguageSatellite ModeYour phone contains 21 languages. These languages are (in alphabetical order): Chinese (Simplified), Chinese (Traditional), Czech, Danish, Dutch, English, Finnish, French, German, Greek, Hungarian, Italian, Japanese, Korean, Norwegian, Polish, Portuguese, Russian, Spanish, Swedish, and Turkish.Use this feature to select the language in which your phone displays menus and messages.1. Follow the steps in “1-2: Getting to Phone Setup...” to get to Language Selection, and then press O to select.2. Press M to scroll through the choices, and then press O to select the displayed option.3. Press and hold C to exit the menu.If you accidentally change the language of your phone’s display, press and hold the C key to return to the idle display, then press M 2 6 O to return directly to the language selection submenu.Cellular ModeYou cannot select this feature in cellular mode. You must select this feature from satellite mode. However, the selection you make will apply in cellular mode.
Customizing Phone Features 1551-2-3: Getting to Phone Status...1.Press M until you see Phone Setup, and then press O.2.Press < to scroll to Phone Status, and then press O.3.Press < to scroll to one of the features described below.+ Managing Your Phone’s SettingsView all your phone’s settings that have changed from their defaults, and reset them to their original settings if you like. + Review the Phone’s SettingsSatellite ModeUse this feature to review but not change your phone’s settings.Keep in Mind: This feature does not show you the settings for your cellular mode-specific features.1. Follow the steps in “1-2-3: Getting to Phone Status...” to get to Status Review, and then press O2. Press M to scroll through the list of all the menu items you have changed.3. Press and hold C to exit the menu.Cellular ModeThis feature is not available in cellular mode.
156 Customizing Phone Features1-2-3: Getting to Phone Status...1.Press M until you see Phone Setup, and then press O.2.Press < to scroll to Phone Status, and then press O.3.Press < to scroll to one of the features described below.+ Reset Options to Factory DefaultsUse the Master Reset option to reset all settings to their original default settings. The Master Reset option:•resets audible call timers, the in-call display meter, and the automatic lock•resets Extended Menus to default setting and return language selection to original•restores keypad tones to normal, ringer tones to standard, and the volume level to the middle of its range•reset cellular mode (CDMA/AMPS) emergency number and international prefix•resets mode selection (this may cause the phone to switch modes)Satellite ModeTo reset all settings:1. Follow the steps in “1-2-3: Getting to Phone Status...” to get to Master Reset, and then press O to select. You will see Enter Security Code.Tip: The factory default security code is 000000.2. Enter your six-digit security code. You will see Reset Complete.3. Press and hold C to exit the menu.Cellular ModeYou cannot reset your settings from cellular mode. However, when you reset your setting from satellite mode, you cellular cassette settings are reset as well.
Customizing Phone Features 157+ Clear All Stored InformationThe Master Clear option resets the same items as Master Reset, plus the following:•clear phone book entries from phone memory (not from SIM memory)•clear last calls made list •reset resettable call timersMaster Clear does not clear the: •fixed dial list•my number(s) list•received messages listSatellite ModeTo clear the settings:1. Follow the steps in “1-2-3: Getting to Phone Status...” to get to Master Clear, and then press O to select. You will see Enter Security Code.Tip: The factory default security code is 000000.2. Enter your six-digit security code.You will see Reset Complete.3. Press and hold C to exit the menu.Cellular ModeYou cannot clear your settings from cellular mode. However, when you clear your setting from satellite mode, you cellular cassette settings are cleared as well.
158 Customizing Phone Features1-2: Getting to Phone Setup...1.Press M until you see Phone Setup, and then press O.2.Press < to scroll to one of the features below.You will see the feature name, followed by Select?.r Cellular Mode Settingsr Set Up the Emergency NumberSatellite ModeThis feature does not apply to satellite mode. You will not see this menu option in this mode.Cellular Mode (CDMA/AMPS)This feature allows you to dial 112 to make an emergency call even if your local emergency number is not 112. The default number is 911.1. Follow the steps in “1-2: Getting to Phone Setup...” to get to Emergency Mapping, and then press O to select. You will see Enter Number?2. Enter number. Enter your local emergency number and then press O. 3. Press and hold C to exit the menu.Cellular Mode (GSM)This feature does not apply to GSM cellular mode. You will not see this menu option in this mode.
Customizing Phone Features 159r Set Up an International PrefixSatellite ModeThis feature does not apply to satellite mode. You will not see this menu option in this mode.Cellular Mode (CDMA/AMPS)This feature allows you to use the 0 key (international prefix +) to make an international call without entering the access code for the country, no matter what mode you are in. The default prefix is 001.1. Follow the steps in “1-2: Getting to Phone Setup...” to get to Intl. Dialing Prefix, and then press O to select. You will see Enter Number?2. Enter number. Enter the international access code for the country you are in, and then press O. 3. Press and hold C to exit the menu.Cellular Mode (GSM)This feature does not apply to GSM cellular mode. You will not see this menu option in this mode.
160 Customizing Phone Features1-2: Getting to Phone Setup...1.Press M until you see Phone Setup, and then press O.2.Press < to scroll to one of the features below.You will see the feature name, followed by Select?.r System ScanSatellite ModeThis feature does not apply to satellite mode. You will not see this menu option in this mode.Cellular Mode (CDMA/AMPS)The System Scan feature lets you select the type of cellular system your phone accesses. This feature is configured by your cellular service provider.Select a System Scan MethodYour system ID is shown on your display when you are registered with the system. An A indicates you are registered with an analog system and a D indicates you are registered with a digital system.1. Follow the steps in “1-2: Getting to Phone Setup...” to get to System Scan, and then press O to select.2. Press < to scroll to Std A/B, Scan A/B, Std B/A, Scan B/A, Scan A, Scan B, Home Only, or Preferred SIDs, and then press O to select.See the table on page 161 for a detailed description of these settings.3. Press and hold C to exit the menu.
Customizing Phone Features 161System Scan SettingsCellular Mode (GSM)This feature does not apply to GSM cellular mode. You will not see this menu option in this mode.Standard ModeYour phone first seeks a home type system, then a non-home type system.•If home system is non-wireline (type A), you will see Std A/B.•If home system is wireline (type B), you will see Std B/A.Reversed Preference ModeYour phone first seeks a non-home type system, then a home type system. (This mode may be useful in fringe areas or certain roaming situations.)•If home system is non-wireline (type A), you will see Scan B/A.•If home system is wireline (type B), you will see Scan A/B.Home Only ModeYour phone does not operate outside its home system. You see will Home Only.Scan A Mode You phone operates only within non-wireline (A) systems. You will see Scan A.Scan B Mode Your phone operates only within wireline (B) systems. You will see Scan B.Enhanced Preferred Scanning ModeYour phone scans for home or programmed preferred System ID numbers (SIDs) first. This mode requires entry of the SIDs for the systems in which you wish to operate. Contact your cellular service provider for SID information.If you have selected two system operation, the phone seeks cellular service according to the system type mode selected for each phone number.You will see Preferred SIDs.
162 Customizing Phone Features1-2: Getting to Phone Setup...1.Press M until you see Phone Setup, and then press O.2.Press M to scroll to one of the features below.You will see the feature name, followed by Select?.r Switching Phone NumbersSatellite ModeThis feature does not apply to satellite mode. You will not see this menu option in this mode.Cellular Mode (CDMA/AMPS)Your phone can operate on four different home systems depending on your Cellular Cassette.The Change Number feature lets you change your active number to the one appropriate for your current area. All the phone numbers are designated as your home system, but only one number can be active at any given time. Calls are placed and received by the currently active number only.To change the active phone number:1. Follow the steps in “1-2: Getting to Phone Setup...” to get to Change Number, and then press O to select. You will see your active number with a z next to it.2. Press < to scroll through your phone numbers and press O to switch to that phone number.Note: Contact your service provider to add additional numbers to this list.3. Press O to confirm the new setting. You will see Set.4. Press and hold C to exit the menu.Cellular Mode (GSM)This feature does not apply to GSM cellular mode. You will not see this menu option in this mode.
Accessing the Network 163Accessing the NetworkThis section shows you how to register with the network.What You Will  Learn•accessing the Iridium satellite network•setting up cellular mode network selectionKeep in Mind: If you see a + next to a feature, the phone must be in satellite mode. If you see a r next to a feature, the phone must be in cellular mode. See “Selecting a Mode” on page 173 to change modes.
164 Accessing the NetworkEntering the Network MenuTo enter the Network Selection menu:1. Press M to open the Options Menu.2. Press M to scroll forward.orPress < to scroll backward or forward.3. Press O when you see:4. Press M to scroll through the submenu.orPress < to scroll backward or forward through the submenu.NetworkSelectionView Options?
Accessing the Network 165Network Feature OverviewThe feature selection in the Network menu varies depending on your mode setting. The table below shows the features available in each mode. See “Selecting a Mode” on page 173 for more information on changing modes.Feature Satellite GSM CDMA/AMPS Available Networks •Find New Network •Network Search •Register Now ••
166 Accessing the NetworkWhat’s on the Network Menu?Satellite ModeRegister NowNetwork Selection
Accessing the Network 167Cellular Mode (GSM)Cellular Mode (CDMA/AMPS)This menu is not available in CDMA/AMPS cellular mode.Network SelectionRegistration PreferencesNetwork SearchAutomatic SearchManual SearchFind New NetworkRegister NowAvailable Networks
168 Accessing the Network1-2: Getting to Network Selection...1.Press M until you see Network Selection, and then press O.2.Press < to scroll to one of the features described below. You will see the feature name, followed by Select?.+ Registering With the Satellite NetworkSatellite ModeIf you know your phone is outside the range of your local service, use this feature to access Iridium satellite service.Your phone searches for the Iridium satellite network.1. Rotate and extend the antenna upward. See “Placing a Call” on page 49.2. Follow the steps in “1-2: Getting to Network Selection...” to get to Register Now. 3. Press O to select. You will see Registering.... This may take a few seconds.If the phone finds the signal, you will see Registered and the signal strength indicator:rx The n indicator also appears.If the phone is unsuccessful you may see one of these messages: Rotate Antenna, Orient Antenna, System Busy, Restricted Area, or Weak Signal.Cellular ModeThis feature does not apply to cellular mode. You will not see this menu option in this mode.
Accessing the Network 169r Cellular Mode (GSM) SettingsThese network selection features are available in GSM cellular mode only. For information on switching to cellular mode, see “Selecting a Mode” on page 173.r Scan for Available NetworksSatellite ModeThis feature does not apply to satellite mode. You will not see this menu option in this mode.Cellular Mode (GSM)This option scans to see which networks are operating in your current location.1. Follow the steps in “1-2: Getting to Network Selection...” to get to Available Networks, and then press O. You will see Scanning and then a list of the available networks.2. Press < to scroll to the network you want to register with, and then press O. You will see Register Now?.3. Press O to register with that network. You will see Searching. When your phone has completed registering with the network, you will see the name of the network and either the n or l indicator.Cellular Mode (CDMA/AMPS)This feature does not apply to CDMA/AMPS cellular mode. You will not see this option in this mode.
170 Accessing the Network1-2: Getting to Network Selection...1.Press M until you see Network Selection, and then press O.2.Press < to scroll to one of the features described below. You will see the feature name, followed by Select?.r Set Network Search MethodSatellite ModeThis feature does not apply to satellite mode. You will not see this menu option in this mode.Cellular Mode (GSM)When your phone needs to register with a network, it generates a sorted list of networks. The network list is sorted in the following order:•the home network•networks from a preferred list•random list of other networks found above a certain signal strength•remaining networks in descending order of signal strengthAny forbidden networks stored in the SIM chip are not included in the sorted list.This feature allows you to determine how the phone tries to register with a system. See the table on page 171 for a description of the available search methods.To set your network search method:1. Follow the steps in “1-2: Getting to Network Selection...” to get to Network Search, and then press O. You will see Registration Preferences.2. Press O.3. Press < to scroll to Automatic Search or Manual Search, and then press O. You will see Completed.
Accessing the Network 171You can select one of the following methods:Cellular Mode (CDMA/AMPS)This feature does not apply to CDMA/AMPS cellular mode. You will not see this option in this mode.Automatic Search The phone tries to register with the first network in the sorted list that satisfies the GSM network search rules (described on the previous page). If this is successful your phone displays the network name.Manual SearchThe phone presents you with a sorted list of networks within range. You select the network with which you want to register. You will see Search Network followed by Search?1. Press O to generate the sorted list.2. Press < to select the network you want to register with, and then press O. You  will see Register Now?.3. Press O to register with that network. When your phone has completed registering with the network, you will see the name of the network and the n or l indicator.
172 Accessing the Network1-2: Getting to Network Selection...1.Press M until you see Network Selection, and then press O.2.Press < to scroll to one of the features described below. You will see the feature name, followed by Select?.r Find a New NetworkSatellite ModeThis feature does not apply to satellite mode. You will not see this menu option in this mode.Cellular Mode (GSM)When your phone tries to register with a network, it excludes your current network from the search. If the attempt fails, your phone then attempts to reregister with the previous network.1. Follow the steps in “1-2: Getting to Network Selection...” to get to Find New Network, and then press O. If you are using the automatic method, you will see Searching and then the name of the network.If you are using the manual method continue with step 2.2. Press < to scroll to the network you want to register with, and then press O. You will see Searching and then the name of the network.Cellular Mode (CDMA/AMPS)This feature does not apply to CDMA/AMPS cellular mode. You will not see this option in this mode.
Selecting a Mode 173Selecting a ModeIf you have an optional Cellular Cassette installed in your satellite phone, you can access the cellular network as well as the satellite network.What You Will  Learn•selecting automatic modes•selecting manual modes
174 Selecting a ModeEntering the Mode Selection MenuTo enter the Mode Selection menu:1. Press M to open the Options menu.2. Press M to scroll forward.orPress < to scroll backward or forward.3. Press O when you see:4. Press M to scroll through the submenu.orPress < to scroll backward or forward through the submenu.12:00Mode SelectionView Options?
Selecting a Mode 175Mode Selection Feature OverviewThe feature selection in the Mode Selection menu varies depending on your mode setting. The table below shows the features available in each mode. This chapter shows you how to change modes.Feature Satellite  GSM CDMA/AMPSCellular Always •••Cellular Preferred •••Satellite Always •••Satellite Preferred •  •*•*  This feature may not be available for some GSM  Cellular Cassette users. Check with your service provider.
176 Selecting a ModeWhat’s on the Mode Selection Menu?All ModesSatellite AlwaysCellular AlwaysSatellite PreferredCellular PreferredMode Selection
Selecting a Mode 177Selecting a Mode Preferred or Automatic ModesWhen you select a preferred mode, your phone looks for that type of service first. If it cannot find your preferred service, after about five minutes, it switches automatically to your non-preferred service. If the phone switches to a non-preferred service, it checks at regular intervals (every 30 minutes) to see if your preferred service has become available. The exact intervals that your phone switches modes and checks for preferred service varies depending on your SIM chip. Check with your service provider.Keep in Mind: The phone postpones a switch between modes while you are in a call or are actively using one of the phone’s features.Always or Manual ModesIf you select an always mode, your phone always accesses that type of service. If you become out-of-range in that mode, the phone does not switch to the other type of service. You have to manually switch it to the other mode by changing the settings in this menu.
178 Selecting a Mode1-2: Getting to Mode Selection...1.Press M until you see Mode Selection, and then press O.2.Press < to scroll to one of the features described below.Selecting Satellite ModeSelect Satellite Preferred ModeIf you select this feature, your phone uses your Iridium satellite service if possible. When you are in satellite mode, you will see the + indicator in the lower left corner of your display.Tip: You must have a Cellular Cassette installed in your phone for this selection to work properly.If you are out of range and are unable to access a satellite, your phone switches automatically to cellular mode. If this happens, you no longer will see the + indicator in the lower left corner of your display.1. Follow the steps in “Selecting a Mode” to get to Satellite Preferred.2. Press O to select.If you see the message Check Cassette or Insert Cassette, make sure your cassette is installed and is installed properly.3. Press and hold C to exit the menu.Keep in Mind: This option may not be available for some GSM Cellular Cassette users. If you power your phone up with a GSM Cellular Cassette inserted, your phone may switch to Cellular Preferred mode.
Selecting a Mode 179Select Satellite Always ModeIf you select this feature, your system always accesses the Iridium satellite network. When you are in satellite mode, you will see the + indicator in the lower left corner of your display.1. Follow the steps in “1-2: Getting to Mode Selection...” to get to Satellite Always.2. Press O to select.
180 Selecting a Mode1-2: Getting to Mode Selection...1.Press M until you see Mode Selection, and then press O.2.Press < to scroll to one of the features described below.Selecting Cellular ModeSelect Cellular Preferred ModeWhen this mode is active, your phone uses your cellular service if possible. If you are out of range, your phone switches to satellite mode. If this happens, you will see the + indicator in the lower left corner of your display. Tip: You must have a Cellular Cassette installed in your phone for these selections to work properly.1. Follow the steps in “Selecting a Mode” to get to Cellular Preferred.2. Press O to select.If you see the message Check Cassette or Insert Cassette, make sure your Cellular Cassette is installed properly.Select Cellular Always ModeIf you select this feature, your system always accesses the cellular network.1. Follow the steps in “1-2: Getting to Mode Selection...” to get to Cellular Always.2. Press O to select.If you see the message Check Cassette or Insert Cassette, make sure your Cellular Cassette is installed properly.
Timing Your Calls 181+ Timing Your  Calls Your phone’s call meters give you a variety of options for tracking the time you spend on the phone. You can monitor the length of individual calls, set a timer to track monthly usage, or have the phone alert you with tones at specific intervals.The features described in this chapter are only available in satellite mode.What You Will  Learn•viewing your phone’s call timers to monitor your air-time•setting your phone’s audible alerts to sound at intervals you specify•activating an in-call display of the elapsed time of your current call•checking the total airtime of your phone since it was manufacturedKeep in Mind: If you see a + next to a feature, the phone must be in satellite mode. If you see a r next to a feature, the phone must be in cellular mode. See “Selecting a Mode” on page 173 to change modes.
182 Timing Your CallsEntering the Call Meters MenuTo enter the Call Meters menu:1. Press M to open the Options menu.2. Press M to scroll forward.orPress < to scroll backward or forward.3. Press O when you see:4. Press M to scroll through the submenu.orPress < to scroll backward or forward through the submenu.12:00CallMetersView Options?
Timing Your Calls 183Call Meters Feature OverviewThe feature selection in the Call Meters menu varies depending on your mode setting. The table below shows the features available in each mode. See “Selecting a Mode” on page 173 for more information on changing modes. Feature Satellite  GSM CDMA/AMPS Reset All Timers •Set Repetitive Alert Timer •Set Single Alert Timer •Show Time of Last Call •Show Total Time  of All  Calls •View In-call Timer •View Lifetime Timer •
184 Timing Your CallsWhat’s on the Call Meters Menu?Satellite Mode1 This feature is availabe when the Extended Menu is active.Cellular ModeThis menu is not available in cellular mode.No In-Call DisplayShow Time Per CallSingle Alert TimerRepetitive TimerSet In-Call DisplayShow Last CallTotal For All CallsReset All TimersShow Call TimersSet Audible Call TimersLifetime Timer1Call MetersOn/Off On/Off
Timing Your Calls 1851-2-3: Getting to Show Call Timers...1.Press M until you see Call Meters, and then press O.2.Press M until you see Show Call Timers, and then press O.3.Press M to scroll to one of the features described below.+ Showing Call Timers This submenu helps you track your airtime. Keep a running tab of your monthly usage or view the airtime of your most recent call.+ Show the Time of the Last Call Satellite ModeUse this feature to display the elapsed time of your most recent call.1. Follow the steps in “1-2-3: Getting to Show Call Timers...” to get to Show Last Call, and then press O to select.You will see the airtime of the most recent call in hours, minutes, and seconds. After several seconds, the display returns to Show Last Call.2. Press and hold C to exit the menu.Cellular ModeThis feature is not available in cellular mode.
186 Timing Your Calls1-2-3: Getting to Show Call Timers...1.Press M until you see Call Meters, and then press O.2.Press < to scroll to Show Call Timers, and then press O.3.Press < to scroll to one of the features described below.+ Show Total Time for All Calls Satellite ModeUse this feature to display your total airtime since you last reset the Call Timer.1. Follow the steps in “1-2-3: Getting to Show Call Timers...” to get to Total For All Calls, and then press O to select. You will see the airtime accumulated (hours, minutes, and seconds) since the timer was last reset. After several seconds, the display returns to Total For All Calls.2. Press and hold C to exit the menu.Cellular ModeThis feature is not available in cellular mode.+ Reset All TimersSatellite ModeReset your timers at the beginning of each billing cycle to keep track of your spending.1. Follow the steps in “1-2-3: Getting to Show Call Timers...” to get to Reset All Timers, and then press O to select. You will see Completed. The display then returns to Reset All Timers.2. Press and hold C to exit the menu.Keep in Mind: This does not reset the Lifetime Timer described on page 190.Cellular ModeThis feature is not available in cellular mode.
Timing Your Calls 1871-2-3: Getting to Audible Call Timers...1.Press M until you see Call Meters, and then press O.2.Press < to scroll to Set Audible Call Timers, and then press O.3.Press < to scroll to one of the features described below.+ Setting Audible Call Timers Let your phone watch the clock for you. The call timers signal at a set time or interval with beeps only you can hear.+ Set the Single Alert Timer Satellite ModeUse this feature to set your phone to alert you after an elapsed time.1. Follow the steps in “1-2-3: Getting to Audible Call Timers...” to get to Single Alert Timer, and then press O to select.2. Press M to scroll to On or Off, and then press O to select.•If you select On, you will see Enter Seconds. Continue with step 3.•If you select Off, you will see Completed. Continue with step 4.3. Press O to accept the current setting. You will see Seconds XXX.orEnter a number from 11 to 999, and then press O. You will see Seconds XXX.4. Press and hold C to exit the menu.Cellular ModeThis feature is not available in cellular mode.
188 Timing Your Calls1-2-3: Getting to Audible Call Timers...1.Press M until you see Call Meters, and then press O.2.Press < to scroll to Set Audible Call Timers, and then press O.3.Press < to scroll to one of the features described below.+ Set the Repetitive TimerSatellite ModeUse this feature to set your phone to alert you at specific intervals, for example every 45 seconds.1. Follow the steps in “1-2-3: Getting to Audible Call Timers...” to get to Repetitive Timer, and then press O to select. 2. Press M to scroll to On or Off, then press O to select.•If you select On, you will see Enter Seconds. Continue with step 3.•If you select Off, you will see Completed. Continue with step 4.3. Press O to accept the current setting. You will see Seconds XXX. orEnter a number from 11 to 999, and then press O. You will see Seconds XXX.4. Press and hold C to exit the menu.Cellular ModeThis feature is not available in cellular mode.
Timing Your Calls 1891-2: Getting to Call Meters...1.Press M until you see Call Meters, and then press O.2.Press M to scroll to one of the features described below.+ Showing the In-Call TimerSatellite ModeUse this feature to display a running clock of the airtime elapsed while on a call.1. Follow the steps in “1-2: Getting to Call Meters...” to get to Set In-Call Display, and then press O to select. 2. Press M to scroll to Show Time Per Call or No In-Call Display, and then press O to select.3. Press and hold C to exit the menu.Cellular ModeThis feature is not available in cellular mode.
190 Timing Your Calls1-2: Getting to Call Meters...1.Press M until you see Call Meters, and then press O.2.Press < to scroll to one of the features described below.+ Show the Lifetime TimerSatellite ModeUse this feature to show the total time of all calls for the life of your phone. Tip: The Lifetime Meter can’t be reset. Reset All Timers has no effect on this timer.1. Follow the steps in “1-2: Getting to Call Meters...” to get to Lifetime Timer, and then press O to select. You will see the total airtime of your phone since it was manufactured, including the airtime spent in cellular mode.2. Press and hold C to exit the menu.Cellular ModeThis feature is not available in cellular mode. However, when you view your lifetime time in satellite mode, the total airtime includes the airtime spent in cellular mode.
Customizing the Menu System 191+ Customizing the Menu SystemDo you think your 9505 Portable Phone has too many features for everyday use? You can do something about it by hiding the features you don’t always need. Is your favorite feature not on the Quick Access menu? It’s easy to change the defaults to your favorite features. By customizing your menus, your favorite features are always quick and easy to find! This chapter shows you how.Keep in Mind: The menu systems can only be customized in Iridium satellite mode. See “Selecting a Mode” on page 173 for more information.What You Will  Learn•personalizing the Options Menu•personalizing the Quick Access MenuKeep in Mind: If you see a + next to a feature, the phone must be in satellite mode. If you see a r next to a feature, the phone must be in cellular mode. See “Selecting a Mode” on page 173 to change modes.
192 Customizing the Menu System+ Personalizing the Options MenuSatellite ModeYou can customize the Options Menu by moving features in and out of the Extended Menu.+ Move Menu FeaturesTo move menu features:1. Find the feature you want to move.2. Press and hold O. You will see one of two responses depending on where that menu feature currently is. If you see: Keep in Mind: Some features and submenus cannot be moved. You will see Cannot Move Menu Item.Remove From Short Menus(the feature is in the Short Menu)Press O to move the feature to the Extended Menu. You will see Menu Item Moved.orPress < scroll to Leave in Short Menus, and then press O to select. You will see Move Cancelled.Add To Short Menus(the feature is in the Extended Menu)Press O to move the feature to the Short Menu. You will see Menu Item Moved.orPress < to scroll to Leave in Long Menus, and then press O to select. You will see Move Cancelled.
Customizing the Menu System 193+ Activate/Deactivate Extended MenusUse the Options Menu to activate and deactivate Extended Menu. Activate it when you need access to every feature. Deactivate it for everyday use.1. Press M until you see Phone Setup, and then press O to select.2. Press M until you see Extended Menus, and then press O to select.3. Press M to scroll to either On or Off, and then press O to select.If you activate the Extended Menu, you will notice that all the hidden features are now accessible.+ Access Hidden FeaturesIf you want access to a feature hidden in the Extended Menu, but don’t want to leave the Extended Menu active, you can use this shortcut:Press and hold M for a few seconds.All Extended Menu features are accessible until you exit the Options Menu.Cellular ModeThese features are not available in cellular mode. You will see all of the available cellular menu options when you are in cellular mode, regardless of whether the Extended menu is active or not.
194 Customizing the Menu System+ Personalizing the Quick Access MenuSatellite ModeYou can put any of the features listed below in the Quick Access Menu instead of the defaults listed on page 73.To change the default quick access features to one of the features listed above, choose the feature you want to replace, and then choose the replacement.1. Press E and then press M to scroll to the feature you wish to change.2. Press and hold O to access the list of features available.3. Press M to scroll through the list until you find the desired feature.4. Press O to store the displayed feature in the new location.You will see Completed.Cellular ModeThis feature is not available in cellular mode.DFind by Location recalls Phone Book entries by memory location numbers.FAdd Entry to Phone stores entered numbers in the next available phone memory location.TAdd Entry to SIM stores entered numbers in the next available SIM chip location.JPhone Mute on or off mutes the phone.NRing Volume displays and sets the incoming call ring tone volume.VSwitch Memory switches One-Touch dialing between the phone and SIM memories depending on the current setting.YLast Call Timer displays the duration of your last call.
Menu Quick Reference 195Menu Quick ReferenceThe Options Menu changes depending on the mode you are in. This section provides a quick reference of the menu structure and features for each mode.What You Will  Learn•Menu Quick Reference
196 Menu Quick ReferencePhone Book MenuSatellite ModeMy Phone Number(s)Find Entry By NameFind Entry By LocationAdd EntryPersonal NumbersLast Ten CallsPhone BookAdd To Phone MemoryAdd To SIM Card MemoryCheck CapacityPrevent AccessCheck Phone CapacityCheck SIM CapacityNo Memory RestrictionsTo Phone MemoryTo SIM Card MemoryTo Phone & SIM MemoryFixed DialingFixed Dial ListView Fixed Dial ListSetup Fixed DialingOn/OffAdd EntryOne-Touch Dial SettingsTo Phone MemoryTo SIM Card MemoryTo Fixed Dial ListShow ServicesEdit Entry Fixed Dial ListEnter Name:Enter Location:Call NumberModify Name Or NumberErase Name And NumberCall NumberModify Name Or NumberErase Name And NumberLast Calls MadeErase All NumbersErase Entry
Menu Quick Reference 197Phone Book MenuCellular ModeMy Phone Number(s)Find Entry By NameFind Entry By LocationAdd EntryPersonal NumbersLast Ten CallsPhone BookAdd To Phone MemoryAdd To SIM Card MemoryEnter Name:Enter Location:Call NumberModify Name Or NumberErase Name And NumberCall NumberModify Name Or NumberErase Name And NumberLast Calls MadeErase All Numbers
198 Menu Quick ReferenceCall Related Features MenuSatellite ModeBar Outgoing CallsBar Incoming CallsChange Bar PasswordCall Barring1Forward When UnavailableForward All CallsDetailed ForwardingCall Forwarding1Call Waiting1Show Battery MeterCall Related FeaturesForward Voice CallsForward All Voice CallsIf BusyIf No AnswerIf Not ReachableCancel All ForwardingOn/OffOn/OffShow Signal StrengthOn/OffPending Call DropOn/OffOn/OffOn/OffOn/OffOn/OffOn/Off
Menu Quick Reference 199Call Related Features MenuCellular Mode (GSM)Cellular Mode (CDMA/AMPS)This menu is not available in CDMA/AMPS cellular mode.Bar Outgoing CallsBar Incoming CallsChange Bar PasswordCall Barring1Forward When UnavailableForward All CallsDetailed ForwardingCall Forwarding1Call Related FeaturesForward Voice CallsForward All Voice CallsIf BusyIf No AnswerIf Not ReachableCancel All ForwardingOn/OffOn/OffForward Fax CallsFoward Data CallsIntl CallsIntl Calls Except HomeAll CallsWhen RoamingAll CallsOn/OffOn/OffOn/OffOn/OffOn/OffOn/Off
200 Menu Quick ReferenceMessages MenuSatellite ModeVoicemail NumberMessage SettingsReceived MessagesCall VoicemailGo to Next MessageDelete MessageReturn CallMessages Menu
Menu Quick Reference 201Messages MenuCellular Mode (GSM)Cellular Mode (CDMA/AMPS)This menu is not available in CDMA/AMPS cellular mode.Received MessagesGo to Next MessageDelete MessageMessages Menu
202 Menu Quick ReferencePhone Setup MenuSatellite Mode1 This feature is available when the Extended Menu is active.Status ReviewMaster ResetMaster ClearAutomatic LockLock NowChange Unlock CodePhone LockRing or VibrateSet Ringer ToneRequire SIM Card PINOn/OffChange SIM PIN CodeChange SIM PIN2 CodeNew Security CodeExtended MenusShow Time and Date1Set Time and Date1Set Time Format1Language Selection1Adjust Ring VolumeNo TonesNormal TonesSingle ToneSelect Key Pad Tones1Phone Status1Phone SetupEnglishTürkçeNo Ring or VibrateRing OnlyVibrate OnlyVibrate Then RingStandard ToneHigh ToneShow Home Time & DateShow Away Time & DateSet Home Time & DateSet Away Time & Date12 Hour24 HourOn/OffOn/OffChange ClockAway TimeHome Time
Menu Quick Reference 203Phone Setup MenuCellular Mode (CDMA/AMPS)Cellular Mode (GSM)This menu is not available in GSM cellular mode.Phone SetupEmergency MappingSystem ScanIntl. Dialing PrefixStd A/BScan B/AChange NumberScan AScan A/BScan BPreferred SIDsStd B/AHome Only
204 Menu Quick ReferenceNetwork Selection MenuSatellite ModeRegister NowNetwork Selection
Menu Quick Reference 205Network Selection MenuCellular Mode (GSM)Cellular Mode (CDMA/AMPS)This menu is not available in CDMA/AMPS cellular mode.Network SelectionRegistration PreferencesNetwork SearchAutomatic SearchManual SearchFind New NetworkRegister NowAvailable Networks
206 Menu Quick ReferenceMode Selection and Call Meters MenusMode Selection MenuAll ModesCall Meters MenuSatellite Mode1 This feature is availabe when the Extended Menu is active.Cellular ModeThis menu is not available in cellular mode.Satellite AlwaysCellular AlwaysSatellite PreferredCellular PreferredMode Selection No In-Call DisplayShow Time Per CallSingle Alert TimerRepetitive TimerSet In-Call DisplayShow Last CallTotal For All CallsReset All TimersShow Call TimersSet Audible Call TimersLifetime Timer1Call MetersOn/Off On/Off
207TroubleshootingThis section tells you what to do if you experience one of the following problems: Problem SolutionYou can’t turn the phone’s power on.Check the battery. Is it charged, properly fitted, and are the contacts clean and dry?You can’t make calls.•Check the antenna. Is it fully extended and rotated? Do you have a clear view of the sky?•Did you enter the number in international format? All calls made from the Iridium satellite system must be in international format (satellite mode only).•Check the signal strength meter. If the signal is weak, move to an open space or, if you are in a building, move closer to a window.•Check the Network Selection settings. Try Manual Registration or if in GSM cellular mode try Manual Selection, or try another network.•Check your Operator coverage map.•Is Restricted displayed? Check the Call Barring setting.•Has a new SIM chip been inserted? Check that no new restrictions have been imposed.•Check to see if you have your Fixed Dialing list enabled. If so, you can only make calls to numbers or prefixes that are on the list. If you are in cellular mode you must disable this feature. You must check and disable the feature from satellite mode.You can’t receive calls.•Check to see that your phone is powered on.•Check the antenna. Is it fully extended and rotated? Do you have a clear view of the sky?•Check the signal strength. If the signal is weak, move to an open space or, if you are in a building, move closer to a window.•Check the Call Forwarding and Call Barring settings.•Check the Ringer setting. If it is off, there is no audible ringer. •Check to see if your Fixed Dialing list is enabled. If you are in cellular mode you must disable it. You must check and disable the feature from satellite mode.
208You can’t make international calls.•Have you included the relevant codes? Press and hold the 0 key to display the international dialing prefix (+) and then enter the appropriate country code followed by the phone number. •If you are in cellular mode, some service providers automatically bar the ability to make international calls. Contact your service provider.•Are you in a CDMA/AMPS cellular mode? You must map the international access code in order to use the   0 key to display the international dialing prefix (+).Your phone won’t unlock.•Have you inserted a new SIM chip? Enter the new PIN code.•Do you have a replacement phone? Enter the default phone unlock code —1234.•Have you forgotten the unlock code? Press M to change the unlock code (you need your security code).Your PIN is blocked.Enter the PIN unblocking code or contact your service provider.Your PIN2 is blocked.Enter the PIN2 unblocking code or contact your service provider.Your SIM chip won’t work.•Is the chip inserted the correct way?•Is the chip visibly damaged or scratched? Return the chip to your service provider.•Check the SIM and phone contacts. If they are dirty, clean them with an antistatic cloth.You can’t access your messages.•Are you in the correct mode? If you do not have a GSM cellular cassette installed, you must be in satellite mode to access your messages.•Is your GSM Cellular Cassette inserted? In order to access messages from cellular mode, you must have a GSM Cellular Cassette inserted.You can’t cancel Call Forwarding or Call Barring.Wait until you are in an area with good network coverage and try again.The o symbol is flashing.There is not enough memory available to store another message. Use the Messages menu to delete one or more messages.Problem Solution
209The battery won’t charge.•Check the charger. Is it properly connected? Are its contacts clean and dry?•Check the battery contacts. Are they clean and dry?•Check the battery temperature. If it is warm, let it cool before recharging.•Is it an old battery? Battery performance declines after several years use. Replace the battery.•Make sure you have a Motorola approved battery installed. If you see Invalid Batt. in the display, you will not be able to charge this battery.The battery drains faster than normal.•Are you in an area of variable coverage? This uses extra battery power.•Is your antenna fully rotated and extended? Do you have a clear view of the sky? This helps use less battery power.•Is it a new battery? A new battery needs two to three charge/discharge cycles to attain normal performance. •Is it an old battery? Battery performance declines after several years of use. Replace the battery.•Is it a battery that hasn’t been completely discharged? Allow the battery to fully discharge (until the phone turns itself off) and then charge the battery overnight.•Are you using your phone in extreme temperatures? At extreme hot or cold temperatures, battery performance is significantly reduced.You find your phone becoming warm during use.You may notice this during long calls or during charging. The heat is produced by the electronic components within your phone and is quite normal.Your phone has your SIM chip inside but the display says:•Check Card or Insert Card.Check that the SIM chip has been inserted correctly. The contacts of the SIM chip may be dirty. Turn the phone off, remove the SIM chip and rub the gold contacts on the chip with a clean cloth. Replace the chip in the phone.•Blocked or Bad Card See Supplier. Please contact your service provider.Your phone has a Cellular Cassette installed but the display says:Check Cassette or Insert Cassette.Check that the Cellular Cassette has been inserted correctly.Problem Solution
210You do not have a Cellular Cassette and your phone says Insert CassetteMake sure you have the correct mode settings selected. You are either in Cellular Always mode or a Preferred mode.You find your phone’s prompts in a language other than your own.Press M, 2, 6. This routes you directly to the language selection submenu. Press < until you see your preferred language. Press O to select. You must be in satellite mode to do this.Problem Solution
211GlossaryAaccessory connector port  A socket on the bottom of the phone where you can attach accessories such as a travel charger, desktop charger, auto accessory adapter or data accessories.airtime   The amount of time you spend using a cellular or satellite system. Especially, the time between successfully placing a call and terminating a call.AMPS   Advanced Mobile Phone Service. An analog network protocol.antenna   The devices on your phone that send and receive satellite or cellular signals.Auto Accessory Adapter   An accessory device that allows you to power your phone and charge any attached batteries from a car’s cigarette lighter.CCDMA   Code Division Multiple Access. A digital technology.cellular   A wireless personal telecommunications system which uses terrestrial base station controllers.cellular carrier   One of several competing organizations in a given geographic area that owns and operates a cellular system.Cellular Cassette   An optional module that is inserted into the portable phone and gives it access to the cellular system.cellular mode   When your phone is in this mode it is accessing the cellular system. You must have the appropriate cellular cassette installed.cellular system   The cellular equipment in a given geographic area that relays signals to and from individual cellular telephones and the landline telephone system.clear-line-of sight   In order for your phone to communicate to the satellite network, your antenna must have a clear view of the sky.Ddefault   A feature’s original setting as pre-programmed in the factory.DTMF   See Dual Tone Multi-Frequency tones.dual mode phone   A phone designed to operate on a cellular network and the Iridium satellite network.
212Dual Tone Multi-Frequency Tones   The tones that your phone transmits when you press a key on the keypad. These tones are used to access automated calling systems such as voicemail.EEmergency Call   This feature allows you to make an emergency call even if your phone is locked by dialing 112.Ffringe area   The outermost range of a cellular system or the Iridium satellite system where signals are weak.GGSM   Global System for Mobile Communications—A digital network protocol.Hhome system   The local cellular system or satellite network where you obtain your wireless service.home type system   A cellular/satellite system of the same type as your local system. See also non-home type system, and system type.IIn-Call Menu   The menu that appears when you press M during a call. It allows you to access features like call holding. indicator   A light or icon on your phone that gives you information about your phone’s status.Iridium System   A system of 66 satellites that offer global communication.Llandline   The telephone system used for conventional office and home phones.lock   Use this feature to prevent unauthorized access to your satellite telephone.lock code   A four-digit code used to unlock a locked phone.Mmemory location   A space in the internal Phone Book (both Phone Memory and SIM memory) where you can store a telephone number and a name. Each of the Phone’s memory locations can hold up to 32 digits and 16 letters. The SIM chip memory can hold up to 20 digits and 16 letters.menu feature   Any feature that can be accessed through the menu system.menu system   The hierarchical arrangement of your phone’s features that allows for quick, intuitive access.message   A feature that allows the user to view pager-like alphanumeric messages.
213Nname directory   An alphabetical list of the names and telephone numbers you have stored into your phone’s internal Phone Book.NAMPS   Narrow-Band AMPS. An analog technology.non-home type system   A system type different from your home system. See also home type system and system type.non-wireline   A cellular carrier that is not the same company as the conventional telephone company.OOne-Touch Dialing   To use this feature, press and hold a number on the keypad, 1 through 9 and your call is placed.Options Menu   The first level of the menu system hierarchy, which contains the six main feature menus: Phone Book, Call-Related Features, Messages, Phone Setup, Network Selection, Mode Selection, Call Meters.Ppause   A special character that tells your phone to “pause” or wait for your input before sending a group of numbers stored in memory.PIN or PIN2 Code   Personal Identification Network Code. A private numeric password that allows you to access your SIM chip and some network services.Portable Dock   An accessory for the portable phone that converts it to a speaker phone. It runs off either AC power or auxiliary batteries.prompt   A message requesting input.QQuick Access Menu   A set of features that is activated by pressing E and a digit key (1 to 9).Rroam   To use a cellular system outside of your home system, usually when you travel beyond the range of your home system. If you are roaming you see the l indicator (cellular mode only).S satellite mode   When you are in this mode you are accessing the Iridium satellite system. You see the + indicator.scroll   To move backward or forward through a list; for example: to move backward or forward through the menu system or the name directory.security code   A six-digit code used to access sensitive features.service provider   A company affiliated with a cellular or satellite carrier that provides cellular/satellite service to its customers. SID   See System Identification.
214signal   The radio waves that carry information between your phone and the satellite or cellular system.SMS   Short Messaging Services.standby-time   The amount of time that your phone is left powered on to receive calls.status indicator   See indicator.submenu   A secondary level of your phone’s menu system hierarchy.System Identification   An up to five-digit number that identifies your home cellular system. An even number indicates a wireline system and an odd number indicates a non-wireline system.system mode   A setting that determines the system type that your cellular phone accesses (CDMA/AMPS cellular mode).system type   A designation that indicates one of two competing cellular carriers in a given geographic area. The non-wireline carriers operate on “A” block frequencies and the wireline carriers operate on “B” block frequencies.Ttalk-time   The amount of time that you spend talking on the phone.TDMA   Time Division Multiple Access. A digital technology.toggle   To switch between two possible options; for example: on vs. off.Travel Charger   An accessory device that allows you to power your phone and charge any attached batteries from a wall outlet.Vvolume keys   Located on the side of your phone, the upper and lower volume keys are used to adjust ringer and earpiece volume.Wwireline system   A cellular carrier that is the same company as the conventional telephone company.
215IndexSymbols* character  51+ character  50, 51Ü character  51, 85AAC travel charger  21accessing hidden features  193accessing the network  163accessories  21lanyard wrist strap  25accessory connector port  17defined  211illustration  15activating call waiting  118adapterantenna  25Auto Accessory  23StarTAC  24adding an entry to the Phone Book  81–82dedicated keys  82Options menu  81Overwrite? message  82Range XXX-XX message  82Stored XXX message  82Adjust Ring feature  73adjusting ringer volume  140adjusting volumeearpiece  58ringer  59airbag  10aircraft  10airtimedefined  211alphanumeric keypad  15AMPSdefined  211Answer?  64answering a call  55antenna  16adapter  25care  7cellular cassette  15correct position  48defined  211extending  48inserting  28left detente  48removing  28right detente  48attaching battery covers  31Auto Accessory Adapter  23defined  211automatic modes  177automatic redial  51Bbacklight  47Bad Card See Supplier message  46barring callsincoming  121outgoing  119batteries  24battery charge indicator  19battery covers  31battery meter  38charging  38check power status  38drains too fast  209full charge  38inserting  32low battery warning  38low charge  38messages  39removing  42safety considerations  8
216showing the battery meter  38using internal charger  36won’t charge  209BatteryinstallingInvalid Batt message  32batteryBattery Meter feature  73cautions  40charging  36–??, 36, ??–37Charging Battery message  37, 39, 115charging tips  40compartment  15disposing of  40Fast Charge Completed message  39, 115inserting  32Invalid Batt. message  39level indicator  15messages  115Not Available message  39, 115removing  34storing  40tips  40viewing battery meter  115battery covers  31attaching  31removing  31battery level indicator  15battery meterviewing  115Battery Meter feature  73Blocked message  46! Blocked message  46Busy Try Later message  50, 64, 67, 71Ccallanswering  55ending  53placing  49–52receiving  55–57Call Answer?  55call barring  119–122barr passwordchanging  122entering  119–122incoming calls  121outgoing calls  119Call Failed  55Call Failed message  56call forwardingall calls  109cancelling  114data  113detailed  111–113fax  113voice  111–112when unavailable  107call holding  66ending both calls  66ending current call  66ending held call  67making a new call  66messages  67switching between calls  66Call Holding message  66Call Meters menu  181, 182, 206Call Related Features menu  103–122, 198Bar Incoming Calls feature  121Bar Outgoing Calls feature  119Call Barring feature  119–122Call Forwarding feature  107–114Call Waiting feature  118Cancel All Forwarding feature  114Change Bar Password feature  122Detailed Forwarding feature  111–113diagram  105entering  104Forward All Calls feature  109
217Forward When Unavailable feature  107Pending Call Drop feature  117Show Battery Meter feature  115Show Signal Strength feature  116call timersaudible  187lifetime  190repetitive  188resetting all  186showing all calls  186showing last call  185single alert  187viewing in-call  189Call Voicemail feature  73call waitingaccepting a waiting call  64activating  118cellular mode  65ending current call  64messages  64rejecting waiting call  64satellite mode  64Call Waiting message  64Call?  49calling a number in a message  52calling an entry in the Phone Book  90calling features  103–122Calling message  49can’t make calls  207Cannot Hold Second Call message  64, 67Cassette Removed message  42CDMAdefined  211cellulardefined  211cellular carrierdefined  211Cellular Cassette  26, 173Cassette Removed message  42connector  17defined  211inserting  41messages  209removing  42cellular cassetteantenna  15connector  15cellular modedefined  211selecting  180cellular systemdefined  211changing a Phone Book entry to a similar number  87changing the call barring password  122chargerAC travel  21desktop  22solar  22Charging Battery message  37, 39, 115charging the battery  36–??, 36, ??–37Check Card message  46check mark  20Check Signal feature  73Check Signal message  46checking battery power status  38checking Phone Book capacity  91Checking Signal... message  116clear key  16clearing stored information  157clear-line-of-sight  16defined  211clock  15codesphone unlockEnter Phone Unlock Code message  46
218securitydefault  92entering  92SIM card PIN2  ??–96SIM chip PIN  46SIM chip PIN2  93–??Completed message  71Connected  55Connected message  49correcting a Phone Book entry  83current state of service indicator  18customizingOptions Menu  192phone features  135Quick Access Menu  194Ddatesetting  152viewing  150defaultdefined  211Desktop Charger  22desktop charger  36detentes, antenna  48dialing0  51* character  51+ character  51Ü character  51, 85number from the Phone Book  52number with pauses  51, 86phone number  49PINs  51special characters  51supplementary service numbers  51display  15* character  51+ character  50, 51Ü character  51, 85cold temperatures and  17icons  71, 73indicators  15, 19, 45defined  19–20messages  71questions in  71standby mode  47volume level  58disposing of battery  40driving  8DTMFdefined  211dual mode phonedefined  211Dual Tone Multi-Frequency Tonesdefined  212Eearpieceadjusting volume  58illustration  15electronic devices  8–9emergency calldefined  212placing  52setup  158Emergency Calling message  52End Active & Held Call message  66, 74End Active Call message  64, 74End Call?  49, 67End Held Call message  67, 74ending a call  53, 57Enter Name message  71Enter Phone Unlock Code message  46Enter PIN message  46, 71Enter PIN2 message  93–96entering characters in the Phone Book  83entering menusIn-Call menu  74Options menu  70Quick Access menu  72
219entering names in the Phone Book  83–84entering pauses in numbers  85erasing a Phone Book entry  90exiting menus and menu features  70extended menus  193accessing hidden features  193activating  153, 193Call Barring  119Detailed Call Forwarding  111Ffactory defaults  156Failed message  71Fast Charge Completed message  39, 115Find Name feature  73finding a Phone Book entry  88–89by location  89by name  88fixed dial listdefined  93one-touch dialing  101viewing  97Fixed Dialingerasing an entry  95fixed dialing  93–97activating  93adding an entry  94editing an entry  96viewing fixed dial list  97flash  108Flash Options message  65, 68, 74, 108flash. See phone flashForward On/Off feature  73forwarding callsall calls  109cancelling  114data  113detailed  111–113fax  113voice  111–112when unavailable  107fringe areadefined  212function keysdefined  212Ggetting started  27GSMdefined  212GSM network selectionfind new network  172scan available networks  169search method  170automatic  171manual  171GSM SIM chipusing with satellite phone  29guide overview  12Hhearing aids  9hidden features  193Hold Call message  66, 74Hold Failed message  64, 67holding a call  66ending both calls  66ending current call  66ending held call  67making a new call  66messages  67switching between calls  66holding the phone  48home systemdefined  212home system indicator  20, 45home type systemdefined  212IiconsOptions menu  71
220Quick Access menu  20, 73Quick Access Menu custom icons  194in use indicator  20In-Call Menudefined  212In-Call menu  61–67, 74call muting  63call waiting  64–65defined  74End Active & Held Call message  74End Active Call message  74End Held Call message  74entering  74Hold Call message  74Make New Call message  74menu features  74placing a call on hold  66Reconnect Held Call message  74Reject Call Waiting message  74Turn Mute on or off message  63, 74in-call timer  189incoming callsbarring  121indicators  212battery charge  19battery level  15check mark  20current state of service  18display  15home system  20, 45in use  20message  19no service  20, 45Quick Access menu  20real time clock  19Roam symbol  20scroll bar  20signal strength  19Insert Card message  46inserting antenna  28inserting the battery  32inserting the Cellular Cassette  41inserting the SIM chip  30Installing batteryInvalid Batt message  32international dialing  50dialing + character  51international prefix  159setup  159Invalid Account message  46Invalid Batt message  32Invalid Batt. message  39Iridium Systemdefined  212Kkey presses  12keypad tonesselecting  143keysalphanumeric keypad  15clear  16memory recall  16, 89memory store  16menu  16message  16navigating the menu system  70OK  16power  16quick access  16scroll  16special keys  17volume  15, 16, 59, 214Llandlinedefined  212languagesetting  154lanyard wrist strap  25last ten numbers dialedviewing  98
221LCD. See Liquid Crystal Displaylifetime timer  190Liquid Crystal Displaycold temperatures and  17indicators  19defined  19–20lockdefined  212lock codedefined  212Lock Now feature  73locking phoneautomatically  144instantly  144low battery warning  38MMake New Call message  66, 74making a call  49–52automatic redial  51calling a number in a message  52dialing a number from the Phone Book  52dialing a number with pauses  51dialing a phone number  49dialing special characters  51emergency call  52international dialing  50last ten numbers dialed  98one-touch dialing  101redialing the last number  51managing messages  130managing the phone book  75–102manual modes  180master clear  157master reset  156memoryphone  79SIM chip  79memory locationdefined  212memory recall keydefined  16using  89memory store key  16menuCall Meters  182, 206Call Related Features  198diagram  105entering  104featuredefined  212Messages  124, 200Mode Selection  206Network  164Network Selection  163, 204Phone Book  196diagram  77entering  76Phone Setup  138, 202quick reference  195Selecting a Mode  173systemdefined  212menu key  16menusdefined  69personalized menus  192using  69–74message (SMS)defined  212message indicatordefined  19flashing  19message key  16messages  12, 123battery  39deleting  133managing  130notification  130reading  133receiving  57returning calls  134storing  130, 133text  131
222what’s in one  131Messages menu  124, 200microphone  15mode selectionautomatic  177cellular always  178cellular preferred  180manual  180satellite  168satellite always  179satellite preferred  178Mode Selection menu  174, 206modifying a Phone Book entry  90modifying your SIM chip phone number(s)  100multiple key answer  55Mute message  63mutingphone  63Nname directorydefined  213NAMPSdefined  213navigating the menu system  70network featurescall holding  66call waiting  64–65Detailed Call Forwarding  111–113Forward All Calls  109Forward When Unavailable  107Network Selection menu  164, 204networksfind new network  172scan available  169search method  170automatic  171manual  171no service indicator  20, 45non-home type systemdefined  213non-wirelinedefined  213Not Available message  39, 115notification messagesfax  131voicemail  131OOK key  16one-touch dialingdefined  213one-touch dialingdefined  101frequently called numbers and  79setting up  101using  101Options Menucustomizing  192defined  213extended menus  193moving features  192Options menu  70–71Busy Try Later message  71Completed message  71defined  70Enter Name message  71Enter PIN message  71entering  70exiting  70Failed message  71messages and icons  71navigating  70questions  71Quit?  71scrolling  70Select?  71selecting options and submenus  70View Options?  71Orient Antenna Call Attempt  56Orient Antenna Call Attempt message  55
223outgoing callsbarring  119Overwrite?  82Ppassword, call barring  119–122pausedefined  213pause dialing  86dialing Ü character  51, 85pending call drop signalactivating  117deactivating  117defined  117personal mailbox  57phoneanswering a call  55ending a call  53last ten numbers dialedviewing  98messages at power-on  45muting  63placing a call  49–52receiving a call  55–57security codeentering  92service phone numbers  102turning on and off  45volume level display  58Phone Book  75–102adding an entry  81–82dedicated keys  82Options menu  81Overwrite? message  82Range XXX-XX message  82Stored XXX message  82adding numbersdedicated keys  82calling an entry  90changing an entry to a similar number  87character set  84checking capacity  91correcting an entry  83dialing a phone number  52entering characters  83entering names  83–84entering numbers  81–82Options menu  81erasing a name and number  90finding an entry by location  89dedicated keys  89Options menu  89finding an entry by name  88Fixed Dialingerasing an entry  95fixed dialing  93–97activating  93adding an entry  94editing an entry  96viewing fixed dial list  97Last Ten Calls feature  98menu diagram  77modifying a name or number  90My Phone Number(s) feature  99One-Touch Dial Setting feature  101one-touch dialing  101organizing  79pauses in numbers  85dialing numbers with  86entering  85phone memory  79phone numbersgrouping  80security issues  80storing  79preventing access  92Restricted message  92Show Services feature  102SIM chip memory  79storage capacities  79storing names and numbers  81–84using prefixes  87
224viewing the last ten numbers dialed  98Phone Book Menu  196Phone Book menu  75–102diagram  77entering  76phone flash  108defined  68sending  65, 68phone memorychecking capacity  91one-touch dialing  101storage capacities  79phone numbermodifying your own  100using pauses in  85using prefixes  87viewing your own  99Phone Setup menu  138, 202PIN codeBlocked message  46changing  147defined  213Enter PIN message  46entering  46unblocking  147PIN2 code! Blocked message  46changing  148Enter PIN2 message  93–96entering  93–96is blocked  208unblocking  149placing a call  49–52automatic redial  51calling a number in a message  52dialing a number from the Phone Book  52dialing a number with pauses  51dialing a phone number  49dialing special characters  51emergency call  52international dialing  50last ten numbers dialed  98one-touch dialing  101redialing the last number  51placing callsembedded in a message  134Please Try Later message  50Portable Dockdefined  213postscripting  87powerturning on and off  45power key  16power-on messages  45prefixesusing with phone numbers  87preventing access to the Phone Book  92privacy  63promptdefined  213prompts, defined  12protecting SIM chip with a PIN code  146Qquick access key  16Quick Access Menucustom icons  194customizing  194defined  213Quick Access menu  72–73activating a menu feature  72Adjust Ring feature  73Batter Meter feature  73Call Voicemail feature  73Check Signal feature  73default settings  73defined  72Find Name feature  73Forward On/Off feature  73icons  20, 73Lock Now feature  73Read Messages feature  73
225Register Now feature  73scrolling  72using  72Quit?  71RRange XXX-XX message  82Read Messages feature  73real time clock  19receiving a call  55–57answering  55unanswered calls  57receiving messages  57Reconnect Failed message  64, 67Reconnect Held Call message  74Reconnect?  66Redial Failed message  51Redial?  50, 51redialing the last number called  51Register Now feature  73registering with satellite network  168Registering... message  45, 49Reject Call Waiting message  74removing antenna  28removing battery covers  31removing the battery  34removing the Cellular Cassette  42removing the SIM chip  30repetitive timer  188resetting options to defaults  156Restricted Area message  50Restricted message  92restricting access to the SIM chip  93restricting calls  119–122incoming calls  121outgoing calls  119restricting phone use  93–97ringeradjusting volume  59ringer tonesetting  142roamdefined  213Roam symbol  20Rotate and Extend Antenna message  45, 50Rotate Antenna  48Rotate Antenna Call Attempt message  56Rotate Antenna Registering... message  45Ssafety covers  31safety information  7–10satellite antennaantennasatellite  15satellite mode  168, 179defined  213selecting  178satellite networkregistering  168scrolldefined  213scroll bar  20scroll keys  16scrollingOptions menu  70Quick Access menu  72Searching... message  45security codechanging  149default  92defined  213entering  92Select?  71selecting a mode  173selecting menu options  70Send Digits? message  86send flash  108Send Flash? message  65, 68, 108service phone numbers  102service provider
226defined  213setting phone to ring or vibrate  141settingsclearing  157reviewing  155Show Services feature  102SID. See System ID numbersignaldefined  214signal strength indicator  15, 19viewing  116SIM chipBad Card See Supplier message  46Blocked message  46! Blocked message  46changing PIN code  147changing PIN2 code  148Check Card message  46deactivating PIN code  146defined  29displaying phone number of  54fixed dial list  93GSMusing with satellite phone  29Insert Card message  46inserting  30insertion direction  30messages  209modifying your phone number(s)  100phone number security and  80PIN codeEnter PIN message  46entering  46PIN2 codeEnter PIN2 message  93–96entering  93–96precautions  29, 30protecting  146removing  30restricting access to  93unblock PIN2 code  149unblocking PIN code  147viewing your phone number(s)  99SIM chip memorychecking capacity  91one-touch dialing  101storage capacities  79single alert timer  187SMSdefined  214Solar Charger  22special characters  51special keys  15standby  47standby time  24defined  214StarTAC Adapter  24status indicatordefined  214Stored XXX message  82storing batteries  40storing names and numbers  81–84submenusdefined  214submenus, defined  69supplementary service numbers  51Switch?  66switching between numbers  162symbols  12System ID numberdefined  161, 214system modedefined  214selecting  160system scan  160method  160system scan settings  161system typedefined  214
227Ttalk-timedefined  214TDMAdefined  214timesetting  152setting format  151viewing  150timing calls  181tips, defined  13toggledefined  214Travel Chargerdefined  214troubleshooting  207battery drains fast  209battery won’t charge  209can’t cancel Call Forwarding or Barring  208can’t make international call  208can’t receive calls  207can’t turn power on  207Cellular Cassette messages  209message symbol is flashing  208phone won’t unlock  208PIN is blocked  208SIM chip messages  209SIM chip won’t work  208wrong language in the display  210your phone is hot  209Trying message  64, 67Turn Mute on or off message  63, 74turning phone power on and off  45turning the SIM chip PIN On or Off  1462 Calls message  66UUnanswered Call message  57unanswered calls  57unblock PIN code  147unblocking SIM PIN2 code  149unconditional call forwarding  73unlock codechanging  145unlocking phone  145using the internal charger  36Vvibrate  141on wakeup  45View Options?  71viewing service phone numbers  102viewing the last ten numbers dialed  98viewing your SIM chip phone number(s)  99voicemailcall forwarding when unavailable  107checking  128detailed call forwarding  111–113forward all calls  109storing number  129volumebar graph display  58control keys  15earpiece  58ringer  59, 140volume keysdefined  16, 214using  58volume level display  58Wwakeup tone  45wireline systemdefined  214
228
229Patent InformationManufactured under one or more of the following U.S. patents:412121841386814193036425438243028454312074432731943296664369516436952243786034390963D269873439826544005844400585D270835D271491Re.314704431977443446144555344462098D275951448415344854864486624D2768094491972D2776674504834D27870845231554546329455042645516964564821D28216945715954573017457424345859574602218D284759D28543946163144617520D28677846263094628529462982946303044630305463314146365934636741D28843246481254649543D2886834654655D2891564662691466733346689174670747467250246807874681476468358546927264704588D2925784706036D292920471072447113614715063471631947163914723305D2942574727306472758347301954734635473627747379764740794474101847410344742562D2956274746242D295973D2959754751737D29618747616214764737D297734D2977354777564Re.32768D29913647979294798975480034848022364809356481137748114044827226482750748292744837534D30147648436214845772D302015485196648685764870686D30365648765524879533D30542748961244897873D305717490454949052884905301D306293D306441D30659449126024918732492217849455704954796495985149638124963843496553749723554972432497245549758084984290D314173D315330D315346D315543D315559D3155655004992D3159075008925D316417D3168595017856501818850200915020092502009350280835028859502904450292335031028503653250539245057762D32078050598855060294D322783D32295550816745083304D324024D3243885095503D325028D3255835109536D32591551134365117450512104751224805122722D3270615128834D328302514255151426965146620514847151484735148961515035951503845152006515769351631595164652516659651757595175874D3322615182749D33278551855665187809519322351951065195108520106952049775210793521467552221045222251D33733252300075230093523363352354925237257523912752415455241548524165052416935242767D33958252493025251331D340710526098852611195262710526305252767075278994D3431735280637D344087528755352875555287556D34451153013655321847D34888053495885359696536140053630715365549D3524975366826D353131D353361537514353752585379324D354055D3540625384825D356084540244754061465406562D357224D3574575410741D357680D3576815428836D359734D359735D3599595432017D3606325438684D36107054426805446763544876354487715453997D362840545774454596405463646546541254691775475752D365094D3658175486843548718454883355488649D3668725493198549371454971265497382D36764054993945506490D36869655106935511235D3691625513078D3693595519303551934655242765524278D370463553092255421165544250D37248155462755546380D37289655510785559471D374424D374872557219355749765577268D375732D375733D375734D375932D375952D37612755880415589796559017755947785594951D377792D37793456040505606730D3783665613229561386356152335621763Other patents pending.
230

Navigation menu