Motorola Solutions 89FT4886 Portable 2-Wat Radio User Manual APX 7000 Portable Dual Display User Guide
Motorola Solutions, Inc. Portable 2-Wat Radio APX 7000 Portable Dual Display User Guide
Contents
- 1. Ex8 Draft Users Manual
- 2. Ex8b RF Safety Booklet
- 3. Ex8B Revised RF Safety Booklet
Ex8 Draft Users Manual
English
m
ASTRO® APX™ 7000 Series
Digital Portable Radios
Quick Reference Card
Product Safety and RF Exposure Compliance
ATTENTION!
This radio is restricted to occupational use only to satisfy FCC RF
energy exposure requirements. Before using this product, read
the RF energy awareness information and operating instructions
in the Product Safety and RF Exposure booklet enclosed with
your radio (Motorola Publication part number 6881095C98) to
ensure compliance with RF energy exposure limits.
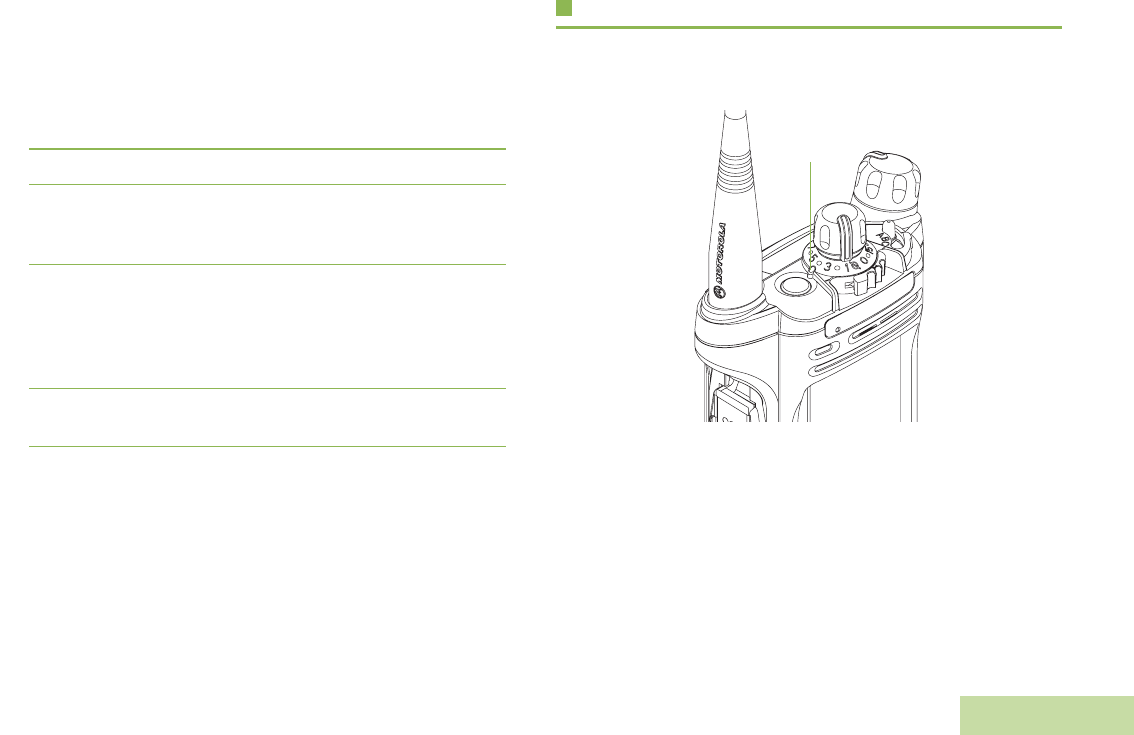
Radio Controls
Radio On/Off
Zones and Channels
Receiving and Transmitting
Sending an Emergency Alarm
To exit emergency at any time, press and hold
the Emergency button.
Before using this product, read the operating instructions
for safe usage contained in the Product Safety and RF
Exposure booklet enclosed with your radio.
!
Secondary Speake
r
Top (Orange)
Button
__________
2-Position
Concentric Switch
__________
Main Display
Keypad
Menu Select
Buttons
3-Position A/B/C
Switch
__________
4-Way Navigation
Button
Accessory
Connector
Home Button
Microphone
Data Feature
Button
•On – On/Off/Volume knob clockwise.
•Off – On/Off/Volume knob counterclockwise.
•Zone – Zone switch to desired zone.
•Channel – Channel switch to desired channel.
Battery
Side Button 1
__________
Side Button 2
__________
PTT Button
On/Off/Volume
Control Knob
16-Position
Select Knob
__________
Top Side (Select)
Button
__________
Main
Speaker
Top
Display
Antenna 1Select zone/channel.
2Listen for a transmission.
OR
Press and hold Volume Set button.
OR
Press Monitor button and listen for activity.
3Adjust volume, if necessary.
4Press the PTT button to transmit; release to
receive.
1Press the Emergency button.
2The display shows Emergency and the
current zone/channel. A short, medium-
pitched tone sounds, and the LED rapidly
blinks red.
3When acknowledgment is received, you hear
four beeps; alarm ends; and radio exits
emergency.
*68007024034*
68007024034-A
© 2009 by Motorola, Inc. All Rights Reserved. 09/09
1301 E. Algonquin Rd., Schaumburg,
IL 60196-1078, U.S.A.

English
Menu Navigation
< or > to Menu Entry.
{, |, or } directly below Menu
Entry to select.
H to exit.
U or D to scroll through sub-list.
{, |, or } directly below Menu
Entry to select.
Sending an Emergency Call
To exit emergency at any time, press and hold
the Emergency button.
Sending a Silent Emergency Call
To exit emergency at any time, press and hold
the Emergency button.
Display Status Icons
1Press the Emergency button.
2Press and hold the PTT button. Speak clearly
into the microphone.
3Release the PTT button to end call.
4Press and hold Emergency button to exit
emergency.
1Press the Emergency button.
2The display does not change; the LED does
not light up, and there is no tone.
3Silent emergency continues until you:
Press and hold the Emergency button to exit
emergency state.
OR
Press and release the PTT button to exit silent
emergency mode and enter regular
emergency (alarm, call, or alarm with call)
mode.
Receiving a call or data
u
Transmitting a call or data
Received an Individual Call.
Blinks when the battery is low.
The more stripes, the stronger the
signal strength for the current site
(trunking only).
Direct radio to radio communication or
connected through a repeater.
On = Direct
Off = Repeater
L = Radio is set at Low power.
H = Radio is set at High power.
Scanning a scan list.
Blinking dot = Detects activity on the
Priority-One Channel
during scan.
Steady dot = Detects activity on the
Priority-Two Channel
during scan.
t
F
8
v
O
HOR .
i
j
The vote scan feature is enabled.
This channel is being monitored.
On = Secure operation.
Off = Clear operation.
Blinking = Receiving an encrypted
voice call.
On = AES Secure operation.
Off = Clear operation.
Blinking = Receiving an encrypted
voice call.
On = Location feature enabled, and
location signal available.
Off = Location feature disabled.
Blinking = Location feature enabled,
but location signal
unavailable.
On = User is currently associated with
the radio.
Off = User is currently not associated
with the radio.
Blinking = Device registration or user
registration with the server
failed due to an invalid
username or pin.
Data activity is present.
k
M
m
l
G
n
o

Declaration of Conformity
English
i
Declaration of Conformity
This declaration is applicable to your radio only if your radio is labeled with the FCC logo shown below.
DECLARATION OF CONFORMITY
Per FCC CFR 47 Part 2 Section 2.1077(a)
Responsible Party
Name: Motorola, Inc.
Address: 1301 East Algonquin Road, Schaumburg, IL 60196-1078, U.S.A.
Phone Number: 1-800-927-2744
Hereby declares that the product:
Model Name: APX 7000
conforms to the following regulations:
FCC Part 15, subpart B, section 15.107(a), 15.107(d) and section 15.109(a)
Class B Digital Device
As a personal computer peripheral, this device complies with Part 15 of the FCC Rules. Operation is subject to the
following two conditions:
1. This device may not cause harmful interference, and
2. This device must accept any interference received, including interference that may cause undesired operation.

Declaration of Conformity
English
ii
Note:This equipment has been tested and found to comply with the limits for a Class B digital device, pursuant to part
15 of the FCC Rules. These limits are designed to provide reasonable protection against harmful interference in a
residential installation. This equipment generates, uses and can radiate radio frequency energy and, if not
installed and used in accordance with the instructions, may cause harmful interference to radio communications.
However, there is no guarantee that interference will not occur in a particular installation.
If this equipment does cause harmful interference to radio or television reception, which can be determined by
turning the equipment off and on, the user is encouraged to try to correct the interference by one or more of the
following measures:
• Reorient or relocate the receiving antenna.
• Increase the separation between the equipment and receiver.
• Connect the equipment into an outlet on a circuit different from that to which the receiver is connected.
• Consult the dealer or an experienced radio/TV technician for help.

Contents
English
iii
Contents
This User Guide contains all the information you need
to use the APX™ 7000 Series Digital Portable Radios.
Declaration of Conformity . . . . . . . . . . . . . . . . . .i
Important Safety Information . . . . . . . . . . . . . .ix
Product Safety and RF Exposure Compliance . . . . .ix
Software Version . . . . . . . . . . . . . . . . . . . . . . . .ix
Computer Software Copyrights . . . . . . . . . . . . x
Documentation Copyrights . . . . . . . . . . . . . . . . x
Disclaimer . . . . . . . . . . . . . . . . . . . . . . . . . . . . . . x
Getting Started . . . . . . . . . . . . . . . . . . . . . . . . . . 1
How to Use This Guide . . . . . . . . . . . . . . . . . . . . . . . 1
Notations Used in This Manual . . . . . . . . . . . . . . . . . 1
What Your Dealer/System Administrator
Can Tell You . . . . . . . . . . . . . . . . . . . . . . . . . . . . . . 2
Preparing Your Radio for Use . . . . . . . . . . . . . .3
Charging the Battery . . . . . . . . . . . . . . . . . . . . . . . . . 3
Battery Charger . . . . . . . . . . . . . . . . . . . . . . . . . . . . 3
Attaching the Battery . . . . . . . . . . . . . . . . . . . . . . . . . 4
Attaching the Antenna . . . . . . . . . . . . . . . . . . . . . . . . 5
Attaching the Accessory Connector Cover . . . . . . . . 5
Using the Carry Holder . . . . . . . . . . . . . . . . . . . . . . . 6
Turning On the Radio . . . . . . . . . . . . . . . . . . . . . . . . 7
Adjusting the Volume . . . . . . . . . . . . . . . . . . . . . . . . 8
Identifying Radio Controls . . . . . . . . . . . . . . . . .8
Radio Parts and Controls . . . . . . . . . . . . . . . . . . . . . 9
Programmable Features . . . . . . . . . . . . . . . . . . . . . 10
Assignable Radio Functions . . . . . . . . . . . . . . . . . 10
Assignable Settings or Utility Functions . . . . . . . . . 11
Accessing the Preprogrammed Functions . . . . . . . 12
Using the Menu Select Buttons . . . . . . . . . . . . . . . 12
Using the Navigation Buttons . . . . . . . . . . . . . . . . 12
Home Button . . . . . . . . . . . . . . . . . . . . . . . . . . . . . 12
Data Feature Button . . . . . . . . . . . . . . . . . . . . . . . 12
4-Way Navigation Button . . . . . . . . . . . . . . . . . . . 12
Using the Keypad . . . . . . . . . . . . . . . . . . . . . . . . . . 13
Keypad Characters – Uppercase Mode . . . . . . . . . 13

Contents
English
iv
Keypad Characters – Lowercase Mode . . . . . . . . . 14
Keypad Characters – Numeric Mode . . . . . . . . . . . 15
Keypad Characters – Hexadecimal Mode . . . . . . . 16
Push-To-Talk (PTT) Button . . . . . . . . . . . . . . . . . . 17
Identifying Status Indicators . . . . . . . . . . . . . .17
Status Icons . . . . . . . . . . . . . . . . . . . . . . . . . . . . . . 18
Text Messaging Service (TMS) Icons . . . . . . . . . . 21
Status Icons . . . . . . . . . . . . . . . . . . . . . . . . . . . . . . 21
TMS Menu Options . . . . . . . . . . . . . . . . . . . . . . . . . 22
Call Type Icons . . . . . . . . . . . . . . . . . . . . . . . . . . . . 23
LED Indicator . . . . . . . . . . . . . . . . . . . . . . . . . . . . . 24
Intelligent Lighting Indicators . . . . . . . . . . . . . . . . . 25
Alert Tones . . . . . . . . . . . . . . . . . . . . . . . . . . . . . . . 26
Phone Call Display and Alert Prompts . . . . . . . . . . 29
General Radio Operation . . . . . . . . . . . . . . . . .30
Selecting a Zone . . . . . . . . . . . . . . . . . . . . . . . . . . 30
Selecting a Radio Channel . . . . . . . . . . . . . . . . . . . 31
Receiving and Responding to a Radio Call . . . . . . 32
Receiving and Responding to a Talkgroup Call . . . 33
Receiving and Responding to a Private Call
(Trunking Only) . . . . . . . . . . . . . . . . . . . . . . . . . . . . 33
Receiving and Responding to a Telephone Call
(Trunking Only) . . . . . . . . . . . . . . . . . . . . . . . . . . . .34
Making a Radio Call . . . . . . . . . . . . . . . . . . . . . . . . 35
Making a Talkgroup Call . . . . . . . . . . . . . . . . . . . . .35
Making a Private Call (Trunking Only) . . . . . . . . . . .35
Making an Enhanced Private Call (Trunking Only) .36
Making a Telephone Call (Trunking Only) . . . . . . . .37
Repeater or Direct Operation . . . . . . . . . . . . . . . . . 38
Monitoring Features . . . . . . . . . . . . . . . . . . . . . . . . 38
Monitoring a Channel . . . . . . . . . . . . . . . . . . . . . . .38
Conventional Mode Operation . . . . . . . . . . . . . . . .39
Advanced Features . . . . . . . . . . . . . . . . . . . . . 40
Advanced Call Features . . . . . . . . . . . . . . . . . . . . . 40
Receiving and Making a Selective Call (ASTRO
Conventional Only) . . . . . . . . . . . . . . . . . . . . . . . . .40
Receiving a Selective Call . . . . . . . . . . . . . . . . . . .40
Making a Selective Call . . . . . . . . . . . . . . . . . . . . .41
Using the Talkgroup Call Feature (Conventional
Operation Only) . . . . . . . . . . . . . . . . . . . . . . . . . . . .41
Selecting a Talkgroup . . . . . . . . . . . . . . . . . . . . . . .41
Sending a Status Call . . . . . . . . . . . . . . . . . . . . . . .42
Using the Dynamic Regrouping Feature
(Trunking Only) . . . . . . . . . . . . . . . . . . . . . . . . . . . .43
Requesting a Reprogram (Trunking Only) . . . . . . .43
Classifying Regrouped Radios . . . . . . . . . . . . . . . .44

Contents
English
v
Contacts . . . . . . . . . . . . . . . . . . . . . . . . . . . . . . . . . 44
Making a Private Call from Contacts . . . . . . . . . . . .45
Adding a New Contact Entry . . . . . . . . . . . . . . . . . .46
Deleting a Contact Entry . . . . . . . . . . . . . . . . . . . . .47
Adding a Contact to a Call List . . . . . . . . . . . . . . . .48
Removing a Contact from a Call List . . . . . . . . . . . .48
Editing a Contact in a Call List . . . . . . . . . . . . . . . .49
Editing an Entry Alias . . . . . . . . . . . . . . . . . . . . . . .49
Editing as Entry ID . . . . . . . . . . . . . . . . . . . . . . . . .49
Editing a Call Type . . . . . . . . . . . . . . . . . . . . . . . . .50
Viewing Details of a Contact . . . . . . . . . . . . . . . . . .50
Scan Lists . . . . . . . . . . . . . . . . . . . . . . . . . . . . . . . . 51
Viewing a Scan List . . . . . . . . . . . . . . . . . . . . . . . . .51
Editing the Scan List . . . . . . . . . . . . . . . . . . . . . . . .51
Changing the Scan List Status . . . . . . . . . . . . . . . .52
Viewing and Changing the Priority Status . . . . . . .53
Scan . . . . . . . . . . . . . . . . . . . . . . . . . . . . . . . . . . . . 53
Turning Scan On or Off . . . . . . . . . . . . . . . . . . . . . .53
Making a Dynamic Priority Change (Conventional
Scan Only) . . . . . . . . . . . . . . . . . . . . . . . . . . . . . . .54
Deleting a Nuisance Channel . . . . . . . . . . . . . . . . .54
Restoring a Nuisance Channel . . . . . . . . . . . . . . . .54
Call Alert Paging . . . . . . . . . . . . . . . . . . . . . . . . . . . 55
Receiving a Call Alert Page . . . . . . . . . . . . . . . . . .55
Sending a Call Alert Page . . . . . . . . . . . . . . . . . . . .55
Emergency Operation . . . . . . . . . . . . . . . . . . . . . . . 57
Sending an Emergency Alarm . . . . . . . . . . . . . . . . 57
Sending an Emergency Call (Trunking Only) . . . . 58
Sending an Emergency Alarm with
Emergency Call . . . . . . . . . . . . . . . . . . . . . . . . . . . 58
Sending a Silent Emergency Alarm . . . . . . . . . . . . 59
Using the Emergency Keep-Alive Feature . . . . . . . 59
Automatic Registration Service (ARS) . . . . . . . . . . 60
Selecting or Changing the ARS Mode . . . . . . . . . . 60
Accessing the User Login Feature . . . . . . . . . . . . . 61
Logging In as a User . . . . . . . . . . . . . . . . . . . . . . . 61
Logging Out . . . . . . . . . . . . . . . . . . . . . . . . . . . . . 62
Text Messaging Service (TMS) . . . . . . . . . . . . . . . . 63
Accessing the TMS Features . . . . . . . . . . . . . . . . . 63
Composing and Sending a New Text Message . . . 64
Sending a Quick Text Message . . . . . . . . . . . . . . . 65
Using the Priority Status and Request Reply
Features . . . . . . . . . . . . . . . . . . . . . . . . . . . . . . . . . 67
Appending a Priority Status to a Text Message . . 67
Removing a Priority Status from a Text Message 67
Appending a Request Reply to a Text Message . 67
Removing a Request Reply from a Text
Message . . . . . . . . . . . . . . . . . . . . . . . . . . . . . . . . 68
Appending a Priority Status and a Reply
Request to a Text Message . . . . . . . . . . . . . . . . . 68
Removing a Priority Status and a Reply
Request from a Text Message . . . . . . . . . . . . . . . 68
Managing Text Messages . . . . . . . . . . . . . . . . . . . 69

Contents
English
vi
Receiving a Text Message . . . . . . . . . . . . . . . . . . 69
Viewing a Text Message from the Inbox . . . . . . . . 69
Replying to a Received Text Message . . . . . . . . . 70
Accessing the Drafts Folder . . . . . . . . . . . . . . . . . . 71
Managing Sent Text Messages . . . . . . . . . . . . . . . 71
Viewing a Sent Text Message . . . . . . . . . . . . . . . . 71
Sending a Sent Text Message . . . . . . . . . . . . . . . 72
Deleting a Text Message . . . . . . . . . . . . . . . . . . . . 73
Deleting All Text Messages . . . . . . . . . . . . . . . . . . 73
Secure Operations . . . . . . . . . . . . . . . . . . . . . . . . . 74
Selecting Secure Transmissions . . . . . . . . . . . . . . 74
Selecting Clear Transmissions . . . . . . . . . . . . . . . . 75
Managing Encryption . . . . . . . . . . . . . . . . . . . . . . . 75
Loading an Encryption Key . . . . . . . . . . . . . . . . . . 75
Using the Multikey Feature . . . . . . . . . . . . . . . . . . 75
Selecting an Encryption Key . . . . . . . . . . . . . . . . . 76
Selecting a Keyset . . . . . . . . . . . . . . . . . . . . . . . . . 76
Erasing the Selected Encryption Keys . . . . . . . . . . 77
Requesting an Over-the-Air Rekey (ASTRO
Conventional Only) . . . . . . . . . . . . . . . . . . . . . . . . 78
Security . . . . . . . . . . . . . . . . . . . . . . . . . . . . . . . . . 78
Radio Lock . . . . . . . . . . . . . . . . . . . . . . . . . . . . . . . 78
Unlocking Your Radio . . . . . . . . . . . . . . . . . . . . . . 78
Changing Your Password . . . . . . . . . . . . . . . . . . . 79
Enabling or Disabling the Radio Lock Feature
(Secure Radios Only) . . . . . . . . . . . . . . . . . . . . . . 79
The Global Positioning System (GPS) . . . . . . . . . . 80
Understanding the GPS Feature . . . . . . . . . . . . . . .80
Enhancing GPS Performance . . . . . . . . . . . . . . . . .81
The Outdoor Location Feature (Using GPS) . . . . . .81
Accessing the Outdoor Location Feature . . . . . . . .82
Saving a Waypoint . . . . . . . . . . . . . . . . . . . . . . . . .83
Viewing a Saved Waypoint . . . . . . . . . . . . . . . . . . .83
Editing the Alias of a Waypoint . . . . . . . . . . . . . . . .84
Editing the Coordinates of a Waypoint . . . . . . . . . .85
Deleting a Single Saved Waypoint . . . . . . . . . . . . .86
Deleting All Saved Waypoints . . . . . . . . . . . . . . . .86
Measuring the Distance and Bearing from a
Saved Waypoint . . . . . . . . . . . . . . . . . . . . . . . . . . .87
Using the Location Feature While in Emergency
Mode . . . . . . . . . . . . . . . . . . . . . . . . . . . . . . . . . . .87
Trunking System Controls . . . . . . . . . . . . . . . . . . . 88
Using the Failsoft System . . . . . . . . . . . . . . . . . . . .88
Going Out of Range . . . . . . . . . . . . . . . . . . . . . . . .88
Using the Site Trunking Feature . . . . . . . . . . . . . . .88
Locking and Unlocking a Site . . . . . . . . . . . . . . . . .89
Viewing and Changing a Site . . . . . . . . . . . . . . . . .89
Viewing the Current Site . . . . . . . . . . . . . . . . . . . . .89
Changing the Current Site . . . . . . . . . . . . . . . . . . .89
Utilities . . . . . . . . . . . . . . . . . . . . . . . . . . . . . . . . . . 90
Viewing the Recent Calls List . . . . . . . . . . . . . . . . .90
Using the Flip Display . . . . . . . . . . . . . . . . . . . . . . .90

Contents
English
vii
Selecting a Zone Bank . . . . . . . . . . . . . . . . . . . . . .91
Selecting the Power Level . . . . . . . . . . . . . . . . . . . .91
Selecting a Radio Profile . . . . . . . . . . . . . . . . . . . . .91
Enabling and Disabling the Radio Alias . . . . . . . . .92
Selecting the Audio Speaker . . . . . . . . . . . . . . . . . .92
Controlling the Display Backlight . . . . . . . . . . . . . . .93
Locking and Unlocking the Keypad . . . . . . . . . . . . .94
Turning Keypad Tones On or Off . . . . . . . . . . . . . .94
Turning Voice Mute On or Off . . . . . . . . . . . . . . . . .94
Using the Time-Out Timer . . . . . . . . . . . . . . . . . . . .94
Setting the Time and Date . . . . . . . . . . . . . . . . . . .95
Editing the Time and Date . . . . . . . . . . . . . . . . . . .95
Using the Conventional Squelch Operation
Features . . . . . . . . . . . . . . . . . . . . . . . . . . . . . . . . .96
Analog Options . . . . . . . . . . . . . . . . . . . . . . . . . . .96
Digital Options . . . . . . . . . . . . . . . . . . . . . . . . . . . .96
Using the PL Defeat Feature . . . . . . . . . . . . . . . . . .96
Using the Digital PTT ID Feature . . . . . . . . . . . . . .97
Using the Smart PTT Feature (Conventional
Only) . . . . . . . . . . . . . . . . . . . . . . . . . . . . . . . . . . . .97
Accessing the Battery Information . . . . . . . . . . . . .98
Accessing the General Radio Information . . . . . . . .98
Accessing the Radio Information . . . . . . . . . . . . . .98
Viewing the IP Information . . . . . . . . . . . . . . . . . . .99
Viewing the Control Assignments . . . . . . . . . . . .100
Editing the Soft ID . . . . . . . . . . . . . . . . . . . . . . . .100
Voice Announcement . . . . . . . . . . . . . . . . . . . . . .101
Helpful Tips . . . . . . . . . . . . . . . . . . . . . . . . . . .103
Caring for Your Radio . . . . . . . . . . . . . . . . . . . . . . 103
Cleaning Your Radio . . . . . . . . . . . . . . . . . . . . . . 104
Handling Your Radio . . . . . . . . . . . . . . . . . . . . . . 104
Servicing Your Radio . . . . . . . . . . . . . . . . . . . . . . 105
Taking Care of the Battery . . . . . . . . . . . . . . . . . . 105
Checking the Battery Charge Status . . . . . . . . . . 105
LED and Sounds . . . . . . . . . . . . . . . . . . . . . . . . . 105
Fuel Gauge Icon . . . . . . . . . . . . . . . . . . . . . . . . . 105
Battery Recycling and Disposal . . . . . . . . . . . . . . 106
Accessories . . . . . . . . . . . . . . . . . . . . . . . . . . .107
Appendix: Maritime Radio Use in the VHF
Frequency Range . . . . . . . . . . . . . . . . . . . . . .108
Special Channel Assignments . . . . . . . . . . . . . . . 108
Emergency Channel . . . . . . . . . . . . . . . . . . . . . . 108
Non-Commercial Call Channel . . . . . . . . . . . . . . 108
Operating Frequency Requirements . . . . . . . . . . . 109


Important Safety Information
English
ix
Important Safety Information
Product Safety and RF Exposure Compliance
ATTENTION!
This radio is restricted to occupational use only to
satisfy FCC RF energy exposure requirements.
Before using this product, read the RF energy awareness
information and operating instructions in the Product
Safety and RF Exposure booklet enclosed with your radio
(Motorola Publication part number 6881095C98) to
ensure compliance with RF energy exposure limits.
For a list of Motorola-approved antennas, batteries, and
other accessories, visit the following website:
http://www.motorola.com/governmentandenterprise
Software Version
All the features described in the following sections are
supported by the radio's software version R02.00.00 or
later.
See Accessing the Radio Information on page 98 to
determine your radio's software version.
Check with your dealer or system administrator
for more details of all the features supported.
Before using this product, read the operating
instructions for safe usage contained in the
Product Safety and RF Exposure booklet
enclosed with your radio.
!

Computer Software Copyrights
English
x
Computer Software Copyrights
The Motorola products described in this manual may
include copyrighted Motorola computer programs stored
in semiconductor memories or other media. Laws in the
United States and other countries preserve for Motorola
certain exclusive rights for copyrighted computer
programs, including, but not limited to, the exclusive right
to copy or reproduce in any form the copyrighted
computer program. Accordingly, any copyrighted
Motorola computer programs contained in the Motorola
products described in this manual may not be copied,
reproduced, modified, reverse-engineered, or distributed
in any manner without the express written permission of
Motorola. Furthermore, the purchase of Motorola
products shall not be deemed to grant either directly or by
implication, estoppel, or otherwise, any license under the
copyrights, patents or patent applications of Motorola,
except for the normal non-exclusive license to use that
arises by operation of law in the sale of a product.
Documentation Copyrights
No duplication or distribution of this document or any
portion thereof shall take place without the express
written permission of Motorola. No part of this manual
may be reproduced, distributed, or transmitted in any
form or by any means, electronic or mechanical, for any
purpose without the express written permission of
Motorola.
Disclaimer
The information in this document is carefully examined,
and is believed to be entirely reliable. However, no
responsibility is assumed for inaccuracies. Furthermore,
Motorola reserves the right to make changes to any
products herein to improve readability, function, or
design. Motorola does not assume any liability arising out
of the applications or use of any product or circuit
described herein; nor does it cover any license under its
patent rights, nor the rights of others.

Getting Started
English
1
Getting Started
Take a moment to review the following:
How to Use This Guide . . . . . . . . . . . . . . . . . . . . . . . . . page 1
Notations Used in This Manual . . . . . . . . . . . . . . . . . . . page 1
What Your Dealer/System Administrator
Can Tell You. . . . . . . . . . . . . . . . . . . . . . . . . . . . . . . . page 2
How to Use This Guide
This User Guide covers the basic operation of the APX™ 7000
Portables.
However, your dealer or system administrator may have
customized your radio for your specific needs. Check with your
dealer or system administrator for more information.
Notations Used in This Manual
Throughout the text in this publication, you will notice the use of
WARNING, Caution, and Note. These notations are used to
emphasize that safety hazards exist, and the care that must be
taken or observed.
An operational procedure, practice, or condition,
etc., which may result in injury or death if not
carefully observed.
An operational procedure, practice, or
condition, etc., which may result in damage
to the equipment if not carefully observed.
Note: An operational procedure, practice, or condition,
etc., which is essential to emphasize.
!!
!

Getting Started
English
2
The following special notations identify certain items: What Your Dealer/System Administrator
Can Tell You
Check with your dealer or system administrator, if the radio is to
be operated in extremely cold temperatures (less than -20°C),
for the correct radio settings to ensure proper top display
operation.
You can also consult your dealer or system administrator about
the following:
•Is your radio preprogrammed with any preset conventional
channels?
•Which buttons have been preprogrammed to access other
features?
•What optional accessories may suit your needs?
Example Description
Home button
or H
Buttons and keys are shown in bold print
or as an icon.
Phone Menu entries are shown similar to the
way they appear on the radio’s display.
>This means “Press the right side of the
4-way Navigation button.”
Preparing Your Radio for Use
English
3
Preparing Your Radio for Use
Assemble your radio by following these steps:
Charging the Battery . . . . . . . . . . . . . . . . . . . . . . . . . . . page 3
Battery Charger . . . . . . . . . . . . . . . . . . . . . . . . . . . . . page 3
Attaching the Battery . . . . . . . . . . . . . . . . . . . . . . . . . . . page 4
Attaching the Antenna . . . . . . . . . . . . . . . . . . . . . . . . . . page 5
Using the Carry Holder . . . . . . . . . . . . . . . . . . . . . . . . . page 6
Attaching the Accessory Connector Cover . . . . . . . . . . page 5
Turning On the Radio . . . . . . . . . . . . . . . . . . . . . . . . . . page 7
Adjusting the Volume. . . . . . . . . . . . . . . . . . . . . . . . . . . page 8
Charging the Battery
The Motorola-approved battery shipped with your radio is
uncharged. Prior to using a new battery, charge it for a minimum
of 16 hours to ensure optimum capacity and performance.
For a list of Motorola-authorized batteries available for use
with your radio, see Accessories on page 107.
Note: When charging a battery attached to a radio, turn the
radio off to ensure a full charge.
Battery Charger
To charge the battery, place the battery, with or without the
radio, in a Motorola-approved charger. The charger’s LED
indicates the charging progress; see your charger’s user guide.
For a list of chargers, see Accessories on page 107.
To avoid a possible explosion:
•DO NOT replace the battery in any area
labeled “hazardous atmosphere”.
•DO NOT discard batteries in a fire.
!!
Preparing Your Radio for Use
English
4
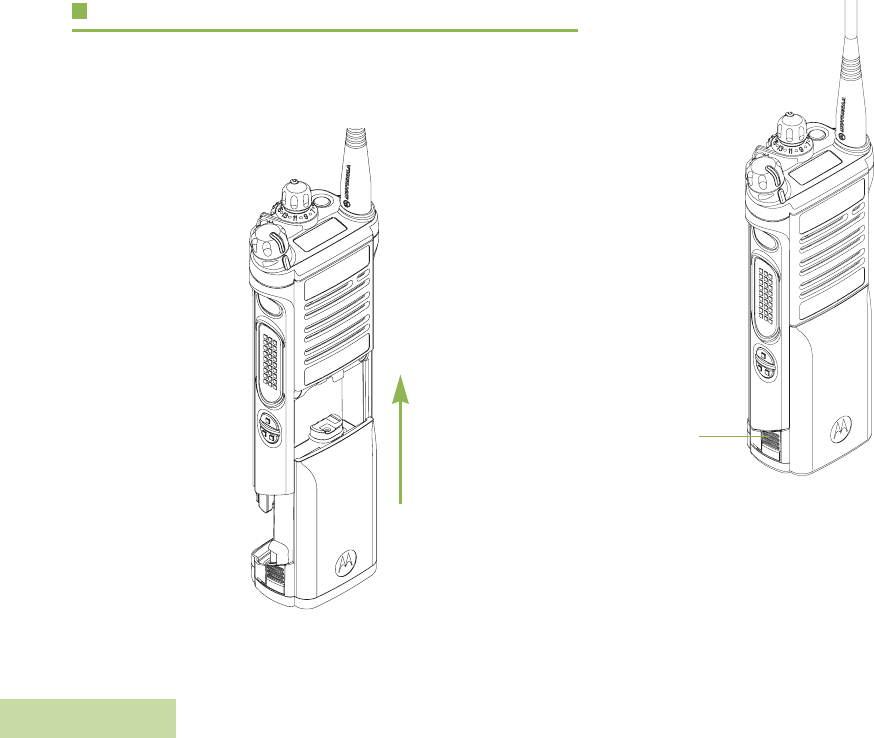
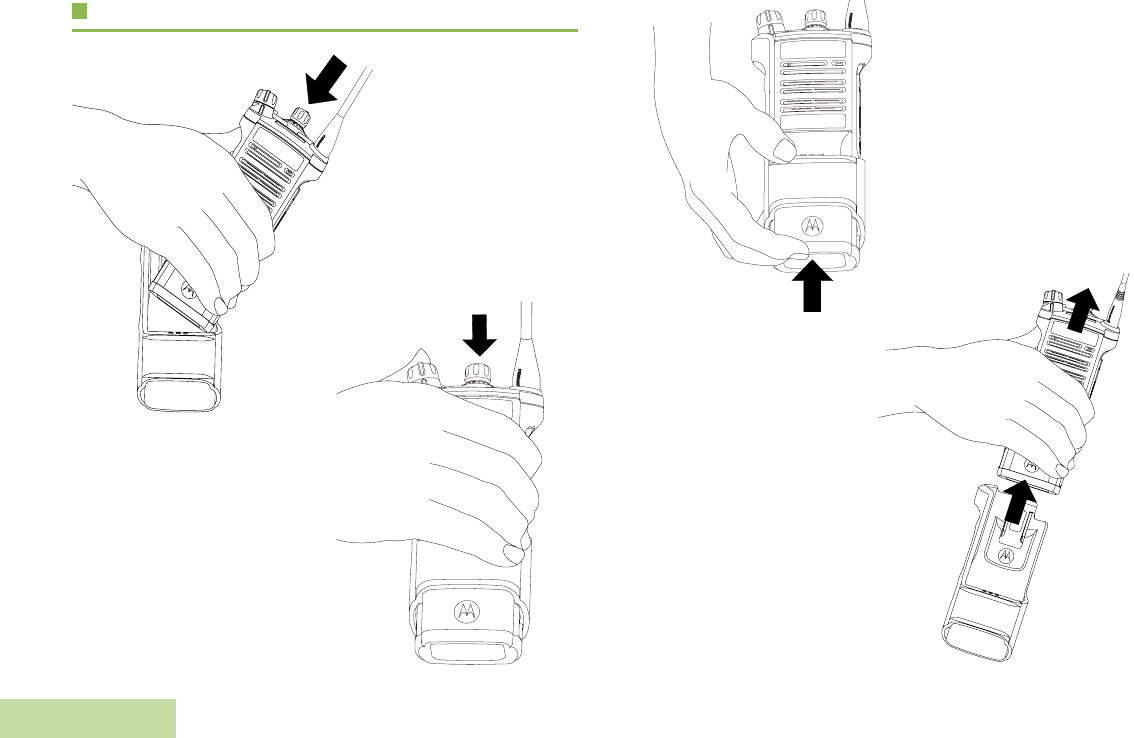
Attaching the Battery
With the radio turned off, slide the battery into the radio’s frame
until side latches click into place.
To remove the battery,
turn the radio off. Squeeze
the release latches on the
bottom of the battery until
the battery releases from
the radio. Remove the
battery from the radio.
Note: If your radio is
preprogrammed
with volatile-key
retention, the
encryption keys
are retained for
approximately 30
seconds after
battery removal.
Check with your
dealer or system
administrator for
more information.
You can view the status of your IMPRES battery. See
Accessing the Radio Information on page 98 for more
information.
Battery
Latch
Preparing Your Radio for Use
English
5
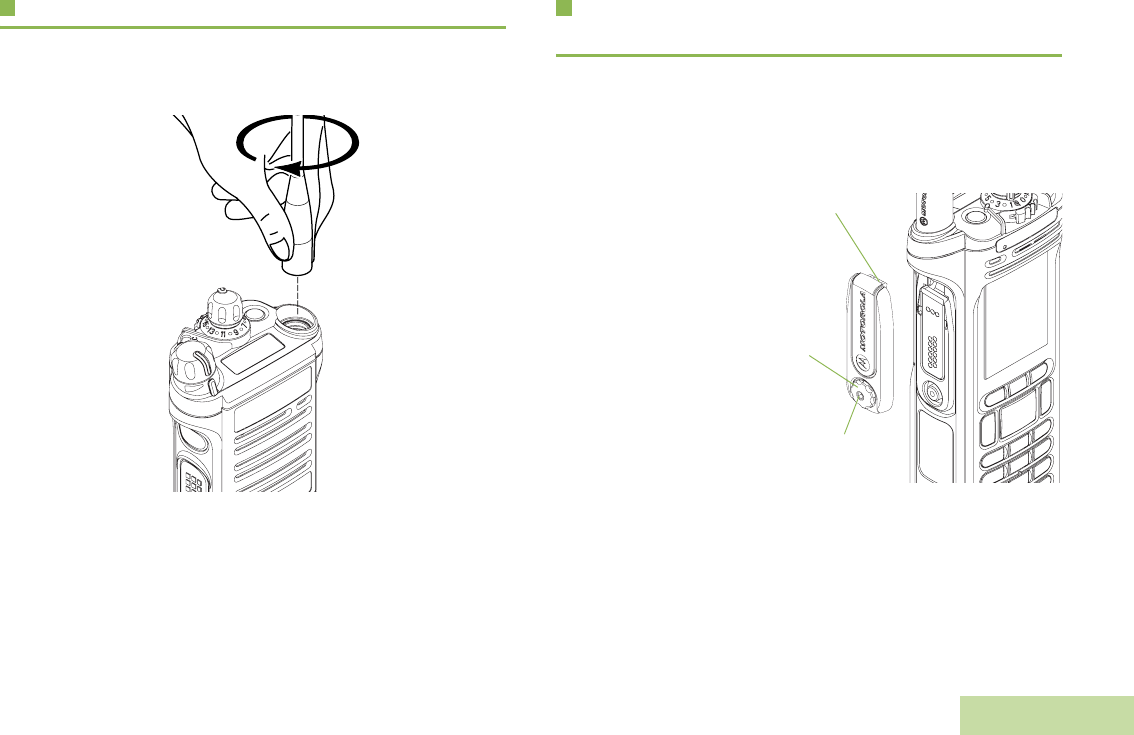
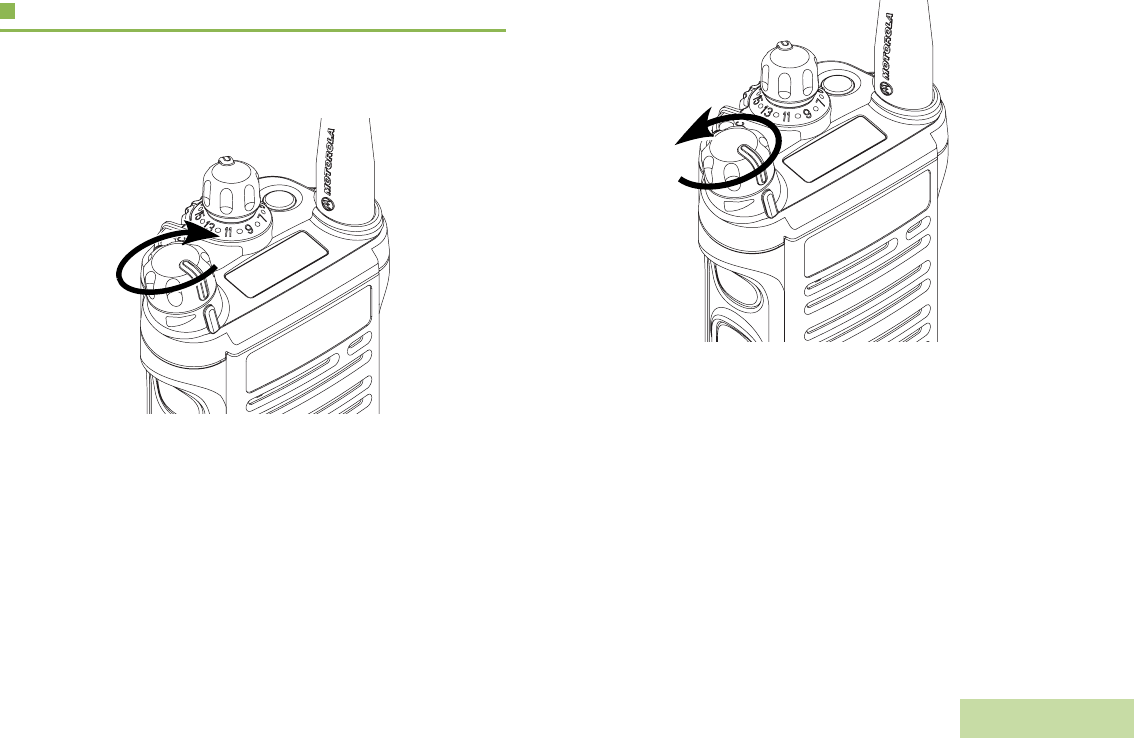
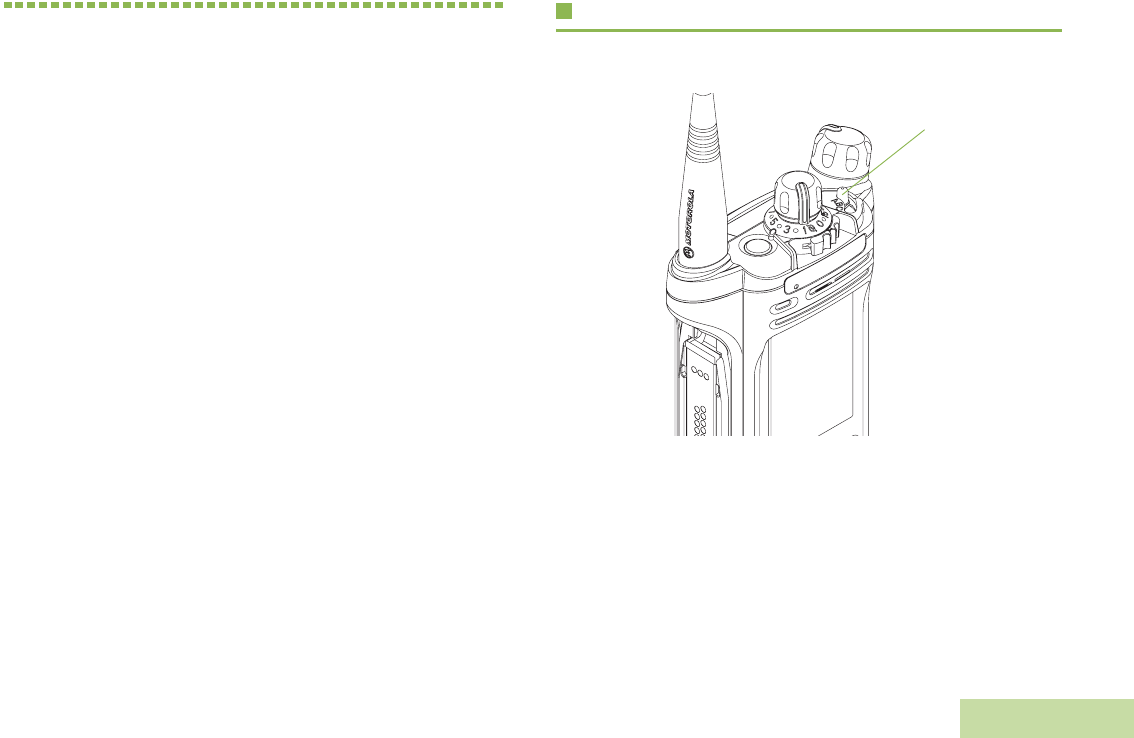
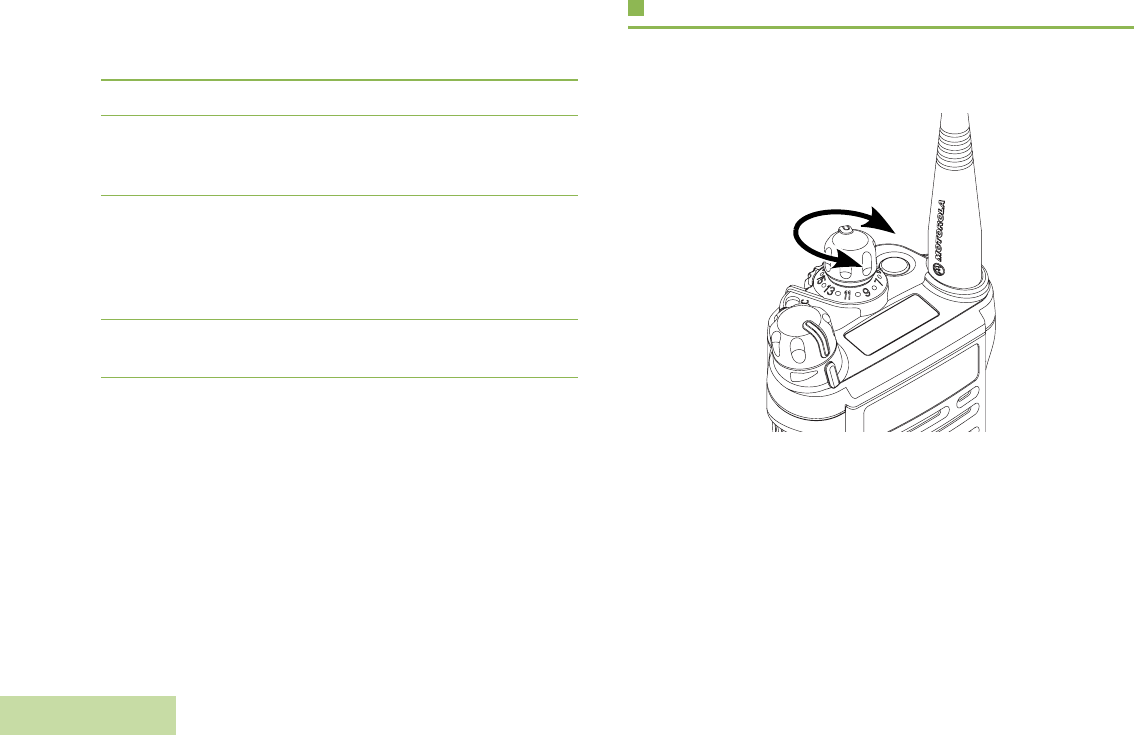
Attaching the Antenna
With the radio turned off, set the antenna in its receptacle and
turn clockwise to attach it to the radio.
To remove the antenna, turn the antenna counterclockwise.
Make sure you turn off the radio first.
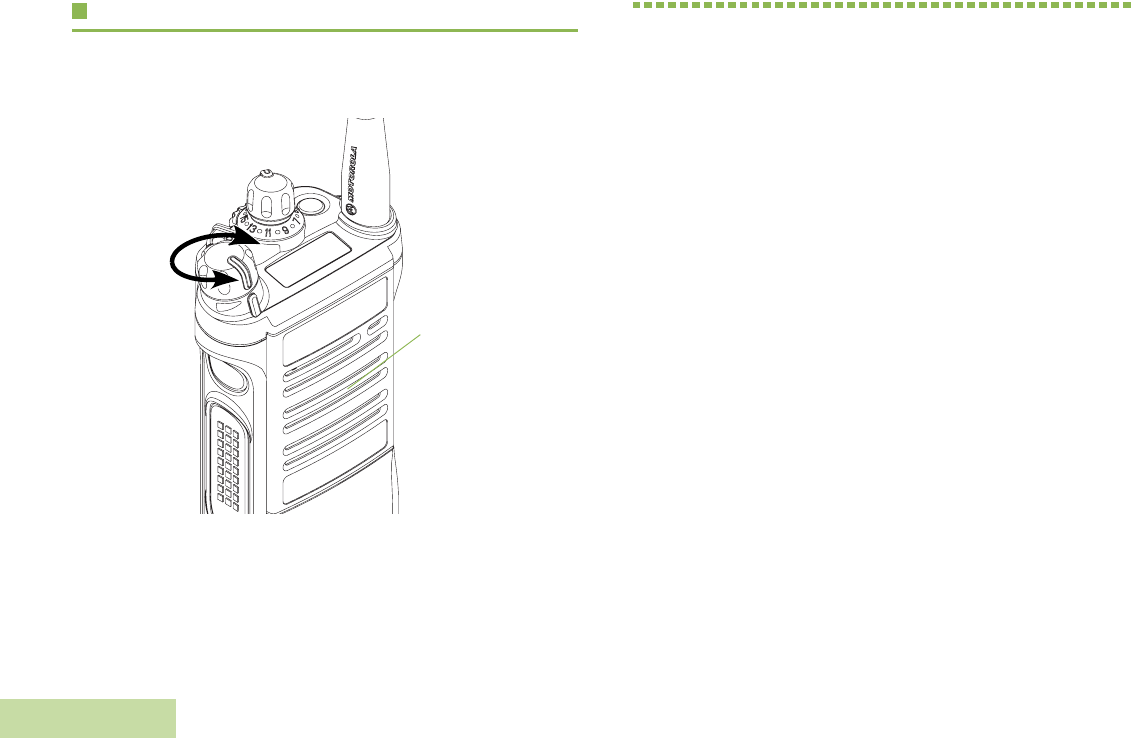
Attaching the Accessory Connector
Cover
The accessory connector is located on the antenna side of the
radio. It is used to connect accessories to the radio.
Note: To prevent damage to the connector, shield it with the
connector cover when not in use.
Insert the hooked
end of the cover
into the slot above
the connector.
Press downward on
the cover’s top to
seat it in the slot.
Once in place, rotate
the thumbscrew
clockwise by hand
until tight.
To remove the accessory connector cover, rotate the
thumbscrew counterclockwise until it disengages from the radio.
If the thumbscrew is too tight, use an Allen wrench to loosen
it first.
Rotate and lift the connector cover to disengage it from
the radio.
Hooked End
Thumbscrew
Hex Socket Head
Preparing Your Radio for Use
English
6
Using the Carry Holder
Position the radio within
the carry holder with the
main speaker facing
outward. Slide the radio
down into the carry
holder until it clicks in
place.
To remove the radio from
the carry holder, place the
tip of your fingers on the
ledge of the carry holder
and push at the bottom of
the radio until the radio
releases from it.
Preparing Your Radio for Use
English
7
Turning On the Radio
Rotate the On/Off/Volume Control Knob clockwise until you
hear a click.
If the power-up test is successful, you see SELFTEST on the
radio’s display momentarily, followed by the Home screen.
Note: If the power-up test is unsuccessful, you see Error
XX/YY (XX/YY is an alphanumeric code).
Turn off the radio, check the battery, and turn the
radio back on. If the radio fails the power-up test
again, record the Error XX/YY code and contact
your dealer.
To turn off the radio, rotate the On/Off/Volume Control Knob
counterclockwise until you hear a click.
Identifying Radio Controls
English
8
Adjusting the Volume
To increase the volume, turn the On/Off/Volume Control Knob
clockwise.
To decrease the volume, turn this knob counterclockwise.
Note: Ensure that the main speaker is pointed towards you
for increased loudness and intelligibility, especially in
areas with loud background noises.
Identifying Radio Controls
Take a moment to review the following:
Radio Parts and Controls. . . . . . . . . . . . . . . . . . . . . . . . page 9
Programmable Features . . . . . . . . . . . . . . . . . . . . . . . page 10
Assignable Radio Functions. . . . . . . . . . . . . . . . . . . page 10
Assignable Settings or Utility Functions . . . . . . . . . . page 11
Accessing the Preprogrammed Functions. . . . . . . . . . page 12
Using the Menu Select Buttons . . . . . . . . . . . . . . . . page 12
Using the Navigation Buttons. . . . . . . . . . . . . . . . . . page 12
Using the Keypad . . . . . . . . . . . . . . . . . . . . . . . . . . . . page 13
Keypad Characters – Uppercase Mode. . . . . . . . . . page 13
Keypad Characters – Lowercase Mode. . . . . . . . . . page 14
Keypad Characters – Numeric Mode. . . . . . . . . . . . page 15
Keypad Characters – Hexadecimal Mode . . . . . . . . page 16
Push-To-Talk (PTT) Button . . . . . . . . . . . . . . . . . . . . . page 17
Main
Speaker

Identifying Radio Controls
English
9
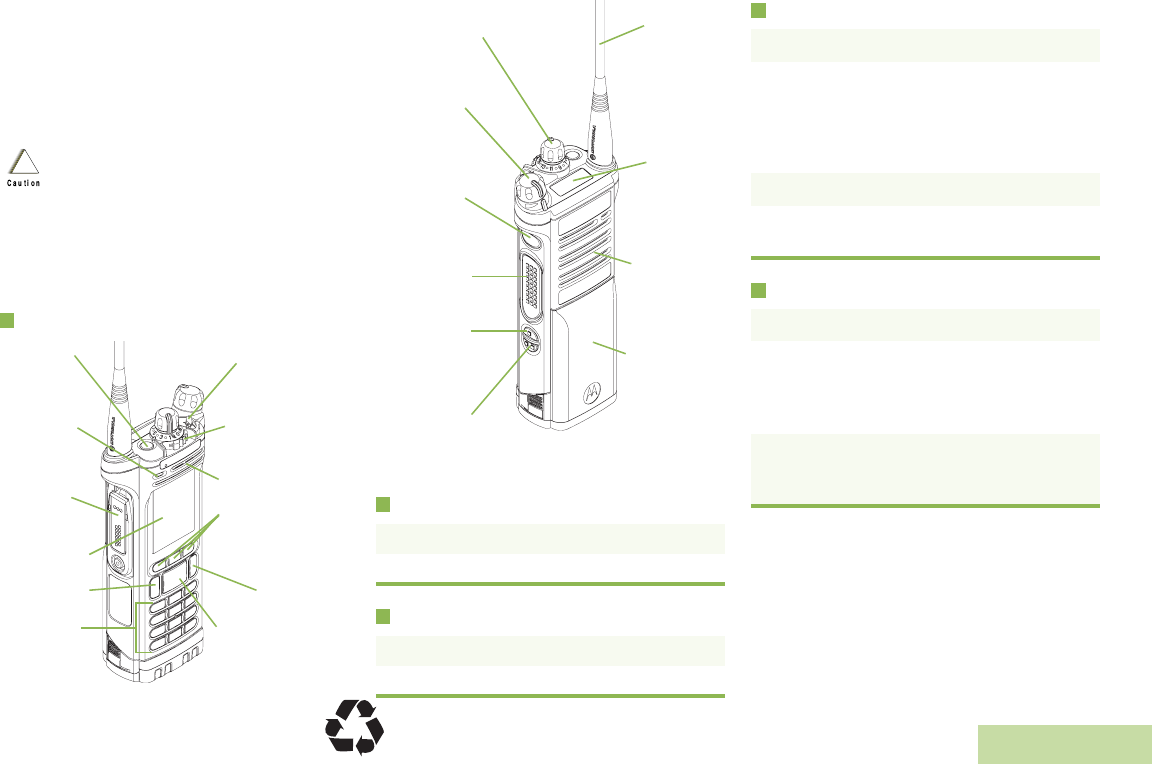
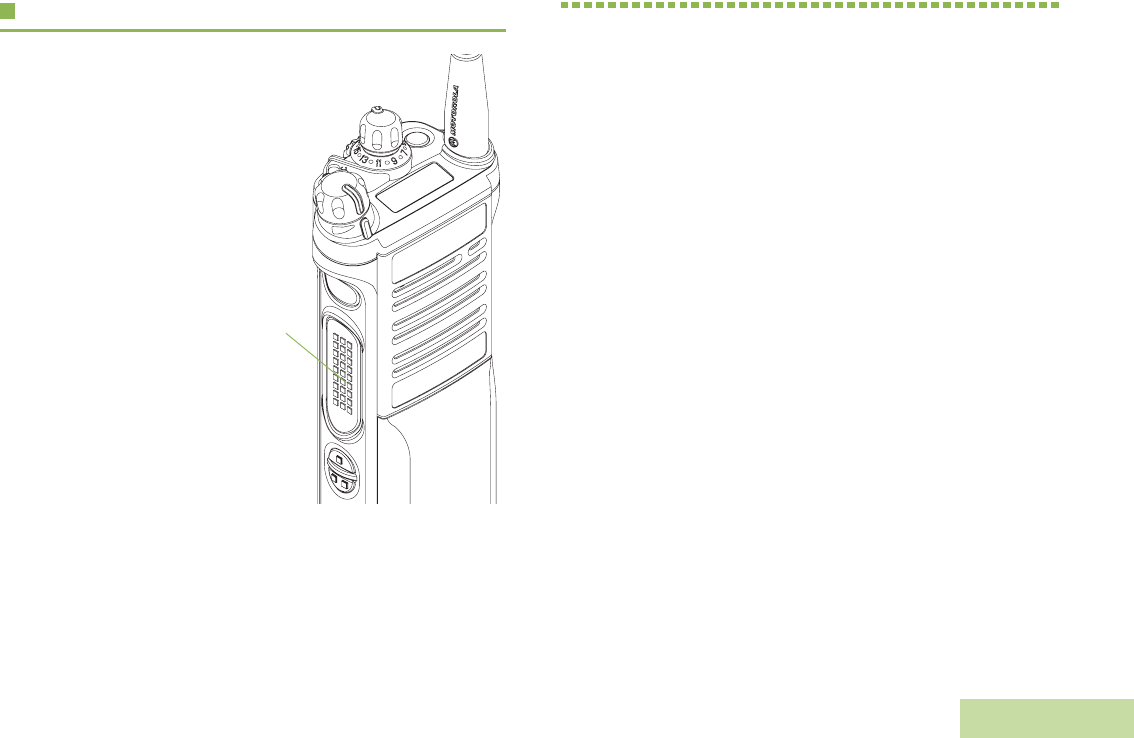
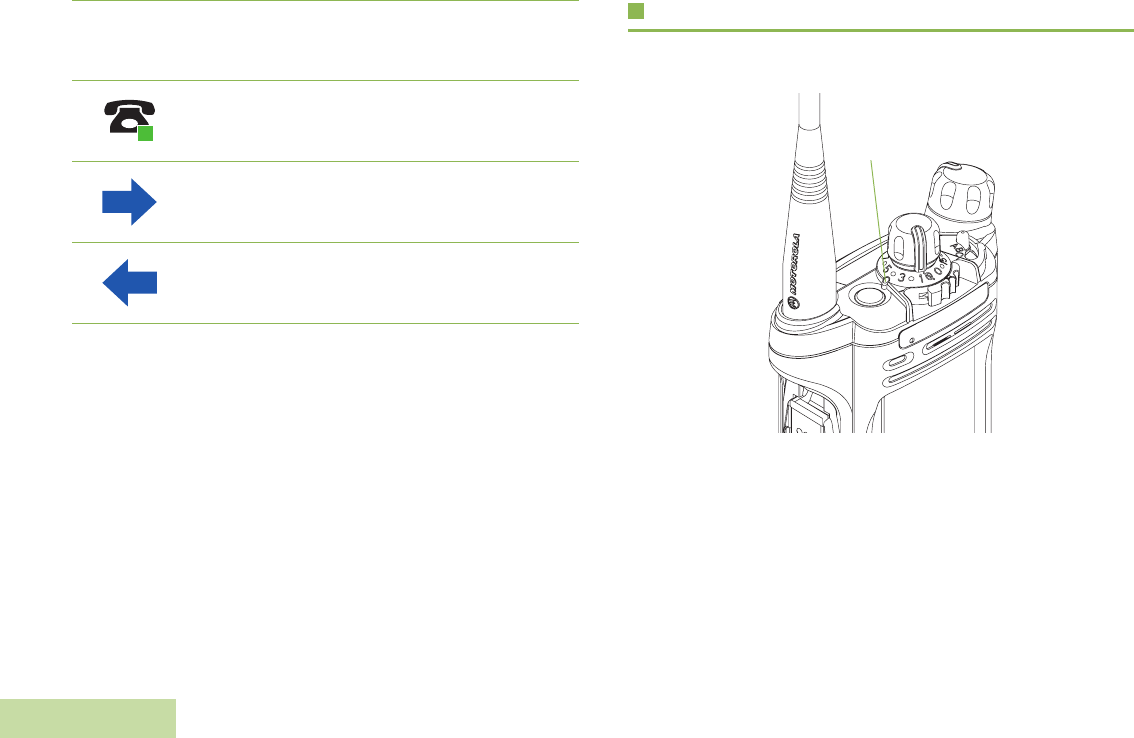
Radio Parts and Controls
Antenna
1
LED
2
Accessory
Connector
5
On/Off/Volume
Control Knob
Keypad
9
Home Button
6
74-Way
Navigation
Button Battery Latch
8
11 Menu Select
Buttons
14 2-Position Concentric
Switch*
15 3-Position A/B/C
Switch*
Battery
21
25 16-Position
Select Knob*
Secondary Speaker
13 24 Top
Display
22 Main
Speaker
16
Side Button 2*
20
Side Button 1*
19
18 Push-to-Talk
(PTT) Button
Microphone
4
* These radio controls/buttons are programmable
.
17 Top Side (Select)
Button* Microphone
23
Main Display
12
10 Data Feature
Button
Top (Orange)
Button*
3

Identifying Radio Controls
English
10
Programmable Features
Any reference in this manual to a control that is
“preprogrammed” means that the control must be programmed
by a dealer or qualified radio technician using the radio's
programming software, in order to assign a feature to that
control.
The programmable buttons can be programmed as shortcuts to
radio functions or preset channels/groups depending on the
duration of a button press:
•Press – Pressing and releasing rapidly.
•Long press – Pressing and holding for the preprogrammed
duration (between 0.25 seconds and 3.75 seconds).
•Hold down – Keeping the button pressed.
Assignable Radio Functions
Call Alert – Allows the radio to function like a pager, or to verify
if a radio is active on the system.
Call Response – Allows you to answer a private call.
Channel – Selectes a channel.
Contacts – Selects the Contacts menu.
Dynamic Priority (Conventional Only) – Allows any channel
in a scan list (except for the Priority-One channel) to temporarily
replace the Priority-Two channel.
Emergency – Depending on the programming, initiates or
cancels an emergency alarm or call.
Information – Displays the information of the radio.
Internet Protocol Address – Displays the Internet Protocol (IP)
address, device name and status of the radio.
Location – Determines the current location (latitude, longitude,
time and date), and also the distance and bearing to another
location. Or, turns the GPS functionality on or off for all location.
Message – Enters the current message list.
Monitor (Conventional Only) – Monitors a selected channel
for all radio traffic until function is disabled.
Multiple Private Line (Conventional Only) – Selects the
Mulitple Private Line lists.
Nuisance Delete – Temporarily removes an unwanted channel,
except for priority channels or the designated transmit channel,
from the scan list.
One Touch 1 – 4 – Launches a specific feature with one single
button-press. You can setup as much as four separately
programmed buttons for four different features.
Phone – Allows you to make and receive calls similar to
standard phone calls.
Private Call (Trunking Only) – Allows a call from an individual
radio to another individual radio.

Identifying Radio Controls
English
11
Radio Profiles – Allows for easy access to a set of
preprogrammed visual and audio settings of the radio.
Recent Calls – Allows for easy access to the list of calls
recently received or made.
Rekey Request – Notifies the dispatcher that you want a new
encryption keys.
Repeater Access Button (RAB) (Conventional Only) –
Allows to manually send a repeater access codeword.
Reprogram Request (Trunking Only) – Notifies the dispatcher
that you want a new dynamic regrouping assignment.
Request-To-Talk (Conventional Only) – Notifies the
dispatcher that you want to send a voice call.
Scan – Toggles scan on or off.
Select – Selects the assigned list for editing.
Selective Call (Conventional Only) – Calls an assigned radio.
Site Display (Trunking Only) – Displays the current site ID and
RSSI value.
Site Lock/Unlock – Locks onto a specific site.
Site Search (Trunking Only) – Performs site search for AMSS
(Automatic Multiple Site Select) or SmartZone operation.
Status – Sends data calls to the dispatcher about a predefined
status.
Talkaround/Direct (Conventional Only) – Toggles between
using a repeater and communicating directly with another radio.
Talkgroup (Conventional Only) – Allows a call from an
individual radio to a group of radios.
Text Messaging Service (TMS) – Selects the text messaging
menu.
TMS Quick Text – Selects a predefined message.
User – Automatically registers with the server.
Zone Select – Allows selection from a list of zones.
Zone Bank – Allows selection from a larger list of zones.
Assignable Settings or Utility Functions
Flip – Flips the content of the top display.
Keypad Lock – Toggles the keypad lock on or off.
Light – Toggles display backlight on or off.
Voice Announcement – Audibly indicates the current feature
mode, Zone or Channel the user has just assigned.
Voice Mute – Toggles voice mute on or off.
Volume Set Tone – Sets the volume set tone.
Identifying Radio Controls
English
12
Accessing the Preprogrammed Functions
You can access various radio functions through one of the
following ways:
•A short or long press of the relevant programmable buttons.
OR
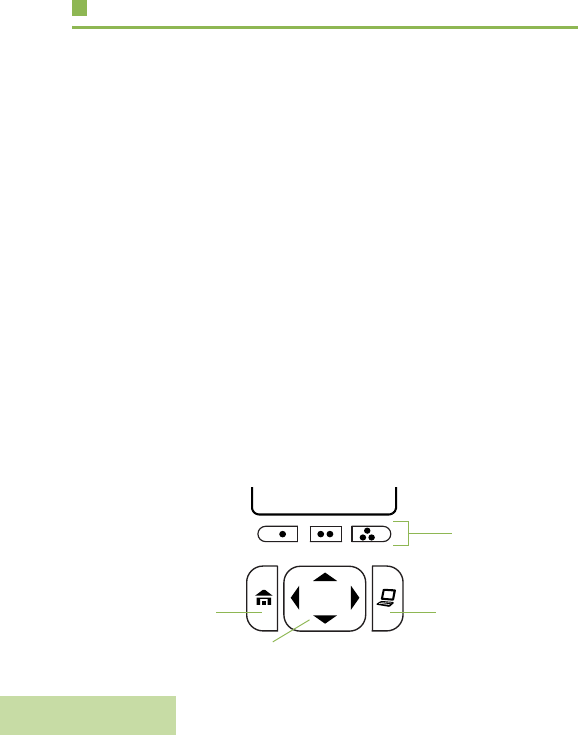
•Use the Menu Select Buttons ({, |, and }).
Using the Menu Select Buttons
The Menu Select buttons access the menu entries of features.
Note: Check with your dealer or system administrator for the
list of features activated in your radio.
Your radio may be preprogrammed differently from the following
example, but the steps for selecting a channel may appear as
shown below:
•Press the Menu Select button ( | ) directly below Chan.
Using the Navigation Buttons
Home Button
The H button returns you to the Home (default) screen. In most
cases, this is the current mode.
For selected radio features, the H button is also used to save
user-edited radio settings or information before returning you to
the Home screen.
Note: Some features do not require you to press H to go to
the Home screen. Refer to the individual feature
sections in this manual for further details on saving
user-edited radio settings or information.
Data Feature Button
Use this button to access data-related features, such as the
Text Messaging Service (TMS) feature screen.
4-Way Navigation Button
Use this button to scroll up, down, left or right.
Press and release one of the button to scroll from one entry to
the next one. Press and hold one of the button to have the radio
toggles through the list automatically (release the button to
stop).
Data Feature
Button
4-Way Navigation Button
Home Button
Zone | Chan | MyId Menu Select
Buttons

Identifying Radio Controls
English
13
Using the Keypad
You can use the 3 x 4 alphanumeric keypad to access your radio’s features. The keypad functions in a manner similar to a standard
telephone keypad when entering numeric digits. When the keypad is used to edit a list, each key can generate different characters of
the alphabet. The tables below show the number of times a key needs to be pressed to generate the required character.
Keypad Characters – Uppercase Mode
Number of Times Key is Pressed
Key123456789101112131415161718 1920
11.,?!;@_-*#&$/+=\“‘()
2ABC
3DEF
4GH I
5JKL
6MNO
7PQRS
8TUV
9WX Y Z
0 Toggle between mixed case mode, uppercase mode, and lowercase mode.
*Space
#Toggle between numeric and letter mode.

Identifying Radio Controls
English
14
Keypad Characters – Lowercase Mode
Number of Times Key is Pressed
Key123456789101112131415161718192021
11.,?!;@_-*#&$/+=\“‘()
2abc
3def
4gh i
5jkl
6mno
7pqr s
8tuv
9wxyz
0 Toggle between mixed case mode, uppercase mode, and lowercase mode.
*Space
#Toggle between numeric and letter mode.

Identifying Radio Controls
English
15
Keypad Characters – Numeric Mode
Number of Times Key is Pressed
Key123456789101112131415161718 1920
11.,?!;@_-*#&$/+=\“‘()
22
33
44
55
66
77
88
99
00
*Space
#Toggle between numeric and letter mode.

Identifying Radio Controls
English
16
Keypad Characters – Hexadecimal Mode
Number of Times Key is Pressed
Key123456789101112131415161718192021
11
22ABC
33DEF
44
55
66
77
88
99
00
*Not applicable
#Not applicable
Identifying Status Indicators
English
17
Push-To-Talk (PTT) Button
The PTT button on the side
of the radio serves two basic
purposes:
•While a call is in progress,
the PTT button allows the
radio to transmit to other
radios in the call.
Press and hold down PTT
button to talk. Release the
PTT button to listen.
The microphone is
activated when the PTT
button is pressed.
•While a call is not in
progress, the PTT button
is used to make a new
call. See Making a Radio
Call on page 35 for more
information.
Identifying Status Indicators
Your radio indicates its operational status through the following:
Status Icons . . . . . . . . . . . . . . . . . . . . . . . . . . . . . . . . .page 18
Text Messaging Service (TMS) Icons. . . . . . . . . . . . . .page 21
Status Icons . . . . . . . . . . . . . . . . . . . . . . . . . . . . . . .page 21
TMS Menu Options. . . . . . . . . . . . . . . . . . . . . . . . . .page 22
Call Type Icons. . . . . . . . . . . . . . . . . . . . . . . . . . . . . . .page 23
LED Indicator . . . . . . . . . . . . . . . . . . . . . . . . . . . . . . . .page 24
Intelligent Lighting Indicators . . . . . . . . . . . . . . . . . . . .page 25
Alert Tones . . . . . . . . . . . . . . . . . . . . . . . . . . . . . . . . . .page 26
Phone Call Display and Alert Prompts . . . . . . . . . . . . .page 29
PTT
Button
Identifying Status Indicators
English
18
Status Icons
The 240 x 320 pixel front liquid crystal display (LCD) of your
radio shows radio status, text entries, and menu entries. The
top two display rows contain color icons that indicate radio
operating conditions.
Selected icons are also shown on the first row of the 112 x 32
pixel top monochrome display screen of your radio.
The following icons are for the front display screen unless
indicated otherwise.
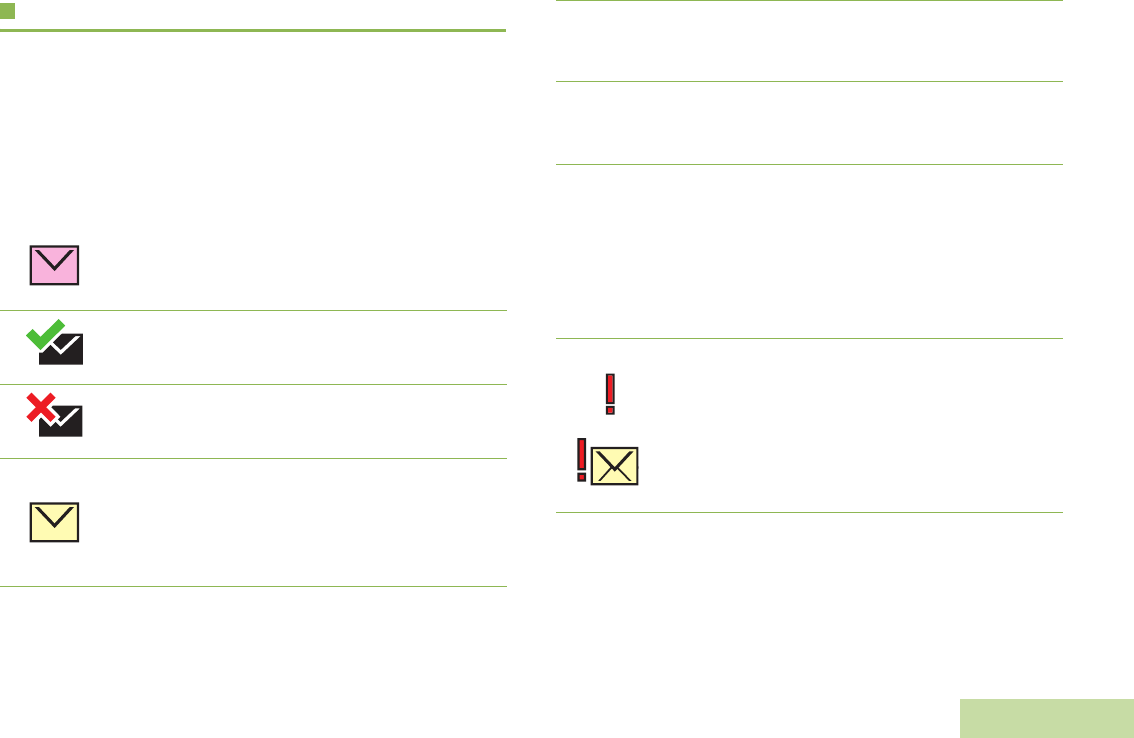
Receiving
Radio is receiving a call or data.
Transmitting
Radio is transmitting a call or data.
Call Received
Radio has received an Individual Call.
F
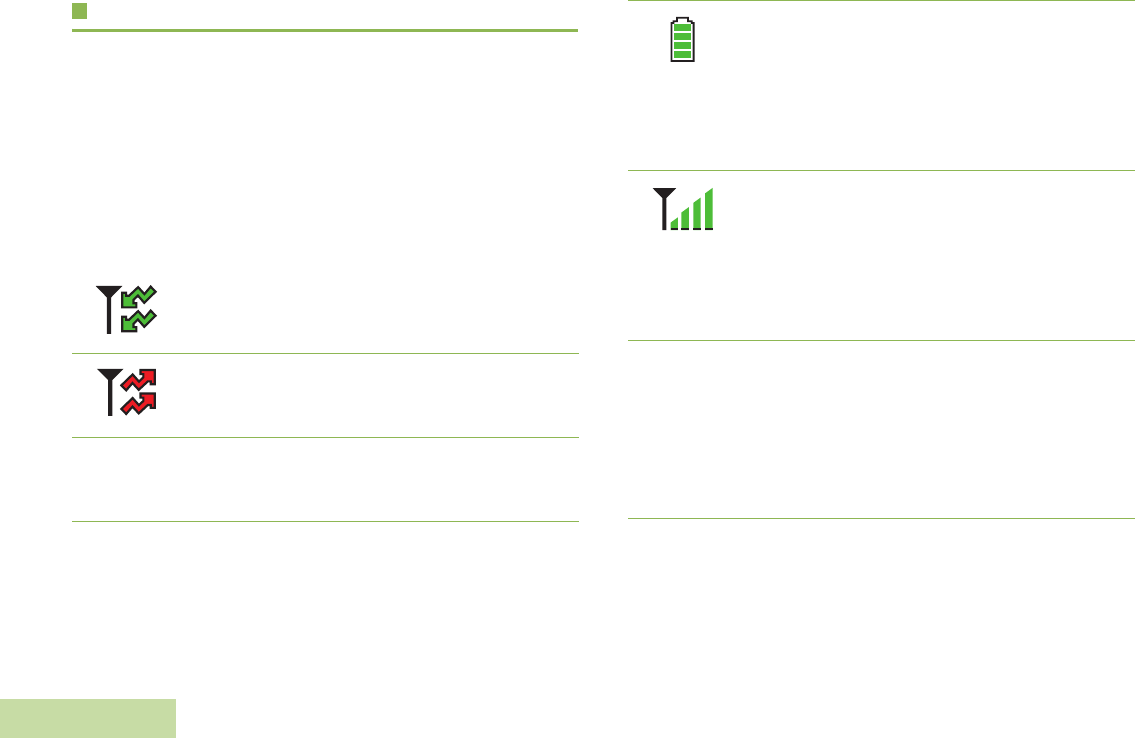
Battery
The number of bars (0 – 4) shown indicates the
charge remaining in the battery. Blinks when the
battery is low.
Received Signal Strength Indicator (RSSI)
The number of bars displayed represents the
received signal strength for the current site, for
trunking only. The more stripes in the icon, the
stronger the signal.
Direct
•On = Radio is currently configured for direct
radio-to-radio communication (during
conventional operation only).
•Off = Radio is connected with other radios
through a repeater.
Top Display
U
Top Display
V
Top Display
N
O

Identifying Status Indicators
English
19
Monitor (Carrier Squelch)
Selected channel is being monitored (during
conventional operation only).
In-Call User Alert
•On = The feature is enabled. Voice muting of
the affiliated trunking talkgroup or
selected conventional channel is
activated.
•Off = The feature is disabled. Voice muting of
the affiliated trunking talkgroup or
selected conventional channel is
deactivated.
Power Level
•L = Radio is set at Low power.
•H = Radio is set at High power.
Top Display
M
M
K
Top Display
H or L
H or .
Scan
Radio is scanning a scan list.
Priority Channel Scan
•Blinking dot = Radio detects activity on
channel designated as
Priority-One.
•Steady dot = Radio detects activity on channel
designated as Priority-Two.
View/Program Mode
Radio is in the view or program mode.
•On steady = View mode
•Blinking = Program mode
Vote Scan Enabled
The vote scan feature is enabled.
Top Display
J
i
Top Display
j
Top Display
Top Display
I
k

Identifying Status Indicators
English
20
Zone Bank 1
•A = Radio is in Zone 1.
•B = Radio is in Zone 2.
•C = Radio is in Zone 3.
Zone Bank 2
•D = Radio is in Zone 4.
•E = Radio is in Zone 5.
•F = Radio is in Zone 6.
Secure Operation
•On = Secure operation.
•Off = Clear operation.
•Blinking = Receiving an encrypted voice call.
Top Display
A or B
or C
Top Display
D or E
or F
Top Display
G
m
AES Secure Operation
•On = AES Secure operation.
•Off = Clear operation.
•Blinking = Receiving an encrypted voice call.
Location Signal
•On = Location feature is enabled, and location
signal is available.
•Off = Location feature is disabled.
•Blinking = Location feature is enabled, but no
location signal is available.
User Login Indicator (IP Packet Data)
•On = User is currently associated with the
radio.
•Off = User is currently not associated with the
radio.
•Blinking = Device registration or user
registration with the server failed
due to an invalid username or pin.
Data Activity
Data activity is present.
l
G
n
o
Identifying Status Indicators
English
21
Text Messaging Service (TMS) Icons
This feature allows you to send and receive text messages. See
Text Messaging Service (TMS) on page 63 for more
information.
Status Icons
The following icons appear on the radio’s display when you
send and receive text messages.
Inbox Full
The Inbox is full.
Message Sent
The text message is sent successfully.
Message Unsent
The text message cannot be sent.
Unread Message
•User receives a new message.
•The selected text message in the Inbox has not
been read.
Read Message
The selected text message in the Inbox has been
read.
Normal Message
User is composing a message with normal priority
and without a request for a reply.
3/6 Message Index
Indicates the index of the current message the
user is viewing.
Example: If the user is looking at the third
message out of a total of 6 messages in the Inbox
folder, the icon is displayed as the icon on the left
column.
Priority Status
•The “Priority” feature is toggled on before the
message is sent.
•Messages in the Inbox folder are flagged with
“Priority”.
Y
r
Identifying Status Indicators
English
22
Request Reply
•The “Request Reply” feature is toggled on
before the message is sent.
•Messages in the Inbox folder are flagged with
“Request Reply”.
Priority Status and Request Reply
•User is composing a message with a priority
status and a request for a reply.
•Messages in the Inbox folder are flagged with
“Priority” and “Request Reply”.
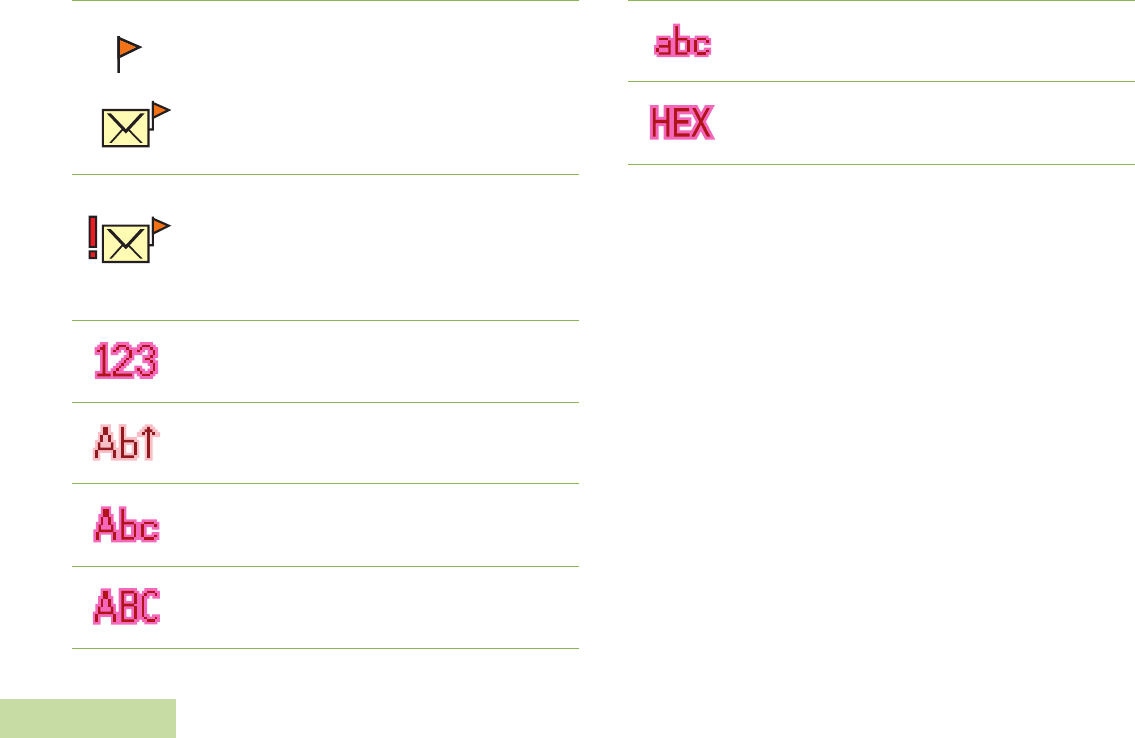
Numeric
Indicates that the text entry is currently in numeric
mode.
Start Case
Indicates that the first character of the text entry is
capitalized.
Mixed Case
Indicates that the text entry is currently in normal
text mode.
Uppercase
Indicates that the text entry is currently in
uppercase mode.
Lowercase
Indicates that the text entry is currently in
lowercase mode.
Hexadecimal
Indicates that the text entry is currently in
hexadecimal mode.
Identifying Status Indicators
English
23
TMS Menu Options Call Type Icons
The following icons appear on the radio’s main display, when
you make or receive a call, or view selected call lists, to indicate
the different call types associated with an alias or ID.
Menu Option Description/Function
Back Brings you back to the previous screen.
Clr Deletes all messages.
Del Deletes a message or text.
Edit Brings you to the edit screen.
Exit Exits to the Home screen.
No Returns to the previous screen.
Optn Brings you to the Options main screen.
Rply Replies to a message.
Sel Selects the highlighted command.
Send Sends the message.
Yes Updates or saves a command.
Radio number.
Radio number added to a Call List.
Mobile number.
Mobile number added to a Call List.
U
?
Identifying Status Indicators
English
24
LED Indicator
The LED indicator shows the operational status of your radio.
Solid red – Radio is transmitting.
Blinking red – Radio is transmitting at low battery condition.
Landline phone number.
Landline phone number added to a Call List.
Incoming call or data.
Outgoing call or data.
%
LED Indicator

Identifying Status Indicators
English
25
Rapidly blinking red – Radio has failed the self test upon
powering up or encountered a fatal error.
Solid yellow – Channel is busy.
Blinking yellow – Radio is receiving a secured transmission.
Solid green – Radio is powering up, or is on a non-priority
channel while in the Scan List Programming mode.
Blinking green – Radio is receiving an individual or telephone
call, or is on a Priority-Two channel while in the Scan List
Programming mode.
Rapidly blinking green – Radio is on a Priority-One channel
while in the Scan List Programming mode.

Identifying Status Indicators
English
26
Intelligent Lighting Indicators
This feature temporary changes the backlight of the top display screen and the keypad, and adds a color bar to the main display
screen to help signal that a radio event has occurred.
Note: This feature must be preprogrammed by a qualified radio technician.
Backlight and Bar Color Notification When
Orange Emergency Alerts The radio initiates an emergency alarm or call.
The radio receives an emergency alarm or call.
Red Critical Alerts
The radio battery is low.
The radio is out of range.
The radio enters failsoft mode.
The radio is unable to establish a full connection with the system.
Green Call Alerts
The radio receives a private call.
The radio receives a phone call.
The radio receives a call alert.
The radio receives a selective call.

Identifying Status Indicators
English
27
Alert Tones
An alert tone is a sound or group of sounds. Your radio uses alert tones to inform you of your radio’s conditions. The following table
lists these tones and when they occur.
You Hear Tone Name Heard
Short,
Low-Pitched
Tone
Radio Self Test Fail When radio fails its power-up self test.
Reject When unauthorized request is made.
Time-Out Timer Warning Four seconds before time out.
No ACK Received When radio fails to receive an acknowledgment.
Individual Call
Warning Tone When radio is in an individual call for greater than 6 seconds without any activity.
Long,
Low-Pitched
Tone
Time-Out Timer
Timed Out After time out.
Talk Prohibit/PTT Inhibit (When PTT button is pressed) transmissions are not allowed.
Out of Range (When PTT button is pressed) the radio is out of range of the system.
Invalid Mode When radio is on an unpreprogrammed channel.
A Group of
Low-Pitched
Tones Busy When system is busy.

Identifying Status Indicators
English
28
Short,
Medium-Pitched
Tone
Valid Key-Press When correct key is pressed.
Radio Self Test Pass When radio passes its power-up self test.
Clear Voice At beginning of a non-coded communication.
Priority Channel
Received When activity on a priority channel is received.
Emergency Alarm Entry When entering the emergency state.
Central Echo When central controller has received a request from a radio.
Long,
Medium-Pitched
Tone
Volume Set When volume is changed on a quiet channel.
Emergency Exit When exiting the emergency state.
A Group of
Medium-Pitched
Tones
Failsoft When the trunking system fails.
Automatic Call Back When voice channel is available from previous request.
Talk Permit (When PTT button is pressed) verifying system accepting transmissions.
Keyfail When encryption key has been lost.
Console Acknowledge When status, emergency alarm, or reprogram request ACK is received.
Received Individual Call When Call Alert or Private Call is received.
Call Alert Sent When Call Alert is received by the target radio.
Site Trunking When a SmartZone trunking system fails.
You Hear Tone Name Heard

Identifying Status Indicators
English
29
Short,
High-Pitched
Tone (Chirp) Low-Battery Chirp When battery is below preset threshold value.
Ringing
Fast Ringing When system is searching for target of Private Call.
Enhanced Call Sent When waiting for target of Private Call to answer the call.
Phone Call Received When a land-to-mobile phone call is received.
Gurgle Dynamic Regrouping (When the PTT button is pressed) a dynamic ID has been received.
Unique,
Low-Pitched
Chirp New Message When a new message is received.
Unique,
High-Pitched
Chirp Priority Status When a priority message is received.
You Hear Tone Name Heard

Identifying Status Indicators
English
30
Phone Call Display and Alert Prompts
The following appears on the radio’s display when you make and receive Phone calls. The radio also uses alert tones to indicate the
current status.
You Hear You See When Notes
A Long
Tone
No phone You press the PTT button and the
phone system is not available. Press H to hang up. The radio returns to the Home screen.
Phone busy The phone system is busy. Press H to exit the phone mode and try your call later.
A Busy
Tone Phone busy When a channel is not available. The radio automatically connects when a channel opens.
–No
acknowledge The call is not acknowledged. Press H to hang up. The radio returns to the Home screen.
A High-
Pitched
Tone –When you release the PTT button. The radio indicates to the landline party that he or she may begin
talking.
Note: You have the option of sending additional digits (overdial), such as an extension number, or credit card or PIN numbers, to the
phone system. If the radio is preprogrammed for live overdial, every digit entered after the call is connected is sent to the
phone system.
If the radio is preprogrammed for buffered overdial, the digits pressed are entered into memory and then sent when the PTT
button is pressed. Press the PTT button to send either digits or voice, but not both at the same time.
General Radio Operation
English
31
General Radio Operation
Once you understand how your APX 7000 Portable is
configured, you are ready to use your radio.
Use this navigation guide to familiarize yourself with the basic
Call features:
Selecting a Zone . . . . . . . . . . . . . . . . . . . . . . . . . . . . . page 30
Selecting a Radio Channel . . . . . . . . . . . . . . . . . . . . . page 31
Receiving and Responding to a Radio Call. . . . . . . . . page 32
Making a Radio Call . . . . . . . . . . . . . . . . . . . . . . . . . . page 35
Repeater or Direct Operation . . . . . . . . . . . . . . . . . . . page 38
Monitoring Features. . . . . . . . . . . . . . . . . . . . . . . . . . . page 38
Selecting a Zone
A zone is a group of channels.
Use the following procedure to select a zone.
Note: Your radio must be preprogrammed to allow you to use
this feature.
Procedure:
Move the preprogrammed Zone (3-Position A/B/C) switch to
the position of the required zone and proceed to Step 3.
3-Position
A/B/C Switch
General Radio Operation
English
32
OR
Follow the procedure below.
1< or > to Zone.
2Press the Menu Select button directly below Zone.
3U or D to the required zone.
OR
Use the keypad to enter the zone number.
4If the zone number entered is unprogrammed, the display
shows Invalid entry. Repeat Step 3.
OR
Press the Menu Select button directly below Sel to confirm
the displayed zone.
5Press the PTT button to transmit on the displayed zone
channel.
Selecting a Radio Channel
A channel is a group of radio characteristics, such as transmit/
receive frequency pairs.
Use the following procedure to select a channel.
Note: Your radio must be preprogrammed to allow you to use
this feature. If you select a channel that is not within the
preprogrammed band, the radio indicates that it is on
an unsupported frequency with both audio and visual
warnings.
Consult a qualified radio technician for the right choice
between the following methods.
General Radio Operation
English
33
Procedure:
Turn the preprogrammed 16-Position Select knob to the
desired channel.
OR
Follow the procedure below.
1< or > to Chan.
2Press the Menu Select button directly below Chan.
3U or D to the required channel.
OR
Use the keypad to enter the channel number.
4If the channel number entered is unprogrammed, the display
shows Invalid entry. Repeat Step 3.
OR
Press the Menu Select button directly below Sel to confirm
the selected channel.
5Press the PTT button to transmit on the displayed zone
channel.
Receiving and Responding to a Radio Call
Once you have selected the required channel and/or zone, you
can proceed to receive and respond to calls.
The LED lights up solid red while the radio is transmitting, and
solid yellow when the radio is receiving a transmission
(conventional mode only). There is no LED indication when the
radio receives a transmission in trunking mode.
If the radio is receiving a secure transmission, the LED blinks
yellow.
LED Indicator

General Radio Operation
English
34
Receiving and Responding to a Talkgroup Call
To receive a call from a group of users, your radio must be
configured as part of that talkgroup.
Procedure:
When you receive a talkgroup call (while on the Home screen),
depending on how your radio is preprogrammed:
1ASTRO Conventional Only:
The LED lights up solid yellow. The display shows the
talkgroup alias or ID, and the caller alias or ID.
OR
Trunking Only:
The display shows the caller alias or ID.
2Hold the radio vertically 1 to 2 inches (2.5 to 5.0 cm) from
your mouth.
3Press the PTT button to respond to the call. The LED lights
up solid red.
4Release the PTT button to listen.
See Making a Talkgroup Call on page 35 for details on making
a Talkgroup Call.
Receiving and Responding to a Private Call
(Trunking Only)
A Private Call is a call from an individual radio to another
individual radio.
These one-to-one calls between two radios are not heard by
others in the current talkgroup. The calling radio automatically
verifies that the receiving radio is active on the system and can
display the caller ID.
Note: The radio automatically exits the feature, if the feature
inactivity timer is enabled, when the radio is left idle
and the timer expires. You will hear the Menu Inactive
Exit Tone upon feature exit.
Procedure:
When you receive a Private Call:
1You hear two alert tones and the LED blinks green. The
display shows Call received and the call received icon
blinks.

General Radio Operation
English
35
2Press the Menu Select button directly below Resp.
OR
Press the Call Response button within 20 seconds after the
call indicators begin.
3During the call, the display shows the caller alias (name), if it
is in the call list.
OR
During the call, the display shows the caller ID (number), if
the caller’s name is not in the call list.
4Press and hold the PTT button to talk. Release the PTT
button to listen.
5Press H or the Call Response button to hang up and
return to the Home screen.
See Making a Private Call (Trunking Only) on page 35 for
details on making a Private Call.
Receiving and Responding to a Telephone Call
(Trunking Only)
This feature allows you to receive calls similar to standard
phone calls from a landline phone.
Note: The radio automatically exits the feature, if the feature
inactivity timer is enabled, when the radio is left idle
and the timer expires. You will hear the Menu Inactive
Exit Tone upon feature exit.
Procedure:
Use the preprogrammed Call Response button to answer a
Telephone Call:
1You hear a telephone-type ringing and the LED blinks green.
The backlight of the screen and the bar turns green. The
display shows Phone Call and the call received icon blinks.
2Press the Call Response button within 20 seconds after the
call indicators begin.
3Press and hold the PTT button to talk. Release the PTT
button to listen.
4Press H or the Call Response button to hang up and
return to the Home screen.
See Making a Telephone Call (Trunking Only) on page 37 for
details on making a Telephone Call.

General Radio Operation
English
36
Making a Radio Call
You can select a zone, channel, subscriber ID, or talkgroup by
using:
•The preprogrammed Zone switch
•The Channel Selector Knob
•A preprogrammed One Touch Call button
•The Contacts list (see Viewing Details of a Contact on
page 50)
Note: The radio automatically exits the feature, if the feature
inactivity timer is enabled, when the radio is left idle
and the timer expires. You will hear the Menu Inactive
Exit Tone upon feature exit.
Making a Talkgroup Call
To make a call to a group of users, your radio must be
configured as part of that talkgroup.
Procedure:
1Turn the Channel Selector Knob to select the channel with
the desired talkgroup.
2Hold the radio vertically 1 to 2 inches (2.5 to 5.0 cm) from
your mouth.
3Press the PTT button to make the call.
4ASTRO Conventional Only:
The LED lights up solid red. The display shows the
talkgroup alias or ID.
OR
Trunking Only:
The LED lights up solid red.
5Speak clearly into the microphone.
6Release the PTT button to listen.
Making a Private Call (Trunking Only)
Procedure:
Press the preprogrammed Quick Access (One-Touch) Private
Call button to dial the preprogrammed ID (number) and proceed
to Step 5.
OR
Follow the procedure below.
1< or > to Call.

General Radio Operation
English
37
2Press the Menu Select button directly below Call. The
display shows the last transmitted or received ID.
3Press the Menu Select button directly below Cnts to scroll
through and select the required ID.
OR
Press the Menu Select button directly below LNum to go to
the last number dialed.
OR
U or D to the required ID.
OR
Use the keypad to enter the required ID.
4Press the PTT button to start the Private Call.
5The display shows Calling... <Number>.
6Hold the radio vertically 1 to 2 inches (2.5 to 5.0 cm) from
your mouth.
7When you are connected, the display shows the ID of the
target radio. Press and hold the PTT button to talk. Release
the PTT button to listen.
OR
If no acknowledgment is received, the display shows No
acknowledge.
8Press H to return to the Home screen.
Making an Enhanced Private Call (Trunking Only)
This feature allows you to send an individual Call Alert page if
there is no answer from the target radio. See Sending a Call
Alert Page on page 55 for more information.
Note: Your radio must be preprogrammed to allow you to use
this feature.
Procedure:
Press the preprogrammed Quick Access (One-Touch)
Enhanced Private Call button to dial the preprogrammed ID
and proceed to Step 5.
OR
Follow the procedure below.
1< or > to Call.
2Press the Menu Select button directly below Call. The
display shows the last transmitted or received ID.
3Press the Menu Select button directly below Cnts to scroll
through and select the required ID.
OR
Press the Menu Select button directly below LNum to go to
the last number dialed.
OR
U or D to the required ID.
OR
Use the keypad to enter the required ID.

General Radio Operation
English
38
4Press the PTT button to start the Private Call.
5The display shows Calling... <Number>.
6Hold the radio vertically 1 to 2 inches (2.5 to 5.0 cm) from
your mouth.
7When you are connected, the display shows the ID of the
target radio. Press and hold the PTT button to talk. Release
the PTT button to listen.
OR
If no acknowledgment is received, the display shows No
acknowledge.
OR
If the target radio does not respond before the time out, the
display shows No answer.
8Press H to return to the Home screen.
Making a Telephone Call (Trunking Only)
This feature allows you to make calls similar to standard phone
calls to a mobile or landline phone.
Procedure:
Press the preprogrammed Quick Access (One-Touch) Phone
Call button to dial the preprogrammed phone number and
proceed to Step 5.
OR
Follow the procedure below.
1< or > to Phon.
2Press the Menu Select button directly below Phon. The
display shows the last transmitted phone number.
3Press the Menu Select button directly below Cnts to scroll
through and select the required ID.
OR
Press the Menu Select button directly below LNum to go to
the last number dialed.
OR
U or D to the required phone number.
OR
Use the keypad to enter the required phone number.
4Press and release the PTT button to dial the phone number.
5Hold the radio vertically 1 to 2 inches (2.5 to 5.0 cm) from
your mouth.
6When your call is answered, press the PTT button to talk.
Release the PTT button to listen.
7Press H to return to the Home screen.
See Phone Call Display and Alert Prompts on page 29 for
more information if your call is NOT answered.

General Radio Operation
English
39
Repeater or Direct Operation
The REPEATER operation increases the radio’s range by
connecting with other radios through a repeater. The transmit
and receive frequencies are different.
The DIRECT or “talkaround operation” allows you to bypass the
repeater and connect directly to another radio. The transmit and
receive frequencies are the same.
Procedure:
Press the preprogrammed Repeater/Direct switch to toggle
between talkaround and repeater modes.
OR
Follow the procedure below.
1< or > to Dir.
2Press the Menu Select button directly below Dir.
3The display shows Repeater mode if the radio is currently
in Repeater mode.
OR
The display shows Direct mode and the Talkaround icon if
the radio is currently in Direct mode (during conventional
operation only).
Monitoring Features
Radio users who switch from analog to digital radios often
assume that the lack of static on a digital channel is an
indication that the radio is not working properly. This is not the
case.
Digital technology quiets the transmission by removing the
“noise” from the signal and allowing only the clear voice or data
information to be heard.
Use the Monitor feature to make sure a channel is clear before
transmitting.
Monitoring a Channel
Procedure:
Use the preprogrammed Volume Set Button button.
1Select the desired zone and channel.
2Press and hold the Volume Set button to hear the volume
set tone.
3Adjust the Volume Control knob if necessary.

General Radio Operation
English
40
4Release the Volume Set button.
5Press and hold the PTT button to transmit. The LED lights
up solid red.
6Release the PTT button to receive (listen).
OR
Press the preprogrammed Monitor button and proceed to
Step 3.
OR
Follow the procedure below.
1Select the desired zone and channel.
2Listen for a transmission.
3Adjust the Volume Control knob if necessary.
4Press and hold the PTT button to transmit. The LED lights
up solid red.
5Release the PTT button to receive (listen).
The Carrier Squelch indicator appears on the display when you
monitor a channel via the preprogrammed Monitor button.
Conventional Mode Operation
Your radio may be preprogrammed to receive Private-Line®
(PL) calls.
Procedure:
1Momentarily press the Monitor button to listen for activity.
The Carrier Squelch indicator appears on the display.
2Press and hold the Monitor button to set continuous
monitor operation. The duration of the button press is
programmable.
3Press the Monitor button again, or the PTT button, to return
to the original squelch setting.
If you try to transmit on a receive-only channel, you hear an
invalid tone until you release the PTT button.

Advanced Features
English
40
Advanced Features
Use this navigation guide to learn more about advanced
features available with your radio:
Advanced Call Features . . . . . . . . . . . . . . . . . . . . . . . page 40
Contacts . . . . . . . . . . . . . . . . . . . . . . . . . . . . . . . . . . . page 44
Scan Lists . . . . . . . . . . . . . . . . . . . . . . . . . . . . . . . . . . page 51
Scan . . . . . . . . . . . . . . . . . . . . . . . . . . . . . . . . . . . . . . page 53
Call Alert Paging . . . . . . . . . . . . . . . . . . . . . . . . . . . . . page 55
Emergency Operation . . . . . . . . . . . . . . . . . . . . . . . . . page 57
Automatic Registration Service (ARS) . . . . . . . . . . . . page 60
Text Messaging Service (TMS) . . . . . . . . . . . . . . . . . . page 63
Secure Operations . . . . . . . . . . . . . . . . . . . . . . . . . . . page 74
Security . . . . . . . . . . . . . . . . . . . . . . . . . . . . . . . . . . . . page 78
The Global Positioning System (GPS) . . . . . . . . . . . . page 80
Trunking System Controls. . . . . . . . . . . . . . . . . . . . . . page 88
Utilities. . . . . . . . . . . . . . . . . . . . . . . . . . . . . . . . . . . . . page 90
Advanced Call Features
Receiving and Making a Selective Call (ASTRO
Conventional Only)
This feature allows you to receive a call from or to call a specific
individual. It is intended to provide privacy and to eliminate the
annoyance of having to listen to conversations that are of no
interest to you.
Receiving a Selective Call
Procedure:
1When you receive a Selective Call, you hear two alert tones
and the LED lights up solid yellow. The call received icons
blinks and the display shows Call received.
2The speaker unmutes.
3Hold the radio vertically 1 to 2 inches (2.5 to 5.0 cm) from
your mouth.
4Press and hold the PTT button to talk. Release the PTT
button to listen.
5Press H to return to the Home screen.

Advanced Features
English
41
Making a Selective Call
Procedure:
Press the preprogrammed Quick Access (One-Touch)
Selective Call button to dial the preprogrammed ID and
proceed to Step 4.
OR
Follow the procedure below.
1< or > to Call.
2Press the Menu Select button directly below Call. The
display shows the last transmitted or received ID.
3Press the Menu Select button directly below Cnts to scroll
through and select the required ID.
OR
Press the Menu Select button directly below LNum to go to
the last number dialed.
OR
U or D to the required ID.
OR
Use the keypad to enter the required ID.
4Hold the radio vertically 1 to 2 inches (2.5 to 5.0 cm) from
your mouth.
5Press and hold the PTT button to start the Selective Call.
The display shows the ID of the target radio.
6Release the PTT button to listen.
7Press H to return to the Home screen.
Using the Talkgroup Call Feature (Conventional
Operation Only)
This feature allows you to define a group of conventional
system users so that they can share the use of a conventional
channel.
Note: Encryption keys are associated to talkgroups. When
talkgroups are associated, encryption keys are
changed by changing the active talkgroup. See Secure
Operations on page 74 for more information.
Selecting a Talkgroup
Procedure:
1< or > to Tgrp.
2Press the Menu Select button directly below Tgrp. The
display shows the last talkgroup that was selected and
stored, Sel and Exit.

Advanced Features
English
42
3U or D to Preset for the preset preprogrammed talkgroup.
OR
U or D to the required talkgroup.
OR
Use the keypad to enter the number of the corresponding
talkgroup in the list.
4Press the Menu Select button directly below Sel to save the
currently selected talkgroup and return to the Home screen.
5If the encryption key associated to the new talkgroup is
erased, a momentary key fail tone sounds and the display
shows Key fail.
OR
If the encryption key that is associated to the new talkgroup
is not allowed, a momentary key fail tone sounds and the
display shows Illegal key.
6Press H or the PTT button to exit.
OR
Turn the 16-Position Select knob to exit.
Sending a Status Call
This feature allows you to send data calls to the dispatcher
about a predefined status.
Each status can have up to a 14-character name. A maximum
of eight status conditions is possible.
Note: The radio automatically exits the feature, if the feature
inactivity timer is enabled, when the radio is left idle
and the timer expires. You will hear the Menu Inactive
Exit Tone upon feature exit.
Procedure:
Press the preprogrammed Status button and proceed to
Step 3.
OR
Follow the procedure below.
1< or > to Sts.
2Press the Menu Select button directly below Sts.
3The display shows the last acknowledged status call, or the
first status in the list.
4U or D to the required status.
OR
Use the keypad to enter a number corresponding to the
location in the status list.
5Press the PTT button to send the status.

Advanced Features
English
43
6When the dispatcher acknowledges, four tones sound and
the display shows Ack received. The radio returns to
normal dispatch operation.
OR
If no acknowledgment is received, a low-pitched tone
sounds and the display shows No acknowledge.
7Press H to return to the Home screen.
No traffic is heard on trunked channels while Status Calls is
selected. If the radio detects no Status Call activity for six
seconds, an alert tone sounds until you press H or the PTT
button.
Using the Dynamic Regrouping Feature (Trunking
Only)
This feature allows the dispatcher to temporarily reassign
selected radios to a single special channel so they can
communicate with each other. This feature is typically used
during special operations and is enabled by a qualified radio
technician.
You will not notice whether your radio has this feature enabled
until a dynamic regrouping command is sent by the dispatcher.
Note: If you try to access a zone or channel that has been
reserved by the dispatcher as a dynamically regrouped
mode for other users, an invalid tone sounds.
Procedure:
1When your radio is dynamically regrouped, it automatically
switches to the dynamically regrouped channel. A “gurgle”
tone sounds and the display shows the dynamically
regrouped channel’s name.
2Press the PTT button to talk. Release PTT button to listen.
When the dispatcher cancels dynamic regrouping, the radio
automatically returns to the zone and channel that you were
using before the radio was dynamically regrouped.
Requesting a Reprogram (Trunking Only)
This feature lets you notify the dispatcher that you want a new
dynamic regrouping assignment.
Procedure:
Press the preprogrammed Reprogram Request button to send
reprogram request to the dispatcher and proceed to Step 3.
OR
Follow the procedure below.
1< or > to Rpgm.
2Press the Menu Select button directly below Rpgm to send
reprogram request to the dispatcher.

Advanced Features
English
44
3The display shows Reprgrm rqst and Please wait.
4If you hear five beeps, the dispatcher has acknowledged the
reprogram request. The display shows Ack received and
the radio returns to the Home screen.
OR
If the dispatcher does not acknowledge the reprogram
request within six seconds, a low-pitched alert tone sounds
and the display shows No acknowledge.
Try again or press H to cancel and return to the Home
screen.
Classifying Regrouped Radios
The dispatcher can classify regrouped radios into either of two
categories: Select Enabled or Select Disabled.
•Select-enabled radios are free to change to any available
channel, including the dynamic-regrouping channel, once the
user has selected the dynamic-regrouping position.
•Select-disabled radios cannot change channels while
dynamically regrouped. The dispatcher has forced the radio
to remain on the dynamic-regrouping channel.
The Scan or Private Call feature cannot be selected while your
radio is Select Disabled.
Contacts
This feature provides “address-book” capabilities on your radio.
Each entry corresponds to an alias (name) or ID (number) that
you use to initiate a call.
Contacts manages up to 2,500 contact entries, alphabetically
sorted according to entry alias. Each alias can have up to 5 IDs
of different call types associated with it.
Additionally, each entry, depending on context (conventional,
trunking, or phone), associates with one or more of the four
types of calls: Phone Call, Selective Call, Private Call, or Call
Alert.
Each entry within Contacts displays the following information:
•Call Alias (Name)
•Call ID (Number)
•Call Type (Icon)
•WACN ID (Astro 25 Trunking IDs only)
•System ID
Note: Your radio must be preprogrammed to allow you to
add, edit, or delete the contact entries.

Advanced Features
English
45
Your radio also supports a maximum of 50 call lists. Each list
can store up to 100 IDs (numbers).
Note: Your radio is preprogrammed with a number of
contacts per Call Lists. Check with your dealer or
system administrator for more information.
The radio automatically exits the feature, if the feature
inactivity timer is enabled, when the radio is left idle
and the timer expires. You will hear the Menu Inactive
Exit Tone upon feature exit.
Making a Private Call from Contacts
Note: Your radio must be preprogrammed to allow you to use
this feature.
Procedure:
Use the Options Menu.
1< or > to Cnts.
2Press the Menu Select button directly below Cnts. The
entries are alphabetically sorted.
3U or D to the required subscriber alias.
4Press the Menu Select button directly below Optn.
5U or D to Call and press the Menu Select button directly
below Sel.
6U or D to select the call type.
7Hold the radio vertically 1 to 2 inches (2.5 to 5.0 cm) from
your mouth.
8Press the PTT button to initiate the call. During the call, the
display shows the subscriber alias.
9Press and hold the PTT button to talk. The LED lights up
solid red.
OR
Release the PTT button to listen.
10 If there is no voice activity for a preprogrammed period of
time, the call ends.
OR
The call ends when it reaches the maximum ring time.
OR
Use the PTT button.
1< or > to Cnts.
2Press the Menu Select button directly below Cnts. The
entries are alphabetically sorted.
3U or D to the required subscriber alias.
4< or > to scroll through the available IDs for the selected
subscriber alias.

Advanced Features
English
46
5Hold the radio vertically 1 to 2 inches (2.5 to 5.0 cm) from
your mouth.
6Press the PTT button to initiate the call. During the call, the
display shows the subscriber alias.
7Press and hold the PTT button to talk. The LED lights up
solid red.
OR
Release the PTT button to listen. The LED lights up solid
yellow.
8If there is no voice activity for a preprogrammed period of
time, the call ends.
OR
The call ends when it reaches the maximum ring time.
Adding a New Contact Entry
Procedure:
1< or > to Cnts.
2Press the Menu Select button directly below Cnts. The
entries are alphabetically sorted.
3U or D to {New Contact} and press the Menu Select
button directly below Sel.
4U or D to Name and press the Menu Select button directly
below Edit.
5The display shows Edit name and a blinking cursor
appears.
Use the keypad to enter the name.
Press < to move one space to the left.
Press > to move one space to the right.
Press the Menu Select button directly below Del to delete
any unwanted characters.
Press * to add a space.
Press 0 to toggle between mixed case mode, uppercase
mode, and lowercase mode.
Press # to toggle between numeric and letter mode.
6Press the Menu Select button directly below Ok once you
have entered the name.
OR
Press the Menu Select button directly below Cncl to return
to the previous screen.
7U or D to {Add Number} and press the Menu Select button
directly below Sel.
8U or D to Number 1 and press the Menu Select button
directly below Edit.

Advanced Features
English
47
9The display shows Edit Number 1 and a blinking cursor
appears.
Use the keypad to enter the number.
Press < to move one space to the left.
Press > to move one space to the right.
Press the Menu Select button directly below Del to delete
any unwanted characters.
10 Press the Menu Select button directly below Ok once you
have entered the number.
OR
Press the Menu Select button directly below Cncl to return
to the previous screen.
11 U or D to Type 1 and press the Menu Select button directly
below Edit.
U or D to the required mode and press the Menu Select
button directly below Ok.
OR
Repeat Steps 8 through 10 to enter or edit the existing
system IDs.
OR
U or D to {Add Number} and press the Menu Select button
directly below Sel to add a new number. Repeat Steps 8
through 10.
12 Press the Menu Select button directly below Done once you
have finished.
13 The display shows <Entry> Stored, confirming that the
contact entry has been added.
14 The radio returns to the main Contacts screen.
Deleting a Contact Entry
Procedure:
1< or > to Cnts.
2Press the Menu Select button directly below Cnts. The
entries are alphabetically sorted.
3U or D to the entry you want to delete and press the Menu
Select button directly below Optn.
4U or D to Delete and press the Menu Select button directly
below Sel.
5The display shows Delete <Entry> confirm?.
6Select Yes to delete the entry.
The display shows <Entry> deleted and the radio returns
to the main screen for Contacts.
OR
Select No to return to the main screen for Contacts.

Advanced Features
English
48
Adding a Contact to a Call List
Procedure:
1< or > to Cnts.
2Press the Menu Select button directly below Cnts. The
entries are alphabetically sorted.
3U or D to the entry you want to add to a call list and press
the Menu Select button directly below Optn.
4U or D to Add to CallLst and press the Menu Select button
directly below Sel.
5U or D to the required Call List and press the Menu Select
button directly below Add.
OR
U or D to Cncl to return to the main display for Contacts.
6The display momentarily shows Please wait before
showing <Entry> added to Call List, confirming the
addition of the contact to the list.
7The radio returns to the main display for Contacts.
Removing a Contact from a Call List
Procedure:
1< or > to Cnts.
2Press the Menu Select button directly below Cnts. The
entries are alphabetically sorted.
3U or D to the entry you want to remove from a call list and
press the Menu Select button directly below Optn.
4U or D to Rm frm CallLst and press the Menu Select button
directly below Sel.
5The display shows Remove <Entry> frm Call List?.
6Press the Menu Select button directly below Yes to remove
the entry from the Call List.
OR
Press the Menu Select button directly below No to return to
the main display for Contacts.
7The display momentarily shows Please wait before
showing <Entry> removed from Call List, confirming the
removal of the contact from the list.
8The radio returns to the main display for Contacts.

Advanced Features
English
49
Editing a Contact in a Call List
Editing an Entry Alias
Procedure:
1< or > to Cnts.
2Press the Menu Select button directly below Cnts. The
entries are alphabetically sorted.
3U or D to the entry you want to edit and press the Menu
Select button directly below Optn.
4U or D to Edit and press the Menu Select button directly
below Sel.
5U or D to the entry alias you wish to change and press the
Menu Select button directly below Edit.
6A blinking cursor appears.
Use the keypad to edit the name.
Press < to move one space to the left.
Press > to move one space to the right.
Press the Menu Select button directly below Del to delete
any unwanted characters.
Press * to add a space.
Press 0 to toggle between mixed case mode, uppercase
mode, and lowercase mode.
Press # to toggle between numeric and letter mode.
7Press the Menu Select button directly below Ok once you
have finished. The display returns to the Edit Contact
screen.
8Press the Menu Select button directly below Done to save
your changes and return to the main screen for Contacts.
Editing as Entry ID
Procedure:
1< or > to Cnts.
2Press the Menu Select button directly below Cnts. The
entries are alphabetically sorted.
3U or D to the entry you want to edit and press the Menu
Select button directly below Optn.
4U or D to Edit and press the Menu Select button directly
below Sel.
5U or D to the entry ID you wish to change and press the
Menu Select button directly below Edit.

Advanced Features
English
50
6A blinking cursor appears.
Use the keypad to edit the name.
Press < to move one space to the left.
Press > to move one space to the right.
Press the Menu Select button directly below Del to delete
any unwanted characters.
Press * to add a space.
Press 0 to toggle between mixed case mode, uppercase
mode, and lowercase mode.
Press # to toggle between numeric and letter mode.
7Press the Menu Select button directly below Ok once you
have finished. The display returns to the Edit Contact
screen.
8Press the Menu Select button directly below Done to save
your changes and return to the main screen for Contacts.
Editing a Call Type
Procedure:
1< or > to Cnts.
2Press the Menu Select button directly below Cnts. The
entries are alphabetically sorted.
3U or D to the entry you want to edit and press the Menu
Select button directly below Optn.
4U or D to Edit and press the Menu Select button directly
below Sel.
5U or D to Type and press the Menu Select button directly
below Edit.
6U or D to choose from the list of call types given and press
the Menu Select button directly below Ok to select.
7The display returns to the Edit Contact screen.
8Press the Menu Select button directly below Done to save
your changes and return to the main screen for Contacts.
Viewing Details of a Contact
Procedure:
1< or > to Cnts.
2Press the Menu Select button directly below Cnts. The
entries are alphabetically sorted.
3U or D to the entry you want to view and press the Menu
Select button directly below Optn.
4U or D to View and press the Menu Select button directly
below Sel.
5The display shows all the numbers associated with the
entry.

Advanced Features
English
51
Scan Lists
Scan lists are created and assigned to individual channels/
groups. Your radio scans for voice activity by cycling through the
channel/group sequence specified in the scan list for the current
channel/group.
Your radio can support up to 125 different scan lists. These lists
must be preprogrammed by a qualified radio technician.
Viewing a Scan List
Procedure:
1< or > to ScnL.
2Press the Menu Select button directly below ScnL.
3U or D to view the members on the list.
4Press H to exit the current display and return to the Home
screen.
Editing the Scan List
This feature lets you change scan list members and priorities.
Note: The maximum number of members for a trunking
priority monitor scan list is 50; for a conventional scan
list, 30; and for a talkgroup scan list, 250.
Procedure:
Long press the preprogrammed Scan List Programming
button (side button) and proceed to Step 3.
OR
Move the preprogrammed Scan List Programming switch to
programming position and proceed to Step 3.
OR
Follow the procedure below.
1< or > to ScnL.
2Press the Menu Select button directly below ScnL. The
display shows the lists that can be changed.
3U or D to the entry you want to edit.

Advanced Features
English
52
4Press the Menu Select button directly below Sel to add and/
or change the priority of the currently displayed channel in
the scan list.
OR
Press the Menu Select button directly below Del to delete
the currently displayed channel from the scan list.
OR
Press the Menu Select button directly below Rcl to view the
next member of the scan list.
5U or D to select more channels to be added or deleted.
OR
Use the keypad to go directly to additional channels to be
added or deleted.
OR
Use the 16-Position Select knob to select additional
channels to be added or deleted.
6Move the Scan List Programming switch out of
programming position.
OR
Press H to exit scan list programming and return to the
Home screen.
See Viewing and Changing the Priority Status on page 53 for
more information on how to add and/or change the priority of
the currently displayed channel in the scan list.
Changing the Scan List Status
Procedure:
1Long press the preprogrammed Scan List Programming
button (side button).
OR
Move the preprogrammed Scan List Programming switch
to programming position.
2The display shows the programming mode icon and the first
list member.
3U or D to the number you want to edit.
4Press the Select button once to add the currently displayed
channel to the scan list.
OR
Press the Select button one or more times to change the
scan list status icon of the currently displayed channel.
5U or D to select more list members whose scan status you
want to change.
OR
Use the keypad to go directly to that scan list member.
OR
Use the 16-Position Select knob to select another scan list
member.
6Move the Scan List Programming switch out of
programming position.

Advanced Features
English
53
Viewing and Changing the Priority Status
Procedure:
1Below the Sel, Del, and Rcl screen, press the Menu Select
button directly below Sel to view and/or change the priority
status of the currently displayed channel.
OR
Below the Sel, Del, and Rcl screen, press the Select button
one or more times to view and/or change the scan list status
icon of the currently displayed channel.
2A Scan icon indicates that the current channel is in the scan
list as a non-priority channel. The LED lights up solid green.
OR
A Priority-Two Channel Scan icon indicates that the current
channel is in the scan list as the Priority-Two channel. The
LED blinks green.
OR
A Priority-One Channel Scan icon indicates that the current
channel is in the scan list as the Priority-One channel. The
LED rapidly blinks green. You hear all traffic on the Priority-
One channel, regardless of traffic on non-priority channels.
OR
No icon indicates that the current channel is deleted from
the scan list.
Scan
This feature allows you to monitor traffic on different channels
by scanning a preprogrammed list of channels.
Turning Scan On or Off
Procedure:
Press the preprogrammed Scan button, or turn the
preprogrammed Scan switch to the Scan on or Scan off
position, to start or stop scan.
OR
Follow the procedure below.
1< or > to Scan.
2Press the Menu Select button directly below Scan.
3The display shows Scan off if scan is disabled. Press the
Menu Select button directly below Scan to enable scan.
OR
The display shows Scan on and the scan status icon if scan
is enabled. Press the Menu Select button directly below
Scan to disable scan.
4The radio returns to the Home screen.

Advanced Features
English
54
Making a Dynamic Priority Change (Conventional
Scan Only)
While the radio is scanning, the dynamic priority change feature
allows you to temporarily change any channel in a scan list
(except for the Priority-One channel) to the Priority-Two
channel.
This change remains in effect until scan is turned off. Scan then
reverts to the preprogrammed (original) setting.
Procedure:
1When the radio locks onto the channel designated as the
new Priority-Two channel, press the preprogrammed
Dynamic Priority button.
2The radio continues scanning the remaining channels in the
list.
Deleting a Nuisance Channel
If a channel continually generates unwanted calls or noise
(termed a “nuisance” channel), you can temporarily remove the
unwanted channel from the scan list.
This capability does not apply to priority channels or the
designated transmit channel.
Note: Deleting a “nuisance” channel is only possible through
the preprogrammed Nuisance Channel Delete
button. This feature is not accessible through the
menu.
Procedure:
1When the radio is locked onto the channel to be deleted,
press the preprogrammed Nuisance Delete button.
2The radio continues scanning the remaining channels in the
list.
Restoring a Nuisance Channel
Procedure:
To restore the deleted nuisance channel, do one of the
following:
•Turn the radio off and then turning it on again.
OR
•Stop and restart a scan via the preprogrammed Scan button
or menu.
OR
•Change the channel via the 16-Position Select knob.

Advanced Features
English
55
Call Alert Paging
This feature allows your radio to work like a pager.
Even if other users are away from their radios, or if they are
unable to hear their radios, you can send them an individual
Call Alert page. You can also verify if a radio is active on the
system.
Depending on how your radio is programmed, when you make
an Enhanced Private Call, the radio either automatically sends
a call alert page if there is no answer after the maximum ring
time, OR when you press the PTT button.
Note: This feature must be preprogrammed by a qualified
radio technician.
Receiving a Call Alert Page
Procedure:
1When you receive a Call Alert page, you hear four repeating
alert tones and the LED blinks green.
2The call received icons blinks and the display shows Page
received.
Press any button to clear the Call Alert page. See Making a
Talkgroup Call on page 35 or Making a Private Call
(Trunking Only) on page 35 for more information on returning
the call.
Sending a Call Alert Page
Note: The radio automatically exits the feature, if the feature
inactivity timer is enabled, when the radio is left idle
and the timer expires. You will hear the Menu Inactive
Exit Tone upon feature exit.
Procedure:
Press the preprogrammed Quick Access (One-Touch) Call
Alert Paging button to send a page to the preprogrammed ID
and proceed to Step 5.
OR
Follow the procedure below.
1< or > to Page.
2Press the Menu Select button directly below Page.
3Press Cnts to scroll through and select the required ID.
OR
U or D to the required ID.
OR
Use the keypad to enter the required ID.
4Press the PTT button to send the page.
5The display shows Paging... <Number>.

Advanced Features
English
56
6If the call alert page is sent successfully, a tone sounds and
the display shows Ack received.
OR
If the call alert page is not acknowledged, a low tone sounds
and the display shows No acknowledge.
7The radio returns to the Home screen.
OR
Press the Menu Select button directly below Ok to return to
the main screen for Contacts.
OR
Follow the procedure below.
1< or > to Call.
2Press the Menu Select button directly below Call.
3U or D to select the alias or ID, and press the PTT button to
initiate the call.
4If the target radio does not respond after a preprogrammed
period of time, the display shows Send page?.
5Press the Menu Select button directly below Yes to send
the call alert page.
OR
Press the Menu Select button directly below No to exit the
screen without sending the call alert page.
6The display shows Paging... <Alias>.
7If the call alert page is sent successfully, a tone sounds and
the display shows Ack received.
OR
If the call alert page is not acknowledged, a low tone sounds
and the display shows No acknowledge.
8The radio returns to the Home screen.
OR
Press the Menu Select button directly below Ok to return to
the main screen for Contacts.

Advanced Features
English
57
Emergency Operation
The Emergency feature is used to indicate a critical situation.
If the Top (Orange) button is preprogrammed to send an
emergency signal, this signal overrides any other
communication over the selected channel.
Your radio supports the following Emergency modes:
•Emergency Alarm
•Emergency Call (Trunking Only)
•Emergency Alarm with Emergency Call
•Silent Emergency Alarm
Check with your dealer or system administrator for more
information on the programming of this feature.
Only one of the Emergency modes above can be assigned to
the preprogrammed Emergency button.
Note: To exit emergency at any time, press and hold the
preprogrammed Emergency button for about a
second.
Sending an Emergency Alarm
This feature allows you to send a data transmission, which
identifies the radio sending the emergency, to the dispatcher.
Procedure:
1Press the preprogrammed Emergency button.
2The display shows Emergency and the current zone or
channel. A short, medium-pitched tone sounds and the
LED rapidly blinks red.
OR
The display shows No emergency, if the selected channel
does not support emergency.
3When you receive the dispatcher’s acknowledgment, the
display shows Ack received. Four tones sound, the alarm
ends, and the radio exits the Emergency Alarm mode.
OR
If no acknowledgement is received, the display shows
No acknowledge. The alarm ends and the radio exits the
Emergency Alarm mode.

Advanced Features
English
58
Sending an Emergency Call (Trunking Only)
This feature gives your radio priority access on a channel.
Note: The radio operates in the normal dispatch manner
while in Emergency Call, except, if enabled, it returns
to one of the following:
•Tactical/Non-Revert – You talk on the channel you
selected before you entered the emergency state.
•Non-Tactical/Revert – You talk on a preprogrammed
emergency channel. The emergency alarm is sent
on this same channel.
Procedure:
1Press the preprogrammed Emergency button.
2The display shows Emergency and the current zone or
channel. A short, medium-pitched tone sounds and the
LED rapidly blinks red.
OR
The display shows No emergency, if the selected channel
does not support emergency.
3Hold the radio vertically 1 to 2 inches (2.5 to 5.0 cm) from
your mouth.
4Press and hold the PTT button. Speak clearly into the
microphone.
5Release the PTT button to end the transmission and wait for
a response from the dispatcher.
6Press and hold the preprogrammed Emergency button for
about a second to exit the Emergency Call mode.
Sending an Emergency Alarm with Emergency
Call
Procedure:
1Press the preprogrammed Emergency button.
2The display shows Emergency and the current zone or
channel. A short, medium-pitched tone sounds and the
LED rapidly blinks red.
OR
The display shows No emergency, if the selected channel
does not support emergency.
3The radio enters the Emergency Call state when:
You receive the dispatcher’s acknowledgment. The display
shows Ack received.
OR
You press the PTT button while in the Emergency Alarm
mode.
4Hold the radio vertically 1 to 2 inches (2.5 to 5.0 cm) from
your mouth.
5Press and hold the PTT button. Speak clearly into the
microphone.
6Release the PTT button to end the transmission and wait for
a response from the dispatcher.

Advanced Features
English
59
7Press and hold the preprogrammed Emergency button for
about a second to exit the Emergency Call mode.
Sending a Silent Emergency Alarm
This feature allows you to send an Emergency Alarm to another
radio without any audio or visual indicators.
Procedure:
1Press the preprogrammed Emergency button.
2The display shows no changes, the LED does not light up,
and you hear no tones.
3The silent emergency state continues until you:
Press and hold the preprogrammed Emergency button for
about a second to exit the Silent Emergency Alarm mode.
OR
Press and release the PTT button to exit the Silent
Emergency Alarm mode and enter regular dispatch or
Emergency Call mode.
Note: For ALL Emergency signals, when changing channels:
•If the new channel is also preprogrammed for
Emergency, you can change channels while in
Emergency operation. The emergency alarm or call
continues on the new channel.
•If the new channel is NOT preprogrammed for
Emergency, the display shows No emergency, and
you hear an invalid tone until you exit the Emergency
state or change to a channel preprogrammed for
Emergency.
Using the Emergency Keep-Alive Feature
This feature, when enabled, prevents the radio from being
turned off via the On/Off Control knob when the radio is in the
Emergency state.
Note: The radio only exits the Emergency state using one of
the ways mentioned in the previous sections.
See Sending an Emergency Alarm on page 57,
Sending an Emergency Call (Trunking Only) on
page 58, Sending an Emergency Alarm with
Emergency Call on page 58, or Sending a Silent
Emergency Alarm on page 59.

Advanced Features
English
60
Automatic Registration Service (ARS)
This feature provides an automated data application registration
for the radio. When you turn on the radio, the device
automatically registers with the server.
Data applications within the fixed network can determine the
presence of a device on the system and send data to the
device. For example: Text Messaging Service (TMS).
The Automatic Registration Service for the radio consists of
two (2) modes:
•ARS Server Mode (default mode)
•ARS Non-Server Mode
Note: The default ARS mode can be changed by a qualified
radio technician using the radio’s programming
software.
Selecting or Changing the ARS Mode
Procedure:
Turn the preprogrammed 16-Position Select knob, once the
zone you want is displayed, to the desired mode.
OR
Follow the procedure below.
1< or > to Chan.
2Press the Menu Select button directly below Chan. The
display shows the User Login Indicator icon, the zone, and a
blinking current channel name.
3U or D to the required channel or mode.
4In ARS Server Mode, the display shows the User Login
Indicator icon, the zone, and ARSsvr.
OR
In ARS Non-Server Mode, the display shows the User Login
Indicator icon, the zone, and Nonsvr.
OR
If the channel or mode selected is unprogrammed, the
display shows Unprogrammed. Repeat Step 3.
5Press H to confirm the displayed zone and channel.
Advanced

Advanced Features
English
61
Accessing the User Login Feature
This feature allows you as the user to be associated with the
radio. With this association, every data application (Example:
Text Messaging Service) takes on a friendly username.
You can still send text messages without logging in as a user.
The user login feature only enables the recipient of your
message to identify you as the sender by assigning a username
to your message.
Note: Valid characters for a username entry are capital
letters (A – Z), small letters (a – z), numbers (0 – 9),
symbols (*, -, #, /), and the space character.
The maximum length for a username is eight (8)
characters. Usernames are not case sensitive in server
mode but are case sensitive in non-server mode.
A predefined username may sometimes be invalid
because the programming software that is used to set
predefined usernames allows you to set usernames
comprising of eight (8) characters or more.
Logging In as a User
Procedure:
Press the preprogrammed User Login button and proceed to
Step 3.
OR
Follow the procedure below.
1< or > to User.
2Press the Menu Select button directly below User.
3The display shows the User Login screen.
4U or D to {ID Entry} and press the Menu Select button
directly below Edit.
A blinking cursor appears beside Id:. Use the keypad to
enter a username.
OR
U or D to scroll through the list of predefined usernames.
Press the Menu Select button directly below Logn to select
the predefined username.
OR
Press and hold U or D to scroll through the list of predefined
usernames at a fast scroll rate.
Press the Menu Select button directly below Logn to select
the predefined username.

Advanced Features
English
62
5If the selected predefined username has more than eight (8)
characters, or an invalid character in it, the display
momentary shows Invalid ID. Repeat Step 4.
OR
A blinking cursor appears beside PIN:.
Use the keypad to enter your Personal Identification
Number (PIN) number. The maximum PIN length is 4 digits.
The PIN number appears as asterisks.
6Press the Menu Select button directly below Logn.
7In ARS Server Mode, the display shows the User Login
Indicator icon, the ID, and In progress, with Cncl.
OR
In ARS Non-Server Mode, the display shows the User Login
Indicator icon, the ID, and Logged in, with Logt and Exit.
OR
In non-ARS enabled mode, the display shows Offline, with
Logt and Exit.
8If the username is invalid, login fails and the user login
failure indicator (IP indicator) icon blinks. The display also
momentary shows Login failed. Repeat Step 4.
OR
If the PIN is invalid, login fails and the user login failure
indicator (IP indicator) icon blinks. The display also
momentary shows Login failed. Repeat Step 6.
OR
Press the Menu Select button directly below Cncl to cancel
the login in progress screen and return to the initial user
login screen.
OR
Wait for the logged in confirmation screen. If the login
process is successful, the display shows the successful user
login indicator (IP indicator) icon and Logged in, with Logt
and Exit.
Logging Out
Once the data application registration is completed, you can log
out.
Procedure:
1Press the Menu Select button directly below Logt.
2The display shows the User Login Indicator icon and Clear
private data?.
3Select Yes to clear all your private data. The display
momentary shows Private data cleared.
OR
Select No to keep your private data.
Note: Private data refers to all messages in the text
messaging inbox, Draft, and Sent folder. The next user
is able to access the Inbox, Draft and Sent messages if
private data is not deleted.

Advanced Features
English
63
Text Messaging Service (TMS)
This feature allows you to send and receive text messages. The
maximum length of characters for a text message is 200.
There are three (3) types of text messages:
•A new text message (free form message).
•A predefined message (quick text message).
•An edited quick text message.
The main menu consists of the following options:
•Inbox
•Compose
•Drafts
•Sent
Note: See Status Icons on page 18 for more information on
the TMS icons and TMS Menu Options on page 22 for
more information on each menu option.
Accessing the TMS Features
Note: The radio automatically exits the feature, if the feature
inactivity timer is enabled, when the radio is left idle
and the timer expires. You will hear the Menu Inactive
Exit Tone upon feature exit.
Press the Menu Select button directly below Back at
any time to return to the previous screen.
Procedure:
Press the preprogrammed Data Feature button or the TMS
Feature button to access the TMS feature screen.
OR
Press and hold the preprogrammed Data Feature button or the
TMS Feature button to access the Inbox.
OR
Follow the procedure below.
1< or > to TMS.
2Press the Menu Select button directly below TMS to access
the TMS feature screen.
3U or D to scroll through the main menu options.

Advanced Features
English
64
Composing and Sending a New Text Message
Note: During the uppercase and lowercase mode, multi-
tapping the keys only scrolls through the letters. For
example, A->B->C, a->b->c.
During the numeric mode, except for 1, pressing the
keypad only enters the numeric digits. Subsequent
presses of the same key inserts the same digit to the
text message (no multi-tap).
Procedure:
1< or > to TMS.
2Press the Menu Select button directly below TMS to access
the TMS feature screen.
3U or D to Compose and press the Menu Select button
directly below Sel.
OR
Press the Menu Select button directly below Exit to return to
the Home screen.
4U or D to Text Message and press the Menu Select
button directly below Sel to compose a new message.
5A blinking cursor appears on the Compose screen.
Use the keypad to type or edit your message.
Press < to move one space to the left.
Press > to move one space to the right.
Press the Menu Select button directly below Del to delete
any unwanted characters.
Press * to add a space.
Press 0 to toggle between mixed case mode, uppercase
mode, and lowercase mode.
Press # to toggle between numeric and letter mode.
6Press the Menu Select button directly below Optn once the
message is composed.
7U or D to Send Message and press the Menu Select
button directly below Sel.
8U or D to scroll through the address list and highlight the
required address.
OR
U or D to {Other Recpnt} and press the Menu Select
button below Edit.
A blinking cursor appears on the Enter Address screen.
Use the keypad to type the address entry.
Press < to move one space to the left.
Press > to move one space to the right.
Press the Menu Select button directly below Del to delete
any unwanted characters.

Advanced Features
English
65
Press * to add a space.
Press 0 to toggle between mixed case mode, uppercase
mode, and lowercase mode.
Press # to toggle between numeric and letter mode.
9Press the Menu Select button below Send or the PTT
button to send the message.
10 The display shows the Send Message screen and
Sending msg.
11 If the message is sent, a tone sounds and the display shows
Msg sent.
OR
If the message is not sent, a low tone sounds and the
display shows Send failed.
If the message fails to send, the radio returns you to the main
TMS screen.
Note: You can append a priority status and/or a request reply
to your message. See Using the Priority Status and
Request Reply Features on page 67 for more
information.
You can also select the Save to Drafts option to save
your message in the Drafts folder to send it at a later
time. See Accessing the Drafts Folder on page 71 for
more information.
Sending a Quick Text Message
Quick Text messages are messages that are predefined and
usually consist of messages that are used most frequently.
Each Quick Text message has a maximum length of 50
characters.
Procedure:
Press the preprogrammed Quick Text button and proceed to
Step 4.
OR
Follow the procedure below.
1< or > to TMS.
2Press the Menu Select button directly below TMS to access
the TMS feature screen.
3U or D to Compose and press the Menu Select button
directly below Sel.
OR
Press the Menu Select button directly below Exit to return to
the Home screen.
4U or D to Quick Text and press the Menu Select button
directly below Sel for a predefined message.
5U or D to scroll through the list of messages and press the
Menu Select button directly below Sel to select the required
message.

Advanced Features
English
66
6The message appears on the Compose screen, with a
blinking cursor at the end of it.
Use the keypad to edit the message, if required.
Press < to move one space to the left.
Press > to move one space to the right.
Press the Menu Select button directly below Del to delete
any unwanted characters.
Press * to add a space.
Press 0 to toggle between mixed case mode, uppercase
mode, and lowercase mode.
Press # to toggle between numeric and letter mode.
7Press the Menu Select button directly below Optn.
8U or D to Send Message and press the Menu Select
button directly below Sel.
9U or D to scroll through the address list and highlight the
required address.
OR
U or D to {Other Recpnt} and press the Menu Select
button below Edit.
A blinking cursor appears on the Enter Address screen.
Use the keypad to type the address entry.
Press < to move one space to the left.
Press > to move one space to the right.
Press the Menu Select button directly below Del to delete
any unwanted characters.
Press * to add a space.
Press 0 to toggle between mixed case mode, uppercase
mode, and lowercase mode.
Press # to toggle between numeric and letter mode.
10 Press the Menu Select button below Send or the PTT
button to send the message.
11 The display shows the Send Message screen and
Sending msg.
12 If the message is sent, a tone sounds and the display shows
Msg sent.
OR
If the message is not sent, a low tone sounds and the
display shows Send failed.
If the message fails to send, the radio returns you to the main
TMS screen.
Note: You can append a priority status and/or a request reply
to your message. See Using the Priority Status and
Request Reply Features on page 67 for more
information.

Advanced Features
English
67
Using the Priority Status and Request Reply
Features
Before sending your message, you can append a priority status
and/or a request reply to your message.
Appending a Priority Status to a Text Message
Note: The Priority Status icon on a message does not imply
that the message gets higher priority over the other
messages when it is being transmitted. It is just an
indication that can be embedded into a message to let
the receiver know that the message is important.
Procedure:
After the outgoing message is composed (see Composing and
Sending a New Text Message on page 64 for more
information):
1Press the Menu Select button directly below Optn.
2U or D to Mark Important and press the Menu Select
button directly below Sel to indicate the message as
important.
3The priority status icon appears beside the normal message
icon on the label bar.
Removing a Priority Status from a Text Message
Procedure:
After the outgoing message is composed (see Composing and
Sending a New Text Message on page 64 for more
information):
1Press the Menu Select button directly below Optn.
2U or D to Mark as Normal and press the Menu Select
button directly below Sel to remove the priority status from
the message.
3The display shows the normal message icon on the label
bar.
Appending a Request Reply to a Text Message
Procedure:
After the outgoing message is composed (see Composing and
Sending a New Text Message on page 64 for more
information):
1Press the Menu Select button directly below Optn.
2U or D to Req Reply and press the Menu Select button
directly below Sel to request for a reply.
3The request reply icon appears beside the normal message
icon on the label bar.

Advanced Features
English
68
Removing a Request Reply from a Text Message
Procedure:
After the outgoing message is composed (see Composing and
Sending a New Text Message on page 64 for more
information):
1Press the Menu Select button directly below Optn.
2U or D to No Req Reply and press the Menu Select button
directly below Sel to remove the priority status from the
message.
3The display shows the normal message icon on the label
bar.
Appending a Priority Status and a Reply Request to a
Text Message
Procedure:
After the outgoing message is composed (see Composing and
Sending a New Text Message on page 64 for more
information):
1Press the Menu Select button directly below Optn.
2U or D to Mark Important and press the Menu Select
button directly below Sel to indicate the message as
important.
AND
U or D to Req Reply and press the Menu Select button
directly below Sel to request for a reply.
3The priority status and request reply icons appear beside
the normal message icon on the label bar.
Removing a Priority Status and a Reply Request from
a Text Message
Procedure:
After the outgoing message is composed (see Composing and
Sending a New Text Message on page 64 for more
information):
1Press the Menu Select button directly below Optn.
2U or D to Mark as Normal and press the Menu Select
button directly below Sel to indicate the message as
important.
AND
U or D to No Req Reply and press the Menu Select button
directly below Sel to request for a reply.
3The display shows the normal message icon on the label
bar.

Advanced Features
English
69
Managing Text Messages
Receiving a Text Message
Note: When you receive a message that is flagged with the
“Request Reply” icon, you must manually respond to
the sender that you have received the message. The
system will not automatically send back a notification
that the radio has received such message.
Procedure:
When you receive a message, press and hold the
preprogrammed Data Feature button or the TMS Feature
button to access the Inbox and go to Step 3.
OR
Follow the procedure below.
1The new message icon appears and the display
momentarily shows New msg.
2Press the Menu Select button directly below TMS to access
the Inbox.
3The display shows a list of aliases or IDs, with the sender of
the latest received message on top.
Viewing a Text Message from the Inbox
The Inbox can hold up to thirty (30) messages.
Note: U or D to read the message if fills more than one
screen.
Procedure:
Press the preprogrammed Data Feature button or the TMS
Feature button to access the TMS feature screen, and proceed
to Step 3.
OR
Press and hold the preprogrammed Data Feature button or the
TMS Feature button to access the Inbox and proceed to Step 4.
OR
Follow the procedure below.
1< or > to TMS.
2Press the Menu Select button directly below TMS to access
the TMS feature screen.
3U or D to Inbox and press the Menu Select button below
Sel.

Advanced Features
English
70
4The display shows a list of aliases or IDs, with the sender of
the latest received message on top.
5U or D to the required aliases or ID and press the Menu
Select button below Sel to view the message.
While on the view message screen, press the Menu Select
button directly below
Optn
,
Del
, or
Back
to access the option.
•Select
Optn
to configure the message settings.
•Select
Del
to delete the message.
•Select
Back
to return to the previous screen.
Note: The icon at the top right corner of the screen indicates
the status of the message. See Text Messaging
Service (TMS) Icons on page 21 for more information.
Replying to a Received Text Message
Note: The original date and time stamp, address and
message content is automatically appended to the
reply message.
Procedure:
1U or D to the required aliases or ID and press the Menu
Select button below Sel to view the message.
2Press the Menu Select button directly below Rply to reply to
a message.
3U or D to Text Message and press the Menu Select
button directly below Sel.
OR
U or D to Quick Text and press the Menu Select button
directly below Sel for a predefined message.
OR
U or D to scroll through the list of messages and press the
Menu Select button directly below Sel to select the required
message.
4A blinking cursor appears on the Compose screen.
OR
The predefined message appears on the Compose screen,
with a blinking cursor at the end of it.
5Use the keypad to type or edit your message.
Press < to move one space to the left.
Press > to move one space to the right.
Press the Menu Select button directly below Del to delete
any unwanted characters.
Press * to add a space.
Press 0 to toggle between mixed case mode, uppercase
mode, and lowercase mode.
Press # to toggle between numeric and letter mode.
6Press the Menu Select button directly below Optn once you
have finished writing the message.
7U or D to Send Message and press the Menu Select
button directly below Sel to send the message.

Advanced Features
English
71
8The display shows the Send Message screen and
Sending msg.
Press the Menu Select button directly below
Back
at any time to
return to the previous screen.
Note: You can append a priority status and/or a request reply
to your message. See Using the Priority Status and
Request Reply Features on page 67 for more
information.
Accessing the Drafts Folder
This folder stores the messages that were saved previously.
The Drafts folder can hold up to 10 messages. The oldest draft
in the folder is deleted when the 11th message comes in.
Procedure:
1< or > to TMS.
2Press the Menu Select button directly below TMS to access
the TMS feature screen.
3U or D to Drafts and press the Menu Select button below
Sel.
4The display shows a list of drafts, with the latest text
message drafted on top.
5U or D to the required text message press the Menu Select
button below Sel to view the message.
Press the Menu Select button directly below
Edit
,
Del.
, or
Back
to access the option.
•Select
Edit
to edit the message before sending it.
•Select
Del
to delete the message.
•Select
Back
to return to the previous screen.
Managing Sent Text Messages
Once a message is sent to another radio, it is saved in the Sent
folder. The most recent sent text message is always added to
the top of the Sent list.
The Sent folder is capable of storing a maximum of ten (10) last
sent messages. When the folder is full, the oldest message in
the folder is deleted when the 11th message comes in.
Viewing a Sent Text Message
Procedure:
Press the preprogrammed Data Feature button or the TMS
Feature button to access the TMS feature screen, and proceed
to
Step 3.
OR
Follow the procedure below.
1< or > to TMS.

Advanced Features
English
72
2Press the Menu Select button directly below TMS to access
the TMS feature screen.
3U or D to Sent and press the Menu Select button below
Sel.
4The display shows a list of aliases or IDs, with the recipient
of latest sent message on top.
5U or D to the required aliases or ID and press the Menu
Select button below Sel to view the message.
While on the view message screen, press the Menu Select
button directly below
Optn
,
Del
, or
Back
to access the option.
•Select
Optn
to configure the message settings.
•Select
Del
to delete the message.
•Select
Back
to return to the previous screen.
Note: The icon at the top right corner of the screen indicates
the status of the message. See Text Messaging
Service (TMS) Icons on page 21 for more information.
Sending a Sent Text Message
Procedure:
1Press the Menu Select button directly below Optn while
viewing the message.
2U or D to Send Message and press the Menu Select
button directly below Sel.
3U or D to scroll through the address list and highlight the
required address.
OR
U or D to {Other Recpnt} and press the Menu Select
button below Edit.
A blinking cursor appears on the Enter Address screen.
Use the keypad to type the address entry.
Press < to move one space to the left.
Press > to move one space to the right.
Press the Menu Select button directly below Del to delete
any unwanted characters.
Press * to add a space.
Press 0 to toggle between mixed case mode, uppercase
mode, and lowercase mode.
Press # to toggle between numeric and letter mode.

Advanced Features
English
73
4Press the Menu Select button below Send or the PTT
button to send the message.
5The display shows the Send Message screen and
Sending msg.
Press the Menu Select button directly below
Back
at any time to
return to the previous screen.
Note: You can append a priority status and/or a request reply
to your message. See Using the Priority Status and
Request Reply Features on page 67 for more
information.
Deleting a Text Message
Procedure:
From the Inbox, Draft, or Sent screen:
1U or D to scroll through the messages.
2Press the Menu Select button directly below Del to delete
the current message.
3The display shows Delete Message Confirm?.
4Press the Menu Select button directly below Yes to delete
the message.
OR
Press the Menu Select button directly below No to return to
the main TMS screen.
Deleting All Text Messages
Procedure:
Press the preprogrammed Data Feature button or the TMS
Feature button to access the TMS feature screen, and proceed
to
Step 3.
OR
Follow the procedure below.
1< or > to TMS.
2Press the Menu Select button directly below TMS to access
the TMS feature screen.

Advanced Features
English
74
3U or D to Inbox and press the Menu Select button below
Sel to select all messages in the folder.
OR
U or D to Drafts and press the Menu Select button below
Sel to select all messages in the folder.
OR
U or D to Sent and press the Menu Select button below
Sel to select all messages in the folder.
4Press the Menu Select button directly below Clr.
5The display shows Delete All Messages Confirm?.
6Press the Menu Select button directly below Yes to delete
all the messages in the selected folder.
OR
Press the Menu Select button directly below No to return to
the main TMS screen.
Secure Operations
Secure radio operation provides the highest commercially
available level of voice security on both trunked and
conventional channels.
Unlike other forms of security, Motorola digital encryption
provides signaling that makes it virtually impossible for others to
decode any part of an encrypted message.
Selecting Secure Transmissions
Procedure:
Turn the preprogrammed Secure/Clear switch to the secure
position.
Note: If the selected channel is preprogrammed for clear-only
operation – when you press the PTT button, an invalid
mode tone sounds and the display shows Clear TX
only.
The radio will not transmit until you set the Secure/
Clear switch to the clear position.

Advanced Features
English
75
Selecting Clear Transmissions
Procedure:
Turn the preprogrammed Secure/Clear switch to the clear
position.
Note: If the selected channel is preprogrammed for secure-
only operation – when you press the PTT button, an
invalid mode tone sounds and the display shows
Secure TX only.
The radio will not transmit until you set the Secure/
Clear switch to the secure position.
Managing Encryption
Loading an Encryption Key
Note: Refer to the key-variable loader (KVL) manual for
equipment connections and setup.
Procedure:
1Attach the KVL to your radio.
2The display shows Keyloading, and all other radio
functions, except for power down, backlight, and volume,
are locked out.
3Select the required keys and press the Menu Select button
directly below LOAD on the KVL. This loads the encryption
keys into your radio.
4When the key has been loaded successfully, the radio
sounds a short tone for single-key radios.
OR
When the key has been loaded successfully, the radio
sounds an alternating tone for multikey radios.
Using the Multikey Feature
This feature allows the radio to be equipped with as many as 48
different encryption keys and supports the DES-OFB algorithm.
There are two types:
•Conventional Multikey – The encryption keys can be tied
(strapped), on a one-per-channel basis, through Customer
Programming Software. In addition, you can have operator-
selectable keys, operator-selectable keysets, and operator-
selectable key erasure. If talkgroups are enabled in
conventional, then the encryption keys are strapped to the
talkgroups.
•Trunked Multikey – If you use your radio for both
conventional and trunked applications, you have to strap your
encryption keys for trunking on a per-talkgroup or
announcement-group basis. In addition, you may strap a
different key to other features, such as dynamic regrouping,
failsoft, or emergency talkgroup. You can have operator-
selectable key erasure.

Advanced Features
English
76
Selecting an Encryption Key
Procedure:
1< or > to Key.
2Press the Menu Select button directly below Key. The
display shows the last user-selected and stored encryption
key, and the available menu selections.
3U or D to scroll through the encryption keys.
OR
Use the keypad to enter the number of the desired key.
4Press the Menu Select button directly below Sel to save the
newly selected key and return to the Home screen.
OR
Press H, the PTT button, or the Menu Select button directly
below Exit to exit.
OR
Turn the 16-Position Select knob to exit.
Note: If the selected key is erased, a momentary keyfail tone
sounds and the display shows Key fail.
OR
If the selected key is not allowed, a momentary illegal
key tone sounds and the display shows Illegal key.
Selecting a Keyset
This feature allows you to select one or more groups of several
encryption keys from among the available keys stored in the
radio.
For example, you could have a group of three keys structured to
one keyset, and another group of three different keys structured
to another keyset; by changing keysets, you would
automatically switch from one set of keys to the other.
Every channel to which one of the original keys was tied now
has the equivalent new key instead.
Note: Press H, the PTT button, or the Exit menu selection,
or turn the 16-Position Select knob to exit this menu at
any time without changing the keyset selection.
Procedure:
1< or > to KSet.
2Press the Menu Select button directly below KSet. The
display shows the last user-selected and stored keyset, and
the available keyset menu selections.
3U or D to scroll through the keysets.
OR
Use the keypad to enter the number of the desired keyset.

Advanced Features
English
77
4Press the Menu Select button directly below Sel to save the
newly selected keyset.
5The radio exits keyset selection and returns to the Home
screen.
Erasing the Selected Encryption Keys
This feature allows you to erase all or selected encryption keys.
Procedure:
1< or > to Eras.
2Press the Menu Select button directly below Eras. The
display shows the last user-selected and stored encryption
key, and the available menu selections.
3U or D to the desired encryption key.
OR
Use the keypad to enter the number of the desired key.
4Press the Menu Select button directly below Optn. The
display shows the available key erase options.
5U or D to the required option and press the Menu Select
button directly below Sel.
6At Erase all keys?, press the Menu Select button directly
below Yes to erase all the encryption keys in the radio OR
No to return to the previous screen.
OR
At Erase single key?, press the Menu Select button
directly below Yes to erase the displayed encryption key
OR No to return to the previous screen.
7Press H, the PTT button, or the Menu Select button directly
below Exit to exit.
OR
Turn the 16-Position Select knob to exit.
OR
Use the preprogrammed Top Side (Select) button and Top
(Orange) button to erase the single key in radios with the
single-key option, and to erase all keys in radios with the
multikey option.
1Press and hold the Top Side (Select) button.
2While holding Top Side (Select) button down, press the Top
(Orange) button.
3The display shows Please wait.
4When all the encryption keys have been erased, the display
shows All keys erased.
Note: DO NOT press the Top (Orange) button before
pressing the Top Side (Select) button, unless you are
in an emergency situation as this sends an emergency
alarm.

Advanced Features
English
78
Requesting an Over-the-Air Rekey (ASTRO
Conventional Only)
This feature, also known as OTAR, allows the dispatcher to
reprogram the encryption keys in the radio remotely. The
dispatcher performs the rekey operation upon receiving a rekey
request from the user.
Procedure:
1< or > to Reky.
2Press the Menu Select button directly below Reky.
3Press the PTT button to send the rekey request.
OR
Press the PTT button again, or the Home or Emergency
button, to exit the feature and transmit in normal mode.
4If the rekey operation fails, a bad-key tone sounds and the
display shows Rekey fail.
Note: The rekey operation failure indicates that your radio
does not contain the Unique Shadow Key (USK). This
key must be loaded into the radio with the key-variable
loader (KVL) before the rekey request can be sent.
Refer to your local key management supervisor for
more information.
Security
Radio Lock
This feature changes your radio to a more robust security
system that protects the use of the secure encryption keys.
If this feature is enabled in your radio by a qualified radio
technician, when you turn the radio on, the display shows Radio
locked.
Unlocking Your Radio
Procedure:
1Enter your numeric password.
Secure-equipped radios – 6 to 8 characters.
Clear radios – 0 to 8 characters.
2Press the Menu Select button directly below Sel to enter the
code.
OR
Press the Menu Select button directly below Del to delete
any unwanted characters.
OR
Press the Menu Select button directly below Cncl to exit the
feature.

Advanced Features
English
79
3If the password is correct, the radio unlocks.
OR
If the password is incorrect, the display show Incorrect
password and the radio remains locked.
If you enter three incorrect passwords in a row, the display
shows
Deadlock
. Turn the radio off and then on, and begin
again at Step 1.
IMPORTANT:
For Secure Radios Only – After a total of 17 consecutive
incorrect passwords (turning the radio off and on does not reset
this number), the radio erases all of its encryption keys and
shows Deadlock. See a qualified radio technician.
If you forget the password, enter ******** to erase all keys
and revert the password in the radio back to the default
password of 01234567.
Changing Your Password
Procedure:
1< or > to Pswd.
2Press the Menu Select button directly below Pswd.
3Enter the old password.
4Press the Menu Select button directly below Ok.
5Enter the new password.
6Press the Menu Select button directly below Sel.
7Re-enter the new password.
8Press the Menu Select button directly below Sel. The
password is updated.
OR
If the two passwords do not match, repeat Steps 5 through
8.
Note: If you enter three incorrect old passwords, the radio
exits the password feature. You cannot access this
feature again until you turn the radio off and on.
Enabling or Disabling the Radio Lock Feature
(Secure Radios Only)
This feature allows you to enable or disable the radio lock
feature. It is programmable by a qualified radio technician.
Procedure:
1< or > to Logf.
2Press the Menu Select button directly below Logf.
3Display shows Pswd enabled, indicating that the radio lock
feature is enabled.
OR
Display shows Pswd disabled, indicating that the radio lock
feature is disabled.

Advanced Features
English
80
The Global Positioning System (GPS)
This feature uses information from the Global Positioning
System (GPS) satellites orbiting the Earth to determine the
approximate geographical location of your radio, expressed as
latitude and longitude. The availability and accuracy of this
location information (and the amount of time that it takes to
calculate it) varies depending on the environment in which you
are using the GPS feature.
For example, GPS location fixes are very difficult to obtain
indoors, in covered locations, between high buildings, or in
situations where you have not established a clear broad view of
the sky.
Understanding the GPS Feature
The GPS technology uses radio signals from earth orbiting
satellites, to establish the location coordinates, maximizing your
view of clear unobstructed sky is essential for optimum
performance.
Where adequate signals from multiple satellites are not
available (usually because you cannot establish a view of a
wide area of the sky), the GPS feature of your radio will not
work. Such situations include but are not limited to:
•In underground locations
•Inside of buildings, trains, or other covered vehicles
•Under any other metal or concrete roof or structure
•Between tall buildings or under dense tree-cover
•In temperature extremes outside the operating limits of your
radio
Even where location information can be calculated in such
situations, it may take longer to do so, and your location
estimate may not be as accurate. Therefore, in any emergency
situation, always report your location to your dispatcher.
Note: Even where adequate signals from multiple satellites
are available, your GPS feature only provides an
approximate location, usually within 20 meters from
your actual location, but sometimes further away.
Keep in mind that the accuracy of the location information and
the time it takes to obtain it varies depending upon
circumstances, particularly the ability to receive signals from an
adequate number of satellites.
Note: The satellites used by the GPS feature are controlled
by the U.S. government and are subject to changes
implemented in accordance with the Department of
Defense GPS user policy and the Federal Radio
Navigation Plan. These changes may affect the
performance of the GPS feature on your radio.

Advanced Features
English
81
Enhancing GPS Performance
Sometimes, the GPS feature may be unable to complete a
location calculation successfully. You then see a message
indicating that your radio cannot connect to enough visible
satellites.
To maximize the ability of your radio to determine a fix, please
note the following guidelines:
•For your initial fix, hold the radio in the face position.
•Stay in the open. The GPS feature works best where there is
nothing between your radio and a large amount of open sky.
The Outdoor Location Feature (Using GPS)
This feature allows you to determine your current location using
a location menu, as well as your current distance and bearing in
relation to another location. Radio location may be requested
and reported over-the-air.
Your radio stores up to a maximum of sixty (60) programmable
location coordinates, also known as waypoints. When the
memory is full, the next waypoints automatically replaces the
oldest waypoints in the radio.
The radio also stores four (4) preprogrammed waypoints. These
coordinates cannot be deleted.
Note: The radio automatically exits the feature, if the feature
inactivity timer is enabled, when the radio is left idle
and the timer expires. You will hear the Menu Inactive
Exit Tone upon feature exit.
Programmable Waypoints Preprogrammed Waypoints
User-configurable location
coordinates.
Fixed location coordinates:
•Home
•Emergency
•Last Known Location
•Destination
Only the alias is editable, not
the coordinates. The Home and Destination
coordinates are editable.
Coordinates can be deleted
one at a time, or all at once. Coordinates cannot be
deleted.

Advanced Features
English
82
Accessing the Outdoor Location Feature
Note: An ON menu key may be present on the location menu
if it is preprogrammed by the dealer or system
administrator.
Procedure:
Press the preprogrammed GPS button to toggle the Outdoor
Location feature on or off.
OR
Follow the procedure below.
1< or > to Loc.
2Press the Menu Select button directly below Loc.
3The display shows Location off.
4Press the Menu Select button directly below On to obtain a
location fix.
OR
Press the Menu Select button directly below Optn.
U or D to Turn On GPS and press the Menu Select button
directly below Sel.
5The front display shows the latitude, longitude, time and
date of the last successful location fix.
6Press the Menu Select button directly below Rfsh to obtain
a new location fix.
7The top line temporarily displays Please wait while the new
location is being determined.
While the new location is being determined, the location
signal can be a solid or blinking icon.
8Once the location coordinates are fixed, the display shows
the current latitude and longitude, along with the UTC (Zulu)
time and date that the location fix was obtained.
The location coordinates are updated automatically every
five seconds while the location signal is present.
OR
If the radio fails to get a location fix, the display shows No
service and returns to the previous display.
9Press the Menu Select button directly below Exit to exit the
feature and return to the main screen.
OR
Press H, the PTT button, or the preprogrammed GPS
button to return to the Home screen.
The radio also exits the menu if the emergency button is
pressed.

Advanced Features
English
83
Saving a Waypoint
Procedure:
While in the current location display:
1Press the Menu Select button directly below Optn.
2U or D to Save As Waypt and press the Menu Select
button directly below Sel.
3A blinking cursor appears in the Save As Waypt screen.
Use the keypad to edit the auto-generated waypoint, if
required.
Press < to move one space to the left.
Press > to move one space to the right.
Press the Menu Select button directly below Del to delete
any unwanted characters.
Press * to add a space.
Press 0 to toggle between mixed case mode, uppercase
mode, and lowercase mode.
Press # to toggle between numeric and letter mode.
OR
Press the Menu Select button directly below Cncl to return
to the Location main screen.
4Press the Menu Select button directly below Ok once you
are done.
5The display shows Current loc saved as <waypoint
name>.
6Press the Menu Select button directly below Exit to exit the
feature and return to the main screen.
OR
Press H, the PTT button, or the preprogrammed GPS
button to return to the Home screen.
Viewing a Saved Waypoint
Procedure:
While in the current location display:
1Press the Menu Select button directly below Optn.
2U or D to Waypoints and press the Menu Select button
directly below Sel.
3The display shows a list of waypoints.
4U or D to scroll through the list.
OR
U or D to select a waypoint to view the location information
in full.
5Press the Menu Select button directly below Optn.
6U or D to View and press the Menu Select button directly
below Sel to view the latitude, longitude, time and date of
the selected waypoint.

Advanced Features
English
84
7Press the Menu Select button directly below Back to return
to the previous screen.
OR
Press H, the PTT button, or the preprogrammed GPS
button to return to the Home screen.
Editing the Alias of a Waypoint
Procedure:
While in the current location display:
1Press the Menu Select button directly below Optn.
2U or D to Waypoints and press the Menu Select button
directly below Sel.
3The display shows a list of waypoints.
4U or D to the required saved waypoint, and press the Menu
Select button directly below Optn.
5U or D to Edit name and press the Menu Select button
directly below Sel.
6A blinking cursor appears in the Edit Name screen.
Use the keypad to edit the alias.
Press < to move one space to the left.
Press > to move one space to the right.
Press the Menu Select button directly below Del to delete
any unwanted characters.
Press * to add a space.
Press 0 to toggle between mixed case mode, uppercase
mode, and lowercase mode.
Press # to toggle between numeric and letter mode.
7Press the Menu Select button directly below Ok once you
are done.
OR
Press the Menu Select button directly below Cncl to return
to the Waypoints main screen.
8The display shows <Waypoint name> Updated and the
radio returns to the Waypoints main screen.
9Press the Menu Select button directly below Back to return
to the previous screen.
OR
Press H, the PTT button, or the preprogrammed GPS
button to return to the Home screen.

Advanced Features
English
85
Editing the Coordinates of a Waypoint
Note: Only the preprogrammed coordinates of Home and
Destination are editable.
Procedure:
While in the current location display:
1Press the Menu Select button directly below Optn.
2U or D to Waypoints and press the Menu Select button
directly below Sel.
3The display shows a list of waypoints.
4U or D to {Home} and press the Menu Select button directly
below Optn.
OR
U or D to {Destination} and press the Menu Select button
directly below Optn.
5U or D to Edit Location and press the Menu Select button
directly below Sel.
6The first number blinks.
Press < to move to the previous number/coordinates.
Press > to move back to the next number/coordinates.
Press the Menu Select button directly below Edit to change
the number/coordinates.
7A blinking cursor appears in the Edit Location screen.
Press < to move one space to the left.
Press > to move one space to the right.
Press the Menu Select button directly below Del to delete
any unwanted characters.
8Press the Menu Select button directly below Ok once you
are done.
OR
Press the Menu Select button directly below Cncl to return
to the previous screen.
9Press the Menu Select button directly below Ok once you
are done with the new coordinates.
10 The display shows {Home} Updated and the radio returns
to the Waypoints main screen.
OR
The display shows {Destination} Updated and the radio
returns to the Waypoints main screen.

Advanced Features
English
86
Deleting a Single Saved Waypoint
Procedure:
While in the current location display:
1Press the Menu Select button directly below Optn.
2U or D to Waypoints and press the Menu Select button
directly below Sel.
3The display shows a list of waypoints.
4U or D to the required saved waypoint, and press the Menu
Select button directly below Optn.
U or D to Edit name and press the Menu Select button
directly below Del.
OR
Press the Menu Select button directly below Del.
5The display shows Delete <Waypoint name> Confirm?.
6Press the Menu Select button directly below Yes to delete
the waypoint.
OR
Press the Menu Select button directly below No to return to
the Waypoints main screen.
7The display momentarily shows <Waypoint name>
deleted before the radio returns to the Waypoints main
screen.
Deleting All Saved Waypoints
Procedure:
While in the current location display:
1Press the Menu Select button directly below Optn.
2U or D to Waypoints and press the Menu Select button
directly below Sel.
3The display shows a list of waypoints.
4U or D to a saved waypoint, and press the Menu Select
button directly below Optn.
5U or D to Delete All and press the Menu Select button
directly below Sel.
6The display shows Delete All saved waypnts Confirm?.
7Press the Menu Select button directly below Yes to delete
all waypoints.
OR
Press the Menu Select button directly below No to return to
the Waypoints main screen.
8The display momentarily shows All saved waypnts
deleted before the radio returns to the Waypoints main
screen.
You cannot delete any of the preprogrammed waypoints.

Advanced Features
English
87
Measuring the Distance and Bearing from a Saved
Waypoint
Procedure:
While in the current location display:
1Press the Menu Select button directly below Optn.
2U or D to Dist frm here and press the Menu Select button
directly below Sel.
3The display shows a list of waypoints.
4U or D to the required waypoint, and press the Menu Select
button directly below Sel.
5The display shows the distance and bearing from the current
to the selected coordinates.
Using the Location Feature While in Emergency
Mode
When the Emergency feature is activated by pressing the
emergency button, the radio exits the Location menu and
returns to the Home (default) screen so that you can see which
channel the emergency signal is going out on.
However, you may re-enter the Location menu while still in
emergency mode, provided that Silent Emergency has not been
activated.
If you have turned Location off using the ON/OFF menu key, it
automatically turns back on when Emergency is activated.
If there is a solid location signal during Emergency, the current
location and the location information received is saved as
Emergency and Last Known Location waypoints, respectively.

Advanced Features
English
88
Trunking System Controls
Using the Failsoft System
The failsoft system ensures continuous radio communications
during a trunked system failure. If a trunking system fails
completely, the radio goes into failsoft operation and
automatically switches to its failsoft channel.
Procedure:
1During failsoft operation, your radio transmits and receives
in conventional operation on a predetermined frequency.
2A medium-pitched tone sounds every 10 seconds and the
display shows Failsoft.
When the trunking system returns to normal operation, your
radio automatically leaves failsoft operation and returns to
trunked operation.
Going Out of Range
When your radio goes out of the range of the system, it can no
longer lock onto a control channel.
Procedure:
1A low-pitched tone sounds.
AND/OR
The display shows the currently selected zone/channel
combination and Out of range.
2Your radio remains in this out-of-range condition until:
It locks onto a control channel.
OR
It locks onto a failsoft channel.
OR
It is turned off.
Using the Site Trunking Feature
If the zone controller loses communication with any site, that
site reverts to site trunking.
The display shows the currently selected zone/channel
combination and Site trunking.
Note: When this occurs, you can communicate only with
other radios within your trunking site.

Advanced Features
English
89
Locking and Unlocking a Site
This feature allows your radio to lock onto a specific site and not
roam among wide-area talkgroup sites. This feature should be
used with caution, since it inhibits roaming to another site in a
wide-area system.
Procedure:
Use the preprogrammed Site Lock/Unlock button to toggle the
lock state between locked and unlocked.
OR
Follow the procedure below.
1< or > to Site.
2Press the Menu Select button directly below Site.
3Press the Menu Select button directly below Lock to lock
the site. The display shows Site locked.
OR
Press the Menu Select button directly below Unlk to unlock
the site. The display shows Site unlocked.
4The radio saves the new site lock state and returns to the
Home screen.
Viewing and Changing a Site
This feature allows you to view the number of the current site or
force your radio to change to a new one.
Viewing the Current Site
Procedure:
1Press the preprogrammed Site Search button.
2The display momentarily shows the name of the current site
and its corresponding received signal strength indicator
(RSSI).
Changing the Current Site
Procedure:
1Press and hold down the preprogrammed Site Search
button.
2A tone sounds and the display momentarily shows
Scanning site.
3When the radio finds a new site, it returns to the Home
screen.

Advanced Features
English
90
Utilities
Viewing the Recent Calls List
This feature allows you to view the recent incoming and
outgoing call information of the following call types:
•Call Alert
•Selective Call
•Private Call
•Phone Call (Outgoing Only)
Note: The radio can also be preprogrammed to log only the
radio IDs associated with incoming Dispatch Calls.
Check with your dealer or system administrator for
more information.
Procedure:
Press the preprogrammed Recent Calls button and proceed to
Step 3.
OR
Follow the procedure below.
1< or > to Rcnt.
2Press the Menu Select button directly below Rcnt to access
the Recent Calls feature screen.
3U or D to scroll through the list.
4Press the Menu Select button directly below Exit to return to
the Home screen.
OR
Press H or the PTT button to return to the Home screen.
The radio automatically exits the feature, if the feature inactivity
timer is enabled, when the radio is left idle and the timer
expires. You will hear the Menu Inactive Exit Tone upon feature
exit.
Using the Flip Display
This feature allows you to flip the content of the top display
upside down. It is particularly useful when you would like to read
the top display while the radio is still in the carry holder attached
to your belt.
Procedure:
Press and hold the preprogrammed Light button to flip the
display.

Advanced Features
English
91
Selecting a Zone Bank
This feature allows twice as many zones to be accessed from a
switch, doubling the amount of switch positions.
Note: The Zone Select feature must to be preprogrammed to
the 3-position A-B-C switch, while the Zone Bank
feature must be preprogrammed to any side button or
Top (Orange) button before you can use this feature.
Procedure:
1Use the preprogrammed Zone Bank button to toggle the
position between Bank 1 and Bank 2.
2The top display shows the status icons (A, B, C, D, E or F) or
the zone name based on the bank and switch position
selected.
See Zone Bank 1 and Zone Bank 2 on page 20 for more
information on the status icons.
Selecting the Power Level
You can select the power level at which your radio transmits.
The radio always turns on to the default setting.
Note: This feature must be preprogrammed by a qualified
radio technician.
Settings:
•Select Low for a shorter transmitting distance and to
conserve power.
•Select High for a longer transmitting distance.
Procedure:
Use the preprogrammed Transmit Power Level Switch to
toggle the power level between low and high power.
OR
Follow the procedure below.
1< or > to Pwr.
2Press the Menu Select button directly below Pwr.
3The display shows Low power and the low power icon.
OR
The display shows High power and the high power icon.
Selecting a Radio Profile
This feature allows you to manually switch the visual and audio
settings of the radio. The display, backlight, alert tones, and
audio settings are defined according to the preprogrammed
radio settings of each radio profile.

Advanced Features
English
92
You can have up to a maximum of twelve (12) radio profiles
programmed into your radio by a qualified radio technician.
Note: The radio automatically exits the feature, if the feature
inactivity timer is enabled, when the radio is left idle
and the timer expires. You will hear the Menu Inactive
Exit Tone upon feature exit.
Procedure:
Use the preprogrammed Profile button and proceed to Step 3.
OR
Follow the procedure below.
1< or > to Prfl.
2Press the Menu Select button directly below Prfl to access
the Profiles feature screen.
3U or D to scroll through the menu selections.
4Press the Menu Select button directly below Sel to select
the required radio profile.
OR
Press the Menu Select button directly below Exit to exit the
screen without making any changes.
5The radio returns to the Home screen. The profile name on
the Home screen indicates the current selected radio profile.
Enabling and Disabling the Radio Alias
This feature allows you to display or hide the radio alias (name).
Procedure:
1Press the Menu Select button directly below MyId.
2The display momentarily shows Radio id off, and the radio
alias disappears from the Home screen.
OR
The display momentarily shows Radio id on, and the radio
alias appears on the Home screen.
Selecting the Audio Speaker
This feature allows you to select the speaker route for the
radio's audio from either the main or the secondary speaker
using the radio profile settings.
Note: Your radio must be preprogrammed to allow you to use
this feature.
While both speakers function together with the secondary
speaker enhancing intelligibility of the received audio
during typical radio operation, each speaker has an
independently-tuned frequency response and volume
level operation.

Advanced Features
English
93
The secondary speaker also has a "whisper" mode with a
modified volume taper for quieter modes of operation.
Note: If an external speaker or microphone accessory is
attached to the radio, neither internal speaker is
operational as audio is routed to the accessory.
Procedure:
Use the preprogrammed Profile button and proceed to Step 3.
OR
Follow the procedure below.
1< or > to Prfl.
2Press the Menu Select button directly below Prfl to access
the Profiles feature screen.
3U or D to scroll through the menu selections.
4Press the Menu Select button directly below Sel to select
the radio profile with the required speaker routing.
OR
Press the Menu Select button directly below Exit to exit the
screen without making any changes.
5The radio returns to the Home screen. The profile name on
the Home screen indicates the current selected radio profile.
Controlling the Display Backlight
You can enable or disable the radio’s display backlight as
needed, if poor light conditions make the display or keypad
difficult to read.
Depending on how your radio is preprogrammed, you can also
maintain a minimum backlight level on the radio's front display.
Note: The backlight setting also affects the Menu Select
buttons, the Menu Navigation buttons and the keypad
backlighting accordingly.
Procedure:
Press the preprogrammed Light button to toggle the backlight
on or off.
OR
Press any key of the keypad, the Menu Select or Menu
Navigation buttons, or any programmable radio controls or
buttons to turn the backlight on.
Note: The backlight remains on for a preprogrammed time
before it automatically turns off completely or returns to
the minimum backlight level.

Advanced Features
English
94
Locking and Unlocking the Keypad
You can lock your radio’s keypad to avoid inadvertent key entry.
Procedure:
Press the preprogrammed Keypad Lock button to toggle the
keypad lock on or off.
Turning Keypad Tones On or Off
You can enable and disable keypad tones, if needed.
Procedure:
Press the preprogrammed Keypad Mute button to turn the
tones off or on.
OR
Follow the procedure below.
1< or > to Mute.
2Press the Menu Select button directly below Mute.
3The display momentarily shows Tones off, indicating that
the keypad tones are disabled.
OR
The display momentarily shows Tones on, and a short tone
sounds, indicating that the keypad tones are enabled.
Turning Voice Mute On or Off
You can enable and disable voice transmission, if needed.
Procedure:
Press the preprogrammed Voice Mute button to turn the feature
off or on.
OR
Follow the procedure below.
1< or > to VMut.
2Press the Menu Select button directly below VMut.
3The display momentarily shows Voice mute off, and a
short tone sounds, indicating that the feature is disabled.
OR
The display momentarily shows Voice mute on, and a short
tone sounds, indicating that the feature is enabled.
Using the Time-Out Timer
This feature turns off your radio’s transmitter. You cannot
transmit longer than the preset timer setting.
If you attempt to do so, the radio automatically stops your
transmission, and you hear a talk-prohibit tone.

Advanced Features
English
95
The timer is defaulted at 60 seconds, but it can be
preprogrammed from 3 to 120 seconds, in 15-second intervals,
or it can be disabled entirely for each radio mode, by a qualified
radio technician.
Note: You will hear a brief, low-pitched, warning tone four
seconds before the transmission times out.
Procedure:
1Hold down the PTT button longer than the preprogrammed
time. You hear a short, low-pitched warning tone, the
transmission is cut-off, and the LED goes out until you
release the PTT button.
2Release the PTT button. The timer resets.
3Press the PTT button to re-transmit. The time-out timer
restarts and the LED lights up solid red.
Setting the Time and Date
You can set the time and date for your radio.
Settings:
•The default time setting is a 12-hour clock.The display shows
12:00AM.
•The AM/PM selection is not available for the 24-hour clock
setting.
•The default setting for the domestic date shows Day/Mth/Yr.
Note: Check with your dealer or system administrator for
additional programmable settings for this feature.
Editing the Time and Date
Procedure:
1< or > to Clck.
2Press the Menu Select button directly below Clck. The
display shows the current setting of the radio.
3Press the Menu Select button directly below Edit. The first
item blinks.
4U or D to change the selected item.
OR
< or > one or more times to move to an item you wish to
change.
U or D to change the selected item.
OR
Press the Menu Select button directly below Exit to exit the
screen without making any changes and return to the Home
screen.
5Press the Menu Select button directly below Ok once you
have finished to save your changes and return to the Home
screen.
OR
Press the Menu Select button directly below Cncl to discard
all changes and return to the Home screen.

Advanced Features
English
96
Press H at any time to return to the Home screen without
saving your changes.
Note: If a call arrives while the radio is in the clock-setting
menu, the radio exits clock setting and displays the call
information. Any changes made before the call is NOT
saved.
Using the Conventional Squelch Operation
Features
This feature filters out unwanted calls with low signal strength or
channels that have a higher than normal background noise.
Analog Options
Tone Private Line (PL), Digital Private-Line (DPL), and carrier
squelch can be available (preprogrammed) per channel.
Digital Options
One or more of the following options may be preprogrammed in
your radio. Check with your dealer or system administrator for
more information.
Using the PL Defeat Feature
This feature allows you to override any coded squelch (DPL or
PL) that might be preprogrammed to a channel. The radio will
also unmute to any digital activity on a digital channel.
Procedure:
Place the preprogrammed PL Defeat switch in the PL Defeat
position. You hear any activity on the channel.
OR
The radio is muted if no activity is present.
Note: When this feature is active, the Carrier Squelch status
indicator is displayed.
Mode Result
Carrier squelch (C) You hear all traffic on a channel.
PL or DPL The radio responds only to your
messages.
Option Result
Digital Carrier-Operated
Squelch (COS) You hear any digital traffic.
Normal Squelch You hear any digital traffic having
the correct network access code.
Selective Switch You hear any digital traffic having
the correct network access code
and correct talkgroup.

Advanced Features
English
97
Using the Digital PTT ID Feature
This feature allows you to see the radio ID (number) of the radio
from whom you are currently receiving a transmission. This ID,
consisting up to a maximum of eight characters, can be viewed
by both the receiving radio and the dispatcher.
Your radio’s ID number is also automatically sent every time the
PTT button is pressed. This is a per-channel feature. For digital
voice transmissions, your radio’s ID is sent continuously during
the voice message.
Using the Smart PTT Feature (Conventional Only)
Smart PTT is a per-personality, programmable feature used in
conventional radio systems to keep radio users from talking
over other radio conversations.
When smart PTT is enabled in your radio, you cannot transmit
on an active channel.
If you try to transmit on an active smart-PTT channel, you hear
an alert tone, and the transmission is inhibited. The LED lights
up solid yellow to indicate that the channel is busy.
Three variations of smart PTT are available:
Mode Description
Transmit Inhibit
on Busy Channel
with Carrier
You cannot transmit if any traffic is
detected on the channel.
Transmit Inhibit
on Busy Channel
with Wrong
Squelch Code
You cannot transmit on an active
channel with a squelch code or
(if secure-equipped) encryption key
other than your own. If the PL code is
the same as yours, the transmission is
not prevented.
Quick-Key
Override
This feature can work in conjunction
with either of the two above variations.
You can override the transmit-inhibit
state by quick-keying the radio. In other
words, two PTT button presses within
the preprogrammed time limit.

Advanced Features
English
98
Accessing the Battery Information
This feature allows you to check the charge status of the
battery.
Procedure:
1Press the Menu Select button directly below Batt.
2The display shows the current battery charge, remaining
capacity, and the estimated number of times the battery has
been charged.
3Press H or the Menu Select button directly below Exit to
return to the Home screen.
Accessing the General Radio Information
Your radio contains information on the following:
•Radio Information
•IP Display
•Control Assignments
•Soft ID (If Enabled)
Note: The radio automatically exits the feature, if the feature
inactivity timer is enabled, when the radio is left idle
and the timer expires. You will hear the Menu Inactive
Exit Tone upon feature exit.
Accessing the Radio Information
This feature displays the following information of your radio:
Note: Press H at any time to return to the Home screen.
•Host Version •KG (Secure Algorithm)
•Model Number •Memory Size
•Serial Number •Tuning Version
•ESN •Processor Version
•Flash Code •RF Band
•Flash Size •Secure Version
•CH 1 – 4 Version
(depending on the
number of channel
connected)
•DSP Version
•DVRS App Version (only when
DVRS is available)
•AUX CH Version •DVRS DSP Version (only when
DVRS is available)
•TRC Version •DVRS CP Version (only when
DVRS is available)
•VRS Version •CHIB Version
•MCHB Version •Siren Version

Advanced Features
English
99
Procedure:
Press the preprogrammed Info button and proceed to Step 3.
OR
Follow the procedure below.
1< or > to Info.
2Press the Menu Select button directly below Info.
3U or D to Radio Info and press the Menu Select button
directly below Sel.
4The display shows the Information screen.
5U or D to scroll through the various information.
OR
Press the Menu Select button directly below Back to return
to the previous screen.
OR
Press H to return to the Home screen.
Viewing the IP Information
This feature displays the device name, IP address, and status of
your radio.
Note: The device name of your radio is preprogrammed.
Check with your dealer or system administrator for
more information.
Procedure:
Press the preprogrammed Info button and proceed to Step 3.
OR
Follow the procedure below.
1< or > to Info.
2Press the Menu Select button directly below Info.
3U or D to IP Info and press the Menu Select button directly
below Sel.
4The display shows the IP Info screen.
5U or D to scroll through the various information.
OR
Press the Menu Select button directly below Back to return
to the previous screen.
OR
Press H to return to the Home screen.

Advanced Features
English
100
Viewing the Control Assignments
This feature displays the programmable radio functions
assigned to the controls of your radio for the currently selected
channel.
See Programmable Features on page 10 for more information
on the various programmable features of your radio.
Procedure:
Press the preprogrammed Info button and proceed to Step 3.
OR
Follow the procedure below.
1< or > to Info.
2Press the Menu Select button directly below Info.
3U or D to Control map and press the Menu Select button
directly below Sel.
4The display shows the Control Map screen.
5U or D to scroll through the various information.
OR
Press the Menu Select button directly below Back to return
to the previous screen.
OR
Press H to return to the Home screen.
Editing the Soft ID
This feature allows you to change your username.
Note: Your radio must be preprogrammed to allow you to use
this feature.
Procedure:
Press the preprogrammed Info button and proceed to Step 3.
OR
Follow the procedure below.
1< or > to Info.
2Press the Menu Select button directly below Info.
3U or D to Soft ID and press the Menu Select button directly
below Sel.
4The display shows the current Soft ID.
5Press the Menu Select button directly below Edit to edit the
current Soft ID.
OR
Press the Menu Select button directly below Back to return
to the previous screen.

Advanced Features
English
101
6A blinking cursor appears in the Edit Soft ID screen.
Use the keypad to edit the text.
Press < to move one space to the left.
Press > to move one space to the right.
Press the Menu Select button directly below Del to delete
any unwanted characters.
Press * to add a space.
Press 0 to toggle between mixed case mode, uppercase
mode, and lowercase mode.
Press # to toggle between numeric and letter mode.
7Press the Menu Select button directly below Ok to save the
new Soft ID and return to the previous screen.
OR
Press the Menu Select button directly below Cncl to return
to the previous screen.
Voice Announcement
This feature enables the radio to audibly indicate the current
feature mode, Zone or Channel the user has just assigned. This
is typically useful when the user is in a difficult condition to read
the content shown on the display. A maximum of 2000 unique
voice announcements are allowed in a radio. The sum total
duration for all voice announcements in a radio shall be no more
than 1000 seconds.
The features which Voice Announcement supports are:
•Zone
•Channel
•Scan
•Monitor
•Talkaround/Direct
•Tx Inhibit
Note: Voice announcements support certain number of zone-
channel, but not all. Seek advise from your dealer or
qualified technician for the best selections for this
feature.

Advanced Features
English
102
You can select to determine the priority given to this Voice
Announcement feature. The two options available are:
•High – enables the voice of the feature to announce even
when the radio is receiving calls.
•Low – disables the voice of the feature from announcing
when the radio is receiving calls.
The Voice Announcement and above mentioned options are
enabled by a qualified radio technician.
All the three programmable buttons at the side of the radio
support this feature.
The procedure below is applicable only on activation of voice
announcement for the current zone and channel assigned to the
radio.
Procedure:
During power up of the radio, the radio announces the current
zone and channel it is transmitting.
1Press the preprogrammed button.
2The radio produces audible indication of the current zone
and channel.
3The radio produces audible indication of the activated
features when you launch a feature (if preprogrammed).
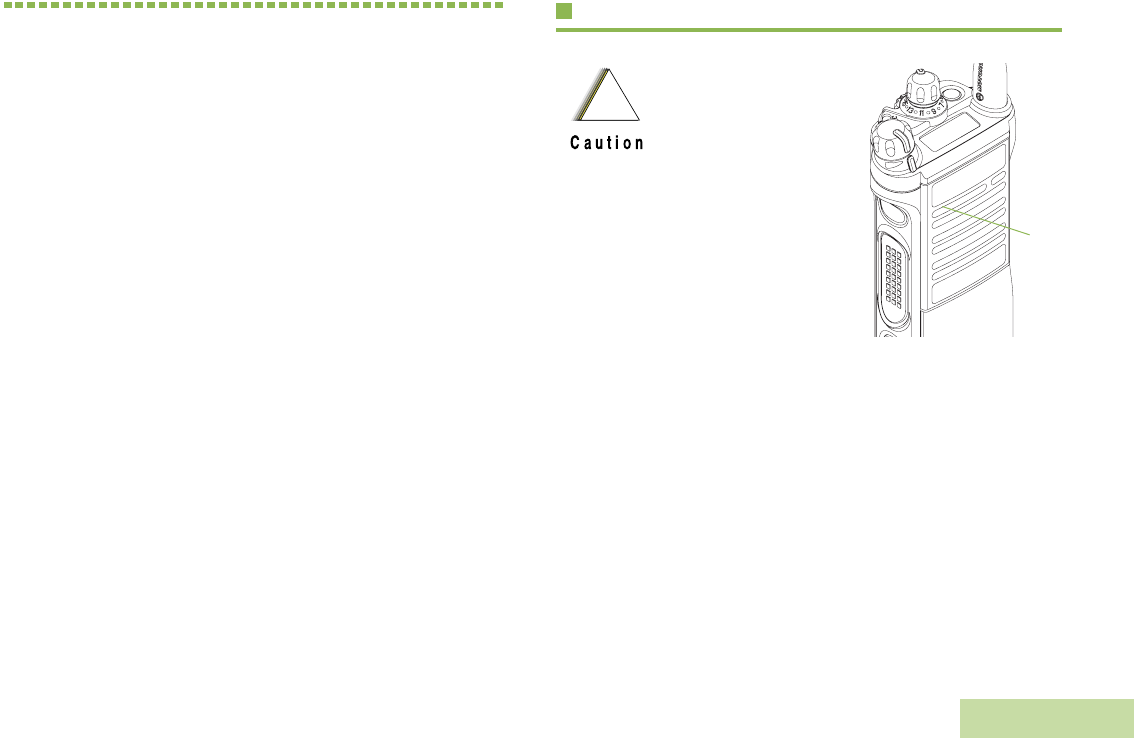
Helpful Tips
English
103
Helpful Tips
Take a moment to review the following:
Caring for Your Radio . . . . . . . . . . . . . . . . . . . . . . . . page 103
Cleaning Your Radio . . . . . . . . . . . . . . . . . . . . . . . page 104
Handling Your Radio . . . . . . . . . . . . . . . . . . . . . . . page 104
Servicing Your Radio . . . . . . . . . . . . . . . . . . . . . . . page 105
Taking Care of the Battery. . . . . . . . . . . . . . . . . . . . . page 105
Checking the Battery Charge Status . . . . . . . . . . . page 105
Battery Recycling and Disposal . . . . . . . . . . . . . . . page 106
Caring for Your Radio
•The APX 7000 radio
casting has a vent
port that allows for
pressure equalization
in the radio. Never
poke this vent with
any objects, such as
needles, tweezers, or
screwdrivers. This
could create leak
paths into the radio
and the radio’s
submergibility will be
lost.
•(For APX 7000 R Radios Only)
The APX 7000 R radio is designed to be
submerged to a maximum depth of 6 feet, with a
maximum submersion time of 2 hours.
Exceeding either maximum limit may result in
damage to the radio.
!
Vent
Port
Helpful Tips
English
104
Cleaning Your Radio
To clean the external surfaces of your radio:
1Combine one teaspoon of mild dishwashing detergent to
one gallon of water (0.5% solution).
2Apply the solution sparingly with a stiff, non-metallic, short-
bristled brush, making sure excess detergent does not get
entrapped near the connectors, controls or crevices. Dry the
radio thoroughly with a soft, lint-free cloth.
3Clean battery contacts with a lint-free cloth to remove dirt or
grease.
Handling Your Radio
•Do not pound, drop, or throw the radio unnecessarily. Never
carry the radio by the antenna.
•Avoid subjecting the radio to an excess of liquids. Do not
submerge the radio unless it is a ruggedized, APX 7000 R
model.
•(For APX 7000 R Radios Only)
Elastomer technology materials used for seals
in rugged portable radios can age with time and
environmental exposure. Therefore, Motorola
recommends that rugged radios be checked
annually as a preventive measure in order to
assure the watertight integrity of the radio.
Motorola details the disassembly, test, and
reassembly procedures along with necessary
test equipment needed to inspect, maintain and
troubleshoot radio seals in the radio’s service
manual.
•If the radio battery contact area has been
submerged in water, dry and clean the radio
battery contacts before attaching a battery to the
radio. Otherwise, the water could short-circuit
the radio.
•If the radio has been submerged in water, shake
the radio well so that any water that may be
trapped inside the speaker grille and
microphone port can be removed. Otherwise,
the water will decrease the audio quality of the
radio.
•Do not disassemble the radio. This could
damage radio seals and result in leak paths into
the radio. Any radio maintenance should be
performed only by a qualified radio technician.
!
Do not use solvents to clean your radio. Spirits
may permanently damage the radio housing.
Do not submerge the radio in the detergent
solution.
!

Helpful Tips
English
105
•Avoid subjecting the radio to corrosives, solvents or spirits.
•Do not disassemble the radio.
•Keep the accessory-connector cover in place until ready to
use the connector. Replace the cover immediately once the
accessory has been disconnected.
Servicing Your Radio
Proper repair and maintenance procedures will assure efficient
operation and long life for this product. A Motorola maintenance
agreement will provide expert service to keep this and all other
communication equipment in perfect operating condition. A
nationwide service organization is provided by Motorola to
support maintenance services. Through its maintenance and
installation program, Motorola makes available the finest
service to those desiring reliable, continuous communications
on a contract basis. For a contract service agreement, please
contact your nearest Motorola service or sales representative,
or an authorized Motorola dealer.
Express Service Plus (ESP) is an optional extended service
coverage plan, which provides for the repair of this product for
an additional period of either one or two years beyond the
normal expiration date of the standard warranty. For more
information about ESP, contact the Motorola Radio Support
Center at 3761 South Central Avenue, Rockford, IL 61102 (800)
227-6772 / (847)725-4200.
Taking Care of the Battery
Checking the Battery Charge Status
Your radio can indicate the battery’s charge status through:
•the LED and sounds.
•the fuel gauge icon on the display.
You can also check the battery charge status via the menu
entry. See Accessing the Battery Information on page 98 for
more information.
LED and Sounds
When your battery is low:
•the LED blinks red when the PTT button is pressed.
•you hear a low-battery “chirp” (short, high-pitched tone).
Fuel Gauge Icon
A blinking fuel gauge icon ( ) is displayed only when the
battery voltage drops to low level. In this case, replace the
battery with a fully charged one.
0
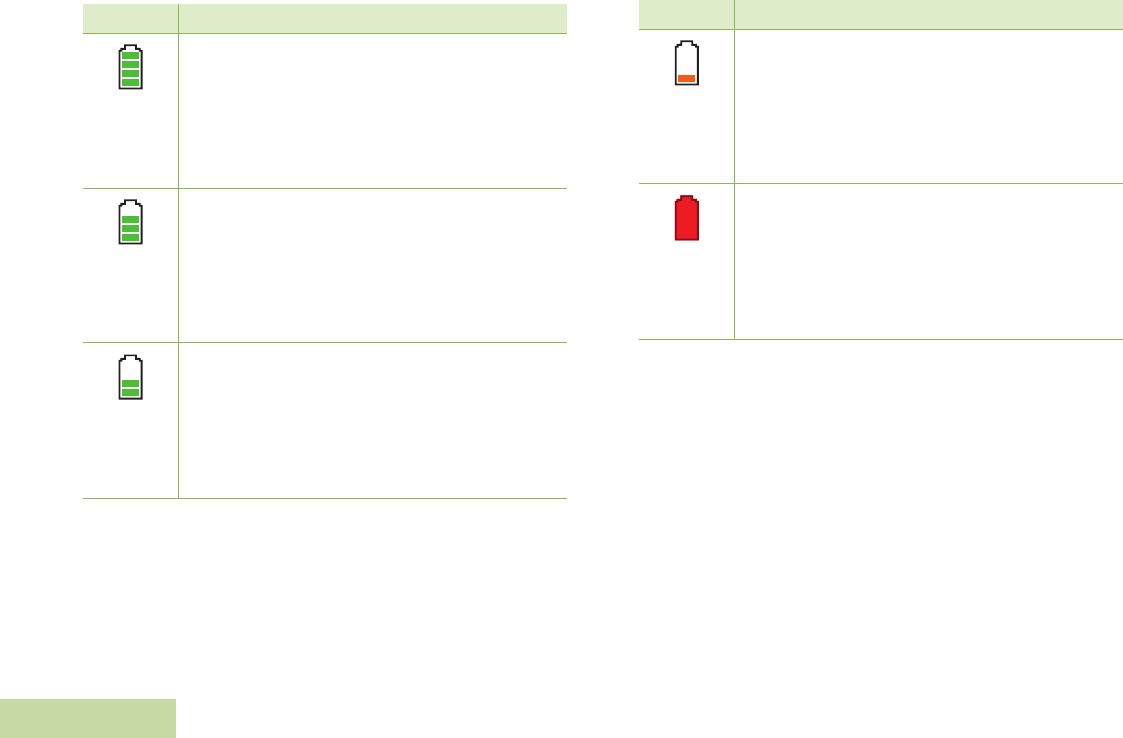
Helpful Tips
English
106
Battery Recycling and Disposal
In the U.S. and Canada, Motorola participates in the nationwide
Rechargeable Battery Recycling Corporation (RBRC) program
for NiCd battery collection and recycling. Many retailers and
dealers participate in this program.
For the location of the drop-off facility closest to you, access
RBRC's Internet web site at www.rbrc.com or call 1-800-8-
BATTERY. This internet site and telephone number also provide
other useful information concerning recycling options for
consumers, businesses, and governmental agencies.
Gauge Battery Charge
76% to 100% full
51% to 75%
26% to 50%
Top Display
U
Top Display
T
Top Display
S
11% to 25%
10% or less (at 10%, the gauge begins blinking)
Gauge Battery Charge
Top Display
R
Top Display
Q

Accessories
English
107
Accessories
For a list of Motorola-approved antennas and other accessories,
visit the following website:
http://www.motorola.com/governmentandenterprise

Appendix: Maritime Radio Use in the VHF Frequency Range
English
108
Appendix: Maritime Radio Use in the
VHF Frequency Range
Take a moment to review the following:
Special Channel Assignments. . . . . . . . . . . . . . . . . . page 108
Operating Frequency Requirements. . . . . . . . . . . . . page 109
Special Channel Assignments
Emergency Channel
If you are in imminent and grave danger at sea and require
emergency assistance, use VHF Channel 16 to send a distress
call to nearby vessels and the United States Coast Guard.
Transmit the following information, in this order:
1“MAYDAY, MAYDAY, MAYDAY.”
2“THIS IS _____________________, CALL SIGN
__________.”
State the name of the vessel in distress 3 times, followed
by the call sign or other identification of the vessel, stated 3
times.
3Repeat “MAYDAY” and the name of the vessel.
4“WE ARE LOCATED AT _______________________.”
State the position of the vessel in distress, using any
information that will help responders to locate you, e.g.:
• latitude and longitude
• bearing (state whether you are using true or magnetic
north)
• distance to a well-known landmark
• vessel course, speed or destination
5State the nature of the distress.
6Specify what kind of assistance you need.
7State the number of persons on board and the number
needing medical attention, if any.
8Mention any other information that would be helpful to
responders, such as type of vessel, vessel length and/or
tonnage, hull color, etc.
9“OVER.”
10 Wait for a response.
11 If you do not receive an immediate response, remain by the
radio and repeat the transmission at intervals until you
receive a response. Be prepared to follow any instructions
given to you.
Non-Commercial Call Channel
For non-commercial transmissions, such as fishing reports,
rendezvous arrangements, repair scheduling, or berthing
information, use VHF Channel 9.

Appendix: Maritime Radio Use in the VHF Frequency Range
English
109
Operating Frequency Requirements
A radio designated for shipboard use must comply with Federal
Communications Commission Rule Part 80 as follows:
• on ships subject to Part II of Title III of the Communications
Act, the radio must be capable of operating on the 156.800
MHz frequency
• on ships subject to the Safety Convention, the radio must be
capable of operating:
• in the simplex mode on the ship station transmitting
frequencies specified in the 156.025 – 157.425 MHz
frequency band, and
• in the semiduplex mode on the two frequency channels
specified in the table below.
Note: Simplex channels 3, 21, 23, 61, 64, 81, 82, and 83
cannot be lawfully used by the general public in US
waters.
Additional information about operating requirements in the
Maritime Services can be obtained from the full text of FCC
Rule Part 80 and from the US Coast Guard.
Table A-1: VHF Marine Channel List
Channel
Number
Frequency (MHz)
Transmit Receive
1 156.050 160.650
2 156.100 160.700
* 156.150 160.750
4 156.200 160.800
5 156.250 160.850
6 156.300 –
7 156.350 160.950
8 156.400 –
9 156.450 156.450
10 156.500 156.500
11 156.550 156.550
12 156.600 156.600
13** 156.650 156.650
14 156.700 156.700
15** 156.750 156.750
16 156.800 156.800
17** 156.850 156.850
18 156.900 161.500
19 156.950 161.550
20 157.000 161.600
* 157.050 161.650
22 157.100 161.700
Table A-1: VHF Marine Channel List (Continued)
Channel
Number
Frequency (MHz)
Transmit Receive

Appendix: Maritime Radio Use in the VHF Frequency Range
English
110
* Simplex channels 3, 21, 23, 61, 64, 81, 82, and 83 cannot be
lawfully used by the general public in US waters.
** Low power (1 W) only
*** Guard band
Note: A – in the Receive column indicates that the channel is
transmit only.
* 157.150 161.750
24 157.200 161.800
25 157.250 161.850
26 157.300 161.900
27 157.350 161.950
28 157.400 162.000
60 156.025 160.625
* 156.075 160.675
62 156.125 160.725
63 156.175 160.775
* 156.225 160.825
65 156.275 160.875
66 156.325 160.925
67** 156.375 156.375
68 156.425 156.425
69 156.475 156.475
71 156.575 156.575
72 156.625 –
73 156.675 156.675
74 156.725 156.725
Table A-1: VHF Marine Channel List (Continued)
Channel
Number
Frequency (MHz)
Transmit Receive
75 *** ***
76 *** ***
77** 156.875 –
78 156.925 161.525
79 156.975 161.575
80 157.025 161.625
* 157.075 161.675
* 157.125 161.725
* 157.175 161.775
84 157.225 161.825
85 157.275 161.875
86 157.325 161.925
87 157.375 161.975
88 157.425 162.025
Table A-1: VHF Marine Channel List (Continued)
Channel
Number
Frequency (MHz)
Transmit Receive

Glossary
English
111
Glossary
This glossary is a list of specialized terms used in this manual.
Term Definition
ACK Acknowledgment of communication.
Active Channel A channel that has traffic on it.
Analog Signal An RF signal that has a continuous nature
rather than a pulsed or discrete nature.
ARS Automatic Registration Service
ASTRO 25
Trunking Motorola standard for wireless digital
trunked communications.
ASTRO
Conventional Motorola standard for wireless digital
conventional communications.
Autoscan A feature that allows the radio to
automatically scan the members of a scan
list.
Call Alert Privately page an individual by sending an
audible tone.
Carrier Squelch
Feature that responds to the presence of
an RF carrier by opening or unmuting
(turning on) a receiver’s audio circuit. A
squelch circuit silences the radio when no
signal is being received so that the user
does not have to listen to “noise.”
Central
Controller
A software-controlled, computer-driven
device that receives and generates data for
the trunked radios assigned to it. It
monitors and directs the operations of the
trunked repeaters.
Channel A group of characteristics such as transmit/
receive frequency pairs, radio parameters,
and encryption encoding.
Control Channel
In a trunking system, one of the channels
that is used to provide a continuous, two-
way/data communications path between
the central controller and all radios on the
system.
Conventional Typically refers to radio-to-radio
communications, sometimes through a
repeater (see Trunking).
Conventional
Scan List A scan list that includes only conventional
channels.
Term Definition

Glossary
English
112
Cursor A visual tracking marker (a blinking line)
that indicates a location on the display.
CP Codeplug
Deadlock
Displayed by the radio after three failed
attempts to unlock the radio.The radio must
be powered off and on prior to another
attempt.
Digital Private
Line (DPL)
A type of coded squelch using data bursts.
Similar to PL except a digital code is used
instead of a tone.
Digital Signal An RF signal that has a pulsed, or discrete,
nature, rather than a continuous nature.
Dispatcher An individual who has radio system
management duties.
DSP Digital Signal Processing
Dynamic
Regrouping
A feature that allows the dispatcher to
temporarily reassign selected radios to a
single special channel so they can
communicate with each other.
ESN Electrical Serial Number
Term Definition
Failsoft
A feature that allows communications to
take place even though the central
controller has failed. Each trunked repeater
in the system transmits a data word
informing every radio that the system has
gone into failsoft.
FCC Federal Communications Commission.
Hang Up Disconnect.
Home screen The first display information after the radio
completes its self test.
KVL Key-variable loader: A device for loading
encryption keys into the radio.
LCD Liquid crystal display.
LED Light-emitting diode.
Menu Entry
A software-activated feature shown at the
bottom of the display – selection of these
features is controlled by the {, |, and
} buttons.
Term Definition

Glossary
English
113
Monitor
Check channel activity by pressing the
Monitor button. If the channel is clear, you
hear static. If the channel is in use, you
hear conversation. It also serves as a way
to check the volume level of the radio,
since the radio “opens the squelch” when
the monitor button is pressed.
Multi-System
Talkgroup Scan
List
A scan list that can include both talkgroups
(trunked) and channels (conventional).
Network Access
Code
Network Access Code (NAC) operates on
digital channels to reduce voice channel
interference between adjacent systems
and sites.
NiCd Nickel-cadmium
NiMH Nickel-metal-hydride.
Non-Tactical/
Revert
The user talks on a preprogrammed
emergency channel. The emergency alarm
is sent out on this same channel.
OTAR Over-the-air rekeying.
Page A one-way alert, with audio and/or display
messages.
Personality A set of unique features specific to a radio.
Term Definition
PIN Personal Identification Number
Preprogrammed Refers to a software feature that has been
activated by a qualified radio technician.
Private
(Conversation)
Call
A feature that lets you have a private
conversation with another radio user in the
talkgroup.
Private Line
(PL)
A sub-audible tone that is transmitted such
that only receivers decoding the tone
receives it.
Programmable Refers to a radio control that can have a
radio feature assigned to it.
PTT Push-To-Talk – the PTT button engages
the transmitter and puts the radio in
transmit (send) operation when pressed.
Radio
Frequency (RF)
The part of the general frequency spectrum
between the audio and infrared light
regions (about 10 kHz to 10,000,000 MHz).
Repeater
A conventional radio feature, where you
talk through a receive/transmit facility that
re-transmits received signals, in order to
improve communications range and
coverage.
Term Definition

Glossary
English
114
Selective Call
A feature that allows you to call a select
individual, intended to provide privacy and
to eliminate the annoyance of having to
listen to conversations of no interest to you.
Selective Switch Any digital P25 traffic having the correct
Network Access Code and the correct
talkgroup.
Squelch
Special electronic circuitry, added to the
receiver of a radio, that reduces, or cuts off,
unwanted signals before they are heard in
the speaker.
Standby An operating condition whereby the radio’s
speaker is muted but still continues to
receive data.
Status Calls Pre-defined text messages that allow the
user to send a conditional message without
talking.
Tactical/
Non-Revert
The user talks on the channel that was
selected before the radio entered the
emergency state.
Talkaround Bypass a repeater and talk directly to
another unit for easy local unit-to-unit
communications.
Term Definition
Talkgroup An organization or group of radio users
who communicate with each other using
the same communication path.
TMS Text Messaging Service
Trunking The automatic sharing of communications
paths between a large number of users
(see Conventional).
Trunking
Priority Monitor
Scan List
A scan list that includes talkgroups that are
all from the same trunking system.
USK Unique Shadow Key.
UTC
Coordinated Universal Time. The
international time standard (formerly
Greenwich Mean Time, or GMT). Zero
hours UTC is midnight in Greenwich,
England, which is located at 0 degrees
longitude. Everything east of Greenwich
(up to 180 degrees) is later in time;
everything west is earlier. There are 42
time authorities around the world that are
constantly synchronizing with each other.
Abbreviated as UTC (English backronym =
Universal Time, Coordinated), it is also
known as Zulu (Z) Time.
Term Definition

Glossary
English
115
Zone A grouping of channels.
Term Definition

Notes
English
116
Notes

Commercial Warranty
English
117
Commercial Warranty
Limited Warranty
MOTOROLA COMMUNICATION PRODUCTS
I. WHAT THIS WARRANTY COVERS AND FOR HOW
LONG:
MOTOROLA INC. (“MOTOROLA”) warrants the MOTOROLA
manufactured Communication Products listed below (“Product”)
against defects in material and workmanship under normal use and
service for a period of time from the date of purchase as scheduled
below:
MOTOROLA, at its option, will at no charge either repair the
Product (with new or reconditioned parts), replace it (with a new or
reconditioned Product), or refund the purchase price of the Product
during the warranty period provided it is returned in accordance
with the terms of this warranty. Replaced parts or boards are
warranted for the balance of the original applicable warranty period.
All replaced parts of Product shall become the property of
MOTOROLA.
This express limited warranty is extended by MOTOROLA to the
original end user purchaser only and is not assignable or
transferable to any other party. This is the complete warranty for the
Product manufactured by MOTOROLA. MOTOROLA assumes no
obligations or liability for additions or modifications to this warranty
unless made in writing and signed by an officer of MOTOROLA.
Unless made in a separate agreement between MOTOROLA and
the original end user purchaser, MOTOROLA does not warrant the
installation, maintenance or service of the Product.
MOTOROLA cannot be responsible in any way for any ancillary
equipment not furnished by MOTOROLA which is attached to or
used in connection with the Product, or for operation of the Product
with any ancillary equipment, and all such equipment is expressly
excluded from this warranty. Because each system which may use
the Product is unique, MOTOROLA disclaims liability for range,
coverage, or operation of the system as a whole under this
warranty.
II. GENERAL PROVISIONS:
This warranty sets forth the full extent of MOTOROLA'S
responsibilities regarding the Product. Repair, replacement or
refund of the purchase price, at MOTOROLA’s option, is the
exclusive remedy. THIS WARRANTY IS GIVEN IN LIEU OF ALL
OTHER EXPRESS WARRANTIES. IMPLIED WARRANTIES,
INCLUDING WITHOUT LIMITATION, IMPLIED WARRANTIES OF
MERCHANTABILITY AND FITNESS FOR A PARTICULAR
PURPOSE, ARE LIMITED TO THE DURATION OF THIS LIMITED
WARRANTY. IN NO EVENT SHALL MOTOROLA BE LIABLE FOR
DAMAGES IN EXCESS OF THE PURCHASE PRICE OF THE
PRODUCT, FOR ANY LOSS OF USE, LOSS OF TIME,
INCONVENIENCE, COMMERCIAL LOSS, LOST PROFITS OR
SAVINGS OR OTHER INCIDENTAL, SPECIAL OR
CONSEQUENTIAL DAMAGES ARISING OUT OF THE USE OR
ASTRO APX 7000 Portable Units One (1) Year
Product Accessories One (1) Year

Commercial Warranty
English
118
INABILITY TO USE SUCH PRODUCT, TO THE FULL EXTENT
SUCH MAY BE DISCLAIMED BY LAW.
III. STATE LAW RIGHTS:
SOME STATES DO NOT ALLOW THE EXCLUSION OR
LIMITATION OF INCIDENTAL OR CONSEQUENTIAL DAMAGES
OR LIMITATION ON HOW LONG AN IMPLIED WARRANTY
LASTS, SO THE ABOVE LIMITATION OR EXCLUSIONS MAY
NOT APPLY.
This warranty gives specific legal rights, and there may be other
rights which may vary from state to state.
IV. HOW TO GET WARRANTY SERVICE:
You must provide proof of purchase (bearing the date of purchase
and Product item serial number) in order to receive warranty
service and, also, deliver or send the Product item, transportation
and insurance prepaid, to an authorized warranty service location.
Warranty service will be provided by MOTOROLA through one of its
authorized warranty service locations. If you first contact the
company which sold you the Product (e.g., dealer or
communication service provider), it can facilitate your obtaining
warranty service. You can also call MOTOROLA at 1-800-927-2744
US/Canada.
V. WHAT THIS WARRANTY DOES NOT COVER:
A)Defects or damage resulting from use of the Product in other
than its normal and customary manner.
B)Defects or damage from misuse, accident, water, or neglect.
C)Defects or damage from improper testing, operation,
maintenance, installation, alteration, modification, or adjustment.
D)Breakage or damage to antennas unless caused directly by
defects in material workmanship.
E)A Product subjected to unauthorized Product modifications,
disassembles or repairs (including, without limitation, the addition
to the Product of non-MOTOROLA supplied equipment) which
adversely affect performance of the Product or interfere with
MOTOROLA's normal warranty inspection and testing of the
Product to verify any warranty claim.
F) Product which has had the serial number removed or made
illegible.
G)Rechargeable batteries if:
(1) any of the seals on the battery enclosure of cells are broken
or show evidence of tampering.
(2) the damage or defect is caused by charging or using the
battery in equipment or service other than the Product for which it
is specified.
H)Freight costs to the repair depot.
I) A Product which, due to illegal or unauthorized alteration of the
software/firmware in the Product, does not function in
accordance with MOTOROLA’s published specifications or the
FCC type acceptance labeling in effect for the Product at the time
the Product was initially distributed from MOTOROLA.
J) Scratches or other cosmetic damage to Product surfaces that
does not affect the operation of the Product.
K)Normal and customary wear and tear.

Commercial Warranty
English
119
VI. PATENT AND SOFTWARE PROVISIONS:
MOTOROLA will defend, at its own expense, any suit brought
against the end user purchaser to the extent that it is based on a
claim that the Product or parts infringe a United States patent, and
MOTOROLA will pay those costs and damages finally awarded
against the end user purchaser in any such suit which are
attributable to any such claim, but such defense and payments are
conditioned on the following:
A)that MOTOROLA will be notified promptly in writing by such
purchaser of any notice of such claim;
B)that MOTOROLA will have sole control of the defense of such
suit and all negotiations for its settlement or compromise; and
C)should the Product or parts become, or in MOTOROLA’s opinion
be likely to become, the subject of a claim of infringement of a
United States patent, that such purchaser will permit
MOTOROLA, at its option and expense, either to procure for
such purchaser the right to continue using the Product or parts or
to replace or modify the same so that it becomes non-infringing
or to grant such purchaser a credit for the Product or parts as
depreciated and accept its return. The depreciation will be an
equal amount per year over the lifetime of the Product or parts as
established by MOTOROLA.
MOTOROLA will have no liability with respect to any claim of patent
infringement which is based upon the combination of the Product or
parts furnished hereunder with software, apparatus or devices not
furnished by MOTOROLA, nor will MOTOROLA have any liability
for the use of ancillary equipment or software not furnished by
MOTOROLA which is attached to or used in connection with the
Product. The foregoing states the entire liability of MOTOROLA with
respect to infringement of patents by the Product or any parts
thereof.
Laws in the United States and other countries preserve for
MOTOROLA certain exclusive rights for copyrighted MOTOROLA
software such as the exclusive rights to reproduce in copies and
distribute copies of such MOTOROLA software. MOTOROLA
software may be used in only the Product in which the software was
originally embodied and such software in such Product may not be
replaced, copied, distributed, modified in any way, or used to
produce any derivative thereof. No other use including, without
limitation, alteration, modification, reproduction, distribution, or
reverse engineering of such MOTOROLA software or exercise of
rights in such MOTOROLA software is permitted. No license is
granted by implication, estoppel or otherwise under MOTOROLA
patent rights or copyrights.
VII. GOVERNING LAW:
This Warranty is governed by the laws of the State of Illinois, U.S.A.

Notes
English
120
Notes