Motorola Solutions 89FT4918 Portable 2-Way Radio User Manual MOTOTRBO Professional Digital Two Way Radio System
Motorola Solutions, Inc. Portable 2-Way Radio MOTOTRBO Professional Digital Two Way Radio System
Contents
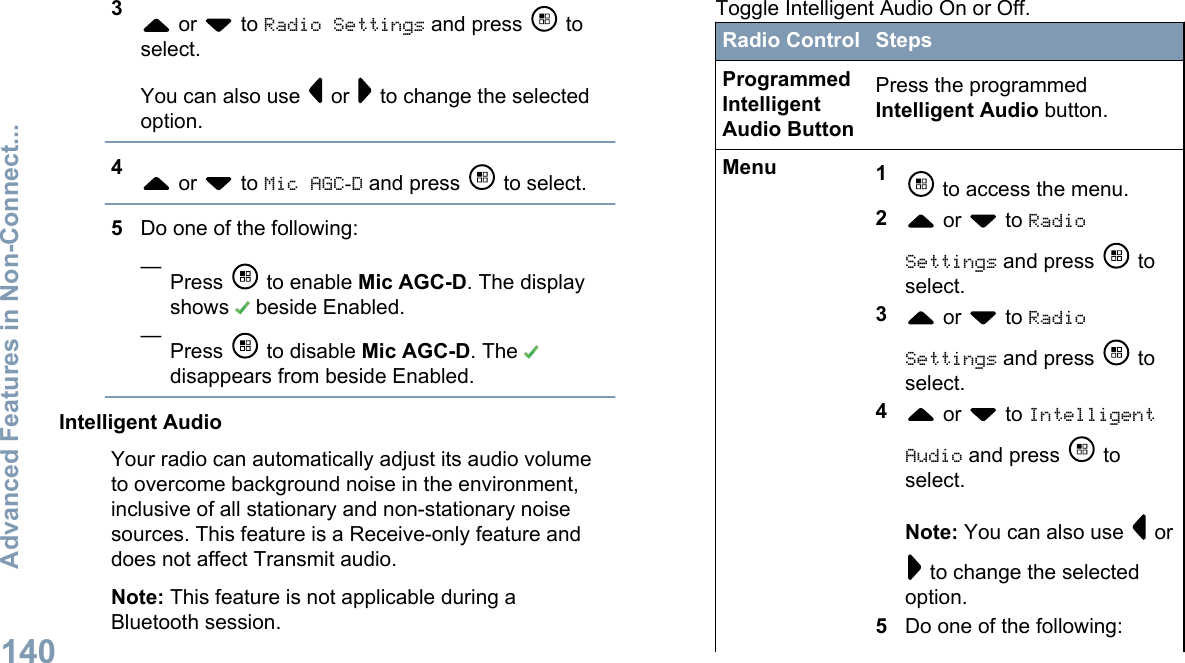
- 1. Users Guide
- 2. RF Safety Manual
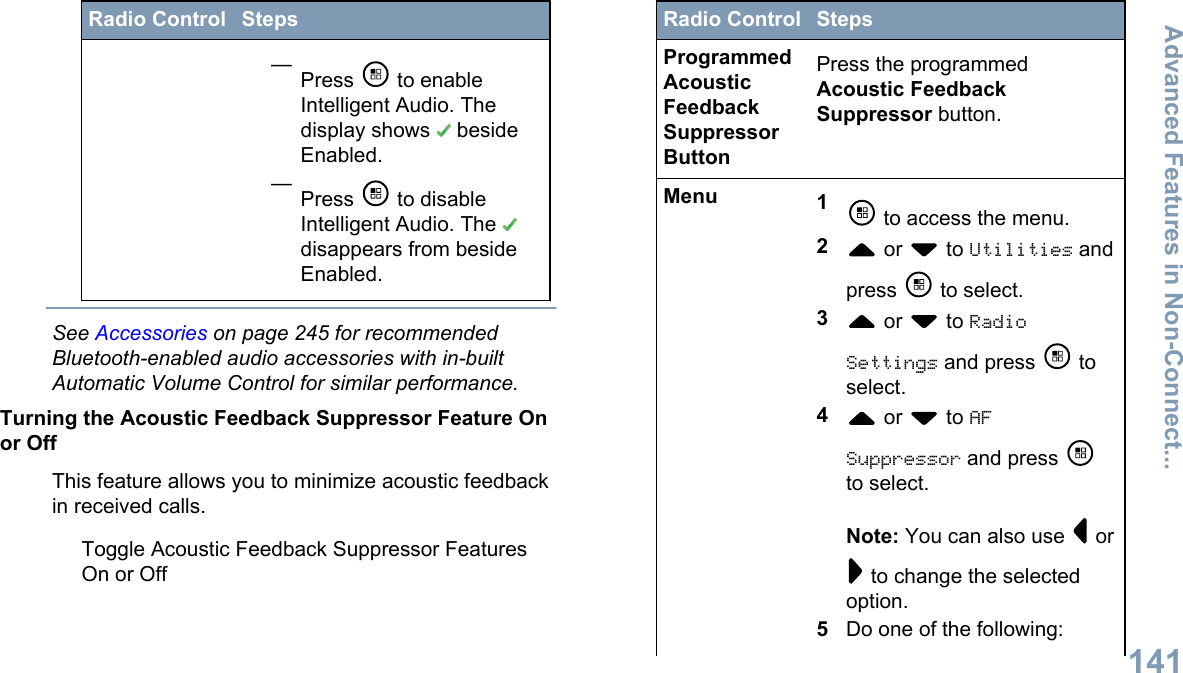
Users Guide


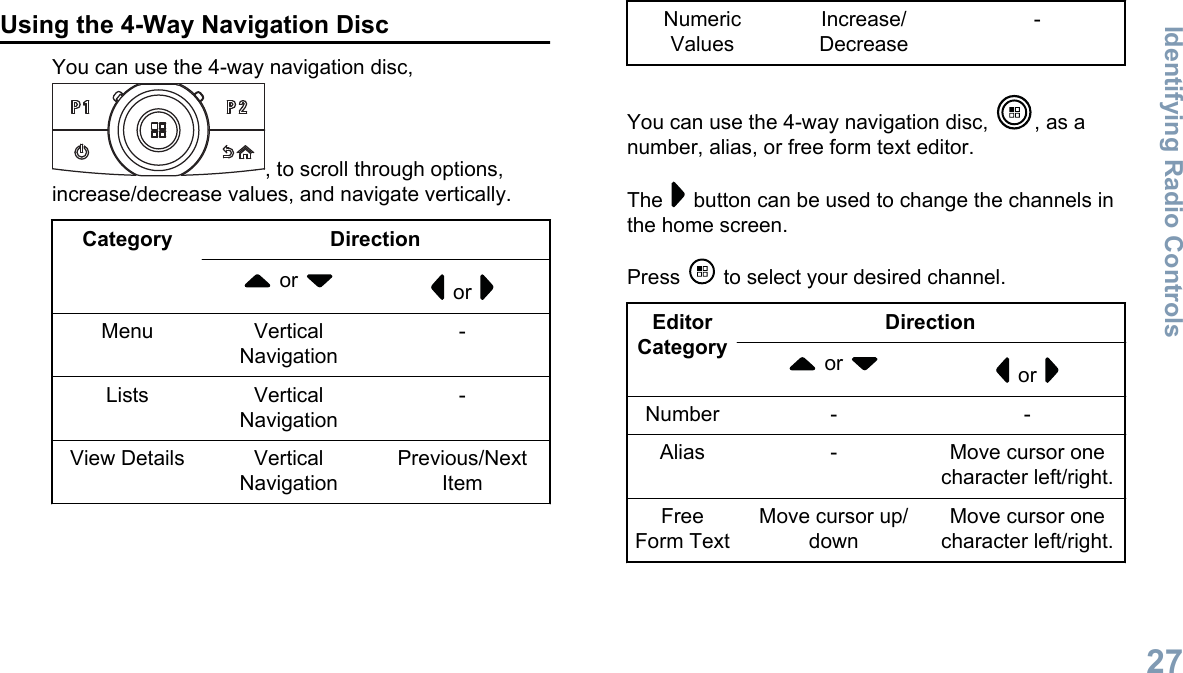
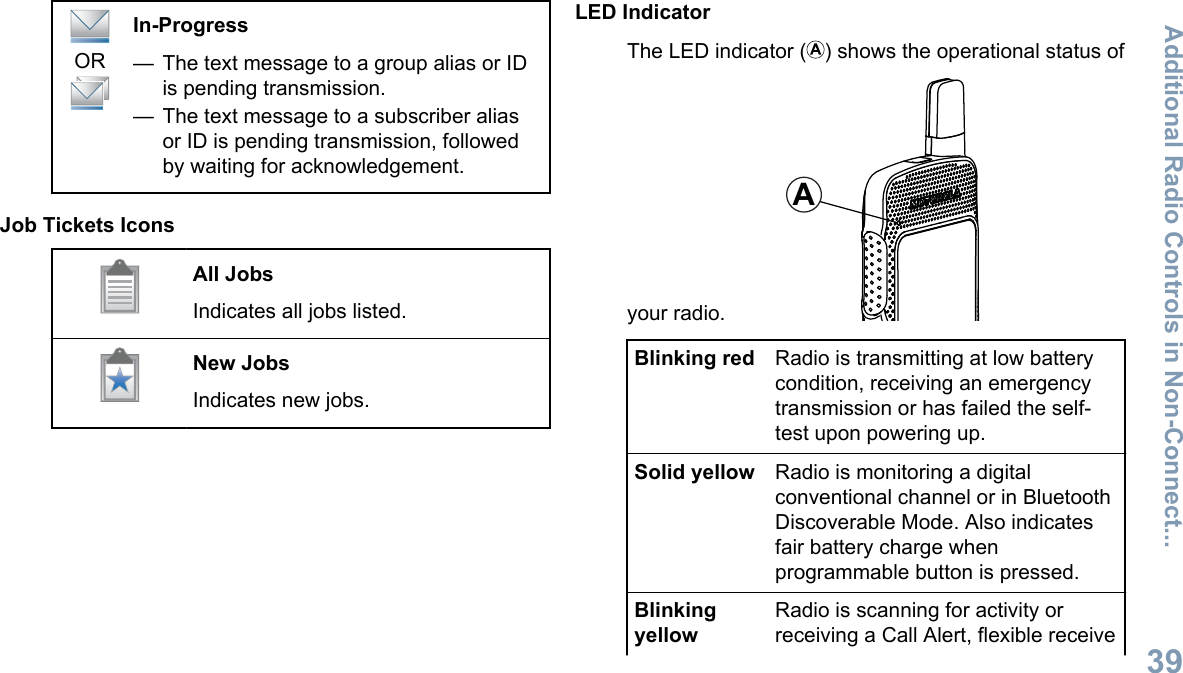
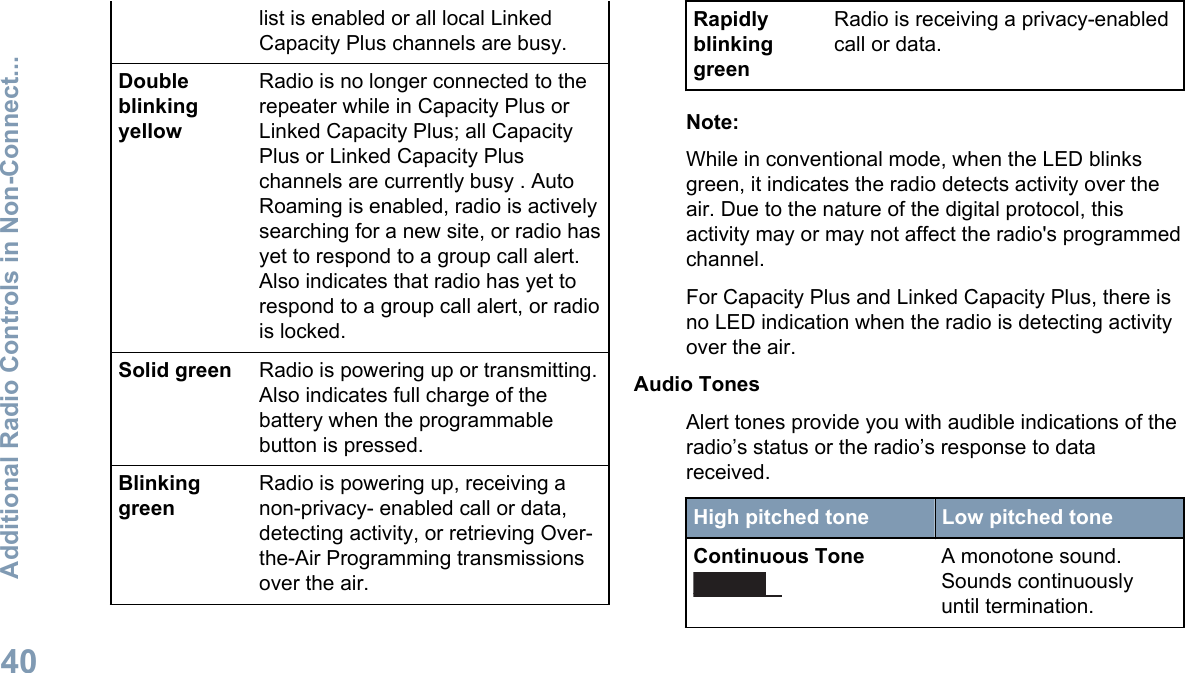
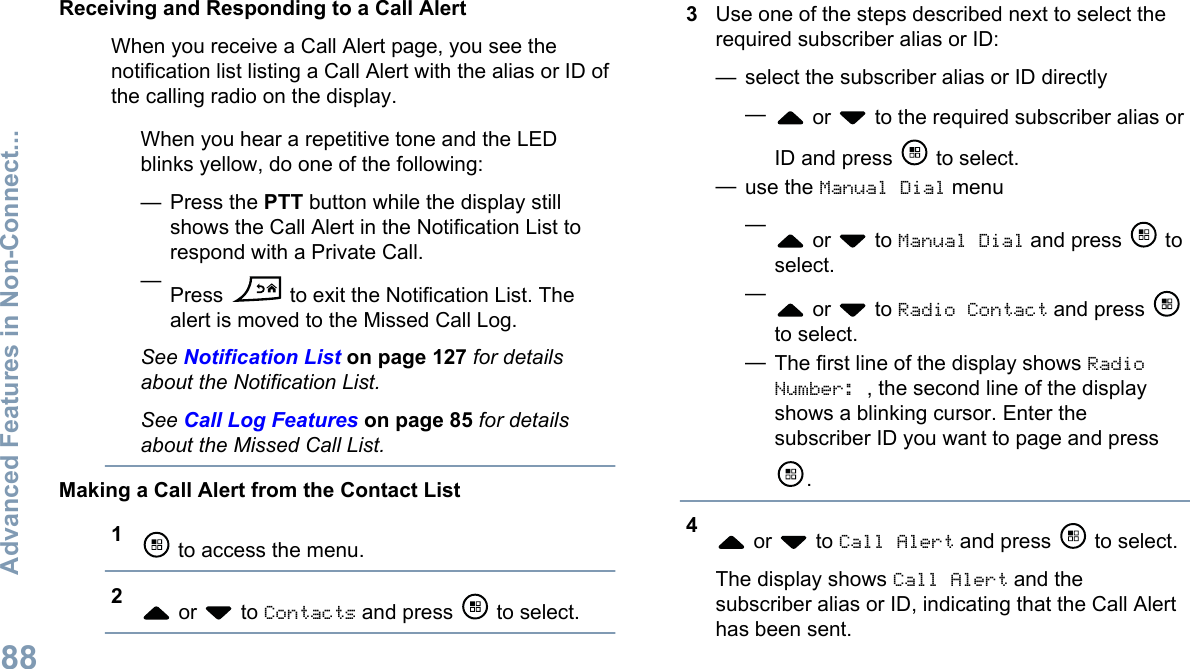
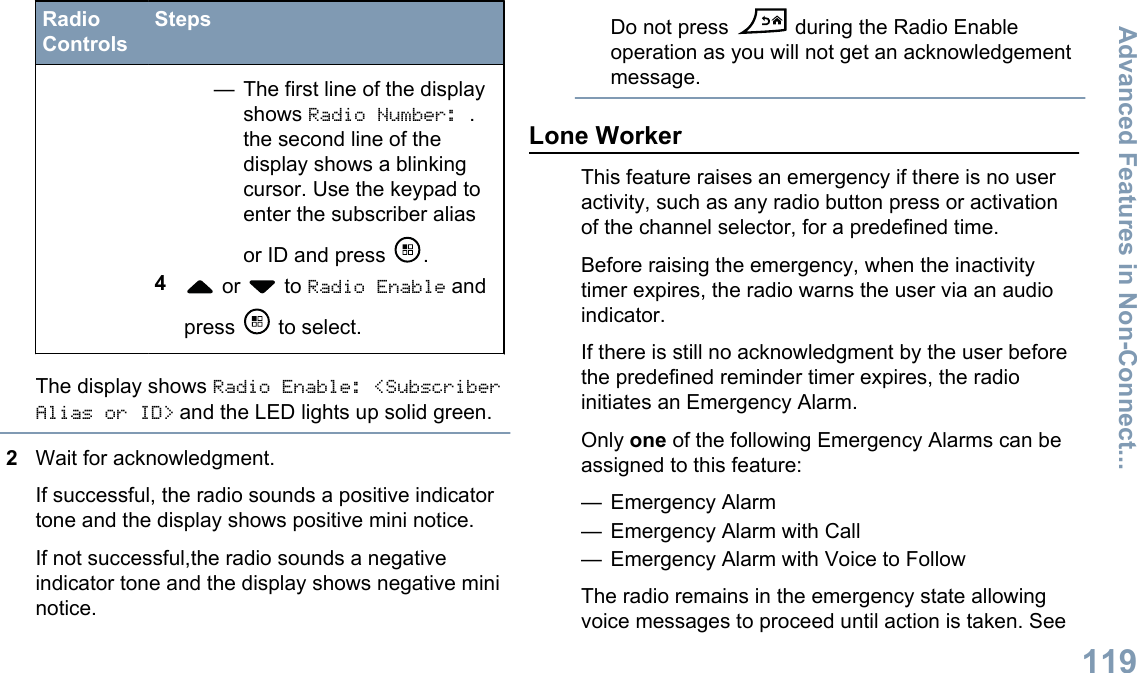
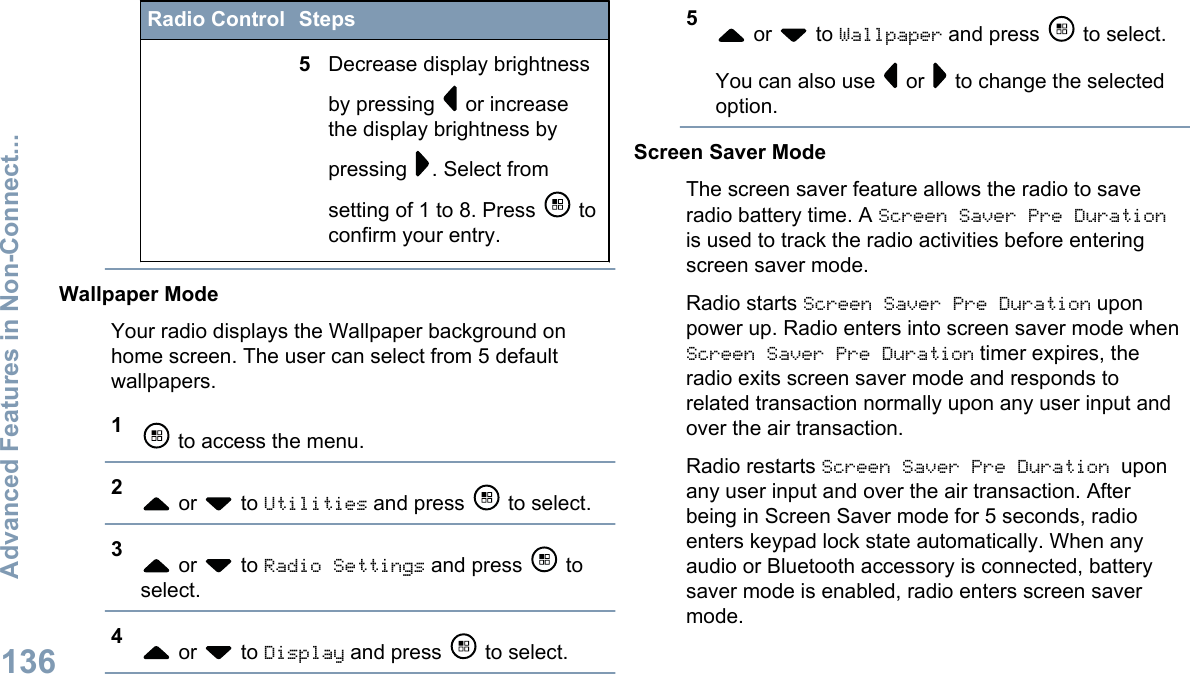
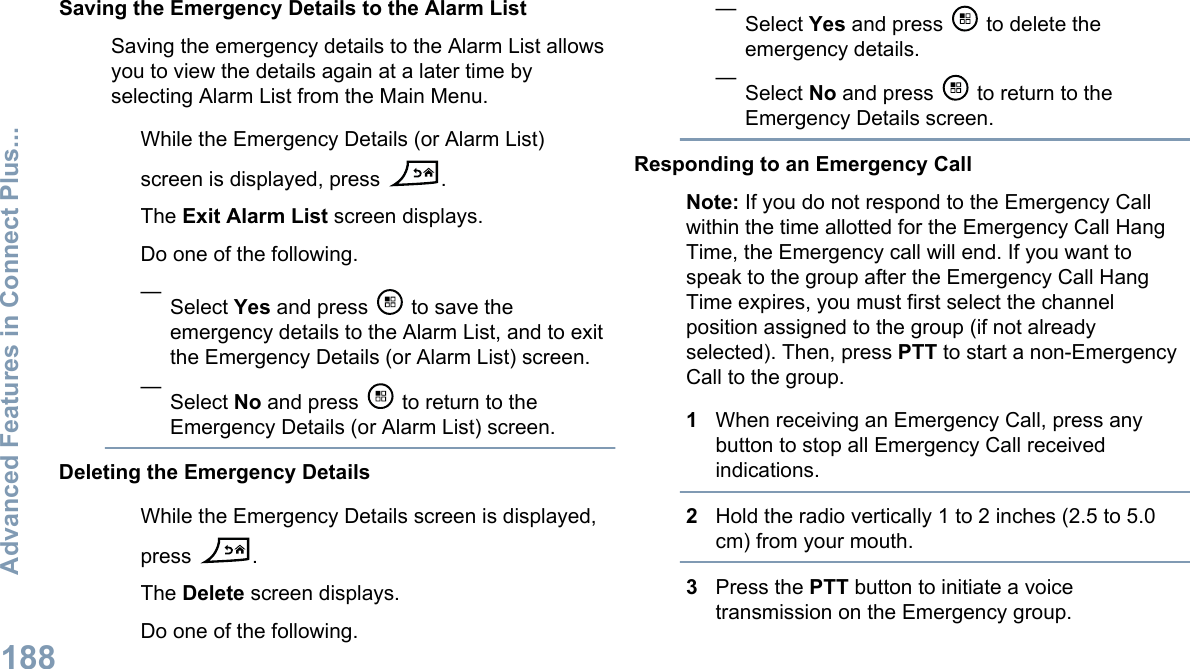
![Identifying Radio ControlsRadio Controls5943782115111210614131LED Indicator2Push-to-Talk (PTT) Button3Display4Microphone5Volume Button6Front Button P1[1]7On/Off Button8Emergency Button[1]94–way Navigation Disc10 Antenna11 Speaker12 Front Button P2[1]13 Back/Home Button14 Menu/OK Button15 Keypad1These buttons are programmable.Identifying Radio Controls26English](https://usermanual.wiki/Motorola-Solutions/89FT4918.Users-Guide/User-Guide-2119984-Page-27.png)

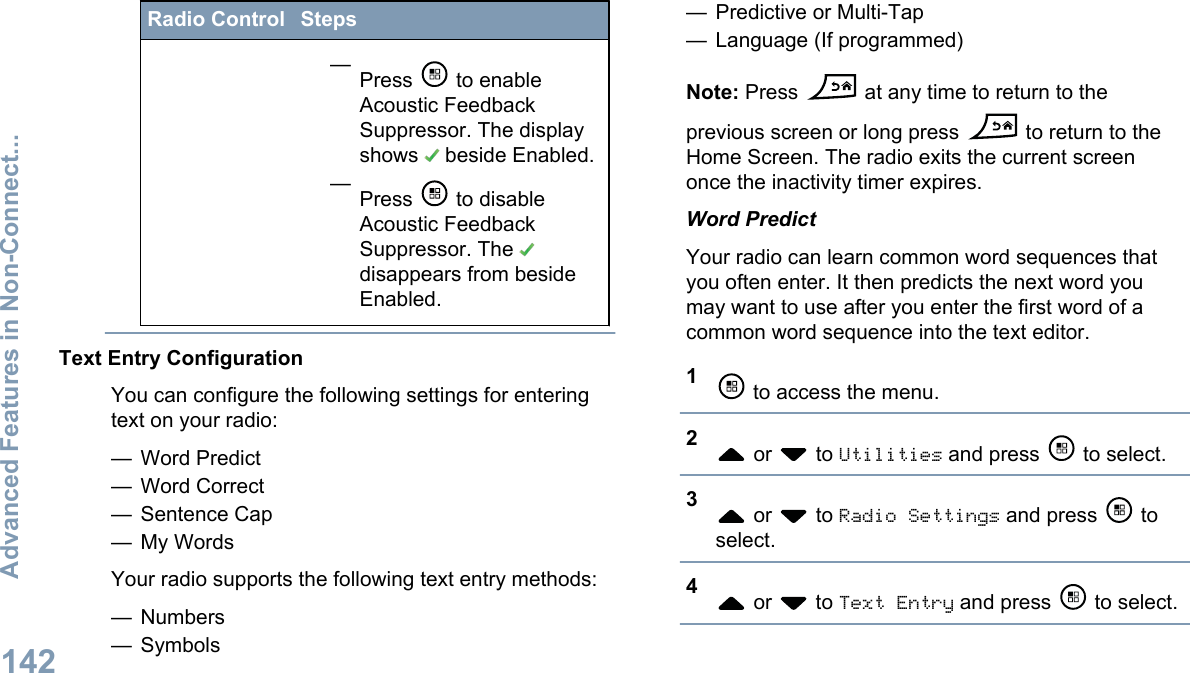
![— Long press – Pressing and holding for theprogrammed duration.— Hold down – Keeping the button pressed.Note: The programmed duration of a button press isapplicable for all assignable radio/utility functions orsettings. See Emergency Operation on page 185 formore information on the programmed duration of theEmergency button.Assignable Radio FunctionsActions — A programmable button to access a CPSprogrammable action list.Audio Routing — Toggles audio routing betweeninternal and external speakers.Bluetooth® Audio Switch — Toggles audio routingbetween internal radio speaker and externalBluetooth-enabled accessory.Contacts — Provides direct access to the Contactslist.Call Alert — Provides direct access to the contactslist for you to select a contact to whom a Call Alertcan be sent.Call Log — Selects the call log list.Channel Announcement — Plays zone and channelannouncement voice messages for the currentchannel.Display Radio Alias — Shows radio display name.Emergency — Depending on the programming,initiates or cancels an emergency.Intelligent Audio — Toggles intelligent audio on oroff.Job Tickets — Allows the user to view and act uponjob tickets.Manual Dial — Depending on the programming,initiates a Private or Phone Call by keying in anysubscriber ID or phone number.Manual Site Roam[2] — Starts the manual sitesearch.2Not applicable in Capacity Plus and Linked Capacity PlusAdditional Radio Controls in Non-Connect...31English](https://usermanual.wiki/Motorola-Solutions/89FT4918.Users-Guide/User-Guide-2119984-Page-32.png)
![Mic AGC On/Off — Toggles the internal microphoneautomatic gain control (AGC) on or off.Monitor — Monitors a selected channel for activity.Notifications — Provides direct access to theNotifications list.Nuisance Channel Delete[2] — Temporarily removesan unwanted channel, except for the SelectedChannel, from the scan list. The Selected Channelrefers to the user’s selected zone/channelcombination from which scan is initiated.One Touch Access — Directly initiates a predefinedPrivate, Phone or Group Call, a Call Alert or a QuickText message.Option Board Feature — Toggles option boardfeature(s) on or off for option board-enabledchannels.Permanent Monitor[2] — Monitors a selectedchannel for all radio traffic until function is disabled.Phone— Provides direct access to the PhoneContacts listPower Battery Indicator — Displays the currentstatus of the battery level.Privacy — Toggles privacy on or off.Radio Alias and ID — Provides radio alias and ID.Radio Check — Determines if a radio is active in asystem.Radio Enable — Allows a target radio to be remotelyenabled.Radio Disable — Allows a target radio to be remotelydisabled.Remote Monitor — Turns on the microphone of atarget radio without it giving any indicators.Repeater/Talkaround[2] — Toggles between using arepeater and communicating directly with anotherradio.Ring Alert Type — Provides direct access to theRing Alert Type Setting.Scan[2] — Toggles scan on or off.Site Info — Displays current Linked Capacity Plussite name and ID. Plays site announcement voicemessages for the current site (this function isunavailable when Voice Announcement is disabled).Site Lock On/Off[2] — When toggled on, the radiosearches the current site only. When toggled off, theAdditional Radio Controls in Non-Connect...32English](https://usermanual.wiki/Motorola-Solutions/89FT4918.Users-Guide/User-Guide-2119984-Page-33.png)
![Notification List has items to review.Option BoardThe Option Board is enabled. (Optionboard enabled models only)Option Board Non-FunctionThe Option Board is disabled.Over-the-Air Programming DelayTimerIndicates time left before automaticrestart of radio.Scan[3][4]Scan feature is enabled.Scan- Priority 1[3][4]Radio detects activity on channel/groupdesignated as Priority 1.Scan- Priority 2[3][4]Radio detects activity on channel/groupdesignated as Priority 2.Flexible Receive ListFlexible receive list is enabled.EmergencyRadio is in Emergency mode.SecureThe Privacy feature is enabled.UnsecureThe Privacy feature is disabled.Site Roaming[3]The site roaming feature is enabled.Talkaround[3][4]In the absence of a repeater, radio iscurrently configured for direct radio toradio communication.Additional Radio Controls in Non-Connect...35English](https://usermanual.wiki/Motorola-Solutions/89FT4918.Users-Guide/User-Guide-2119984-Page-36.png)


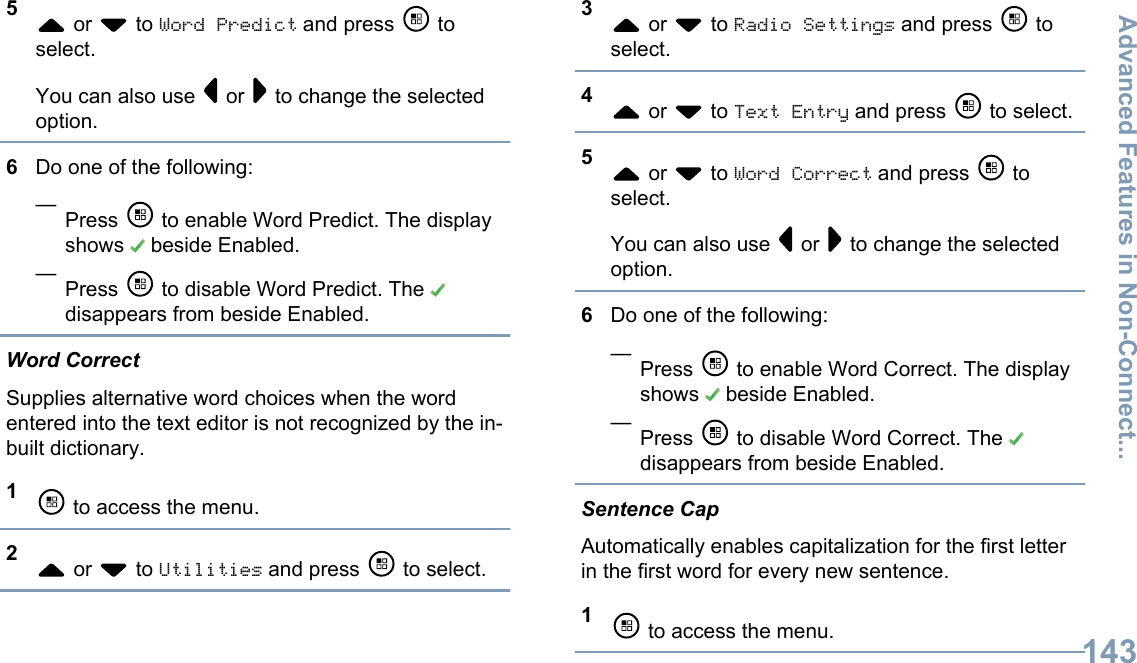


![AccessoriesAntennas— 420 – 445 MHz Stubby Antenna, (PMAE4076_)— 438 – 470 MHz Stubby Antenna, (PMAE4077_)— 403 – 425 MHz Stubby Antenna, (PMAE4078_)— 450 – 490 MHz Stubby Antenna Kit, (PMAE4091_)— 480 – 527 MHz Stubby Antenna Kit, (PMAE4092_)— 806 – 870 MHz Stubby Antenna (PMAF4017_)— 896 – 941 MHz Stubby Antenna (PMAF4018_)Audio Accessories— Surveillance Earpiece with in-line microphone andPTT (PMLN5957_)— Swivel Earpiece with in-line microphone and PTT(PMLN5958_)Batteries— Lithium-Ion 1800 mAH Battery Pack (HKNN4013_)— Lithium-Ion 1370 mAH Battery Pack(PMNN4425_) [5]Bluetooth— HK200 Bluetooth Headset (US) (89409_)— Operations Critical Wireless Earpiece with 12 inchcable (US) (NNTN8125_)— Operations Critical Wireless Earpiece with 9.5 inchcable (US) (NNTN8126_)— Operations Critical Wireless Push-To-Talk POD(US) (NNTN8127_)Cables— Micro USB Programming Cable (25-124330-01R)Carry Devices— Carry Holder (PMLN5956_)— Wrist Strap (PMLN6074_)5Not applicable to the 800/900 band.Accessories245English](https://usermanual.wiki/Motorola-Solutions/89FT4918.Users-Guide/User-Guide-2119984-Page-246.png)