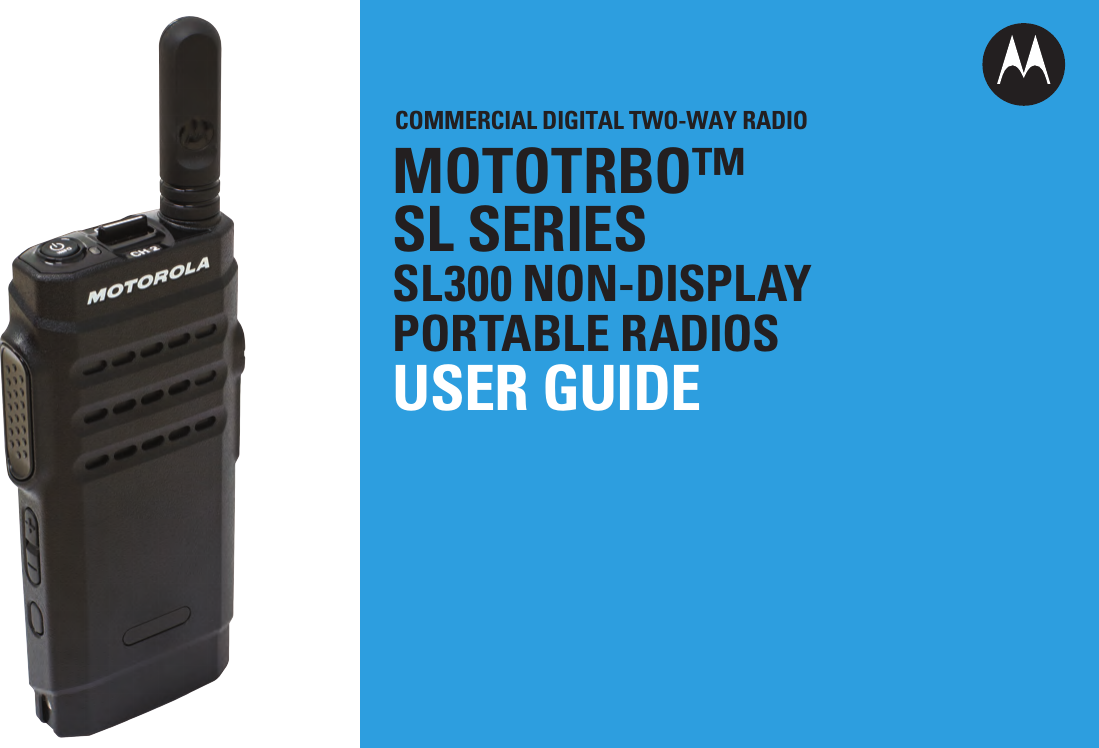
Motorola Solutions 89FT4922 2-Way Portable Radio User Manual MOTOTRBO SL300 Professional Digital Two Way Radio

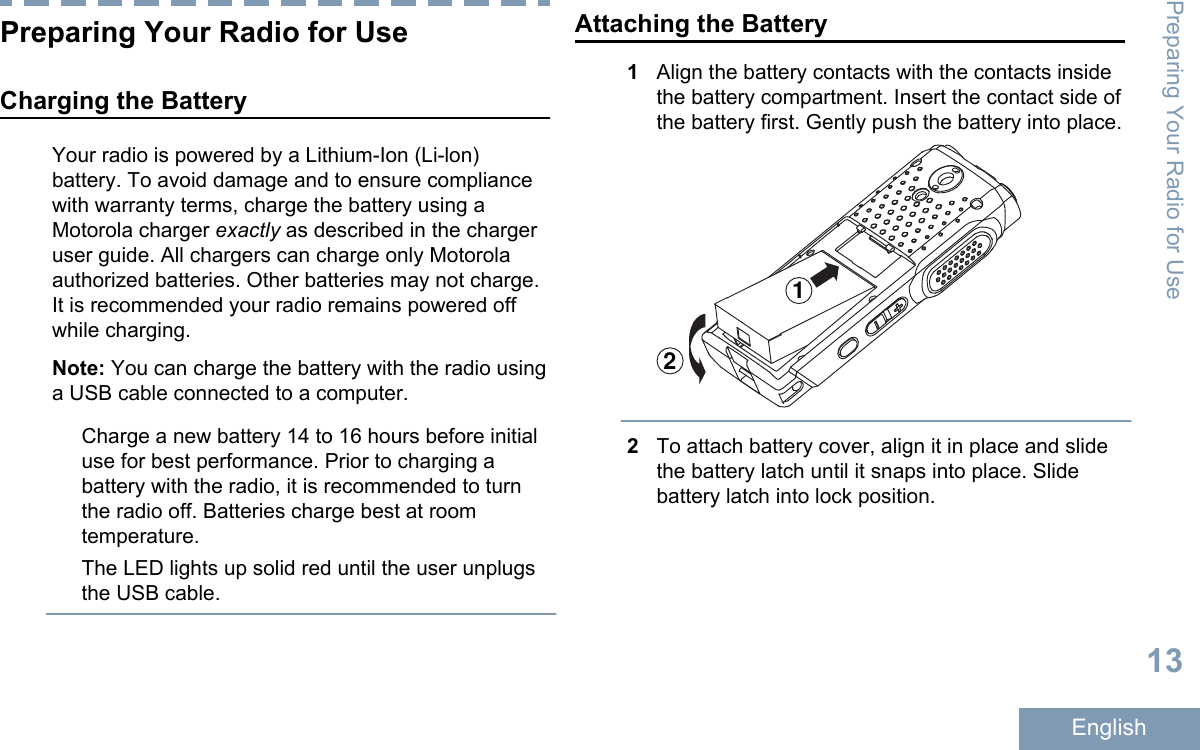
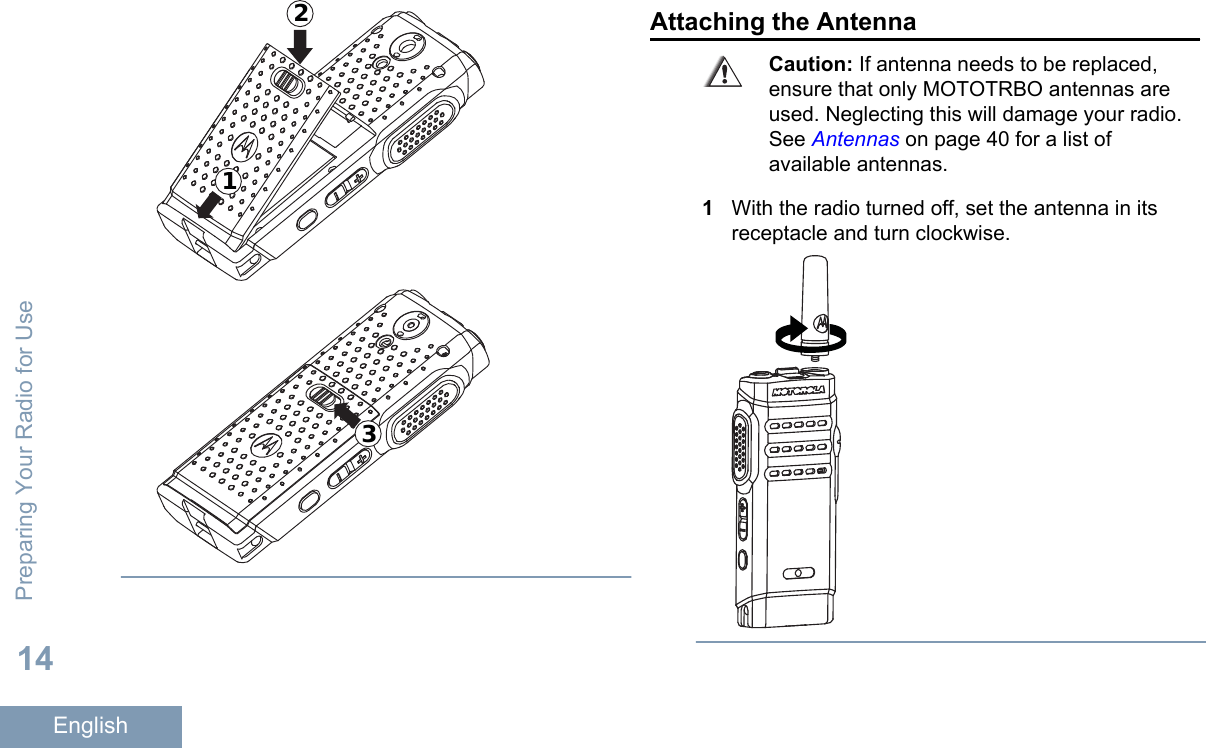
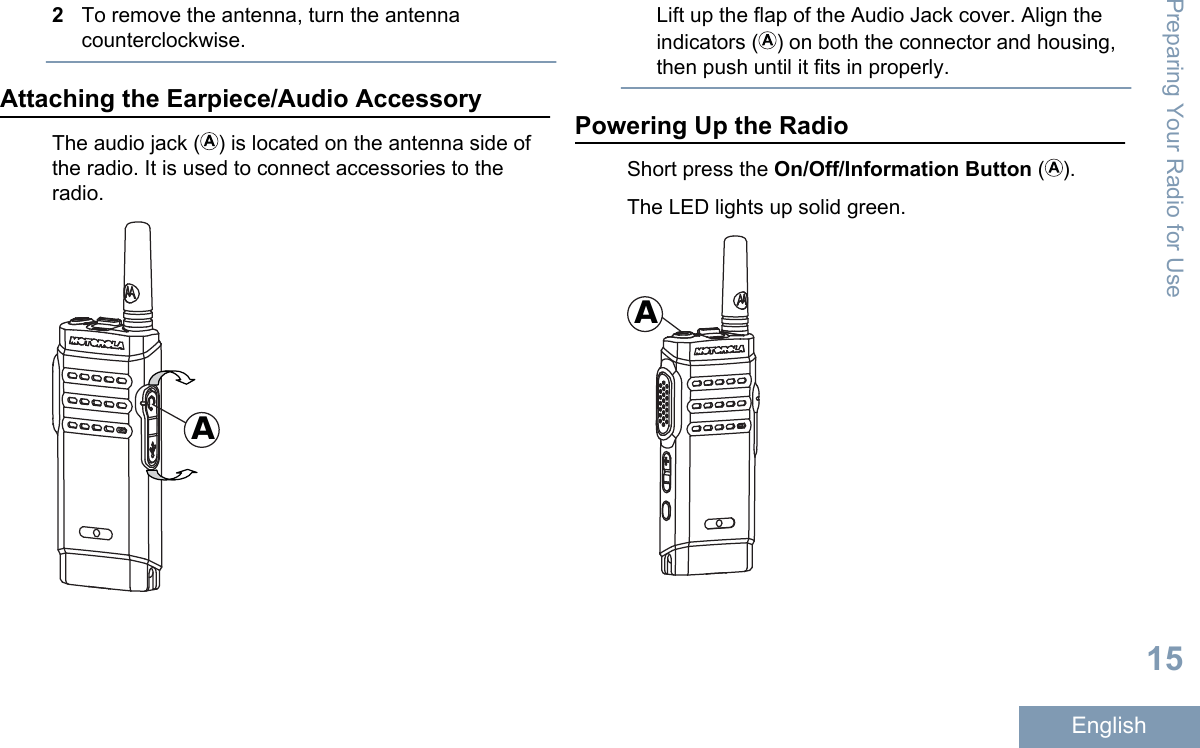
Motorola Solutions, Inc. 2-Way Portable Radio MOTOTRBO SL300 Professional Digital Two Way Radio

Contents

User Manual

COMMERCIAL DIGITAL TWO-WAY RADIOMOTOTRBO™ SL SERIESSL300 NON-DISPLAYPORTABLE RADIOSUSER GUIDE
ContentsDeclaration of Conformity......................... 4Important Safety Information..........6Software Version..............................7Consignes de sécuritéimportantes...................................8Version logicielle............................. 9Computer Software Copyrights....10Handling Precautions.................... 11Getting Started............................... 12How to Use This Guide..................................12What Your Dealer/System AdministratorCan Tell You.............................................12Preparing Your Radio for Use.......13Charging the Battery......................................13Attaching the Battery..................................... 13Attaching the Antenna................................... 14Attaching the Earpiece/Audio Accessory.......15Powering Up the Radio..................................15Adjusting the Volume.....................................16Identifying Radio Controls............ 17Radio Controls...............................................17Programmable Buttons..................................17Assignable Radio Functions............... 18Assignable Settings or UtilityFunctions....................................... 18Accessing the Programmed Action List.........18Push-To-Talk (PTT) Button............................19On/Off/Information Button..............................20Contents1English
Switching Between Conventional Analogand Digital Mode.......................................21Identifying Status Indicators.........22LED Indicator.................................................22Audio Tones...................................................23Indicator Tones..............................................23Making and Receiving Calls .........24Selecting a Channel.......................................24Receiving and Responding to a Radio Call... 24Receiving and Responding to aGroup Call......................................24Receiving and Responding to aPrivate Call ................................... 25Receiving an All Call  .......................25Receiving and Responding to aSelective Call  .............................26Making a Radio Call.......................................26Making a Group Call........................... 26Making a Private Call  ......................27Making an All Call  ...........................28Making a Selective Call ......................28Talkaround.....................................................29Advanced Features........................30Scan Lists...................................................... 30Scan...............................................................30Starting and Stopping Scan................ 30Responding to a TransmissionDuring a Scan................................ 30Deleting a Nuisance Channel............. 31Restoring a Nuisance Channel........... 31Vote Scan  ..................................................31Call Indicator Settings....................................32Escalating Alarm Tone Volume...........32Call Alert Operation....................................... 32Receiving and Responding to aCall Alert........................................ 32Making a Call Alert with the OneTouch Access Button.....................32Emergency Operation....................................32Sending an Emergency Alarm............ 33Sending an Emergency Alarm withCall.................................................34Sending an Emergency Alarm withVoice to Follow ............................. 34Reinitiating an Emergency Mode........35Contents2English
Exiting Emergency Mode AfterSending the Emergency Alarm...... 36Privacy  .......................................................36Lone Worker.................................................. 37Password Lock Features............................... 37Accessing the Radio fromPassword....................................... 37Utilities........................................................... 38Setting the Squelch Level................... 38Setting the Power Level......................38Turning the Voice OperatingTransmission (VOX) FeatureOn or Off........................................ 38Turning the Radio Tones/Alerts Onor Off..............................................39Voice Announcement..........................39Authorized Accessories List.........40Antennas........................................................40Batteries.........................................................40Carry Devices................................................ 40Chargers........................................................40Earbuds and Earpieces................................. 40Batteries and Chargers Warranty........... 41The Workmanship Warranty..........................41The Capacity Warranty..................................41Limited Warranty......................................42MOTOROLA COMMUNICATIONPRODUCTS............................................. 42I. WHAT THIS WARRANTY COVERSAND FOR HOW LONG:........................... 42II. GENERAL PROVISIONS:......................... 43III. STATE LAW RIGHTS:..............................43IV. HOW TO GET WARRANTY SERVICE:...43V. WHAT THIS WARRANTY DOES NOTCOVER:....................................................44VI. PATENT AND SOFTWAREPROVISIONS:.......................................... 44VII. GOVERNING LAW:.................................46Contents3English
Declaration of ConformityThis declaration is applicable to your radio only if your radio is labeled with the FCC logo shown below.Declaration of ConformityPer FCC CFR 47 Part 2 Section 2.1077(a)Responsible PartyName: Motorola Solutions, Inc.Address: 1303 East Algonquin Road, Schaumburg, IL 60196-1078, U.S.A.Phone Number: 1-800-927-2744Hereby declares that the product:Model Name: SL300conforms to the following regulations:FCC Part 15, subpart B, section 15.107(a), 15.107(d) and section 15.109(a)Declaration of Conformity4English
Class B Digital DeviceAs a personal computer peripheral, this device complies with Part 15 of the FCC Rules. This device complies withIndustry Canada licence-exempt RSS standard(s). Operation is subject to the following two conditions:1This device may not cause harmful interference, and2This device must accept any interference received, including interference that may cause undesired operation.Note:This equipment has been tested and found to comply with the limits for a Class B digital device, pursuant to part15 of the FCC Rules. These limits are designed to provide reasonable protection against harmful interference in aresidential installation. This equipment generates, uses and can radiate radio frequency energy and, if notinstalled and used in accordance with the instructions, may cause harmful interference to radio communications.However, there is no guarantee that interference will not occur in a particular installation.If this equipment does cause harmful interference to radio or television reception, which can be determined byturning the equipment off and on, the user is encouraged to try to correct the interference by one or more of thefollowing measures:•Reorient or relocate the receiving antenna.• Increase the separation between the equipment and receiver.• Connect the equipment into an outlet on a circuit different from that to which the receiver is connected.• Consult the dealer or an experienced radio/TV technician for help.Declaration of Conformity5English
Important Safety InformationATTENTION!This radio is restricted to Occupational use only.Before using the radio, read the RF Energy Exposureand Product Safety Guide for Two-Way Radios whichcontains important operating instructions for safeusage and RF energy awareness and control forCompliance with applicable standards andRegulations.For a list of Motorola-approved antennas and otheraccessories, visit the following website:http://www.motorolasolutions.comAny modification to this device, not expresslyauthorized by Motorola, may void the user’s authorityto operate this device.Under Industry Canada regulations, this radiotransmitter may only operate using an antenna of atype and maximum (or lesser) gain approved for thetransmitter by Industry Canada. To reduce potentialradio interference to other users, the antenna typeand its gain should be so chosen that the equivalentisotropically radiated power (e.i.r.p.) is not more thanthat necessary for successful communication.This radio transmitter has been approved by IndustryCanada to operate with Motorola-approved antennawith the maximum permissible gain and requiredantenna impedance for each antenna type indicated.Antenna types not included in this list, having a gaingreater than the maximum gain indicated for thattype, are strictly prohibited for use with this device.Important Safety Information6English
Software VersionAll the features described in the following sections aresupported by the radio's software version R01.00.25or later.Check with your dealer or system administrator formore details of all the features supported.Software Version7English
Consignes de sécurité importantesATTENTION!Cette radio ne doit être utilisée qu'à des finsprofessionnelles. Avant d'utiliser la radio, lisez leguide Radios bidirectionnelles  : exposition auxradiofréquences et sécurité du produit, qui contientd'importantes instructions de fonctionnement pourune utilisation sécuritaire et des informations surl'exposition aux fréquences radioélectriques, dans lebut d’assurer votre conformité aux normes etrèglements en vigueur.Visitez le site Web suivant pour obtenir la liste desantennes et des autres accessoires approuvés parMotorola :http://www.motorolasolutions.comToute modification effectuée à cet appareil sansl'autorisation explicite de Motorola peut annulerl'autorisation d'utiliser cet appareil.Selon la réglementation d'Industrie Canada, cetémetteur radio ne peut être utilisé qu'avec uneantenne dont le type et le gain maximal (ou minimal)sont approuvés par Industrie Canada pour cetémetteur. Afin de limiter les interférences radio pourles autres utilisateurs, le type et le gain de l'antennedoivent être choisis de façon à ce que la puissanceisotrope rayonnée équivalente (P.I.R.E.) ne soit pasplus forte qu'il ne le faut pour établir lacommunication.Cet émetteur radio a été approuvé par IndustrieCanada pour utilisation avec une antenne approuvéepar Motorola offrant le gain maximal autorisé etl'impédance requise pour le type d'antenne indiqué. Ilest strictement interdit d'utiliser avec cet appareil touttype d'antenne ne figurant pas dans cette liste etprésentant un gain supérieur au maximum indiquépour le type.Consignes de sécurité importantes8English
Version logicielleToutes les fonctions décrites dans les sectionssuivantes sont prises en charge par la versionR01.00.25 ou les versions ultérieures du logiciel de laradio.Pour obtenir davantage de renseignements à proposdes fonctions prises en charge, adressez-vous àvotre détaillant ou à votre administrateur de système.Version logicielle9English
Computer Software CopyrightsThe Motorola products described in this manual mayinclude copyrighted Motorola computer programsstored in semiconductor memories or other media.Laws in the United States and other countriespreserve for Motorola certain exclusive rights forcopyrighted computer programs including, but notlimited to, the exclusive right to copy or reproduce inany form the copyrighted computer program.Accordingly, any copyrighted Motorola computerprograms contained in the Motorola productsdescribed in this manual may not be copied,reproduced, modified, reverse-engineered, ordistributed in any manner without the express writtenpermission of Motorola. Furthermore, the purchase ofMotorola products shall not be deemed to grant eitherdirectly or by implication, estoppel, or otherwise, anylicense under the copyrights, patents or patentapplications of Motorola, except for the normal non-exclusive license to use that arises by operation oflaw in the sale of a product.The AMBE+2™ voice coding Technology embodied inthis product is protected by intellectual property rightsincluding patent rights, copyrights and trade secretsof Digital Voice Systems, Inc.This voice coding Technology is licensed solely foruse within this Communications Equipment. The userof this Technology is explicitly prohibited fromattempting to decompile, reverse engineer, ordisassemble the Object Code, or in any other wayconvert the Object Code into a human-readable form.U.S. Pat. Nos. #5,870,405, #5,826,222, #5,754,974,#5,701,390, #5,715,365, #5,649,050, #5,630,011,#5,581,656, #5,517,511, #5,491,772, #5,247,579,#5,226,084 and #5,195,166.Computer Software Copyrights10English
Handling PrecautionsThe MOTOTRBO Series Digital Portable radio meetsIP54 specifications, allowing the radio to withstandadverse field conditions such as being exposed towater or dust.• Keep your radio clean and exposure to watershould be avoided to help ensure properfunctionality and performance.• To clean the exterior surfaces of the radio, use adiluted solution of mild dishwashing detergent andfresh water (i.e. one teaspoon of detergent to onegallon of water).• These surfaces should be cleaned whenever aperiodic visual inspection reveals the presence ofsmudges, grease, and/or grime.Caution: The effects of certain chemicals andtheir vapors can have harmful results oncertain plastics. Avoid using aerosol sprays,tuner cleaners and other chemicals.Handling Precautions11English
Getting StartedHow to Use This GuideThis User Guide covers the basic operation of theMOTOTRBO Portables.However, your dealer or system administrator mayhave customized your radio for your specific needs.Check with your dealer or system administrator formore information.Throughout this publication, the icons described nextare used to indicate features supported in either theconventional Analog mode or conventional Digitalmode:Indicates a conventional Analog Mode-Only feature.Indicates a conventional Digital Mode-Only feature.For features that are available in both conventionalAnalog and Digital modes, no icon is shown.What Your Dealer/System Administrator CanTell YouYou can consult your dealer or system administratorabout the following:•Is your radio programmed with any presetconventional channels?• Which buttons have been programmed to accessother features?• What optional accessories may suit your needs?• What are the best radio usage practices foreffective communication?• What maintenance procedures will help promotelonger radio life?Getting Started12English
Preparing Your Radio for UseCharging the BatteryYour radio is powered by a Lithium-Ion (Li-lon)battery. To avoid damage and to ensure compliancewith warranty terms, charge the battery using aMotorola charger exactly as described in the chargeruser guide. All chargers can charge only Motorolaauthorized batteries. Other batteries may not charge.It is recommended your radio remains powered offwhile charging.Note: You can charge the battery with the radio usinga USB cable connected to a computer.Charge a new battery 14 to 16 hours before initialuse for best performance. Prior to charging abattery with the radio, it is recommended to turnthe radio off. Batteries charge best at roomtemperature.The LED lights up solid red until the user unplugsthe USB cable.Attaching the Battery1Align the battery contacts with the contacts insidethe battery compartment. Insert the contact side ofthe battery first. Gently push the battery into place.122To attach battery cover, align it in place and slidethe battery latch until it snaps into place. Slidebattery latch into lock position.Preparing Your Radio for Use13English
123Attaching the AntennaCaution: If antenna needs to be replaced,ensure that only MOTOTRBO antennas areused. Neglecting this will damage your radio.See Antennas on page 40 for a list ofavailable antennas.1With the radio turned off, set the antenna in itsreceptacle and turn clockwise.Preparing Your Radio for Use14English
2To remove the antenna, turn the antennacounterclockwise.Attaching the Earpiece/Audio AccessoryThe audio jack ( ) is located on the antenna side ofthe radio. It is used to connect accessories to theradio. ALift up the flap of the Audio Jack cover. Align theindicators ( ) on both the connector and housing,then push until it fits in properly.Powering Up the RadioShort press the On/Off/Information Button ( ).The LED lights up solid green.APreparing Your Radio for Use15English
Adjusting the VolumeTo increase the volume, push the (+) Volume Button( ) up.To decrease the volume, push the (–) VolumeButton down.Note: Your radio can be programmed to have aminimum volume offset where the volume levelcannot be lowered past the programmed minimumvolume. Check with your dealer or systemadministrator for more information.APreparing Your Radio for Use16English
Identifying Radio ControlsRadio Controls615 4 9111072381Channel Selector Switch2On/Off/Information Button3LED Indicator4Push-to-Talk (PTT) Button5Volume Button6Side Button 1[1]7Microphone8USB Connector9Accessory Connector10 Speaker11 AntennaProgrammable ButtonsYour dealer can program the programmable buttonsas shortcuts to radio functions depending on theduration of a button press:•Short press – Pressing and releasing rapidly.• Long press – Pressing and holding for theprogrammed duration.• Hold down – Keeping the button pressed.Note: The programmed duration of a button press isapplicable for all assignable radio/utility functions orsettings. See Emergency Operation on page 32 formore information on the programmed duration of theEmergency button.1These buttons are programmable.Identifying Radio Controls17English
Assignable Radio FunctionsActions – A programmable button to access a CPSprogrammable action list.Emergency On/Off – Depending on theprogramming, initiates or cancels an emergency.Mic AGC On/Off – Toggles the internal microphoneautomatic gain control (AGC) on or off.Monitor – Monitors a selected channel for activity.Nuisance Channel Delete – Temporarily removes anunwanted channel, except for the Selected Channel,from the scan list. The Selected Channel refers to theuser’s selected zone/channel combination from whichscan is initiated.One Touch Access – Directly initiates a predefinedchannel, a Private or Group Call, or a Call Alert.Permanent Monitor – Monitors a selected channelfor all radio traffic until function is disabled.Privacy  – Toggles privacy on or off.Repeater/Talkaround – Toggles between using arepeater and communicating directly with anotherradio.Scan – Toggles scan on or off.Voice Announcement On/Off – Toggles voiceannouncement on or off.Voice Operating Transmission (VOX) – TogglesVOX on or off.Assignable Settings or Utility FunctionsAll Tones/Alerts – Toggles all tones and alerts on oroff.Power Level – Toggles transmit power level betweenhigh and low.Squelch   – Toggles squelch level between tightand normal.Accessing the Programmed Action ListYou can access the CPS programmable action list byusing the programmed Actions button.1Press the programmed Actions button.A tone sounds, and the radio plays the itemannouncement voice message.Identifying Radio Controls18English
2Press the programmed Actions button again tonavigate to the next item in the action list.A tone sounds, and the radio plays the itemannouncement voice message.3Press the Volume Button up or down to toggle onor off, or change the status of the item.A tone sounds, and the radio plays the itemannouncement voice messagePush-To-Talk (PTT) ButtonThe PTT button on the side of the radio ( ) servestwo basic purposes:A• While a call is in progress, the PTT button allowsthe radio to transmit to other radios in the call.Press and hold down PTT button to talk. Releasethe PTT button to listen.The microphone is activated when the PTT buttonis pressed.• While a call is not in progress, the PTT button isused to make a new call (see Making a Radio Callon page 26).Identifying Radio Controls19English
If the Talk Permit Tone or the PTT Sidetone   isenabled, wait until the short alert tone ends beforetalking.During a call, if the Channel Free Indication feature isenabled on your radio (programmed by your dealer),you will hear a short alert tone the moment the targetradio (the radio that is receiving your call) releasesthe PTT button, indicating the channel is free for youto respond.You will also hear a continuous talk prohibit tone, ifyour call is interrupted, indicating that you shouldrelease the PTT button, for example when the radioreceives an Emergency Call.On/Off/Information ButtonThe On/Off/Information button at the top of the radio( ) serves two basic purposes:A• The On/Off/Information button is used to powerthe radio on or off.See Powering Up the Radio on page 15 for detailson powering up the radio.• When the radio is powered on, the On/Off/Information button is used to play the batterystrength announcement voice message, and showthe LED indicator of the battery strength of theradio battery.Short press the On/Off/Information button whenthe radio is powered on.Identifying Radio Controls20English
Switching Between Conventional Analog andDigital ModeEach channel in your radio can be configured as aconventional analog or conventional digital channel.Use the Channel Selector Switch () to switchbetween an analog or a digital channel.AWhen switching from digital to analog mode, certainfeatures are unavailable.Your radio also has features available in both analogand digital mode. However, the minor differences inthe way each feature works does not affect theperformance of your radio.Note: Your radio also switches between digital andanalog modes during a dual mode scan (see Scan onpage 30).Identifying Radio Controls21English
Identifying Status IndicatorsLED IndicatorThe LED indicator ( ) shows the operational status ofyour radio.ASolid red Radio is charging.Blinking red Radio is transmitting at lowbattery condition, receivingan emergencytransmission, has failedthe self-test upon poweringup, has charging errors orhas moved out of range ifradio is configured withAuto-Range TransponderSystem. Also indicates lowbattery charge when theOn/Off button is pressed.Solid yellow Radio is monitoring aconventional channel. Alsoindicates fair batterycharge when the On/Offbutton is pressed.Blinking yellow Radio is scanning foractivity or receiving a CallAlert, or the flexiblereceive list is enabled.Solid green Radio is powering up,sending a Call Alert or anemergency transmission,or transmitting. Alsoindicates full charge of theIdentifying Status Indicators22English
battery when theprogrammable On/Offbutton is pressed.Blinking green Radio is receiving a call ordata, or detecting activityover the air.Audio TonesAudio tones provide you with audible indications ofthe status, or response to data received on the radio.Continuous Tone A monotone sound.Sounds continuouslyuntil termination.Periodic Tone Sounds periodicallydepending on theduration set by the radio.Tone starts, stops, andrepeats itself.Repetitive Tone A single tone thatrepeats itself until it isterminated by the user.Momentary Tone Sounds only once for ashort period of timedefined by the radio.Indicator TonesHigh pitched tone Low pitched tonePositive Indicator ToneNegative Indicator ToneIdentifying Status Indicators23English
Making and Receiving CallsSelecting a ChannelTransmissions are sent and received on a channel.Your radio supports up to 2 channels. Depending onyour radio’s configuration, each channel may havebeen programmed differently to support differentgroups of users or supplied with different features.Push the Channel Selector Switch to select thechannel.Receiving and Responding to a Radio CallOnce the channel, subscriber ID, or group ID is set,you can proceed to receive and respond to calls.The LED lights up solid green while the radio istransmitting and blinks green when the radio isreceiving.Receiving and Responding to a Group CallTo receive a call from a group of users, your radiomust be configured as part of that group.LED blinks green. Your radio unmutes and theincoming call sounds through the radio's speaker.1Hold the radio vertically 1 to 2 inches (2.5 to 5.0cm) from your mouth.• If the Channel Free Indication feature isenabled, you hear a short alert tone themoment the transmitting radio releases thePTT button, indicating the channel is free foryou to respond. Press the PTT button torespond.The LED lights up solid green.2Wait for one of the following tones to finish (ifenabled), and speak clearly into the microphone.• The Talk Permit Tone.•The PTT Sidetone. 3Release the PTT button to listen.If there is no voice activity for a predetermined periodof time, the call ends.Note: See Making a Group Call on page 26 fordetails on making a Group Call.Making and Receiving Calls24English
Receiving and Responding to a Private CallA Private Call is a call from an individual radio toanother individual radio.When you receive a Private Call, the LED blinksgreen. Your radio unmutes and the incoming callsounds through the radio's speaker.1Hold the radio vertically 1 to 2 inches (2.5 to 5.0cm) from your mouth.• If the Channel Free Indication feature isenabled, you hear a short alert tone themoment the transmitting radio releases thePTT button, indicating the channel is free foryou to respond. Press the PTT button torespond.The LED lights up solid green.2Wait for the Talk Permit Tone to finish (if enabled),and speak clearly into the microphone.3Release the PTT button to listen.If there is no voice activity for a predetermined periodof time, the call ends.See Making a Private Call on page 27 for details onmaking a Private Call.Receiving an All Call An All Call is a call from an individual radio to everyradio on the channel. It is used to make importantannouncements requiring the user’s full attention.When you receive an All Call, a tone sounds and theLED blinks green.Your radio unmutes and the incoming call soundsthrough the radio speaker.An All Call does not wait for a predetermined periodof time before ending. If the Channel Free Indication feature is enabled,you will hear a short alert tone the moment thetransmitting radio releases the PTT button, indicatingthe channel is now available for use.You cannot respond to an All Call.Note: The radio stops receiving the All Call if youswitch to a different channel while receiving the call.During an All Call, you will not be able to use anyprogrammed button functions until the call ends.Making and Receiving Calls25English
Receiving and Responding to a Selective Call A Selective Call is a call from an individual radio toanother individual radio. It is a Private Call on ananalog system.When you receive a Selective Call, the LED blinksgreen. Your radio unmutes and the incoming callsounds through the radio's speaker.1Hold the radio vertically 1 to 2 inches (2.5 to 5.0cm) from your mouth.2Press the PTT button to respond to the call.The LED lights up solid green.3Wait for the Talk Permit Tone to finish (if enabled),and speak clearly into the microphone.4Release the PTT button to listen.If there is no voice activity for a predetermined periodof time, the call ends.See Making a Private Call on page 27 for details onmaking a Private Call.Making a Radio CallYou can select a channel by using:•Channel Selector Switch.•A programmed One Touch Access button Note: Your radio must have the Privacy featureenabled on the channel to send a privacy-enabledtransmission. Only target radios with the samePrivacy Key as your radio will be able to unscramblethe transmission.Note: See Privacy on page 36 for more information.Making a Group CallTo make a call to a group of users, your radio mustbe configured as part of that group.1Do one of the following.•Select the channel with the active group aliasor ID. See Selecting a Channel on page 24.• Press the programmed One Touch Accessbutton.Making and Receiving Calls26English
2Hold the radio vertically 1 to 2 inches (2.5 to 5.0cm) from your mouth.3Press the PTT button to make the call.The LED lights up solid green.4Release the PTT button to listen.When the target radio responds, the LED blinksgreen.5 If the Channel Free Indication feature isenabled, you hear a short alert tone the momentthe transmitting radio releases the PTT button,indicating the channel is free for you to respond.Press the PTT button to respond.If there is no voice activity for a predeterminedperiod of time, the call ends.Making a Private Call While you can receive and/or respond to a PrivateCall initiated by an authorized individual radio, yourradio must be programmed for you to initiate a PrivateCall.There are two types of Private Calls. The first type,where a radio presence check is performed prior tosetting up the call, while the other sets up the callimmediately.Only one of these call types can be programmed toyour radio by your dealer.You will hear a negative indicator tone, when youmake a Private Call via the One Touch Accessbutton, if this feature is not enabled.Use the Call Alert features to contact an individualradio. See Call Alert Operation on page 32 for moreinformation.1Do one of the following.• Select the channel with the active subscriberalias or ID. See Selecting a Channel on page24.• Press the programmed One Touch Accessbutton.2Hold the radio vertically 1 to 2 inches (2.5 to 5.0cm) from your mouth.3Press the PTT button to make the call.4Wait for the Talk Permit Tone to finish (if enabled),and speak clearly into the microphone.Making and Receiving Calls27English
5Release the PTT button to listen.When the target radio responds, the LED blinksgreen.6 If the Channel Free Indication feature isenabled, you hear a short alert tone the momentthe transmitting radio releases the PTT button,indicating the channel is free for you to respond.Press the PTT button to respond.If there is no voice activity for a predeterminedperiod of time, the call ends. You hear a shorttone.Making an All Call This feature allows you to transmit to all users on thechannel. Your radio must be programmed to allowyou to use this feature.Users on the channel cannot respond to an All Call.1Select the channel with the active All Call groupalias or ID. See Selecting a Channel on page 24.2Hold the radio vertically 1 to 2 inches (2.5 to 5.0cm) from your mouth.3Press the PTT button to make the call.Making a Selective CallJust like a Private Call, while you can receive and/orrespond to a Selective Call initiated by an authorizedindividual radio, your radio must be programmed foryou to initiate a Selective Call.1Select the channel with the active subscriber aliasor ID. See Selecting a Channel on page 24.2Hold the radio vertically 1 to 2 inches (2.5 to 5.0cm) from your mouth.3Press the PTT button to make the call.The LED lights up solid green.4Wait for one of the following tones to finish (ifenabled), and speak clearly into the microphone.•The Talk Permit Tone.•The PTT Sidetone. 5Release the PTT button to listen.When the target radio responds, the LED blinksgreen.Making and Receiving Calls28English
 If the Channel Free Indication feature isenabled, you hear a short alert tone the momentthe transmitting radio releases the PTT button,indicating the channel is free for you to respond.Press the PTT button to respond.If there is no voice activity for a predeterminedperiod of time, the call ends.TalkaroundYou can continue to communicate when yourrepeater is not operating, or when your radio is out ofthe repeater’s range but within talking range of otherradios.This is called “talkaround”.The Talkaround setting is retained even afterpowering down.Press the programmed Repeater/Talkaroundbutton.You hear ... Indicating ...Positive IndicatorToneRadio is in Talkaround mode.You hear ... Indicating ...NegativeIndicator ToneRadio is in Repeater mode.Making and Receiving Calls29English
Advanced FeaturesScan ListsScan lists are created and assigned to individualchannels/groups.Your radio can support up to 3 scan lists, with amaximum of 16 members in a list.ScanWhen you start a scan, your radio cycles through theprogrammed scan list for the current channel lookingfor voice activity.The LED blinks yellow.There are two ways of initiating scan:•Main Channel Scan (Manual): Your radio scansall the channels/groups in your scan list. Onentering scan, your radio may – depending on thesettings – automatically start on the last scanned“active” channel/group or on the channel wherescan was initiated.•Auto Scan (Automatic): Your radio automaticallystarts scanning when you select a channel/groupthat has Auto Scan enabled.Starting and Stopping ScanDo one of the following.•Press the programmed Scan button.• Use the Channel Selector Switch to select achannel programmed with Auto Scan enabled.The LED blinks yellow and you hear a positiveindicator tone, when Scan is enabled.The LED turns off and you hear a negativeindicator tone, when Scan is disabled.Responding to a Transmission During a ScanDuring scanning, your radio stops on a channel/groupwhere activity is detected.1Hold the radio vertically 1 to 2 inches (2.5 to 5.0cm) from your mouth. If the Channel Free Indication feature isenabled, you hear a short alert tone the momentthe transmitting radio releases the PTT button,indicating the channel is free for you to respond.Advanced Features30English
2Press the PTT button during hang time.The LED lights up solid green.3Release the PTT button to listen.If you do not respond within the hang time, theradio returns to scanning other channels/groups.Deleting a Nuisance ChannelIf a channel continually generates unwanted calls ornoise (termed a “nuisance” channel), you cantemporarily remove the unwanted channel from thescan list.This capability does not apply to the channeldesignated as the Selected Channel.1When your radio “locks on to” an unwanted ornuisance channel, press the programmedNuisance Channel Delete button until you hear atone.2Release the Nuisance Channel Delete button.The nuisance channel is deleted.Restoring a Nuisance ChannelTo restore the deleted nuisance channel, do one ofthe following:•Turn the radio off and then power it on again.• Stop and restart a scan via the programmed Scanbutton.• Change the channel via the Channel SelectorSwitch.Vote Scan Vote Scan provides you with wide area coverage inareas where there are multiple base stationstransmitting identical information on different analogchannels.Your radio scans analog channels of multiple basestations and performs a voting process to select thestrongest received signal. Once that is established,your radio unmutes to transmissions from that basestation.The LED blinks yellow during the Vote Scanoperation.Advanced Features31English
To respond to a transmission during a Vote Scan,follow the same procedures as Responding to aTransmission During a Scan on page 30.Call Indicator SettingsYou can turn on or off the ringing tones for a receivedPrivate Call (see Turning the Radio Tones/Alerts Onor Off on page 39).Escalating Alarm Tone VolumeYou can program your radio to continually alert youwhen a radio call remains unanswered. This is doneby automatically increasing the alarm tone volumeover time. This feature is known as Escalert.Call Alert OperationCall Alert paging enables you to alert a specific radiouser to call you back when they are able to do so.This feature is accessible via a programmed OneTouch Access button.Receiving and Responding to a Call AlertWhen you receive a Call Alert page, you hear arepetitive tone and the LED blinks yellow.Press the PTT button within four (4) seconds ofreceiving a Call Alert page to respond to thePrivate Call.Making a Call Alert with the One Touch Access ButtonPress the programmed One Touch Accessbutton to make a Call Alert to the predefined aliasor ID.The LED lights up solid green when your radio issending the Call Alert.If the Call Alert acknowledgement is received, atone sounds.If the Call Alert acknowledgement is not received,a low-pitch tone sounds.Emergency OperationAn Emergency Alarm is used to indicate a criticalsituation. You are able to initiate an Emergency atany time even when there is activity on the currentchannel.Your dealer can set the duration of a button press forthe programmed Emergency button, except for longpress, which is similar with all other buttons:Advanced Features32English
• Short press – Between 0.05 seconds and 0.75seconds•Long press – Between 1.00 second and 3.75secondsThe Emergency button is assigned with theEmergency On/Off feature. Check with your dealer forthe assigned operation of the Emergency button.Note: If the short press for the Emergency button isassigned to turn on the Emergency mode, then thelong press for the Emergency button is assigned toexit the Emergency mode.If the long press for the Emergency button isassigned to turn on the Emergency mode, then theshort press for the Emergency button is assigned toexit the Emergency mode.Your radio supports three Emergency Alarms:• Emergency Alarm• Emergency Alarm with Call• Emergency Alarm with Voice to FollowNote: Only ONE of the Emergency Alarms above canbe assigned to the programmed Emergency button.In addition, each alarm has the following types:•Regular – Radio transmits an alarm signal andshows audio and/or visual indicators.•Silent – Radio transmits an alarm signal withoutany audio or visual indicators. Radio receives callswithout any sound through the radio’s speaker,until you press the PTT button to initiate the call.•Silent with Voice – Radio transmits an alarmsignal without any audio or visual indicators, butallow incoming calls to sound through the radio’sspeaker.Sending an Emergency AlarmThis feature allows you to send an Emergency Alarm,a non-voice signal, which triggers an alert indicationon a group of radios.If your radio is set to Silent, it does not display anyaudio or visual indicators during Emergency mode.Press the programmed Emergency On button.When an Emergency Alarm acknowledgement isreceived, the Emergency tone sounds and theLED blinks green.If your radio does not receive an EmergencyAlarm acknowledgement, and after all retries havebeen exhausted, a tone sounds.Advanced Features33English
Radio exits the Emergency Alarm mode.Sending an Emergency Alarm with CallThis feature allows you to send an Emergency Alarmto a group of radios. Upon acknowledgement by aradio within the group, the group of radios cancommunicate over a programmed Emergencychannel.If your radio is set to Silent, it does not display anyaudio or visual indicators during Emergency mode, orallow any received calls to sound through the radio’sspeaker, until you press the PTT button to initiate thecall.If your radio is set to Silent with Voice, it does notdisplay any audio or visual indicators duringEmergency mode, but allow incoming calls to soundthrough the radio’s speaker. The indicators onlyappear once you press the PTT button to initiate, orrespond to, the call.1Press the programmed Emergency On button.The LED lights up solid green.When an Emergency Alarm acknowledgement isreceived, the Emergency tone sounds and theLED blinks green.2Hold the radio vertically 1 to 2 inches (2.5 to 5.0cm) from your mouth.3Press PTT button to make the call.The LED lights up solid green.4Release the PTT button to listen. If the Channel Free Indication feature isenabled, you hear a short alert tone the momentthe transmitting radio releases the PTT button,indicating the channel is free for you to respond.5Press the PTT button to respond.6Once your call ends, press Emergency Off buttonto exit the Emergency mode.Sending an Emergency Alarm with Voice to FollowThis feature allows you to send an Emergency Alarmto a group of radios. Your radio’s microphone isautomatically activated, allowing you to communicatewith the group of radios without pressing the PTTbutton.Advanced Features34English
This activated microphone state is also known as “hotmic”.Note: Some accessories may not support “hot mic”.Check with your dealer or system administrator formore information.If you press the PTT button during the programmedhot mic transmission period, you hear a prohibit tone,indicating that you should release the PTT button.The radio ignores the PTT press and remains inEmergency mode.Note: If you press the PTT button during hot mic, andcontinue to press it after the hot mic duration expires,the radio continues to transmit until you release thePTT button.If your radio is set to Silent, it does not display anyaudio or visual indicators during Emergency mode, orallow any received calls to sound through the radio’sspeaker, until the programmed hot mic transmissionperiod is over, and you press the PTT button.If your radio is set to Silent with Voice, it does notdisplay any audio or visual indicators duringEmergency mode when you are making the call withhot mic, but allow sound through the radio’s speakerwhen the target radio responds after the programmedhot mic transmission period is over. The indicatorsonly appear when you press the PTT button.Note: If the Emergency Alarm request fails, the radiodoes not retry to send the request, and enters the hotmic state directly.1Press the programmed Emergency On button.The LED lights up solid green.2Once a tone sounds, speak clearly into themicrophone.When hot mic has been enabled, the radioautomatically transmits without a PTT button pressuntil the hot mic duration expires. Whiletransmitting, the LED lights up solid green.3Once the hot mic duration expires, the radioautomatically stops transmitting. To transmitagain, press the PTT button.Reinitiating an Emergency ModeNote: This feature is only applicable to the radiosending the Emergency Alarm.There are two instances where this can happen:Advanced Features35English
• You change the channel while the radio is inEmergency mode. This exits the Emergencymode. If Emergency Alarm is enabled on this newchannel, the radio reinitiates Emergency.•You press the programmed Emergency Onbutton during an Emergency initiation/transmissionstate. This causes the radio to exit this state, andto reinitiate Emergency.Exiting Emergency Mode After Sending the EmergencyAlarmNote: This feature is only applicable to the radiosending the Emergency Alarm.Your radio exits Emergency mode when one of thefollowing occurs:•Emergency Alarm acknowledgement is received(for Emergency Alarm only).• All retries to send the alarm have been exhausted.• The Emergency Off button is pressed.Note: If your radio is powered off, it exits theEmergency mode. The radio will not reinitiate theEmergency mode automatically when it is turned onagain.Privacy If enabled, this feature helps to preventeavesdropping by unauthorized users on a channelby the use of a software-based scrambling solution.The signaling and user identification portions of atransmission are not scrambled.Your radio must have privacy enabled on the channelto send a privacy-enabled transmission, although thisis not a necessary requirement for receiving atransmission. While on a privacy-enabled channel,the radio is still able to receive clear (unscrambled)transmissions.Your radio only supports Basic Privacy.To unscramble a privacy-enabled call or datatransmission, your radio must be programmed tohave the same Privacy Key (for Basic Privacy) as thetransmitting radio.If your radio receives a scrambled call that is of adifferent Privacy Key, or a different Key Value andKey ID, you will hear a garbled transmission (BasicPrivacy).Advanced Features36English
The LED lights up solid green while the radio istransmitting and blinks green rapidly when the radio isreceiving an ongoing privacy-enabled transmission.Note: Some radio models may not offer this Privacyfeature. Check with your dealer or systemadministrator for more information.Lone WorkerThis feature raises an emergency if there is no useractivity, such as any radio button press or activationof the channel selector, for a predefined time.Before raising the emergency, when the inactivitytimer expires, the radio warns the user via an audioindicator.If there is still no acknowledgement by the userbefore the predefined reminder timer expires, theradio initiates an Emergency Alarm.Only one of the following Emergency Alarms can beassigned to this feature:•Emergency Alarm• Emergency Alarm with Call• Emergency Alarm with Voice to FollowThe radio remains in the emergency state allowingvoice messages to proceed until action is taken. See Emergency Operation on page 32 on ways to exitEmergency.Note: This feature is limited to radios with thisfunction enabled. Check with your dealer or systemadministrator for more information.Password Lock FeaturesIf enabled, this feature only allows you access yourradio if the correct password is entered uponpowering up.Accessing the Radio from Password1Power up your radio.You hear a continuous tone.2Push the Channel Selector Switch to enter thefirst digit of the password.3Press Side Button 1 to enter each digit of theremaining three digits of the password. When thesecond digit of the password is entered, your radioignores any push of the Channel SelectorSwitch. When the last digit of the four-digitAdvanced Features37English
password is entered, your radio automaticallychecks the validity of the password.You hear a positive indicator tone for every digitentered.If the password is correct, your radio proceeds topower up. See Powering Up the Radio on page15.If the password is incorrect, you hear a continuoustone. Repeat steps 1 to 3.UtilitiesSetting the Squelch LevelYou can adjust your radio's squelch level to filter outunwanted calls with low signal strength or channelsthat have a higher than normal background noise.Normal Squelch is the default. Tight Squelch filtersout (unwanted) calls and/or background noise;however, calls from remote locations may also befiltered out.Press the programmed Squelch button.Tone heard ... Radio operating in ...Positive Indicator tone Tight SquelchNegative Indicator tone Normal SquelchSetting the Power LevelYou can customize your radio’s power setting to highor low for each channel.High Power enables communication with radioslocated at a considerable distance from you. LowPower enables communication with radios in closerproximity.Press the programmed Power Level button.Tone heard ... Radio transmittingat ...Positive Indicator tone Low PowerNegative Indicator tone High PowerTurning the Voice Operating Transmission (VOX)Feature On or OffThis feature allows you to initiate a hands-free voiceactivated call on a programmed channel. The radioAdvanced Features38English
automatically transmits, for a programmed period,whenever the microphone on the VOX-capableaccessory detects voice.Pressing the PTT button during radio operation willdisable VOX. To re-enable VOX, do one of thefollowing:•Turn the radio off and power it on again.• Change the channel via the Channel SelectorSwitch.• Press the programmed VOX button to toggle thefeature on or off.Note: Turning this feature on or off is limited to radioswith this function enabled. Check with your dealer orsystem administrator for more information.Turning the Radio Tones/Alerts On or OffYou can enable and disable all radio tones and alerts(except for the incoming Emergency alert tone) ifneeded.Press the programmed All Tones/Alerts button.Tone heard ... IndicationPositive Indicator tone All tones and alerts areON.Negative Indicator tone All tones and alerts areOFF.Voice AnnouncementThis feature enables the radio to audibly indicate thecurrent Zone or Channel the user has just assigned,or programmable button press. This audio indicatorcan be customized per customer requirements.Press the programmed Voice Announcementbutton.Tone heard ... IndicationPositive Indicator tone All tones and alerts areON.Negative Indicator tone All tones and alerts areOFF.Advanced Features39English
Authorized Accessories ListAntennas• UHF, 403 – 425 MHz, 4.5 cm, Stubby Antenna(PMAE4093_)•UHF, 420 – 445 MHz, 4.5 cm, Stubby Antenna(PMAE4094_)• UHF, 435 – 470 MHz, 4.5 cm, Stubby Antenna(PMAE4095_)• VHF, 136 – 144 MHz, 5.0 cm, Stubby Antenna(PMAD4144_)• VHF, 144 – 156 MHz, 5.0 cm, Stubby Antenna(PMAD4145_)• VHF, 156 – 174 MHz, 5.0 cm, Stubby Antenna(PMAD4146_)Batteries• Lithium-Ion 2200 mAh Battery (PMNN4468_)•Battery Door (PMLN7074_)Carry Devices• Nylon Wrist Strap (PMLN6074_)•Flexible Quick Release Hand Strap (PMLN7076_)• Heavy-Duty Swivel Belt Clip (PMLN7128_)• Swivel Carry Holster (PMLN7190_)Chargers• Standard Multi-Unit Charger, US/NA Plug(PMLN7101_)•Standard Single Unit Charger, US/NA Plug(PMLN7109_)• Micro USB Power Supply, 5 V 1 A, US/NA Plug(25009298001)Earbuds and Earpieces• Earbud with In-line Mic/PTT, MagOne(PMLN7156_)•2-Wire with Transparent Tube, Black(PMLN7157_)• 1-Wire Surveillance Earpiece, In-Line Mic and PTT(PMLN7158_)• Swivel Earpiece, In-line Mic and PTT(PMLN7189_)• Transparent Acoustic Tube (RLN6242_)• High Noise Yellow Foam Earpieces (5080384F72)Authorized Accessories List40English
Batteries and Chargers WarrantyThe Workmanship WarrantyThe workmanship warranty guarantees againstdefects in workmanship under normal use andservice.All MOTOTRBOBatteriesTwo (2) YearsIMPRES Chargers(Single-Unit and Multi-Unit, Non-Display)Two (2) YearsIMPRES Chargers (Multi-Unit with Display)One (1) YearThe Capacity WarrantyThe capacity warranty guarantees 80% of the ratedcapacity for the warranty duration.Nickel Metal-Hydride(NiMH) or Lithium-Ion (Li-lon) Batteries12 MonthsIMPRES Batteries, WhenUsed Exclusively withIMPRES Chargers18 MonthsBatteries and Chargers Warranty41English
Limited WarrantyMOTOROLA COMMUNICATION PRODUCTSI. WHAT THIS WARRANTY COVERS AND FORHOW LONG:MOTOROLA SOLUTIONS, INC. (“MOTOROLA”)warrants the MOTOROLA manufacturedCommunication Products listed below (“Product”)against defects in material and workmanship undernormal use and service for a period of time from thedate of purchase as scheduled below:Digital Radios Two (2) YearsProduct Accessories One (1) YearMOTOROLA, at its option, will at no charge eitherrepair the Product (with new or reconditioned parts),replace it (with a new or reconditioned Product), orrefund the purchase price of the Product during thewarranty period provided it is returned in accordancewith the terms of this warranty. Replaced parts orboards are warranted for the balance of the originalapplicable warranty period. All replaced parts ofProduct shall become the property of MOTOROLA.This express limited warranty is extended byMOTOROLA to the original end user purchaser onlyand is not assignable or transferable to any otherparty. This is the complete warranty for the Productmanufactured by MOTOROLA. MOTOROLAassumes no obligations or liability for additions ormodifications to this warranty unless made in writingand signed by an officer of MOTOROLA.Unless made in a separate agreement betweenMOTOROLA and the original end user purchaser,MOTOROLA does not warrant the installation,maintenance or service of the Product.MOTOROLA cannot be responsible in any way forany ancillary equipment not furnished by MOTOROLAwhich is attached to or used in connection with theProduct, or for operation of the Product with anyancillary equipment, and all such equipment isexpressly excluded from this warranty. Because eachsystem which may use the Product is unique,MOTOROLA disclaims liability for range, coverage, oroperation of the system as a whole under thiswarranty.Limited Warranty42English
II. GENERAL PROVISIONS:This warranty sets forth the full extent ofMOTOROLA'S responsibilities regarding the Product.Repair, replacement or refund of the purchase price,at MOTOROLA’s option, is the exclusive remedy.THIS WARRANTY IS GIVEN IN LIEU OF ALLOTHER EXPRESS WARRANTIES. IMPLIEDWARRANTIES, INCLUDING WITHOUT LIMITATION,IMPLIED WARRANTIES OF MERCHANTABILITYAND FITNESS FOR A PARTICULAR PURPOSE,ARE LIMITED TO THE DURATION OF THISLIMITED WARRANTY. IN NO EVENT SHALLMOTOROLA BE LIABLE FOR DAMAGES INEXCESS OF THE PURCHASE PRICE OF THEPRODUCT, FOR ANY LOSS OF USE, LOSS OFTIME, INCONVENIENCE, COMMERCIAL LOSS,LOST PROFITS OR SAVINGS OR OTHERINCIDENTAL, SPECIAL OR CONSEQUENTIALDAMAGES ARISING OUT OF THE USE ORINABILITY TO USE SUCH PRODUCT, TO THEFULL EXTENT SUCH MAY BE DISCLAIMED BYLAW.III. STATE LAW RIGHTS:SOME STATES DO NOT ALLOW THE EXCLUSIONOR LIMITATION OF INCIDENTAL ORCONSEQUENTIAL DAMAGES OR LIMITATION ONHOW LONG AN IMPLIED WARRANTY LASTS, SOTHE ABOVE LIMITATION OR EXCLUSIONS MAYNOT APPLY.This warranty gives specific legal rights, and theremay be other rights which may vary from state tostate.IV. HOW TO GET WARRANTY SERVICE:You must provide proof of purchase (bearing the dateof purchase and Product item serial number) in orderto receive warranty service and, also, deliver or sendthe Product item, transportation and insuranceprepaid, to an authorized warranty service location.Warranty service will be provided by MOTOROLAthrough one of its authorized warranty servicelocations. If you first contact the company which soldyou the Product (e.g., dealer or communicationservice provider), it can facilitate your obtainingwarranty service. You can also call MOTOROLA at1-800-927-2744 US/Canada.Limited Warranty43English
V. WHAT THIS WARRANTY DOES NOTCOVER:1Defects or damage resulting from use of theProduct in other than its normal and customarymanner.2Defects or damage from misuse, accident, water,or neglect.3Defects or damage from improper testing,operation, maintenance, installation, alteration,modification, or adjustment.4Breakage or damage to antennas unless causeddirectly by defects in material workmanship.5A Product subjected to unauthorized Productmodifications, disassembles or repairs (including,without limitation, the addition to the Product ofnon-MOTOROLA supplied equipment) whichadversely affect performance of the Product orinterfere with MOTOROLA's normal warrantyinspection and testing of the Product to verify anywarranty claim.6Product which has had the serial number removedor made illegible.7Rechargeable batteries if:• any of the seals on the battery enclosure ofcells are broken or show evidence oftampering.•the damage or defect is caused by charging orusing the battery in equipment or service otherthan the Product for which it is specified.8Freight costs to the repair depot.9A Product which, due to illegal or unauthorizedalteration of the software/firmware in the Product,does not function in accordance withMOTOROLA’s published specifications or the FCCcertification labeling in effect for the Product at thetime the Product was initially distributed fromMOTOROLA.10 Scratches or other cosmetic damage to Productsurfaces that does not affect the operation of theProduct.11 Normal and customary wear and tear.VI. PATENT AND SOFTWARE PROVISIONS:MOTOROLA will defend, at its own expense, any suitbrought against the end user purchaser to the extentthat it is based on a claim that the Product or partsinfringe a United States patent, and MOTOROLA willpay those costs and damages finally awarded againstLimited Warranty44English
the end user purchaser in any such suit which areattributable to any such claim, but such defense andpayments are conditioned on the following:1that MOTOROLA will be notified promptly inwriting by such purchaser of any notice of suchclaim,2that MOTOROLA will have sole control of thedefense of such suit and all negotiations for itssettlement or compromise, and3should the Product or parts become, or inMOTOROLA’s opinion be likely to become, thesubject of a claim of infringement of a UnitedStates patent, that such purchaser will permitMOTOROLA, at its option and expense, either toprocure for such purchaser the right to continueusing the Product or parts or to replace or modifythe same so that it becomes non-infringing or togrant such purchaser a credit for the Product orparts as depreciated and accept its return. Thedepreciation will be an equal amount per year overthe lifetime of the Product or parts as establishedby MOTOROLA.MOTOROLA will have no liability with respect to anyclaim of patent infringement which is based upon thecombination of the Product or parts furnishedhereunder with software, apparatus or devices notfurnished by MOTOROLA, nor will MOTOROLA haveany liability for the use of ancillary equipment orsoftware not furnished by MOTOROLA which isattached to or used in connection with the Product.The foregoing states the entire liability ofMOTOROLA with respect to infringement of patentsby the Product or any parts thereof.Laws in the United States and other countriespreserve for MOTOROLA certain exclusive rights forcopyrighted MOTOROLA software such as theexclusive rights to reproduce in copies and distributecopies of such MOTOROLA software. MOTOROLAsoftware may be used in only the Product in whichthe software was originally embodied and suchsoftware in such Product may not be replaced,copied, distributed, modified in any way, or used toproduce any derivative thereof. No other useincluding, without limitation, alteration, modification,reproduction, distribution, or reverse engineering ofsuch MOTOROLA software or exercise of rights insuch MOTOROLA software is permitted. No license isgranted by implication, estoppel or otherwise underMOTOROLA patent rights or copyrights.Limited Warranty45English
VII. GOVERNING LAW:This Warranty is governed by the laws of the State ofIllinois, U.S.A.Limited Warranty46English
BackCover_HalfLetter_P299C.fm  Page 1  Friday, July 5, 2013  2:40 PM
MOTOROLA, MOTO, MOTOROLA SOLUTIONS and the Stylized M logo are trademarks or registered trademarks of Motorola Trademark Holdings, LLC and are used under license.All other trademarks are the property of their respective owners. © 2014 Motorola Solutions, Inc. All rights reserved.September 2014www.motorolasolutions.com/mototrbo*MN000897A01*MN000897A01-ABackCover_HalfLetter_P299C.fm  Page 2  Friday, July 5, 2013  2:40 PM

Navigation menu