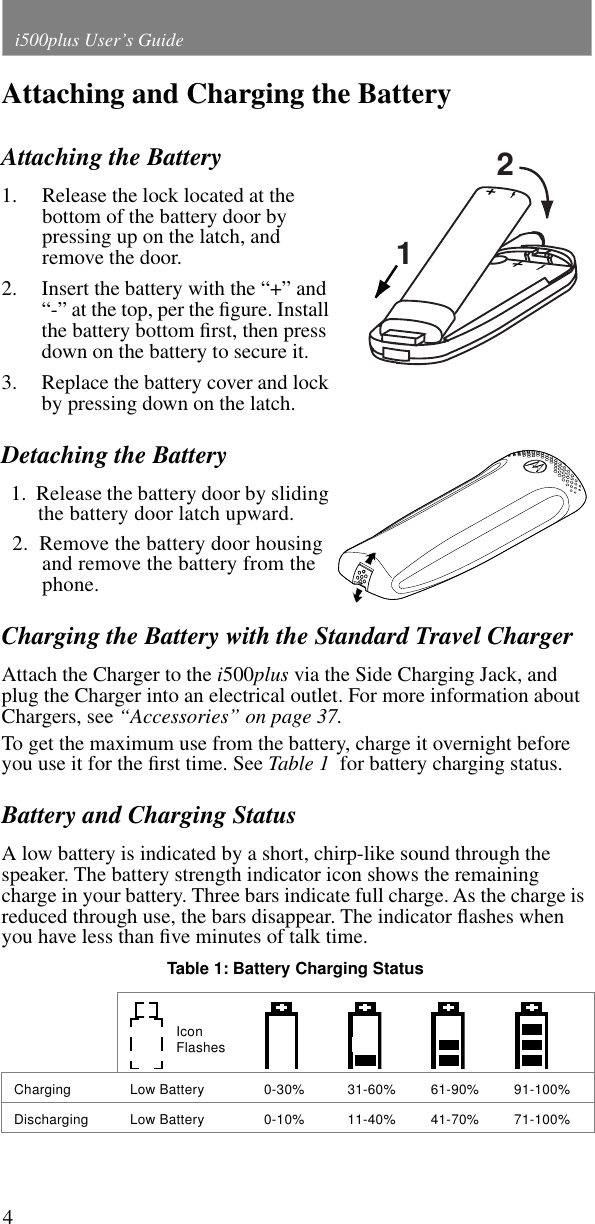
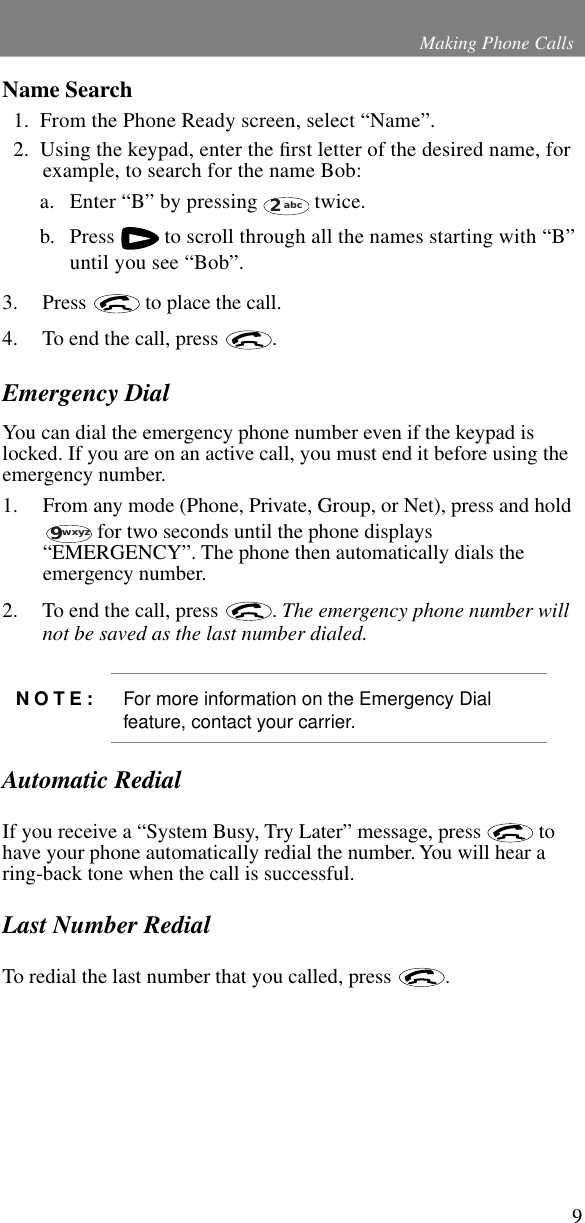
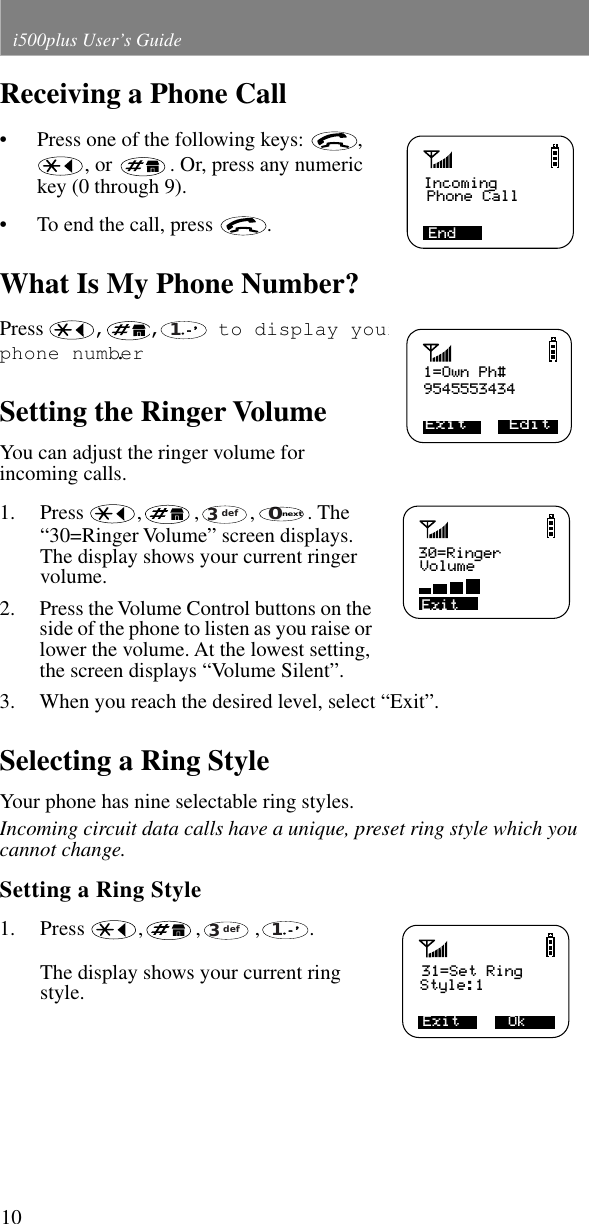
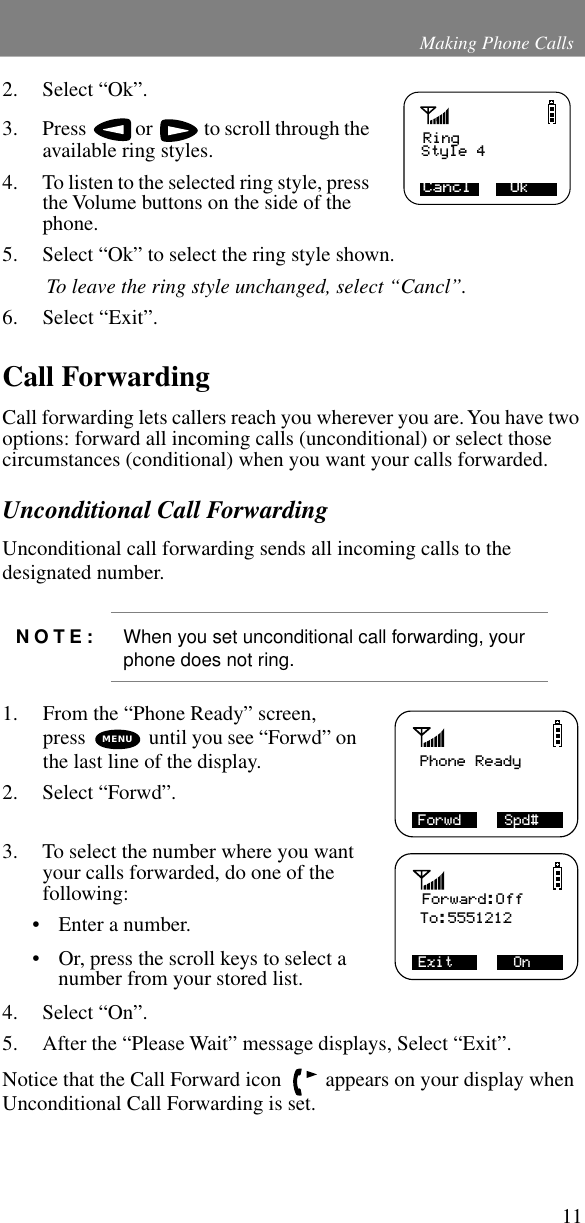
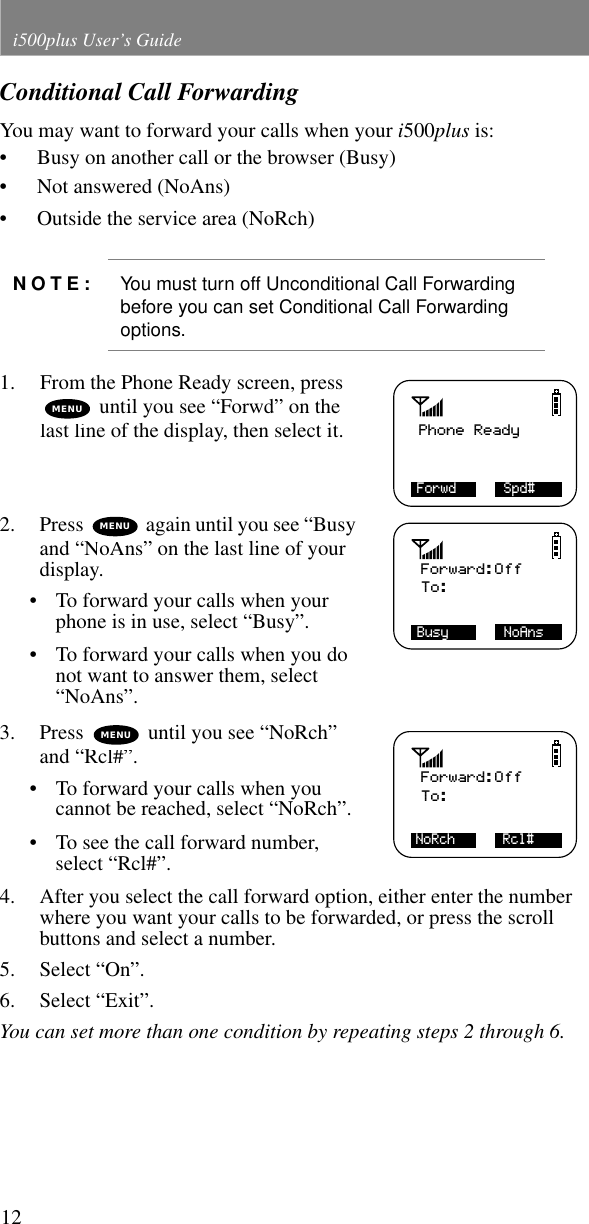
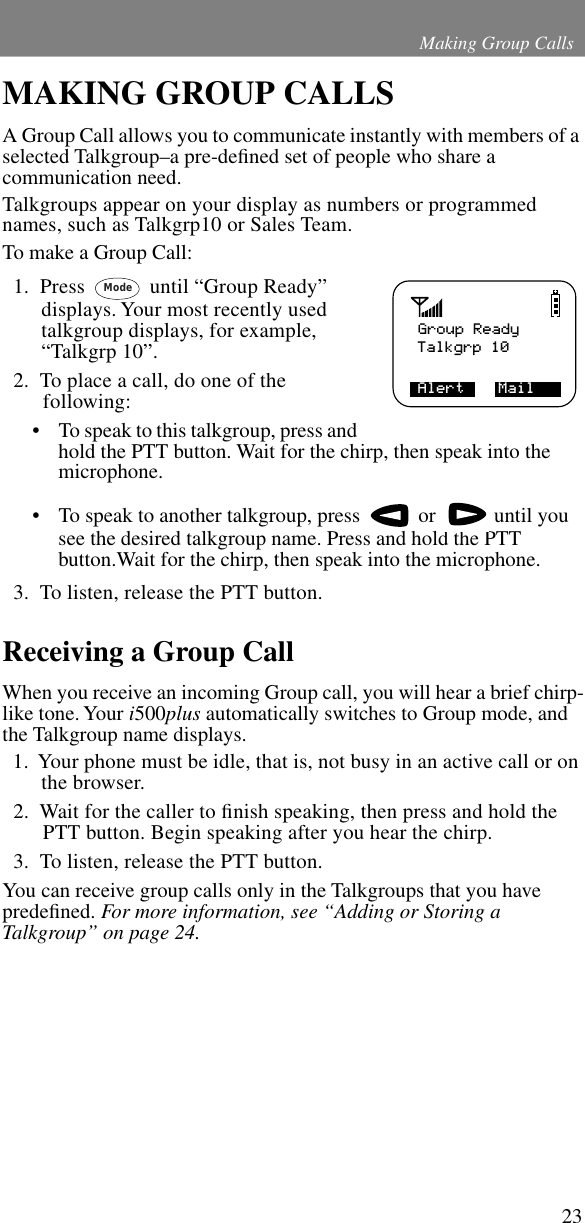
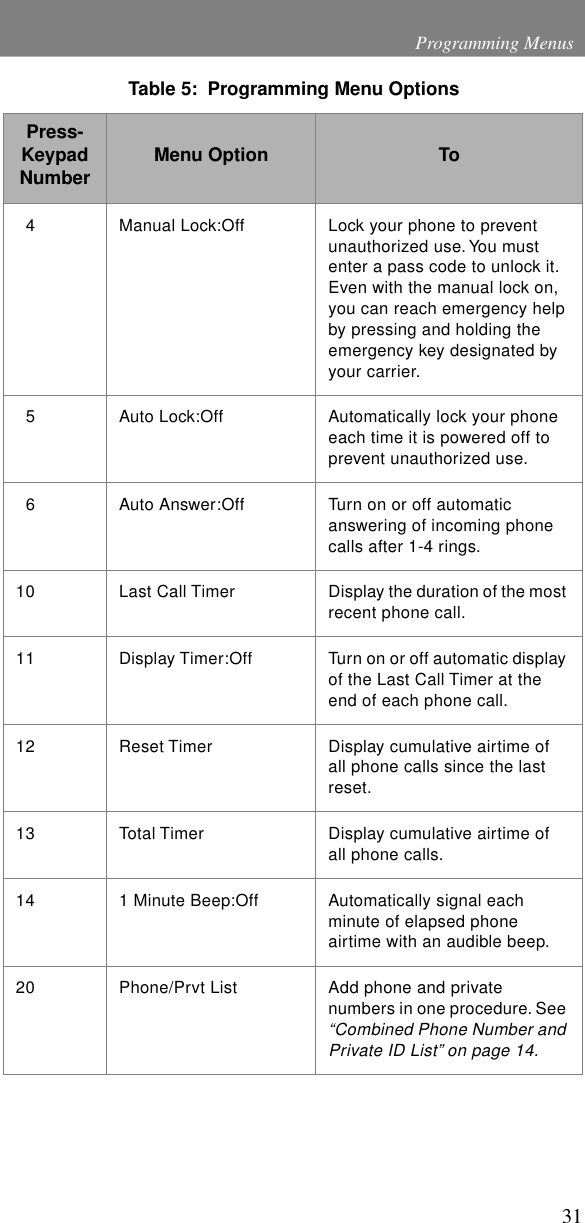
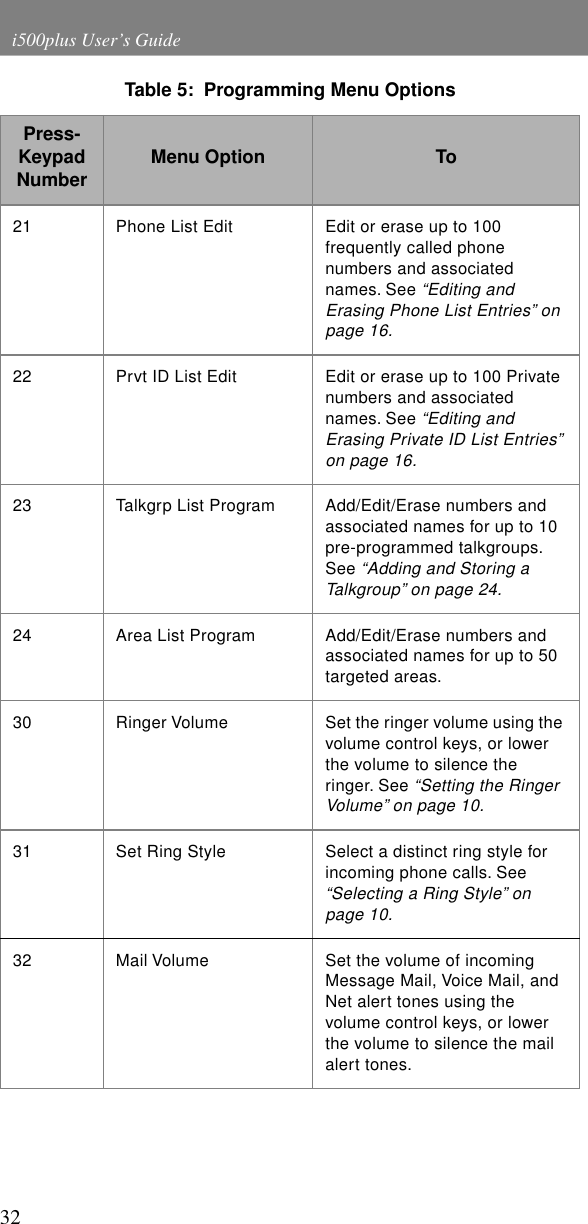
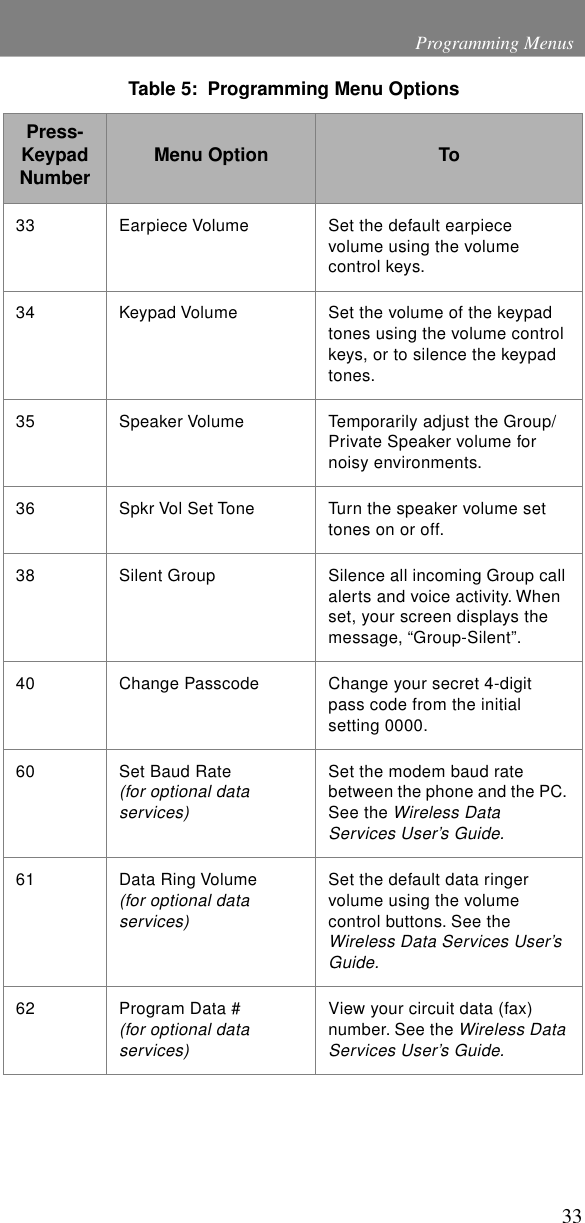
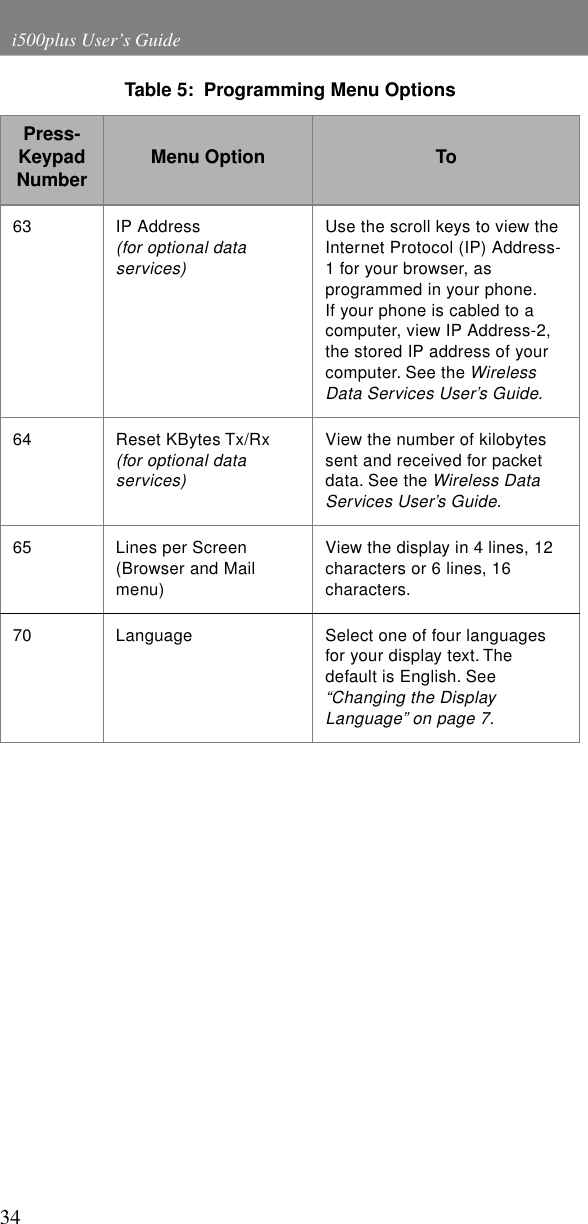
Motorola Solutions 89FT5792 User Manual Section1

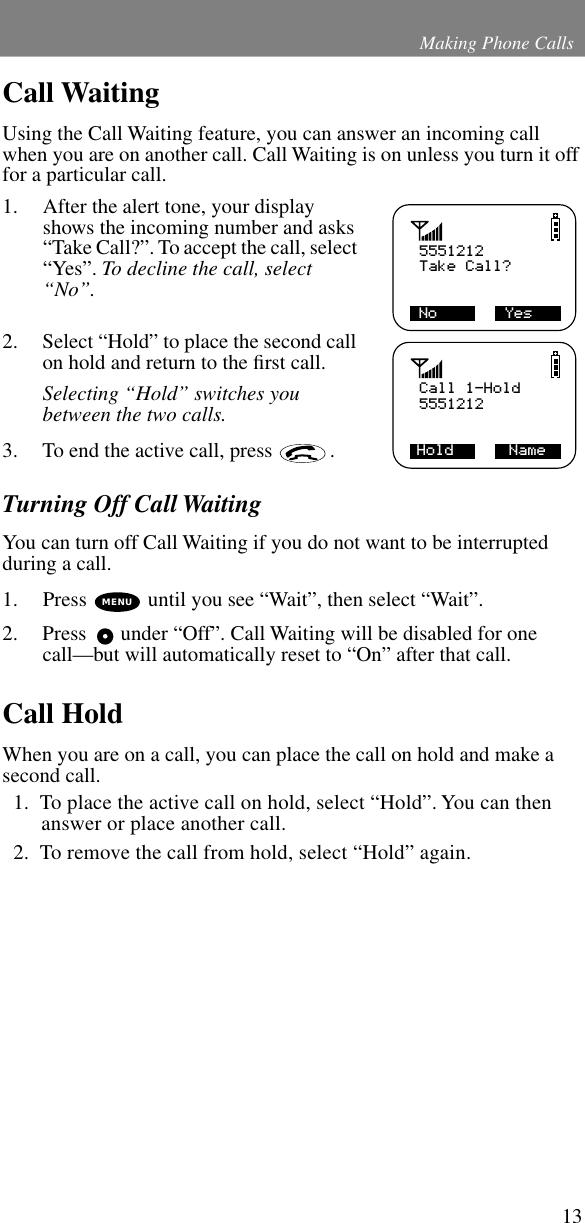
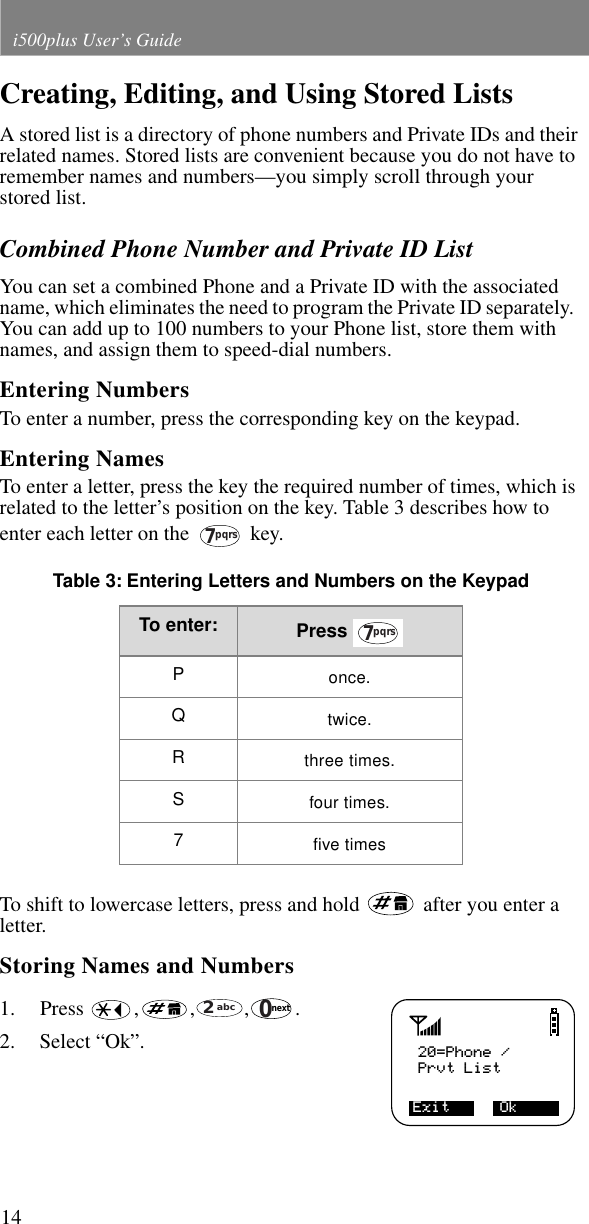
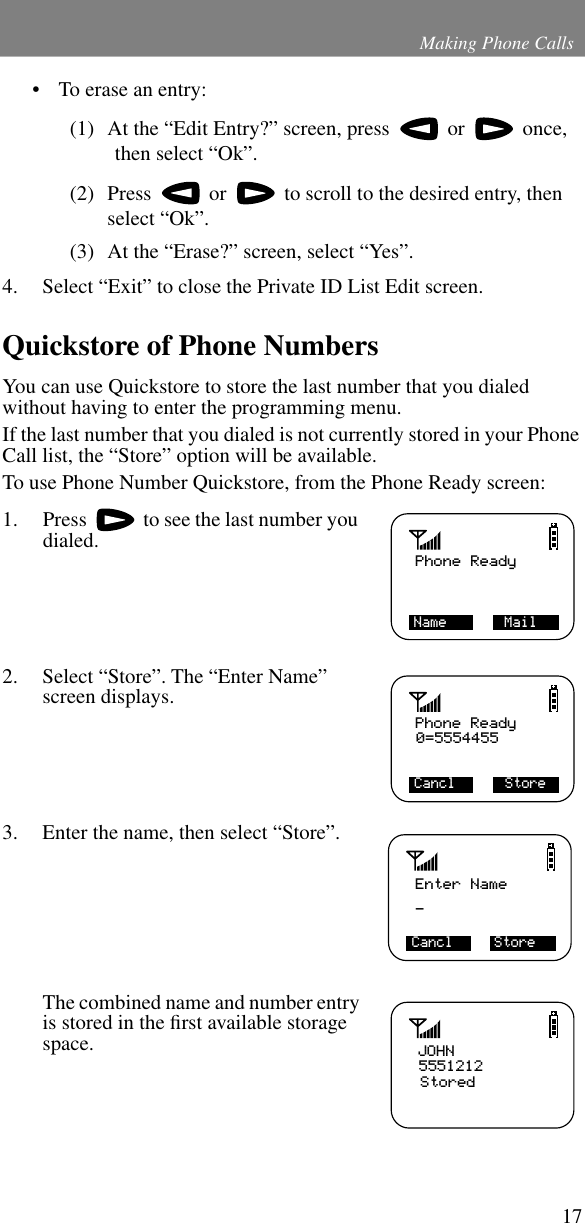
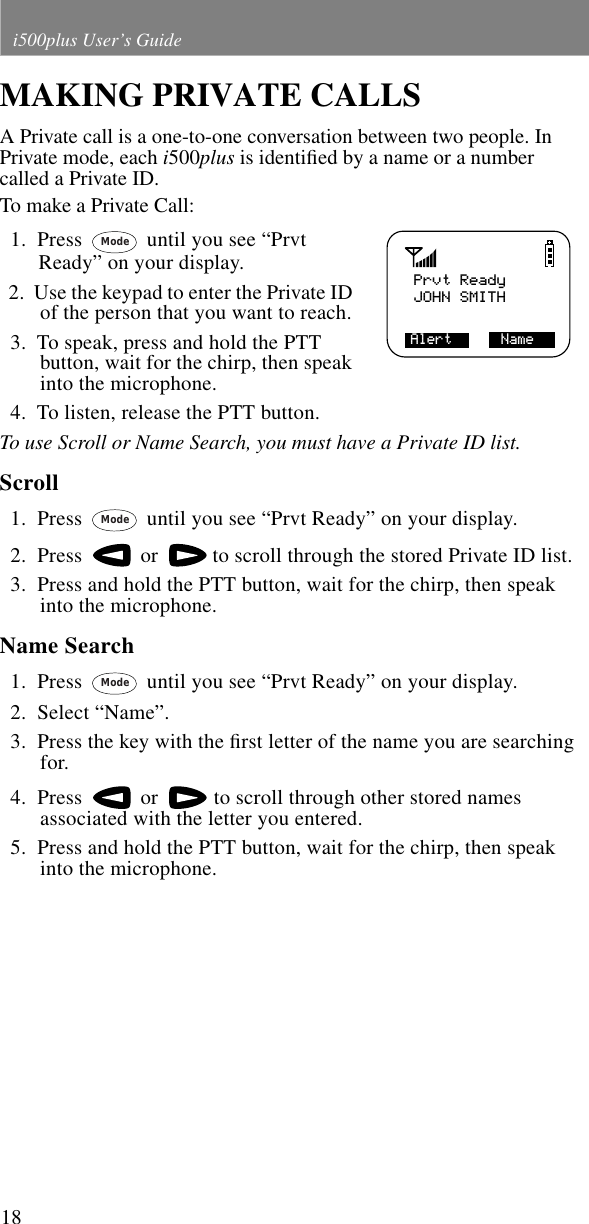
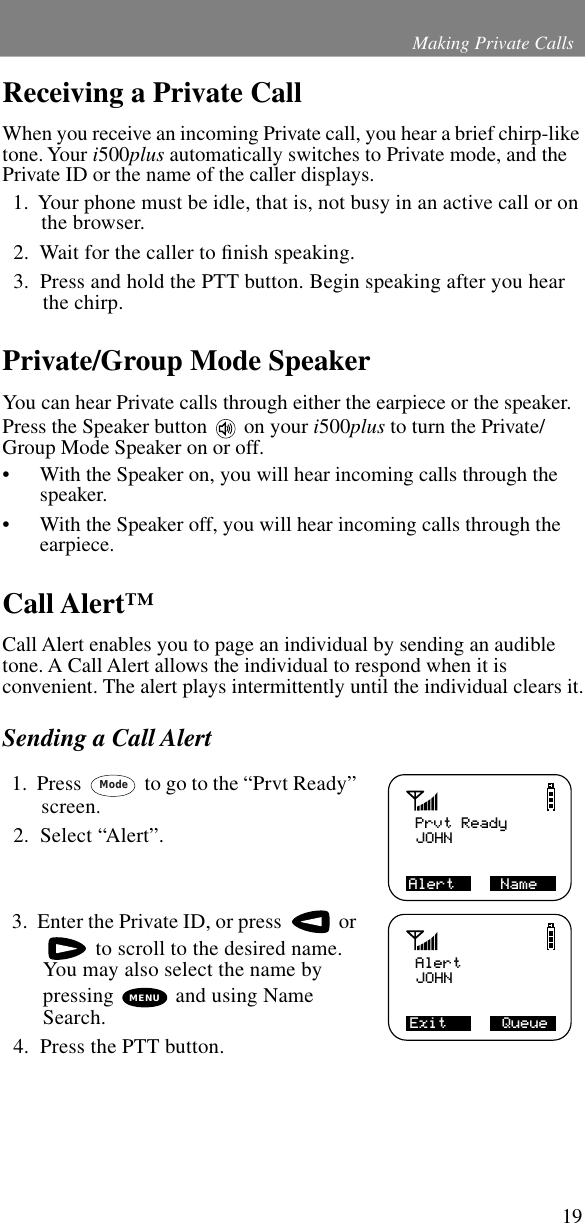
Motorola Solutions, Inc. Section1

Amended user manual

 i500plus User’s Guide PATENT AND TRADEMARK INFORMATION This product is protected under one or more of the following patents:4817157, 4896361, 4857928, 5041793, 5060294, 5066923, 5134718, 5140156, 5239963, 5257411, 5287387, 5265219, 5289504, 5316168, 5317247, 5338396, 5389927, 5406588, 5424921, 5457376, 5460906, 5551063, 5557079, 5596487, 5615412, 5638403, 5559468, 5469465, 5170413, 5140615, 5519730, 5241544, 5584059, 5574992, 5396656, 5487091, 5533004, 5299199, 5343499, 5369501, 5509031, 5515379, 5528723, 5598417, 5066923, 5241650, 5278833, 5359696, 5548631, 5410632, 5440582, 5457735, 5457818, 5471670, 5477550, 5481537, 5566181, 5229767, 5208804, 5295140, 5381449, 5440590, 5467398, 5490230, 5620242, 5623523, 5655913, 5715240, 5771440, 5854578, 5675281Additional patents are pending., Motorola, iDEN, Call Alert, and Message Mail are trademarks or registered trademarks of Motorola, Inc.®Reg. U.S. Pat. & Tm. Off.T9 Text Input is a trademark of Tegic Communications.All other trademarks mentioned in this manual are trademarks of their respective companies.© Copyright 1999, Motorola, Inc. All rights reserved.
 i     CONTENTS Welcome . . . . . . . . . . . . . . . . . . . . . . . . . . . . . . . . . . . . . 1 Features of Your  i 500 plus    . . . . . . . . . . . . . . . . . . . . . . . . . . . . . 2Attaching and Charging the Battery  . . . . . . . . . . . . . . . . . . . . . . 4Turning On Your  i 500 plus   . . . . . . . . . . . . . . . . . . . . . . . . . . . . . 5Turning Off Your  i 500 plus  . . . . . . . . . . . . . . . . . . . . . . . . . . . . . 5Display Icons   . . . . . . . . . . . . . . . . . . . . . . . . . . . . . . . . . . . . . . . 6About Modes and Menus  . . . . . . . . . . . . . . . . . . . . . . . . . . . . . . 7Changing the Display Language . . . . . . . . . . . . . . . . . . . . . . . . . 7 Making Phone Calls  . . . . . . . . . . . . . . . . . . . . . . . . . . . 8 Using Other Dialing Methods . . . . . . . . . . . . . . . . . . . . . . . . . . . 8Emergency Dial . . . . . . . . . . . . . . . . . . . . . . . . . . . . . . . . . . 9Automatic Redial . . . . . . . . . . . . . . . . . . . . . . . . . . . . . . . . . 9Last Number Redial . . . . . . . . . . . . . . . . . . . . . . . . . . . . . . . 9Receiving a Phone Call . . . . . . . . . . . . . . . . . . . . . . . . . . . . . . . 10What Is My Phone Number?   . . . . . . . . . . . . . . . . . . . . . . . . . . 10Setting the Ringer Volume  . . . . . . . . . . . . . . . . . . . . . . . . . . . . 10Selecting a Ring Style . . . . . . . . . . . . . . . . . . . . . . . . . . . . . . . . 10Call Forwarding  . . . . . . . . . . . . . . . . . . . . . . . . . . . . . . . . . . . . 11Unconditional Call Forwarding . . . . . . . . . . . . . . . . . . . . . 11Conditional Call Forwarding . . . . . . . . . . . . . . . . . . . . . . . 12Call Waiting  . . . . . . . . . . . . . . . . . . . . . . . . . . . . . . . . . . . . . . . 13Call Hold . . . . . . . . . . . . . . . . . . . . . . . . . . . . . . . . . . . . . . . . . . 13Creating, Editing, and Using Stored Lists   . . . . . . . . . . . . . . . . 14Quickstore of Phone Numbers  . . . . . . . . . . . . . . . . . . . . . . . . . 17 Making Private Calls  . . . . . . . . . . . . . . . . . . . . . . . . . 18 Receiving a Private Call  . . . . . . . . . . . . . . . . . . . . . . . . . . . . . . 19Private/Group Mode Speaker  . . . . . . . . . . . . . . . . . . . . . . . . . . 19Call Alert™   . . . . . . . . . . . . . . . . . . . . . . . . . . . . . . . . . . . . . . . 19Sending a Call Alert   . . . . . . . . . . . . . . . . . . . . . . . . . . . . . 19Receiving a Call Alert  . . . . . . . . . . . . . . . . . . . . . . . . . . . . 20Call Alert Queuing   . . . . . . . . . . . . . . . . . . . . . . . . . . . . . . 20Quickstore of Private IDs  . . . . . . . . . . . . . . . . . . . . . . . . . . . . . 21Storing Your Private ID  . . . . . . . . . . . . . . . . . . . . . . . . . . . . . . 22 Making Group Calls . . . . . . . . . . . . . . . . . . . . . . . . . . 23 Receiving a Group Call   . . . . . . . . . . . . . . . . . . . . . . . . . . . . . . 23Adding and Storing a Talkgroup   . . . . . . . . . . . . . . . . . . . . . . . 24Area Selection . . . . . . . . . . . . . . . . . . . . . . . . . . . . . . . . . . . . . . 24Private/Group Mode Speaker  . . . . . . . . . . . . . . . . . . . . . . . . . . 24
 ii i500plus User’s Guide Using Mail Services  . . . . . . . . . . . . . . . . . . . . . . . . . .  25 Net Mail  . . . . . . . . . . . . . . . . . . . . . . . . . . . . . . . . . . . . . . . . . . 25Voice Mail   . . . . . . . . . . . . . . . . . . . . . . . . . . . . . . . . . . . . . . . . 26Message Mail  . . . . . . . . . . . . . . . . . . . . . . . . . . . . . . . . . . . . . . 27Saving and Erasing Mail  . . . . . . . . . . . . . . . . . . . . . . . . . . 27Auto Call Back   . . . . . . . . . . . . . . . . . . . . . . . . . . . . . . . . . 27Mail Memory Full  . . . . . . . . . . . . . . . . . . . . . . . . . . . . . . . 28 Using Your Phone as a Modem . . . . . . . . . . . . . . . . .  29Programming Menus  . . . . . . . . . . . . . . . . . . . . . . . . .  30About Status Messages   . . . . . . . . . . . . . . . . . . . . . . .  36Accessories   . . . . . . . . . . . . . . . . . . . . . . . . . . . . . . . . .  37 Batteries  . . . . . . . . . . . . . . . . . . . . . . . . . . . . . . . . . . . . . . . . . . 37Travel Chargers   . . . . . . . . . . . . . . . . . . . . . . . . . . . . . . . . . . . . 38Using the Standard Travel Charger . . . . . . . . . . . . . . . . . .38Using the Rapid Travel Charger (110V/220V/240V)  . . . . 38Vehicular Battery Charger  . . . . . . . . . . . . . . . . . . . . . . . . . . . . 39Desktop Dual-Pocket Charger  . . . . . . . . . . . . . . . . . . . . . . . . . 40Audio Adapter   . . . . . . . . . . . . . . . . . . . . . . . . . . . . . . . . . . . . . 43Dash Mount Holder   . . . . . . . . . . . . . . . . . . . . . . . . . . . . . . . . . 44Swivel Belt Clip  . . . . . . . . . . . . . . . . . . . . . . . . . . . . . . . . . . . . 45Leather Carry Case with Clear Plastic Cover . . . . . . . . . . . . . . 45Hands-Free Car Kit . . . . . . . . . . . . . . . . . . . . . . . . . . . . . . . . . . 46 Safety and General Information . . . . . . . . . . . . . . . .  48 Exposure To Radio Frequency Energy . . . . . . . . . . . . . . . . . . . 48Interference to Medical and Personal Electronic Devices  . . . . 49Pacemakers  . . . . . . . . . . . . . . . . . . . . . . . . . . . . . . . . . . . . . . . . 49Hearing Aids . . . . . . . . . . . . . . . . . . . . . . . . . . . . . . . . . . . . . . . 49Other Medical Devices  . . . . . . . . . . . . . . . . . . . . . . . . . . . . . . . 50Interference to Other Electronic Devices  . . . . . . . . . . . . . . . . .50Use While Driving  . . . . . . . . . . . . . . . . . . . . . . . . . . . . . . . . . . 50Operational Warnings . . . . . . . . . . . . . . . . . . . . . . . . . . . . . . . . 51Potentially Explosive Atmospheres . . . . . . . . . . . . . . . . . . 51Batteries . . . . . . . . . . . . . . . . . . . . . . . . . . . . . . . . . . . . . . . 51Blasting Caps and Areas  . . . . . . . . . . . . . . . . . . . . . . . . . . 51For Vehicles Equipped with Air Bags . . . . . . . . . . . . . . . . 51
 iiiOperational Cautions   . . . . . . . . . . . . . . . . . . . . . . . . . . . . . . . . 52Damaged Antennas  . . . . . . . . . . . . . . . . . . . . . . . . . . . . . . 52Batteries . . . . . . . . . . . . . . . . . . . . . . . . . . . . . . . . . . . . . . . 52Cleaning Instructions  . . . . . . . . . . . . . . . . . . . . . . . . . . . . . . . . 52Antenna Considerations  . . . . . . . . . . . . . . . . . . . . . . . . . . . . . . 52Accessory Safety Information   . . . . . . . . . . . . . . . . . . . . . . . . . 53 Owner’s Information  . . . . . . . . . . . . . . . . . . . . . . . . . 55
 iv i500plus User’s Guide
 1 Welcome WELCOME ongratulations on purchasing your Motorola iDEN  i 500 plus  data-capable, multi-service, digital portable phone. Superior features and state-of-the-art technology help to keep you in constant touch with all your business and personal contacts.The  i 500 plus  offers:• Phone Mode –for cellular phone operation. See page 8. • Private Mode –for two-way radio use to talk with one person. See page 18. • Group Mode –for two-way radio use to talk with several people.  See page 23. • Mail Services –for message, voice, and net mail. See page 25. Optional Features With optional wireless access to the Internet, you can check on the latest news and weather, get stock quotes, send and receive e-mail, and download information from your computer. Wireless features include:• Net Mode –to access the built-in microbrowser.• Fax and Data Transfer –to send and receive faxes and transfer files.• TTY Access –for assisting hearing-impaired users. See the  Wireless Data Services User’s Guide  for information about data calls and TTY access.This manual provides information about how Net Mode works with various features of your  i 500 plus . For information on using the microbrowser and other components of Net Mode, see the  Net Mode User’s Guide. NOTE: This guide describes the features of the  i 500 plus  as they were set up by Motorola. However, your carrier or your organization may have changed or added features. For more information, check with your carrier or your organization.C
 2 i500plus User’s Guide Features of Your  i 500 plus *These features are available in the Net Mode browser. NOTE: •    Remove the plastic lens protector from the display before initial use.•    Some keys have multiple uses. For more information, see the  Net Mode User’s Guide . •    Press any key or button to turn on the keypad backlight.wxyz90mno6def35jkltuv8abc2pqrsghi471ModeMENUnext1.  Antenna8.  On/Off Key 9.  Punctuation     Key 4.  Push-To-Talk     (PTT) Button3.  Volume     Control     Buttons6.  Mode Key7.  LED2.  Earpiece5.  Scroll Keys12.  Microphone11.  Back Key14.  Menu Key18.  Next Key 17.  Alphanumeric       Keypad16.  Send/End Key13.  Alphanumeric       Display15.  Option Keys21.  Bottom       Accessory       Connector19.  Home Key 20.  Speaker Key 10.  Side Charging       Jack500 plus****
 3 Welcome      1.   Antenna Extend for optimal signal.  2.   Earpiece Hold to your ear to hear the other party.  3.   Volume Control Buttons Press to adjust volume levels in Phone, Private, and Group modes.  4.   Push-To-Talk (PTT) Button Transmit a Private or Group Call, or a Call Alert. Press and hold the PTT button to talk; release it to listen.  5.   Scroll Keys Press the left key to scroll backward or the right key to scroll forward through menu options and lists.   6.   Mode Key Press to change modes.  7.   LED (Light Emitting Diode) Check the phone’s status. See  Table 2 on page 5  for more information.  8.   On/Off Key Press and hold to turn your  i 500 plus  on or off.  9.   Punctuation Key Add punctuation in the Net Mode browser (within T9™ Text Input).  10.   Side Charging Jack Attach charging accessories.  11.   Back Key Return to the previous browser screen.  12.   Microphone Use to speak during calls.  13.   Alphanumeric Display  View up to four lines (12 characters per line) or six lines (16 characters per line) on the display.  14.   Menu Key Press to scroll through menu options.  15.   Option Keys Press the right or left option key to select the menu option that appears directly above the key.  16.   Send/End Key Press to answer an incoming Phone call. After entering a phone number, press to begin an outgoing Phone call or to redial the entered phone number. Press to end Phone calls.  17.   Alphanumeric Keypad Enter telephone numbers, Private Call IDs, and alphanumeric characters.  18.   Next Word Key Press to display the next word choice in the browser (within T9 Text Input).  19.   Home Key Press to return to the browser Home menu.  20.   Speaker Key Press to hear incoming calls through the earpiece or the speaker during private and group conversations.  21.   Bottom Accessory Connector Connect accessories and the data cable.
 4 i500plus User’s Guide Attaching and Charging the Battery Attaching the Battery 1. Release the lock located at the bottom of the battery door by pressing up on the latch, and remove the door.2. Insert the battery with the “+” and “-” at the top, per the figure. Install the battery bottom first, then press down on the battery to secure it. 3. Replace the battery cover and lock by pressing down on the latch. Detaching the Battery   1.  Release the battery door by sliding the battery door latch upward.  2.  Remove the battery door housing and remove the battery from the phone. Charging the Battery with the Standard Travel Charger Attach the Charger to the  i 500 plus  via the Side Charging Jack, and plug the Charger into an electrical outlet. For more information about Chargers, see  “Accessories” on page 37. To get the maximum use from the battery, charge it overnight before you use it for the first time.   See  Table 1   for battery charging status. Battery and Charging Status A low battery is indicated by a short, chirp-like sound through the speaker. The battery strength indicator icon shows the remaining charge in your battery. Three bars indicate full charge. As the charge is reduced through use, the bars disappear. The indicator flashes when you have less than five minutes of talk time. Table 1: Battery Charging Status IconFlashesCharging Low Battery 0-30% 31-60% 61-90% 91-100%Discharging Low Battery 0-10% 11-40% 41-70% 71-100%++++12
 5 Welcome Turning On Your  i 500 plus Press the On/Off button   until a set of icons appears on your display. Next, a welcome message displays while the  i 500 plus  connects to your carrier’s network. The LED indicator on the  i 500 plus  shows the service state. See  Table 2  . Table 2: LED Indicator Turning Off Your  i 500 plus Press and hold the On/Off button   until you see the message “Powering Off”. Status Light Indicator i 500 plus  Phone Status Flashing Red Registering—your  i 500plus is signing on to your carrier’s network. Please wait.Solid Red No service—your i500plus cannot sign on because it is outside your carrier’s service area.Flashing GreenIn service—your i500plus is ready to use. You can now place and receive calls.Solid Green In use—your i500plus is currently being used. To make sure that you ended the last call, press .
6i500plus User’s GuideDisplay IconsAfter you turn on the phone, display icons appear on the screen to inform you of existing conditions. See the following list.The following icons may appear on the display.Signal Strength IndicatorShows the signal strength. Six bars indicate the strongest signal. Calls and messages may not be sent or received when there is no signal.Battery Strength IndicatorShows the remaining charge in your battery. Three bars show full charge. The indicator flashes when you have less than five minutes of talk time remaining.Voice MailIndicates that you listened to but did not save or delete messages. This icon flashes when unplayed messages are waiting in your voice mailbox.New Message MailIndicates that you have new text messages in your mailbox.Unread Message MailIndicates that you have unread text messages.Call ForwardIndicates that incoming phone calls are being forwarded.Private/Group SpeakerIndicates that the Private/Group speaker is off. You will hear calls through the earpiece.Optional: Packet DataIndicates packet data registration. The blinking arrows indicate send and receive activity. For more information, see the Wireless Data User’s Guide.Some of the following icons may appear on the last line of the display.Optional: Secure Packet Data ConnectionIndicates that your packet data information is encrypted during transmission.More InformationIndicates that there is more text to read above, below, or above and below the current screen.
7WelcomeAbout Modes and Menus Modes and menus are the navigational tools, providing access to the various features of your i500plus. There are four modes:•Phone–For cellular phone calls. See page 8. •Private–for one-to-one radio calls. See page 18.•Group–For radio calls with all individuals in a designated talkgroup. See page 23. •Net–(optional) for browser use. See the Net Mode User’s Guide.To change modes, press  .Menu choices within each mode provide access to the various features of your i500plus.To select menu options: (1) Press   until you see the desired menu option.(2) Press  under the desired menu option.Changing the Display LanguageYou can customize your i500plus to display one of four languages: English, French, Spanish, or Portuguese.To change the displayed language:1. Press , , , .2. Select “Ok”.3. Press   or   to scroll through the language options. Selecting “Exit” at any time retains the current language selection. 4. When the desired language appears on your display, select “Ok”. The displayed text immediately changes to the selected language. 5. Select “Exit”.The language you select will be the displayed language.ModeMENUpqrs70next70=LanguageEnglishExit      OkLanguageFrancaisCancl     Ok
8i500plus User’s GuideMAKING PHONE CALLSIn addition to making and receiving phone calls in Phone mode, you can forward calls, use call waiting, put calls on hold, and create and use stored lists. Phone Ready is the main screen.You can place a call by entering the phone number on the keypad.  1.  From the “Phone Ready” screen, using the keypad, enter the desired number.If you make a mistake, press   once to move back one digit, or select “Cancl” to start over.  2.  Press   to place the call.  3.  To end the call, press  .Using Other Dialing MethodsTo use Scroll, Speed Dial, or Name Search, names and numbers must be programmed into your phone. See “Creating, Editing, and Using Stored Lists” on page 14.Scroll 1. From the Phone Ready screen, press   or   to scroll backward or forward through the stored list of numbers and names.2. Press   to place the call.3. To end the call, press  .Speed Dial   1.  From the Phone Ready screen, press   until you see the “Spd#” option on the last line of your display.  2.  Select “Spd#”.  3.  Enter the assigned speed-dial number (1-100). You will see the stored name and phone number associated with the speed dial number.   4.  Press   to place the call.  5.  To end the call, press  .Phone ReadyName           MailMENU
9Making Phone CallsName Search  1.  From the Phone Ready screen, select “Name”.  2.  Using the keypad, enter the first letter of the desired name, for example, to search for the name Bob:a. Enter “B” by pressing   twice.b. Press   to scroll through all the names starting with “B” until you see “Bob”.3. Press   to place the call.4. To end the call, press  .Emergency DialYou can dial the emergency phone number even if the keypad is locked. If you are on an active call, you must end it before using the emergency number.1. From any mode (Phone, Private, Group, or Net), press and hold  for two seconds until the phone displays “EMERGENCY”. The phone then automatically dials the emergency number.2. To end the call, press  . The emergency phone number will not be saved as the last number dialed.Automatic RedialIf you receive a “System Busy, Try Later” message, press   to have your phone automatically redial the number. You will hear a ring-back tone when the call is successful.Last Number RedialTo redial the last number that you called, press  .NOTE: For more information on the Emergency Dial feature, contact your carrier.abc2wxyz9
10i500plus User’s GuideReceiving a Phone Call• Press one of the following keys:  ,  , or  . Or, press any numeric key (0 through 9). • To end the call, press  . What Is My Phone Number?Press  ,  ,   to display your own phone number. Setting the Ringer VolumeYou can adjust the ringer volume for incoming calls. 1. Press , , , . The “30=Ringer Volume” screen displays. The display shows your current ringer volume.2. Press the Volume Control buttons on the side of the phone to listen as you raise or lower the volume. At the lowest setting, the screen displays “Volume Silent”.3. When you reach the desired level, select “Exit”.Selecting a Ring StyleYour phone has nine selectable ring styles.Incoming circuit data calls have a unique, preset ring style which you cannot change.Setting a Ring Style1. Press , , , .The display shows your current ring style.IncomingPhone CallEnd1=Own Ph#Exit        Edit9545553434130=RingerVolume Exitdef30next31=Set RingStyle:1Exit        Okdef31
11Making Phone Calls2. Select “Ok”.3. Press   or   to scroll through the available ring styles.4. To listen to the selected ring style, press the Volume buttons on the side of the phone.5. Select “Ok” to select the ring style shown.To leave the ring style unchanged, select “Cancl”.6. Select “Exit”.Call ForwardingCall forwarding lets callers reach you wherever you are. You have two options: forward all incoming calls (unconditional) or select those circumstances (conditional) when you want your calls forwarded.Unconditional Call ForwardingUnconditional call forwarding sends all incoming calls to the designated number.1. From the “Phone Ready” screen, press   until you see “Forwd” on the last line of the display.2. Select “Forwd”.3. To select the number where you want your calls forwarded, do one of the following:• Enter a number.• Or, press the scroll keys to select a number from your stored list.4. Select “On”.5. After the “Please Wait” message displays, Select “Exit”.Notice that the Call Forward icon   appears on your display when Unconditional Call Forwarding is set.NOTE: When you set unconditional call forwarding, your phone does not ring.RingStyle 4Cancl    OkPhone ReadyForwd     Spd#MENUForward:OffTo:5551212Exit       On
12i500plus User’s GuideConditional Call ForwardingYou may want to forward your calls when your i500plus is:• Busy on another call or the browser (Busy)• Not answered (NoAns)• Outside the service area (NoRch)1. From the Phone Ready screen, press  until you see “Forwd” on the last line of the display, then select it.2. Press   again until you see “Busy and “NoAns” on the last line of your display.• To forward your calls when your phone is in use, select “Busy”.• To forward your calls when you do not want to answer them, select “NoAns”.3. Press   until you see “NoRch” and “Rcl#”.• To forward your calls when you cannot be reached, select “NoRch”.• To see the call forward number, select “Rcl#”.4. After you select the call forward option, either enter the number where you want your calls to be forwarded, or press the scroll buttons and select a number. 5. Select “On”.6. Select “Exit”.You can set more than one condition by repeating steps 2 through 6.NOTE: You must turn off Unconditional Call Forwarding before you can set Conditional Call Forwarding options.Phone ReadyForwd      Spd#MENUForward:OffTo:Busy       NoAnsMENUForward:OffTo:NoRch      Rcl#MENU
13Making Phone CallsCall WaitingUsing the Call Waiting feature, you can answer an incoming call when you are on another call. Call Waiting is on unless you turn it off for a particular call.1. After the alert tone, your display shows the incoming number and asks “Take Call?”. To accept the call, select “Yes”. To decline the call, select “No”.   2. Select “Hold” to place the second call on hold and return to the first call. Selecting “Hold” switches you between the two calls.3. To end the active call, press  .Turning Off Call Waiting You can turn off Call Waiting if you do not want to be interrupted during a call.1. Press   until you see “Wait”, then select “Wait”.2. Press   under “Off”. Call Waiting will be disabled for one call—but will automatically reset to “On” after that call. Call HoldWhen you are on a call, you can place the call on hold and make a second call.  1.  To place the active call on hold, select “Hold”. You can then answer or place another call.  2.  To remove the call from hold, select “Hold” again.5551212 No               YesTake Call?Call 1-Hold Hold      Name5551212MENU
14i500plus User’s GuideCreating, Editing, and Using Stored ListsA stored list is a directory of phone numbers and Private IDs and their related names. Stored lists are convenient because you do not have to remember names and numbers—you simply scroll through your stored list.Combined Phone Number and Private ID ListYou can set a combined Phone and a Private ID with the associated name, which eliminates the need to program the Private ID separately.  You can add up to 100 numbers to your Phone list, store them with names, and assign them to speed-dial numbers.Entering NumbersTo enter a number, press the corresponding key on the keypad.Entering NamesTo enter a letter, press the key the required number of times, which is related to the letter’s position on the key. Table 3 describes how to enter each letter on the   key.To shift to lowercase letters, press and hold   after you enter a letter.Storing Names and Numbers1. Press , , , .2. Select “Ok”.Table 3: Entering Letters and Numbers on the KeypadTo enter: Press Ponce.Qtwice.Rthree times.Sfour times.7five timespqrs7pqrs720=Phone / Exit            OkPrvt Listabc20next
15Making Phone CallsThe next screen briefly displays the remaining number of phone numbers and Private IDs that you can store. 3. Enter the name that you wish to store.  4. Select “Store”.See Table 4  for an example of entering a name.Table 4: Entering a Name5. Enter the phone number that you want to associate with this name and select “Store”.To skip the Phone Number entry, select “Skip”. You will go directly to the “Enter Prvt ID Number” screen. The next screen displays the name that you entered and a flashing speed-dial number where the entry will be stored. 6. Do one of the following:• To accept the speed-dial number shown, select “Store”.• To change the speed-dial number, enter the desired speed-dial number. The speed-dial number stops flashing.7. At the next screen, enter the Private ID number associated with the name that you entered, then select “Store”.To skip the Private ID number entry, select “Skip.”To store the name “TIM”:  1.  Enter “T” by pressing   once.   2.  Enter “I” by pressing   three times.   3.  Enter “M” by pressing   once. Available98 Phone #3 Prvt IDsEnter Name_  Exit           Storetuv8ghi4mno6Enter PhoneNumber Skip           Store_ TIMSpd#=3 Cancl          StoreEnter PrvtID Skip           Store_
16i500plus User’s GuideEditing and Erasing Phone List Entries1. Press , , , .2. Select “Ok”. The “Edit Entry” screen displays.3. Do one of the following:• To edit an entry, select “Ok”:(1)  At the “Edit Entry?” screen, press   or   until the desired entry appears, then select “Ok”.(2) At the “Edit Number” screen, edit the phone number, if you wish; then select “Store”.(3) At the “Edit Name” screen, edit the name, if you wish; then select “Store”.(4) At the “Edit Spd#” screen, edit the speed number, if you wish; then select “Store”.• To erase an entry:(1) At the “Edit Entry?” screen, press   or  .(2) At the “Erase Entry?” screen, select “Ok”.(3) Scroll to the desired entry, then select “Ok”. At the “Erase?” screen, select “Yes”.4. Select “Exit” to close the Phone List Edit screen.Editing and Erasing Private ID List Entries1. Press , , , .2. Select “Ok”. The “Edit Entry?” screen displays.3. Do one of the following:• To edit an entry, select “Ok”. (1) At the “Edit Entry?” screen, press   or   until the desired entry appears, then select “Ok”.(2) At the “Edit ID” screen, edit the number, if you wish, then select “Store”.(3) At the “Edit Name” screen, edit the name, if you wish, then select “Store”.abc21abc2abc2
17Making Phone Calls• To erase an entry:(1) At the “Edit Entry?” screen, press   or   once, then select “Ok”.(2) Press   or   to scroll to the desired entry, then select “Ok”.(3) At the “Erase?” screen, select “Yes”.4. Select “Exit” to close the Private ID List Edit screen.Quickstore of Phone NumbersYou can use Quickstore to store the last number that you dialed without having to enter the programming menu.If the last number that you dialed is not currently stored in your Phone Call list, the “Store” option will be available.To use Phone Number Quickstore, from the Phone Ready screen:1. Press   to see the last number you dialed.2. Select “Store”. The “Enter Name” screen displays.3. Enter the name, then select “Store”.The combined name and number entry is stored in the first available storage space.Phone ReadyName       MailPhone Ready0=5554455Cancl      StoreEnter Name_Cancl     StoreJOHN5551212Stored
18i500plus User’s GuideMAKING PRIVATE CALLSA Private call is a one-to-one conversation between two people. In Private mode, each i500plus is identified by a name or a number called a Private ID.To make a Private Call:  1.  Press   until you see “Prvt Ready” on your display.  2.  Use the keypad to enter the Private ID of the person that you want to reach.  3.  To speak, press and hold the PTT button, wait for the chirp, then speak into the microphone.  4.  To listen, release the PTT button.To use Scroll or Name Search, you must have a Private ID list.Scroll  1.  Press   until you see “Prvt Ready” on your display.  2.  Press   or   to scroll through the stored Private ID list.  3.  Press and hold the PTT button, wait for the chirp, then speak into the microphone.Name Search  1.  Press   until you see “Prvt Ready” on your display.  2.  Select “Name”.  3.  Press the key with the first letter of the name you are searching for.  4.  Press   or   to scroll through other stored names associated with the letter you entered.  5.  Press and hold the PTT button, wait for the chirp, then speak into the microphone.Prvt ReadyAlert      NameJOHN SMITHModeModeMode
19Making Private CallsReceiving a Private CallWhen you receive an incoming Private call, you hear a brief chirp-like tone. Your i500plus automatically switches to Private mode, and the Private ID or the name of the caller displays.  1.  Your phone must be idle, that is, not busy in an active call or on the browser.  2.  Wait for the caller to finish speaking.  3.  Press and hold the PTT button. Begin speaking after you hear the chirp.Private/Group Mode SpeakerYou can hear Private calls through either the earpiece or the speaker. Press the Speaker button   on your i500plus to turn the Private/Group Mode Speaker on or off.• With the Speaker on, you will hear incoming calls through the speaker.• With the Speaker off, you will hear incoming calls through the earpiece.Call Alert™Call Alert enables you to page an individual by sending an audible tone. A Call Alert allows the individual to respond when it is convenient. The alert plays intermittently until the individual clears it.Sending a Call Alert  1.  Press   to go to the “Prvt Ready” screen.  2.  Select “Alert”.  3.  Enter the Private ID, or press   or  to scroll to the desired name. You may also select the name by pressing   and using Name Search.  4.  Press the PTT button.Prvt ReadyJOHNAlert     NameModeAlertJOHNExit      QueueMENU
20i500plus User’s GuideReceiving a Call AlertWhen you receive a Call Alert, you will hear an alert tone and see a message on your display.• To answer the Call Alert, press the PTT button.• To clear the Call Alert without answering it, select “Clear”.• To silence the Call Alert without clearing it, press any key other than the PTT button.Call Alert QueuingIf you carrier provides Call Alert Queuing, you can save up to eight Call Alerts in a queue for later use.After you respond to the Call Alert, it is removed from the queue.Clearing or Queueing a Call AlertWhen you receive a Call Alert, do one of the following:• To clear a Call Alert, select “Clear”.• To place the Call Alert into the queue, select “Queue”. Pressing   also queues the Call Alert.If you receive multiple Call Alerts, the last received Call Alert displays and the remaining Call Alerts are stacked at the beginning of the queue.Responding to a Queued Call AlertYou can respond to the Call Alerts in any order. To select a Call Alert for response:  1.  Select “Queue”.  2.  Press   or   to scroll to the desired Call Alert.  3.  Press the PTT button to respond to the Call Alert.NOTE: Until the Call Alert is cleared or returned, the alert plays intermittently and you will not be able to receive any additional Phone, Private, Group, or Net calls.Alert 3JOHN SMITHClear     QueueMode
21Making Private CallsQuickstore of Private IDsQuickstore allows you to quickly store a received or sent Private ID, without having to enter the programming menu.The ID is added as the last number received or sent in Private mode. From the Private Ready screen, with the Private ID displayed:1. Select “Store”. If an ID is greater than 12 characters in length, the ID wraps to the third line.2. Enter the name associated with the Private ID.3. Select “Store”. The Stored message displays.If the list is full with the maximum 100 entries, you will get the message, “Prvt List Full”. You cannot add names until you remove some names from the list. 4. Next, the display returns to the Private Ready mode.Prvt Ready56781Alert       StoreEnter NameCancl       Store_JOHNStoredPrvt ReadyJOHNAlert       Name
22i500plus User’s GuideStoring Your Private IDTo store your Private ID in your i500plus:  1.  Press  ,,. The screen displays the message, “2=Own Pvt ID”.  2.  Select “Ok”.  3.  Enter the Private ID provided by your carrier.  4.  Select “Store”.To view your Private ID at any time after you store it:  1.  Press  ,,. The screen displays the message, “2=Own Pvt ID”. The next line displays your Private ID. This is the number supplied by your carrier that you store in your phone.  2.  Select “Exit”.abc2abc2
23Making Group CallsMAKING GROUP CALLSA Group Call allows you to communicate instantly with members of a selected Talkgroup–a pre-defined set of people who share a communication need.Talkgroups appear on your display as numbers or programmed names, such as Talkgrp10 or Sales Team.To make a Group Call:  1.  Press   until “Group Ready” displays. Your most recently used talkgroup displays, for example, “Talkgrp 10”.  2.  To place a call, do one of the following:• To speak to this talkgroup, press and hold the PTT button. Wait for the chirp, then speak into the microphone.• To speak to another talkgroup, press   or   until you see the desired talkgroup name. Press and hold the PTT button.Wait for the chirp, then speak into the microphone.  3.  To listen, release the PTT button.Receiving a Group CallWhen you receive an incoming Group call, you will hear a brief chirp-like tone. Your i500plus automatically switches to Group mode, and the Talkgroup name displays.  1.  Your phone must be idle, that is, not busy in an active call or on the browser.  2.  Wait for the caller to finish speaking, then press and hold the PTT button. Begin speaking after you hear the chirp.  3.  To listen, release the PTT button.You can receive group calls only in the Talkgroups that you have predefined. For more information, see “Adding or Storing a Talkgroup” on page 24.Group ReadyTalkgrp 10Alert       MailMode
24i500plus User’s GuideAdding and Storing a TalkgroupTo add and store a talkgroup name to your i500plus:1. Press , , , .2. Select “Ok”.3. At “Add New Entry?”, select “Ok”.4. At “Enter ID”, enter the desired talkgroup number and select “Store”.5. At “Enter Name”, enter a name for the talkgroup and select “Store”.Area SelectionIn Group mode, you can call only those talkgroup members in a specific location. This is useful when you know where the individuals are located within the service area.  1.  Press   until you see “Group Ready” on your display.  2.  Press  , then select “Area”.  3.  Press   or   to scroll through the targeted areas specified by your local carrier.  4.  Select “Ok” to select the targeted area.Private/Group Mode SpeakerYou can hear Group calls through either the earpiece or the speaker.Press the Speaker button   on the i500plus to turn the Private/Group Mode Speaker on or off.With the Speaker on, you will hear incoming calls through the speaker. This is useful to monitor talkgroup activity in Group mode.With the Speaker off, you will hear incoming calls through the earpiece.abc2def3ModeMENU
25Using Mail ServicesUSING MAIL SERVICESYour i500plus provides the following mail services:• Net Mail™• Voice Mail• Message MailWhen you receive a new message, the  icon appears and flashes.• To read your new mail immediately, select “Now”.• To read your new mail later, select “Later”.An asterisk * next to a mail service indicates new mail.To use message services, select “Mail” from any Ready screen. The inbox screen opens with your message services listed.To select a message service, scroll to highlight the service or press the corresponding number. For example, to access your Message Mail, press 2.Net MailIf you subscribe to the optional Net mode feature, Net Mail alerts you when you receive alerts from the Browser. For example, notification of an e-mail or fax.From any mode:  1.  Select “Mail”  2.  Select “Net Mail”, then select “Ok”.The Alerts inbox opens and displays the type of Net mail alerts.  3.  Scroll to the type of alert that you wish to view, then select “Ok”.New MailEmailLater        Now 1>Voice MailExit          Ok 3>Net Mail*2>Mesg Mail 1>Voice MailExit          Ok 3>Net Mail 2>Mesg MailInboxOK          Del2 Fax1 Email
26i500plus User’s Guide  4.  The details of the alert type displays. To read the message, select “View”.  5.  After you read the message, do one of the following:• Select “Menu” to view a list of actions that you can take for this message, such as reply, delete, save, and so forth.• Or, select “Next” to read the next message.Voice MailWhen your i500plus receives a Voice Mail message:• The   icon appears on your display.• The Voice Mail alert tone sounds (if Mail Notification is turned on).• The message, “New Voice Mail Waiting” appears on your display.• An exclamation point (!) on the display indicates that you have at least one urgent message.From any mode:  1.  Select “Mail”.  2.  Select “Voice Mail”.The Voice Mail inbox opens and displays the number of your new and total Voice Mail messages.To retrieve your voice mail immediately:  1.  Select “Dial”. This action automatically places a call to your voice mailbox. The most recent message is retrieved first.  2.  To close your voice mailbox, select “Exit”.Inbox: 1 unreadView         Menu2 Meeting1*LunchLUNCHNext        MenuWith client at12:00 1>Change FolderOk          Back3>Delete4>Compose2>Respond1>Voice MailExit         Ok3>Net Mail2>Mesg MailVoice MailExit         Dial  1 Total  1 New
27Using Mail ServicesMessage MailMessage Mail can be either a numeric page or a text message of up to 140 characters. Your phone can receive and store 16 mail messages at any time.  1.  To postpone reading your mail and to clear the display, select “Later”. The icon stops flashing but remains on your display to remind you that you have unread messages.To read you mail now:  2.  To read your mail now, select “Now”. The screen will briefly display the number of new and saved messages in your mailbox.  3.  A list of all your messages will display. Highlight the message that you wish to read and select “Read”.To read you mail later:  4.  From any mode, select “Mail”. The Mailbox opens.  5.  Select “Mesg Mail”.Your message mailbox opens and briefly displays the number of new and saved messages currently in your mailbox.  6.  Next, a list of all messages will display. Select the message that you wish to read and select “Read”.Saving and Erasing MailYour message shows the time and date that the sender entered it in the networkAfter you read a text or numeric message, you can either Save or Erase the message. Press   under the desired option.Auto Call BackYou can respond to numeric pages and text messages containing a call-back number. To automatically dial a number contained within a Message Mail, press . 1>Voice MailExit         Ok 3>Net Mail 2>Mesg MailMessage Mail  0 Saved  2 New*1>FR: SmithExit         Read*2>FR: Jones1>CallErase        Save555121211:15a 04/02
28i500plus User’s GuideMail Memory FullIf all 16 message registers are full, your phone displays the message “Mail Waiting, Memory Full”. You cannot receive new Message Mail until you empty register space by erasing saved or unread messages.
29Using Your Phone as a ModemUSING YOUR PHONE AS A MODEMYou can use your i500plus as a modem for data transfer from you laptop, handheld device, or desktop computer. This is particularly useful when there is no wired phone line (wall jack) available.You simply attach a data cable to your phone and your computer. From that point, your phone is your modem. This allows you to send or receive time-critical information such as e-mail, a field service report, or files. In addition, you can also send or receive faxes.This type of wireless connection uses one of two types of data connection: circuit-switched data and packet data.• Circuit-switched data is typically used for sending and receiving faxes and for transferring large files.• Packet data is used for small file transfers such as e-mail.To use these services, you must install the iDEN Wireless Data Services software. For more information on setting up your computer and your i500plus for Packet and Circuit Data calls, see the Wireless Data Services User’s Guide and contact your carrier.TTY UsersYou can use your phone and computer in TTY mode. Your computer screen and keyboard replace the standard TTY device. For more information, please see the Wireless Data Services User’s Guide.
30i500plus User’s GuidePROGRAMMING MENUSYou can customize the settings on your phone using the Programming Menu.  1.  Press   until you see “Prgm” on the display.  2.  Select “Prgm”.  3.  Select “Ok”.  4.  Press   or   to scroll to the desired Programming Menu Option or enter the number of the Option.SHORTCUT...Press  , press  , then press the keypad number. See Table 5 .This shortcut does not function within the browser.Table 5:  Programming Menu OptionsPress-Keypad Number Menu Option To  1 Own Ph #  Automatically store the telephone number of your phone after you receive the first incoming call. You can also enter the number and view it.  2 Own Pvt ID  Display the private number of your phone. You must first store this number.   3 Mail Display:On/Off Turn on and off the New Mail message that is displayed with incoming Voice, Message, or Net Mail.MENU
31Programming Menus  4 Manual Lock:Off Lock your phone to prevent unauthorized use. You must enter a pass code to unlock it.Even with the manual lock on, you can reach emergency help by pressing and holding the emergency key designated by your carrier.  5 Auto Lock:Off Automatically lock your phone each time it is powered off to prevent unauthorized use.  6 Auto Answer:Off Turn on or off automatic answering of incoming phone calls after 1-4 rings.10 Last Call Timer Display the duration of the most recent phone call.11 Display Timer:Off Turn on or off automatic display of the Last Call Timer at the end of each phone call.12 Reset Timer Display cumulative airtime of all phone calls since the last reset.13 Total Timer Display cumulative airtime of all phone calls.14 1 Minute Beep:Off Automatically signal each minute of elapsed phone airtime with an audible beep. 20 Phone/Prvt List  Add phone and private numbers in one procedure. See “Combined Phone Number and Private ID List” on page 14.Table 5:  Programming Menu OptionsPress-Keypad Number Menu Option To
32i500plus User’s Guide21 Phone List Edit  Edit or erase up to 100 frequently called phone numbers and associated names. See “Editing and Erasing Phone List Entries” on page 16.22 Prvt ID List Edit Edit or erase up to 100 Private numbers and associated names. See “Editing and Erasing Private ID List Entries” on page 16.23 Talkgrp List Program Add/Edit/Erase numbers and associated names for up to 10 pre-programmed talkgroups. See “Adding and Storing a Talkgroup” on page 24.24 Area List Program  Add/Edit/Erase numbers and associated names for up to 50 targeted areas.30 Ringer Volume Set the ringer volume using the volume control keys, or lower the volume to silence the ringer. See “Setting the Ringer Volume” on page 10. 31 Set Ring Style Select a distinct ring style for incoming phone calls. See “Selecting a Ring Style” on page 10.32 Mail Volume Set the volume of incoming Message Mail, Voice Mail, and Net alert tones using the volume control keys, or lower the volume to silence the mail alert tones.Table 5:  Programming Menu OptionsPress-Keypad Number Menu Option To
33Programming Menus33 Earpiece Volume Set the default earpiece volume using the volume control keys.34 Keypad Volume Set the volume of the keypad tones using the volume control keys, or to silence the keypad tones.35 Speaker Volume Temporarily adjust the Group/Private Speaker volume for noisy environments.36 Spkr Vol Set Tone Turn the speaker volume set tones on or off.38 Silent Group  Silence all incoming Group call alerts and voice activity. When set, your screen displays the message, “Group-Silent”. 40 Change Passcode Change your secret 4-digit pass code from the initial setting 0000.60 Set Baud Rate(for optional data services)Set the modem baud rate between the phone and the PC. See the Wireless Data Services User’s Guide.61 Data Ring Volume(for optional data services)Set the default data ringer volume using the volume control buttons. See the Wireless Data Services User’s Guide.62 Program Data #(for optional data services)View your circuit data (fax) number. See the Wireless Data Services User’s Guide.Table 5:  Programming Menu OptionsPress-Keypad Number Menu Option To
34i500plus User’s Guide63 IP Address(for optional data services)Use the scroll keys to view the Internet Protocol (IP) Address-1 for your browser, as programmed in your phone.If your phone is cabled to a computer, view IP Address-2, the stored IP address of your computer. See the Wireless Data Services User’s Guide.64 Reset KBytes Tx/Rx(for optional data services)View the number of kilobytes sent and received for packet data. See the Wireless Data Services User’s Guide.65 Lines per Screen (Browser and Mail menu)View the display in 4 lines, 12 characters or 6 lines, 16 characters.70 Language  Select one of four languages for your display text. The default is English. See “Changing the Display Language” on page 7.Table 5:  Programming Menu OptionsPress-Keypad Number Menu Option To
35Programming Menus NOTE: Important!  Do not perform the following shaded menu options unless you are instructed to do so by your carrier. You could damage your phone.In the Browser, do not select the “Advanced Encryption New” key. Instead, contact your carrier.Option Number Menu Option Function41 Feature Reset Returns all feature settings to their original defaults.42 Master Clear Performs Feature Reset and erases all stored lists.43 Master Reset Resets the phone’s identification number.44 Change Service Key Changes or resets the fraud prevention service key.50 NAM  Selects alternate Numeric Assignment Module (NAM). See local carrier for information.51 Network ID Edits the pre-programmed Network number list and select roaming options.
36i500plus User’s GuideABOUT STATUS MESSAGESYou may receive status messages under certain conditions. Before contacting your carrier, note the message, numeric code, and the conditions under which it appeared. Table 6 lists and describes the error messages.Table 6: Status MessagesStatus Messages Message DescriptionNumber Not in Service The number that you entered is not valid.User Not Available The party that you called is either busy, out-of-range, or turned off. Please try again later.User Not Authorized The party that you called has not purchased this service.Please Try Later This service is temporarily not available. Please try again later.User Busy in Private The party that you called is busy in a Private call.User Busy in Data The party that you called is busy in a data call.Service Restricted This service was restricted by your carrier or it was not purchased.Service Not Available  This feature is not available on the current network.System Busy Try Later The system is experiencing heavy traffic. Please try again later.Service Conflict This service cannot be enabled because an incompatible service has already been turned on.Please Try Again An error occurred. Note the error code and try again.Self Check Error A fault was detected with your phone. If this error recurs, note the error code and contact your carrier.Self Check Fail An operational fault was detected with your phone. Note the numeric code, turn your phone off, and contact your carrier immediately.
37AccessoriesACCESSORIESBatteriesCharging the BatteryTo get the maximum use from the battery, charge it overnight before you use it for the first time. See Table 7 for battery charging times.Attach the Charger to the i500plus via the Side Charging Jack, and plug the charger into an electrical outlet.Table 7:  Battery Charging Times Battery Operating Instructions• Extreme temperatures will degrade battery performance. Do not store your battery where temperatures exceed 60°C (140°F) or fall below -20°C (4°F).• The battery capacity will be degraded if stored for long periods while fully charged. If long term storage is required, store at half capacity.• For optimal battery life, use a Motorola iDEN approved NiMH Charger with your Motorola iDEN NiMH battery. Other chargers may not fully charge your NiMH or may yield a reduced number of charge cycles.NOTE: •     For best results, charge the batteries within the temperature range of 10oC to 40oC (50oF to 104o).•     Prolonged charging is not recommended. See Table 7 for battery charging guidelines.Motorola Battery Charging Time to 90%: Kit Number DescriptionChemistryStandard TravelChargerRapidChargerNTN8971 Standard NiMH 5 hours 75 minutesNTN8970 Slim NiMH 3.5 hours 50 minutes
38i500plus User’s GuideTravel ChargersUsing a Travel Charger, you can charge a battery from an electrical outlet. You can use:• The SPN4474 Standard Travel Charger• The NTN1680 Rapid Travel Charger (110V/220V/240V) with U.S. Plug AdapterFigure 1. Using the Travel ChargersUsing the Standard Travel Charger1. Insert the Standard Travel Charger’s power supply plug into an electrical outlet (110V U.S.).2. Insert the Charger’s DC plug into the Side Charging Jack on your i500plus.Using the Rapid Travel Charger (110V/220V/240V)1. Insert the wall plug adapter into the Rapid Travel Charger’s power supply.2. Insert the Charger’s power supply into an electrical outlet.3. Insert the DC plug into the Side Charging Jack of your i500plus.4. The power light (green LED) turns on when the Rapid Travel Charger is receiving power.Standard Travel Charger Operating SpecificationsInput voltage range: 110V - U.S.Operating temperature range: 0°C to +50°C.Rapid Travel Charger Operating SpecificationsInput voltage range: 110V/220V/240V.Operating temperature range: 0°C to +50°C.Rapid Travel ChargerMAEPF-26735-OStandard Travel Charger
39AccessoriesVehicular Battery ChargerThe NTN8978 Vehicular Battery Charger enables in-vehicle communications by charging the NiMH battery and providing power to your i500plus. The power light (green LED) will light when the Vehicular Battery Charger is receiving power.Figure 2. Using the Vehicular Battery ChargerUsing the Vehicular Battery Charger1. Insert the Vehicular Battery Charger’s DC plug into the Side Charging Jack of your i500plus. Push firmly until the plug rests securely in the Side Charging Jack.2. Remove the vehicle’s cigarette lighter plug (if one exists) from the cigarette lighter receptacle.3. Plug the Vehicular Battery Charger into the cigarette lighter receptacle. The power light (green LED) will turn on.While your i500plus is attached to the Vehicular Battery Charger, you can leave the phone off, turn it on, or use it. For best charging results, leave it off.Removing the Vehicular Battery Charger:1. Unplug the Vehicular Battery Charger from the vehicle’s cigarette lighter receptacle.2. Gently pull the plug from the Side Charging Jack of your i500plus.Vehicular Battery Charger Operating SpecificationsOperating voltage range: 10.8 - 33.0 Vdc.Operating temperature range: -30°C to +60°C.To i500plusTo cigarette lighter receptacle
40i500plus User’s GuideDesktop Dual-Pocket ChargerThe NTN1690 Desktop Dual-Pocket Charger charges Motorola authorized batteries, as listed on page 37, for the i500plus.Figure 3. Desktop Dual-Pocket ChargerCharging a battery:1. Insert the power supply’s DC jack plug into the DC jack receptacle on the back of the Charger. Use only with the Motorola rapid charger included with your Desktop Charger package.2. Plug the power supply end of the power-supply cord into any standard AC outlet. The Charger performs a quick power-up self-test during which both LED indicators flash green once to indicate a successful power-up.3. Attach a battery to your i500plus phone. Place the i500plus onto the pin connector located in the charger’s front pocket.NOTE: The Desktop Dual-Pocket Charger should only be powered by the included Rapid Power Supply. The Charger will flash both LEDs red if the Standard Travel Charger is attached.Data cable receptacle(DC jack)MAEPF-26698-OMAEPF-26726-ORear pocketFront pocketPin connectorLED indicatorsPower supply cord receptacle
41AccessoriesData Operation1. Insert the round end of the iDEN Data Cable (NKN6521) into the data cable receptacle located on the back of the charger, with the Motorola logo facing upwards.2. Connect the opposite end of the data cable to the PC.Adding and removing a battery from the rear pocketFigure 4. Adding and Removing a Battery from the Rear Pocket1. Insert the battery with the Motorola label facing forward and the (+ and -) symbols pointing downward.2. To remove the battery, pull it forward, then up and out of the Charger.Desktop Charger StatusThe Charger displays the battery’s charge status. The indicator will show one of the following: solid red =1-30%; solid yellow =31-60%; flashing green =61-90%; solid green =91-100%.NOTE: Charging times may vary when performing data operations.NOTE: If a battery is in the rear pocket...and the i500plus with a battery is inserted into the front pocket, the battery in the front pocket will charge to full capacity before the battery in the rear pocket is charged. The LED for the rear pocket flashes yellow, indicating that its battery is waiting to be charged.To remove the battery from the rear pocket, hold the base of the Charger and pull the battery forward, then straight up.112INSERT REMOVE
42i500plus User’s GuideDesktop Charger TroubleshootingIf the battery is not charging and you see:A flashing yellow indicator -• The flashing yellow LED is used to indicate that the Charger’s pocket is in a wait state.• If a battery is in the rear pocket, the rear pocket’s LED continues to flash yellow until the battery in the front pocket is more than 90% charged (front pocket’s LED is solid green). This is normal operation.• To protect your battery’s life expectancy, the Charger does not rapid charge a battery when its temperature is below 5oC (41oF) or above 45oC (113oF).No LED indication - • Check that the i500plus with battery, or a battery alone, is inserted correctly. • Make sure that the power supply is plugged into an appropriate AC outlet and that the connector is properly seated.•Rear pocket only: Remove the battery from the Charger. Use an ordinary pencil eraser to clean the three metal contacts on the battery and then place the battery in the Charger.• If the LED indicator remains turned OFF, the battery may be defective and should be replaced.Flashing red LED indicator -• Remove the battery from the Charger. Use an ordinary pencil eraser to clean the three metal contacts on the battery and then place the battery in the Charger.• If the LED indicator remains turned OFF, the battery may be defective and should be replaced.Both LEDs flash red -• This indicates that the incorrect power supply is plugged in.
43AccessoriesAudio AdapterThe NTN8654 Audio Adapter connects an earpiece microphone or headset to your i500plus for privacy and hands-free operation. The Audio Adapter fits onto the bottom of the i500plus and provides a standard 2.5mm jack connection for an earpiece microphone or headset. The following audio accessories are compatible with the audio adapter:•    Earpiece with Microphone (NTN8367)•    Headset with Boom Microphone (NTN8513)•    Lightweight Headset with Microphone (NTN8496)•    Over-the-Ear Style Headset (NTN8497)Figure 5. Using the Audio AdapterUsing the Audio Adapter1. Hold the phone and the Audio Adapter facing you so that you see the Motorola logo on the adapter.2. Insert the Audio Adapter’s connector into the i500plus Bottom Accessory Connector. You will hear the connector snap into place.Attaching/Detaching the Earpiece Microphone or Headset1. Insert the 2.5mm plug of the earpiece microphone or headset cord into the jack of the Audio Adapter. 2. Pull on the plug, not on the cord, to remove the earpiece microphone.Removing the Audio Adapter1. Press the button on the front of the Audio Adapter. The button displays the Motorola logo.2. Pull the Audio Adapter from the i500plus.Audio AdapterConnectorButton2.5mm jack
44i500plus User’s GuideDash Mount HolderThe NTN9025 Dash Mount Holder provides a convenient holder for your i500plus. The Dash Mount Holder can be installed either horizontally or vertically.Important! Do not place the dash mount holder over the air bag or in the air bag deployment area. For more information, see “For Vehicles Equipped with an Air Bag” on page 51.Figure 6. Installing the Dash Mount HolderUsing the Dash Mount Holder1. Mount the Dash Mount Holder to the dash of your vehicle by securing the four self-tapping screws to the base of the Holder. Or, for a semi-permanent installation, use the included adhesive strip.2. Snap your phone securely into the holder.MAEPF-26723-O
45AccessoriesSwivel Belt ClipThe NTN8980 Swivel Belt Clip provides a convenient means by which to carry your i500plus with you.Figure 7. Using the Swivel Belt ClipUsing the Swivel Belt Clip1. Attach the Swivel Belt Clip to your belt.2. Insert your i500plus into the belt clip holder and attach the holder to the Swivel Belt Clip.3. To remove your i500plus from the holder, push the holder tab inward while pulling the phone outward.4. To remove your i500plus and the holder from the Swivel Belt Clip, push down on the button on top of the Swivel Belt Clip and lift the holder out.Leather Carry Case with Clear Plastic Cover• The NTN8981 Leather Carry Case protects your i500plus while on the go• Includes a leather belt clip for easy attachment to a belt or purse• Accommodates most i500plus accessories including travel chargers, audio accessories, vehicle accessories, and data accessories.MAEPF-26699-OSwivel Belt ClipHolder
46i500plus User’s GuideHands-Free Car KitIMPORTANT! The Hands-Free Car Kit is also a charger. Therefore, DO NOT operate this kit and the Vehicular Battery Charger at the same time.The NTN1674 Hands-Free Car Kit enables in-vehicle communications by providing a built-in speaker, a power supply for the phone’s internal battery charger, hands-free visor microphone, dash-mount holder, and power to the phone.An external Push-To-Talk (PTT) switch is also included. When the phone is turned off, the Hands-Free Car Kit charges the Standard battery in 75 minutes to 90% capacity. Charging time will be longer if the phone is operational during charge time.Figure 8. Using the Hands-Free Car KitUsing the Hands-Free Car Kit1. Hold the i500plus with its front toward you. Insert the accessory connector (with the Motorola logo facing you) into the phone’s bottom accessory connector until it clicks into place.2. Remove the vehicle’s cigarette lighter from the cigarette lighter receptacle.3. Plug the Hands-Free Car Kit’s Vehicular Battery Charger into the cigarette lighter receptacle. The power light (green LED) will come on.VisorMicrophone500CigaretteLighterReceptacle CigaretteLighterAdapterSpeakerAccessoryConnectorRemotePTTiwxyz90mno6def35jkltuv8abc2pqrsghi471ModeMENUnextplus500plus
47Accessories4. Selecting the correct position for the hands-free visor microphone is vital for the performance of the hands-free circuitry. It is recommended that the microphone be mounted either on the sun visor directly above (and facing) the driver, or on the headliner just above (and facing) the driver. The visor microphone:• Should NOT be located within 12 inches of the speaker box.• Should never be mounted near the vehicle’s window, or in a spot where road and ambient noise are substantially high.• Should be mounted so that it does not come into contact with the air bag, or interfere with air bag deployment.5. Turn on your i500plus phone.6. Adjust the speaker volume using the volume control buttons on your i500plus.To remove the i500plus:1. Push the Motorola logo button on the accessory connector and remove the connector from the phone.NOTE: The i500plus should only be used with a Hands-free Car Kit that has a grey button on the accessory connector. The use of any other hands-free car kit will result in an “incompatible accessory” message on the phone’s display.
48i500plus User’s Guide For the Safe and Efficient Operation of Your Radio, Observe these Guidelines:Your radio product contains a transmitter and a receiver. When it is ON, it receives and transmits radio frequency (RF) energy. The radio operates in the frequency range of 806 MHz to 870 MHz and employs digital modulation techniques. When you communicate with your radio product, the system handling your call controls the power level at which your radio product transmits. The output power level typically may vary over a range from 0.00024 watts to 0.6 watts.Exposure To Radio Frequency EnergyYour Motorola Radio Product is designed to comply with the following national and international standards and guidelines regarding exposure of human beings to radio frequency electromagnetic energy:• United States Federal Communications Commission, Code of Federal Regulations; 47 CFR part 2 sub-part J• American National Standards Institute (ANSI) IEEE. C95. 1-1992• National Council on Radiation Protection and Measurements (NCRP). Report 86 • International Commission on Non-Ionizing Radiation Protection (ICNIRP) 1998• National Radiological Protection Board of the United Kingdom, GS 11, 1988• Verband Deutscher Elektrotechniker (VDE) DIN-0848• Department of Health and Welfare Canada. Safety Code 6To assure optimal radio product performance and make sure human exposure to radio frequency electromagnetic energy is within the guidelines set forth in the above standards, always adhere to the following procedures:SAFETY AND GENERAL INFORMATIONIMPORTANT INFORMATION ON SAFE AND EFFICIENT OPERATION. READ THIS INFORMATION BEFORE USING YOUR INTEGRATED MULTI-SERVICE PORTABLE RADIO.
49Safety and General InformationWhen placing or receiving a phone call, or using the group and private call functions with a Group/Private Speaker OFF (muted speaker icon visible in the display), hold your radio product as you would a telephone. Speak directly into the microphone and position the antenna up and over your shoulder.When using your radio product as a traditional two-way radio while making group or private calls with the Group/Private Speaker ON (no speaker icon visible in the display), hold the radio product in a vertical position with the microphone one to two inches (2.5 to 5 cm) away from the lips.For body-worn operation, with or without an earpiece or any other accessory, the antenna should be kept at least one inch (2.5 cm) from the body when transmitting. A carry holder with a belt clip is provided with the radio product for body-worn use.When using any data feature of the radio product, with or without an accessory cable, position the antenna of the radio product at least one inch (2.5 cm) away from the body.DO NOT hold the antenna when the radio is “IN USE”. Holding the antenna affects call quality and may cause the radio product to operate at a higher power level than needed.Interference to Medical and Personal Electronic DevicesMost electronic equipment is shielded from RF energy. However, certain equipment may not be shielded against the RF signals from your radio product.PacemakersThe Health Industry Manufacturers Association recommends that a minimum separation of 6 inches (15 cm) be maintained between a handheld wireless phone and a pacemaker to avoid potential interference with the pacemaker. These recommendations are consistent with the independent research by and recommendations of Wireless Technology Research.Persons with pacemakers should:• ALWAYS keep the radio product more than six inches from the pacemaker when the radio product is turned ON. • Not carry the radio product in a breast pocket. • Use the ear opposite the pacemaker to minimize the potential for interference. • Turn the radio product OFF immediately if you have any reason to suspect that interference is taking place.
50i500plus User’s GuideHearing AidsSome radio products may interfere with some hearing aids. In the event of such interference, you may want to consult your hearing aid manufacturer to discuss alternatives.Other Medical DevicesIf you use any other personal medical device, consult the manufacturer of your device to determine if it is adequately shielded from external RF energy. Your physician may be able to assist you in obtaining this information.Turn your radio product OFF in health care facilities when any regulations posted in these areas instruct you to do so. Hospitals or health care facilities may be using equipment that could be sensitive to external RF energy. Interference to Other Electronic DevicesRF energy may affect improperly installed or inadequately shielded electronic operating and entertainment systems in motor vehicles. Check with the manufacturer or representative to determine if these systems are adequately shielded from external RF energy. Also check with the manufacturer of any equipment that has been added to the vehicle.Turn your radio product OFF before boarding any aircraft to prevent possible interference to aircraft systems. Regulations of the United States Federal Communications Commission prohibit use when the plane is airborne. The United States Department of Transportation regulations require you have permission from a crew member to use your radio product while the plane is on the ground.Safety and GeneralUse While DrivingCheck the laws and regulations on the use of wireless telephones in the area where you drive. Always obey them.When using the radio product while driving, please:• Give full attention to driving and to the road• Use hands-free operation, if available• Pull off the road and park before making or answering a call if driving conditions so require.
51Safety and General Information OPERATIONAL WARNINGSPOTENTIALLY EXPLOSIVE ATMOSPHERESTurn off your radio product when you are in any area with a potentially explosive atmosphere, unless it is a radio product type especially qualified for use in such areas (for example, Factory Mutual Approved). Sparks in a potentially explosive atmosphere can cause an explosion or fire resulting in bodily injury, or even death.Note: The areas with potentially explosive atmospheres referred to above include fueling areas such as: below decks on boats; fuel or chemical transfer or storage facilities; areas where the air contains chemicals or particles such as grain, dust or metal powders; and any other area where you would normally be advised to turn off your vehicle engine. Areas with potentially explosive atmospheres are often, but not always posted.BatteriesDo not replace or charge batteries in a potentially explosive atmosphere. Contact sparking may occur while installing or removing batteries and cause an explosion.BLASTING CAPS AND AREASTo avoid possible interference with blasting operations, turn off your radio product when you are near electrical blasting caps, in a blasting area, or in areas posted: “Turn off two-way radio”. Obey all signs and instructions.FOR VEHICLES EQUIPPED WITH AN AIR BAGDo NOT place objects, including both installed and portable wireless equipment, in the area over the air bag or in the air bag deployment area. An air bag inflates with great force. If in-vehicle wireless equipment is improperly installed and the air bag inflates, serious injury could result.!W A R N I N G!
52i500plus User’s GuideCleaning InstructionsClean the external surfaces of the radio product with a damp cloth, using a mild solution of dishwashing detergent and water. Some household cleaners may contain chemicals that could seriously damage the radio product. Avoid the use of any petroleum-based solvent cleaners. Also, avoid applying liquids directly on the radio product.Antenna ConsiderationsUse only the supplied or an approved antenna. Unauthorized antennas, modifications, or attachments could impair call quality, damage the radio product, or result in violation of local agency regulations.  OPERATIONAL CAUTIONSDAMAGED ANTENNASDo not use any portable radio product that has a damaged antenna. If a damaged antenna comes into contact with your skin, a minor burn can result.BATTERIESAll batteries can cause property damage and/or bodily injury such as burns if a conductive material such as jewelry, keys, or beaded chains touch exposed terminals. The conductive material may complete an electrical circuit (short circuit) and become quite hot. Exercise care in handling any charged battery, particularly when placing it inside a pocket, purse, or other container with metal objects.!C a u t i o n
53Accessory Safety InformationAccessory Safety InformationIMPORTANT:SAVE THESE ACCESSORY SAFETY INSTRUCTIONS • Before using any battery or battery charger, read all the instructions for and cautionary markings on (1) the battery, (2) the battery charger, which may include a separate wall-mounted power supply or transformer, and (3) the radio product using the battery.• Do not expose any battery charger to water, rain, or snow as they are designed for indoor or in-vehicle use only.• Since a battery charger is designed for indoor or in-vehicle use only, do not expose a battery charger to water, rain, or snow. • To reduce the risk of damage to the cord or plug, pull by the plug rather than the cord when you disconnect the battery charger from the power source outlet.  • Do not operate any battery charger with a damaged cord or plug - replace them immediately.• Battery chargers may become warm during operation, but not hot. If it becomes hot to the touch, unplug it from the power outlet immediately and discontinue its use. • Use of a non-recommended attachment to a battery charger may result in a risk of fire, electric shock, or injury to persons.• Make sure the battery charger power cord is located so that it will not be stepped on, tripped over, or subjected to damage or stress.• An extension cord should not be used with any battery charger unless absolutely necessary. Use of an improper extension cord could result in a risk of fire and electric shock. If an extension cord must be used, make sure that:❒The pins on the plug of the extension cord are the same number, size, and shape as those on the plug of the charger.❒The extension cord is properly wired and in good electrical condition. To reduce the risk of injury, charge only the rechargeable batteries listed in the Accessories section of this manual. Other types of batteries may burst, causing personal injury and damage.!W A R N I N G!
54i500plus User’s Guide❒The cord size is 18AWG for lengths up to 100 feet and 16AWG for lengths up to 150 feet.• Do not operate any battery charger if it has received a sharp blow, has been dropped, or has been damaged in any way; take it to a qualified service technician.• Do not disassemble a battery charger; take it to a qualified service technician when service or repair is required. Incorrect reassembly may result in a risk of electric shock or fire.• Maximum ambient temperature around the power supply or transformer of any battery charger should not exceed 40°C (104°F).• The output power from the power supply or transformer must not exceed the rating given on the Desktop Dual-Pocket Charger.• The disconnection from the line voltage is made by unplugging the power supply from the AC receptacle.• To reduce risk of electric shock, unplug any battery charger from the outlet before attempting any maintenance or cleaning.• For optimum charging performance, turn off the radio product while charging it in any battery charger.
55Owner’s InformationOWNER’S INFORMATIONMobile Equipment Identifier (IMEI)_____________________________Own Phone Number_____________________________Own Private ID_____________________________Date Purchased______________Sales Representative Telephone Number_______________________Customer Care Number_______________________

Navigation menu