Motorola Solutions 89FT5827 I285 PHONE User Manual i285BoostMobile
Motorola Solutions, Inc. I285 PHONE i285BoostMobile
UserManual.wiki
>
Motorola Solutions
>
89FT5827 User Manual
EXHIBIT 8
Navigation menu
Upload a User Manual
Namespaces
Wiki Guide
HTML
PDF
Info
Views
User Manual
Discussion / Help
Navigation


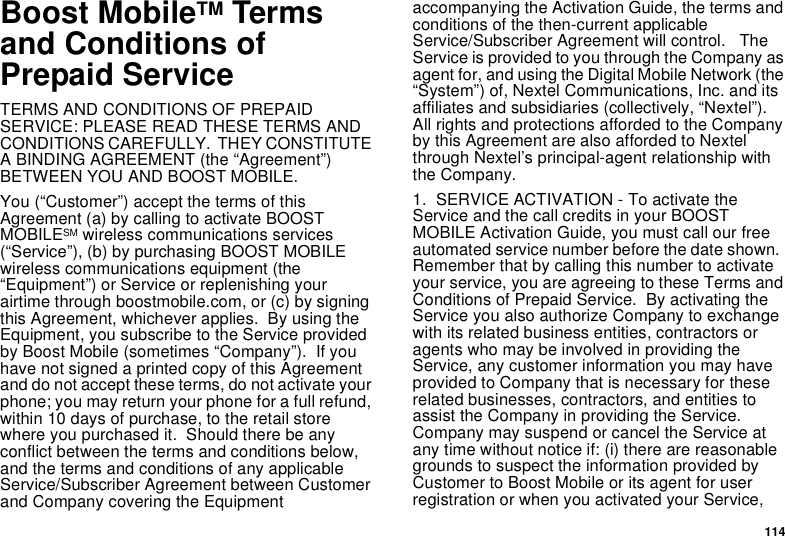
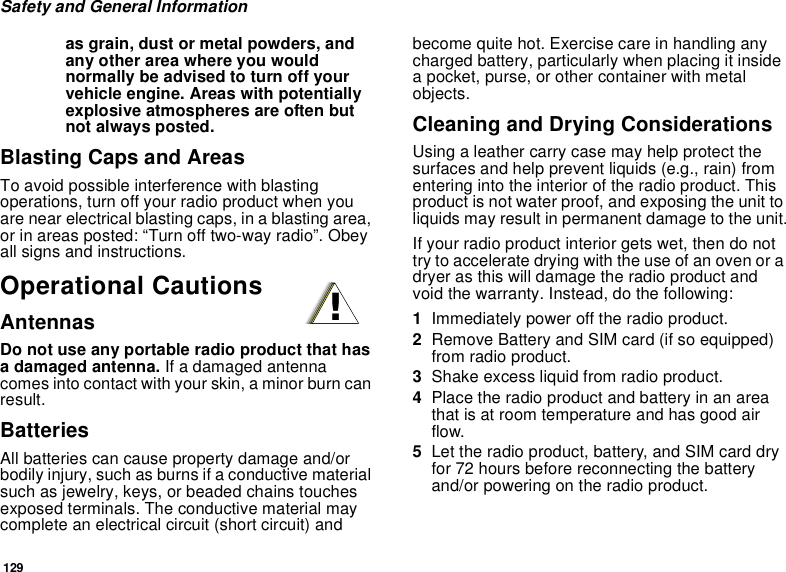
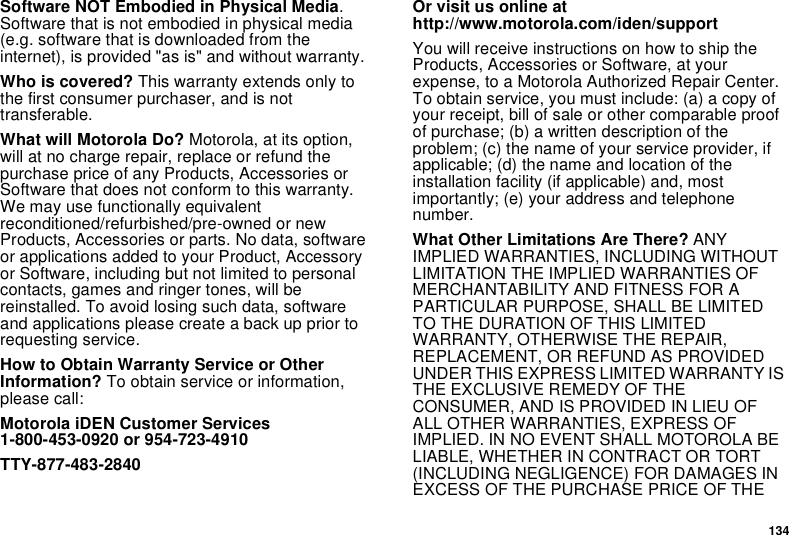
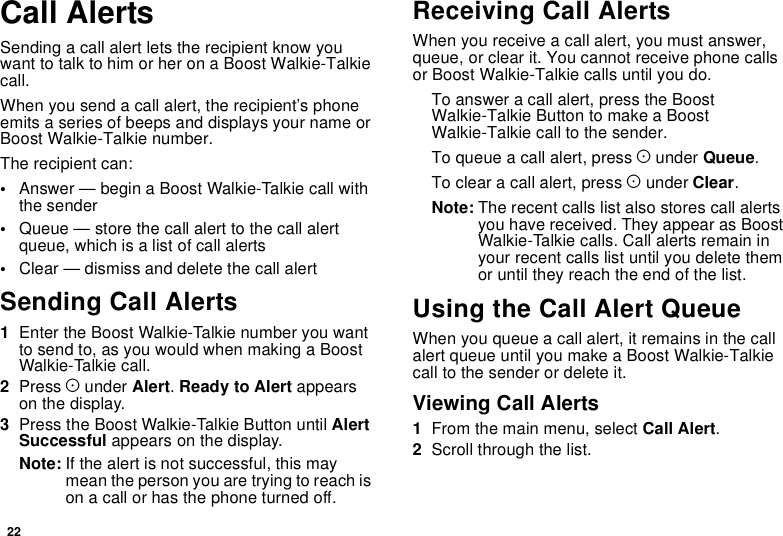
![16Getting StartedMain Menu My Info Contacts (continued) Name Line 1 Direct Connect (Boost Walkie-Talkie) CKT Carrier IP IP1 Address Service Status Call Alert Received Call Alerts (if any) Store View Delete Delete All Sort By Recent Calls Contacts [New Contact] New Search Capacity Filter Call Setup Delete All Web Re-Boost Ring Tones VibeAll On/Off Ring Tones Assign w/vibe Overview Memory Usage Delete Settings Display/Info Phone Calls DC (Walkie-Talkie) Options Volume Security Advanced Contacts (if any) View New Search Edit Delete Contact Delete Number Capacity Filter Call Setup Delete All Messages Voice Mail Text Msgs Delete All Memory Meter Net Alert Recent Calls Recent Calls (if any) Store View Delete Delete All Call Alert Queue Call Setup Call Timers Last Call Phone Reset Phone Lifetime DC (Walkie-Talkie) Reset DC (Walkie-Talkie) Lifetime Circuit Reset Circuit Lifetime Kbytes Reset Call Forward All Calls - To Retrieve Status Detailed - If Busy - If No Answer - If Unreachable Retrieve Status GPS Position Privacy Interface Memo Store Cancel Delete](https://usermanual.wiki/Motorola-Solutions/89FT5827/User-Guide-403084-Page-24.png)

![25Deleting Recent Calls3To store the number as a new entry, select [NewContact].-or-To store the number to an existing entry, selectthe entry.4With the Contacts type field highlighted, scrollleft or right to display the Contacts type you wantto assign the number. For information onContacts types, see page 29.5If you want to add more information to the entry,follow the applicable instructions in “CreatingEntries” on page 31.6Press Aunder Done.Deleting Recent CallsTo delete a call:1From the recent calls list, scroll to the call youwant to delete.2Press m.3Select Delete.4Press Aunder Yes to confirm.To delete all calls:1From the recent calls list, press m.2Select Delete All.3Press Aunder Yes to confirm.](https://usermanual.wiki/Motorola-Solutions/89FT5827/User-Guide-403084-Page-33.png)

![31Creating Entries3With Show DC highlighted, press AunderSelect.To set Contacts to show all entries:1From the Contacts list, press m.2Select Filter.3Scroll to Show All.4Press Aunder Select.Creating EntriesA number or address and a Contacts type arerequired for all Contacts entries. Other informationis optional. You may enter the information in anyorder by scrolling through the entry details.After you have entered the number or address,Contacts type, and any other information you want,you can press Aunder Done to save the entry toContacts.To cancel a Contacts entry at any time press, etoreturn to the idle screen.Tip: In some fields that require you to enterinformation, you can begin entering theinformation from the keypad instead ofpressing Aunder Change.To create a Contacts entry:1To access the entry details screen:Select Contacts > [New Contact].-or-From the Contacts list, press m.ScrolltoNew.Press Aunder Select.2Ifyouwanttoassignanametotheentry:With the Name field highlighted, press AunderChange.Enter the name. See “Entering Text” on page26. When you are finished, press Aunder Ok.3Ifyouwanttoassignaringtonetothename:With the Ringer field highlighted, press AunderChange.Scrolltotheringtoneyouwanttoassign.PressAunder Select.4ToassignaContactstypetothenumberoraddress being stored:With the Contacts type field highlighted, press Aunder Change.Scroll to the Contacts type you want to assign.Press Aunder Select.5To store a number or address:With the #field (or ID for an email address, or IPfor an IP address) highlighted, press AunderChange.](https://usermanual.wiki/Motorola-Solutions/89FT5827/User-Guide-403084-Page-39.png)
![32ContactsEnter the number or address. For phonenumbers, use the 10-digit format. For emailaddresses, see “Entering Text” on page 26.Tip: Press Aunder Browse to select a numberor address from Contacts, the recent callslist, or Memo.When you are finished, press Aunder Ok.6If you want to assign a Speed Dial number to thenumber, press Aunder Change with the[Options] field highlighted. See “AssigningOptions”.7If you want to add more numbers or addressesto the entry:Scroll past the information you already entered.Enter the additional information for the entryusing step 2 through step 6. You must assign aname to the entry, if you have not already.8Press Aunder Done.Assigning Options1If you have not already, press Aunder Changewith the [Options] field highlighted2The default Speed Dial number assigned to aphone number is displayed in the Speed # field.This is always the next available Speed Diallocation.Ifyouwanttoassignthephonenumbertoadifferent Speed Dial location:With the Speed # field highlighted, press Aunder Change.Press Aunder Delete to delete the currentSpeed Dial number.Enter the new Speed Dial number using thekeypad.When you are finished, press Aunder Ok.3When you are finished, press Aunder Back.Storing Numbers FasterTo store numbers to Contacts from the recent calllist, see “Storing Recent Calls to Contacts” on page24.To store numbers to Contacts from Memo, see“Memo” on page 35.To store numbers to Contacts from the idle screen:1Use the keypad to enter the number you want tostore.2Press m.3Select Store Number.4To store the number as a new entry, select [NewContact].-or-](https://usermanual.wiki/Motorola-Solutions/89FT5827/User-Guide-403084-Page-40.png)
![35MemoMemoletsyoustoreanumber,makeacalltothatnumber, and save it to Contacts.To create a memo:1From the main menu, select Memo.2Enter the number using your keypad.3Press Aunder Store.Toviewthememolater:1From the main menu, select Memo.To delete the memo:1From the main menu, select Memo.2Press and hold Aunder Delete.3Press Aunder Store.To edit the memo:1From the main menu, select Memo.2Enter the new number.3Press Aunder Store.To make a call to the memo number:1From the main menu, select Memo.2Press s.To store the memo number to Contacts:1From the main menu, select Memo.2Press m.3Press Aunder Select.4To store the number as a new entry, select [NewContact].-or-To store the number to an existing entry, selectthe entry.5With the Contacts type field highlighted, scrollleft or right to display the Contacts type you wantto assign the number.6If you want to add more information to the entry,follow the applicable instructions in “CreatingEntries” on page 31.7Press Aunder Done.](https://usermanual.wiki/Motorola-Solutions/89FT5827/User-Guide-403084-Page-43.png)
![36Message CenterThe message center manages your messages.When you receive the following types ofmessages, you can access them through themessage center:•voice mail messages•Multimedia Messaging Service (MMS)messages•Short Message Service (SMS) messages•Two-Way messagesYou can listen to or view these messages, deletethem, or continue to store them in the messagecenter.The message center also lets you create and sendMMS messages. It stores messages you have sentand lets you save drafts of messages you arecreating.Accessing the MessageCenterPress Aunder Mesg.-or-From the main menu, select Messages.Message Center OptionsAfter accessing the message center, select theoption you want:•[ComposeMessage]— begin creating anMMS message.•VoiceMail— access voice mail messages youhave received.• Inbox — access MMS messages you havereceived•Drafts— access MMS messages you havecreated and saved but not sent.•SentItems— access MMS messages you havecreated and sent.•SMS— access SMS messages you havereceived•WebAlert— access Boost Mobile textmessages you have received.](https://usermanual.wiki/Motorola-Solutions/89FT5827/User-Guide-403084-Page-44.png)
![47MMS MessagesMultimedia Messaging Service (MMS) lets you tosend and receive text messages from your phone,through any email account, and onwww.boostmobile.com.Composing and SendingMessagesEach message you compose may contain thefollowing fields:•To— the phone numbers or email addresses ofone or more recipients•Msg— the body of the message•Subject— the subject line•Cc— the phone numbers or email addresses ofmore recipients.•Priority— sets the priority that the messagehas when it is received.•Report— lets you receive a report confirmingthat your message was delivered.• Valid Until — If the message has not beendelivered after this date, no more deliveryattempts are made.To send a message, you must address it to at leastone recipient. All other message fields are optional.You can fill in the message fields in an order.To send the message at any time after it has beenaddressed:Press Aunder Send.-or-If Send is not one of your options: Press m.Select Send.To cancel the message at any time:Press s.-or-Press Aunder Cancel.-or-If Cancel is not one of your options: Press m.Select Cancel.Tip: In message fields that require you to entertext, you can begin entering the text fromthe keypad instead of pressing AunderChange.Forinformationonwaystoentertext from the keypad, see “Entering Text” onpage 26.Sending a Basic Message1To begin a composing a message:From the main menu, select Messages >[Compose Message].-or-](https://usermanual.wiki/Motorola-Solutions/89FT5827/User-Guide-403084-Page-55.png)
![48MMS MessagesSelect [Compose Message] from Inbox,Drafts,orSent Items.-or-Begin composing a message from Contacts, therecent calls list, or the idle screen. See “MoreWays to Begin a Message” on page 50. -or-Reply to a received message. (See “Replying toaMessage”onpage49.)2To address the message:With To highlighted, press Aunder Change.Enter the phone number or email address fromyour keypad and press Done. Repeat this actionto enter more phone numbers or emailaddresses. -or-Select recipients from Contacts or the recentcalls list. See “More Ways to Address aMessage” on page 50.When you are finished, press Aunder Done.3To enter or edit the body of the message:With Msg highlighted, press Aunder Change.Enter text from your keypad. -or-Use a Quick Note. See “Quick Notes” on page52.When you are finished, press Aunder Done.4Ifyouwanttosendthemessagenow,pressAunder Send.-or-Continue composing your message. See“AddingMoreMessageOptions”.Adding More Message Options1To view more message fields, select MORE.2If you want to create or edit the subject line:With Subject highlighted, press AunderChange.Enter text from your keypad. -or-Select a Quick Note. See “Quick Notes” on page52.When you are finished, press Aunder Done.3If you want to add more recipients in addition tothoseintheTo field:With To highlighted, press Aunder Change.Enter the number or email address from youkeypad. -or-Select recipients from Contacts or the recentcalls list. See “More Ways to Address aMessage” on page 50.When you are finished, press Aunder Done.](https://usermanual.wiki/Motorola-Solutions/89FT5827/User-Guide-403084-Page-56.png)
![49Composing and Sending Messages4If you want to set the priority your message haswhen it is received:With Priority highlighted, press AunderChange. Select the priority you want.5Ifyouwanttoreceiveareportconfirmingthatyour message was delivered:With Report highlighted, press AunderChange. Select On Delivery.6If you want to set a date after which attempts todeliver the message end:With Valid Until highlighted, press AunderChange. Select a date by scrolling or enteringnumbers.7To send the message, press Aunder Send.Replying to a MessageWhen you reply to a message you received, someof the fields in your reply message are filled inautomatically:•To— the phone number or email address of thesender of the message you are replying to. Ifyou are sending a reply to all, some recipientsmaybeinthisfield.•Msg— the first 40 characters of the messageyou are replying to. Text you add to the body ofyour message appears above this.•Subject— “Re:” followed by the subject line ofthe message you are replying to, if any.•Cc— If you are sending a reply to all, somerecipients may be in this field.To reply to a message:1View the message you want to reply to. -or-If you have already viewed the message, scrollto it.2Press m.3To reply to the sender only, select Reply.-or-To reply to the sender and all recipients, selectReply All.4A list of words and short phrases is displayed.Select any of these phrases to make add it tothe body of your messages. -or-Select [Compose Reply] to begin the body ofyour message without using any of thesephrases.5Edit any message fields you want to change.6Send the message.Tip: To create new reply phrases to use in laterreply message, see “Customizing MMS” onpage 58.](https://usermanual.wiki/Motorola-Solutions/89FT5827/User-Guide-403084-Page-57.png)
![56MMS Messages2Press m.3Select Call # In Message.4If the message contains more than one phonenumber, scroll to the number you want to call.5Press s.Sending a Call Alert1View the message.2Press m.3Select Alert.4If the message contains more than one BoostWalkie-Talkie number, scroll to the BoostWalkie-Talkie number you want to alert.5Press the PTT button.Making a Group ConnectTM Call1View the message.2Press m.3Select Talkgroup.4If the message contains more than oneTalkgroup number, scroll to the Talkgroupnumber you want to alert.5Press the PTT button.Storing Message Information ToContactsYou can save sender information and informationcontained in the message to Contacts.Saving Sender InformationIf the message was sent from a phone, you cansave the sender’s phone number to Contacts. If themessage was sent using email, you can save thesender’s email address to Contacts.1View the message.2Press m.3Select Save Sender # or Save Sender Email.4To store the number as a new entry, select [NewContact].-or-To store the number to an existing entry, selectthe entry.5If you are saving a phone number:Scroll to the Contacts type field.Scroll left or right to display the Contacts typeyouwanttoassignthenumber.6If you want to add more information to the entry,follow the applicable instructions in “CreatingEntries” on page 31.7Press Aunder Done.](https://usermanual.wiki/Motorola-Solutions/89FT5827/User-Guide-403084-Page-64.png)
![57Actions for Received MessagesStoring Numbers from the MessageIf a message you receive contains a phonenumber, Boost Walkie-Talkie number, or TalkgroupID, you can store these numbers to Contacts.1View the message.2Press m.3Select Save Number in Message.4If the message contains more than one number,scroll to the number you want to store.5To store the number as a new entry, select [NewContact].-or-To store the number to an existing entry, selectthe entry.6With the Contacts type field highlighted, scrollleft or right to display the Contacts type you wantto assign the number.7If you want to add more information to the entry,follow the applicable instructions in “CreatingEntries” on page 31.8Press Aunder Done.Storing Email Addresses from the MessageIf a message you receive contains one or moreemail addresses, you can store these addresses toContacts.1View the message.2Press m.3Select Save Email in Message.4If more the message contains more than oneemail address, scroll to the address you want tostore.5To store the number as a new entry, select [NewContact].-or-To store the number to an existing entry, selectthe entry.6If you want to add more information to the entry,follow the applicable instructions in “CreatingEntries” on page 31.7Press Aunder Done.GoingtoaWebsite1If a message contains one or more websiteURLs, you can go to the website.1View the message.2Press m.3Select Go to Website.4If the message contains more than one websiteURL, scroll to the website URL you want to goto.](https://usermanual.wiki/Motorola-Solutions/89FT5827/User-Guide-403084-Page-65.png)
![58MMS MessagesCustomizing MMSThe Setup menu lets you customize MMS for yourphone:•FriendlyName— Enter text here to create afriendly name. Your friendly name is the namedisplayedintheFromfieldonotheriDENphones when they receive messages from you.•Signature— Enter text here to create asignature. Your signature is text that isautomatically inserted at the end of allmessages you compose. You can edit the textbefore sending the message.•QuickNotes— lets you create new QuickNotes and edit or delete Quick Notes you havecreated.• Replies — lets you create new reply phrasesand edit or delete reply phrases you havecreated.•Cleanup— controls how long messages remainin the Inbox and Sent Items before they aredeleted. See “Setting the Clean-up Option”To access the Setup menu:1From the main menu, select Messages >[Compose Message].2Press m.3Select Setup.Tip: This option is available from manycontext-sensitive menu when you are usingMMS.Setting the Clean-up OptionThe clean-up option controls how long messagesremain in the Inbox and Sent Items before they aredeleted. You set the clean-up option for the Inboxand Sent Items separately.The clean-up option deletes only read, unlockedmessages.Clean-Up Options•Off— messages are never automaticallydeleted.• 5 Messages — If you have more than 5messages, messages are deleted in the orderthey were received, starting with the oldest, untilthere are 5 left.• 10 Messages — If you have more than 10messages, messages are deleted in the orderthey were received, starting with the oldest, untilthere are 10 left.•1Day— Messages are deleted if they are olderthan1day.•3Day— Messages are deleted if they are olderthan3days.](https://usermanual.wiki/Motorola-Solutions/89FT5827/User-Guide-403084-Page-66.png)
![60MMS MessagesDeleting All MessageTo delete all messages in the Inbox, Drafts, andSent Items.1From the main menu, select Messages >[Compose Message].2Press m.3Select Delete All.Tip: This option is available from manycontext-sensitive menu when you are usingMMS.](https://usermanual.wiki/Motorola-Solutions/89FT5827/User-Guide-403084-Page-68.png)


![95ShortcutsShortcuts lets you access most menu options bypressing a number on your keypad or saying thevoice name of the shortcut. You create the shortcutand then use it to take you to that screen any time.Creating a Shortcut1Go to the menu item you want to create a shortcutfor.Forexample,ifyouwanttocreateashortcuttothe screen for creating a new Contacts entry:From the main menu, select Contacts > [NewContact].2Press and hold muntil a confirmation screenappears.3Press Aunder Yes.4Select Key.5Press the key number you want to assign to theshortcut.6Ifyouwanttorecordavoicenamefortheshortcut: Select Voice.Asdirectedbythescreenprompts, say and repeat the name you want toassign to the number. Speak clearly into themicrophone.7Press Aunder Done.Using a ShortcutIf you know the shortcut number:1From the idle screen, press m.2On your keypad, press the number assigned tothe shortcut.If you do not know the shortcut number:1From the main menu, select Shortcuts.2Scroll to the shortcut you want to use. -or-If you assigned a voice name to the shortcut:Press t. Say the voice name into your phone.The shortcut with that voice name is thenhighlighted.3Press Aunder Done.Editing a ShortcutTo change the number assigned to a shortcut:1From the main menu, select Shortcuts.2With any shortcut highlighted, press m.3Select Reorder.4Highlight the shortcut you want to move.5Press Aunder Grab.6Scroll to the place where you want the shortcut toappear.](https://usermanual.wiki/Motorola-Solutions/89FT5827/User-Guide-403084-Page-101.png)

![109Profiles3Press m.4Select Store Changes.The temporary profile is stored with the name of theprofile it is based on. The profile it is based on, as itexisted before you made changes to settings, isgone.Creating Profiles1From the main menu, select Profiles.2Select [New Profile].-or-Scroll to any profile. Press m. Select New.3Enter the name you want to give the profile. See“Entering Text” on page 26.When you are finished, press Aunder Done.4If you want to base this profile on an existingprofile: Select Copy from. Select the profile youwant to base this profile on. If you do not choosea profile to copy from, the new profile is based ona default profile.5Press Aunder Create.6Scroll through the list of options and set theirvalues.7Press Aunder Done.Editing Profiles1From the main menu, select Profiles.2Scrolltotheprofileyouwanttoedit.3Press m.4Select Edit.5Follow the applicable instructions in “TemporaryProfiles” to edit the various fields.Deleting ProfilesTo delete a profile:1From the main menu, select Profiles.2Select the profile you want to delete.Note: A temporary profile is automatically deletedwhen the profile it is based on is deleted.3Press m.4Select Delete.5Press Aunder Yes to confirm.To delete all profiles:1From the main menu, select Profiles.2Press m.3Select Delete All.4Press Aunder Yes to confirm.](https://usermanual.wiki/Motorola-Solutions/89FT5827/User-Guide-403084-Page-110.png)