Motorola Solutions 89FT5834 iDEN im240 User Manual iM240User Guide
Motorola Solutions, Inc. iDEN im240 iM240User Guide
USERS MANUAL

im240 Wireless Modem
User’s Guide
for Microsoft® Windows® 2000, Windows ME®,
Windows NT®, Windows® XP,
Pocket PC 2002, and Pocket PC 2003
@NNTN5927A@
NNTN5927A
i
Contents
Getting Started.....................................................................1
im240 Wireless Modem.................................................................1
Package Contents.........................................................................1
Supported operating systems........................................................1
Your account and coverage area ..................................................1
im240 Wireless Modem Software..................................................2
Customer Support .........................................................................2
SIM Card ...............................................................................3
Inserting and Removing a SIM Card .............................................3
SIM Card Personal Identification Number (PIN)............................ 4
Enabling the SIM PIN.................................................................... 4
Invalid PIN..................................................................................... 4
Valid PIN ....................................................................................... 4
Changing the SIM PIN................................................................... 5
Disabling the SIM PIN ...................................................................5
Unlocking the SIM PIN ..................................................................5
Modem Setup.......................................................................6
When to Insert the Modem............................................................ 6
System Requirements................................................................... 6
Preparing the Modem for Setup ....................................................7
Installing on Windows ME ............................................................. 7
Installing on Windows 2000, and XP ............................................7
Installing on Windows NT ............................................................. 8
Installing on a Pocket PC ............................................................11
Using the Modem...............................................................12
Using the Detachable Antenna.................................................... 13
Using the External Antenna.........................................................13
Turning on the Modem ................................................................14
Compact Mode............................................................................ 14
ii
Internet ...............................................................................16
Connecting to the Internet ...........................................................16
Disconnecting from the Internet...................................................17
Data Connectivity ..............................................................17
Connecting via Packet Data ........................................................18
Connecting via Circuit Data .........................................................18
Modem Status....................................................................18
Launching the im240 Wireless Modem Dashboard .....................18
The im240 Wireless Modem Dashboard Window........................19
Common Functionality.................................................................19
Getting Status Information...........................................................20
Status Light..................................................................................20
Uninstalling Modem Software ..........................................21
Laptop..........................................................................................21
Pocket PC....................................................................................21
Troubleshooting ................................................................22
Diagnostics ..................................................................................22
Registration..................................................................................23
Safety and General Information .......................................24
RF Operational Characteristics....................................................24
Portable Radio Product Operation and EME Exposure...............24
Electro Magnetic Interference/Compatibility ................................26
Medical Devices...........................................................................27
Operational Warnings..................................................................27
Operational Cautions...................................................................28
MOTOROLA LIMITED WARRANTY ..................................29
Patent and Trademark Information..................................32
Index ...................................................................................34

iii
DECLARATION OF CONFORMITY
Per FCC CFR 47 Part 2 Section 2.1077(a)
Responsible Party Name: Motorola, Inc.
Address: 8000 West Sunrise Boulevard
Plantation, FL 33322 USA
Phone Number: 1 (800) 453-0920
Hereby declares that the product:
Product Name: im240
Model Number: H70UAA9RR1AN
Conforms to the following regulations:
FCC Part 15, subpart B, section 15.107(a), 15.107(d) and section
15.109(a)
Class B Digital Device
As a personal computer peripheral, this device complies with Part
15 of the FCC Rules. Operation is subject to the following two
conditions: (1) this device may not cause harmful interference, and
(2) this device must accept any interference received, including
interference that may cause undesired operation.
Note: This equipment has been tested and found to comply with
the limits for a Class B digital device, pursuant to part 15
of the FCC Rules. These limits are designed to provide
reasonable protection against harmful interference in a
residential installation. This equipment generates, uses
and can radiate radio frequency energy and, if not
installed and used in accordance with the instructions,
may cause harmful interference to radio communications.
However, there is no guarantee that interference will not
occur in a particular installation.
iv
If this equipment does cause harmful interference to radio or
television reception, which can be determined by turning the
equipment off and on, the user is encouraged to try to
correct the interference by one or more of the following
measures:
• Reorient or relocate the receiving antenna.
• Increase the separation between the equipment and
receiver.
• Connect the equipment into an outlet on a circuit
different from that to which the receiver is connected.
• Consult the dealer or an experienced radio/TV
technician for help.
1
im240 Wireless Modem
Getting Started
im240 Wireless Modem
Thank you for purchasing the Motorola im240 Wireless Modem.
The im240 Wireless Modem lets you perform important laptop
computer or Pocket PC activities, like connecting to the internet.
The im240 Wireless Modem offers access to the internet through the
iDEN network.
Package Contents
Your im240 Wireless Modem package contains the following:
•im240 Wireless Modem card
•protective jewel case
•SIM (Subscriber Identity Module) card
•external antenna
•Installation CD containing the im240 Wireless Modem Dashboard
software and this installation guide.
Supported operating systems
The im240 Wireless Modem works in:
•Microsoft® Windows® 2000
•Windows ME®
•Windows NT® (Service Pack 4 or later)
•Windows XP®
•Pocket PC 2002
•Pocket PC 2003
Your account and coverage area
Note: If you purchased the im240 Wireless Modem from a iDEN
service provider, you may already have an account.
Otherwise, your retailer should be able to provide you with
the names of companies that provide this service.
2
Getting Started
Companies that operate iDEN networks and provide access to those
networks are called service providers. You must have an account with a
iDEN service provider that offers iDEN service to use the im240
Wireless Modem.
When you obtain your account, you will be given a SIM card. The SIM
card contains account information and must be inserted in the im240
Wireless Modem anytime you use it.
Before you can use the im240 Wireless Modem, you must install the
im240 Wireless Modem software and ensure that your im240 Wireless
Modem is configured to use your account. Instructions on completing
these steps are provided in the chapters that follow.
Once installed and configured, you can connect to the Internet with the
im240 Wireless Modem in any area in which you can obtain iDEN
service. Your ability to obtain iDEN service depends on these factors:
•Proximity to a iDEN network—You must be within the coverage area
of an iDEN network on which iDEN has been implemented, in order
to use the im240 Wireless Modem.
•Service provider—If you are within the coverage area of a network
that is not operated by your own service provider, you can only
obtain service if there is a roaming agreement between your service
provider and the network operator.
•Account provisions—Your account may restrict your usage to
certain networks or limit the amount of time you can use the
network.
Most service providers have coverage maps on their web sites.
im240 Wireless Modem Software
The im240 Wireless Modem comes with the following software:
•The Dashboard software and driver software that allows you to
manage the im240 Wireless Modem and monitor your connections
between the im240 Wireless Modem and your Windows operating
system.
Customer Support
For technical support, contact your service provider. Before you call,
make a note of the exact problems and error messages you
encountered.
Additional information for iDEN Wireless Data Services can be found on
the Motorola iDEN web site at: http://www.mot.com/iDEN
3
Inserting and Removing a SIM Card
SIM Card
Inserting and Removing a SIM Card
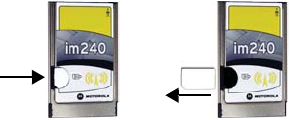
To insert the SIM card:
1Turn the unit over, so that the antenna is at the upper right corner.
2 Gently insert the SIM card with the gold contacts facing down and
with the clipped corner positioned in the lower left hand corner of the
card.
3 Gently push the SIM card in until it stops moving.
To remove the SIM card:
1Remove the im240 Wireless Modem from your laptop or Pocket PC
and turn it over, so that the antenna is at the upper right corner.
2 Place a finger on the SIM card and slide the SIM card out.
3 When the SIM card pops out, gently hold the two sides with your
fingers and take out the SIM card.
After installing the im240 Dashboard software:
Note: The following features can be accessed after the installation
of the Dashboard application.
When you insert the wireless modem into your laptop or Pocket PC,
you may be prompted to enter a SIM PIN, if it is enabled.
If your wireless modem is set to prompt you to enter a SIM PIN, your
default SIM PIN is 0000. It is recommended that you change your SIM
PIN to prevent fraudulent use of the SIM card.
If your wireless modem is not set to prompt you to enter a SIM PIN, it is
recommended that you enable the SIM PIN security feature to prevent
fraudulent use of the SIM card. Disabling your SIM PIN allows anyone
to use your wireless modem.
4
SIM Card
SIM Card Personal Identification Number
(PIN)
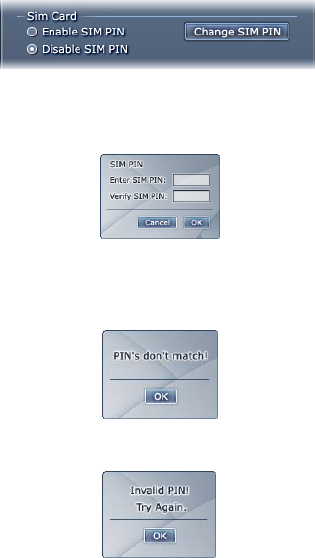
You can enable or disable the SIM PIN by selecting the appropriate
radio button:
Enabling the SIM PIN
When you try to enable the SIM PIN, you are prompted to enter your
SIM PIN and verify it.
Invalid PIN
If the 2 pin numbers don’t match, you will be presented with a pop up
saying, “PIN’s don’t match!”
If the SIM PIN is invalid when you click OK, a pop up is displayed with
the prompt, “Invalid PIN! Try again.”
Valid PIN
If the SIM PIN is valid, the SIM PIN is enabled and if you want, you can
choose to disable the SIM PIN or change the SIM PIN.
5
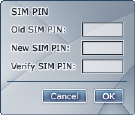
Changing the SIM PIN
Changing the SIM PIN
You can change the SIM PIN, selecting Change SIM PIN. The
dashboard will prompt you to enter the old SIM PIN, the new SIM PIN,
and to verify the new SIM PIN.
Note: You can only change the SIM PIN if the SIM PIN is enabled.
Disabling the SIM PIN
To disable the SIM PIN, you must enter your SIM PIN.
•Once you enter the correct SIM PIN, the SIM PIN will be disabled.
Unlocking the SIM PIN
If you enter an incorrect PIN 3 times, your SIM card will lock. A pop-up
will instruct you to call iDen customer service to unlock your SIM Card.
You can then choose to either cancel this action or call customer
service to unlock the SIM Card.
If you cancel this action, the Dashboard closes. The pop up window will
re-appear everytime you start Dashboard until you call customer
service to unlock your SIM Card.
When you call customer service, you will be given a code to unlock your
SIM Card. Once you enter in the code, you will need to enter a new SIM
PIN. The new PIN is entered and verified, you will have full access to
Dashboard.
6
Modem Setup
Modem Setup
The im240 Wireless Modem Installation and Application Software lets
your im240 Wireless Modem transmit data from your laptop or Pocket
PC. This software lets you control the wireless modem’s functions.
When to Insert the Modem
Important: DO NOT INSERT THE WIRELESS MODEM PRIOR TO
INSTALLING THE WIRELESS MODEM DRIVER AND
DASHBOARD SOFTWARE.
System Requirements
To install the im240 Wireless Modem Installation and Application
Software onto your laptop, you need the following:
•An im240 Wireless Modem
•The im240 Wireless Modem Installation and Application Software
CD-ROM (provided in your package)
•An IBM-compatible PC with:
•CD-ROM or DVD drive
•Available PCMCIA Type II slot
•One of these operating systems installed:
Windows 2000, Windows ME, Windows NT, or Windows XP.
Important: You must have administrative rights to install onWindows NT,
Windows 2000 or Windows XP.
•25 MB free hard-disk space
•Recommended: Mouse or compatible pointing device
•For use with a Pocket PC:
Note: If your Pocket PC does not have a PCMCIA Type II slot, you
will need an adapter to use the wireless modem.
•One of these operating systems installed on your Pocket PC:
Pocket PC 2002, or Pocket PC 2003
•Microsoft ActiveSync 3.1 or higher
•Minimum 3 MB of addressable RAM
•A packet data account with an iDEN service provider
7
Preparing the Modem for Setup
Preparing the Modem for Setup
Before setting up your im240 Wireless Modem:
•Confirm that the SIM card is in place. See “SIM Card” on page 3
Installing on Windows ME
Use these instructions if you are installing onto a laptop running
Windows ME. The installation wizard will prompt you to insert the im240
Wireless Modem into the PCMCIA slot.
1Turn on your laptop and start Windows.
2 Insert the im240 Wireless Modem Installation and Application
Software CD in your CD-ROM or DVD drive.
•If the im240 Wireless Modem and Installation and Application
Software installation program does not start automatically, select
Start, Run, and then type d:\setup.exe, where d refers to the letter
of your CD-ROM or DVD drive.
3 Use the Next and Back buttons to navigate through the wizard.
Using the default settings for the Destination Location and Program
Folder is recommended unless you have special requirements and
an advanced understanding of PC configuration.
4 When prompted, choose Laptop as your installation platform.
5 When prompted, insert your wireless modem into the available
PCMCIA Type II slot. Click Ok.
6 Upon completion of the installation, to start the im240 Wireless
Modem Dashboard Application, double click the im240 Wireless
Modem icon on your desktop.
Installing on Windows 2000, and XP
Use these instructions if you are installing on to a laptop running
Windows 2000 or Windows XP. The installation wizard will prompt you
to insert the im240 Wireless Modem into the PCMCIA slot.
Note: You must have administrative rights to install on Windows
2000 or Windows XP.
8
Modem Setup
Windows XP Only: In System Properties, right click on your My
Computer icon then left click on Properties. Select the Hardware tab,
click on Driver Signing. If the driver signing option is set to Block, then
the Installation program will not be able to install the driver.
1Turn on your laptop and start Windows. If you are running
Windows 2000 or XP log in with administrative rights.
2 Insert the im240 Wireless Modem Installation and Application
Software CD in your CD-ROM or DVD drive.
•If the im240 Wireless Modem and Installation and Application
Software installation program does not start automatically, select
Start, Run, and then type d:\setup.exe, where d refers to the letter
of your CD-ROM or DVD drive.
3 Use the Next and Back buttons to navigate through the Wizard.
Using the default settings for the Destination Location and Program
Folder is recommended unless you have special requirements and
an advanced understanding of PC configuration.
4 When prompted, choose Laptop as your installation platform.
5 When prompted, insert your wireless modem into the available
PCMCIA Type II slot. Click Ok.
6 If the Software Installation window appears, you can safely ignore
the warning. Click Continue Anyway, each time it appears.
7 When you see a window with the message “im240 Wireless Modem
has been successfully installed.”, click OK. If upon completion of the
installation, you want to start the im240 Wireless Modem
Dashboard Application, click the im240 Wireless Modem icon on
your desktop.
Installing on Windows NT
Use these instructions if you are installing on to a laptop running
Windows NT.
1Turn on your laptop.
2 Log on as Administrator.
3 Insert the im240 Wireless Modem Installation and Application
Software CD in your CD-ROM or DVD drive.
9
Installing on Windows NT
•If the im240 Wireless Modem and Installation and Application
Software installation program does not start automatically, select
Start, Run, and then type d:\setup.exe, where d refers to the letter
of your CD-ROM or DVD drive.
4 Use the Next and Back buttons to navigate through the Wizard.
Using the default settings for the Destination Location and Program
Folder is recommended unless you have special requirements and
an advanced understanding of PC configuration.
5 When prompted, users will be required to enter the COM port and
the IRQ that will be assigned to the im240 Wireless Modem. To get
the next available COM port, go to Control Panel and open Ports.
Select a COM port that is not used. For example, if ports displays
COM1, then select COM2/COM3/COM4.
Note: To find an available unused IRQ, go to:
•Start > Programs > Administrative Tools > Windows NT
Diagnostics.
•Click on the Resources Tab and click the IRQ button in that
property page.
•This page lists all the IRQs that are currently in use.
•Select an IRQ from this list 3-7, 9-12, and 15 that is not in use, for
example 10.
•After entering the COM port and IRQ, the im240 Wireless Modem
is installed as a COM port
6 When prompted, shut down Windows.
7 Turn on your laptop and start Windows.
8 After restarting you will be prompted to install the wireless modem.
9 With the SIM card inserted into the im240 Wireless Modem, and the
label of the im240 Wireless Modem facing up, carefully insert the
im240 Wireless Modem into your laptop card slot.
10 On the next page, click Have Disk to browse to the location where
you installed the Dashboard and select the subfolder "Driver". Click
OK and Click Next.
Installing the modem driver
1In the Control Panel, double click the Modems icon. If the Install
New Modem wizard opens, skip to step 3. Otherwise, proceed to
step 2.
2 Click the Add button to open the Install New Modem wizard.
10
Modem Setup
3 Select Don’t detect my modem, I will select it from a list and click
Next.
4 Select the Have Disk button.
5 Enter d:\Drivers\WinNT\ where d is the drive letter for your
CD-ROM drive and click OK.
6 On completion of this step, the modem driver is installed and you
can proceed to configure the im240 Wireless Modem to use your
account (if it was not preactivated).
7 Verify that im240 Wireless Modem is displayed and click Next.
8 Select the port that you installed in the previous step. Click Next.
9 Click Finish.
Setting up Remote Access Service (RAS)
1The Network control panel opens. In the Network window, select the
Services tab. Within the Services tab, select Remote Access
Service. Click Properties
2 The Remote Access Setup window opens. Click Add.
3 The Add RAS Device window opens. Ensure the COM port for your
im240 Wireless Modem is selected from the drop-down list. Then
click OK.
4 The Remote Access Setup window now shows the added COM
port. Verify that the im240 Wireless Modem was added to the list of
RAS devices, verify that TCP/IP is the only dial out network protocol
by clicking Network and then Protocols. Then click Continue.
5 In the Network Services Selection window, click Close.
6 The Network Settings Change window opens prompting you to
restart your laptop. Click Yes to restart.
7 The im240 Wireless Modem is now installed.
Note: Dial up networking must be installed on the Computer for
Dashboard to install properly. Follow the steps for “Installing
the modem driver” before using the Dashboard.
Reinstalling the Dashboard with a different IRQ
If the message, “Communication Failed!...” occurs when you start the
Dashboard, a possible reason is that you have assigned an interrupt
request, IRQ, to the im240 Wireless Modem that has been assigned to
another device.
11
Installing on a Pocket PC
To change the interrupt assigned to the im240 Wireless Modem:
1Reinstall the im240 Wireless Modem Dashboard.
2 It is not necessary to uninstall the Dashboard.
3 When prompted, enter the COM port and assign a different IRQ to
the im240 Wireless Modem. To get the next available COM port, go
to Control Panel and open Ports. Select a COM port that is not
used. For example, if ports displays COM1, then select
COM2/COM3/COM4.
Note: To find an available unused IRQ, go to:
•Start > Programs > Administrative Tools > Windows NT
Diagnostics.
•Click on the Resources Tab and click the IRQ button in that
property page.
•This page lists all the IRQs that are currently in use.
•Select an IRQ from this list 3-7, 9-12, and 15 that is not in use, for
example 10.
•After entering the COM port and IRQ, the im240 Wireless Modem
is installed as a COM port
4 When prompted, shut down Windows.
5 Turn on your laptop and start Windows.
6 After restarting you will be prompted to install the wireless modem.
7 With the SIM card inserted into the im240 Wireless Modem, and the
label of the im240 Wireless Modem facing up, carefully insert the
im240 Wireless Modem into your laptop card slot.
8 On the next page, click Have Disk to browse to the location where
you installed the Dashboard and select the subfolder "Driver". Click
OK and Click Next.
Installing on a Pocket PC
1Connect your Pocket PC to your laptop or desktop computer using
the cable or cradle provided with your Pocket PC.
Note: If you are installing using ActiveSync, the host PC must have:
•A CD-ROM drive
•ActiveSync version 3.1 or higher
Microsoft ActiveSync must indicate that the connection has been
established.
12
Using the Modem
2 Insert the im240 Wireless Modem Installation and Application
Software CD-ROM in your CD-ROM or DVD drive.
3 If the im240 Wireless Modem and Installation and Application
Software installation program does not start automatically, select
Start, Run, and then type d:\setup.exe, where d refers to the letter
of your CD-ROM or DVD drive.
4 Use the Next and Back buttons to navigate through the Wizard.
Using the default settings for the Destination Location and Program
Folder is recommended unless you have special requirements and
an advanced understanding of PC configuration.
5 When prompted, select Pocket PC. Click Next.
6 When prompted, insert your im240 Wireless Modem into the
available PCMCIA Type II slot.
Note: Some Pocket PC’s may not be compatible with a PCMCIA
Type II adapter. Check with your Pocket PC manufacturer.
7 To start the im240 Wireless Modem Dashboard Application, click
the im240 Wireless Modem icon on your programs desktop.
Using the Modem
Before using the im240 Wireless Modem, you must insert it into your
laptop’s PCMCIA slot or connect it to your Pocket PC’s PCMCIA slot, if
available. Then connect the detachable antenna or external antenna.
You must register the im240 Wireless Modem with your service
providers’ network before you use it. Your im240 Wireless Modem
registers automatically when turned on.
Note: The initial registration may take an extended amount of time
to complete. The im240 Wireless Modem will need to retrieve
configuration data from the system.
The Dashboard displays the status of the modem, Powering On,
Seeking Signal, Registering, and Dialing to Network
If the SIM PIN requirement for your im240 Wireless Modem is enabled,
you will be prompted to enter your SIM PIN now. (See “SIM Card
Personal Identification Number (PIN)” on page 4.)
13
Using the Detachable Antenna
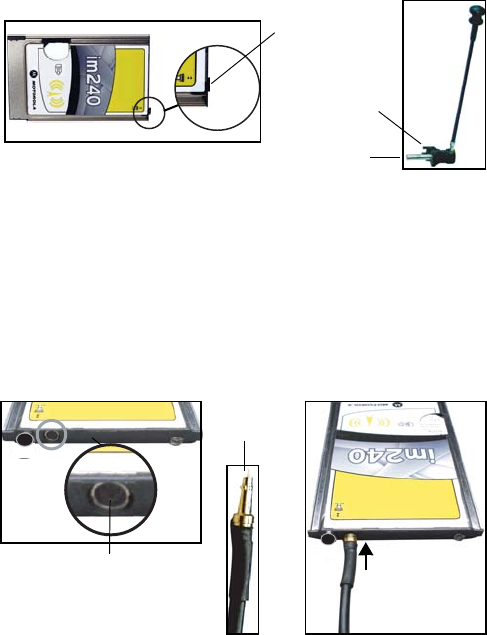
Using the Detachable Antenna
To use the detachable antenna, follow the diagrams below.
The detachable antenna is keyed to allow connection only in a vertical
position. Align keying features as you insert the antenna feed into the
ferrule. Push in until the snap ring engages.
To remove the antenna from the card DISCONNECT THE MODEM
USING THE DASHBOARD to assure the transmitter is not operating.
Then hold the card in the slot and pull the base of the antenna straight
out from the card.
Using the External Antenna
To use the external antenna, follow the diagrams below.
detachable
place antenna
in the vertical
position
antenna
ferrule
keying feature
external
click plug into place
external antenna jack
antenna plug

14
Using the Modem
When removing the rf cable hold the card in the slot to prevent pulling
the card out then pull the cable plug straight out away from the card.
Use the external antenna whenever experiencing decreased signal
strength.
Important: When using any approved accessory antenna, position it at
least eight inches (20 cm) from any part of any person.
Turning on the Modem
When you enter the Setup screen, the im240 Wireless Modem will be
powered on. The LED on the im240 Wireless Modem will turn red. The
red LED is a good indication that things are happening correctly. This
ensures an instantaneous response from the SIM Card and Diagnostic
sections.
A pop up will appear saying, “Modem is Starting”. The pop up will
remain until the im240 Wireless Modem is successfully powered on.
When the Setup tab is clicked, all information will be accessible except
for the SIM PIN and Diagnostic sections. These sections will be grayed
out until the modem powers up successfully.
Note: If the im240 Wireless Modem doesn’t power on, an alert will
appear. You can then try to troubleshoot the problem or close
the window. However, you will only be able to view default
information and won’t be able to connect to the network. If
you press the Connect button, the “Modem is Starting...” pop
up will appear.
Note: Always disconnect from an active modem session before
removing the im240 Wireless Modem. (See “Disconnecting
from the Internet” on page 17).
Compact Mode
Switching to Compact Mode
You can switch the Dashboard to a compact View mode. This view is
available for both the Disconnect and Connected modes.
You can switch to Compact mode by either:

15
Compact Mode
•Pressing in the upper-left hand corner of the application
•Pressing the Change View button in the upper-left hand corner
•Selecting ‘View Compact’ from the contextual menu
When the user switches to Compact mode, the main window will be
shown in Compact mode. The detailed setup screen mode will be
unaffected. This means:
•In Disconnect mode: if you have the Setup window open, the
window will remain open
•In Connected mode: if you have the Details window open, the
window will remain open
When the main area is compacted, the following functionality is
available:
•All common functionality
•Mode specific functionality
•‘Disconnect’ and ‘Details’ in Connected mode
•‘Connect’ and ‘Setup’ in Disconnect mode
To compact the main window, click the far left arrow button. To expand
the main window click the far left arrow button again.
Switching back to Normal Mode
You can return to normal mode by:
•Pressing the Change View button in the upper-left hand corner
•Selecting View Compact from the contextual menu
change view
button

16
Internet
Internet
Connecting to the Internet
To connect im240 Wireless Modem to the Internet or an intranet,
complete the following steps.
Laptop
1Start the im240 Wireless Modem Dashboard program on your
laptop. To do this select Start > Programs > Motorola > im240
Dashboard or double-click the shortcut on your desktop. The
Dashboard interface window appears.
2 Click to Connect.
3 As the connection starts, you will see the following messages:
•Powering On
•Seeking Signal
•Registering and Dialing to Network
You may now use your modem to access the internet, your Web-based
email, FTP server, etc.
Pocket PC
Note: Do not start a data session while the Pocket PC is connected
to the host computer and ActiveSync is running.
1Start im240 Wireless Modem Status on your Pocket PC. To do this,
go to the Start button and select Programs. Then tap on the im240
Wireless Modem icon.
2 Tap Connect.
3 As the connection starts, you will see the following messages:
•Connecting
•Connected
You may now use your modem to access the Internet, your Web-based
email, FTP server, etc.
17
Disconnecting from the Internet
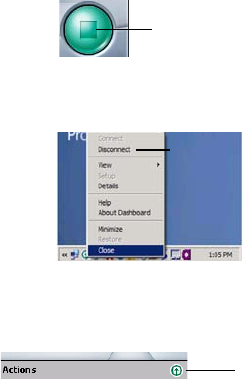
Disconnecting from the Internet
Laptop
•If your Dashboard is open click the green disconnect button
•If the Dashboard is closed, you can open it by double-clicking the
im240 Wireless Modem icon in the system tray, or
•Right-click the im240 Wireless Modem icon in the system tray.
Select Disconnect
Pocket PC
1If the im240 Wireless Modem Dashboard is closed, open it by
tapping the im240 Wireless Modem icon located at the bottom right
of your screen.
2 Then tap Disconnect.
Data Connectivity
You can perform the following types of data connections with the im240
Wireless Modem.
• Packet data: Access the Internet, send and receive e-mail, and
transfer files over the packet data network using standard IP
protocols.
•Packet data transmits packets (blocks) of data at high speed. After
the data is transmitted, you can remain connected without being
charged for the idle time.
Click here to
disconnect
Click here to
disconnect
Tap here
18
Modem Status
• Circuit data: Access an ISP or your corporate server with a PPP
dial-up connection to send and receive data over the
circuit-switched cellular channel, just as you would using a standard
telephone network.
Circuit data provides a dedicated connection for transmitting data.
The connection is maintained until broken by one of the connected
parties. You can use the im240 wireless modem to connect to the
internet or to a corporate server using a PPP or dial-up network
connection (circuit data). Contact your ISP or IT department for
specific instructions on setting up a modem to access their server.
You will need to obtain the phone number of the ISP or corporate
server, as well as your network user name and password.
Connecting via Packet Data
You can run any standard TCP/IP application during a packet data
session.
Note: During an active packet data session, any software
configured for use with other service providers may need to
be reconfigured for use with your service provider.
Connecting via Circuit Data
Before attempting to use your im240 Wireless Modem to connect to the
internet via circuit data, contact your Internet Service Provider (ISP)
for instructions on setting up your modem to access their server.
Modem Status
Launching the im240 Wireless Modem
Dashboard
The Dashboard is the program you can use to manage and monitor
your im240 Wireless Modem connections. The Dashboard allows you
to:
•Determine signal strength, and other network parameters
•Monitor the status of the im240 Wireless Modem
•Initiate data connections
•Enable or disable SIM security that prevents others from using your
SIM card if it is lost or stolen. See “Enabling the SIM PIN” on page 4
19
The im240 Wireless Modem Dashboard Window
You can launch the im240 Wireless Modem Dashboard by:
•Double clicking the im240 Wireless Modem desktop icon
•Selecting Start > Programs > Motorola > im240 Dashboard
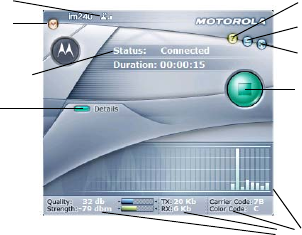
The im240 Wireless Modem Dashboard
Window
Laptop
.
Common Functionality
Using your laptop, in compact or extended mode,
you can:
•Access the Contextual Menu. Right-click the Dashboard to bring up
the contextual menu
•Drag the Dashboard around by left-clicking and dragging anything
on the dashboard (except buttons)
•Close. Use the Exit button to hide the Dashboard. The application
will still be available in the system tray
•Minimize. Pressing the Minimize button will minimize the application
to the taskbar
•Help. This will bring up the Help feature
compact view
signal strength
connect /
disconnect
show / hide
connection details
close window
help
minimize window
connection details
connection status
20
Modem Status
•Change View. Changes the view of the Dashboard from Normal to
Compact and vice versa. Keyboard access. You can access all
functionality using the keyboard
The Details Screen graph shows number of bytes sent and received:
•A new bar will be displayed every 500 ms. All bars will be shifted to
the left, and the new bar will be displayed at the far right
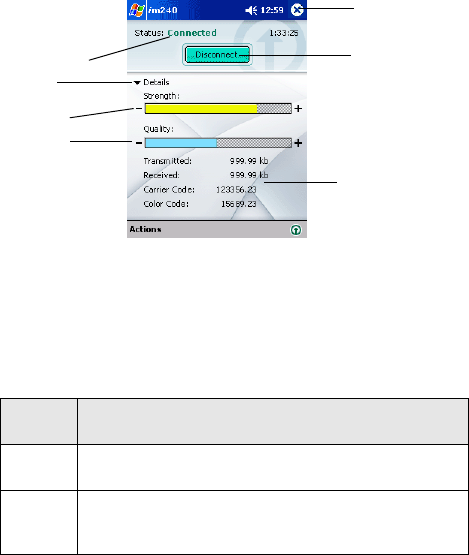
Pocket PC
.
Getting Status Information
Status Light
The LED status light located on the end of the im240 Wireless Modem
indicates your service status of your modem.
When Using Modem
Status
Light im240 Wireless Modem Status
Flashing
Red Registering. Your modem is registering with your
service providers’ network. Please wait.
Solid
Red No service. Your modem can not register with
the network. The modem will continue trying to
register every two minutes until it is powered off.
signal strength
connect /
disconnect
show / hide
connection details
close window
connection details
connection status
signal quality

21
Laptop
Uninstalling Modem Software
You may want to uninstall the im240 Wireless Modem Installation and
Application software. If you do this, you will be unable to use your
modem until you reinstall the software.
Note: The steps in this procedure may vary slightly depending on
your operating system.
To uninstall im240 Wireless Modem Installation and Application
Software, follow the steps described here.
Laptop
1Select Start > Programs > Motorola im240 Wireless Modem >
Uninstall im240 Wireless Modem.
Pocket PC
1Remove or disconnect the im240 Wireless Modem from the
PCMCIA slot of your Pocket PC.
2 Go to the Start button and choose Settings.
3 Choose the System tab.
4 Tap Remove Programs.
5 Choose MOTOROLA im240 Wireless Modem and tap Remove.
6 Confirm the removal of the software by tapping Yes.
7 A message stating Uninstall completed successfully appears.
Tap OK.
Flashing
Amber Unit registered. No packet data service. Circuit
data calls can be performed in this mode.
Flashing
Green In service. Your modem has successfully
completed packet data registration.
Solid
Green Transmitting or receiving data.
Status
Light im240 Wireless Modem Status
22
Troubleshooting
Troubleshooting
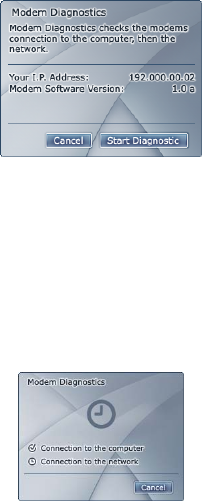
Diagnostics
You can diagnose both the connection to the network and the modem
connection to the computer by selecting ‘Test’ from the Dashboard
setup.
In the new window, there will be instructional text and fields that show
the users IP address and Modem Software Version.
From this screen you can start the diagnostic process.
When you start the diagnostic process, the screen changes and an
animation begins to indicate the start of the diagnostic process. The
following get checked as they are diagnosed:
•Connection to the Computer
•Connection to the Network
If the diagnosis is successful, the given connection will have a ✔. If the
diagnosis failed, the connection will have a !.
While the diagnostics for each connection is being performed, a clock
icon will display.
23
Registration
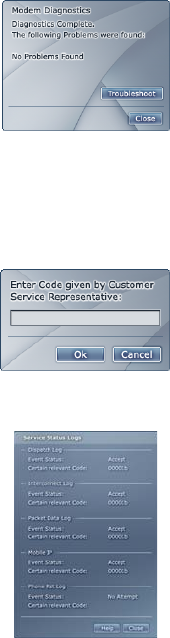
After the diagnostics are completed, the screen refreshes to show what
problems were encountered, if any. From here, you can choose to
Master Reset the modem, Troubleshoot, or close the diagnostics.
If no problems were found, the text should read, “No Problems Found.”
Registration
If you have significant trouble connecting the modem to either the
network or your own computer, call customer service. A customer
service representative will instruct you to enter a pass code that will
unlock a detailed diagnostic screen.
The detailed diagnostic screen will help you accurately diagnose the
problem.
24
Safety and General Information
Safety and General Information
IMPORTANT INFORMATION ON SAFE AND EFFICIENT
OPERATION.
READ THIS INFORMATION BEFORE USING YOUR MOTOROLA
IM240 WIRELESS MODEM.
RF Operational Characteristics
Your Motorola product contains a radio frequency transmitter to convey
the information you wish to send as well as occasional automatic
signals used to sustain connection to the wireless network, and a
receiver which enables you to receive communication and connection
information from the network.
Antenna Care
Use only the supplied or an approved replacement antenna.
Unauthorized antennas, modifications, or attachments could damage
the radio product and may violate FCC regulations. When using any
approved accessory antenna, position it at least eight inches (20 cm)
from any part of any person.
DO NOT hold the antenna when the radio product is "IN USE". Holding
the antenna affects call quality and may cause the product to operate at
a higher power level than needed.
Portable Radio Product Operation and
EME Exposure
Your Motorola product is designed to comply with the following national
and international standards and guidelines regarding exposure of
human beings to radio frequency electromagnetic energy (EME):
•United States Federal Communications Commission, Code of
Federal Regulations; 47 CFR part 2 sub-part J.
•American National Standards Institute (ANSI) / Institute of Electrical
and Electronics Engineers (IEEE). C95. 1-1992.
•Institute of Electrical and Electronics Engineers (IEEE). C95.
1-1999 Edition.
•International Commission on Non-Ionizing Radiation Protection
(ICNIRP) 1998.
25
Portable Radio Product Operation and EME Exposure
•Ministry of Health (Canada). Safety Code 6. Limits of Human
Exposure to Radiofrequency Electromagnetic Fields in the
Frequency Range from 3 kHz to 300 GHz, 1999.
•Australian Communications Authority Radiocommunications
(Electromagnetic Radiation - Human Exposure) Standard 2003
•ANATEL, Brasil Regulatory Authority, Resolution 303 (July 2, 2002)
“Regulation of the limitation of exposure to electrical, magnetic, and
electromagnetic fields in the radio frequency range between 9 kHz
and 300 GHz.” "Attachment to Resolution 303 from July 2, 2002."
The iM240 modem card has been tested for compliance with FCC / IC
RF exposure limits in laptop computer configurations with side PCMCIA
slots, and palmtop computers with rear PCMCIA slots, and can be used
in laptop computers and palmtop computers with substantially similar
physical dimensions, construction, and electrical and RF
characteristics.
Your wireless modem is designed and manufactured to operate with the
antenna in the vertical position. To assure optimal radio product
performance and make sure exposure to radio frequency
electromagnetic energy is within the guidelines set forth in the above
standards, be sure always to put the antenna in the vertical position
when operating the wireless modem in any computer that is sitting on
your body.
Approved Accessories
For a list of approved Motorola accessories call 1-800-453-0920, or visit
our website at www.mot.com/iden.
ALL MODELS WITH FCC ID AZ489FT5834 MEET THE GOVERNMENT’S
REQUIREMENTS FOR EXPOSURE TO RADIO WAVES.
Your wireless modem is a radio transmitter and receiver. It is designed and
manufactured not to exceed the emission limits for exposure to radiofrequency
(RF) energy set by the Federal Communications Commission of the U.S.
Government. These limits are part of comprehensive guidelines and establish
permitted levels of RF energy for the general population. The guidelines are
based on standards that were developed by independent scientific organizations
through periodic and thorough evaluation of scientific studies. The standards
include a substantial safety margin designed to assure the safety of all persons,
regardless of age and health.
The exposure standard for wireless modems employs a unit of measurement
known as the Specific Absorption Rate, or SAR. The SAR limit set by the FCC is
1.6W/kg.1 Tests for SAR are conducted using standard operating positions
reviewed by the FCC with the modem transmitting at its highest certified power
level in all tested frequency bands. Although the SAR is determined at the highest
certified power level, the actual SAR level of the modem while operating can be
26
Safety and General Information
well below the maximum value. This is because the modem is designed to
operate at multiple power levels so as to use only the power required to reach the
network. In general, the closer you are to a wireless base station antenna, the
lower the power output.
Before a modem model is available for sale to the public, it must be tested and
certified to the FCC that it does not exceed the limit established by the
government-adopted requirement for safe exposure. The tests are performed in
positions and locations as required by the FCC for each model. The highest SAR
value for this radio product when tested for use during packet data transmission is
1.19 W/kg.
The FCC has granted an Equipment Authorization for this modem with all
reported SAR levels evaluated as in compliance with the FCC RF exposure
guidelines. SAR information on this modem is on file with the FCC and can be
found under the Display Grant section of http://www.fcc.gov/oet/fccid after
searching on FCC ID AZ489FT5834.
Additional information on Specific Absorption Rates (SAR) can be found on the
Cellular Telecommunications Industry Association (CTIA) web-site at
http://www.wow-com.com.
1 In the United States and Canada, the SAR limit for modems used by the public
is 1.6 watts/kg (W/kg) averaged over one gram of tissue. The standard
incorporates a substantial margin of safety to give additional protection for the
public and to account for any variations in measurements.
2 The SAR information reported to the FCC includes the FCC-accepted Motorola
testing protocol, assessment procedure, and measurement uncertainty range
for this product.
Electro Magnetic
Interference/Compatibility
Note: Nearly every electronic device is susceptible to
electromagnetic interference (EMI) if inadequately
shielded, designed or otherwise configured for
electromagnetic compatibility.
Facilities
To avoid electromagnetic interference and/or compatibility conflicts,
turn off your modem product in any facility where posted notices
instruct you to do so. Hospitals or health care facilities may be using
equipment that is sensitive to external RF energy.
Aircraft
When instructed to do so, turn off your modem product when on board
an aircraft. Any use of a modem product must be in accordance with
applicable regulations per airline crew instructions.

27
Medical Devices
Medical Devices
Pacemakers
The Advanced Medical Technology Association (AdvaMed)
recommends that a minimum separation of 6 inches (15 cm) be
maintained between a wireless modem product and a pacemaker.
These recommendations are consistent with those of the U.S. Food
and Drug Administration.
Persons with pacemakers should:
•ALWAYS keep the modem product more than 6 inches (15 cm) from
their pacemaker when the modem product is turned ON.
•Turn the modem product OFF immediately if you have any reason
to suspect that interference is taking place.
Hearing Aids
Some digital wireless modem products may interfere with some hearing
aids. In the event of such interference, you may want to consult your
hearing aid manufacturer to discuss alternatives.
Other Medical Devices
If you use any other personal medical device, consult the manufacturer
of your device to determine if it is adequately shielded from RF energy.
Your physician may be able to assist you in obtaining this information.
Operational Warnings
For Vehicles with an Air Bag
Do not place a portable modem product in the area over the air bag or
in the air bag deployment area. Air bags inflate with great force. If a
portable modem is placed in the air bag deployment area and the air
bag inflates, the modem product may be propelled with great force and
cause serious injury to occupants of the vehicle.
Potentially Explosive Atmospheres
Turn off your modem product prior to entering any area with a
potentially explosive atmosphere, unless it is a modem product type
especially qualified for use in such areas as “Intrinsically Safe” (for
example, Factory Mutual, CSA, or UL approved). Sparks in a potentially
explosive atmosphere can cause an explosion or fire resulting in bodily
injury or even death.
!

28
Safety and General Information
Note: The areas with potentially explosive atmospheres referred to
above include fueling areas such as below decks on boats,
fuel or chemical transfer or storage facilities, areas where the
air contains chemicals or particles, such as grain, dust or
metal powders, and any other area where you would
normally be advised to turn off your vehicle engine. Areas
with potentially explosive atmospheres are often but not
always posted.
Blasting Caps and Areas
To avoid possible interference with blasting operations, turn off your
modem product when you are near electrical blasting caps, or in a
blasting area. Obey all signs and instructions.
Operational Cautions
Cleaning and Drying Considerations
This product is not water proof, and exposing the unit to liquids may
result in permanent damage to the unit.
If your modem product interior gets wet, then do not try to accelerate
drying with the use of an oven or a dryer as this will damage the modem
product and void the warranty. Instead, do the following:
1Immediately power off the modem product.
2 Remove SIM card (if so equipped) from modem product.
3 Shake excess liquid from modem product.
4 Place the modem product in an area that is at room temperature
and has good air flow.
5 Let the modem product and SIM card dry for 72 hours before
powering on the modem product.
If the modem product does not work after following the steps listed
above, contact your dealer for servicing information.
Clean the external surfaces of the modem product with a damp cloth,
using a mild solution of dishwashing detergent and water. Some
household cleaners may contain chemicals that could seriously
damage the modem product. Avoid the use of any petroleum-based
solvent cleaners. Also, avoid applying liquids directly on the modem
product.
!
29
Operational Cautions
MOTOROLA LIMITED WARRANTY
Note: FOR IDEN SUBSCRIBER PRODUCTS, ACCESSORIES
AND SOFTWARE PURCHASED IN THE UNITED STATES
OR CANADA
What Does this Warranty Cover?
Subject to the exclusions contained below, Motorola, Inc. warrants its
Motorola iDEN Digital Mobile ("Products"), Motorola-branded or
certified accessories sold for use with these Products ("Accessories")
and Motorola software contained on CD-Roms or other tangible media
and sold for use with these Products ("Software") to be free from
defects in materials and workmanship under normal consumer usage
for the period(s) outlined below. This limited warranty is a
consumer's exclusive remedy, and applies as follows to new
Products, Accessories and Software purchased by consumers in
the United States or Canada, which are accompanied by this
written warranty:
PRODUCTS
COVERED LENGTH OF COVERAGE
Products as defined
above. One (1) year from the date of purchase
by the first consumer purchaser of the
product.
Accessories as
defined above. One (1) year from the date of purchase
by the first consumer purchaser of the
product.
Products or
Accessories that are
Repaired or Replaced.
The balance of the original warranty
or for ninety (90) days from the date
returned to the consumer, whichever is
longer.
Software as defined
above. Applies only to
physical defects in the
media that embodies
the copy of the software
(e.g. CD-ROM, or floppy
disk).
Ninety (90) days from the date of
purchase.
30
MOTOROLA LIMITED WARRANTY
What is not covered? (Exclusions)
Normal Wear and Tear. Periodic maintenance, repair and replacement
of parts due to normal wear and tear are excluded from coverage.
Abuse & Misuse. Defects or damage that result from: (a) improper
operation, storage, misuse or abuse, accident or neglect, such as
physical damage (cracks, scratches, etc.) to the surface of the product
resulting from misuse; (b) contact with liquid, water, rain, extreme
humidity or heavy perspiration, sand, dirt or the like, extreme heat, or
food; (c) use of the Products or Accessories for commercial purposes
or subjecting the Product or Accessory to abnormal usage or
conditions; or (d) other acts which are not the fault of Motorola, are
excluded from coverage.
Use of Non-Motorola Products and Accessories. Defects or damage
that result from the use of Non-Motorola branded or certified Products,
Accessories, Software or other peripheral equipment are excluded from
coverage.
Unauthorized Service or Modification. Defects or damages resulting
from service, testing, adjustment, installation, maintenance, alteration,
including without limitation, software changes, or modification in any
way by someone other than Motorola, or its authorized service centers,
are excluded from coverage.
Altered Products. Products or Accessories with (a) serial numbers or
date tags that have been removed, altered or obliterated; (b) broken
seals or that show evidence of tampering; (c) mismatched board serial
numbers; or (d) nonconforming or non-Motorola housings, antennas, or
parts, are excluded from coverage.
Communication Services. Defects, damages, or the failure of
Products, Accessories or Software due to any communication service
or signal you may subscribe to or use with the Products, Accessories or
Software is excluded from coverage.
Software Embodied in Physical Media. No warranty is made that the
software will meet your requirements or will work in combination with
any hardware or software applications provided by third parties, that the
operation of the software products will be uninterrupted or error free, or
that all defects in the software products will be corrected.
Software NOT Embodied in Physical Media. Software that is not
embodied in physical media (e.g. software that is downloaded from the
internet), is provided "as is" and without warranty.
Who is covered? This warranty extends only to the first consumer
purchaser, and is not transferable.
31
Operational Cautions
What will Motorola Do? Motorola, at its option, will at no charge repair,
replace or refund the purchase price of any Products, Accessories or
Software that does not conform to this warranty. We may use
functionally equivalent reconditioned/refurbished/pre-owned or new
Products, Accessories or parts. No data, software or applications
added to your Product, Accessory or Software, including but not limited
to personal contacts, games and ringer tones, will be reinstalled. To
avoid losing such data, software and applications please create a back
up prior to requesting service.
How to Obtain Warranty Service or Other Information? To obtain
service or information, please call:
Motorola iDEN Customer Services 1-800-453-0920 or 954-723-4910
TTY-877-483-2840
Or visit us online at http://www.motorola.com/iden/support
You will receive instructions on how to ship the Products, Accessories
or Software, at your expense, to a Motorola Authorized Repair Center.
To obtain service, you must include: (a) a copy of your receipt, bill of
sale or other comparable proof of purchase; (b) a written description of
the problem; (c) the name of your service provider, if applicable; (d) the
name and location of the installation facility (if applicable) and, most
importantly; (e) your address and telephone number.
What Other Limitations Are There? ANY IMPLIED WARRANTIES,
INCLUDING WITHOUT LIMITATION THE IMPLIED WARRANTIES OF
MERCHANTABILITY AND FITNESS FOR A PARTICULAR
PURPOSE, SHALL BE LIMITED TO THE DURATION OF THIS
LIMITED WARRANTY, OTHERWISE THE REPAIR, REPLACEMENT,
OR REFUND AS PROVIDED UNDER THIS EXPRESS LIMITED
WARRANTY IS THE EXCLUSIVE REMEDY OF THE CONSUMER,
AND IS PROVIDED IN LIEU OF ALL OTHER WARRANTIES,
EXPRESS OF IMPLIED. IN NO EVENT SHALL MOTOROLA BE
LIABLE, WHETHER IN CONTRACT OR TORT (INCLUDING
NEGLIGENCE) FOR DAMAGES IN EXCESS OF THE PURCHASE
PRICE OF THE PRODUCT, ACCESSORY OR SOFTWARE, OR FOR
ANY INDIRECT, INCIDENTAL, SPECIAL OR CONSEQUENTIAL
DAMAGES OF ANY KIND, OR LOSS OF REVENUE OR PROFITS,
LOSS OF BUSINESS, LOSS OF INFORMATION OR DATA,
SOFTWARE OR APPLICATIONS OR OTHER FINANCIAL LOSS
ARISING OUT OF OR IN CONNECTION WITH THE ABILITY OR
INABILITY TO USE THE PRODUCTS, ACCESSORIES OR
SOFTWARE TO THE FULL EXTENT THESE DAMAGES MAY BE
DISCLAIMED BY LAW.
32
Patent and Trademark Information
Some states and jurisdictions do not allow the limitation or
exclusion of incidental or consequential damages, or limitation on
the length of an implied warranty, so the above limitations or
exclusions may not apply to you. This warranty gives you specific
legal rights, and you may also have other rights that vary from
state to state or from one jurisdiction to another.
Laws in the United States and other countries preserve for Motorola
certain exclusive rights for copyrighted Motorola software such as the
exclusive rights to reproduce and distribute copies of the Motorola
software. Motorola software may only be copied into, used in, and
redistributed with, the Products associated with such Motorola
software. No other use, including without limitation disassembly of such
Motorola software or exercise of the exclusive rights reserved for
Motorola, is permitted.
Patent and Trademark Information
MOTOROLA, the Stylized M Logo and all other trademarks indicated as
such herein are trademarks of Motorola, Inc. ® Reg. U.S. Pat. & Tm.
Off. © 2002 Motorola, Inc. All rights reserved.
Microsoft, Microsoft Internet Explorer, Windows NT, Windows 2000,
Windows XP, Pocket PC 2002, and Pocket PC 2003 are registered
trademarks of Microsoft Corporation.
All other product or service names mentioned in this manual are the
property of their respective trademark owners.
Software Copyright Notice
The Motorola products described in this manual may include
copyrighted Motorola and third party software stored in semiconductor
memories or other media. Laws in the United States and other
countries preserve for Motorola and third party software providers
certain exclusive rights for copyrighted software, such as the exclusive
rights to distribute or reproduce the copyrighted software. Accordingly,
any copyrighted software contained in the Motorola products may not
be modified, reverse-engineered, distributed, or reproduced in any
manner to the extent allowed by law. Furthermore, the purchase of the
Motorola products shall not be deemed to grant either directly or by
implication, estoppel, or otherwise, any license under the copyrights,
patents, or patent applications of Motorola or any third party software
provider, except for the normal, non-exclusive, royalty-free license to
use that arises by operation of law in the sale of a product.
34
Index
Index
A
Accessories
approved 25
safety 29
Antenna
detachable, using 13
external, using 13
C
Circuit Data 18
Circuit data
internet, connecting 18
Circuit-switched data
description 18
D
Dashboard
compact mode 14
internet, connecting 16
internet, disconnecting 17
status info 20
using 19
E
EME Exposure 24
H
Hardware
Pocket PC 6
I
Installation
IBM-compatible PC 6
operating systems 6
Pocket PC 6
requirements 6
Internet
connecting 16
connecting using circuit data
18
connecting using packet data
17, 18
disconnecting 17
M
Medical devices
hearing aids 27
other 27
pacemaker 27
Modem
hardware 20
status light 20
turning on 14
using 12
Modem setup 7
inserting modem 6
installing software, laptop 7, 8
installing software, Pocket PC
11
Modem software
uninstalling 21
P
Packet data 17
internet, connecting 18
Patent information 32
R
RF Operational Characteristics
24
S
Safety 24
accessories 29
electromagnetic interference
26
35
EME Exposure 24
medical devices 27
Safety info 24
SIM
SIM PIN 2
SIM card
personal identification number
(PIN) 4
unblocking 5
unlocking 5
SIM PIN
disabling 2
enabling 2
Software
uninstalling 21
System
requirements 6
System requirements 6
T
Trademark information 32
Troubleshooting
diagnostics 22
registration 23
W
Warnings
operational 27