Motorola Solutions 89FT7017 Handheld Computer with iDEN, WLAN and Bluetooth User Manual Enhanced IMD Users
Motorola Solutions, Inc. Handheld Computer with iDEN, WLAN and Bluetooth Enhanced IMD Users
Contents
- 1. Exhibit 8a Users Manual
- 2. Exhibit 8b Users Manual
Exhibit 8a Users Manual
HC700-i
Handheld Computer
Model F3130A
User Manual
a
Enhanced IMD Users.book Page 1 Tuesday, September 26, 2006 2:17 PM
Enhanced IMD Users.book Page 2 Tuesday, September 26, 2006 2:17 PM

i
COMPUTER SOFTWARE COPY-
RIGHTS
The Motorola products described in this instruction manual may include
copyrighted Motorola computer programs stored in semiconductor memo-
ries or other media. Laws in the United States and other countries preserve
for Motorola certain exclusive rights for copyrighted computer programs,
including the exclusive right to copy or reproduce in any form the copy-
righted computer program. Accordingly, any copyrighted Motorola com-
puter programs contained In the Motorola products described in this
instruction manual may not be copied or reproduced in any manner without
the express written permission of Motorola. Furthermore, the purchase of
Motorola products shall not be deemed to grant either directly or by impli-
cation, estoppel. or otherwise. any license under the copyrights, patents or
patent applications of Motorola, except for the normal non-exclusive, roy-
alty free license to use that arises by operation of law in the sale of a prod-
uct.
EPS – 34440- B
This warranty applies within the fifty (50) United States, the District of
Columbia and Canada.
Document Copyrights
No duplication or distribution of this document or any portion thereof shall
take place without the express written permission of Motorola. No part of
this manual may be reproduced, distributed, or transmitted in any form or by
any means, electronic or mechanical, for any purpose without the express
written permission of Motorola.
Disclaimer
The information in this document is carefully examined, and is believed to
be entirely reliable. However, no responsibility is assumed for inaccuracies.
Furthermore, Motorola reserves the right to make changes to any products
herein to improve readability, function, or design. Motorola does not assume
any liability arising out of the applications or use of any product or circuit
described herein; nor does it cover any license under its patent rights nor the
rights of others.
Commercial Warranty
Limited Warranty
MOTOROLA COMMUNICATION PROD-
UCTS
I. What This Warranty Covers And For How Long
MOTOROLA INC. (“MOTOROLA”) warrants the MOTOROLA manu-
factured Communication Products listed below (“Product”) against
defects in material and workmanship under normal use and service
for a period of time from the date of purchase as scheduled below:
HC700-i unit One (1) Year
Product Accessories One (1) Year
Enhanced IMD Users.book Page i Tuesday, September 26, 2006 2:17 PM
ii
Motorola, at its option, will at no charge either repair the Product (with
new or reconditioned parts), replace it (with a new or reconditioned
Product), or refund the purchase price of the Product during the war-
ranty period provided it is returned in accordance with the terms of
this warranty. Replaced parts or boards are warranted for the bal-
ance of the original applicable warranty period. All replaced parts of
Product shall become the property of MOTOROLA.
This express limited warranty is extended by MOTOROLA to the
original end user purchaser only and is not assignable or transferable
to any other party. This is the complete warranty for the Product man-
ufactured by MOTOROLA. MOTOROLA assumes no obligations or
liability for additions or modifications to this warranty unless made in
writing and signed by an officer of MOTOROLA. Unless made in a
separate agreement between MOTOROLA and the original end user
purchaser, MOTOROLA does not warrant the installation, mainte-
nance or service of the Product.
MOTOROLA cannot be responsible in any way for any ancillary
equipment not furnished by MOTOROLA which is attached to or
used in connection with the Product, or for operation of the Product
with any ancillary equipment, and all such equipment is expressly
excluded from this warranty. Because each system which may use
the Product is unique, MOTOROLA disclaims liability for range, cov-
erage, or operation of the system as a whole under this warranty.
II. General Provisions
This warranty sets forth the full extent of MOTOROLA’s responsibili-
ties regarding the Product. Repair, replacement or refund of the pur-
chase price, at MOTOROLA’s option, is the exclusive remedy. THIS
WARRANTY IS GIVEN IN LIEU OF ALL OTHER EXPRESS WAR-
RANTIES. IMPLIED WARRANTIES, INCLUDING WITHOUT LIMI-
TATION, IMPLIED WARRANTIES OF MERCHANTABILITY AND
FITNESS FOR A PARTICULAR PURPOSE, ARE LIMITED TO THE
DURATION OF THIS LIMITED WARRANTY. IN NO EVENT SHALL
MOTOROLA BE LIABLE FOR DAMAGES IN EXCESS OF THE
PURCHASE PRICE OF THE PRODUCT, FOR ANY LOSS OF USE,
LOSS OF TIME, INCONVENIENCE, COMMERCIAL LOSS, LOST
PROFITS OR SAVINGS OR OTHER INCIDENTAL, SPECIAL OR
CONSEQUENTIAL DAMAGES ARISING OUT OF THE USE OR
INABILITY TO USE SUCH PRODUCT, TO THE FULL EXTENT
SUCH MAY BE DISCLAIMED BY LAW.
III. State Law Rights
SOME STATES DO NOT ALLOW THE EXCLUSION OR LIMITA-
TION OF INCIDENTAL OR CONSEQUENTIAL DAMAGES OR LIMI-
TATION ON HOW LONG AN IMPLIED WARRANTY LASTS, SO
THE ABOVE LIMITATION OR EXCLUSIONS MAY NOT APPLY.
This warranty gives specific legal rights, and there may be other
rights which may vary from state to state.
Enhanced IMD Users.book Page ii Tuesday, September 26, 2006 2:17 PM
iii
IV. How To Get Warranty Service
You must provide proof of purchase (bearing the date of purchase
and Product item serial number) in order to receive warranty service
and, also, deliver or send the Product item, transportation and insur-
ance prepaid, to an authorized warranty service location. Warranty
service will be provided by Motorola through one of its authorized
warranty service locations. If you first contact the company which
sold you the Product, it can facilitate your obtaining warranty service.
You can also call Motorola at 1-888-567-7347 US/Canada.
V. What This Warranty Does Not Cover
A. Defects or damage resulting from use of the Product in
other than its normal and customary manner.
B. Defects or damage from misuse, accident, water, or
neglect.
C. Defects or damage from improper testing, operation,
maintenance, installation, alteration, modification, or
adjustment.
D. Breakage or damage to antennas unless caused
directly by defects in material workmanship.
E. A Product subjected to unauthorized Product modifica-
tions, disassemblies or repairs (including, without limi-
tation, the addition to the Product of non-Motorola
supplied equipment) which adversely affect perfor-
mance of the Product or interfere with Motorola's nor-
mal warranty inspection and testing of the Product to
verify any warranty claim.
F. Product which has had the serial number removed or
made illegible.
G. Rechargeable batteries if:
•any of the seals on the battery enclosure of cells are bro-
ken or show evidence of tampering.
•the damage or defect is caused by charging or using the
battery in equipment or service other than the Product
for which it is specified.
H. Freight costs to the repair depot.
I. A Product which, due to illegal or unauthorized alteration
of the software/firmware in the Product, does not func-
tion in accordance with MOTOROLA’s published speci-
fications or the FCC type acceptance labeling in effect
for the Product at the time the Product was initially dis-
tributed from MOTOROLA.
J. Scratches or other cosmetic damage to Product sur-
faces that does not affect the operation of the Product.
K. Normal and customary wear and tear.
Enhanced IMD Users.book Page iii Tuesday, September 26, 2006 2:17 PM
iv
VI. Patent And Software Provisions
MOTOROLA will defend, at its own expense, any suit brought
against the end user purchaser to the extent that it is based on a
claim that the Product or parts infringe a United States patent, and
MOTOROLA will pay those costs and damages finally awarded
against the end user purchaser in any such suit which are attribut-
able to any such claim, but such defense and payments are condi-
tioned on the following:
A. that MOTOROLA will be notified promptly in writing by
such purchaser of any notice of such claim;
B. that MOTOROLA will have sole control of the defense of
such suit and all negotiations for its settlement or com-
promise; and
C. should the Product or parts become, or in MOTOR-
OLA’s opinion be likely to become, the subject of a
claim of infringement of a United States patent, that
such purchaser will permit MOTOROLA, at its option
and expense, either to procure for such purchaser the
right to continue using the Product or parts or to replace
or modify the same so that it becomes noninfringing or
to grant such purchaser a credit for the Product or parts
as depreciated and accept its return. The depreciation
will be an equal amount per year over the lifetime of the
Product or parts as established by MOTOROLA.
MOTOROLA will have no liability with respect to any claim of patent
infringement which is based upon the combination of the Product or
parts furnished hereunder with software, apparatus or devices not
furnished by MOTOROLA, nor will MOTOROLA have any liability for
the use of ancillary equipment or software not furnished by MOTOR-
OLA which is attached to or used in connection with the Product. The
foregoing states the entire liability of MOTOROLA with respect to
infringement of patents by the Product or any parts thereof.
Laws in the United States and other countries preserve for MOTOR-
OLA certain exclusive rights for copyrighted MOTOROLA software
such as the exclusive rights to reproduce in copies and distribute
copies of such Motorola software. MOTOROLA software may be
used in only the Product in which the software was originally embod-
ied and such software in such Product may not be replaced, copied,
distributed, modified in any way, or used to produce any derivative
thereof. No other use including, without limitation, alteration, modifi-
cation, reproduction, distribution, or reverse engineering of such
MOTOROLA software or exercise of rights in such MOTOROLA soft-
ware is permitted. No license is granted by implication, estoppel or
otherwise under MOTOROLA patent rights or copyrights.
VII. Governing Law
This Warranty is governed by the laws of the State of Illinois, USA.
EPS – 48759 – O
Enhanced IMD Users.book Page iv Tuesday, September 26, 2006 2:17 PM
v
Notational Conventions
Throughout this publication, you will notice the use of cautions and
notes. These notations are used to emphasize that safety hazards
exist, and care must be taken.
CAUTION
Do not proceed beyond a CAUTION until the indicated conditions are
fully understood and met.
Grant of Equipment Authorization
IMPORTANT: Unauthorized repairs or modifications could result in
permanent damage to the equipment and void your warranty and
your authority to operate this device under Part 15 of the FCC Rules.
FCC Grant of Equipment Authorization
FCC ID: AZ489FT7017
Canada Grant of Equipment Authorization
IC: 109U-89FT7017
FCC INTERFERENCE
This device complies with Part 15 of the FCC Rules. Operation is
subject to the following two conditions:
(1) This device may not cause harmful interference.
(2) This device must accept any interference received, including
interference that may cause undesired operation.
Indicates a potentially hazardous situation which, if not
avoided, may result in minor or moderate injury. CAU-
TION may also be used to alert against unsafe practices
and property-damage-only accident hazards.
Radio Network Freq Band Rated Power
iDEN WAN 806 - 825 MHz
896 - 902 MHZ 600 mW
Wi-Fi 802.11b/g W-LAN 2412 - 2462 MHz b-32 mW
g-32 mW
Bluetooth W-PAN 2402 - 2480 MHz 1 mW
Changes or modifications made in the handheld com-
puter, not expressly approved by Motorola, will void
the user's authority to operate the equipment.
!
Caution
!
Caution
Enhanced IMD Users.book Page v Tuesday, September 26, 2006 2:17 PM

vi
DECLARATION OF CONFORMITY
Per FCC CFR 47 Part 2 Section 2.1077(a)
Responsible Party Name: Motorola, Inc.
Address: 8000 West Sunrise Boulevard, Plantation, FL
33328 USA
Phone Number: 1 (800) 453-0920
Hereby declares that the product:
Product Name: HC700i
Model Number: F3130A
Conforms to the following regulations:
FCC Part 15, subpart B
Class B Digital Device
Date: September 25th , 2006
NOTE: This equipment has been tested and found to comply
with the limits for a Class B digital device, pursuant to Part 15
of the FCC Rules. These limits are designed to provide rea-
sonable protection against harmful interference in a residen-
tial installation. This equipment generates, uses and can
radiate radio frequency energy and, if not installed and used
in accordance with the instructions, may cause harmful inter-
ference to radio communications. However, there is no guar-
antee that interference will not occur in a particular
installation.
If this equipment does cause harmful interference to radio or
television reception, which can be determined by turning the
equipment off and on, the user is encouraged to try to correct
the interference by one or more of the following measures:
• Reorient or relocate the receiving antenna.
• Increase the separation between the equipment and
receiver.
• Connect the equipment into an outlet on a circuit different
from that to which the receiver is connected.
• Consult the dealer or an experienced radio/TV technician
for help.
Enhanced IMD Users.book Page vi Tuesday, September 26, 2006 2:17 PM

vii
For detailed product safety and RF exposure refer to Safety and
General Information leaflet, Motorola publication Number
6802979C37.
HC700-i (US) Transmission Modes
HC700-i contains (iDEN, WLAN and BT).
Below please find the radios transmitting combinations:
- The iDEN (both bands) and WLAN transmitters will not work simul-
taneously when used in the present configuration.
- The iDEN (both bands) and Bluetooth transmitters may work simul-
taneously when used in the present configuration.
- The WLAN and Bluetooth transmitters may work simultaneously
when used in the present configuration.
Trademarks
SD is a registered trademark of SanDisk Corporation.
Microsoft and Windows are registered trademarks of Microsoft Cor-
poration.
ActiveSync is a registered trademarks of Microsoft Corporation.
The Bluetooth trademarks are owned by their proprietor and used by
Motorola, Inc. under license in the U.S. and other countries.
MOTOROLA and the Stylized M Logo are registered in the U.S.
Patent and Trademark Office. All other product or service names are
the property of their registered owners. © Motorola, Inc. 2005.
Enhanced IMD Users.book Page vii Tuesday, September 26, 2006 2:17 PM
viii
Enhanced IMD Users.book Page viii Tuesday, September 26, 2006 2:17 PM
© Motorola Inc., 2006 6802981C65-A
August, 2006
Contents
COMPUTER SOFTWARE COPYRIGHTS... i
Document Copyrights........................................ i
Disclaimer.......................................................... i
Commercial Warranty........................................ i
Welcome....................................................... 1
What is the HC700-i Handheld Computer? .. 1
Unpacking..................................................... 2
HC700-i Features ......................................... 4
Front Panel and Top Side Features................... 4
Rear and Bottom Side Features........................ 5
Charging the Battery..................................... 6
Checking the Remaining Battery Power............ 6
First Time Battery Charge ................................. 7
Routine Battery Charge..................................... 7
Battery Replacement......................................... 7
Battery Maintenance ......................................... 8
Battery Disposal ................................................ 9
Using the HC700-i ........................................ 10
Starting to Work................................................. 10
Using the Keypad .............................................. 14
Direct Action Keys ............................................. 17
Virtual Keyboard................................................ 17
Wireless Manager ............................................. 18
Using the Phone................................................ 19
Bluetooth Connection........................................ 26
Wireless LAN Connection ................................. 27
Sending files by IrDA......................................... 29
Voice Recording ................................................ 30
Scanning Barcodes ........................................... 30
Calibrating the Touch Screen ............................ 31
Resetting the HC700-i....................................... 31
Enhanced IMD Users.book Page ix Tuesday, September 26, 2006 2:17 PM
x
Allocating Memory........................................ 33
miniSD Memory Card ................................... 34
Installing a miniSD Card.................................... 34
miniSD Card Handling Precautions................... 34
Service.......................................................... 34
Maintaining the HC700-i.................................... 34
Cleaning ............................................................ 35
ActiveSync (USB) Connectivity .................... 35
First Time Connection ....................................... 35
Troubleshooting ........................................... 37
Enhanced IMD Users.book Page x Tuesday, September 26, 2006 2:17 PM
1
Welcome
Welcome to the world of Motorola digital wireless communi-
cations! We are pleased that you have chosen the Motorola
HC700-i iDEN wireless Handheld Computer.
The HC700-i unique functionality and features make this
state-of-the-art device, superior for use in a wide range of
data collection and management applications.
This manual covers the basic operations and use of the
HC700-i. However, evaluation of the HC700-i performance
can be fully achieved by referring to Microsoft® Windows®
Mobile 2005 for Pocket PC Phone Edition documentation and
by using the demo software applications provided with the
HC700-i.
What is the HC700-i Handheld
Computer?
The HC700-i is a rugged handheld computer. The HC700-i is
designed for field applications where fast data acquisition
and exchange is required.
The HC700-i serves as a Personal Digital Assistant (PDA) that
enables portable access to Microsoft® Windows® Mobile
2005 for Pocket PC Phone Edition applications. It contains a
built-in imager (camera), capable of reading one of the fol-
lowing barcode options: 1D or 1D and PDF or 2D and PDF.
Wireless communication enables access to the outside world
through Integrated Digital Enhanced Network (iDEN) and
802.11b/g Wireless Local Area Network (WLAN, WiFi).
Data exchange with peripheral wireless equipment can be
established through Wireless Personal Area Network
(WPAN) using Bluetooth® radio. Personal wireless equipment
may include printers and body-worn devices.
When docked in a cradle, the HC700-i supports full RS232
and USB (1.1 Client) serial communication with a host com-
puter (USB via Microsoft® ActiveSync®) or a dial-up modem.
Ethernet connection can be established through
Enhanced IMD Users.book Page 1 Tuesday, September 26, 2006 2:17 PM
2
10/100 base T interface via multi-slot communication cra-
dles. The HC700-i can also communicate through a built-in
IrDA port.
The HC700-i is equipped with a QVGA 3.5 inch transflective
TFT display, built to withstand high impact. Display backlight
is designed to enable clear screen visibility under varied light
conditions.
A touch-screen enables easy on-screen menu navigation, in
addition to using keypad navigation. The keypad uses an
adjustable backlight illumination, designed for low-light
working conditions.
The HC700-i is powered by an 1800 mAh 7.2V Lithium-Ion
battery pack. The battery is fully recharged within four hours
when the HC700-i is docked in a cradle.
A drained battery can be replaced without data loss from the
HC700-i memory ("hot swap"). A built-in power source, inde-
pendent of the battery pack, maintains the data in the HC700-
i memory for at least 30 minutes until a fresh battery is
placed.
The HC700-i may use a line of Motorola docking cradles for
network communications and power charging.
The personal desktop cradle is designed for office use of the
HC700-i. The 8 and 4 slot charging/communication cradles
provide multi-slot docking in large operations. The vehicle
cradle is used for the mobile applications of the HC700-i, by
allowing charging while driving.
For detailed installation and operation of each cradle, refer to
the specific user manual of each cradle.
Unpacking
The HC700-i basic package includes the following items:
•HC700-i
• 1800 mAh 7.2V Lithium-Ion battery pack
• Tethered Stylus
• Hand-strap
Enhanced IMD Users.book Page 2 Tuesday, September 26, 2006 2:17 PM
3
• This User Manual
• Safety and General Information leaflet, Motorola P.N,
6802979C37
Optional items include:
• Spare stylus (pack of 5)
• Tethered stylus
• Cigarette lighter power cable
• Software Development Kit (SDK)
• Carrying holster
Carefully unpack each item from the shipping carton. Check
all items for shipping damage, and check that you have
received all items ordered.
Note: Retain the original carton packaging in the event that
the HC700-i should need to be returned for service.
The HC700-i is shipped with a plastic film, protecting the
screen. Before usage, remove the film and use a soft cloth to
buff the screen. A clean screen ensures smooth gliding of the
stylus over the surface.
Enhanced IMD Users.book Page 3 Tuesday, September 26, 2006 2:17 PM
4
HC700-i Features
Front Panel and Top Side Features
Figure 1. HC700-i - Front and Top Views
1. Imager Window
2. Stylus
3. Power Button with Status LED (see page 10) & (see page 12)
4. Earpiece/Speaker Volume Keys (see page 23)
5. Push to Talk (PTT) Button (see page 30)
6. miniSD Card Door (see page 34)
7. IrDA Window
8. Microphone (see page 30)
9. Speaker
10. Application LED (see page 13)
11. Earpiece
1
2
3
5
6
7
89
10
11
4
Enhanced IMD Users.book Page 4 Tuesday, September 26, 2006 2:17 PM
5
Rear and Bottom Side Features
Figure 2. HC700-i - Rear and Bottom Views
1. Bluetooth address identification label (Used to link the HC700-
i with another device using Bluetooth)
2. Stylus Compartment
3. Voice Recording Button (see page 30)
4. Scan Key
5. Hand-strap
6. Battery Pack (see page 7)
7. Access Door to the miniSD Memory Card (see page 34)
8. IrDA Window
9. Cradle Interface Connector
1
2
3
5
6
7
8
9
4
Enhanced IMD Users.book Page 5 Tuesday, September 26, 2006 2:17 PM
6
Charging the Battery
The battery is charged when the HC700-i is docked in the cra-
dle. When using a Personal Desktop Cradle, a stand-alone
battery can be charged in the battery charging slot.
A fully charged battery provides 10 continuous hours of typi-
cal usage or 24 hours in Standby mode.
New batteries are shipped partially charged.
Always use Motorola HC700-i original batteries and battery
chargers.
The HC700-i warranty does not cover damage caused by
using non-Motorola batteries and/or battery chargers.
The following sections describe the installation and charging
of the battery of the HC700-i.
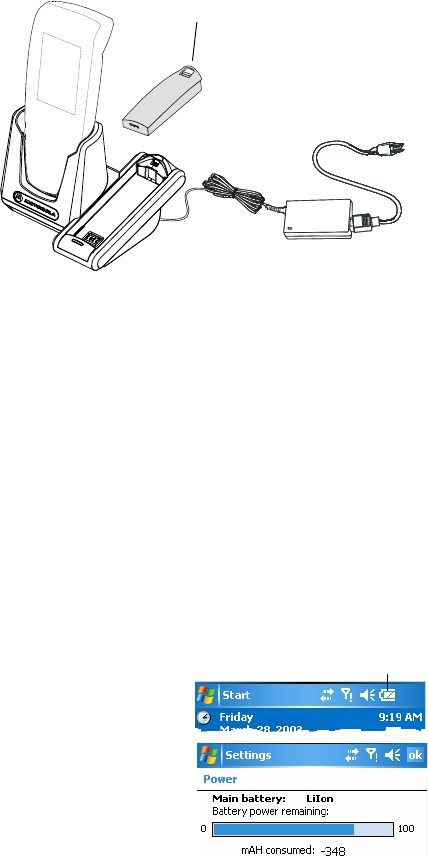
Checking the Remaining Battery Power
The status of the battery
power is shown as a bat-
tery icon on the upper sta-
tus bar. The remaining
power level can be viewed
by tapping the battery icon.
Figure 3. HC700-i Personal Desktop Cradle
Stand-alone battery charging
Battery Power Icon
Enhanced IMD Users.book Page 6 Tuesday, September 26, 2006 2:17 PM
7
First Time Battery Charge
Charge the battery before using the HC700-i for the first time
until the status LED inside the Power Button shows steady
green. While charging for the first time, the Status LED turns
to steady red. When battery is fully charged, the LED shows
steady green.
The HC700-i Cradle charges the battery most effectively
when it is at room temperature [approx. 68°F (20°C)]. The rec-
ommended battery charging temperature range is 32°F to
95°F (0°C to 35°C).
Routine Battery Charge
A battery is recharged to 90% of its full capacity after
approximately three and a half hours. The battery is fully
charged after four hours. During the charge, the Status LED
inside the Power Button shows steady red and turns green
when charging is completed.
Important: The battery will not charge if the HC700-i is not
properly docked in the cradle.
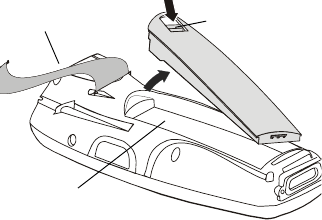
Battery Replacement
When the battery
is drained, the
HC700-i automati-
cally enters "Criti-
cal Low Battery"
state and shuts
down all functions
(the screen turns
off) to preserve the
data in its mem-
ory. The HC700-i allows you to replace batteries without los-
ing information stored in its memory (“hot swap”). To avoid
losing data stored in the memory, a fresh battery must be
installed within 30 minutes after removing the drained bat-
tery.
To replace a battery perform the following steps:
Figure 4. Battery Installation and Removal
Hand-strap Battery Snap
Battery
Compartment
Enhanced IMD Users.book Page 7 Tuesday, September 26, 2006 2:17 PM

8
1. Hold down the Power Button for at least four seconds
until the HC700-i screen turns off.
2. Remove the HC700-i hand-strap (see Figure 4).
3. Press the battery snap on the battery (see Figure 4) and
pull away the battery from the HC700-i.
4. Insert a fresh battery, bottom end first, into the battery
compartment.
5. Carefully, press the battery top downward until it clicks
and locks in place.
Press the Power Button - the HC700-i is now ready for use.
Battery Safety
The battery or HC700-i may carry warning symbols, defined
as follows:
Important safety information will follow.
Your battery or HC700-i should not be disposed of in a
fire.
To prevent injury or burns:
• USE ONLY SPECIFIED BATTERIES AND CHARGERS - RISK OF EXPLO-
SION IF BATTERY IS REPLACED BY AN INCORRECT TYPE!
• DO NOT DISPOSE OF ANY BATTERIES IN FIRE, AS THEY MAY
EXPLODE!
• DO NOT PUNCTURE OR ALLOW METAL TO CONTACT THE BATTERY
CONTACTS
• DO NOT DISPOSE OF IN WATER
• DO NOT DISASSEMBLE
Battery Maintenance
The performance of the battery depends on the way the bat-
tery is treated. Therefore, to comply with Motorola Warranty
for batteries and to assure high performance and a long life
for the rechargeable battery, please read and follow the bat-
tery maintenance instructions described in the following sec-
tions.
Enhanced IMD Users.book Page 8 Tuesday, September 26, 2006 2:17 PM

9
Battery Storage
Ultimate battery storage temperature range is -4°F (-20°C)
95°F (35°C).
Batteries which have already been charged and then stored
for more than two months should be recharged before use.
Extending Battery Life
Battery performance depends on many factors, including the
temperature at which you operate your handheld computer;
the features and/or settings you select and use; peripherals
attached to the computer and other application usage pat-
terns.
Batteries are expendable parts and gradually wear down and
require longer charging times. This is normal. If you charge
your battery regularly and notice a decrease in usage time or
an increase in charging time, then it is probably time to
switch to a new battery.
To ensure maximum service life of the HC700-i, always
replace the battery with a genuine Motorola replacement.
Battery Disposal
Batteries must be recycled or disposed of properly in accor-
dance with local requirements. Recycling facilities may not
exist in all areas. Please contact your local environmental
agency for more information regarding proper disposal.
To prevent injuries or burns, do not allow metal
objects to come in contact with or short-circuit the
battery contacts.
!
Caution
Enhanced IMD Users.book Page 9 Tuesday, September 26, 2006 2:17 PM

10
Using the HC700-i
Starting to Work
Place the battery in the HC700-i to boot-up and press the
Power Button (see Figure 1) to turn on the HC700-i; the
Motorola logo will show for about 30 seconds and Windows
Mobile screen will appear. The Windows Mobile screen will
instruct to tap on the screen and to follow the Align Screen
procedure (touch screen calibration).
Turning On
Whenever the HC700-i screen is off, press the Power Button
(see Figure 1) to turn on the HC700-i and resume operation.
Important: do not press the Power Button when the HC700-i
is out of the cradle and the Status LED (inside the Power but-
ton) is red.
Turning Off
Turn off the HC700-i when not in use for long duration and
when charging is not available.
To turn off the HC700-i perform the following:
While the HC700-i is turned on, hold down the Power Button
for at least four seconds - the HC700-i will store the informa-
tion of the last used program screen and will shift to off mode
- no information will be lost.
Once turned on again, the HC700-i will return to the last pro-
gram screen that was in use.
Suspend Mode
Use Suspend mode as often as possible during daily use to
conserve battery power. For power saving, the HC700-i will
automatically turn to Suspend after 1 minute (default). To
configure the time duration before the HC700-i enters Sus-
pend mode, go to: Start Menu -> Settings -> System ->
Power -> Advanced (duration range is 0 to 5 minutes).
Enhanced IMD Users.book Page 10 Tuesday, September 26, 2006 2:17 PM
11
To manually shift to Suspend mode - while the HC700-i is
turned on, momentarily press the Power Button (see Figure
1).
During Suspend mode the display turns off and the status
LED inside the Power Button slowly flashes green. To resume
operation, momentarily press the Power Button again.
In Suspend mode, the battery power is conserved by auto-
matically turning off the display and the computer sections of
the HC700-i. During Suspend mode, the iDEN and WLAN
radios continue to operate. When the HC700-i resumes oper-
ation, it returns to the program screen shown prior to enter-
ing Suspend mode.
Enhanced IMD Users.book Page 11 Tuesday, September 26, 2006 2:17 PM
12
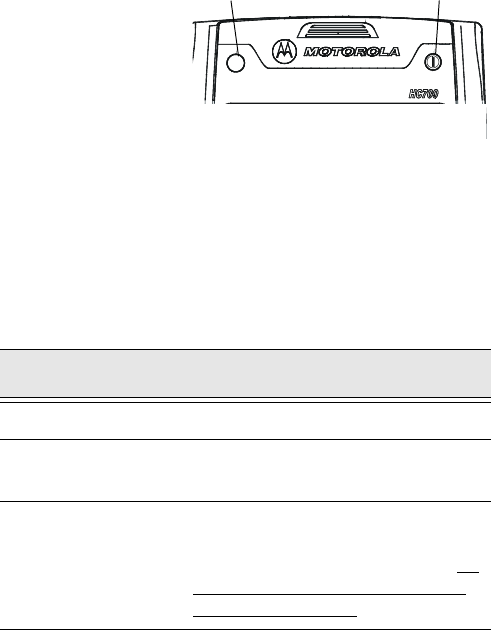
The Status LED
The status LED,
located inside the
Power Button (see Fig-
ure 5), may show three
colors to indicate the
HC700-i power status.
The Status LED indica-
tions are not identical and have different meaning when the
HC700-i is used outside of the cradle and when docked in the
cradle.
LED indications when HC700-i is used outside
of the cradle
Table 1: Status LED indications when HC700-i is used out of the Cradle
LED Indication Description
Slowly flashing green HC700-i is in Suspend mode
Fast flashing green
with off interval
HC700-i display is off
Steady red for 6 sec-
onds
HC700-i is resuming from critical off or
power off.
Important!: to avoid system failure, do
not remove the battery when the LED
illuminates steady red.
Status LED
Figure 5. HC700-i - Status LED
Application LED
Enhanced IMD Users.book Page 12 Tuesday, September 26, 2006 2:17 PM

13
LED Indications when HC700-i is docked in the
cradle
The Application LED
The Application LED may be used for any kind of application
notification. For example; the LED may show communication
indication when the application establishes connection with
a host computer or indicate an alert that needs to be handled.
For more information, refer to your software application
guide and the HC700-i Software Development Kit (SDK).
Table 2: Status LED indications when HC700-i is docked in the Cradle
LED Indication Description
Steady red Battery is charging
Steady green Battery is fully charged
Flashing orange Battery temperature or voltage is out
of range - battery charging has
stopped. Charging will resume when
temperature or voltage is back within
range
Flashing red/green Charging error/defective battery. Re-
install the HC700-i in the cradle
If the LED continues to flash red/
green, replace the battery
Enhanced IMD Users.book Page 13 Tuesday, September 26, 2006 2:17 PM

14
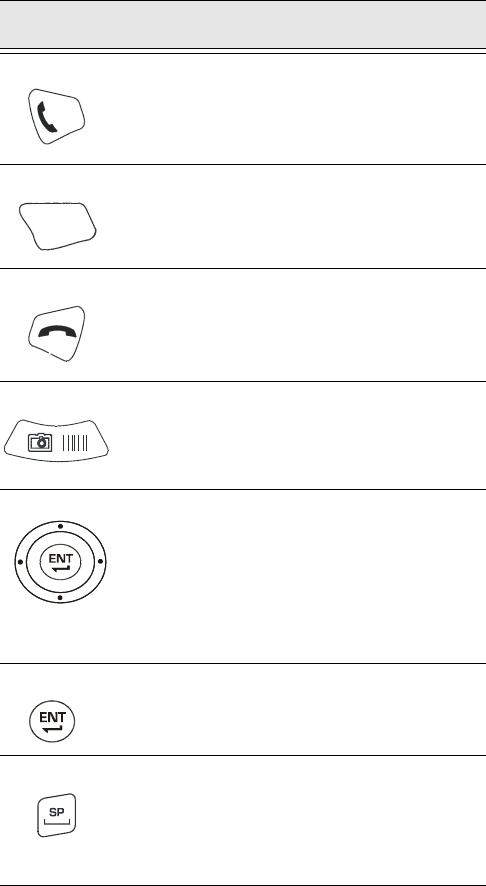
Using the Keypad
The HC700-i keypad enables the user to enter both alpha-
betic and numeric data to the software application. However,
since the keypad can only contain a limited number of keys,
some special keys are assigned to perform special tasks that
are usually found on full-size computer keyboards. These are
produced using a combination of the existing keys on the
HC700-i keypad.
Two sets of keys exist on the HC700-i:
1. Keys active when in Alphabetic mode, which are those
seen on overlay of the HC700-i keypad.
2. Keys active when in Shift or Function mode which are
those seen next to each key on the HC700-i keypad
panel.
Press the <SHIFT> key to toggle between the Alphabetic and
Numeric keypad modes. Figure 6 shows the HC700-i keypad
and Table 3 describes the HC700-i keys assignment.
S
M
GB
YZ
X
R
L
F
CDE
HI
A
JK
NOPQ
TUV
W
123
456
9
87
0
F2
F1
F4
F3
F5
F6
F7
F8
/
?
‘
;
!
@
&
$
F10
F9
F12
F11
^
%
-
+
,
.
*
#
TAB
ESC
Figure 6. HC700-i - Keypad
4-Way Navigation Key Enter Key
Space Key
Backspace Key
End Key
Escape Key
Shift key
TAB/Send Key
Function Key
Main
Scan Button
Application Key
Enhanced IMD Users.book Page 14 Tuesday, September 26, 2006 2:17 PM
15
Key Assignment
Table 3: HC700-i - Key Assignment
Key Function
Use the <TAB/Send> key to make & answer
phone calls. The key also serves as <TAB> key
when editing text.
Use the <Esc> key to exit from a menu or an
application.
The <End> key turns the phone off and ends a
call.
The Main Scan Button is used for scanning
barcodes (refer to “Scanning Barcodes” on
page 30).
The 4 Way Navigation key is used for screen
navigation. The <Up bump> and <Down bump>
keys are used to scroll up and down. The <Right
bump> and <Left bump> are used for horizontal
navigation between action buttons and entry
fields.
The <ENT> key is used to continue to the next
field/screen (i.e., continue processing).
The <SP> key enables entering blank space(s)
within a text field. The <SP> key is active only
on those text entry screens which contain fields
that allow spaces to be entered.
TAB
ESC
Enhanced IMD Users.book Page 15 Tuesday, September 26, 2006 2:17 PM
16
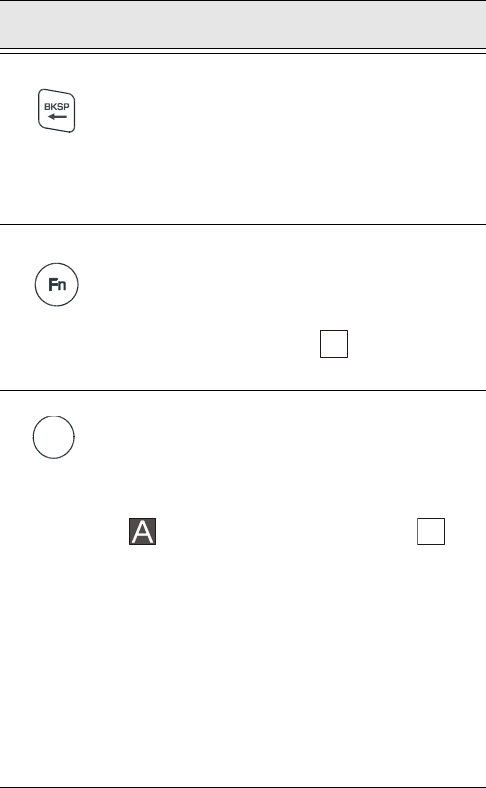
The <BKSP> key moves the cursor to the previ-
ous character in the field, and while doing so,
erases the character. Any remaining characters
to the right of the cursor are shifted to the left.
The <BKSP> key is only active on data entry
screens.
The Function <Fn> key changes the alphabetic
keypad to preset function keys. For example, the
<A> key in <Fn> mode becomes <F1>. Pressing
the <Fn> key produces the function icon on
the lower Taskbar.
When pressed once, the orange <SHIFT> key
toggles between alphabetic and numeric keypad
modes, shifting between letter entry and digit
entry. Pressing the <SHIFT> key produces the
alphabetic mode or numeric mode
icon on the lower Taskbar.
For example, pressing the <SHIFT> key and then
the <P> key types the digit “8”. Pressing the
<SHIFT> again and then the <P> key types the
letter “P”.
Hold down the <SHIFT> key and press on any
alphabet key for uppercase letter (default mode
is lowercase letters).
The <SHIFT> is also used for screen and keypad
illumination (see page 17).
Table 3: HC700-i - Key Assignment
Key Function
F
N
Enhanced IMD Users.book Page 16 Tuesday, September 26, 2006 2:17 PM
17
Direct Action Keys
The direct action keys enable the user a quick access to basic
operations of the HC700-i without exploring the HC700-i soft-
ware programs.
Virtual Keyboard
To display the virtual keyboard - hold down the <SHIFT> and
<SP> keys and toggle the Scan button to display or remove
the virtual keyboard.
Screen Backlight Adjustment
The screen backlight can be adjusted by holding down the
<SHIFT> key and pressing the up or down bumps to
increase or decrease the screen backlight.
Turning the Screen Backlight On & Off
Hold down the <SHIFT> for two seconds - the screen back-
light will turn on. To turn off - hold down for another two sec-
onds.
When not in use, the backlight turns off automatically. To
configure the screen illumination duration and intesity, go to:
Start Menu -> Settings -> System -> Backlight.
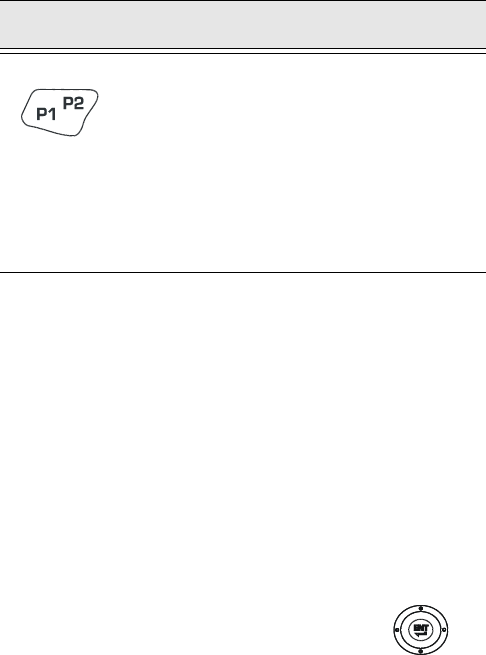
The Application <P1/P2> key functionality is set
by the software application running on the
HC700-i. Use the <SHIFT> key to toggle between
P1 and P2. To learn more about these keys, con-
sult the software application guide.
To set the Application key functionality, go to:
Start Menu -> Settings -> Personal -> But-
tons.
Table 3: HC700-i - Key Assignment
Key Function
Enhanced IMD Users.book Page 17 Tuesday, September 26, 2006 2:17 PM

18
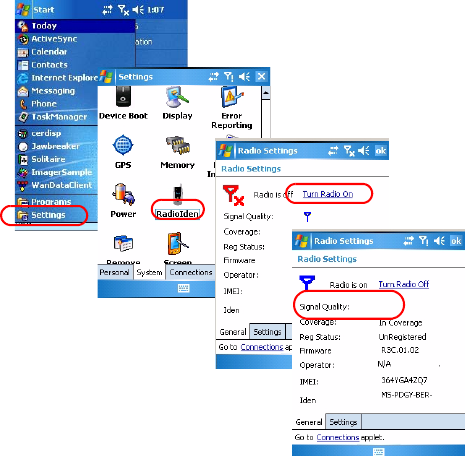
Wireless Manager
Before making a call, connecting to wireless network or sen-
dig files by Bluetooth, you should turn on the wireless device
using the Wireless Manager application. To start the appli-
cation, tap on the antenna icon on the upper status bar.
Tap on the wireless type to turn on/off the radio. Tap “All” to
turn on/off all wireless radios.
Keypad Backlight Adjustment
The keypad backlight can be adjusted by holding down the
<SHIFT> key and pressing the right or left bumps to
increase or decrease the keypad backlight.
Turning the Keypad Backlight On & Off
Hold down the <SHIFT> key for four seconds - the keypad
backlight will turn on.
To turn off - hold down the <SHIFT> key for another two sec-
onds.
Wireless Manager
Enhanced IMD Users.book Page 18 Tuesday, September 26, 2006 2:17 PM
19
When not in use, the backlight turns off automatically. To
configure the keypad illumination duration, go to: Start Menu
-> Settings -> System -> Backlight.
Using the Phone
SIM Card Installation
Before using the HC700-i as a phone, make sure that your
phone is equipped with a SIM (Subscriber Identity Module)
card. SIM card is a small smart card that fits inside the
HC700-i. The SIM card holds the personalized information
about its user including the network activation and even
phone book entries.
To install or replace a SIM
card, perform the following
steps:
1. Turn off the HC700-i
2. Remove the battery
3. Open the SIM card
door
4. Slide the SIM card
holder forward to
unlock the SIM card
5. Slide the new SIM card in the holder with the cut corner
on the upper right and the gold plate facing down
6. Lower the SIM card holder and press downward to lock
the SIM card holder
7. Close the SIM card door
8. Install the battery
9. Perform HW Cold Reset “Step 2: HW Cold Reset” on
page 32
Figure 7. SIM Card Installation
SIM Card
Door
SIM Card Holder
Enhanced IMD Users.book Page 19 Tuesday, September 26, 2006 2:17 PM
20
Turning on the phone
Before making a call, you should turn on the phone. To turn on
the phone - go to: Start Menu -> Settings -> System -> Radio-
Iden -> Turn Radio On.
The phone keyboard will show on the screen. To run the
phone application when the phone is already turned on, press
the <TAB> key or go to: Start Menu -> Phone.
Make a Phone Call
There are few ways to make a call. The most direct method is
to use the on-screen Phone keypad or the HC700-i keypad.
From the Phone keypad, tap the number you want to call, and
press TALK or press the <TAB> key. To end a call, press END
or press the <End> key.
Make a Dispatch call
From the Phone keypad, tap the privet number you want to
call, and press the PTT buton to talke, or release the PTT to
listen.
Enhanced IMD Users.book Page 20 Tuesday, September 26, 2006 2:17 PM
21
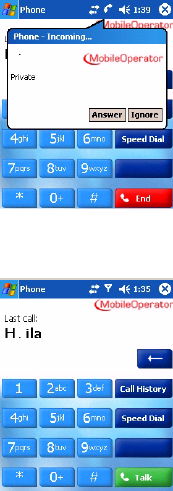
Answer a Call
1. Tap Answer
When receiving a call, you can
ignore it. If you choose to ignore,
tap Ignore. The phone will stop ring-
ing and the caller will be directed to
your voice mail, depending on your
service provider.
Make a call using speed dial
1. From the Start menu, tap
Phone
2. On the Phone keypad, tap the
Speed Dial button
3. Tap the speed dial number
next to the contact you want to
call from the list.
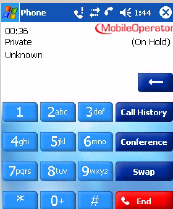
Call Waiting
If you receive a call while in a call, tap Wait to place the call
in on hold.
Create a Contact from a Call
You can create a contact from Call History.
1. Tap Call History
2. Tap hold your stylus on the call - a popup menu will show
3. Tap Save to Contacts
Enhanced IMD Users.book Page 21 Tuesday, September 26, 2006 2:17 PM
22
Make a conference call
You can create a phone session
between yourself and other per-
sons.
1. From the Phone keypad, tap
the first number,
2. Tap Hold
3. Dial the second number, and
tap Menu -> Conference.
4. To add another person, tap
Hold, dial the number, and tap Conference.
During the conference call, you can talk to one of the persons
privately by tapping Private. To join everyone in the call
again, tap Conference.
Use Call Waiting
Call Waiting notifies incoming calls when you are already in
a call session.
1. From the Phone keypad, tap Tools -> Options -> Services
tab
2. Tap Call Waiting -> Get Settings
3. Tap Notify me to be notified or Do not notify me to ignore
notification.
Place a call on hold
During a call, you can place a call on hold so you can call
another number or answer an incoming call. If you have more
than one call on the line, you can switch between one call
and other.
1. To place a call on hold, tap Hold.
2. To move from one call to another, tap Swap.
Speed Dial
Create a speed dial entry
Enhanced IMD Users.book Page 22 Tuesday, September 26, 2006 2:17 PM
23
You can create speed dials for frequently-called phone num-
bers so you can dial a number with a single tap. Speed dials
can only be created for numbers stored in Contacts.
1. Tap Phone -> Speed Dial
2. Tap Menu -> New
3. Tap a contact
4. Tap the phone number for which you want to create a
speed dial
5. In the Location box, select an available location for the
new speed dial
Note: The first speed dial location is reserved for your voice
mail.
To create a speed dial from Contacts, tap and hold the con-
tact name, tap Add to Speed Dial, and then select an avail-
able location for the new speed dial.
Adjusting the earpiece/speaker volume
Use the Earpiece/Speaker Volume keys (see Figure 1) to
increase or decrease volume during a call.You may also use
the keypad keys - hold down the <SHIFT>and <SP> keys and
press the up and down bumps on t e 4-Way Navigation key.
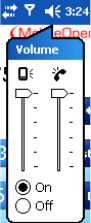
Change the ringer volume
As you move between loud and quiet environ-
ments throughout your day, you may want to
change the ringer volume to suit your situation.
1. Tap the volume icon on the upper Taskbar
2. Move the slider to the desired volume level
Enhanced IMD Users.book Page 23 Tuesday, September 26, 2006 2:17 PM
24
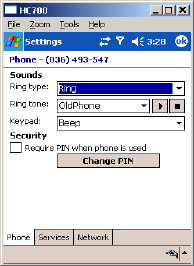
Change the ring type
You can change the way that you
are notified of incoming calls. For
example, you can choose to be
notified by a ring, a vibration, or a
combination of both.
1. From the Phone keypad, tap
Tools -> Options -> Phone
tab.
2. In the Ring type list, tap the
desired option.
Change the ring tone
You can select a ring tone to notify you of incoming calls.
From the Phone keypad, tap Tools -> Options -> Phone tab.
In the Ring tone list, tap the sound you want to use.
To use custom sound files as ring tones, use ActiveSync on
your PC to copy the file to the Mobile Device/My pocket PC/
Windows/Rings folder on your device. Then, select the sound
from the Ring tone list. For more information on copying files
to your device, see ActiveSync Help on your PC.
Change services settings
1. From the Start menu tap Settings.
2. Tap Phone -> Services tab.
You can access and configure settings for the phone services
you subscribed to through your wireless service provider. For
example, you may want to block certain types of incoming
and/or outgoing calls, forward incoming calls to a different
phone number based on your situation, be notified of incom-
ing calls when you're already in a call, or let others know your
identity when making calls.
Tip: To change services settings from the Phone keypad, tap
Menu -> Options -> Services tab, tap a service, and then tap
Get Settings.
Enhanced IMD Users.book Page 24 Tuesday, September 26, 2006 2:17 PM
25
Internet connection using iDEN network
Internet access and surfing is available through the HC700-i
iDEN mobile phone network.
1. Tap Start Menu -> Settings -> Connections tab -> Con-
nections -> Manage Existing connections
2. Tap and hold the stylus on your internet connection,
press Connect on the opened menu.
To edit a connection:
Before you start, obtain the following information from your
Internet Service Provider (ISP) administrator: connection
phone number, User Name, Password and Domain.
1. Tap Start Menu -> Settings -> Connections tab -> Con-
nections
2. In My ISP, tap Add a new modem connection
3. Enter a name for the connection (for example: My Link)
4. Select a mode: Cellular Line (iDEN) and tap Next
5. Enter the phone number provided by your ISP and tap
Next
6. Enter User Name, Password and Domain provided by
your ISP and tap Finish
7. Switch to Internet Explorer Mobile and surf the Internet.
Your HC700 will connect automatically.
To view Help information for any screen in the wizard or
while changing settings, tap the question mark icon.
Enhanced IMD Users.book Page 25 Tuesday, September 26, 2006 2:17 PM
26
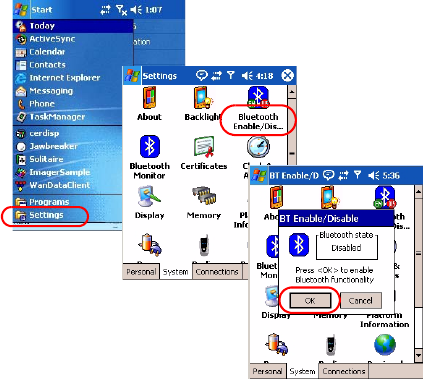
Bluetooth Connection
Turning on/off
Ensure that the two devices are within 10 meters from each
other and that both Bluetooth-enabled devices are discover-
able. Note that in In Flight mode, Bluetooth is turned off.
1. Tap Start Menu -> Settings -> System tab.
2. Tap Bluetooth Enable/Disable icon.
3. Press the OK button to turn on the Bluetooth
Create a Bluetooth link (partnership)
You can create a link between your HC700-i and another
remote device. The link enables to transmit information
between the two devices. Ensure that the two devices are
turned on, discoverable, and within 10 meters.
1. Tap Start Menu -> Settings -> System tab.
2. Tab the Bluetooth Monitor icon
3. Tap Device -> Find Devices. Your device searches for
other remote devices, and displays them on the screen.
4. Tap Device -> Trust this Device.
Enhanced IMD Users.book Page 26 Tuesday, September 26, 2006 2:17 PM
27
5. Passkey is used to secure your HC700-i. You can use a
passkey by entering a alphanumeric passkey between 1
and 16 characters, and tap Next. Otherwise, leave the
passkey blank, and tap OK.
6. If you use passkey, enter the same passkey on the other
device. You may change the name of the remote device
name. Tap OK.
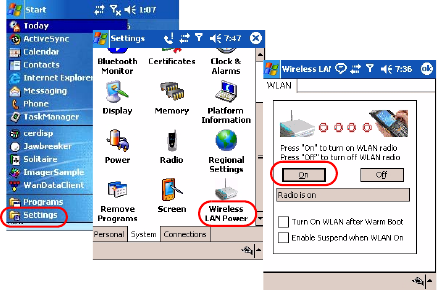
Wireless LAN Connection
Turning on/off
Ensure that your HC700-i is within active Wireless LAN cov-
erage. Note that in In Flight mode, Wireless LAN is turned
off.
1. Tap Start Menu -> Settings -> System tab.
2. Tap Wireless LAN Power icon.
3. Press the On button to turn on the WLAN.
Connection to the Internet
When the HC700-i Wireless LAN radio is turned on, an Auto-
matic mechanism will keep looking for wireless networks.
When entering a wireless LAN coverage area, the HC700-i
will popup a message that will require you to confirmation
connection to a network.
LAN connection can be made to either Internet through your
ISP or to your work server.
Enhanced IMD Users.book Page 27 Tuesday, September 26, 2006 2:17 PM
28
First time Connection to the Internet
Before you connect to the Internet for the first time, perform
the following:
1. Tab Start Menu -> Settings -> Connections tab -> Con-
nections
2. In My ISP, tap Add a new modem connection and follow
the connection wizard. You will be required to provide
your ISP phone number, domain and password.
3. To start surfing the net, switch to your Internet browser
(Start Menu -> Internet Explorer). Your HC700-i will auto-
matically connect.
Connect to work
Before you connect to the Internet for the first time, perform
the following:
1. Tab Start Menu -> Settings -> Connections tab -> Con-
nections
2. In My Work Network, You will be required to set up a
modem, network card, wireless network, or VPN server.
To start connecting to your work, switch to your Internet
browser (Start Menu -> Internet Explorer). Your HC700-i will
automatically connect.
Switching to a different wireless LAN
There may be times when you want to manually select or
switch to a different wireless network. For example, you may
want to select a specific network out of many available in
order to control costs.
1. From the Phone keypad, tap Start Menu -> Settings ->
Connections tab.
2. Tap Network Cards
3. From the list of networks, tap and hold your stylus on the
available network you want to use - an option list will
popup.
4. From the option list select Connect - the background of
aerial icon (next to the network name) will turn blue.
Enhanced IMD Users.book Page 28 Tuesday, September 26, 2006 2:17 PM
29
Advance wireless operations
For advance wireless operations, use the “swluce” wireless
LAN utility, go to: Start Menu -> Programs -> Sample Appli-
cations -> swluce.
You can transfer files between the HC700-i and target device
(cell phone, HC700 device, laptop etc.) by using the IrDA port.
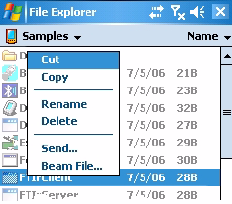
Sending files by IrDA
To detect or receive Infrared beam from target device perform
the following.
1. Tap and hold the stylus on the file you wish to send.
2. From the opened menu select "Beam File".
3. Place the HC700 and the target device IrDA windows
aligned. Make sure that nothing is between the Irda win-
dows of the HC700-I and the target device.
4. Confirm the file transfer at the target device. During the
file transfer, an icon will show on the HC700 screen to
indicate the send process.
Adjusting the Phone Volume
Use the Earpiece/Speaker Volume keys (see Figure 1) to
increase or decrease volume during a call. You may also use
the keypad keys - hold down the <SHIFT> and <SP> keys and
press the up and down bumps on the 4-Way Navigation key.
The volume may also be adjusted in Function mode by hold-
ing the <Fn> key down and using <F6> key to increase or <F7>
key to decrease volume.
Enhanced IMD Users.book Page 29 Tuesday, September 26, 2006 2:17 PM
30
Voice Recording
To record sound, press the Voice Recording button - the Notes
application will run, enabling you to record and play sounds.
To assign different functionality to this button, go to: Start
Menu -> Settings -> Personal -> Buttons.
Scanning Barcodes
The HC700-i houses a digital camera (imager) that scans the
most commonly used 1D, 2D and PDF barcodes. The HC700-i
supports 360° omni-directional capture for easy use in daily
work.
To capture an image:
1. Run the Bcr barcode reader application: Start Menu ->
Programs -> Sample Applications -> Bcr.
2. Aim and hold the HC700-i at the target.
3. Press one of the Scan keys and aim the green aiming bar
towards the target to adjust your position. Note that
when the HC700-i is held closer to the barcode the green
aiming bar appears smaller and when held farther from
Vertical angle of
barcode capture
Horizontal angle of
barcode capture
Red Ambient Light
Aim the green light
bar at the barcode
Scan Key
Scan Key
Figure 8. Capturing Barcodes with the HC700-i Imager
CLASS 1 LED PRODUCT
IEC 60825-1 ED 1.2:2001
Enhanced IMD Users.book Page 30 Tuesday, September 26, 2006 2:17 PM

31
the barcode it appears larger. Barcode symbols with
dense symbol elements should be read closer to the
HC700-i while large barcodes with larger symbol ele-
ments should be read at a larger distance (Depth-of-
Field) from the HC700-i.
To capture a barcode, aim the green aiming bar at any angle
across the barcode symbol, as shown in Figure 9
Note: When adjusting your position, you may move back
and forth from the target to capture the entire object - a suc-
cessful scan is indicated by a beeping sound.
Calibrating the Touch Screen
To calibrate the touch screen - hold down the <SHIFT> and
<SP> and <C> keys and follow the calibrate application
instructions to complete your touch screen calibration.
Resetting the HC700-i
You may need to reset the HC700-i; for example, you may
need to reset due to communication cut-off, or if the operat-
ing system or the application stops responding.
If the HC700-i stops responding, perform the steps described
on the following page.
Figure 9. HC700-i Imager - Barcode Capture Positions
2D Barcode Symbol
1D Barcode Symbol
Enhanced IMD Users.book Page 31 Tuesday, September 26, 2006 2:17 PM
32
Step 1: Warm Reset
Important Note: When
the HC700-i performs
Warm Reset, all recorded
information remains
stored in RAM file sys-
tem. To perform Warm
Reset, perform the fol-
lowing:
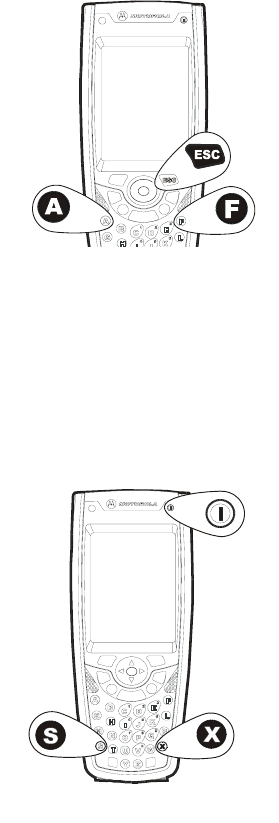
Hold down the <ESC>
and <A> and <F> keys
(see Figure 10) for at least 5 seconds - the Motorola logo will
show on the screen for about 30 seconds and then Windows
Mobile desktop or application screen will appear - the
HC700-i functions again. Warm Reset can also be performed
in the following way: go to: Start Menu -> Settings -> Device
Boot - selecting “Warm Boot” and tapping on the “Perform
Boot” button.
If the HC700-i still does
not respond, perform
Step 2 HW Cold Reset:
Step 2: HW Cold
Reset
HW Cold Reset restarts
the HC700-i by erasing
all stored records and
entries from the Ram-
disk.
Do Not perform HW
Cold Reset unless Warm
Reset fails to solve the
problem. To perform HW Cold Reset, perform the following:
Hold down the Power Button and <S> and <X> keys for at
least 5 seconds (see Figure 11); the HC700-i will restart its
operating system. HW Cold Reset can also be performed in
the following way: go to: Start Menu -> Settings -> Device
F
igure 10. Warm Reset - Key Combination
igure 11. HW Cold Reset - Key Combinatio
n
Enhanced IMD Users.book Page 32 Tuesday, September 26, 2006 2:17 PM
33
Boot - selecting “Hw Cold Boot” and tapping on the “Perform
Boot” button.
Step 3: SW Clean Reset
SW Clean Reset restarts the HC700-i by erasing all stored
records and entries from the RAM file system and the RAM-
disk. The SW Clean Reset also sets the HC700-i to its default
settings.
Do Not perform SW Clean Reset unless HW Cold Reset fails
to solve the problem. To perform SW Clean Reset, perform
the following:
Hold down the Power Button and <S> and <X> keys for at
least 5 seconds and release. Now, hold down the <S> and
<X> and <C> keys for at least 5 seconds and release.
The HC700-i will restart its operating system. SW Clean
Reset can also be performed in the following way: go to:
Start Menu -> Settings -> Device Boot - selecting “Sw Cold
Boot” and tapping on the “Perform Boot” button.
Allocating Memory
You can allocate the HC700-i memory by setting the size of
the storage and the programs memory. You can also view the
amount of memory used by running programs or storage
space.
To view and allocate the memory of the HC700, go to: Start ->
Settings -> System -> Memory.
Enhanced IMD Users.book Page 33 Tuesday, September 26, 2006 2:17 PM
34
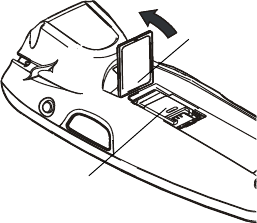
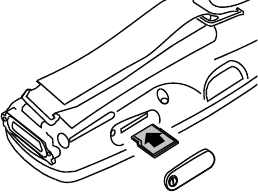
miniSD Memory Card
Installing a miniSD Card
Important: Turn off the
HC700-i before removing
or installing the miniSD
(Secure Digital) card.
1. Turn off the HC700-i
2. Remove the cover
screw to access the
miniSD card slot (see
Figure 12)
3. Insert the miniSD card as shown in Figure 12
miniSD Card Handling Precautions
• SanDisk are recommended miniSD cards
• Do not bend or apply force to the miniSD card
• Do not store the miniSD card in locations subjected to
high humidity or temperatures
Service
The HC700-i does not contain user serviceable parts. How-
ever, the following sections provide maintenance guidelines.
Maintaining the HC700-i
In order to maintain the HC700-i in good working order:
• Do not scratch the screen. Use only Motorola supplied
stylus
• Never use a pen or pencil or any sharp object on the
screen
• Protect the HC700-i from temperature extremes. Do not
leave the HC700-i on the dashboard of a car on a hot day,
and keep the HC700-i away from hot places
• Do not store or use the HC700-i in any location that is
extremely dusty, damp or wet
Figure 12. miniSD Card Installation
Enhanced IMD Users.book Page 34 Tuesday, September 26, 2006 2:17 PM

35
Cleaning
If the battery contacts, screen or surface of the HC700-i
become dirty, use a soft lint cloth moistened with solution to
remove dirt.
Cleaning Materials
To clean the HC700-i, use Chemical Pure grade (C.P) “Isopro-
pyl Alcohol (IPA)” also named “Propanol”. The IPA can be
diluted with water up to 20%.
You may use IPA manufactured by Merck, Riedel-de Haen.
It is recommended to use a soft lint free cloth such as Tex-
wipe TX512, BlueWipe cleaning rag/cloth. It is also possible
to use optic lens wiping paper such as "rice paper".
ActiveSync (USB) Connectivity
The ActiveSync over USB enables the user to explore and
manage the HC700-i from remote, transfer files (data images
etc.) and surf the Internet via host PC.
First Time Connection
In order to enable USB communication with your host PC,
Microsoft ActiveSync program must be installed on your PC.
The HC700-i is provided with the ActiveSync program
installed. However, the program can be obtained from
Microsoft web site. To learn more about most up-to-date ver-
Before using any of the materials detailed
below, refer to the safety instructions shown
on the product’s label or package.
!
Caution
Figure 13. USB Connectivity
PC USB Port
Host PC
HC700-i Port
Enhanced IMD Users.book Page 35 Tuesday, September 26, 2006 2:17 PM
36
sion of the ActiveSync and its operation, refer to ActiveSync
help.
Connect the USB cable between the HC700-i and PC. Your PC
will identify the new connection and will request you to point
to the HC700-i software driver (wceusbsh.inf) provided with
this product.
Routine Connection
Just hook the USB cable from the HC700-i personal desktop
cradle to your PC - the ActiveSync icon will become green
and a Partnership window will show. Check the Guest Part-
nership and click Next to popup the ActiveSync program.
Enhanced IMD Users.book Page 36 Tuesday, September 26, 2006 2:17 PM

37
Troubleshooting
Table 4: Troubleshooting the HC700-i
Problem Cause Solution
HC700-i does
not turn on
HC700-i in Sus-
pend mode
Press the Power Button
battery is
drained
Replace with fresh battery
Battery is not
installed prop-
erly or not
charged
Ensure proper battery
installation in HC700-i.
Charge or replace the bat-
tery
Battery con-
tacts are dirty.
Remove the battery and
clean the battery contacts
as described in “Cleaning”
on page 35.
Battery does
not charge in
HC700-i Cra-
dle
HC700-i is not
locked in the
HC700-i Cradle
Re-install the HC700-i in
the HC700-i Cradle. Place
the HC700-i properly in
HC700-i Cradle. (Verify that
the HC700-i Cradle LED is
On and charge for 4 hours)
HC700-i bat-
tery contacts
are not clean
Clean the battery contacts,
see “Cleaning” on page 35
Battery temper-
ature is out of
range (Status
LED flashes
orange)
Ensure that the battery
temperature is within
range. (refer to “Charging
the Battery” on page 6). If
battery remains hot,
replace battery (defective
battery).
Defective bat-
tery
Replace battery
Enhanced IMD Users.book Page 37 Tuesday, September 26, 2006 2:17 PM

38
HC700-i does
not detect
scan input
Aiming pattern
not directed at
the barcode
symbol
Scan again and make sure
that the green light is
aimed across the barcode
Check for readable barcode
(not covered, or abstracted)
Unreadable
barcode
Be sure the barcode symbol
is not covered, damaged or
obstructed. Make sure the
barcode symbology is con-
figured. For a list of symbol-
ogies configured by default,
refer to the Specifications
section.
HC700-i does
not respond
Problem in the
HC700-i operat-
ing system or
communica-
tions network
Ensure proper battery
installation in HC700-i.
Charge or replace the bat-
tery
Execute Warm Reset
“Resetting the HC700-i” on
page 31. The HC700-i
should function again
If HC700-i still does not
respond, perform HW Cold
Reset (see “Step 2: HW
Cold Reset” on page 32).
The operating system will
reboot in 30 seconds
HC700-i ran-
domly
shuts off
Unclean bat-
tery contacts.
Clean the battery contacts,
see “Cleaning” on page 35.
Communica-
tion failure
between
HC700-i and
HC700-i Cra-
dle
HC700-i is not
docked prop-
erly in the cra-
dle
Make sure that the HC700-i
is properly docked in the
cradle
Table 4: Troubleshooting the HC700-i
Problem Cause Solution
Enhanced IMD Users.book Page 38 Tuesday, September 26, 2006 2:17 PM

39
Communica-
tion software
was incorrectly
installed or
configured
Refer to your system
administrator for program
installation or configuration
Table 4: Troubleshooting the HC700-i
Problem Cause Solution
Enhanced IMD Users.book Page 39 Tuesday, September 26, 2006 2:17 PM
Index
40
Numerics
4-Way Navigation Key 15
8 and 4 slot cradles 2
802.11b 1
A
ActiveSync 35
alphabetic/numeric icon 16
Answer 21
Application LED 13
B
Back-Light Adjustment 18
Battery Maintenance 8
battery snap 8
battery temperature 7
BKSP 16
Bluetooth label 5
body-worn devices 1
C
call on hold 22
Call Waiting 21, 22
Capture Position 31
Cigarette lighter power cable
3
Cleaning 35
Cold Reset 32, 33
conference call 22
critical off 12
D
deep sleep 10
dense symbol 31
Depth-of-Field 31
Desktop Cradle 6
direct action keys 17
Disposal 9
does not charge 37
does not respond 38
does not turn on 37
E
Earpiece 4
earpiece/speaker volume 23
End 15
ENT 15
Esc 15
Ethernet 1
F
Fast flashing green 12
First Time Battery Charge 7
Flashing orange inside cradle
13
Flashing red/green 13
Fn 16
G
GPRS 1
green aiming pattern 30
H
Hand-strap 2
holster 3
hot swap 2
I
Imager Window 4
IrDA Window 4
K
Keypad 14
keypad backlight 18
L
Local Area Network 1
M
make a call 20
Microphone 4
Mini SD Card 34
N
Navigation Key Panel 5
Enhanced IMD Users.book Page 40 Tuesday, September 26, 2006 2:17 PM
41
P
P1/P2 17
package 2
PDA 1
Personal Digital Assistant 1
Phone Contact 21
Pocket PC® 1
Power Button 10
R
red ambient light 30
remaining battery power 6
Resetting 31
Routine Battery Charge 7
S
Scan Button 15
screen backlight 17
screen calibration 10
SDK 3
SHIFT 16
single slot battery charger 6
Slowly flashing green out of
cradle 12
SP 15
Speaker 4
Speed Dial 22
speed dial 21
status LED 12
Steady green inside cradle
13
Steady red 12
Steady red inside cradle 13
Storage 9
Stylus 4
Suspend 10
system failure 12
T
TAB/Send 15
Tethered stylus 3
TFT 2
turn on the phone 20
Turning Off 10
Turning On 10
V
vehicle cradle 2
Volume Keys 4
W
Warm Reset 32
WATER 8
WiFi 1
Windows Mobile screen 10
Enhanced IMD Users.book Page 41 Tuesday, September 26, 2006 2:17 PM

Notes:
Enhanced IMD Users.book Page 42 Tuesday, September 26, 2006 2:17 PM

Enhanced IMD Users.book Page 43 Tuesday, September 26, 2006 2:17 PM

ab
Motorola, Inc.
1301 E. Algonquin Road,
Schaumburg, IL 60196 U.S.A.
For Motorola Customer Support call:
1-888-877-7023 (US domestic)
1-847-725-4150 (International)
MOTOROLA and the Stylized M Logo
are registered in the U.S. Patent and
Trademark Office. All other product or
service names are the property of their
respective owners. © Motorola, Inc.
2006.
6802981C65-B
@6802981C65@
Enhanced IMD Users.book Page 44 Tuesday, September 26, 2006 2:17 PM
45
Enhanced IMD Users.book Page 45 Tuesday, September 26, 2006 2:17 PM