Motorola Solutions 89FT7022 Bluetooth Wireless Handsfree Set User Manual BTHandsfree
Motorola Solutions, Inc. Bluetooth Wireless Handsfree Set BTHandsfree
Users Manual

Final Approval Request
A
Personal Communications Sector
Interoffice Correspondence
Integrated Technical Communications (ITC)
If you approve, please state so explicitly in your email response.
DATE:
SUBJECT:
Bob Harr
FROM:
FILE NAME AND LOCATION:
6840420Z01-O
IHF 1000 Bluetooth Handsfree Car Kit User Guide
http://fl25-pcsitc-nas.comm.mot.com/PCSITC-Public/BT.Handsfree/684
0420z01o.073104
PART #:
August 1, 2004
Return comments by this date:
All comments to be submitted to: Bob Harr
7/31/2004
Thank you.
• Review draft publication for complete & accurate technical information.
• Focus on your area of expertise—ITC will complete editing before final review.
• Provide specific comments:
- If information is wrong—Provide correct information or name of person with correct information.
- If information is missing—Provide information to be added or name of person with correct
information.
• Return markup by date specified above.
• When sending markup, include name of all reviewers who contributed.
SPECIAL INSTRUCTIONS FROM ITC:

Final Approval Request
A
Personal Communications Sector
Interoffice Correspondence
Integrated Technical Communications (ITC)

1
DRAFT
Welcome
Welcome to Motorola’s “connected” world of Bluetooth® personal area wireless
networking. Motorola’s Premium Wireless Car Kit with Bluetooth Wireless
Technology makes wireless connection simple and quick.
Motorola’s Premium Car Kit offers these features:
•
seamless, wireless handsfree audio through Bluetooth connection
•
digital audio interface with high quality, full-duplex, handsfree speech
•
Speaker Independent Voice Recognition—in multiple languages
•
voice-driven menu prompts
•
entertainment mute—automatically mutes radio during calls (where
supported by the radio)
•
noise reduction and acoustic echo cancellation
•
compliance with Bluetooth Hands Free 0.96 and 1.0 profiles
DRAFT
2
MOTOROLA, the Stylized M Logo and all other trademarks indicated as such herein are trademarks of
Motorola, Inc. ® Reg. U.S. Pat. & Tm. Off. The Bluetooth trademarks are owned by their proprietor and used by
Motorola, Inc. under license. VELCRO® and VELCRO with the FLYING-V® (DESIGN) are registered
trademarks of Velcro Industries B.V. All other product or service names are the property of their respective
owners.
© 2004 Motorola, Inc. All rights reserved. Printed in the U.S.A.
Manual number: 6840420Z01-O

3
DRAFT
Contents
Welcome . . . . . . . . . . . . . . . . . . . . . . . . . . . . . . . . . . . . . . . . . . . . . . . . . . . . . . . . . . . . . . 1
Safety and General Information . . . . . . . . . . . . . . . . . . . . . . . . . . . . . . . . . . . . . . . . . . . 4
Installing the Handsfree Kit . . . . . . . . . . . . . . . . . . . . . . . . . . . . . . . . . . . . . . . . . . . . . . 6
Guidelines for Installation and Connection . . . . . . . . . . . . . . . . . . . . . . . . . . . . . . . . . . . 6
How to Install the Handsfree Kit . . . . . . . . . . . . . . . . . . . . . . . . . . . . . . . . . . . . . . . . . . . 6
Using Your Car Kit . . . . . . . . . . . . . . . . . . . . . . . . . . . . . . . . . . . . . . . . . . . . . . . . . . . . . 10
User Interface Module (UIM) Control Buttons . . . . . . . . . . . . . . . . . . . . . . . . . . . . . . .10
Connecting Your Phone to the Car Kit . . . . . . . . . . . . . . . . . . . . . . . . . . . . . . . . . . . . . 12
Removing Your Phone from the Car Kit . . . . . . . . . . . . . . . . . . . . . . . . . . . . . . . . . . . . 14
Placing a Call with the Car Kit . . . . . . . . . . . . . . . . . . . . . . . . . . . . . . . . . . . . . . . . . . . 15
Answering a Call . . . . . . . . . . . . . . . . . . . . . . . . . . . . . . . . . . . . . . . . . . . . . . . . . . . . . 17
Ending a Call . . . . . . . . . . . . . . . . . . . . . . . . . . . . . . . . . . . . . . . . . . . . . . . . . . . . . . . . 18
Using Features while on a Call . . . . . . . . . . . . . . . . . . . . . . . . . . . . . . . . . . . . . . . . . . 18
Managing the Contact List . . . . . . . . . . . . . . . . . . . . . . . . . . . . . . . . . . . . . . . . . . . . . .20
Turning Off System Prompts . . . . . . . . . . . . . . . . . . . . . . . . . . . . . . . . . . . . . . . . . . . . 22
Announcing a Caller . . . . . . . . . . . . . . . . . . . . . . . . . . . . . . . . . . . . . . . . . . . . . . . . . . . 22
Audio Indicators . . . . . . . . . . . . . . . . . . . . . . . . . . . . . . . . . . . . . . . . . . . . . . . . . . . . . . 22
Selecting a Language . . . . . . . . . . . . . . . . . . . . . . . . . . . . . . . . . . . . . . . . . . . . . . . . .23
If You Need Help . . . . . . . . . . . . . . . . . . . . . . . . . . . . . . . . . . . . . . . . . . . . . . . . . . . . . . . 24
Warranty Coverage . . . . . . . . . . . . . . . . . . . . . . . . . . . . . . . . . . . . . . . . . . . . . . . . . . . 24
Troubleshooting . . . . . . . . . . . . . . . . . . . . . . . . . . . . . . . . . . . . . . . . . . . . . . . . . . . . . . 24
Calling Features Quick Reference . . . . . . . . . . . . . . . . . . . . . . . . . . . . . . . . . . . . . . . . 25
Dial Number . . . . . . . . . . . . . . . . . . . . . . . . . . . . . . . . . . . . . . . . . . . . . . . . . . . . . . . . . 25
Speed Dial . . . . . . . . . . . . . . . . . . . . . . . . . . . . . . . . . . . . . . . . . . . . . . . . . . . . . . . . . . 25
Call Contact . . . . . . . . . . . . . . . . . . . . . . . . . . . . . . . . . . . . . . . . . . . . . . . . . . . . . . . . . 25
Redial . . . . . . . . . . . . . . . . . . . . . . . . . . . . . . . . . . . . . . . . . . . . . . . . . . . . . . . . . . . . . .25
Phone Voice Tags . . . . . . . . . . . . . . . . . . . . . . . . . . . . . . . . . . . . . . . . . . . . . . . . . . . .25
Setup Menu . . . . . . . . . . . . . . . . . . . . . . . . . . . . . . . . . . . . . . . . . . . . . . . . . . . . . . . . . 26
Contact List . . . . . . . . . . . . . . . . . . . . . . . . . . . . . . . . . . . . . . . . . . . . . . . . . . . . . . . . . 27
Appendix . . . . . . . . . . . . . . . . . . . . . . . . . . . . . . . . . . . . . . . . . . . . . . . . . . . . . . . . . . . . .28
Definitions . . . . . . . . . . . . . . . . . . . . . . . . . . . . . . . . . . . . . . . . . . . . . . . . . . . . . . . . . .28
Phone Tips . . . . . . . . . . . . . . . . . . . . . . . . . . . . . . . . . . . . . . . . . . . . . . . . . . . . . . . . . . 28
Power Connections . . . . . . . . . . . . . . . . . . . . . . . . . . . . . . . . . . . . . . . . . . . . . . . . . . .29
UIM Button Functions . . . . . . . . . . . . . . . . . . . . . . . . . . . . . . . . . . . . . . . . . . . . . . . . .29
UIM LED Indicator Functions . . . . . . . . . . . . . . . . . . . . . . . . . . . . . . . . . . . . . . . . . . . . 31

DRAFT
4
Safety and General Information
IMPORTANT INFORMATION ON SAFE AND EFFICIENT OPERATION.
READ THIS INFORMATION BEFORE USING YOUR PHONE.
Users are not permitted to make changes or modify the device in any way.
Changes or modifications not expressly approved by the party responsible
for compliance could void the user’s authority to operate the equipment.
See 47 CFR Sec. 15.21.
This device complies with Part 15 of the FCC rules. Operation is subject to
the following two conditions: (1) This device may not cause harmful interference,
and (2) this device must accept any interference received, including interference
that may cause undesired operation.
Canada Compliance (Industry Canada)
To prevent radio interference to the licensed service, this device is intended to be
operated indoors and away from windows to provide maximum shielding.
Equipment that is installed outdoors is subject to licensing.
Electromagnetic Interference/Compatibility
Nearly every electronic device is susceptible to electromagnetic interference (EMI)
if inadequately shielded, designed, or otherwise configured for electromagnetic
compatibility.
5
DRAFT
Conformance Statement
Hereby, Motorola declares that this product is in compliance with:
•
The essential requirements and other relevant provisions of Directive 1999/5/EC
•
All other relevant EU Directives
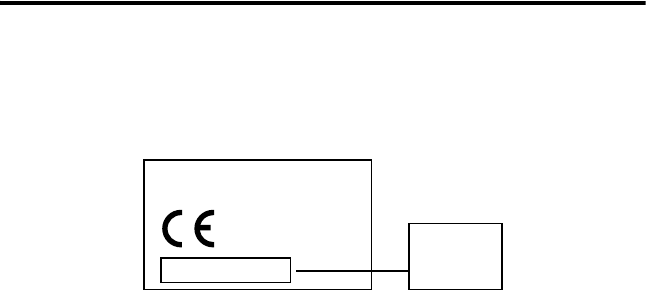
The above gives an example of a typical Product Approval Number.
You can view your product’s Declaration of Conformity (DoC) to Directive 1999/5/EC (the R&TTE
Directive) at
www.motorola.com/rtte
- to find your DoC, enter the product Approval Number
from your product’s label in the “Search” bar on the Web site.
Product
Approval
Number
IMEI: 350034/40/394721/9
0168
Type: MC2-41H14

DRAFT
6
Installing the Handsfree Kit
Installing the Handsfree Kit
Guidelines for Installation and Connection
•
Only qualified personnel should install this car kit. If necessary, contact with
vehicle manufacturer for air bag information specific to the vehicle.
Caution:
An air bag inflates with great force.
DO NOT
place objects, including
communication equipment, in the area over the air bag or in the air bag deployment
area. If the communication equipment is improperly installed and the air bag
inflates, serious injury could occur.
•
Mount components securely on strong surfaces to prevent shifting that could
cause injury or interfere with safe vehicle operation. Always use the supplied
mounting hardware
•
Mounted components and attached wires or cables must not interfere with
seating or leg space.
•
Route cables so they are protected from pinching, sharp edges, and crushing.
Keep all in-line connectors easily accessible.
•
This car kit is intended for use in 12 volt negative ground systems only. The car
kit draws less than 5 amps. Confirm that the vehicle’s electrical system can
supply this current.
How to Install the Handsfree Kit
Caution:
This car kit must be connected to a 5A fuse in the car fuse panel to
prevent fire or other damages if a short circuit should occur somewhere in the
electronic module. Before installing the car kit, disconnect the vehicle’s battery.
Before you begin: Unpack, assemble, and test all components on a service bench.
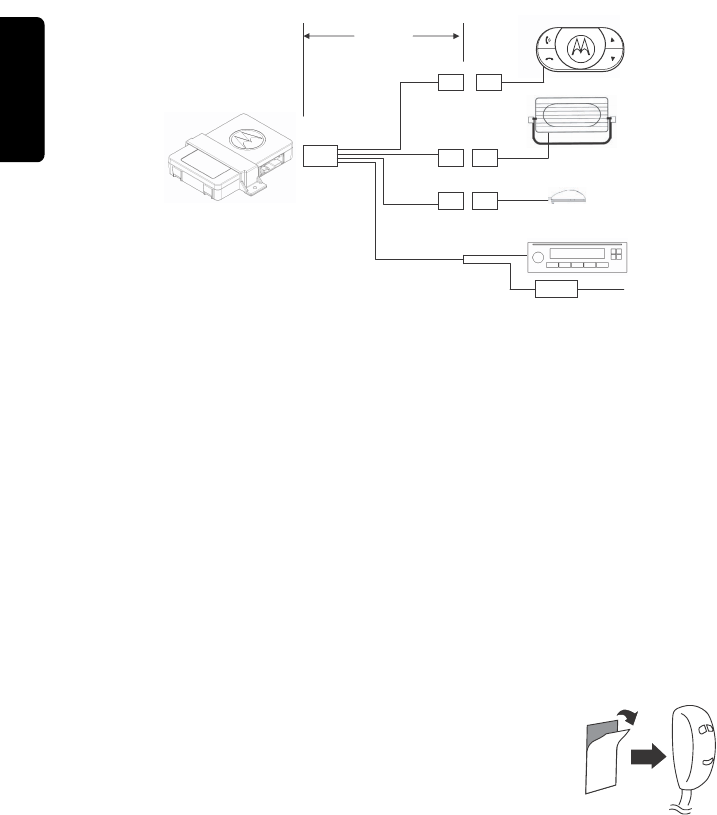
Car Kit Contents
Interface Cable
The Interface Cable connects the electronic module to the other system
components. It connects the vehicle’s power and ignition to the car kit and provides
some optional audio connections when the car kit is used with the vehicle’s radio.
Electronic Module
You can place the electronic module anywhere inside the vehicle to facilitate
convenient connection between the interface cable and other system components.

7
DRAFT
Installing the Handsfree Kit
Microphone
The microphone cable can be routed along the side of the vehicle, through the
dash, and along the edge of the windshield. The microphone is placed best near
the rearview mirror and aimed directly toward the user.
User Interface Module
The User Interface Module (UIM) cable can be mounted in several ways to
provide a safe and comfortable environment for use.
Audio Connections
You can install the system’s audio components in 2 ways:
External Speaker
If you are installing the system with the external speaker, you MUST leave the
audio output (+/-) lines disconnected. (See “Power Connections” on page 29.)
The external speaker should be connected to the interface cable.
Vehicle Radio
If you intend to use the vehicle radio to control audio level, you must connect the
audio output (+/-) lines to your vehicle’s entertainment system.
Installing the Electronic Module
The best location for the electronic module is under the vehicle’s dash. The box
must be protected from dirt and moisture and have adequate space for cooling
and to allow for cable connection.
For optimal Bluetooth® performance, mount the electronic module in a central
location within the vehicle. Do not place it behind or within large areas of metal.
The location of the electronic module MUST NOT interfere with deployment of the
vehicles air bags. Do NOT locate the electronic module in the vehicle’s trunk
(boot).
Installing the Interface Cable
Caution:
Failure to follow the steps below may cause the accessory not to work
properly and may cause damage to the car kit.
The interface cable has integral fuses on the power lines (VBatt and Ign).
DRAFT
8
Installing the Handsfree Kit
Note:
See “Power Connections” on page 29 for more information.
1
Connect the
GREEN
Ignition Sense wire to an ignition-switched location on the
fuse block. When the ignition is off, the ignition sense line is low.
2
Connect the
YELLOW
Entertainment Mute Wire to the vehicle’s entertainment
system.
Note:
This feature is only operational if the vehicle’s radio supports this
capability. Installation may require an optional relay (not included).
3
Connect the
RED
positive battery lead to a point in the vehicle’s fuse box that is
fused at 5 to 10 amp.
4
Connect the
BLACK
ground wire to the vehicle chassis.
5
Inspect all connections.
Note:
The
ORANGE
and
BLUE
wires are not used. (These wires are used to
connect the line-level audio to the vehicle radio, if the radio supports this feature.)
Installing the Microphone
1
Attach 1 side of the VELCRO
®
tape to the bottom side of
the microphone.
2
Select a suitable mounting location and mount the
microphone:
•
Locate the microphone no more than 16 inches (40 cm) from the driver.
•
Aim the microphone directly toward the driver and away from direct air flow
from a vent.
•
Do not allow anything (such as a rear-view mirror or sun visor) to block the
path between the microphone and the driver.
FUSES
Interface
Cable
Speaker
Microphone
Radio
IHF1500
Module
User Interface Module
(UIM)
32-pin
12-pin
2-pin
2-pin
9
DRAFT
Installing the Handsfree Kit
•
Mount the microphone firmly so that vibrations do not affect audio quality.
Caution:
The location of the microphone MUST NOT interfere with the vehicle’s
air bag deployment.
3
Connect the microphone to the interface cable.
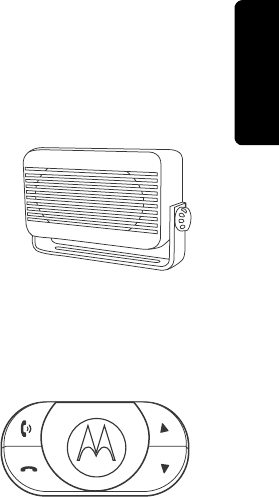
Installing the External Speaker
Note:
Always use the supplied mounting hardware.
1
Mount the speaker to the transmission hump (center
console) or beneath the dash. Position the speaker
so that it does not directly face the microphone.
Caution:
The location of the external speaker MUST
NOT interfere with the vehicle’s air bag deployment.
2
Connect the speaker to the electronic module.
Installing the User Interface Module
1
Remove the backing of the tape on the bottom of
the User Interface Module (UIM).
2
Select a suitable location on the vehicle dash,
within easy reach of the driver, and mount the UIM.
The UIM can be mounted anywhere on the dash.
Caution:
The location of the UIM
MUST NOT
interfere with the vehicle’s air bag
deployment.
Caution:
The mounted UIM
MUST NOT
create a visual distraction.
Caution: DO NOT
mount the UIM on the steering wheel.
3
Connect the UIM to the interface cable.
DRAFT
Using Your Car Kit
10
Using Your Car Kit
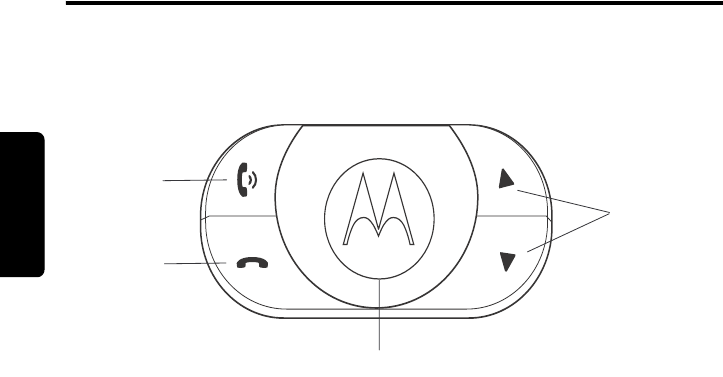
User Interface Module (UIM) Control Buttons
The UIM enables you to set up and use the Bluetooth® Hands Free Car Kit.
The buttons on the UIM are lit at different times to indicate when they may be
pressed.
Note:
See “UIM LED Indicator Functions” on page 31 for information on when and
why the buttons light or flash.
The TALK Button
The blue TALK button has 2 functions, depending on whether you press and
release it quickly or press and hold it.
Press and Release
Press and release
the TALK button to initiate a Voice Recognition (VR) session.
When you begin a VR session, you hear a prompt and then a short beep. The
beep—also known as a listening prompt—indicates that the system is waiting for a
verbal command from you.
Press and Hold
Press and hold
the TALK button to initiate the pairing process.
The ANSWER Button
The green ANSWER button has 6 functions, depending on the state of the system.
These functions can be initiated by pressing and releasing or pressing and holding
the button.
Volume
UP/DOWN
END
ANSWER
TALK
11
DRAFT
Using Your Car Kit
Press and Release
Press and Hold
During an active call, press and hold the ANSWER button to switch the audio
between handsfree and privacy modes.
The END Button
The red END button has 5 functions. These functions can be initiated by pressing
and releasing or pressing and holding the button.
Press and Release
Press and Hold
Volume UP/DOWN Buttons
During normal operation, press and release the Volume UP/DOWN buttons to
increase or decrease speaker volume.
(If the system is using the vehicle radio speakers, you can also use the radio’s
volume controls to raise or lower volume.)
In This Situation ... Press and Release ANSWER to ...
when receiving an incoming call answer the call
when system not on a call attempt to place call using last number
dialed
while 1 call in progress toggle between Hold & Resume
while in a call & after call waiting
notification is received
answer the waiting call
with 2 active calls toggle between calls
In This Situation ... Press and Release END to ...
during an active call end the call
when system is awaiting a command
during Voice Recognition mode
cancel Voice Recognition mode
when receiving an incoming call reject the call
In This Situation ... Press and Hold END to ...
during an active call (including
multi-party calls)
end all calls
when system not on a call terminate the Bluetooth connection

DRAFT
Using Your Car Kit
12
To mute the microphone, press and hold either Volume UP/DOWN button. To
unmute the microphone, press and release either button.
Getting Help
While learning to use the system, or whenever you need a reminder, say “
Help
.”
The system includes Help prompts in every menu.
You can also say “
Repeat
” whenever you are prompted for a
Yes
or
No
. The system
will repeat the question.
Note:
If you need to reset the system, press and hold the TALK and ANSWER
buttons simultaneously for more than 2 seconds.
Connecting Your Phone to the Car Kit
Before you can use this car kit, you must complete a Bluetooth connection between
the kit and your phone. You establish a Bluetooth connection between your car kit
and phone with a paired link.
When you set up a paired link, the car kit remembers the phone’s ID. Once the car
kit and phone are paired, your car kit automatically connects to your phone every
time you start your vehicle or power up the car kit.
This system supports paired links with up to 4 phones.
Note:
The process of initiating a Bluetooth connection with a phone varies per
phone manufacturer. For more information, refer to the user’s guide for your phone.
Initial Pairing
Note:
Use this procedure ONLY if there are no handsets paired to the system.
With the car kit and phone in close proximity:
Action
1
Press the TALK button.
2
When prompted, say “
Pair Phone
.”
The system responds:
Set your phone in scan mode and enter 1234 when prompted for
the passcode
.

13
DRAFT
Using Your Car Kit
Additional Pairing
To pair additional handsets to the system, with the car kit and phones in close
proximity:
3
When the phone displays the device name, select the device.
The phone displays the passcode entry screen.
4
Enter the passkey (
1234
).
The phone displays “PIN verified,” and the system says:
Pairing complete.
Connection in progress.
Note:
Some phones ask you to accept the BT link. Enter Yes.
Upon successful completion, the system says:
Connection is complete. Phone <
n>
ready for use
.
Action
1
Press the TALK button.
2
When prompted, say “
Setup Menu
.”
The system responds:
Setup menu. Please say a command
.
3
Say “
Pair Phone
.”
The system responds:
Set your phone in scan mode and enter 1234 when prompted for
the passcode
.
4
When the phone displays the device name, select the device.
The phone displays the passcode entry screen.
5
Enter the passkey value provided by the system.
The phone confirms that the PIN is verified and says:
Pairing complete.
Connection in progress
.
Note:
Some phones ask you to accept the BT link. Enter Yes.
Upon successful completion, the system says:
Connection is complete. Phone <
n>
ready for use
.
Action

DRAFT
Using Your Car Kit
14
Selecting a Phone
With the car kit and phone in close proximity:
List Phones Paired to the System
Removing Your Phone from the Car Kit
Removing a Connected Phone
Action
1
Press the TALK button.
2
When prompted, say “
Setup Menu
.”
The system responds:
Setup menu. Please say a command
.
3
Say “
Connect Phone
<
n>
.
”
The system responds:
Connecting phone <
n>
.
Upon successful completion, the system says:
Connection complete
.
Action
1
Press the TALK button.
2
When prompted, say “
Setup Menu
.”
The system responds:
Setup menu. Please say a command
.
3
Say “
List Phones.
”
The system says:
The following phones have been paired: phone 1,
etc
.
Action
1
Press the TALK button.
2
When prompted, say “
Setup Menu
.”
The system responds:
Setup menu. Please say a command
.
3
Say “
Remove phone
<
n>.
”
The system responds:
Removing phone <
n>
. Are you sure?
.
4
Say “
Yes.
The system responds:
Phone <
n
>
removed
.”

15
DRAFT
Using Your Car Kit
Removing All Phones
Placing a Call with the Car Kit
To place a call, you must first establish a Bluetooth link between the car kit and
your phone (see page 12).
You can place a call with the car kit in these ways:
•
Dial a number from the phone.
•
Digit dial with Voice Recognition.
•
Use the system’s Contact List.
•
Speak a phone voice tag.
•
Use the
Speed Dial
command.
•
Use the
Redial
command.
•
Use last number redial from the User Interface Module.
When connected, all of these calls are handsfree. You can terminate a VR
session at any time by pressing the END button.
Placing a Call with Voice Recognition
You can enter a phone number as 1 or more segments of digits. A segment can
include up to 15 digits. An entire number can include no more than 32 digits. You
can begin the number set with the * or # character.
Note:
Speak numbers as continuous digits. For example, dictate 555-2211 as
“
5-5-5-2-2-1-1
”, not “
5-5-5-twenty-two-eleven
.”
Calling with a Whole Number
Action
1
Press the TALK button.
2
When prompted, say “
Setup Menu
.”
The system responds:
Setup menu. Please say a command
.
3
Say “
Remove all phones
.”
The system responds:
Are you sure you want to remove all the phones?
.
4
Say “
Yes.
”
The system responds:
All phones removed
.
Action
1
Press the TALK button.
2
When prompted, say “
Dial Number
.”
The system responds:
Number please?
.

DRAFT
Using Your Car Kit
16
Calling with Digit Segments
To delete a phone number segment, say “
Clear
” when prompted for the next
segment. The system responds
Last String Cleared
, echoes any remaining segments,
and waits for you to dictate a new segment.
To clear all phone number segments dictated so far, say “
Clear All
” when prompted
for the next segment. The system clears all segments and returns to the
Number
please?
prompt (see step 2 above).
Dialing a Number from the Contact List
3
Dictate the phone number as a single set of digits (without pauses
between digits).
The system recites the digits heard.
4
If the number recited by the system is correct, say “
Dial.
” The system
responds:
Dialing
.
Action
1
Press the TALK button.
2
When prompted, say “
Dial Number.
”
The system responds:
Number please?
.
3
Dictate the first segment of digits. (For example, say the 1st 3 numbers.)
The system recites the digits heard.
4
Dictate the next segment of digits. The system recites the digits heard.
Repeat this step until you enter the complete phone number.
5
When the complete number is recited by the system, say “
Dial.
” The
system responds:
Dialing
.
Action
1
Press the TALK button.
2
When prompted, say “
Call <contact>
.”
Note:
The contact must be a valid contact stored in the Contact List.
The system responds:
Do you want to call <
contact
>?
.
3
If the number recited by the system is correct, say “
Yes.
” The system
responds:
Calling
.
Action

17
DRAFT
Using Your Car Kit
Dialing a Number Using the Phone’s Voice Tags
Using the Speed Dial Command
Note:
Speak speed dial numbers as continuous digits. For example, dictate
speed dial location 22 as “
2-2
”, not “
twenty-two
.”
Using the Redial Command
You can also redial the last number by pressing the ANSWER button.
Answering a Call
When you receive an incoming call, the system responds:
Call from <
Caller ID
>
, if
available.
If Caller ID is not available:
•
The system plays the in-band ring tone, if the phone supports it.
Action
1
Press the TALK button.
2
When prompted, say “
Phone voice tag
.”
Note:
The voice tag must already be stored in the phone.
The system responds:
Phone voice tag, please
.
3
Say “
<voice tag>”
(where
<voice tag>
is a voice tag stored in the phone.”
The system calls the number associated with the phone voice tag.
Action
1
Press the TALK button.
2
When prompted, say “
Speed Dial.
”
The system responds:
Speed dial number, please.
3
Recite the speed dial number.
The system repeats the number it heard and asks:
Is this correct?
4
If the number recited is correct, say “
Yes.
”
The system responds:
Dialing
, and places the call.
Action
1
Press the TALK button.
2
When prompted, say “
Redial
.
The system responds:
Redialing.

DRAFT
Using Your Car Kit
18
•
If no in-band ring tone is supported, the system generates a local ring tone.
To answer an incoming call:
Ending a Call
Using the Phone
Using the UIM
Using the End Call Command
Using Features while on a Call
Note:
To use the functions described below:
•
A Bluetooth link must be established between the car kit and your phone.
•
A call must be initiating or in progress.
Action
Press the ANSWER button.
or
Press your phone’s Send, OK, Answer, or Yes key (depending on your phone
model), just as you would to answer a call in privacy mode.
Action
Press your phone’s End or Hang up key (depending on your phone model).
Action
Press the END button.
Action
1
Press the TALK button.
2
When prompted, say “
End Call
. The system responds:
Call ended.

19
DRAFT
Using Your Car Kit
Rejecting a Call
To reject a call while the phone is ringing:
Transferring a Call
From the Car Kit to Your Phone
From Your Phone to the Car Kit
Muting and Unmuting a Call
Using the UIM
Action
Press the END button on the UIM. The system responds:
Call rejected
.
or
Press your phone’s IGNORE key (may be a soft key, depending on phone
model) or your phone’s End or Hang up key. The system responds:
Call ended
.
Action
Press and hold the ANSWER button.
or
Turn OFF the vehicle ignition. (If your phone asks to switch to handset mode,
press Yes.)
or
Press the TALK button. When prompted, say “
Privacy Mode
.”
Action
Press and hold the ANSWER button.
or
Turn ON the vehicle ignition.
or
Press the TALK button. When prompted, say “
Hands Free mode
.”
Action
To mute the microphone during a call, press and hold either Volume
UP/DOWN button.
To unmute the microphone, press and release either Volume UP/DOWN
button.

DRAFT
Using Your Car Kit
20
Using the MUTE and UNMUTE Commands
Call Waiting
When you are on a call, an audible beep signals a 2nd call.
Note:
If the ANSWER button is not pressed, the incoming call is automatically
rejected and sent to voicemail (if set up on the phone).
Sending DTMF Tones
You can send DTMF tones from the phone keypad, or by using the
Enter
command:
Managing the Contact List
You can store a list of names and phone numbers in your car kit’s contact list. The
list can include up to 20 entries.
Adding an Entry
Action
To mute the microphone during a call, press the TALK button. When
prompted, say “
Mute
.”
To unmute the microphone, press the TALK button. When prompted, say
“
Unmute
.”
Action
Press and release the ANSWER button to place the 1st call on hold and
answer the incoming call.
Each time you press and release the ANSWER button, you toggle between
active calls.
Action
1
Press the TALK button.
2
When prompted, say “
Enter <digits>
” to send numbers as DTMF tones.
Action
1
Press the TALK button.
2
When prompted, say “
Contact List
.”
3
If the system responds:
Contact list is empty. Do you wish to add a contact?
, say
“
Yes
.”
or
If the system responds:
Contact list. Please say a command
, say “
Add entry.
”

21
DRAFT
Using Your Car Kit
Deleting an Entry
4
When the system responds:
Please say the name
, recite the contact to be
stored.
If the name sounds like 1 that is already stored, or if an error is detected,
the system asks you to try again.
If it accepts the name, the system responds:
Please say the number for
<c
ontact
>
.
5
Dictate the phone number as an entire number (without pauses between
digits).
or
Dictate the number as a series of segments (for example, say the 1st 3
digits, then the next 3, etc.), until you have dictated the entire number.
The system repeats the number it heard.
6
When you have correctly entered the entire phone number, say “
Store
.”
The system responds:
Contact added. Would you like to add another contact?
7
Say “
No
” to return to the system’s ready state.
or
Say “
Yes
” to add another entry.
Action
1
Press the TALK button.
2
When prompted, say “
Contact List
.”
3
If the system responds:
Contact list. Please say a command
, say “
Delete
<c
ontact
>
” (where
<c
ontact
>
is the name of a contact entry).
or
If the system responds:
Contact list is empty. Do you wish to add a contact?
, say
“
No
.” The system exits to ready state.
4
When the system responds:
Are you sure you want to delete the contact
<c
ontact
>
?
, say “
Yes.
”
The system responds:
Contact deleted
.
Action

DRAFT
Using Your Car Kit
22
Listing Entries
Tip:
To move quickly through the list, say “
Previous contact
” or “
Next contact
.”
Turning Off System Prompts
To turn off certain VR prompts (for example,
Main Menu. Please say a command
):
Announcing a Caller
To turn the Caller Announce function On or Off:
Audio Indicators
When the system is not in a call or an active VR session, you may hear the
following audio indicators:
Action
1
Press the TALK button.
2
When prompted, say “
Contact List
.”
3
If the system responds:
Contact list. Please say a command
, say “
List entries.
”
The system begins to list the stored entries.
or
If the system responds:
Contact list is empty. Do you wish to add a contact?
, say
“
No
.” The system exits to ready state.
Action
1
Press the TALK button.
2
When prompted, say “
Setup Menu
.”
3
Say “
Prompts On
” or “
Prompts Off
.”
The system responds:
Prompts On
or
Prompts Off
.
Action
1
Press the TALK button.
2
When prompted, say “
Setup Menu
.”
3
Say “
Caller Announce On
” or “
Caller Announce Off
.”
The system responds:
Caller Announce On
or
Caller Announce Off
.
Audio Indicator Description
You have a voicemail.
New voicemail message received.
23
DRAFT
Using Your Car Kit
Note:
These indicators are turned off when you turn off prompts.
Selecting a Language
Note:
When you change your system’s language, all contacts in your
Contacts
list
are deleted.
You have a new message.
New SMS message received.
Phone battery low.
Low battery.
Action
1
Press and hold the END button, turn on the vehicle ignition, and continue
holding the END button for at least 10 seconds.
The system enters language selection and responds:
Language Menu. Press
volume up or down to change language
.
2
Use the Volume UP/DOWN buttons to scroll through the language
choices.
As you scroll to a language, the system plays the prompt for that
language. (For example:
English. To choose this language, restart the vehicle.
)
3
When you have selected the desired language, turn off the vehicle
ignition.
The next time you turn on the vehicle ignition, the new language is loaded.
Audio Indicator Description

DRAFT
24
If You Need Help
If You Need Help
Warranty Coverage
Please refer to the warranty information included in the car kit package.
Troubleshooting
Symptom Solution(s)
You cannot pair new
phones with the car kit.
•
The phone must support Bluetooth
Handsfree Profile 0.96 or 1.0.
•
The system supports a maximum of 4
phones at once. Make sure this limit is not
exceeded.
•
Remove all previous pairings using the
Remove All
command. The system should
be reset.
•
Delete the pairing information on the
phone and ensure that the phone is
removed from any other systems with
which it is paired.
No VR or HF audio. •
Check speaker connection.
•
Check the connection to the electronic
module.
VR does not respond,
or in-vehicle audio is
not heard on the
remote phone.
•
Check microphone connection.
•
Check the connection to the electronic
module.
System does not
respond.
UIM buttons not lit.
•
Check UIM connection.
•
Check the connection to the electronic
module.

25
DRAFT
Calling Features Quick Reference
Calling Features Quick
Reference
Dial Number
Speed Dial
Call Contact
Redial
Phone Voice Tags
G Dial
G Clear
G Clear All
Press TALK
Button
F Main Menu.
Please say command.
G Dial Number
F Number please.
G <number>
F <number>
G Yes
G No
G Repeat
Press TALK
Button
F Main Menu.
Please say command.
G Speed Dial
F Speed dial
number please.
G <number>
F <number>
Is this correct?
G Yes
G No
G Repeat
Press TALK
Button
F Main Menu.
Please say command.
G Call <contact>
F Do you want to call
<contact>?
Press TALK
Button
F Main Menu.
Please say command.
G Redial
Press TALK
Button
F Main Menu.
Please say command.
G Phone Voice Tag
F Phone voice tag please.
G <voice tag>

DRAFT
26
Calling Features Quick Reference
Setup Menu
G Remove
Phone <n>
F Removing phone <n>.
Are you sure? G Yes
G No
G Repeat
G Connect
Phone <n>
G Remove
All Phones
F Are you sure you want
to remove all phones? G Yes
G No
G Repeat
G List
Phones
G Call
Announce
F On or Off?
G On
G Off
G Pair
Phone
G Prompts F On or Off?
G On
G Off
Press TALK
Button
F Main Menu.
Please say command.
G Setup Menu
F Setup Menu.
Please say command.

27
DRAFT
Calling Features Quick Reference
Contact List
G Delete
<contact>
F Are you sure you
want to delete the
contact <contact>?
G Yes G No G Repeat
G List
Entries
F Next Entry <contact>
or
Previous Entry <contact>
G Call
G Details
G Delete
G Add Entry
F Please say
the name.
G <name>
F Please say
the number
for <name>.
G <number>
F Main Menu.
Please say command.
Press TALK
Button
G Contact List
F Contact List.
Please say command.
F <number>
F Contact List is empty.
Do you wish to add
a voicetag entry?
G Yes
G No
G Repeat
G Store
G Clear
G Clear All

DRAFT
28
Appendix
Appendix
Definitions
Phone Tips
Features Support
•
Sony/Ericsson T610 and the T616 do not switch from privacy to handsfree
mode.
•
Nokia 6310i does not support memory dialing.
Term Definition
Boot
The trunk.
Continuous Voice
Recognition
The ability to find word boundaries without requiring
pauses between words.
Handset
The wireless phone.
Pair
The process used by two wireless devices, with
passcodes as an input, to create the link of the
Bluetooth® authentication process.
Passcode
A term that is generally synonymous with PIN or
passkey, used in the Bluetooth specifications. The
passcode is entered into the devices involved in
pairing, enabling them to verify the operation.
In this application, to avoid confusion, passkey is
used as distinct from PIN, which is used to unlock a
handset’s SIM card.
Press and Hold
A button press of at least 1 second.
Press and Release
Pressing a button for 100 milliseconds.
Ready State
The system is paired to a phone but is not in an
active call.
Speaker Dependence
The degree to which a speech recognition system
requires knowledge of a speaker’s individual voice
characteristics in order to successfully process
speech.
Speaker
Independence
Describes speech recognition systems that do not
need to be trained by a user.
Voice Recognition
The method of verbal input into the speech interface.
29
DRAFT
Appendix
Power Saving Mode on Motorola Phones
Motorola phones include a power-save mode for Bluetooth operation. This mode
turns off the phone’s Bluetooth radio to conserve battery power.
When you attempt to pair a phone with a car kit that is turned off, the phone asks:
Bluetooth power off. Temporarily power on?
.
If you select
On
, you can pair the phone with
the car kit, but the power turns on for only 1 connection.
The Motorola V600 phone currently ships with the Bluetooth power set to
Off
.
Refer to the user’s guide for this phone for information on setting the power to
On
.
Power Connections
Battery, ground, and ignition must be connected regardless of the audio
connections being used. If the vehicle radio and speaker are used instead of the
external speaker, the audio (+/-)
must
be connected to the vehicle radio harness.
The table below illustrates the connections to the vehicle.
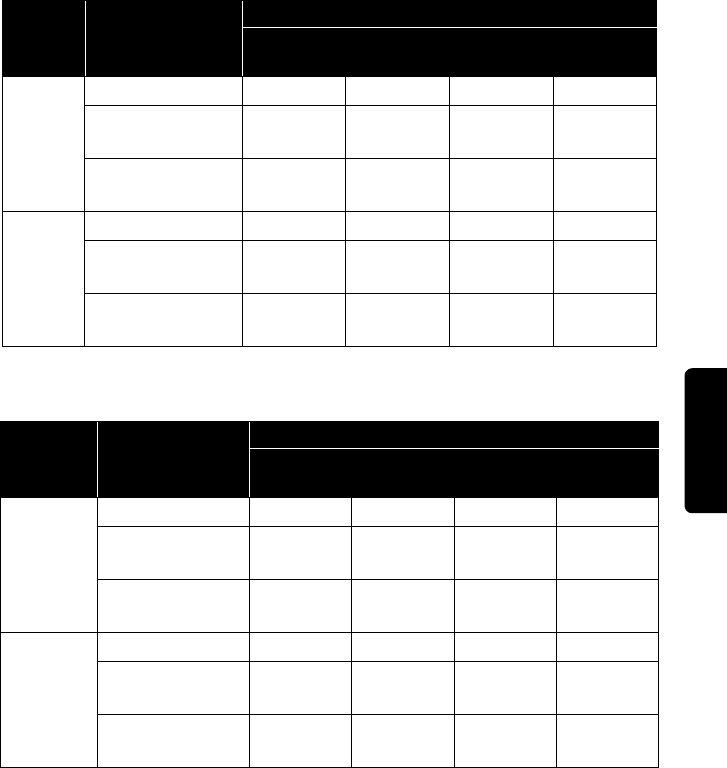
UIM Button Functions
Vehicle Color Connection
Battery + Red Required
Ground Black Required
Ignition Green Required
Radio Mute Yellow Optional
(for use with radio only)
Audio + Orange Optional
(for use with radio only)
Audio - Blue Optional
(for use with radio only)
Key(s) Action
State
Not
Connected
Connected
(in a call)
Connected
(not in a call)
TALK
(Blue)
Press & Release
VR session activate VR
session
activate VR
session
Press & Hold
begin pairing N/A N/A

DRAFT
30
Appendix
ANSWER
(Green)
Press & Release
no action 1 way = toggle
between Hold
and Resume
2 way = Call
Waiting/toggle
between
active calls
answer
incoming
call/redial last
number dialed
Press & Hold
N/A handsfree/priv
acy
N/A
END
(Red)
Press & Release
end any active
sessions
end active call reject
incoming
call/end any
active session
Press & Hold
N/A end all calls disconnect
Bluetooth link
Volume
(White)
Press & Release
VR session
volume
control
increase or
decrease
volume of
in-vehicle
audio/unmute
VR session
volume
control
Press & Hold
N/A mute vehicle
microphone
(both keys
have same
effect)
N/A
Key(s) Action
State
Not
Connected
Connected
(in a call)
Connected
(not in a call)
31
DRAFT
Appendix
UIM LED Indicator Functions
Blue TALK Key and White Volume UP/DOWN Keys
Green ANSWER Key and Red END Key
Key(s) Status of
Connections
LED State
Power Off Power On Pairing in
Progress
Mute
Mode
TALK
(Blue)
Not Connected
off off flashing N/A
Connected (in a
Call)
off on N/A flashing
Connected (No
Active Call)
off on N/A N/A
Volume
(White)
Not Connected
off off flashing N/A
Connected (in a
Call)
off on N/A flashing
Connected (No
Active Call)
off on N/A N/A
Key(s) Status of
Connections
LED State
Power Off Power On Pairing in
Progress
Call
Waiting
ANSWER
(Green)
Not Connected
off off off N/A
Connected (in a
Call)
off on off flashing
Connected (No
Active Call)
off off off N/A
END
(Red)
Not Connected
off on on on
Connected (in a
Call)
off on on on
Connected (No
Active Call)
off on on on