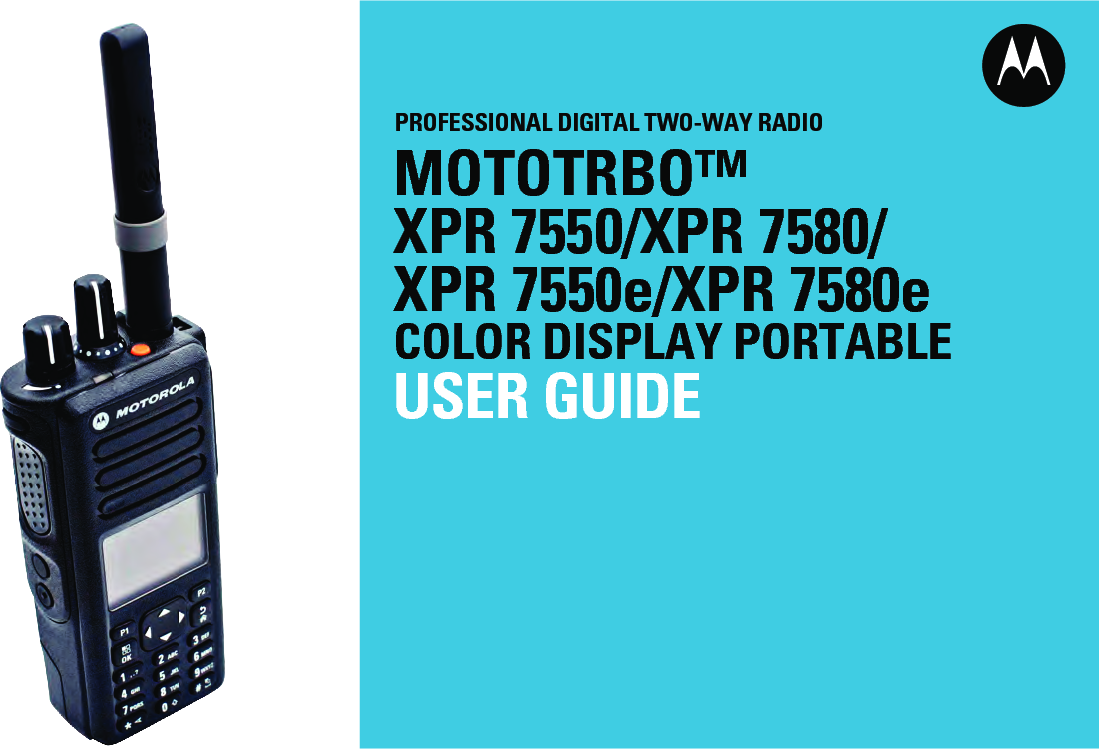
Motorola Solutions 89FT7065 2-Way Portable Radio with BT and WiFi User Manual MOTOTRBO Professional Digital Two Way Radio System
Motorola Solutions, Inc. 2-Way Portable Radio with BT and WiFi MOTOTRBO Professional Digital Two Way Radio System
Contents
- 1. Manual
- 2. RF Safety Manual
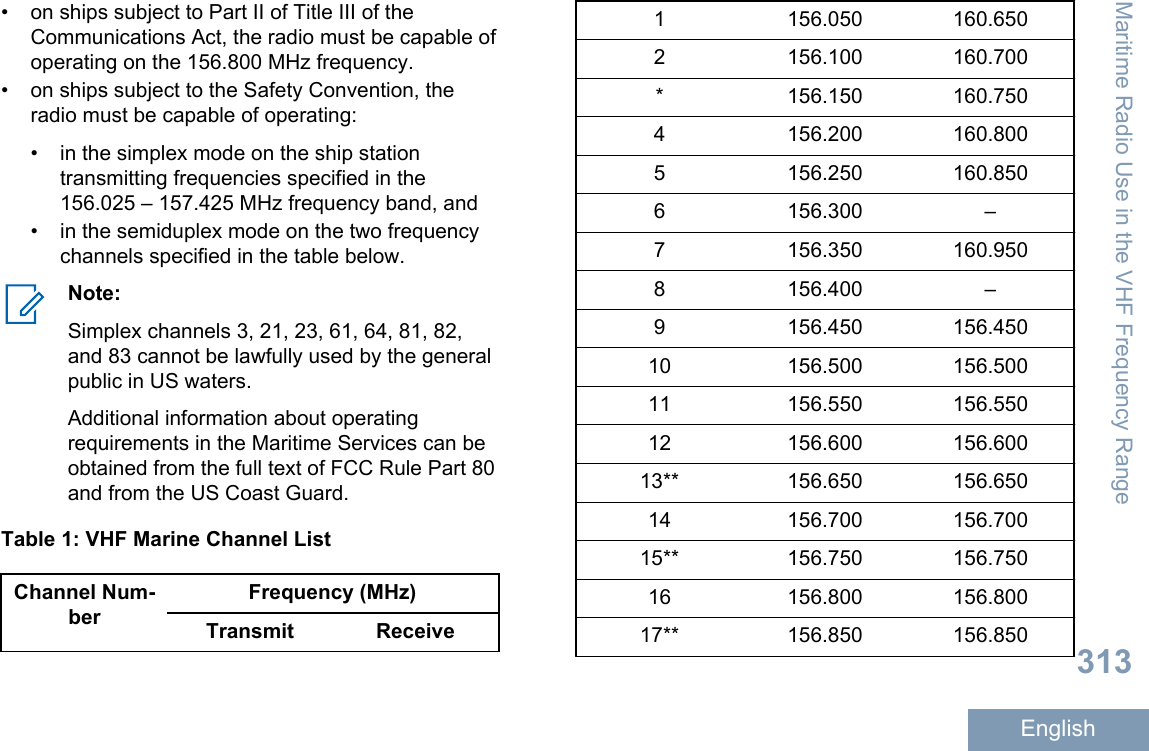
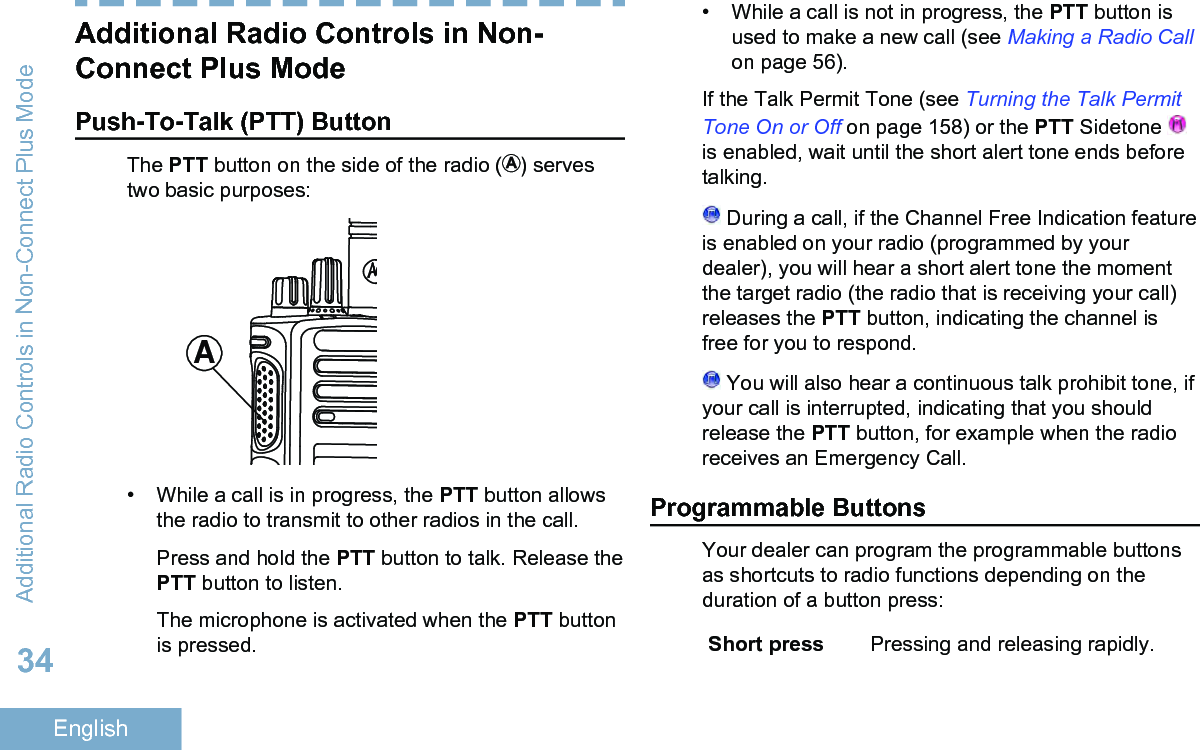
Manual


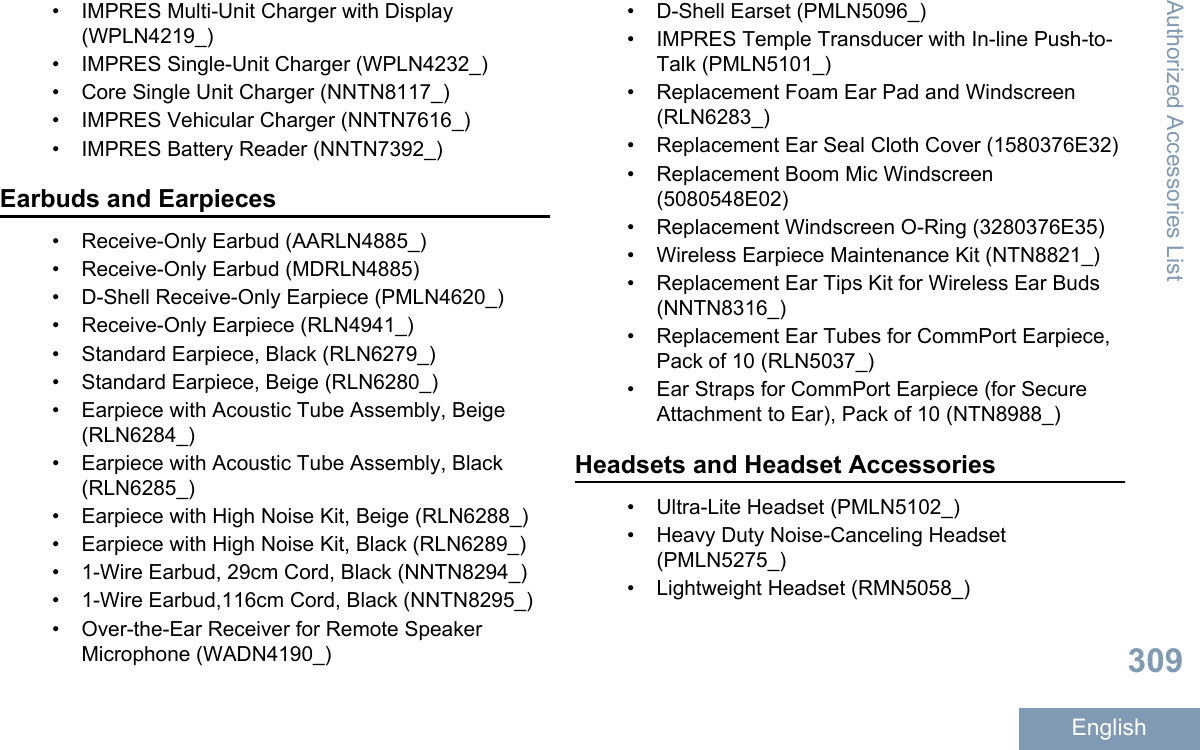
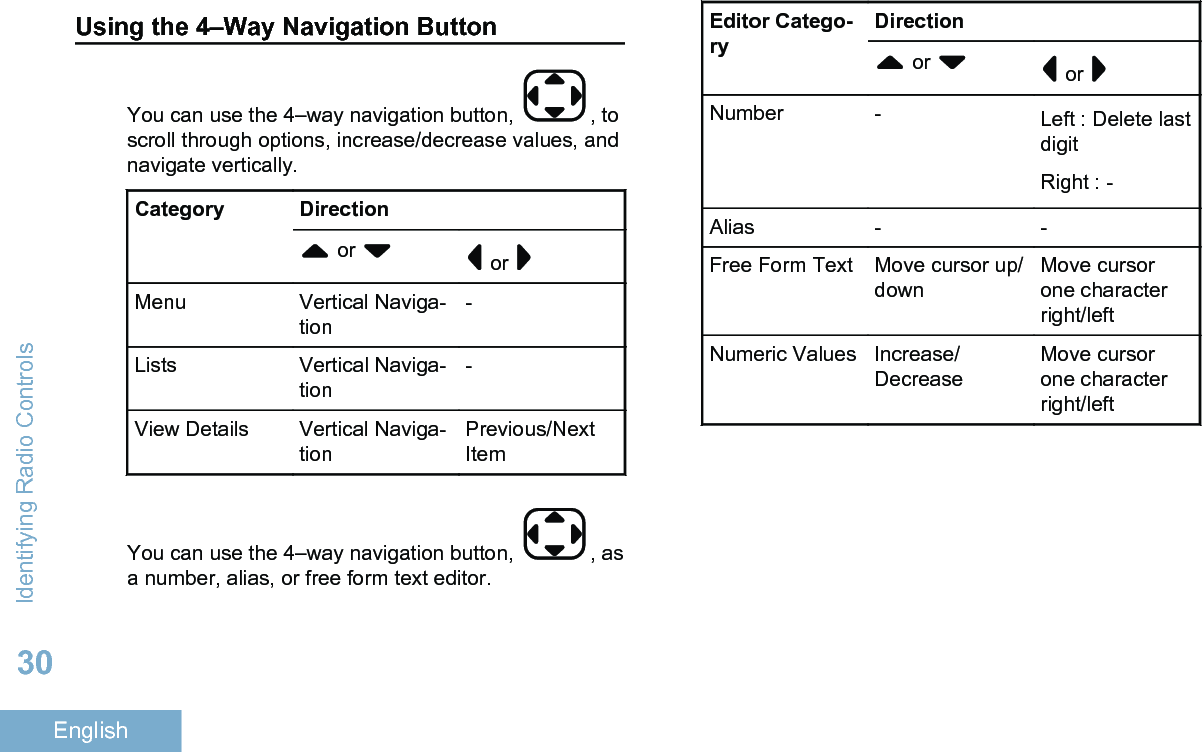
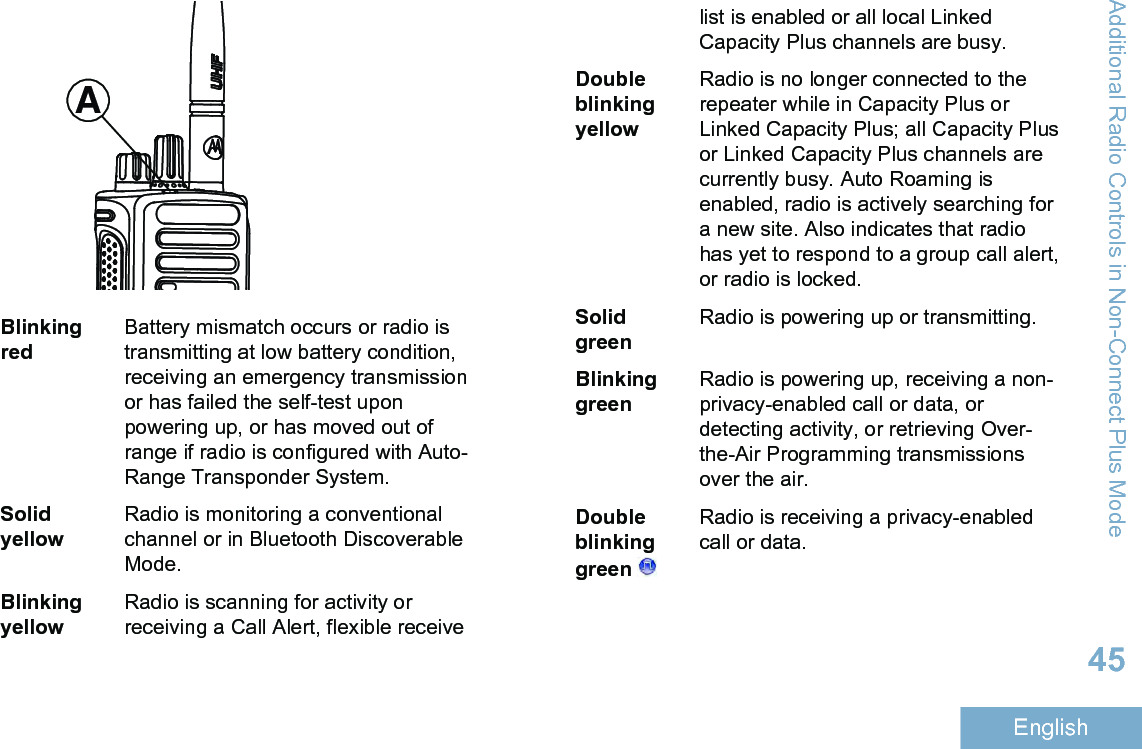
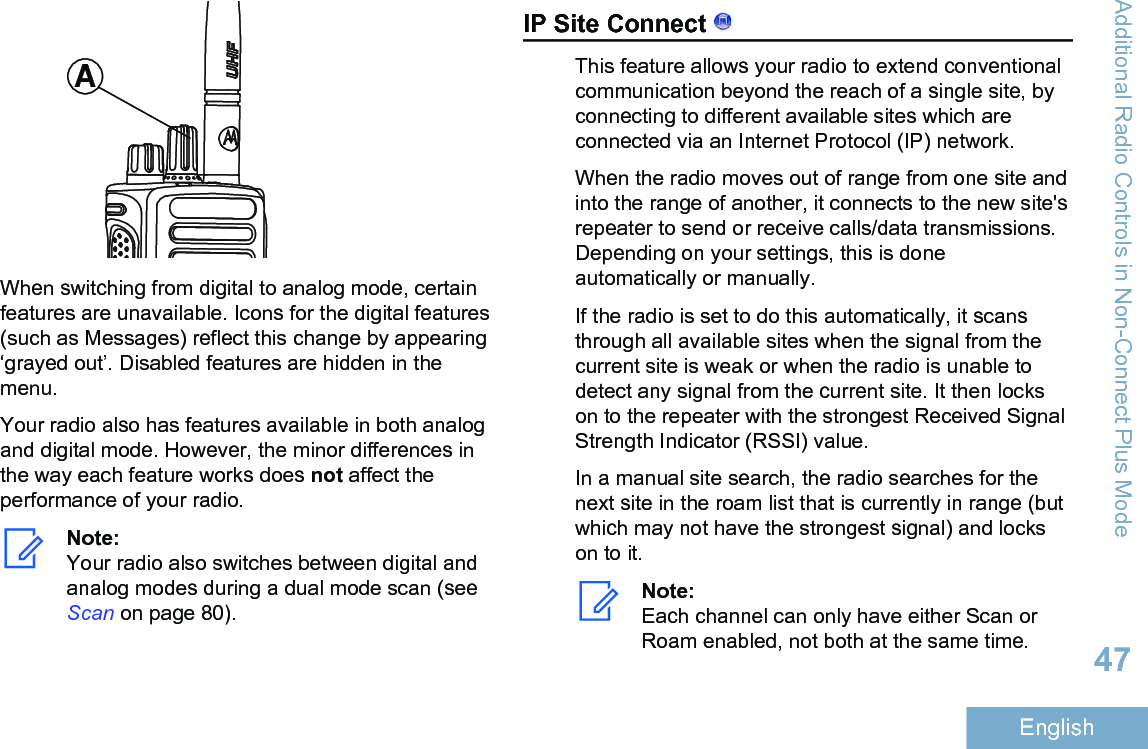
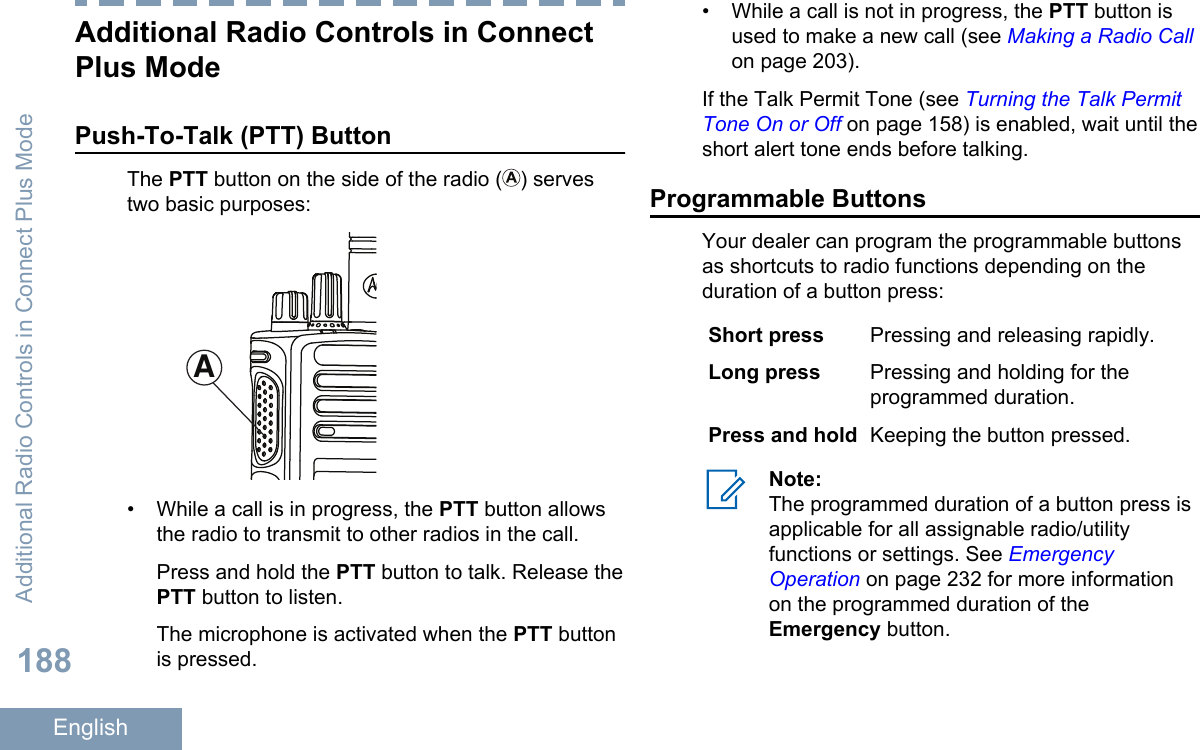
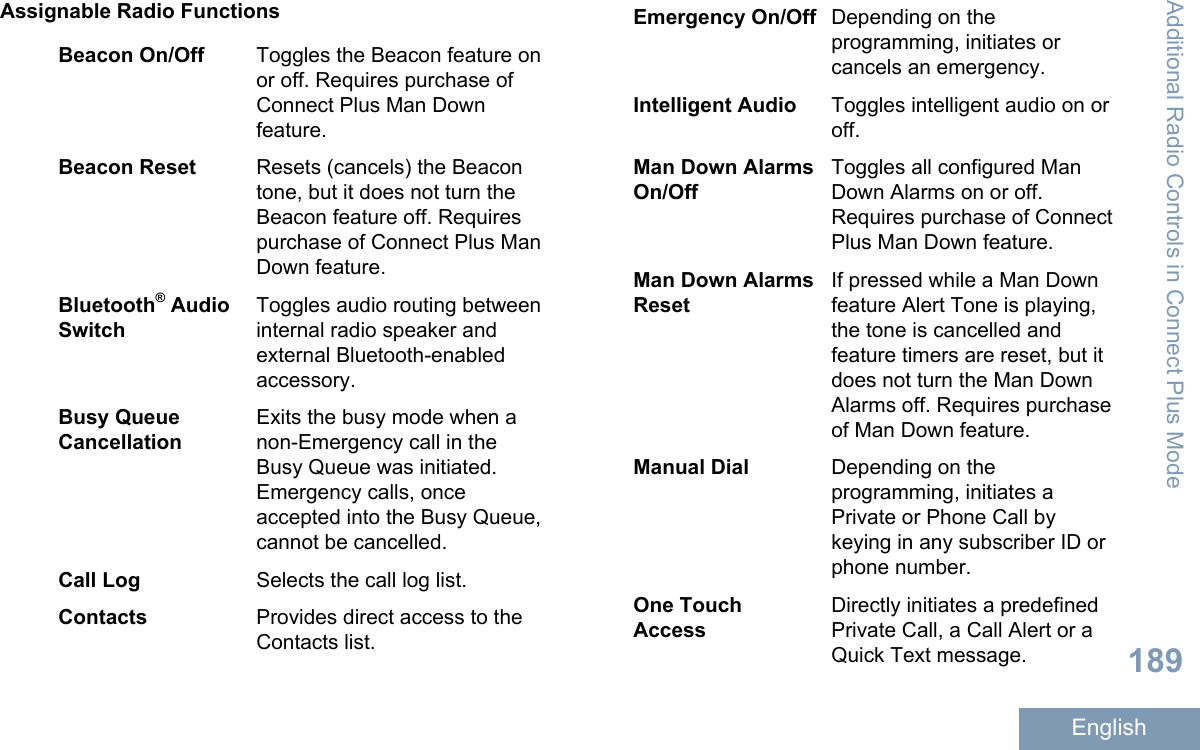
![Identifying Radio ControlsRadio Controls12345678919101817161514131211 1Channel Selector Knob2On/Off/Volume Control Knob3LED Indicator4Side Button 1[1]5Push-to-Talk (PTT) Button6Side Button 2[1]7Side Button 3[1]8Front Button P1[1]9Menu/OK Button10 4-Way Navigation Button11 Keypad12 Back/Home Button13 Front Button P2[1]14 Display15 Microphone16 Speaker17 Universal Connector for Accessories18 Emergency Button[1]19 Antenna1These buttons are programmable.Identifying Radio Controls29English](https://usermanual.wiki/Motorola-Solutions/89FT7065.Manual/User-Guide-2821939-Page-34.png)
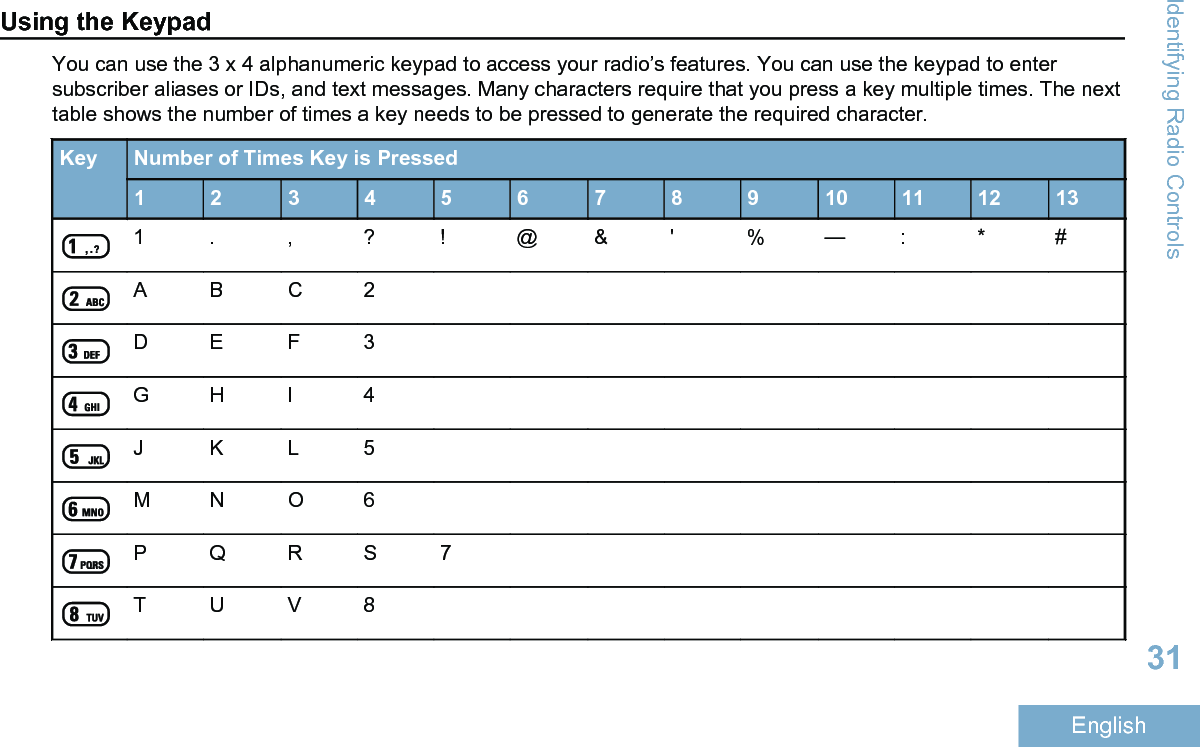
![Manual SiteRoam[2] Starts the manual site search.Mic AGC On/Off Toggles the internalmicrophone automatic gaincontrol (AGC) on or off.Monitor Monitors a selected channelfor activity.Notifications Provides direct access to theNotifications list.Nuisance ChannelDelete[2]Temporarily removes anunwanted channel, except forthe Selected Channel, fromthe scan list. The SelectedChannel refers to the selectedzone or channel combinationof the user from which scan isinitiated.One Touch Access Directly initiates a predefinedPrivate, Phone or Group Call,a Call Alert or a Quick Textmessage.Option BoardFeatureToggles option boardfeature(s) on or off for optionboard-enabled channels.Permanent Monitor Monitors a selected channelfor all radio traffic until functionis disabled.Phone Provides direct access to thePhone Contacts list.Privacy Toggles privacy on or off.Radio Alias and ID Provides radio alias and ID.Radio Check Determines if a radio is activein a system.Radio Enable Allows a target radio to beremotely enabled.Radio Disable Allows a target radio to beremotely disabled.Remote Monitor Turns on the microphone of atarget radio without it givingany indicators.Additional Radio Controls in Non-Connect Plus Mode36English](https://usermanual.wiki/Motorola-Solutions/89FT7065.Manual/User-Guide-2821939-Page-41.png)
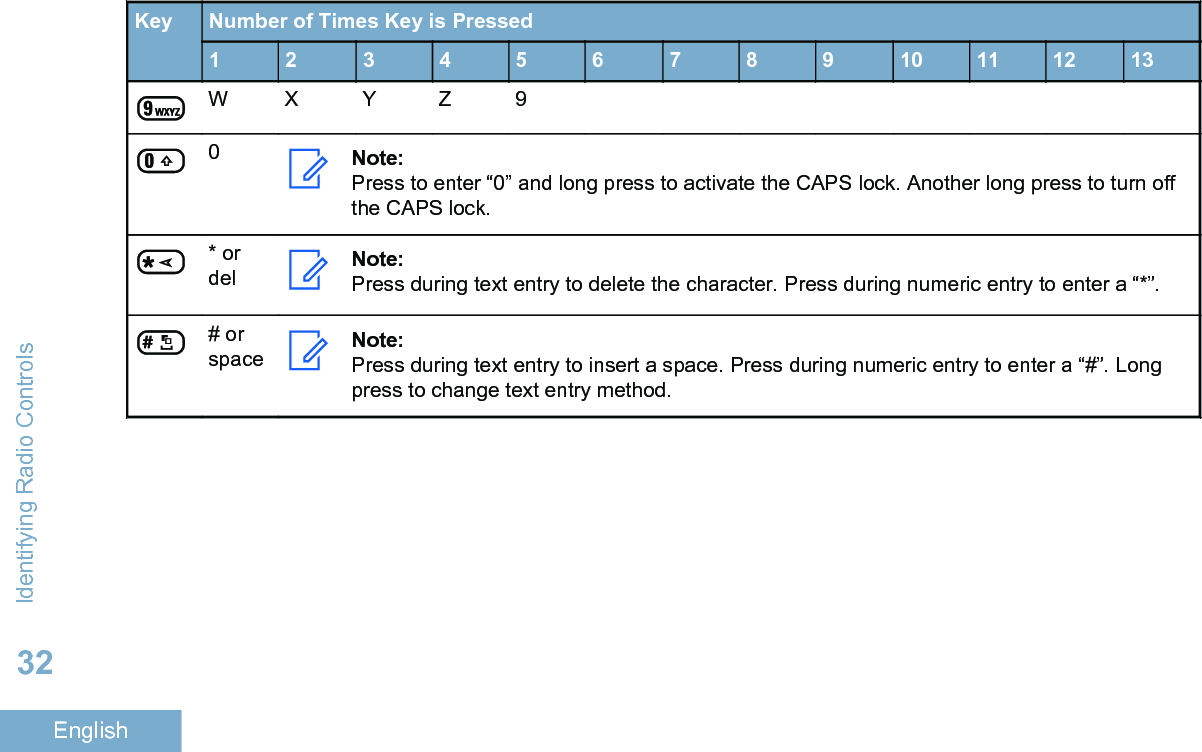
![Repeater/Talkaround[2]Toggles between using arepeater and communicatingdirectly with another radio.Scan[2] Toggles scan on or off.Site Info Displays current LinkedCapacity Plus site name andID. Plays site announcementvoice messages for thecurrent site (this function isunavailable when VoiceAnnouncement is disabled).Site Lock On/Off[2] When toggled on, the radiosearches the current site only.When toggled off, the radiosearches other sites inaddition to the current site.Status Selects the status list menu.Telemetry Control Controls the Output Pin on alocal or remote radio.Text Message Selects the text messagemenu.Transmit InterruptRemote Dekey Stops the transmission of aremote monitored radiowithout giving any indicators,or an ongoing interruptible callto free the channel.Trill EnhancementOn/OffToggles trill enhancement onor off.VoiceAnnouncement forChannelPlays zone and channelannouncement voicemessages for the currentchannel. This function isunavailable when VoiceAnnouncement is disabled.VoiceAnnouncementOn/OffToggles voice announcementon or off.Voice OperatingTransmission(VOX)Toggles VOX on or off.Zone Allows selection from a list ofzones.Additional Radio Controls in Non-Connect Plus Mode37English](https://usermanual.wiki/Motorola-Solutions/89FT7065.Manual/User-Guide-2821939-Page-42.png)
![or Power LevelRadio is set at Low power or Radio isset at High power.Tones DisableTones are turned off.Option BoardThe Option Board is enabled.Option Board Non-FunctionThe Option Board is disabled.Over-the-Air Programming Delay Tim-erIndicates time left before automatic re-start of radio.GPS/GNSS Available The GPS/GNSS feature is enabled. Theicon stays lit when a position fix is avail-able.GPS/GNSS Not Available/Out ofRange The GPS/GNSS feature is enabled butis not receiving data from the satellite.Scan[3][4]Scan feature is enabled.Scan- Priority 1[3][4]Radio detects activity on channel/groupdesignated as Priority 1.Scan- Priority 2[3][4]Radio detects activity on channel/groupdesignated as Priority 2.Vote ScanVote scan feature is enabled.Flexible Receive ListFlexible receive list is enabled.Additional Radio Controls in Non-Connect Plus Mode40English](https://usermanual.wiki/Motorola-Solutions/89FT7065.Manual/User-Guide-2821939-Page-45.png)
![EmergencyRadio is in Emergency mode.Secure The Privacy feature is enabled.Unsecure The Privacy feature is disabled.Site Roaming[3] The site roaming feature is enabled.Talkaround[3][4]In the absence of a repeater, radio iscurrently configured for direct radio to ra-dio communication.BatteryThe number of bars (0 – 4) shown indi-cates the charge remaining in the bat-tery. Blinks when the battery is low.Wi-Fi Excellent[5]Wi-Fi signal is excellent.Wi-Fi Good[5]Wi-Fi signal is good.Wi-Fi Average[5]Wi-Fi signal is average.Wi-Fi Poor[5]Wi-Fi signal is poor.Wi-Fi Unavailable[5]Wi-Fi signal is unavailable.3Not applicable in Capacity PlusAdditional Radio Controls in Non-Connect Plus Mode41English](https://usermanual.wiki/Motorola-Solutions/89FT7065.Manual/User-Guide-2821939-Page-46.png)


![Tones DisableTones are turned off.Option BoardThe Option Board is enabled.Option Board Non-FunctionThe Option Board is disabled.GPS/GNSS AvailableThe GPS/GNSS feature is enabled. Theicon stays lit when a position fix is avail-able.GPS/GNSS Not Available/Out ofRangeThe GPS/GNSS feature is enabled butis not receiving data from the satellite.ScanScan feature is enabled.EmergencyRadio is in Emergency mode.SecureThe Privacy feature is enabled.UnsecureThe Privacy feature is disabled.Site RoamingThe site roaming feature is enabled.BatteryThe number of bars (0 – 4) shown indi-cates the charge remaining in the bat-tery. Blinks when the battery is low.Wi-Fi Excellent[6]Wi-Fi signal is excellent.Wi-Fi Good[6]Wi-Fi signal is good.Additional Radio Controls in Connect Plus Mode192English](https://usermanual.wiki/Motorola-Solutions/89FT7065.Manual/User-Guide-2821939-Page-197.png)
![Wi-Fi Average[6]Wi-Fi signal is average.Wi-Fi Poor[6]Wi-Fi signal is poor.Wi-Fi Unavailable[6]Wi-Fi signal is unavailable.Call IconsThe following icons appear on the radio’s displayduring a call. These icons also appear in the Contactslist to indicate ID type.Private CallIndicates a Private Call in progress. Inthe Contacts list, it indicates a sub-scriber alias (name) or ID (number).Group Call/Site All CallIndicates a Group Call or Site All Callin progress. In the Contacts list, it indi-cates a group alias (name) or ID(number).Phone Call as Private CallIndicates a Phone Call as Private Callin progress.Dispatch CallThe Dispatch Call contact type is usedto send a text message to a dispatch-er PC through a third-party Text Mes-sage Server.Advanced Menu IconsThe following icons appear beside menu items thatoffer a choice between two options or as an indicationthat there is a sub-menu offering two options.6Only applicable for XPR 7550e/XPR 7580eAdditional Radio Controls in Connect Plus Mode193English](https://usermanual.wiki/Motorola-Solutions/89FT7065.Manual/User-Guide-2821939-Page-198.png)


![Authorized Accessories ListAntennas• UHF, 403 – 527MHz, Whip Antenna(PMAE4068_)[7]• UHF, 403 – 527MHz, Slim Whip Antenna(PMAE4079_)[7]• UHF, 403 – 450MHz, Stubby Antenna(PMAE4069_)[7]•UHF, 440 – 490MHz, Stubby Antenna(PMAE4070_[7]• UHF, 470 – 527MHz, Stubby Antenna(PMAE4071_)[7]• UHF, 470 – 527MHz, Stubby Antenna(PMAE4071_)[7]• VHF, 144 – 165MHz, Helical Antenna(PMAD4116_)[7]• VHF, 136 – 155MHz, Helical Antenna(PMAD4117_)[7]• VHF, 152 – 174MHz, Helical Antenna(PMAD4118_)[7]• VHF, 136 – 148MHz, Stubby Antenna(PMAD4119_)[7]• VHF, 146 – 160MHz, Stubby Antenna(PMAD4120_)[7]• VHF, 160 – 174MHz, Stubby Antenna(PMAD4121)[7]• 800/900, 806 – 870MHz, Whip Antenna(PMAF4011_)[8]• 800/900, 896 – 941MHz, Whip Antenna(PMAF4012_)[8]• 800/900, 806 – 870MHz, Short Whip Antenna(PMAF4009_)• 800/900, 896 – 941MHz, Short Whip Antenna(PMAF4010_)Batteries• Core NiMH, 1300 mAh Battery (PMNN4412_)• Core Slim Li-Ion, 1500 mAh Battery(PMNN4406_R)7Applicable to XPR7550 only.8Applicable to XPR7580 only.Authorized Accessories List307English](https://usermanual.wiki/Motorola-Solutions/89FT7065.Manual/User-Guide-2821939-Page-312.png)
![• IMPRES Li-Ion, 1500 mAh Slim Battery(PMNN4407_R)• IMPRES Hi-Capacity Li-Ion, 2150 mAh Battery(PMNN4409_R)• IMPRES Hi-Capacity Li-Ion, 2300 mAh Battery(FM) (NNTN8129_)•IMPRES Li-Ion, 2700 mAh Battery(PMNN4448_R)• IMPRES Li-Ion, 2900 mAh TIA4950 HAZLOC IP68Battery(PMNN4489_)[9]• IMPRES Hi-Capacity Li-Ion, 2500 mAh TIA4950Submersible IP57 Battery, Intrinsically Safe(NNTN8560_)• IMPRES Slim Li-Ion, 2100 mAh IP68 Battery(PMNN4491_)• IMPRES Li-Ion, 3000 mAh IP68 Battery, lowvoltage (PMNN4493_)• IMPRES Li-Ion, 3000 mAh IP68 Battery(PMNN4488_)Carry Devices• 2.5-Inch Replacement Leather Swivel Belt Loop(PMLN5610_)• 3-Inch Replacement Leather Swivel Belt Loop(PMLN5611_)• Hard Leather Carry Case with 3-Inch Fixed BeltLoop for Full-Keypad Radio (PMLN5838_)•Hard Leather Carry Case with 3-Inch Swivel BeltLoop for Full-Keypad Radio (PMLN5840_)• Hard Leather Carry Case with 2.5-Inch Swivel BeltLoop for Full-Keypad and Limited-Keypad Radio(PMLN5842_)• Nylon Carry Case with 3-Inch Fixed Belt Loop forFull-Keypad and Limited-Keypad Radio(PMLN5844_)• Belt Clip for 2-Inch Belt Width (PMLN4651_)• Belt Clip for 2.5-Inch Belt Width (PMLN7008_)• Vibrating Belt Clip for 2.5-Inch Belt Width(PMLN7296_)Chargers• IMPRES Multi-Unit Charger (WPLN4212_)9Applicable to XPR 7550e/XPR 7580e only.Authorized Accessories List308English](https://usermanual.wiki/Motorola-Solutions/89FT7065.Manual/User-Guide-2821939-Page-313.png)