Motorola Solutions 89FT7068 Portable 2-Way Radio with BT and WiFi User Manual Manual
Motorola Solutions, Inc. Portable 2-Way Radio with BT and WiFi Manual
UserManual.wiki
>
Motorola Solutions
>
89FT7068 User Manual
>
Manual
Contents
1.
Manual
2.
RF Safety Manual
Manual
Navigation menu
Upload a User Manual
Namespaces
Wiki Guide
HTML
PDF
Info
Views
User Manual
Discussion / Help
Navigation


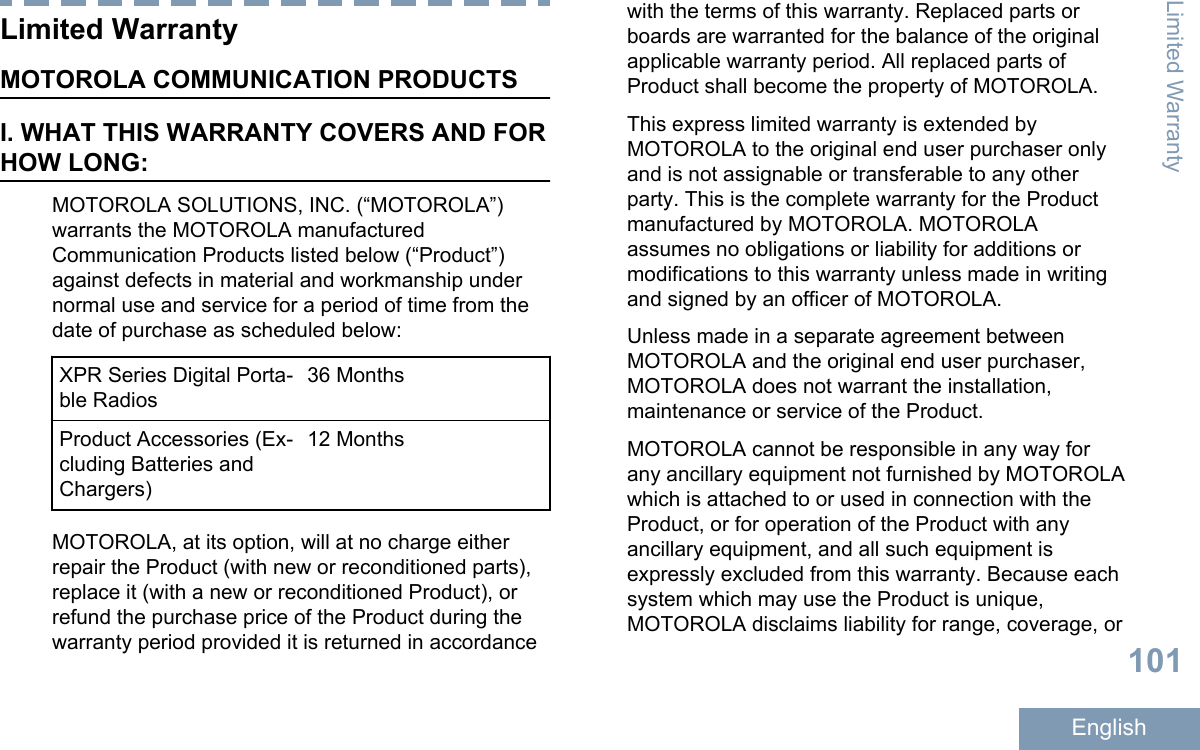
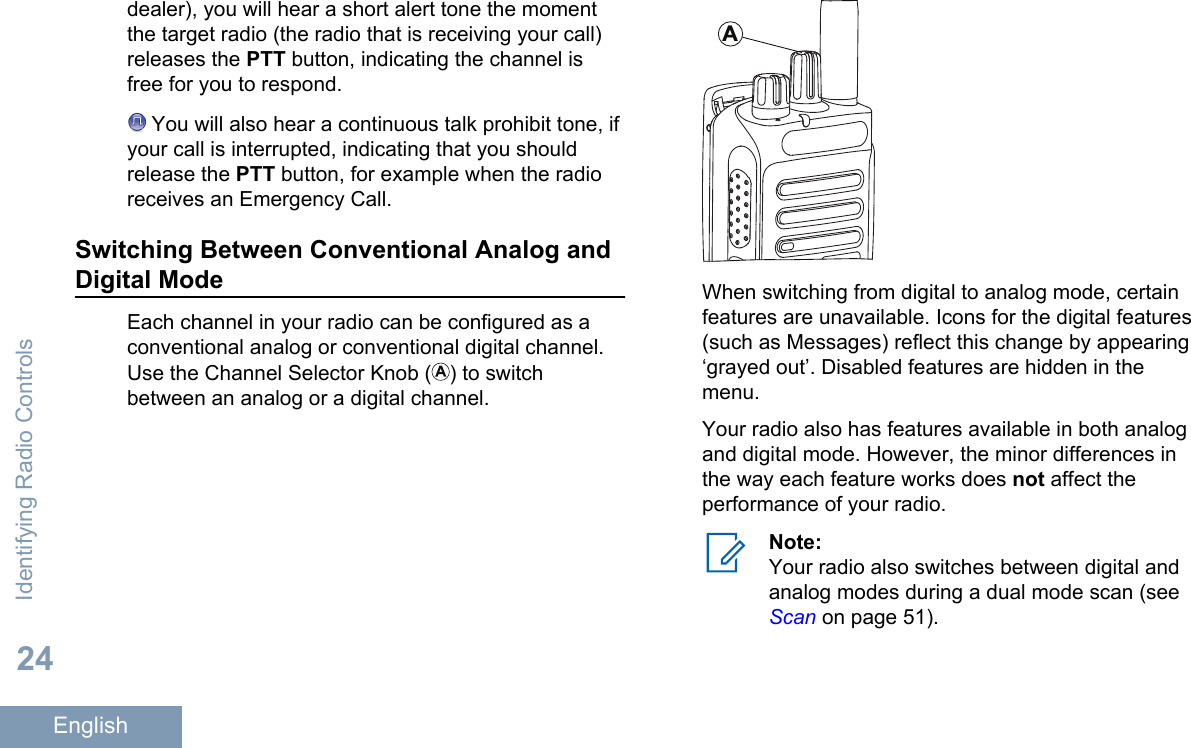
![Identifying Radio ControlsRadio Controls1131413128765219410151617181Channel Selector Knob2On/Off/Volume Control Knob3LED Indicator4Push-to-Talk (PTT) Button5Microphone6Side Button 1[1]7Side Button 2[1]8Left Navigation Button9Menu Button10 Front Button P1[1]11 OK Button12 Front Button P2[1]13 Back/Home Button14 Right Navigation Button15 Display16 Speaker17 Universal Connector for Accessories18 Antenna1These buttons are programmable.Identifying Radio Controls19English](https://usermanual.wiki/Motorola-Solutions/89FT7068.Manual/User-Guide-2845132-Page-24.png)
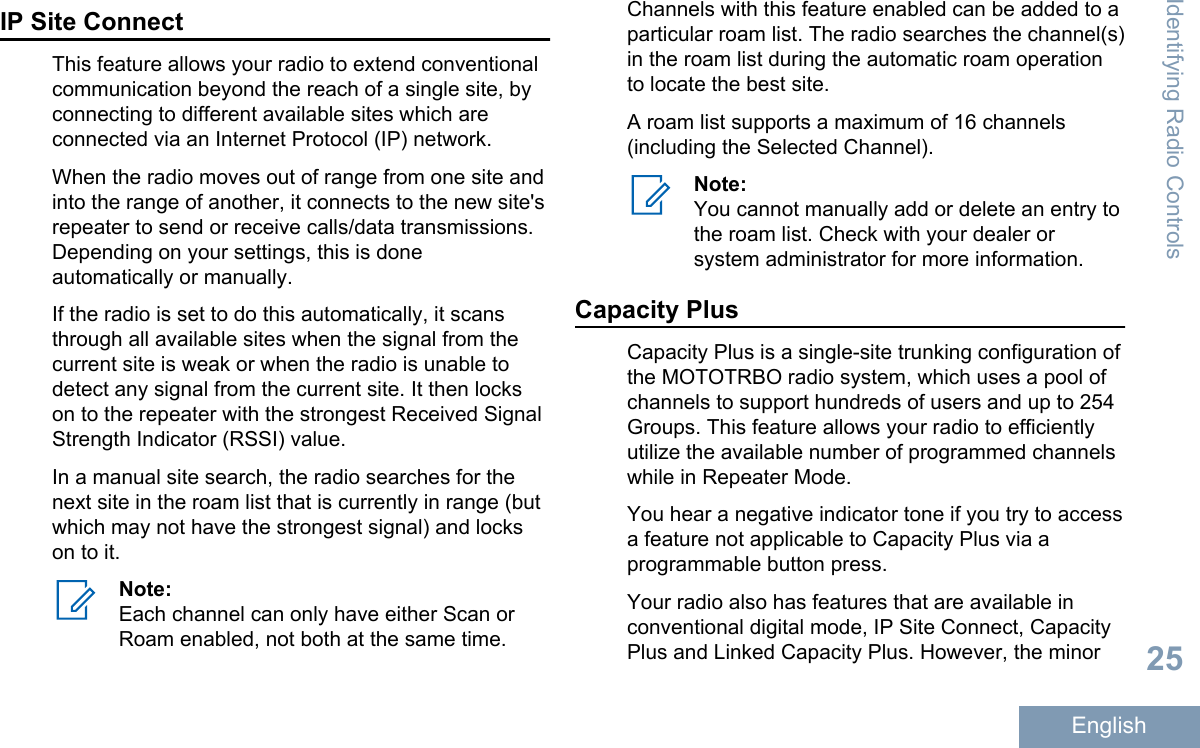
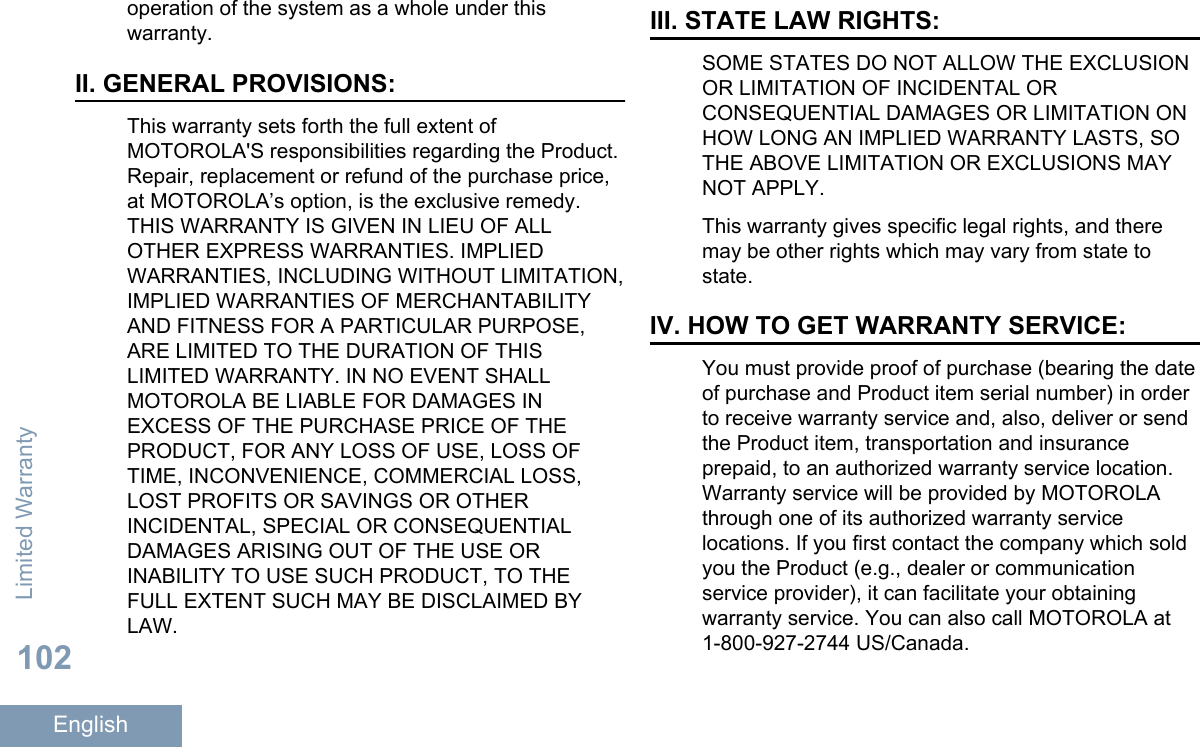
![Identifying Status IndicatorsDisplay IconsThe following are icons that appear on the display ofthe radio.Received Signal Strength Indicator(RSSI)The number of bars displayed repre-sents the radio signal strength. Fourbars indicate the strongest signal. Thisicon is only displayed while receiving.MonitorSelected channel is being monitored.High Volume DataRadio is receiving high volume data andchannel is busy.NotificationNotification List has one or more missedevents. or Power LevelRadio is set at Low power or Radio isset at High power.Tones DisableTones are turned off.Over-the-Air Programming Delay Tim-erIndicates time left before automatic re-start of radio.Scan[3][4]Scan feature is enabled.Scan- Priority 1[3][4]Radio detects activity on channel/groupdesignated as Priority 1.Identifying Status Indicators28English](https://usermanual.wiki/Motorola-Solutions/89FT7068.Manual/User-Guide-2845132-Page-33.png)
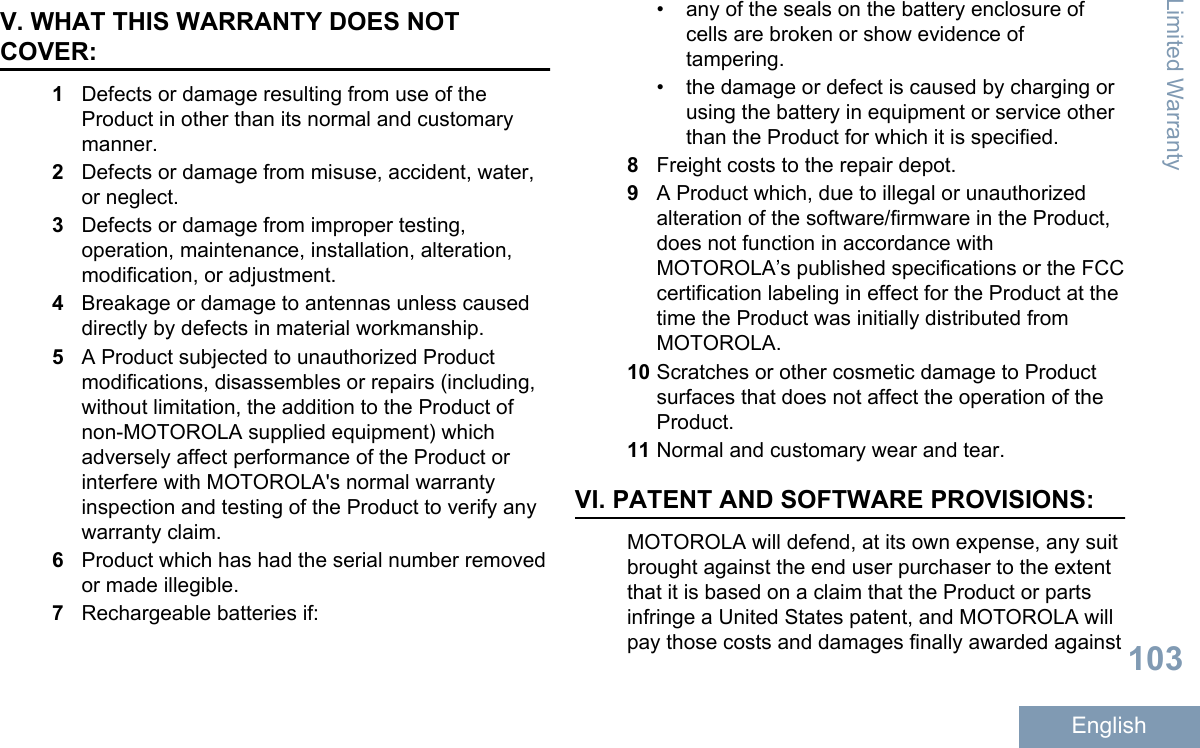
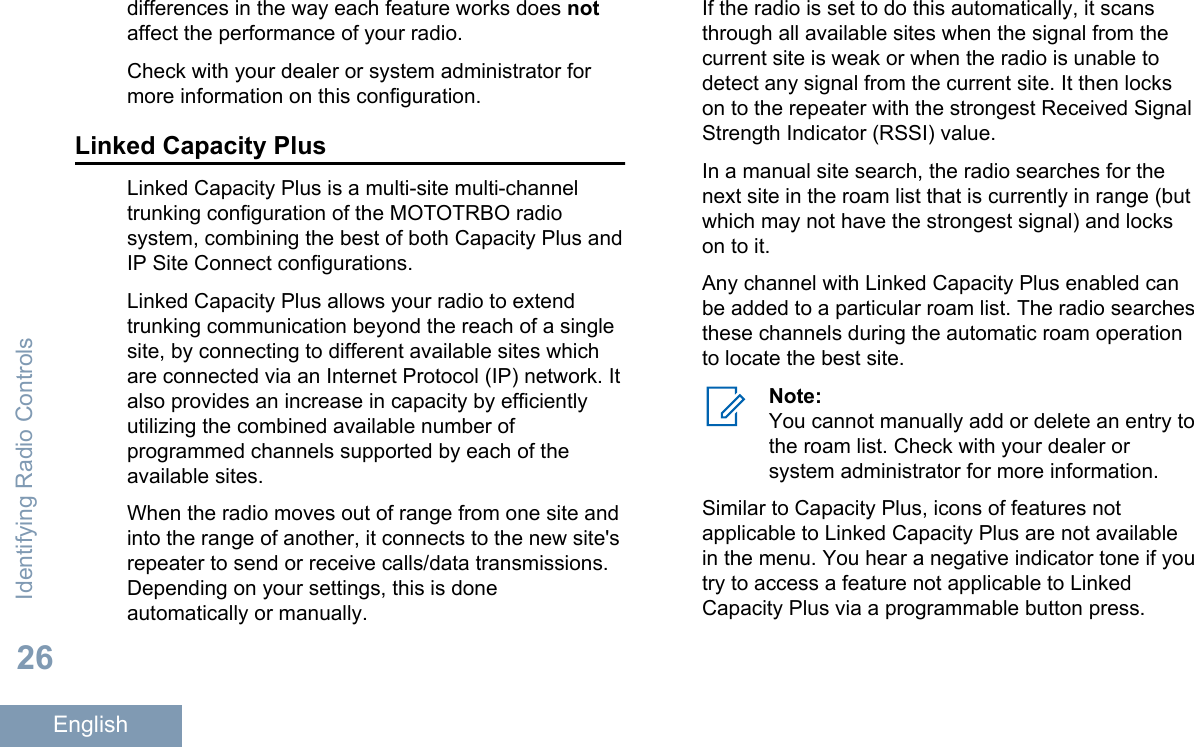
![Scan- Priority 2[3][4]Radio detects activity on channel/groupdesignated as Priority 2.Vote ScanVote scan feature is enabled.Flexible Receive ListFlexible receive list is enabled.EmergencyRadio is in Emergency mode.Secure The Privacy feature is enabled.Unsecure The Privacy feature is disabled.Site Roaming[3] The site roaming feature is enabled.Talkaround[3][4]In the absence of a repeater, radio iscurrently configured for direct radio to ra-dio communication.BatteryThe number of bars (0 – 4) shown indi-cates the charge remaining in the bat-tery. Blinks when the battery is low.Wi-Fi Excellent[5]Wi-Fi signal is excellent.Wi-Fi Good[5]Wi-Fi signal is good.Wi-Fi Average[5]Wi-Fi signal is average.Wi-Fi Poor[5]Wi-Fi signal is poor.Identifying Status Indicators29English](https://usermanual.wiki/Motorola-Solutions/89FT7068.Manual/User-Guide-2845132-Page-34.png)
![Wi-Fi Unavailable[5]Wi-Fi signal is unavailable.Call IconsThe following icons appear on the radio’s displayduring a call. These icons also appear in the Contactslist to indicate ID type.Private CallIndicates a Private Call in progress. Inthe Contacts list, it indicates a sub-scriber alias (name) or ID (number).Group Call/All CallIndicates a Group Call or All Call inprogress. In the Contacts list, it indi-cates a group alias (name) or ID(number).Phone Call as Private CallIndicates a Phone Call as Private Callin progress. In the Contacts list, it indi-cates a phone alias (name) or ID(number).Phone Call as Group CallIndicates a Phone Call as Group/AllCall in progress. In the Contacts list, itindicates a phone alias (name) or ID(number).3Not applicable in Capacity Plus4Not applicable in Linked Capacity Plus5Only applicable for XPR 3500eIdentifying Status Indicators30English](https://usermanual.wiki/Motorola-Solutions/89FT7068.Manual/User-Guide-2845132-Page-35.png)


![Authorized Accessories ListAntennas• VHF, 136 – 155 MHz, Helical Antenna(PMAD4117_)• VHF, 144 – 165 MHz, Helical Antenna(PMAD4116_)•VHF, 152 – 174 MHz, Helical Antenna(PMAD4118_)• VHF, 136 – 148 MHz, Stubby Antenna(PMAD4119_)• VHF, 146 – 160 MHz, Stubby Antenna(PMAD4120_)• VHF, 160 – 174 MHz, Stubby Antenna(PMAD4121_)• UHF, 403 – 450 MHz, Stubby Antenna(PMAE4069_)• UHF, 440 – 490 MHz, Stubby Antenna(PMAE4070_)• UHF, 470 – 527 MHz, Stubby Antenna(PMAE4071_)• UHF, 403 – 527 MHz, Slim Whip Antenna(PMAE4079_)Batteries• IMPRES Slim Li-Ion, 1500 mAh IP56 Battery(PMNN4407_R)• Core Slim Li-Ion, 1500 mAh IP56 Battery(PMNN4406_R)•IMPRES Li-Ion Non-FM, 2150 mAh IP56 Battery(PMNN4409_R)• IMPRES Slim Li-Ion, 2100 mAh IP68 Battery(PMNN4491_)• IMPRES Li-Ion, 3000 mAh IP68 Battery, lowvoltage (PMNN4493_)• IMPRES Li-Ion, 3000 mAh IP68 Battery withVibrating Belt Clip (PMNN4488_)• IMPRES Li-Ion, 2900 mAh TIA4950 HAZLOC IP68Battery (PMNN4490_)[6]• Li-Mn, 1400 mAh Submersible (IP57) Battery, lowtemperature -30C (PMNN4435_R)6Applicable to XPR 3500e only.Authorized Accessories List96English](https://usermanual.wiki/Motorola-Solutions/89FT7068.Manual/User-Guide-2845132-Page-101.png)