Motorola Solutions 89FT7074 Portable 2-Way Radio User Manual MOTOTRBO Professional Digital Two Way Radio System
Motorola Solutions, Inc. Portable 2-Way Radio MOTOTRBO Professional Digital Two Way Radio System
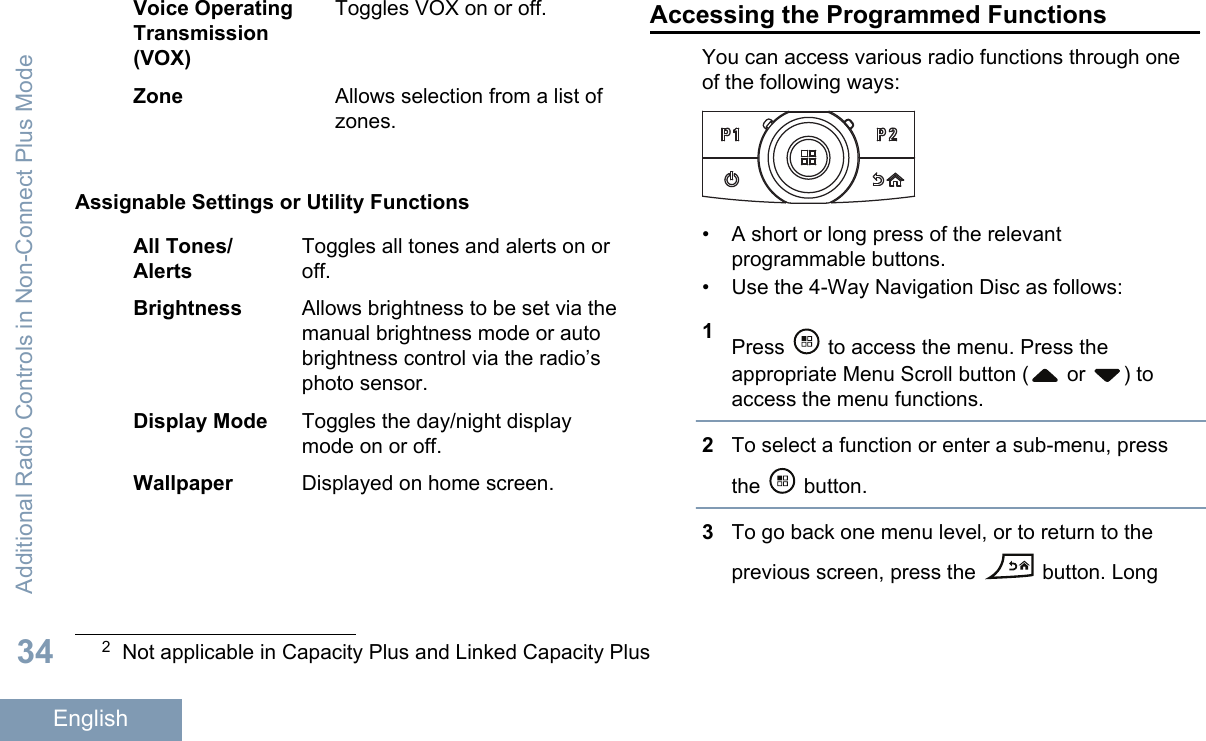
Contents
- 1. Manual
- 2. RF Safety Manual
Manual


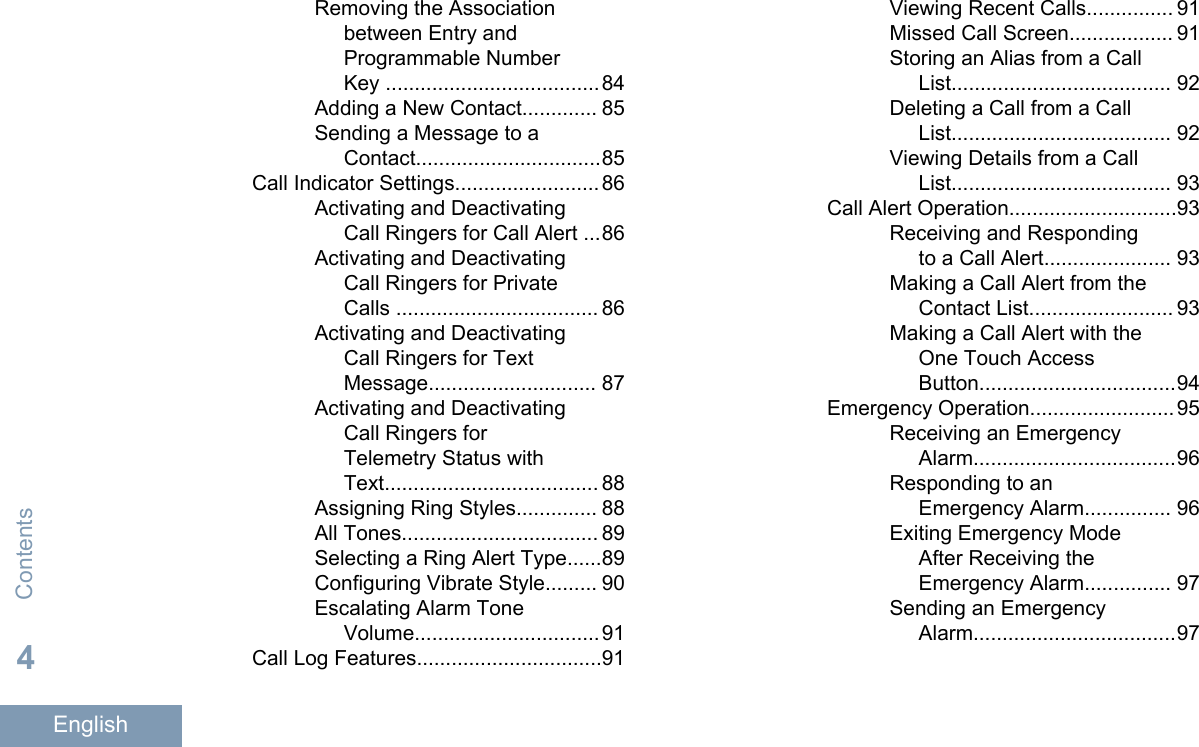

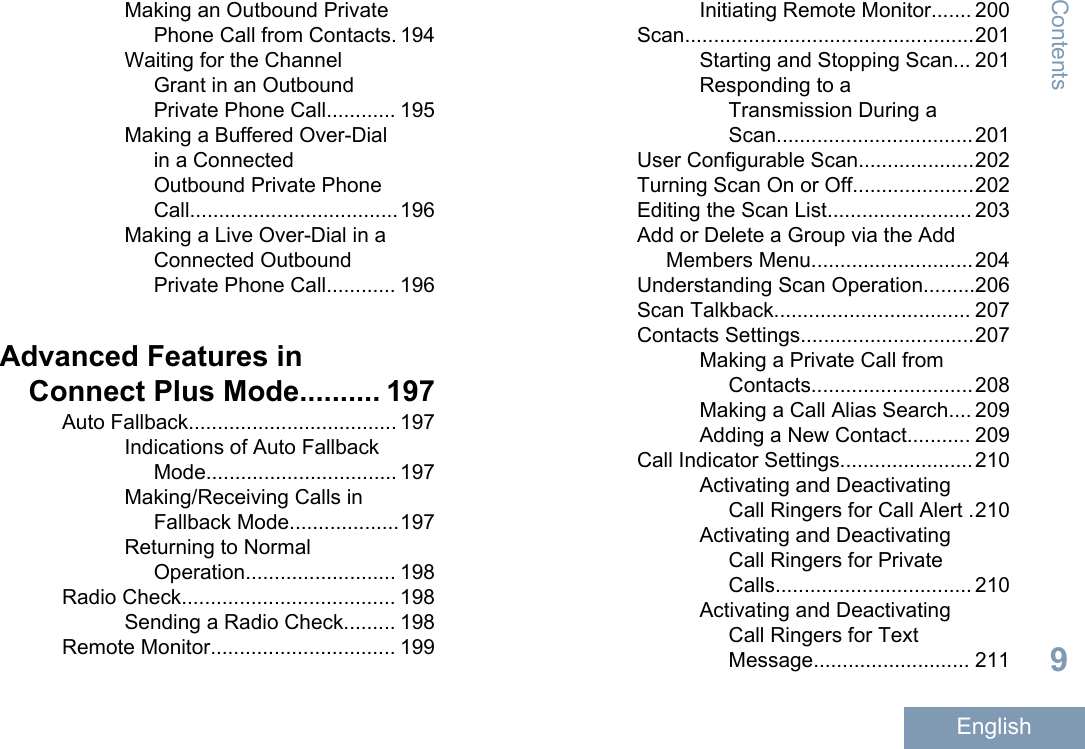


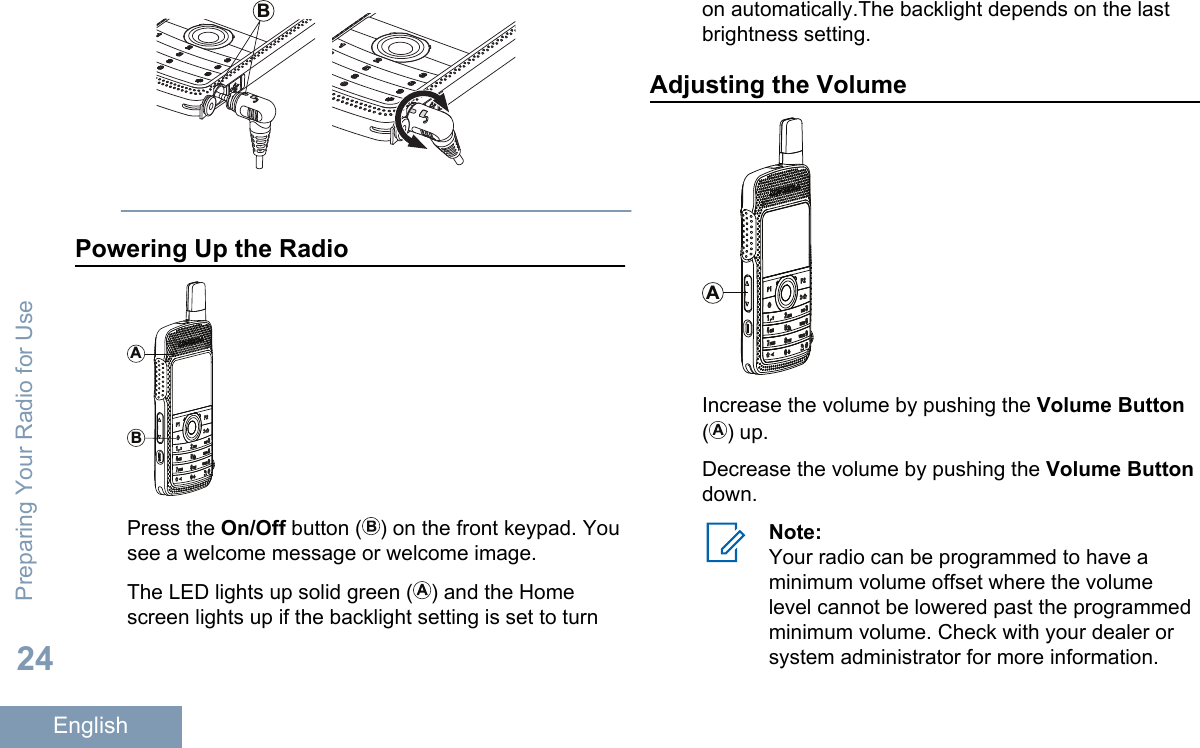
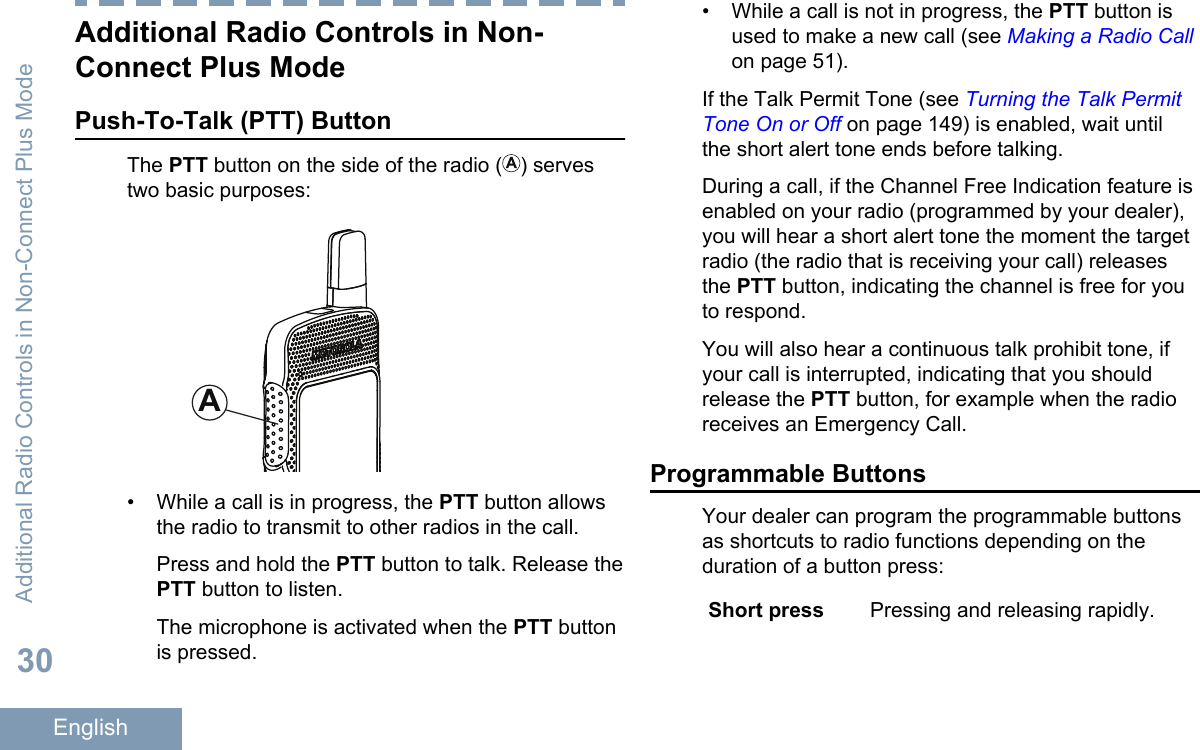
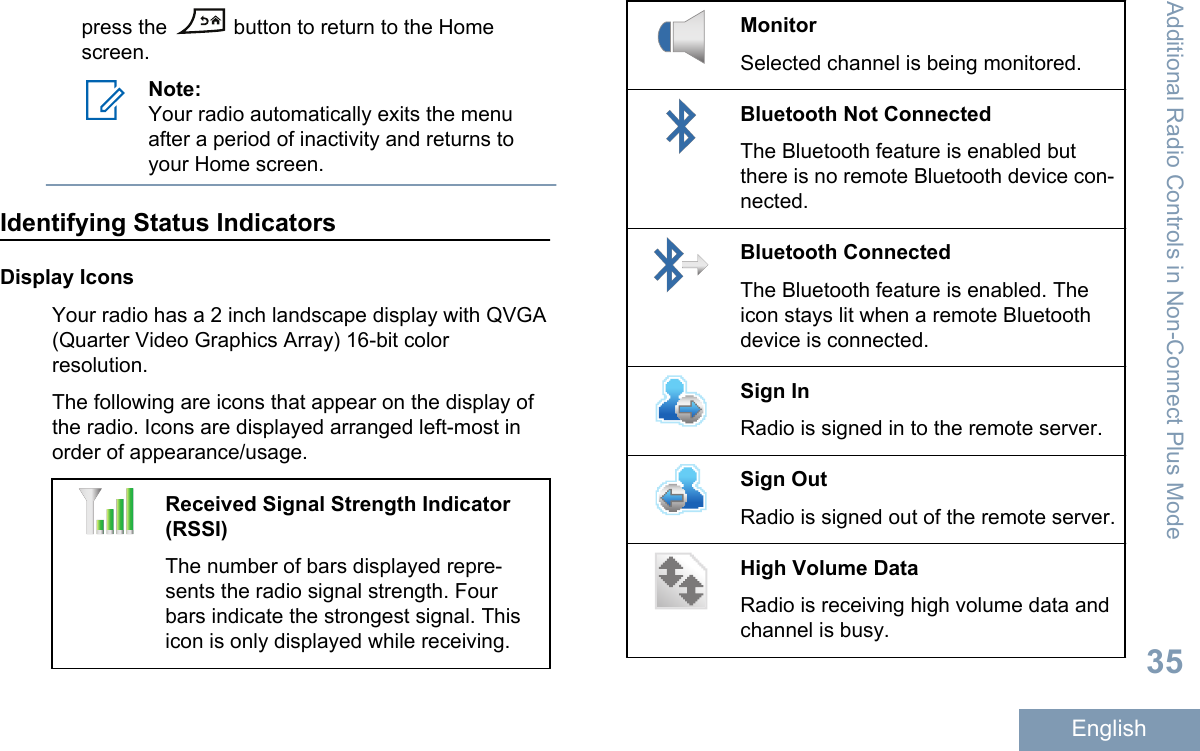
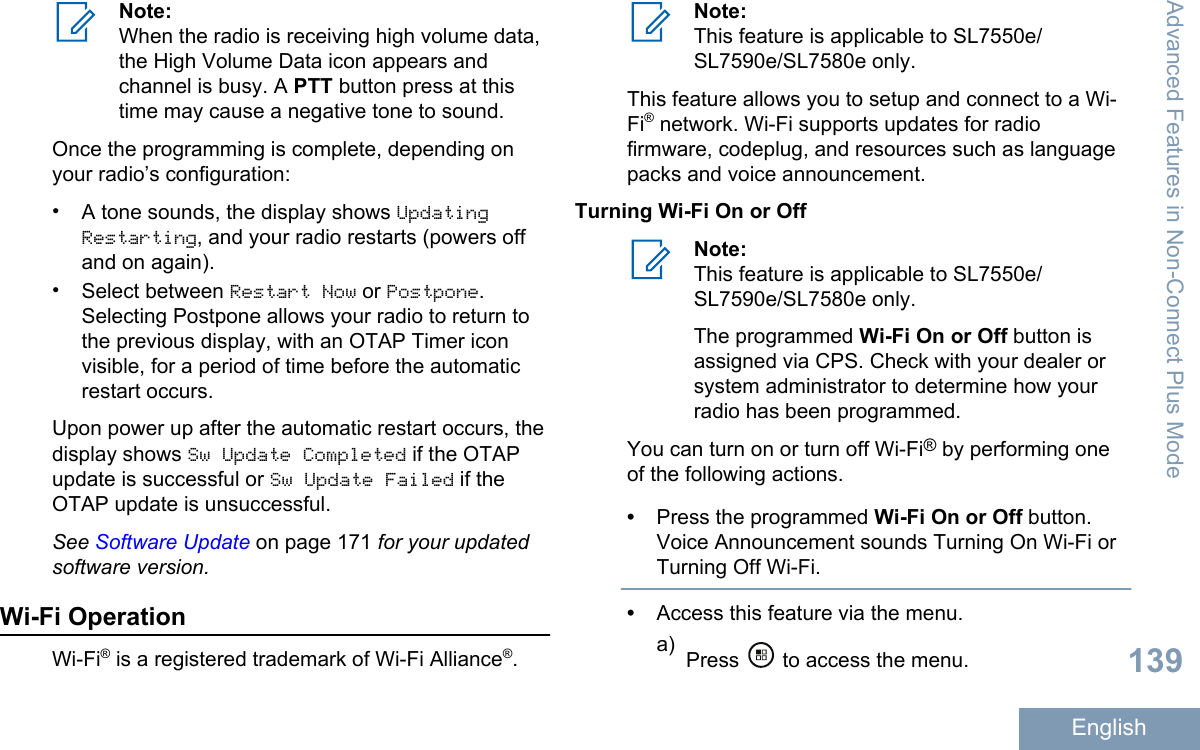
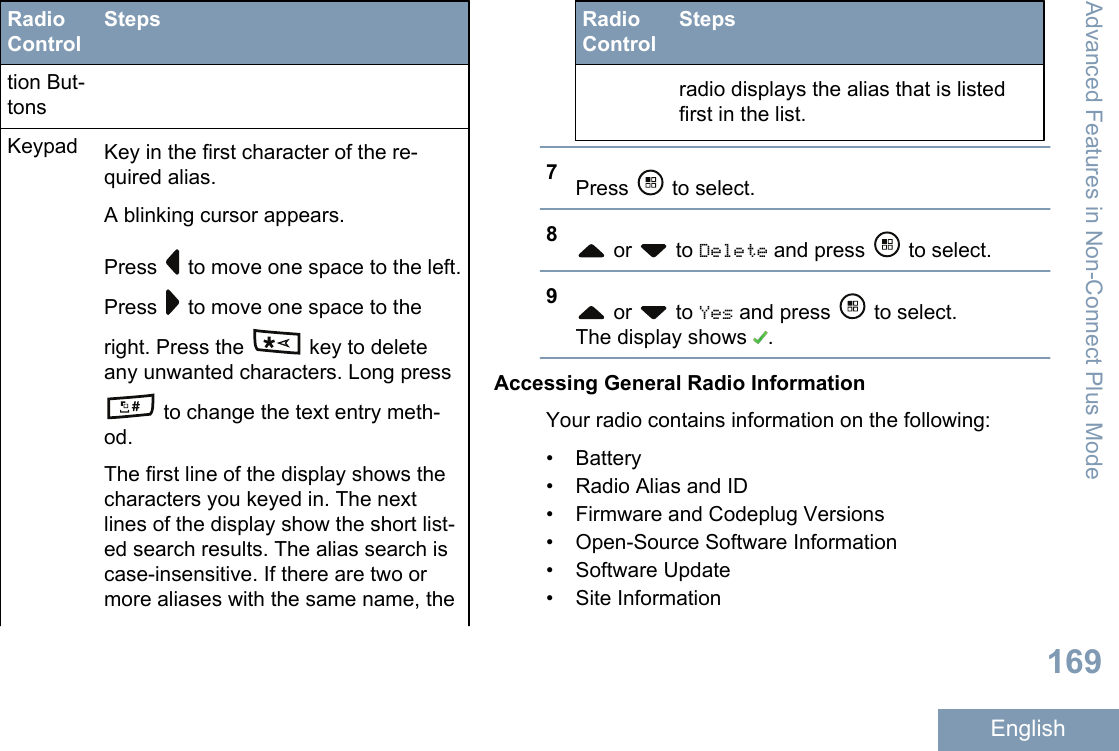
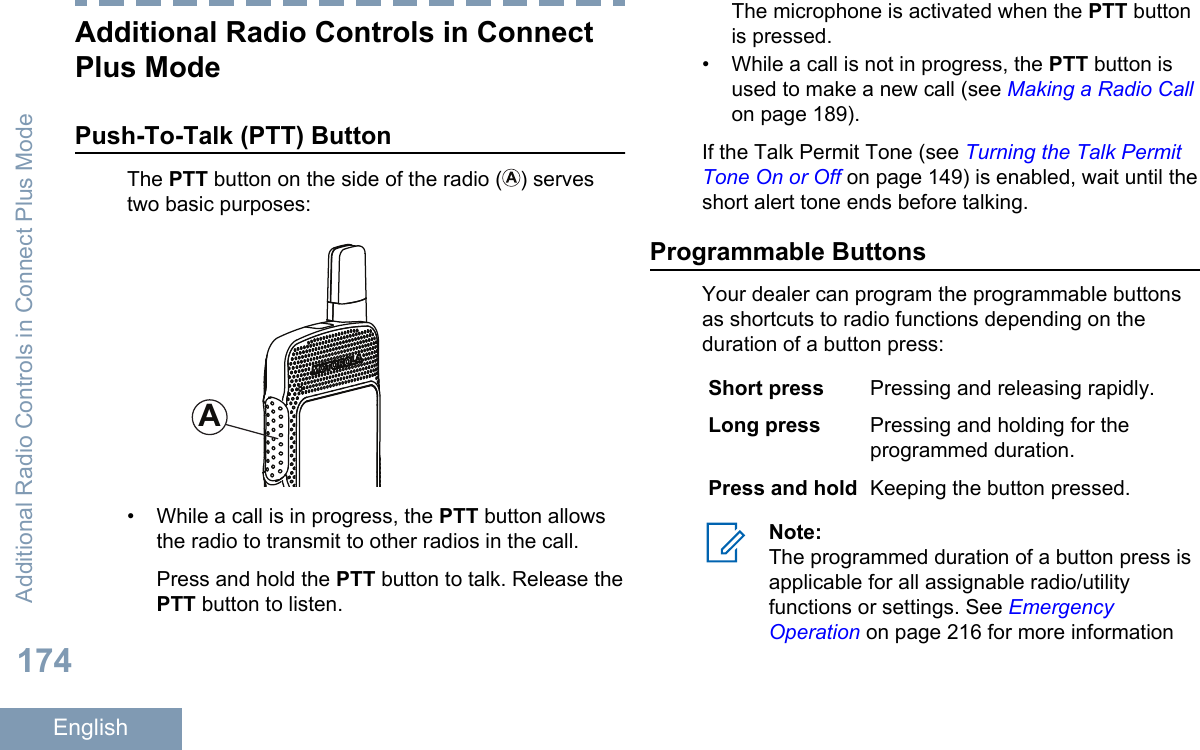
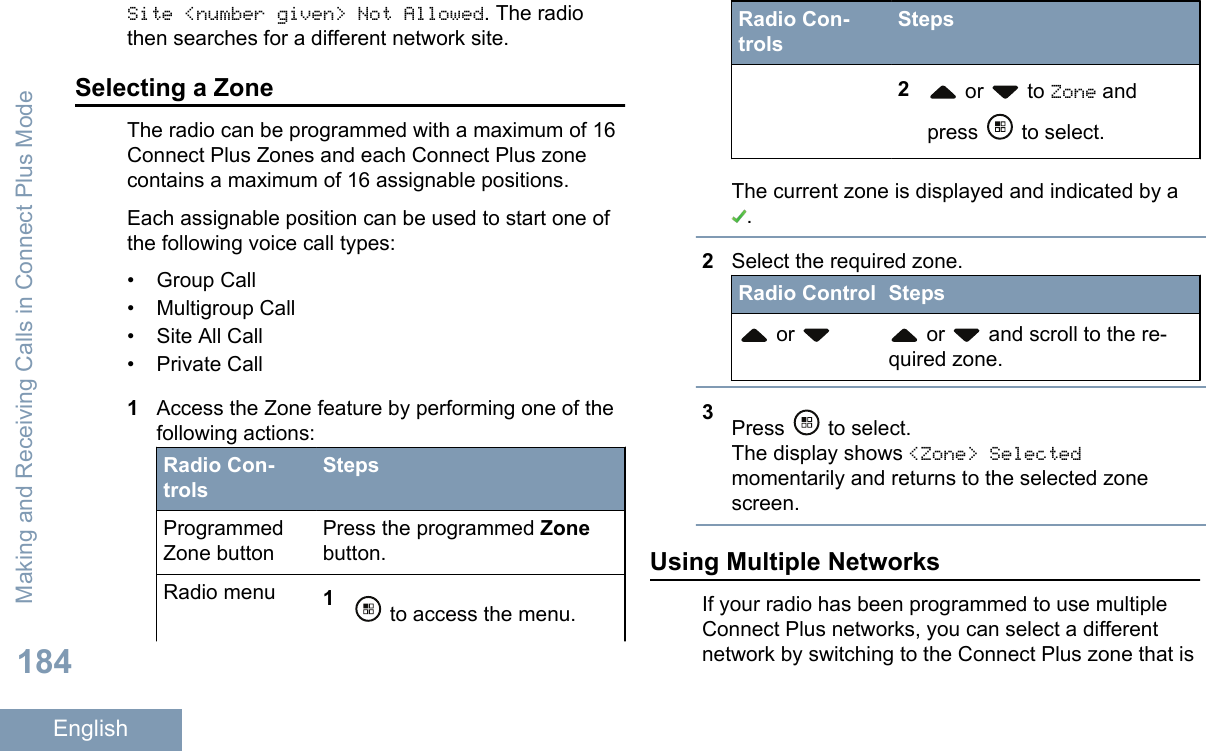
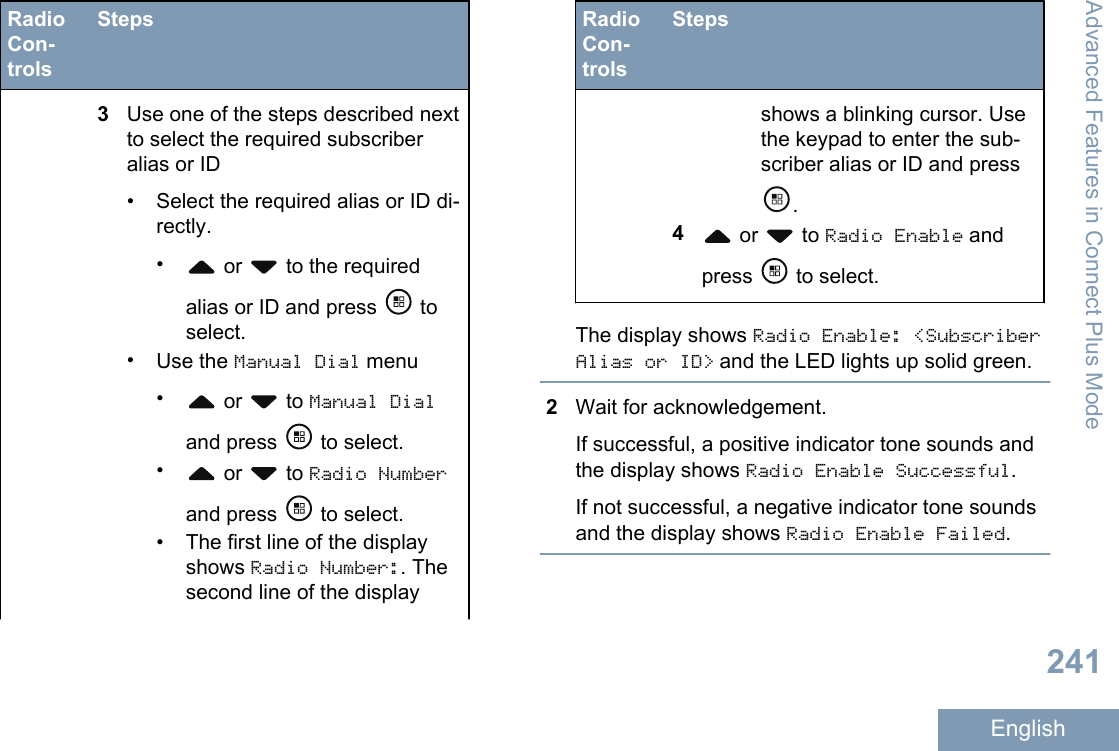
![Identifying Radio ControlsRadio Controls5943782115111210614131LED Indicator2Push-to-Talk (PTT) Button3Display4Microphone5Volume Button6Front Button P1[1]7On/Off/Information Button8Emergency Button[1]94-way Navigation Disc10 Antenna11 Speaker12 Front Button P2[1]13 Back/Home Button14 Menu/OK Button15 Keypad1These buttons are programmable.Identifying Radio Controls25English](https://usermanual.wiki/Motorola-Solutions/89FT7074.Manual/User-Guide-2871581-Page-30.png)
![Emergency Depending on theprogramming, initiates orcancels an emergency.Intelligent Audio Toggles intelligent audio on oroff.Job Tickets Allows the user to view andact upon job tickets.Manual Dial Depending on theprogramming, initiates aPrivate or Phone Call bykeying in any subscriber ID orphone number.Manual SiteRoam[2]Starts the manual site search.Mic AGC On/Off Toggles the internalmicrophone automatic gaincontrol (AGC) on or off.Monitor Monitors a selected channelfor activity.Notifications Provides direct access to theNotifications list.Nuisance ChannelDelete[2]Temporarily removes anunwanted channel, except forthe Selected Channel, fromthe scan list. The SelectedChannel refers to the selectedzone or channel combinationof the user from which scan isinitiated.One Touch Access Directly initiates a predefinedPrivate, Phone or Group Call,a Call Alert or a Quick Textmessage.Option BoardFeatureToggles option boardfeature(s) on or off for optionboard-enabled channels.PermanentMonitor[2]Monitors a selected channelfor all radio traffic until functionis disabled.Phone Provides direct access to thePhone Contacts list.Power BatteryIndicatorDisplays the current status ofthe battery level.Privacy Toggles privacy on or off.Additional Radio Controls in Non-Connect Plus Mode32English](https://usermanual.wiki/Motorola-Solutions/89FT7074.Manual/User-Guide-2871581-Page-37.png)
![Radio Alias and ID Provides radio alias and ID.Radio Check Determines if a radio is activein a system.Radio Enable Allows a target radio to beremotely enabled.Radio Disable Allows a target radio to beremotely disabled.Remote Monitor Turns on the microphone of atarget radio without it givingany indicators.Repeater/Talkaround[2]Toggles between using arepeater and communicatingdirectly with another radio.Ring Alert Type Provides direct access to theRing Alert Type Setting.Scan[2] Toggles scan on or off.Site Info Displays current LinkedCapacity Plus site name andID. Plays site announcementvoice messages for thecurrent site (this function isunavailable when VoiceAnnouncement is disabled).Site Lock On/Off[2] When toggled on, the radiosearches the current site only.When toggled off, the radiosearches other sites inaddition to the current site.Telemetry Control Controls the Output Pin on alocal or remote radio.Text Message Selects the text messagemenu.Transmit InterruptRemote Dekey Stops an ongoing interruptiblecall to free the channel.Trill EnhancementOn/OffToggles trill enhancement onor off.Unassigned Unassigned programmablebutton.VoiceAnnouncementOn/OffToggles voice announcementon or off.Additional Radio Controls in Non-Connect Plus Mode33English](https://usermanual.wiki/Motorola-Solutions/89FT7074.Manual/User-Guide-2871581-Page-38.png)
![Job Ticket NotificationNotification List has items to review.Option BoardThe Option Board is enabled. (Optionboard enabled models only)Option Board Non-FunctionThe Option Board is disabled.Over-the-Air Programming Delay Tim-erIndicates time left before automatic re-start of radio.Scan[3][4]Scan feature is enabled.Scan- Priority 1[3][4]Radio detects activity on channel/groupdesignated as Priority 1.Scan- Priority 2[3][4]Radio detects activity on channel/groupdesignated as Priority 2.Flexible Receive ListFlexible receive list is enabled.EmergencyRadio is in Emergency mode.SecureThe Privacy feature is enabled.UnsecureThe Privacy feature is disabled.Site Roaming[3]The site roaming feature is enabled.Talkaround[3][4]Additional Radio Controls in Non-Connect Plus Mode36English](https://usermanual.wiki/Motorola-Solutions/89FT7074.Manual/User-Guide-2871581-Page-41.png)
![In the absence of a repeater, radio iscurrently configured for direct radio to ra-dio communication.BatteryThe number of bars (0 – 4) shown indi-cates the charge remaining in the bat-tery. Blinks when the battery is low.Battery Charging StatusShows battery discharging status.All Tones DisabledNo ring tones available.Call LogRadio call log.ContactRadio contact is available.MessageIncoming message.Silent RingSilent ring mode is enabled.Ring OnlyRinging mode is enabled.VibrateVibrate mode is enabled.Vibrate and RingVibrate and Ring mode is enabled.Wi-Fi Excellent[5]Wi-Fi signal is excellent.Wi-Fi Good[5]Wi-Fi signal is good.Wi-Fi Average[5]Wi-Fi signal is average.Additional Radio Controls in Non-Connect Plus Mode37English](https://usermanual.wiki/Motorola-Solutions/89FT7074.Manual/User-Guide-2871581-Page-42.png)
![Wi-Fi Poor[5]Wi-Fi signal is poor.Wi-Fi Unavailable[5]Wi-Fi signal is unavailable.Wi-Fi Excellent Highlighted[5]Wi-Fi signal is excellent. When youscroll to a network in the network list, theWi-Fi icon of that network is highlighted.Wi-Fi Good Highlighted[5]Wi-Fi signal is good. When you scroll toa network in the network list, the Wi-Fiicon of that network is highlighted.Wi-Fi Average Highlighted[5]Wi-Fi signal is average. When you scrollto a network in the network list, the Wi-Fiicon of that network is highlighted.Wi-Fi Poor Highlighted[5]Wi-Fi signal is poor. When you scroll toa network in the network list, the Wi-Fiicon of that network is highlighted.Wi-Fi Unavailable Highlighted[5]Wi-Fi signal is unavailable. When youscroll to a network in the network list, theWi-Fi icon of that network is highlighted.3Not applicable in Capacity Plus4Not applicable in Linked Capacity Plus5Only applicable for SL7550e/SL7590e/SL7580eAdditional Radio Controls in Non-Connect Plus Mode38English](https://usermanual.wiki/Motorola-Solutions/89FT7074.Manual/User-Guide-2871581-Page-43.png)


![BatteryThe number of bars (0 – 4) shown indi-cates the charge remaining in the bat-tery. Blinks when the battery is low.Battery Charging StatusShows battery discharging status.All Tones DisabledNo ring tones available.Call LogRadio call log.ContactRadio contact is available.MessageIncoming message.Silent RingSilent ring mode is enabled.Ring OnlyRinging mode is enabled.VibrateVibrate mode is enabled.Vibrate and RingVibrate and Ring mode is enabled.Wi-Fi Excellent[6]Wi-Fi signal is excellent.Wi-Fi Good[6]Wi-Fi signal is good.Wi-Fi Average[6]Wi-Fi signal is average.Wi-Fi Poor[6]Wi-Fi signal is poor.Additional Radio Controls in Connect Plus Mode178English](https://usermanual.wiki/Motorola-Solutions/89FT7074.Manual/User-Guide-2871581-Page-183.png)
![Wi-Fi Unavailable[6]Wi-Fi signal is unavailable.Wi-Fi Excellent Highlighted[6]Wi-Fi signal is excellent. When youscroll to a network in the network list, theWi-Fi icon of that network is highlighted.Wi-Fi Good Highlighted[6]Wi-Fi signal is good. When you scroll toa network in the network list, the Wi-Fiicon of that network is highlighted.Wi-Fi Average Highlighted[6]Wi-Fi signal is average. When you scrollto a network in the network list, the Wi-Fiicon of that network is highlighted.Wi-Fi Poor Highlighted[6]Wi-Fi signal is poor. When you scroll toa network in the network list, the Wi-Fiicon of that network is highlighted.Wi-Fi Unavailable Highlighted[6]Wi-Fi signal is unavailable. When youscroll to a network in the network list, theWi-Fi icon of that network is highlighted.Call IconsThe following icons appear on the radio’s displayduring a call. These icons also appear in the Contactslist to indicate ID type.Private CallIndicates a Private Call in progress.Group Call/Site All CallIndicates a Group Call or Site All Callin progress.6Only applicable for SL7550e/SL7590e/SL7580eAdditional Radio Controls in Connect Plus Mode179English](https://usermanual.wiki/Motorola-Solutions/89FT7074.Manual/User-Guide-2871581-Page-184.png)


![Authorized Accessories ListAntennas• 420 – 445 MHz Stubby Antenna (PMAE4076_)• 438 – 470 MHz Stubby Antenna (PMAE4077_)•403 – 425 MHz Stubby Antenna (PMAE4078_)• 450 – 490 MHz Stubby Antenna Kit (PMAE4091_)• 480 – 527 MHz Stubby Antenna Kit (PMAE4092_)• 806 – 870 MHz Stubby Antenna (PMAF4017_)• 896 – 941 MHz Stubby Antenna (PMAF4018_)• Antenna Mounting Kit, pack of ten screws andplugs (PMLN6040_)Audio Accessories• Surveillance Earpiece with in-line microphone andPTT (PMLN5957_)• Swivel Earpiece with in-line microphone and PTT(PMLN5958_)•Business Wireless Accessory Kit (PMLN6463_)• Mag One Earbud with In-Line Microphone andPush-to-Talk (PMLN7156_)• 2-Wire with Trans Tube, Black (PMLN7157_)• Surveillance Earpiece with In-Line Microphoneand Push-to-Talk (PMLN7158_)• Adjustable D-Style with In-Line Microphone andPush-to-Talk (PMLN7159_)• Swivel Earpiece with In-Line Microphone andPush-to-Talk (PMLN7189_)Batteries• Lithium-Ion 1800 mAh Battery Pack(HKNN4013_).• Lithium-Ion 1370 mAh Battery Pack(PMNN4425_)[7]•Lithium-Ion 2300mAh Battery Pack (PMNN4468_)Bluetooth• HK200 Bluetooth Headset (US) (89409_)• Operations Critical Wireless Earpiece with 12 inchcable (US) (NNTN8125_)•Operations Critical Wireless Earpiece with 9.5 inchcable (US) (NNTN8126_)7Not applicable to the 800/900 band.Authorized Accessories List281English](https://usermanual.wiki/Motorola-Solutions/89FT7074.Manual/User-Guide-2871581-Page-286.png)