Motorola Solutions 89FT7078 Smart phone User Manual LEX L10i Mission Critical Handheld User Guide
Motorola Solutions, Inc. Smart phone LEX L10i Mission Critical Handheld User Guide
Contents
User Manual LEV L10i

LEX L10i Mission
Critical Handheld User
Guide
MN002347A01-A
JANUARY 2016
© 2016 Motorola Solutions, Inc. All rights reserved

Copyrights
The Motorola products described in this document may include copyrighted Motorola computer
programs. Laws in the United States and other countries preserve for Motorola certain exclusive rights
for copyrighted computer programs. Accordingly, any copyrighted Motorola computer programs
contained in the Motorola products described in this document may not be copied or reproduced in any
manner without the express written permission of Motorola.
© 2016 Motorola Solutions, Inc. All Rights Reserved
No part of this document may be reproduced, transmitted, stored in a retrieval system, or translated
into any language or computer language, in any form or by any means, without the prior written
permission of Motorola Solutions, Inc.
Furthermore, the purchase of Motorola products shall not be deemed to grant either directly or by
implication, estoppel or otherwise, any license under the copyrights, patents or patent applications of
Motorola, except for the normal non-exclusive, royalty-free license to use that arises by operation of
law in the sale of a product.
Disclaimer
Please note that certain features, facilities, and capabilities described in this document may not be
applicable to or licensed for use on a particular system, or may be dependent upon the characteristics
of a particular mobile subscriber unit or configuration of certain parameters. Please refer to your
Motorola contact for further information.
Trademarks
MOTOROLA, MOTO, MOTOROLA SOLUTIONS, and the Stylized M Logo are trademarks or
registered trademarks of Motorola Trademark Holdings, LLC and are used under license. All other
trademarks are the property of their respective owners.
European Union (EU) Waste of Electrical and Electronic Equipment (WEEE)
directive
The European Union's WEEE directive requires that products sold into EU countries must have the
crossed out trash bin label on the product (or the package in some cases).
As defined by the WEEE directive, this cross-out trash bin label means that customers and end-users
in EU countries should not dispose of electronic and electrical equipment or accessories in household
waste.
Customers or end-users in EU countries should contact their local equipment supplier representative or
service centre for information about the waste collection system in their country.
MN002347A01-A
Copyrights
Send Feedback 3
This page intentionally left blank.
Contact Us
Motorola Solution Support Center
The Solution Support Center (SSC) is the primary Motorola Solutions support contact. Call:
• Before any software reload.
• To confirm troubleshooting results and analysis before removing and replacing a Field Replaceable
Unit (FRU) and Field Replaceable Entity (FRE) to repair the system.
For... Phone
United States Calls 800-221-7144
International Calls 302-444-9800
North America Parts Organization
For assistance in ordering replacement parts or identifying a part number, contact the Motorola Parts
organization. Your first response when troubleshooting your system is to call the Motorola SSC.
For... Phone
Phone Orders 800-422-4210 (US and Canada Orders)
For help identifying an item or part number, select
choice 3 from the menu.
302-444-9842 (International Orders)
Includes help for identifying an item or part number and
for translation as needed.
Fax Orders 800-622-6210 (US and Canada Orders)
Comments
Send questions and comments regarding user documentation to
documentation@motorolasolutions.com.
Provide the following information when reporting a documentation error:
• The document title and part number
• The page number with the error
• A description of the error
We welcome your feedback on this and other Motorola manuals. To take a short, confidential survey
on Motorola Customer Documentation, go to docsurvey.motorolasolutions.com or scan the following
QR code with your mobile device to access the survey.
MN002347A01-A
Contact Us
Send Feedback 5
Latest Manual Versions
You can verify the latest version of this manual at https://businessonline.motorolasolutions.com.
MN002347A01-A
Contact Us
6 Send Feedback

Document History
Version Description Date
MN002347A01-
A
Initial release of the LEX L10i Mission Critical
Handheld User Guide.
January 2016
MN002347A01-A
Document History
Send Feedback 7
This page intentionally left blank.
Contents
Copyrights................................................................................................................... 3
Contact Us................................................................................................................... 5
Document History....................................................................................................... 7
List of Figures............................................................................................................15
List of Tables.............................................................................................................19
List of Procedures.....................................................................................................21
Chapter 1: About this Guide.....................................................................................25
Contact Us...................................................................................................................................25
Versions.......................................................................................................................................26
Operating System Version................................................................................................ 26
Software Build Number..................................................................................................... 26
Kernel Version..................................................................................................................26
Chapter Descriptions................................................................................................................... 26
Helpful Background Information..................................................................................................27
Notational Conventions................................................................................................................27
Icon Conventions......................................................................................................................... 27
Regulatory Information................................................................................................................ 28
Service Information......................................................................................................................28
Documentation Set...................................................................................................................... 29
Chapter 2: Getting Started .......................................................................................31
Features.......................................................................................................................................31
Unpacking....................................................................................................................................33
Setting Up the LEX L10i.............................................................................................................. 33
Removing the Screen Protective Film...............................................................................34
Removing the Battery Cover.............................................................................................34
Installing a microSD or CRYPTR micro Encryption Card................................................. 35
Removing the microSD or CRYPTR Card........................................................................ 35
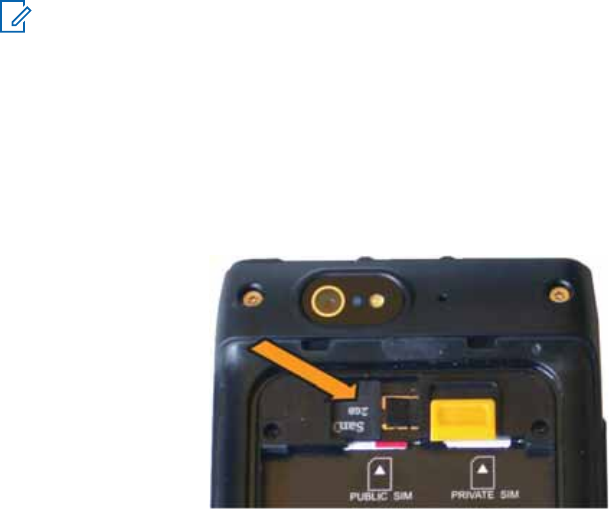
Installing the Public and Private SIM Cards......................................................................36
Removing the Public and Private SIM Cards....................................................................36
Installing the Battery......................................................................................................... 37
Removing the Battery....................................................................................................... 37
Charging the LEX L10i.................................................................................................................37
Charging Temperature......................................................................................................38
Battery Charge Indications................................................................................................38
Battery Management.........................................................................................................39
MN002347A01-A
Contents
Send Feedback 9
Monitor Battery Usage........................................................................................... 40
Low Battery Notification......................................................................................... 41
Battery Optimization...............................................................................................41
Powering On the LEX L10i for the First Time.............................................................................. 43
Powering Off the LEX L10i.......................................................................................................... 43
Entering and Exiting the Suspend Mode..................................................................................... 44
Setting Time Out to Enter Suspend Mode........................................................................ 44
Covert Mode................................................................................................................................ 44
Turning On Covert Mode.................................................................................................. 45
Turning Off Covert Mode.................................................................................................. 45
Locking the LEX L10i...................................................................................................................46
Selecting a Locking Option............................................................................................... 46
Specifying a Pattern............................................................................................... 47
Specifying a PIN or Password................................................................................47
Setting the Timeout for Locking the LEX L10i........................................................47
Unlocking the LEX L10i.....................................................................................................48
Unlocking the LEX L10i Using a Pattern................................................................ 48
Unlocking the LEX L10i Using a PIN or Password.................................................48
Calling Emergency from a Locked LEX L10i.................................................................... 49
Setting the Date and Time........................................................................................................... 49
Setting the Display.......................................................................................................................49
Setting Screen Brightness................................................................................................ 50
Setting Screen Rotation.................................................................................................... 50
Setting Up Sleep Mode..................................................................................................... 50
Setting Up Daydream........................................................................................................51
Setting the Font Size.........................................................................................................51
Enabling Cast Screen....................................................................................................... 52
Projecting the LEX L10i Screen on Another Device...............................................52
General Sound Setting................................................................................................................ 52
Public and Private Carrier Modes................................................................................................54
Switching Modes Using the Power Button........................................................................ 54
Switching Modes Using the Settings App......................................................................... 55
LEX L10i Emergency Button........................................................................................................56
Chapter 3: Using the LEX L10i.................................................................................57
Using the Touchscreen................................................................................................................57
Using the On-Screen Keyboard...................................................................................................58
Android Keyboard Settings............................................................................................... 59
Motorola Solutions Home Experience (MHx)...............................................................................60
LEX L10i Home Screen.................................................................................................... 60
MN002347A01-A
Contents
10 Send Feedback
Home Screen Overlay............................................................................................61
Customizing the Home Screen......................................................................................... 61
Adding Widgets...................................................................................................... 61
Moving Widgets......................................................................................................67
Removing Widgets................................................................................................. 67
Example of a Customized Home Screen Panel..................................................... 68
Status Bar....................................................................................................................................68
Notification Icons......................................................................................................................... 69
LEX L10i Status Icons................................................................................................................. 70
Managing Notifications................................................................................................................ 71
Working with Status..................................................................................................................... 72
Quick Settings..............................................................................................................................73
Applications................................................................................................................................. 74
Folders.........................................................................................................................................76
Creating a Folder.............................................................................................................. 76
Naming Folders.................................................................................................................76
Removing a Folder............................................................................................................76
Accessing Files from a Computer................................................................................................77
Chapter 4: Calling......................................................................................................79
Making a Call Using the Dialer.................................................................................................... 80
Making a Call Using People List Contacts...................................................................................82
Making a Call Using Call History................................................................................................. 83
Making a Conference Call........................................................................................................... 84
Answering Calls with a Bluetooth Headset.................................................................................. 87
Call Settings.................................................................................................................................87
Requesting an Emergency Alert.................................................................................................. 88
Chapter 5: Radio Services........................................................................................91
Pairing LEX L10i with Bluetooth Accessory.................................................................................91
Unpairing LEX L10i from Bluetooth Accessory............................................................................93
Chapter 6: Messaging...............................................................................................95
Sending a Text Message............................................................................................................. 95
Sending a Multimedia Message...................................................................................................96
Chapter 7: Applications............................................................................................99
Using File Browser.......................................................................................................................99
Managing People Contacts........................................................................................................100
Adding People.................................................................................................................100
Editing People.................................................................................................................100
Deleting People...............................................................................................................101
Camera...................................................................................................................................... 101
MN002347A01-A
Contents
Send Feedback 11
Taking Photos................................................................................................................. 102
Taking a Panoramic Photo..............................................................................................104
Recording Videos............................................................................................................105
Camera Settings............................................................................................................. 106
Video Settings.................................................................................................................108
Gallery....................................................................................................................................... 109
Working with Albums...................................................................................................... 110
Sharing an Album.................................................................................................111
Getting Album Information................................................................................... 111
Deleting an Album................................................................................................112
Working with Photos....................................................................................................... 112
Viewing and Browsing Photos..............................................................................112
Rotating a Photo.................................................................................................. 113
Cropping a Photo................................................................................................. 114
Setting a Photo as a Contact Icon........................................................................114
Sharing a Photo................................................................................................... 115
Deleting a Photo...................................................................................................115
Working with Videos....................................................................................................... 115
Watching a Video................................................................................................. 115
Sharing a Video....................................................................................................116
Deleting a Video...................................................................................................116
Using Sound Recorder.............................................................................................................. 117
Voice Dialer............................................................................................................................... 119
Calling a Person by Name.............................................................................................. 119
Redialing a Previous Call................................................................................................119
Dialing by Number.......................................................................................................... 120
Opening an Application...................................................................................................120
Chapter 8: Wireless.................................................................................................121
Wireless Wide Area Networks................................................................................................... 121
Sharing the Mobile Data Connection.............................................................................. 121
Configuring USB Tethering.................................................................................. 121
Configuring Bluetooth Tethering.......................................................................... 122
Configuring Portable Wi-Fi Hotspot Settings........................................................123
Data Usage.....................................................................................................................124
Setting Data Usage Warning................................................................................125
Setting Auto-Sync................................................................................................ 125
Disabling Data When Roaming.......................................................................................125
Limiting Data Connection to a Network...........................................................................126
Editing the Access Point Name.......................................................................................126
MN002347A01-A
Contents
12 Send Feedback
Adding a Virtual Private Network (VPN)......................................................................... 126
Cell Broadcasts...............................................................................................................127
Wireless Local Area Networks...................................................................................................128
Scanning and Connecting to a Wi-Fi Network................................................................ 128
Configuring a Wi-Fi Network........................................................................................... 130
Adding a Wi-Fi Network.................................................................................................. 131
Manually Adding a Wi-Fi Network...................................................................................131
Advanced Wi-Fi Settings.................................................................................................132
WLAN Configuration....................................................................................................... 133
Modifying a Wi-Fi Network.............................................................................................. 133
Removing a Wi-Fi Network............................................................................................. 133
Bluetooth Device........................................................................................................................134
Adaptive Frequency Hopping..........................................................................................134
Bluetooth Security...........................................................................................................134
Bluetooth Profiles............................................................................................................135
Bluetooth Power States.................................................................................................. 135
Bluetooth Radio Power for Android.................................................................................136
Enabling Bluetooth............................................................................................... 136
Disabling Bluetooth.............................................................................................. 136
Changing the Bluetooth Name........................................................................................136
Selecting Profiles on a Bluetooth Device........................................................................ 137
Chapter 9: ADB and USB Driver Setup................................................................. 139
Required Software and Hardware............................................................................................. 139
Installing USB Driver and ADB.................................................................................................. 139
Chapter 10: Accessories........................................................................................ 145
Accessories............................................................................................................................... 145
USB Cable................................................................................................................................. 145
Desktop Cradle.......................................................................................................................... 146
Vehicle Cradle........................................................................................................................... 146
Holster....................................................................................................................................... 147
Chapter 11: Maintenance and Troubleshooting...................................................149
Maintaining the LEX L10i...........................................................................................................149
Battery Safety Guidelines.......................................................................................................... 149
Cleaning Guidelines...................................................................................................................150
Cleaning the LEX L10i............................................................................................................... 151
Cleaning the Interface Connector.............................................................................................. 151
Cleaning the Battery Contacts................................................................................................... 151
Troubleshooting ........................................................................................................................ 152
Backing Up the LEX L10i...........................................................................................................154
MN002347A01-A
Contents
Send Feedback 13
Backing up Contacts....................................................................................................... 155
Resetting the LEX L10i.............................................................................................................. 157
Performing Factory Data Reset...................................................................................... 157
Chapter 12: Technical Specifications................................................................... 159
MN002347A01-A
Contents
14 Send Feedback
List of Figures
Figure 1: Manufacturing Label................................................................................................................28
Figure 2: LEX L10i Features...................................................................................................................31
Figure 3: Removing the Screen Protective Film..................................................................................... 34
Figure 4: Removing the Battery Cover................................................................................................... 34
Figure 5: Installing the microSD or CRYPTR micro Encryption Card.....................................................35
Figure 6: Installing the Public and Private SIM Cards............................................................................ 36
Figure 7: Installing the Battery................................................................................................................37
Figure 8: Charging the LEX L10i............................................................................................................ 38
Figure 9: Charge and Notification LED...................................................................................................38
Figure 10: Battery Screen.......................................................................................................................40
Figure 11: Low Battery Notification.........................................................................................................41
Figure 12: Battery Depleted Screen....................................................................................................... 41
Figure 13: Quick Settings Menu — Airplane Mode................................................................................ 42
Figure 14: LEX L10i Boot Screen........................................................................................................... 43
Figure 15: Selecting Power Off...............................................................................................................43
Figure 16: Power Button Menu...............................................................................................................45
Figure 17: Power Button Menu...............................................................................................................46
Figure 18: Sound Screen........................................................................................................................53
Figure 19: Volume Button.......................................................................................................................53
Figure 20: Service Switch.......................................................................................................................55
Figure 21: Switch Networks Confirmation Popup...................................................................................55
Figure 22: Switch Networks Confirmation Popup...................................................................................56
Figure 23: Android Keyboard Settings....................................................................................................58
Figure 24: Default Home Screen............................................................................................................ 60
Figure 25: Widgets Screen.....................................................................................................................62
Figure 26: Example of a Widget Added to New Panel........................................................................... 63
Figure 27: Empty My Apps Widget......................................................................................................... 64
Figure 28: List of Shortcuts for My Apps Widgets.................................................................................. 65
Figure 29: My Apps Widget with Shortcuts Added................................................................................. 66
Figure 30: My Status Widget.................................................................................................................. 66
Figure 31: Status Selection.................................................................................................................... 66
Figure 32: Example of a Customized Home Screen Panel.................................................................... 68
Figure 33: Status Bar..............................................................................................................................68
Figure 34: Notification Panel.................................................................................................................. 72
Figure 35: Quick Settings Panel............................................................................................................. 73
Figure 36: Opened Unnamed Folder......................................................................................................76
MN002347A01-A
List of Figures
Send Feedback 15
Figure 37: Named Folder........................................................................................................................76
Figure 38: Notifications Screen.............................................................................................................. 77
Figure 39: MTP / PTP Selection Screen.................................................................................................78
Figure 40: Insert Wired Headset Plug.................................................................................................... 80
Figure 41: Dialer Screen.........................................................................................................................81
Figure 42: Call in Progress..................................................................................................................... 82
Figure 43: People List Contact............................................................................................................... 83
Figure 44: Call History Tab.....................................................................................................................84
Figure 45: Two Calls...............................................................................................................................85
Figure 46: Two Calls Connected............................................................................................................ 86
Figure 47: Merged Calls......................................................................................................................... 86
Figure 48: Emergency Alert Activation Popup........................................................................................89
Figure 49: Bluetooth Pairing Screen.......................................................................................................92
Figure 50: Bluetooth Device Screen.......................................................................................................92
Figure 51: Bluetooth Paired Devices Screen..........................................................................................93
Figure 52: Bluetooth Paired Devices...................................................................................................... 94
Figure 53: Unpair Complete................................................................................................................... 94
Figure 54: New Message Screen........................................................................................................... 95
Figure 55: New Multimedia Message Screen.........................................................................................96
Figure 56: File Browser Screen.............................................................................................................. 99
Figure 57: Camera Photo Screen.........................................................................................................102
Figure 58: Camera Screen................................................................................................................... 103
Figure 59: Camera Option Bar............................................................................................................. 103
Figure 60: Camera Zoom..................................................................................................................... 104
Figure 61: Panoramic Mode................................................................................................................. 104
Figure 62: Panoramic Frame................................................................................................................105
Figure 63: Video Mode......................................................................................................................... 105
Figure 64: Camera Settings..................................................................................................................106
Figure 65: First More Options Screen.................................................................................................. 107
Figure 66: Second More Options Screen............................................................................................. 107
Figure 67: Third More Options Screen................................................................................................. 108
Figure 68: Video Settings..................................................................................................................... 108
Figure 69: First More Options Video Screen........................................................................................ 109
Figure 70: Second More Options Video Screen................................................................................... 109
Figure 71: Gallery — Albums............................................................................................................... 110
Figure 72: Photos/Videos Inside an Album.......................................................................................... 111
Figure 73: Photo Example.................................................................................................................... 113
Figure 74: Cropping Grid......................................................................................................................114
Figure 75: Video Playback Controls..................................................................................................... 116
MN002347A01-A
List of Figures
16 Send Feedback
Figure 76: Start Recording................................................................................................................... 117
Figure 77: Record Your Message.........................................................................................................118
Figure 78: Finish Recording................................................................................................................. 118
Figure 79: Voice Dialer Window........................................................................................................... 119
Figure 80: USB Cable Connection to Host Computer.......................................................................... 122
Figure 81: Set up Wi-Fi Hotspot Dialog Box.........................................................................................124
Figure 82: Settings Screen...................................................................................................................129
Figure 83: Wi-Fi Screen........................................................................................................................129
Figure 84: WLAN Network Security Dialog Boxes................................................................................130
Figure 85: Access Computer................................................................................................................ 139
Figure 86: Access CD...........................................................................................................................140
Figure 87: Select Destination............................................................................................................... 140
Figure 88: Access Device Manager......................................................................................................141
Figure 89: Select Update Drive Software............................................................................................. 141
Figure 90: Select Browse my computer for driver software..................................................................142
Figure 91: Select Installation Folder..................................................................................................... 142
Figure 92: Select Install this driver software anyway............................................................................143
Figure 93: Close the Installation........................................................................................................... 143
Figure 94: USB Cable...........................................................................................................................145
Figure 95: Desktop Cradle....................................................................................................................146
Figure 96: Vehicle Cradle.....................................................................................................................146
Figure 97: Holster.................................................................................................................................147
Figure 98: Contacts Menu.................................................................................................................... 155
Figure 99: Import/Export Contacts Popup............................................................................................ 156
Figure 100: Export Confirmation Popup............................................................................................... 156
MN002347A01-A
List of Figures
Send Feedback 17
This page intentionally left blank.
List of Tables
Table 1: LEX L10i Features....................................................................................................................31
Table 2: Charge and Notification LED — Charging Indications..............................................................38
Table 3: Using the Touchscreen.............................................................................................................57
Table 4: Android Keyboard Settings.......................................................................................................59
Table 5: Notification Icons...................................................................................................................... 69
Table 6: Status Icons..............................................................................................................................70
Table 7: Applications.............................................................................................................................. 74
Table 8: Camera Icons and Actions..................................................................................................... 102
Table 9: Troubleshooting the LEX L10i................................................................................................ 152
Table 10: Technical Specifications....................................................................................................... 159
Table 11: General Accessories............................................................................................................ 161
MN002347A01-A
List of Tables
Send Feedback 19
This page intentionally left blank.
List of Procedures
Removing the Battery Cover ................................................................................................................. 34
Installing a microSD or CRYPTR micro Encryption Card ...................................................................... 35
Removing the microSD or CRYPTR Card .............................................................................................35
Installing the Public and Private SIM Cards .......................................................................................... 36
Removing the Public and Private SIM Cards ........................................................................................ 36
Installing the Battery ..............................................................................................................................37
Removing the Battery ............................................................................................................................ 37
Turning Off the Radio ............................................................................................................................ 42
Powering Off the LEX L10i .................................................................................................................... 43
Entering and Exiting the Suspend Mode ............................................................................................... 44
Setting Time Out to Enter Suspend Mode .............................................................................................44
Turning On Covert Mode ....................................................................................................................... 45
Turning Off Covert Mode .......................................................................................................................45
Selecting a Locking Option ....................................................................................................................46
Specifying a Pattern .............................................................................................................................. 47
Specifying a PIN or Password ............................................................................................................... 47
Setting the Timeout for Locking the LEX L10i ....................................................................................... 47
Unlocking the LEX L10i Using a Pattern ............................................................................................... 48
Unlocking the LEX L10i Using a PIN or Password ................................................................................ 48
Calling Emergency from a Locked LEX L10i ......................................................................................... 49
Setting the Date and Time .....................................................................................................................49
Setting Screen Brightness ..................................................................................................................... 50
Setting Screen Rotation .........................................................................................................................50
Setting Up Sleep Mode ..........................................................................................................................50
Setting Up Daydream ............................................................................................................................ 51
Setting the Font Size ............................................................................................................................. 51
Enabling Cast Screen ............................................................................................................................52
Projecting the LEX L10i Screen on Another Device .............................................................................. 52
Switching Modes Using the Power Button .............................................................................................54
Switching Modes Using the Settings App ..............................................................................................55
Adding Widgets ..................................................................................................................................... 61
Adding Shortcuts to the My Apps Widget .............................................................................................. 63
Changing My Status .............................................................................................................................. 66
Moving Widgets ..................................................................................................................................... 67
Removing Widgets ................................................................................................................................ 67
Creating a Folder ...................................................................................................................................76
MN002347A01-A
List of Procedures
Send Feedback 21
Naming Folders ..................................................................................................................................... 76
Removing a Folder ................................................................................................................................ 76
Accessing Files from a Computer ..........................................................................................................77
Making a Call Using the Dialer .............................................................................................................. 80
Making a Call Using People List Contacts .............................................................................................82
Making a Call Using Call History ........................................................................................................... 83
Making a Conference Call ..................................................................................................................... 84
Requesting an Emergency Alert ............................................................................................................88
Pairing LEX L10i with Bluetooth Accessory ...........................................................................................91
Unpairing LEX L10i from Bluetooth Accessory ......................................................................................93
Sending a Text Message .......................................................................................................................95
Sending a Multimedia Message ............................................................................................................ 96
Adding People ..................................................................................................................................... 100
Editing People ..................................................................................................................................... 100
Deleting People ................................................................................................................................... 101
Taking Photos ......................................................................................................................................102
Taking a Panoramic Photo .................................................................................................................. 104
Recording Videos ................................................................................................................................ 105
Sharing an Album ................................................................................................................................ 111
Getting Album Information ...................................................................................................................111
Deleting an Album ............................................................................................................................... 112
Viewing and Browsing Photos ............................................................................................................. 112
Rotating a Photo ..................................................................................................................................113
Cropping a Photo .................................................................................................................................114
Setting a Photo as a Contact Icon ....................................................................................................... 114
Sharing a Photo ...................................................................................................................................115
Deleting a Photo .................................................................................................................................. 115
Watching a Video ................................................................................................................................ 115
Sharing a Video ................................................................................................................................... 116
Deleting a Video .................................................................................................................................. 116
Calling a Person by Name ...................................................................................................................119
Redialing a Previous Call .................................................................................................................... 119
Dialing by Number ............................................................................................................................... 120
Opening an Application ....................................................................................................................... 120
Configuring USB Tethering ..................................................................................................................121
Configuring Bluetooth Tethering ..........................................................................................................122
Configuring Portable Wi-Fi Hotspot Settings ....................................................................................... 123
Configuring the Wi-Fi Hotspot ............................................................................................................. 123
Setting Data Usage Warning ............................................................................................................... 125
MN002347A01-A
List of Procedures
22 Send Feedback
Setting Auto-Sync ................................................................................................................................125
Disabling Data When Roaming ........................................................................................................... 125
Limiting Data Connection to a Network ............................................................................................... 126
Editing the Access Point Name ........................................................................................................... 126
Adding a Virtual Private Network (VPN) .............................................................................................. 126
Cell Broadcasts ................................................................................................................................... 127
Scanning and Connecting to a Wi-Fi Network .....................................................................................128
Configuring a Wi-Fi Network ................................................................................................................130
Adding a Wi-Fi Network .......................................................................................................................131
Manually Adding a Wi-Fi Network ....................................................................................................... 131
Modifying a Wi-Fi Network ...................................................................................................................133
Removing a Wi-Fi Network ..................................................................................................................133
Enabling Bluetooth .............................................................................................................................. 136
Disabling Bluetooth ..............................................................................................................................136
Changing the Bluetooth Name ............................................................................................................ 136
Selecting Profiles on a Bluetooth Device .............................................................................................137
Installing USB Driver and ADB ............................................................................................................ 139
Cleaning the Interface Connector ........................................................................................................151
Cleaning the Battery Contacts .............................................................................................................151
Backing Up the LEX L10i .....................................................................................................................154
Backing up Contacts ............................................................................................................................155
Resetting the LEX L10i ........................................................................................................................157
Performing Factory Data Reset ........................................................................................................... 157
MN002347A01-A
List of Procedures
Send Feedback 23
This page intentionally left blank.
Chapter 1
About this Guide
This guide provides information about using the LEX L10i Mission Critical Handheld and accessories.
NOTICE: Screens and menu options may be changed or customized by your agency to show
different information.
Contact Us
The Solution Support Center (SSC) is the primary Motorola Solutions support contact.
Motorola Solution Support Center
Call the SSC:
• Before any software reload.
• To confirm troubleshooting results and analysis before removing and replacing a Field Replaceable
Unit (FRU) and Field Replaceable Entity (FRE) to repair the system.
For... Phone
United States Calls 800-221-7144
International Calls 302-444-9800
North America Parts Organization
For assistance in ordering replacement parts or identifying a part number, contact the Motorola Parts
organization. Your first response when troubleshooting your system is to call the Motorola SSC.
For... Phone
Phone Orders 800-422-4210 (US and Canada Orders)
For help identifying an item or part number, select
choice 3 from the menu.
302-444-9842 (International Orders)
Includes help for identifying an item or part number and
for translation as needed.
Fax Orders 800-622-6210 (US and Canada Orders)
Comments
Send questions and comments regarding user documentation to
documentation@motorolasolutions.com.
Provide the following information when reporting a documentation error:
• The document title and part number
• The page number with the error
• A description of the error
MN002347A01-A
About this Guide
Send Feedback 25
We welcome your feedback on this and other Motorola manuals. To take a short, confidential survey
on Motorola Customer Documentation, go to docsurvey.motorolasolutions.com or scan the following
QR code with your mobile device to access the survey.
Versions
This guide covers various software configurations and references are made to operating system or
software versions discussed in the following three subsections.
Operating System Version
The Operating System for the LEX L10i is the Android Operating System.
To determine the Operating System version, from the Home screen touch → → About phone
→ Android Version. The last line provides the Android version information. For example: 4.4.4.
Software Build Number
This topic has information on how to find the software build number of your LEX L10i.
To determine the software build number, from the Home screen touch → → About phone →
Build Number.
Kernel Version
The Kernel version can be found in the Settings application.
To determine the kernel version, from the Home screen, touch → → About phone → Kernel
version.
Chapter Descriptions
This guide provides information on the features listed in the chapter descriptions below:
•About this Guide on page 25 Chapter 1, presents contacts and general information related to this
product.
•Getting Started on page 31 Chapter 2, explains getting the LEX L10i up and running for the first
time.
•Using the LEX L10i on page 57 Chapter 3, is a reference to operating the LEX L10i.
•Calling on page 79 Chapter 4, is a reference to making and receiving calls.
•Radio Services on page 91 Chapter 5, is a reference to connecting the LEX L10i to a Land Mobile
Radio for communicating on LTE and P25 systems.
•Messaging on page 95 Chapter 6, is a reference to sending text and multimedia messages.
•Applications on page 99 Chapter 7, explains using basic applications installed on the LEX L10i
such as Camera, People, and File Browser.
MN002347A01-A
Chapter 1: About this Guide
26 Send Feedback

•Wireless on page 121 Chapter 8, explains configuring the LEX L10i to operate on a personal, local,
and wide area wireless network.
•ADB and USB Driver Setup on page 139 Chapter 9, is a reference to setting up the Android Debug
Bridge (ADB) and USB driver for your Windows PC.
•Accessories on page 145 Chapter 10, is a reference to available accessories and how to use them
with the LEX L10i.
•Maintenance and Troubleshooting on page 149 Chapter 11, is a reference to cleaning and storing
the LEX L10i, and troubleshooting solutions for potential problems.
•Technical Specifications on page 159 Chapter 12, provides technical specifications for the LEX
L10i.
Helpful Background Information
Motorola Solutions offers various courses designed to assist in learning about the system.
For information, go to http://www.motorolasolutions.com/training to view the current course offerings
and technology paths.
Notational Conventions
The following conventions are used in this document:
Italics are used to highlight the following:
• Icons on a screen
• Chapters and sections in this and related documents
Bold text is used to highlight the following:
• Dialog box, window, and screen names
• Drop-down list and list box names
• Check box and radio button names
• Key names on a keypad
• Button names on a screen
Bullets (•) indicate:
• Action items
• Lists of alternatives
• Lists of required steps that are not necessarily sequential
Sequential lists (e.g., those that describe step-by-step procedures) appear as numbered lists.
Icon Conventions
The documentation set is designed to give the reader more visual clues.
The following graphic icons are used throughout the documentation set. These icons and their
associated meanings are described below.
WARNING: The word WARNING with the associated safety icon implies information that, if
disregarded, could result in death or serious injury, or serious product damage.
CAUTION: The word CAUTION with the associated safety icon implies information that, if
disregarded, may result in minor or moderate injury, or serious product damage.
MN002347A01-A
Chapter 1: About this Guide
Send Feedback 27
NOTICE: NOTICE contains information more important than the surrounding text, such as
exceptions or preconditions. They also refer the reader elsewhere for additional information,
remind the reader how to complete an action (when it is not part of the current procedure, for
instance), or tell the reader where something is located on the screen. There is no warning level
associated with a note.
Regulatory Information
BEFORE USING THIS device, READ the Product Regulatory, Safety & RF Exposure Guide (PN
MN001458A01-A) included with this package.
Service Information
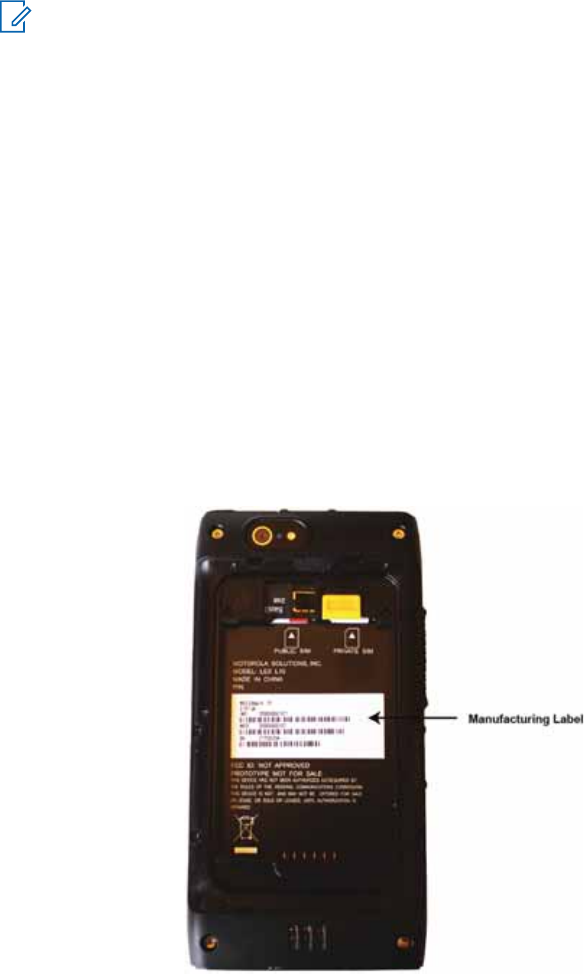
If you have a problem with your equipment, contact Motorola Solutions Global Customer Support
Center for your region.
Contact information is available at: http://www.motorolasolutions.com/support. You can also call
1-800-323-9949 for support and select option 6 for PS LTE infrastructure and devices. When
contacting support, have the following information available:
• Serial number of the unit (found on manufacturing label)
• Model number or product name (found on manufacturing label)
• Software type and version number
Figure 1: Manufacturing Label
Motorola Solutions responds to calls by e-mail, telephone or fax within the time limits set forth in
support agreements.
If your problem cannot be solved by Motorola Solutions Global Customer Support Center, you may
need to return your equipment for servicing and will be given specific directions. Motorola Solutions is
not responsible for any damages incurred during shipment if the approved shipping container is not
MN002347A01-A
Chapter 1: About this Guide
28 Send Feedback
used. Shipping the units improperly can possibly void the warranty. Remove the CRYPTR card or
microSD card and SIM card before shipping.
If you purchased your product from a Motorola Solutions business partner, contact that business
partner for support.
Documentation Set
The documentation set for the LEX L10i provides information for specific user needs.
Unless otherwise specified, Motorola Solutions documents listed here are available from Motorola
Online at https://businessonline.motorolasolutions.com. If you are new to Motorola Online, follow the
on-screen instructions to sign up for an account. To access Public Safety LTE infrastructure and device
manuals, select Resource Center → Product Information → Manuals → Network Infrastructure.
The documentation set for the LEX L10i includes:
•LEX L10i Quick Start Guide PN MN002346A01-A describes how to get the LEX L10i up and
running.
•LEX L10i Mission Critical Handheld User Guide (this guide) MN002347A01-A describes how to use
the LEX L10i.
•LEX L10i Regulatory and Safety Guide PN MN002351A01-A describes how to safely use the LEX
L10i.
•LEX L10i Service Provisioning Guide PN MN002352A01-A provides technical instructions on how to
activate, provision, and configure the LEX L10i.
For the latest version of this guide and all guides, go to: https://businessonline.motorolasolutions.com.
MN002347A01-A
Chapter 1: About this Guide
Send Feedback 29
This page intentionally left blank.
Chapter 2
Getting Started
Use the information in this chapter to help you get started using the LEX L10i.
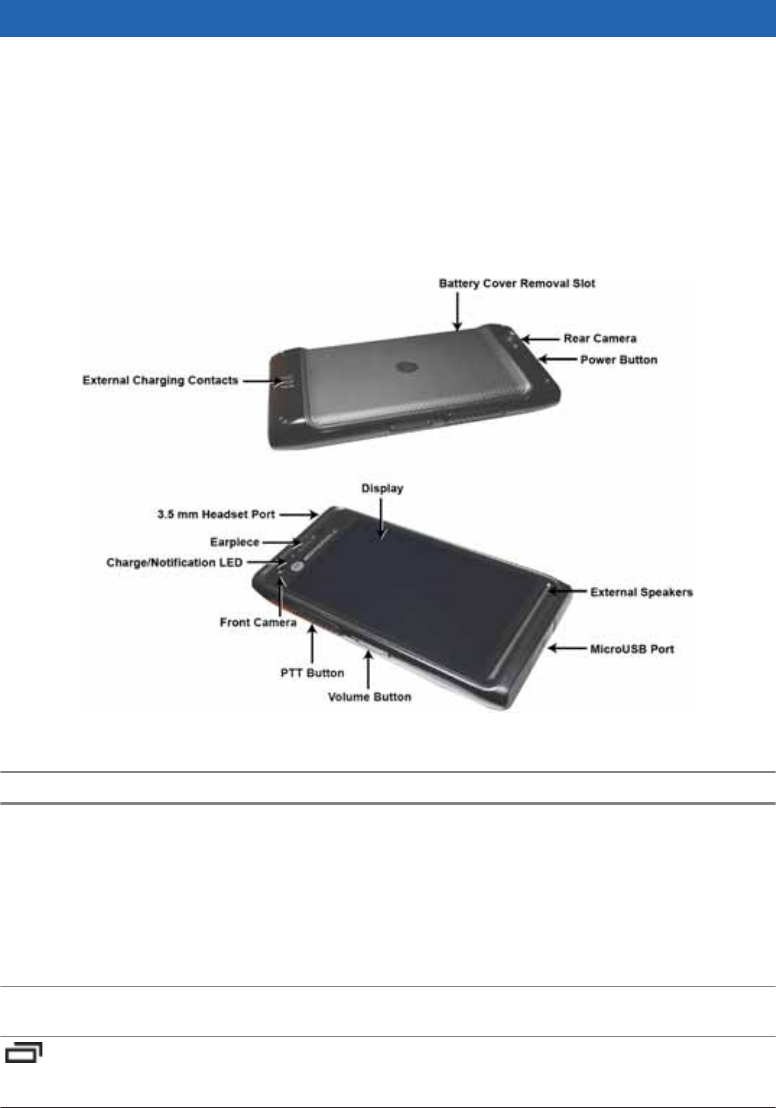
Features
The LEX L10i features are shown in the following figure and summarized in the following table.
Figure 2: LEX L10i Features
Table 1: LEX L10i Features
Item Function
Charge/Notification LED Solid Blue: New notification (New Voice mail,
New Text messages, Missed Calls, Android
App Notifications, and so on)
Off: Battery is not charging.
Solid Red: Battery is charging.
Blinking Amber: Waiting to charge.
Solid Green: Fully Charged.
Display/Screen Tap screen displays all information to operate
the device.
Recent Apps key – Press to switch to, stop or
manage applications currently running on the
background of the device.
Table continued…
MN002347A01-A
Getting Started
Send Feedback 31
Item Function
Home key – Displays the Home screen with a
single tap.
Back key – Displays the previous screen.
Closes the keyboard if the on-screen keyboard
is open.
External Speakers Use for communications in handset mode. Pro-
vides audio output for video and voice playback
in speakerphone mode.
Menu key – At any screen or application, press
to see available options.
3.5 mm Headset Port Connects to headsets (3.5 mm plug).
NOTICE: Do not use 2.5 mm to 3.5
mm adapters
Volume Up/Down Buttons Increase and decrease audio volume.
PTT Button Push-to-Talk (PTT) button enables Push-to-Talk
services over a broadband network and can al-
so be interconnected to Project 25 Land Mobile
Radio (LMR) networks. The PTT application of-
fers calls, alerts, group calls, Talk Group calls,
and Talk Group monitoring and scanning.
For PTT button and application operations, see
Push-To-Talk for LEX L10i manual.
IMPORTANT: The PTT is an optional
feature that requires installation of
software and system connection fol-
lowing the LEX L10i shipping. To veri-
fy if the PTT feature is enabled on the
device, contact your technical sup-
port.
Power Button Press and hold to turn on the device. Press to
turn the screen on or off. Press and hold to se-
lect one of these options:
•Power On/Off — Turn On/Off.
•Airplane mode — Disables all wireless con-
nections.
•Service switch — Switches between public
and Private carrier modes.
•Covert mode — In covert mode, all sounds,
and visual indications are turned off. See
Covert Mode on page 44.
•Vibrate mode — Sets to vibrate only.
•Speaker on — Routes the earpiece sound
to the speaker.
Front Camera Used to capture live video for video calls.
Table continued…
MN002347A01-A
Chapter 2: Getting Started
32 Send Feedback
Item Function
Earpiece Provides audio in handset mode.
External Charging Contacts Provides power to the device from cradles.
Battery Cover Removal Slot Assists in battery cover removal to provide ac-
cess to the battery, SIM, CRYPTR, and mi-
croSD card holders.
microUSB Port Provides USB client and host communications.
Rear Camera and Flash Takes photos and video, and provides flash illu-
mination for the camera.
Unpacking
Carefully remove all protective material from the LEX L10i and save the shipping container for later
storage and shipping.
Verify that the following were received:
• LEX L10i
• Battery Cover
• 2280 mAh Lithium-ion battery
• Charger
• USB Cable
• Regulatory Guide
• Quick Start Guide
Inspect the equipment for damage. If any equipment is missing or damaged, contact the Motorola
Solutions Support Center immediately.
Setting Up the LEX L10i
The initial setup of the LEX L10i requires that the battery and any cards be installed.
NOTICE: The device may be delivered to you with battery, SIM card, microSD card and/or
CRYPTR cards already installed, activated, and ready for use. In this case, ignore steps 2
through 6 of the following section if they were already performed.
Before using the LEX L10i for the first time, perform the following:
1Remove the screen protection film from the LEX L10i screen. (See Removing the Screen Protective
Film on page 34).
2Install the public and/or Private SIM cards. (See Installing the Public and Private SIM Cards on
page 36).
3Install the microSD or CRYPTR card (optional). (See Installing a microSD or CRYPTR micro
Encryption Card on page 35).
4Install the battery. (See Installing the Battery on page 37).
5Install the battery cover.
6Charge the LEX L10i. (See Charging the LEX L10i on page 37).
MN002347A01-A
Chapter 2: Getting Started
Send Feedback 33
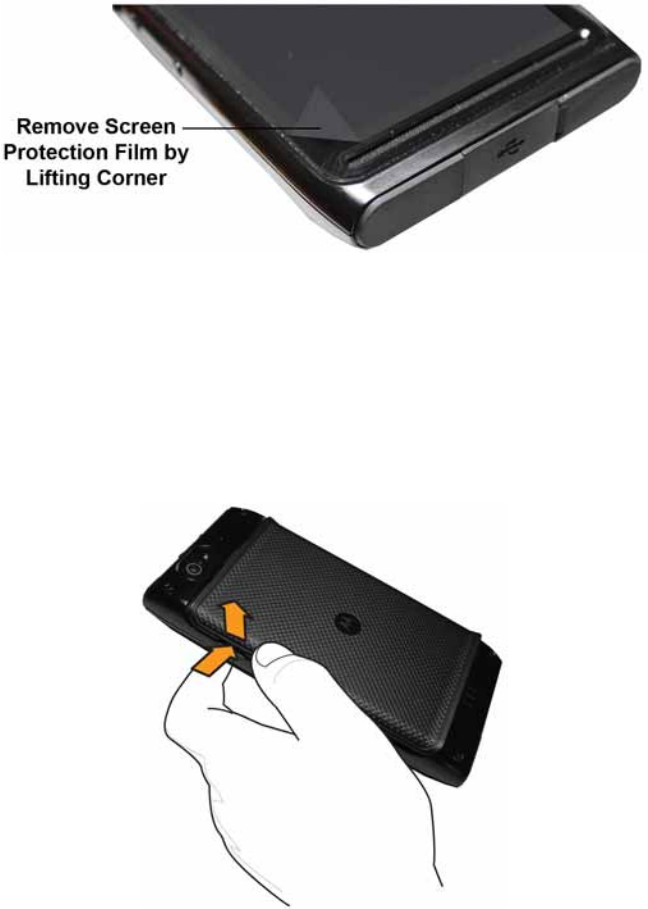
Removing the Screen Protective Film
The LEX L10i is provided with a screen protective film that protects the device during shipping.
To enable proper operation of the LEX L10i, the screen protector must be removed before use.
Figure 3: Removing the Screen Protective Film
Removing the Battery Cover
This procedure explains how to remove the battery cover.
Procedure:
1Hold the LEX L10i firmly as shown.
2Using the battery cover removal slot, gently lift the battery cover up and away from the LEX L10i.
Figure 4: Removing the Battery Cover
MN002347A01-A
Chapter 2: Getting Started
34 Send Feedback
Installing a microSD or CRYPTR micro Encryption Card
The LEX L10i card holder can support either a microSD card or a CRYPTR micro encryption card. The
microSD card is a removable flash memory used for storing media on the LEX L10i. The LEX L10i can
support microSD cards with up to 64GB memory space. The CRYPTR micro encryption card is used
for voice encryption in features such as data and phone over Virtual Private Network (VPN) and Push-
to-Talk (PTT) communication. The CRYPTR micro provides FIPS 140-2 Level 3 storage for
credentials/keys for Data At Rest (DAR) encryption and MVPN. The slot of the card is located under
the LEX L10i battery
When and where to use:
NOTICE: The LEX L10i may be delivered to you with battery, SIM card, and microSD or
CRYPTR card already installed, activated, and ready for use. In case a CRYPTR is pre-
installed in the LEX L10i, you must change the CRYPTR password provided by your technical
support. This is not a password to access the device but a password to protect Motorola
Solutions secure applications. The CRYPTR password is required whenever the LEX L10i is
restarted.
Procedure:
1Slide the card into the card holder slot with contacts facing down.
2Push the card into the slot until it is fully seated and locked into place.
Figure 5: Installing the microSD or CRYPTR micro Encryption Card
Removing the microSD or CRYPTR Card
This procedure explains how to remove a microSD or CRYPTR micro encryption card.
Procedure:
1Press and hold the Power button for three seconds.
2Touch Power Off.
3Touch OK.
4Lift the battery cover.
5Push the Card Holder lock down to release the card.
6Remove the card from the holder.
7Replace the battery cover.
MN002347A01-A
Chapter 2: Getting Started
Send Feedback 35
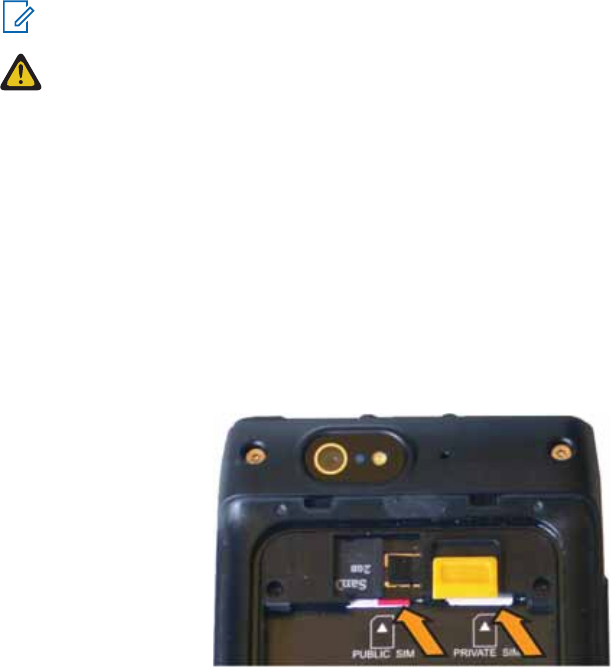
Installing the Public and Private SIM Cards
Public and private phone services require a Subscriber Identification Module (SIM) card.
Prerequisites: The SIM card can contain the following information:
• Mobile phone service provider account details.
• Information regarding service access and preferences.
• Contact information, which can be moved to the People application on the LEX L10i.
• Any additional subscribed services.
NOTICE: The LEX L10i requires activated SIM cards. Obtain activated SIM cards from your
organization administrator.
CAUTION:
• Electrostatic discharge (ESD) precaution.
• For proper ESD precautions to avoid damaging the SIM card. Proper ESD precautions
include, but not limited to, working on an ESD mat and ensuring that the user is properly
grounded.
When and where to use: Use this procedure to install a SIM card:
Procedure:
1If the battery is in place, remove the battery as described in Removing the Battery on page 37.
2Slide the SIM card into the SIM card holder with the contacts facing down. Note the card notch
position.
3Push that the SIM card into the holder until it is fully seated and flat.
You should hear a click when the SIM card in fully in place.
Figure 6: Installing the Public and Private SIM Cards
Removing the Public and Private SIM Cards
When and where to use: Use this procedure to remove the public or private SIM cards.
Procedure:
1Press and hold the Power button for three seconds.
2Tap Power Off.
3Tap OK.
4Lift the battery cover.
MN002347A01-A
Chapter 2: Getting Started
36 Send Feedback

5Slide the battery latch to Unlock position.
6Lift the battery out of the LEX L10i.
7Push the SIM card to release it from the holder.
8Remove the SIM card.
9Place the battery back into the LEX L10i.
10 Snap the battery cover back into place.
Installing the Battery
When and where to use: Perform this procedure to install a battery.
Procedure:
1Remove the battery from the packaging.
2Insert the battery into the battery compartment with the battery contacts facing the bottom of the
LEX L10i.
Figure 7: Installing the Battery
3Press the top of battery into place.
4Place the battery cover into place.
5Ensure that all battery cover snaps are fully engaged.
Removing the Battery
When and where to use: Perform this procedure to remove the battery.
Procedure:
1Slide a finger nail (preferably a thumb nail) into the Battery Cover removal slot and gently pull
the Battery Cover away from the LEX L10i
2Remove the Battery Cover.
3Slide the Battery Lock up and hold it.
4With the tip of your finger, lift up the battery from the side closest to the top side of the LEX L10i.
Charging the LEX L10i
Before using the LEX L10i for the first time, charge the battery using the provided USB Charger and
USB Cable or connect the USB Cable to the USB port of a personal computer. An unused battery fully
charges in less than six hours.
The LEX L10i battery can also be charged by one of the optional charging cradles.
MN002347A01-A
Chapter 2: Getting Started
Send Feedback 37

Figure 8: Charging the LEX L10i
NOTICE: Keep the USB cover closed when USB not in use.
NOTICE: For detailed description, installation and operation of the LEX L10i accessories, refer
the quick start guides provided with each accessory.
Charging Temperature
Charge batteries in temperatures from 0°C to 40°C (32°F to 104°F). Note that charging is intelligently
controlled by the LEX L10i.
To accomplish this, for small periods of time, the LEX L10i alternately enables and disables battery
charging to keep the battery at acceptable temperatures. The LEX L10i LED indicates when charging
is disabled due to abnormal temperatures by fast blinking amber (once every 2 seconds).
Battery Charge Indications
The Charge and Notification LED is located at the top, front of the LEX L10i.
Battery charging and power level are also indicated by a battery icon on the status bar.
NOTICE: Before checking the battery charge level, remove the LEX L10i from any power
source (cradle or USB cable connection).
Figure 9: Charge and Notification LED
Table 2: Charge and Notification LED — Charging Indications
Status Indications
Off Battery is not charging. Could indicate that:
Table continued…
MN002347A01-A
Chapter 2: Getting Started
38 Send Feedback

Status Indications
• Device is not inserted correctly in the cradle
• Device is not connected to a USB cable
• Charger or cradle is not powered
Slowly blinking red (once every 2 seconds) Battery power is extremely low (less than 10%
power left).
Solid red LEX L10i is charging.
Fast blinking red (once every 0.5 second) Charging error:
• Temperature is too low or too high
• Charging has gone on too long without com-
pletion (typical charge is four hours)
Slowly blinking green (once every 2 seconds) Battery is greater than 90% charged.
Solid green Device is completely charged.
Slowly blinking blue (once every 4 seconds) A new notification has been received.
Alternately blinking blue (1 second) and red (3
seconds)
Device is charging and a new notification is re-
ceived.
Alternately blinking blue (1 second) and green
(3 seconds)
Device is completely charged and a new notifi-
cation is received.
Slowly blinking blue and red (every other sec-
ond)
Battery power is extremely low (less than 10%
power left) and a new notification is received.
Alternately blinking blue (1 second) and fast
blinking red (every 0.5 seconds for 3 seconds)
A new notification is received during a charging
error.
Slowly blinking amber (once every 2 seconds) Device is waiting to charge.
When the battery power falls below a predetermined level the icon indicates the status and a battery
dialog box appears indicating the status of the battery. The message displays until the user taps
Dismiss.
To monitor battery usage, from the Home screen, touch → → Battery.
Battery Management
This topic explains how to check the status of your battery and what you can do to make your battery
last longer.
NOTICE: Before checking the battery charge level, remove the LEX L10i from any AC power
source (cradle or cable).
To check the charge status of the main battery, tap → → About phone → Status.
Battery status indicates that the battery is discharging and Battery level lists the battery charge (as a
percentage of fully charged).
MN002347A01-A
Chapter 2: Getting Started
Send Feedback 39
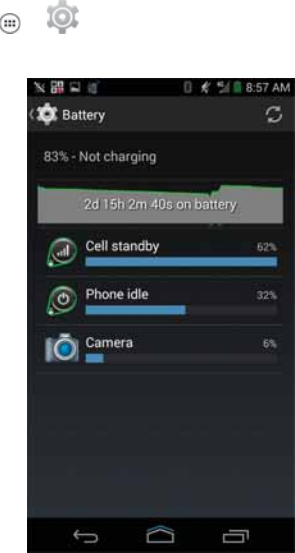
Monitor Battery Usage
The Battery screen lists which applications consume the most battery power. Also use it to turn off
applications that were downloaded if they are consuming too much power.
To monitor battery usage, tap → → Battery.
Figure 10: Battery Screen
The Battery screen lists the applications using the battery. The discharge graph at the top of the
screen shows the rate of the battery discharge since last charged (short periods of time when
connected to a charger are shown as thin green lines at the bottom of the chart), and how long it has
been running on battery power.
Tap an application in the Battery screen to display details about its power consumption. Different
applications display different information. Some applications include buttons that open screens with
settings to adjust power use.
MN002347A01-A
Chapter 2: Getting Started
40 Send Feedback

Low Battery Notification
When the battery charge level drops below 20%, the LEX L10i displays a notice to connect the LEX
L10i to power. The user should charge the battery using one of the charging accessories.
Figure 11: Low Battery Notification
When the battery charge drops below 10%, the LEX L10i displays a notice to connect the LEX L10i to
power. The user must charge the battery using one of the charging accessories.
When the battery charge drops below 4%, the LEX L10i turns off. Anytime the user then tries to power
on the LEX L10i, the following screen appears.
Figure 12: Battery Depleted Screen
The user must charge the LEX L10i using one of the charging accessories to retain data.
Battery Optimization
Observe the following battery saving tips:
• Leave the LEX L10i inside a cradle connected to AC power at all times when not in use.
• Turn off Bluetooth if not needed.
• Turn off Wi-Fi if not needed.
• Change screen time-out to as short as possible.
MN002347A01-A
Chapter 2: Getting Started
Send Feedback 41
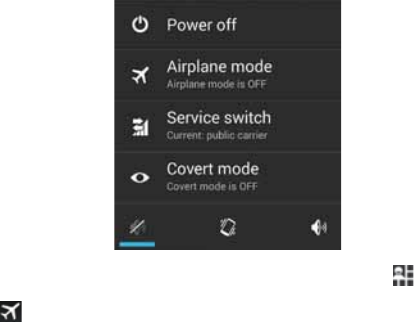
• Charge the LEX L10i when not in use.
• Set the screen to Suspend (Sleep) after a short period of non-use.
• Reduce screen brightness.
• Minimize use of applications that keep the LEX L10i from suspending, for example, music or video
applications.
Turning Off the Radio
When and where to use: Use this procedure to turn off the LEX L10i radios.
Procedure:
1Press the Power button until the Quick Settings menu appears.
Figure 13: Quick Settings Menu — Airplane Mode
2Tap Airplane mode. Alternately, open the Notification panel and tap → Airplane Mode.
The airplane icon appears in the Status bar indicating that all the radios are off.
MN002347A01-A
Chapter 2: Getting Started
42 Send Feedback

Powering On the LEX L10i for the First Time
Press the Power button to turn on the LEX L10i. The device boot screen displays as the LEX L10i
boots.
Figure 14: LEX L10i Boot Screen
Powering Off the LEX L10i
When and where to use: Use this procedure to power off the LEX L10i.
Procedure:
1Press and hold the Power button until the Power Button menu appears.
Figure 15: Selecting Power Off
2Tap Power off and then OK.
Your phone will shut down is displayed on the screen.
MN002347A01-A
Chapter 2: Getting Started
Send Feedback 43

Entering and Exiting the Suspend Mode
Suspend mode (also known as sleep mode) is a low-power mode of operation that helps reduce
electrical power consumption by shutting down parts of the LEX L10i that are not in use. The LEX L10i
goes into Suspend mode when the Power button is pressed or after a time out period of inactivity.
When and where to use: Use this procedure to enter and exit Suspend mode:
Procedure:
1To enter Suspend mode, press and release the Power button.
The LEX L10i screen turns off.
NOTICE: In Suspend mode, the following items continue to operate:
•Power button
•PTT Button (if set to be used)
• Notification LEDs
• Wireless communication.
2To exit Suspend mode, press and release the Power button.
Setting Time Out to Enter Suspend Mode
When and where to use: Use this procedure to set the period of inactivity before suspend mode
occurs.
Procedure:
1From the Home screen, tap: → → Display → Sleep.
2Select the inactivity duration before Suspend mode becomes active.
3Tap .
Covert Mode
In the Covert Mode, the LEX L10i goes dark and quiet. All visible and audible LEX L10i alerts and
notifications are shut down. This feature makes the LEX L10i effectively unnoticeable even in a silent
and dark environment.
In Covert Mode, the following sounds, visual indications, and keys of the LEX L10i are disabled:
• Display brightness
• Touchscreen
• Keylight
• LED indications
• Vibration
• Speaker audio
NOTICE: In Covert Mode, sound is routed to a Bluetooth headset, if connected or sound is
routed to a wired earpiece, if connected. Alternatively, sound is routed to the LEX L10i
earpiece.
• Tone indications
MN002347A01-A
Chapter 2: Getting Started
44 Send Feedback
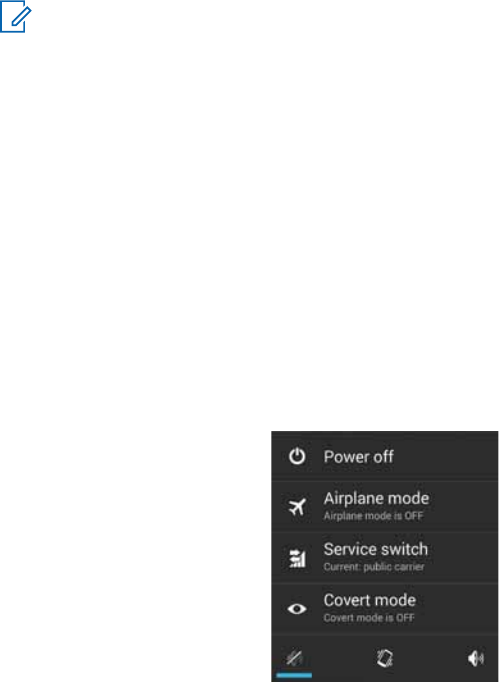
NOTICE: In Covert Mode, the following features remain active:
-Power button
-PTT button
-Volume button
- Four front panel keys
-Camera button
- Audio or tone indications are available using a wired headset (through headset port) or a
Bluetooth headset
Turning On Covert Mode
When and where to use: Use this procedure to turn on Covert Mode.
Procedure:
1Press and hold the Power button for at least two seconds.
The following Power Button menu displays:
Figure 16: Power Button Menu
2Tap Covert mode.
The LEX L10i screen goes blank.
Turning Off Covert Mode
When and where to use: Use this procedure to turn off Covert Mode.
Procedure:
1Press and hold the Power button for at least two seconds.
The following Power Button menu displays:
MN002347A01-A
Chapter 2: Getting Started
Send Feedback 45

Figure 17: Power Button Menu
2Tap Covert mode.
The Home screen appears.
Locking the LEX L10i
The lock screen automatically displays after predefined time out to prevent unauthorized people from
using the device. The device does not lock at the same time as it is suspended. The device can also
be locked manually by the user to disable unwanted key presses or screen tap or to keep data
secured. To manually lock the device, press and release the Power button. When the device is locked
and cellular network signal is available, phone calls, notification of new messages, missed calls and
upcoming appointments still can be received. The device locks after a specified time.
Selecting a Locking Option
When and where to use: Security dictates a specific level of locking for the LEX L10i. Use this
procedure to select a locking option.
Procedure:
1Tap .
2Tap .
3Tap Security.
4Tap Screen lock.
The following options are displayed:
•None.
•Slide — User slides the lock to unlock the device.
•Pattern — User must replicate a specified pattern to unlock the device.
•PIN — User must enter a pin to unlock the device.
•Password — User must enter a specified password to unlock the device.
5Select an option.
If None or Slide is selected, the Security screen is re-displayed. If Pattern, PIN, or Password
is selected, a pattern, pin or password must be specified. Then, the Security screen is re-
displayed.
The LEX L10i is now set to lock.
MN002347A01-A
Chapter 2: Getting Started
46 Send Feedback

Postrequisites: Specify a pattern as described in Specifying a Pattern on page 47 Specify a pin, or
password as described in Specifying a PIN or Password on page 47. Then, specify a timeout value
as described in Setting the Timeout for Locking the LEX L10i on page 47.
Specifying a Pattern
Prerequisites: The Pattern option must be selected for Screen lock.
When and where to use: Use this procedure to specify a pattern to unlock your LEX L10i.
Procedure:
1Tap .
2Tap .
3Tap Security lock.
4Select Pattern.
5Using a finger, draw a pattern to unlock your LEX L10i
6Tap Continue.
7Draw the same pattern again.
8Tap Confirm.
The Security screen is re-displayed.
A pattern must be entered to unlock the LEX L10i.
Specifying a PIN or Password
Prerequisites: The PIN or Password option has been selected for Screen lock.
When and where to use: Use this procedure to specify a PIN or password to unlock your LEX L10i.
Procedure:
1Tap .
2Tap .
3Tap Security lock.
4Select PIN or Password.
5Enter a pin or password.
6Tap Continue.
7Enter the pin or password again.
8Tap OK.
The Security screen is re-displayed.
A pin or password must be entered to unlock the LEX L10i.
Setting the Timeout for Locking the LEX L10i
Prerequisites: Screen lock must be set to Pattern, PIN, or Password.
MN002347A01-A
Chapter 2: Getting Started
Send Feedback 47

When and where to use: Use this procedure to set the timeout value to lock the LEX L10i.
Procedure:
1Tap .
2Tap .
3Tap Security.
4Tap Automatically lock.
A list of timeout values is displayed.
5Select a timeout value from the list.
6The Security screen is re-displayed.
Unlocking the LEX L10i
When the LEX L10i is not used for a period of time and the user tries to access the device, the Lock
screen displays.
Depending on which Screen lock option is active, the user does one of the following:
• Nothing
• Slide the slider to the unlock position
• Enter a pattern, pin, or password.
Unlocking the LEX L10i Using a Pattern
When and where to use: Use this procedure to unlock the LEX L10i with a pattern.
Procedure:
1Press and release the Power button.
2Using a finger, draw the specified pattern on the screen.
Once the correct pattern is drawn, the device unlocks.
Unlocking the LEX L10i Using a PIN or Password
When and where to use: Use this procedure to unlock the LEX L10i with a PIN or password.
Procedure:
1Press and release the Power button.
2In the text field, enter your pin or password.
3Tap Done.
The device unlocks and the Home screen is shown.
MN002347A01-A
Chapter 2: Getting Started
48 Send Feedback

Calling Emergency from a Locked LEX L10i
You can make an emergency call even when the LEX L10i is locked and you do not remember the
PIN.
When and where to use: Use this procedure to make an emergency call when the device is locked
and you do not remember the PIN:
Procedure:
1Tap EMERGENCY CALL at the bottom of the lock screen.
The Emergency Dialer screen displays.
2Enter the emergency number.
3Tap .
Setting the Date and Time
When the LEX L10i is connected to cellular network, date and time are automatically synchronized.
When and where to use: Perform this procedure to manually set the date and time:
Procedure:
1Tap .
2Tap .
3Tap Date & time.
4Tap Automatic date & time to disable automatic date and time synchronization.
5Tap Automatic time zone to disable automatic time zone synchronization.
6Tap Set date.
7Slide your finger up and down to select the month, date and year.
8Tap Done.
9Tap Set time.
10 Slide your finger up and down to select the hour, minutes and part of the day.
11 Tap Done.
12 Tap Select time zone.
13 Tap to select a time zone from the list.
14 Tap .
Setting the Display
The following LEX L10i display features can be customized:
• Brightness — Set the brightness of the display.
• Auto-rotate — Set the content to rotate automatically when the device is turned.
• Sleep — Set the length of time the device waits before turning off the display’s backlight.
• Daydream — Set the device to launch a screensaver when the device is docked inside a cradle or
charging.
MN002347A01-A
Chapter 2: Getting Started
Send Feedback 49

• Font size — Change the font size for display text.
• Cast screen — Enable the device to project the screen to a TV or other device.
Setting Screen Brightness
When and where to use: Use this procedure to set the screen brightness.
Procedure:
1Tap .
2Tap .
3Tap Display.
4Tap Brightness.
5Tap Automatic brightness to set the device to automatically adjust the brightness using the
built-in light sensor. Use the slider to set a brightness level.
6Tap .
Setting Screen Rotation
Screen rotation enables the LEX L10i to automatically determine the orientation of the screen to
portrait or landscape.
When and where to use: Use this procedure when you want to set your screen to automatically
rotate:
Procedure:
1 NOTICE: Some applications may not support screen rotation.
Tap .
2Tap .
3Tap Display.
4Check Auto-rotate screen to automatically switch orientation when the LEX L10i is rotated.
NOTICE: The Home screen does not rotate.
5Tap .
Setting Up Sleep Mode
Use this procedure to set up sleep mode (screen time-out).
Procedure:
1Tap .
2Tap .
3Tap Display.
4Tap Sleep.
MN002347A01-A
Chapter 2: Getting Started
50 Send Feedback

5Select one of the sleep values:
• 15 seconds
• 30 seconds (default)
• 1 minutes
• 2 minutes
• 5 minutes
• 10 minutes
• 30 minutes
6Tap .
Setting Up Daydream
When and where to use: The Daydream application behaves as a screensaver when the LEX L10i is
docked inside a cradle and/or in sleep mode. Use this procedure to set up a screensaver.
Procedure:
1From the Home screen, tap .
2Tap .
3Tap Display.
4Tap Daydream.
5Select from Clock, Colors, Photo Frame or Photo Table.
6Tap to configure the item selected in the previous step.
7Tap WHEN TO DAYDREAM and select when you would like the feature to be active (While
docked, while charging or either).
8Tap START NOW to preview and confirm your selection.
9Tap .
Setting the Font Size
When and where to use: Use this procedure to change the font size.
Procedure:
1Tap .
2Tap .
3Tap Display.
4Tap Font size.
5Select one of the font size values:
• Small
• Normal (default)
• Large
• Huge
MN002347A01-A
Chapter 2: Getting Started
Send Feedback 51

6Press .
Enabling Cast Screen
When and where to use: Use this procedure to enable the LEX L10i to project the its screen to a TV
or other device.
Procedure:
1From the Home screen, tap .
2Tap .
3Tap Display.
4Tap Cast screen.
5Tap .
6Select Enable wireless display.
Projecting the LEX L10i Screen on Another Device
Prerequisites: The Cast screen must be enabled.
When and where to use: Use this procedure to project the LEX L10i screen on another device.
Procedure:
1From the Home screen, tap .
2Tap .
3Tap Display.
4Tap Cast screen.
5Select the device to show your device screen on.
Your device should now display on the other device.
6To stop projecting your device screen, swipe down from the Status bar and tap Disconnect
under Cast screen.
General Sound Setting
Use the Sounds settings to configure media and alarm volumes.
On the Home screen, tap → → Sound.
Alternately, open the Notification panel and tap → Settings → Sound.
MN002347A01-A
Chapter 2: Getting Started
52 Send Feedback
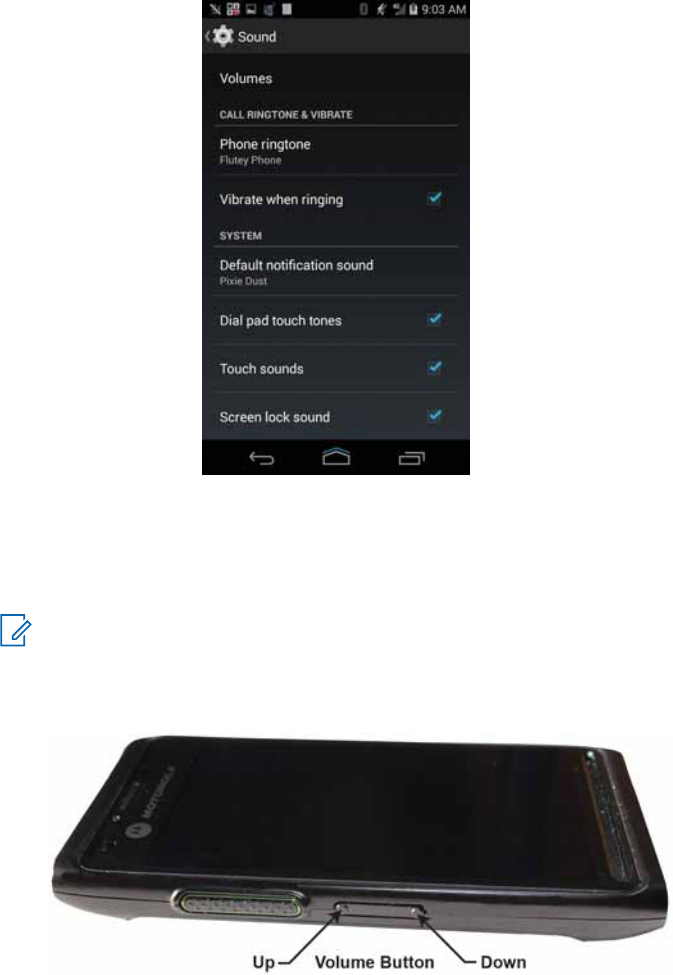
Figure 18: Sound Screen
•Volumes – Use to change the volume of media, ringtones, notifications, and alarms.
•Call Ringtone and Vibrate
-Phone ringtone — Tap to select a ringtone to sound when an incoming call is received.
-Vibrate when ringing — Check to make the device vibrate when a call is received.
NOTICE: Setting volume can also be done by pressing the Volume button, up and down,
during a call, or while playing music or a video. When not on a call, pressing the Volume
button all the way down to set the device to vibrate. During an in-coming call, pressing
the Volume button up and down changes the ringtone volume.
Figure 19: Volume Button
•System
-Default notification sound — Tap to select a sound to play for all system notifications.
-Dial pad tap tones — Check to play a sound when a device key is touched.
-Touch sounds — Check to play a sound when making screen selections.
MN002347A01-A
Chapter 2: Getting Started
Send Feedback 53

-Screen lock sounds — Check to play a sound when locking and unlocking the screen.
-Vibrate on tap — Check to have the device vibrate when touching soft keys and on certain
screen interactions.
-Emergency tone — Select and check Alert to play a tone or Vibrate when an emergency
notification is received. Select Off to disable emergency notification.
Public and Private Carrier Modes
The LEX L10i operates on both public and private carriers.
Private Mode
• LTE B14
Public Mode
• LTE B4 and B13
• CDMA EVDO Rev. A (Band 0, Band 1) 3G, 1X
The user can manually switch modes to operate on the Private Mode LTE network or the Public Carrier
Mode.
The LEX 10i Mission Critical LTE Handheld operates in:
•4G LTE Bands: 3, 4, 5, 7, 8, 20, 26, 28
•3G/UMTS Bands: 1, 2, 4, 5, 8 Quad Band
•GSM: 850 MHz, 900 MHz, 1800 MHz, 1900 MHz
•802.11 a/b/g/n Wi-Fi and Miracast
Switching Modes Using the Power Button
When the LEX L10i is equipped with Private and Public SIM cards, the Power button can be used to
switch modes.
Prerequisites: The LEX L10i is equipped with Private and Public enabled SIM cards.
When and where to use: Use this procedure to switch modes using the power button.
NOTICE: You may need to switch between private and public network modes when you want to
use capabilities provided by one network that are not provided by the other. For example, if the
phone is in private mode, switch to public mode before you can dial numbers that are not
included in the private network.
Procedure:
1Press and hold the Power button until a menu appears.
MN002347A01-A
Chapter 2: Getting Started
54 Send Feedback
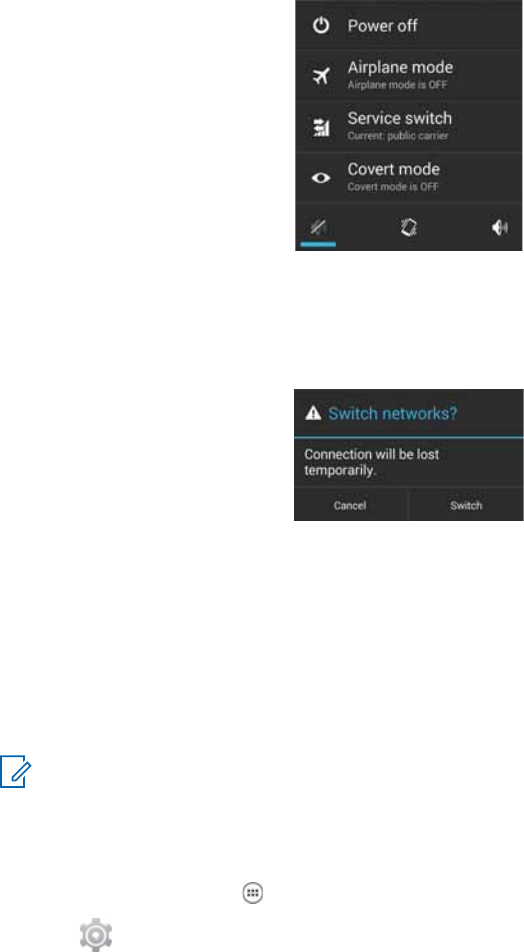
Figure 20: Service Switch
The current carrier mode is indicated under the Service switch option.
2Tap Service switch.
A confirmation popup is displayed.
Figure 21: Switch Networks Confirmation Popup
3Tap Switch.
Switching Modes Using the Settings App
When the LEX L10i is equipped with Private and Public SIM cards, the Settings application can be
used to switch modes.
Prerequisites: The LEX L10i is equipped with Private and Public enabled SIM cards.
When and where to use: Use this procedure to switch modes using the setting applications.
NOTICE: You may need to switch between private and public network modes when you want to
use capabilities provided by one network that are not provided by the other. For example, if the
phone is in private mode, switch to public mode before you can dial numbers that are not
included in the private network.
Procedure:
1On the Home screen, tap .
2Tap .
3Tap More... .
4Tap Mobile networks.
5Tap Select network.
6Select Public or Private.
A confirmation popup is displayed.
MN002347A01-A
Chapter 2: Getting Started
Send Feedback 55
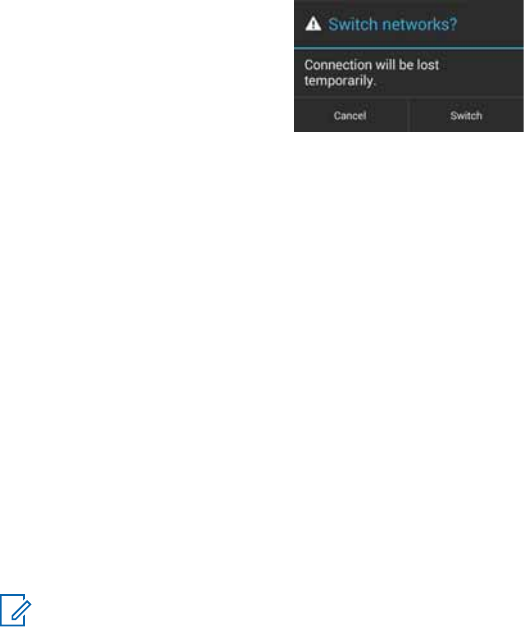
Figure 22: Switch Networks Confirmation Popup
7Tap Switch.
LEX L10i Emergency Button
The LEX L10i includes an Emergency Button which aids responders during emergencies. This
feature helps reduce response times in an emergency situation.
The device must be pre-configured based on the responder’s specific requirements before it is given to
a user. Once the device is configured to use the Emergency Button, users can access the actions by
swiping the Home screen icon up to access the Home screen overlay.
The Emergency Button supports the following actions:
• Initiate a phone call — The Emergency Button can be pre-configured to initiate an E911 call or to
initiate a call to a customized phone number.
• Send an SMS notification (with/without GPS) — The Emergency Button can be pre-configured to
send an SMS notification to customized numbers. Location coordinates (if available) of LTE handset
and information about paired (if paired) Land Mobile Radio (LMR) is also sent as part of the text
message.
• Initiate a phone call and send an SMS notification (with/without GPS) — The Emergency Button
can be pre-configured to perform both of the above actions.
NOTICE: You are required to have a voice and text plan to initiate calls and send SMS
notifications.
MN002347A01-A
Chapter 2: Getting Started
56 Send Feedback

Chapter 3
Using the LEX L10i
This chapter explains the indicators, buttons, status icons, and controls on the LEX L10i. This chapter
also provides basic instructions for using the device.
Using the Touchscreen
The multi-tap sensitive screen is used to operate the LEX L10i.
Table 3: Using the Touchscreen
Action Result
Tap Tap to:
• select items on the screen
• type letters and symbols using the on-screen
keyboard
• press on-screen buttons
Tap and Hold Tap and hold:
• an item on the Home screen to move it to a
new location or to the trash
• an item in Apps to create a shortcut on the
Home screen
• an empty area on the Home screen until the
menu appears
Drag Tap and hold an item for a moment and then
move finger on the screen until reaching the
new position.
Swipe Move finger up and down or left and right on the
screen to:
• unlock the screen
• view additional Home screens
• view additional application icons in the
Launcher window
• view more information on an application’s
screen
Double-tap Tap twice on a web page, map, or other screen
to zoom in and out.
Pinch In some applications, zoom in and out by plac-
ing two fingers on the screen and pinching them
together (to zoom out) or spreading them apart
(to zoom in).
MN002347A01-A
Using the LEX L10i
Send Feedback 57
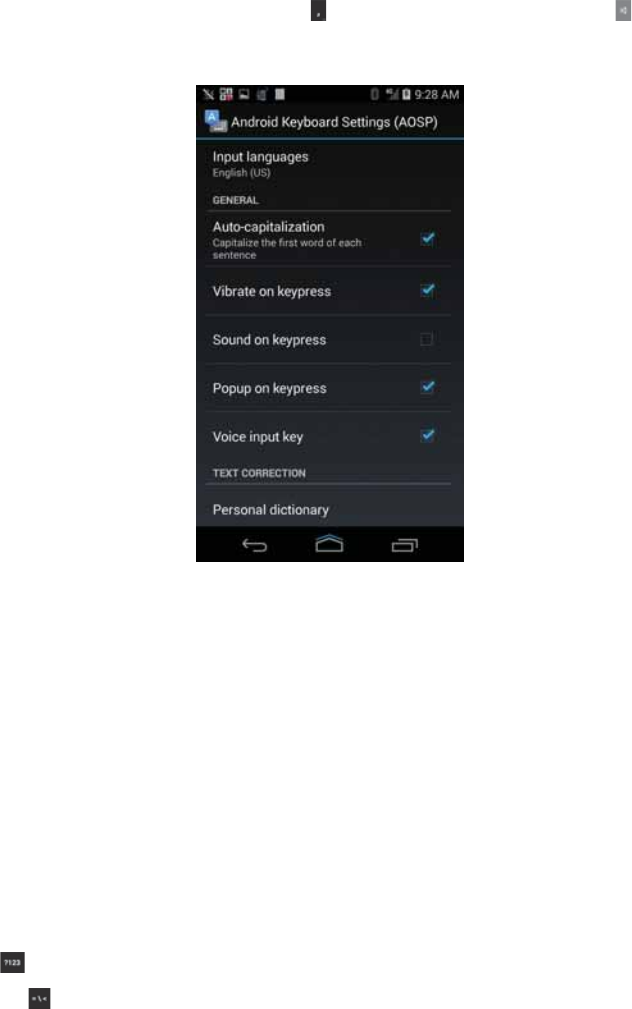
Using the On-Screen Keyboard
The on-screen keyboard is used to enter text in a text field.
To configure the keyboard settings, tap and hold (comma key) > slide your finger up to and then
select Android Keyboard Settings.
Figure 23: Android Keyboard Settings
A description of the settings can be found in Android Keyboard Settings on page 59.
Editing Text
Edit entered text and use menu commands to cut, copy, and paste text within or across applications.
Some applications do not support editing some or all of the text they display; others may offer their own
way to select text.
Entering Numbers, Symbols and Special Characters
To enter numbers and symbols:
• Without switching to the Numbers or Symbols keyboard, tap and hold one of the top-row keys until
a menu appears then select a number. Keys with alternate characters display an ellipsis ( ... ) below
the character.
• Tap the Shift key to enter one capital letter.
• Tap and hold the Shift key until it changes state (Shift key is underlined) to enter two or more
capital letters. Tap Shift key again to return to the lowercase keyboard.
• Tap to switch to the numbers and symbols keyboard.
• Tap the key on the numbers and symbols keyboard to view additional symbols.
To enter special characters, tap and hold a number or symbol key to open a menu of additional
symbols.
MN002347A01-A
Chapter 3: Using the LEX L10i
58 Send Feedback

• A larger version of the key displays briefly over the keyboard.
• Keys with alternate characters display an ellipsis ( ... ) below the character.
Android Keyboard Settings
The Android Keyboard Settings may be personalized to meet your preferences.
Table 4: Android Keyboard Settings
Setting Description
GENERAL
Input Languages Selects the language used in the keyboard.
Auto-capitalization Automatically capitalize the first letter after a pe-
riod.
Vibrate on keypress Vibrates the device when a key is pressed.
Sound on keypress Makes a sound on the device when a key is
pressed.
Popup on keypress Pops up a duplicate of the key pressed.
Voice input key Allows you to speak the name of the key to in-
put a key.
TEXT CORRECTION
Personal Dictionary Uses your personal dictionary when correcting
words.
Add-on dictionaries Allows you to add additional dictionaries to cor-
rect words.
Block offensive words Blocks offensive words from being suggested to
correct words.
Auto-correction Sets the level of auto-correction to: Off, Mod-
est, Aggressive, or Very aggressive.
Show correction suggestions Displays a list of corrections so that you can se-
lect make a selection.
OTHER OPTIONS
Next word suggestions Anticipates the next word that you want to type
based on the last word typed.
Advanced settings The Advanced settings should only be set by
experts.
MN002347A01-A
Chapter 3: Using the LEX L10i
Send Feedback 59
Motorola Solutions Home Experience (MHx)
The Motorola Solutions Home Experience (MHx) is the engine that drives the user interface of the LEX
L10i. Specifically, MHx provides a unique experience for customizing the LEX L10i Home screen.
LEX L10i Home Screen
The Home screen displays after the LEX L10i turns on and unlocks.
Figure 24: Default Home Screen
The Home screen is completely customizable depending on the specifications for your agency. Each
organization may have a different Home screen. The Radio Manager (RM) Tool, described in the LEX
L10i Service Provisioning Guide, can be used to stage the Home screen on your devices.
NOTICE: When CRYPTR Card is used, the device requires setting a password after initial boot
and entering this password whenever the device restarts. This is not a password to access the
device but a password to protect Motorola Solutions secure applications.
After suspend mode or screen time-out, the screen displays with the lock slider. Slide in any
direction towards the outside of the screen to unlock the screen.
NOTICE: If you have changed the Screen lock option, depending on the selected option, you
will have to enter a pattern, pin, or password to unlock the LEX L10i.
The Home screen consists of the following items:
• Core Applications Widget — Provides shortcuts such as:
- Phone Dialer
- Contacts
- Application Launcher
- Camera
- Search Feature
MN002347A01-A
Chapter 3: Using the LEX L10i
60 Send Feedback

- Other shortcuts determined by your agency
• Calendar Widget
• email Widget
• Messaging Widget
• Search Widget
• My Apps Widget
• Other Widgets determined by your agency
• Home Screen Overlay — Provides quick access to core functions.
The Home screen provides four screens for placement of widgets and shortcuts. Swipe the screen left
or right to view the additional screens.
Home Screen Overlay
The Home screen overlay provides quick access to core functions (Emergency Button). Swipe the
Home screen up from the icon to access the Home screen overlay.
Customizing the Home Screen
The Home screen contains panels that can be accessed by swiping the page to the left or right. Panels
provide more space for adding widgets to the Home screen and can be customized by the user.
This section describes how to:
• Add Widgets
• Move Widgets
• Remove Widgets
• Configure Home screen settings
Adding Widgets
Widgets are applications that run on your Home screen.
When and where to use: Use this procedure to add one or more widgets to your Home screen.
Procedure:
1Swipe the Home screen left or right to locate the panel that you want to add a widget to.
2Touch and hold a gray area of the panel until you see the following icons near the bottom of the
screen:
3Tap the Widgets icon to reveal the widgets.
MN002347A01-A
Chapter 3: Using the LEX L10i
Send Feedback 61
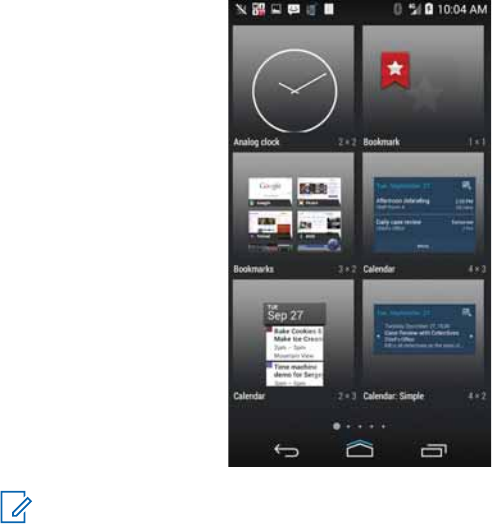
Figure 25: Widgets Screen
NOTICE: To identify Motorola Solutions Widgets, their names are preceded by MHx.
4The Widgets screen contains multiple panels. Swipe the Widgets screen left or right to locate
the widget that you want to add.
5Touch and hold the widget; then, slide the widget down the screen and place it in the current
panel.
If there is not enough room in the panel or you want to place the widget in a new panel, slide the
widget to the right of the screen until a blank panel appears. Then, place the widget in the new
panel.
MN002347A01-A
Chapter 3: Using the LEX L10i
62 Send Feedback
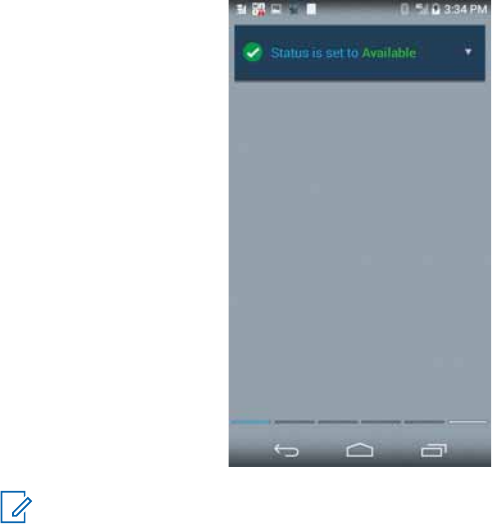
Figure 26: Example of a Widget Added to New Panel
NOTICE: Some widgets are re-sizable as soon as you place it in a panel. Press and hold
the widget. If the re-size tool displays (four dots, one on each side of the widget), you can
re-size the widget by dragging the dots on the re-size tool.
Adding Shortcuts to the My Apps Widget
The My Apps widget is a special MHx widget where you can add shortcuts for quick access.
Prerequisites: Before adding shortcuts, the My Apps widget must be added to the Home screen.
When and where to use: An empty My Apps needs shortcuts to be functional. Use this procedure to
add shortcuts to the My Apps widget.
Procedure:
1Add My Apps widget as described inAdding Widgets on page 61.
An empty My Apps widget displays.
MN002347A01-A
Chapter 3: Using the LEX L10i
Send Feedback 63
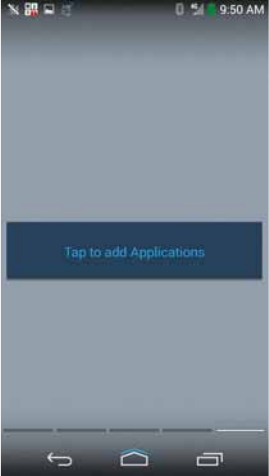
Figure 27: Empty My Apps Widget
2Tap the My Apps widget to add shortcuts to it.
A screen with a list of shortcuts is displayed.
MN002347A01-A
Chapter 3: Using the LEX L10i
64 Send Feedback

Figure 28: List of Shortcuts for My Apps Widgets
3Select each shortcut that you want to add to the My Apps widget.
You may add up to five shortcuts.
4Tap Done.
Shortcuts are added to the My Apps widget.
MN002347A01-A
Chapter 3: Using the LEX L10i
Send Feedback 65
Figure 29: My Apps Widget with Shortcuts Added
Changing My Status
When and where to use: Perform this procedure to set the status of the LEX L10i user to either
Available or Busy. No matter what the status is set to, calls are still received. This status is shown to
other users.
NOTICE: The My Status widget must be added before it is visible in the Home screen. The My
Status widget is used in conjunction with the UNS System from Motorola Solutions or when you
have WAVE 7000. One of these systems must be active before My Status will work properly.
Procedure:
1Tap the My Status dropdown menu.
Figure 30: My Status Widget
The My Status options menu is displayed.
Figure 31: Status Selection
MN002347A01-A
Chapter 3: Using the LEX L10i
66 Send Feedback

2Tap one of the status states.
Status is immediately set to the selected state.
Moving Widgets
When and where to use: Use this procedure to move (relocate) widgets on the Home screen.
Procedure:
1Navigate to the Home screen panel where the widget is located.
2Touch and hold the widget; then, slide the widget to a new location.
If you want to move the widget to another panel, slide the widget left or right to that panel; then
slide the widget to a location in the panel.
Removing Widgets
When and where to use: Use this procedure to remove or clear space on your Home screen.
Procedure:
1Slide the Home screen panel until you locate the panel that holds the widget that you want to
remove.
2Touch and hold the widget while sliding it down to the bottom of the panel.
X Remove appears near the bottom of the screen.
3Slide the widget to X Remove until the widget turns red and your finger is directly above X
Remove; then, release the widget.
The widget is removed from the panel.
NOTICE: The widget is only removed from the panel. It is not deleted from the LEX L10i.
MN002347A01-A
Chapter 3: Using the LEX L10i
Send Feedback 67
Example of a Customized Home Screen Panel
This topic shows you an example of a customized Home screen panel.
Figure 32: Example of a Customized Home Screen Panel
The above figure shows a customized Home screen panel with the following widgets:
•My Status
• Two Direct dial widgets
•Calendar
•My Apps
Status Bar
The Status bar displays the time, notification icons (left side) and status icons (right side).
Figure 33: Status Bar
If there are more notifications than can fit in the Status bar, it is indicated that more notifications exist.
Open the Notifications panel to view all notifications and status.
MN002347A01-A
Chapter 3: Using the LEX L10i
68 Send Feedback
Notification Icons
Notification icons alert you when a notification has been received.
Table 5: Notification Icons
Icon Description
Indicates that more notifications are available
for viewing.
Indicates that data is syncing.
Indicates an incoming email.
Converged Services notification. This icon has
four parts: location services (top left), radio
services (top right), priority manager (bottom
left), and presence service (bottom right).
Converged Services error notification. The tri-
angle with the exclamation point inside indi-
cates an error. If an error is observed, the user
can swipe down from the icon to reveal the er-
ror. An example is:
Indicates location reporting service is enabled.
Indicates the device is searching location data.
Indicates an error or a warning that requires
user action in the location application.
Indicates an error or a warning that requires
user action in the presence application.
CRYPTR feature error.
Indicates an upcoming event.
Indicates an open Wi-Fi network is available.
Radio Services application is on.
Indicates a song is playing.
Indicates a problem with sign-in or sync has oc-
curred.
Indicates the device is uploading data.
Table continued…
MN002347A01-A
Chapter 3: Using the LEX L10i
Send Feedback 69
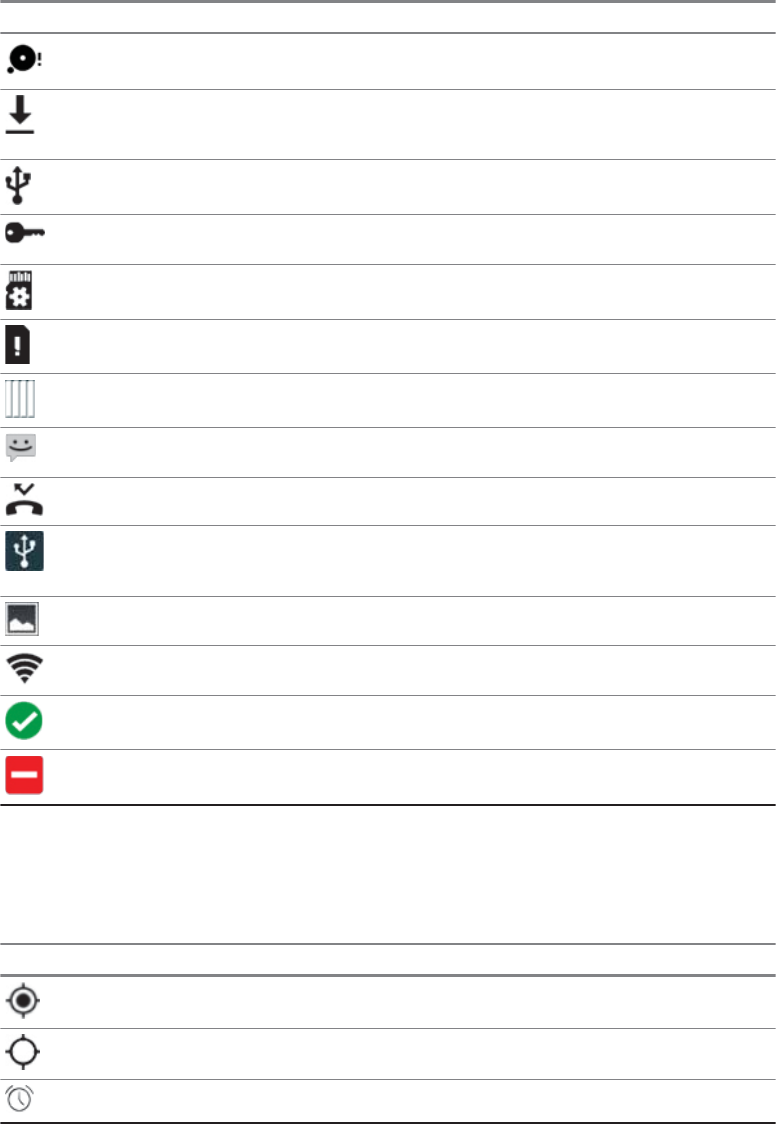
Icon Description
Indicates the microSD card is almost full.
Indicates the device is downloading data when
animated and download is complete when stat-
ic.
Indicates the device is connected via USB ca-
ble.
Indicates the device is connected to or discon-
nected from virtual private network (VPN).
Preparing SD card.
Indicates no SIM is installed.
Indicates the USB debugging is enabled on the
LEX L10i.
Indicates the device has received a text mes-
sage.
Indicates a missed call.
Indicates tethering is active for Bluetooth or
USB. Also used to indicate a Wi-Fi hotspot is
active.
Screenshot captured.
Indicates that Wi-Fi hotspot is active.
My Status indicates device is available.
My Status indicates device is busy.
LEX L10i Status Icons
Status icons give you status information on actions occurring on your LEX L10i.
Table 6: Status Icons
Icon Description
Indicates that GPS is in use.
Indicates the device is searching location data.
Indicates the Alarm is active.
Table continued…
MN002347A01-A
Chapter 3: Using the LEX L10i
70 Send Feedback
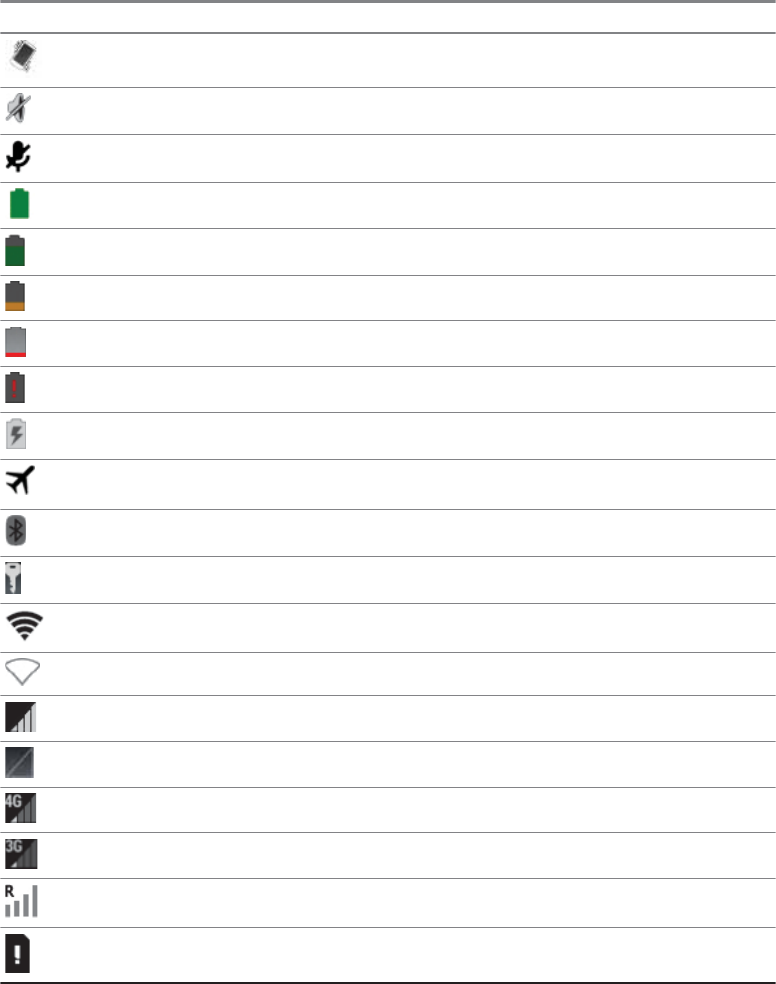
Icon Description
Indicates all sounds except media and alarms
are silenced and vibrate mode is active.
Indicates the ringer is silenced.
Microphone is muted during a call.
Indicates the battery is fully charged.
Indicates the battery is partially drained.
Indicates the battery charge is low.
Indicates the battery charge is very low.
Indicates the battery charge is low.
Indicates the battery is charging.
Indicates the Airplane Mode is active. All ra-
dios are turned off.
Indicates Bluetooth is on.
Set to operate on Private network.
Connected to a Wi-Fi network.
No Wi-Fi signal.
Mobile network signal strength.
No mobile network signal.
Connected to a 4G network.
Connected to a 3G network.
Roaming from a network.
No SIM card installed.
Managing Notifications
Notification icons report the arrival of new messages, calendar events, alarms, and ongoing events.
When a notification occurs, an icon appears in the Status bar with a brief description. See Notification
Icons on page 69 for a list of possible notification icons and their description. Open the Notifications
panel to view a list of all the notifications.
MN002347A01-A
Chapter 3: Using the LEX L10i
Send Feedback 71

To open the Notification panel drag the Status bar down from the top of the screen.
Figure 34: Notification Panel
To respond to a notification, open the Notifications panel and then tap a notification. The
Notifications panel closes and the subsequent activity is dependent on the notification.
To clear all notifications, open the Notifications panel and tap . All event-based notifications are
removed. Ongoing notifications remain in the list.
NOTICE: Some notifications cannot be cleared and will remain to inform you of running
applications
To close the Notifications panel, drag the bottom of the Notifications panel to the top of the screen or
tap .
Working with Status
LEX L10i users work with status in two ways: setting their own status (Available or Busy) and viewing
the status of their contacts.
The status displayed for Contacts shows the following:
• The presence status currently detected by a call system or network (offline or online status)
• The availability status currently selected by the contact (Available or Busy)
My Status
The LEX L10i user sets the value of My Status to Available or Busy. This status is shown in the
Contacts and Session Log screens of other LEX L10i users. The Available status:
• Is the default “sign-on” state
• Indicates the LEX L10i user is willing to send and receive calls
MN002347A01-A
Chapter 3: Using the LEX L10i
72 Send Feedback
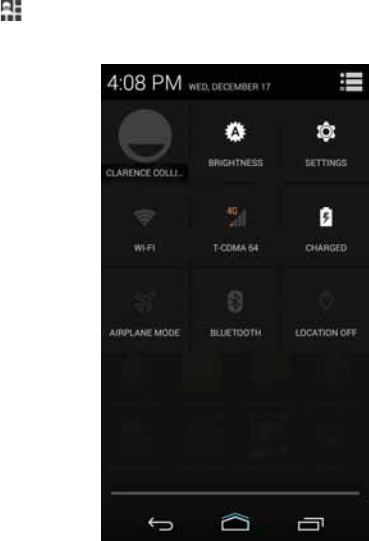
The Busy status indicates that the LEX L10i user is busy but the LEX L10i is still able to send and
receive calls.
Status of Contacts
The status of LEX L10i contacts is shown in all of the Contacts screens, and People list. The status of
a contact can be:
• Offline
• Available
•Busy
If the contact is not connected to and registered with a system server, the status shown is Offline.
If the contact is connected to and registered with the system server, the My Status value (Available or
Busy) of the contact is shown.
When the Contacts are synchronized with the People list, the Contacts are added to the regular
device contacts.
Quick Settings
The Quick Settings panel provides easy access to some frequently used settings.
You can use one of two methods:
• With two fingers, drag the Status Bar panel down to display the Quick Settings panel.
• Drag the Status Bar down from the top of the screen. The Quick Settings icon displays in the top
right corner. Tap to display the Quick Settings panel.
Figure 35: Quick Settings Panel
• Display the owner’s contact image. Tap to open the owner’s contact information.
•Brightness — Opens the Brightness setting dialog box to set the screen brightness.
MN002347A01-A
Chapter 3: Using the LEX L10i
Send Feedback 73
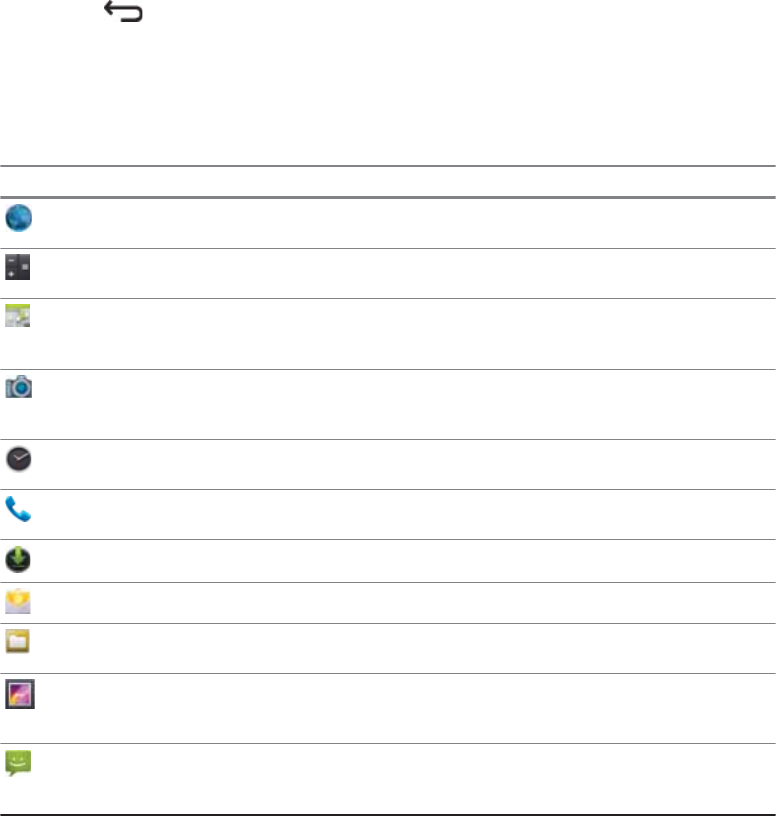
•Settings — Opens the Settings screen.
•Wi-Fi — Displays the current Wi-Fi connection. Tap to open the Wi-Fi settings screen.
•Service — Displays the current cellular service used; public or Private.
•Battery Status — Displays the current battery charge level. Tap to open the Battery screen.
•Airplane Mode — Displays the Airplane mode status. Tap to toggle Airplane mode on and off. Turn
on Airplane mode to turn off all the radios.
•Bluetooth — Displays the current state of the Bluetooth radio. Tap to open the Bluetooth settings
screen.
•Location — Displays the current state.
To close the Quick Settings panel, drag the bottom of the Quick Settings panel to the top of the
screen or tap .
Applications
The Apps screen displays icons for all installed applications.
Table 7: Applications
Icon Description
AOSP Browser — Use to access the Internet
or agency intranet.
Calculator — Provides the basic and scientific
arithmetic functions.
Calendar — Use to manage events and ap-
pointments. Allows synchronization with Google
account calendar.
Camera / Video Recorder — Take photos or
record videos. For more information, see Cam-
era on page 101.
Clock / Alarms — Use to set an alarm, stop-
watch, or timer.
Dialer — Use to make phone calls. See Calling
on page 79 for more information.
Downloads — lists all downloads files.
Email — Use to send and receive email.
File Browser — Use to view and manage files
on the LEX L10i.
Gallery — Use to view photos stored on the mi-
croSD card. For more information, see Gallery
on page 109 for more information.
Messaging - Send SMS and MMS messages.
See Messaging on page 95 for more informa-
tion.
Table continued…
MN002347A01-A
Chapter 3: Using the LEX L10i
74 Send Feedback
Icon Description
Motorola Device Management — Enables
staging and management of the device for initial
use by initiating the deployment of settings,
firmware, and software from a server. For more
information, see the LEX 10i Service Provision-
ing Guide.
Motorola TechDocs — Use to view device on-
device documentation.
MVPN — Enables the Motorola Solutions Mo-
bile VPN (MVPN).
Movie Studio — Use to combine existing vid-
eos.
Music — Access music stored on the device.
My Status — Use to view the current availabili-
ty of the user and device to other agency users
and system.
People — Use to manage contact information.
Push-To-Talk — Enables Push-to-Talk serv-
ices over a broadband network and intercon-
nected to Project 25 Land Mobile Radio (LMR)
networks to enable PTT interoperability be-
tween broadband and P25 radio users (availa-
ble only if PTT application is installed and acti-
vated on the LEX 10i).
Radio Services — Use to pair Operations Criti-
cal Wireless Push-to-Talk (PTT) Pod.
Radio Management Link Client — Enables
connecting the device to a remote host comput-
er for staging, firmware installation, application
installation, and application removal by techni-
cal support. See the Radio Management Online
Help for more information on the RM Tool.
Search — Searches the device for an App or
feature, Also searches the Web using Google
Search.
Settings — Use to configure the device.
Software Licensing — Licensing for software
installed on the device.
Sound Recorder — Use to record audio.
Voice Dialer — Use to place calls by speaking.
MN002347A01-A
Chapter 3: Using the LEX L10i
Send Feedback 75
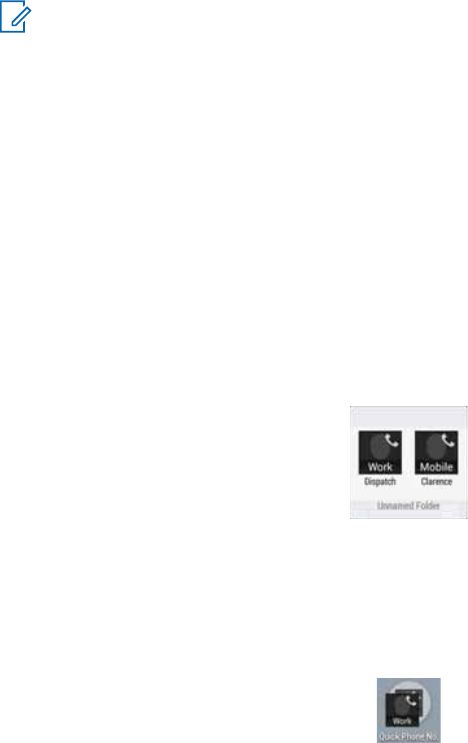
Folders
Use Folders to organize similar applications together. Tap the folder to open and display items in the
folder.
Creating a Folder
When and where to use: Use a procedure to create a folder on the Home screen.
NOTICE: There must be a minimum of two app icons to create a folder.
Procedure:
1Go to the desired Home screen.
2Tap and hold on one application icon.
3Drag the icon and stack on top of another icon.
4Lift and release.
Naming Folders
When and where to use: Use this procedure to name folders. You can give folders a name after they
are created.
Procedure:
1Tap the folder.
Figure 36: Opened Unnamed Folder
2Tap the title area and enter a folder name using the keyboard.
3Tap Done.
4Tap anywhere on the Home screen to close the folder.
The folder name appears under the folder.
Figure 37: Named Folder
Removing a Folder
When and where to use: When a folder is no longer needed, you can remove it. Use this procedure to
remove a folder.
Procedure:
1Tap and hold the folder until it enlarges and the device vibrates.
MN002347A01-A
Chapter 3: Using the LEX L10i
76 Send Feedback
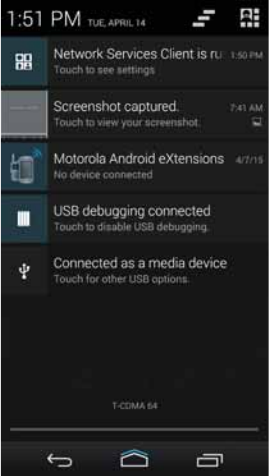
2Drag the folder to X Remove until the folder turns red; then release.
The folder is removed from the screen.
Accessing Files from a Computer
When and where to use: Use this procedure to allow access to files from your computer using MTP
(media device) or using PTP (camera software).
Procedure:
1Connect the device to your computer using a USB cable.
If one of the following messages is displayed in the notification area (top of screen): Connected
as a media device or Connected as a camera, you already have access to the files on your
device.
2Swipe down from the Status Bar.
Figure 38: Notifications Screen
3Tap the notification that has a Touch for other USB options subtitle (in this case Connected
as a media device).
MN002347A01-A
Chapter 3: Using the LEX L10i
Send Feedback 77
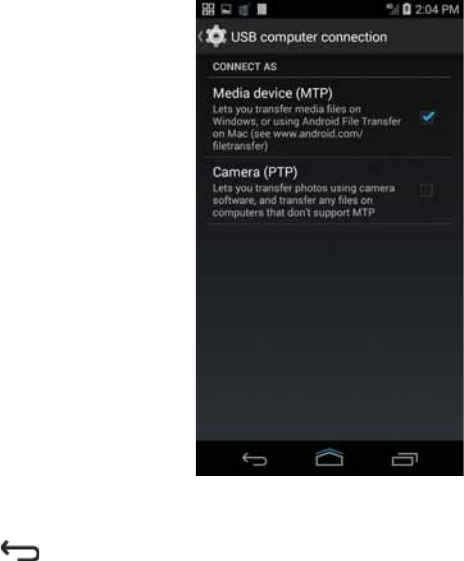
Figure 39: MTP / PTP Selection Screen
4Select Media device (MTP) to access media files from a Windows computer or Camera (PTP)
to access photos / files on a computer that does not support MTP.
5Tap to return to the previous screen.
MN002347A01-A
Chapter 3: Using the LEX L10i
78 Send Feedback

Chapter 4
Calling
Make a phone call from the Phone application, the People application, or other applications or widgets
that display contact information.
Push-To-Talk (PTT) Calling
The handheld must be provisioned for PTT services on a Motorola Solutions PTT server. To make PTT
calls and how to receive PTT calls on the LEX 10i, see Push-To-Talk for LEX L10i manual.
Emergency Calling
The service provider programs one or more emergency phone numbers that you can call under any
circumstances, even when the phone is locked, a SIM card is not inserted, or the phone is not
activated. However, the SIM card must be installed in the LEX L10i to enable preset emergency
numbers stored on it.
Emergency numbers vary by country. The device must be switched to public mode to use the
emergency numbers for your country on the public SIM.
The LEX L10i pre-programmed emergency numbers may not work in all locations, and sometimes an
emergency call cannot be placed due to network, environmental, or interference issues. For additional
information, contact your organization’s technical support.
IMPORTANT: The numbers you can call depend on whether the device is in private mode or
public mode. For example, if the device is in private mode, you must switch to public mode
before you can call numbers that are not included in the private network. To switch modes, see
Switching Modes Using the Power Button on page 54 and Switching Modes Using the Settings
App on page 55.
NOTICE: If your device is licensed for these options, see LEX L10i Service Provisioning Guide
to set up other emergency alert methods.
Audio Modes
The device offers three audio modes for use during phone calls:
•Handset Mode: Switches audio to the receiver at the top front of the device, so the user can use
the device as a handset and is the default mode.
•Speaker Mode: Use the device as if on speaker phone.
•Headset Mode: Connect a Bluetooth or wired headset to automatically switch audio to the headset.
Using a Bluetooth Headset
Use a Bluetooth headset for audio communication when using an audio-enabled application. See
Pairing LEX L10i with Bluetooth Accessory on page 91 for information on connecting a Bluetooth
headset to the device. Set the volume appropriately before putting on the headset. When a Bluetooth
headset is connected, the speakerphone is muted.
Using a Wired Headset
Use a wired headset (with 3.5 mm plug) for audio communication when using an audio-enabled
application. Set the volume appropriately before putting on the headset. When a wired headset is
connected, the speakerphone is muted.
MN002347A01-A
Calling
Send Feedback 79

Lift the headset cover and insert the headset plug.
To end a call using the wired headset, press and hold the headset button until the call ends.
Figure 40: Insert Wired Headset Plug
NOTICE: The headset cover must be properly seated after removing the headset plug.
Adjusting Audio Volume
Use the Volume buttons to adjust the volume of the ringer when not in a call and the audio volume
when in a call.
NOTICE: Adjust the conversation phone volume during a call. Adjusting the volume while not in
a call affects the ring and notification sound levels.
Making a Call Using the Dialer
When and where to use: Use this procedure to make a call using the dialer tab to dial phone
numbers.
Procedure:
1On the Home screen, tap .
MN002347A01-A
Chapter 4: Calling
80 Send Feedback
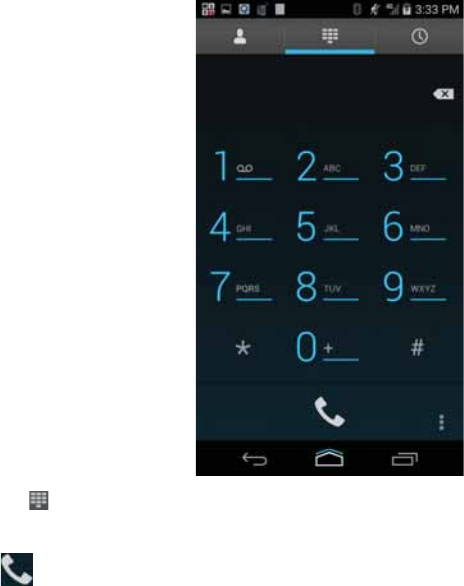
Figure 41: Dialer Screen
2Tap the tab above the dialer.
3Tap the keys to enter the phone number.
4Tap below the dialer to initiate the call.
MN002347A01-A
Chapter 4: Calling
Send Feedback 81
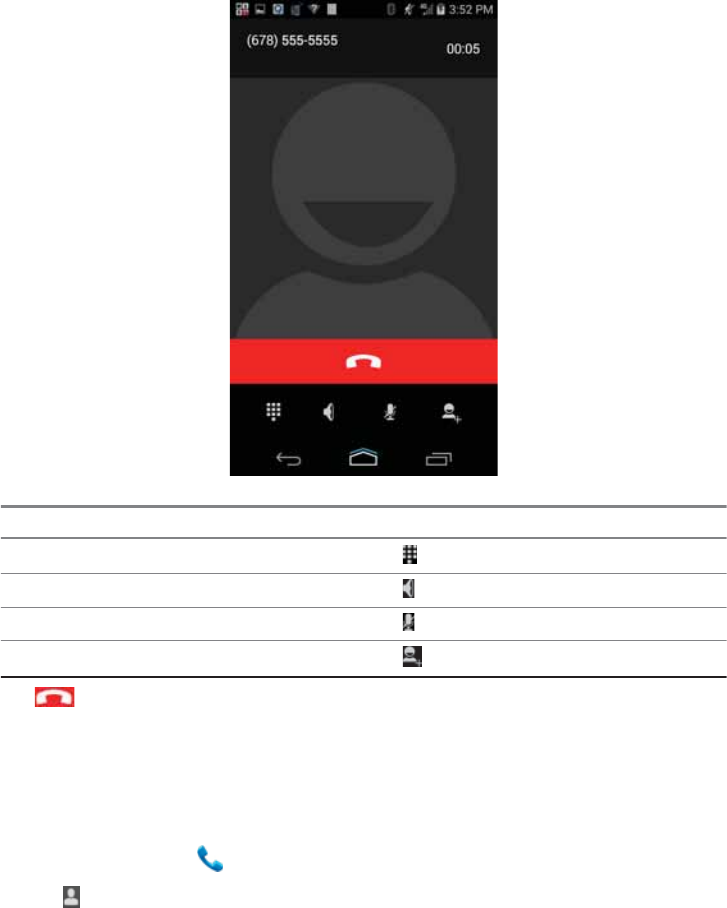
Figure 42: Call in Progress
If... Then...
You want to display the dialer. Tap .
You want to turn on the speakerphone. Tap .
You want to mute the call. Tap .
You want to add another person to the call. Tap .
5Tap to end the call.
Making a Call Using People List Contacts
When and where to use: Use this procedure to make a call using people list contacts to initiate a call.
Procedure:
1On the Home screen, tap .
2Tap the tab.
3From the people list contacts, tap a phone contact or a PTT contact for making a One-to-One
Private or Alert Call (see Push-To-Talk User Guide For LEX 10i).
MN002347A01-A
Chapter 4: Calling
82 Send Feedback
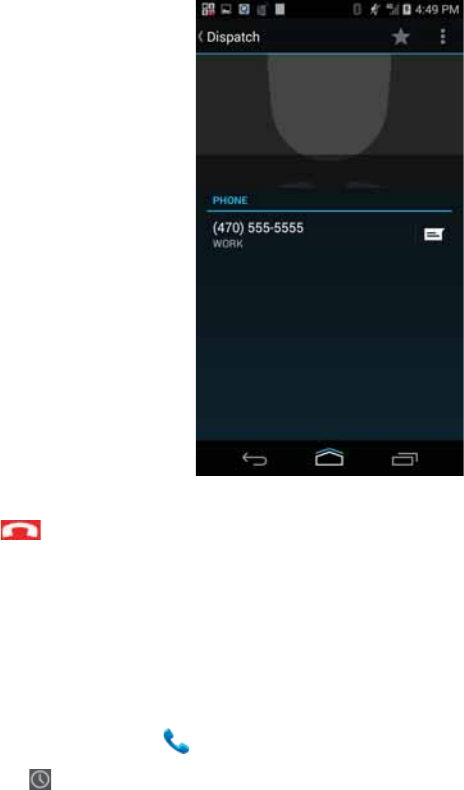
Figure 43: People List Contact
4Tap the phone number next to the contact to initiate the call.
5Tap to end the call.
Making a Call Using Call History
When and where to use: Use this procedure to make a call using call history. Call History is a list of
all the calls placed, received, or missed. It provides a convenient way to redial a number, return a call,
or add a number to Contacts.
Procedure:
1On the Home screen, tap .
2Tap the tab.
MN002347A01-A
Chapter 4: Calling
Send Feedback 83
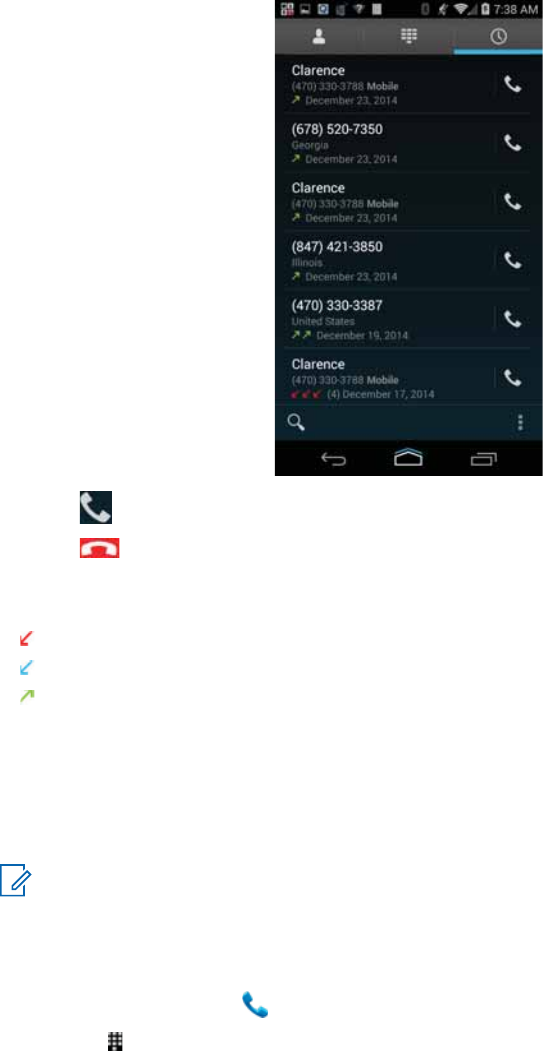
Figure 44: Call History Tab
3Tap next to the contact to initiate the call.
4Tap to end the call.
Example:
Arrow icons beside a call indicate the type of call. Multiple arrows indicate multiple calls:
• — Missed incoming call
• — Received incoming call
• — Outgoing call
Making a Conference Call
When and where to use: Conference calling is available if you have two or more people you wish to
have a conversation with at the same time. Use this procedure to create a conference phone session
with multiple people.
NOTICE: Conference calling may not be supported by your service provider. Check with your
technical support for conference calling availability. The total number of conference call
participants may be limited by your service provider. For the maximum number of participants in
a conference call, contact technical support.
Procedure:
1On the Home screen, tap .
2Tap the tab above the dialer.
3Tap the keys to enter the phone number.
MN002347A01-A
Chapter 4: Calling
84 Send Feedback
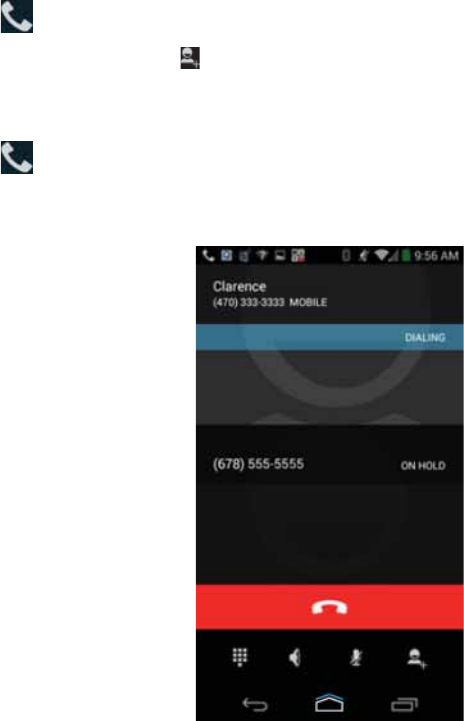
4Tap below the dialer to initiate the call.
5When the call connects, tap .
The first call is placed on hold.
6Tap the keys to enter the second phone number.
7Tap below the dialer to initiate the call.
8When the call connects, the first call is placed on hold and the second call is active.
Figure 45: Two Calls
The screen quickly changes to:
MN002347A01-A
Chapter 4: Calling
Send Feedback 85
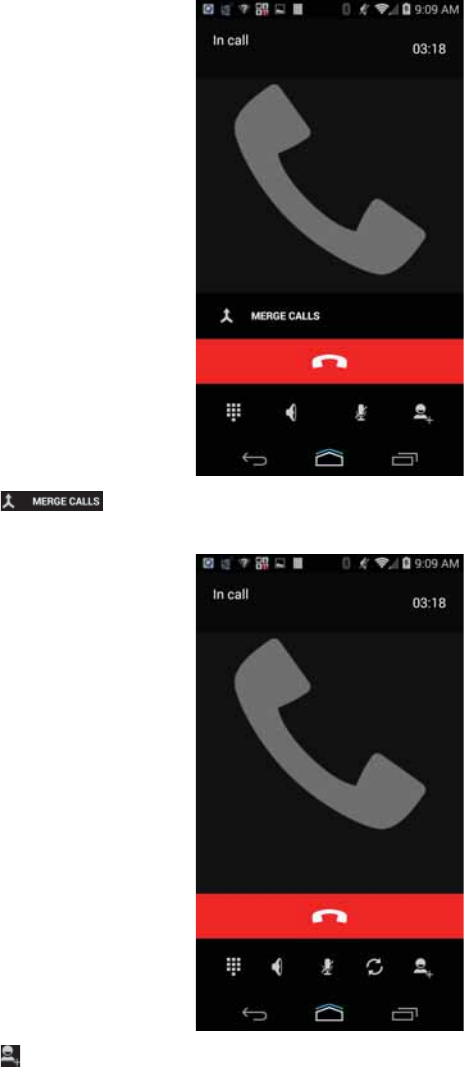
Figure 46: Two Calls Connected
9Tap to create a conference call with three people.
Figure 47: Merged Calls
10 Tap to add another call.
The conference is placed on hold.
MN002347A01-A
Chapter 4: Calling
86 Send Feedback

11 Tap the keys to enter the second phone number.
12 Tap below the dialer to initiate the call.
13 Tap to add the third call to the conference.
14 Tap to rotate between the individual calls.
Calls are rotated starting with the first call. This allows you to speak privately to one party. Tap
to rotate to the next party. When the rotation is complete, you are placed back into
conference mode and all calls are active.
Answering Calls with a Bluetooth Headset
When you receive a phone call, the Incoming Call screen opens, displaying the caller ID and any
additional information about the caller that is in the People application.
NOTICE: To connect a Bluetooth headset to the LEX L10i, see Pairing LEX L10i with Bluetooth
Accessory on page 91.
When a call arrives, tap the Call button on the Bluetooth headset to answer the call.
To silence the ringer before answering the call, press the volume down button on the side of LEX L10i.
To end the call press the Call button on the Bluetooth headset.
All incoming calls are recorded in the Phone application call Logs tab. If you miss a call, you will
receive a notification.
Call Settings
Use the Call Settings to modify options related to the phone call feature.
NOTICE: Not all options are available for all configurations.
•Ringtone & Vibrate
-Phone Ringtone — Tap to select a ringtone to sound when an incoming call is received.
-Vibrate When Ringing — Check to make the device vibrate when a call is received.
•Other Call Settings
-Ringtone Settings — When using a Bluetooth headset, select the path that the ring is heard.
Options: Bluetooth or Speaker and Bluetooth (default).
NOTICE: Bluetooth headset connection is required to set this option.
-Voicemail — Tap to configure voicemail settings
+Service — Set the service provider or other provider for voicemail service.
+Setup — Tap to update the phone number used to access voicemail.
+Sound — Tap to select a sound when a voicemail is received.
+Vibrate — Tap to vibrate when a voicemail is received.
.
-Dial pad touch tones — Check to play a sound when a phone key is touched.
-Quick Responses - Tap to edit quick responses to use instead of answering a call.
MN002347A01-A
Chapter 4: Calling
Send Feedback 87

-Fixed Dialing Numbers — Use Fixed Dialing to restrict the phone to dial only the phone
number(s) or area code(s) specified in a Fixed Dialing list.
-TTY mode — Tap to set the TTY setting. Use an optional teletypewriter (TTY) device with the
LEX L10i to send and receive calls. Plug the TTY device into the LEX L10i headset jack and set
the device to operate in one of the TTY modes.
NOTICE: Use a TSB-121 compliant cable (provided by the TTY manufacturer) to connect
the TTY device to the LEX L10i.
Set the device volume to a middle level setting for proper operation. If you experience a
high number of incorrect characters, adjust the volume as needed to minimize the error
rate.
For optimal performance, the LEX L10i should be at least 30 cm (12 inches) from the
TTY device. Placing the device too close to the TTY device may cause high error rates.
+TTY Off (default) — TTY is off.
+TTY Full — Transmit and receive TTY characters.
+TTY HCO — Transmit TTY characters but receive by listening to earpiece.
+TTY VCO — Receive TTY characters but transmit by speaking into microphone.
-DTMF tones — Set the length of the DTMF tones. Available options are: Normal or Long.
-CDMA Call Settings:
+Voice privacy — Enable enhanced privacy mode.
Requesting an Emergency Alert
This emergency alert procedure is used to indicate a critical situation.
When and where to use: Use this procedure to trigger an emergency alert on the LEX L10i.
Procedure:
1Swipe up from the icon.
2Tap Activate Emergency.
A popup displays giving you 2 seconds to cancel the emergency alert. The emergency number
programmed in the LEX L10i device is dialed. See LEX L10i Service Provisioning Guide or
configuration details.
MN002347A01-A
Chapter 4: Calling
88 Send Feedback
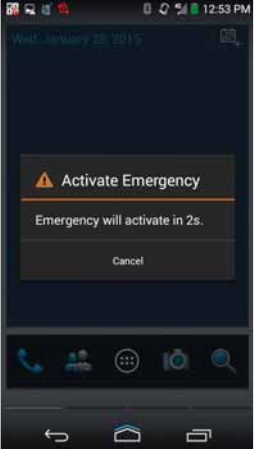
Figure 48: Emergency Alert Activation Popup
MN002347A01-A
Chapter 4: Calling
Send Feedback 89
This page intentionally left blank.

Chapter 5
Radio Services
Radio Services for LEX 10i
The Radio Services is a free application available on the device and enables a LEX L10i to connect
with a Motorola Operations Critical Wireless (OCW) Push-to-talk Pod (NNTN8127) and Bluetooth-
enabled device (accessory) through a wireless Bluetooth connection.
Bluetooth-equipped devices can communicate without wires, using frequency-hopping spread
spectrum (FHSS) radio frequency (RF) to transmit and receive data in the 2.4 GHz Industry Scientific
and Medical (ISM) band (802.15.1). Bluetooth wireless technology is specifically designed for
shortrange (10 meters (32.8 feet) communication and low power consumption.
Bluetooth operates within a range of 10 meters (32 feet) line of sight. This is an unobstructed path
between your radio and your Bluetooth enabled device.
Pairing LEX L10i with Bluetooth Accessory
Prerequisites: Confirm Bluetooth is enabled on the LEX L10i device and Bluetooth-enabled device
(accessory). To enable/disable Bluetooth on the LEX L10i, see Enabling Bluetooth on page 136 or
Disabling Bluetooth on page 136. Once pairing is established, the range of connection is no more than
10 meters (32.8 feet) line-of-sight. This is an unobstructed path between the location of the LEX L10
and the location of the Radio (or other paired accessory).
When and where to use: Use this procedure to pair a LEX L10i with a Bluetooth-enabled device
(accessory) through a wireless Bluetooth connection.
Procedure:
1From the Home screen, tap
2Tap .
3In the Secure Pairing window, tap Pair.
MN002347A01-A
Radio Services
Send Feedback 91
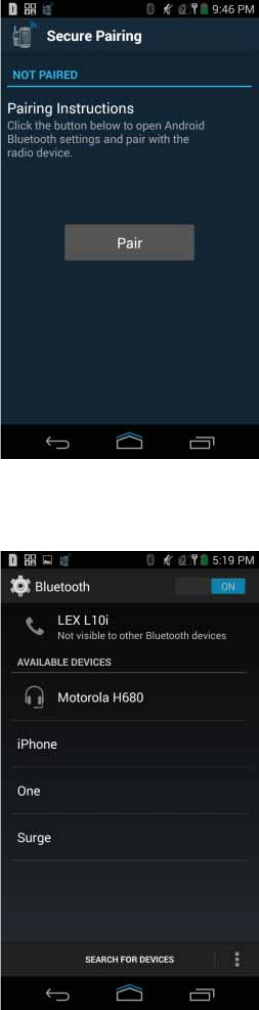
Figure 49: Bluetooth Pairing Screen
4From the Bluetooth screen, in the AVAILABLE DEVICES section, tap an unconnected
Bluetooth-enabled device (accessory).
Figure 50: Bluetooth Device Screen
5In the PAIRED DEVICES section, the Bluetooth-enabled device is connected.
MN002347A01-A
Chapter 5: Radio Services
92 Send Feedback

Figure 51: Bluetooth Paired Devices Screen
NOTICE: Your Bluetooth-enabled device (accessory) may require additional steps to
complete the pairing. Refer to respective Bluetooth-enabled device (accessory) user
manual.
Unpairing LEX L10i from Bluetooth Accessory
Prerequisites: The LEX L10i is unpaired with Bluetooth-enabled device (accessory).
When and where to use: Use this procedure to unpair the LEX L10i from a Bluetooth-enabled device
(accessory).
Procedure:
1From the Home screen, tap .
2Tap .
3From the Settings screen, tap Bluetooth.
4From the Bluetooth screen, tap next to the device name.
MN002347A01-A
Chapter 5: Radio Services
Send Feedback 93
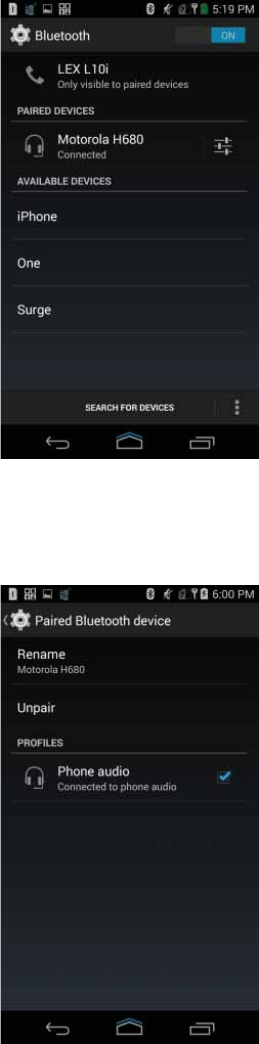
Figure 52: Bluetooth Paired Devices
5Tap Unpair.
Figure 53: Unpair Complete
MN002347A01-A
Chapter 5: Radio Services
94 Send Feedback
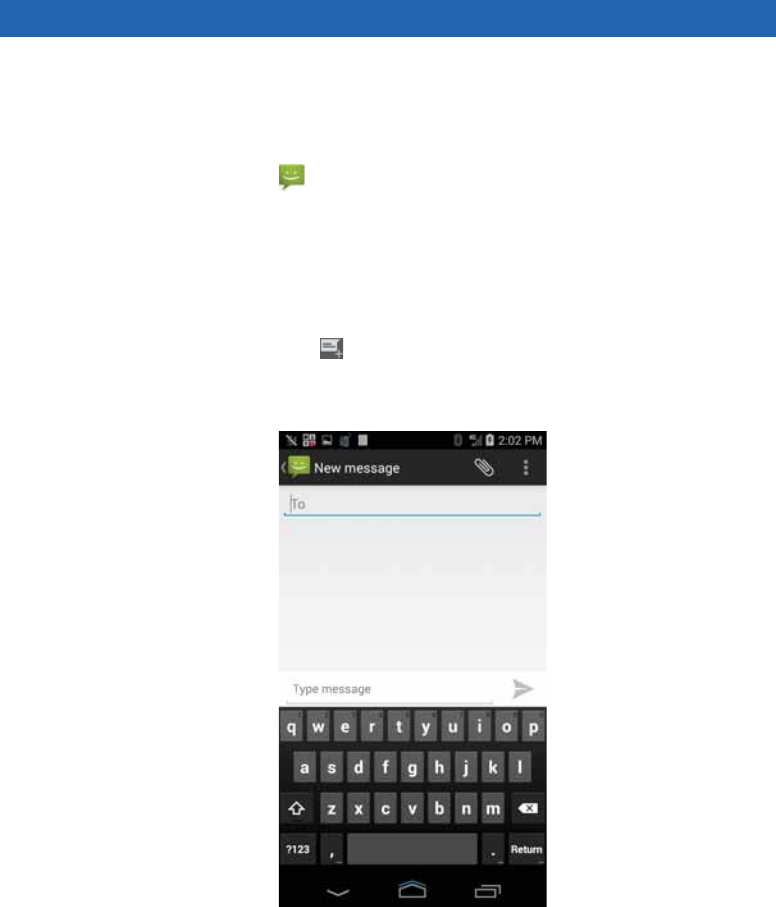
Chapter 6
Messaging
Use Messaging to send and receive SMS and MMS messages.
From Home or All Apps screen, tap .
Sending a Text Message
When and where to use: Use this procedure to send text messages.
Procedure:
1In the main Messaging screen, tap .
The New Message screen displays.
Figure 54: New Message Screen
2In the To field, enter a name or a mobile phone number.
3In the Type message field, enter the text message.
Messages are limited to 160 characters. When the limit is approached, a counter displays,
above the Send control, showing how many characters are left. If the limit is reached and the
user keeps typing, a new message is created, which is joined with its predecessors when
received.
If the user presses the Back button while composing a message, it is saved as a draft in the
Messaging screen. Tap the conversation to resume composing it.
MN002347A01-A
Messaging
Send Feedback 95
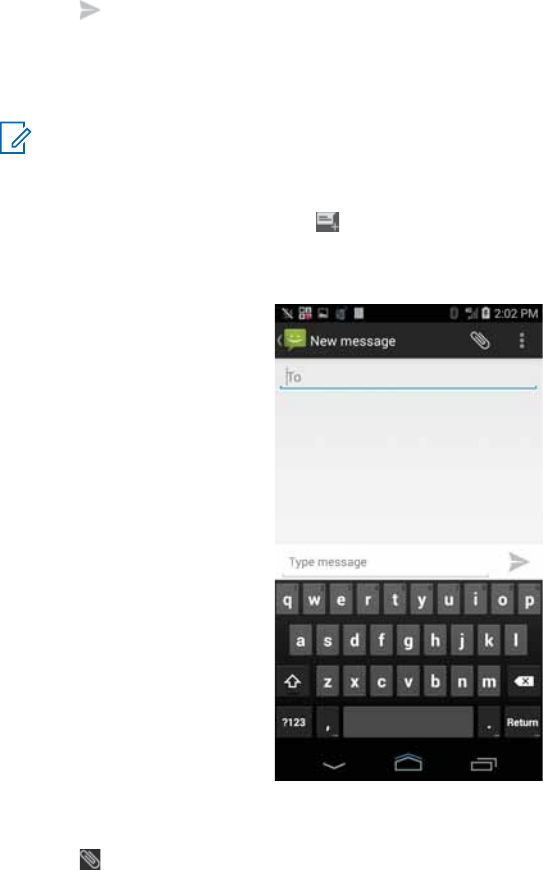
4Tap to send the message.
Sending a Multimedia Message
When and where to use: Use this procedure to send multimedia messages.
NOTICE: Multimedia messaging is only supported when the LEX L10i is in Public network
mode.
Procedure:
1In the main Messaging screen, tap .
The New Multimedia Message screen displays.
Figure 55: New Multimedia Message Screen
2In the To field, enter a name or a mobile phone number.
3Tap to attach the media file of your choice:
•Pictures — Select a picture to attach.
•Capture picture — Camera opens to take a picture and attach it.
•Videos — Select a video to attach.
•Capture video — Camcorder opens to record a video and attach it to the message.
•Audio — Choose a sound file to attach.
•Record audio — Sound Recorder opens to record a spoken message and attach it to the
message.
•Slideshow — Opens a screen to assemble text, photos, videos, and recordings into a
slideshow of up to 10 slides to attach to the message.
MN002347A01-A
Chapter 6: Messaging
96 Send Feedback

4Tap to send the message.
MN002347A01-A
Chapter 6: Messaging
Send Feedback 97
This page intentionally left blank.
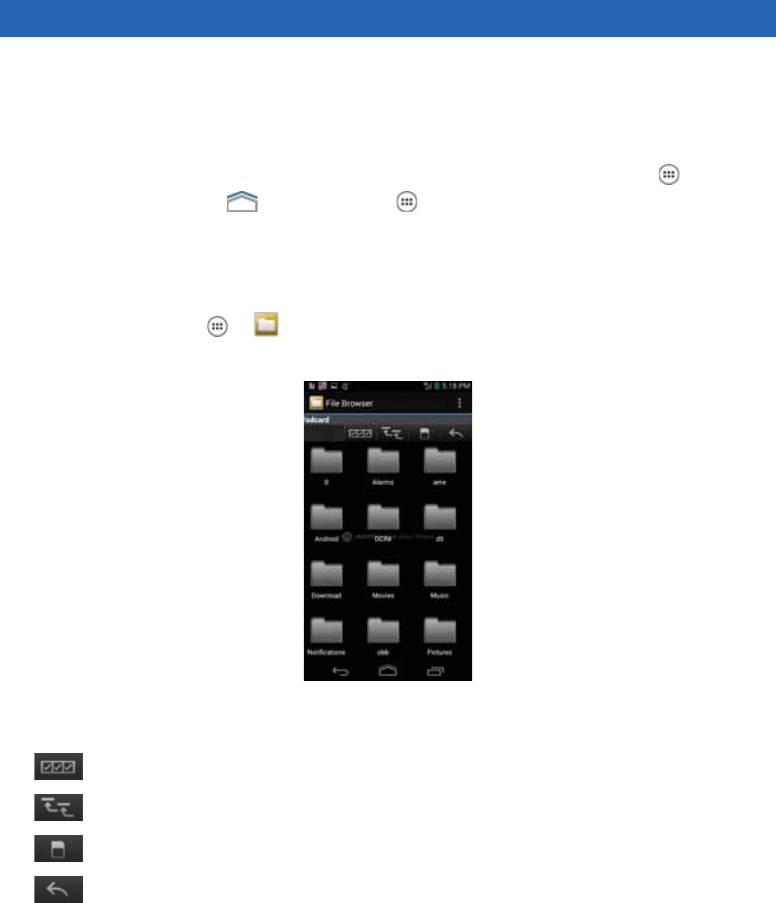
Chapter 7
Applications
This chapter describes the applications installed on the LEX L10i.
Normally, you access the applications through the Home screen overlay by clicking the icon. Swipe
the Home screen up from the icon to reveal the icon.
Using File Browser
Use the File Browser application to view and manage files on the device.
To open File Browser, tap → .
Figure 56: File Browser Screen
The address bar indicates the current folder path. Tap the current folder path to manually enter a path
and folder name.
Tap to select multiple files/folder.
Tap to view the internal storage root folder.
Tap to view the microSD card root folder.
Tap to view the previous folder or to exit the application.
Tap and hold an item to perform an operation on that item. Select one of the options from the File
Operations menu:
•Information — View detailed information about the file or folder.
•Move — Move the file or folder to a new location.
•Copy — Copy the select file.
•Delete — Delete the selected file.
•Rename — Rename the select file.
•Open as — Open the selected file as a specific file type.
MN002347A01-A
Applications
Send Feedback 99

•Share — Share the file with other devices.
Tap to open additional functionality:
• Tap the key → New Folder to create a new folder in the current folder.
• Tap the key → Search to search for a file or folder.
• Tap the key → Sort to sort the list by name, by type, by size or by date.
• Tap the key → Refresh to re-display the contents of the current folder.
• Tap the key → List View to change the folder view from tile to list format
• Tap the key → Change Size to change the size of the icons: Large, Normal or Small.
• Tap the key → About File Browser to view the application version information.
Managing People Contacts
Use the People application to manage contacts.
From a Home or Apps screen, tap . The People application, displays four tabs at the top of the
screen: Search, Groups, All contacts, and Favorites. Tap the tabs to change how to view the
contacts. Swipe up or down to scroll through the lists.
Adding People
When and where to use: Use this procedure to add contacts.
Procedure:
1In the People application, tap .
2If there are more than one account with contacts, tap the one to use.
3Type the contact’s name and other information. Tap a field to start typing, and swipe down to
view all categories.
4Adding more than one entry for a category requires an additional step. For example:
• To add a work address after typing a personal address, tap Add new for that field.
• To open a menu with preset labels, such as Home or Work for an email address, tap the
label to the right of the item of contact information.
• To create your own label, tap Custom in the menu.
5Tap Done.
Editing People
When and where to use: Use this procedure to edit contact information.
Procedure:
1In the People application, tap tab.
2Tap a name to edit.
3Tap .
4Tap Edit.
MN002347A01-A
Chapter 7: Applications
100 Send Feedback

5Edit the contact information.
6Tap Done.
Deleting People
When and where to use: Use this procedure to delete contacts.
Procedure:
1In the People application, tap tab.
2Tap a name to delete.
3Tap .
4Tap Delete.
5Tap OK to confirm.
Camera
This section provides information for taking photos and recording videos using the integrated digital
cameras.
NOTICE: If a microSD card is installed, the LEX L10i saves photos and videos on the microSD
card. If a microSD card is not installed, the LEX L10i saves photos and videos on the internal
storage.
MN002347A01-A
Chapter 7: Applications
Send Feedback 101
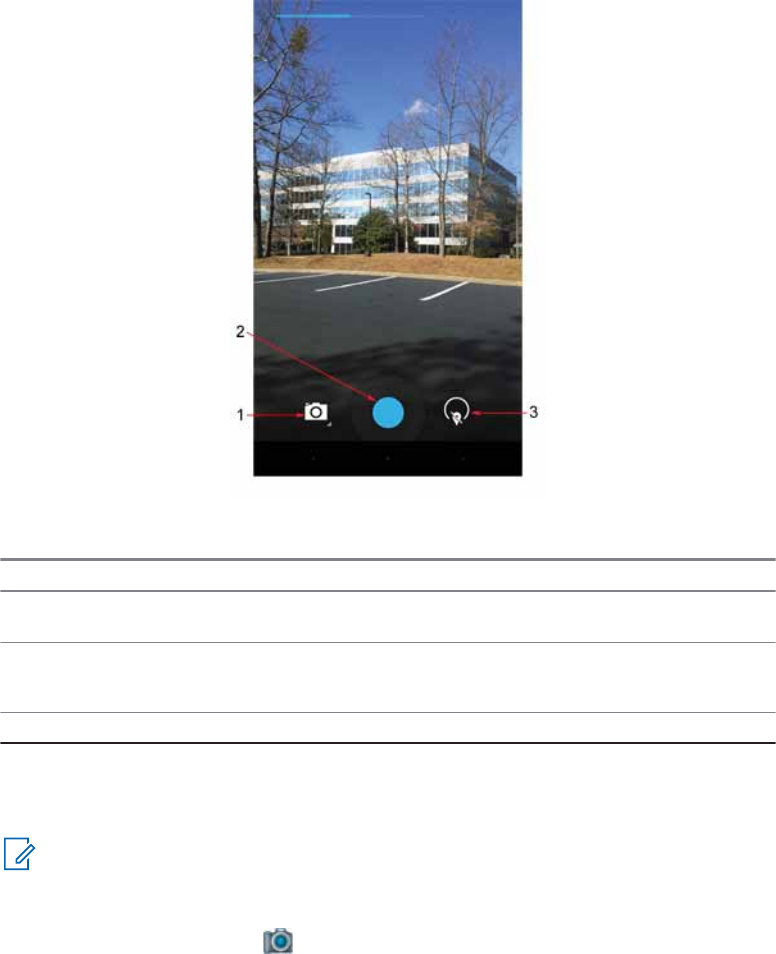
Figure 57: Camera Photo Screen
Table 8: Camera Icons and Actions
Call Out Icon Action
1 Camera Options Tap to select Camera, Video,
or Panorama mode.
2 Shutter Tap to take a photo, a panor-
amic photo, or to record a vid-
eo.
3 Photo Settings Tap to select camera settings.
Taking Photos
When and where to use: Use this procedure to take photos.
NOTICE: For camera settings, see Camera Settings on page 106.
Procedure:
1From the Home screen, tap .
The Camera screen is displayed.
MN002347A01-A
Chapter 7: Applications
102 Send Feedback
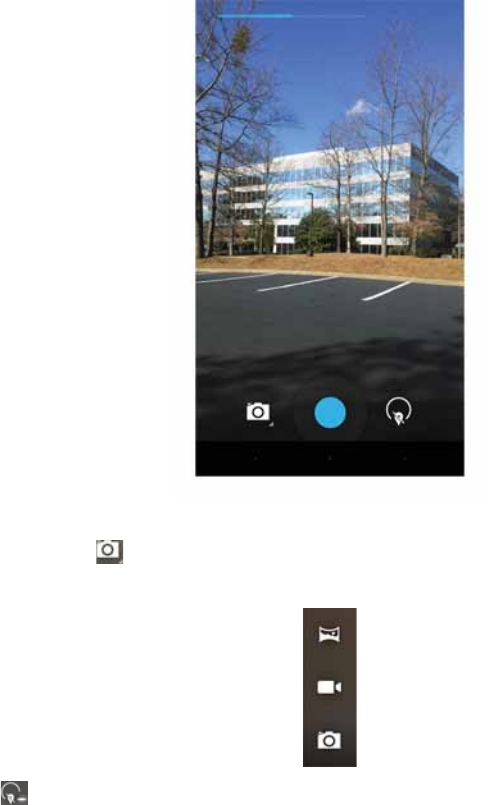
Figure 58: Camera Screen
2If necessary, tap to open the Camera Option bar and select Camera icon.
Figure 59: Camera Option Bar
3Tap for settings.
4Frame the subject on screen.
5To zoom in or out, press two fingers on the display and pinch or expand fingers.
The zoom controls appear on the screen.
MN002347A01-A
Chapter 7: Applications
Send Feedback 103
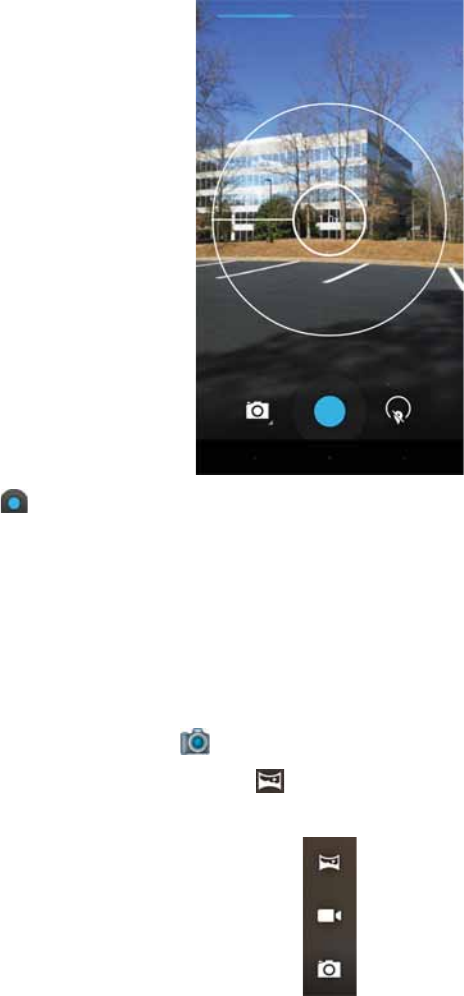
Figure 60: Camera Zoom
6Tap .
The camera brings the image into focus. When the image is in focus, the focus indicators (top
and bottom of screen) turn green and the camera takes a photo.
Taking a Panoramic Photo
When and where to use: Use this procedure to create a single wide image by panning slowly across
a scene.
Procedure:
1From the Home screen, tap .
2Tap the Camera Options bar and tap .
Figure 61: Panoramic Mode
3Frame one side of the scene to capture.
MN002347A01-A
Chapter 7: Applications
104 Send Feedback
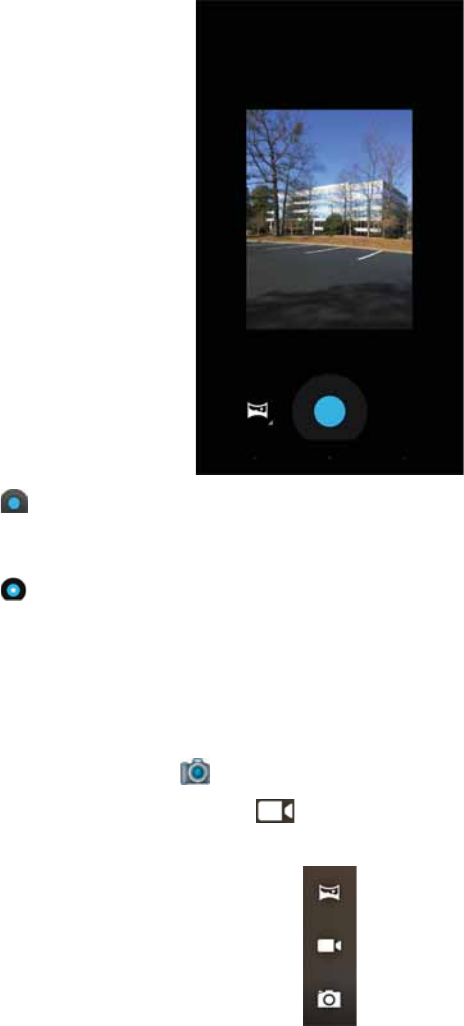
Figure 62: Panoramic Frame
4Tap and slowly start panning across the area to capture. A small white square appears
inside the button the shot is in progress.
If panning too quickly, the message Too fast displays.
5Tap to end the shot. The panorama is displayed and a progress indicator displays while it
saves the image.
Recording Videos
When and where to use: Use this procedure to record videos.
Procedure:
1From the Home screen, tap .
2Tap the Camera Options bar and tap .
Figure 63: Video Mode
3To zoom in or out, press two fingers on the display and pinch or expand fingers.
MN002347A01-A
Chapter 7: Applications
Send Feedback 105
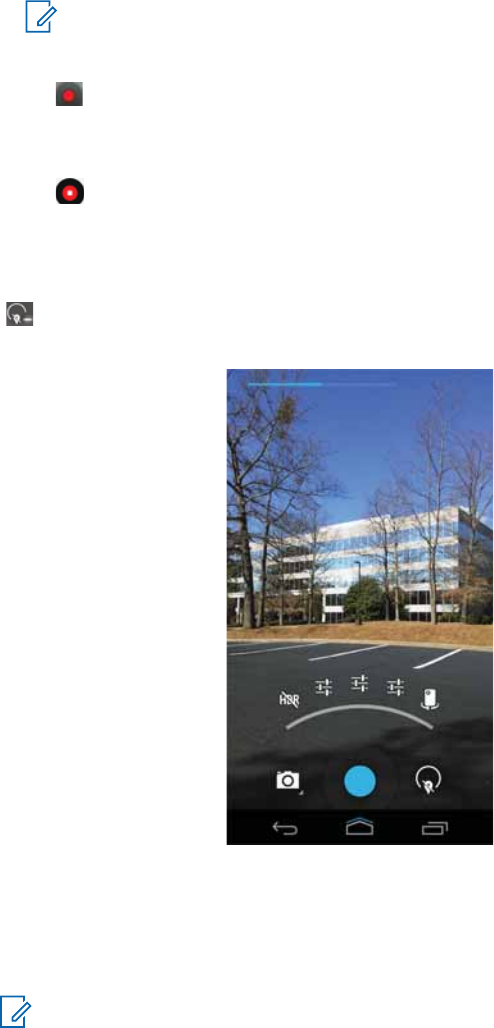
NOTICE: Video zoom works the same as camera zoom.
4Point the camera and frame the scene.
5Tap to start recording.
The device starts recording the video. The video time remaining appears in the top left of the
screen.
6Tap to end recording.
Camera Settings
When you are in Photo mode, photo settings are displayed on the screen.
Tap to display the photo settings options.
Figure 64: Camera Settings
The available photo settings are (from left icon to right icon):
• Turn High Dynamic Range (HDR) on or off.
• Three screens of More Options. Settings for each option depend on the selected option. Click
these icons to display more options. Some options require selecting a setting from a menu. Set
these options accordingly.
NOTICE: These options are similar to the camera options seen on most cameras. Set
accordingly.
- First More Options Screen.
MN002347A01-A
Chapter 7: Applications
106 Send Feedback
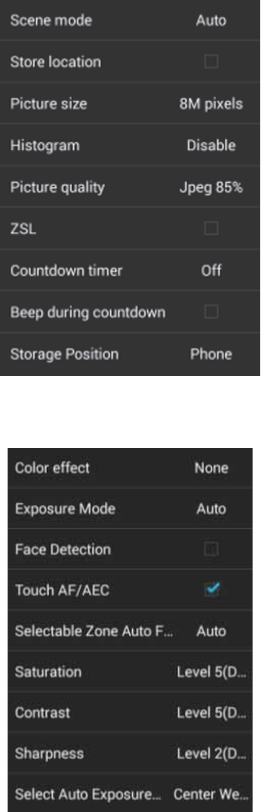
Figure 65: First More Options Screen
- Second More Options Screen.
Figure 66: Second More Options Screen
- Third More Options Screen.
MN002347A01-A
Chapter 7: Applications
Send Feedback 107
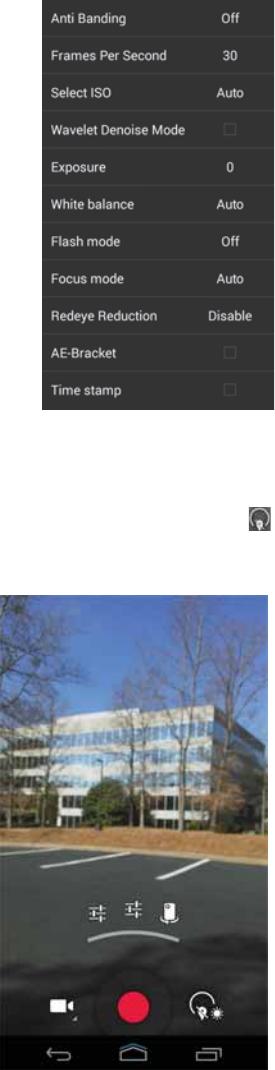
Figure 67: Third More Options Screen
• Switch from front to rear camera or from rear to front camera.
Video Settings
When in Video mode, video settings are displayed on screen. Tap to display the video settings
options.
Figure 68: Video Settings
MN002347A01-A
Chapter 7: Applications
108 Send Feedback
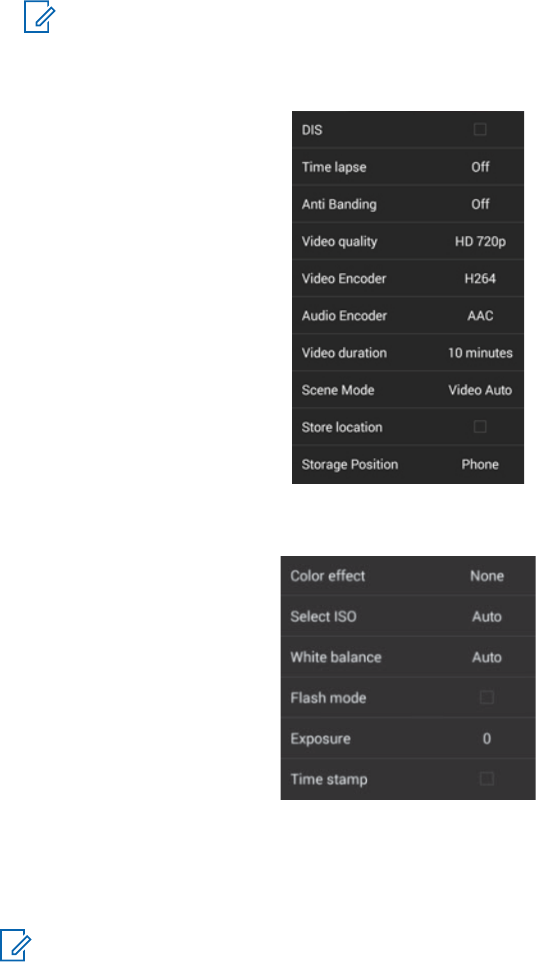
The available video settings are (from left icon to right icon):
• Two screens of More Options. Settings for each option depend on the selected option. You can
select an item from a menu or you select an option by clicking it.
NOTICE: These options are similar to the video options seen on most cameras. Set the
video options accordingly.
- First More Options Screen.
Figure 69: First More Options Video Screen
- Second More Options Screen.
Figure 70: Second More Options Video Screen
• Switch from front to rear video or from rear to front video.
Gallery
The Gallery is used to manage your photos and videos.
NOTICE: The device supports the following image formats: JPEG, GIF, PNG, and BMP.
Use the Gallery to:
• View photos
• Play videos
MN002347A01-A
Chapter 7: Applications
Send Feedback 109
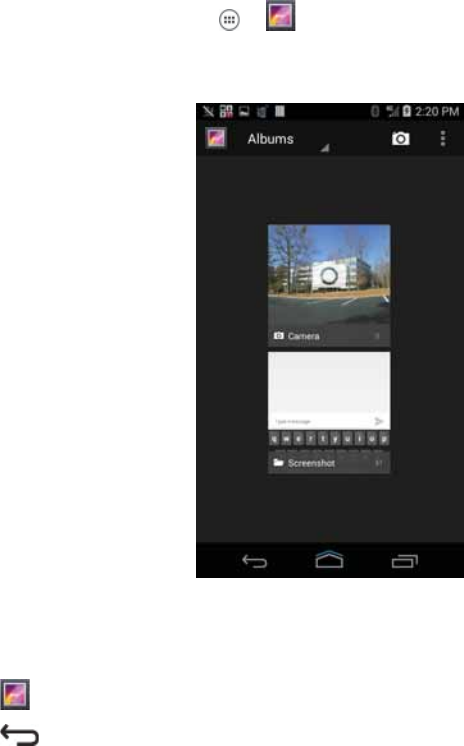
• Perform basic editing of photos
• Set photos as wallpaper
• Set photos as a contact photo
• Share photos and videos
To open the Gallery application, tap → .
The Gallery presents all photos and videos stored on the microSD card and internal memory.
Figure 71: Gallery — Albums
• Tap an album to open it and view its contents. The photos and videos in the album are displayed in
chronological order.
• Tap a photo or video in an album to view it.
• Tap icon (top left corner) to return to the main Gallery screen.
• Tap to return to the main Gallery screen.
Working with Albums
Albums are groups of images and videos in folders.
Tap an album to open it. The photos and videos are listed in a chronologically ordered grid. The name
of the album displays at the top of the screen.
MN002347A01-A
Chapter 7: Applications
110 Send Feedback
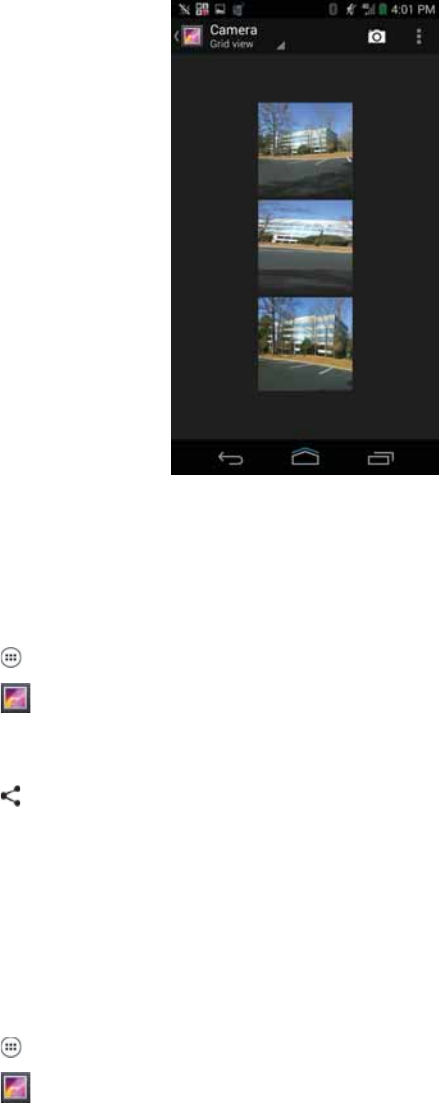
Figure 72: Photos/Videos Inside an Album
Swipe left or right to scroll images across the screen.
Sharing an Album
When and where to use: Use this procedure to share an album in your Gallery.
Procedure:
1Tap .
2Tap .
3Tap and hold an album until it highlights.
4Tap other albums as required.
5Tap .
Share applications are displayed.
6Select the application that you want to use.
7Follow the instructions within the selected application.
Getting Album Information
When and where to use: Use this procedure to view information about an album.
Procedure:
1Tap .
2Tap .
MN002347A01-A
Chapter 7: Applications
Send Feedback 111

3Tap and hold an album until it highlights.
4Tap .
5Tap Details.
Deleting an Album
When and where to use: Use this procedure to delete an album that you no longer need.
Procedure:
1Tap .
2Tap .
3Tap and hold an album until it highlights.
4Tap .
5Tap Delete.
6Tap OK to delete the album.
Working with Photos
Use Gallery to view photos on the microSD card and edit and share photos.
Viewing and Browsing Photos
When and where to use: Use this procedure to view or browse photos that you have taken.
Procedure:
1Tap .
2Tap .
3Tap an album to open it.
4Tap a photo.
MN002347A01-A
Chapter 7: Applications
112 Send Feedback

Figure 73: Photo Example
5Swipe left or right to view the next or previous photo in the album.
6Turn the LEX L10i to view the photo in upright (portrait) or sideways (landscape) orientation. The
photo is displayed (but not saved) in the new orientation.
7Tap the photo to view the controls.
8Double-tap the screen to zoom in or pinch two fingers together or spread them apart to zoom in
or out.
9Drag the photo to view parts that are not in view.
Rotating a Photo
When and where to use: Use this procedure to rotate a photo.
Procedure:
1Tap a photo to view the controls.
2Tap .
3Tap .
4Tap .
The photo rotates 90° clockwise. Each tap rotates the photo another 90°. The photo is
automatically saved with the new orientation.
MN002347A01-A
Chapter 7: Applications
Send Feedback 113
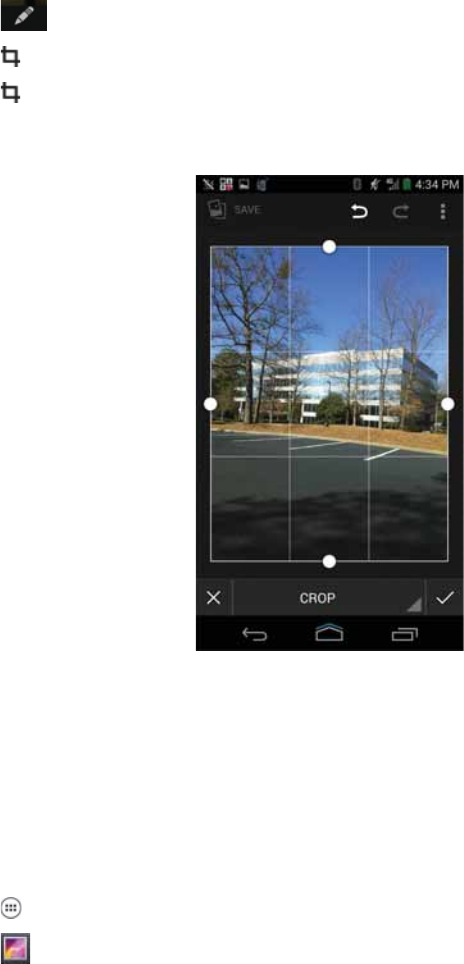
Cropping a Photo
When and where to use: Use this procedure to crop a photo.
Procedure:
1In the Gallery, tap a photo to view the controls.
2Tap .
3Tap .
4Tap ).
The cropping grid displays.
Figure 74: Cropping Grid
5Adjust the endpoints to select the portion of the photo to crop.
6Tap CROP to save a copy of the cropped photo.
The original version is retained.
Setting a Photo as a Contact Icon
When and where to use: Use this procedure to set a photo as a contact icon.
Procedure:
1Tap .
2Tap .
3Tap an album to open it.
MN002347A01-A
Chapter 7: Applications
114 Send Feedback

4Tap the photo to open it.
5Tap .
6Tap Set picture as.
7Select a contact.
8Crop the photo accordingly as described in Cropping a Photo on page 114.
9Tap SAVE.
Sharing a Photo
When and where to use: Use this procedure to share a photo.
Procedure:
1Tap .
2Tap .
3Tap an album to open it.
4Tap a photo to open it.
5Tap .
6Tap the application to use for sharing the selected photo (for example Bluetooth).
Deleting a Photo
When and where to use: Use this procedure to delete a photo.
Procedure:
1Tap .
2Tap .
3Tap an album to open it.
4Tap a photo to open it.
5Tap .
6Tap Delete.
7Tap OK to delete the photo.
Working with Videos
Use the Gallery to view videos on the microSD card and share videos.
Watching a Video
When and where to use: Use this procedure to watch a video.
Procedure:
1Tap .
2Tap .
MN002347A01-A
Chapter 7: Applications
Send Feedback 115

3Tap an album to open it.
4Tap a video.
5Tap .
The video begins to play.
6Tap the screen to view the playback controls.
Figure 75: Video Playback Controls
7Tap the Pause control.
8Tap to return to the previous screen or to return to the Home screen.
Sharing a Video
When and where to use: Use this procedure to share a video.
Procedure:
1Tap .
2Tap .
3Tap an album to open it.
4Tap a video to open it.
5Tap .
The Share menu appears.
6Tap the application to use to share the selected video.
The selected application opens with the video attached to a new message.
Deleting a Video
When and where to use: Use this procedure to delete a video.
Procedure:
1Tap .
MN002347A01-A
Chapter 7: Applications
116 Send Feedback
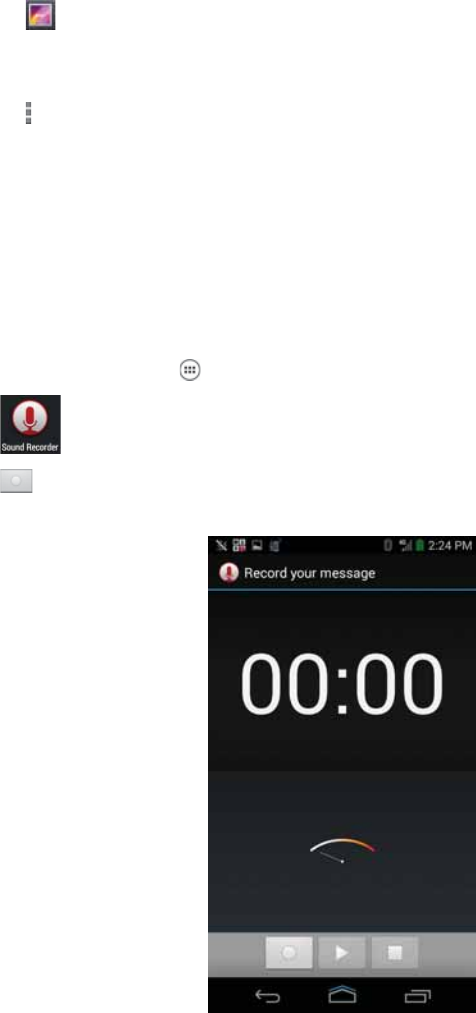
2Tap .
3Tap an album to open it.
4Tap a video to open it.
5Tap .
6Tap Delete.
7Tap OK.
Using Sound Recorder
Use Sound Recorder to record audio messages.
Recordings are saved on the microSD card (if installed) or the Internal Storage and available in the
Music application playlist titled My Recordings.
The recording process is done in four stages.
1From the Home screen, tap .
2Tap .
3Tap to start a recording.
Figure 76: Start Recording
4Record your message.
MN002347A01-A
Chapter 7: Applications
Send Feedback 117
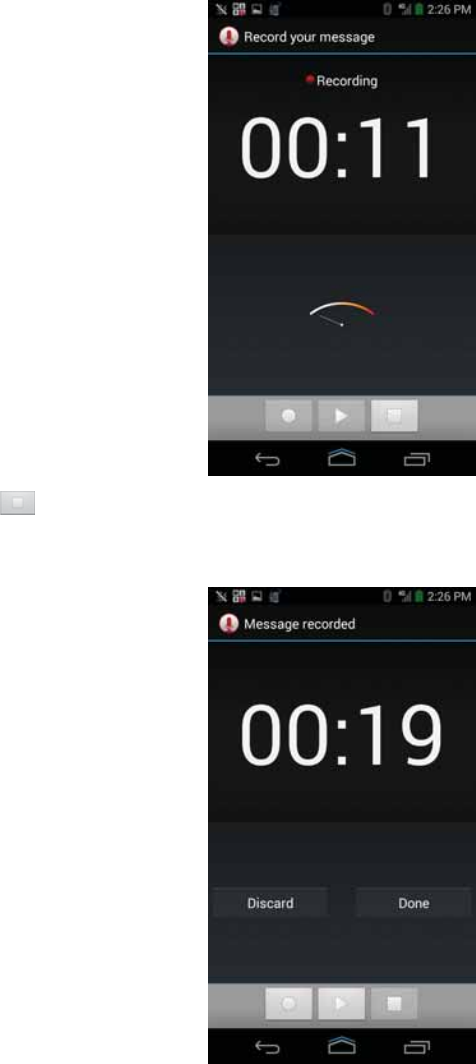
Figure 77: Record Your Message
5Tap to stop recording.
6Tap Done to save the recording.
Figure 78: Finish Recording
MN002347A01-A
Chapter 7: Applications
118 Send Feedback
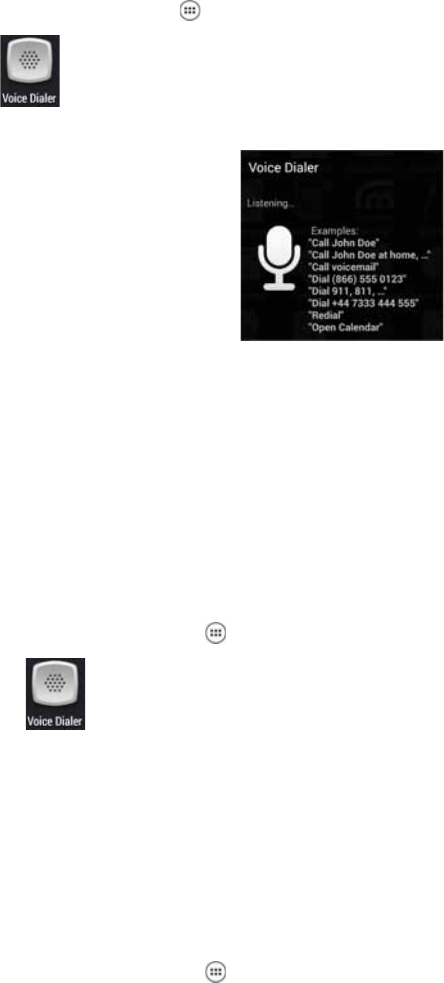
Voice Dialer
Voice Dialer is a speech dialog system that provides natural human interface for users to
communicate seamlessly with the device. Users can make phone calls, look up contact information,
launch programs or check calendars.
1From the Home screen, tap .
2Tap or press the call button on a Bluetooth headset. The following window displays.
Figure 79: Voice Dialer Window
3Say one of the following commands:
• Call
• Dial
• Redial
• Open
Calling a Person by Name
When and where to use: Use this procedure to call a person by name.
Procedure:
1From the Home screen, tap .
2Tap or press the call button on a Bluetooth headset.
3Say the name of the person that you want to call (for example, John Doe).
4In the Voice Dialer dialog box, tap Call John Doe.
The call is initiated.
Redialing a Previous Call
When and where to use: Use this procedure to redial a previous call.
Procedure:
1From the Home screen, tap .
MN002347A01-A
Chapter 7: Applications
Send Feedback 119

2Tap or press the call button on a Bluetooth headset.
3Say Redial.
4In the Voice Dialer dialog box, tap Redial.
The call is initiated.
Dialing by Number
When and where to use: Use this procedure to dial a number using the phone number.
Procedure:
1From the Home screen, tap .
2Tap or press the call button on a Bluetooth headset.
3Say Dial<[phone number]>.
4In the Voice Dialer dialog box, tap the number that displays.
The call is initiated.
Opening an Application
When and where to use: Use this procedure to open an application.
Procedure:
1From the Home screen, tap .
2Tap or press the call button on a Bluetooth headset.
3Say Open<[application name]>.
4In the Voice Dialer dialog box, tap the application name.
The application opens.
MN002347A01-A
Chapter 7: Applications
120 Send Feedback

Chapter 8
Wireless
This section provides information on the wireless features of the LEX L10i.
• Wireless Wide Area Network (WWAN)
• Wireless Local Area Network (WLAN)
• Bluetooth
Wireless Wide Area Networks
Use Wireless Wide Area Networks (WWANs) to access data over a cellular network.
This section provides information on:
• Setting the preferred network Public / Private
• Sharing a data connection
• Enabling / Disabling data roaming
• Monitoring data usage
• Limiting connections to 2G, 3G, 4G networks
• Editing Access Point Names (APNs)
• Adding Virtual Private Network VPN
• Cellular broadcasts
Sharing the Mobile Data Connection
The Tethering & portable hotspot settings allow you to share your data connection. You can share
the LEX L10i mobile data connection with a single computer via USB tethering or Bluetooth tethering.
You can also share the data connection with up to eight devices at once, by turning it into a portable
Wi-Fi hotspot. While the LEX L10i is sharing its data connection, an icon appears at the top of the
screen and a corresponding message appears in the notification list.
Configuring USB Tethering
Use this procedure to share a data connection with a host computer.
NOTICE: USB tethering is not supported on computers running Mac OS. If your computer is
running Windows 7 or a recent version of Linux (such as Ubuntu), follow these instructions
without any special preparation. If running a version of Windows that precedes Windows 7, or
some other operating system, you may need to prepare the computer to establish a network
connection via USB.
NOTICE: After connecting the LEX L10i to a computer using USB tethering, the computer
disconnects from the network connection, for a short time, and does not have access to the
Internet (the LEX L10i becomes the primary network adapter).
Procedure:
1Connect the LEX L10i to a host computer with the USB cable.
MN002347A01-A
Wireless
Send Feedback 121
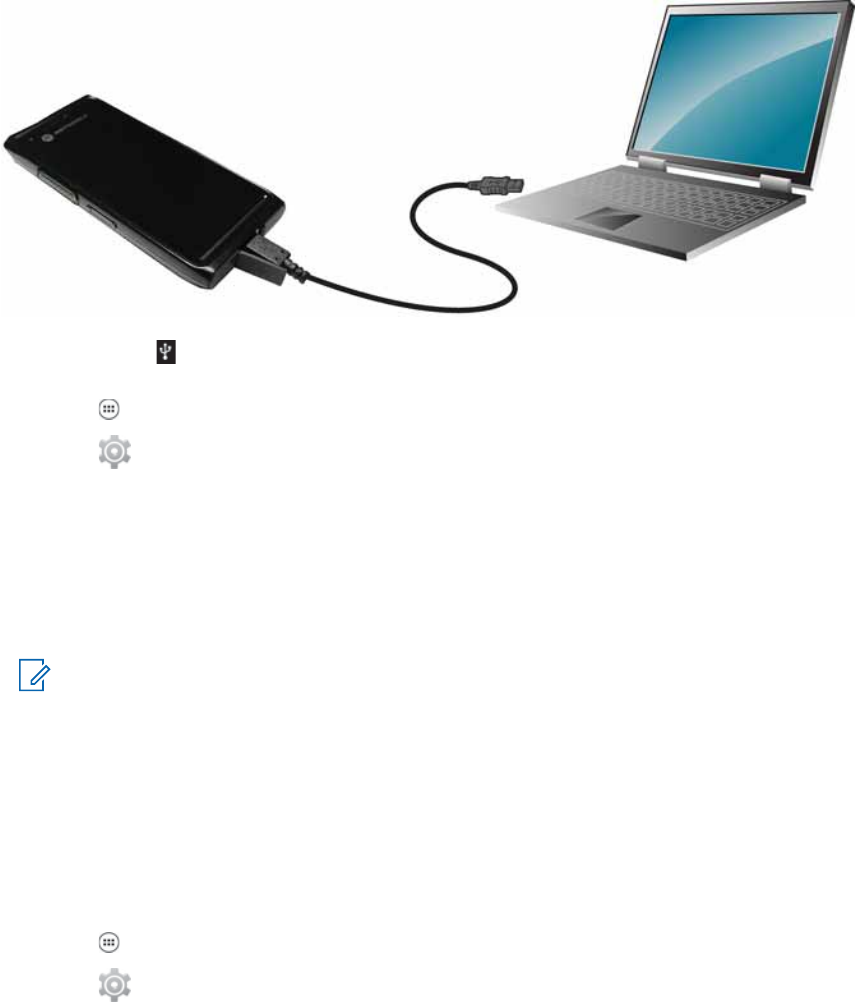
Figure 80: USB Cable Connection to Host Computer
A USB icon appears at the top of the screen, and the notification Connected as a media
device appears briefly at the top of the screen.
2Tap .
3Tap .
4Tap More ... .
5Tap Tethering & portable hotspot.
6Check USB tethering.
The host computer is now sharing the LEX L10i data connection.
Postrequisites: To stop sharing the data connection, uncheck USB tethering or disconnect the USB
cable.
NOTICE: The USB cover needs to be fully seated after use.
Configuring Bluetooth Tethering
Prerequisites: Configure the host computer to obtain its network connection using Bluetooth. For
more information, see the host computer’s documentation.
When and where to use: Use this procedure to tether Bluetooth to share the data connection with a
host computer.
Procedure:
1Pair the LEX L10i with the host computer.
2Tap .
3Tap .
4Tap More ... .
5Tap Tethering & portable hotspot.
MN002347A01-A
Chapter 8: Wireless
122 Send Feedback

6Check Bluetooth tethering.
The host computer is now sharing the LEX L10i data connection.
Postrequisites: To stop sharing the data connection, uncheck Bluetooth tethering .
Configuring Portable Wi-Fi Hotspot Settings
Prerequisites: Configure the Wi-Fi Hotspot settings.
When and where to use: Use this procedure to turn your LEX L10i into a portable Wi-Fi hotspot.
Procedure:
1Tap .
2Tap .
3Tap More ... .
4Tap Tethering & portable hotspot.
5Select Portable Wi-Fi hotspot.
After a moment, the LEX L10i starts broadcasting its Wi-Fi network name (SSID), so you can
connect to it with up to eight computers or other devices.
Postrequisites: To stop sharing the data connection, uncheck Portable Wi-Fi hotspot.
Configuring the Wi-Fi Hotspot
When and where to use: Use this procedure is used to configure a Wi-Fi hotspot.
Procedure:
1Tap .
2Tap .
3Tap More ... .
4Tap Tethering & portable hotspot.
5Tap Set up Wi-Fi hotspot.
The Set up Wi-Fi hotspot screen displays.
MN002347A01-A
Chapter 8: Wireless
Send Feedback 123
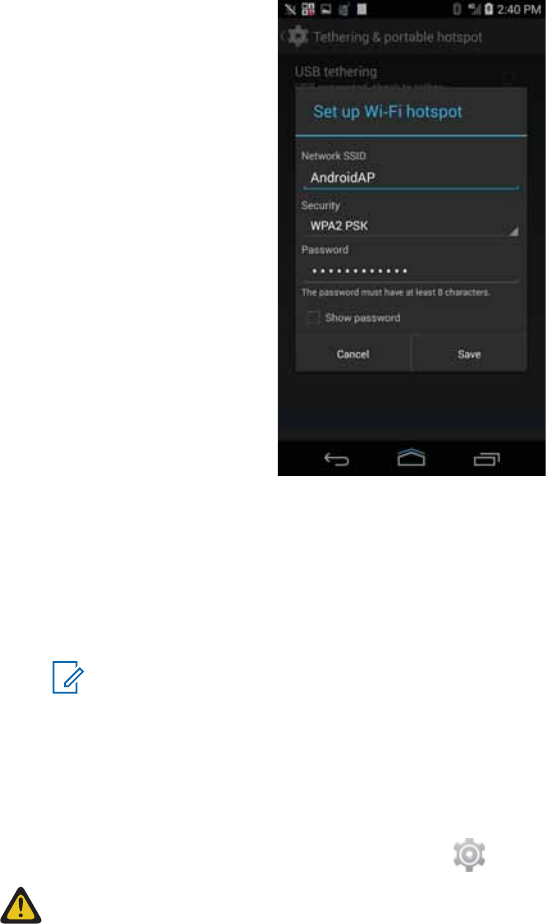
Figure 81: Set up Wi-Fi Hotspot Dialog Box
6In the Network SSID text field, edit the network name.
7Tap the Security option and select a security method from the drop-down list.
•Open
•WPA2 PSK.
8In the Password text field, enter a password.
NOTICE: If Open is selected in the Security option, a password is not required.
9Tap Save.
Data Usage
Data usage refers to the amount of data uploaded or downloaded by the LEX L10i during a given
period. Depending on the wireless plan, you may be charged additional fees when your data usage
exceeds your plan's limit. To monitor your data usage, go to → Data usage.
CAUTION: The usage displayed on the data usage settings screen is measured by your
device. Your carrier's data usage accounting may differ. Usage in excess of your carrier plan's
data limits can result in steep overage charges. The feature described here can help you track
your usage, but is not guaranteed to prevent additional charges.
Data usage settings allow you to:
• Set the data usage level at which you' will receive a warning.
• Set a data usage limit.
• View or restrict data usage by app.
MN002347A01-A
Chapter 8: Wireless
124 Send Feedback

• Identify mobile hotspots and restrict background downloads that may result in extra charges.
By default, when you open the data usage settings screen you see the settings for mobile data: that is,
the data network or networks provided by your carrier.
Just below the on-off switch, note the data usage cycle. Tap it to choose a different cycle. This date
range is the period of time for which the graph displays data usage.
The vertical white lines on the graph show a period of time within the data usage cycle. This range
determines the usage amount displayed just below the graph. Drag lines to change the period.
Setting Data Usage Warning
When and where to use: Use this procedure to set data usage warning.
Procedure:
1Tap .
2Tap .
3Tap Data usage.
4Check Set mobile data limit.
5Drag the red line up/down to the level where you want to limit.
6Drag the orange line up/down to the level where you want to receive a warning. When your data
usage reaches this level, you' will receive a notification.
Setting Auto-Sync
You can also conserve data usage by syncing your apps manually, only when you need the data,
rather than relying on auto-sync.
When and where to use: Use this procedure to set Auto-Sync.
Procedure:
To turn auto-sync off or on, tap → Auto-sync data.
Disabling Data When Roaming
When and where to use: Use this procedure to prevent the LEX L10i from transmitting data over
other carriers’ mobile networks when leaving an area that is covered by the carrier’s networks. This is
useful for controlling expenses if the service plan does not include data roaming.
Procedure:
1Tap .
2Tap .
3Tap More... .
4Tap Mobile networks.
5Un-check Data roaming.
6Tap .
MN002347A01-A
Chapter 8: Wireless
Send Feedback 125

Limiting Data Connection to a Network
You can limit the device Private or Public services or extend the battery life by limiting the data
connections to Global networks, LTE networks, or CDMA networks.
NOTICE: This feature is only available on some networks. Check with service provider.
When and where to use: Use this procedure to limit data connection to a network.
Procedure:
1Tap .
2Tap .
3Tap More ... .
4Tap Mobile networks.
5Tap Network Mode.
6Select Global mode, LTE only, or CDMA only .
7Tap .
Editing the Access Point Name
When and where to use: When network information needs to change, the user can edit the APN
information.
NOTICE: Many service provider Access Point Name (APN) data are pre-configured in the LEX
L10i.
Procedure:
1Tap .
2Tap .
3Tap More ... .
4Tap Mobile networks.
5Tap Access Point Names.
6Tap .
7When finished, tap .
8Tap Save.
9Tap the radio button next to the new APN name to start using it.
10 Tap .
Adding a Virtual Private Network (VPN)
A virtual private network (VPN) extends a private network across a public network. VPN enables the
LEX L10i to communicate data across a public network while benefiting from the functionality and
security of the private network. When connected by VPN, the LEX L10i establishes a virtual point-to-
point connection through a dedicated virtual tunneling protocols or data encryption. TheLEX L10i
enables connection to Basic VPN to communicate through any VPN and to Motorola Solutions Mobile
MN002347A01-A
Chapter 8: Wireless
126 Send Feedback

VPN (MVPN) to communicate through Motorola Solutions mobile VPN. This section describes adding a
basic VPN. Motorola Mobile VPN is added and configured by your technical support and requires
license certification for use.
When and where to use: Use this procedure to add a virtual private network to the LEX L10i (not
including the Motorola Mobile VPN).
Procedure:
1Tap .
2Tap .
3Tap More... .
4Tap VPN.
5Tap Basic VPN .
6Tap + to add VPN profile.
7Enter and check:
• Name
• Type
• Server Address
• If required, check PPP encryption (MPPE).
• If required, check Show advanced options to enter:
• DNS servers
• DNS search domains
• Forwarding routs
8Tap Save.
Connection to VPN is indicated by on the status bar and the Choose Certification screen
is displayed.
9Check My Keychain and tap Allow.
10 Tap .
Cell Broadcasts
Cell Broadcasts allows emergency alert messages to be broadcast simultaneously from a service
provider to multiple users in within a designated geographical area. Broadcasts are often used for
weather updates, regional events, traffic conditions and other services.
When and where to use: Use this procedure to enable emergency alert messages by cell broadcasts
on the LEX L10i.
Procedure:
1Tap .
2Tap .
3Tap More... .
4Tap Cell broadcasts.
MN002347A01-A
Chapter 8: Wireless
Send Feedback 127

5Check the emergency alert types you want to receive.
6Tap .
Wireless Local Area Networks
Wireless local area networks (WLANs) allow the LEX L10i to communicate wirelessly inside a building.
Before using the LEX L10i on a WLAN, the facility must be set up with the required hardware to run the
WLAN (sometimes known as infrastructure). The infrastructure and the LEX L10i must both be properly
configured to enable this communication.
See the documentation provided with the infrastructure (access points (APs), access ports, switches,
Radius servers) for instructions on how to set up the infrastructure.
Once the infrastructure is set up to enforce the chosen WLAN security scheme, use the Wireless &
networks settings to configure the LEX L10i to match the security scheme.
The LEX L10i supports the following WLAN security options:
• Open
• Wireless Equivalent Privacy (WEP)
• Wi-Fi Protected Access (WPA)/WPA2 Personal (PSK)
• Extensible Authentication Protocol (EAP)
- Protected Extensible Authentication Protocol (PEAP) — with Microsoft Challenge-Handshake
Authentication Protocol version 2 (MSCHAPv2) and Generic Token Card (GTC) authentication.
- EAP-Transport Layer Security (TLS)
- EAP-TTLS - with Password Authentication Protocol (PAP), MSCHAP and MSCHAPv2
authentication
The Status bar displays icons that indicate Wi-Fi network availability and Wi-Fi status.
NOTICE: Turn off Wi-Fi when not using it, to extend the life of the battery.
Scanning and Connecting to a Wi-Fi Network
When and where to use: Use this procedure to scan for and connect to a Wi-Fi network.
Procedure:
1Tap .
2Tap .
MN002347A01-A
Chapter 8: Wireless
128 Send Feedback
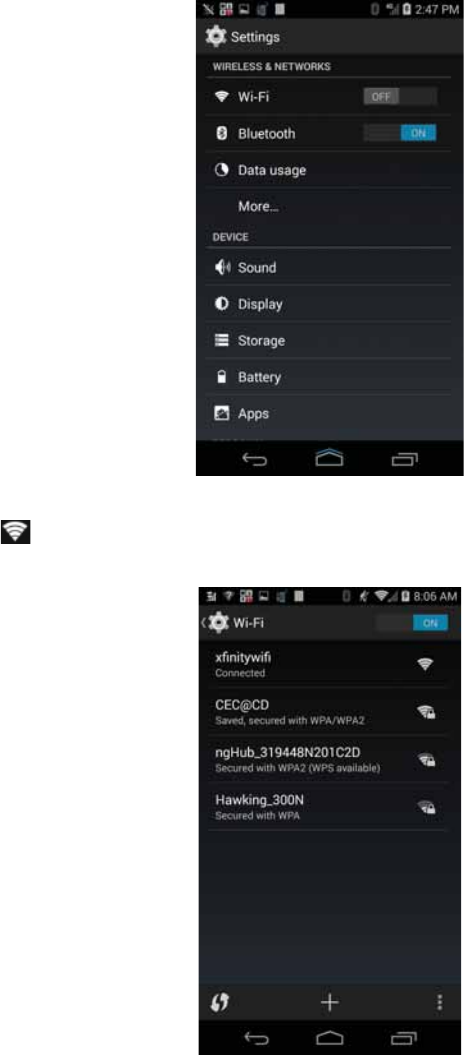
Figure 82: Settings Screen
3Slide the Wi-Fi switch to the ON position.
4Tap Wi-Fi. The LEX L10i searches for WLANs in the area and lists them.
Figure 83: Wi-Fi Screen
5Scroll through the list and select the desired WLAN network.
MN002347A01-A
Chapter 8: Wireless
Send Feedback 129

6For open networks, tap profile once or press and hold and then select Connect to network or
for secure networks enter the required password or other credentials then tap Connect. See
technical support for more information.
The LEX L10i obtains a network address and other required information from the network using
the dynamic host configuration protocol (DHCP) protocol.
7In the Wi-Fi setting field, Connected displays indicating that the LEX L10i LEX L10i is
connected to the WLAN.
Configuring a Wi-Fi Network
When and where to use: Use this procedure to configure a Wi-Fi network.
Procedure:
1Tap .
2Tap .
3Tap Wi-Fi.
4Slide the switch to the ON position.
The LEX L10i searches for WLANs in the area and lists them on the screen.
5Scroll through the list and select the desired WLAN network.
6Tap the desired network.
If the network security is Open, the LEX L10i automatically connects to the network. For all other
network security a dialog box appears.
Figure 84: WLAN Network Security Dialog Boxes
NOTICE: By default, the network Proxy is set to None and the IP settings is set to
DHCP.
7If the network security is WEP or WPA/WPA2 PSK, enter the required password and then tap
Connect.
8If the network security is 802.1x EAP, enter the information below and then tap Connect:
MN002347A01-A
Chapter 8: Wireless
130 Send Feedback

• Tap the EAP method drop-down list and select PEAP, TLS, or TTLS.
• Tap the Phase 2 authentication drop-down list and select an authentication method.
• If required, tap CA certificate and select a Certification Authority (CA) certificate. Note:
Certificates are installed using the Security settings.
• If required, tap User certificate and select a user certificate. Note: User certificates are
installed using the Location & security settings.
• If required, in the Identity text box, enter the username credentials.
• If desired, in the Anonymous identity text box, enter an anonymous identity username.
• If required, in the Password text box, enter the password.
9Tap .
Adding a Wi-Fi Network
When and where to use: You can add a Wi-Fi Network that is currently out of range or indiscoverable.
Procedure:
1Tap .
2Tap .
3Tap Wi-Fi.
4Slide the Wi-Fi switch to the On position.
5Tap +.
6Enter network SSID and select Security.
7Tap Save.
The LEX L10i connects to the wireless network.
8Tap .
Manually Adding a Wi-Fi Network
When and where to use: Use this procedure to manually add a Wi-Fi network if the network does not
broadcast its name (SSID) or to add a Wi-Fi network when out of range.
Procedure:
1Tap .
2Tap .
3Tap Wi-Fi.
4Slide the Wi-Fi switch to the ON position.
5Tap + in the bottom right corner of the screen.
By default, the network Proxy is set to None and the IP settings is set to DHCP.
6In the Network SSID text box, enter the name of the Wi-Fi network.
7In the Security drop-down list, select the type of security. Options included are:
MN002347A01-A
Chapter 8: Wireless
Send Feedback 131

•None
•WEP
•WPA/WPA2 PSK
•802.1x EAP
8If the network security is None, tap Save.
9If the network security is WEP or WPA/WPA2 PSK, enter the required password and then tap
Save.
10 If the network security is 802.1x EAP enter the information below and then tap Save:
• Tap EAP method drop-down list and select PEAP, TLS, or TTLS.
• Tap Phase 2 authentication drop-down list and select an authentication method.
• Tap CA certificate and select a Certification Authority (CA) certificate.
NOTICE: Certificates are installed using the Security settings.
• Tap User certificate and select a user certificate.
NOTICE: User certificates are installed using the Security settings.
• Tap Identity to enter the username credentials.
• Tap Anonymous to enter an anonymous identity username.
• Tap Password to enter password.
11 Tap .
Advanced Wi-Fi Settings
Use the Advanced settings to configure additional Wi-Fi settings.
NOTICE: Advanced Wi-Fi settings are for the device not for a specific wireless network.
From the Wi-Fi screen, tap → Advanced to view the advanced settings.
•Network notification — When enabled, notifies the user when an open network is available.
•Keep Wi-Fi on during sleep — Opens a menu to set whether and when the Wi-Fi radio turns off.
-Always — The radio stays on when the device enters suspend mode.
-Only when plugged in — The radio stays on while the device is connected to external power.
-Never (increases data usage) — The radio turns off when the device enters suspend mode
(default).
•Wi-Fi optimization — Minimize the battery usage when Wi-Fi is on.
•Avoid poor Connection — Connects to the internet only if connection is good.
•MAC address — Displays the Media Access Control (MAC) address of the device when connecting
to Wi-Fi networks.
•IP address — Displays the IP address of the device when connecting to Wi-Fi networks.
MN002347A01-A
Chapter 8: Wireless
132 Send Feedback

WLAN Configuration
Use the WLAN Configuration settings to configure additional WLAN settings.
From the Wi-Fi screen, tap → Advanced to view the settings. The following two settings are used to
configure WLAN:
•Wi-Fi frequency band
-Auto (2.4GHz and 5GHz) —Use both the 2.4 GHz and 5 GHz bands (default).
-5GHz Only — Use only the 5 GHz band.
-2.4GHz Only —Use only the 2.4 GHz band.
•Keep Wi-Fi on during sleep
-Always — Wi-Fi is always enabled even in sleep mold.
-Only when plugged in — Wi-Fi is enabled only when the device is plugged in. If the device is
not plugged in, the device will not enter the sleep mold.
-Never (increases data usage) — Wi-Fi is never disabled.
Modifying a Wi-Fi Network
The user can change settings and passwords for a network in the Wi-Fi list.
When and where to use: Use this procedure to modify a Wi-Fi network.
Procedure:
1Tap .
2Tap .
3Tap Wi-Fi.
4Slide the Wi-Fi switch to the ON position.
5Tap and hold on a network name and then tap Modify network.
6Modify the network settings and then tap Save.
7Tap .
Removing a Wi-Fi Network
When and where to use: Use this procedure to remove a Wi-Fi network from your list of Wi-Fi
networks.
Procedure:
1Tap .
2Tap .
3Tap Wi-Fi.
4In the Wi-Fi networks list, tap and hold the name of the network.
5In the menu, tap Forget network.
6Tap .
MN002347A01-A
Chapter 8: Wireless
Send Feedback 133

Bluetooth Device
The LEX L10i supports Motorola Operations Critical Wireless (OCW) Push-to-talk Pod (NNTN8127)
and Bluetooth-enabled device (accessory) through a wireless Bluetooth connection.
Adaptive Frequency Hopping
Adaptive Frequency Hopping (AFH) is a method of avoiding fixed frequency interferers, and can be
used with Bluetooth voice. All devices in the piconet (Bluetooth network) must be AFH-capable in order
for AFH to work. There is no AFH when connecting and discovering devices. Avoid making Bluetooth
connections and discoveries during critical 802.11b communications.
AFH for Bluetooth consists of four main sections:
• Channel Classification - A method of detecting an interference on a channel-by-channel basis, or
pre-defined channel mask.
• Link Management - Coordinates and distributes the AFH information to the rest of the Bluetooth
network.
• Hop Sequence Modification - Avoids interference by selectively reducing the number of hopping
channels.
• Channel Maintenance - A method for periodically re-evaluating the channels.
The Bluetooth radio in this device operates as a Class 2 device power class. The maximum output
power is 2.5 mW and the expected range is 10 meters (32.8 ft.). A definition of ranges based on power
class is difficult to obtain due to power and device differences, and whether one measures open space
or closed office space.
NOTICE: It is not recommended to perform Bluetooth wireless technology inquiry when high
rate 802.11b operation is required.
Bluetooth Security
The current Bluetooth specification defines security at the link level. Application-level security is not
specified. This allows application developers to define security mechanisms tailored to their specific
need. Link-level security occurs between devices, not users, while application-level security can be
implemented on a per-user basis. The Bluetooth specification defines security algorithms and
procedures required to authenticate devices, and if needed, encrypt the data flowing on the link
between the devices. Device authentication is a mandatory feature of Bluetooth while link encryption is
optional.
Pairing of Bluetooth devices is accomplished by creating an initialization key used to authenticate the
devices and create a link key for them. Entering a common personal identification number (PIN) in the
devices being paired generates the initialization key. The PIN is never sent over the air. By default, the
Bluetooth stack responds with no key when a key is requested (it is up to user to respond to the key
request event). Authentication of Bluetooth devices is based-upon a challenge-response transaction.
Bluetooth allows for a PIN or passkey used to create other 128-bit keys used for security and
encryption. The encryption key is derived from the link key used to authenticate the pairing devices.
Also worthy of note is the limited range and fast frequency hopping of the Bluetooth radios that makes
long distance eavesdropping difficult.
Recommendations are:
• Perform pairing in a secure environment
• Keep PIN codes private and do not store the PIN codes in the device
• Implement application-level security
MN002347A01-A
Chapter 8: Wireless
134 Send Feedback
Bluetooth Profiles
The LEX L10i supports the following Bluetooth services:
• Generic Access Profile (GAP) — Use for device discovery and authentication.
• Service Discovery Protocol (SDAP) — Handles the search for known and specific services and
general services.
• Serial Port Profile (SPP) — Sets up a virtual serial port and connects two Bluetooth enabled
devices. For example, connecting the LEX L10i to a printer.
• Human Interface Device Profile (HID) — Allows Bluetooth keyboards, pointing devices, gaming
devices and remote monitoring devices to connect to the LEX L10i.
• Object Push Profile (OPP) — Allows the LEX L10i to push and pull objects to and from a push
server.
• Dial-up Networking (DUN) — Allows the LEX L10i to access the Internet and other dial-up services
using a Bluetooth enabled mobile phone.
• Hands-Free Profile (HFP) — Allows a hands-free device, such as a Bluetooth headset, to place and
receive calls on the LEX L10i.
• Advanced Audio Distribution Profile (A2DP) — Allows the LEX L10i to stream stereo-quality audio
to a wireless headset or wireless stereo speakers.
• Audio/Video Remote Control Profile (AVRCP) — Allows the LEX L10i to control televisions, hi-fi
equipment, etc.
• General Object Exchange Profile (GOEP) — Provides a basis for other data profiles. Based on
OBEX and sometimes referred to as such.
• Handsfree Profile (HFP) — Allow car hands-free kits to communicate with mobile phones in the car.
• Personal Area Network (PAN) — Allow the use of Bluetooth Network Encapsulation Protocol on
Layer 3 protocols for transport over a Bluetooth link.
• General Audio/Video Distribution Profile (GAVDP) — Provides the basis for A2DP, and VDP.
• Phone Book Access Profile (PBAP) — Allows exchange of Phone Book Objects between a car kit
and a mobile phone to allow the car kit to display the name of the incoming caller; allow the car kit
to download the phone book so the user can initiate a call from the car display.
• Message Access Profile (MAP) — allows exchange of messages between devices.
• Handset Profile (HSP) — Provides support for the popular Bluetooth headsets to be used with
mobile phones with ability to ring, answer a call, hang up and adjust the volume.
• File Transfer Profile (FTP) — Provides the capability to browse, manipulate and transfer files and
folders in a file system of another system.
• Proximity profile (PXP) — Enables proximity monitoring between two devices.
• Heart Rate Profile (HRP) — Enables transmission and reception of medical device data.
• Health Thermometer profile (HTP) — Enables transmission and reception of medical device data.
Bluetooth Power States
The Bluetooth radio is off by default.
The following modes are available:
•Suspend — When the LEX L10i goes into suspend mode, the Bluetooth radio stays on.
•Airplane Mode — When the LEX L10i is placed in Airplane Mode, the Bluetooth radio turns off.
When Airplane Mode is disabled, the Bluetooth radio returns to the prior state. When in Airplane
Mode, the Bluetooth radio can be turned back on if desired.
MN002347A01-A
Chapter 8: Wireless
Send Feedback 135
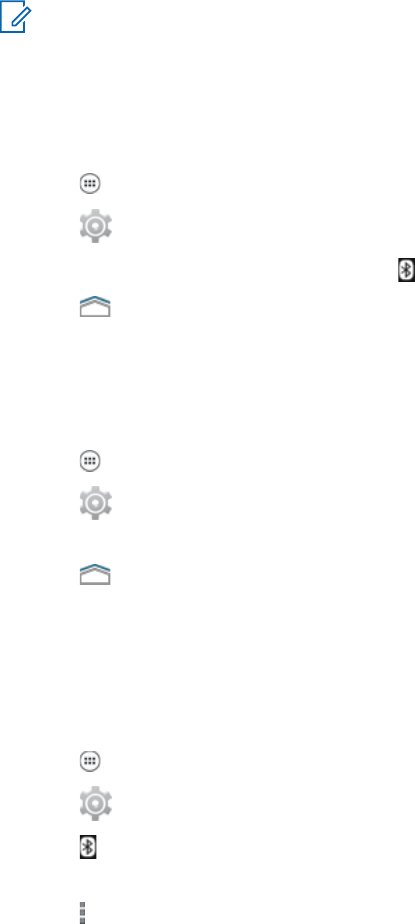
Bluetooth Radio Power for Android
Turn off the Bluetooth radio to save power or if entering an area with radio restrictions (e.g., an
airplane). When the radio is off, other Bluetooth devices cannot see or connect to the device. Turn on
the Bluetooth radio to exchange information with other Bluetooth devices (within range). Communicate
only with Bluetooth radios in close proximity.
NOTICE: To achieve the best battery life, turn off radios when not in use.
Enabling Bluetooth
When and where to use: Use this procedure to enable Bluetooth.
Procedure:
1Tap .
2Tap .
3Slide the Bluetooth switch to the ON position. also appears in the Status bar.
4Tap .
Disabling Bluetooth
Use this procedure to disable Bluetooth.
Procedure:
1Tap .
2Tap .
3Slide the Bluetooth switch to the OFF position.
4Tap .
Changing the Bluetooth Name
By default, the LEX L10i has a generic Bluetooth name that is visible to other devices when connected.
When and where to use: Use this procedure to change the Bluetooth name.
Procedure:
1Tap .
2Tap .
3Tap Bluetooth.
4If Bluetooth is not on, slide the switch to the ON position.
5Tap .
6Tap Rename Phone.
7Enter a name and tap Rename.
MN002347A01-A
Chapter 8: Wireless
136 Send Feedback

8Tap .
Selecting Profiles on a Bluetooth Device
Some Bluetooth devices have multiple profiles for different connections.
When and where to use: Use this procedure to select a profile on the Bluetooth device that connects
to the LEX L10i.
Procedure:
1Tap .
2Tap .
3Tap Bluetooth.
4In the AVAILABLE DEVICES list, tap next to the device name.
5Under PROFILES, select a profile to use.
6Tap .
MN002347A01-A
Chapter 8: Wireless
Send Feedback 137
This page intentionally left blank.
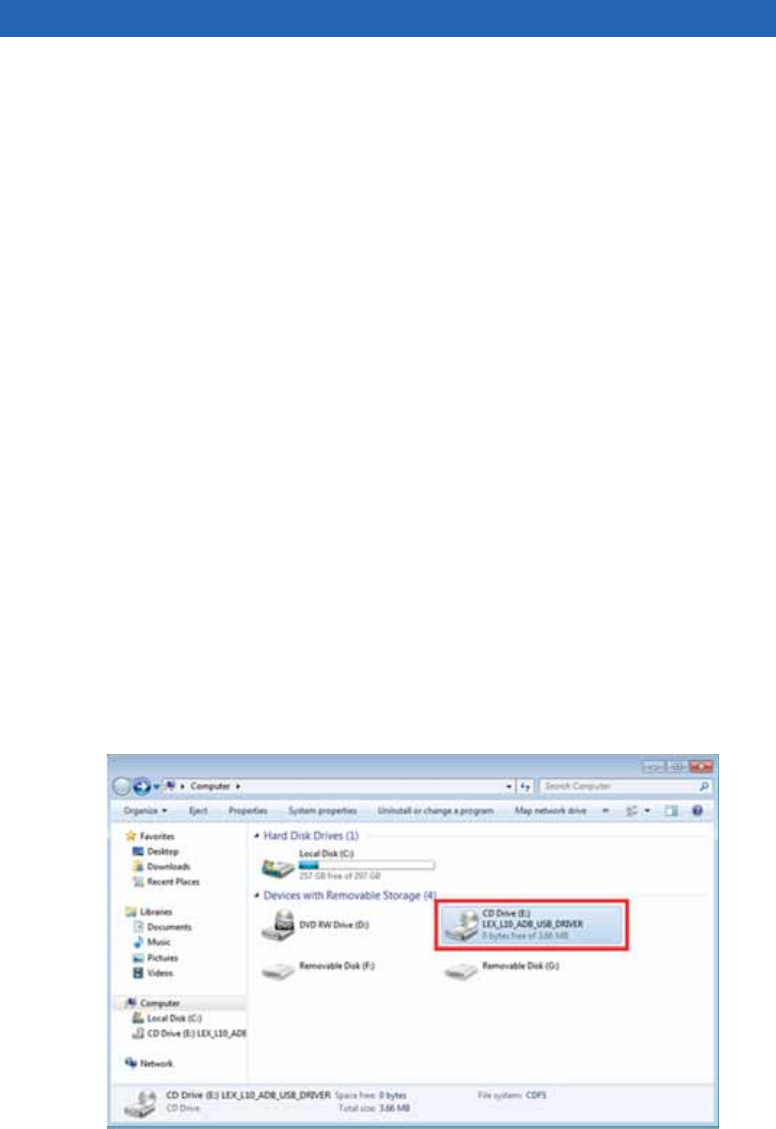
Chapter 9
ADB and USB Driver Setup
This chapter describes how to set up the Android Debug Bridge (ADB) and USB driver for your
Windows PC. The ADB and USB driver are required to perform Fastboot OS updates and to capture
debug logs using ADB. They are also used to push files onto a device and for APK installation.
Required Software and Hardware
In order to install the ADB and USB driver, certain software and hardware requirements must be met.
• Hardware (one of the following)
- Windows PC running Window 8
- Windows PC running Window 7 32/64 bits
- Windows PC running Windows XP SP3 with Micro-B USB Cable
• Software
- LEX_L10.zip (contains ADB and USB drivers)
- Android SDK (adb utility) installation procedure available at the following link: https://
developer.android.com/sdk/installing/index.html?pkg=tools
Installing USB Driver and ADB
Prerequisites: Ensure all old USB drivers are removed before beginning this procedure.
When and where to use: Use this procedure to install the USB driver and ADB.
Procedure:
1Insert the provided LEX L10i ADB USB Driver CD into a CD or DVD drive.
2Click the Start button and select Computer.
Figure 85: Access Computer
MN002347A01-A
ADB and USB Driver Setup
Send Feedback 139

3Open the CD drive and copy LEX_L10.zipto your desktop.
Figure 86: Access CD
4Extract the LEX_L10.zip file copied on your desktop to C:\Program Files (x86) or any other
location in your OS installation drive where you prefer to keep the driver, and then select OK.
Figure 87: Select Destination
5Enable USB debugging in your device by:
aOn the LEX L10i, navigate to Settings → About Phone and click the build number seven
times to enable developer options.
MN002347A01-A
Chapter 9: ADB and USB Driver Setup
140 Send Feedback
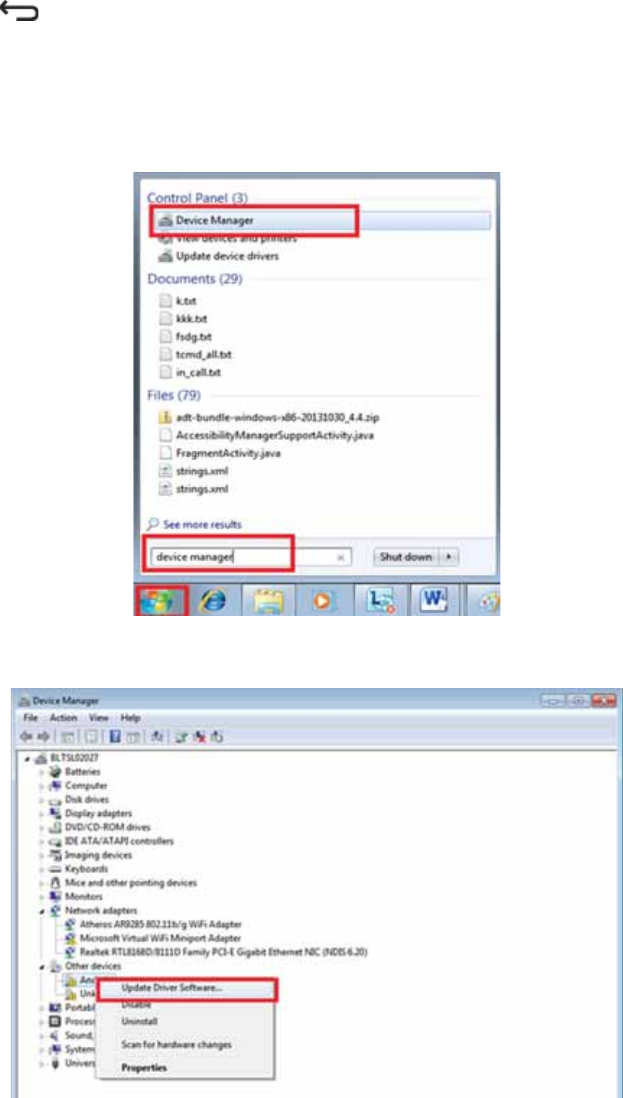
bTap to return to Settings; then, tap Developer options and click the checkbox for USB
Debugging.
cClick OK when prompted to allow USB debugging.
6Configure the driver in the Device Manager.
aOn your computer, click the Start button and search for Device Manager and open it.
Figure 88: Access Device Manager
bFind Android under Other devices right-click and select Update Driver Software.
Figure 89: Select Update Drive Software
cSelect Browse my computer for driver software.
MN002347A01-A
Chapter 9: ADB and USB Driver Setup
Send Feedback 141
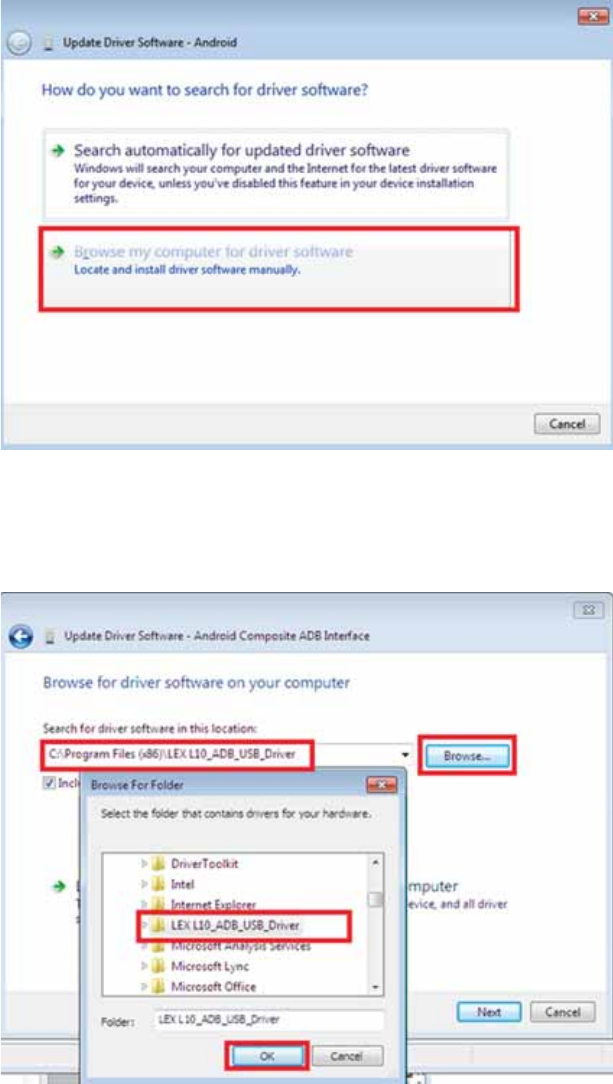
Figure 90: Select Browse my computer for driver software
dClick Browse and select the folder where the driver was extracted (that is, C:\Program Files
(x86)\Lex L10_ADB_USB_Driver or the custom path chosen by you at the time of extracting
the LEX_L10.zip file.
eClick OK and then click Next.
Figure 91: Select Installation Folder
MN002347A01-A
Chapter 9: ADB and USB Driver Setup
142 Send Feedback
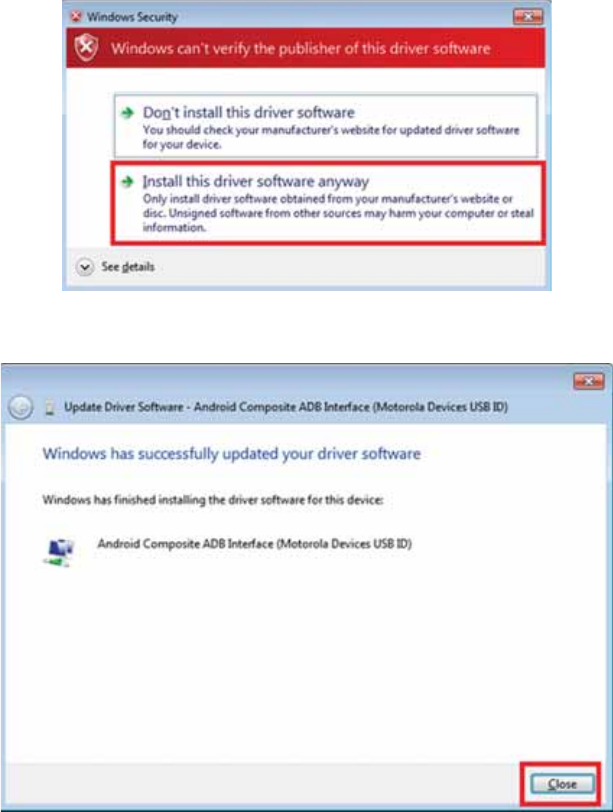
fIf prompted, select Install this driver software anyway.
Figure 92: Select Install this driver software anyway
gClick Close to complete the installation.
Figure 93: Close the Installation
The driver is now installed.
7Set up the ADB USB profile on your PC as follow-up with these steps:
aAfter driver installation, make sure there is a .android folder in your user profile directory.
bIf you have installed and run ADB for the device before, run adb kill- server” before you can
use the ADB.
cTo see if ADB installs successfully, run adb devices from the command line.
MN002347A01-A
Chapter 9: ADB and USB Driver Setup
Send Feedback 143
This page intentionally left blank.

Chapter 10
Accessories
This chapter provides information for using the accessories associated with the LEX L10i.
Accessories
This section lists the LEX L10i accessories along with specifications.
LEX 10i General Accessories:
• Replaceable Standard Battery Li Ion 2340 mAh 3.7V
• Replaceable High-capacity Battery Pack Li Ion 4680 mAh 3.7V
• Handheld Standard Battery Door
• Handheld Extended Battery Door
• LEX L10i Auto Charge (Vehicle Power Adapter)
• Power Supply
• Carry Accessory Glove LEX L10i Rubber Sleeve
• Desktop Cradle
• Vehicle Cradle
• USB Cable
• Holster
USB Cable
A USB cable is necessary to connect your LEX L10i to a charger.
The USB cable:
• Connects the LEX L10i to a USB charger to charge the LEX L10i.
• Provides USB communication with a host computer. When the LEX L10i is connected to a host
computer, the LEX L10i appears as a removable disk on the host computer.
Figure 94: USB Cable
MN002347A01-A
Accessories
Send Feedback 145
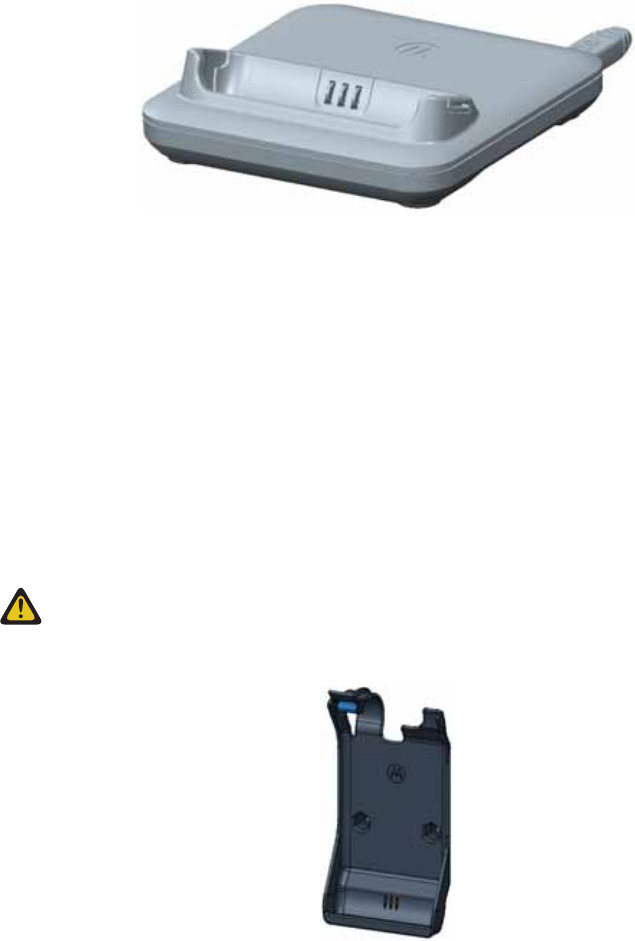
Desktop Cradle
A desktop cradle provides an alternative method to charge your LEX L10i.
The desktop cradle:
• Provides power for charging and operating the LEX L10i
• Enables connecting a mouse to the LEX L10i
Figure 95: Desktop Cradle
Charging the LEX L10i
To charge the LEX L10i, insert the LEX L10i units by placing the bottom of the LEX L10i, at a slight
forward angle, into the cradle.
The LED of the LEX L10i, shows the status of the battery charging. See Battery Charge LED Status for
charging status indications. The 2280 mAh battery charges in approximately four hours.
Charge the LEX L10i units in temperatures from 0°C to +45°C (32°F to 113°F) ). Note that charging is
intelligently controlled by the LEX L10i. To accomplish this, for small periods of time, the LEX L10i
alternately enables and disables battery charging to keep the battery at acceptable temperatures. The
LEX L10i indicates when charging is disabled due to abnormal temperatures via its notification LED.
Vehicle Cradle
Install the vehicle mount on the surface of the vehicle that is reasonably flat and free of dirt and oil.
Clean the mounting surface with a glass cleaner and a clean cotton cloth. Install the vehicle mount on
the windshield or other flat car surface.
CAUTION: Some states prohibit the mounting of any electronic device in any location on the
vehicle dashboard. Be sure to check with local laws acceptable mounting areas before installing
the auto mounting kit.
Figure 96: Vehicle Cradle
MN002347A01-A
Chapter 10: Accessories
146 Send Feedback

Holster
Use the holster to securely carry the LEX L10i when working. The holster is threaded through a belt
and stores the LEX L10i when not in use or when using a headset.
Figure 97: Holster
Insert the LEX L10i into the holster with the screen facing in or out.
MN002347A01-A
Chapter 10: Accessories
Send Feedback 147
This page intentionally left blank.

Chapter 11
Maintenance and Troubleshooting
This chapter includes instructions on cleaning and storing the LEX L10i. It also provides
troubleshooting solutions for potential problems during LEX L10i operation.
Maintaining the LEX L10i
For trouble-free service, observe the following tips when using the LEX L10i:
• Do not scratch or use a pen or a pencil or other sharp object on the surface of the screen.
• The touch-sensitive screen is made of polycarbonate. Do not to drop or subject the device to strong
impact.
• Protect from extreme temperatures. Do not leave device on the dashboard of a car on a hot day,
and keep it away from heat sources.
• Do not store in any location that is dusty, damp, or wet.
• Use a soft lens cloth to clean the device. If the surface of the screen becomes soiled, clean it with a
soft cloth moistened with isopropyl alcohol.
• Periodically replace the rechargeable battery to ensure maximum battery life and product
performance. Battery life depends on individual usage patterns.
Battery Safety Guidelines
Adhere to the following guidelines for battery safety:
• The area where the units are charged should be clear of debris and combustible materials or
chemicals.
• Follow battery usage, storage, and charging guidelines found in this guide.
• Improper battery use may result in a fire, explosion, or other hazard.
• To charge the battery, the battery and charger temperatures must be between +32 ºF and +113 ºF
(0 ºC and +45 ºC)
• Do not use incompatible batteries and chargers. Use of an incompatible battery or charger may
present a risk of fire, explosion, leakage, or other hazard. If you have any questions about the
compatibility of a battery or a charger, contact Motorola Solution support.
• If charging through a USB port, the device shall only be connected to products that bear the USB-IF
logo or have completed the USB-IF compliance program.
• To enable authentication of an approved battery, as required by IEEE1725 clause 10.2.1, all
batteries will carry a Motorola hologram. Do not fit any battery without checking it has the Motorola
authentication hologram.
• Do not disassemble or open, crush, bend or deform, puncture, or shred.
• Severe impact from dropping any battery-operated device on a hard surface could cause the battery
to overheat.
• Do not modify or remanufacture, attempt to insert foreign objects into the battery, immerse or
expose to water or other liquids, or expose to fire, explosion, or other hazard.
• Do not leave or store the equipment in or near areas that might get very hot, such as in a parked
vehicle or near a radiator or other heat source. Do not place battery into a microwave oven or dryer.
MN002347A01-A
Maintenance and Troubleshooting
Send Feedback 149

• Battery usage by children should be supervised.
• Follow local regulations to properly dispose of used rechargeable batteries.
• Do not dispose of batteries in fire.
• In the event of a battery leak, do not allow the liquid to come in contact with the skin or eyes. If
contact has been made, wash the affected area with large amounts of water and seek medical
advice.
• If you suspect damage to your equipment or battery, contact Motorola Solutions support to arrange
for inspection.
Cleaning Guidelines
This section includes cleaning guidelines for the LEX L10i.
WARNING: Avoid exposing this product to contact with hot oil or other flammable liquids. If
such exposure occurs, unplug the device and clean the product immediately in accordance with
these guidelines. Avoid exposing this product to contact with hot oil or other flammable liquids.
If such exposure occurs, unplug the device and clean the product immediately in accordance
with these guidelines.
CAUTION:
Always wear eye protection.
Read the warning labels on compressed air and alcohol products before use.
If you have to use any other solution for medical reasons, contact Motorola Solutions for more
information.
Approved Cleanser Active Ingredients
100% of the active ingredients in any cleaner must consist of one or a combination of the following:
isopropyl alcohol, or mild dish soap.
Cleaning Instructions
Do not apply liquids directly to the device. Dampen a soft cloth or use pre-moistened wipes. Do not
wrap the device in the cloth or wipe, but gently wipe the unit
Harmful Ingredients
Many vinyl gloves contain phthalate additives, which are often not recommended for medical use and
are known to be harmful to the housing of the device. The device should not be handled while wearing
vinyl gloves containing phthalates, or before hands are washed to remove contaminant residue after
gloves are removed. If products containing the harmful ingredients are used before handling the
device, such as hand sanitizers containing ethanolamine, hands must be completely dry before
handling the device to prevent damage to the plastics.
Cleaning Materials Required
• Alcohol wipes
• Lens tissue
• Cotton-tipped applicators
• Isopropyl alcohol
• Can of compressed air with a tube
MN002347A01-A
Chapter 11: Maintenance and Troubleshooting
150 Send Feedback
Cleaning Frequency
The cleaning frequency is up to your discretion due to the varied environments in which the mobile
devices are used. They may be cleaned as frequently as required, but it is advisable to clean the
camera window periodically when used in dirty environments to ensure optimum performance.
Cleaning the LEX L10i
This section includes instructions on how the LEX L10i should be cleaned.
Housing
Using the alcohol wipes, wipe the housing including buttons.
Display
The display can be wiped down with the alcohol wipes, but care should be taken not to allow any
pooling of liquid around the edges of the display. Immediately dry the display with a soft, non-abrasive
cloth to prevent streaking.
Camera Window
Wipe the camera window periodically with a lens tissue or other material suitable for cleaning optical
material such as eyeglasses.
Cleaning the Interface Connector
When and where to use: Use this procedure To clean the contacts of the interface connector on LEX
L10i.
Procedure:
1Power off the LEX L10i.
2Dip the cotton portion of the cotton-tipped applicator in isopropyl alcohol.
3Rub the cotton portion of the cotton-tipped applicator along the contacts of the interface
connector. Slowly move the applicator back-and-forth from one side of the connector to the
other.
4If grease and other dirt can be found on other areas of the cradle, remove using a lint-free cloth
and alcohol.
5Allow few minutes (depending on ambient temperature and humidity) for the alcohol to air dry
before powering on the LEX L10i.
Cleaning the Battery Contacts
When and where to use: Perform this procedure to clean the battery connectors.
Procedure:
1Remove the main battery from LEX L10i.
2Dip the cotton portion of the cotton-tipped applicator in isopropyl alcohol.
3Gently, rub the cotton portion of the cotton-tipped applicator back-and-forth across the contacts.
Do not leave any cotton residue on the contacts.
4Use the cotton-tipped applicator dipped in alcohol to remove any grease and dirt near the
contacts area.
MN002347A01-A
Chapter 11: Maintenance and Troubleshooting
Send Feedback 151

5Use a dry cotton-tipped applicator and repeat steps 4 and 5 at least three times.
CAUTION: Do not point nozzle at yourself and others. Ensure that the nozzle or tube is
away from your face.
6Spray compressed air on the connector area by pointing the tube/nozzle about ½ inch away
from the surface.
7Inspect the area for any grease or dirt, repeat if required.
Troubleshooting
This section lists common problems and solutions to fix the problems.
Table 9: Troubleshooting the LEX L10i
Problem Cause Solution
After pressing the
Power button, does
not turn on.
Battery is
completely
discharged.
Re-charge or replace the battery.
Battery not
installed
properly.
Install the battery properly. See Installing the Battery.
Power button
not held
down long
enough.
Press the Power button until the Motorola Solutions splash
screen is displayed.
Device not
responding.
Reset the device.
After pressing the
Power button, the
device does not
turn on but a
charge battery icon
Appears.
Battery
charge level
is very low.
Re-charge or replace the battery.
After connecting
the device to a Ca-
ble, a battery
charging icon Ap-
pears.
Battery is de-
pleted but is
charging.
Press and hold the Power button to turn on.
When charging, the
LED slowly blinks
red.
The device is
at an ex-
tremely low-
power state.
Charge the device for a few minutes. The LED changes to
flashing green then press the Power button to turn on the
LEX L10i. If LED continuously blinks red, check power
connections. Disconnect and reconnect connections.
Battery did not
charge.
Battery
failed.
Replace battery. If the device still does not operate, per-
form a hardware reset.
Device was
removed
from power
while battery
Insert device in cradle or attach Charge Cable. The 2280
mAh battery fully charges in approximately four hours.
Table continued…
MN002347A01-A
Chapter 11: Maintenance and Troubleshooting
152 Send Feedback

Problem Cause Solution
was charg-
ing.
Extreme bat-
tery tempera-
ture.
Battery does not charge if ambient temperature is below 0
°C (32 °F) or above 45 °C (113 °F).
During data com-
munication with a
host computer, no
data transmitted, or
transmitted data
was incomplete.
Device re-
moved from
USB cable or
disconnected
from host
computer
during com-
munication.
Reattach the communication cable and re-transmit.
Incorrect ca-
ble configura-
tion.
See technical support.
During data com-
munication over Wi-
Fi, no data trans-
mitted, or transmit-
ted data was in-
complete.
Wi-Fi radio is
not on.
Turn on the Wi-Fi radio.
You moved
out of range
of an access
point.
Move closer to an access point.
During data com-
munication over
Bluetooth, no data
transmitted, or
transmitted data
was incomplete.
Bluetooth ra-
dio is not on.
Turn on the Bluetooth radio.
You moved
out of range
of another
Bluetooth de-
vice.
Move without 10 m (32.8 ft.) of the other device.
During data com-
munication over
Public / Private, no
data transmitted, or
transmitted data
was incomplete.
You are in an
area of poor
cellular serv-
ice.
Move into an area that has better service.
VPN is not
set up cor-
rectly.
See technical support for VPN setup information.
SIM card not
installed
properly.
Remove and re-install the SIM cards.
Data plan not
activated.
Contact your service provider and ensure that your data
plan is enabled.
No sound. Volume set-
ting is low or
turned off.
Adjust the volume.
Device turns off. Device is in-
active.
The display turns off after a period of inactivity. Set this pe-
riod to 15 seconds, 30 seconds, 1, 2, 5, 10, or 30 minutes.
Table continued…
MN002347A01-A
Chapter 11: Maintenance and Troubleshooting
Send Feedback 153
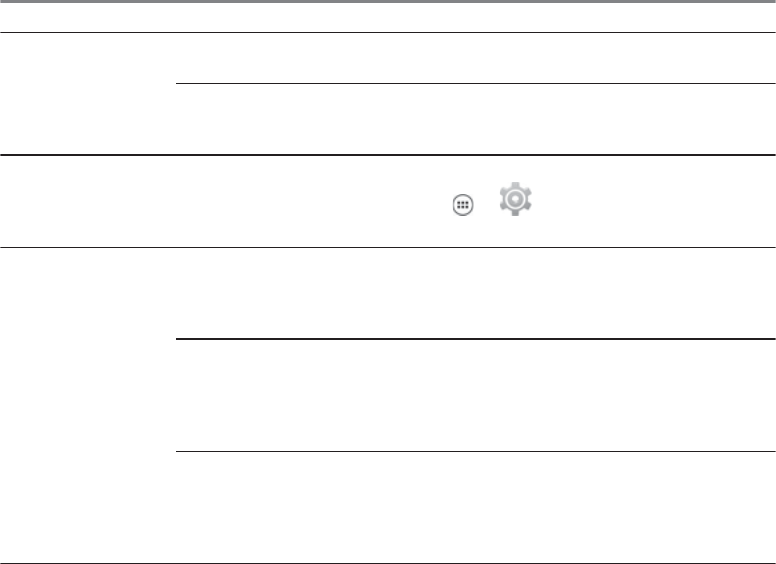
Problem Cause Solution
Battery is de-
pleted.
Recharge or replace the battery.
Extreme bat-
tery tempera-
ture.
Move device to an area where the ambient temperature is
between 0 °C (32 °F) or above 45 °C (113 °F).
A message ap-
pears stating not
enough storage
memory.
Too many
applications
installed on
the device.
Remove user-installed applications on the device to recov-
er memory. Select → → Apps → Downloaded.
Select the unused programs and tap Uninstall.
Device cannot find
any Bluetooth devi-
ces nearby.
Too far from
other Blue-
tooth devi-
ces.
Move closer to the other Bluetooth device(s), within a
range of 10 meters (32.8 feet).
The Blue-
tooth de-
vice(s) near-
by are not
turned on.
Turn on the Bluetooth device(s) to find.
The Blue-
tooth de-
vice(s) are
not in discov-
erable mode.
Set the Bluetooth device(s) to discoverable mode. If need-
ed, refer to respective Bluetooth-enabled device (accesso-
ry) user manual..
Backing Up the LEX L10i
Backing up the LEX L10i must be done manually.
Prerequisites: A USB cable to connect the LEX L10i to a computer.
When and where to use: Use this procedure anytime a backup of the LEX L10i is necessary.
Procedure:
1Connect the LEX L10i to a computer using the supplied USB cable.
The first time you connect to a computer the following message is displayed:
Installing Device Driver Software
After the driver software is installed, the following message is displayed:
Your device is ready to use
2Click the Start button and then select Computer.
3Select the LEX L10i Portable Device.
4Select Internal storage.
5Navigate to the files that you want to back up.
6Copy the files/folders to a secure location on your computer.
MN002347A01-A
Chapter 11: Maintenance and Troubleshooting
154 Send Feedback
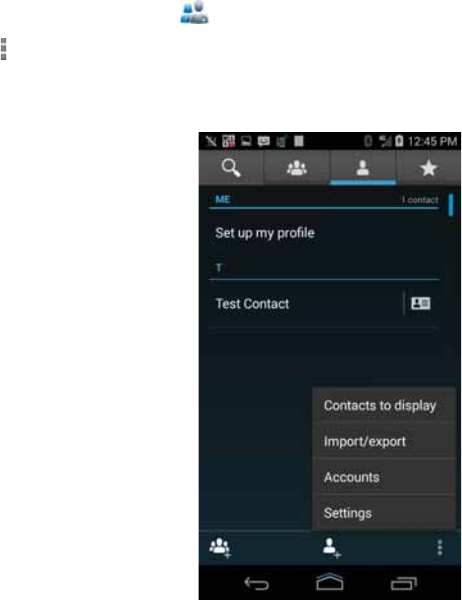
Backing up Contacts
To back up contacts, the contacts must be exported to a VCF file which must be copied to a secure
location.
Prerequisites: Contacts must exist in the contact list.
When and where to use: Use this procedure to periodically back up your contacts.
Procedure:
1From the Home screen, tap .
2Tap .
Figure 98: Contacts Menu
3Select Import/export.
MN002347A01-A
Chapter 11: Maintenance and Troubleshooting
Send Feedback 155
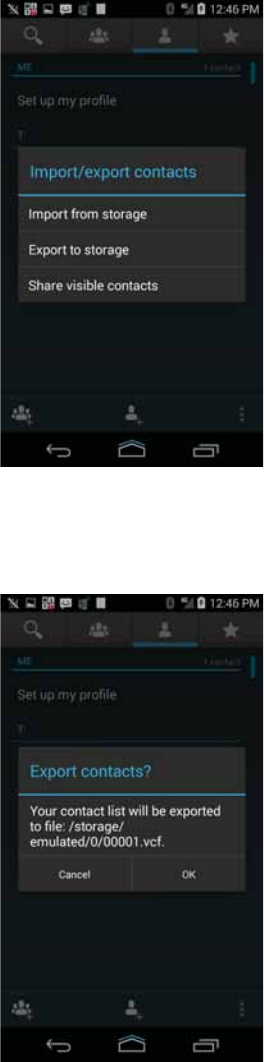
Figure 99: Import/Export Contacts Popup
4Select Export to storage.
Figure 100: Export Confirmation Popup
MN002347A01-A
Chapter 11: Maintenance and Troubleshooting
156 Send Feedback

5Tap OK to export the contacts.
The VCF file is saved to the location indicated.
6Follow the procedure under Backing Up the LEX L10i on page 154 to complete the contacts
backup.
Resetting the LEX L10i
Use this procedure to reset the LEX L10i.
When and where to use: If the LEX L10i does not operate properly, perform the following procedure.
Procedure:
1Power off and on the LEX L10i and verify if the problem is gone.
The LEX L10i restarts. If the problem remains, perform Step 2.
CAUTION: To avoid erasing important data from your LEX L10i, do not press any of the
LEX L10i buttons during power up.
2Remove the battery, reinsert it, and verify if the problem is gone.
The LEX L10i restarts. If the problem remains, perform factory data reset.
Performing Factory Data Reset
A factory data reset is a software restore of the LEX L10i to its original manufacturer settings. Before
resetting the LEX L10i, back up your data. Factory data reset erases all your personal data from the
LEX L10i memory and microSD card including: configuration, contents, accounts, installed
applications, user settings, music, photos, videos, installed licenses, pre-loaded application updates,
DM bootstrapping data, integrated and pre-loaded application configuration, post-loaded applications
and user passwords. After reset is performed, re-enter your backed up information.
When and where to use: Use this procedure to perform factory data reset:
CAUTION: Factory data reset is performed only by technical support as a last resort when the
LEX L10i fails to operate. Before performing factory data reset, remove the SIM and microSD
cards from the LEX L10i. Performing factory data reset with a microSD or SIM cards installed
may cause data corruption or loss.
NOTICE: Factory data reset configures the LEX L10i to public communication only. To return to
combined Public and Private configuration, see your technical support. The last updated
firmware and the initial version of pre-loaded applications are preserved through a reset to
factory defaults.
Procedure:
1Tap .
2Tap .
3Tap Backup & reset.
4Tap Factory data reset.
The LEX L10i powers off, powers on, then the system recovery screen appears.
MN002347A01-A
Chapter 11: Maintenance and Troubleshooting
Send Feedback 157
This page intentionally left blank.

Chapter 12
Technical Specifications
The following table summarizes the LEX L10i operating, environment, and technical hardware
specifications.
Table 10: Technical Specifications
Item Specification
Physical
Dimensions (H x W x D) 5.62 x 2.85 x 0.547 in
143 x 72.6 x 15 mm
Weight 195 g (6.88 Oz) including standard battery
Durability Continues to run after multiple drops to concrete from a height of 48
inches (121 cm)
Drop tested using MIL-STD-810G Method 516.6, Procedure IV
IP67 (1 meter water immersion for 30 minutes)
Display 4.7” 720p HD (720 x 1280)
Capacitive touch screen
Operating Temperature 14°F to 131°F (-10°C to +55°C)
Storage Temperature -22°F to 149°F (-30°C to +65°C)
Hardware
Processor 2.3 GHz
Quad Core Processor
Qualcomm MSM8974AA
Display 4.7” 720p HD (720X1280)
Capacitive, touch screen
Memory 2 GB RAM
16 GB eMMC
Expandable to 64GB with microSD™ card
Camera Rear 8MP Camera
Auto Focus
High-Output LED Flash
Digital Zoom
Front 2MP Camera
Sensors Proximity Sensor
Ambient Light Sensor
Accelerometer Sensor
Table continued…
MN002347A01-A
Technical Specifications
Send Feedback 159

Item Specification
Barometer Sensor
E-Compass
Ports USB 2.0 High-Speed
3.5 mm Audio Jack (stereo)
Accessory/Charging Port
Battery Standard - 2340 mAH, Li Ion
High Capacity - 4680 mAh, Li Ion
Software
Operating System Android™ KitKat 4.4.4
User Interface Public Safety Experience (PSX) Software
Messaging SMS/MMS
Email (Corporate Sync, POP3, IMAP, Push Email)
Web Standard AOSP Browser
4G/LTE
Release 3GPP Release 9
Band Class 3, 4, 5, 7, 8, 20, 26, 28
Output Power 23 dBm +/- 2 dB (UE power class 3)
Bandwidth Up to 20 MHz
Broadband data throughput depends on network conditions
3G
Standards HSPA +/-UMTS
Bands 1,2,4,5,8
2G
Standards GSM/GPRS/EDGE
Frequencies 850 MHz, 900 MHz, 1800 MHz, 1900 MHz
Wi-Fi
Operating Band 2.4 GHz, 5 GHz
Standards 802.11 a/b/g/n
Personal Area Networks
Bluetooth Bluetooth 4.0 Low Energy (LE) + Enhanced
Data Rate (EDR)
Mission Critical Wireless Bluetooth
Max throughput 2.1 Mbps
A2DP Stereo Profile
GPS
Table continued…
MN002347A01-A
Chapter 12: Technical Specifications
160 Send Feedback
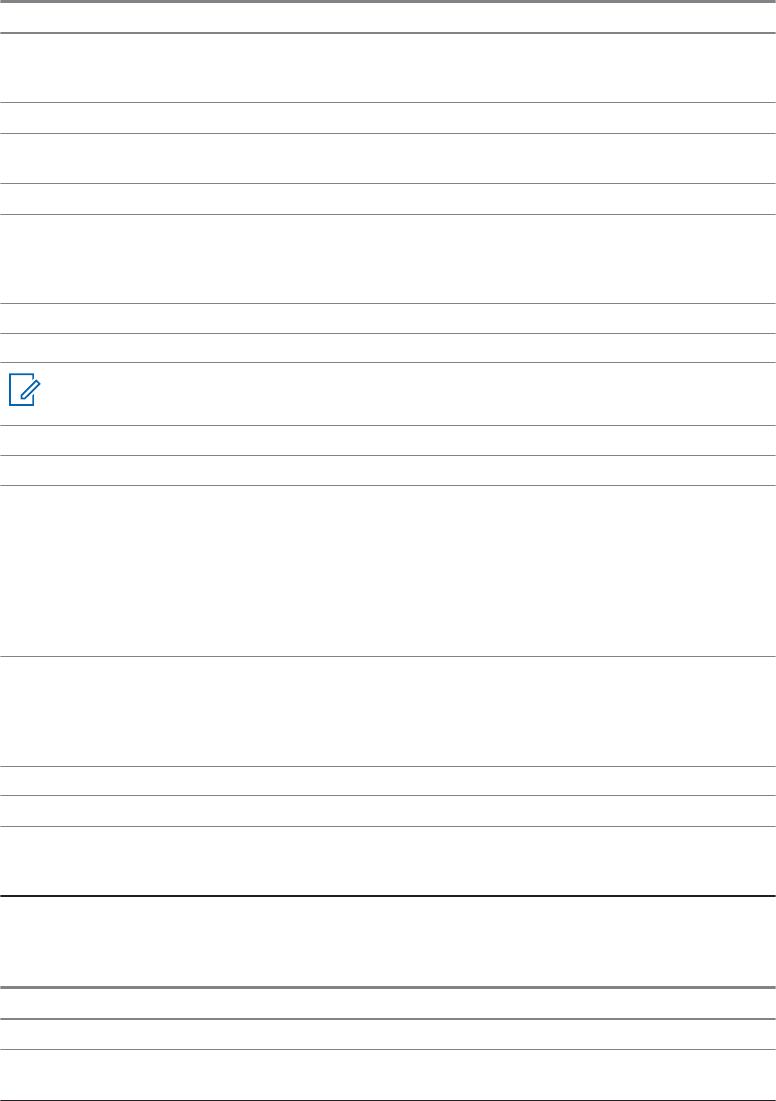
Item Specification
Location Services Standalone GPS
Assisted GPS (aGPS)
Device Management
Remote Management and
Configuration Supports OMA-DM (Open Mobile Alliance Device Management)
Video and Imaging
Supported Formats H.263, H.264, MPEG-4 SP, VP8, JPEG (.jpg), GIF (.gif), PNG (.png),
BMP (.bmp), WebP (.webp)
Formats supported for playback, streaming and recording
Supported File Types 3GPP (.3gp), MPEG-4 (.mp4), WebM (.webm), (.mkv)
Video Recording Quality 1080p HD up to 30 frames per second (fps)
NOTICE: Video and images are time stamped for evidence documentation.
Audio
Supported Formats MP3, WAVE, AAC, AMR-NB, AMR-WB, FLAC, MIDI, Vorbis
Supported File Types MP3 (.mp3), WAVE (.wav), 3GPP (.3gp),
MPEG-4 (.mp4, m4a), ATDS raw AAC (.aac),
MPEG-TS (.ts)
FLAC (.flac), MIDI (.mid, .xmf, .mxmf),
RTTTL/RTX (.rtttl, rtx),
OTA (.ota), iMelody (imy), Ogg (.ogg), Matroska
(.mkv)
Output Dual 1 Watt Front-Facing Speakers,
106 dB Sound Pressure Level (SPL)
3.5 mm audio jack (stereo)
Bluetooth (A2DP stereo)
Input Triple Noise and Echo Cancelling Microphones
Quick Access Leather Holster
Dimensions (H x W x D) 5.7 x 3.5 x 2.0 in
(145 x 90 x 50 mm)
Specifications subject to change.
Table 11: General Accessories
Item Desktop Cradle Impact-Rated Vehicle Cradle
Physical
Dimensions (H x W x D) 6.0 x 5.0 x 3.5 in (152 x 128 x
89 mm)
6.1 x 3.0 x 2.2 in (155 x 76 x
56 mm)
Table continued…
MN002347A01-A
Chapter 12: Technical Specifications
Send Feedback 161

Item Desktop Cradle Impact-Rated Vehicle Cradle
Weight 12.8 Oz (363 g) 4.8 Oz (135 g)
Environmental Specification
Operating Temperature 32°F to 113°F (0°C to +45°C) -4°F to 131°F (-20°C to +55°C)
Storage Temperature -40° F to 158°F (-40°C to
70°C)
-40° F to 185°F (-40°C to
+85°C)
Humidity 95% at 113°F (45°C) for 8
hours (non-condensing)
95% at 131°F (55°C) for 8
hours (non-condensing)
Durability
Salt Fog Yes Yes
Vibration Yes Yes
Drop Yes Yes
Shock (Functional) Yes Yes
Shock (Crash Hazard) Yes, MIL-STD-810G, 75G im-
pact
ESD Yes Yes
Solar Radiation Yes
Liquid Resistance Yes Yes
Safety Regulatory
Electrical Safety US: UL60950 US: UL60950
EMI/RFI FCC part 15, Subpart B, Class
B28a
ANSI C63.4 2009 FCC part 15, Subpart B, Class
B28b
Flammability ANSI/UL-94 and ASTM Stand-
ards
ANSI/UL-94 and ASTM Stand-
ards
Electrical
Power Supply External power supply input
100- 240VAC output 5.0VDC
1.2A
12V-24V, 5.0VDC, 1.2A
Power Input 5.0 VDC, 1.2A 5.0 VDC, 1.2A
DC Output 5.0VDC 5.0VDC
Power On With device insertion With device insertion
Optional Accessories
Vehicle Ram® Mount Kit
Specifications subject to change.
MN002347A01-A
Chapter 12: Technical Specifications
162 Send Feedback