Motorola Solutions 89FT7104 LEX L11 Mission Critical LTE Device User Manual LEX L11 Mission Critical LTE Device User Guide
Motorola Solutions, Inc. LEX L11 Mission Critical LTE Device LEX L11 Mission Critical LTE Device User Guide
Contents
- 1. Users Manual (Eng) rev.pdf
- 2. Users Manual (Eng) rev2.pdf
- 3. User Manual
Users Manual (Eng) rev2.pdf

LEX L11 Mission-Critical
LTE Device User Guide
Release 1.0
MN005019A01-B
JULY 2018
© 2018 Motorola Solutions, Inc. All rights reserved

Copyrights
The Motorola Solutions products described in this document may include copyrighted Motorola
Solutions computer programs. Laws in the United States and other countries preserve for Motorola
Solutions certain exclusive rights for copyrighted computer programs. Accordingly, any copyrighted
Motorola Solutions computer programs contained in the Motorola Solutions products described in this
document may not be copied or reproduced in any manner without the express written permission of
Motorola Solutions.
© 2018 Motorola Solutions, Inc. All Rights Reserved
No part of this document may be reproduced, transmitted, stored in a retrieval system, or translated
into any language or computer language, in any form or by any means, without the prior written
permission of Motorola Solutions, Inc.
Furthermore, the purchase of Motorola Solutions products shall not be deemed to grant either directly
or by implication, estoppel or otherwise, any license under the copyrights, patents or patent
applications of Motorola Solutions, except for the normal non-exclusive, royalty-free license to use that
arises by operation of law in the sale of a product.
Disclaimer
Please note that certain features, facilities, and capabilities described in this document may not be
applicable to or licensed for use on a specific system, or may be dependent upon the characteristics of
a specific subscriber unit or configuration of certain parameters. Please refer to your Motorola
Solutions contact for further information.
Trademarks
MOTOROLA, MOTO, MOTOROLA SOLUTIONS, and the Stylized M Logo are trademarks or
registered trademarks of Motorola Trademark Holdings, LLC and are used under license. All other
trademarks are the property of their respective owners.
European Union (EU) Waste of Electrical and Electronic Equipment (WEEE)
directive
The European Union's WEEE directive requires that products sold into EU countries must have
the crossed out trash bin label on the product (or the package in some cases).
As defined by the WEEE directive, this cross-out trash bin label means that customers and end-users
in EU countries should not dispose of electronic and electrical equipment or accessories in household
waste.
Customers or end-users in EU countries should contact their local equipment supplier representative or
service centre for information about the waste collection system in their country.
MN005019A01-B
Copyrights
2
Contact Us
Motorola Solutions Support Center
The Solutions Support Center (SSC) is the primary contact for technical support included in your
organization's service agreement with Motorola Solutions.
Service agreement customers should be sure to call the SSC in all situations listed under Customer
Responsibilities in their agreement, such as:
• Before reloading software.
• To confirm troubleshooting results and analysis before taking action.
Your organization received support phone numbers and other contact information appropriate for your
geographic region and service agreement. Use that contact information for the most efficient response.
However, if needed, you can also find general support contact information on the Motorola Solutions
website, by following these steps:
• Enter motorolasolutions.com in your browser
• Ensure that your organization's country or region is displayed on the page. Clicking or tapping the
name of the region provides a way to change it.
• Select "Support" on the motorolasolutions.com page.
Comments
Send questions and comments regarding user documentation to
documentation@motorolasolutions.com.
Provide the following information when reporting a documentation error:
• The document title and part number
• The page number or title of the section with the error
• A description of the error
MN005019A01-B
Contact Us
3

Document History
Version Description Date
MN005019A01-A Original release of the LEX L11 Mission-Critical LTE
Device User Guide
May 2018
MN005019A01-B Second release of the LEX L11 Mission-Critical LTE
Device User Guide
The following sections were updated:
•Important Safety Information on page 20
•Regulatory Information on page 21
•Accessories on page 105
•Enabling Hearing Aid Compatibility on page 55
•Switching Between PSX PTT App and LMR Ra-
dio for PTT Communications on page 72
•Technical Specifications on page 118
July 2018
MN005019A01-B
Document History
4
Contents
Copyrights................................................................................................................... 2
Contact Us................................................................................................................... 3
Document History....................................................................................................... 4
List of Figures............................................................................................................11
List of Tables............................................................................................................. 12
List of Processes...................................................................................................... 13
List of Procedures.....................................................................................................14
About This Manual.................................................................................................... 18
What is Covered in This Manual..................................................................................................18
Helpful Background Information.................................................................................................. 18
Related Information..................................................................................................................... 18
Important Safety Information....................................................................................................... 20
Service Information......................................................................................................................20
Regulatory Information................................................................................................................ 21
Versions.......................................................................................................................................23
Notational Conventions................................................................................................................23
Icon Conventions......................................................................................................................... 23
Chapter 1: Getting Started........................................................................................24
1.1 Device Overview....................................................................................................................24
1.2 Package Contents................................................................................................................. 26
1.3 Setting Up the Device............................................................................................................ 27
1.3.1 Dual SIM Functionality............................................................................................. 27
1.3.2 Inserting SIM Cards................................................................................................. 27
1.3.2.1 Removing SIM Cards................................................................................. 28
1.3.3 Installing a MicroSD Card........................................................................................ 28
1.3.3.1 Removing a MicroSD Card........................................................................ 29
1.3.4 Installing the Battery................................................................................................ 29
1.3.4.1 Removing the Battery.................................................................................29
1.3.5 Attaching Battery Cover........................................................................................... 30
1.3.5.1 Removing the Battery Cover...................................................................... 30
1.3.6 Charging Information............................................................................................... 30
1.3.6.1 Battery Charge Indicators.......................................................................... 31
1.3.6.2 Turning On Battery Saving Mode...............................................................32
1.4 Powering On the Device for the First Time............................................................................32
1.5 Powering On.......................................................................................................................... 34
MN005019A01-B
Contents
5
1.6 Powering Off.......................................................................................................................... 34
1.7 Battery Management............................................................................................................. 34
1.7.1 Battery Usage Monitor............................................................................................. 34
1.7.2 Low Battery Notification........................................................................................... 35
1.7.3 Battery Optimization.................................................................................................35
1.7.3.1 Entering Airplane Mode..............................................................................36
Chapter 2: Basic Functions......................................................................................37
2.1 Home Screen.........................................................................................................................37
2.2 Touchscreen Navigation........................................................................................................ 38
2.3 On-Screen Keyboard............................................................................................................. 39
2.3.1 Google Keyboard Settings....................................................................................... 39
2.3.2 Google Voice Typing................................................................................................40
2.3.2.1 Adjusting Google Voice Typing Settings.................................................... 40
2.4 Status Bar Icons.................................................................................................................... 41
2.5 Switching to Multiple Active Windows View...........................................................................41
2.6 Accessing Files from a Computer..........................................................................................42
Chapter 3: Device Settings.......................................................................................43
3.1 Covert Mode.......................................................................................................................... 43
3.1.1 Turning On Covert Mode......................................................................................... 43
3.1.2 Turning Off Covert Mode......................................................................................... 44
3.1.3 Configuring Covert Mode......................................................................................... 44
3.2 Setting Programmable Buttons..............................................................................................44
3.3 LEX Series Screen Lock........................................................................................................45
3.3.1 Selecting a Locking Option...................................................................................... 45
3.3.2 Setting Timeout for Locking..................................................................................... 47
3.3.3 Device Unlock.......................................................................................................... 47
3.3.3.1 Unlocking the LEX Device Using a Pattern................................................47
3.3.3.2 Unlocking the LEX Device Using a PIN or Password................................ 47
3.3.3.3 Setting Unlock with Fingerprint.................................................................. 48
3.3.4 Calling Emergency from a Locked LEX Device....................................................... 49
3.4 Setting Date and Time........................................................................................................... 50
3.5 Setting the Display.................................................................................................................50
3.5.1 Setting Screen Brightness Level..............................................................................50
3.5.2 Setting Adaptive Brightness.....................................................................................51
3.5.3 Changing Wallpapers...............................................................................................51
3.5.4 Setting Up Sleep Mode............................................................................................ 51
3.5.5 Setting Up Screen Saver......................................................................................... 51
3.5.6 Setting Font Size......................................................................................................51
3.5.7 Setting Display Size................................................................................................. 52
MN005019A01-B
Contents
6
3.5.8 Setting Screen Rotation........................................................................................... 52
3.5.9 Enabling Cast Screen.............................................................................................. 52
3.6 Sound Settings...................................................................................................................... 52
3.6.1 Adjusting Sound Settings.........................................................................................52
3.6.2 Enabling Howling Suppression................................................................................ 53
3.6.2.1 Disabling Howling Suppression..................................................................53
3.6.3 Setting Up Do Not Disturb........................................................................................54
3.6.3.1 Setting Automatic Rules.............................................................................54
3.6.4 Enabling Hearing Aid Compatibility..........................................................................55
3.6.4.1 Disabling Hearing Aid Compatibility........................................................... 56
Chapter 4: Wireless...................................................................................................57
4.1 Bluetooth Profiles...................................................................................................................57
4.2 Bluetooth Power States......................................................................................................... 58
4.3 Enabling Bluetooth.................................................................................................................58
4.4 Disabling Bluetooth................................................................................................................59
4.5 Renaming the Device............................................................................................................ 59
4.6 Pairing LEX with Bluetooth Devices...................................................................................... 59
4.6.1 Managing Bluetooth Devices................................................................................... 59
4.7 Connecting to Wi-Fi Networks............................................................................................... 60
Adding New Networks.......................................................................................................60
Editing Networks............................................................................................................... 60
Forgetting Networks..........................................................................................................60
4.8 Configuring Wi-Fi Hotspots....................................................................................................61
4.9 Setting Up USB Tethering..................................................................................................... 62
4.10 Configuring Bluetooth Tethering.......................................................................................... 62
4.11 Near-Field Communication.................................................................................................. 62
4.11.1 Turning NFC On.....................................................................................................63
4.11.2 Turning NFC Off.....................................................................................................63
Chapter 5: Contacts.................................................................................................. 64
5.1 Adding New Contacts............................................................................................................ 64
5.2 Editing Contact Details.......................................................................................................... 64
5.3 Searching Contacts............................................................................................................... 64
5.4 Sharing Contacts................................................................................................................... 65
Chapter 6: Calling......................................................................................................66
6.1 Making Calls.......................................................................................................................... 66
6.1.1 Setting Up Speed Dial..............................................................................................67
6.2 Making Conference Calls.......................................................................................................67
6.3 Answering Calls with a Bluetooth Headset............................................................................ 68
6.4 Call Settings...........................................................................................................................69
MN005019A01-B
Contents
7
Chapter 7: Messaging...............................................................................................70
7.1 Sending Messages................................................................................................................ 70
Chapter 8: Collaboration with LMR Radios............................................................ 72
8.1 Switching Between PSX PTT App and LMR Radio for PTT Communications...................... 72
8.2 Pairing Radio with the LEX Device ....................................................................................... 74
8.3 Unpairing Radio from the LEX Device................................................................................... 75
8.4 Selecting Zones and Channels..............................................................................................75
8.5 Adding Favorite Talkgroups...................................................................................................76
8.6 Selecting Talkgroups............................................................................................................. 77
8.7 Sending PTT Audio................................................................................................................77
8.8 Selecting Audio Routing Options........................................................................................... 77
8.8.1 Adjusting Sound Volume..........................................................................................78
8.9 Emergency Mode on LEX Device Paired with LMR.............................................................. 79
Chapter 9: Emergency Services.............................................................................. 80
9.1 Emergency Mode Alert Settings............................................................................................ 80
9.1.1 Enabling Emergency Mode......................................................................................80
9.2 Emergency Calls....................................................................................................................80
9.2.1 Making Emergency Calls......................................................................................... 81
9.3 Configuring Emergency Broadcast Alert Settings..................................................................81
Chapter 10: IMS VoLTE.............................................................................................82
10.1 Making IMS VoLTE Calls.....................................................................................................82
10.2 Making IMS Video Calls.......................................................................................................83
10.2.1 Receiving IMS Video Calls.....................................................................................84
10.2.2 Enabling IMS Video Calling .................................................................................. 85
10.3 Making IMS Multi-Party Conference Calls........................................................................... 86
10.4 IMS Voicemail......................................................................................................................87
10.4.1 Enabling IMS VoiceMail Notification Sounds ........................................................ 87
10.5 IMS Supplementary Services.............................................................................................. 88
10.5.1 Placing IMS VoLTE Call on Hold .......................................................................... 88
10.5.2 Enabling IMS Call Waiting..................................................................................... 89
10.5.3 Enabling IMS Call Forwarding............................................................................... 89
10.5.4 Enabling IMS Call Barring......................................................................................90
10.5.5 Enabling and Disabling Caller ID in an IMS System.............................................. 90
10.6 IMS Messaging.................................................................................................................... 91
10.6.1 Enabling IMS Group Messaging ........................................................................... 91
Chapter 11: Applications..........................................................................................93
11.1 Applications......................................................................................................................... 93
11.2 Camera................................................................................................................................ 95
11.2.1 Taking Photos........................................................................................................ 95
MN005019A01-B
Contents
8
11.2.2 Recording Videos...................................................................................................96
11.3 Gallery................................................................................................................................. 97
11.3.1 Albums................................................................................................................... 97
11.3.1.1 Sharing Albums........................................................................................97
11.3.1.2 Checking Album Information.................................................................... 97
11.3.1.3 Deleting Albums....................................................................................... 98
11.3.2 Photos....................................................................................................................98
11.3.2.1 Viewing and Browsing Photos..................................................................98
11.3.2.2 Rotating Photos........................................................................................98
11.3.2.3 Cropping Photos...................................................................................... 99
11.3.2.4 Setting Photos as Contact Icons.............................................................. 99
11.3.2.5 Sharing Photos.......................................................................................100
11.3.2.6 Deleting Photos......................................................................................100
11.3.3 Videos.................................................................................................................. 100
11.3.3.1 Watching Videos.................................................................................... 100
11.3.3.2 Sharing Videos.......................................................................................101
11.3.3.3 Deleting Videos...................................................................................... 101
11.4 Turning On the Flashlight.................................................................................................. 102
11.5 Taking Screen Captures.................................................................................................... 102
11.6 Managing Downloads........................................................................................................ 102
11.7 Exploring Files................................................................................................................... 103
11.8 Public Safety Experience (PSX) Applications....................................................................103
Chapter 12: Accessories........................................................................................ 105
12.1 Accessories....................................................................................................................... 105
Chapter 13: Maintenance and Troubleshooting...................................................107
13.1 Installing Firmware Updates.............................................................................................. 107
13.2 Maintaining LEX Device ....................................................................................................107
13.3 Battery Safety Guidelines.................................................................................................. 108
13.4 Cleaning Guidelines...........................................................................................................108
13.5 Cleaning LEX Device.........................................................................................................109
13.6 Cleaning Interface Connector............................................................................................ 110
13.7 Cleaning Battery Contacts................................................................................................. 110
13.8 Troubleshooting................................................................................................................. 110
13.9 Backing up Contacts with Android..................................................................................... 114
13.10 Backing Up LEX Data Manually.......................................................................................115
13.11 Syncing Data with Google............................................................................................... 115
13.12 Backing Up Your Data and Settings with Android Backup Service................................. 115
13.13 Restoring Contact Data................................................................................................... 116
13.14 Restoring Your Data and Settings................................................................................... 116
MN005019A01-B
Contents
9
List of Figures
Figure 1: LEX L11 Overview...................................................................................................................24
Figure 2: LEX L11 Top........................................................................................................................... 25
Figure 3: LEX L11 Side Buttons Overview............................................................................................. 26
Figure 4: LEX L11 SIM Card Tray.......................................................................................................... 27
Figure 5: MicroSD Card Insertion........................................................................................................... 28
Figure 6: Battery Cover Removal Slot.................................................................................................... 30
Figure 7: LEX L11 Welcome Screen...................................................................................................... 33
Figure 8: Battery Screen.........................................................................................................................35
Figure 9: LEX L11 Home Screen Overview............................................................................................37
Figure 10: Notifications Panel.................................................................................................................42
Figure 11: Set up WLAN Hotspot Dialog Box.........................................................................................61
Figure 12: PSX Cockpit Sidebar Menu...................................................................................................73
Figure 13: Push to Talk Screen.............................................................................................................. 73
Figure 14: Secure Pairing Screen.......................................................................................................... 74
Figure 15: Radio Services Overflow Menu............................................................................................. 75
Figure 16: Channel Selection Screen.....................................................................................................76
Figure 17: Navigation in the Channel Selection Screen......................................................................... 76
Figure 18: Radio Volume Slidebar..........................................................................................................79
Figure 19: Receiving Video Call............................................................................................................. 85
Figure 20: Mode Selection Bar............................................................................................................... 95
Figure 21: Mode Selection Bar............................................................................................................... 96
Figure 22: Mode Selection Bar............................................................................................................... 96
Figure 23: Video Playback Controls..................................................................................................... 101
MN005019A01-B
List of Figures
11
List of Tables
Table 1: Motorola Documentation.......................................................................................................... 19
Table 2: Motorola Solutions Accessories and Energy Documentation...................................................20
Table 3: LEX L11 Back and Front.......................................................................................................... 24
Table 4: LEX L11 Top.............................................................................................................................25
Table 5: LEX L11 Side Buttons.............................................................................................................. 26
Table 6: LEX L11 Notification LEDs....................................................................................................... 31
Table 7: LEX L11 Home Screen.............................................................................................................37
Table 8: On-Screen Navigation Buttons................................................................................................. 38
Table 9: Touchscreen Actions................................................................................................................ 38
Table 10: Google Keyboard Settings......................................................................................................39
Table 11: Status Bar Icons..................................................................................................................... 41
Table 12: Bluetooth Profiles................................................................................................................... 57
Table 13: Message Media Type............................................................................................................. 70
Table 14: ASTRO (APX) Radios Supported by LEX L11....................................................................... 72
Table 15: TETRA Radios Supported by LEX L11.................................................................................. 72
Table 16: Calling Accounts Setting.........................................................................................................89
Table 17: LEX L11 Applications............................................................................................................. 93
Table 18: Carry Accessories................................................................................................................ 105
Table 19: Chargers (USB-C)................................................................................................................ 105
Table 20: Batteries............................................................................................................................... 106
Table 21: Troubleshooting the LEX Series Device...............................................................................110
Table 22: For LEX Devices with Dual SIMs (Private Network and Public Network).............................113
Table 23: Technical Specifications....................................................................................................... 118
MN005019A01-B
List of Tables
12
List of Procedures
Inserting SIM Cards ...............................................................................................................................27
Removing SIM Cards ............................................................................................................................ 28
Installing a MicroSD Card ......................................................................................................................28
Removing a MicroSD Card ....................................................................................................................29
Installing the Battery .............................................................................................................................. 29
Removing the Battery ............................................................................................................................ 29
Attaching Battery Cover .........................................................................................................................30
Removing the Battery Cover ................................................................................................................. 30
Turning On Battery Saving Mode .......................................................................................................... 32
Powering On the Device for the First Time ............................................................................................32
Powering On ..........................................................................................................................................34
Powering Off ..........................................................................................................................................34
Entering Airplane Mode ......................................................................................................................... 36
Google Voice Typing ............................................................................................................................. 40
Adjusting Google Voice Typing Settings ............................................................................................... 40
Switching to Multiple Active Windows View ...........................................................................................41
Accessing Files from a Computer ..........................................................................................................42
Turning On Covert Mode ....................................................................................................................... 43
Turning Off Covert Mode ....................................................................................................................... 44
Configuring Covert Mode .......................................................................................................................44
Setting Programmable Buttons ..............................................................................................................44
Selecting a Locking Option ....................................................................................................................45
Setting Timeout for Locking ...................................................................................................................47
Unlocking the LEX Device Using a Pattern ........................................................................................... 47
Unlocking the LEX Device Using a PIN or Password ............................................................................47
Setting Unlock with Fingerprint ..............................................................................................................48
Unlocking the Device by Using the Fingerprint Sensor ......................................................................... 49
Calling Emergency from a Locked LEX Device .....................................................................................49
Setting Date and Time ...........................................................................................................................50
Setting Screen Brightness Level ........................................................................................................... 50
Setting Adaptive Brightness .................................................................................................................. 51
Changing Wallpapers ............................................................................................................................ 51
Setting Up Sleep Mode ..........................................................................................................................51
Setting Up Screen Saver ....................................................................................................................... 51
Setting Font Size ................................................................................................................................... 51
Setting Display Size ...............................................................................................................................52
MN005019A01-B
List of Procedures
14
Setting Screen Rotation .........................................................................................................................52
Enabling Cast Screen ............................................................................................................................52
Adjusting Sound Settings ...................................................................................................................... 52
Enabling Howling Suppression ..............................................................................................................53
Disabling Howling Suppression ............................................................................................................. 53
Setting Up Do Not Disturb ..................................................................................................................... 54
Setting Automatic Rules ........................................................................................................................ 54
Enabling Hearing Aid Compatibility ....................................................................................................... 55
Disabling Hearing Aid Compatibility ...................................................................................................... 56
Enabling Bluetooth ................................................................................................................................ 58
Disabling Bluetooth ................................................................................................................................59
Renaming the Device ............................................................................................................................ 59
Pairing LEX with Bluetooth Devices ...................................................................................................... 59
Managing Bluetooth Devices .................................................................................................................59
Connecting to Wi-Fi Networks ............................................................................................................... 60
Adding New Networks ........................................................................................................................... 60
Editing Networks ....................................................................................................................................60
Forgetting Networks .............................................................................................................................. 60
Configuring Wi-Fi Hotspots ....................................................................................................................61
Setting Up USB Tethering ..................................................................................................................... 62
Configuring Bluetooth Tethering ............................................................................................................62
Turning NFC On .................................................................................................................................... 63
Turning NFC Off .................................................................................................................................... 63
Adding New Contacts ............................................................................................................................ 64
Editing Contact Details .......................................................................................................................... 64
Searching Contacts ............................................................................................................................... 64
Sharing Contacts ................................................................................................................................... 65
Making Calls .......................................................................................................................................... 66
Setting Up Speed Dial ........................................................................................................................... 67
Making Conference Calls ...................................................................................................................... 67
Answering Calls with a Bluetooth Headset ............................................................................................68
Sending Messages ................................................................................................................................ 70
Switching Between PSX PTT App and LMR Radio for PTT Communications ...................................... 72
Pairing Radio with the LEX Device ........................................................................................................74
Unpairing Radio from the LEX Device ...................................................................................................75
Selecting Zones and Channels ..............................................................................................................75
Adding Favorite Talkgroups ...................................................................................................................76
Selecting Talkgroups ............................................................................................................................. 77
Sending PTT Audio ............................................................................................................................... 77
MN005019A01-B
List of Procedures
15
Selecting Audio Routing Options ...........................................................................................................77
Adjusting Sound Volume ....................................................................................................................... 78
Enabling Emergency Mode ................................................................................................................... 80
Making Emergency Calls .......................................................................................................................81
Configuring Emergency Broadcast Alert Settings ................................................................................. 81
Making IMS VoLTE Calls .......................................................................................................................82
Making IMS Video Calls ........................................................................................................................ 83
Receiving IMS Video Calls .................................................................................................................... 84
Enabling IMS Video Calling ................................................................................................................... 85
Making IMS Multi-Party Conference Calls .............................................................................................86
Enabling IMS VoiceMail Notification Sounds .........................................................................................87
Placing IMS VoLTE Call on Hold ...........................................................................................................88
Enabling IMS Call Waiting ..................................................................................................................... 89
Enabling IMS Call Forwarding ............................................................................................................... 89
Enabling IMS Call Barring ..................................................................................................................... 90
Enabling and Disabling Caller ID in an IMS System ..............................................................................90
IMS Messaging ......................................................................................................................................91
Enabling IMS Group Messaging ............................................................................................................91
Taking Photos ........................................................................................................................................95
Recording Videos .................................................................................................................................. 96
Sharing Albums ..................................................................................................................................... 97
Checking Album Information ................................................................................................................. 97
Deleting Albums .................................................................................................................................... 98
Viewing and Browsing Photos ............................................................................................................... 98
Rotating Photos ..................................................................................................................................... 98
Cropping Photos ....................................................................................................................................99
Setting Photos as Contact Icons ........................................................................................................... 99
Sharing Photos .................................................................................................................................... 100
Deleting Photos ................................................................................................................................... 100
Watching Videos ..................................................................................................................................100
Sharing Videos .................................................................................................................................... 101
Deleting Videos ................................................................................................................................... 101
Turning On the Flashlight .................................................................................................................... 102
Taking Screen Captures ......................................................................................................................102
Managing Downloads .......................................................................................................................... 102
Exploring Files ..................................................................................................................................... 103
Installing Firmware Updates ................................................................................................................ 107
Cleaning Interface Connector ..............................................................................................................110
Cleaning Battery Contacts ...................................................................................................................110
MN005019A01-B
List of Procedures
16
Backing up Contacts with Android .......................................................................................................114
Backing Up LEX Data Manually .......................................................................................................... 115
Syncing Data with Google ................................................................................................................... 115
Backing Up Your Data and Settings with Android Backup Service ..................................................... 115
Restoring Contact Data ....................................................................................................................... 116
Restoring Your Data and Settings ....................................................................................................... 116
Resetting the LEX Device ....................................................................................................................117
MN005019A01-B
List of Procedures
17
About This Manual
This guide provides information about using the LEX L11 Mission-Critical LTE Device, its basic Android
features, and features added by Motorola Solutions. Motorola Solutions features include a Radio
Services application for collaboration with supported Land Mobile Radio (LMR) models, such as
ASTRO 25 APX and TETRA MTP radios.
Screens and menu options may be changed or customized by your agency to show different
information.
What is Covered in This Manual
This manual contains the following chapters:
•Getting Started on page 24 explains getting the LEX device up and running for the first time.
•Basic Functions on page 37 describes basic functions of the LEX device, such as touchscreen
navigation, on-screen keyboard settings, and others.
•Device Settings on page 43 describes the settings available on the device.
•Wireless on page 57 explains configuring the device to operate in wireless networks.
•Contacts on page 64 covers the Contacts application.
•Calling on page 66 describes using the Phone application, for example making calls, conference
calls, and others.
•Messaging on page 70 covers sending text and multimedia messages.
•Collaboration with LMR Radios on page 72 is a reference to connecting the LEX device to a Land
Mobile Radio for communicating on LTE, TETRA, and ASTRO systems.
•Emergency Services on page 80 explains emergency functions of the device.
•IMS VoLTE on page 82 covers communication in the IP Multimedia Core Network Subsystem
(IMS), if present in your phone's network.
•Applications on page 93 describes applications available for the LEX device.
•Accessories on page 105 provides information on accessories compatible with the LEX L11 device.
•Maintenance and Troubleshooting on page 107 provides solutions to most common problems
related to the LEX device.
•Technical Specifications on page 118 contains technical details of the LEX device.
Helpful Background Information
Motorola Solutions offers various courses designed to assist in learning about the system.
For more information on current course offerings and technology paths, visit http://
www.motorolasolutions.com/training.
Related Information
It is recommended that you obtain access to the following documentation.
Unless otherwise specified, the Motorola Solutions documents listed here are available to users with a
login account at https://learning.motorolasolutions.com. You can search for LEX device manuals by
entering LEX in the Search Catalog field.
MN005019A01-B
About This Manual
18
You can also access the manuals on the device by tapping LEX Docs on the device home screen.
You are redirected to the Motorola Solutions learning portal, where you can download the LEX
manuals and view them.
For information on warranty terms, see the Support page at https://www.motorolasolutions.com. For
instructions on accessing the appropriate Support page for your region, see Contact Us on page 3.
Table 1: Motorola Documentation
Related Information Purpose
LEX L11 Mission-Critical LTE Device Quick
Start Guide
Provides initial tasks for the physical setup of
the LEX L11 Mission-Critical LTE Device, in-
cluding SIM card and battery installation, and
charging using the USB-C cable.
NOTICE: For information about
charger accessories available from
Motorola Solutions, contact your de-
vice technician or device administra-
tor.
RF Energy Exposure Training and Product
Safety Information for Mission Critical Devices
Describes how to safely use mission critical de-
vices.
LEX L11 Mission-Critical LTE Device Service
Provisioning and Management Guide
Provides field technician with instructions for ac-
tivating LEX L11 devices on the broadband net-
work with the configuration required by their
users and organization.
WAVE 7000 PSX Push-to-Talk for Mobile Devi-
ces manual
Describes how to use the PTT application that
offers services over 4G, 3G, or WiFi network.
WAVE Mobile Communicator PTT User Guide Provides instructions for installing, configuring,
and operating the WAVE Mobile Communicator
on Android and iOS devices, for use in a WAVE
5000 Management Server domain or
www.waveoncloud.com.
Tutorial for Motorola Solutions carrier-based
Push-To-Talk app, such as Enhanced Push-To-
Talk for Android from AT&T.
Browser-based tutorial is accessible from the
user interface of the Android PTT application,
under Settings. For additional information, con-
tact your service provider.
PSX User Guide This manual provides basic operation proce-
dures for PSX mobile application suite (dedicat-
ed chapters for Cockpit, Mapping, and Messen-
ger), including necessary operator and system
context.
PSX Secure Calling User Guide Provides information about the Private Teleph-
ony Solution PSX Secure Calling client for
Voice Over IP (VoIP) services available from
Motorola Solutions for its Public Safety LTE
systems.
MN005019A01-B
About This Manual
19

Table 2: Motorola Solutions Accessories and Energy Documentation
Document Purpose
MN004688A01 LEX L11 Holster User Manual A user guide that describes how to use the hol-
ster.
MN004687A01 LEX L11 Cradle Quick Start
Guide
A quick start guide that describes how to start
using the LEX L11 cradle in no time.
MN003440A01 LEX L11 Multi Unit Charger
User Manual
A user guide that describes how to use the Mul-
ti-Unit Charger.
MN003922A01 LEX L11 Multi Unit Charger
Safety Leaflet
A safety information leaflet that describes LEX
L11 Charger Kits.
MN004263A01 LEX L11 IMPRES 2 Adaptive
Unit Charger User Guide
A user manual that describes how to use the
IMPRES 2 Adaptive Unit Charger.
MN004594A01 LEX L11 IMPRES 2 Dual Or
Single Unit Chargers Safety Leaflet
A safety leaflet that describes the IMPRES 2
Dual Or Single Unit Chargers.
Important Safety Information
RF Energy Exposure Training and Product Safety Information for Mission Critical Devices.
NOTICE:
ATTENTION! This mission critical device is restricted to Occupational use only. Before using
the mission critical device, read the RF Energy Exposure Training and Product Safety
Information for Mission Critical Devices manual which contains important operating instructions
for safe usage and RF energy awareness and control for Compliance with applicable standards
and Regulations. This equipment is designed and manufactured not to exceed the emission
limits for exposure to radio frequency (RF) energy set by the Federal Communications
Commission of the U.S. Government. For body worn operation, this device has been tested and
meets the FCC RF exposure guideline for use with a Motorola Solutions, Inc. approved
accessories sold with this device.
Use of non-Motorola-approved body worn or battery accessories may exceed the applicable RF
exposure guidelines (iEEE, ICNIRP or FCC).
Service Information
If you have a problem with your device, you can contact Motorola Solutions Global Customer Support
Center for your region.
Contact information is available at: http://www.motorolasolutions.com/support. You can also call
1-800-323-9949 for support and select option 6 for PS LTE infrastructure and devices. When
contacting support, have the following information available:
• Serial number of the unit (found on manufacturing label)
• Model number or product name (found on manufacturing label)
• Software type and version number
If returning the device to Motorola Solutions for repair service, please ensure the following items have
been completed prior to shipping the device:
• Perform complete backup of device, including personal data and contact information
• Remove SIM card(s) from device
• If applicable, remove SD memory card from device
• If applicable, remove CRYPTR micro SD card from device
MN005019A01-B
About This Manual
20

• Erase/wipe all personal and/or confidential data from device
Please return the damaged device, only. Accessories, such as the battery, battery cover, charging
cable, holster, etc., should NOT be included with the device when it is returned.
Regulatory Information
LEX L11 regulatory labels are located at Settings → About phone → Regulatory labels.
NOTICE: If you cannot access regulatory labels in Settings, you can locate physical regulatory
labels in the LEX L11 battery compartment.
Federal Communication Commission Interference Statement
This device complies with part 15 of the FCC Rules and Industry Canada license exempt RSS
standard(s). Operation is subject to the following three conditions: (1) This device may not cause
harmful interference, and (2) this device must accept any interference received, including interference
that may cause undesired operation. (3) Any changes or modifications not expressly approved by
Motorola Solutions may void the user's authority to operate this device.
This equipment has been tested and found to comply with the limits for a Class B digital device,
pursuant to Part 15 of the FCC Rules and complies with Canadian ICES-003. These limits are
designed to provide reasonable protection against harmful interference in a residential installation. This
equipment generates, uses and can radiate radio frequency energy and, if not installed and used in
accordance with the instructions, may cause harmful interference to radio communications. However,
there is no guarantee that interference will not occur in a particular installation. If this equipment does
cause harmful interference to radio or television reception, which can be determined by turning the
equipment off and on, the user is encouraged to try to correct the interference by one of the following
measures:
• Reorient or relocate the receiving antenna.
• Increase the separation between the equipment and receiver.
• Connect the equipment into an outlet on a circuit different from that to which the receiver is
connected.
• Consult the dealer or an experienced radio/TV technician for help.
This transmitter must not be co-located or operating in conjunction with any other antenna or
transmitter.
For Canada: Operations in the 5.15-5.25GHz band are restricted to indoor usage only.
This device meets all the other requirements specified in Part 15E, Section 15.407 of the FCC Rules.
Wireless Device Country Approvals
Regulatory markings, subject to certification, are applied to the device signifying that the radio(s) is/are
approved for use in the US. Operation of the device without regulatory approval is illegal.
FOR COUNTRY CODE SELECTION USAGE (WLAN DEVICES)
NOTICE: The country code selection is for non-US model only and is not available to all US
model. Per FCC regulation, all WiFi product marketed in US must fixed to US operation
channels only.
MN005019A01-B
About This Manual
21

Industry Canada WLAN statement
CAUTION:
(i) the device for operation in the band 5150-5250 MHz is only for indoor use to reduce the
potential for harmful interference to co-channel mobile satellite systems;
(ii) the maximum antenna gain permitted for devices in the bands 5250-5350 MHz and
5470-5725 MHz shall be such that the equipment still complies with the e.i.r.p. limit;
(iii) the maximum antenna gain permitted for devices in the band 5725-5850 MHz shall be such
that the equipment still complies with the e.i.r.p. limits specified for point-to-point and non-point-
to-point operation as appropriate; and
(iv) the worst-case tilt angle(s) necessary to remain compliant with the e.i.r.p. elevation mask
requirement set forth in Section 6.2.2(3) shall be clearly indicated.
(v) Users should also be advised that high-power radars are allocated as primary users (i.e.
priority users) of the bands 5250-5350 MHz and 5650-5850 MHz and that these radars could
cause interference and/or damage to LE-LAN devices.
Use with Hearing Aids
This phone has been tested and rated for use with hearing aids for some of the wireless technologies
that it uses. However, there may be some newer wireless technologies used in this phone that have
not been tested yet for use with hearing aids. It is important to try the different features of this phone
thoroughly and in different locations, using your hearing aid or cochlear implant, to determine if you
hear any interfering noise. Consult your service provider or the manufacturer of this phone for
information on hearing aid compatibility. If you have questions about return or exchange policies,
consult your service provider or the manufacturer of this phone.
To determine the compatibility of a WD and a particular hearing aid, simply add the numerical part of
the hearing aid category (e.g. M2/T2=2) with the numerical part of the WD emission rating (e.g., M3=3)
to arrive at the system classification for this particular combination of WD and hearing aid. A sum of 5
would indicate that the WD and hearing aid would provide normal use, and a sum of 6 or greater would
indicate that the WD and hearing aid would provide excellent performance. A category sum of less
than 4 would likely result in a performance that is judged unacceptable by the hearing aid user.
WHAT IS HEARING AID COMPATIBILITY?
The Federal Communications Commission has implemented rules and a rating system designed to
enable people who wear hearing aids to more effectively use these wireless telecommunications
devices. The standard for compatibility of digital wireless phones with hearing aids is set forth in
American National Standard Institute (ANSI) standard C63.19. There are two sets of ANSI standards
with ratings from one to four (four being the best rating): an “M” rating for reduced interference making
it easier to hear conversations on the phone when using the hearing aid microphone, and a “T” rating
that enables the phone to be used with hearing aids operating in the telecoil mode thus reducing
unwanted background noise.
HOW WILL I KNOW WHICH WIRELESS PHONES ARE HEARING AID COMPATIBLE?
The Hearing Aid Compatibility rating is displayed on the wireless phone box.
A phone is considered Hearing Aid Compatible for acoustic coupling (microphone mode) if it has an
“M3” or “M4” rating. A digital wireless phone is considered Hearing Aid Compatible for inductive
coupling (telecoil mode) if it has a “T3” or “T4” rating.
The tested M-Rating and T-Rating for this device (FCC/IC ID: AZ489FT7104/109U-89FT7104) are M4
and T3.
HOW WILL I KNOW IF MY HEARING AID WILL WORK WITH A PARTICULAR DIGITAL WIRELESS
PHONE?
You’ll want to try a number of wireless phones so that you can decide which works the best with your
hearing aids. You may also want to talk with your hearing aid professional about the extent to which
MN005019A01-B
About This Manual
22

your hearing aids are immune to interference, if they have wireless phone shielding, and whether your
hearing aid has a HAC rating.
Versions
This guide covers various software configurations and references made to operating system or
software versions.
For the operating system version, software build number, and the kernel version you can go to
Settings → About phone → Phone status.
Notational Conventions
The following conventions are used in this document:
Italics are used to highlight the following:
• Icons on a screen
• Chapters and sections in this and related documents
Bold text is used to highlight the following:
• Dialog box, window, and screen names
• Drop-down list and list box names
• Check box and radio button names
• Key names on a keypad
• Button names on a screen
Bullets (•) indicate:
• Action items
• Lists of alternatives
• Lists of required steps that are not necessarily sequential
Sequential lists (for example, those that describe step-by-step procedures) appear as numbered lists.
Icon Conventions
The documentation set is designed to give the reader more visual clues.
The following graphic icons are used throughout the documentation set. These icons and their
associated meanings are described here.
WARNING: The word WARNING with the associated safety icon implies information that, if
disregarded, could result in death or serious injury, or serious product damage.
CAUTION: The word CAUTION with the associated safety icon implies information that, if
disregarded, may result in minor or moderate injury, or serious product damage.
NOTICE: NOTICE contains information more important than the surrounding text, such as
exceptions or preconditions. They also refer the reader elsewhere for additional information,
remind the reader how to complete an action (when it is not part of the current procedure, for
instance), or tell the reader where something is located on the screen. There is no warning level
associated with a note.
MN005019A01-B
About This Manual
23
Chapter 1
Getting Started
In this chapter, you can learn about the features of the LEX L11 device, and how to set up the device
before the first power up.
1.1
Device Overview
This topic provides an overview of the LEX L11 device.
Figure 1: LEX L11 Overview
1 2
3
4
5
6
7
89
12
1013
11
Table 3: LEX L11 Back and Front
Number Item
1 Front camera
2 Earpiece speaker
3 Front microphone #1
4 Audio Jack
5 SIM card tray
6 Display
7 Loudspeaker
8 USB port
MN005019A01-B
Chapter 1: Getting Started
24
Number Item
9 Front microphone #2
10 Rear camera and flash
11 Fingerprint sensor
12 Battery cover
13 Rear microphone
Figure 2: LEX L11 Top
13
2
Table 4: LEX L11 Top
Number Item Description
1 Emergency button Upon a long press, the Emergency button initiates Public Safety
Emergency operation when the Public Safety applications are
installed.
NOTICE: For more information on the PSX Cockpit
Emergency button, see PSX User Guide.
2 Talkgroup rocker The talkgroup rocker changes talkgroups when used with a Mo-
torola Solutions application that supports it.
3 LED LED light is a notification light that serves to communicate infor-
mation even when the LEX screen is off. For more information
on LED notifications, see Battery Charge Indicators on page
31.
MN005019A01-B
Chapter 1: Getting Started
25
Figure 3: LEX L11 Side Buttons Overview
1
4
5
2
3
Table 5: LEX L11 Side Buttons
Number Button Function
1 Power button A long press of the Power button turns on the device. When the
device is on, a long press of the power button displays the Power
button menu. A short press toggles the display on and off.
2 PTT button When continuously pressed, enables transmission of Push-to-Talk
(PTT) calls in all device modes: active, locked, and/or suspended,
when used with a PTT application designed to support it.
3 Volume Up and Volume
Down buttons
Controls the audio volume.
4 Programmable Button 1 A short press or a long press of each of the buttons can generate
events. Programmable buttons are pre-programmed with default
settings, which can generate events even before provisioning.
5 Programmable Button 2
1.2
Package Contents
The LEX L11 package contains the following items:
• The LEX L11 device
• Standard battery/high capacity battery with the appropriate battery cover
• USB-A to USB-C data/power cable
• Region-specific wall charger
•LEX L11 Mission-Critical LTE Device Quick Start Guide
•RF Energy Exposure Training and Product Safety Information for Mission Critical Devices
MN005019A01-B
Chapter 1: Getting Started
26
1.3
Setting Up the Device
Process:
1Remove the screen protection film from the device.
2Install the SIM card(s). See Inserting SIM Cards on page 27.
3Optional: Install the microSD or CRYPTR card. See Installing a MicroSD Card on page 28.
4Install the battery. See Installing the Battery on page 29.
5Attach the battery cover. See Attaching Battery Cover on page 30.
6Charge the device. See Charging Information on page 30.
1.3.1
Dual SIM Functionality
Your LEX device can operate in two different networks.
The dual SIM functionality allows you to use two SIM cards in your LEX device. Each SIM card is
issued by a different carrier or provider.
Whenever you want to switch between the two networks, you can go to Settings → SIM cards, and
select a radio button next to the SIM slot of your choice.
NOTICE: When only a single SIM card is present in the SIM card tray, that SIM card is
automatically chosen.
1.3.2
Inserting SIM Cards
You can insert one or two Nano SIM cards into the SIM tray.
Procedure:
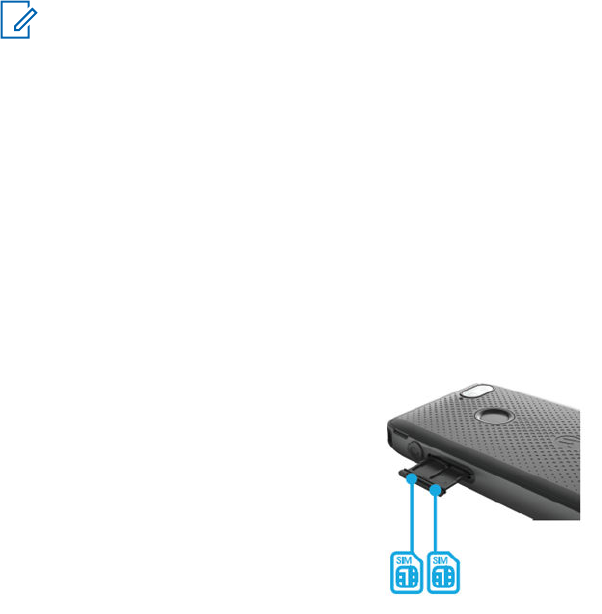
1By using your fingernail, pull out the Nano SIM card side tray.
The Nano SIM card side tray is located on the side of the LEX L11 device, under the audio port.
2With the phone display facing down, insert the Nano SIM card in the SIM card tray.
Figure 4: LEX L11 SIM Card Tray
3Push the SIM card into the tray until it is fully seated and flat.
4Insert the Nano SIM card tray back into the device.
MN005019A01-B
Chapter 1: Getting Started
27
1.3.2.1
Removing SIM Cards
You can follow these steps to remove the Nano SIM cards from the Nano SIM card holder.
Procedure:
1By using your fingernail, pull out the Nano SIM card side tray.
The Nano SIM card side tray is located on the side of the LEX L11 device, under the audio port.
2Remove the Nano SIM card from the SIM card tray.
3Insert the Nano SIM card tray back into the device.
1.3.3
Installing a MicroSD Card
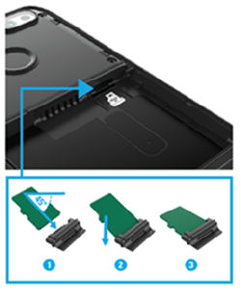
You can follow this procedure to install a microSD card (for example, a memory card, or a CRYPTR
micro encryption card) in your device.
The following figure describes how to insert a microSD card in your LEX device:
Figure 5: MicroSD Card Insertion
Procedure:
1Press and hold the Power button.
2Tap Power Off. Tap OK.
3Remove the battery cover. See Removing the Battery Cover on page 30.
4Remove the battery. See Removing the Battery on page 29.
5Remove the microSD card plug by using your fingernail.
6If a dummy microSD card is inserted in the microSD plug, remove it and replace it with your
microSD card.
7Insert the microSD card by performing the following actions:
aInsert the microSD card into the microSD plug (1).
The angle of insertion should be 45 degrees. The rib of the microSD card must be at the
bottom for insertion.
bPush the microSD card down and ensure that it is fully seated (2).
cWhen the microSD card is fully seated and flat (3), slide the card with the plug into the card
holder slot with contacts facing up.
8Push the card into the slot until it is fully seated and locked into place.
MN005019A01-B
Chapter 1: Getting Started
28

9Insert the battery. See Installing the Battery on page 29.
10 Place the battery cover on the back of the device.
1.3.3.1
Removing a MicroSD Card
Procedure:
1Press and hold the Power button.
2Tap Power Off. Tap OK.
3Remove the battery cover. See Removing the Battery Cover on page 30.
4Remove the battery. See Removing the Battery on page 29.
5Remove the microSD card plug by using your nail.
6Remove the microSD card from the card plug.
7Reattach the card plug to the card holder slot.
8Insert the battery. See Installing the Battery on page 29.
9Place the battery cover on the back of the device. See Attaching Battery Cover on page 30.
1.3.4
Installing the Battery
CAUTION: If the device has been submerged, and the battery has been removed, you must
allow the battery compartment to dry completely before re-inserting the battery. Failure to do so
will result in damage to the device.
Procedure:
1If you are performing initial setup of the device, remove the battery from the packaging.
2If the battery cover is on, gently remove it from the device. See Removing the Battery Cover on
page 30.
3Make sure the slider on the back of the device is on the unlock position (away from the battery).
4Insert the battery into the battery compartment, first attaching the top of the battery, where the
connector is located.
5Press the top of the battery in place.
6Lock the slider by shifting it up.
7Attach the battery cover. See Attaching Battery Cover on page 30.
1.3.4.1
Removing the Battery
Procedure:
1Gently remove the battery cover. See Removing the Battery Cover on page 30.
2Make sure the slider on the back of the device is on the unlock position (away from the battery).
3With the tips of your thumb and index finger, remove the battery by lifting the tab at the bottom of
the battery.
4Place the battery cover on the back of the device. See Attaching Battery Cover on page 30.
MN005019A01-B
Chapter 1: Getting Started
29
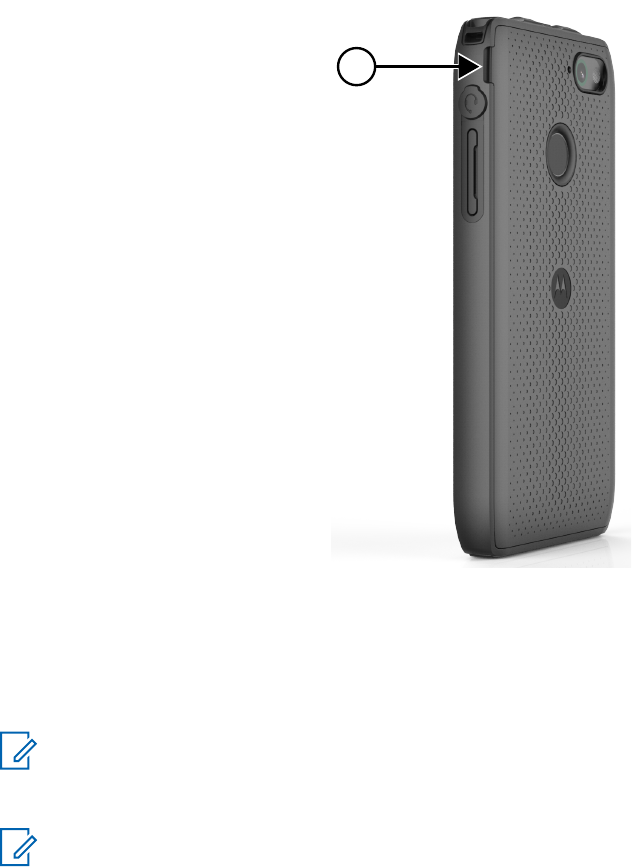
1.3.5
Attaching Battery Cover
Procedure:
1Place the battery cover on the back of the device.
2Ensure that all battery cover snaps are fully engaged.
1.3.5.1
Removing the Battery Cover
Procedure:
1Hold the device firmly.
2Using the battery cover removal slot, gently lift the battery cover up and away.
Figure 6: Battery Cover Removal Slot
The battery cover removal slot is marked as 1.
1
1.3.6
Charging Information
Before using the LEX L11 for the first time, you must charge the battery by using the provided USB
Charger and USB Cable or connect the USB Cable to the USB port of a personal computer.
NOTICE: For detailed description, installation, and operation procedures for the LEX device
accessories, refer to the quick start guides provided with each accessory.
The LEX device typically charges the standard battery up to 90% in about 1.5h in room temperature.
NOTICE: Charge times vary by ambient temperature. You can achieve better charging time by
using the quick charger.
MN005019A01-B
Chapter 1: Getting Started
30
Batteries can be charged in temperatures from 0°C to 45°C (32°F to 113°F). Note that charging is
intelligently controlled by the LEX L11. To accomplish this, for short periods of time, the LEX L11
alternately enables and disables battery charging to keep the battery at acceptable temperatures. The
LEX L11 LED indicates when charging is disabled due to abnormal temperatures by fast blinking
amber (once every two seconds).
1.3.6.1
Battery Charge Indicators
The Charge and Notification LED at the top front of the LEX device indicates the battery charging and
power level.
Battery charging and power level are indicated also by a battery icon on the status bar.
NOTICE: Before checking the battery charge level, remove the device from any power source
(cradle or USB cable connection).
For the location of the charge and notification LED on the LEX L11 device, see Device Overview on
page 24.
Table 6: LEX L11 Notification LEDs
State Indications
Off The battery is not charging. This can indicate
that:
• The device is not inserted correctly in the
cradle.
• The device is not connected to a USB cable.
• The charger or cradle is not powered.
Blinking blue New notifications:
New Voice Mail
New notification (for example, Android App
Notification)
New SMS or MMS
New Email
Missed Call
Solid green The battery is fully charged.
NOTICE: This only applies when the
device is connected to USB, Dual-
Unit Charger (DUC), or Multi-Unit
Charger (MUC).
Slowly blinking red Low battery notification (10% or less).
Solid red The battery is charging.
Fast blinking red Charging errors:
• Too high or too low battery charging temper-
ature
• Invalid battery
When the battery power falls below a predetermined level, the icon indicates the state, and a battery
dialog box appears indicating the status of the battery. The message displays until you tap Dismiss.
MN005019A01-B
Chapter 1: Getting Started
31

To monitor battery usage, from the Home screen, tap All Apps → Settings → Battery.
1.3.6.2
Turning On Battery Saving Mode
You can follow these steps to enter the battery saving mode.
When the battery saver is turned on, some device features become unavailable, such as WLAN
connectivity, mobile data, Bluetooth, GPS, NFC, and hotspot. Vibration and most background data is
limited. Screen brightness in battery saving mode is reduced. Applications that rely on syncing may not
update unless you open them.
NOTICE: The battery saving mode turns off automatically when your device is charging.
Procedure:
1Swipe the home screen up from the arrow sign and tap Settings.
2In Settings, tap Battery.
3Select Battery saver and tap the slider next to Off.
4Tap Turn on automatically and, from the list of options, select when you want your device to
automatically enter the battery saving mode.
You can select one of the following options:
Never
at 5% battery
at 15% battery
5Select the option of your choice by tapping it.
1.4
Powering On the Device for the First Time
The first time you turn on your device, you are guided through a setup process.
NOTICE: Some of the settings selected in this procedure can be changed later in Android
Settings, if needed.
Procedure:
1Turn on the device by long-pressing the Power button.
The device boots up.
2Select Exit to Google Setup Wizard and, in the Continue with Google Setup wizard prompt,
tap Continue.
The Welcome screen appears.
MN005019A01-B
Chapter 1: Getting Started
32

Figure 7: LEX L11 Welcome Screen
3Choose the language in which you want your device to operate by selecting a language from the
English drop-down list.
4Tap Let's Go.
5On the Get Connected page, connect to a Wi-Fi network available in your area.
aTap a network name of your choice.
bEnter the password.
cTap Connect.
6On the Set up email page, set up your email account by selecting one of the options available.
If you have a Gmail account, you can use the same e-mail address and password to sign in.
After you sign in, all your e-mail, contacts, calendar events, and other data associated with that
account are synced to your device.
If you do not have a Google account, you can create one during the setup process, or connect
your device by using your e-mail account in another domain.
7On the Protect your phone page, select the screen lock you want to use, and follow the on-
screen instructions.
8On the next screen, select options of your choice and tap Next.
9On the Anything else? screen, when finished, tap All set.
If you have more than one Google account, you can add them later.
Postrequisites: If you want a keyboard that matches the language selected for your LEX L11, search
on “keyboard” and that language in the Google Play Store, then install the keyboard that your
organization recommends.
MN005019A01-B
Chapter 1: Getting Started
33

1.5
Powering On
Procedure:
Press and hold the Power button.
The device boots up.
1.6
Powering Off
Procedure:
1Press and hold the Power button.
The Power button menu displays.
2Tap Power off.
1.7
Battery Management
This section explains how to check the status of your battery and what you can do to make your battery
last longer.
NOTICE: Before checking the battery charge level, remove the device from any AC power
source (cradle or cable).
To check the charge status of the main battery, from the Home screen, you can swipe the screen up
from the arrow sign, and tap → About Phone → Status.
Battery status indicates that the battery is discharging, and Battery level lists the battery charge (as a
percentage of fully charged).
1.7.1
Battery Usage Monitor
The Battery screen lists applications and allows you to check how much energy they consume. You
can turn off applications that consume too much energy.
You can access the battery usage monitor by swiping the home screen up from the arrow sign, and
tapping → Battery.
MN005019A01-B
Chapter 1: Getting Started
34
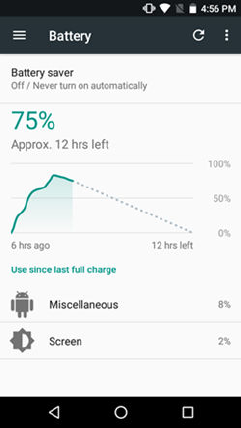
Figure 8: Battery Screen
The Battery screen lists the applications using the battery. The discharge graph at the top of the
screen shows the rate of the battery discharge since last charged, and how long it has been running on
battery power.
You can tap an application in the Battery screen to display details about its power consumption.
Different applications display different information. Some applications include buttons that open
screens with settings to adjust power use.
1.7.2
Low Battery Notification
When the battery charge level drops below 15%, you should charge the battery by using one of the
charging accessories.
When the battery charge drops below 15%, the device displays a notice to connect the device to
power, and the red LED slowly blinks.
When the battery charge drops below 1%, the device turns off.
You must charge the device by using one of the charging accessories to maintain power.
1.7.3
Battery Optimization
You can observe the following battery saving tips:
• You can leave the device inside a cradle connected to AC power at all times when not in use.
• You can turn off Bluetooth and/or Wi-Fi if not needed.
• You can change screen time-out to be as short as possible.
• You can charge the device when not in use.
• You can set the screen to Suspend (Sleep) after a short period of non-use.
• You can reduce screen brightness.
• You can minimize use of applications that keep the device from suspending, for example, music or
video applications.
• You can turn Battery Saver on.
MN005019A01-B
Chapter 1: Getting Started
35

1.7.3.1
Entering Airplane Mode
The Airplane Mode disables radio-frequency signal transmission by the LEX device. When enabled,
the device cannot establish any Bluetooth, GPS, telephone, or Wi-Fi connections.
NOTICE: While in airplane mode, you can turn Bluetooth and/or Wi-Fi on. See Enabling
Bluetooth on page 58 and Connecting to Wi-Fi Networks on page 60.
Procedure:
1Press the Power button until the Power Button menu appears.
2Go offline by tapping Airplane mode.
The airplane icon appears in the Status bar indicating that all radios are off.
MN005019A01-B
Chapter 1: Getting Started
36
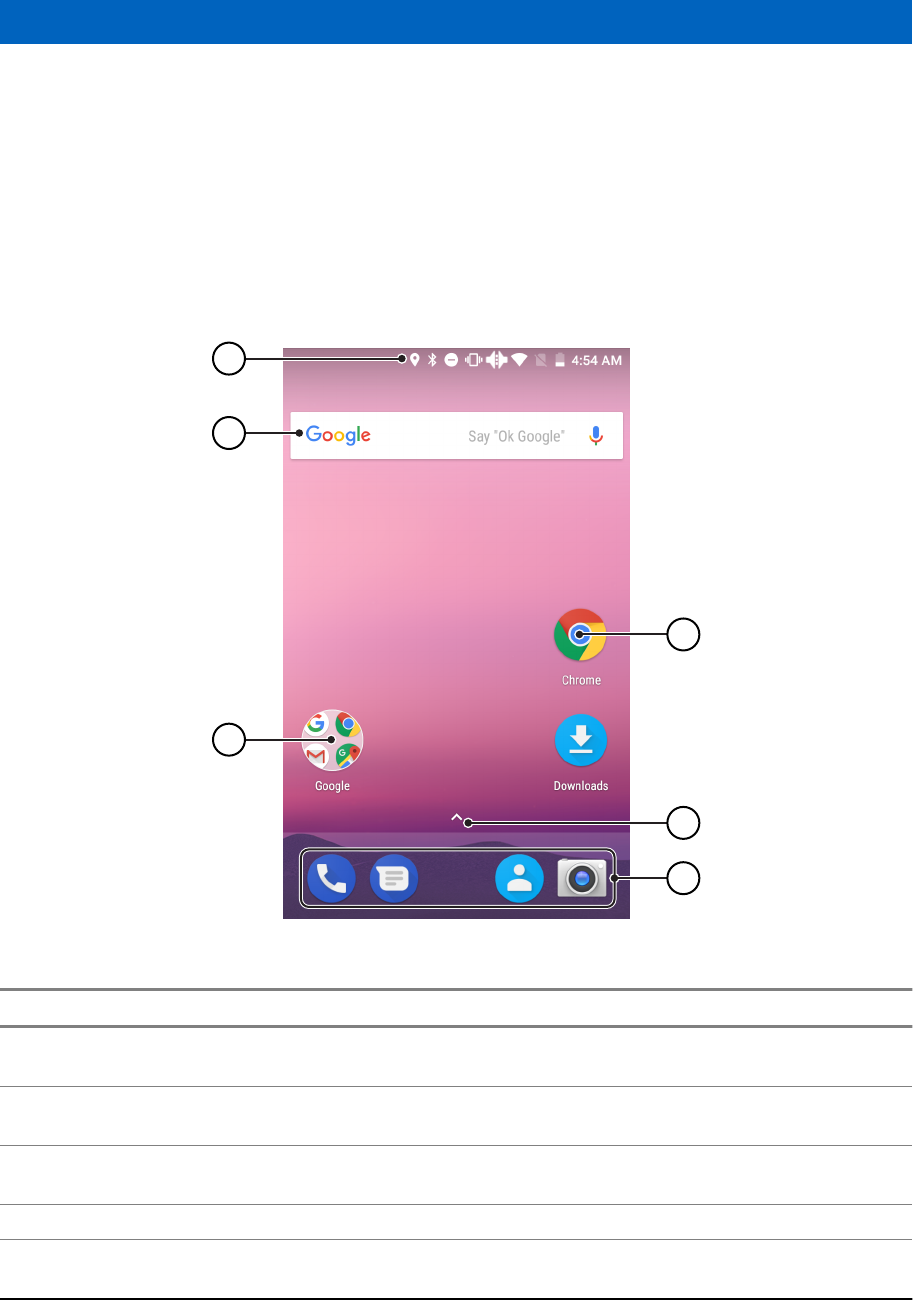
Chapter 2
Basic Functions
Basic functions of the LEX L11 device include touchscreen navigation, entering text by using the on-
screen keyboard, managing notifications, and others.
2.1
Home Screen
Figure 9: LEX L11 Home Screen Overview
1
2
3
5
4
6
Table 7: LEX L11 Home Screen
Item number Description
1Status Bar—Displays status and notification
icons.
2Widget—An application extension that is part of
an application installed on your device.
3Application Folder—You can group several
files into folders.
4Application Icon
5Arrow Sign—You can swipe up from the arrow
sign to open the Apps screen.
MN005019A01-B
Basic Functions
37
Item number Description
6Application Shortcuts—Allow you to access
your favorite applications quickly.
Table 8: On-Screen Navigation Buttons
Item Description
Back button—allows you to exit application win-
dows.
Home button—you can tap it to return to the
home screen.
Overview button—allows you to view a list of
applications that are currently open on your
LEX device. You can manage the application
windows. See Switching to Multiple Active Win-
dows View on page 41.
2.2
Touchscreen Navigation
The LEX device is equipped with a multi-touch screen.
Table 9: Touchscreen Actions
Action Result
Tap You can tap to:
• Select items on the screen
• Type letters and symbols using the on-
screen keyboard
• Press on-screen buttons
Tap and Hold You can tap and hold:
• An item on the Home screen to move it to a
new location (by dragging it) or to remove
• An item in Apps to create a shortcut on the
Home screen
• An empty area on the Home screen until the
menu appears
• An application to perform application actions
Drag You can tap and hold an item for a moment and
then move your finger on the screen until you
reach the new position for that item.
Swipe You can move your finger up, down, left, or right
on the screen to:
• Unlock the screen
• View additional Home screens
MN005019A01-B
Chapter 2: Basic Functions
38
Action Result
• View additional application icons in the
Launcher window
• View more information on an application
screen
Double-tap You can tap twice on a webpage, map, or other
screen to zoom in and out.
Pinch In some applications, you can zoom in and out
by placing two fingers on the screen and pinch-
ing them together (to zoom out) or spreading
them apart (to zoom in).
2.3
On-Screen Keyboard
The on-screen keyboard is used to enter text in a text field.
Text Editing
You can edit entered text and use menu commands to cut, copy, and paste text within or across
applications. Some applications do not support editing some or all of the text they display; others may
offer their own way to select text.
Numbers, Symbols, and Special Characters
To enter numbers and symbols:
• Without switching to the Numbers or Symbols keyboard, it is possible to tap and hold one of the
top-row keys until a menu appears and then select a number.
• By tapping the arrow key, you can enter a capital letter.
• When you tap and hold the arrow key until it becomes underlined, you can enter two or more capital
letters. By tapping the arrow key again, you can return to the lowercase keyboard.
• By tapping the ?123 key, you can switch to the numbers and symbols keyboard.
• By tapping the key, you can view additional symbols.
• By tapping and holding a key, you can open a menu with additional characters available under that
key.
2.3.1
Google Keyboard Settings
The Google Keyboard Settings may be personalized to meet your preferences.
Table 10: Google Keyboard Settings
Google keyboard settings are located at Settings → Languages & Input → Virtual keyboard →
Gboard.
Setting Description
Languages You can select the language to be used in the
keyboard.
MN005019A01-B
Chapter 2: Basic Functions
39

Setting Description
Preferences Allows you to adjust settings such as one-hand-
ed mode, sound on keypress, vibrate on key-
press, and others.
Theme Allows you to select the keyboard theme: you
can choose from one of your images, or from
other themes available on the device.
Text correction You can choose from text correction options,
such as show suggestion strip, block offensive
words, suggest contact names, auto-correction,
and others.
Glide Typing These settings allow you to enter a word by
sliding through the letters on the keyboard.
Voice Typing You can adjust voice typing settings, such as
the language to be spoken.
Dictionary You can choose to sync learned words, or to
delete learned words from your personal dic-
tionary.
Search You can choose to use predictive search, or to
show the Search and more button in the sug-
gestion strip for faster access to Search.
Advanced These settings allow you to display application
icons in the launcher, or to have a physical ALT
key show the emoji keyboard. You an also de-
cide to improve Gboard statistics.
2.3.2
Google Voice Typing
You can enter text by speaking.
Procedure:
1On the Google keyboard, tap .
2Start speaking your text.
3When finished, tap .
2.3.2.1
Adjusting Google Voice Typing Settings
Procedure:
1On the home screen, swipe up from the arrow sign and tap Settings.
2Select Languages & Input → Virtual keyboard → Google voice typing.
3Configure the settings of your choice.
MN005019A01-B
Chapter 2: Basic Functions
40
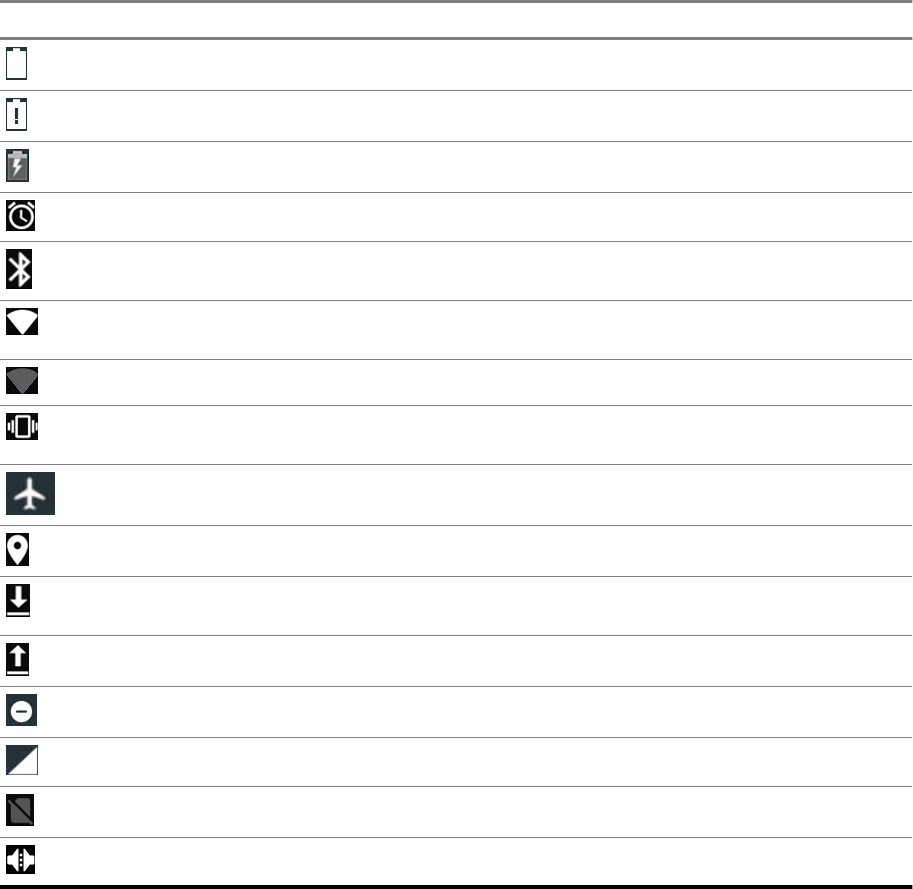
2.4
Status Bar Icons
Status icons give you status information on actions occurring on your LEX device.
Table 11: Status Bar Icons
For the location of the Status Bar, see Home Screen on page 37.
Icon Description
Indicates the battery is fully charged.
Indicates the battery level is low (20% or less).
Indicates the battery is charging.
Indicates the alarm is active.
Indicates the Bluetooth service is on.
Indicates that the device is connected to a Wi-Fi
network.
Indicates that there is no Wi-Fi signal.
Indicates all sounds except media and alarms
are silenced and vibrate mode is active.
Indicates the Airplane Mode is active.
Indicates that location services are on.
Indicates that a file was downloaded to the de-
vice.
Indicates that a file was sent from the device.
Indicates that do not disturb is on.
Indicates mobile network signal strength.
Indicates no SIM card is present.
Indicates howling suppression is on.
2.5
Switching to Multiple Active Windows View
The LEX device supports multi-window view, which allows for dragging and dropping data between the
panes.
You can view two applications side-by-side on your device screen. This feature works in both portrait
and landscape mode.
MN005019A01-B
Chapter 2: Basic Functions
41
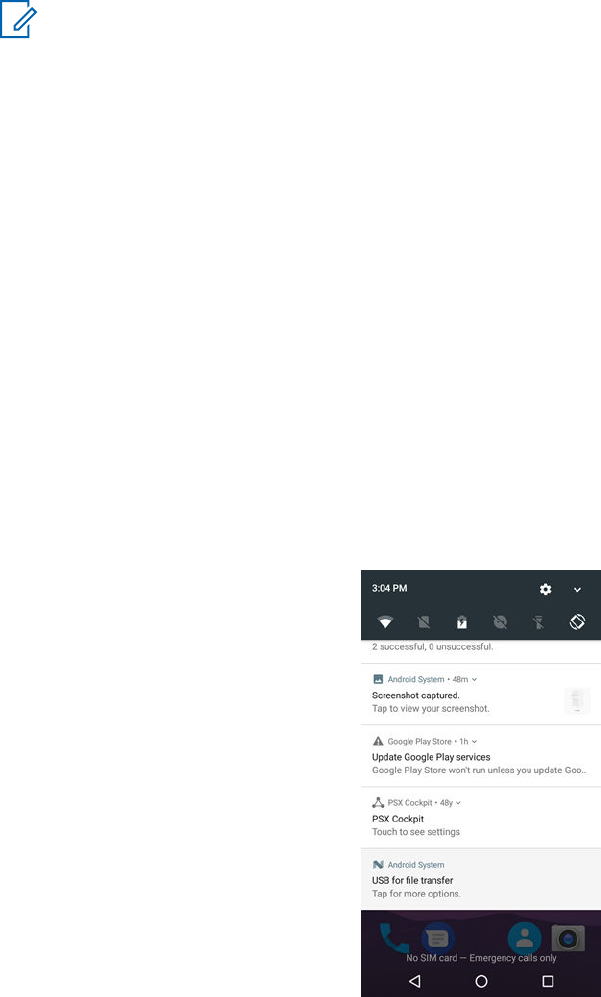
NOTICE: Some applications may not support this functionality.
Procedure:
1Start the applications that you want to use simultaneously.
2Long press the square Overview button located at the bottom of the device screen.
The screen splits in two. One half of it displays the most recently opened application, and the
other one displays a list of the rest of the recently opened applications.
3Select an application by sliding your finger on the list of applications and tapping an application
of your choice.
2.6
Accessing Files from a Computer
Procedure:
1Connect the device to your computer using a USB type C cable.
2Open the Notifications panel by swiping the screen down from the Status bar.
Figure 10: Notifications Panel
3Tap the USB for... notification.
4In the Use USB to screen, select one of the following:
• If you want to transfer files to Windows or Mac (MTP), select File transfers.
• If you want to access photos or other files on a computer that does not support MTP, select
Photo transfer (PTP).
• If you want to use LEX for MIDI input, select MIDI.
MN005019A01-B
Chapter 2: Basic Functions
42

Chapter 3
Device Settings
This chapter describes ways to personalize your LEX L11 device by changing the default device
settings.
NOTICE: If you cannot access features described in this section, contact your device technician
for more information.
3.1
Covert Mode
In the Covert Mode, the device goes dark and quiet. All visible and audible alerts and notifications are
shut down. This feature makes the LEX device effectively unnoticeable even in a silent and dark
environment.
In Covert Mode, the following sounds, visual indications, and keys are disabled:
• Display backlight
• Touchscreen
• Keylight
• LED indications
• Vibration and haptics - optional
• Speaker audio
NOTICE: In Covert Mode, sound is routed to a Bluetooth headset, if connected or sound is
routed to a wired earpiece, if connected. Alternatively, sound is routed to the earpiece.
In Covert Mode, the following features remain active:
•Power button
•PTT button
•Emergency button
•Talkgroup Rocker button
•Programmable buttons
•Volume button
• Audio indications are available using a wired headset (through headset port) or a Bluetooth
headset.
When the LEX device is in covert mode, after a long press of the power key, the device illuminates the
display backlight at low intensity to display the Power button menu where you can exit covert mode.
3.1.1
Turning On Covert Mode
Procedure:
1Press and hold the Power button for at least two seconds.
The Power Button menu appears.
MN005019A01-B
Device Settings
43

2Tap Covert mode.
The screen goes blank.
3.1.2
Turning Off Covert Mode
Procedure:
1Press and hold the Power button for at least two seconds.
The Power Button menu appears.
2Tap Covert mode.
All audible and visual settings, such as loudspeaker volume, display brightness, and vibration,
return to the same settings and levels as they were before the device entered the Covert Mode.
3.1.3
Configuring Covert Mode
Procedure:
1In Settings, select Languages & input.
2Tap Covert Mode settings.
3Adjust the slidebars next to the options of your choice.
3.2
Setting Programmable Buttons
You can set the LEX L11 programmable buttons to perform various actions.
Each button can have two functions: one for short press, and one for long press.
For the exact location of the programmable buttons on the LEX L11 device, see Device Overview on
page 24.
NOTICE: Programmable buttons are pre-programmed with default settings, which can generate
events even before provisioning.
Procedure:
1From the main menu, pull down the Notification bar.
2Tap Settings → Languages and Input → Programmable buttons.
3In the Programmable Buttons window, select one of the following options:
•Programmable button -1- short press
•Programmable button -1- long press
•Programmable button -2- short press
•Programmable button -2- long press
4From the list of available applications/settings, select one application/setting by tapping the radio
button next to it.
The list of available options is as follows:
• Covert mode ON/OFF toggle - default for long press on top programmable button
• Home
MN005019A01-B
Chapter 3: Device Settings
44

• Screen brightness up
• Screen brightness down
• Camera - default for short press on top programmable button
• Answer call (when ringing) or end call (when in call) - default for short press on bottom
programmable button
• Ringer/Media Mute/Unmute - default for long press on bottom programmable button
• “OK Google” (open in Google App listening for instructions)
• No event
3.3
LEX Series Screen Lock
You can cause the LEX device screen to lock automatically by specifying a pattern, PIN, password, or
a fingerprint.
If you establish a PIN, pattern, password, or a fingerprint as a preferred way to unlock the device
screen, you can keep your data secured.
NOTICE: If the device screen lock option is set to None or Swipe, your data is not secured and
can be accessed by anyone.
When the device is on, you can lock your device by pressing the Power button, and unlock by
providing a pattern, PIN, password, or a fingerprint. If you did not specify a pattern, PIN, password, or a
fingerprint, you can also unlock the LEX device by swiping up the device screen, or only by pressing
the Power button if no locking option was set.
When the device is locked and cellular network signal is available, phone calls, notification of new
messages, missed calls and upcoming appointments still can be received.
You can also set the device to automatically lock after a specified time. See Setting Timeout for
Locking on page 47.
3.3.1
Selecting a Locking Option
Security dictates a specific level of locking for the LEX device screen. You may protect the device by
setting a password, PIN, a pattern, or a fingerprint as a locking option, but you may also decide not to
select any of these options at all (not recommended).
NOTICE: Your account may enforce more stringent locking requirements than those listed here.
For more information, contact your device administrator.
Procedure:
1Swipe the home screen up from the arrow sign, and tap .
2Select Security → Screen lock.
The following options are displayed:
•None.
•Swipe — You must slide the lock to unlock the device.
•Pattern — You must replicate a specified pattern to unlock the device.
•PIN — You must enter a PIN to unlock the device.
•Password — You must enter a specified password to unlock the device.
MN005019A01-B
Chapter 3: Device Settings
45

3Select an option of your choice by tapping it.
If… Then…
If you selected PIN, perform the following actions:
aIf you want your device to require your
PIN when it starts up, in the Secure
start-up window, tap Require PIN to
start device.
bIn the Choose your PIN window, enter a
PIN code of at least four digits and tap
CONTINUE.
cConfirm your PIN.
dIn the Notifications window, decide how
you want your notifications shown by se-
lecting a radio button of your choice and
tapping DONE.
If you selected Pattern, perform the following actions:
aIf you want your device to require your
pattern when it starts up, in the Secure
start-up window, tap Require pattern to
start device.
bIn the Choose your pattern window,
create your pattern that connects at least
four dots and tap CONTINUE.
cConfirm your pattern.
dIn the Notifications window, decide how
you want your notifications shown by se-
lecting a radio button of your choice and
tapping DONE.
If you selected Password, perform the following actions:
aIf you want your device to require your
password when it starts up, in the Se-
cure start-up window, tap Require
password to start device.
bIn the Choose your password window,
enter a password of at least four charac-
ters and tap CONTINUE.
cConfirm your password.
dIn the Notifications window, decide how
you want your notifications shown by se-
lecting a radio button of your choice and
tapping DONE.
The device is set to lock.
MN005019A01-B
Chapter 3: Device Settings
46

3.3.2
Setting Timeout for Locking
You may specify the timeout for device locking. After the set amount of time, the device automatically
locks.
Prerequisites: Ensure that the screen lock is set to pattern, PIN, or password.
Procedure:
1Swipe the home screen up from the arrow sign.
2Select → Security.
3Tap next to Screen lock.
4Tap Automatically lock.
5Select a timeout value from the list.
3.3.3
Device Unlock
When the LEX device is not used for a period of time and you try to access the device, the Lock
screen displays.
Depending on which Screen lock option is active, you can do one of the following:
• Nothing.
• Swipe the screen.
• Enter a pattern, PIN, or password, or unlock the device by using a fingerprint.
3.3.3.1
Unlocking the LEX Device Using a Pattern
Procedure:
1Press and release the Power button.
2Swipe the screen from the bottom upwards.
3By using a finger, draw the specified pattern on the screen.
Once the correct pattern is drawn, the device unlocks.
3.3.3.2
Unlocking the LEX Device Using a PIN or Password
Procedure:
1Press and release the Power button.
2Swipe the screen from the bottom upwards.
3In the text field, enter your PIN or password.
4Tap .
The device unlocks and the Home screen is shown.
MN005019A01-B
Chapter 3: Device Settings
47

3.3.3.3
Setting Unlock with Fingerprint
You can follow this procedure to be able to unlock your device by touching the fingerprint sensor.
You can use your fingerprint to unlock applications.
NOTICE:
A fingerprint may be less secure than a strong PIN, pattern, or password.
Your account may enforce more stringent locking requirements than those listed here. For more
information, contact your device administrator.
Procedure:
1Swipe the home screen up from the arrow sign, and tap .
2Select Security → Fingerprint.
3In the Unlock with fingerprint window, tap NEXT.
4In the Unlock selection window, choose your backup screen lock method.
The backup method is used when:
• You restart the device
• The fingerprint sensor does not recognize your fingerprint after a few attempts
• You switch to a different user
• You did not use your backup method to unlock your device for more than 48 hours.
5Depending on the choice you made in step 4, perform one of the following actions:
If… Then…
If you selected PIN, perform the following actions:
aIf you want your device to require your
PIN when it starts up, in the Secure
start-up window, tap Require PIN to
start device.
bIn the Choose your PIN window, enter a
PIN code of at least four digits and tap
CONTINUE.
cConfirm your PIN.
dIn the Notifications window, decide how
you want your notifications shown by se-
lecting a radio button of your choice and
tapping DONE.
If you selected Pattern, perform the following actions:
aIf you want your device to require your
pattern when it starts up, in the Secure
start-up window, tap Require pattern to
start device.
bIn the Choose your pattern window,
create your pattern that connects at least
four dots and tap CONTINUE.
MN005019A01-B
Chapter 3: Device Settings
48

If… Then…
cConfirm your pattern.
dIn the Notifications window, decide how
you want your notifications shown by se-
lecting a radio button of your choice and
tapping DONE.
If you selected Password, perform the following actions:
aIf you want your device to require your
password when it starts up, in the Se-
cure start-up window, tap Require
password to start device.
bIn the Choose your password window,
enter a password of at least four charac-
ters and tap CONTINUE.
cConfirm your password.
dIn the Notifications window, decide how
you want your notifications shown by se-
lecting a radio button of your choice and
tapping DONE.
6Add your fingerprint by following the on-screen instructions.
The fingerprint sensor is located on the back of the device. See Device Overview on page 24.
7In the Fingerprint added screen, tap DONE.
You can add more than one fingerprint.
3.3.3.3.1
Unlocking the Device by Using the Fingerprint Sensor
Procedure:
Press your finger to the fingerprint sensor on the back of the device.
The device screen unlocks.
3.3.4
Calling Emergency from a Locked LEX Device
You can make an emergency call even when the LEX device is locked and you do not remember your
PIN, pattern, or password.
Procedure:
1Press the Power button.
2Tap EMERGENCY at the bottom of the lock screen.
The Emergency Dialer screen displays.
3Enter the emergency number.
4Tap .
MN005019A01-B
Chapter 3: Device Settings
49

3.4
Setting Date and Time
When the LEX device is connected to cellular network, date and time are automatically synchronized.
You can perform this procedure to manually set the date and time on your LEX device.
Procedure:
1Swipe the home screen up from the arrow sign.
2Tap .
3Tap Date & time.
4Disable automatic date and time synchronization by tapping Automatic date & time.
5Disable automatic time zone synchronization by tapping Automatic time zone.
6Tap Set date.
7Select a month, date and year.
8Tap OK.
9Tap Set time.
10 Select the hour, minutes and part of the day by sliding your finger up and down.
11 Tap OK.
12 Tap Select time zone.
13 Tap to select a time zone from the list.
3.5
Setting the Display
The following LEX device display features can be customized:
• Brightness level — Set the brightness of the display.
• Adaptive brightness — Optimize brightness level for available light.
• Wallpaper — Choose a background type on the home and lock screens.
• Sleep — Set the time the device waits before turning off the backlight of the display.
• Screen saver — Set the device to launch a screensaver when the device is docked inside a cradle
or charging.
• Ambient display — Wake screen when you receive notifications.
• Font size — Change the font size for display text.
• Display size — Change the display size.
• When device is rotated — Rotate the contents of the screen.
• Cast — Enable the device to project the screen to a TV or other device.
3.5.1
Setting Screen Brightness Level
Procedure:
1In Settings , tap Display → Brightness level.
2Set the brightness level by adjusting the Brightness level slidebar.
MN005019A01-B
Chapter 3: Device Settings
50

3.5.2
Setting Adaptive Brightness
Optimize brightness level for available light.
Procedure:
From → Display, set the Adaptive brightness slidebar to the ON position.
3.5.3
Changing Wallpapers
You can set an image or a photo stored in your device as your home screen wallpaper.
Procedure:
1Tap and hold the home screen.
2From the context menu, select Wallpapers.
3Scroll through the available images and tap a photo or image of your choice.
4Tap Set wallpaper.
3.5.4
Setting Up Sleep Mode
Use this procedure to set up sleep mode (screen time-out).
Procedure:
1From Settings , tap Display → Sleep.
2Select one of the sleep values by tapping a value of your choice.
3.5.5
Setting Up Screen Saver
Procedure:
1In Settings , select Display → Screen saver.
2Select one of the available options by tapping it.
You can configure your the options by tapping next to your selection.
3Tap , tap When to start screen saver and select when you would like the feature to be
active (While docked, while charging, or either).
4Preview and confirm your selection by tapping Start now.
3.5.6
Setting Font Size
Procedure:
1In Display settings, tap Font size.
2Slide your finger on the scale to adjust the font size.
MN005019A01-B
Chapter 3: Device Settings
51

3.5.7
Setting Display Size
Procedure:
1In Display settings, tap Display size.
2Adjust the display size by sliding your finger left to right on the scale.
3.5.8
Setting Screen Rotation
Screen rotation enables the LEX device to automatically determine the orientation of the screen to
portrait or landscape.
NOTICE: Some applications may not support screen rotation.
Procedure:
1In the Display settings, tap When device is rotated.
2Select one of the following options:
• If you want the screen to rotate, select Rotate the contents of the screen.
• If you do not want the screen to rotate, select Stay in portrait view.
3.5.9
Enabling Cast Screen
When and where to use: You can use this procedure to enable the LEX device to project the screen
to a TV or other device.
Procedure:
1In the Display settings, tap Cast.
2Tap .
3Select Enable wireless display.
3.6
Sound Settings
Sound settings allow you to configure default media, alarm, and ring volume levels and ringtones.
3.6.1
Adjusting Sound Settings
Sound settings allow you to adjust media, alarm, and ring volume.
Procedure:
1Tap → Sound & notification.
2Adjust the slidebars for media, alarm, and ring volume.
3If you want your device to vibrate for calls, adjust the slidebar for Also vibrate for calls.
MN005019A01-B
Chapter 3: Device Settings
52
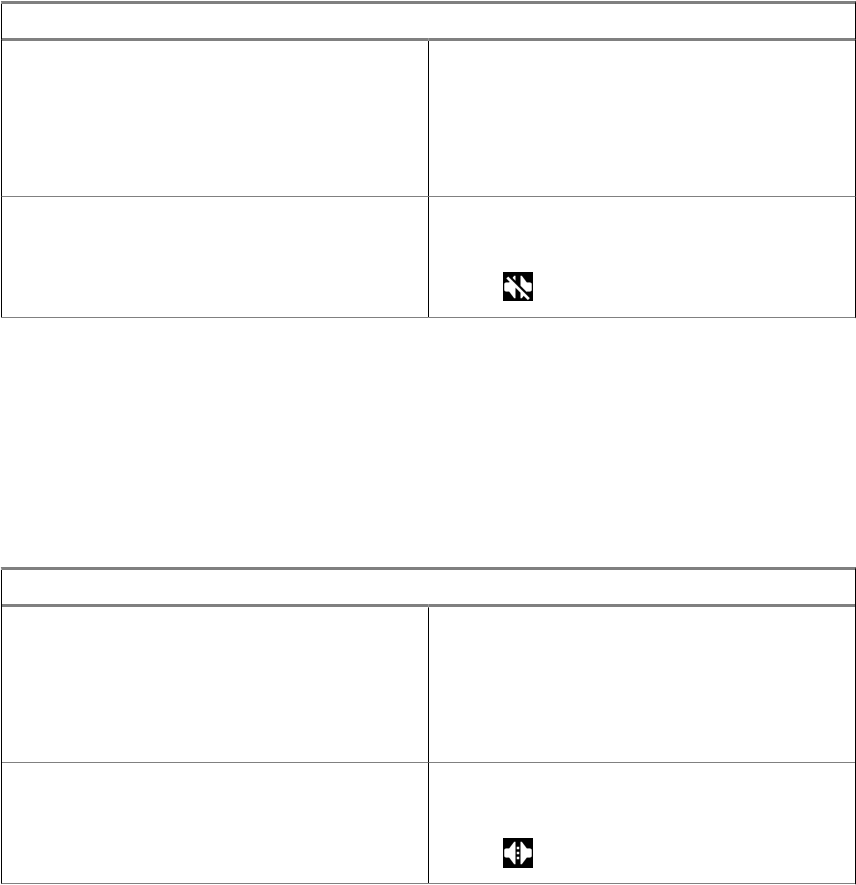
3.6.2
Enabling Howling Suppression
You can enable a microphone and loudspeaker sound profile that suppresses feedback loop and
screeching or howling noise in a half-duplex call when sending and receiving phones are close to each
other.
Procedure:
Enable howling suppression by performing one of the following actions:
If… Then…
If you want to enable howling suppres-
sion from the Settings menu,
perform the following actions:
aFrom the main menu, tap Settings →
Sound.
bSlide the Howling Suppression toggle
to ON.
If you want to enable howling suppres-
sion from the Quick Settings panel,
perform the following actions:
aPull down the Quick Settings panel.
bTap .
3.6.2.1
Disabling Howling Suppression
You can perform this procedure to disable the howling suppression feature.
Procedure:
1From the main menu, tap Settings → Sound.
2Disable howling suppression by performing one of the following actions:
If… Then…
If you want to disable howling suppres-
sion from the Settings menu,
perform the following actions:
aFrom the main menu, tap Settings →
Sound.
bSlide the Howling Suppression toggle
to OFF.
If you want to disable howling suppres-
sion from the Notifications panel,
perform the following actions:
aPull down the Notifications panel.
bTap .
MN005019A01-B
Chapter 3: Device Settings
53

3.6.3
Setting Up Do Not Disturb
The Do not disturb setting allows you to mute alarms, reminders, events, messages, and calls.
You can set a schedule so that Do not disturb is turned on and off automatically. You can set
exceptions on chosen elements.
Procedure:
1Tap → Sound → Do not disturb → Priority only allows.
2Set exceptions by following these steps:
aIf you want to unmute Reminders, adjust the Reminders slidebar.
bIf you want to unmute Events, adjust the Events slidebar.
cIf you want to set exception on Messages, select Messages and choose from the list of
available options.
dIf you want to set exception on Calls, tap Calls and choose from the list of available options.
eIf you want to repeat callers, adjust the Repeat callers slidebar.
3.6.3.1
Setting Automatic Rules
Automatic rules allow you to set a schedule when Do not disturb turns on and off automatically.
Procedure:
1Tap → Sound → Do not disturb → Automatic rules.
2Choose from the following automatic rules:
If… Then…
If you want to set automatic rules for
weekends,
perform the following actions:
aSelect Weekend and adjust the slidebar
to the On position.
bSet the following:
• Rule name
• Days
• Start time
• End time
• Do not disturb
• Alarm can override end time
If you want to set automatic rules for
weeknights,
perform the following actions:
aSelect Weeknights and adjust the slide-
bar to the On position.
bSet the following:
• Rule name
MN005019A01-B
Chapter 3: Device Settings
54

If… Then…
• Days
• Start time
• End time
• Do not disturb
• Alarm can override end time
If you want to set automatic rules for
events,
perform the following actions:
aSelect Event and adjust the slidebar to
the On position.
bSet the following:
• Rule name
• During events for
• Where reply is
• Do not disturb
If you want to add a new rule, perform the following actions:
aSelect Add rule.
bEnter the rule name and set it to time
rule or event rule.
cSet the following:
• Rule name
• Days
• Start time
• End time
• Do not disturb
• Alarm can override end time
3.6.4
Enabling Hearing Aid Compatibility
You can follow this procedure to enable hearing aid compatibility on your LEX L11 device.
The Federal Communications Commission (FCC) has adopted hearing-aid compatibility (HAC)
requirements for digital wireless phones. By using a hearing aid with a hearing aid compatible LEX
L11, you can improve your ability to hear on the phone.
WARNING: When the hearing aid compatibility is enabled, the handset mode volume level of
voice calls may be increased above safe levels. Listening at a high volume for a long time may
damage your hearing.
Procedure:
1Swipe the home screen up from the arrow sign.
2Tap .
3Select Sound.
4Tap Other sounds.
MN005019A01-B
Chapter 3: Device Settings
55

5Enable hearing aid compatibility by setting the Hearing aid compatibility toggle to the ON
position.
3.6.4.1
Disabling Hearing Aid Compatibility
Procedure:
1Swipe the home screen up from the arrow sign.
2Tap .
3Select Sound.
4Tap Other sounds.
5Disable hearing aid compatibility by setting the Hearing aid compatibility toggle to the OFF
position.
MN005019A01-B
Chapter 3: Device Settings
56

Chapter 4
Wireless
This section provides information on the wireless features of the LEX L11 device.
4.1
Bluetooth Profiles
The LEX device supports a wide range of Bluetooth services.
Table 12: Bluetooth Profiles
Bluetooth Profile Description
Advanced Audio Distribution Profile (A2DP
SRC)
Allows the device to stream stereo-quality audio
to a wireless headset or wireless stereo speak-
ers.
Handsfree Profile (HFP AG) Provides the capability for carkits and Bluetooth
headset to be used for phone calls and control
them (initiate, answer, terminate, and other).
Headset Profile (HSP AG) Provides support for the popular Bluetooth
headsets to be used with mobile phones with
ability to ring, answer a call, hang up, and ad-
just the volume.
Human Interface Device Profile (HID Host) Allows Bluetooth keyboards, pointing devices,
gaming devices, and remote monitoring devices
to connect to the device.
Serial Port Profile (SPP Dev A, Dev B) Sets up a virtual serial port and connects two
Bluetooth-enabled devices. For example, con-
necting the device to a printer.
Generic Access Profile (GAP) This profile defines how Bluetooth-enabled de-
vices can make themselves available and how
two devices can communicate directly with each
other.
Service Discovery Application Profile (SDAP) Describes how an application should use SDP
to discover services on a remote device.
Dial-up Networking (DUN GW) Profile Allows the device to share Internet connection
with another device.
Generic Object Exchange Profile (GOEP) Provides a basis for other data profiles.
Object Push Profile (OPP Client/Server) Allows the device to push and pull objects to
and from a push server.
Generic Audio/Video Distribution Profile
(GAVDP)
Provides the basis for A2DP and VDP. This pro-
file defines two roles: initiator (INT) and accept-
or (ACP).
Message Access Profile (MAP MSE) Allows exchange of messages between devi-
ces.
MN005019A01-B
Wireless
57

Bluetooth Profile Description
Audio/Video Remote Control Profile (AVRCP
TG)
Allows remote devices to control audio playback
on local device (for example: play, pause, stop,
adjust volume).
Phone Book Access Profile (PBAP PSE) Allows exchange of Phone Book Objects be-
tween a car kit and a mobile phone to allow the
car kit to display the name of the incoming call-
er; allow the car kit to download the phone book
so the user can initiate a call from the car dis-
play.
File Transfer Profile (FTP Server) Provides the capability to expose local file sys-
tem to remote devices which can manipulate
and transfer files.
Personal Area Networking (PAN NAP/PANU)
Profile
Allows the device to share Internet connection
with another device (for example a laptop) and
to access the Internet shared by another device
(for example a Bluetooth enabled phone).
Proximity Profile (PXP Monitor) Enables proximity monitoring between two devi-
ces.
Health Device Profile (HDP) Makes transmission and reception of Medical
Device data possible.
SIM Access Profile (SAP) Allows devices with built-in GSM transceivers to
connect to a SIM card in a Bluetooth enabled
phone. These devices do not need to have sep-
arate SIM cards.
Generic Attribute (GATT) and attribute protocol
(ATT)
Allows profile discovery and description serv-
ices for Bluetooth Low Energy protocol.
4.2
Bluetooth Power States
The Bluetooth radio is off by default.
The following modes are available:
•Suspend — When the device goes into suspend mode, the Bluetooth radio stays on.
•Airplane Mode — When the device is placed in Airplane Mode, the Bluetooth radio turns off. When
Airplane Mode is disabled, the Bluetooth radio returns to the prior state. When in Airplane Mode, the
Bluetooth radio can be turned back on if desired.
4.3
Enabling Bluetooth
Bluetooth allows you to send to and receive data from other Bluetooth-enabled devices paired with
your LEX device.
Procedure:
1On the Settings page, tap Bluetooth.
2Switch the Bluetooth slidebar to the On position.
MN005019A01-B
Chapter 4: Wireless
58

4.4
Disabling Bluetooth
Procedure:
1On the Settings page, tap Bluetooth.
2Switch the Bluetooth slidebar to the Off position.
4.5
Renaming the Device
By default, your LEX device has a generic Bluetooth name visible to other devices when connected.
Procedure:
1In Settings , tap Bluetooth.
2If Bluetooth is not on, adjust the Bluetooth slidebar.
3Tap and select Rename this device.
4Enter a new device name and tap Rename.
4.6
Pairing LEX with Bluetooth Devices
The LEX device can receive and send data when paired with other Bluetooth-enabled devices.
Prerequisites: Ensure that Bluetooth is enabled on both devices, and that the device you want to pair
your LEX with is in discoverable mode.
Procedure:
1On the Settings page, tap Bluetooth.
2Enable Bluetooth by adjusting the slidebar to the ON position.
The device searches for available Bluetooth-enabled devices and lists them.
3Scroll through the list and tap a device name.
The Pairing request dialog box displays.
4Compare the pass keys on both devices and tap Pair on both devices.
The device is added to the Paired devices list.
4.6.1
Managing Bluetooth Devices
You can manage Bluetooth devices paired with your LEX by renaming the devices, sharing contacts,
and more.
Procedure:
1Tap located next to a paired Bluetooth device.
2If you want to rename the device, tap the Name field.
MN005019A01-B
Chapter 4: Wireless
59

3If you want to unpair the device, tap Forget.
4If you want to share contacts with the device, tap Contact sharing.
Some Bluetooth-enabled accessories/devices allow for more profiles to be used.
4.7
Connecting to Wi-Fi Networks
Wi-Fi is a wireless network technology that provides Internet access at distance up to 100 feet,
depending on the Wi-Fi router and surroundings. You can access Internet when you connect your LEX
device to a Wi-Fi network.
Procedure:
1Swipe the home screen up from the arrow sign and tap Settings .
2Tap WLAN.
The device searches for wireless networks in the area and lists them.
3Scroll through the list and select the desired network.
4Enter the password and tap Connect.
You can verify the password before connecting by tapping Show password.
Adding New Networks
You can add a Wi-Fi network that does not broadcast its name (SSID), or is currently out of range.
Procedure:
1In the WLAN screen, select Add network.
2Enter the following details:
•Network name: The wireless network SSID
•Security: Set the security type to None, WEP, WPA/WPA2 PSK, 802.1x EAP
3Tap Show Advanced Options and set the Proxy details and IP settings.
4Tap SAVE.
Editing Networks
Procedure:
1Touch and hold the connected network.
2Select Modify Network.
3Save the settings by tapping Save.
Forgetting Networks
You can disconnect your device from a remembered wireless network.
Procedure:
1Touch and hold the connected network.
MN005019A01-B
Chapter 4: Wireless
60

2Select Forget Network.
The device disconnects from the selected network. You are prompted for the password if you try
to connect to the same network again.
4.8
Configuring Wi-Fi Hotspots
The LEX device can serve as a portable Wi-Fi hotspot, which allows you to connect 32 other devices to
the wireless Internet provided by the LEX device.
In Wi-Fi Access Point mode, the LEX L11 device supports two authentication types:
• None
• WPA2-PSK
Prerequisites: Ensure that your device has Internet connection.
Procedure:
1From the home screen, swipe the screen up from the arrow sign.
2Tap Settings.
3In the Wireless and networks section, tap More ....
4Tap Tethering & portable hotspot.
5Tap Set up WLAN hotspot.
The Set up WLAN hotspot screen displays.
Figure 11: Set up WLAN Hotspot Dialog Box
6In the Network Name text field, edit the network name.
7Tap the Security option and select a security method from the drop-down list:
•None
•WPA2 PSK
8In the Password text field, enter a password.
NOTICE: If None is selected in the Security field, a password is not required.
MN005019A01-B
Chapter 4: Wireless
61

9Under Select AP Band, tap the 2.4 GHz Band drop-down list, and select one of the following
options:
• 2.4 GHz
• 5 GHz
Without the SIM card, only the 2.4 GHz band is supported.
10 Tap Save.
4.9
Setting Up USB Tethering
You can share your mobile Internet connection with a computer or with other devices.
Prerequisites: Connect your device to a computer by using a USB cable.
Procedure:
1On the Settings page, tap More → Tethering & Portable hotspot.
2Enable USB tethering.
4.10
Configuring Bluetooth Tethering
You can use this procedure to tether Bluetooth to share the data connection with a host computer.
Prerequisites: Configure the host computer to obtain its network connection using Bluetooth. For
more information, see the host computer documentation.
Procedure:
1Pair the LEX device with the host computer.
See Pairing LEX with Bluetooth Devices on page 59.
2Swipe the home screen up from the arrow sign and tap Settings .
3Tap More ... .
4Tap Tethering & portable hotspot.
5Adjust the Bluetooth tethering slidebar.
The host computer is now sharing the LEX device data connection.
4.11
Near-Field Communication
Near-field communication (NFC) allows you to establish one- and two-way communication between
two electronic devices by bringing them close to each other at a distance of max. 2 cm.
The following are the examples of how NFC could be used. Some of the examples may require the use
of other applications:
• LEX L11 can act as a badge for physical access (doors entry)
• LEX L11 can be used as a physical token to access protected networks and/or services
• NFC tag reading
MN005019A01-B
Chapter 4: Wireless
62
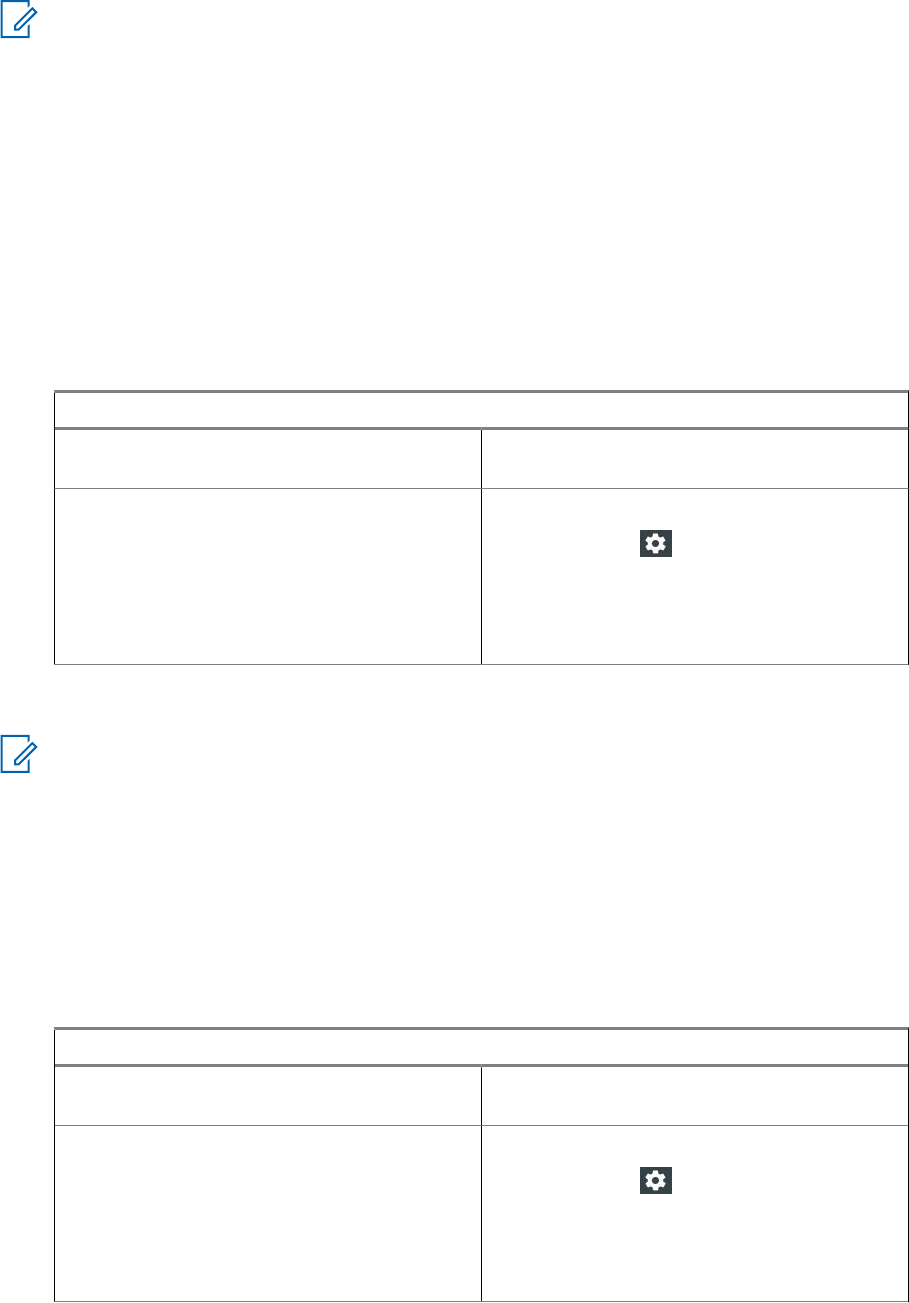
NOTICE:
The NFC feature is set to OFF by default.
You can turn NFC on or off when the device is in Airplane mode.
Turning on NFC displays the current setting for Tap and Pay in Android Settings.
The practical applications of NFC available to the user may depend on other applications.
4.11.1
Turning NFC On
You can perform this procedure to enable near-field communication (NFC) transfers between your LEX
L11 device and other devices.
Procedure:
Pull down the Quick Settings panel, and perform one of the following actions:
If… Then…
If you want to turn NFC on from the
Quick Settings panel,
slide the NFC toggle to the ON position.
If you want to turn NFC on from the Set-
tings page,
perform the following actions:
aTap Settings .
bOn the Settings page, tap Wireless and
Network → More.
cSet the NFC slidebar to the On position.
You can start using the NFC feature on your device. You can transfer data to and from other devices
when your LEX device touches another device.
NOTICE: The maximum distance between the devices is two (2) cm.
4.11.2
Turning NFC Off
You can perform this procedure to disable the near field communication (NFC) feature on your LEX
L11 device.
Procedure:
Pull down the Quick Settings panel.
If… Then…
If you want to turn NFC off from the
Quick Settings panel,
slide the NFC toggle to the OFF position.
If you want to turn NFC off from the Set-
tings page,
perform the following actions:
aTap Settings .
bOn the Settings page, tap Wireless and
Network → More.
cSet the NFC slidebar to the OFF position.
MN005019A01-B
Chapter 4: Wireless
63
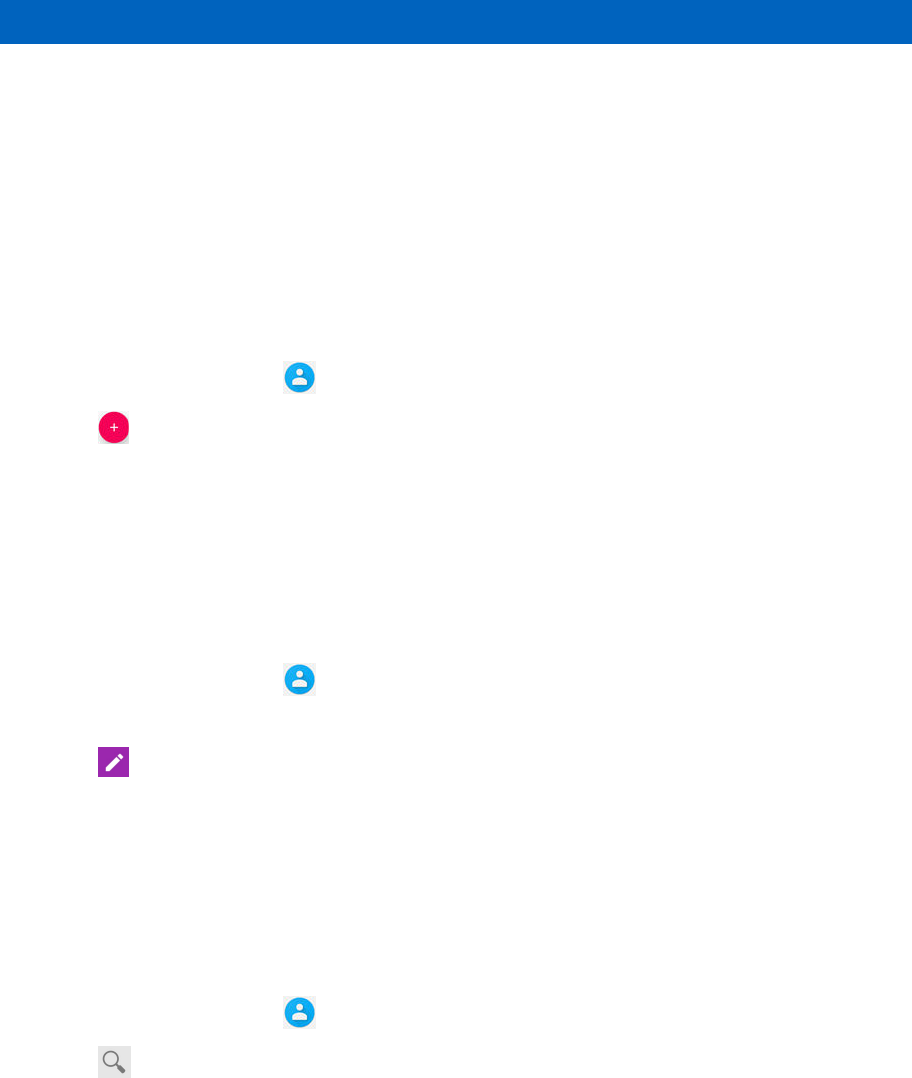
Chapter 5
Contacts
You can use the Contacts application to maintain phone numbers and other data.
5.1
Adding New Contacts
You can add new contacts to the phonebook.
Procedure:
1On the home screen, tap .
2Tap , and enter the contact details.
3Add the new contact by tapping SAVE.
5.2
Editing Contact Details
You can edit the details of your contacts.
Procedure:
1On the home screen, tap .
2Tap the contact that you want to modify.
3Tap .
4Edit the required details, and tap SAVE.
5.3
Searching Contacts
You can use the search option to quickly find specific contacts from the list.
Procedure:
1On the home screen, tap .
2Tap and perform one of the following actions:
• If you want to browse by name, enter the first few letters of the contact name.
• If you want to browse by phone number, enter the first few digits of the contact phone
number.
All contacts that contain the text entered in the search field are displayed.
MN005019A01-B
Chapter 5: Contacts
64

5.4
Sharing Contacts
You can send contact information by MMS, Bluetooth, Drive, and e-mail.
Procedure:
1Open the Contacts application.
2Tap → Select.
3Tap the contacts that you want to share.
4Tap .
5From the list of suggested sharing applications, tap the application of your choice.
6Choose when to select the transfer mode by selecting one of the following options:
• To select the transfer mode each time, tap Just Once.
• To send contacts by using the same method, tap Always.
MN005019A01-B
Chapter 5: Contacts
65
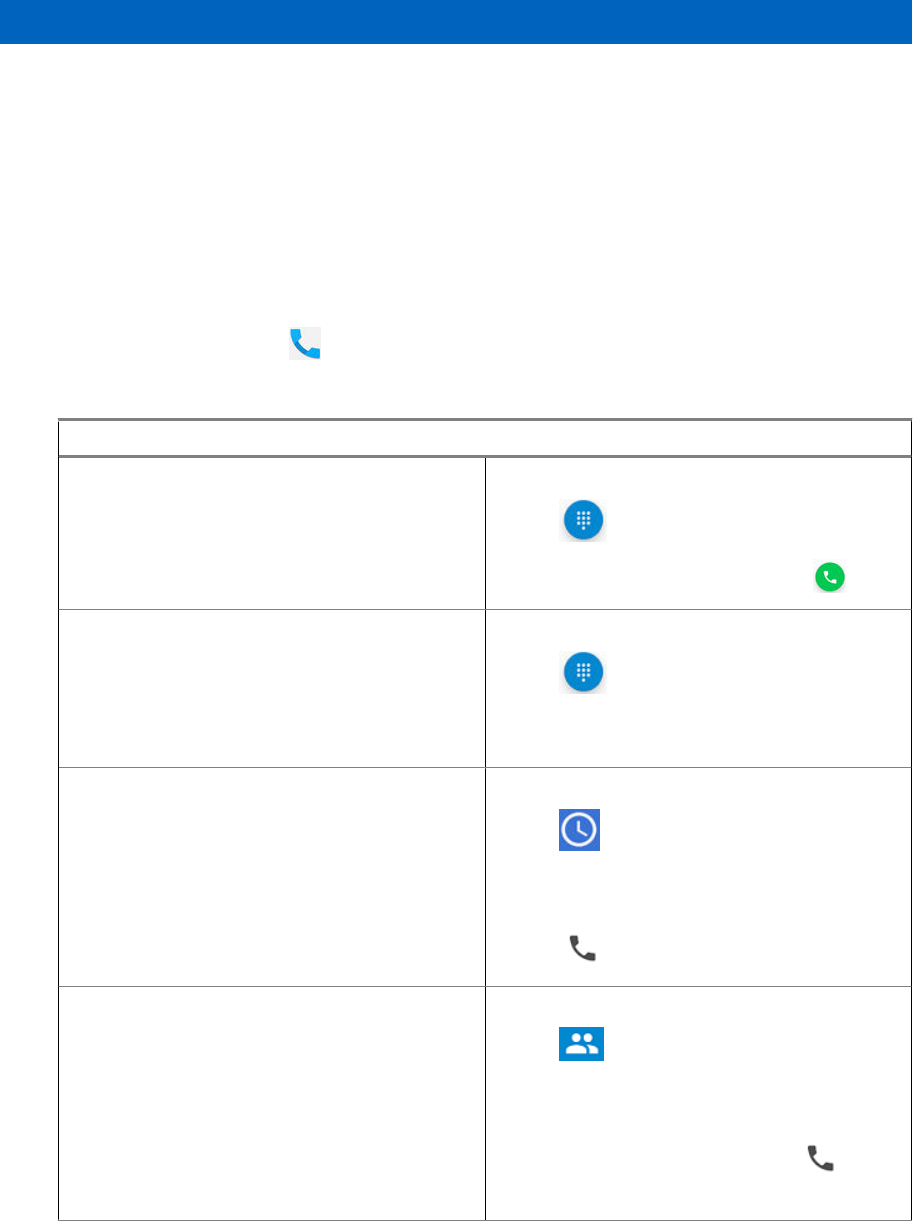
Chapter 6
Calling
This chapter describes using the Phone application, for example making calls and conference calls.
6.1
Making Calls
Procedure:
1On the Home screen, tap .
2Dial a number by performing one of the following actions:
If… Then…
If you want to make a call by directly en-
tering a number,
perform the following actions:
aTap .
bEnter the phone number and tap .
If you want to make a call by using Speed
Dial,
perform the following actions:
aTap .
bTap and hold the key that corresponds to
a contact number that you want to call.
If you want to call a recently called num-
ber,
perform the following actions:
aTap .
bFrom the list, tap the contact that you
want to call.
cTap .
If you want to make a call by searching
the contacts already saved on your de-
vice,
perform the following actions:
aTap .
bFrom the list, tap the contact that you
want to call.
cWhen the contact displays, tap
next to the number.
3If you want to adjust audio settings during the call, perform one of the following actions:
MN005019A01-B
Chapter 6: Calling
66
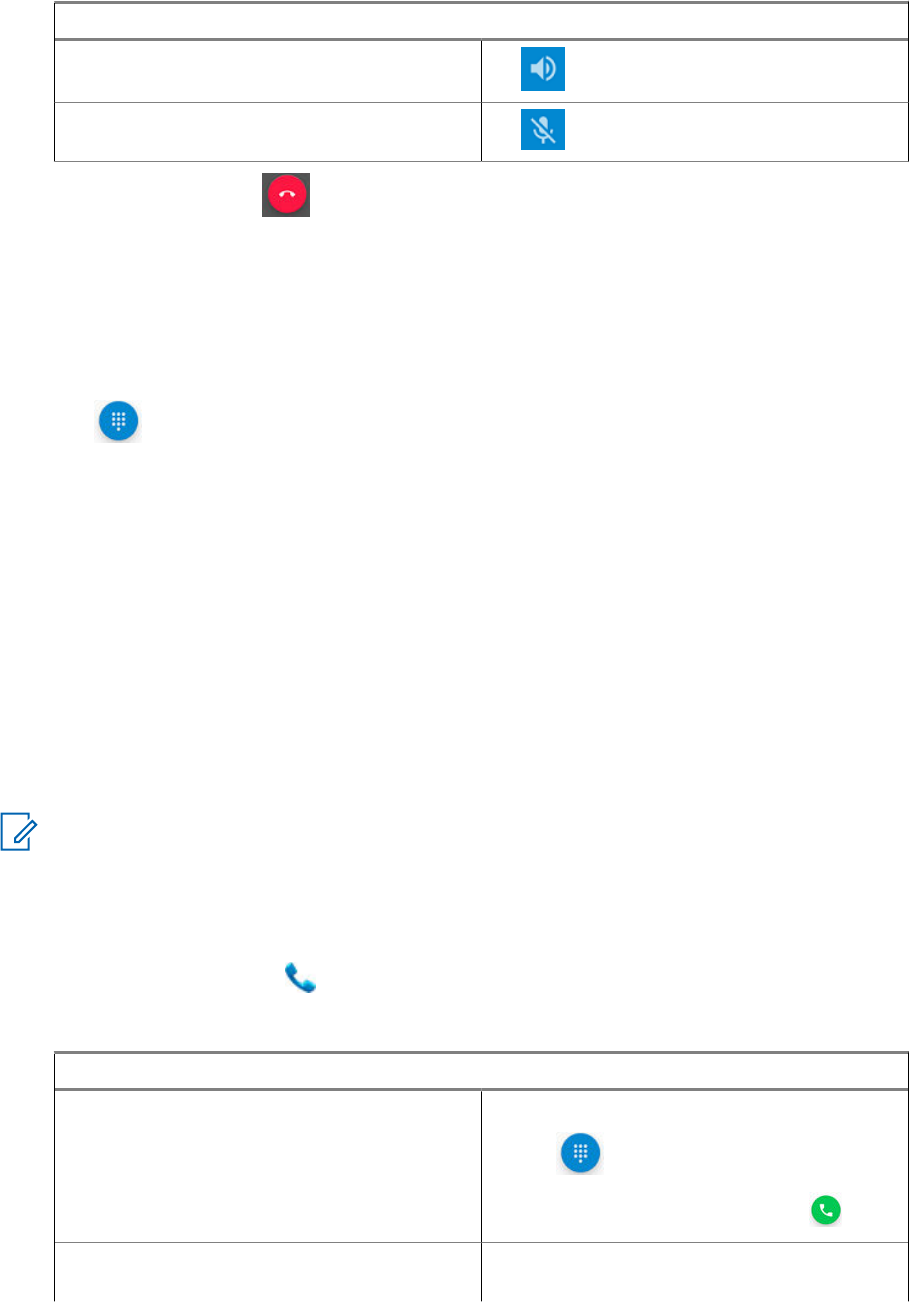
If… Then…
You want to turn on the speakerphone, tap .
You want to mute the call, tap .
4End the call by tapping .
6.1.1
Setting Up Speed Dial
Procedure:
1Open the Phone application.
2Tap .
3Tap and hold 2.
4In the Key unassigned prompt, tap Yes.
5In the Speed dial settings window, tap a key to assign a contact to it.
6In the prompt, enter the number that you want to assign to the selected key, or tap the Contacts
icon next to the field to select a number from a contact list.
7When finished, tap OK.
6.2
Making Conference Calls
You can use this procedure to create a conference call with multiple people.
Conference calling (Add Call) is available if you want to talk to more than one user at a time.
NOTICE: Conference calling may not be supported by your service provider. Check with your
service provider technical support for conference calling availability. The total number of
conference call participants may be limited by your service provider. For the maximum number
of participants in a conference call, contact your service provider technical support.
Procedure:
1On the Home screen, tap .
2Dial a number by performing one of the following actions:
If… Then…
If you want to make a call by directly en-
tering a number,
perform the following actions:
aTap .
bEnter the phone number and tap .
If you want to make a call by using Speed
Dial,
perform the following actions:
MN005019A01-B
Chapter 6: Calling
67
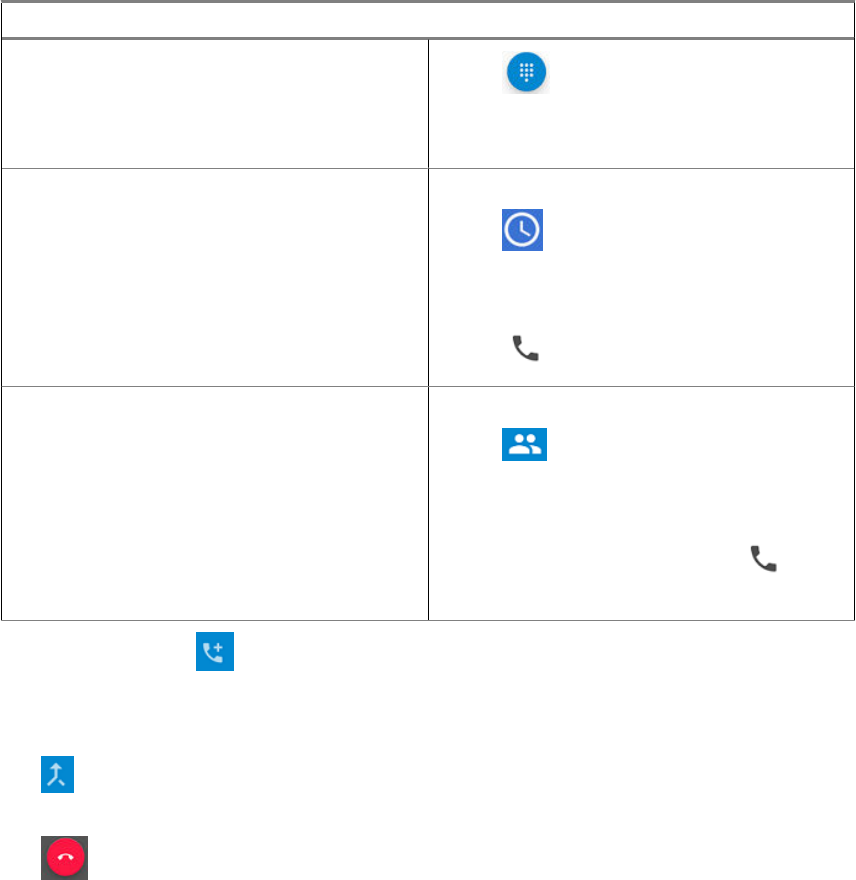
If… Then…
aTap .
bTap and hold the key that corresponds to
a contact number that you want to call.
If you want to call a recently called num-
ber,
perform the following actions:
aTap .
bFrom the list, tap the contact that you
want to call.
cTap .
If you want to make a call by searching
the contacts already saved on your de-
vice,
perform the following actions:
aTap .
bFrom the list, tap the contact that you
want to call.
cWhen the contact displays, tap
next to the number.
3While in your call, tap .
The first person is put on hold.
4Dial the second person. See step 2.
5Tap to join the two calls together. The device screen states Conference Call and
everyone can talk and hear one another.
6Tap to end the call.
6.3
Answering Calls with a Bluetooth Headset
You can follow this procedure to answer calls by using a Bluetooth headset.
When you receive a phone call, the Incoming Call screen opens, displaying the caller ID and any
additional information about the caller that is in the contact application.
Prerequisites: Ensure your LEX device is paired with the Bluetooth accessory. See Pairing LEX with
Bluetooth Devices on page 59.
Procedure:
1When a call arrives, tap the Call button on the Bluetooth headset to answer the call.
2To silence the ringer before answering the call, press the volume down button on the side of
device.
3To end the call press the Call button on the Bluetooth headset.
MN005019A01-B
Chapter 6: Calling
68

All incoming calls are recorded in the Phone ( ) application, in the Recents tab. If you
miss a call, you receive a notification.
6.4
Call Settings
In Call settings, you can adjust display options, sounds and vibration, select quick responses, and
many more.
NOTICE: Not all options are available for all configurations.
Call settings are located at → → Settings.
MN005019A01-B
Chapter 6: Calling
69
Chapter 7
Messaging
LEX device can be used to send and receive text messages on the service provider network. The LEX
device uses the Phone application.
NOTICE: If your Organization requires a Public Safety Experience (PSX) for text messaging,
contact your device technician.
The LEX device supports the following types of text messages:
Text messages
You can send and receive simple messages containing text to other mobile phones (also known as
SMS).
Multimedia messages
You can send and receive text messages with pictures, video, and/or sound to other mobile phones
(also known as MMS).
NOTICE: Messaging service availability depends on your network and service plan.
7.1
Sending Messages
You can use this procedure to send text and multimedia messages.
Procedure:
1From Home screen tap .
2Tap .
3In the To field, type a name, a phone number, or an email address.
As you enter text in the field, matching contacts appear.
4Tap the contact from the list.
5In the Type an SMS message field, type your message.
6You can add the media of your choice by tapping and choosing one of the available options.
The available options are as follows:
Table 13: Message Media Type
Icons Description
Emojis - Attach a small digital image or icon
to express an idea or emotion.
Camera - Take a pictures or record video
and share.
Media - Share photos, media, and files.
MN005019A01-B
Chapter 7: Messaging
70
Icons Description
Microphone - Record audio and share.
Location - Snap your location and share.
7Send the message by tapping .
MN005019A01-B
Chapter 7: Messaging
71

Chapter 8
Collaboration with LMR Radios
Radio Services is a free application available on the device that enables the LEX device to connect
with a Land Mobile Radio (LMR).
You can connect your LEX device with an LMR radio.
The supported LMR radios are as follows:
Table 14: ASTRO (APX) Radios Supported by LEX L11
Release R17.01.00 and Later Releases of the Following ASTRO APX Radio Models
APX 6000
APX 6000XE
APX 7000
APX 7000XE
APX 8000
APX 8000XE
Table 15: TETRA Radios Supported by LEX L11
TETRA Radio Models
TETRA MTP3000 series radios
TETRA MTP6000 series radios
When in collaborative mode with a TETRA or APX radio, the LEX device supports both half-duplex
private calls and group PTT calls sent to and from the TETRA or APX radio.
NOTICE:
If you cannot access features described in this chapter, contact your device technician for more
information.
TETRA radios need to be provisioned to use the LEX L11 device as an accessory.
8.1
Switching Between PSX PTT App and LMR Radio for PTT
Communications
The LEX device supports Push-To-Talk (PTT) communications in two different modes – PTT through
Land Mobile Radio (LMR), or Broadband PTT through PSX PTT solution.
The LEX device can operate in only one of these modes at a time. You can switch between the two
modes using the PSX Cockpit application.
NOTICE: For more information on using the PSX Cockpit application and the PSX Push-to-Talk
application, see the PSX User Guide and/or WAVE 7000 Push-to-Talk for Mobile Devices
manual.
Prerequisites: Obtain the PSX Cockpit application.
MN005019A01-B
Chapter 8: Collaboration with LMR Radios
72
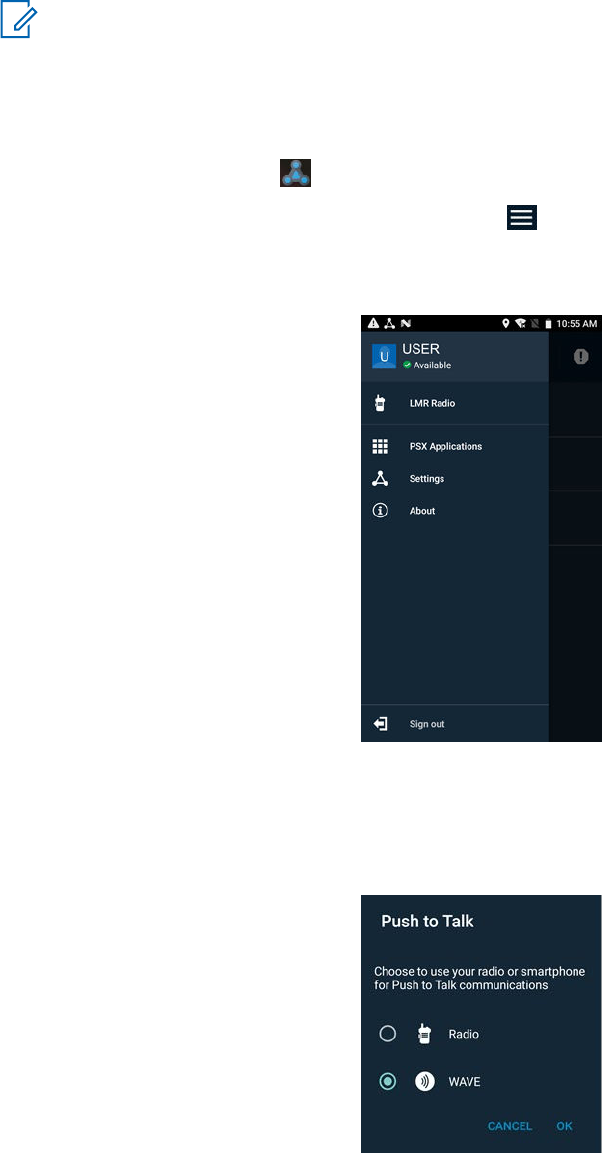
NOTICE: To access the PSX Cockpit sidebar menu settings, you must log on to the PSX
Cockpit application. If needed, contact your Motorola Solutions representative to obtain an
account.
Procedure:
1Swipe the Home screen up from the arrow sign.
2On the Apps screen, tap .
3Display the PSX Cockpit sidebar menu by tapping .
4In the PSX Cockpit sidebar menu, tap the PTT that you currently use.
Figure 12: PSX Cockpit Sidebar Menu
5In the Push to Talk screen, choose the PTT that you want to use:
• If you want to use the LMR radio for PTT communications, select Radio.
• If you want to make Broadband PTT calls through the PSX PTT application, select WAVE.
Figure 13: Push to Talk Screen
Choosing LMR or WAVE not only sets your choice for PTT functionality, but configures the
emergency button.
Selecting Radio enables the Radio Services application on the LEX and disables the PSX PTT
application on the LEX automatically.
MN005019A01-B
Chapter 8: Collaboration with LMR Radios
73
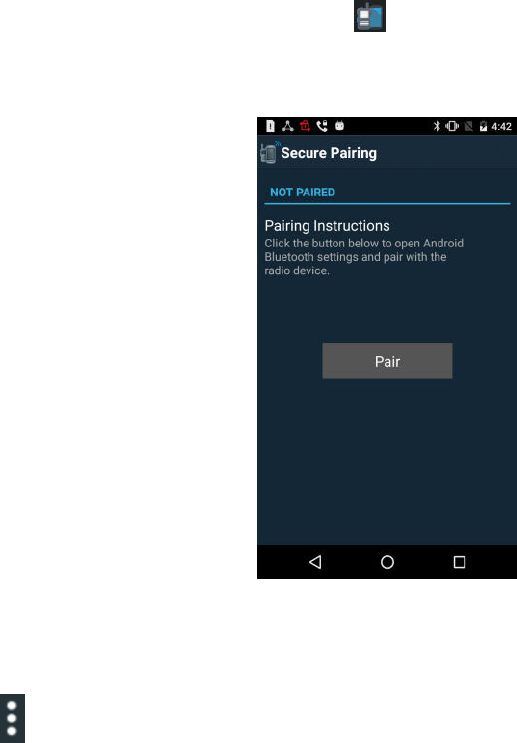
Selecting WAVE automatically enables the PSX PTT application on the LEX and disables the
Radio Services application on the LEX.
6Tap OK.
8.2
Pairing Radio with the LEX Device
You can pair the LEX device with a Land Mobile Radio (LMR) to send and receive PTT calls. The
devices remember each other and automatically resume connection when they are on and within
connection range.
Prerequisites: Ensure the following:
Verify whether your LMR radio is supported for pairing with the LEX device. For the list of supported
radios, see Collaboration with LMR Radios on page 72.
Turn on Bluetooth on the LEX device and on the radio. For more information, see Enabling
Bluetooth on page 58.
Ensure the LEX device is not paired with any previously paired Bluetooth devices. For more
information, see Managing Bluetooth Devices on page 59.
Procedure:
1Swipe the home screen up from the arrow sign.
2From the Apps screen, tap Radio Services .
Figure 14: Secure Pairing Screen
3In the Secure Pairing window, tap Pair.
4In the Bluetooth window, set the Bluetooth slidebar to the ON position.
5
Tap → Refresh and select the radio from the list of available devices.
MN005019A01-B
Chapter 8: Collaboration with LMR Radios
74

NOTICE: Ensure the LMR Radio is in discoverable mode.
The Bluetooth pairing prompt appears.
6Compare the pairing code on the LEX device with the code on the LMR radio and tap Pair.
7On the LMR radio, select Accept.
The LMR radio is paired with your LEX device.
8.3
Unpairing Radio from the LEX Device
You can follow this procedure to unpair the LEX device from the Land Mobile Radio (LMR).
Procedure:
1Start the Radio Services application.
2In the Radio Services window, tap → Unpair and tap OK.
Figure 15: Radio Services Overflow Menu
8.4
Selecting Zones and Channels
You can select zones and channels to communicate with other users.
Prerequisites: Ensure your Land Mobile Radio (LMR) is successfully paired with the LEX device.
Procedure:
1Start the Radio Services application.
2Select a zone by tapping a zone of your choice.
The Channel selection screen appears, displaying a list of channels available for that zone.
MN005019A01-B
Chapter 8: Collaboration with LMR Radios
75
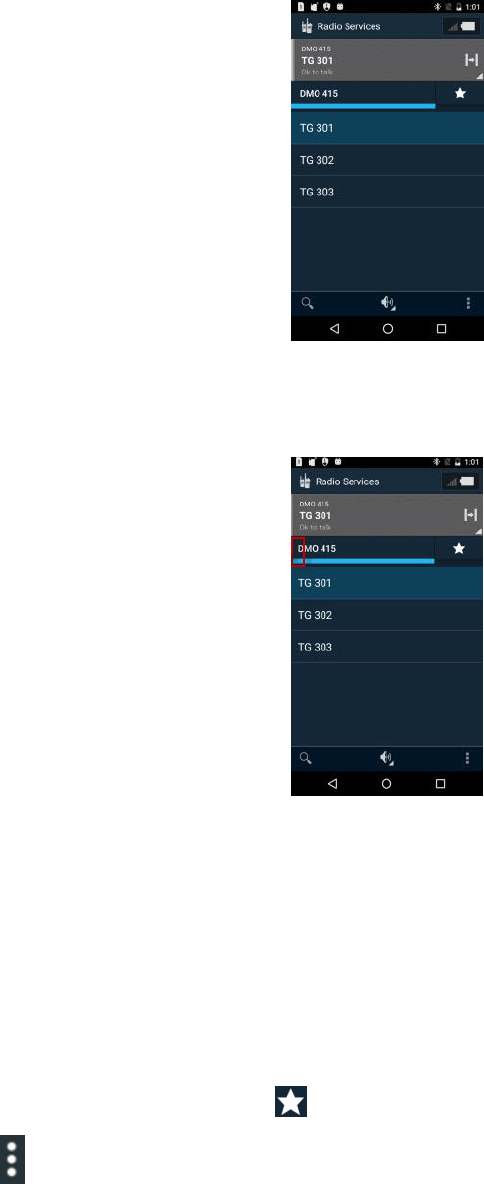
Figure 16: Channel Selection Screen
3Navigate to the parent folder by tapping on the left corner of the current folder name.
Figure 17: Navigation in the Channel Selection Screen
4Select a channel by tapping a channel of your choice.
8.5
Adding Favorite Talkgroups
You can create a list of favorite talkgroups to facilitate contact with other users.
Prerequisites: Ensure the Land Mobile Radio (LMR) is successfully paired with the LEX device.
Procedure:
1Start the Radio Services application.
2In the Radio Services window, tap
3Tap and select Edit favorites.
4Tap + and add a talkgroup by performing one of the following actions:
• Scroll through the list and select the check box next to the talkgroup you want to add to
Favorites.
MN005019A01-B
Chapter 8: Collaboration with LMR Radios
76

• Search for a talkgroup by entering its name in the search field at the top of the screen and
select the check box next to the talkgroup.
5Return to the Radio Services main screen by tapping .
8.6
Selecting Talkgroups
You can change talkgroups within a zone by using the talkgroup rocker.
For the exact location of the talkgroup rocker on the LEX device, see Device Overview on page 24.
NOTICE: You cannot change zones with the talkgroup rocker.
If you select a talkgroup added to a Favorites list, the rocker moves in the Favorites list and selects
next/previous Favorite talkgroup.
You receive a tone feedback on each press. When you reach the beginning or the end of a list of
talkgroups, you receive a different tone feedback.
NOTICE: If you cannot access this feature on your device, contact your system administrator.
Procedure:
1If you want to move to the next talkgroup, press and release the talkgroup rocker in the direction
of the display.
2If you want to move to a previous group, press and move the talkgroup rocker in the direction
away from the display.
8.7
Sending PTT Audio
You can follow this procedure to start and stop sending PTT audio on the LEX device.
The LEX PTT button serves to send audio. When you press the LEX L11 PTT button, the LEX
microphone is always used for communication.
NOTICE: You can also send audio by pressing and holding the PTT button on the Land Mobile
Radio (LMR). In that case, when the LEX device is paired with a TETRA radio and the LMR
PTT button is pressed, the LEX microphone is used to send audio. When the LEX device is
paired with an ASTRO radio and the LMR PTT button is pressed, the ASTRO microphone is
used to transmit audio.
Procedure:
On the LEX device, press and hold the PTT button.
For the location of the PTT button on the LEX device, see Device Overview on page 24.
The LEX device transmits audio as long as you press the PTT button.
8.8
Selecting Audio Routing Options
The PTT audio can be routed to different sound outputs for the incoming and outgoing audio. You can
select loudspeaker, headset, or earpiece to route audio.
Prerequisites: Ensure that the Land Mobile Radio (LMR) is successfully paired with the LEX device.
MN005019A01-B
Chapter 8: Collaboration with LMR Radios
77
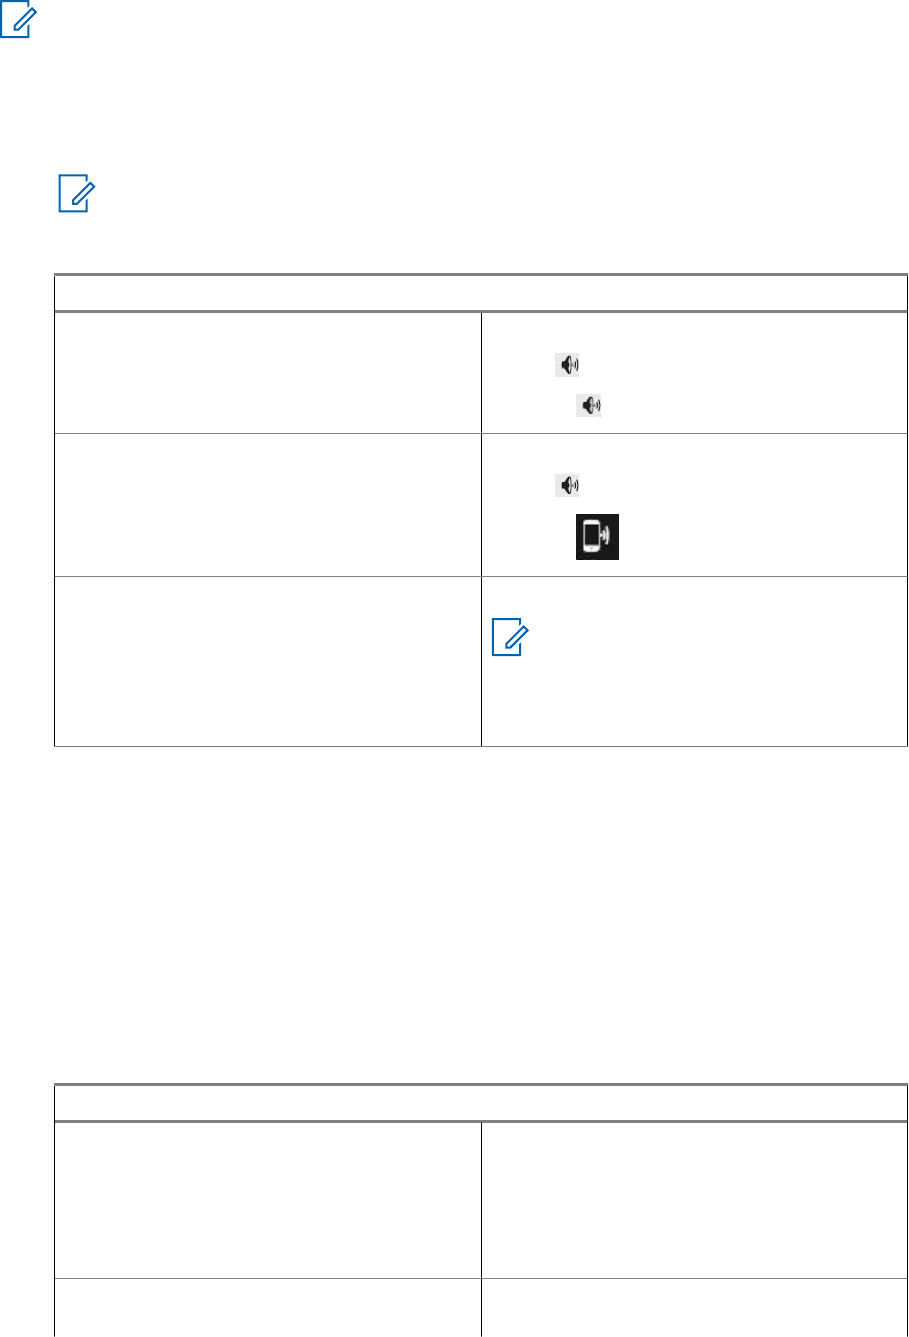
NOTICE: The LEX loudspeaker is the default audio output.
Procedure:
1Start the Radio Services application.
2Choose the way of audio routing:
NOTICE:
You can only select headset if the wired 3.5 mm headset is plugged in.
You can only select earpiece if the wired 3.5 mm headset is not plugged in.
If… Then…
If you want to select loudspeaker, perform the following actions:
aTap .
bSelect .
If you want to select a normal handheld
speaker/earpiece,
perform the following actions:
aTap .
bSelect .
If you want to select headset, plug in the 3.5 mm jack of a wired headset.
NOTICE: Unplugging the 3.5mm
jack automatically selects the out-
put used before the headset was
plugged in (loudspeaker or ear-
piece).
8.8.1
Adjusting Sound Volume
You can perform this procedure to adjust radio sound settings on the LEX device. You can choose
different audio routing options.
You can also modify sound settings from the Land Mobile Radio (LMR). For more information, see the
respective LMR user manual.
Prerequisites: Ensure that your LMR radio is successfully paired with the LEX device.
Procedure:
1Adjust the sound volume by performing one of the following actions:
If… Then…
If you want to adjust volume using the
Volume button* on the device,
perform the following actions:
• If you want to increase volume, press the
upper part of the Volume button.
• If you want to decrease volume, press
the lower part of the Volume button.
If you want to adjust sound volume in the
Radio Services application,
perform the following actions:
MN005019A01-B
Chapter 8: Collaboration with LMR Radios
78
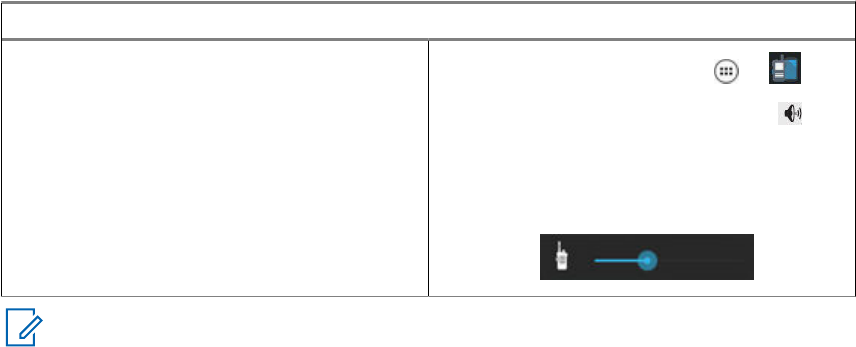
If… Then…
aFrom the Home screen, tap → .
bIn the Radio Services window, tap .
cSet the radio volume by adjusting the Ra-
dio volume slidebar.
Figure 18: Radio Volume Slidebar
NOTICE: *See the Volume button in Device Overview on page 24.
8.9
Emergency Mode on LEX Device Paired with LMR
When Land Mobile Radio (LMR) is paired with a LEX device and the Emergency button is pressed (on
any device where LMR is present), the LEX device reacts based on what LMR channel the user is on
and what Emergency Mode that channel is assigned.
The LEX device initiates an emergency by pressing the emergency button on the LEX device. See
Enabling Emergency Mode on page 80.
The following types of Emergency Modes are available and are configurable by your technician:
• Emergency Alert - A LEX device that is on a channel provisioned with this Emergency Mode sends
an alert over the channel.
• Emergency Call - A LEX device on a channel provisioned with this Emergency Mode gives the user
that pressed the Emergency button (the initiator) the top priority on the channel.
• Emergency Alert with LMR Emergency call - A LEX device that is on channel provisioned with this
Emergency Mode sends an alert and give the user top priority on the channel.
• Silent Emergency Alert - A LEX device that is on a channel provisioned with this Emergency Mode
silently sends an alert over the channel.
When the LEX device is paired with an LMR radio and an emergency is activated, it is equivalent to
pressing the LMR emergency button. If you are not paired with an LMR radio or the emergency fails
(for example out of range), you can use the PSX Cockpit application to switch between the PSX PTT
app and LMR. See Switching Between PSX PTT App and LMR Radio for PTT Communications on
page 72. For more details on emergency, see Emergency Services on page 80, and the WAVE 7000
Push-to-Talk for Mobile Devices manual.
MN005019A01-B
Chapter 8: Collaboration with LMR Radios
79

Chapter 9
Emergency Services
This chapter describes emergency services available on the LEX L11 device.
The LEX L11 allows you to enter emergency mode in a critical situation. You can also make
emergency calls from the device.
9.1
Emergency Mode Alert Settings
Emergency Mode indicates a critical situation, and triggers actions in applications, for example in
Public Safety Experience (PSX) applications. The emergency alert signal overrides any other
communication on the LEX device.
NOTICE:
Contact your System Administrator to set up other emergency alert notifications if required.
If no application supporting the emergency mode is installed, pushing the Emergency button
does not trigger any actions.
The following are examples of actions that can be triggered in applications that support the emergency
mode when you press the Emergency button:
• Initiate an emergency call only
• Send an SMS including your location
• Initiate a call and SMS
NOTICE: For more information on the PSX Cockpit Emergency button, see the PSX User
Guide.
9.1.1
Enabling Emergency Mode
Emergency Mode indicates a critical situation. The emergency alert signal overrides any other
communication over the selected channel of the radio.
NOTICE: For information how to exit the emergency mode and what actions are triggered by
pressing the Emergency button, contact your device administrator.
Procedure:
Press and hold the Emergency button for more than three seconds.
For the exact location of the Emergency button on the LEX device, see Device Overview on
page 24.
9.2
Emergency Calls
Emergency numbers are pre-programmed in your phone. They can vary by country and by the type of
communication network. The pre-programmed emergency numbers may not work in all locations, and
sometimes an emergency call cannot be placed due to network, environmental, or interference issues.
For additional information, contact your system administrator.
MN005019A01-B
Chapter 9: Emergency Services
80
If your phone has settings to disable Caller ID (by selecting Phone → Settings → Calls → Additional
settings → Caller ID), be aware that disabling Caller ID prevents an the emergency operator from
obtaining caller information needed to assist you. If you disable Caller ID for a specific call, you must
enable it again immediately after that call.
9.2.1
Making Emergency Calls
Procedure:
Make an emergency call on a LEX device by performing one of the following actions:
If… Then…
If you need to make an emergency call on
a locked LEX device,
perform the following actions:
• On the locked device screen, tap EMER-
GENCY to display the dialer.
• Enter the emergency number (112 and
911 are always available).
• Tap to initiate the call.
If you need to make an emergency call on
an unlocked LEX device,
perform the following actions:
aOn the Home screen, tap .
bTap to display the dialer.
cEnter the emergency phone number.
dTap to initiate the call.
9.3
Configuring Emergency Broadcast Alert Settings
Configuring the emergency broadcast settings allows you to receive warnings about dangerous
weather, missing people, or any threats to your life and/or health.
Procedure:
1Swipe the home screen up from the arrow sign.
2From the Apps screen, tap → Sound → Emergency broadcasts.
3Select the check boxes next to the settings that you want to enable.
4If you want to set an alert reminder, tap Alert reminder and, in the list, select a radio button next
to the setting of your choice.
The following settings are available:
Once
Every 2 minutes
Every 15 minutes
Off
MN005019A01-B
Chapter 9: Emergency Services
81

Chapter 10
IMS VoLTE
In this chapter, the term "IMS" is used to indicate IP Multimedia Subsystem, which is a type of
communication network. You can ask your system administrator if that type of network is implemented
on your phone.
IMS supports voice, video, and conference calling, and a variety of other multimedia services.
IMS voice calls use the standard Android dialer and Contacts application. Emergency calling is
available (See Emergency Services on page 80).
The following additional features might be enabled on your LEX device if it operates on an IMS network
(contact your system administrator for more information):
• IMS Video Calls
• IMS Conference Calls
• IMS Voice Mail
• IMS Supplementary Services
• IMS Messaging (SMS and MMS)
• IMS Clear Tone - An optional IMS feature enabled by the agency to notify the user that they are on
a clear call (non-secure).
NOTICE: If your Organization must make calls in a secure (encrypted) environment, see Public
Safety Experience (PSX) Applications on page 103.
10.1
Making IMS VoLTE Calls
You can follow these steps to make a Voice over LTE (VoLTE) voice call.
If your system supports VoLTE calling, users can make and receive calls to, and from other users, over
an LTE IP Multimedia Subsystem (IMS) network.
Procedure:
1On the Home screen, tap .
2In the To field, type a name or phone number. As you enter text, matching contacts appear. Tap
a contact from the contact list.
User can also initiate calls to contacts from the following actions:
If... Then...
You want to call a contact, Tap .
You want to call a contact in your favorites, Tap .
You want to make a call with the dialer, Tap .
MN005019A01-B
Chapter 10: IMS VoLTE
82
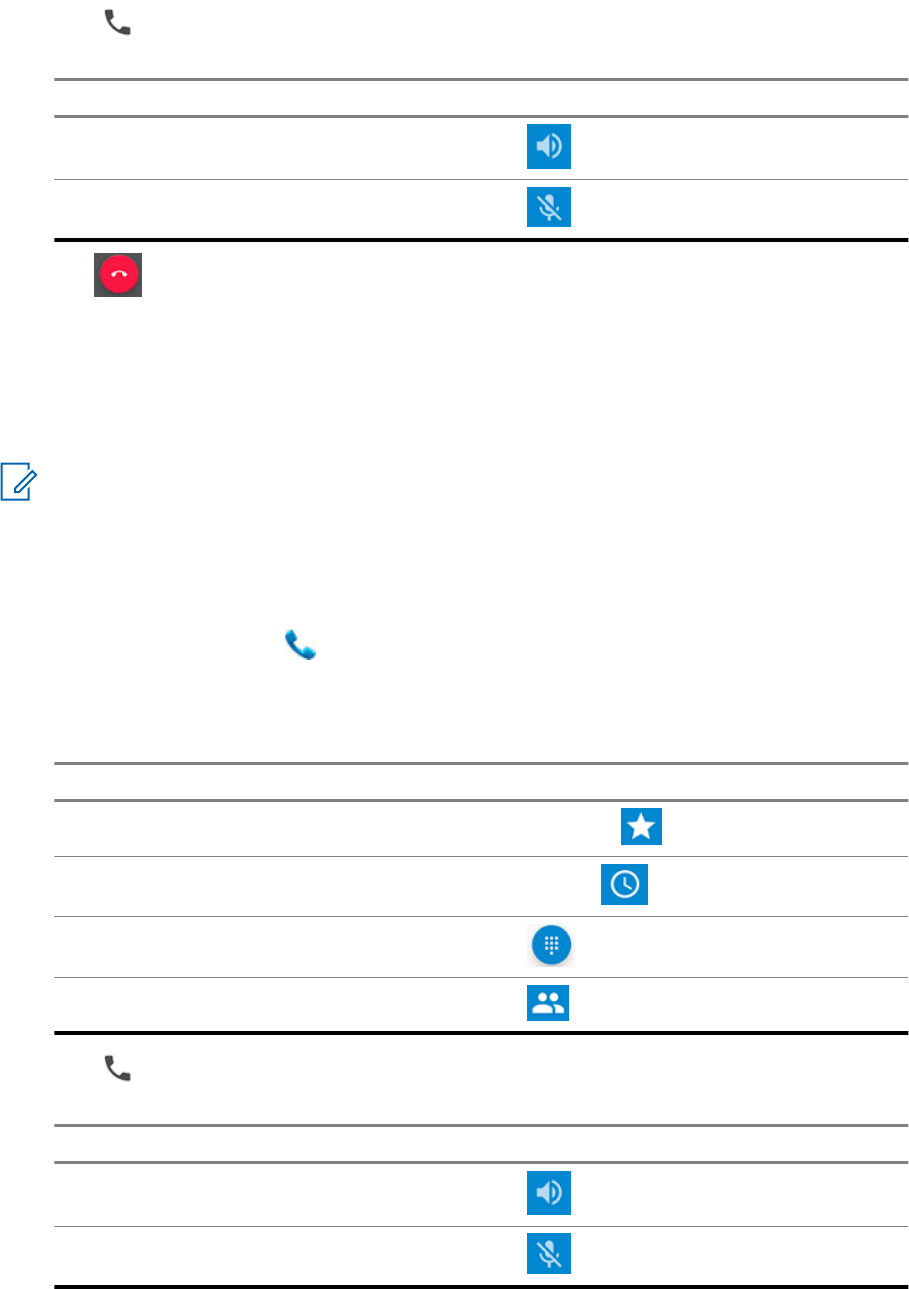
3Tap to initiate the call.
If... Then...
You want to turn on the speakerphone, Tap .
You want to mute the call, Tap .
4Tap to end the call.
10.2
Making IMS Video Calls
If your system supports VoLTE, users can make and receive video calls to, and from other users, over
an LTE IMS network.
NOTICE: This feature may not be available on all networks.
Prerequisites: If you are making video calls, user must enable the Video Calling setting. See Enabling
IMS Video Calling on page 85.
Procedure:
1On the Home screen, tap .
2In the To field, type a name or phone number. As you enter text, matching contacts appear.
User can also initiate calls to contacts from the following actions:
If... Then...
You want to call a contact in your favorites, Tap Favorites .
You want to call a contact in your history list, Tap History .
You want to make a call with the dialer, Tap .
You want to call a contact, Tap .
3Tap to initiate the call.
If... Then...
You want to turn on the speakerphone, Tap .
You want to mute the call, Tap .
MN005019A01-B
Chapter 10: IMS VoLTE
83
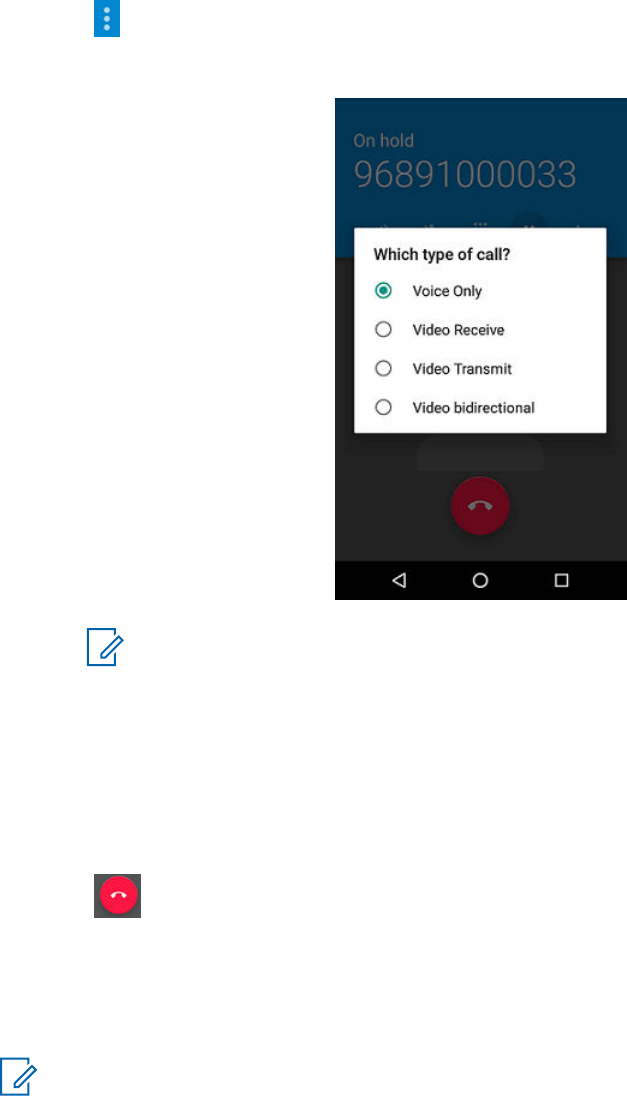
4Tap → Video Call. The call is placed on hold.
5From the Which type of call window, select a call type.
•
NOTICE: While ViLTE call in progress, each user will see video on their respective
device for full duplex video. In case of send only or receive only, the contact picture
displays.
•Voice Only - Audio Only
•Video Transmit - Video Send only
•Video Receive - Video Receive only
•VT - Video send/receive
6Tap to end the call.
10.2.1
Receiving IMS Video Calls
If your private system supports VoLTE calls, users can receive a video call from another user.
NOTICE: This feature may not be available on all networks.
Procedure:
1When callee receives a video call, user swipes one of the following choices from the device
screen:
•Voice Only - Audio Only
•Video Transmit - Video Send only
•Video Receive - Video Receive only
MN005019A01-B
Chapter 10: IMS VoLTE
84
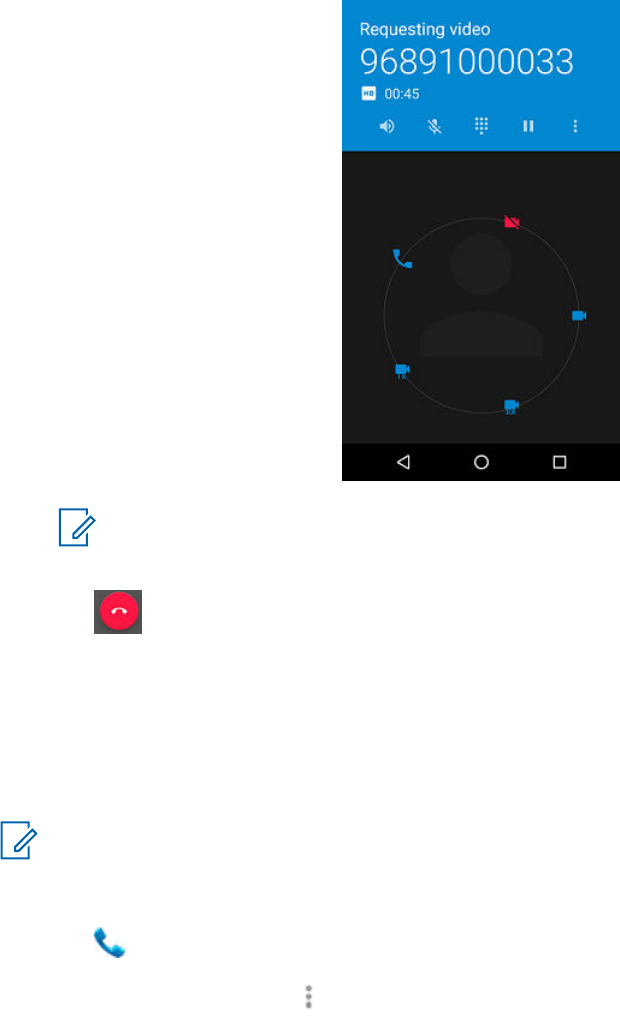
•VT - Video send/receive
Figure 19: Receiving Video Call
NOTICE: While ViLTE call in progress, each user will see video on their respective
device for full duplex video. In case of send only or receive only, the contact picture
displays.
2Tap to end the call.
10.2.2
Enabling IMS Video Calling
You can use this procedure to configure Video Calling. If you are unable to configure Video Call
settings on the LEX device, contact your system administrator.
Video Calling allows the user to send and receive Video Calls.
NOTICE: This feature may not be available on all networks.
Procedure:
1Tap .
2From the drop-down menu , select Settings → Calls.
3Tap Turn on Video Calling to enable.
MN005019A01-B
Chapter 10: IMS VoLTE
85
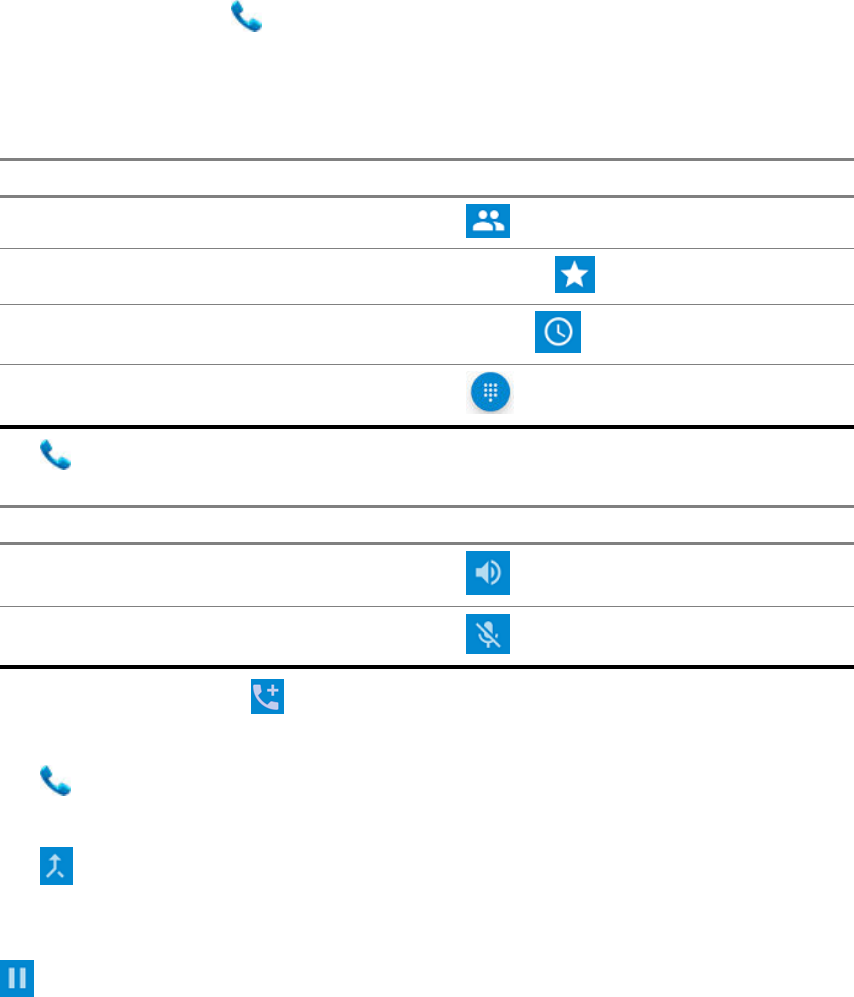
10.3
Making IMS Multi-Party Conference Calls
You can use this procedure to create a conference phone session with up to three people on the LEX
device.
If your private system supports Voice over LTE (VoLTE) calls, you can make and receive conference
calls to and from other users. If you are unable to use Multi-Party Conference calling, contact your
system administrator.
Procedure:
1On the Home screen, tap .
2In the To field, type a name or phone number to add recipients. As you enter text, matching
contacts appear. Tap from the contact list.
You can also initiate calls to contacts from the following actions:
If... Then...
You want to call a contact, tap .
You want to call a contact in your favorites, tap Favorites .
You want to call a contact in your history list, tap History .
You want to make a call with the dialer, tap .
3Tap to initiate the call.
If... Then...
You want to turn on the speakerphone, tap .
You want to mute the call, tap .
4When the call connects, tap .
5Add another recipient by performing steps in step 2.
6Tap to initiate the call.
When the call connects, the first call is placed on hold and the second call is active.
7Tap to create a conference call.
8Tap to rotate between the individual calls.
Calls are rotated starting with the first call. This allows you to speak privately to one party. Tap
to rotate to the next party. When the rotation is complete, you are placed back into
conference mode and all calls are active.
MN005019A01-B
Chapter 10: IMS VoLTE
86

10.4
IMS Voicemail
This section provides information on VoiceMail Services where LEX device users can receive
VoiceMail messages from other users that have connectivity to the operator. If you are unable to use
VoiceMail services on the LEX device, contact your system administrator.
Voicemail is a method of storing voice messages electronically for later retrieval by intended recipients.
Your system administrator enables voicemail services and configures the voicemail number. Users
cannot change the assigned voicemail number on the LEX device. If VoiceMail is enabled, the user
can configure settings in the LEX device that may affect the way VoiceMail will operate.
NOTICE: When switching between networks, you LEX device phone number is not the same.
Contact your system administrator for further details.
You can initiate the following actions:
• Leave a voicemail message.
• Retrieve a voicemail message.
• Select, play, and manage (create/modify greeting/delete messages).
• Receive a voicemail notification.
• Configure message sound and vibrate. See Enabling IMS VoiceMail Notification Sounds on page
87.
• Manage voicemail settings. See Enabling IMS Call Forwarding on page 89.
IMPORTANT:
If you change the Call Forwarding setting on the LEX device to a number different from the
voicemail number received from the device management, the calls will no longer route to the
voicemail server.
In some deployments, the voicemail number is not received from the device management.
10.4.1
Enabling IMS VoiceMail Notification Sounds
You can use this procedure to configure VoiceMail notification sounds.VoiceMail allows you to send
and receive voice messages with notification sounds. If you are unable to configure VoiceMail settings
on the LEX device, contact your system administrator.
Procedure:
1Tap .
2From drop-down menu , select → Settings → Calls → VoiceMail.
3Complete the following actions:
• Tap Sound and select a notification sound.
• Tap Vibrate to enable vibration on received voicemail messages.
MN005019A01-B
Chapter 10: IMS VoLTE
87

10.5
IMS Supplementary Services
This section provides information on Supplementary Services over IMS for the LEX device on a private
network. Supplementary services are available on IMS networks and provides the user with
configurable device settings to manage calling capabilities on the LEX device.
NOTICE: On some networks, this feature may be only partially available or not available at all.
Contact your Agency Device Administrator for more information.
All supplementary service configurations managed from the device are not saved on the server. If a
LEX device requires a reset, the configured settings default to the system configuration. If unable to
configure supplementary services on the LEX device, contact your system administrator.
You may configure some of the following supplementary services on the LEX device:
NOTICE: Some of these supplementary services may not be available for all networks.
•Call Hold - During an active call, the LEX user can place the active call on hold. To configure call
hold on your LEX device, see Placing IMS VoLTE Call on Hold on page 88.
•Communication Waiting - During an active call, if another caller calls your LEX device, the user
has the option to Answer or Decline the incoming call. To configure Call Waiting on the LEX
device, see Enabling IMS Call Waiting on page 89.
•Call Forwarding - User can forward incoming calls to the LEX device to a different number. To
configure Call Forwarding on the LEX device, see Enabling IMS Call Forwarding on page 89 .
•Call Barring - User can prevent incoming, outgoing, or both types of calls from calling your phone.
To configure Call Barring on the LEX device, see Enabling IMS Call Barring on page 90.
•Originating Identification Restriction (OIR), also known as Caller ID Restriction - User can
withold their identity (ID) from being displayed to another LEX device when making a call over IMS,
see Enabling and Disabling Caller ID in an IMS System on page 90.
10.5.1
Placing IMS VoLTE Call on Hold
You can use this procedure to place an active IMS VoLTE call on hold. If you are unable to place calls
on hold on the LEX device, contact your system administrator.
NOTICE: This feature may not be available on all networks.
Procedure:
1During an active call, tap the Hold icon to place the call on hold.
2
To resume the active call, tap the Hold icon again.
NOTICE: The Hold button is not available during an Emergency call.
MN005019A01-B
Chapter 10: IMS VoLTE
88

10.5.2
Enabling IMS Call Waiting
You can use this procedure to enable or disable Call Waiting settings. If you are unable to configure
call waiting on your LEX device, contact your system administrator.
NOTICE: This feature may not be available on all networks.
Procedure:
1Tap .
2From drop-down menu , select → Settings → Calls → Additional Settings.
3Tap to enable Call Waiting.
10.5.3
Enabling IMS Call Forwarding
You can follow this procedure to enable IMS Call Forwarding.
Call Forwarding immediately redirects calls intended for your LEX device to another number. You can
still make outgoing calls when this feature is turned on. If you turn off all Call Forwarding features, the
device sets all conditional call forwarding to the voicemail number and the calls will route to the
voicemail server.
NOTICE:
This feature may not be available on all networks. If you are unable to configure Call
Forwarding settings on the LEX device, contact your system administrator.
The default call forwarding number is preconfigured to the voicemail number. If you change the
Call Forwarding setting to a number different from the voicemail number received from the
device management, the calls will no longer route to the voicemail server.
Procedure:
1Tap .
2From drop-down menu , select Settings → Calls → Call Forwarding → Voice.
3Enable the settings of your choice.
The available settings are:
Table 16: Calling Accounts Setting
Setting Description
Always Forward All incoming calls are sent to the number
you specify; your phone does not ring.
This option overrides all other forwarding
options.
Forward Implicitly Calls are forwarded when you are on the
phone.
Deactivate All All call forwarding options are disabled.
All calls are sent to the voicemail num-
ber.
MN005019A01-B
Chapter 10: IMS VoLTE
89

10.5.4
Enabling IMS Call Barring
You can use this procedure to configure Call Barring.
Call Barring allows you to restrict certain types of incoming and outgoing calls from your LEX device.
NOTICE:
Barring of only video or only audio is not supported.
This feature may not be available on all networks. If you are unable to configure Call Barring
settings on the LEX device, contact your system administrator.
Procedure:
1Tap .
2From drop-down menu , select → Settings → Calls → Call Barring.
You can configure the following settings:
Outgoing call barring
Allows you to bar outgoing International and Roaming audio and video calls.
Incoming call barring
Allows you to bar incoming Roaming audio and video calls.
3Configure the Outgoing call barring setting by performing the following actions:
aTap Outgoing call barring and select one of the following options:
• Off
• International roam call
• International call
• Outgoing call
bIn the Input Password window, enter call barring password and tap OK.
4Configure the Incoming call barring setting by performing the following actions:
aTap Incoming call barring, enter password, and select one of the following options:
• Off
• Roaming
• All
bIn the Input Password window, enter call barring password and tap OK.
10.5.5
Enabling and Disabling Caller ID in an IMS System
You can use this procedure to configure the Caller ID restriction on the LEX device.
Origination Identifcation Restriction (OIR), also known as Caller ID restriction, allows you to restrict the
user identity on outgoing calls to other callers directly from the LEX device.
NOTICE: This feature may not be available on all networks. If you are unable to configure the
Caller ID restriction settings on the LEX device, contact your system administrator.
Procedure:
1Tap .
MN005019A01-B
Chapter 10: IMS VoLTE
90

2From drop-down menu , select → Settings → Calls → Additional Settings.
3Tap Caller ID and tap to disable.
10.6
IMS Messaging
If your system and LEX device support text messaging, users can make and receive text messages to,
and from other users, over an LTE IMS network. If you are unable to text messages on the LEX device,
contact your system administrator.
Prerequisites: Users can install messaging apps from the Google Play Store to use on the IMS
network. If you are sending to multiple users, you must configure the Group Messaging setting before
sending a text. See Enabling IMS Group Messaging on page 91.
NOTICE:
For IMS messaging, you can use the Messaging app on the device.
Multi-media messages (camera, recorded voice, images, and so on) are not supported in the
IMS network.
Procedure:
1From Home or Apps screen, tap .
2In the bottom-right, tap .
3In the To field, type a name or phone number. As you enter text in the field, matching contacts
appear. Tap the contact from the list.
If Group Messaging is enabled, you can add a contact or multiple contacts by tapping Top
Contacts.
4Tap .
5Tap the Send message box and type a message.
Messages are limited to 160 characters. When the limit is approached, a counter displays,
above the Send icon, showing how many characters are left. If the limit is reached and the user
keeps typing, a new message is created, which is joined with its predecessors when received.
6Send a message by tapping .
10.6.1
Enabling IMS Group Messaging
You can follow this procedure to enable group messaging on the device.
Access to the SMS and MMS settings are available through the Messaging settings on the device.
Preference settings allow you to configure Notifications and Group Messaging options on the device.
This option is turned off as a default.
MN005019A01-B
Chapter 10: IMS VoLTE
91
NOTICE: MMS group messaging may not be available for all networks.
Procedure:
1Tap .
2From drop-down menu , select → Settings → Advanced → Group Messaging.
3To enable SMS group messaging, tap Send an SMS reply to all recipients and get individual
replies (mass text).
4To enable MMS group messaging, tap Send an MMS reply to all recipients (group MMS).
MN005019A01-B
Chapter 10: IMS VoLTE
92
Chapter 11
Applications
This chapter contains information on applications available on the LEX L11 device.
NOTICE: For information on applications available on your LEX device and application
limitations related to specific networks your LEX device operates in, contact your Agency
Device Administrator.
11.1
Applications
Table 17: LEX L11 Applications
Icon Description
AirWatch Agent: allows to provision the device
and perform ongoing management procedures.
AirWatch Remote Management: allows you to
connect to end-user devices in order to perform
maintenace and troubleshooting procedures.
Android System Webview: allows Android
apps to display web content.
Calculator : provides the basic and scientific
arithmetic functions.
Camera: use to take photos.
Chrome: use to access Internet.
Clock: use to set an alarm, stopwatch, or timer.
Contacts: use to manage contact information.
CRYPTR Manager: The CRYPTR micro en-
cryption card is used for voice encryption in fea-
tures such as data and phone over Virtual Pri-
vate Network (VPN) and Push-to-Talk (PTT)
communication.
Downloads: lists all downloaded files.
File Manager: use to view and manage files.
Gallery: use to view photos stored on the de-
vice.
Gmail: use to send and receive emails.
Google Calendar: use to manage events and
appointments.
MN005019A01-B
Applications
93
Icon Description
Google Drive: access to files anywhere
through secure cloud storage and file backup
for your photos, videos, files and more.
Google Duo: use to make video calls.
Google Keep: use to create, store, and catego-
rize notes, lists, reminders, images, audio, and
many more.
Google Maps: find local businesses, view
maps and get driving directions.
Google PDF viewer: use to view .pdf files.
Google Play Movies & TV: buy or rent movies
and TV shows.
Google Play Services: updates Google appli-
cations.
Google Photos: use to view photos stored on
the device.
Google Play Music: access music stored on
the device.
Google Play Store: Google app store for An-
droid devices with games, applications, movies,
and more.
Google Search: allows you to find what you
need on the web and on your device.
Google Street View: provides panoramic view
of many streets in the world.
Google TalkBack: helps vision-impaired users
interact with their devices.
Google Text-to-speech: reads the text on your
screen aloud.
Google Translate: online language translation
service. Instantly translates text and web pages.
Messages: send SMS and MMS messages.
Phone: use to make phone calls.
Radio Management Link Client (RM Link):
enables connecting the device to a remote host
computer for staging, firmware installation, ap-
plication installation, and application removal by
technical support. See the Radio Management
Online Help for more information on the RM Ap-
plication.
Settings: use Settings to configure the device.
MN005019A01-B
Chapter 11: Applications
94
Icon Description
YouTube: you can use this app to view videos
and music.
11.2
Camera
This section provides information on taking photos and recording video files by using the Camera
application available on your LEX device.
11.2.1
Taking Photos
You can take photos in normal or panoramic mode.
Procedure:
1Open the Camera application.
2Perform one of the following actions:
If… Then…
If you want to take a picture in normal
mode,
perform the following actions:
aOpen the mode selection bar located at
the bottom-right corner of the screen by
tapping .
Figure 20: Mode Selection Bar
bSelect .
cIf you want to adjust camera settings, tap
and select the settings of your
choice.
dFrame the subject on screen.
eTo zoom in or out, press two fingers on
the display and pinch or expand fingers.
The zoom controls appear on the screen.
fTake a picture by tapping .
If you want to take a picture in panoramic
mode,
perform the following actions:
MN005019A01-B
Chapter 11: Applications
95
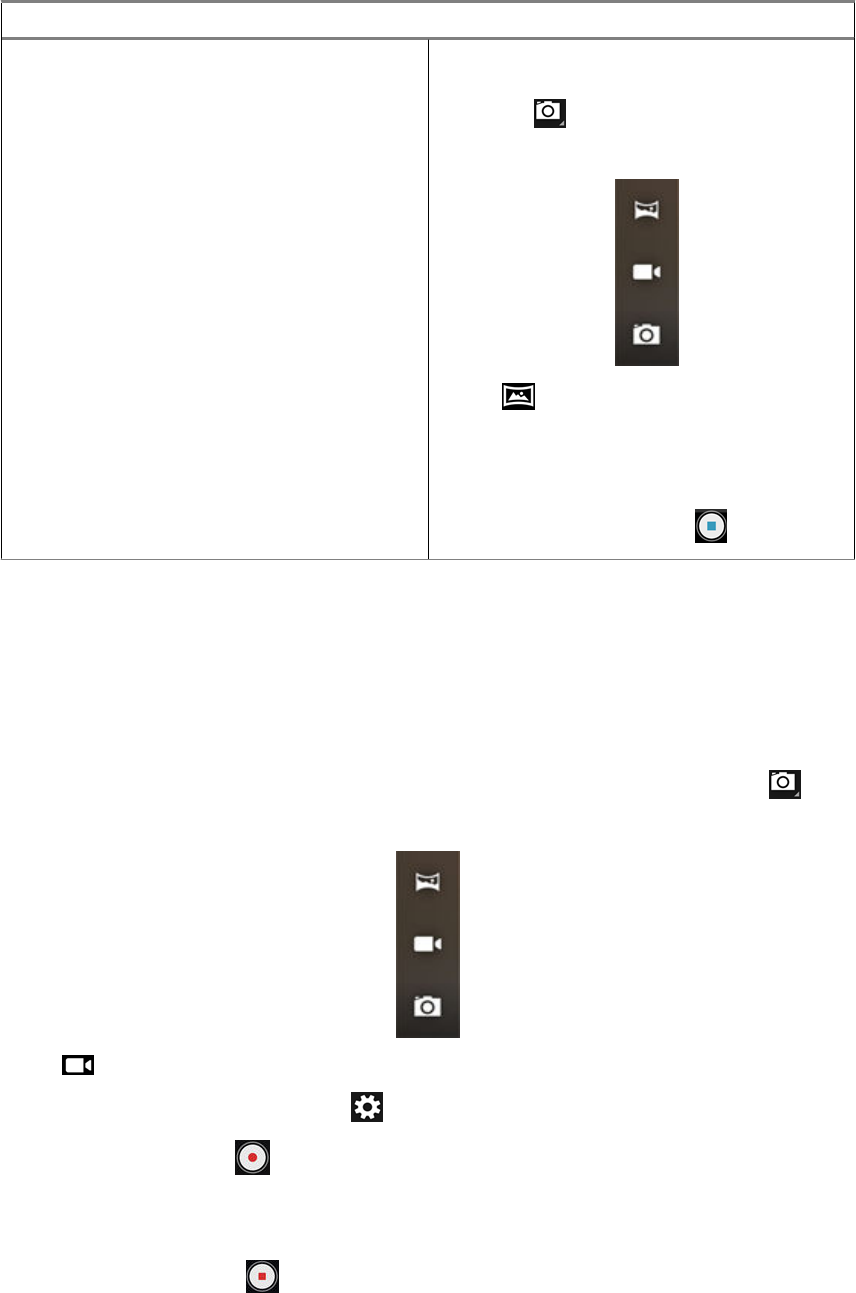
If… Then…
aOpen the mode selection bar located at
the bottom-right corner of the screen by
tapping .
Figure 21: Mode Selection Bar
bTap .
cStart capturing the picture from the left-
most edge of the image and move to-
wards the rightmost edge.
dStop capturing by tapping .
11.2.2
Recording Videos
This section describes using the Camera application for recording video.
Procedure:
1Open the Camera application.
2Open the mode selection bar located at the bottom-right side of the window by tapping .
Figure 22: Mode Selection Bar
3Select .
4If you want to adjust video settings, tap and select the settings of your choice.
5Start recording by tapping .
6To zoom in or out, press two fingers on the display and pinch or expand fingers.
The zoom controls appear on the screen.
7Finish recording by tapping .
MN005019A01-B
Chapter 11: Applications
96
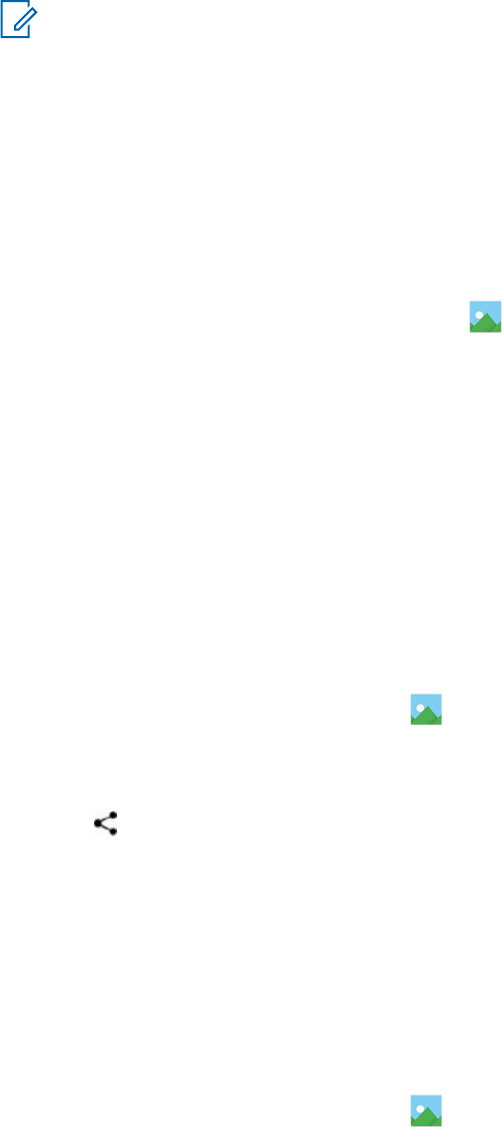
11.3
Gallery
Gallery is used to manage your photos and videos.
NOTICE: The device supports the following image formats: JPEG, GIF, PNG, and BMP.
You can use Gallery to:
• View photos.
• Play videos.
• Perform basic editing of photos.
• Set photos as a wallpaper.
• Set photos as a contact photo.
• Share photos and videos.
The Gallery application is located at Apps screen → .
Gallery contains all photos and videos stored on the microSD card and in the internal memory.
11.3.1
Albums
Albums are groups of images and videos in folders.
Photos and videos grouped together in an album are listed in a chronologically ordered grid. The name
of the album displays at the top of the screen.
11.3.1.1
Sharing Albums
Procedure:
1Open the Gallery application by tapping .
2Tap the triple-bar menu in the upper-left corner of the screen and select Albums.
3Tap and hold an album until it becomes highlighted.
4Tap .
Share applications are displayed.
5Select the application that you want to use.
6Follow the instructions within the selected application.
11.3.1.2
Checking Album Information
Procedure:
1Open the Gallery application by tapping .
2Tap the triple-bar menu in the upper-left corner of the screen and select Albums.
3Tap and hold an album until it becomes highlighted.
MN005019A01-B
Chapter 11: Applications
97

4Tap .
5Tap Details.
11.3.1.3
Deleting Albums
Procedure:
1Open the Gallery application by tapping .
2Tap the three horizontal lines in the upper-left corner of the screen and select Albums.
3Tap and hold an album until it becomes highlighted.
4Tap .
5Delete the album by tapping OK.
11.3.2
Photos
In the Gallery application, you may view, rotate, crop, share, and delete photos.
11.3.2.1
Viewing and Browsing Photos
Procedure:
1Open the Gallery application by tapping .
2Tap the triple-bar menu in the upper-left corner of the screen and select Albums.
3Tap an album of your choice.
4Tap a photo.
5To view the next or previous photo in the album, swipe left or right.
6To view the photo in upright (portrait) or sideways (landscape) orientation, turn the LEX device.
The photo is displayed (but not saved) in the new orientation.
7View the controls by tapping the photo.
8Zoom in by double-tapping the screen, or zoom in or out by pinching two fingers together or
spreading them apart.
9View parts that are not in view by dragging the photo.
11.3.2.2
Rotating Photos
Procedure:
1Open the Gallery application by tapping .
2Tap the triple-bar menu in the upper-left corner of the screen and select Albums.
3Tap the album that contains the photo you want to rotate.
4View the controls by tapping the photo.
MN005019A01-B
Chapter 11: Applications
98
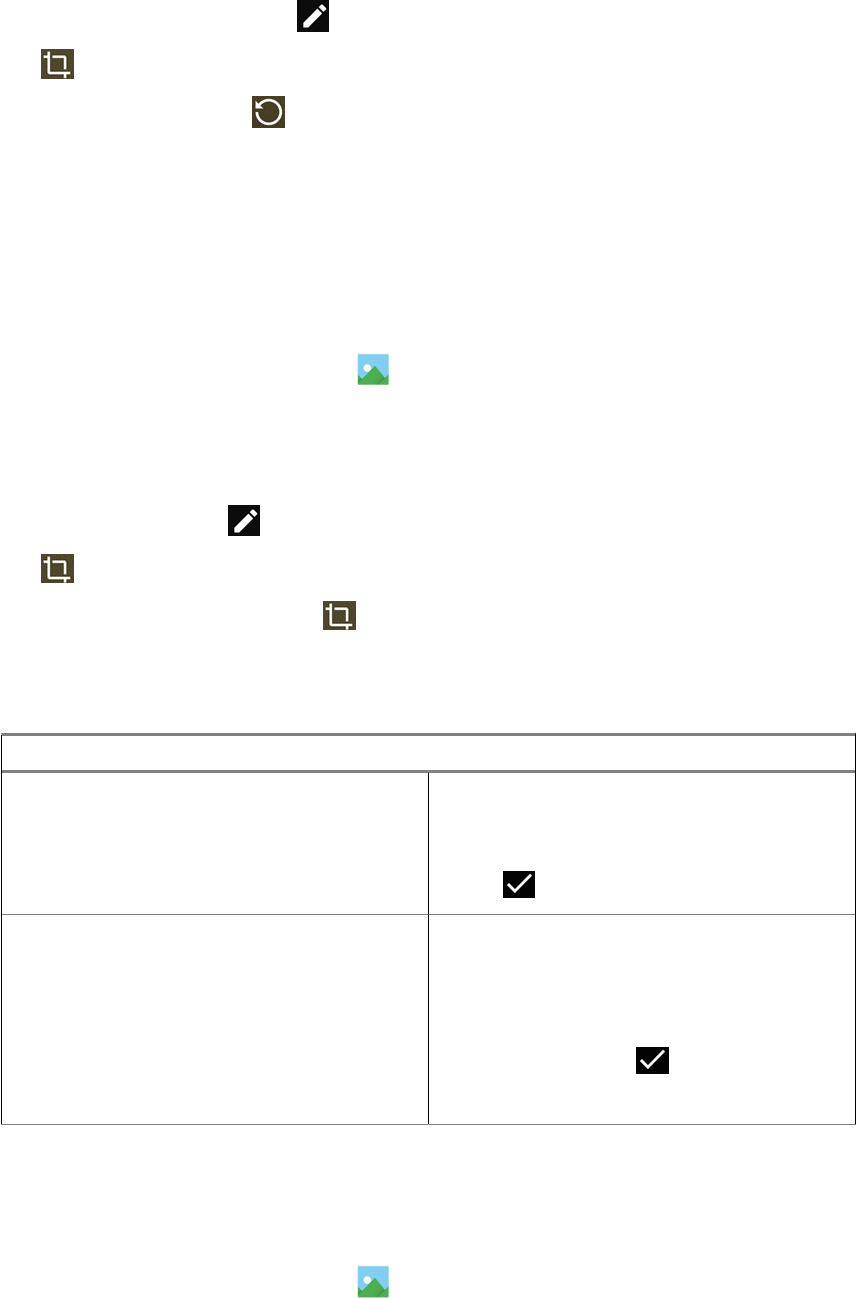
5Open the editing view by tapping .
6Tap .
7Rotate the photo by tapping .
The photo rotates 90° clockwise. Each tap rotates the photo another 90°.
8Save the changes by tapping SAVE.
11.3.2.3
Cropping Photos
Procedure:
1Open the Gallery application by tapping .
2Tap the triple-bar menu in the upper-left corner of the screen and select Albums.
3Tap the album that contains the photo you want to crop.
4View the controls by tapping the photo.
5Edit the photo by tapping .
6Tap .
7Enter the cropping mode by tapping .
The cropping grid appears.
8To crop the photo, perform one of the following actions:
If… Then…
If you want to crop the photo manually, perform the following actions:
aAdjust the endpoints to select the portion
of the photo to crop.
bTap .
If you want to choose automatic cropping
dimensions,
perform the following actions:
aTap 1:1.
bIf you want to view the original photo, tap
Original.
cConfirm by tapping .
dSave changes by tapping SAVE.
11.3.2.4
Setting Photos as Contact Icons
Procedure:
1Open the Gallery application by tapping .
2Tap the triple-bar menu in the upper-left corner of the screen and select Albums.
MN005019A01-B
Chapter 11: Applications
99

3Tap the album that contains the photo you want to set as a contact icon.
4Tap the photo.
5Tap .
6Tap Set picture as.
7Select Contact photo and select a contact of your choice.
8Tap Crop picture.
9Crop the photo accordingly as described in Cropping Photos on page 99.
10 Tap SAVE.
11.3.2.5
Sharing Photos
Procedure:
1Open the Gallery application by tapping .
2Tap the triple-bar menu in the upper-left corner of the screen and select Albums.
3Tap the album that contains the photo you want to share.
4Tap the photo or photos of your choice.
5Tap .
6Tap the application to use for sharing the selected photo.
11.3.2.6
Deleting Photos
Procedure:
1Open the Gallery application by tapping .
2Tap the triple-bar menu in the upper-left corner of the screen and select Albums.
3Tap the album that contains the photo you want to delete.
4Tap the photo or photos of your choice.
5Tap .
6Confirm by tapping OK.
11.3.3
Videos
In the Gallery application, you can view videos saved on the microSD card and share videos.
11.3.3.1
Watching Videos
Procedure:
1Open the Gallery application by tapping .
2Tap the triple-bar menu in the upper-left corner of the screen and select Albums.
MN005019A01-B
Chapter 11: Applications
100
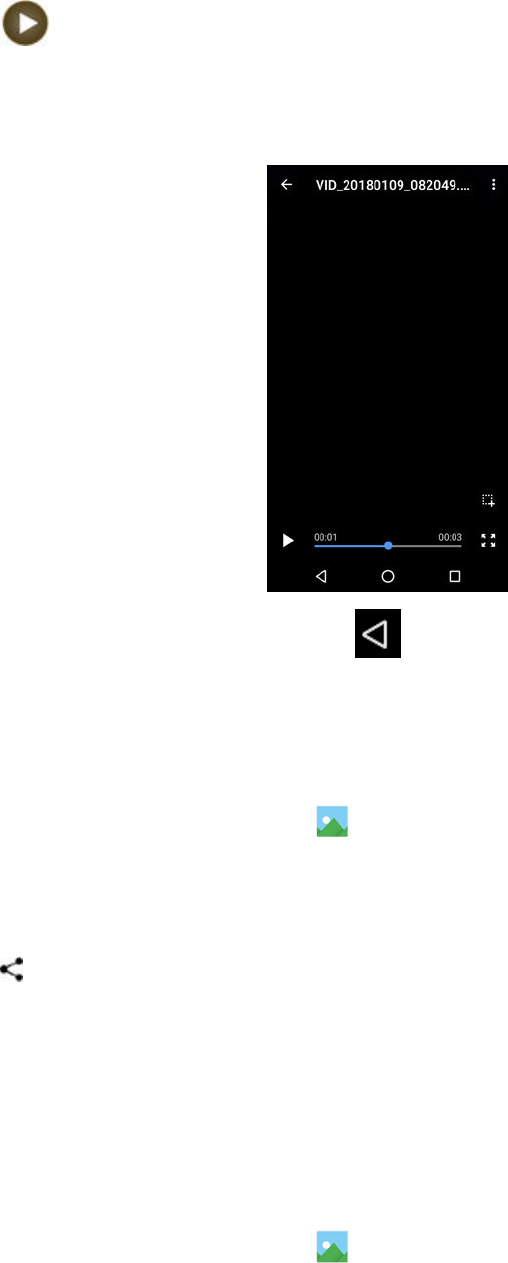
3Tap the album that contains the video you want to watch.
4Tap the video you want to watch.
5Tap .
6Select the application you want to use to watch the video.
7To see the playback controls, tap the screen.
Figure 23: Video Playback Controls
8To return to the previous screen, double-tap .
11.3.3.2
Sharing Videos
Procedure:
1Open the Gallery application by tapping .
2Tap the triple-bar menu in the upper-left corner of the screen and select Albums.
3Tap the album that contains the video you want to share.
4Tap the video.
5Tap .
The Share via menu appears.
6Tap the application you want to use to share the selected video and follow the on-screen
instructions.
11.3.3.3
Deleting Videos
Procedure:
1Open the Gallery application by tapping .
MN005019A01-B
Chapter 11: Applications
101

2Tap the triple-bar menu in the upper-left corner of the screen and select Albums.
3Tap the album that contains the video you want to delete.
4Tap the video.
5Tap .
6Delete the video by tapping OK.
11.4
Turning On the Flashlight
Procedure:
1Open the Notifications panel by swiping the screen down from the Status bar.
2Tap .
11.5
Taking Screen Captures
You can take screen captures of the currently displayed screen.
Procedure:
Press the POWER BUTTON and the VOLUME DOWN button simultaneously.
The screen capture is saved in the device memory.
11.6
Managing Downloads
You can download, install, view your applications and media files, when your device is connected to
the Internet through Wi-Fi or service provider network. You can download files from Google, or other
sources, open, and edit them.
Procedure:
1Manage application downloads by tapping Downloads .
2From the triple-bar menu in the upper-left corner of the screen, select the type of file you want to
manage.
3Open an item by tapping it.
4If you want to share a downloaded item, tap and hold the selected item.
aTap .
bIn the Share via menu, select the application you want use to share the downloaded item.
5If you want to delete downloaded items, check items you want to delete and tap .
MN005019A01-B
Chapter 11: Applications
102

11.7
Exploring Files
You can use the File Manager application to navigate to folders/files, edit them, and create new ones.
Procedure:
1Swipe the home screen up from the arrow sign.
2Tap .
The main screen appears, displaying the storage available on your device.
3Tap the folder you want to open.
4To perform more actions in the File Manager application, tap the three dots in the bottom-left
corner of the screen.
The following options are available:
•Properties – the properties of a selected folder or file, for example type, size, modified date,
and others.
•Refresh – refreshes the application.
•New folder – allows you to create a new folder.
•New file – allows you to create a new file.
•Select all – selects all folders and files.
•Deselect all – deselects all folders and files.
•Add to bookmarks – adds folders and/or files to the bookmarks.
•Add shortcut – creates a shortcut to a selected folder or file.
•Set as home
11.8
Public Safety Experience (PSX) Applications
The following PSX applications are available from Motorola Solutions, as part of an end-to-end solution
that also includes servers to manage licensing, contacts, security, and settings:
NOTICE: To obtain the Public Safety Experience solution, contact Motorola Solutions Support.
PSX Mapping
A mapping application that integrates with PSX Messenger. Allows you to present devices on a
map in near real time along with the location of those devices. It also allows performing additional
actions, such as navigating to the selected user, or instantly starting a call.
PSX Messenger
A messaging application that integrates with PSX Home Screen and PSX Mapping. Allows you to
send text messages to individuals and groups. You can attach photos, video and audio recordings,
and maps showing your current location or another selected location. Taking photos, recording
audio, viewing maps or using other applications is possible without closing the Messenger.
PSX PTT
Turns your LTE device into a multi-channel push-to-talk (PTT) handset for fully secure, real-time
PTT voice communications anywhere you have a network connection.
PSX Secure Calling
Provides Secure Voice over IP (SVoIP) communication between individuals in an agency with
option of deploying connectivity to an existing PBX.
MN005019A01-B
Chapter 11: Applications
103
PSX Cockpit
PSX Cockpit mobile app client that bundles multiple Intelligent MiddleWare (IMW) functions for LTE
devices. It is a central application that manages initial configuration, setting statuses, presence
information, triggering emergency mode, clearing emergency mode, and other central functions for
PSX applications.
MN005019A01-B
Chapter 11: Applications
104
Chapter 12
Accessories
The LEX L11 device can be used with Motorola Solutions accessories.
12.1
Accessories
This section lists supported accessories and their part numbers.
NOTICE: To ensure regulatory compliance, you must use only Motorola Solutions approved,
supplied, or replacement batteries and accessories.
Carry Accessories
Table 18: Carry Accessories
Accessory Name Part Number
Accessory kit, vehicular charger, with suction
base
PMLN7912A
LEX L11 Carry Case with Peter Jones Stud PMLN7845A
Chargers
Table 19: Chargers (USB-C)
Charger Type Part Number
MSI in-box supplied travel charger PS000150A31 – US/JPN Plug
PS000150A32 – EU Plug
PS000150A33 – UK/HK Plug
PS000150A34 – AU/NZ Plug
PS000150A35 – ARG Plug
PS000150A36 – CHN Plug
PS000150A37 – KOR Plug
PS000150A38 – BZL Plug
MSI optional Quickcharge travel charger (with
PD/QC4) PS000278A01 – US/JPN Plug
PS000278A02 – EU Plug
PS000278A03 – UK/HK Plug
PS000278A04 – AU/NZ Plug
PS000278A05 – ARG Plug
PS000278A06 – CHN Plug
PS000278A07 – KOR Plug
PS000278A08 – BZL Plug
MSI Multi-Unit Charger PMPN4341A – EU Power Cord
PMPN4342A – UK/HK Power Cord
PMPN4343A – Aus/NZ Power Cord
MN005019A01-B
Accessories
105

Charger Type Part Number
PMPN4344A – Argentina Power Cord
PMPN4345A – CHN Power Cord
PMPN4346A – KOR Power Cord
PMPN4347A – BZL Power Cord
PMPN4348A – JPN Power Cord
PMPN4349A – US Power Cord
MSI Desktop Charger PMPN4351A – EU Plug
PMPN4352A – UK/HK Plug
PMPN4353A – AU/NZ Plug
PMPN4354A – ARG Plug
PMPN4355A – CHN Plug
PMPN4356A – KOR Plug
PMPN4357A – BZL Plug
PMPN4358A – JPN Plug
PMPN4359A – US Plug
MSI Vehicle Power Adapter (with PD) PMLN7779A
Batteries
Table 20: Batteries
Descrip-
tion
Build-/
Vintage
Battery
Capacity
(mAh)
Battery
Nominal
Voltage
(V)
Battery
Type
Country
of Origin
Part Num-
ber
Standard
battery
(STD)
PRE-PI-
LOT
2500mAh 3.7V LI-ION Malaysia PMNN454
5
High-ca-
pacity bat-
tery (HI-
CAP)
PRE-PI-
LOT
5000mAh 3.7V LI-ION Malaysia PMNN454
6
MN005019A01-B
Chapter 12: Accessories
106

Chapter 13
Maintenance and Troubleshooting
This chapter includes instructions on cleaning and storing the device and provides troubleshooting
solutions for potential problems during device operation.
13.1
Installing Firmware Updates
You can follow this procedure to update the device firmware.
Prerequisites:
Make sure your device has Internet connection.
Perform this procedure once a system update becomes available for your device.
Make sure the battery level is at least 50%.
NOTICE:
To avoid high mobile data charges, connect your device to a Wi-Fi network.
Once a system update is available, a System Update Available notification appears on the
Notifications panel.
Procedure:
1From the Notifications panel, tap System Update Available.
2Select Download.
3In the Update new SW window, tap Download.
When the download completes, the System Update Downloaded notification appears on the
Notifications panel.
4From the Notifications panel, tap System Update Downloaded and select Install.
5In the Update new SW window, select Restart and install.
13.2
Maintaining LEX Device
For trouble-free service, observe the following tips when using the LEX device:
• Do not scratch or use a pen or a pencil or other sharp object on the surface of the screen.
• The touch-sensitive screen is made of polycarbonate. Do not to drop or subject the device to strong
impact.
• Protect from extreme temperatures. Do not leave device on the dashboard of a car on a hot day,
and keep it away from heat sources.
• Do not store in any location that is dusty, damp, or wet.
• Use a soft lens cloth to clean the device. If the surface of the screen becomes soiled, clean it with a
soft cloth moistened with isopropyl alcohol.
• Periodically replace the rechargeable battery to ensure maximum battery life and product
performance. Battery life depends on individual usage patterns.
MN005019A01-B
Maintenance and Troubleshooting
107

13.3
Battery Safety Guidelines
Adhere to the following guidelines for battery safety:
• The area where the units are charged should be clear of debris and combustible materials or
chemicals.
• Follow battery usage, storage, and charging guidelines found in this guide.
• Improper battery use may result in a fire, explosion, or other hazard.
• To charge the battery, the battery and charger temperatures must be between +32 ºF and +113 ºF
(0 ºC and +45 ºC)
• Do not use incompatible batteries and chargers. Use of an incompatible battery or charger may
present a risk of fire, explosion, leakage, or other hazard. If you have any questions about the
compatibility of a battery or a charger, contact Motorola Solution support.
• If charging through a USB port, the device shall only be connected to products that bear the USB-IF
logo or have completed the USB-IF compliance program.
• To enable authentication of an approved battery, as required by IEEE1725 clause 10.2.1, all
batteries will carry a Motorola hologram. Do not fit any battery without checking it has the Motorola
authentication hologram.
• Do not disassemble or open, crush, bend or deform, puncture, or shred.
• Severe impact from dropping any battery-operated device on a hard surface could cause the battery
to overheat.
• Do not modify or remanufacture, attempt to insert foreign objects into the battery, immerse or
expose to water or other liquids, or expose to fire, explosion, or other hazard.
• Do not leave or store the equipment in or near areas that might get very hot, such as in a parked
vehicle or near a radiator or other heat source. Do not place battery into a microwave oven or dryer.
• Battery usage by children should be supervised.
• Follow local regulations to properly dispose of used rechargeable batteries.
• Do not dispose of batteries in fire.
• In the event of a battery leak, do not allow the liquid to come in contact with the skin or eyes. If
contact has been made, wash the affected area with large amounts of water and seek medical
advice.
• If you suspect damage to your equipment or battery, contact Motorola Solutions support to arrange
for inspection.
13.4
Cleaning Guidelines
This section includes cleaning guidelines for the LEX device.
WARNING: Avoid exposing this product to contact with hot oil or other flammable liquids. If
such exposure occurs, unplug the device and clean the product immediately in accordance with
these guidelines.
CAUTION:
Always wear eye protection.
Read the warning labels on compressed air and alcohol products before use.
If you have to use any other solution for medical reasons, contact Motorola Solutions for more
information.
MN005019A01-B
Chapter 13: Maintenance and Troubleshooting
108
Approved Cleanser Active Ingredients
100% of the active ingredients in any cleaner must consist of one or a combination of the following:
isopropyl alcohol, or mild dish soap.
Cleaning Instructions
Do not apply liquids directly to the device. Dampen a soft cloth or use pre-moistened wipes. Do not
wrap the device in the cloth or wipe, but gently wipe the unit
Harmful Ingredients
Many vinyl gloves contain phthalate additives, which are often not recommended for medical use and
are known to be harmful to the housing of the device. The device should not be handled while wearing
vinyl gloves containing phthalates, or before hands are washed to remove contaminant residue after
gloves are removed. If products containing the harmful ingredients are used before handling the
device, such as hand sanitizers containing ethanolamine, hands must be completely dry before
handling the device to prevent damage to the plastics.
Cleaning Materials Required
• Alcohol wipes
• Lens tissue
• Cotton-tipped applicators
• Isopropyl alcohol
• Can of compressed air with a tube
Cleaning Frequency
The cleaning frequency is up to your discretion due to the varied environments in which the mobile
devices are used. They may be cleaned as frequently as required, but it is advisable to clean the
camera window periodically when used in dirty environments to ensure optimum performance.
13.5
Cleaning LEX Device
This section includes instructions on how the LEX device should be cleaned.
Housing
Using the alcohol wipes, wipe the housing including buttons.
Display
The display can be wiped down with the alcohol wipes, but care should be taken not to allow any
pooling of liquid around the edges of the display. Immediately dry the display with a soft, non-abrasive
cloth to prevent streaking.
Camera Window
Wipe the camera window periodically with a lens tissue or other material suitable for cleaning optical
material such as eyeglasses.
MN005019A01-B
Chapter 13: Maintenance and Troubleshooting
109

13.6
Cleaning Interface Connector
When and where to use: Use this procedure to clean the contacts of the interface connector on LEX
device.
Procedure:
1Power off the device.
2Dip the cotton portion of the cotton-tipped applicator in isopropyl alcohol.
3Rub the cotton portion of the cotton-tipped applicator along the contacts of the interface
connector. Slowly move the applicator back-and-forth from one side of the connector to the
other.
4If grease and other dirt can be found on other areas of the cradle, remove using a lint-free cloth
and alcohol.
5Allow few minutes (depending on ambient temperature and humidity) for the alcohol to air dry
before powering on the device.
13.7
Cleaning Battery Contacts
When and where to use: Perform this procedure to clean the battery connectors.
Procedure:
1Remove the main battery from device.
2Dip the cotton portion of the cotton-tipped applicator in isopropyl alcohol.
3Gently, rub the cotton portion of the cotton-tipped applicator back-and-forth across the contacts.
Do not leave any cotton residue on the contacts.
4Use the cotton-tipped applicator dipped in alcohol to remove any grease and dirt near the
contacts area.
5Use a dry cotton-tipped applicator and repeat steps 4 and 5 at least three times.
CAUTION: Do not point nozzle at yourself and others. Ensure that the nozzle or tube is
away from your face.
6Spray compressed air on the connector area by pointing the tube/nozzle about ½ inch away
from the surface.
7Inspect the area for any grease or dirt, repeat if required.
13.8
Troubleshooting
This section lists common problems and solutions to fix the problems.
Table 21: Troubleshooting the LEX Series Device
Problem Cause Solution
After pressing the
Power button, does
not turn on.
Battery is
completely
discharged.
Re-charge or replace the battery.
MN005019A01-B
Chapter 13: Maintenance and Troubleshooting
110
Problem Cause Solution
Battery not
installed
properly.
Install the battery properly. See Installing the Battery on
page 29.
Power button
not held
down long
enough.
Press the Power button until the Motorola Solutions splash
screen is displayed.
Device not
responding.
Reset the device.
After pressing the
Power button, the
device does not
turn on but a
charge battery icon
Appears.
Battery
charge level
is very low.
Re-charge or replace the battery.
After connecting
the device to a Ca-
ble, a battery
charging icon Ap-
pears.
Battery is de-
pleted but is
charging.
Press and hold the Power button to turn on.
When charging, the
LED slowly blinks
red.
The device is
at an ex-
tremely low-
power state.
Charge the device for a few minutes. The LED changes to
flashing green then press the Power button to turn on the
device. If LED continuously blinks red, check power con-
nections. Disconnect and reconnect connections.
Battery did not
charge.
Battery
failed.
Replace battery. If the device still does not operate, per-
form a hardware reset.
Device was
removed
from power
while battery
was charg-
ing.
Attach the device to in-box charger with in-box cable. The
LEX device typically charges the standard battery up to
90% in about 1.5h in room temperature.
NOTICE: Charge times vary by ambient temper-
ature. You can achieve better charging time by
using the quick charger.
Extreme bat-
tery tempera-
ture.
Battery does not charge if ambient temperature is below 0
°C (32 °F) or above 45 °C (113 °F).
During data com-
munication with a
host computer, no
data transmitted, or
transmitted data
was incomplete.
Device re-
moved from
USB cable or
disconnected
from host
computer
during com-
munication.
Reattach the communication cable and re-transmit.
Incorrect ca-
ble configura-
tion.
Contact technical support.
MN005019A01-B
Chapter 13: Maintenance and Troubleshooting
111

Problem Cause Solution
During data com-
munication over Wi-
Fi, no data trans-
mitted, or transmit-
ted data was in-
complete.
Wi-Fi radio is
not on.
Turn on the Wi-Fi radio.
You moved
out of range
of an access
point.
Move closer to an access point.
During data com-
munication over
Bluetooth, no data
transmitted, or
transmitted data
was incomplete.
Bluetooth ra-
dio is not on.
Turn on the Bluetooth radio.
You moved
out of range
of another
Bluetooth de-
vice.
Move without 10 m (32.8 ft.) of the other device.
During data com-
munication over
Public / Private, no
data transmitted, or
transmitted data
was incomplete.
You are in an
area of poor
cellular serv-
ice.
Move into an area that has better service.
VPN is not
set up cor-
rectly.
Contact technical support for VPN setup information.
SIM card not
installed
properly.
Remove and re-install the SIM cards.
Data plan not
activated.
Contact your service provider and ensure that your data
plan is enabled.
No sound. Volume set-
ting is low or
turned off.
Adjust the volume.
Device turns off. Device is in-
active.
The display turns off after a period of inactivity. Set this pe-
riod to 15 seconds, 30 seconds, 1, 2, 5, 10, or 30 minutes.
Battery is de-
pleted.
Recharge or replace the battery.
Extreme bat-
tery tempera-
ture.
Move device to an area where the ambient temperature is
between 0 °C (32 °F) and 45 °C (113 °F).
A message ap-
pears stating not
enough storage
memory.
Too many
applications
installed on
the device.
Remove user-installed applications on the device to recov-
er memory. Swipe the home screen up from the arrow
sign, and tap → Apps. Select the unused programs
and tap Uninstall.
Device cannot find
any Bluetooth devi-
ces nearby.
Too far from
other Blue-
tooth devi-
ces.
Move closer to the other Bluetooth device(s), within a
range of 10 meters (32.8 feet).
The Blue-
tooth de-
vice(s) near-
Turn on the Bluetooth device(s) to find.
MN005019A01-B
Chapter 13: Maintenance and Troubleshooting
112
Problem Cause Solution
by are not
turned on.
The Blue-
tooth de-
vice(s) are
not in discov-
erable mode.
Set the Bluetooth device(s) to discoverable mode. If need-
ed, refer to respective Bluetooth-enabled device (accesso-
ry) user manual.
The screen does
not turn off when
you hold the device
close to your face
during a call.
Dirty device
screen im-
pairs the
proximity
sensor read-
ing.
Clean the device screen with a piece of cloth, paying spe-
cial attention to the proximity sensor area. For more infor-
mation on cleaning the LEX display, see Cleaning LEX De-
vice on page 109. To check the exact location of the prox-
imity sensor on the LEX device, see Device Overview on
page 24.
An application does
not work, even
though it did before
you switched the
SIM cards.
The settings
of your cur-
rent SIM card
do not allow
to use the
application.
Switch back to using the SIM card that allowed you to use
the application. For more information, contact your network
service provider.
Table 22: For LEX Devices with Dual SIMs (Private Network and Public Network)
Problem Cause Solution
When the LEX device is in pri-
vate mode:
• Calls and messages fail to
phone numbers in a public
network, or
• Calls and messages are
not received from phone
numbers in a public net-
work.
Interconnection is not imple-
mented between private net-
work and public network.
If there is no connection be-
tween private network and
public network in your system,
then the LEX needs to be in
public mode to call and an-
swer calls from a public net-
work.
NOTICE: Emergen-
cy calling is availa-
ble when the LEX is
in private mode,
based on emergen-
cy settings in the pri-
vate SIM card.
When the LEX device is in pri-
vate mode:
• Calls and messages are
not received from phone
numbers in a public net-
work.
The caller might be using the
public network phone number
for the LEX.
If there is no connection be-
tween private network and
public network in your system,
the LEX needs to be in public
mode to answer calls to your
public network number and to
check voice mails for your
public network phone number.
If you prefer to keep the LEX
in private mode, then you have
the option of providing your
private network phone number
MN005019A01-B
Chapter 13: Maintenance and Troubleshooting
113

Problem Cause Solution
to the caller, if allowed by your
organization's policies.
When the LEX device is in pri-
vate mode:
• Messages and voice mails
to your private network
phone number are not re-
ceived.
SMS and voicemail are not im-
plemented in your private net-
work.
If SMS messages and voice-
mail are only available on the
public network, callers must
use your public network phone
number to leave messages
and voice mails. Also, the LEX
must be in private mode to ac-
cess those messages and
voice mails.
When the LEX device is in
public mode:
• Calls and messages fail to
phone numbers in the pri-
vate network, or
• Calls and messages are
not received from phone
numbers in the private net-
work.
Interconnection is not imple-
mented between private net-
work and public network.
If there is no connection be-
tween private network and
public network in your system,
then the LEX must be in pri-
vate mode to call, and to an-
swer calls from, the private
network.
When the LEX device is in
public mode:
• Calls and messages are
not received from phone
numbers in the private net-
work.
The caller might be using the
private network phone number
for the LEX.
If there is no connection be-
tween private network and
public network in your system,
the LEX must be in private
mode to answer calls and
messages to your private net-
work number and, if voice mail
is enabled, to check voice
mails for your private network
phone number. If you prefer to
keep the LEX in public mode,
you have the option of provid-
ing your public network phone
number to the caller.
13.9
Backing up Contacts with Android
To back up contacts, the contacts must be exported to a .vcf file which must be copied to a secure
location.
Procedure:
1On the Apps screen, tap .
2Tap the triple-bar menu in the upper-left corner of the screen.
3Select Settings.
4Select Export.
5Tap the triple-bar menu and select the location where you want to export the file with contacts.
MN005019A01-B
Chapter 13: Maintenance and Troubleshooting
114

6In the text box, personalize the .vcf file name and tap .
7Tap SAVE.
Postrequisites: Complete the contacts backup by following steps in Backing Up LEX Data Manually
on page 115.
13.10
Backing Up LEX Data Manually
Prerequisites: Make sure you have a USB type C cable to connect the device to a computer.
Procedure:
1Connect the device to a computer by using the supplied USB-C cable.
The first time you connect the LEX device to a computer, device driver software is installed on
the computer. When the Your device is ready to use message appears, you can
proceed with the backup process.
2From the Notifications panel on the device, tap the USB for... notification.
3Tap Transfer files.
4On the computer, click Start and select Computer.
5Select the LEX L11 Portable Device.
6Double-click Internal Shared Storage.
7Navigate to the files that you want to back up.
8Copy the files/folders to a secure location on your computer.
13.11
Syncing Data with Google
Procedure:
1Swipe the home screen up from the arrow sign.
2On the Apps screen, select Settings .
3Select Accounts.
4Under the Accounts section, select the preferred email account.
5Select the checkbox next to the application to be synced.
If you want your data to be synced automatically, you can tap and select the check box next
to the Auto-sync data option.
13.12
Backing Up Your Data and Settings with Android Backup
Service
You can use the Android Backup Service to back up data connected to one or more of your Google
Accounts. If you had to replace your device or erase its data, you can restore your data using any
account that you backed up.
The following data and settings are backed up with the Android Backup Service:
• Google Calendar settings
MN005019A01-B
Chapter 13: Maintenance and Troubleshooting
115

• Wi-Fi networks and passwords
• Home screen wallpapers
• Gmail settings
• Applications installed through Google Play (backed up on the Play Store application)
• Display settings (Brightness and Sleep)
• Language and Input settings
• Date and Time
• Third-party application settings and data (varies by application)
Procedure:
1On the Apps screen, tap .
2Tap Backup & reset.
3Tap Back up my data and adjust the slider to the ON position.
13.13
Restoring Contact Data
You can restore the backed-up information to your device.
NOTICE: For restoring other user data, see Accessing Files from a Computer on page 42.
Procedure:
1On the Apps screen, tap .
2Tap the triple-bar menu in the upper-left corner of the screen.
3Select Settings.
4Select Import.
5In the Import contacts from pop-up window, tap .vcf file.
6In the folder that opens, select the .vcf file with contacts.
13.14
Restoring Your Data and Settings
You can choose to restore application settings when you reinstall an application on your device. This
feature requires you to back up your data with your Google Account and that the application also uses
the Android Backup Service. Some apps may not back up and restore all data.
Procedure:
1From the Apps screen, tap Settings.
2Select Backup & reset.
3Set the slidebar next to Automatic restore to the ON position.
If you cannot modify the position of the slidebar, you must enable backing up data with Android
backup service first. See Backing Up Your Data and Settings with Android Backup Service on
page 115.
MN005019A01-B
Chapter 13: Maintenance and Troubleshooting
116

13.15
Resetting the LEX Device
You can use this procedure to reset the LEX device if it does not operate properly.
Procedure:
1Power off and on the device and verify if the problem is gone.
The device restarts. If the problem remains, perform step 2.
CAUTION: To avoid erasing important data from your device, do not press any of the
buttons during power up.
2Press the Power button and hold it for 10 seconds.
The device restarts.
3Remove the battery, reinsert it, and verify if the problem is gone.
The device restarts. If the problem remains, contact technical support.
MN005019A01-B
Chapter 13: Maintenance and Troubleshooting
117

Appendix A
Technical Specifications
NOTICE: The specifications are subject to change.
Table 23: Technical Specifications
Item Specification
Physical
Dimensions (H x W x D) With standard battery: 152.5 x 78 x 13.2 mm
(6 x 3 x 0.5 in)
With extended battery: 152.5 x 78 x 18.9 mm
(6 x 3 x 0.7 in)
Weight With standard battery: 260 g (9.8 oz)
With extended battery: 310 g (10.9 Oz)
Durability Continues to work after multiple drops on ev-
ery face/edge/corner onto smooth concrete
from a height of 120 cm (48 in).
Display Screen size and pixels: 5 in (720 x 1280)
Brightness: 500 nits
Touch: capacitive touchpannel supporting
multi-touch, latex glove
Physical keys Volume up and volume down button
PTT button
Emergency button
Group rocker control (up/down)
Power (on/off) button
Two programmable buttons
Operating temperature -20°C to +55°C (-4°F to 131°F)
Storage temperature -46°C to +85°C (-50°F to 185°F)
Hardware
Processor 2 x 4-core Qualcomm Kryo 260 CPU (1.8–2.2
GHz)
Chipset Qualcomm Snapdragon 660
Memory 4 GB LPDDR4 SDRAM
64 GB eMMC
MN005019A01-B
Appendix A: Technical Specifications
118

Item Specification
Camera Rear 13MP Camera with Auto Focus
Front 8MP Camera with Fixed Focus
Flash Rear camera LED Flash with torchlight func-
tionality
Sensors Ambient Light Sensor
Fingerprint Sensor
Barometric Pressure Sensor
Proximity/Gesture Sensor
Accelerometer Sensor
Magnetometer Sensor
Gyro
Ports 3.5 mm Audio Jack (stereo)
Two nano SIM slots
One microSD slot (microSD, microSDHC, mi-
croSDXC, with capacity up to 400 GB)
USB Type-C
Battery Standard – 2500 mAh (nominal voltage of
3.7V)
High capacity – 5000 mAh (nominal voltage
of 3.7V)
Microphone Three microphones (primary, secondary, and
tertiary) with noise and echo cancellation.
Software
Operating System Android Nougat 7.1
Google, Google Play, Android, and other
marks are trademarks of Google Inc.
Messaging SMS/MMS
E-mail
Web HTML5/WAP 2.0 compliant AOSP WebKit
browser, Chrome browser
Wide Area Networks
Standards FDD-LTE/TDD-LTE/GSM/UMTS/HSPA+
LTE release Includes LTE 3GPP Release 11 features,
Category 9 Capable
LTE bands Europe, the Middle East and Africa (EMEA)
LEX L11e: 1, 3, 7, 8, 20, 38, 39, 40, including
FDD-TDD mobility
Asia-Pacific, Latin America (APAC-LA)
LEX L11a: 1, 2, 3, 4, 5, 7, 8, 28
MN005019A01-B
Appendix A: Technical Specifications
119
Item Specification
NOTICE: Bands 2 and 4 are speci-
fied as roaming for the US.
North America (NA), US AT&T/Firstnet
LEX L11n: 2, 4, 5, 7, 12, 14, 29, 30, 66
2CA DL
GSM bands 850 MHz, 900 MHz, 1800 MHz, 1900 MHz
3G/3.5G bands UMTS/HSPA+: 1, 2, 4, 5, 8
Wi-Fi
Operating band 2.4 GHz, 5 GHz
Standards IEEE Std 802.11-2012 a/b/g/n/ac/k/r with hot-
spot functionality (up to 32 connections)
Personal Area Networks
Bluetooth BT 4.2 LE (Low Energy) + BR/EDR
Profiles:
Advanced Audio Distribution Profile (A2DP)
Hands Free Profile (HFP)
Headset Profile (HSP)
Human Interface Device Profile (HID)
Serial Port Profile (SPP)
Generic Access Profile (GAP)
Service Discovery Application Profile (SDAP)
Dial-up Networking Profile (DUN)
Generic Object Exchange Profile (GOEP)
Object Push Profile (OPP)
Generic Audio/Video Distribution Profile
(GAVDP)
Message Access Profile (MAP)
Audio/Video Remote Control Profile (AVRCP)
Phone Book Access Profile (PBAP)
File Transfer Profile (FTP)
Personal Area Networking Profile (PAN)
Proximity Profile (PXP)
Health Device Profile (HDP)
SIM Access Profile (SAP)
Generic Attribute (GATT) and attribute proto-
col (ATT)
NFC Supports the following NFC modes of opera-
tion:
Reader/Writer mode
Peer-to-Peer mode
Card Emulation mode
UICC SE is supported for card emulation
mode.
MN005019A01-B
Appendix A: Technical Specifications
120
Item Specification
GPS
Location services Standalone GPS
Assisted GPS (aGPS)
GLONASS
Device Management
Remote management and configuration Supports AirWatch DM
Video and Imaging
Supported formats MPEG-4 (.mp4)
JPG
PNG
GIF
BMP
H.264
H.263
NOTICE: Video and images are time stamped for evidence documentation.
Audio
Supported formats MP3 (.mp3)
AMR
AMR-NB
AMR-WB
AAC/AAC+/eAAC
LPCM
Output Dual Front Facing Speakers up to 1.6W
3.5 mm 4 pole Audio Jack (stereo) connector
supporting:
COTS 3.5 mm Headset
COTS 3.5 mm Headset with Microphone
COTS 3.5 Headset with Microphone and
Send/End button
Motorola Solutions 3.5 mm Mono Headset
with Microphone and PTT button
Bluetooth power Class 2 – output power 2.5
mW (4 dBm)
Bluetooth Power Class 1.5 – output power
10mW (10dBm)
BLE 4&5 - output power 1mW (0dBm)
Input Three noise and echo cancelling micro-
phones
Accessories
MN005019A01-B
Appendix A: Technical Specifications
121

Item Specification
In-box accessories Either standard battery or high capacity bat-
tery with the appropriate battery cover
USB-A to USB-C data/power cable
Region-specific wall charger
Quick Start Guide
Regulatory/Safety Guide
MN005019A01-B
Appendix A: Technical Specifications
122