Motorola Solutions 89FT7625 Mobile Computer with GSM/ EDGE/ WCDMA Transmitter User Manual ML910 CH0 new version 9 18 07
Motorola Solutions, Inc. Mobile Computer with GSM/ EDGE/ WCDMA Transmitter ML910 CH0 new version 9 18 07
Contents
- 1. Users Manual 1
- 2. Users Manual 2
Users Manual 2
5-2 BIOS Setup Utility & MLUA
When and How to Use the BIOS Setup Utility
When to Use
You need to run the BIOS Setup Utility when:
z You see an error message on the screen requesting you to run Setup.
z You want to restore the factory default settings.
z You want to modify some specific settings according to the hardware.
z You want to modify some specific settings to optimize system performance.
Starting BIOS Setup
NOTE:
1. The Setup screens shown in this chapter are for your reference only. The actual items or
settings on your computer may differ.
2. The Setup utility may have been updated after the publication of this user guide.
3. The settings you select in your operating system might override similar settings in the Setup.
To run BIOS Setup, press F2 when the prompt appears in the lower left corner of the
screen during system startup. The prompt shows up on the screen for only a few
seconds. You must press F2 quickly. The BIOS Setup menu appears as shown next.
Moving Around and Making Selections
A brief description of keyboard usage is listed next:

BIOS Setup Utility & MLUA 5-3
Key Function
F1 General Help
F2 General Help
F9 Load optimal defaults
F10 Save and Exit
← → Select Screen
↑ ↓ Select Item
┼ ─ Change Field/Option
Enter 1) Brings up the sub-menu when available.
2) Opens or closes the options window when an item is selected.
Tab Jumps from one item to another.
Esc 1) Exits the BIOS Setup Utility.
2) Returns to the previous menu if in a sub-menu.
3) Closes the options window if one is open.
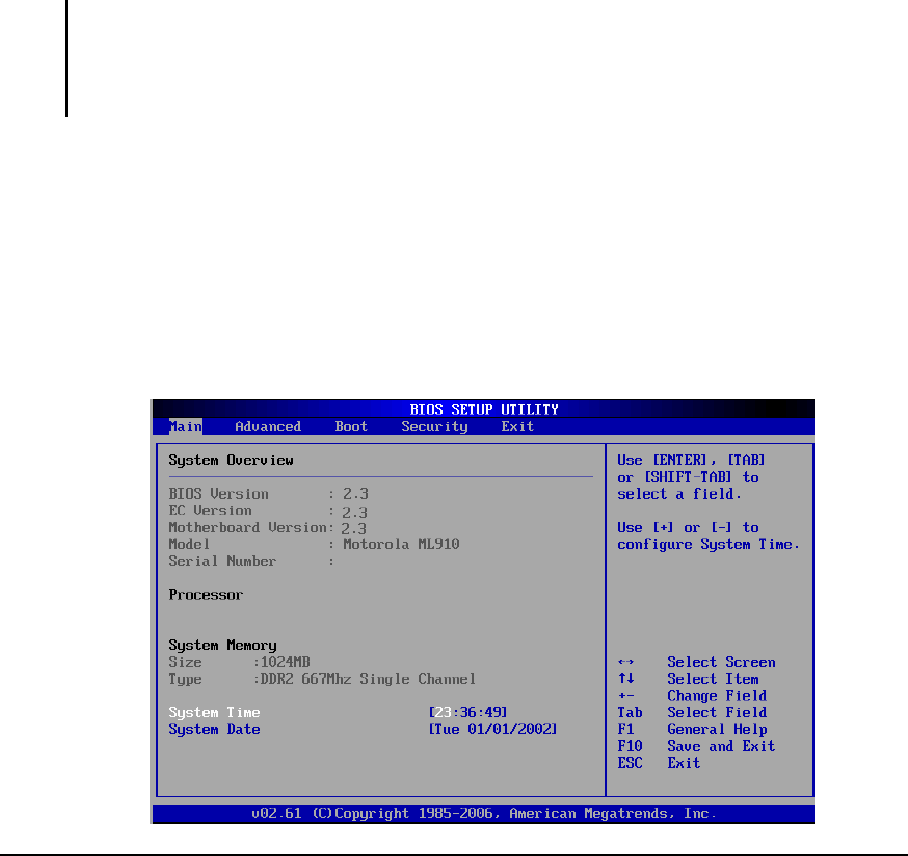
Main Menu
5-4 BIOS Setup Utility & MLUA
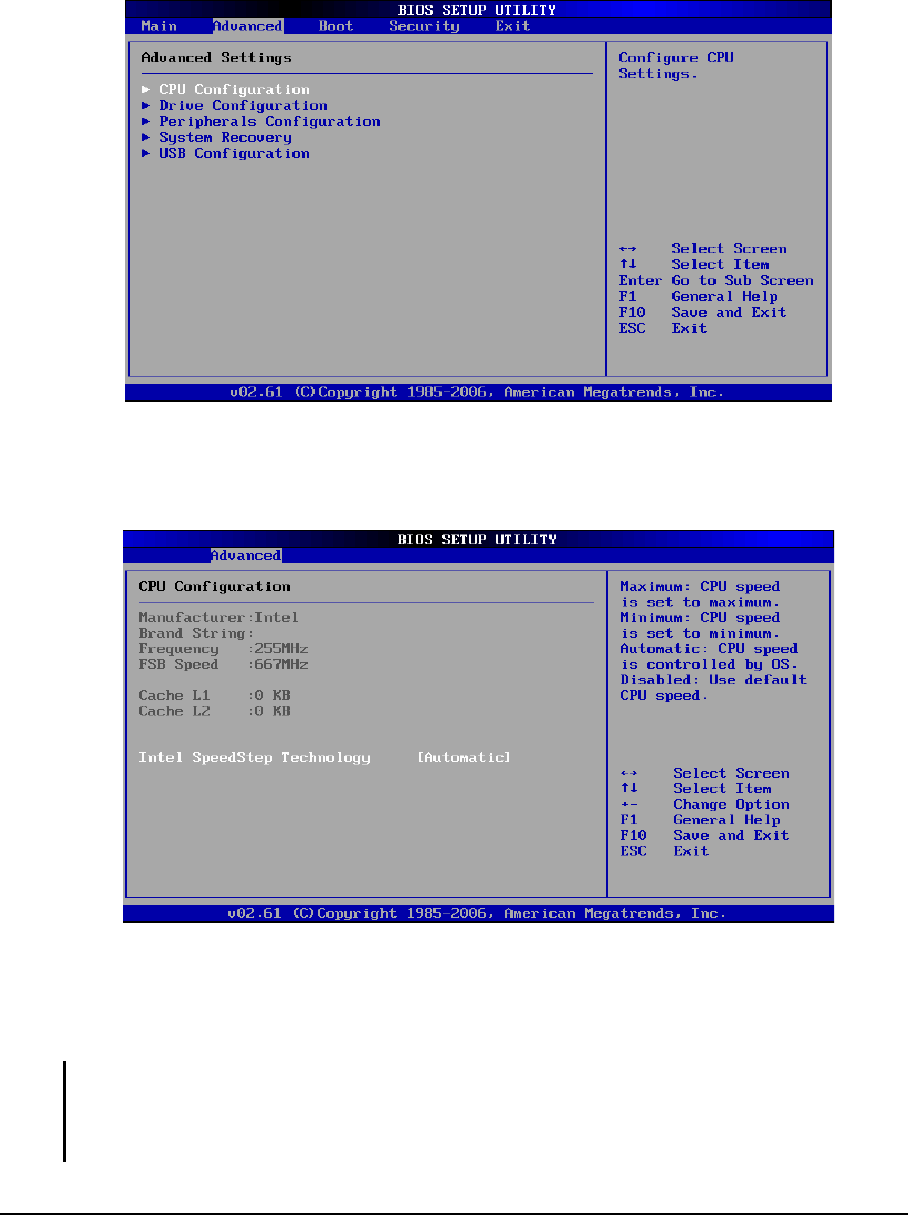
Advanced Menu
CPU Configuration
Setup function of “Intel SpeedStep Technology“: Under the slide of “Advanced”, use ÏÐ
key to move cursor on the string of “Intel SpeedStep Technology” and you will find the
option of “Maximum”, “Minimum”, “Automatic” & “Disabled” on the right top corner of
screen.
z Maximum: CPU speed is set to maximum.
z Minimum: CPU speed is set to minimum.
z Automatic: CPU speed is controlled by OS.
z Disabled: Use default CPU speed.
BIOS Setup Utility & MLUA 5-5
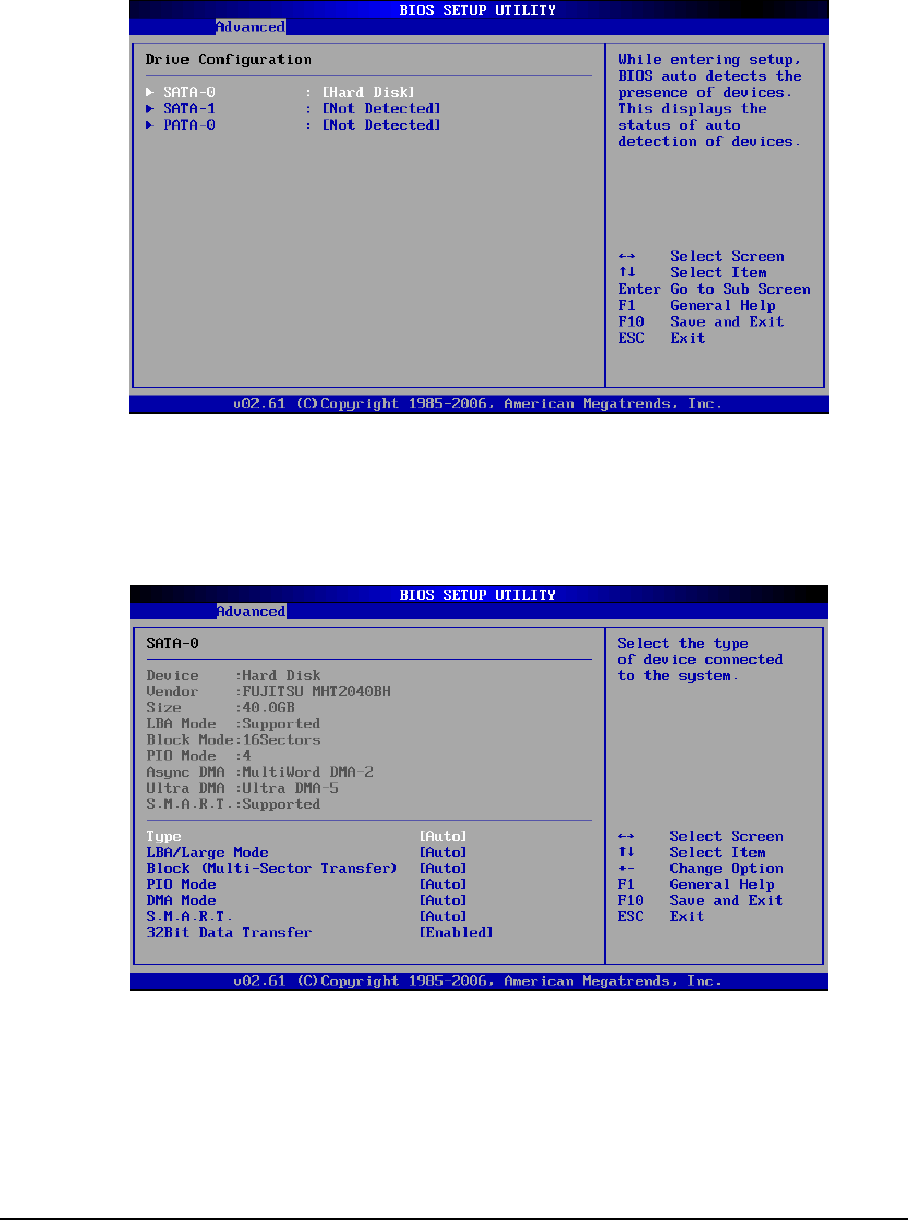
Drive Configuration
While entering setup, BIOS auto detects the presence of devices. This displays the
status of auto detection of devices.
Information of Device
5-6 BIOS Setup Utility & MLUA
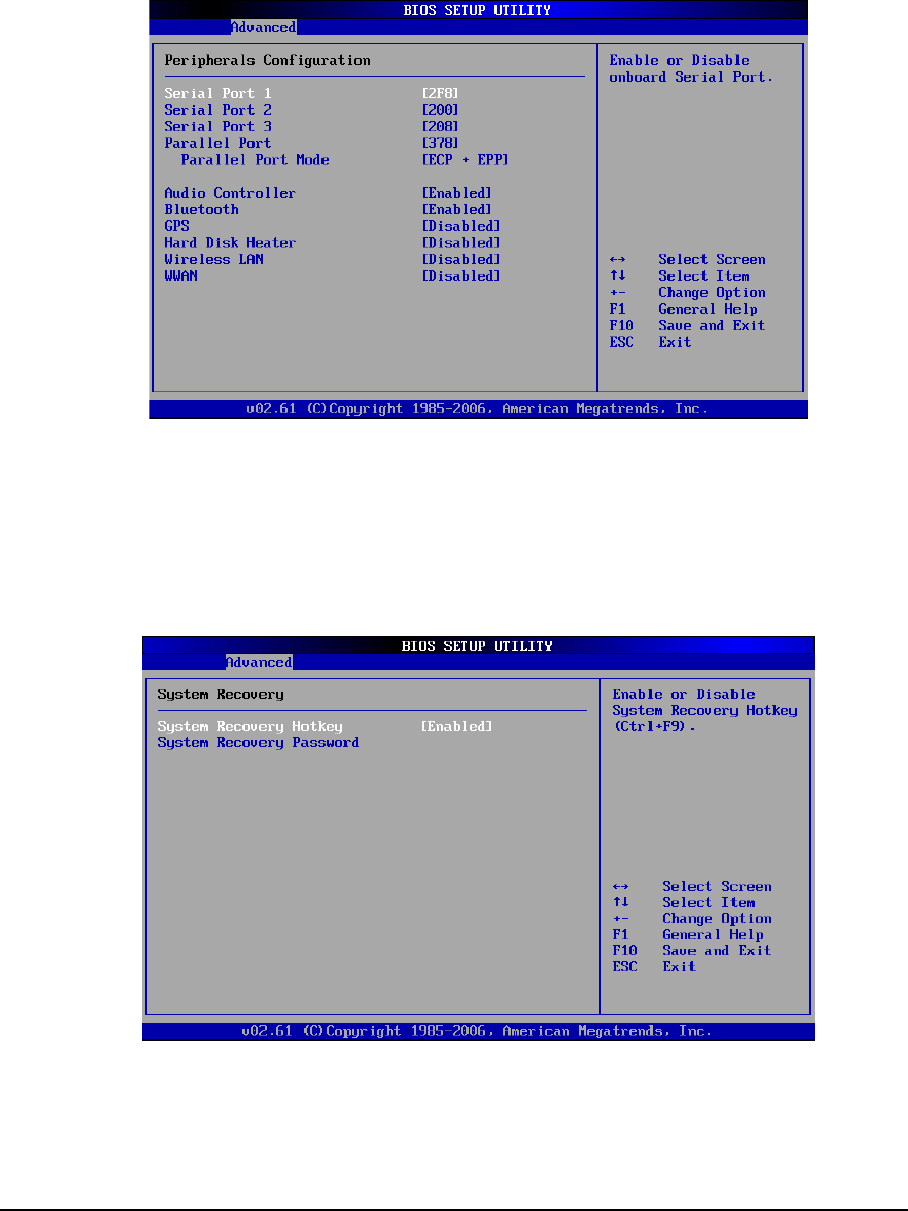
Peripherals Configuration
Enables or disables the feature of “Peripherals Configuration”:
Under the slide of “Advanced”, use ÏÐ key to move cursor on the string of peripherals
and enable or disable peripherals configuration as you need.
System Recovery
System Recovery Hotkey:
Enable or Disable System Recovery Hotkey by (Ctrl+F9).
System Recovery Password:
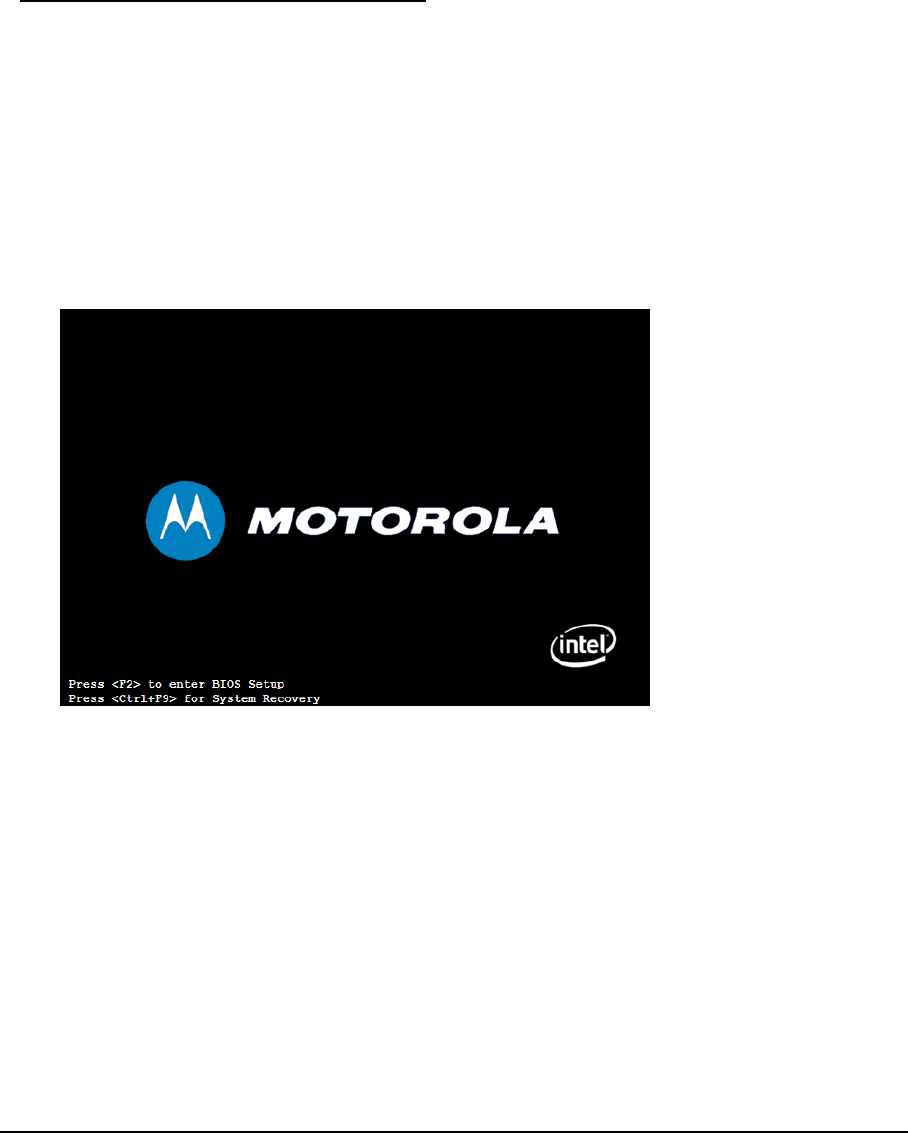
The BIOS support the recovery of the HDD with a Ctrl+ F9 during POST by using one to
six character password.
BIOS Setup Utility & MLUA 5-7
Set and Change Password:
Select Change Password from the System recovery password Setup menu and press
<Enter>.
Enter New Password:
Appears. Type the password and press <Enter>. The screen does not display the
characters entered. Retype the password as prompted and press <Enter>. If the
password confirmation is incorrect, an error message appears. The password is stored in
NVRAM after completes.
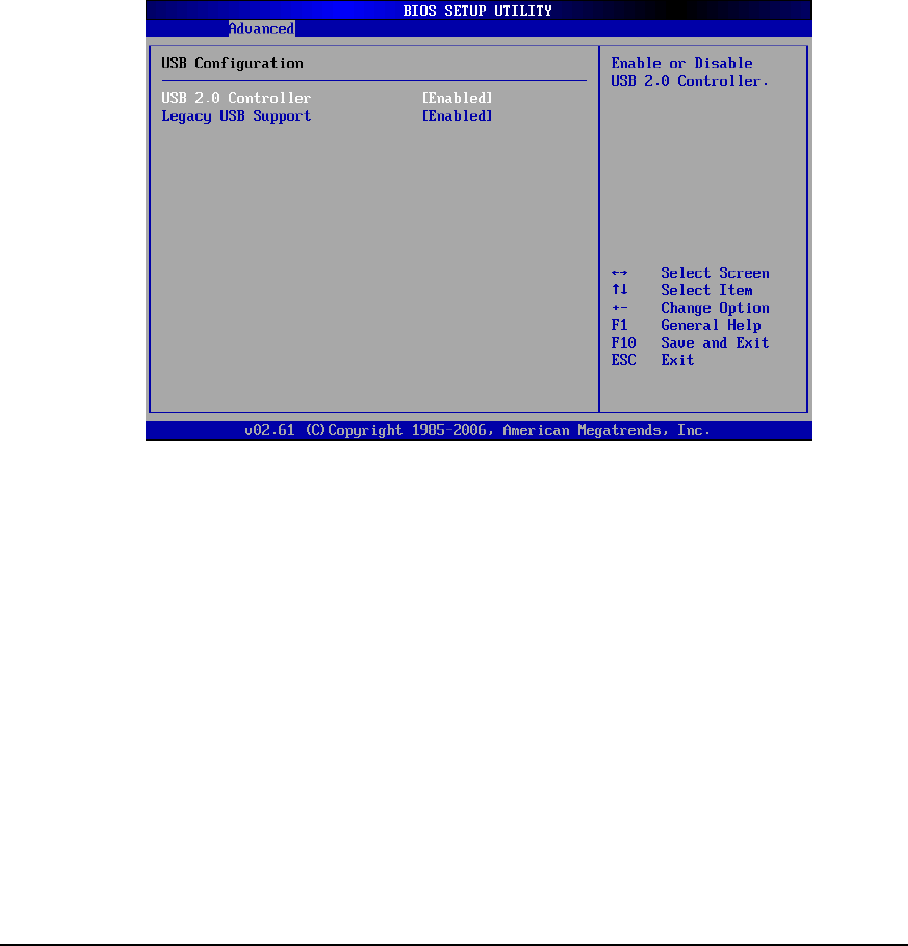
USB Configuration
5-8 BIOS Setup Utility & MLUA
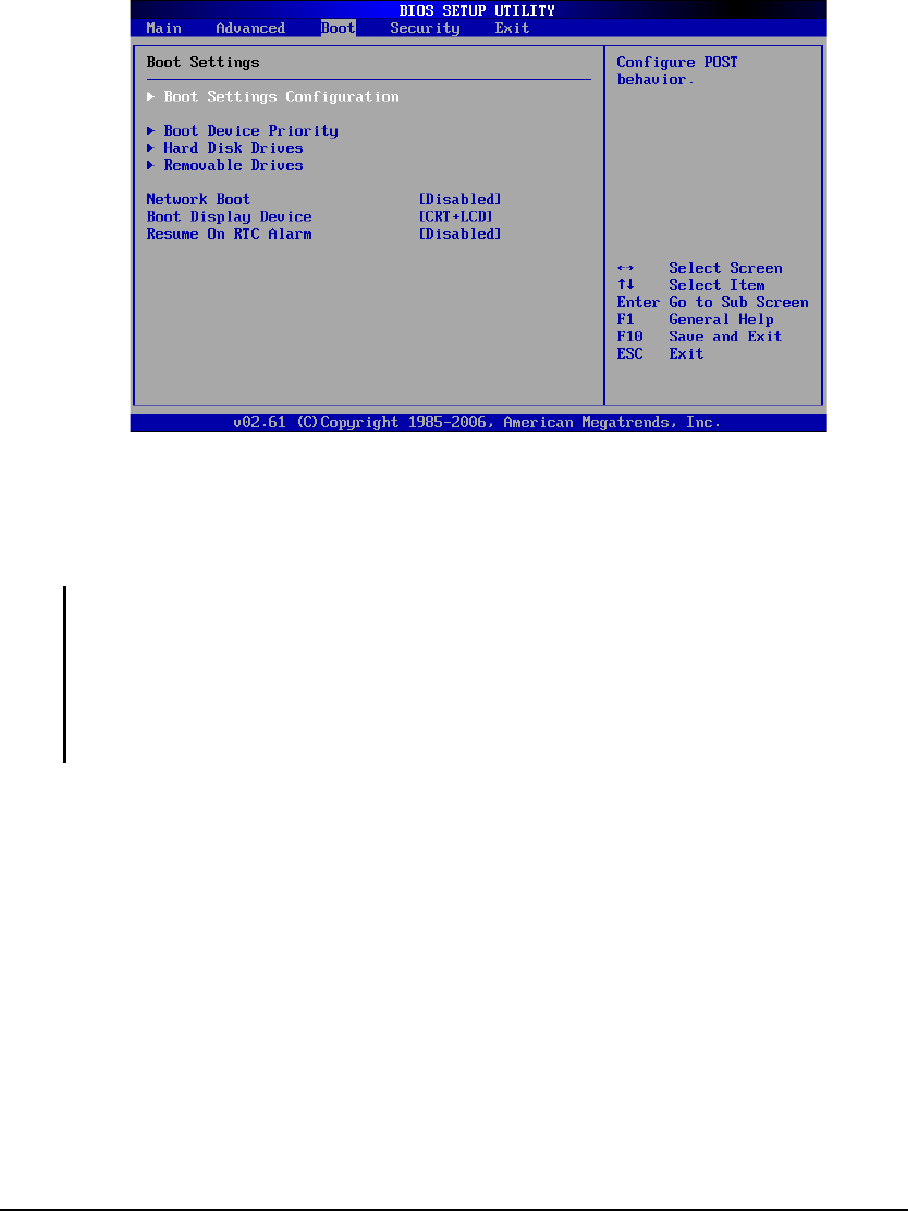
Boot Settings
Boot Settings:
Under the slide of “Boot”, use ÏÐ key to move cursor on the string of “Boot Settings
Configuration”, “Boot Device Priority”, “Hard Disk Drives” & “Removable Drives” for
following features.
z Boot Setting Configuration: Configure POST behavior.
z Boot Device Drives: Set the Boot Device Priority Sequence.
z Hard Disk Drives/Removable Drives/CD & DVD Drives: Set the Boot Device
Priority Sequence from available Drives.
z Network Boot: Enables or Disables Network Boot.
z Boot Display Device: Set Display Device used when system boots.
z Resume On RTC Alarm: Enable or Disable System wake up on RTC Alarm.
BIOS Setup Utility & MLUA 5-9
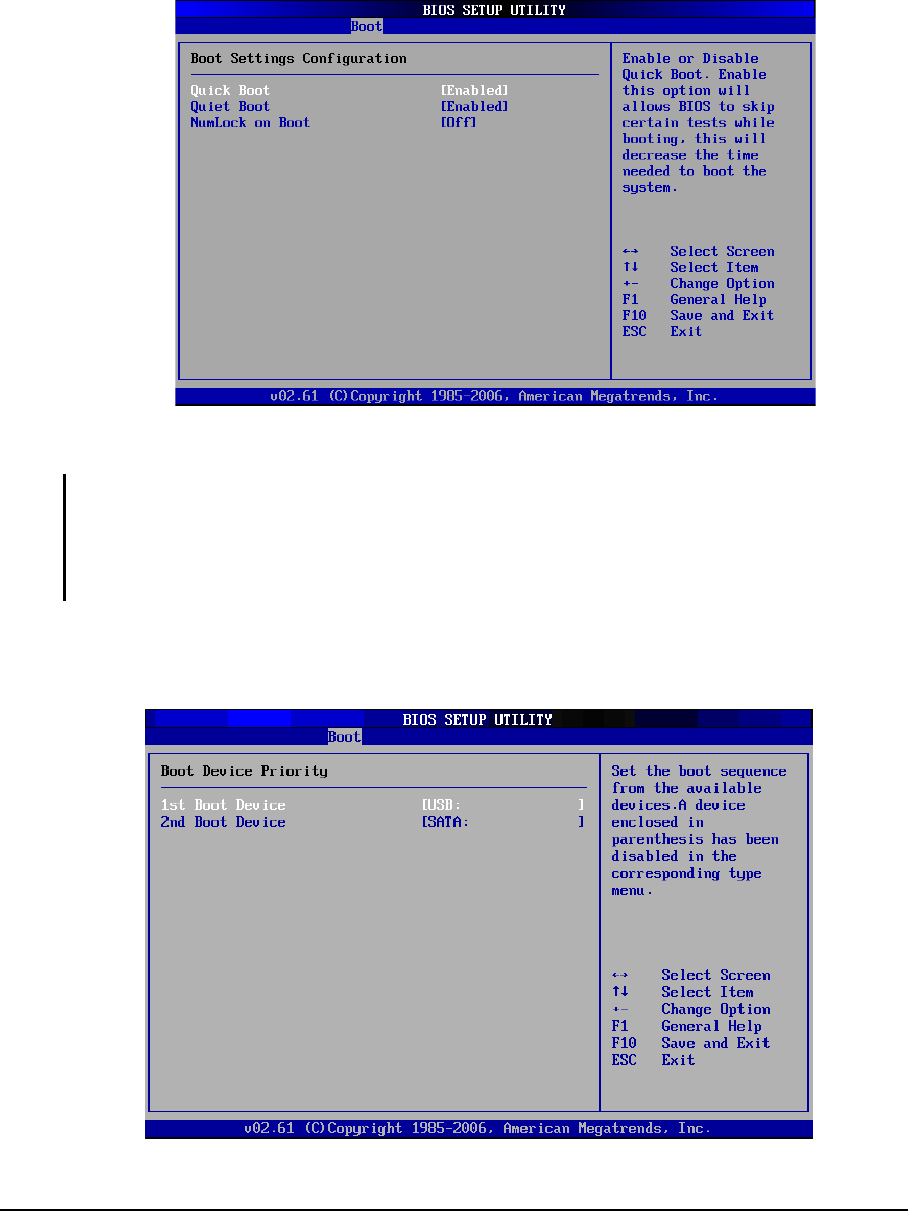
Boot Settings Configuration
Under the Slide of “Boot” use ÏÐ key to move cursor on the string of “Quick Boot”, “Quiet
Boot” & “NumLock on Boot” for the features enable or disable.
z Quick Boot: Enable or Disable Quick Boot. Enable this option will allows BIOS to
skip certain tests while booting, this will decrease the time needed to boot the
system.
z Quiet Boot: Enable this option will shows logo screen instead of POST messages.
z NumLock on Boot: set status & NumLock when system boot.
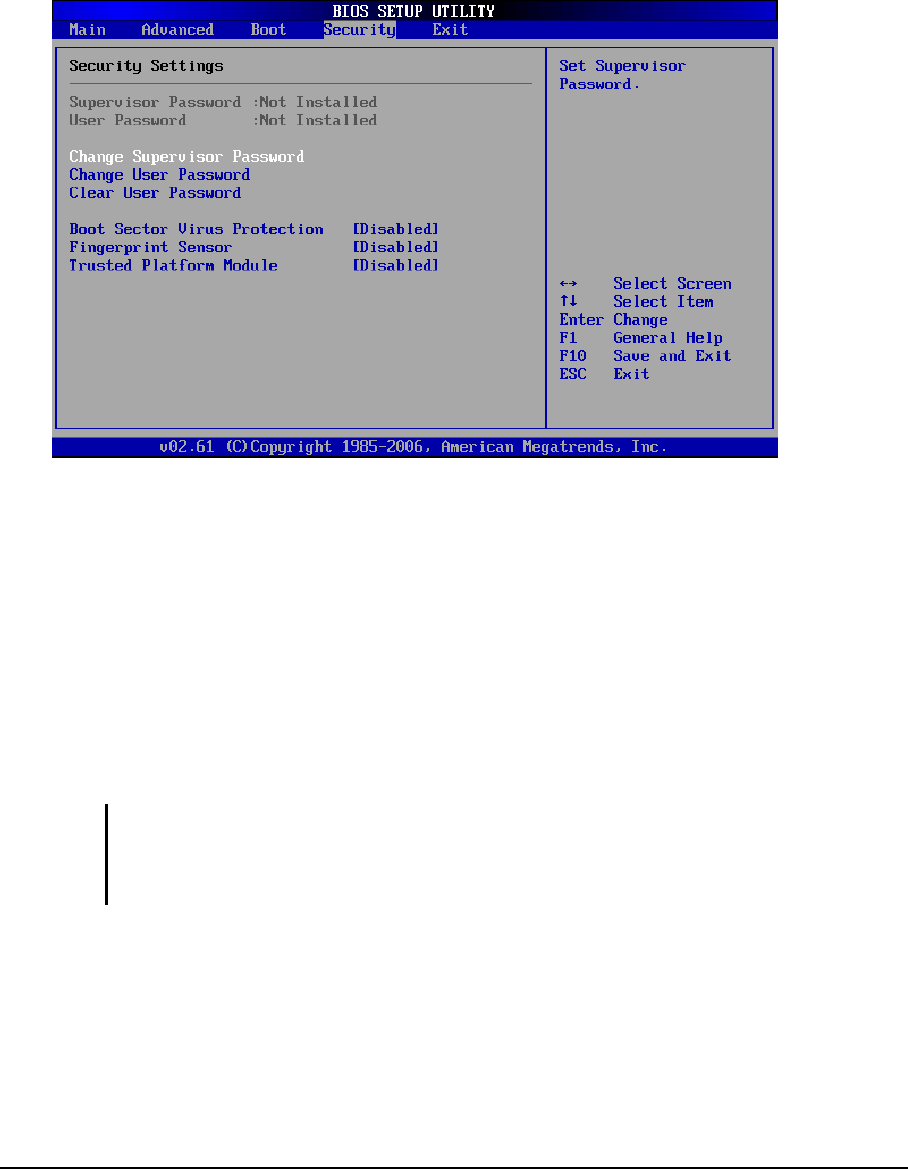
Boot Device Priority
Set the boot sequence from the available devices. A device enclosed in parenthesis is
has been disabled in the corresponding type menu.
5-10 BIOS Setup Utility & MLUA
Security Settings
BIOS Password Setup
Provide both a Supervisor and a User password. If you use both passwords, the
Supervisor password must be set first. The system can be configured so that all users
must enter a password every time the system boots or when Setup is executed, using
either or either the Supervisor password or User password. The Supervisor and User
passwords activate two different levels of password security. If you select password
support, you are prompted for a one to six character password. Type the password on
the keyboard. The password does not appear on the screen when typed. Make sure you
write it down. If you forget it, you must drain NVRAM and reconfigure. Select Security
Setup from the Setup main BIOS setup menu. All Security Setup options, such as
password protection and virus protection, are described in this section. To access the
sub menu for the following items, select the item and press <Enter>:
z Change Supervisor Password
z Change User Password
z Clear User Password
z Supervisor Password
Indicate whether a supervisor password has been set. If the password has been
installed, Installed displays. If not, Not Installed displays.
User Password
Indicate whether a user password has been set. If the password has been installed,
Installed displays. If not, Not Installed displays.
Change Supervisor Password:
Select Change Supervisor Password from the Security Setup menu and press <Enter>.

BIOS Setup Utility & MLUA 5-11
Enter New Password:
Appear Type the password and press <Enter>. The screen does not display the
characters entered. Retype the password as prompted and press <Enter>. If the
password confirmation is incorrect, an error message appears. The password is stored
in NVRAM after completes.
Change User Password:
Select Change User Password from the Security Setup menu and press <Enter>.
Enter New Password:
Appear Type the password and press <Enter>. The screen does not display the
characters entered. Retype the password as prompted and press <Enter>. If the
password confirmation is incorrect, an error message appears. The password is stored
in NVRAM after completes.
Clear User Password:
Select Clear User Password from the Security Setup menu and press <Enter>.
Clear New Password:
[Ok] [Cancel]
Appear Type the password and press <Enter>. The screen does not display the
characters entered. Retype the password as prompted and press <Enter>. If the
password confirmation is incorrect, an error message appears. The password is stored
in NVRAM after completes.
Exit Options
CAUTION:
It will conflict with ML910™ Com Ports resource and there is a work-around to fix it if you use I/O
resources is "2F8h","3F8h","2E8h" or "3E8h" to PCMCIA card.

5-12 BIOS Setup Utility & MLUA
Please enter "BIOS Setup Utility" menu and refer following procedure to setup:
1. Click “Advanced “.
2. Select “Peripherals Configuration”.
3. To disable "Serial Port 1".
("Serial Port 1" is located on the left side of the notebook, when you disable it, this
Serial Port1 will be no function.)

BIOS Setup Utility & MLUA 5-13
ML User Application (MLUA)
As previously described the MLUA is designed for users to configure the parameters of
various functions in the notebook. By using these configuration parameters, you can
change the default configuration that automatically loads when you turn on the
computer.
ML User Application is automatically launched every time you boot your notebook into
Windows Operating System, this can be indicated by the ML User Application icon on
the taskbar. Double-click on the ML User Application icon will bring up the application
window.
ML User Application is presented in a tab-based user interface, which consists of below
tabs:
• About tab displays the following system information:
o Motherboard Version
o BIOS Version
o EC Version
o Application Version
• GPS tab displays the name of the built-in GPS module, and it allows user to turn ON
or OFF the built-in GPS module. Default setting is OFF.
• General Purpose I/O tab allows user to turn ON or OFF the GPIO port 0 and GPIO
port 1 when notebook is docked to a Vehicle Dock. Default setting is OFF both GPIO
ports.
• Monitor tab displays the following information:
o Processor Temperature
o Battery Capacity
o Car Voltage
o Docking Board Temperature
o Docking Fan Speed
• WWAN Device tab displays the name of the built-in WWAN module, and it allows
user to turn ON or OFF the built-in WWAN module. Default setting is OFF.

5-14 BIOS Setup Utility & MLUA
• Temperature tab displays the following temperature readings from different
sensors located on the system:
o Processor Temperature
o LCD Display Temperature
o System Temperature
o Hard Disk Drive Temperature
o Primary Battery Temperature
o Secondary Battery Temperature
• Battery tab allows user to select the most frequently used battery charger profile
which defines the battery calibration cycle.
• This WLAN Device tab displays the name of the built-in WLAN module, and it allows
user to turn ON or OFF the built-in WLAN module. Default setting is OFF.
• This Speaker Output tab allows user to define the notebook speaker behavior.
General Guidelines
Below are the general guidelines on how to use the ML User Application:
• Click on the OK button to save changes and close the ML User Application
window.
• Click on the Cancel button to discard changes and close the ML User
Application.
• Click on the Apply button to save changes and keep the ML User Application
window remained open.
• Click on the Get Default Value button to reset option to its default value.
• Click on the Help button to show the Help Content for the ML User Application.
Note:
Changing on ML User Application parameters will impact the ML Administrator
Application configuration that has connection with ML User Application and vice
versa
Specific details on the MLUA application and the setting that can be addressed are
explained in more detail in the On-line Help that accompanies the application.

BIOS Setup Utility & MLUA 5-15
ML Administrator Application (MLAA)
This application is designed for administrator to configure the parameters of various
functions in the notebook. By using these configuration parameters, you can change
the default configuration that automatically loads when you turn on the computer.
Every time you start the ML Administrator Application, the current configuration
parameters saved in EC is loaded and displayed in the ML Administrator Application
window.
For specific details on this application and the various parameters that can be adjusted please
refer to the On-line for the application.
CAUTION:
It is recommended the any changes made using the MLAA application only be performed by a
System Administrator.

5-16 BIOS Setup Utility & MLUA
This page intentionally left blank

Installing Software Drivers 6-1
CHAPTER
6 6
Installing Software Drivers
To take full advantage of the unique features of your computer, some operating systems
require customized software, known as drivers, to be installed.
If you purchased the computer with Windows pre-installed, your dealer may have already
installed the drivers. If not, you need to install the drivers using the driver CD supplied with
your computer.
This chapter describes how to install the drivers.

6-2 Installing Software Drivers
How to Use the Driver CD
NOTE:
1. The drivers may have been updated after this user guide was published. For latest driver
updates, please contact your dealer.
2. You can always find README or document files in the folders for the LAN, TPM, Touch ,
Bluetooth, WLAN, HD Audio and Chipset on the driver CD. These files contain the latest
information from the software supplier.
3. The available items may differ according to your computer model and operation system.
4. In order to access the User Guide on this CD you will need to have a copy of ADOBE
Acrobat Reader on the computer or access to the Internet by the computer to use the
ADOBE hot link icon to down load the reader.
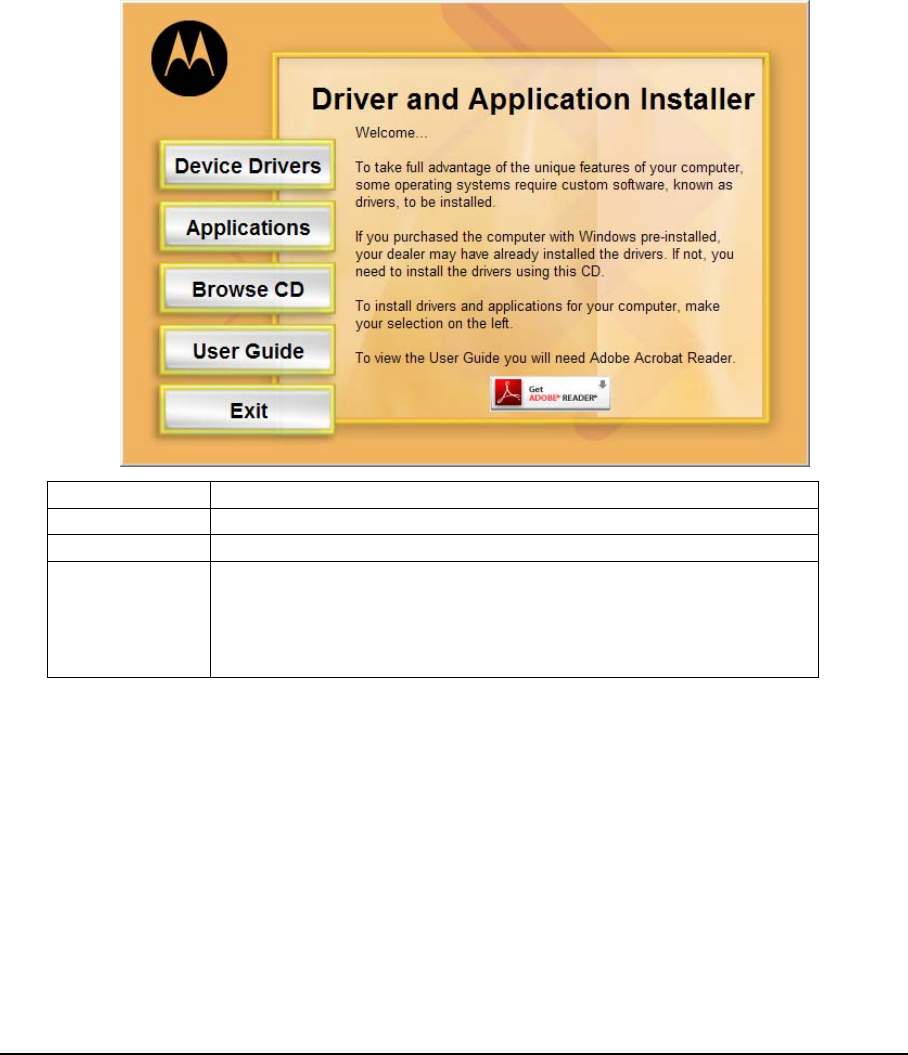
An Autorun program is provided on the driver CD to help you easily install the drivers.
When the driver CD is inserted, the Autorun program automatically starts. If you need to
start the program manually, run the AutoRun.exe program from the root directory of the
driver CD.
Installing Software Drivers 6-3
Main Menu
The Main Menu Screen:
To install drivers and applications for your computer, make your selecting the right.
Device Drivers Provides access to the available drivers selections
Applications Provides access to the available applications selections
User Guide Allows you to access the electronic version of the User Guide
Browse CD Allows you to browse the contents of this CD. Requires the
A
DOBE
Reader
Get ADOBE
Reader Icon
This is a hot link to the ADOBE web site in order to access and
download the ADOBE Reader for viewing the ML910™ User Guide
on this CD
6-4 Installing Software Drivers
Installing Device Drivers
1. Click “Device Drivers” in the “Main Menu”.
2. To install the necessary driver, just click on the particular option and follow the
onscreen instructions to continue and complete installation.
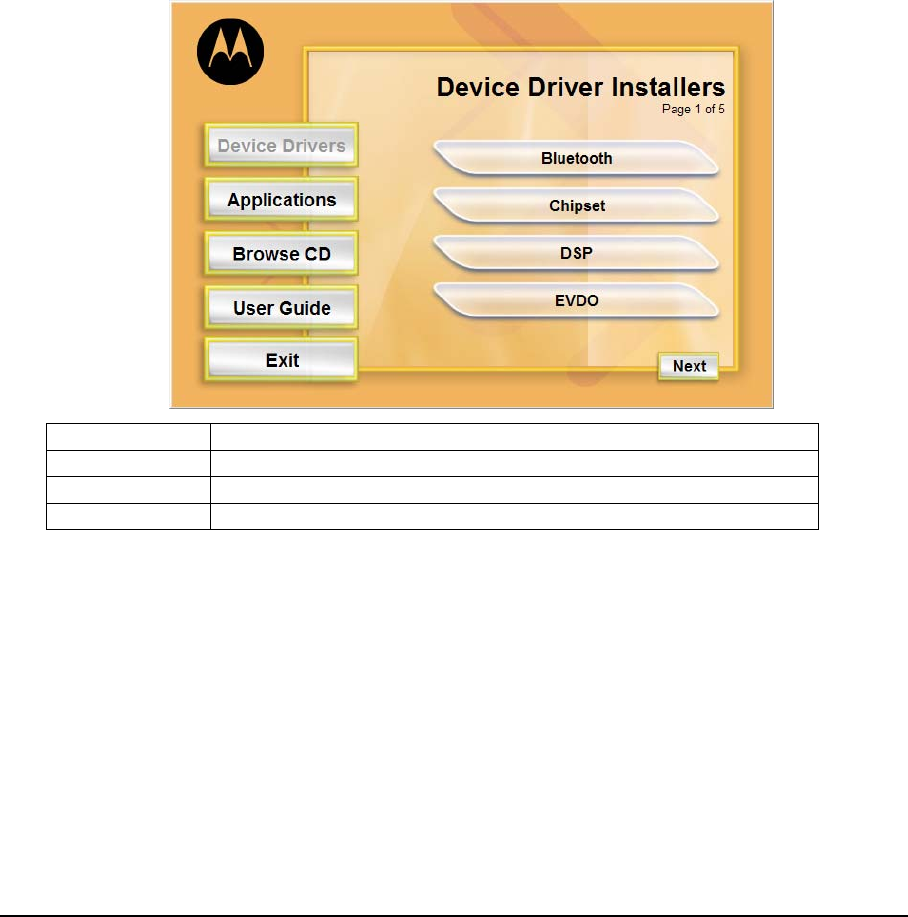
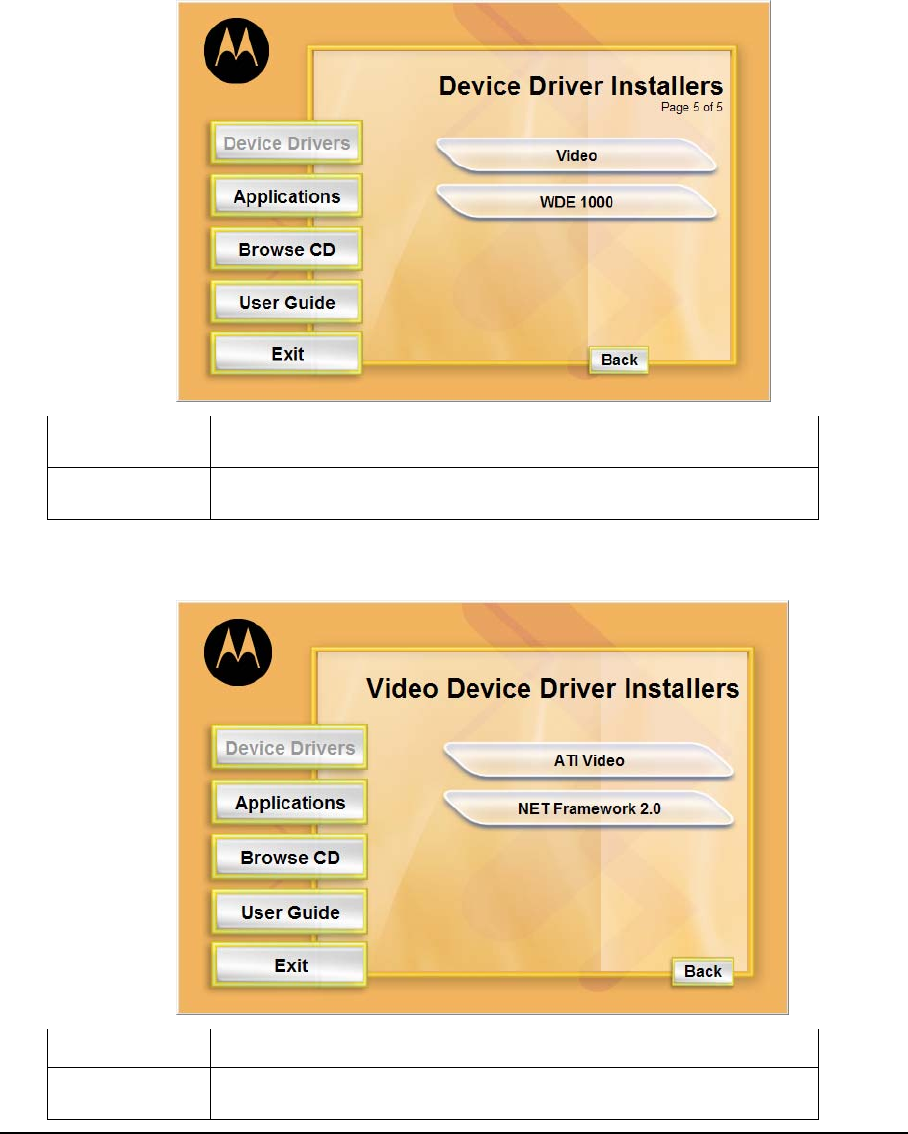
• Device Driver Installers Menu Screen
There are 5 screens located in the Device Driver Installers menus. You can use
the Next and Back buttons to navigate back and forth in the screens.
Bluetooth Click on the Bluetooth button to install both the driver & application
Chipset Click on the Chipset button to install the Chipset driver
DSP Click on the DSP button to install the DSP driver
EVDO Click on the EVDO button to access the Driver and Watcher installs
Installing Software Drivers 6-5
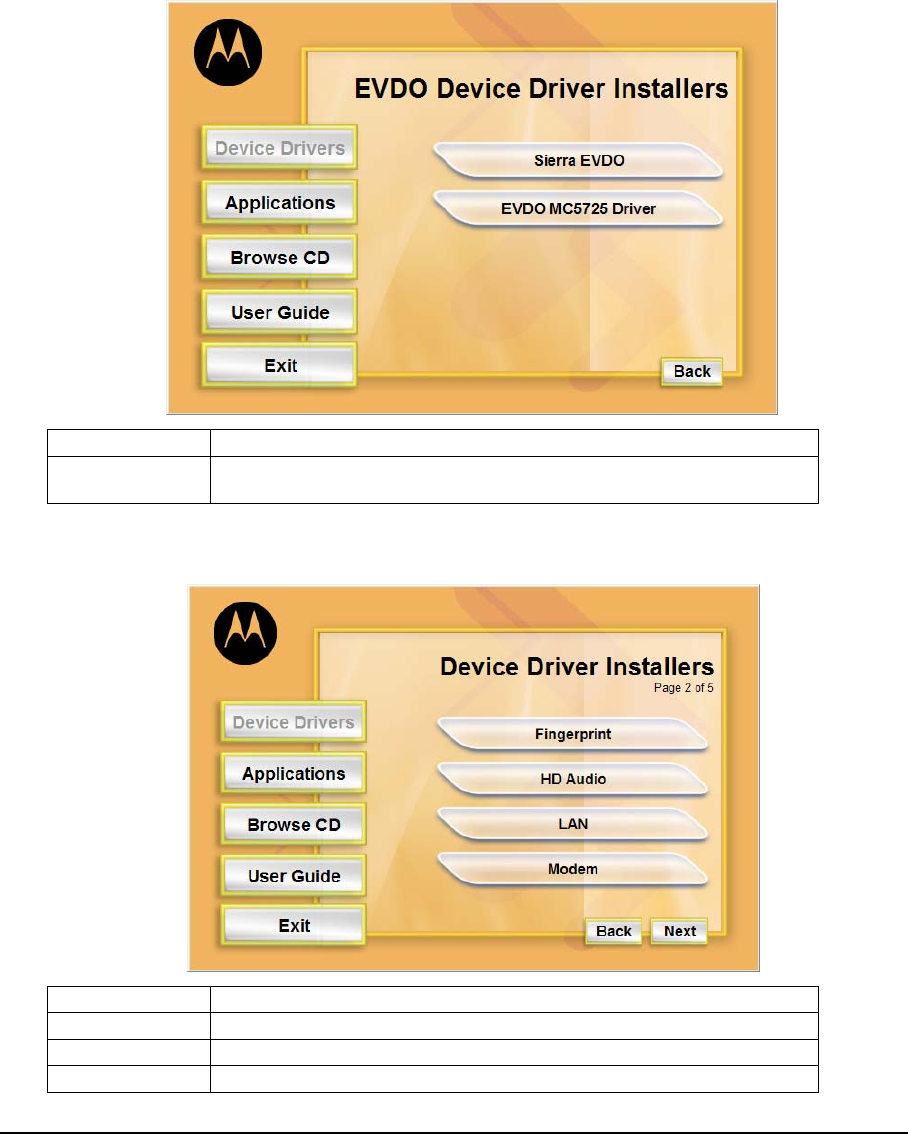
• EVDO Device Driver Installers Menu Screen
EVDO Click on the EVDO button to install Watcher
EVDO MC5725
Driver Click on the EVDO MC5725 Driver button to install the EVDO driver
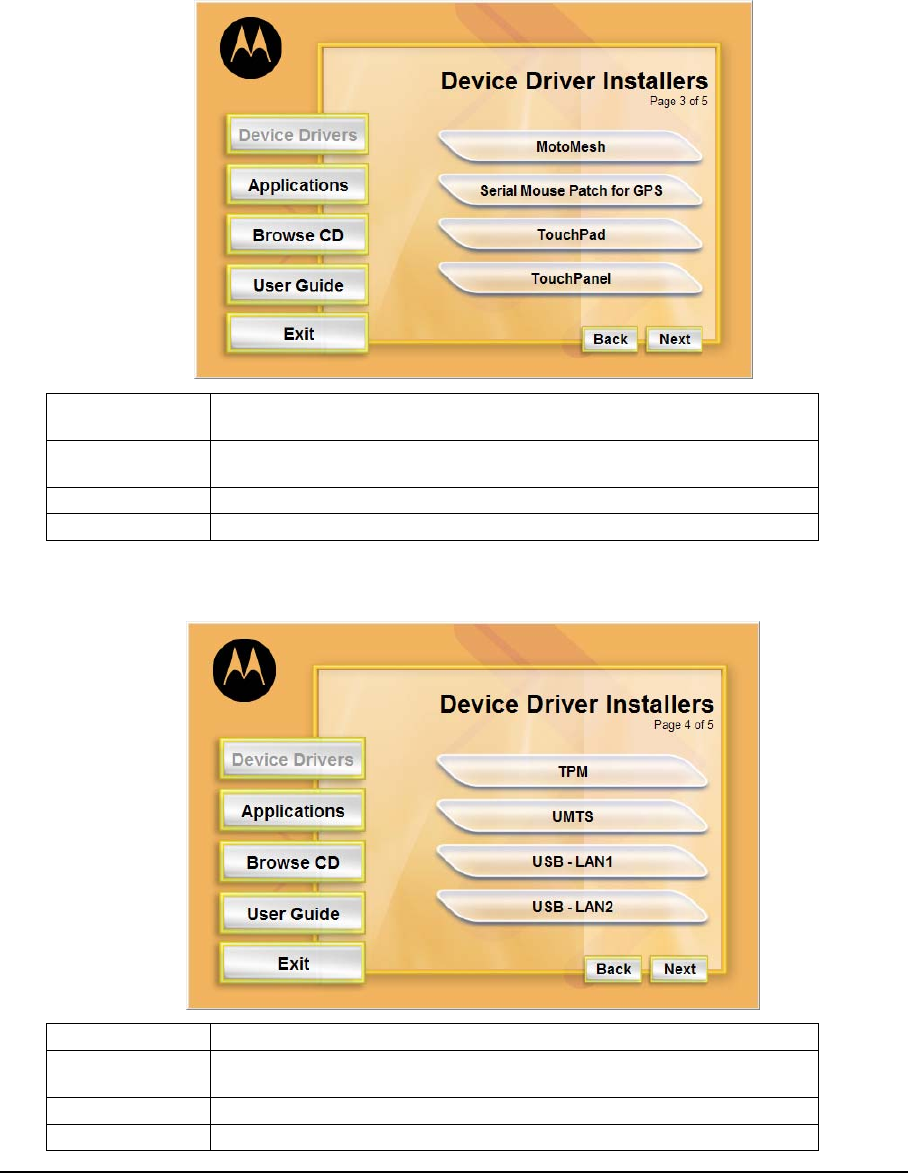
• Device Driver Installers Page 2 of 5
Fingerprint Click on the Fingerprint button to installs the Fingerprint driver.
HD Audio Click on the HD Audio button to installs the HD Audio driver.
LAN Click on the LAN button to installs the LAN driver.
Modem Click on the HD Modem button to installs the Modem driver.
6-6 Installing Software Drivers
• Device Driver Installers Page 3 of 5
MotoMesh Click on the MotoMesh button to both the MotoMesh driver &
application.
Serial Mouse
Patch for GPS This is neither driver or app but is a required patch for GPS
Operation
TouchPad Click on the TouchPad button to installs the LAN driver.
TouchPanel Click on the TouchPanel button to installs the TouchPanel driver.
• Device Driver Installers Page 4 of 5
TPM Click on the TPM button to install the Trusted Platform Module driver.
UMTS Click on the UMTS button to installs both the UMTS driver and
application.
USB – LAN1 Click on the USB – LAN1 button to installs the USB – LAN1 driver.
USB – LAN2 Click on the USB – LAN2 button to installs the USB – LAN2 driver.
Installing Software Drivers 6-7
• Device Driver Installers Page 4 of 5
Video Click this button to access ATI video Driver Installer and NET
Framework 2.0
WDE1000 Click on the WDE1000 button to install both the WDE1000 driver &
application
• Video Device Driver Installers
ATI Video Click on the ATI Video to install the ATI video Driver
NET Framework
2.0 Click on the NET Framework 2.0 button to install the NET
Framework 2.0 which required for the ATI video driver
6-8 Installing Software Drivers
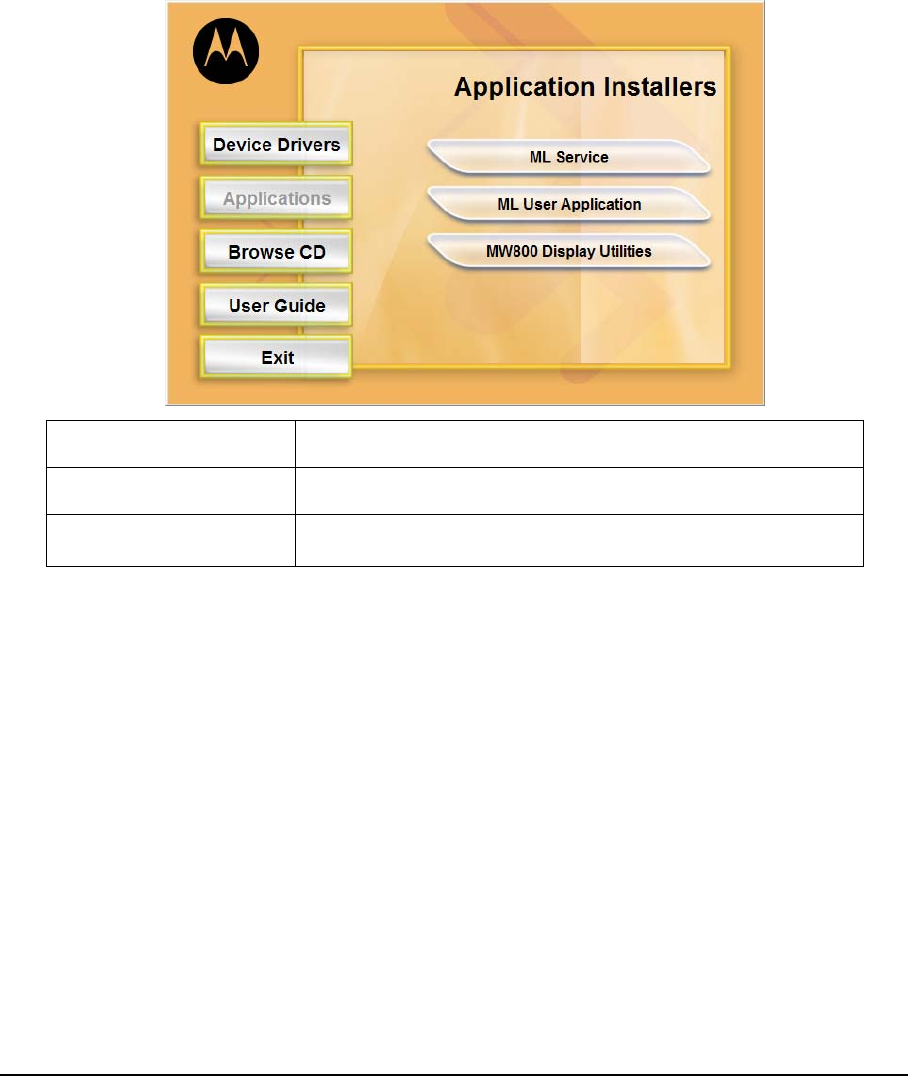
Installing Applications
1. Click “Applications” in the “Main Menu”.
2. Click on the application program you want to install.
ML Service Click on the ML Service button to install the ML admin
Application
ML User Application Click on the ML User Application button to install the ML User
Application
MW800 Display Utilities Click on the MW800 Display Utilities button to install the MW800
Display Application Utilities

Caring for the Computer 7-1
CHAPTER 7
Caring for the Computer
Taking good care of your computer ensures trouble-free operation and also reduces the
risk of damage to your computer.
This chapter gives you guidelines covering these areas of maintenance:
z How to protect the computer.
z What to note when using and storing the computer.
z How to clean the computer.
z What to note when using the battery pack.
z What to note when traveling with the computer.

7-2 Caring for the Computer
Protecting the Computer
To safeguard the integrity of your computer data as well as the computer itself, you can
protect the computer in several ways as described in this section.
Using the Password
The power-on password protects your computer against unauthorized use. If the
password is set, the prompt requesting for the password appears on the screen whenever
the computer is turned on.
The password is set via the SCU program. See “Security Settings” in Chapter 5 for
instructions.
Using an Anti-Virus Strategy
The Security feature of the SCU program protects the boot sector of the hard disk from
virus attacks..
It is recommended that you install a virus-detecting program to keep your computer
secure from potential viruses that could damage your files and system.

Caring for the Computer 7-3
Taking Care of the Computer
Location Guidelines
z Use the computer where the temperature is between -20 °C (-4 °F) and 50 °C (122
°F).
z Avoid placing the computer in a location subject to high humidity, extreme
temperatures, mechanical vibration, direct sunlight, or heavy dust.
z Do not cover or block any ventilation openings on the computer. For example, do
not place the computer on a bed, sofa, rug, or other similar surface. Otherwise,
overheating may occur which could result in damage to the computer.
z Keep the computer at least 13 cm (5 inches) away from electrical appliances that
can generate a strong magnetic field such as a TV, refrigerator, motor, or a large
audio speaker.
z Do not move the computer abruptly from a cold to a warm place. A temperature
difference of more than 10 °C (18 °F) will cause condensation inside the unit, which
may damage the storage media.
z Do not place the computer on an unsteady surface.
General Guidelines
z Do not place heavy objects on top of the computer as this may damage the display.
z The screen surface can be easily scratched. Do not use paper towels to clean the
display. Avoid touching it with a ballpoint pen or pencil.
z To maximize the life of the backlight in the display, use the system’s power
management feature to automatically turn off the backlight. Avoid using a screen
saver or other software that prevents the power management from working.
Cleaning Guidelines
z Never clean the computer with its power on.
z Use a soft cloth moistened with water or a non-alkaline detergent to wipe the exterior
of the computer.
z Gently wipe the display with a soft, lint-free cloth. Do not use alcohol or detergent on
the display.
z Dust or grease on the touchscreen can affect its sensitivity. Clean the touchscreen
by using adhesive tape to remove the dust and grease on its surface.

7-4 Caring for the Computer
Battery Pack Guidelines
Optimal Use of the ML910 RUGGED NOTEBOOK Battery
The battery is a consumable product and its performance will gradually degrade based
on usage. To minimize battery degradation and ensure longer life, limit the number of
charges and ensure the battery is not exposed to high ambient temperatures. If
possible, the battery pack should only be recharged when it is nearly fully discharged.
It is recommended to store the battery removed from the ML910™RUGGED NOTEBOOK
with a nominal charge to prevent over-discharge. A full charge is recommended if the
battery is to be stored in the ML910™RUGGED NOTEBOOK.
For optimal use, users should avoid the following:
• Use on battery power for short periods of time then repeatedly charging
• Using or storing in a place with high temperature.
Charging
Charge and discharge time will differ depending on the computer’s power status and
temperature. Battery charging time increases when the computer’s power is on and is
also dependent on the battery’s temperature. To charge the battery more quickly,
power off the computer or place it in the standby or the hibernation mode. Battery
charging time also increases when in low or high temperature environments below
10ºC, (50ºF) or above 30ºC (86ºF). During normal charging (between 32ºF and 113ºF)
the battery indicator will glow amber. When full the indicator will glow green. The
ML910™’s battery will not be charged if its temperature is outside the allowable range
of 0º to 45ºC (32ºF to 113ºF). During this condition, the battery indicator will not be
illuminated.
• The battery should be charged in a temperature range of 10°C to 35°C (50°F to
95°F).
When the outside air temperature is high (35ºC or above), the temperature inside the
battery will be higher. Avoid charging the battery where the temperature is high, such
as inside a vehicle, with all its windows closed and/or exposed to the hot sun or other
places where the ambient temperature is high. Although the battery can also be
charged down to 0ºC, the charging time will be greatly increased and the battery
capacity will be greatly reduced.
• It is not recommended to charge the battery more than once per day.
Constant recharging of the battery after every use accelerates battery degradation.
To increase battery life it is recommended to recharge the battery no more than once
per day or when the remaining charge drops below 20%. To increase battery life, the
computer will not charge the battery immediately after it has been fully charged unless
the remaining charge has fallen to less than 95%
• If possible, charge the battery while the computer is powered off.
When the computer’s power is on, the temperature inside the battery will increase due
to the heat generated by the internal electronic components. Charging the battery at
higher temperatures will degrade the battery more quickly. It is highly recommended

Caring for the Computer 7-5
that you charge the battery while the computer is powered off. This allows for faster
charging, less degradation, and longer battery life.
Maximizing Battery Operation Time
• Leave the computer off when not in use!
• Decrease the internal LCD brightness by pressing FN + F5
Pressing Fn + F5 will lower the degree of brightness, thereby reducing the power
consumption.
• Before stepping away from your computer, place it in standby or hibernation
mode
Standby or hibernation mode will reduce power consumption.
• To select Power Options: Click: [Start] - [Control Panel] - [Performance and
Maintenance] - [Power Options], and select the desired power-saving setting.
• Motorola recommends against using screen savers or applications that place
a significant load on the CPU
Some screen savers and applications place a large load on the CPU, producing a
significant decrease in battery runtime even when the computer is not being used.
• If possible remove unnecessary peripheral devices (USB devices, PC Cards,
external mouse, etc.) when not in use.
• For all other power-saving settings, please refer to the Power Management
information in this section of the User Guide.
Storage and Non Use for Extended Periods
When the computer is not in use for an extended period (10 days or more):
• Remove the battery from the computer with a remaining charge of 30% to 45%,
and then store it in a cool, dark and dry place.
If the battery pack is kept installed in the computer, it will discharge steadily even when
the computer’s power is off. If this condition continues for a long period (10 days or
more), the battery may over discharge, causing performance degradation. In addition,
this degradation will accelerate if the unit is stored in any high temperature
environment such as inside a vehicle with windows closed, exposed to direct sun or in
any other environment where the temperature is high. Store the unit with battery pack
where the temperature is within the range of 10°C to 30°C (50°F to 86°F). Never allow
the temperature to exceed 60°C (140°F) or permanent damage may occur.
If the battery has been stored out of the notebook computer, longer than 60 days, it
should be checked for remaining charge condition. If below 20% remaining charge, the
battery should be charged up to 30 to 45% before placing it back in storage.

7-6 Caring for the Computer
Removal of the Battery Pack
• Do not install or remove while the computer is on or connected to external
power.
CAUTION:
Removal of the battery pack with power on may present a dangerous condition and may cause
the computer to malfunction or permanent damage to the battery.
• If you remove or store the battery pack, make sure the battery terminals do
not contact any conductors such as metal objects or water. Otherwise the
battery may become unusable as a result of a short circuit.
• Do not touch or attempt to clean the terminals. If battery terminals are dirty or
damaged the battery may not function properly or the computer may not
operate properly. Properly dispose of the dirty or damaged battery and obtain
a new one.
Battery Charge Status and Battery Calibration
The battery pack has built-in functions to measure, store and display the battery
charge status. As the battery pack is used over a long period of time, the remaining
capacity display may become inaccurate due to aging of the battery pack, usage, and
other factors. To display the remaining battery charge accurately, the Battery
Calibration function will automatically check the state of the battery, and then
discharge it to the appropriate level for calibration. A one hour rest period is then
necessary. (AC or external power must stay connected during the preceding steps).
After the rest period, the battery will fully charge as long as the AC power or external
power is still applied. This procedure will be performed once after initial setup and
every 30-45 days thereafter depending on the usage setting, mostly vehicle or mostly
office.
NOTE:
1. A full charge is not necessary for successful completion of the calibration.
2. Battery Calibration does not increase the battery’s capacity; it only allows the battery to recalibrate and report
its full capacity, accurately.

Caring for the Computer 7-7
When Traveling
z Before traveling with your computer, make a backup of your hard disk data into
optical discs or other storage devices. As an added precaution, bring along an extra
copy of your important data.
z Make sure the battery pack is fully charged.
z Make sure the computer is turned off.
z Do not leave objects that will press onto the display.
z Disconnect the AC adapter from the computer and take it with you. Use the AC
adapter as the power source and as a battery-charger.
z Hand-carry the computer. Do not check it in as luggage.
z Allow extra time for airport security. Many airports inspect electronic devices
carefully.
z When going through airport security, it is recommended that you send the computer
and USB disks through the X-ray machine (the device you set your bags on). Avoid
the magnetic detector (the device you walk through) or the magnetic wand (the
hand-held device used by security personnel).
z If you plan to travel abroad with your computer, consult your dealer for the
appropriate AC power cord for use in your country of destination.

7-8 Caring for the Computer
This page intentionally left blank

Troubleshooting 8-1
CHAPTER 8
Troubleshooting
Hardware, software, or a combination of both can cause computer problems. This chapter
tells you what actions to take when solving common computer problems.
This chapter is divided into three sections:
z Preliminary checklist.
z Solving common problems.
z Resetting the computer.
z HDD Recovery Process.

8-2 Troubleshooting
Preliminary Checklist
Here are helpful hints to follow when you encounter any problem before taking further
action.
z Try to isolate which part of the computer is causing the problem.
z Make sure you turn on all peripheral devices before turning on the computer.
z If an external device has a problem, make sure that the cable connections are
correct and secure.
z Make sure the configuration information is properly set in the BIOS Setup Utility.
z Make sure all the device drivers are correctly installed.
z Make note of your observations. Are there any messages on the screen? Do any
indicators light? Do you hear any beeps? Detailed descriptions are useful to the
service personnel when you need to consult one for assistance.
If the problem persists after you follow the instructions in this chapter, contact an
authorized dealer for help.

Troubleshooting 8-3
Solving Common Problems
For easy reference, the problems are divided into these categories.
Problem Type Go to
Battery Problems P. 8-4
Bluetooth Problems P. 8-5
ODD Drive Problems P. 8-5
Display Problems P. 8-6
Hardware Device Problems P. 8-7
Hard Disk Drive Problems P. 8-7
Keyboard, Mouse and Touchpad Problems P. 8-8
LAN Problems P. 8-8
WLAN Problems P. 8-9
Modem Problems P. 8-10
Power Management Problems P. 8-10
Software Problems P. 8-10
Sound Problems P. 8-11
Startup Problems P. 8-11
Other Problems P. 8-11
`Resetting the Computer P. 8-12
The HDD Recovery Process P. 8-13
8-4 Troubleshooting
Battery Problems
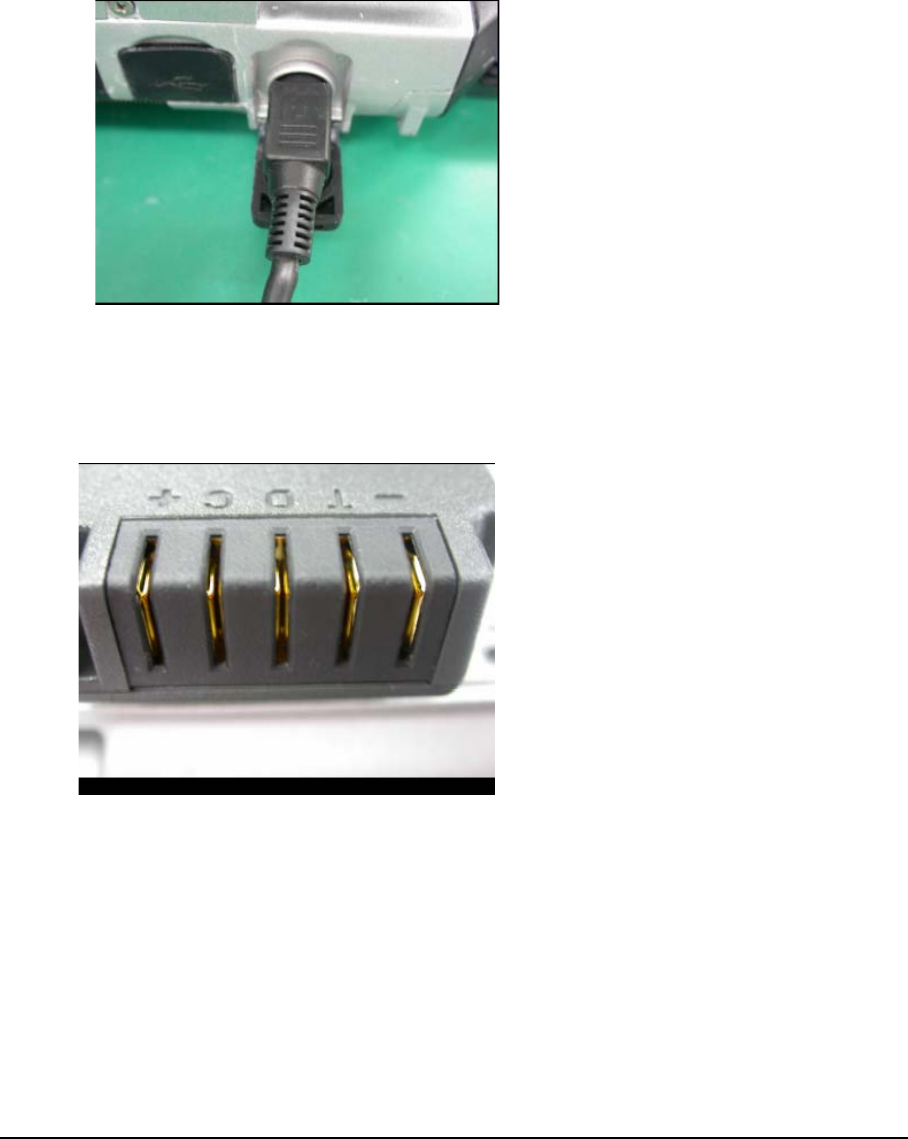
The battery does not charge (Battery Charge indicator does not light amber).
z Make sure the AC adapter is properly connected.
z Make sure the battery is not too hot or cold. Allow time for the battery pack to return
to room temperature.
z Make sure the battery pack is correctly installed.
z Make sure the battery terminals are clean.
The operating time of a fully charged battery becomes shorter.
z If you often partially recharge and discharge, the battery might not be charged to its
full potential. Initialize the battery to solve the problem. (See “Initializing the Battery
Pack” in Chapter 3 for instructions.)
The battery operating time indicated by the battery meter does not match the
actual operating time.
z The actual operating time can be different from the estimated time, depending on
how you are using the computer. If the actual operating time is much less than the
estimated time, initialize the battery. (See “Initializing the Battery Pack” in Chapter 3
for instructions.)
Troubleshooting 8-5
Bluetooth Problems
I cannot connect to another Bluetooth-enabled device.
z Make sure both devices have Bluetooth activated.
z Make sure the distance between the two devices is not over 10 meters or that there
are no walls or other obstructions between the devices.
z Make sure the other device is not in “Hidden” mode.
z Make sure both devices are compatible.
I cannot end a Bluetooth connection.
z If another device is connected to your computer, you can either end the connection
using the other device or by deactivating Bluetooth.
ODD Drive Problems
The ODD drive cannot read a disc.
z Make sure the disc is correctly seated in the tray, with the label facing up.
z Make sure the disc is not dirty. Clean the disc with a disc cleaning kit, available in
most computer stores.
z Make sure the computer supports the disc or the files contained.
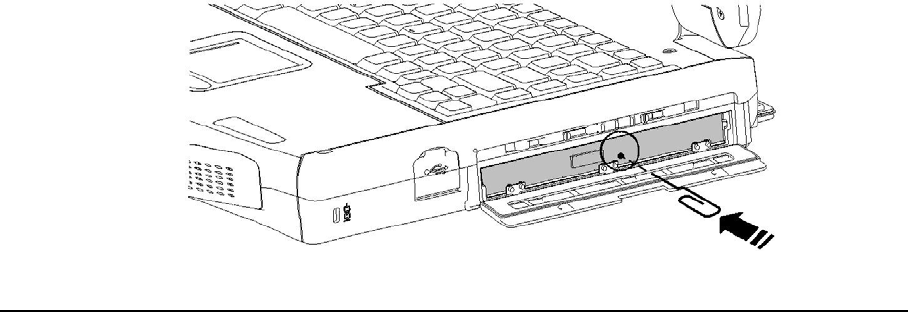
You cannot eject a disc.
The disc is not properly seated in the drive. Manually release the disc following the
method described next:
1. Turn off the computer.
2. Insert a small rod, such as a straightened paperclip, into the drive’s manual-eject hole
and push firmly to release the tray.
3. Pull the tray out until fully extended, and then remove the disc.
8-6 Troubleshooting
Display Problems
Nothing appears on the screen.
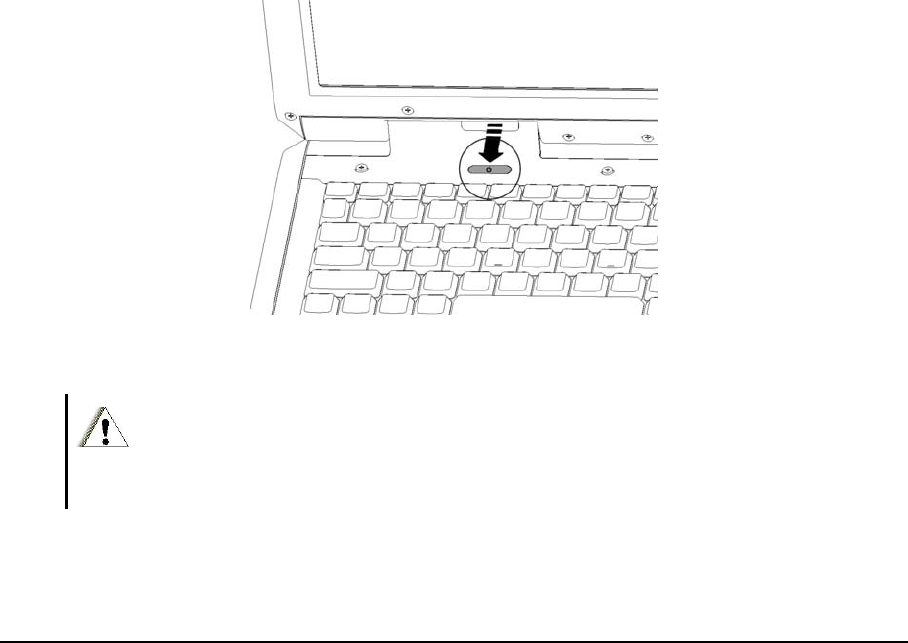
z If the power-on indicator is not on, check the electrical outlet, the plugs and power
cords.
z If the power button does not respond to a light touch, press the button firmly.
z If you are using battery power, make sure that it has a charge remaining and that it is
installed correctly.
z During operation, the screen may automatically turn off as a result of power
management. Press any key to see if the screen comes back.
z The brightness level might be too low. Increase brightness by pressing Fn+F6.
z The display output might be set to an external device. To switch the display back to
the LCD, press Fn+F9, or change the display through the settings in Display
Properties.
z Try turning the computer off (refer the “Resetting the computer” section on P.
8–14), wait for a few seconds then turn on again.
The characters on the screen are dim.
z Adjust the brightness and/or contrast.
Bad dots appear on the display at all times.
z A small number of missing, discolored, or bright dots on the screen are an intrinsic
characteristic of TFT LCD technology. It should not be regarded as a LCD defect.
Resolution cannot be adjusted to desired setting.
z Make sure that the video driver is correctly installed.
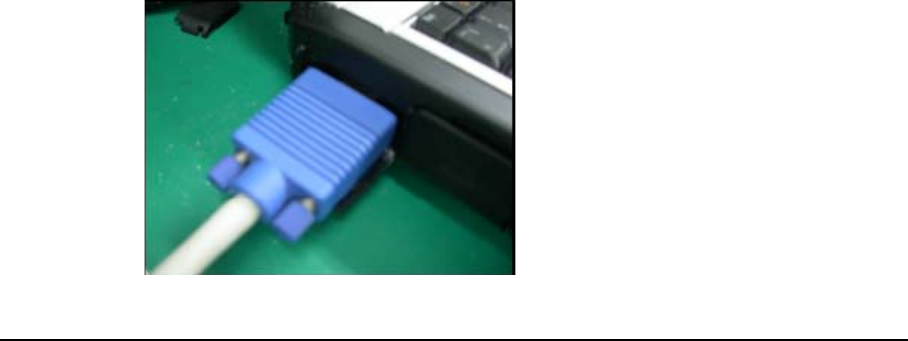
The external monitor displays nothing.
z Make sure that the monitor is turned on.
z Make sure that the monitor’s signal cable is properly connected.

Troubleshooting 8-7
z Switch the display to the monitor by pressing Fn+F9, or change the display through
the settings in Display Properties.
Simultaneous display/multi-display does not work.
z Make sure you turn on the external monitor before turning on the computer.
z Press Fn+F9 to toggle through the display options or change the settings in Display
Properties in Windows.
Hardware Device Problems
The computer does not recognize a newly installed device.
z The device may not be correctly configured in the BIOS Setup Utility. Run the BIOS
Setup Utility program to identify the new type.
z Make sure if the device driver needs to be installed. (Refer to the documentation that
came with the device.)
z Make sure if the device needs any jumper or switch settings. (Refer to the
documentation that came with the device.)
z Check the cables or power cords for correct connections.
z For an external device that has its own power switch, make sure the power is turned
on.
Hard Disk Drive Problems
The hard disk drive error message appears on the screen.
z Insert a bootable diskette and check the integrity of your hard drive.
z The hard disk drive has defects. Ask your dealer for help.
The hard disk drive operations seem slow.
z The data files stored on the hard disk drive may be badly fragmented. Use a tool
such as Window’s Disk Defragmenter to rearrange the files and improve the
performance.
The hard disk drive in-use indicator glows without blinking.
z The data files stored on the hard disk drive may be badly fragmented. Use a tool
such as Window’s Disk Defragmenter to rearrange the files and improve the
performance.
8-8 Troubleshooting
Keyboard, Mouse and Touchpad Problems
The keyboard does not respond.
z Try connecting an external keyboard. If it works, contact an authorized dealer, as the
internal keyboard cable might be loose.
The numeric keypad is disabled.
z Make sure Num Lk is switched on. (Check if the Num Lock Indicator glows or
not.)
The external keyboard does not work.
z Make sure the keyboard cable is properly connected.
The USB mouse does not work.
z Make sure the mouse cable is properly connected.
The touchpad does not work, or the pointer is difficult to control with the
touchpad.
z Make sure the touchpad is clean.
LAN Problems
I cannot access the network.
z Make sure the LAN driver is correctly installed.
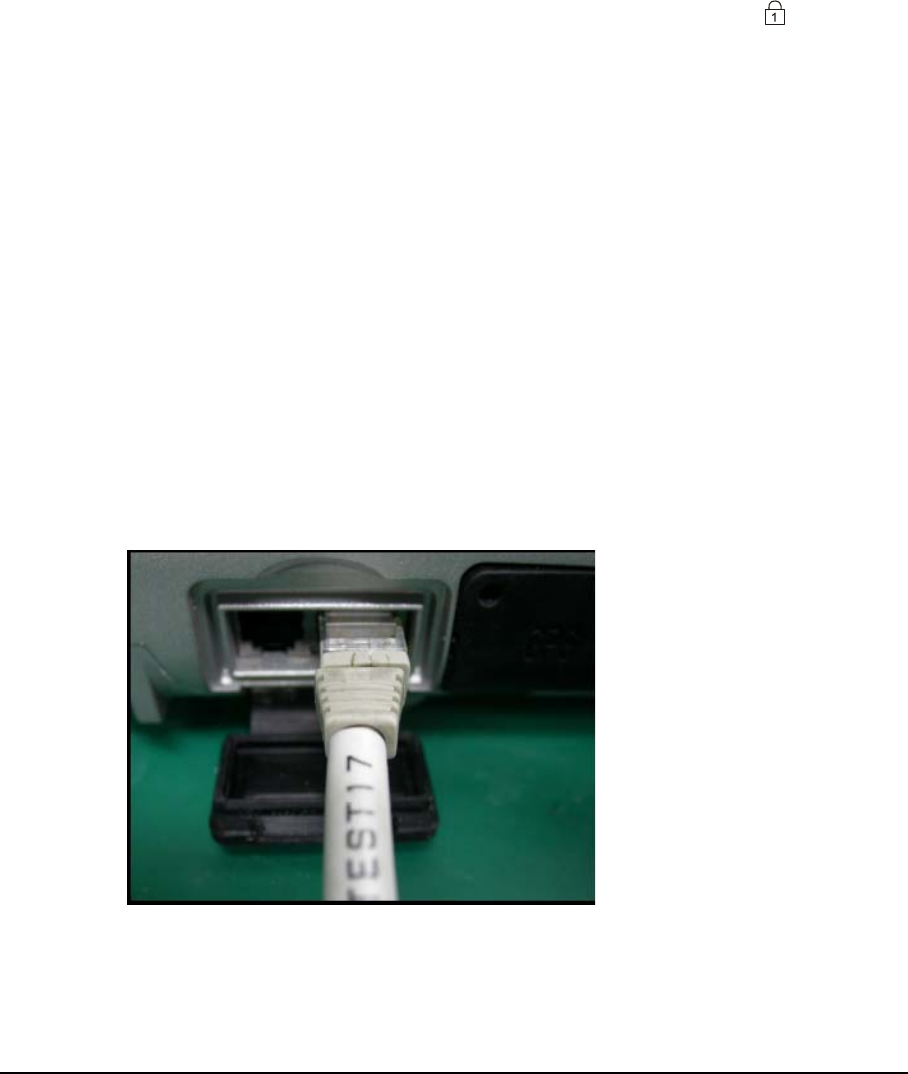
z Make sure the LAN cable is properly connected to the RJ-45 connector and the
network hub.
z Make sure the network is properly setup and configured.
z Make sure the user name or password is correct.

Troubleshooting 8-9
WLAN Problems
I cannot use the WLAN feature.
z Make sure the WLAN card is correctly installed.
z Make sure the necessary driver(s) is correctly installed.
z Make sure the WLAN feature is turned on.
Transmission quality is poor.
z Your computer may be in an out-of-range situation. Move your computer closer to the
Access Point or to the WLAN device it is associated with.
z Check if there is high interference around the environment and solve the problem as
described next.
Radio interference exists.
z Move your computer away from the device causing the radio interference such as
microwave oven and large metal objects.
z Plug your computer into an outlet on a different branch circuit from that used by the
affecting device.
z Consult your dealer or an experienced radio technician for help.
I cannot connect to another WLAN device.
z Make sure the WLAN feature is turned on.
z Make sure the SSID setting is the same for every WLAN device in the network.
z Your computer is not recognizing changes. Restart the computer.
z Make sure the IP address or subnet mask setting is correct.
I cannot communicate with the computer in the network when Infrastructure
mode is configured.
z Make sure the Access Point your computer is associated with is powered on and all
the LEDs are working properly.
z If the quality of the operating radio channel is poor, change the Access Point and all
the wireless station(s) within the BSSID to another radio channel.
z Your computer may be in an out-of-range situation. Move your computer closer to the
Access Point it is associated with.
z Make sure your computer is configured with the same security option (encryption) to
the Access Point.
z Use the Web Manager/Telnet of the Access Point to check whether Access Point is
connected to the network.
z Reconfigure and reset the Access Point.

8-10 Troubleshooting
I cannot access the network.
z Make sure the necessary driver(s) is correctly installed.
z Make sure the network configuration is appropriate.
z Make sure the user name or password is correct.
z You have moved out of range of the network.
z Turn off power management.
Modem Problems
The modem does not work.
z Make sure the modem driver is correctly installed.
Power Management Problems
The computer does not enter Standby or Hibernation mode automatically.
z When your computer is connected to another device, it may not enter Standby or
Hibernation mode if the connection is actively in use.
z Make sure the Standby or Hibernation time-out is enabled.
The computer does not enter Standby or Hibernation mode immediately.
z If the computer is busy performing tasks, it will only enter Standby or Hibernation
mode after completing the tasks.
The computer does not resume from Standby or Hibernation mode.
z The computer automatically enters Standby or Hibernation mode when the battery
pack drops to 3% of being fully discharged. Do any one of the following:
− Connect the AC adapter to the computer.
− Replace the empty battery pack with a fully charged one.
The computer does not enter Hibernation mode with the Fn+F10 hot keys.
z Make sure the Hibernation function is specified on the sleep button.
Software Problems
An application program does not work correctly.
z Make sure the software is correctly installed.
z If an error message appears on the screen, consult the software’s documentation for
further information.

Troubleshooting 8-11
z If you are sure the operation has stopped, reset the computer. (See “Resetting the
Computer” later in this chapter.)
z Use “Task Manager” by pressing Ctrl+Alt+Del to close the error application.
Sound Problems
No sound is audible.
z Make sure the volume control is not set too low.
z Make sure the audio driver is correctly installed.
z Make sure the computer is not in Standby mode.
z If using an external speaker, make sure the speaker is properly connected.
Distorted sound is produced.
z Make sure the volume control is not set too high or too low. In most cases, a high
setting can cause the audio electronics to distort the sound.
The sound system does not record.
z Adjust the playback or recording sound levels.
The external microphone or audio device does not work.
z Make sure the microphone is connected to the proper connector on the computer.
z Make sure the driver is installed in your computer.
z Click the speaker icon on the taskbar and check the Windows volume control.
z Check the volume control of your computer.
Startup Problems
When you turn on the computer, it does not respond and the Power Indicator
does not light green.
z If you are using an external AC power, make sure the AC adapter is correctly and
securely connected. Also, make sure the electrical outlet works properly.
z If you are using the battery power, make sure the battery has been charged prior to
turning on the computer.
When you turn on the computer, it stops after POST.
z Restart your computer.
Other Problems
The date/time is incorrect.
z Correct the date and time via the operating system or BIOS setup Utility.
8-12 Troubleshooting
z If the above does not work, the RTC (Real-Time Clock) battery is at the end of its life.
Call an authorized dealer to replace the RTC battery.
Resetting the Computer
You may have to reset (reboot) your computer when an error occurs and the program
you are using hangs up.
If the system operation appears to hang, first wait. It is possible that the system is
processing data. Check the hard disk drive in-use indicator. If it blinks irregularly, the
program may be accessing data and preventing you from using the keyboard. If you are
sure the operation has stalled and the “restart” function of the operating system does not
work, reset the computer.
Reset the computer by any one of these methods:
z Press Ctrl+Alt+Del – to launch the “Task Manager” window and select “Shut Down”
or “Restart”.
z If the above action does not work, turn off the system by pressing the Power Button
for 4 seconds. Wait for at least five seconds and turn on again.
z If the above does not work, press the Power Button for 10 seconds. The system will
shut down and the Embedded Controller BIOS will be reset. Wait for at least five
seconds before turning it on again.
CAUTION:
Resetting will cause any unsaved data to be lost, but does not impact any of the saved data on
the hard drive. Only the Embedded Controller information will be reset.
Troubleshooting 8-13
The HDD Recovery Process
System Recovery Program
Your system comes with a System Recovery program that can help you to diagnose and
solve problems you found on your system. It consists of the following options:
• Run System Restore Utility– This option will active the System Restore function,
which is a component of Windows XP that you can use to restore your computer to a
previous state, if a problem occurs, without losing your personal data files.
• Run System Recovery – This option will wipe out the entire hard disk and restore
your system back to its original state as it was shipped out from factory.
• Run Disk Diagnostic Utility – This option will help you to detect disks errors and
attempt to repair errors automatically.
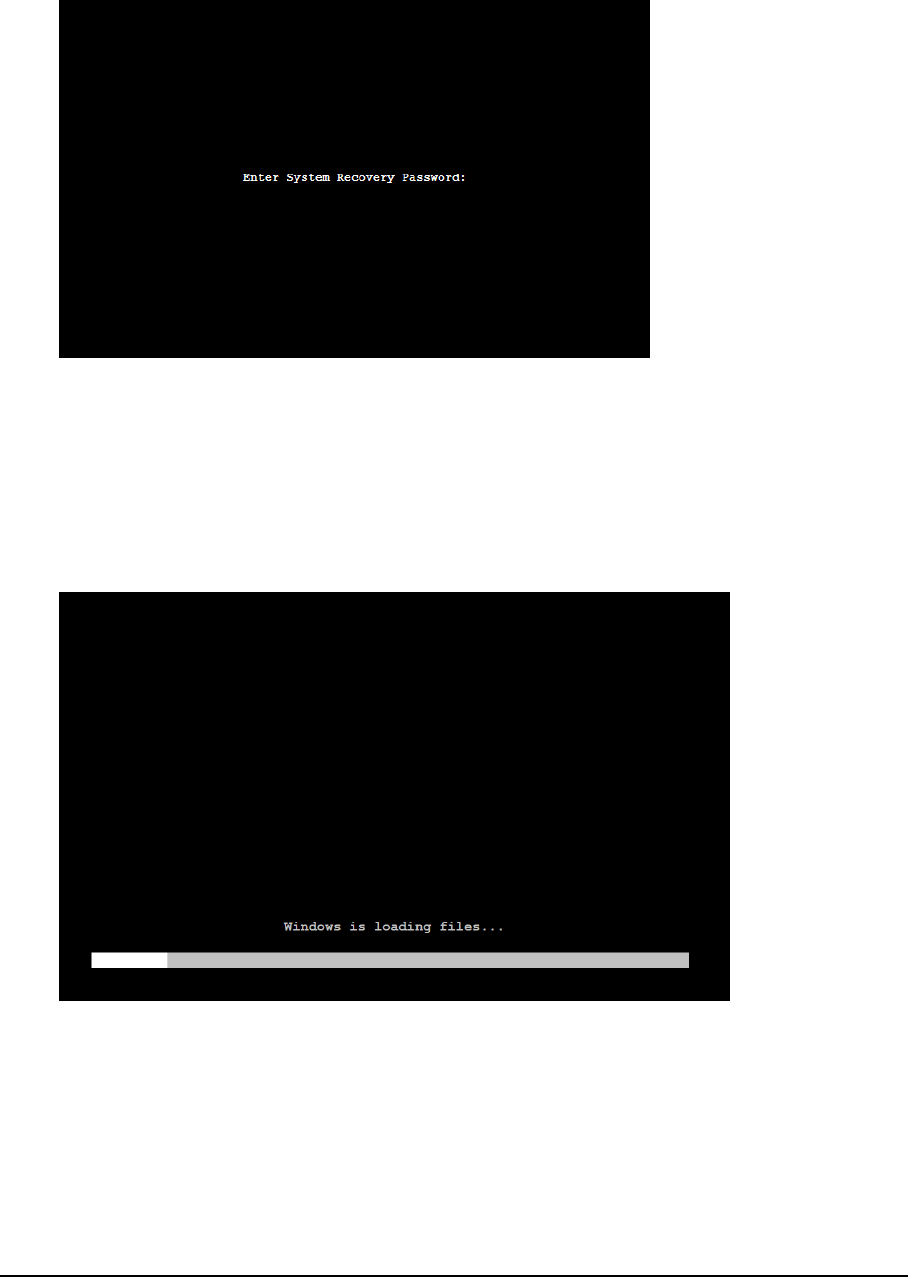
1. During system boots up, press on Ctrl + F9 keys on keyboard to activate the System
Recovery.
8-14 Troubleshooting
2. You will be prompted for the System Recovery password, enter the password then
press Enter key to continue.
Note:
• The default System Recovery password is 123456.
• It can be changed in BIOS Setup.
• If you failed to enter the correct password in 3 attempts, system will be halted and
you will need to restart the system in order to try again.
3. System will be booting into System Recovery program if you entered the correct
password.
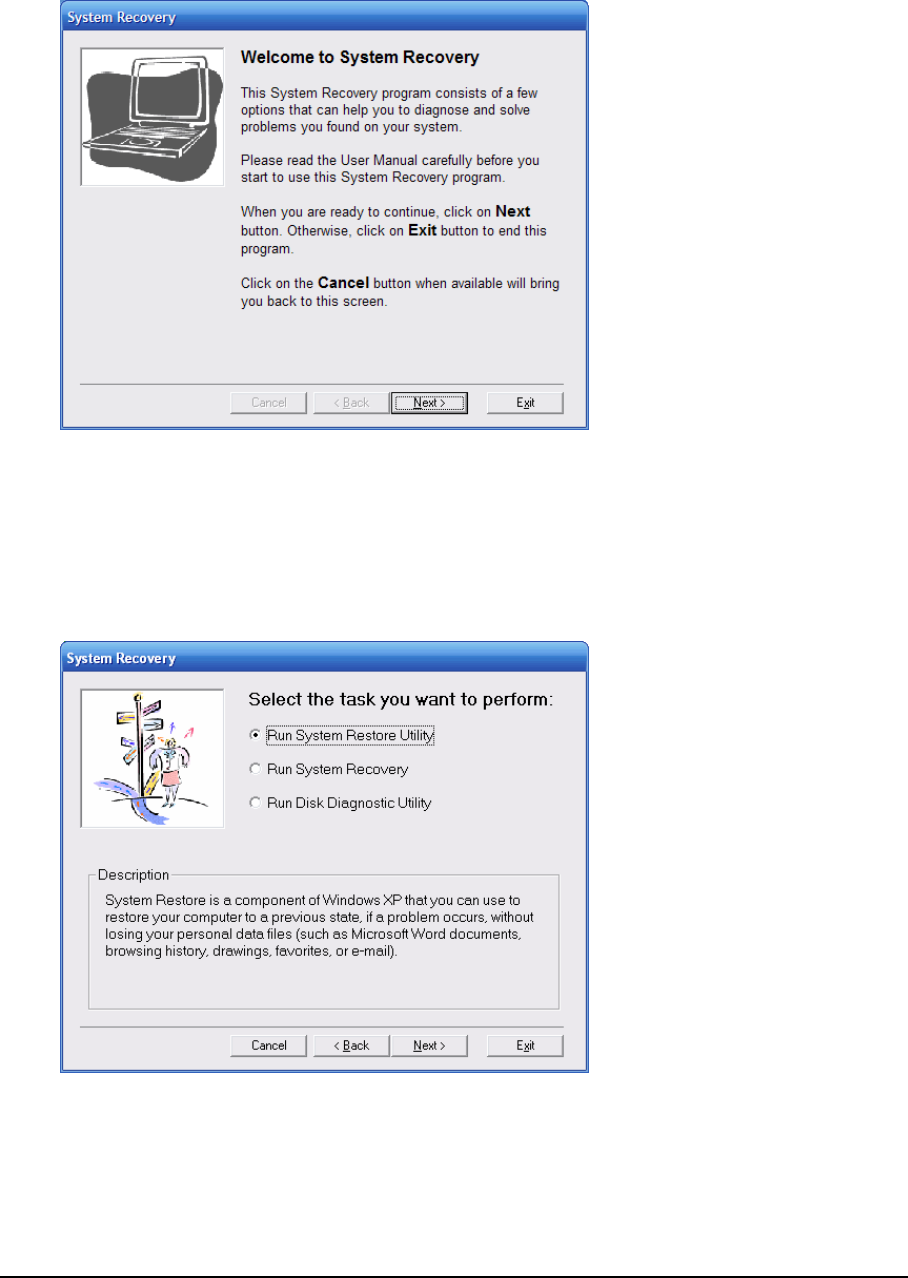
Troubleshooting 8-15
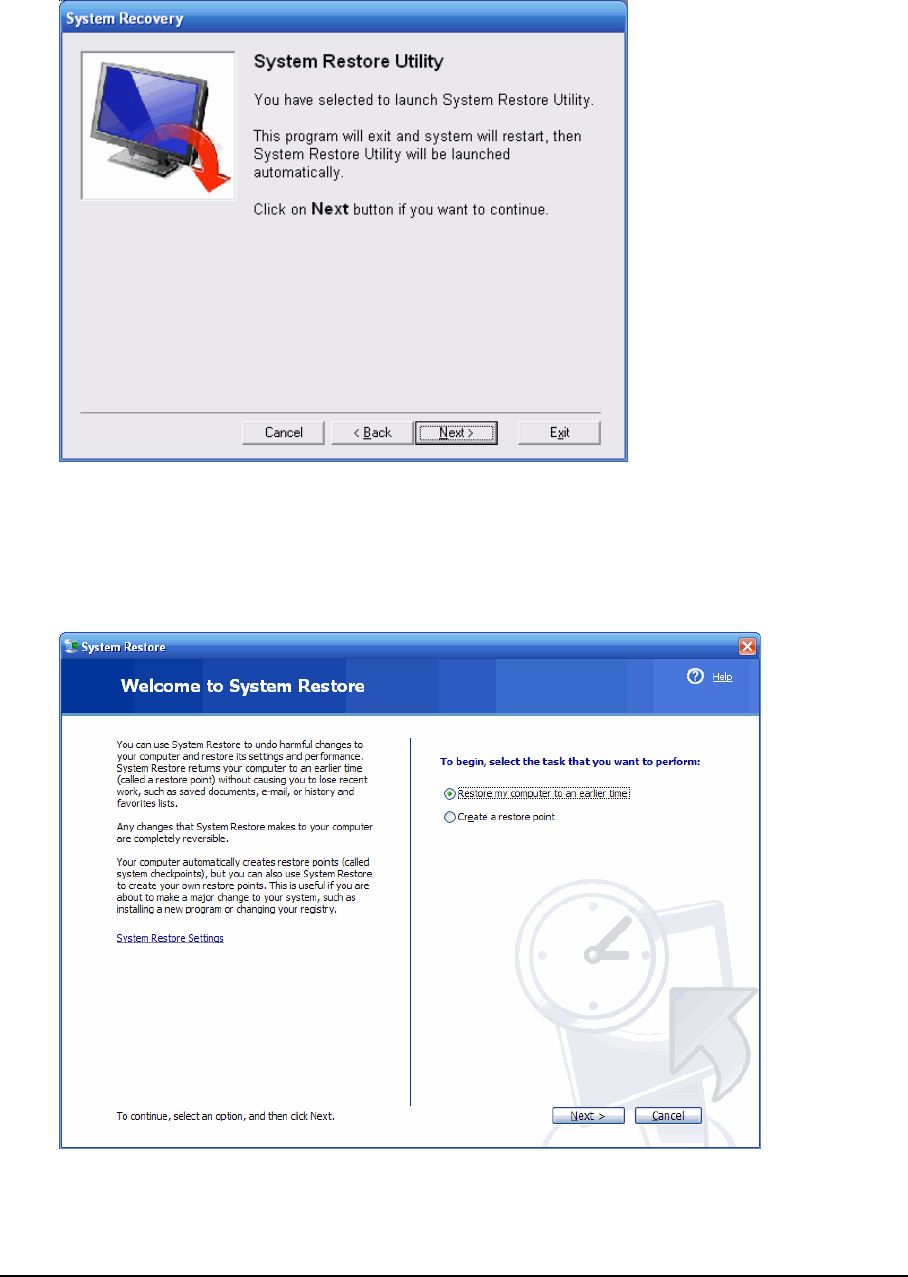
4. This is the Welcome screen you will be seeing if you successfully activate the System
Recovery program. The standard navigation of the program are outlined as below:
• To proceed to the next step, click on the Next button.
• To go back to previous screen, click on the Back button.
• To go back to the Welcome screen, click on the Cancel button.
• To terminate this program and restart to Windows, click on the Exit button.
5. You will be presented with the options of task that you may perform with this program.
A brief description of the selected task is also displayed at the bottom of the screen to
help you.
• After select the task you want to perform, click on Next button.
8-16 Troubleshooting
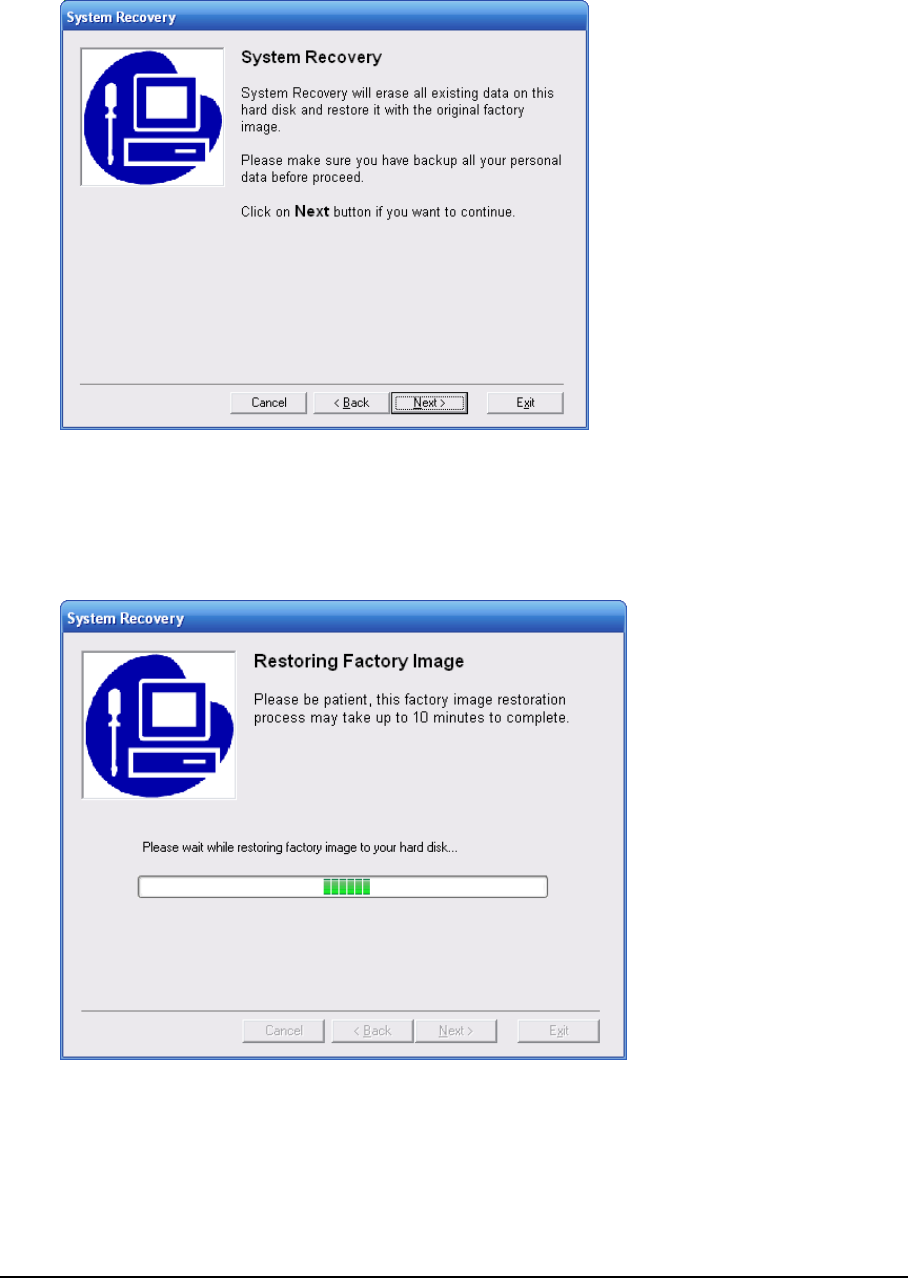
6. If you selected System Restore Utility as the task that you want to perform, you will be
presented with this screen.
• To proceed with System Restore, click on the Next button.
7. System Restore will be launched automatically after the system restarted.
Troubleshooting 8-17
8. If you selected System Recovery as the task that you want to perform, you will be
presented with this screen.
• To proceed with System Recovery, click on the Next button.
9. Please wait while System Recovery is in progress, it may takes up to 10 minutes to
complete.
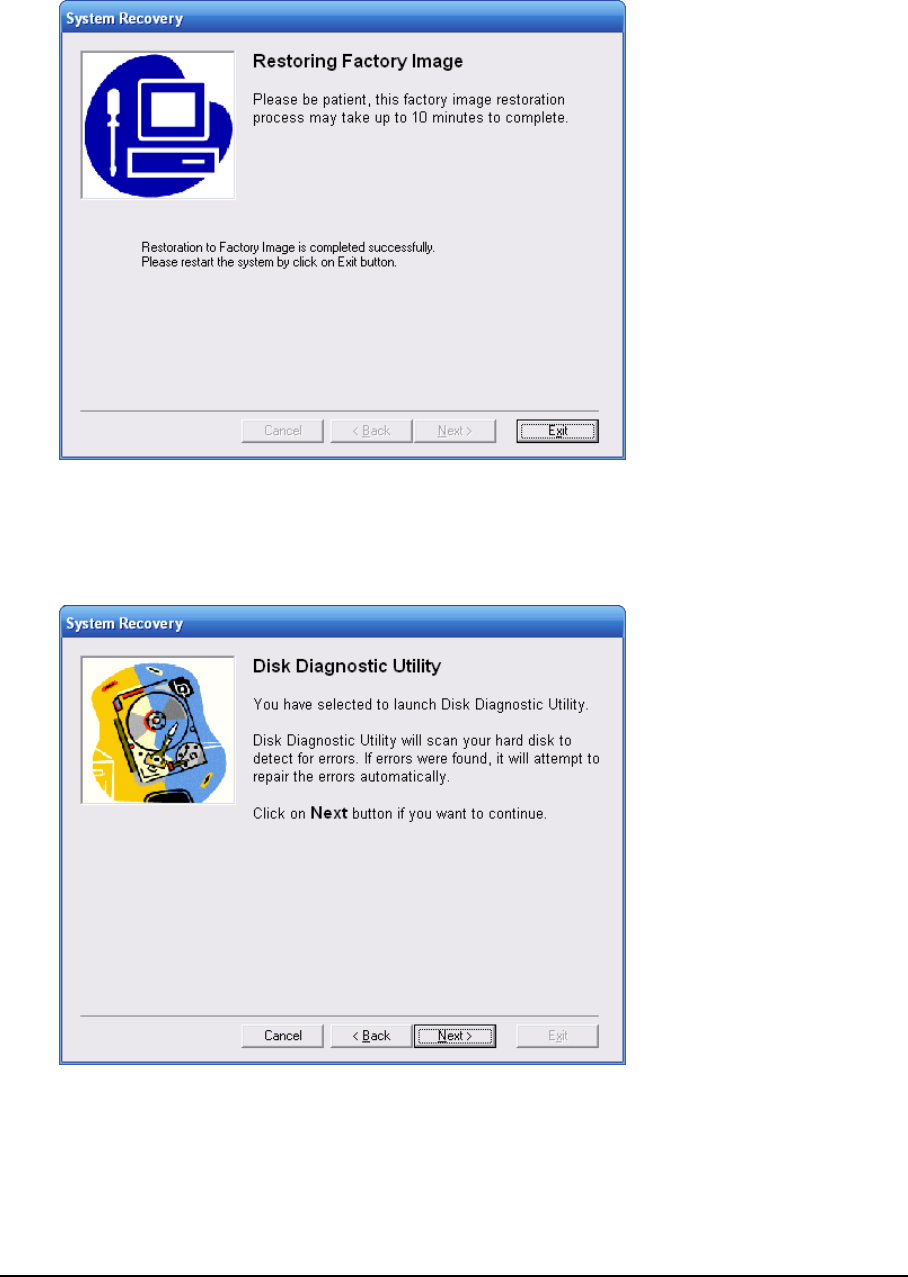
8-18 Troubleshooting
10. System Recovery is completed successfully.
• To restart your system, click on the Next button.
11. If you selected Disc Diagnostic Utility as the task that you want to perform, you will
be presented with this screen.
• To proceed with Disc Diagnostic Utility, click on the Next button.
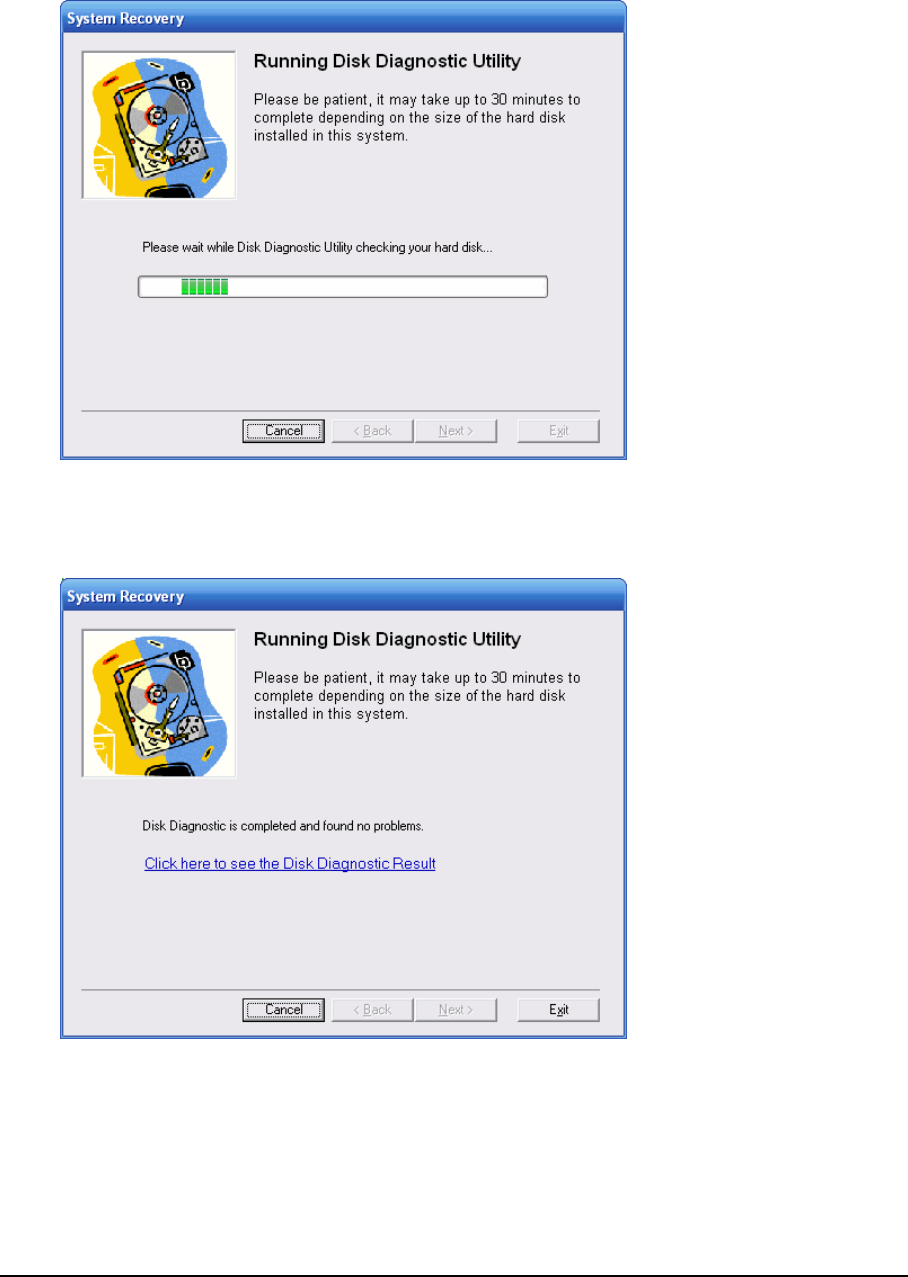
Troubleshooting 8-19
12. Please wait while Disk Diagnostic Utility is checking your hard drive.
13. Disk Diagnostic Utility will show the summary of the disk diagnostic.
• To see the detailed result, click on the Click here to see the Disk Diagnostic
Result link.
• To exit the program and restart to Windows, click on the Exit button.

8-20 Troubleshooting
This page intentionally left blank

The Accessories list 9-1
CHAPTER 9
The Accessories List
Item
No. Parts No. Description
1 HKNN4004A ML910™ Primary Battery
2 HKNN4006A Secondary Battery–for media bay
3 HKVN4005A Software CD, ML910™ User Manual & Drivers
4 HKLN4317A ML910™ High-Tier Dock
5 HKLN4310A ML910™ Mid-Tier Dock
6 HKLN4311A ML910™ Office Port Replicator
7 HKUN4082A Full Travel Keyboard US , ML910™
8 HKUN4083A Rubberized Keyboard Backlit Assy US–ML910™
9 HKLN4309A ML910™ Spare AC ADAPTER
10 DDN756 ML910™ Cigarette ADAPTER
11 HKLN4315A 80G HDD Assembly, ML910™
12 HKLN4316A 120G HDD Assembly, ML910™
13 HKLN4359A Smartcard Reader, PCMCIA **
14 FAG5027A GPS Antenna
15 FAG5026A Wireless WAN Antenna
16 HKUN4064A RF Pass thru kit
17 HKUN4081A Secondary SSD 8Gb Drive
18 HKLN4313A SSD Secondary Installation Kit
Carriers Modems
19 HKUN4067A EVDO Internal Module – VERIZON
20 HKUN4071A UMTS Internal Module – UMTS
21 HKUN4066A PVDT Modem Installation Kit (PRM w/o Modem)
22 HKUN4075A EVDO Internal Module – SPRINT
** Note: The smartcard reader (HKLN4359A) was designed to meet the ISO7816 operating
temperature requirements (0-50C) and does not meet the MIL SPEC-810F temperature
requirements. Operating outside of this temperature range may result in abnormal behavior.

9-2 The Accessories list
Item
No. Parts No. Description
EMEA Specific Accessories
23 HKKN4016A Cable, AC Power UK
24 HKKN4015A Cable, AC Power Europe
25 HKUN4068A Full Travel Keyboard UK, ML910™
26 HKUN4065A Rubberized Keyboard Backlit Assy – ML910™ UK
27 HKUN4073A UMTS Internal Module–EMEA
Media Bay Options
28 HKUN4078A CD-RW/DVD Combo Drive
29 HKUN4079A CD-RW/DVD-RW Dual Drive
Contact local Motorola representative for inquiries please.
30 HKUN4084A 512MB RAM Module, ML910™
31 HKUN4085A 1GB RAM Module, ML910™
32 DDN7511A USB Floppy Drive (YE-DATA) External ML910™
33 HKLN4273A External PCMCIA Mesh Modem WDE 1100
34 HK1235A External PCMCIA Mesh Modem WMC7300
35 HK1234A External PCMCIA Mesh Modem WMC6300
Note: Accessory List and availability subject to change without notice. Contact
your Motorola Dealer for latest information.

The Acronyms and Glossary 10-1
CHAPTER10
1
The Acronyms and Glossary
2 Items Acronyms Glossary
1 AC Alternating Current
2 ACPI
Advanced Configuration and Power Interface: An industry-standard
specification (co-developed by Hewlett-Packard, Intel, Microsoft, Phoenix, and
Toshiba, for operating-system-directed power management for laptop, desktop,
and server computers. A replacement for APM.
3 AP Access Point
4 ATA Advanced Technology Attachment, The computer disk drive interface standard.
The specification is for IDE interface.
5 BIOS Basic Input/Output System
6 BSSID Basic Service Set Identifier.
7 CCD Charge Coupled Device, A storage device in which individual semiconductor
components are connected to each other so that the electrical charge at the
output of one device provides the input to the next.
8 CPU Central processing unit: The computational and control unit of a computer.
9 CRT Cathode-Ray Tube
10 DC Direct Current
11 DVCAM A digital video compression format provided by Sony. The DVCAM format
provides fixed media compression.
12 DVD Digital Versatile Disk
13 DVD-RW Digital Versatile Disk – Read and Write
14 EEPROM
Electrically Erasable Programmable Read-Only Memory: EPROM that can be
erased using electrical signals applied to specific pins. See EPROM.
15 EIRP Effective Isotropic Radiated Power
16 EMEA Europe, Middle East and Africa, a term used in traditional and electronic
commerce to signify activities in those regions of the world or to refer
specifically to those regions.
3

The Acronyms and Glossary 10-2
1
Items
A
cronyms Glossary
17 EMI Electromagnetic interference, Interference by electromagnetic signals that can cause
reduced data integrity and increased error rates on transmission channels.
18 EVDO
Evolution Data Only, EVDO is a high-speed network protocol used for wireless
Internet data communications. EVDO supports up to 2.4 Mbps bandwidth using a set
of radio frequency channels. The EVDO protocol supports asymmetric
communications, allocating a
19 FCC Federal Communications Commission.
20 GPS Global Positioning System. A system that uses satellites, receivers and software to
allow users to determine their precise geographic position.
21 HDD Hard Disk Drive
22 IP Internet Protocol: Network layer protocol in the TCP/IP stack offering a connectionless
internet work service. IP provides features for addressing, type-of-service
specification, fragmentation and reassembly, and security. Defined in RFC 791.
23 LAN Local Area Network
24 LCD Liquid Crystal Display
25 LED Light-Emitting Diode: A semiconductor device that emits light (usually visible or
infrared) when forward-biased.
26 MAC Media Access Control
27 MESH A set of faces, each of which is described by a simple polygon.
28 MMCX Multimedia Communications Exchange
29 NVRAM Nonvolatile RAM, RAM that retains its contents when a unit is turned off.
30 ODD Optical Disk Drive
31 OS Operating System
32 PCMCIA Personal Computer Memory Card International Association. An industry trade
association that creates standards for notebook computer peripheral devices such as
PC cards.
33 POST Power-On Self-Test
34 PVDT Private DataTAC, a registered trademark of Motorola Inc.
35 RF Radio Frequency, The part of the general frequency spectrum between the audio and
infrared light regions (about 10 kHz to10,000,000 MHz).
36 RoHS Restriction o f Hazardous Substance,
37 RTC Real-Time Clock
2

The Acronyms and Glossary 10-3
1
Items Acronyms Glossary
38 S/PDIF
Sony/Philips Digital Interface: It is a standard (developed by Sony
and Philips) for the digital transfer of audio data. Transferring audio
data between two devices digitally avoids the degradation of quality
inherent in using digital to analogue devices.
39 SAR Specific Absorption Rate
40 SATA Serial Advanced Technology Attachment or serial ATA
41 SCU Setup Configuration Utility
42 SSID Service set identifier: A code or name attached to a wireless Wi-Fi®
network. All devices must use this same, case-sensitive name to
communicate.
43 TFT Thin Film technology
44 TPM Trusted Platform Module.
45 UMTS
Universal Mobile Telephone System, UMTS is the name for the
third generation mobile telephone standard in Europe,
standardized by ETSI (see ETSI). UMTS will deliver broadband
information at speeds up to 2 MBIT/s. Besides voice and data,
UMTS will deliver
46 USB Universal serial bus, An external bus connection that supports a
maximum bandwidth of 12 Mbps and is widely used to connect
peripheral devices (sometimes called dongles) to a computer.
47 VCR video cassette recorder,
48 VGA Variable-gain amplifier
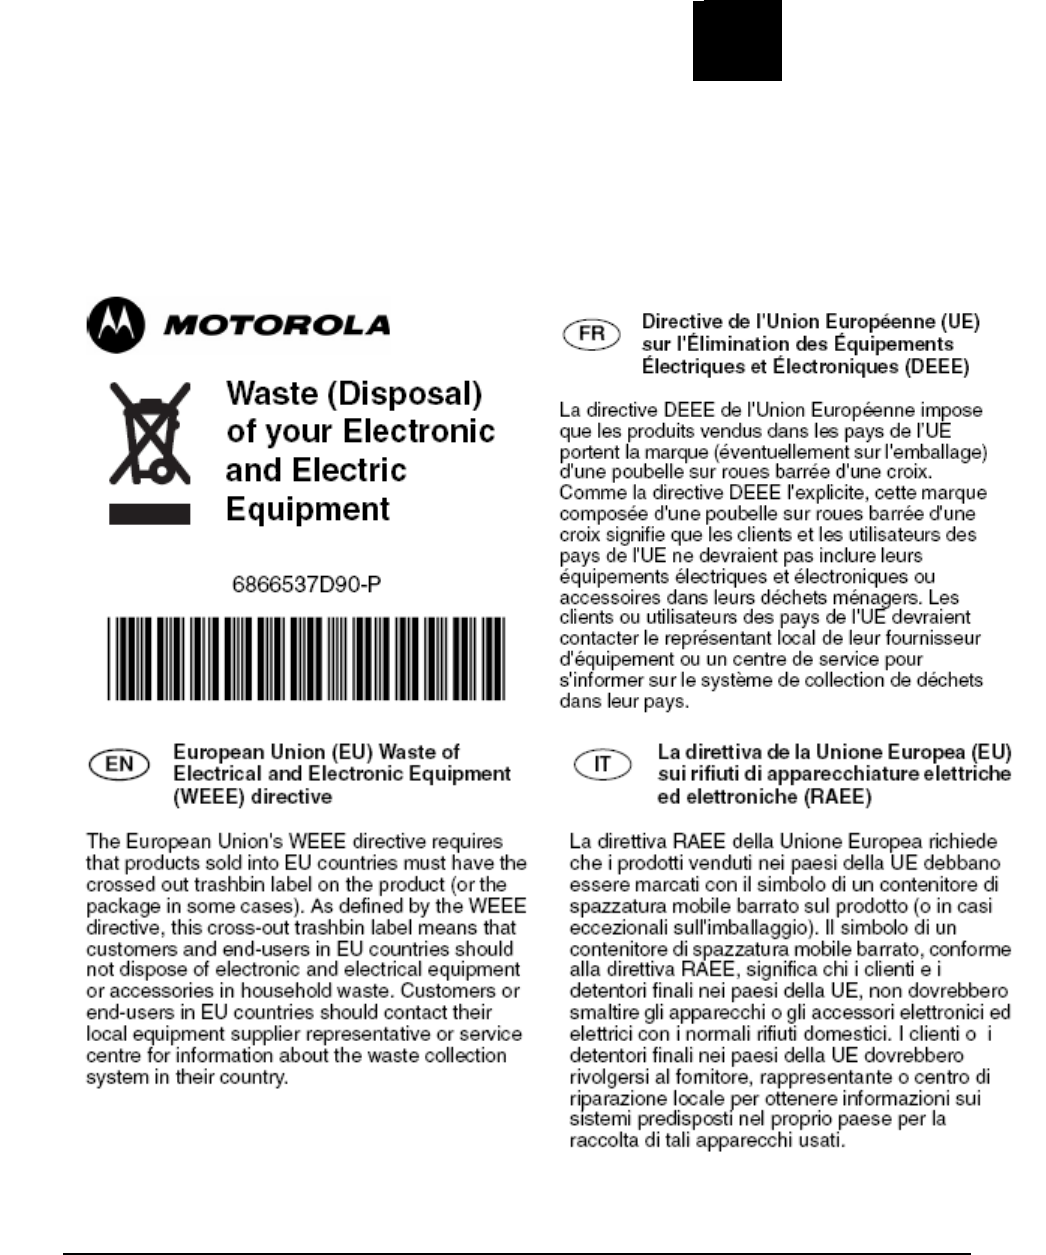
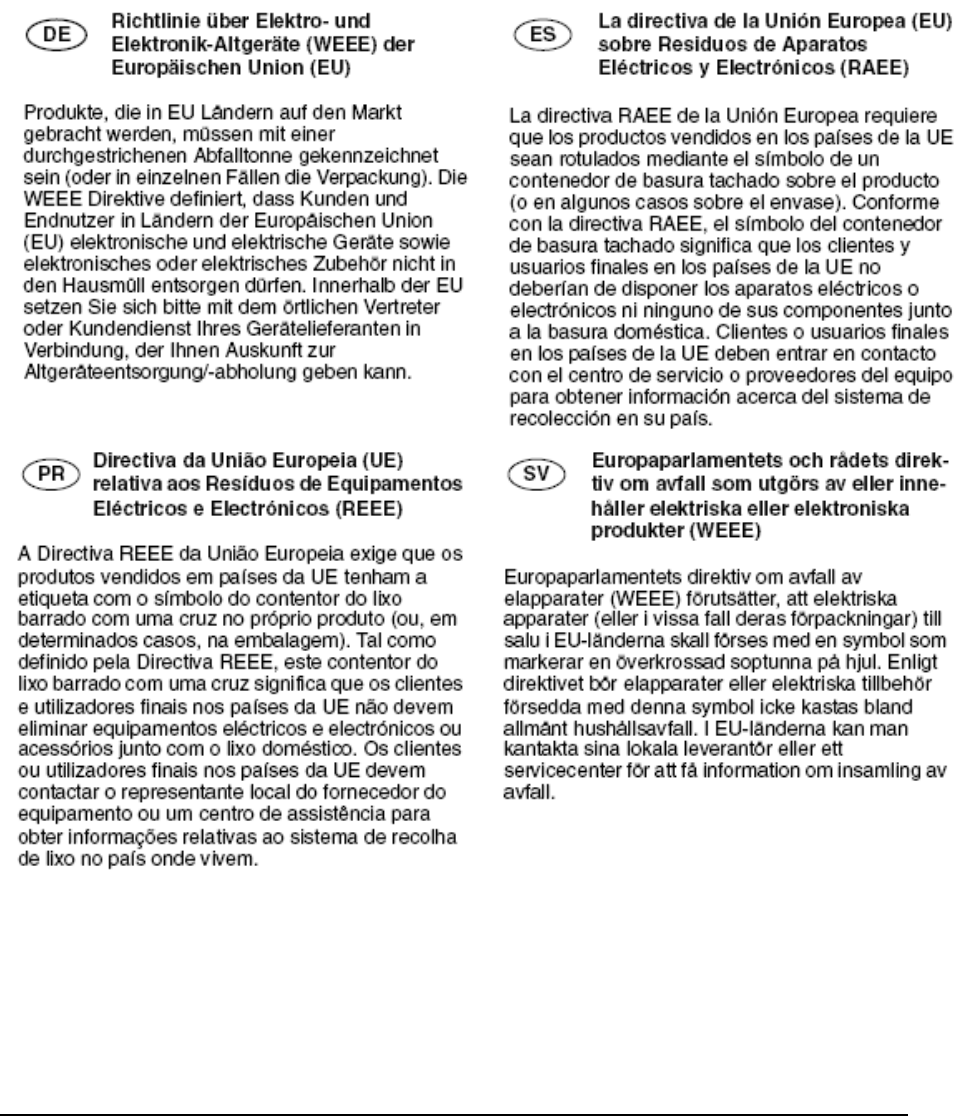
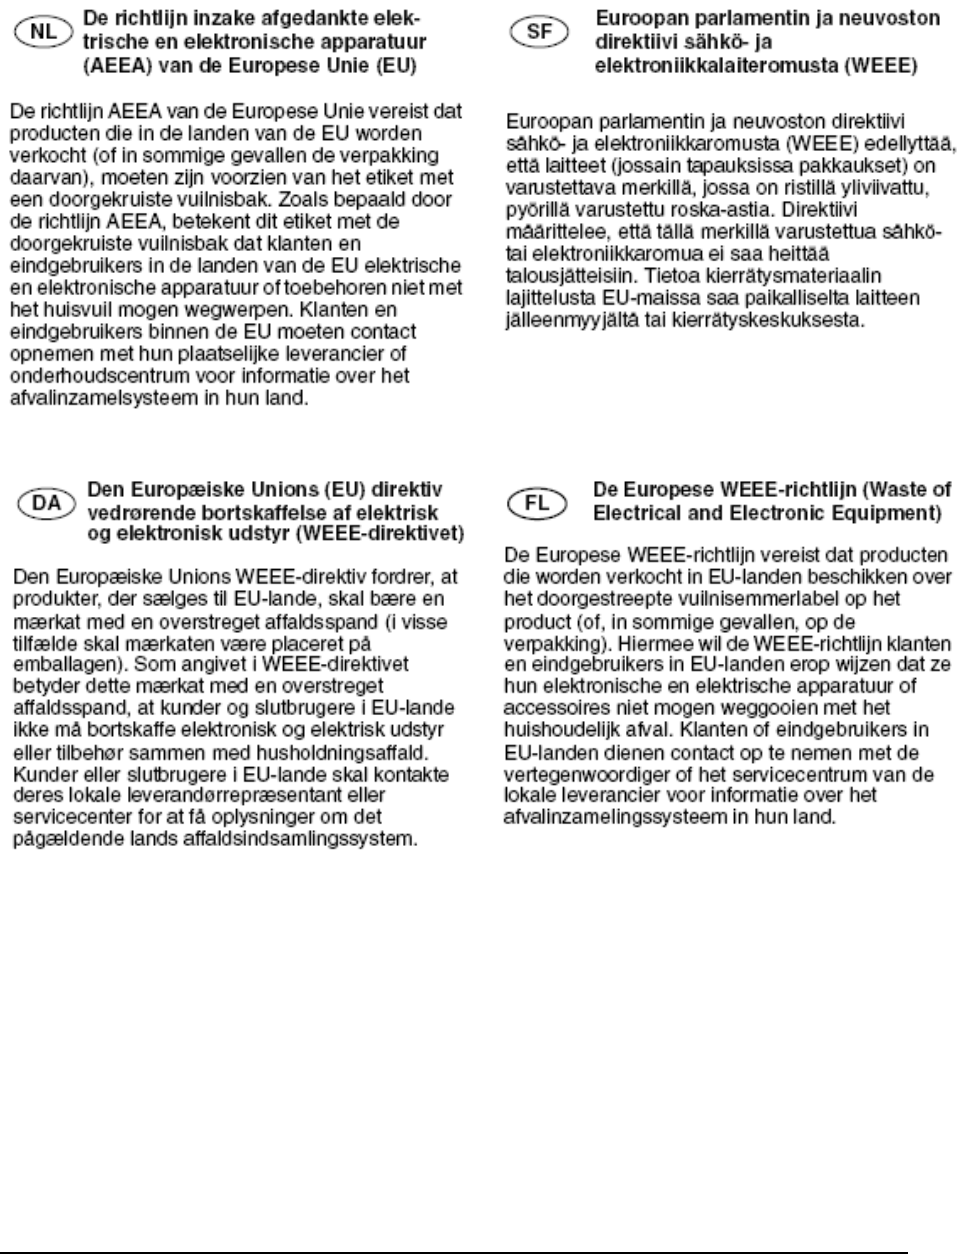
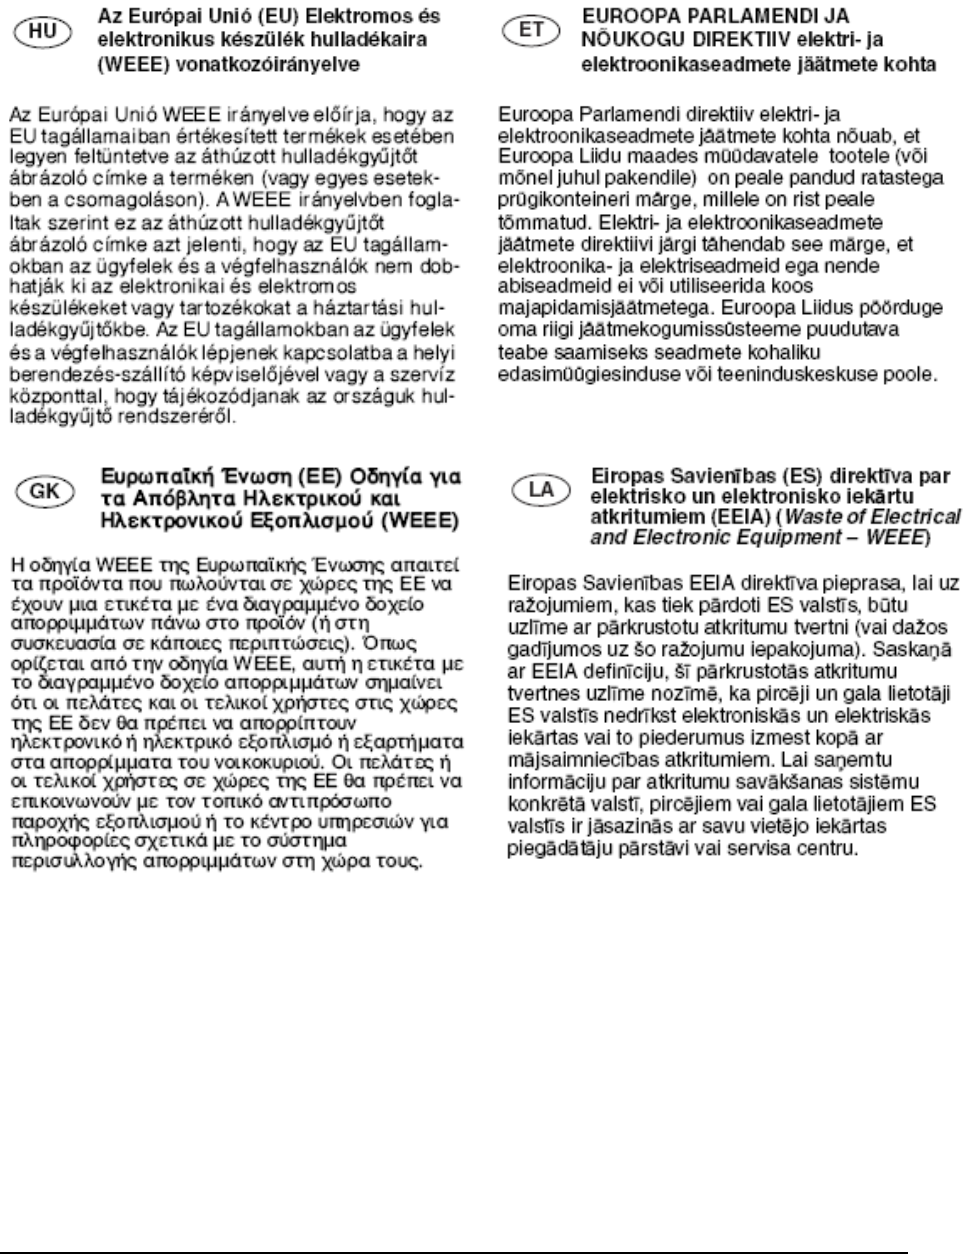
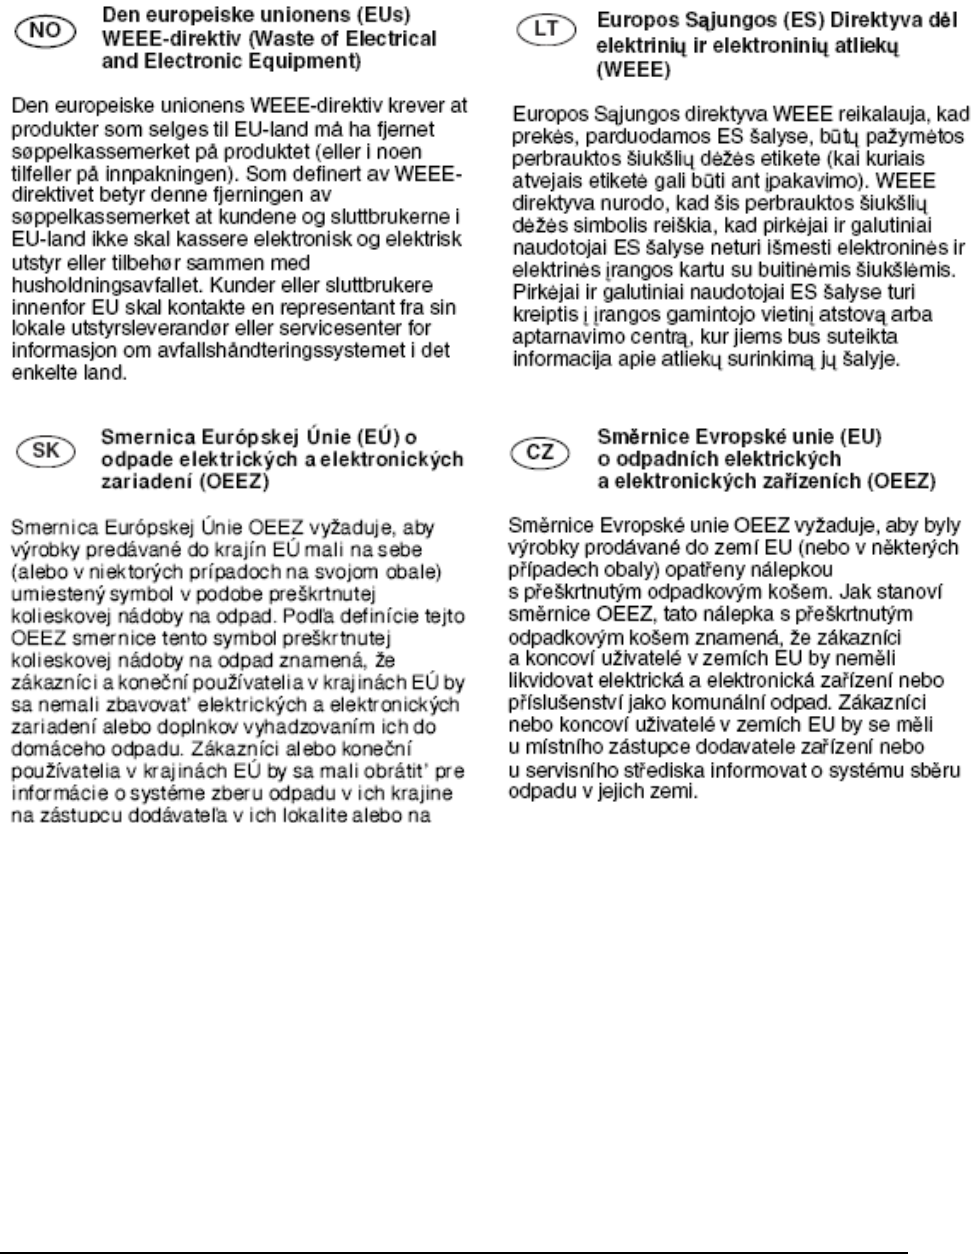
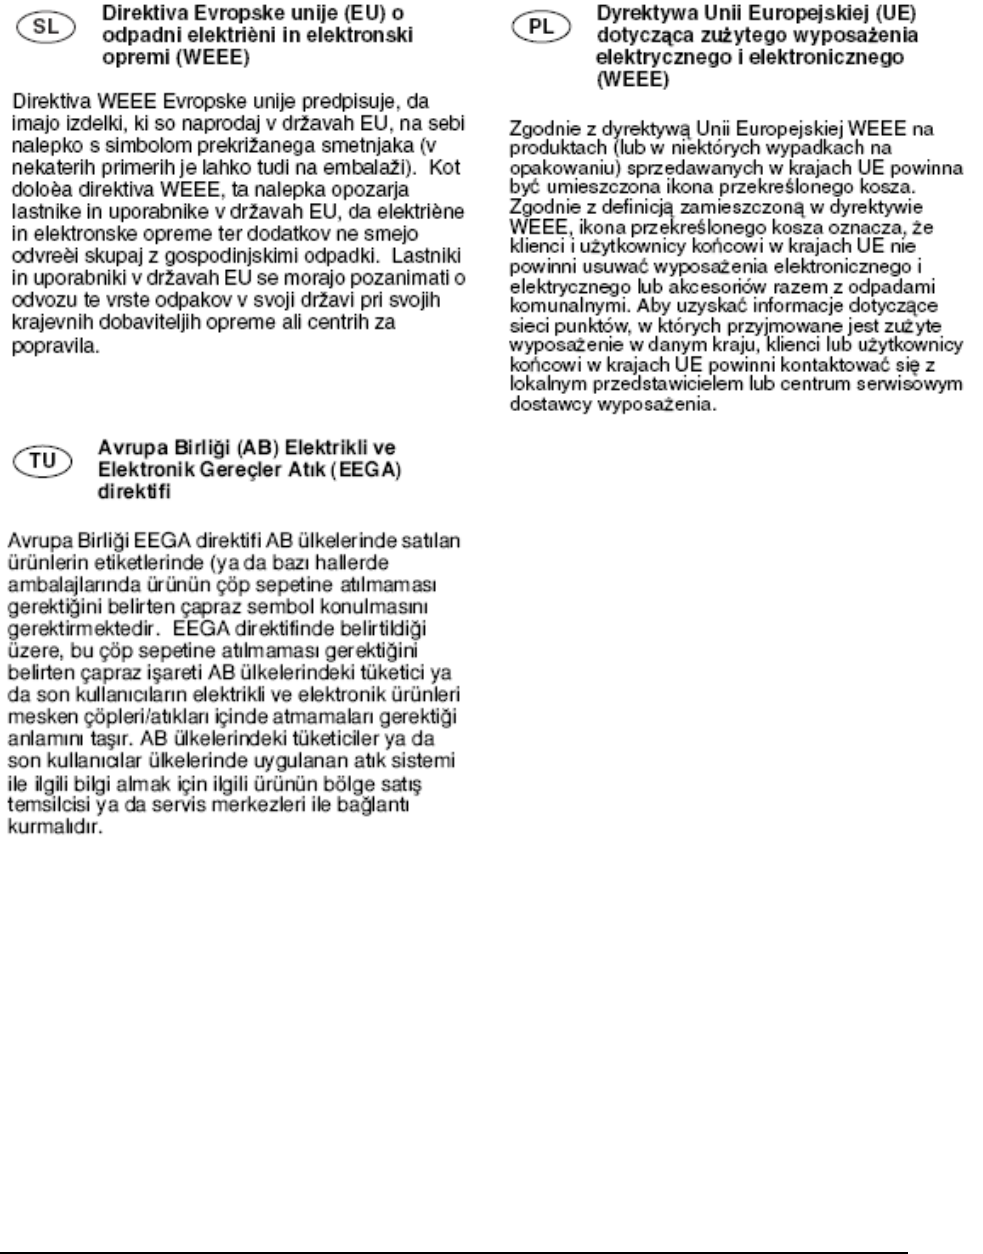
49 WEEE Waste Electrical and Electronic Equipment: A safety directive.
50 WLAN Wireless Local Area Network.
51 WWAN Wireless Wide Area Network,
52 WXGA Wide Extended Graphic Array
2
3
4
5
6
7
8

The Acronyms and Glossary 10-4
1
2
3
4
5
6
7
8
9
10
11
12
13
14
15
16
17
This page intentionally left blank 18

Specifications A-1
APPENDIX A
Specifications
NOTE:
Specifications are subject to change without any prior notices.
Parts Specifications
CPU Intel® Core™ Duo L2400 1.66GHz Processor.
Video Graphics Adapter
ATIMobility Radeon™ X1400 (dedicated 128MB)
MotionComp capability, support hardware aid for DVD
playback
Support Dual View function
LCD/CRT simultaneous
Memory 2 MB L2 Cashe
ROM BIOS 512 KB Flash EEPROM, system and VGA BIOS, ACPI 2.0,
PC2001–compliant.
System Two 200–pin DDR2 667 SO–DIMM sockets, Standard 512
MB, maximum 1GB*2 pcs.
RAM
Video ATI M54 128 MB
Panel 13.3” transmissive WXGA (1280 x 800) LCD with touch
screen 500 NIT Brightness.
Display
Video port VGA port, video capture.
Controller Azalia ALC262 codec, AC97 Rev.2.2 support.
Audio Ports Optical S/PDIF output. 2 channel support.
Keyboard Optional: Full travel QWERTY, fully-sealed backlight
keyboard; rubberized backlight keyboard.
Pointing device Touchpad with 4 programmable buttons.
Hard disk drive
2.5–inch, SATA interface
80 GB standard shock-mounted w/ heater;
Optional: 120 GB hard disk drive,16GB Solid State
Drive(SSD)
Storage device
Floppy Disk Drive Optional: External USB floppy.

A-2 Specifications
Configurable
Media Bay
Configurable Media Bay,
Optional: CD RW / DVD ROM (Combo Drive), CD RW/
DVD RW (Dual Drive), Secondary Battery, or Removable
8GB Secondary Solid State Drive (SSD).
Parts Specifications
I/O ports
•Fingerprint Scanner; 500dpi
(requires customer provided software application)
•PCMCIA : 1x External Type II - Cardbus support.
(Accessory PCMCIA to pci Express 34 converter card
included)
•I/O ports:
* 1x Serial
* 3x USB 2.0
* 1x RJ-11
* 1xDC input
* 1xShrouded Hot-docking Port
* 1xRJ-45 10/100/100 Base-TLAN
* 2xExternal RF Pass-Through Ports (1:GPS, 1:WWAN)
Modem 56 K (V.90/V.92; 28,000 ~ 56,000 bits/s data rates)
LAN (Option) Broadcom BCM5755M 10/100/1000Mbps.
Communications
Others (options)
Intel 3945 Wireless LAN 802.11a/b/g using diversity
antennas.
GPS Lassen IQ module
Bluetooth V2
AC adapter •Universal AC adapter
- Input: 100-240 V, 50/60 Hz AC
- Output: 18.5V DC/120W
Power
Battery Primary: Smart Li–ion battery 11.1 V / 7200 mAH (3S3P)
Secondary: Smart Li–ion battery 11.1V/ 3500mAH
(Configurable Media Bay Option)

Specifications A-3
Parts Specifications
Dimension (W×D×H) 3.2”x11.1”x13.2” (336mmx283mmx78mm)
Weight 9.9 lbs (4.5 kg)
Operating System Supports Windows XP, SP2
Temperature According to IEC 68-2-1,2,14 / MIL-STD-810F, Method
501.4, 502.4
Operating: –20ºC to 60ºC (Tested)
Environment
Humidity According to IEC 68-2-30 / MIL-STD-810F, Method 507.4
5% to 95% RH, non condensing.
Altitude According to IEC 68-2-30 / MIL-STD-810F, Method 500.4
Operating: 15,000 ft
Non-operating: 40,000 ft altitude change rate: 2,000 ft/min
Shock According to IEC 68-2-27 / MIL-STD-810F, Method 516.5
Operating: 40g, 11 ms, half sine wave
Non-operating: 50g, 11 ms, half sine wave
Vibration According to IEC 68-2-6 / MIL-STD-810F, Method 514.5
Operating: 10~55Hz/0.075mm, 55~500Hz/1.0g
Non-operating: 10~55Hz/0.15mm, 55~500Hz/2.0g
Drop According to IEC 68-2-32 / MIL-STD-810F, Method 516.5
(base unit only)
Survives 30-36 drop depending on configuration

A-4 Specifications
This page intentionally left blank

Fingerprint Recognition B-1
APPENDIX B
Fingerprint Recognition
Your ML910™ RUGGED NOTEBOOK features a fingerprint recognition system designed
for computer security. It provides a high level of user convenience and gives you a set of
powerful tools for securing your computer and protecting your private data. The system
can:
• Display fingerprint images derived from the sensor IC.
• Enroll new users.
• Extract fingerprint templates from raw images, and store them in a local database.
• Match live-scan fingerprints against the local database.
B-2 Fingerprint Recognition
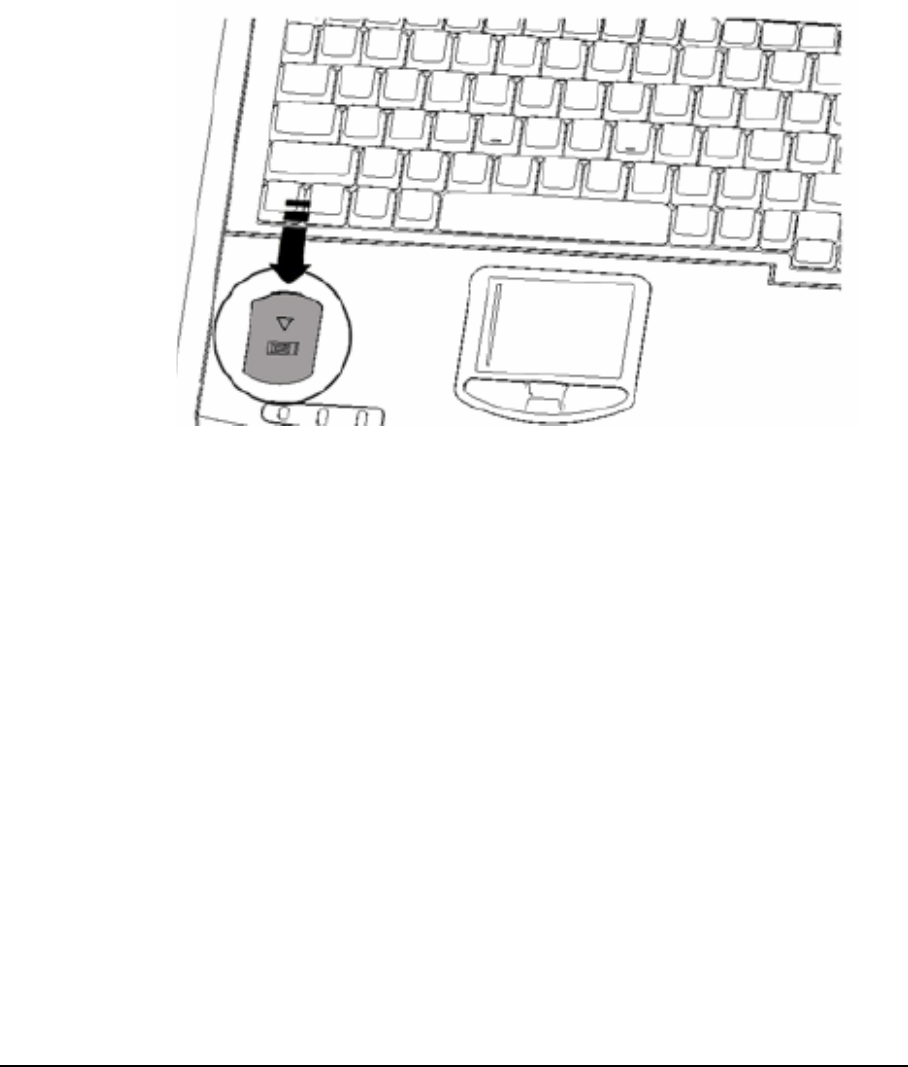
Finger Placement
1. The fingerprint sensor is located at the left side of palm-rest.
2. Slip your finger with the arrow’s direction firmly with steady pressure.
NOTE:
Be sure that you are making contact with the sensor surface during the scan. The
system works best when user follows the recommended direction.

Fingerprint Recognition B-3
Fingerprint Recognition
The ML910™ RUGGED NOTEBOOK has a separate embedded Fingerprint Module and a
Trusted Platform Module (TPM) included in the unit. This will allow ML910™RUGGED
NOTEBOOK to support applications for Trusted Platform Module (TPM) and Fingerprint
Recognition.
1. Fingerprint Module can support Fingerprint Recognition applications which can provide for
the following features:
z Computers
z Application of Protection
z Secure Windows Logon,
z Enterprise Class Password Management,
z File,
NOTE:
1. Above functions will be defined by the Application Provider and the software is used with the
Fingerprint Module.
2. Installation of the Fingerprint Module driver can be found in Chapter 6 of this User Guide.
2. Trusted Platform Module (TPM) can support applications TPM device in the unit. This can
provide the following functions based on the application used:
z Personal Secure Drive,
z Encrypted virtual drive
z Protection against dictionary attacks
NOTE:
1. Above functions will be defined by the Application Provider.
2. Installation of the TPM driver can be found in Chapter 6 of this User Guide.

B-4 Fingerprint Recognition
This page intentionally left blank.

Self Install Internal Wireless Modems C-1
APPENDIX APPENDIX
APPENDIX
C
Self Install Internal Wireless Modems
Most customers will purchase their embedded EVDO or HSDPA WWAN modems from Motorola and
have them pre-installed by the factory. It is possible to add an EVDO REV A. or HSDPA WWAN
(Cellular Carrier) modem later by purchasing a WWAN module from Motorola.
Note:
Normally, Motorola’s Agencies will provide several kind of Wireless Internal Module and they are
different in one/two connectors by one/two of WWAN cable to snap on the joint of the mini card. Please
refer following information for installation. Only the items listed in the below table are Motorola certified
dives for the ML910 TM RUGGED NOTEBOOK operation.
Item Kit No. Description Connector
Numbers WWAN
Cable
1 HKUN4067A Wireless EVDO REV. A Internal Module - VERIZON 2 2
2 HKUN4075A Wireless EVDO REV. A Internal Module - SPRINT 2 2
3 HKUN4071A Wireless HSDPA Internal Module – HSDPA 1 1
4 HKUN4073A Wireless HSDPA Internal Module - EMEA 1 1
C-2 Self Install Internal Wireless Modems
Installation of the HSDPA Internal Modem
HSDPA Internal kits should have one mini Card port and one WWAN cable such as
HKUN4071A and HKUN4073A. Please refer to following procedure for installation.
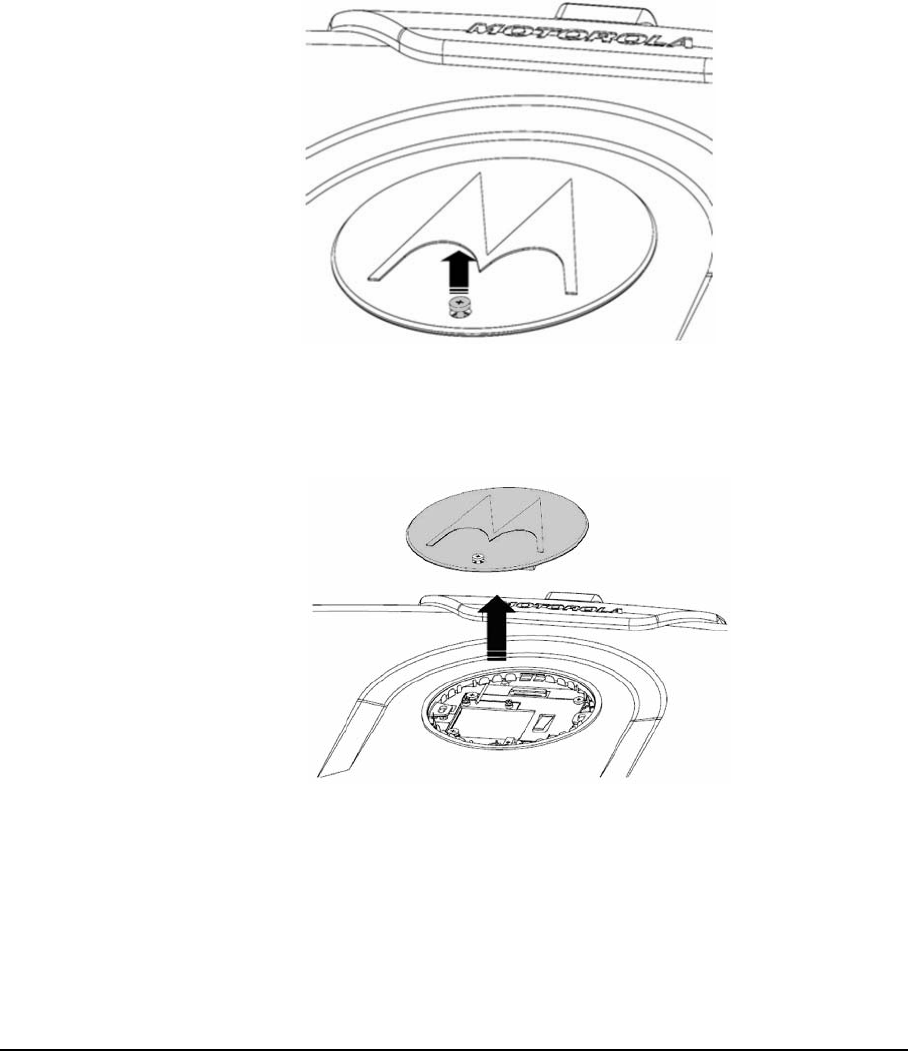
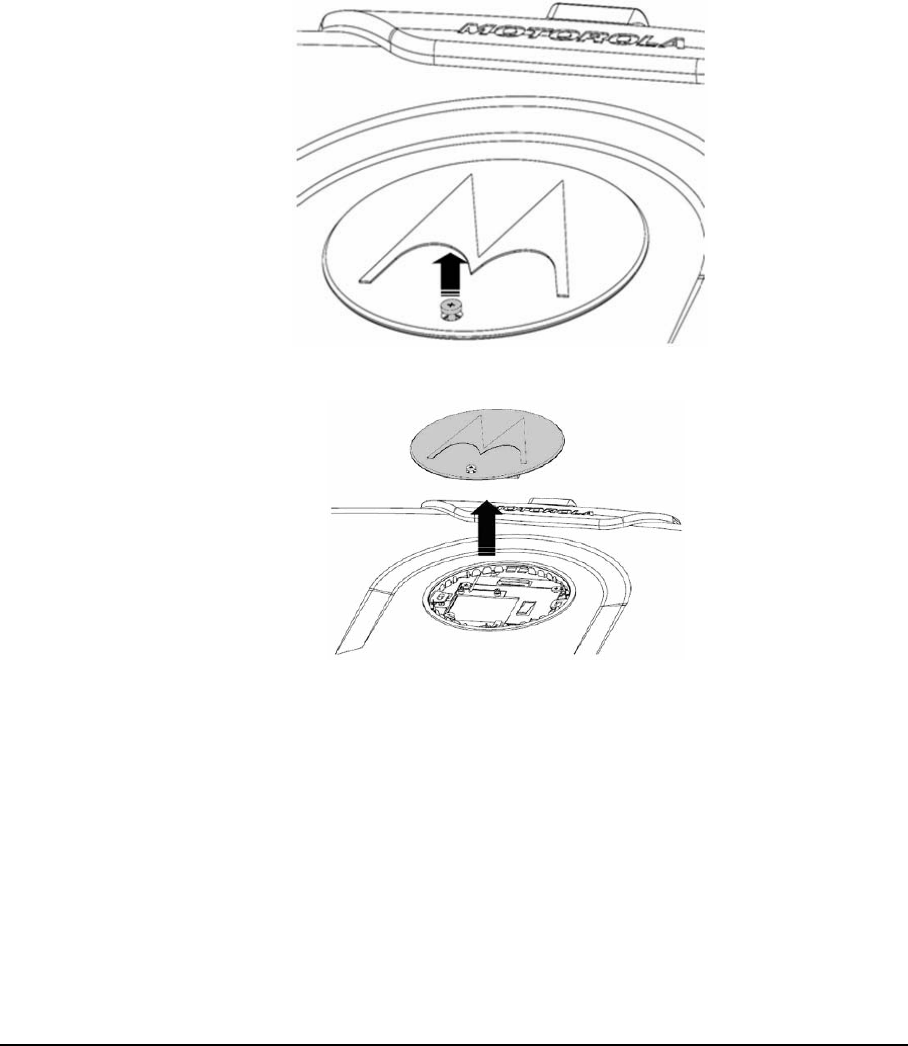
Remove the M logo for installation.
z Remove one screw from the M logo.
z Remove the M logo.
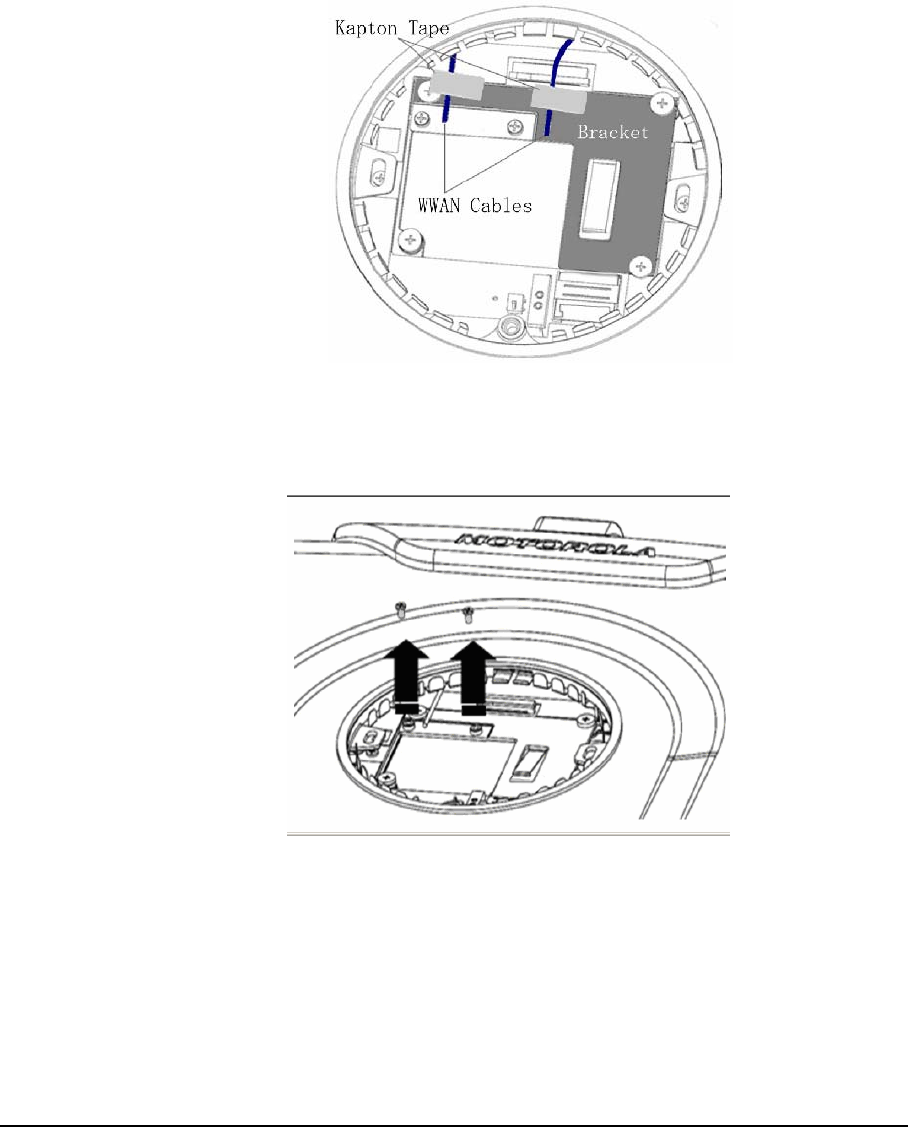
Self Install Internal Wireless Modems C-3
z You will find two antenna (WWAN) cables attached by two pieces of Kapton® tape
on the mini card bracket.
z Remove Kapton® tape from the cable.
z Remove two screws from the mini card bracket.
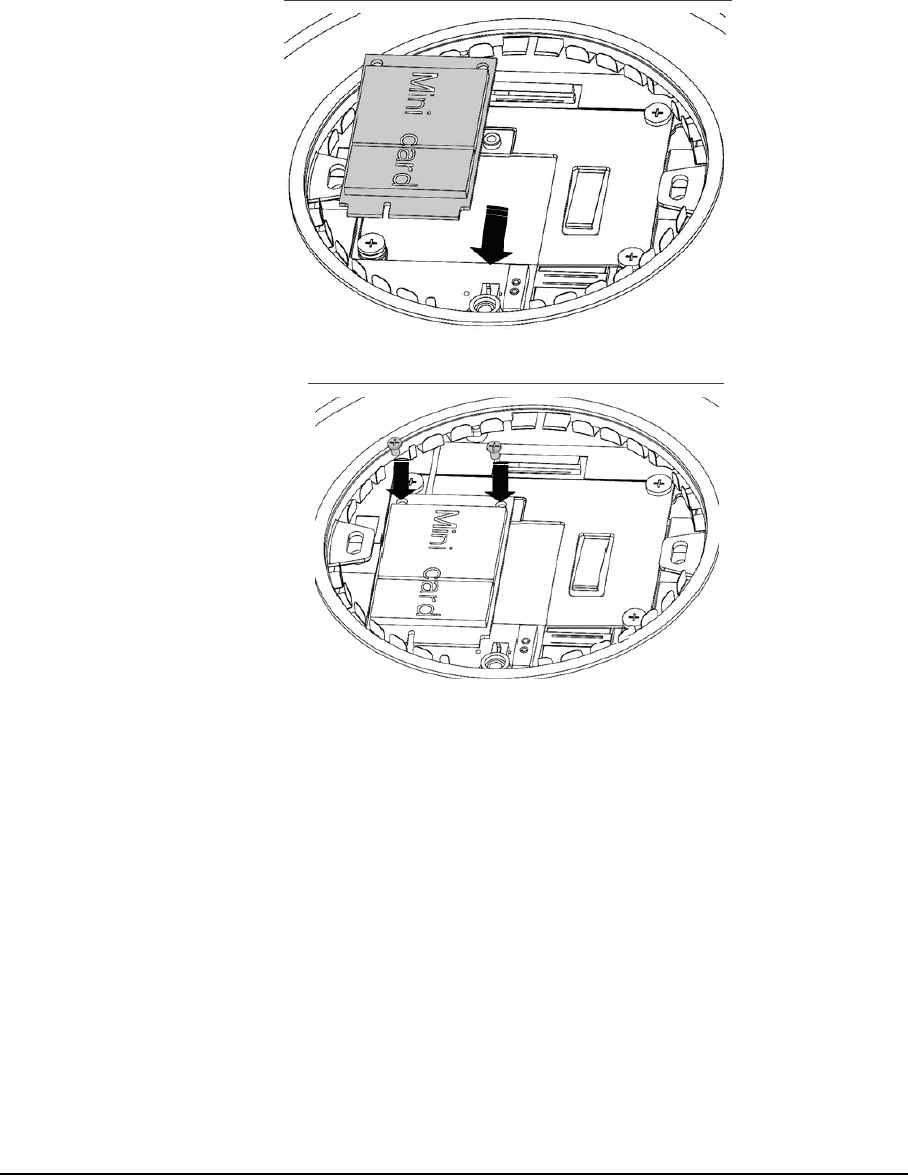
C-4 Self Install Internal Wireless Modems
z Insert the Wireless HSDPA Modem Kit.
z Fix two screws on the Wireless HSDPA Modem kit.
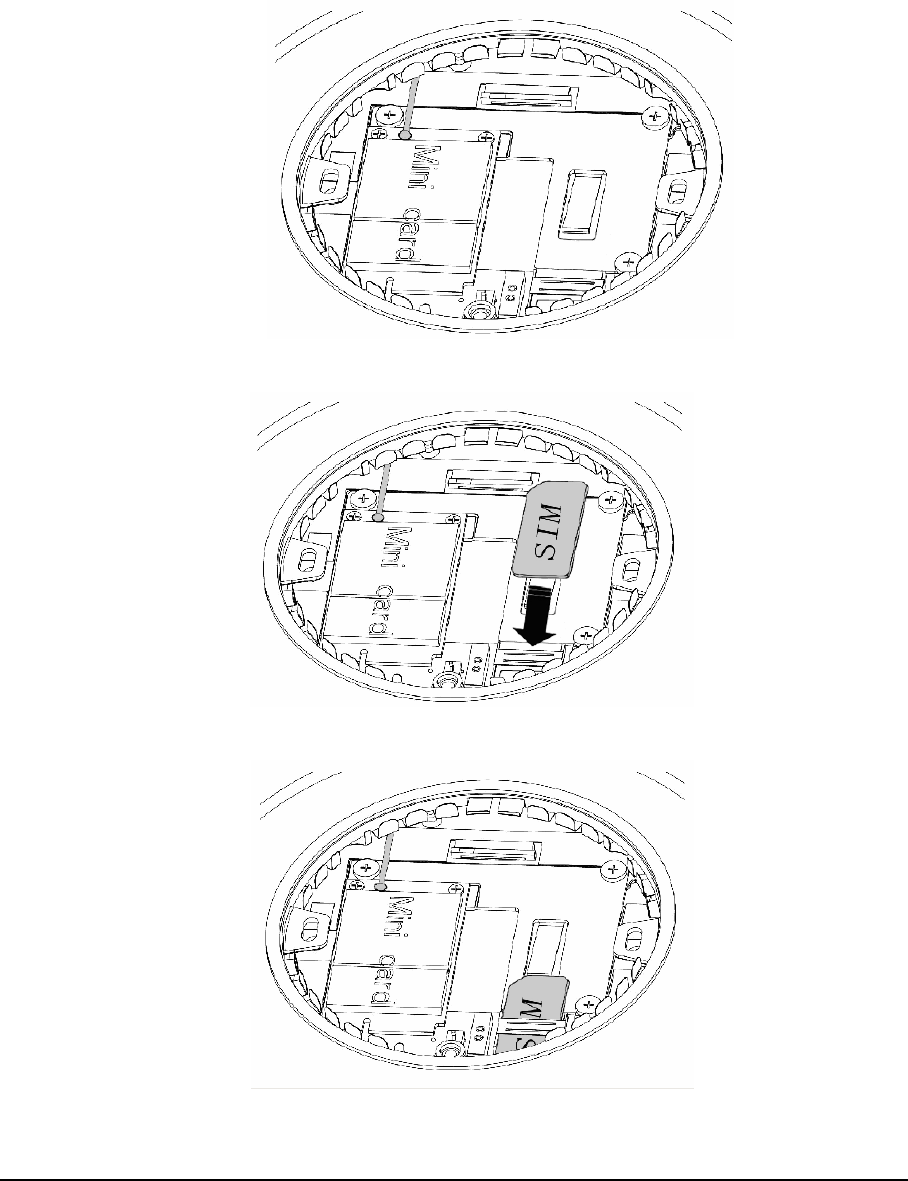
Self Install Internal Wireless Modems C-5
z Snap the Black WWAN cable onto the main port on the mini card.
z Insert the SIM card.
z Installed Internal Wireless HSDPA Modem kit with SIM card.
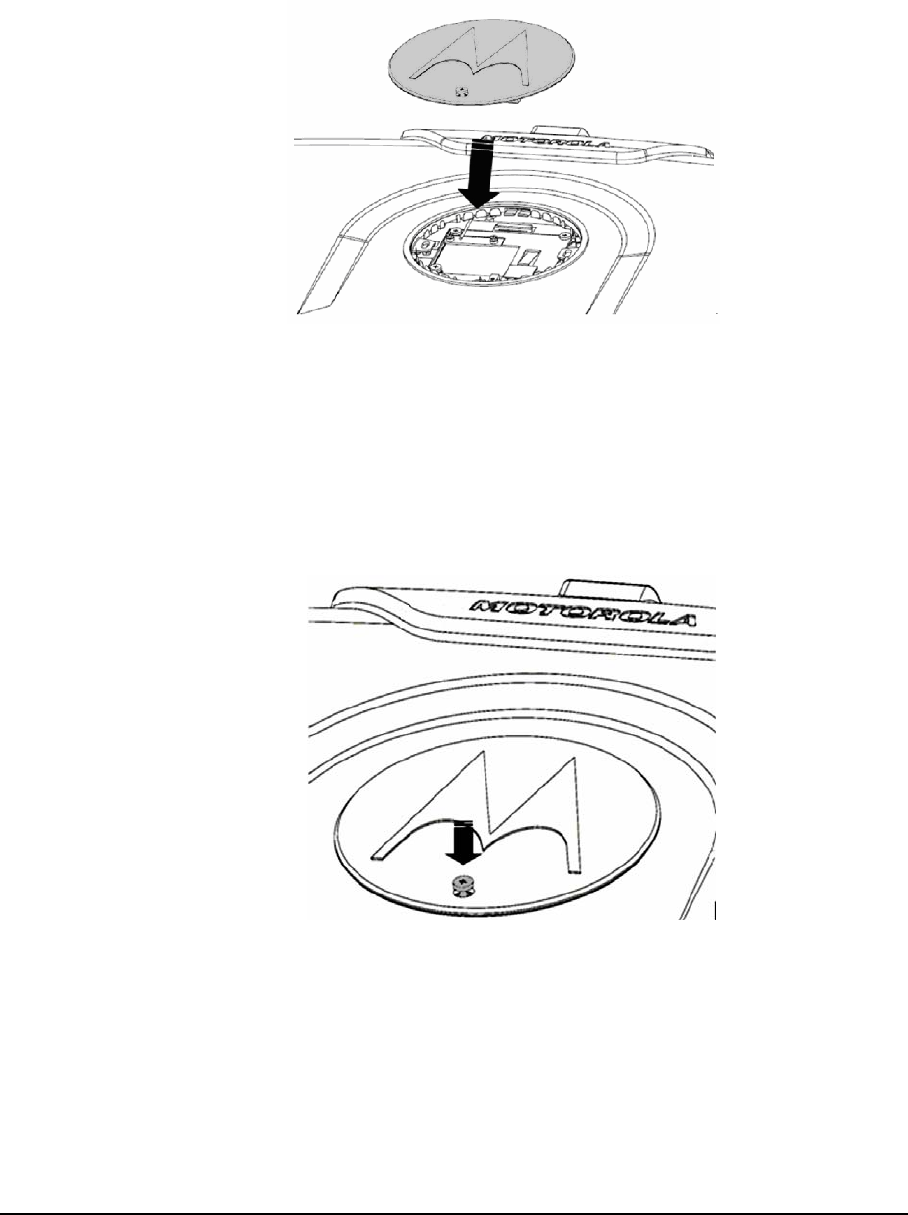
C-6 Self Install Internal Wireless Modems
z Place the M logo back on ML910 TM RUGGED NOTEBOOK unit.
z Fix the M logo with a screw.
Self Install Internal Wireless Modems C-7
Installation of the EVDO REV. A Internal Modem
EVDO REV. A Internal Kits should have two mini card port connectors and two WWAN Cables
such as Kit No. HKUN4067A and HKUN4075A. Please refer to following procedure for
installation.
z Remove one screw from the M logo.
z Remove the M logo.
C-8 Self Install Internal Wireless Modems
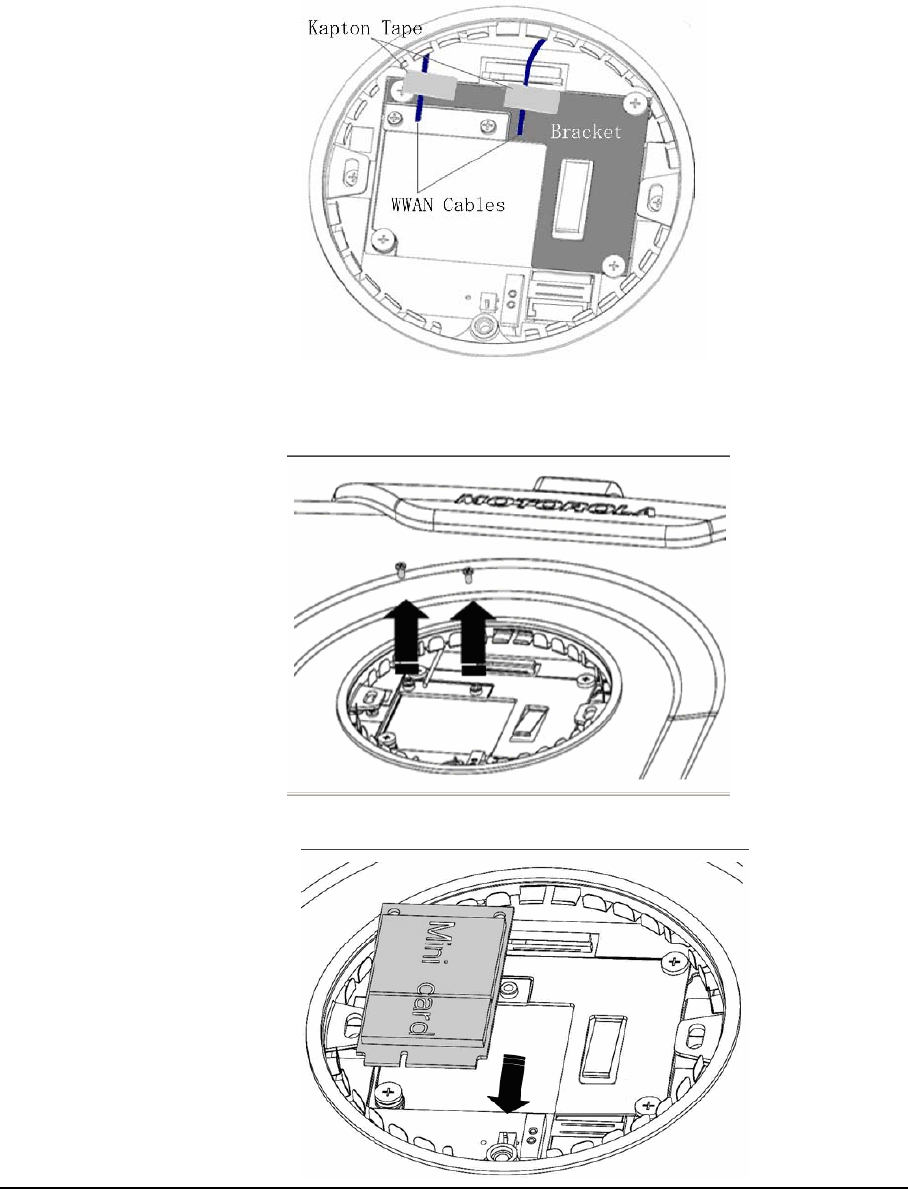
z You will find two antenna (WWAN) cables attached by two pieces of Kapton® tape
on the mini card bracket.
z Remove Kapton® tape from the cable.
z Remove two screws from the mini card bracket.
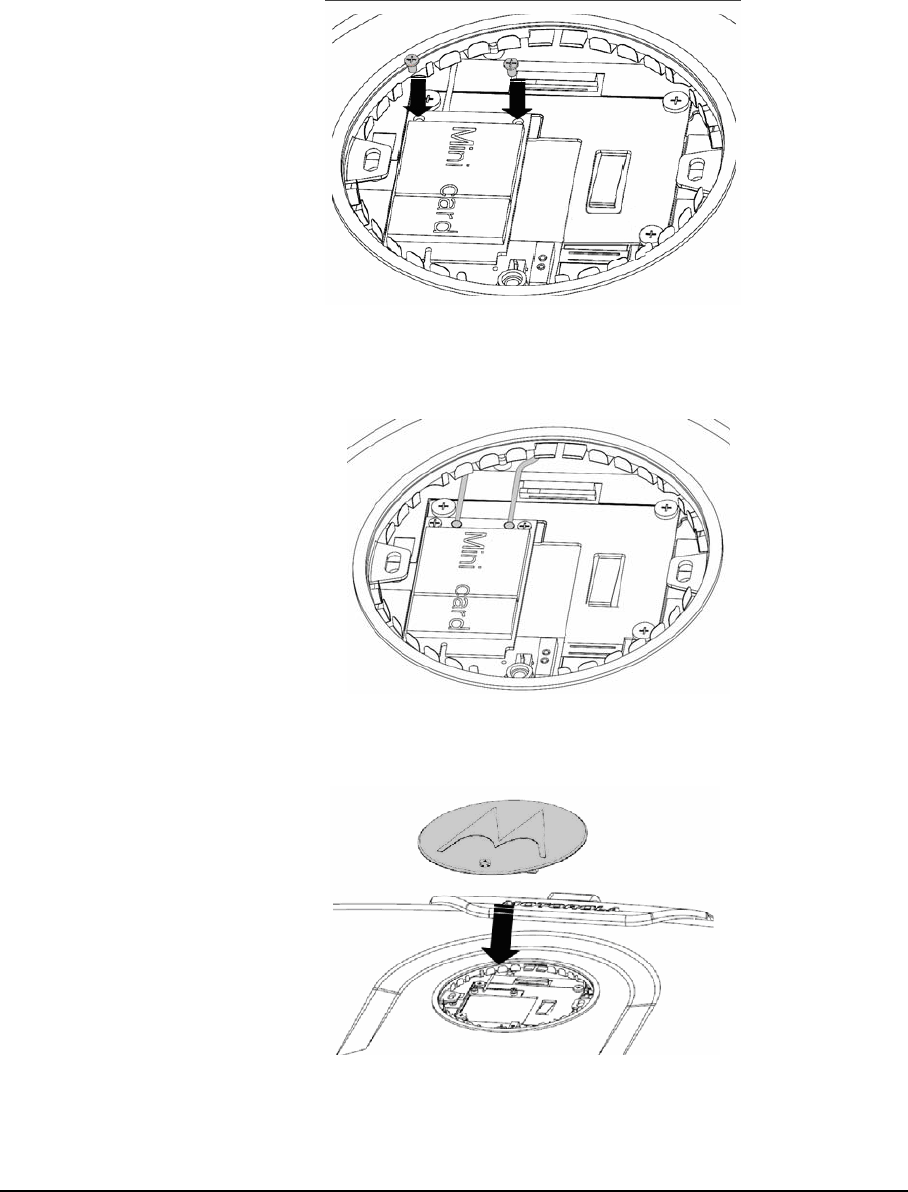
z Insert the Wireless EVDO REV. A Module Kit.
Self Install Internal Wireless Modems C-9
z Fix two screws on the Wireless EVDO REV. A Module.
z Snap the Black WWAN cable onto the Main port of the mini card and the White
WWAN cable onto the AUX post of the mini card.
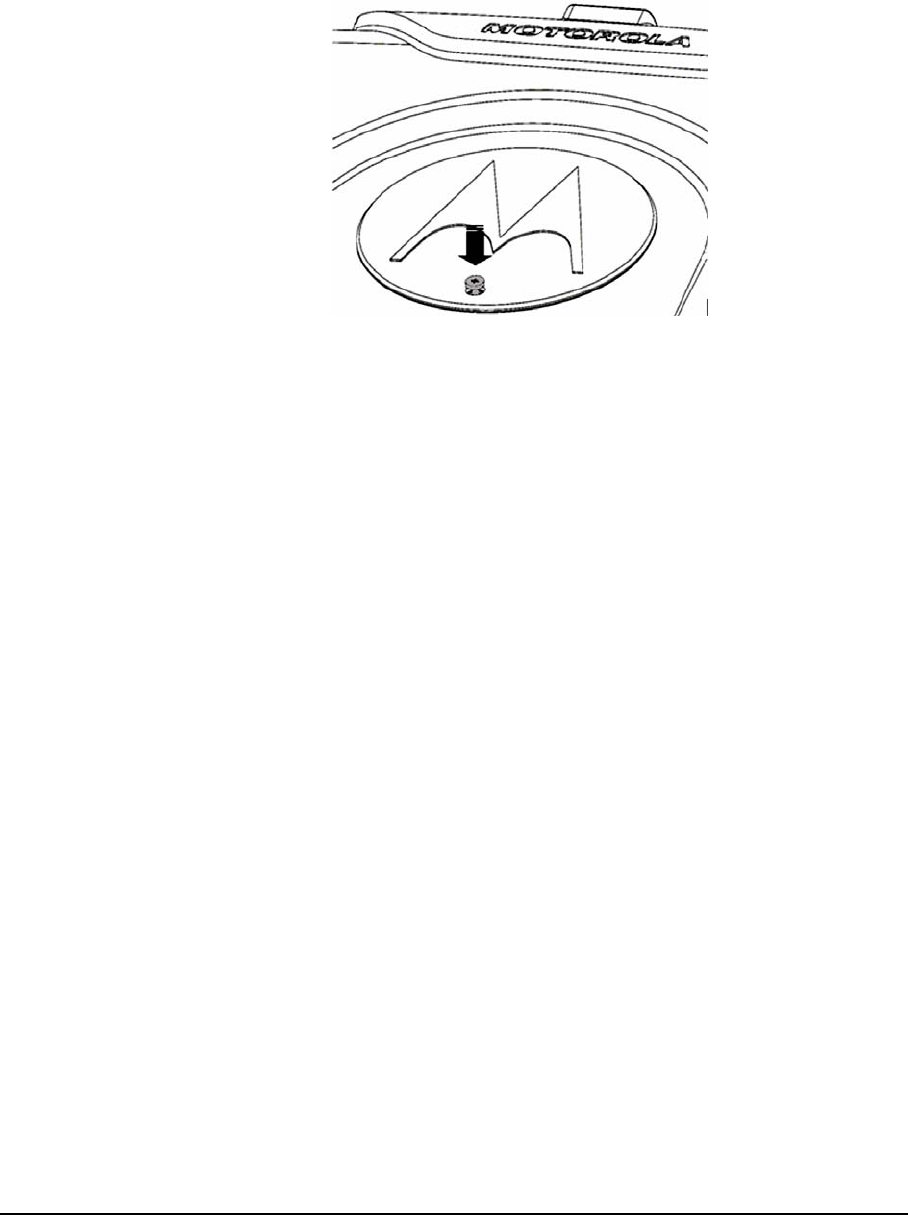
z Place the M logo back on ML910 TM RUGGED NOTEBOOK unit.
C-10 Self Install Internal Wireless Modems
z Fix the M logo with a screw.
Self Install Internal Wireless Modems C-11
Installation of the PRM240 Internal Modem Module
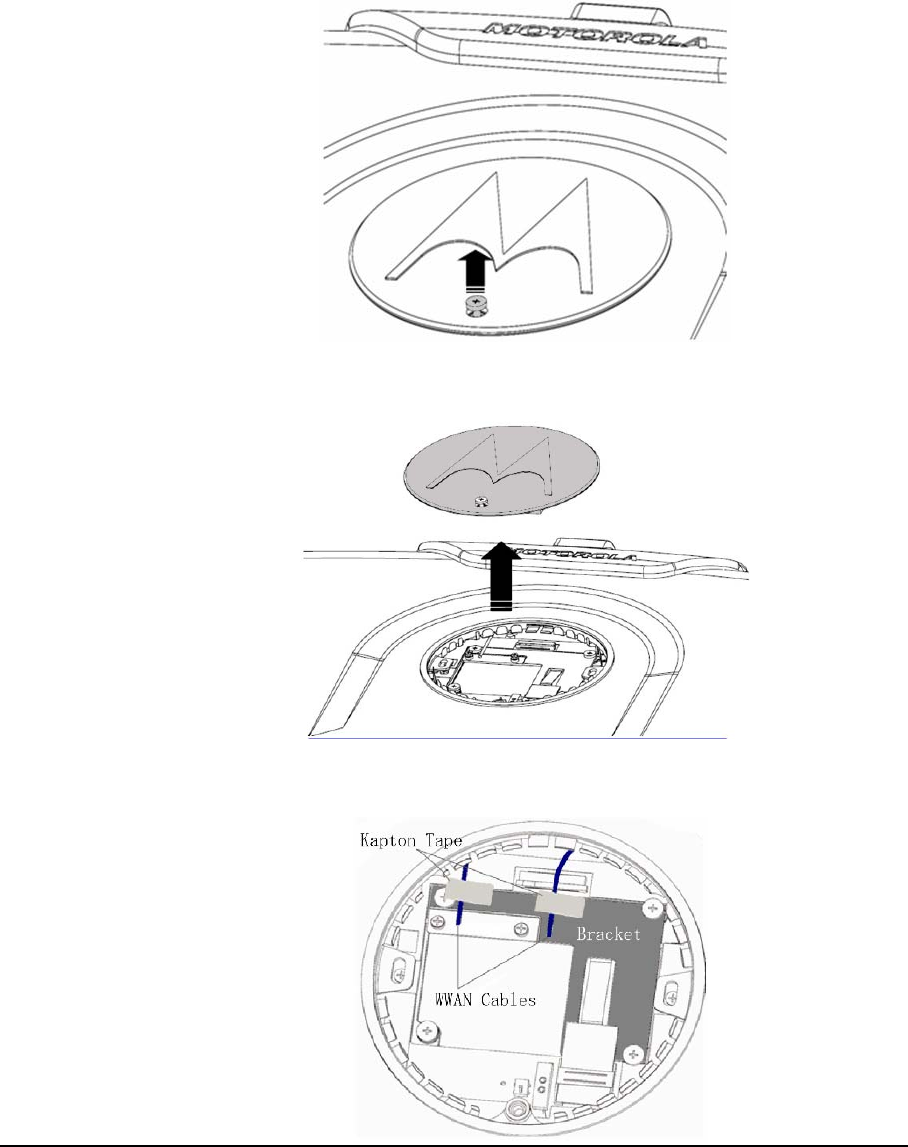
z Remove one screw from the M logo.
z Remove the M logo.
z You will find two WWAN cables attached by two pieces of Kapton® tape on the mini
card bracket.
C-12 Self Install Internal Wireless Modems
z Remove Kapton® tape from cables.
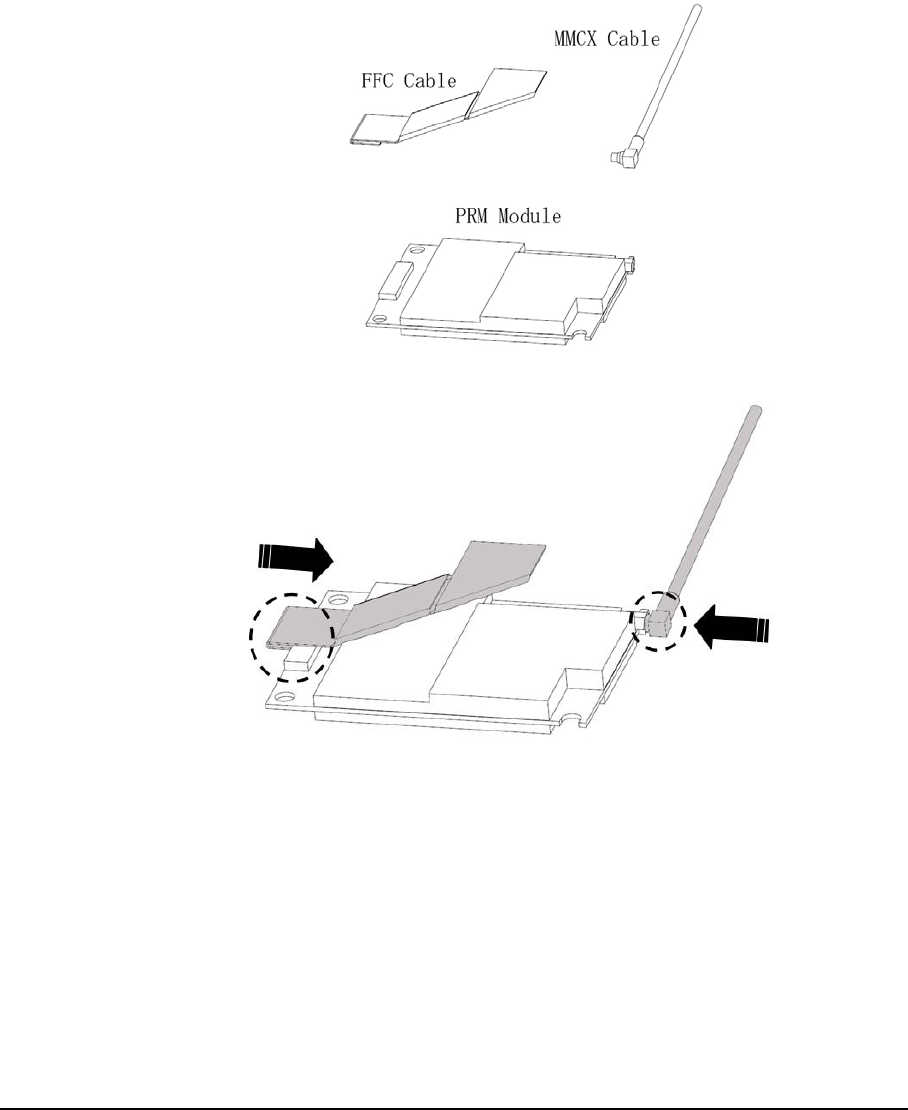
z For each PRM240 Internal Modem Kit (kit no. HKUN4066A), it includes one FFC
cable, one MMCX cable and one PRM240 Internal Modem module.
z Connect one side of the MMCX cable to the PRM240 module.
Self Install Internal Wireless Modems C-13
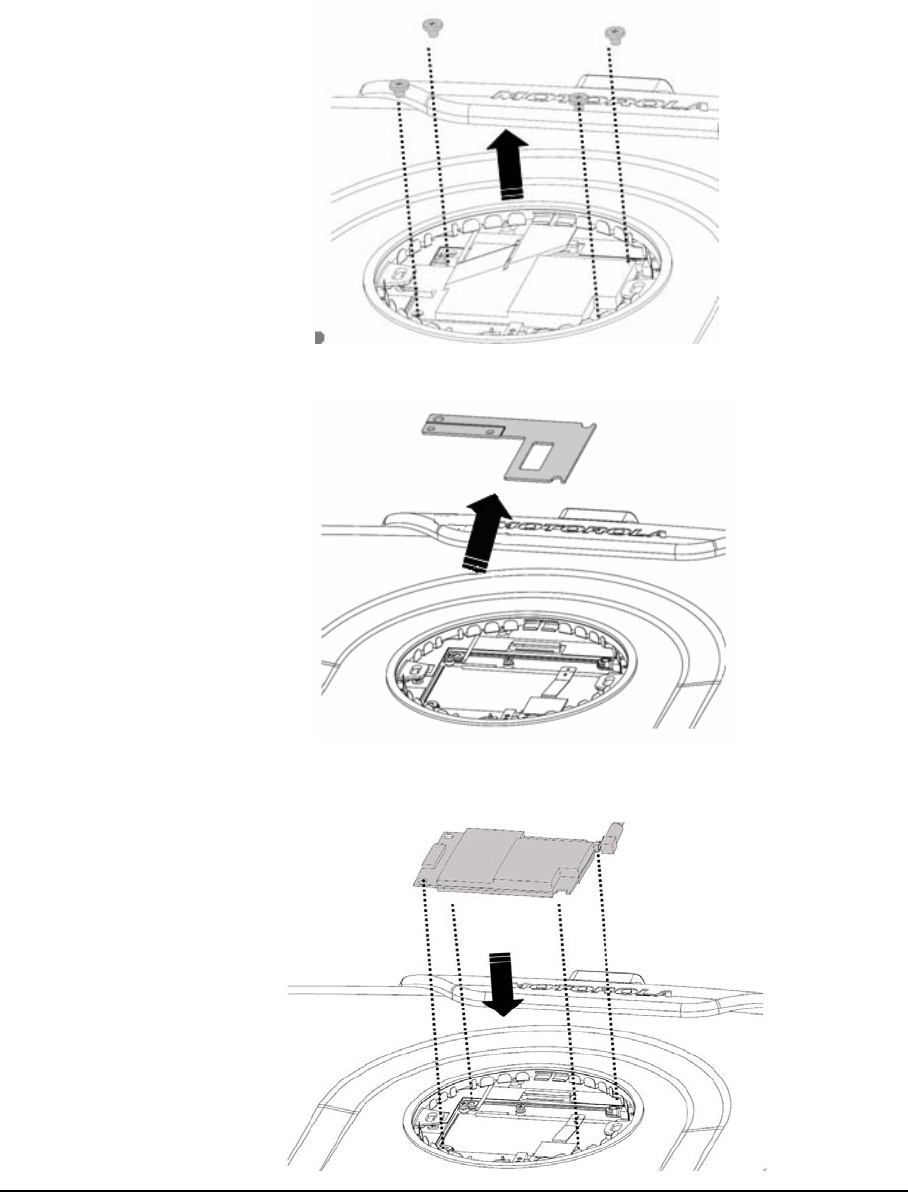
z Remove four screws from the mini card bracket.
z Remove the mini card bracket from ML910 TM RUGGED NOTEBOOK unit.
z Place the PRM240 module on ML910 TM RUGGED NOTEBOOK by matching each
corner of the PRM240 Internal Modem module with the four screw holes.
C-14 Self Install Internal Wireless Modems
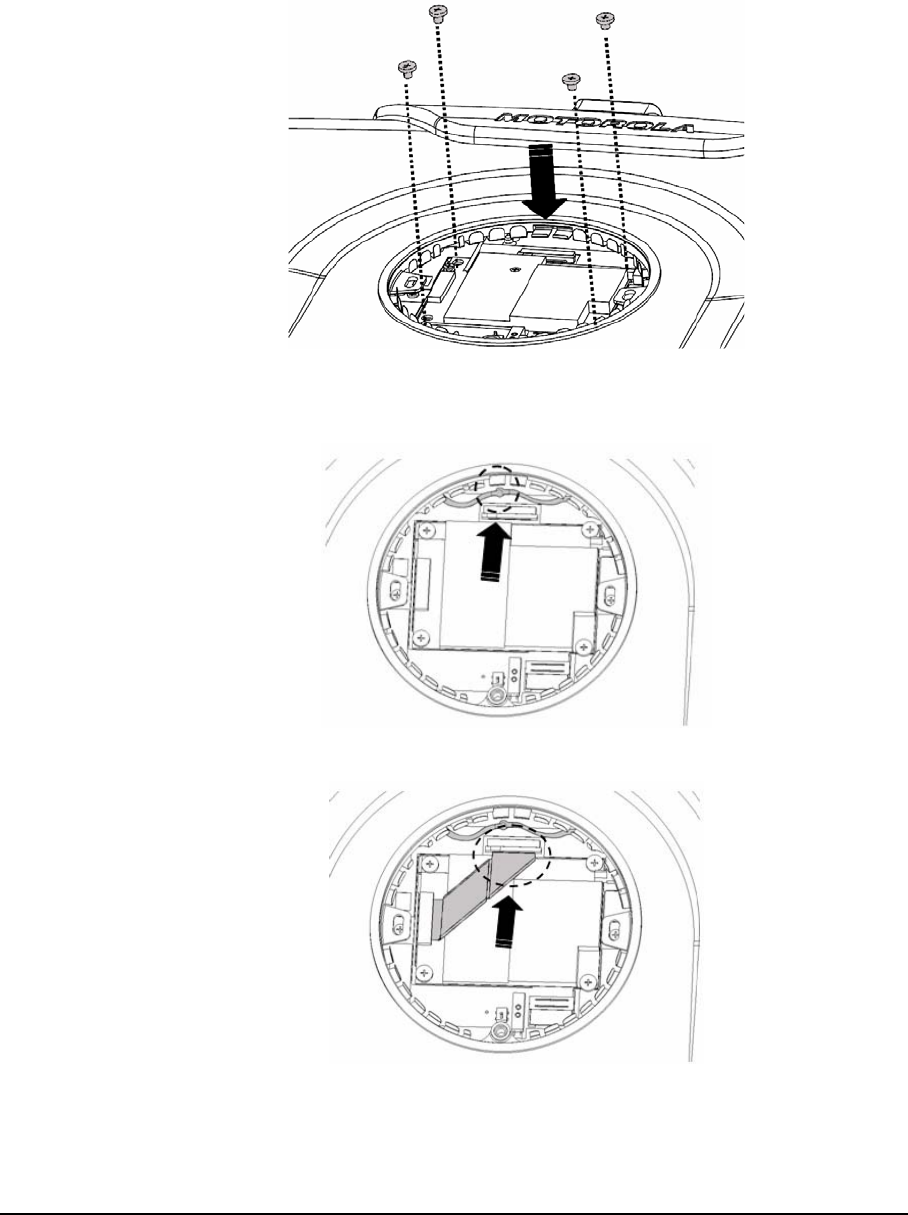
z Fix four screws back on to lock the PRM240 Internal Modem Module.
z Snap the Black WWAN cable to the MMCX cable..
z Connect the FFC cable to the FFC connector on the main board.

Self Install Internal Wireless Modems C-15
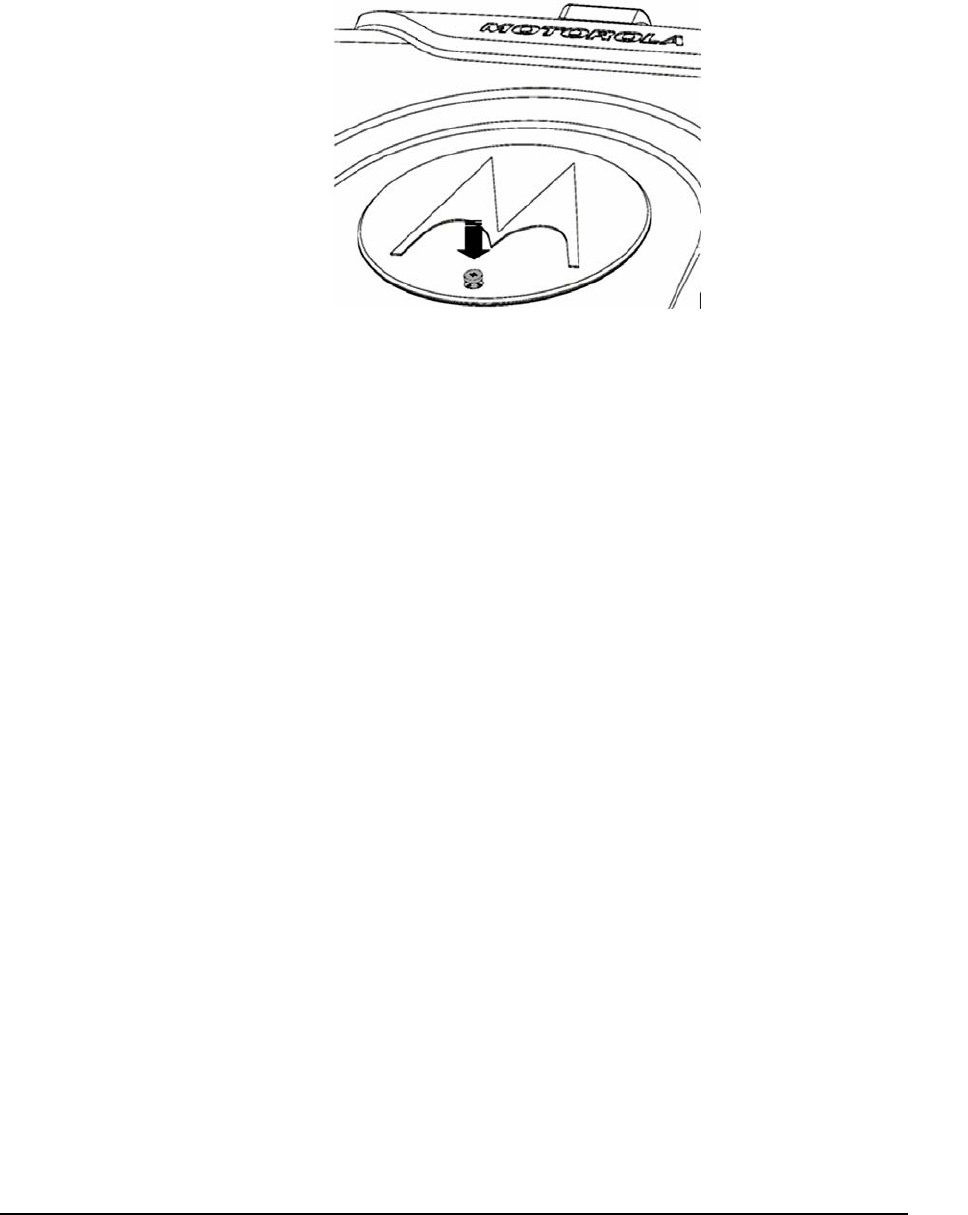
z Place the M logo back on ML910 TM RUGGED NOTEBOOK unit.
C-16 Self Install Internal Wireless Modems
z Fix the M logo with a screw.
RoSH / WEEE D-1
APPENDIX APPENDIX
APPENDIX
D
RoHS / WEEE
D-2 RoSH / WEEE
RoSH / WEEE D-3
D-4 RoSH / WEEE
RoSH / WEEE D-5
D-6 RoSH / WEEE