Motorola Solutions 92FT4859 Mobile and Base Station Transmitter User Manual CDM1250 Mobile Radio User Guide

Motorola Solutions, Inc. Mobile and Base Station Transmitter CDM1250 Mobile Radio User Guide

Contents

Exhibit D Users Manual per 2 1033 c3
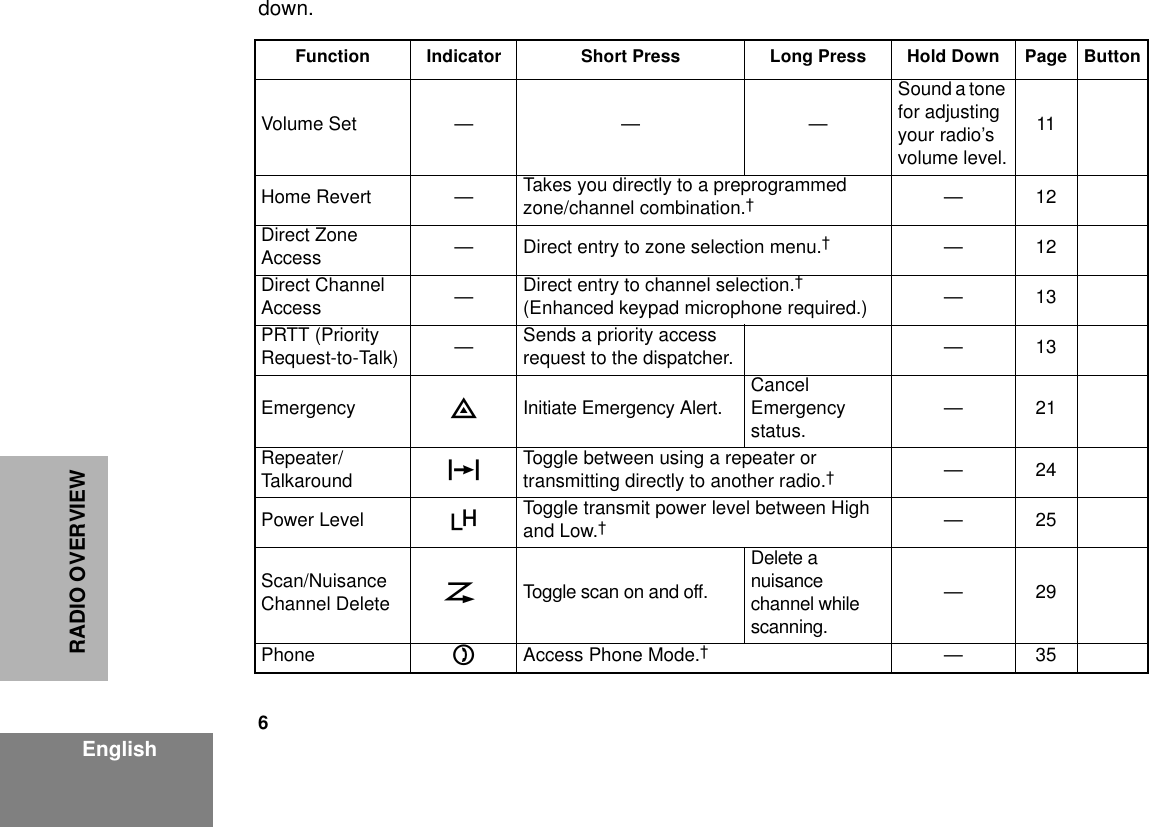
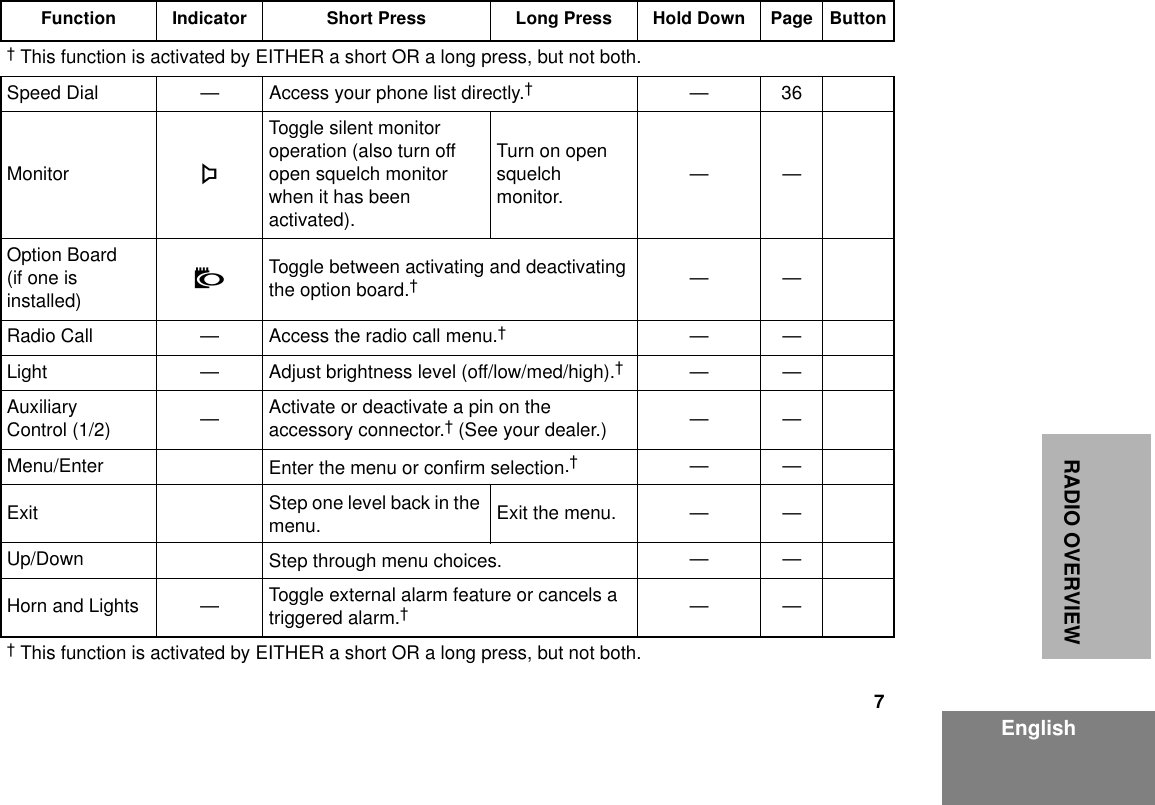
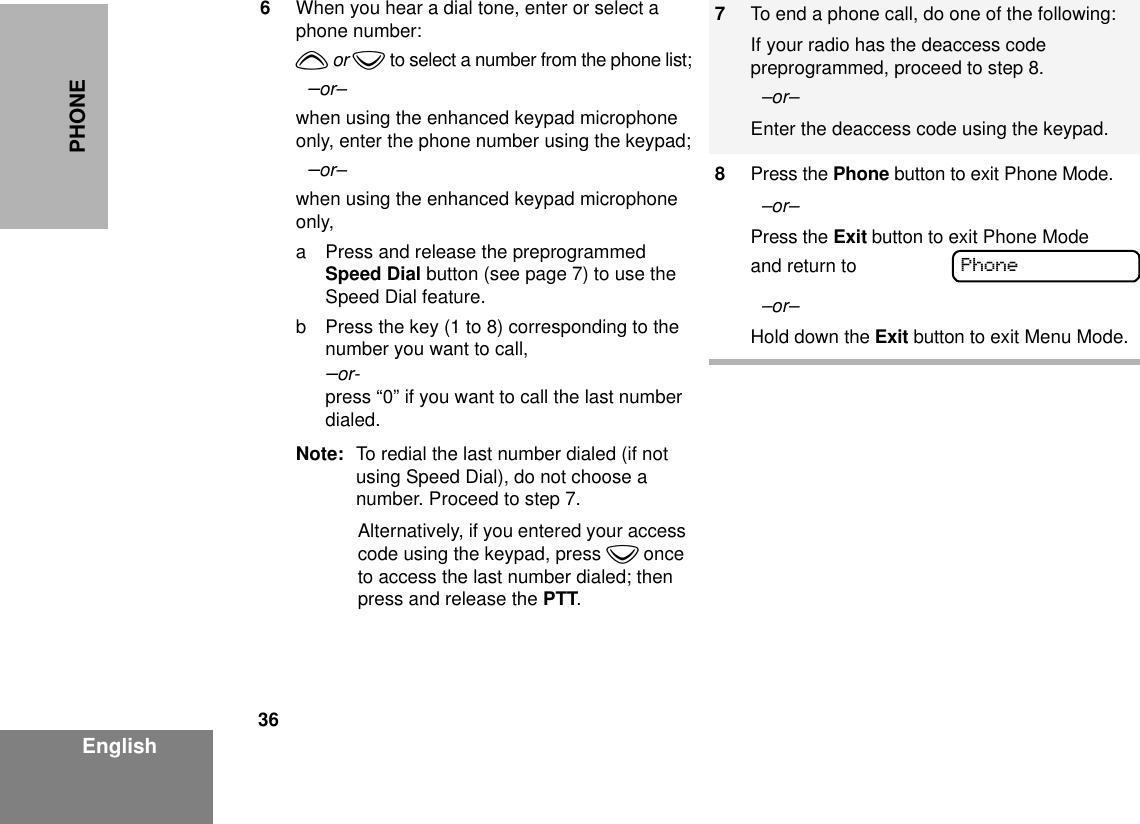
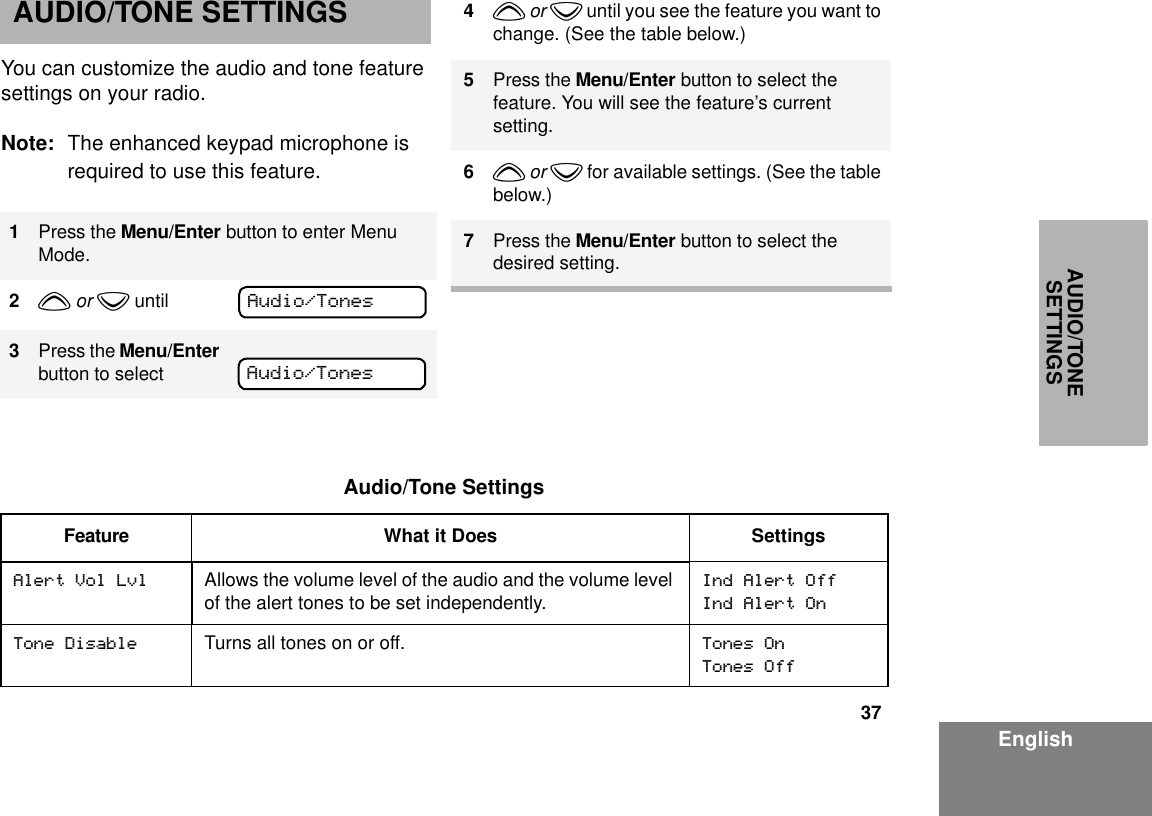
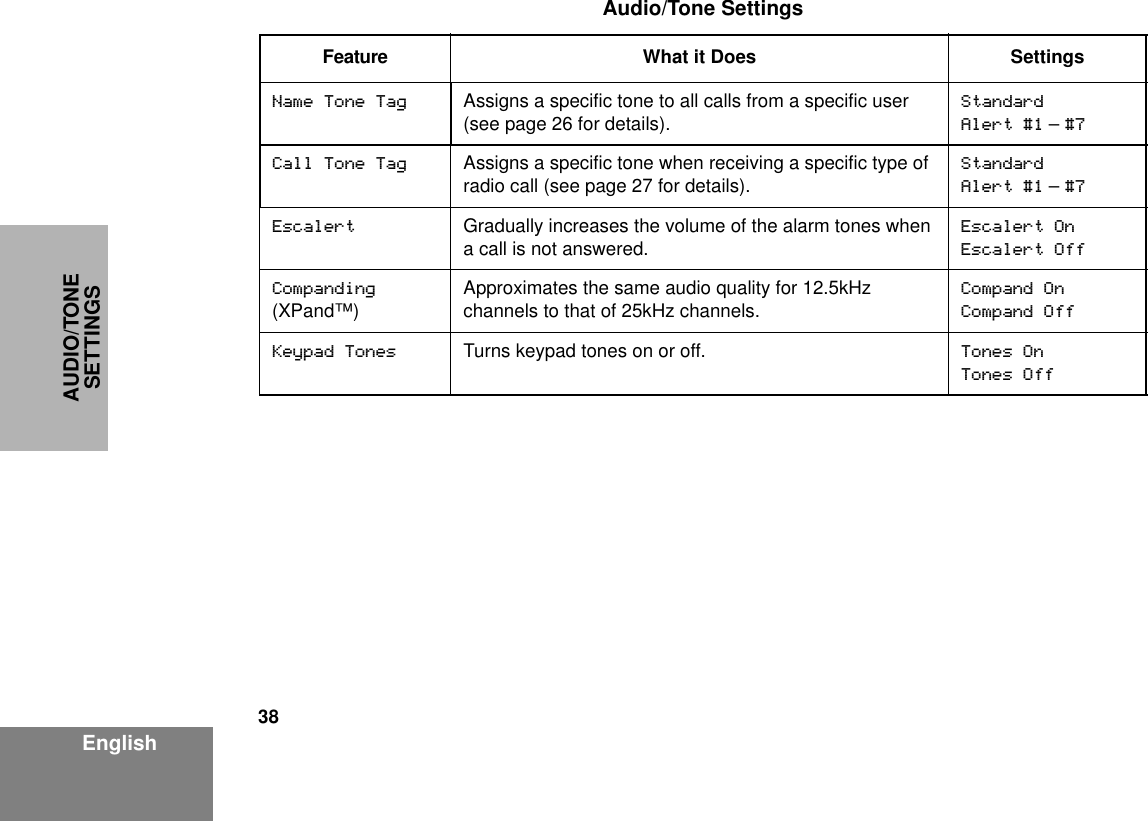
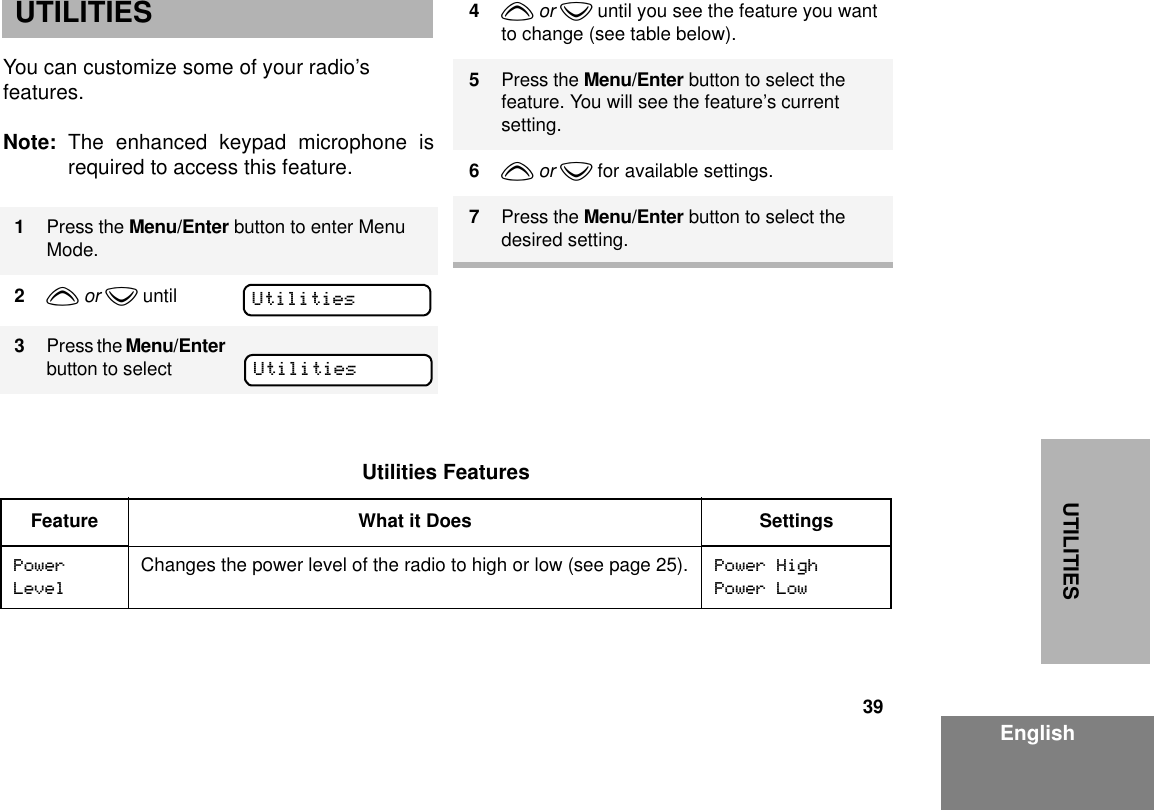
iEnglishCONTENTSCONTENTSComputer Software Copyrights . . . . . . . . . . . .iiSafety . . . . . . . . . . . . . . . . . . . . . . . . . . . . . .  1Product Safety and RF Exposure Compliance . . . . . . . . . . . . . . . . . . . . . . . . .  1Radio Overview . . . . . . . . . . . . . . . . . . . . . .  3Parts of the Radio . . . . . . . . . . . . . . . . . . . . .  3Optional Enhanced Keypad Microphone (RMN4026) . . . . . . . . . . . . . . . . . . . . . . .  4On/Off/Volume Knob . . . . . . . . . . . . . . . .  5Channel Selector Buttons  . . . . . . . . . . . .  5LED Indicators . . . . . . . . . . . . . . . . . . . . .  5Programmable Buttons  . . . . . . . . . . . . . .  5Push-to-Talk (PTT) Button . . . . . . . . . . . .  8Microphone  . . . . . . . . . . . . . . . . . . . . . . .  8Use with Enhanced Keypad Microphone (RMN4026) . . . . . . . . . . . . . . . . . . . . . . .  8LCD Screen . . . . . . . . . . . . . . . . . . . . . . .  8Audio Indicators for Programmable Buttons 10Getting Started  . . . . . . . . . . . . . . . . . . . . .  11Turning the Radio On or Off . . . . . . . . . . . .  11Adjusting the Volume  . . . . . . . . . . . . . . . . .  11Selecting a Zone . . . . . . . . . . . . . . . . . . . . .  12Selecting a Radio Channel . . . . . . . . . . . . .  12Sending a Call  . . . . . . . . . . . . . . . . . . . . . . .13Receiving a Call . . . . . . . . . . . . . . . . . . . . . .13Radio Calls  . . . . . . . . . . . . . . . . . . . . . . . . .15Making a Selective Call  . . . . . . . . . . . . . . . .15Receiving a Selective Call F. . . . . . . . . . . . .16Sending a Call Alert™ Page. . . . . . . . . . . . .16Receiving a Call Alert Page . . . . . . . . . . . . .17Radio Check . . . . . . . . . . . . . . . . . . . . . . . . .19responding to emergencyalerts E . . . . . . . . . . . . . . . . . . . . . . . . . . . .21Decoding an Emergency Alarm. . . . . . . .21Multiple Queued Emergencies  . . . . . . . .22Three Minute Timer . . . . . . . . . . . . . . . . .22After the Timer Expires . . . . . . . . . . . . . .22Clearing an EmergencyAlert E . . . . . . . . . . . . . . . . . . . . . . . . . . . . .23Sending an Emergency Remote Monitor . . .23Sending an Emergency Alert E  . . . . . . . . . .24Selective Radio Inhibit  . . . . . . . . . . . . . . . . .24Repeater or Talkaround  J  Mode. . . . . . . . .24Setting the Power Level  B . . . . . . . . . . . . . .25Name and Call Tone Tagging. . . . . . . . . . . .26Scan . . . . . . . . . . . . . . . . . . . . . . . . . . . . . . .29Starting or Stopping Scan G. . . . . . . . . . . . .29Talkback . . . . . . . . . . . . . . . . . . . . . . . . . . . .30Deleting a Nuisance Channel . . . . . . . . . . . .30
iiEnglishCONTENTSRestoring a Channel to the Scan List . . .30Editing a Scan List . . . . . . . . . . . . . . . . . . . .30Adding or Deleting Channels in a Scan List31Prioritizing a Channel in a Scan List . . . .32Setting Priority Channels . . . . . . . . . . . . .32Phone. . . . . . . . . . . . . . . . . . . . . . . . . . . . . .35Making a Phone Call D. . . . . . . . . . . . . . . . .35Audio/Tone Settings. . . . . . . . . . . . . . . . . .37Utilities. . . . . . . . . . . . . . . . . . . . . . . . . . . . .39Selecting the Display Language . . . . . . . . . .40Warranty  . . . . . . . . . . . . . . . . . . . . . . . . . . .41Limited Warranty. . . . . . . . . . . . . . . . . . . . . .41Accessories  . . . . . . . . . . . . . . . . . . . . . . . .45Audio  . . . . . . . . . . . . . . . . . . . . . . . . . . . . . .45Mounting. . . . . . . . . . . . . . . . . . . . . . . . . . . .45Antennas  . . . . . . . . . . . . . . . . . . . . . . . . . . .46Control Station . . . . . . . . . . . . . . . . . . . . . . .46COMPUTER SOFTWARE COPYRIGHTSThe Motorola products described in this manual may include copyrighted Motorola computer programs stored in semiconductor memories or other media. Laws in the United States and other countries preserve for Motorola certain exclusive rights for copyrighted computer programs including, but not limited to, the exclusive right to copy or reproduce in any form the copyrighted computer program. Accordingly, any copyrighted Motorola computer programs contained in the Motorola products described in this manual may not be copied, reproduced, modified, reverse-engineered, or distributed in any manner without the express written permission of Motorola. Furthermore, the purchase of Motorola products shall not be deemed to grant either directly or by implication, estoppel, or otherwise, any license under the copyrights, patents or patent applications of Motorola, except for the normal non-exclusive license to use that arises by operation of law in the sale of a product.
1EnglishSAFETYSAFETYPRODUCT SAFETY AND RF EXPOSURE COMPLIANCEATTENTION!This radio is restricted to occupational use only to satisfy FCC RF energy exposure requirements. Before using this product, read the RF energy awareness information and operating instructions in the Product Safety and RF Exposure booklet enclosed with your radio to ensure compliance with RF energy exposure limits.For a list of Motorola-approved antennas, batteries, and other accessories, visit the following web site which lists approved accessories: http://www.motorola.com/cgiss/index.shtml.Before using this product, read the operating instructions for safe usage contained in the Product Safety and RF Exposure booklet enclosed with your radio.!C a u t i o n
2EnglishSAFETYNotes
3EnglishRADIO OVERVIEWRADIO OVERVIEWPARTS OF THE RADIOMAEPF-26782-O(Interchangeable)ProgrammableButton 2 (P2) (Interchangeable)ProgrammableButton 4 (P4)(Interchangeable)ProgrammableButton 3 (P3)Red/Yellow/GreenLED Indicators(Interchangeable)ProgrammableButton 1 (P1)Microphone-DFNKnobOn/Off/VolumeChannel Selector(Up/Down)LCD Screen
4EnglishRADIO OVERVIEWOptional Enhanced Keypad Microphone (RMN4026)Your radio may be ordered with an optional DTMF (Dual-Tone Multi-Frequency) microphone that has a direct entry keypad. This enhanced keypad microphone has three buttons (A, B, C) below the keypad that can be programmed to conveniently activate select radio features.By purchasing this enhanced keypad microphone, you will be able to gain access to menu capabilities and the radio’s user- selectable features.FL0830328OKeypadPush-to-Talk(PTT) buttonProgrammableButtons(A, B, C)
5EnglishRADIO OVERVIEWOn/Off/Volume KnobTurns the radio on or off, and adjusts the radio’s volume.Channel Selector ButtonsUsed for channel scrolling. LED IndicatorsIndicates channel, scan, and monitor status, as well as receipt of a selective call.Programmable ButtonsYour radio has several programmable buttons. Your dealer can program these buttons as shortcuts to various radio features.Check with your dealer for a complete list of functions your radio supports.Programmable buttons include the g, h, i, and j buttons (see page 3).Some buttons can access up to two features, depending on the type of button press:• short press—quickly pressing and releasing the programmable buttons• long press—pressing and holding the programmable buttons for a period of time (default 1 1/2 seconds or programmed value)• hold down—pressing and holding down the programmable buttons while checking status or making adjustmentsA summary of programmable radio features and corresponding page references appears beginning on page 6.In the “Button” column, have your dealer record the name of the programmable button next to the feature that has been programmed to it. The dealer can use the abbreviations (P1, P2, P3, P4) shown in the radio illustration on page 3.Also, where appropriate, have your dealer indicate whether the button press requires a short press, a long press, or needs to be held y or z
6EnglishRADIO OVERVIEWdown.Function Indicator Short Press Long Press Hold Down Page ButtonVolume Set — — —Sound a tone for adjusting your radio’s volume level.11Home Revert — Takes you directly to a preprogrammed zone/channel combination.†—12Direct Zone Access — Direct entry to zone selection menu.† —12Direct Channel Access —Direct entry to channel selection.† (Enhanced keypad microphone required.) —13PRTT (PriorityRequest-to-Talk) —Sends a priority access request to the dispatcher. —13Emergency EInitiate Emergency Alert. Cancel Emergency status. —21Repeater/Talkaround JToggle between using a repeater or transmitting directly to another radio.†—24Power Level BToggle transmit power level between High and Low.†—25Scan/Nuisance Channel Delete GToggle scan on and off.Delete a nuisance channel while scanning.—29Phone DAccess Phone Mode.†—35
7EnglishRADIO OVERVIEW† This function is activated by EITHER a short OR a long press, but not both.Speed Dial — Access your phone list directly.†—36Monitor CToggle silent monitor operation (also turn off open squelch monitor when it has been activated).Turn on open squelch monitor. ——Option Board(if one is installed)NToggle between activating and deactivating the option board.†——Radio Call — Access the radio call menu.†——Light — Adjust brightness level (off/low/med/high).†——Auxiliary Control (1/2) —Activate or deactivate a pin on the accessory connector.† (See your dealer.) ——Menu/Enter Enter the menu or confirm selection.†——Exit Step one level back in the menu. Exit the menu. ——Up/Down Step through menu choices. ——Horn and Lights — Toggle external alarm feature or cancels a triggered alarm.†——† This function is activated by EITHER a short OR a long press, but not both.Function Indicator Short Press Long Press Hold Down Page Button
8EnglishRADIO OVERVIEWPush-to-Talk (PTT) ButtonPress and hold down this button to talk; release it to listen.MicrophoneHold the microphone 1 to 2 inches (2.5 to 5 cm) from your mouth, and speak clearly into it.Use with Enhanced Keypad Microphone (RMN4026) These keys are used to:• Dial a phone number• Make a radio call • Directly access preprogrammed featuresLCD ScreenThe top screen row displays radio status information:A B CSymbol IndicationACompandingThe Companding feature is activated. When in narrow band, this feature improves audio quality.BPower LevelLow Power “ R” or High Power “ S “ is activated.CCarrier Squelch (CSQ)The radio is on a CSQ channel, monitor is active, or the microphone is off-hook.DPhonePhone Mode is selected.
9EnglishRADIO OVERVIEWEEmergencyAn Emergency Alert is being sent.FCall ReceivedA Selective Call or Call Alert has been received.GScanThe Scan feature is active. Priority 1 Scan(  flashing)During Scan, indicates that the scan has locked on to a priority 1 channel.HPriority 2 Scan( steady)During Scan, indicates that the scan has locked on to a priority 2 channel.JTalkaroundThe radio is not transmitting through a repeater. KProgramming ModeThe radio is in Program List editing mode.Symbol IndicationMSignal StrengthIndicates signal strength. The more bars, the stronger the signal.NOption BoardOption board is enabled.QNot currently assigned.LNot currently assigned.Symbol Indication
10EnglishRADIO OVERVIEWAUDIO INDICATORS FOR PROGRAMMABLE BUTTONSIn addition to having associated visual indicators, some programmable buttons use tones to indicate one of two modes:Low-High ToneHigh-Low Tone Button Low-High Tone High-Low ToneScan Start scan Stop scanPower Level High power selected Low power selectedOption Board Enabled DisabledRepeater/Talkaround Does not use repeater Uses repeater
11EnglishGETTING STARTEDGETTING STARTEDTURNING THE RADIO ON OR OFFADJUSTING THE VOLUMETurn the On/Off/Volume Control knob clockwise to increase the volume, or counterclockwise to decrease the volume. –or– ON OFFPush the On/Off/Volume Control knob until you hear a click.If power-up is successful, you will hear the Self-Test Pass Tone (if programmed) . If the radio fails to power up, you will hear the Self-Test Fail Tone .Push the On/Off/Volume Control knob until you hear a click and the display clears.1Hold down the Volume Set button (see page 6). You will hear a continuous tone.2Turn the On/Off/Volume Control knob to the desired volume level.3Release the Volume Set button.
12EnglishGETTING STARTEDSELECTING A ZONEA zone is a group of up to 16 channels. Before you can access a channel in a zone, you must select the zone in one of two ways:Method 1 (if programmed by your dealer [see pages 6 - 7])Method 2 (enhanced keypad microphone required)SELECTING A RADIO CHANNELYour radio offers 64 channels (4 zones of 16 channels each).Note: Due to government regulations, some channels may not be programmed. See your dealer for more information.There are three ways to select a channel:Method 1 Method 2 (if programmed by your dealer [see pages 6 - 7])Press the Home Revert button.1Press the Direct Zone Access button.2y or z until you reach the desired zone.3Press the Direct Zone Access button to select the zone.1Press the Menu/Enter button to enter Menu Mode.2y or z until3Press the Menu/Enter button to selectZoneZone4y or z until you see the desired zone name.5Press the Menu/Enter button to select the zone.1Select the appropriate Zone, if required.2y or z until you reach the desired channel, shown on the LCD display.
13EnglishGETTING STARTEDMethod 3 (if programmed by your dealer [see pages 6 - 7]. Enhanced keypad microphone required.)SENDING A CALLIf your system uses the request-to-talk feature, use the following method to send a call:RECEIVING A CALL1Press the Direct Channel Access button.2Enter the desired channel using the enhanced keypad microphone.3Press the Direct Channel Access button to confirm your selection.1Turn your radio on.2y or z to select the desired channel.3Hold the microphone vertically 1 to 2 inches (2.5 to 5 cm) from your mouth. Press the PTT to talk; release it to listen.1Turn your radio on.2y or z to select the desired channel.3Press the PTT (for priority requests to talk, the PRTT) button and wait for the talk permit tone.4Hold the microphone vertically 1 to 2 inches (2.5 to 5 cm) from your mouth. Press the PTT to talk; release it to listen.1Turn your radio on.2Adjust the radio’s volume, if necessary (see page 11).3Select the desired channel. 4To respond, hold the microphone vertically 1 to 2 inches (2.5 to 5 cm) from your mouth. Press the PTT to respond to an incoming call; release it to listen.
14EnglishGETTING STARTEDNotes
15EnglishRADIO CALLSRADIO CALLSMAKING A SELECTIVE CALLYou can make a selective call to a particular radio or group of radios, provided the signalling protocol supports it. Note: An enhanced keypad microphone is required to operate this feature.To make a Selective Call:Method 1Method 21Press the Radio Call button to enter Menu mode.2y or z until3Press the Radio Call button to select4y or z to locate the desired ID in the Radio Call list;  –or– using the enhanced keypad microphone, enter the ID number of the radio you want to call.Selective CallSelective Call5Press the PTT to send the call. The radio sounds a continuous tone.6Press the PTT to talk; release it to listen.7When finished with the call, press the Radio Call button to exit.1Press the Menu/Enter button to enter Menu Mode.2y or z until3Press the Menu/Enter button to select4y or z until5Press the Menu/Enter button to selectRadio CallRadio CallSelective CallSelective Call
16EnglishRADIO CALLSRECEIVING A SELECTIVE CALL FWhen you receive a selective call: • You will hear two alert tones.• The yellow LED Indicator flashes. • The LCD screen displays  F  and the preprogrammed name or ID of the calling radio, if available. SENDING A CALL ALERT™ PAGEYou can alert another person by sending a Call Alert page. Note: An enhanced keypad microphone is required to operate this feature.To send a Call Alert page:Method 16y or z to locate the desired ID in the Radio Call List;  –or– using the enhanced keypad microphone, enter the ID number of the radio you want to call.7Press the PTT to send the call. The radio sounds a continuous tone.8Press the PTT to talk; release it to listen.9When finished with the call,press the Exit button to return to   –or–Hold down the Exit button to exit Menu Mode.Selective Call1Press the Radio Call button to enter Menu Mode.2y or z until3Press the Radio Call button to select4y or z to locate the desired ID in the Radio Call list;  –or– using the enhanced keypad microphone, enter the ID number of the radio you want to page.5Press the PTT to send the page.You will see6If the Call Alert page is received, Call AlertCall AlertCall In Prog
17EnglishRADIO CALLSMethod 2 RECEIVING A CALL ALERT PAGEWhen your radio receives a Call Alert page, it sounds four alert tones continuously and the following are displayed until you respond: you will seeIf not,you will see7Press the Exit button to return to  –or–Hold down the Exit button to exit Menu Mode.1Press the Menu/Enter button to enter Menu Mode.2y or z until3Press the Menu/Enter button to select4y or z until5Press the Menu/Enter button to selectAcknowledgeNo AcknowledgeCall AlertRadio CallRadio CallCall AlertCall Alert6y or z to locate the desired ID in the Radio Call List;  –or–using the enhanced keypad microphone, enter the ID number of the radio you want to page.7Press the PTT to send the page.You will see8If the Call Alert page is received, you will seeIf not,you will see9Press the Exit button to return to  –or–Hold down the Exit button to exit Menu Mode.Call In ProgAcknowledgeNo AcknowledgeCall Alert
18EnglishRADIO CALLSthe  F  symbol, and the ID of the calling radio alternating with  .Press the PTT to answer the page, or press any other key to clear it.Note: Your radio will display only the last Call Alert page received. Also, your radio will not receive any Selective Calls until you clear the page.Call Received
19EnglishRADIO CALLSRADIO CHECKThis feature allows you to determine if a radio is in range without disturbing the user of the radio. Radio Check can also be used when attempts with Selective Call and Call Alert fail. (This feature is available only if your signalling protocol supports it.) Note: An enhanced keypad microphone is required to operate this feature.To perform a Radio Check:Method 11Press the Radio Call button (if programmed) to enter the Radio Call menu.2y or z until3Press the Radio Call button to selectRadio CheckRadio Check4y or z to locate the desired ID in the Radio Call List;  –or– using the enhanced keypad microphone, enter the ID number of the radio you wish to check.
20EnglishRADIO CALLSMethod 2 5Press the PTT.You will see 6If the Radio Check is received, you will see If not, you will see7Press the Exit button to return to  –or–Hold down the Exit button to exit Menu Mode.1Press the Menu/Enter button to enter Menu Mode.2y or z until3Press the Menu/Enter button to select4y or z until5Press the Menu/Enter button to selectCall In ProgAcknowledgeNo AcknowledgeRadio CheckRadio CallRadio CallRadio CheckRadio Check6y or z to locate the desired ID in the Radio Call List;–or– using the enhanced keypad microphone, enter the ID number of the radio you wish to check.7Press the PTT.You will see 8If the Radio Check is received, you will see If not, you will see9Press the Exit button to return to  –or–Hold down the Exit button to exit Menu Mode.Call In ProgAcknowledgeNo AcknowledgeRadio Check
21EnglishRADIO CALLSRESPONDING TO EMERGENCYALERTS (Your radio offers choices for initiating and responding to Emergency Alert communications. Choices may include:• Emergency Cycles - Allows the radio to automatically cycle between transmit and receive mode over a preprogrammed number of times by keying with voice after it has received an Acknowledge to the alarm you send. The default number of transmits is one (10, maximum); the default value of the retransmit interval is 5 seconds (one, minimum; 60, maximum).• Emergency Alarm/Call - Gives you access to a voice resource, on a priority basis, over all other types of call traffic.• Emergency Remote Monitor - Enables the dispatcher to activate the transmit circuit of your radio, during an Emergency, to hear the situation through your microphone. See page 23 for more about sending an Emergency Remote Monitor.• Remote Monitor - Enables the dispatcher to activate the transmit circuit of your radio, during a normal dispatch, to hear the situation through your microphone.  See page 23 for information about sending a Remote Monitor.Note: All the choices listed above are dealer preprogrammed. See your dealer for more details.Decoding an Emergency AlarmIf preprogrammed by your dealer, and provided the signaling protocol supports it, your radio decodes (responds to) an Emergency Alarm or Emergency Call by:• Sounding a unique, repeating alert tone• Activating an external alarm• Displaying alternating message parts on a single line, similar to the following exampleEme rg enc yE
22EnglishRADIO CALLS■the word Emergency, followed by■Emergency Alias from the Radio Call List (example, MDC CALL 01), followed by■ Timestamp of the Emergency Alert (example, 03:55). • Flashing the E icon (while decoding only; lights steady when encoding)Multiple Queued EmergenciesClearing the existing displayed Emergency shows the next in the queue, if one exists.The display updates and shows “Emerg (queued number) of (total number)”. If no additional Emergencies are queued, the radio exits Emergency mode and resumes normal mode.Three Minute TimerResponding to an Emergency starts a three-minute timer. The radio does not generate another Emergency Alert tone against that Emergency Alias or ID until the three-minute period expires. If cleared within 3 minutes, the alarm will regenerate the alert. If the radio receives another Emergency Alert from the same Alias or ID, the radio acknowledges the Emergency but does not restart the tone, activate the external alarm, or display updated information.After the Timer ExpiresIf the three-minute timer has expired for a specific Emergency Alias or ID, and the radio decodes an Emergency that is currently in queue, the radio:• Acknowledges the Emergency• Restarts the Emergency Alert tone• Activates the external alarm• Updates the time stamp on the matching EmergencyMD C CALL 01E03 :55E
23EnglishRADIO CALLSNote: If the Radio Call List does not include an alias for the radio ID, the ID displays. Radios that do not support the signaling protocol sound the alert tone, activate the external alarm and display data.CLEARING AN EMERGENCYALERT (To clear an Emergency Alert:Note: You must press an external switch to clear the visible Emergency Alias and display the next queued Emergency Alias, if present. You must clear all decoded Emergency Alerts before encoding (sending) your own Emergency Alert.SENDING AN EMERGENCY REMOTE MONITORAs your radio responds to an Emergency Alert, only the Emergency Queue menu is available.To access the Emergency Queue menu:1Press any button on the radio to cancel the Emergency Alert tone.2Press (or activate) an external pushbutton or foot switch.1u to enter Menu Mode.2The radio displays the list of aliases currently in the Emergency queue, similar to that shown, oldest to newest.3z or  y to view the next oldest Emergency Remote Monitor packet and to choose the packet to send.4Press the PTT to send the packet.MDC CALL 01
24EnglishRADIO CALLSSENDING AN EMERGENCY ALERT EA priority Emergency Alert can be sent to a specific radio or dispatch center by pressing:• A button preprogrammed by your dealer (see pages 6 - 7)•  The footswitch• A pushbutton accessoryEmergency Alerts have priority over all other calls.The E symbol will appear on the display when your radio is in the Emergency Alert state.An Emergency Alert can be programmed to:•Show E and sound a tone–or–•Show E (Silent Emergency)–or–• Activate the enhanced keypad microphone so that all activity can be transmitted (for a predetermined amount of time). See your dealer for more information.To cancel the Emergency Alert, press and hold down the Emergency button.SELECTIVE RADIO INHIBITYour radio is equipped with a security feature that can temporarily render the unit inoperative when an inhibit signal is sent from the base station.This feature is commonly used to disable radios:• In case of theft• When your vehicle is being serviced• For system control reasonsNote: When your radio has been disabled by the base station, all controls will be inoperative except for the On/Off button. When the radio is powered up, the display will show:REPEATER OR TALKAROUND  J  MODETalkaround Mode enables you to communicate with another radio when either:• The repeater is not operating–or–• Your radio is out of the repeater’s range but Radio Disabled
25EnglishRADIO CALLSwithin communicating distance of another radio. The J symbol appears on the display when Talkaround Mode is selected.To select either Repeater Mode or Talkaround Mode:Press the preprogrammed Repeater/Talkaround button (see page 6) to toggle between Repeater Mode and Talkaround Mode.–or–  (using the enhanced keypad microphone) SETTING THE POWER LEVEL  BEach channel in your radio has a predefined transmit power level that can be changed.• High power ( S )• Low power  ( R )You can set the power level in two ways:Method 1Press the preprogrammed Power Level button (see page 6) to toggle between low and high.–or– Method 2 (using the keypad microphone) 1Press the Menu/Enter button to enter Menu Mode.2y or z until3Press the Menu/Enter button to select4y or z untilor until5Press the Menu/Enter button to confirm your selection.Rptr/TalkarndRptr/TalkarndRepeater ModeTalkarnd Mode1Press the Menu/Enter button to enter Menu Mode.2y or z until3Press the Menu/Enter button to select4y or z until5Press the Menu/Enter button to selectUtilitiesUtilitiesPower LevelPower Level
26EnglishRADIO CALLSNAME AND CALL TONE TAGGING You can program your radio to sound a particular alert tone when:• a specific user is calling—name tone tagging, or• your radio is receiving a type of radio call—call tone tagging.There are seven alert tones to select from.Note: The enhanced keypad microphone is required to operate this feature.To tag a specific user’s name or ID:The display shows the current power level. 6y or z untilor until7Press the Menu/Enter button to confirm the selection.1Press the Menu/Enter button to enter Menu Mode.Power High?Power Low?2y or z until3Press the Menu/Enter button to select4y or z until5Press the Menu/Enter button to select6y or z until you see the name or call you want to tag.7Press the Menu/Enter button to confirm the selection. 8y or z until you hear one of the seven tones you want to use for this name or call.9Press the Menu/Enter button to confirm the selection.You will see10 Press the Exit button to return to  –or–Hold down the Exit button to exit Menu Mode.Audio/TonesAudio/TonesName Tone TagName Tone TagName Tag SetName Tone Tag
27EnglishRADIO CALLSTo tag a type of radio call:1Press the Menu/Enter button to enter Menu Mode.2y or z until3Press the Menu/Enter button to select4y or z until5Press the Menu/Enter button to select6y or z until you see the call type you want to tag.7Press the Menu/Enter button to confirm the selection. 8y or z until you hear the tone you want to use for this type of call.9Press the Menu/Enter button to confirm the selection.You will seeAudio/TonesAudio/TonesCall Tone TagCall Tone TagCall Tag Set10 Press the Exit button to return to  –or–Hold down the Exit button to exit Menu Mode.Call Tone Tag
28EnglishRADIO CALLSNotes
29EnglishSCANSCANYour radio can monitor multiple channels in a scan list. Your dealer can program up to 16 different channels into each scan list. When your radio detects activity on a scan list channel, it will automatically switch to that channel.Note: The same channels can be assigned to different scan lists.STARTING OR STOPPING SCAN GThe G symbol, and the number of the channel you are transmitting on, will appear on the display when you start a scan operation. The green LED indicator blinks during a scan operation and stops blinking when the radio switches to a channel.Note: If you enter Menu Mode while the radio is scanning, scanning will stop. It will resume when you exit Menu Mode.You can start or stop a scan operation in one of three ways:Method 1Press the preprogrammed Scan button (see page 6) to start or stop scanning.  –or– Method 2 (with the enhanced keypad microphone)  –or– Method 3If programmed by your dealer, the radio will start scanning when you select a channel that has auto scan enabled.1Press the Menu/Enter button to enter Menu Mode.2y or z until3Press the Menu/Enter button to select4y or z until  –or–5Press the Menu/Enter button to confirm your selection.System ScanSystem ScanSys Scan On?Sys Scan Off?
30EnglishSCANTALKBACKThe Talkback feature allows you to respond to a transmission while scanning. If a transmission on a channel is detected while scanning, the radio will stop on that channel for a preprogrammed period of time. During this “hangtime” you may respond by pressing the PTT. Note: If transmission stops/ceases or if the PTT is not pressed for a preprogrammed duration, the radio will continue scanning. Also, the LED scan indicator stops blinking while the radio is in hangtime.DELETING A NUISANCE CHANNELIf a channel continually generates unwanted calls or noise (a “nuisance” channel), use the Scan button to temporarily delete the channel from the scan list.Note:You cannot delete a priority channel (see page 32) or the last remaining channel in a scan list.Restoring a Channel to the Scan ListTo restore a previously deleted channel to the scan list, restart the scan operation or turn your radio off and on again.EDITING A SCAN LIST Note: The enhanced keypad microphone is required to operate this feature.A scan list is a group of up to 16 channels. Each channel can have a scan list assigned to it. The same channel can be included in several scan lists, and the same scan list can be assigned to several Channel Selector positions. For example:When you edit a scan list, you can either add, delete, or prioritize channels. The K symbol will appear on the display while you are in edit mode.Note: Your radio cannot receive any calls while you are editing a scan list. 1While the radio is on the nuisance channel, hold down the Scan button until you hear a tone.2Release the Scan button. The nuisance channel is deleted.Position 2 Position 14Channels113253611
31EnglishSCANAdding or Deleting Channels in a Scan ListNote: The enhanced keypad microphone is required to operate this feature.To add or delete channels in a scan list:1Press the Menu/Enter button to enter Menu Mode.2y or z until3Press the Menu/Enter button to select4y or z until5Press the Menu/Enter button to select6y or z until or until7Press the Menu/Enter button to confirm your selection.Program ListsProgram ListsScan ListScan ListAdd Entry?Delete Entry?8y or z until you see the channel you want to add or delete.Note: You cannot delete the last remaining channel in a scan list.9Press the Menu/Enter button to confirm your selection.10 If you added a channel,you will see   –or– If you deleted a channel,you will seePress the Menu/Enter button to confirm the deletion.You will see11Press the Menu/Enter button to return to  or to return to  –or–Hold down the Exit button to exit Menu Mode.Entry SavedDelete?Entry DeletedAdd Entry?Delete Entry?
32EnglishSCANPrioritizing a Channel in a Scan ListNote: The enhanced keypad microphone is required to operate this feature.You may want to check the activity on one or two channels more frequently than others. You can do this by assigning them priority:Note: Even if there may be activity on a non-priority channel, your radio will automatically switch to an active priority channel and indicate the activity with a short tone.Setting Priority ChannelsNote: You cannot reprioritize a Priority 1 channel to Priority 2.Priority ChannelScanning SequenceNone specified Ch1➠Ch2➠Ch3➠Ch4➠Ch1Channel 2(Priority 1) Ch2➠Ch1➠Ch2➠Ch3➠Ch2➠Ch4➠Ch2➠…Ch1Channel 2(Priority 1)Channel 8(Priority 2)Ch2➠Ch1➠Ch8➠Ch3➠Ch2➠Ch4➠Ch8➠…Ch11Press the Menu/Enter button to enter Menu Mode.2y or z until3Press the Menu/Enter button to select4y or z until5Press the Menu/Enter button to select6y or z until7Press the Menu/Enter button to select8y or z untilor untilProgram ListsProgram ListsScan ListScan ListEdit Priority?Edit Priority?Priority #1?Priority #2?
33EnglishSCANNote: If you want to reprioritize all channels, you must first delete each priority channel from the scan list, and then addit back.9Press the Menu/Enter button to select the desired priority level.10 y or z until you see the channel you want to prioritize.11Press the Menu/Enter button to prioritize that channel.12Press the Exit button to return to  –or– Hold down the Exit button to exit Menu Mode.Edit Priority?
34EnglishSCANNotes
35EnglishPHONEPHONEIf your radio has access to a telephone system, you can make a phone call. To do this, your radio must send an access code to a station that connects it to a phone line. (Ask your dealer for more details.) After completing a call, your radio must send a deaccess code to hang up.MAKING A PHONE CALL DYou can make a phone call using the preprogrammed Phone button (see page 6) or the radio menu. The D symbol appears on the LCD screen when you are in Phone Mode.To initiate a phone call:Press the Phone button.   –or– Do the following (an enhanced keypad microphone is required):1Switch to the desired channel.2Press the Menu/Enter button to enter Menu Mode.3y or z until4Press the Exit button to select 5You will hear a series of tones indicating that an access code is being sent automatically. You will also see your access code displayed;  –or– when using the enhanced keypad microphone only, enter your access code using the keypad.PhonePhone
36EnglishPHONE6When you hear a dial tone, enter or select a phone number:y or z to select a number from the phone list;  –or– when using the enhanced keypad microphone only, enter the phone number using the keypad;  –or– when using the enhanced keypad microphone only,a Press and release the preprogrammed Speed Dial button (see page 7) to use the Speed Dial feature. b Press the key (1 to 8) corresponding to the number you want to call, –or- press “0” if you want to call the last number dialed.Note: To redial the last number dialed (if not using Speed Dial), do not choose a number. Proceed to step 7.Alternatively, if you entered your access code using the keypad, press z once to access the last number dialed; then press and release the PTT.7To end a phone call, do one of the following:If your radio has the deaccess code preprogrammed, proceed to step 8.  –or– Enter the deaccess code using the keypad.8Press the Phone button to exit Phone Mode.  –or– Press the Exit button to exit Phone Mode and return to   –or– Hold down the Exit button to exit Menu Mode.Phone
37EnglishAUDIO/TONE SETTINGSAUDIO/TONE SETTINGSYou can customize the audio and tone feature settings on your radio.Note: The enhanced keypad microphone is required to use this feature. 1Press the Menu/Enter button to enter Menu Mode.2y or z until3Press the Menu/Enter button to selectAudio/TonesAudio/Tones4y or z until you see the feature you want to change. (See the table below.)5Press the Menu/Enter button to select the feature. You will see the feature’s current setting.6y or z for available settings. (See the table below.)7Press the Menu/Enter button to select the desired setting. Audio/Tone SettingsFeature What it Does SettingsAlert Vol Lvl Allows the volume level of the audio and the volume level of the alert tones to be set independently.Ind Alert OffInd Alert OnTone Disable Turns all tones on or off. Tones OnTones Off
38EnglishAUDIO/TONE SETTINGSName Tone Tag Assigns a specific tone to all calls from a specific user (see page 26 for details). StandardAlert #1 – #7Call Tone Tag Assigns a specific tone when receiving a specific type of radio call (see page 27 for details).Standard Alert #1 – #7Escalert Gradually increases the volume of the alarm tones when a call is not answered.Escalert OnEscalert OffCompanding(XPand™) Approximates the same audio quality for 12.5kHz channels to that of 25kHz channels.Compand OnCompand OffKeypad Tones Turns keypad tones on or off. Tones OnTones OffAudio/Tone SettingsFeature What it Does Settings
39EnglishUTILITIESUTILITIESYou can customize some of your radio’s features.Note: The enhanced keypad microphone isrequired to access this feature.1Press the Menu/Enter button to enter Menu Mode.2y or z until3Press the Menu/Enter button to selectUtilitiesUtilities4y or z until you see the feature you want to change (see table below).5Press the Menu/Enter button to select the feature. You will see the feature’s current setting.6y or z for available settings. 7Press the Menu/Enter button to select the desired setting.Utilities FeaturesFeature What it Does SettingsPower LevelChanges the power level of the radio to high or low (see page 25). Power HighPower Low
40EnglishUTILITIESSELECTING THE DISPLAY LANGUAGETo select the display language:Language SelectionAllows you to select the language displayed on the display. EnglishSpanishPortugueseFrenchOption boardActivates/deactivates the option board installed in your radio. Opt Board OnOpt Board OffSoftware Ver #Displays the radio’s software version number. ——Utilities FeaturesFeature What it Does Settings1Press the Menu/Enter button to enter Menu Mode.2y or z until3Press the Menu/Enter button to select4y or z untilUtilitiesUtilitiesLanguage Selct5Press the Menu/Enter button to confirm your selection.6y or z until desired language is displayed.7Press the Menu/Enter button to select desired language.8Hold down the Exit button to exit the menu.
41EnglishWARRANTYWARRANTYLIMITED WARRANTYMOTOROLA COMMUNICATION PRODUCTSI. WHAT THIS WARRANTY COVERS AND FOR HOW LONG:MOTOROLA INC. (“MOTOROLA”) warrants the MOTOROLA manufactured Communication Products listed below (“Product”) against defects in material and workmanship under normal use and service for a period of time from the date of purchase as scheduled below:CDM1250 Mobile Units Two (2) YearsProduct Accessories One (1) YearMotorola, at its option, will at no charge either repair the Product (with new or reconditioned parts), replace it (with a new or reconditioned Product), or refund the purchase price of the Product during the warranty period provided it is returned in accordance with the terms of this warranty. Replaced parts or boards are warranted for the balance of the original applicable warranty period. All replaced parts of Product shall become the property of MOTOROLA.This express limited warranty is extended by MOTOROLA to the original end user purchaser only and is not assignable or transferable to any other party. This is the complete warranty for the Product manufactured by MOTOROLA.  MOTOROLA assumes no obligations or liability for additions or modifications to this warranty unless made in writing and signed by an officer of MOTOROLA. Unless made in a separate agreement between MOTOROLA and the original end user purchaser, MOTOROLA does not warrant the installation, maintenance or service of the Product.MOTOROLA cannot be responsible in any way for any ancillary equipment not furnished by MOTOROLA which is attached to or used in connection with the Product, or for operation of the Product with any ancillary equipment, and all such equipment is expressly excluded from this warranty. Because each system which may use the Product is unique, MOTOROLA disclaims liability for range, coverage, or operation of the system as a whole under this warranty.
42EnglishWARRANTYII. GENERAL PROVISIONS:This warranty sets forth the full extent of MOTOROLA’s responsibilities regarding the Product. Repair, replacement or refund of the purchase price, at MOTOROLA’s option, is the exclusive remedy. THIS WARRANTY IS GIVEN IN LIEU OF ALL OTHER EXPRESS WARRANTIES. IMPLIED WARRANTIES, INCLUDING WITHOUT LIMITATION, IMPLIED WARRANTIES OF MERCHANTABILITY AND FITNESS FOR A PARTICULAR PURPOSE, ARE LIMITED TO THE DURATION OF THIS LIMITED WARRANTY. IN NO EVENT SHALL MOTOROLA BE LIABLE FOR DAMAGES IN EXCESS OF THE PURCHASE PRICE OF THE PRODUCT, FOR ANY LOSS OF USE, LOSS OF TIME, INCONVENIENCE, COMMERCIAL LOSS, LOST PROFITS OR SAVINGS OR OTHER INCIDENTAL, SPECIAL OR CONSEQUENTIAL DAMAGES ARISING OUT OF THE USE OR INABILITY TO USE SUCH PRODUCT, TO THE FULL EXTENT SUCH MAY BE DISCLAIMED BY LAW.III. STATE LAW RIGHTS:SOME STATES DO NOT ALLOW THE EXCLUSION OR LIMITATION OF INCIDENTAL OR CONSEQUENTIAL DAMAGES OR LIMITATION ON HOW LONG AN IMPLIED WARRANTY LASTS, SO THE ABOVE LIMITATION OR EXCLUSIONS MAY NOT APPLY. This warranty gives specific legal rights, and there may be other rights which may vary from state to state.IV. HOW TO GET WARRANTY SERVICE:You must provide proof of purchase (bearing the date of purchase and Product item serial number) in order to receive warranty service and, also, deliver or send the Product item, transportation and insurance prepaid, to an authorized warranty service location. Warranty service will be provided by Motorola through one of its authorized warranty service locations. If you first contact the company which sold you the Product (e.g., dealer or communication service provider), it can facilitate your obtaining warranty service. You can also call Motorola at 1-800-927-2744 US/Canada.
43EnglishWARRANTYV. WHAT THIS WARRANTY DOES NOT COVER:A Defects or damage resulting from use of the Product in other than its normal and customary manner.B Defects or damage from misuse, accident, water, or neglect.C Defects or damage from improper testing, operation, maintenance, installation, alteration, modification, or adjustment.D Breakage or damage to antennas unless caused directly by defects in material workmanship.E A Product subjected to unauthorized Product modifications, disassemblies or repairs (including, without limitation, the addition to the Product of non-Motorola supplied equipment) which adversely affect performance of the Product or interfere with Motorola’s normal warranty inspection and testing of the Product to verify any warranty claim.F Product which has had the serial number removed or made illegible.G Freight costs to the repair depot.H A Product which, due to illegal or unauthorized alteration of the software/firmware in the Product, does not function in accordance with MOTOROLA’s published specifications or the FCC type acceptance labeling in effect for the Product at the time the Product was initially distributed from MOTOROLA.I Scratches or other cosmetic damage to Product surfaces that does not affect the operation of the Product.J Normal and customary wear and tear.VI.PATENT AND SOFTWARE PROVISIONS:MOTOROLA will defend, at its own expense, any suit brought against the end user purchaser to the extent that it is based on a claim that the Product or parts infringe a United States patent, and MOTOROLA will pay those costs and damages finally awarded against the end user purchaser in any such suit which are attributable to any such claim, but such defense and payments are conditioned on the following:A that MOTOROLA will be notified promptly in writing by such purchaser of any notice of such claim;B that MOTOROLA will have sole control of the defense of such suit and all negotiations
44EnglishWARRANTYfor its settlement or compromise; andC should the Product or parts become, or in MOTOROLA’s opinion be likely to become, the subject of a claim of infringement of a United States patent, that such purchaser will permit MOTOROLA, at its option and expense, either to procure for such purchaser the right to continue using the Product or parts or to replace or modify the same so that it becomes non-infringing or to grant such purchaser a credit for the Product or parts as depreciated and accept its return. The depreciation will be an equal amount per year over the lifetime of the Product or parts as established by MOTOROLA.MOTOROLA will have no liability with respect to any claim of patent infringement which is based upon the combination of the Product or parts furnished hereunder with software, apparatus or devices not furnished by MOTOROLA, nor will MOTOROLA have any liability for the use of ancillary equipment or software not furnished by MOTOROLA which is attached to or used in connection with the Product. The foregoing states the entire liability of MOTOROLA with respect to infringement of patents by the Product or any parts thereof.Laws in the United States and other countries preserve for MOTOROLA certain exclusive rights for copyrighted MOTOROLA software such as the exclusive rights to reproduce in copies and distribute copies of such Motorola software. MOTOROLA software may be used in only the Product in which the software was originally embodied and such software in such Product may not be replaced, copied, distributed, modified in any way, or used to produce any derivative thereof. No other use including, without limitation, alteration, modification, reproduction, distribution, or reverse engineering of such MOTOROLA software or exercise of rights in such MOTOROLA software is permitted. No license is granted by implication, estoppel or otherwise under MOTOROLA patent rights or copyrights.VII.GOVERNING LAW:This Warranty is governed by the laws of the State of Illinois, USA.
45EnglishACCESSORIESACCESSORIESMotorola offers a number of accessories to enhance the productivity of your two-way radio. Many of the available accessories are listed below. For a complete list, see your Motorola dealer.AUDIOMOUNTINGRMN4025 Compact Remote Speaker MicrophoneRMN4026 Enhanced Keypad MicrophoneRMN4038 Heavy Duty MicrophoneRSN4001 External Speaker 13WHSN8145 External Speaker 7.5WGLN7324 Low Profile TrunnionRLN4780 High Profile TrunnionHLN8097 Removable Slide MountRLN4779 Key Lock MountRLN4774 3 Point Lowband MountRLN4782 DIN Mounting Kit (in dash)RKN4077 Remote Mount Cable - 3 mRKN4078 Remote Mount Cable - 5 mRKN4079 Remote Mount Cable - 7 m
46EnglishACCESSORIESANTENNASCONTROL STATIONNote: A variety of interchangeable buttons are available for use in the P1-P4 locations on your radio (page 3). See your dealer for further details.RAB4002ARB Lowband 29.7-36 MHz, 1/4 Wave Base LoadRAB4003ARB Lowband 36-42 MHz, 1/4 Wave Base LoadRAB4004ARB Lowband 42-52 MHz, 1/4 Wave Base LoadHAD4006A VHF 136-144 MHz, 1/4 Wave Roof MountHAD4007A VHF 146-150.8 MHz, 1/4 Wave Roof MountHAD4008A VHF 150.8-162 MHz, 1/4 Wave Roof MountHAD4009A VHF 162-174 MHz, 1/4 Wave Roof MountHAD4014A VHF 146-172 MHz, 3dB Gain Roof MountHAE4002A UHF 403-430 MHz, 1/4 Wave Roof MountHAE4003A UHF 450-470 MHz, 1/4 Wave Roof MountHAE4010A UHF 406-420 MHz, 3.5dB Gain Roof MountHAE4011A UHF 450-470 MHz, 3.5dB Gain Roof MountHAE4019A UHF 450-470 MHz, 5dB Gain Roof MountHAE4004A UHF 470-512 MHz, 1/4 Wave Roof MountHAE4012A UHF 470-494 MHz, 3.5dB Gain Roof Mount09-02105F01 BNC ConnectorGPN6145 Desktop Power Supply 1-25W (EMC)HPN4002 Desktop Power Supply 1-25WGPN6149 Desktop Power Supply 25-45W (EMC)HPN4001 Desktop Power Supply 25-45WRMN4030 Desktop MicrophoneGLN7318 Desktop Tray without SpeakerGLN7326 Desktop Tray with Speaker
Sending a Call1. Turn radio on and select appropriate zone and channel.2. Press PTT, hold the microphone 1 to 2 inches (2.5 to 5 cm) from your mouth, and speak clearly into it.3. Release PTT to listen.Receiving a Call1. Turn radio on and adjust volume to the desired level.2. Select desired channel.3. To respond to an incoming call, press PTT, hold the microphone 1 to 2 inches (2.5 to 5 cm) from your mouth, and speak clearly into it.Deleting a Nuisance Channel During Scanning1. While radio is on a nuisance channel, hold down preprogrammed Scan button until you hear a tone.2. Release Scan button.Making a Phone Call1. Press Phone button, or select Phone from the menu.2. If access code is not displayed, send access code if required.3. Send phone number in one of the following ways:• Press and release PTT to send last dialed number. —or—• when using enhanced keypad microphone only, press preprogrammed Speed Dial button, followed by a keypad key (1–8), to access first nine num-bers in your phone list. (Press PTT if buffered dial.)—or—• when using enhanced keypad microphone only, enter phone number using the keypad. (Press PTT if buffered dial.)4. Press PTT, hold the microphone 1 to 2 inches (2.5 to 5 cm) from your mouth, and speak clearly into it.Ending a Phone Call1. Send deaccess code if required.2. Press preprogrammed Phone button, or press the Exit key.Sending and Cancelling an Emergency Alert• To activate Emergency Alert, press preprogrammed Emergency button or footswitch.• To cancel, press and hold down Emergency button.CDM1250™ Quick Reference CardRecord the functions for your radio’s  programmable buttons in the table provided below. For further information, see page 6 of this User Guide.MAEPF 26782 O(Interchangeable)ProgrammableButton 2 (P2) (Interchangeable)ProgrammableButton 4 (P4)(Interchangeable)ProgrammableButton 3 (P3)LCD ScreenRed/Yellow/GreenLED Indicators (Up/Down)(Interchangeable)ProgrammableButton 1 (P1)Channel SelectorMicrophoneJackKnobOn/Off/VolumeButton Function Short Press  Long Press Hold Down Page
Selective Callyzhigh/lowMenu NavigationMenu/Enteron/offadd/delete entryrepeater mode/talkarnd modePress the Menu/Enter button to enter Menu Mode.y or zto scroll through the list.Press the Menu/Enter button to select Menu item.Press the Exit button to return to previous menu level —or—Hold down the Exit button to exit Menu Mode.y or zto scroll through sub-list.Press the Menu/Enter button to select sub-menu item.Menu Navigation Chart(Refer to Menu Navigation guidelines—lower, left-hand corner of this page)editpriorityselect/enter IDAudio/Tones(p. 37)Rptr/Talkarnd(p. 24)Utilities(p. 39)Zone(p. 12)Radio Call(p. 16)Phone(p. 35)Program ListsSystemScan (p. 29)yzyzScan List(p. 30)yy yz yz yzCall Alert Radio Checkselect/enter ID select/enter IDPowerLevelselectLanguage Selecton/offOption BoardSoftware Ver #on/offAlert Vol Lvlon/offTone Disablestandard/alert #1 - #7Name Tone TagCall Tone Tagstandard/alert #1 - #7Escalerton/offCompandingon/offKeypad Toneson/off

Navigation menu