Motorola Solutions 92FT5854 SPIRIT iDEN M710 User Manual M710 User Guide En indb
Motorola Solutions, Inc. SPIRIT iDEN M710 M710 User Guide En indb
UserManual.wiki
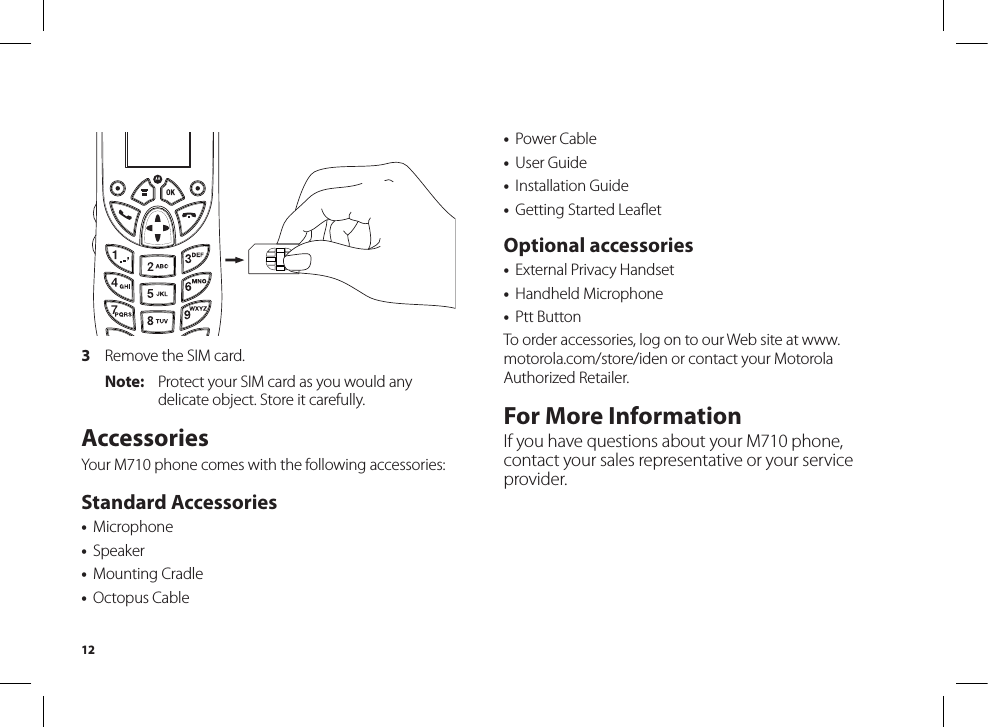
>
Motorola Solutions
>
92FT5854 User Manual
>
USERS MANUAL
Contents
1.
USERS MANUAL
2.
users manual
USERS MANUAL
Navigation menu
Upload a User Manual
Namespaces
Wiki Guide
HTML
PDF
Info
Views
User Manual
Discussion / Help
Navigation


![23Recent CallsTip: To view the details of more items, keep scrolling.Choosing Picture View or List ViewYou can set your phone to show the picture associated with each item as you view the recent calls list or show the list without pictures.1 From the recent calls list, press m.2 Select Recent Calls View.3 Select List View to show the recent calls list without pictures. -or- Select Picture View to show the picture associated with each entry.Storing Items to Contacts1 From the recent calls list, scroll to or select the item you want to store.2 Press A under Store. -or- If Store is not one of your options: Press m. Select Store or Update Contacts.Tip: If the item you want to store is a call, Store does not appear if the number is already stored in Contacts.3 To store the item as a new entry, select [New Contact]. -or- To store the number to an existing entry, select the entry.Note: Storing My Info or contact information from another phone to a Contacts entry that has a name assigned to it does not change the name of the Contacts entry.4 If the item you want to store is a call, you must assign a Contacts type to the number: With the Contacts type field highlighted, scroll left orright to display the Contacts type you want to assign the number.5 If you want to add more information to the entry, follow the applicable instructions in “Creating Entries” on page 38.6 Press A under Save.Deleting ItemsTo delete an item from the recent calls list:1 From the recent calls list, scroll to or select the item you want to delete.](https://usermanual.wiki/Motorola-Solutions/92FT5854.USERS-MANUAL/User-Guide-688858-Page-37.png)
![26• A number or address – Each Contacts entry must contain a number or address. This may be any type of phone number, Private ID, SDG list number, Talkgroup number, email address, or IP address.Note: You can store numbers up to 64 digits long, but every 20 digits must be separated by a pause or wait. See “Creating Pauses and Waits” on page 44.• A Speed Dial number – When you store a phone number, it is assigned a Speed Dial number. You can accept the default Speed Dial number or change it.• A voice name – If you create a voice name for a number, you can then dial that number by saying the voice name into your phone. This icon P appears to the left of the Contacts type icon if a voice name is assigned.Accessing ContactsFrom the main menu, select Contacts. -or-If you are on a call: Press m. Select Contacts.Creating EntriesA number or address and a Contacts type are required for all Contacts entries. Other information is optional. You may enter the information in any order by scrolling through the entry details.After you have entered the number or address, Contacts type, and any other information you want, you can press A under Save to save the entry to Contacts. To cancel a Contacts entry at any time, press e to return to the idle screen.To create a Contacts entry:1 To access the entry details screen: Select Contacts > [New Contact]. -or- From the Contacts list, press m. Select New Contact.2 If you want to assign a name to the entry: Select Name. Enter the name. See “Entering Text” on page 70. When you are finished, press o.Tip: Press A under Browse to select a name already in Contacts.3 If you want to assign a ring tone or picture to the entry, select [Ring Tone/Picture]. See “Assigning a Ring Tone or Picture”.](https://usermanual.wiki/Motorola-Solutions/92FT5854.USERS-MANUAL/User-Guide-688858-Page-40.png)
![27Contacts4 To assign a Contacts type to the number or address being stored: Select the Contacts type field. Select the Contacts type you want to assign.Note: For information about creating SDG lists, see “Creating SDG Lists in Contacts” on page 61.5 To store a number or address: Select the # field (or ID for an email address, or IP for an IP address). Enter the number or address. For phone numbers, use the 10-digit format. For email addresses, see “Entering Text” on page 70.Tip: Press A under Browse to select a number or address from Contacts, the recent calls list, or Memo. When you are finished, press o.6 If you want to change the default Speed Dial number or a create a voice name for the entry, select [Options]. See “Assigning a Speed Dial Number or Voice Name” on page 40.7 If you want to add more numbers or addresses to the entry: Scroll past the information you already entered. Enter the additional information for the entry using step 3 through step 6. You must assign a name to the entry, if you have not already.8 Press A under Save.Assigning a Ring Tone or Picture1 If you have not already, select [Ring Tone/Picture].2 If you want to assign a ring tone from the list of ring tones: With Ringer highlighted, scroll left or right to choose a ring tone. -or- Select Ringer. Select the ring tone you want to assign.3 If you want to assign a picture from the media center: Scroll to Picture. Scroll left or right to choose a picture. -or- Select Picture. Select the picture you want to assign.Only pictures that can be assigned to Contacts entries are displayed. Some large pictures cannot be assigned.](https://usermanual.wiki/Motorola-Solutions/92FT5854.USERS-MANUAL/User-Guide-688858-Page-41.png)
![28Tip: If an entry has a picture assigned and you want the entry to have no picture, select [No Picture] or press A under Unassign.4 When you are finished, press A under Back.Assigning a Speed Dial Number or Voice Name1 If you have not already, select [Options].2 The default Speed Dial number assigned to a phone number is displayed in the Speed # field. This is alwaysthe next available Speed Dial location. If you want to assign the phone number to a differentSpeed Dial location: With the Speed # field highlighted, press o. Press A under Delete to delete the current Speed Dial number. Enter the new Speed Dial number using the keypad. When you are finished, press o.3 If you want to create a voice name for a phone number, select Voice Name. As directed by the screen prompts, say and repeat the name you want to assign to the number. Speak clearly into the microphone.4 When you are finished, press A under Back.Storing Numbers FasterTo store numbers to Contacts from the recent calls list, see “Storing Items to Contacts” on page 34.To store numbers to Contacts from Memo, see “Memo” on page 66.To store numbers to Contacts from the idle screen:1 Use the keypad to enter the number you want to store.2 Press m.3 Select Store Number.4 To store the number as a new entry, select [New Contact]. -or- To store the number to an existing entry, select the entry.5 With the Contacts type field highlighted, scroll left orright to display the Contacts type you want to assign the number.](https://usermanual.wiki/Motorola-Solutions/92FT5854.USERS-MANUAL/User-Guide-688858-Page-42.png)

![47Group Calls and Selective Dynamic Group CallsSelective Dynamic Group (SDG) CallsNote: This feature may not be offered by your serviceprovider.A SDG call is similar to a Private call, but is made to all members of a SDG list at once. A SDG list is a group of Private IDs that you create using your phone. A SDG list must contain at least 2 members and can contain up to 20 members.You can create a SDG list for one call only or store it to Contacts so you can call it any time.You can use Send via PTT* to send SDG lists to other phones that have this capability.* Send via PTT may not be offered by your service provider.Creating SDG Lists in Contacts1 From the main menu, select Contacts.2 Select [New SDG List].Note: You can also create a SDG list by selecting [New Contact] and assigning the SDG contact type.3 If you want to assign a name to the SDG list, enter the name.Note: If you do not assign a name, the SDG list is named “SDG” followed by the number of members in the SDG list. For example, “SDG (8)” for a SDG list with 8 members.4 Add Private IDs. See “Adding Private Numbers”.5 If you want to create a voice name for the SDG list, select [Options] > Voice Name. As directed by the screen prompts, say and repeat the voice name you want to assign to the SDG list. Speak clearly into the microphone.6 Press A under Save.Adding Private NumbersYou can add Private IDs to a SDG list by selecting them from Contacts, the recent calls list, or Memo. You can add all members in an existing SDG list by selecting the list.You can select more than one member from Contacts and the recent calls list. A checkmark appears next to each selected item.Tip: To deselect an item: Scroll to a selected item and press o.](https://usermanual.wiki/Motorola-Solutions/92FT5854.USERS-MANUAL/User-Guide-688858-Page-61.png)
![48You can also enter Private IDs from the keypad.To add members from Contacts, the recent calls list, or Memo:1 While creating a SDG list, select [Add Member]. -or-2 Select [Add Number] and press A under Browse.Note: To move between Contacts, the recent calls list, and Memo, scroll left or right, or press * or #.3 Scroll to the members you want from Contacts, the recent calls list, or Memo and press o. A checkmark appears next to each selected member.Note: To deselect a member, scroll to a selected member and press o.4 Press A under Done.To add members manually from the keypad:1 While creating a SDG list, select [Add Number].2 Enter the Private number using the keypad.3 Press o.Removing Members or SDG ListsTo remove a member from a SDG list:1 From Contacts, scroll to the SDG list you want to delete the member from.2 Press A under Edit.3 Scroll to the member you want to remove.4 Press m.5 Select Remove Member.6 Select Save.To remove all members from a SDG list:1 From Contacts, scroll to the SDG list you want to delete the member from.2 Press A under Edit.3 Press m.4 Select Remove All Members.5 Press A under Yes.To delete a SDG list from Contacts:1 Scroll to the SDG list you want to delete.2 Press m.](https://usermanual.wiki/Motorola-Solutions/92FT5854.USERS-MANUAL/User-Guide-688858-Page-62.png)

![53MemoMemo lets you store a number, make a call to that number, and save it to Contacts.To create a memo:1 From the main menu, select Memo.2 Enter the number using your keypad.3 Press o.To view the memo later: From the main menu, select Memo.To delete the memo:1 From the main menu, select Memo.2 Press and hold A under Delete.3 Press o.To edit the memo:1 From the main menu, select Memo.2 Enter the new number.3 Press o.To make a call to the memo number:1 From the main menu, select Memo.2 To make a phone call, press s. -or- To make a Private call, press the external PTT or Smart button.To store the memo number to Contacts:1 From the main menu, select Memo.2 Press m.3 Select Store to Contacts.4 To store the number as a new entry, select [New Contact]. -or- To store the number to an existing entry, select the entry.5 With the Contacts type field highlighted, scroll left orright to display the Contacts type you want to assign the number.6 Press A under Save.](https://usermanual.wiki/Motorola-Solutions/92FT5854.USERS-MANUAL/User-Guide-688858-Page-67.png)


![64Tip: Scrolling through one message lets you view the next message.4 To save the message, press o. -or- To reply to the message, press A under Reply. -or- To see all other choices, including forwarding and deleting the message, calling the sender, or storing the sender’s number in Contacts, press m.Creating and Sending Messages1 From the main menu, select Messages > [Create Message]. -or- Select [Create Message] from Text Inbox, Text Outbox, or Drafts. -or- Highlight Quick Notes and press A under Create.Tip: This option is available from many context-sensitive menus in the message center.2 To address the message: Use the keypad to enter the phone number of the person you want to send the message to. -or- Press A under Browse. Select Contacts, Recent Calls, or Memo. Select the number you want to enter.Receiving a MessageTo view the message: Press A under Read.To dismiss the message notification: Press the external PTT or Smart button. -or- press A under Back.If your phone is powered off when you receive a textmessage, your phone notifies you the next time you powerit on. If you are out of your coverage area, your phone alerts you when you return to your coverage area.Tip: While reading a text and numeric message that contains a phone number, you can press s to call that number.Reading from the Message Center1 From the main menu, select Messages > Text Inbox.2 Select the message you want to read. -or- Press the number of the message you want to read.3 If the message fills more than one screen, scroll to readit.](https://usermanual.wiki/Motorola-Solutions/92FT5854.USERS-MANUAL/User-Guide-688858-Page-78.png)
![66To create a quick note:1 From the main menu, select Messages > Quick Notes > [New Note].2 Press o or press A under Create. Enter text. -or- To choose from pre-installed notes, select the note you want.Tip: For more options, including sending the quick note, press m.Using DraftsWhen you save a message as a draft, it is saved in the drafts folder.To edit a draft:1 From the main menu, select Messages > Drafts.2 Select the draft you want to edit.3 To edit the fields you want to change, follow step 2through step 4 in “Creating and Sending Messages” on page 77.Resending MessagesTo resend a message:1 From the main menu, select Messages > Text Outbox.2 Scroll to the message you want to resend. -or- Press the number of the message you want to resend.3 Press s. -or- Press m. Select Resend.Deleting Sent MessagesTo delete a sent message:1 From the main menu, select Messages > Text Outbox.2 Scroll to the message you want to delete.3 Press A under Delete.4 Press A under Yes to confirm.To delete all unlocked sent messages:1 From the main menu, select Messages > Text Outbox.2 Press m.](https://usermanual.wiki/Motorola-Solutions/92FT5854.USERS-MANUAL/User-Guide-688858-Page-80.png)
![72If the picture does not fit in the display, scroll left and rightand up and down to view different parts of the picture.Sending in Private CallsFor information on sending stored pictures in Private calls, see “Starting a Call by Sending a Picture” on page 91.Assigning to Contacts1 Scroll to or select the picture you want to assign to a Contacts entry.2 Press m.3 Select Set As Caller ID.4 To store the number as a new entry, select [New Contact]. -or- To store the number to an existing entry, select the entry. Only entries that include phone numbers are displayed. This icon & appears next to entries that have pictures assigned.5 If you selected an entry with a picture assigned, press o or press A under Yes to overwrite the assigned picture. -or- Press A under No to return to the list of entries without overwriting the assigned picture. Setting as Wallpaper1 Scroll to or select the picture you want to set as wallpaper.2 Press m.3 Select Set As Wallpaper.Note: If you later set your wallpaper to Auto Cycle, the picture is included and will appear on the idle screen. See “Wallpaper” on page 123.Audio RecordingsThe media center lets you play audio recordings and assign them to Contacts entries.PlayingTo play an audio recording, select it from the list of items in the media center.This icon # appears next to each audio recording in the list of items.](https://usermanual.wiki/Motorola-Solutions/92FT5854.USERS-MANUAL/User-Guide-688858-Page-86.png)


![78Tell-A-Friend1 Go to the location on your phone that contains the item you want.2 Highlight the DRM item you want to tell your friend about.3 Press m.4 Select Tell-A-Friend. The Create Message screen opens.5 Complete and send the message. See “Creating and Sending Messages” on page 77.Managing DRM ItemsNote: Depending on how the third-party vendor has set rights for the given DRM item, you may be unable to perform some of the following tasks. Viewing License InformationYou can check a DRM item’s license to view the following information:• For time-based items, either the date and time the item is scheduled to expire, or the number of days leftGiftingTo check if a DRM item is giftable:1 Go to the location on your phone that contains the item you want.2 Highlight the DRM item you want to gift.3 Press m. If Gift is an option, the item is giftable.To gift a DRM item:1 Go to the location on your phone that contains the item you want.2 Highlight the DRM item you want to gift.3 Press m.4 Select Gift.5 Select the contact you want to send the item to. -or- If the person you want to send the item to is not in Contacts, select [New Number]. Enter the number.6 Press o.7 Follow the vendor’s instructions for purchasing an additional license.](https://usermanual.wiki/Motorola-Solutions/92FT5854.USERS-MANUAL/User-Guide-688858-Page-92.png)
![88To go to any date in Datebook:1 While viewing Datebook, press m.2 Select Go To Date.3 Select the date you want.Creating EventsEvery Datebook event must have a subject and be stored to a date. Other information is optional.You may enter the information in any order by scrolling through the event details.After you have entered the information you want, you can press A under Done to store the event to Datebook.If you decide you do not want to store the event: Press A under Cancel.To create a Datebook event:1 While viewing Datebook, press A under New. -or- In day view, select [New Event].2 To assign a subject to the event: Select Subject. Enter the name. -or-To view an event:1 Select the day the event occurs.2 Select the event.To change the current view:1 While viewing Datebook, press m.2 Select the view you want.Navigating DatebookTo scroll through Datebook: Scroll left and right using the navigation key. -or- In week view and month view, press * or�#.To see more in day view: Scroll up and down using the navigation key.To highlight a day in month view: Enter the date using the keypad.To go to today’s date:1 While viewing Datebook, press m.2 Select Go To Today.](https://usermanual.wiki/Motorola-Solutions/92FT5854.USERS-MANUAL/User-Guide-688858-Page-102.png)


![108Note: Recording of phone calls is subject to applicable laws regarding privacy and recording of phone conversations. Playing Voice Records1 From the main menu, select VoiceRecord.2 Select the voice record you want to play.3 To stop the voice record while it is playing, press o. Labeling Voice RecordsWhen you create a voice record, it is labeled with the time and date it was recorded. You can then rename it with a custom label.1 From the main menu, select VoiceRecord.2 Scroll to the voice record you want to label.3 Press A under Label.4 Enter the label you want to assign. See “Entering Text” on page 70.5 Press o.Creating Voice RecordsPhone Not in a CallTo record a note to yourself:1 From the main menu, select VoiceRecord > [New VoiceRec]. -or- Press and hold the external PTT or Smart button for 2 seconds.2 Say the message you want to record into the microphone.3 When you are finished recording, press o. Phone in a CallTo record a phone call:1 While on an active call, press m. Select Record. -or- Press and hold the external PTT or Smart button for 2 seconds.3 To stop recording and discard the voice record at any time, press A under Cancel.4 When you are finished recording, press o.](https://usermanual.wiki/Motorola-Solutions/92FT5854.USERS-MANUAL/User-Guide-688858-Page-122.png)
![109Voice RecordsLocking Voice RecordsWhen you lock a voice record, it cannot be deleted until you unlock it.1 From the main menu, select VoiceRecord.2 Scroll to the voice record you want to lock or unlock.3 Press m.4 Select Lock to lock the message. -or- Select Unlock to unlock the message.When a voice record is locked, this icon R appears next to it.Deleting Voice RecordsDeleting a voice record from the voice record list deletes it from all parts of your phone, including the media center.Deleting a Voice Record1 From the main menu, select VoiceRecord.2 Scroll to the unlocked voice record you want to delete.3 Press m.4 Select Delete.5 Press o or A under Yes to confirm.Deleting All Voice Records1 From the main menu, select VoiceRecord.2 Scroll to any voice record.3 Press m.4 Select Delete All.5 Press o or A under Yes to confirm.Managing MemoryTo view the amount of memory available for voice records:1 From the main menu, select VoiceRecord.2 With [New VoiceRec] highlighted, press A under Memory. -or- With any voice record highlighted, press m. Select Memory.To free memory by deleting all unlocked voice records:1 From the voice records memory screen, press A under Delete.2 Press o or A under Yes to confirm.](https://usermanual.wiki/Motorola-Solutions/92FT5854.USERS-MANUAL/User-Guide-688858-Page-123.png)
![119ShortcutsShortcuts lets you access most menu options by pressing a number on your keypad (1 through 9) or saying the voice name of the shortcut. You create the shortcut and then use it to take you to that screen any time.Creating a ShortcutNote: When you receive your phone, all number keys may already be assigned to shortcuts. If this is the case, you can create new shortcuts by deleting or replacing existing shortcuts.1 Go to the menu item you want to create a shortcut for. For example, if you want to create a shortcut to the screen for creating a new Contacts entry: From the main menu, select Contacts, then highlight [New Contact].2 Press and hold m until a confirmation screen appears.3 Press o or press A under Yes.4 Select Key.5 Press the number key you want to assign to the shortcut.6 Press o.7 If you want to record a voice name for the shortcut: Select Voice. As directed by the screen prompts, say and repeat the name you want to assign to the number. Speak clearly into the microphone.8 Press A under Done.9 If the number key you chose is already assigned to a shortcut, a prompt appears asking if you want to replace the existing shortcut. Press A under Yes to replace the existing shortcut. -or- Press A under No if you want to keep the existing shortcut and assign another number key to the shortcut.Using a ShortcutIf you know the shortcut number:1 From the idle screen, press m.2 On your keypad, press the number assigned to the shortcut.](https://usermanual.wiki/Motorola-Solutions/92FT5854.USERS-MANUAL/User-Guide-688858-Page-133.png)