Motorola Solutions 92FT5869 2 Way Mobile Radio User Manual Manual
Motorola Solutions, Inc. 2 Way Mobile Radio Manual
UserManual.wiki
>
Motorola Solutions
>
92FT5869 User Manual
>
Manual
Contents
1.
RF Safety Manual
2.
Manual
Manual
Navigation menu
Upload a User Manual
Namespaces
Wiki Guide
HTML
PDF
Info
Views
User Manual
Discussion / Help
Navigation


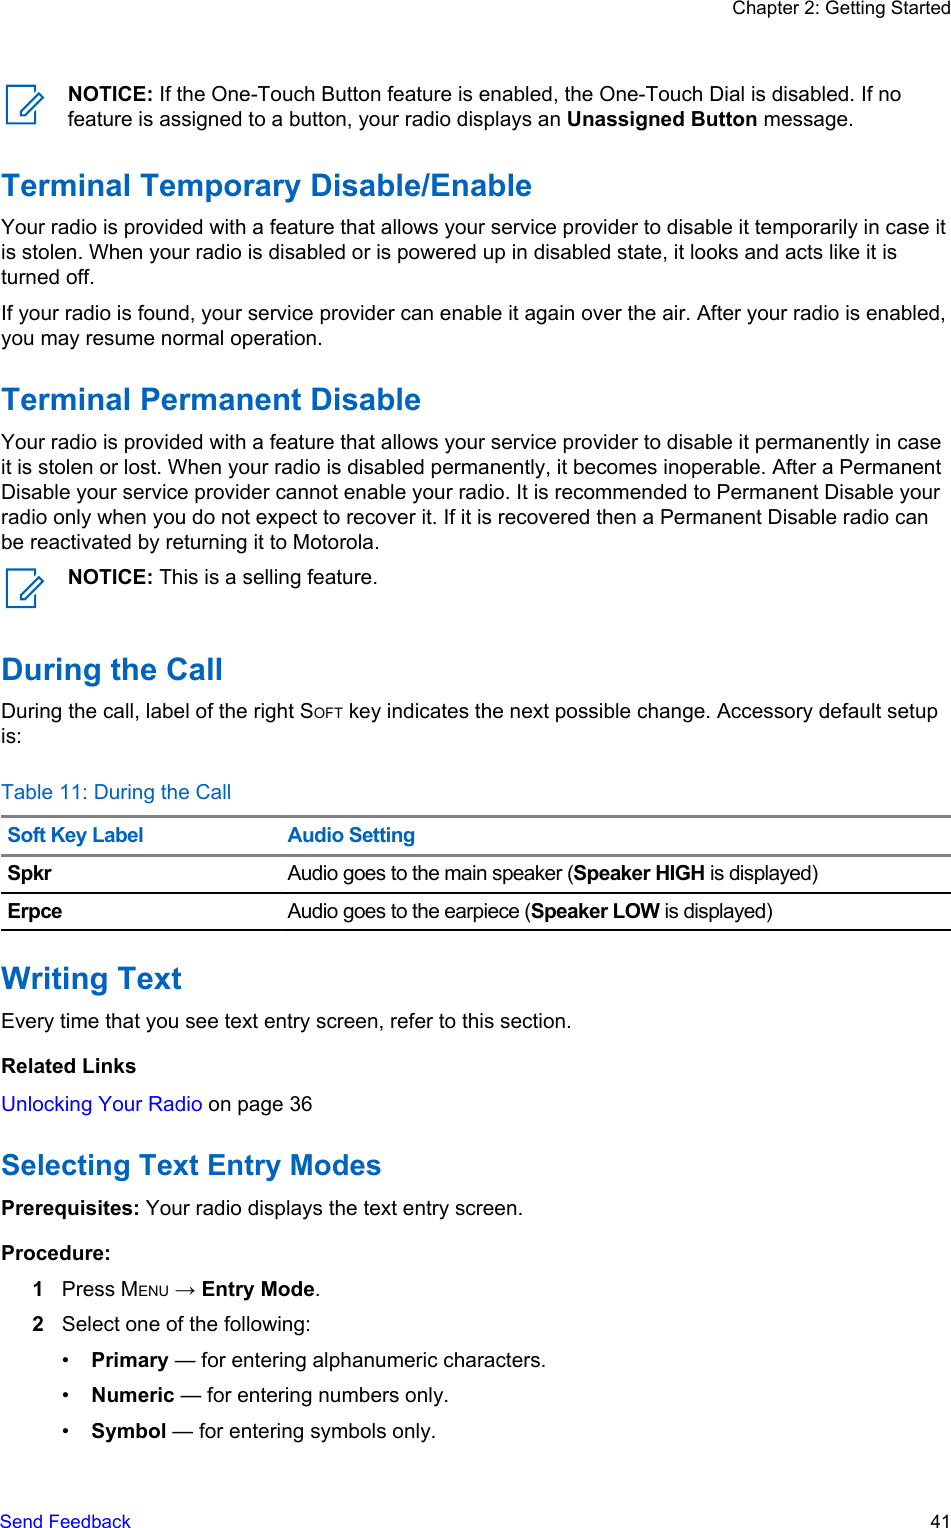
![Enter punctuation and symbols.Keys UsageList of keys and characters in Alphanumeric Mode (TAP/iTAP).Table 13: Keys UsageKey Alphanumeric Mode (TAP/iTAP) Symbol Mode0 to 9 keys Numeric Mode:• Press to enter digit at insertion point.• Press and hold any numeric key to enterTAP alphanumeric mode.• To exit TAP alphanumeric mode, press andhold any numeric key.0 key Press to cycle through single shift, caps lock,and lower case.+ - × * / \ [ ] = < > § #1 key . , ? ! 0 1 @ ’ ” - ( ) / : _ ; + & % × * = < > € £ $ ¥ ¤ [ ] { } \ ~ ^ ¿ ¡ § #2 key A B C 2a b c 2@ _ \3 key D E F 3d e f 3/ , ;4 key G H I 4g h i 4” & ’5 key J K L 5j k l 5( ) [ ] { }6 key M N O 6m n o 6¿ ¡ ~7 key P Q R S 7p q r s 7= < >8 key T U V 8t u v 8€ £ $ ¥ ¤9 key W X Y Z 9w x y z 9# % *Chapter 2: Getting StartedSend Feedback 43](https://usermanual.wiki/Motorola-Solutions/92FT5869.Manual/User-Guide-2590363-Page-43.png)


![3Highlight the required message and press MENU key.4Select one of the following:•Store — Saves a message as a template. Change the default template name and press Ok.•Delete — Deletes the selected message. Press Yes to confirm.•Delete All — Deletes all the messages in the Inbox/Outbox. Press Yes to confirm.•Reply (only for Inbox) — Invokes the edit screen with the old message as default text andthe message originator as a recipient. After editing, press Send, the PTT button, or the SENDkey to send.•Resend (only for Outbox) — Invokes the edit screen with previously entered text with thesame recipient. After editing, press Send, the PTT button, or the SEND key to send.•Forward — Invokes the edit screen with the old message to send it to a different participant.After editing, press Send, the PTT button, or SEND key to send.•Refresh — Re-orders the message list and displays the new messages.•Delivery Status (only for Outbox) — Shows the date and time of the message when it sent,delivered, read, and expired was not delivered, expired was not read, failed unknown.Embedded NumberThis feature allows you to call a number from a message or to start a group call with the messagesender talkgroup.Storing Numbers from MessagesPrerequisites: Embedded Number feature is enabled by your service provider.When and where to use: You can save the sender's or embedded number from the message to anew or existing contact.Procedure:1From the home screen, press the MENU key.2Select Messages → Inbox.3Highlight the required message and select Read.4Press the PTT button.5Radio displays a list of the numbers (including the senders number).6Highlight the required number and press Store.7Highlight required contact and press View.NOTICE: To store a number for a new contact, select [New Contact] and fill out therequired fields. Press Done to save it..8Select Edit.9Choose the Type of the new number and press Done.Calling Numbers in MessagesPrerequisites: Embedded Number feature is enabled by your service provider.Chapter 5: Main Menu76 Send Feedback](https://usermanual.wiki/Motorola-Solutions/92FT5869.Manual/User-Guide-2590363-Page-76.png)
![Table 19: Contact TypesContact Icon DescriptionPrivateCannot have a speed dial number.MobileHomeWorkPABXOtherPickersIndicate more than one number in a contact.•# (number) — each contacts entry must contain a number.•Speed # — accept the default Speed Dial number or change it.Creating ContactsProcedure:1From the home screen, select Contcs.2Select [New Contact].3Highlight Name and press Change. Enter the name of your contact and press Ok.4Highlight Type and press Change. Select the required type of your contact.NOTICE: You can use the left and right NAVIGATION keys to select the type of your contactfrom the Contact Details screen.5Highlight # (number) and press Change. Enter the number of your contact and press Ok.6If needed, highlight Speed # and press Change. Enter the speed dial number (1– 1000) of yourcontact and press Ok.NOTICE: If the entered number exist, the radio displays Overwrite? message. PressYes to confirm, or No to enter the speed dial number again.7Press Done.You have create a contact with one number. To add additional number repeat steps 4–6.Editing ContactsProcedure:1From the home screen, press Contcs.2Highlight the contact you want to edit.Chapter 5: Main MenuSend Feedback 81](https://usermanual.wiki/Motorola-Solutions/92FT5869.Manual/User-Guide-2590363-Page-81.png)
![FavoritesFavorites contains shortcuts to frequently used talkgroups and contact numbers that are organized infavorite folders.To quickly access favorite folders, from the home screen press the up NAVIGATION key. To scroll throughitems inside favorite folders, you can either use the NAVIGATION keys or the ROTARY KNOB.Making Private Calls to Favorite Contact NumbersProcedure:1To select a contact number you want to call, from the home screen do one of the following:• Press the right or left NAVIGATION key.• Go to Optns → TG by Folder, select the required favorite folder, and highlight the contactnumber.2When you are in the following mode:aTMO — For a simplex call, press and release the PTT button. You hear a ringing tone.Otherwise, press and hold the PTT button. Wait for the talk permit tone before talking, andrelease the PTT button to listen. For a duplex call, press and release SEND key. You hear aringing tone.bDMO — Only simplex call is available. Press and hold the PTT button. Wait for the talkpermit tone before talking, and release the PTT button to listen.3To end the call, press the END key.NOTICE: If you are using the fist microphone or the telephone style handset, replace itfirmly on it's clip or holder when done.Adding Folders to FavoritesPrerequisites: Favorites contains less than three favorite folders.Procedure:1From the home screen, press the MENU key.2Select Favorites → [New Folder]3Enter a name and select Ok.Adding Contact Numbers to FavoritesProcedure:1From the home screen, press the MENU key.2Select Contacts3Highlight a contact that you want to add to Favorites and using the left or right NAVIGATION keyselect the required number.4Press the MENU key and select Add to Favorites.5Select a folder you want to add the contact number to and press Select.Adding Talkgroups to FavoritesPrerequisites:Chapter 5: Main Menu104 Send Feedback](https://usermanual.wiki/Motorola-Solutions/92FT5869.Manual/User-Guide-2590363-Page-104.png)
![NOTICE: Press down NAVIGATION key to bypass first two steps.NOTICE: Call time information is only available if the time and date are set in the radio.Call duration is not available in the missed calls list.Calling from Recent CallsProcedure:1From the home screen, press the MENU key.2Select Recent Calls.3Select one of the following:•Dialed (from the home screen press SEND key to access Dialed Calls list)•Received•MissedNOTICE: From the home screen press down NAVIGATION key, to access Recent Callsmenu item.4Highlight the required call and press the PTT button for private calls or press theSEND key tomake a phone call.NOTICE: Phone calls are only available in TMO Mode.Storing Recent Calls to ContactsProcedure:1From the home screen, press the MENU key.2Select Recent Calls.3Select Dialed, Received or Missed.4Press Store.NOTICE: If Store is not assigned to the left SOFT key, the number is already stored inyour contact list.5To store the number as a new entry, select [New Contact]. Or, to store the number to anexisting entry, select the entry, and press View then select Edit.6With the contact type field highlighted, scroll left or right to display the contact type you want toassign the number.7Select Done.Deleting Recent CallsProcedure:1From the home screen, press the MENU key.2Select Recent Calls.3Select Dialed, Received or Missed.4Press MENU on the required call.Chapter 5: Main MenuSend Feedback 107](https://usermanual.wiki/Motorola-Solutions/92FT5869.Manual/User-Guide-2590363-Page-107.png)
![Book On on page 99Logging OnProcedure:1From the home screen, press the MENU key.2Select RUI → Log on.3Highlight:•User ID and press Select to enter User ID List. If you are a new user on this radio, select[New User ID] and enter your user ID. Otherwise select your user ID from the list.• Second line and press Edit, to enter user ID and press Ok.4Select User PIN, enter your credentials, and press Ok.5Logging screen is displayed.Logging OffProcedure:1From the home screen, press the MENU key.2Select RUI → Log off.3Press Accept.NetworksThis menu item allows you to switch between the radio operation modes.Related LinksEntering TMO / DMO Mode on page 37Selecting Network Operation Mode on page 109Selecting Network Operation ModeProcedure:1From the home screen, press the MENU key.2Select Networks.3Select one of the following:•Networks Sel — Selects the network to which the radio is allowed to register.•Trunked Mode — Switches to the mode using infrastructure.•Direct Mode — Switches to the mode without using infrastructure.•Repeater Mode — Switches to the Repeater Mode.•Gateway Mode — Switches to Gateway Mode.•TXI Mode — Select Activate to stop sending any radio transmission.NOTICE: If the radio is in TXI Mode, it is not possible to switch from Direct Mode toTrunked Mode or Repeater Mode, or Gateway Mode.Chapter 5: Main MenuSend Feedback 109](https://usermanual.wiki/Motorola-Solutions/92FT5869.Manual/User-Guide-2590363-Page-109.png)

![•[Send] — for sending the image to the destination of your choice.•Reload — for reloading the image.•Details — for displaying the image details.•Show Image — for showing the image on its own page.Text Input PanePrerequisites: This pane is visible when the browser menu is opened and text entry field is active.When and where to use: To input the text for the URL.Procedure:1Select the URL.2Press abc.The text input pane opens up.3Select www.4Scroll the required extension (for example: .com).5Press .com. The screen displays the URL with the selected extension.Table 24: Browser Text Input IconsMode Soft Key ActionAlphabetic characters - lowercaseabc Enter text in lowercase.Alphabetic characters - uppercaseABC Enter text in uppercase.Numeric 123 Enter numbers and symbols.http mode www EnterWAP PushWAP push allows WAP content to be pushed to a radio. This push is carried out by sending a speciallyformatted (Push Access Protocol) XML document to the Push Proxy Gateway, that in turn forwards thedocument to the radio.A WAP push message is an encoded message including a link to a WAP address. On receiving a WAPpush, a WAP enabled radio automatically gives the option to access the WAP content. Theimplemented WAP push is compliant to WAP 2.0 standard.The radio supports WAP 2.0 through a proxy only. Proxy-less connections are not supported.This is a selling feature.Related LinksWAP Box on page 78WAP on page 118New WAP MessagesTypes of the WAP Messages and their priorities:Chapter 6: Features126 Send Feedback](https://usermanual.wiki/Motorola-Solutions/92FT5869.Manual/User-Guide-2590363-Page-126.png)