Motorola Solutions 92FT7081 Mobile 2-Way Radio User Manual MOTOTRBO Professional Digital Two Way Radio System
Motorola Solutions, Inc. Mobile 2-Way Radio MOTOTRBO Professional Digital Two Way Radio System
Contents
- 1. Manual
- 2. RF Safety Manual
Manual
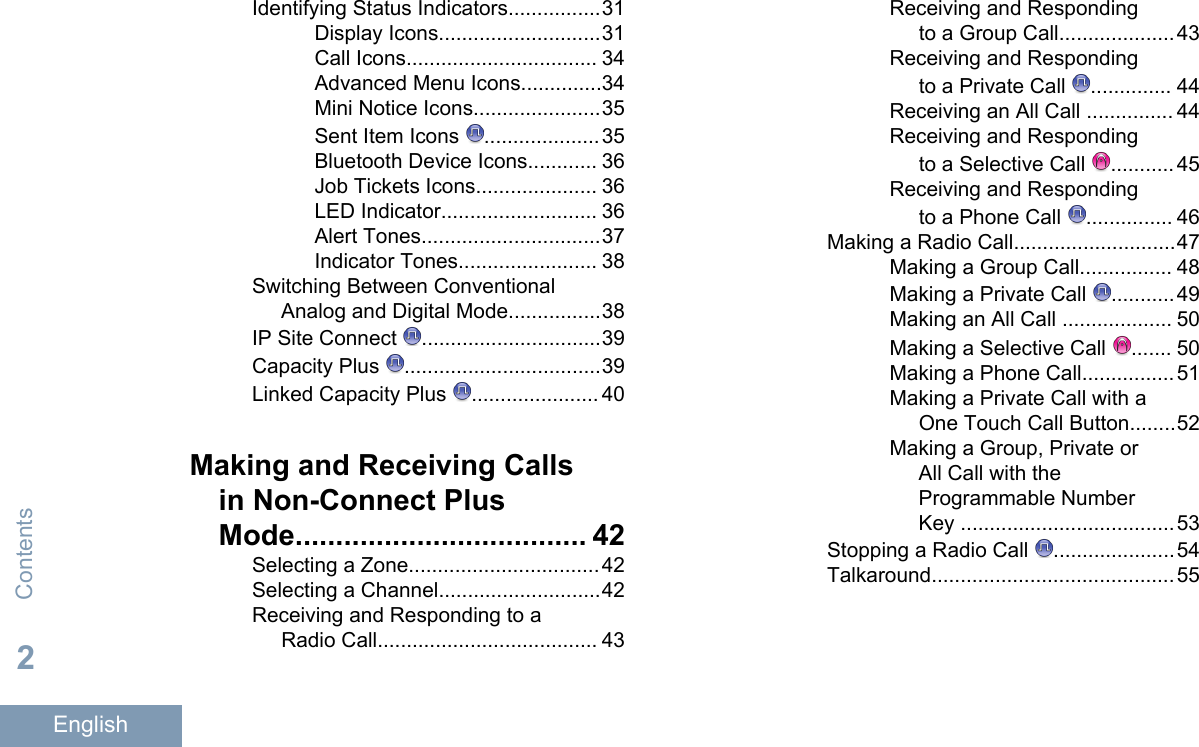
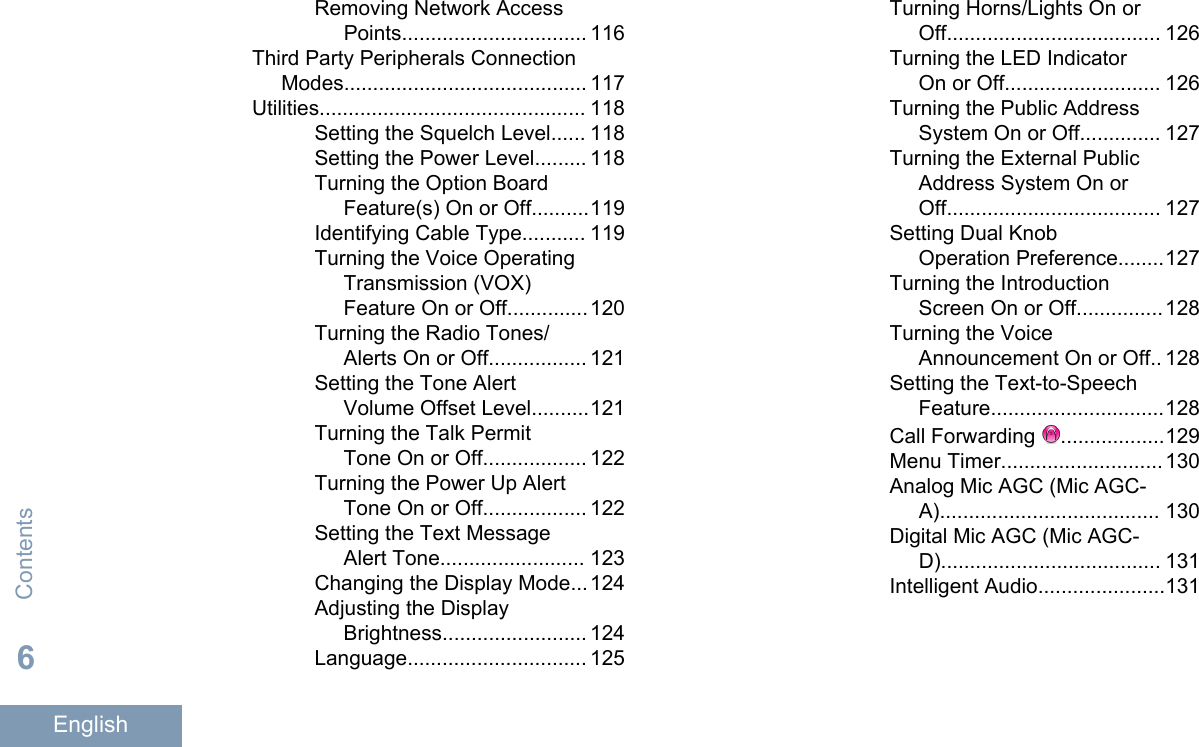
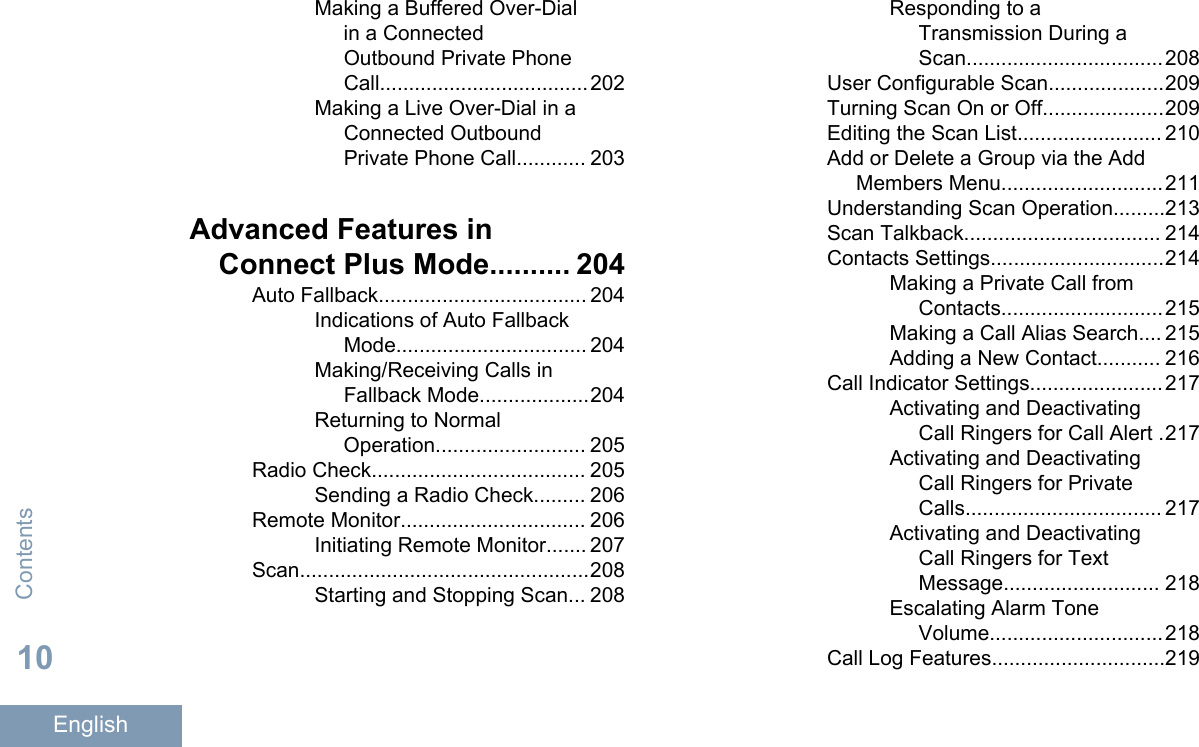


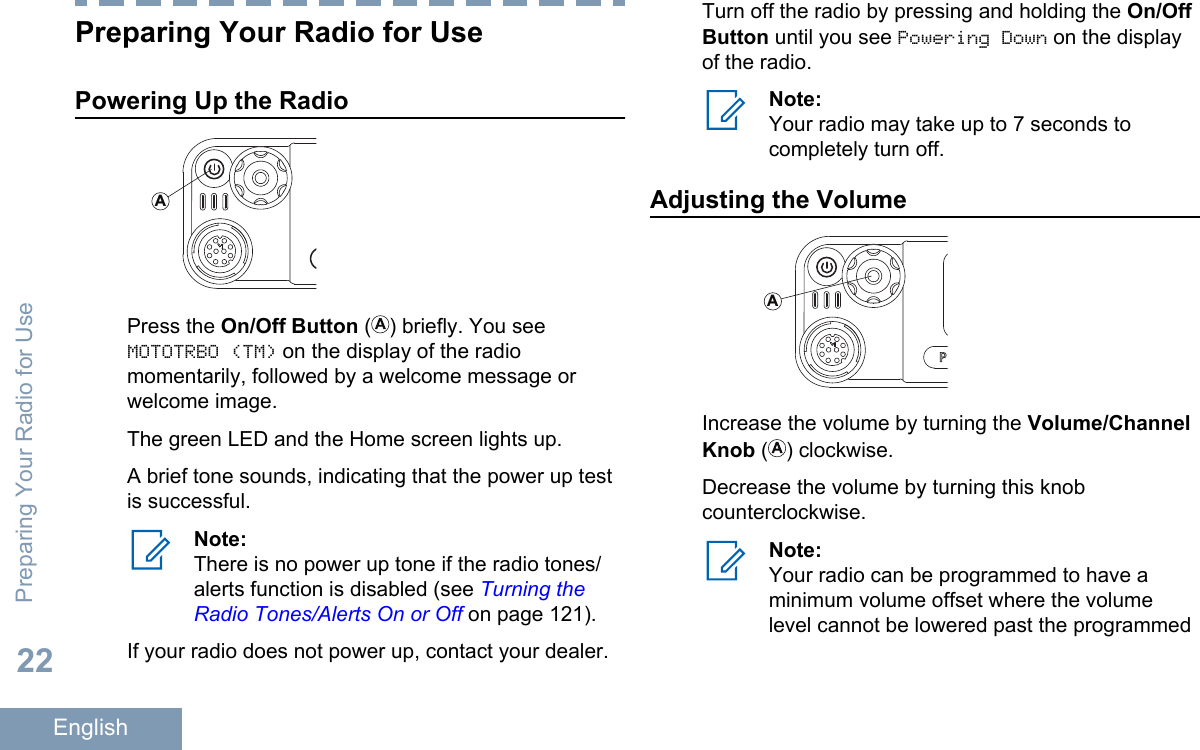
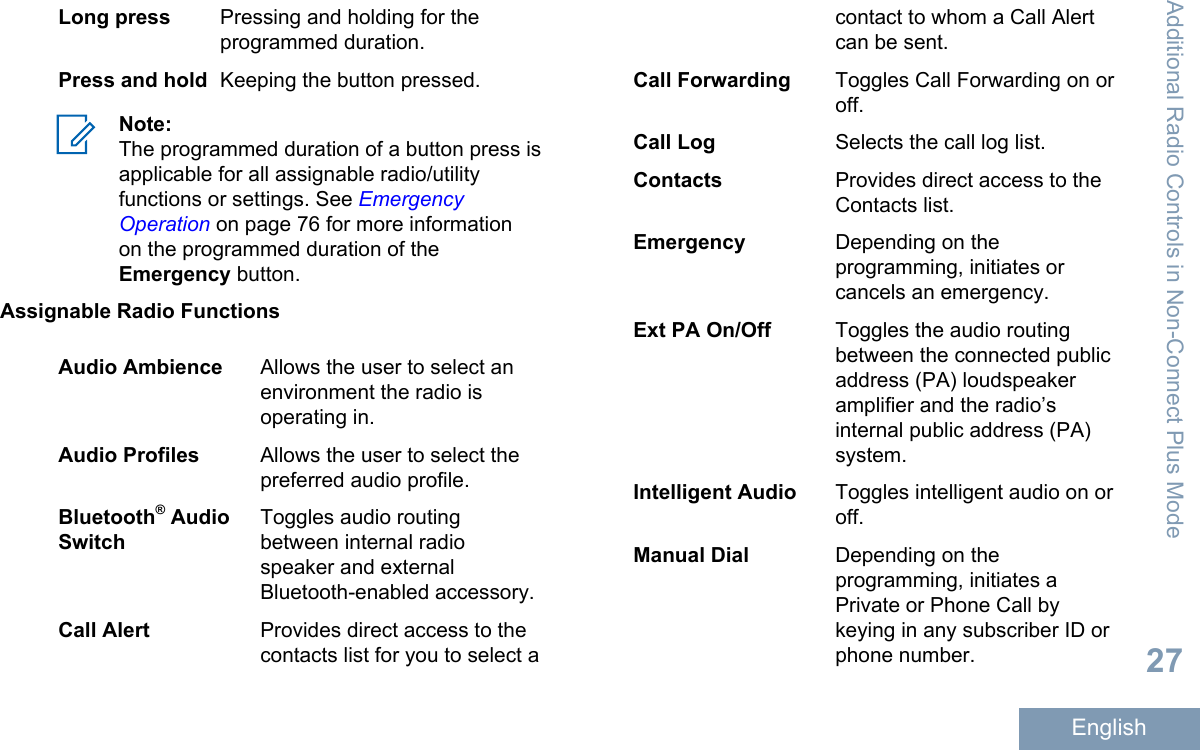
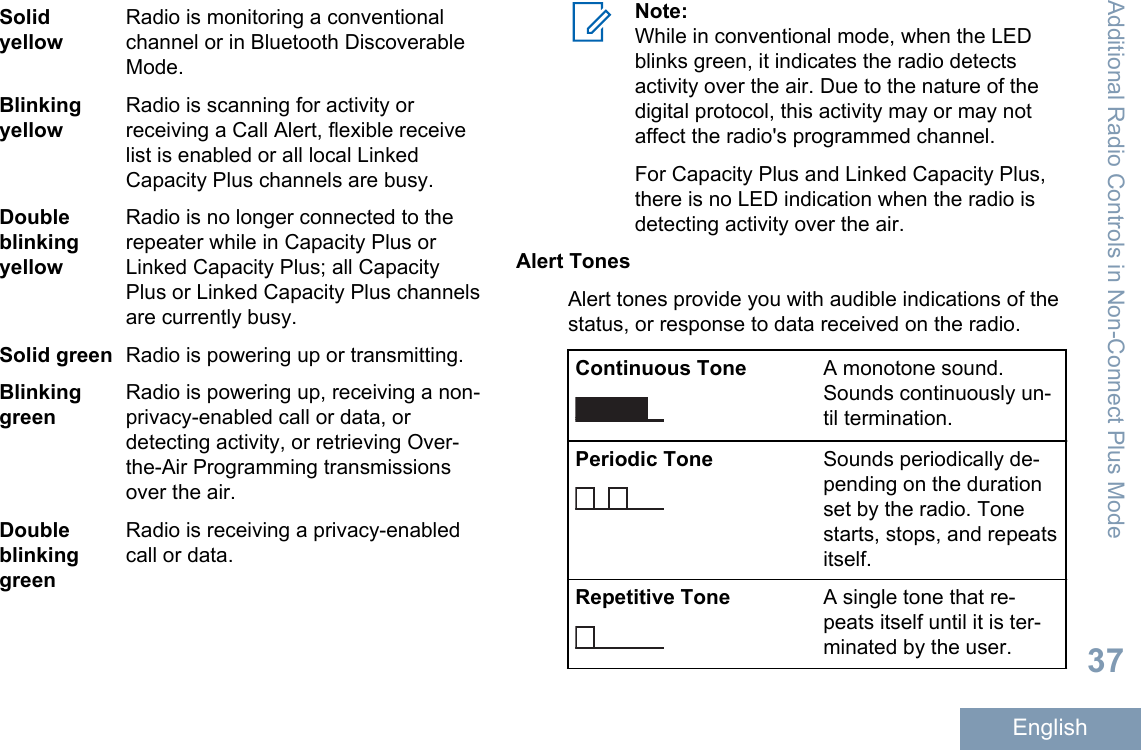
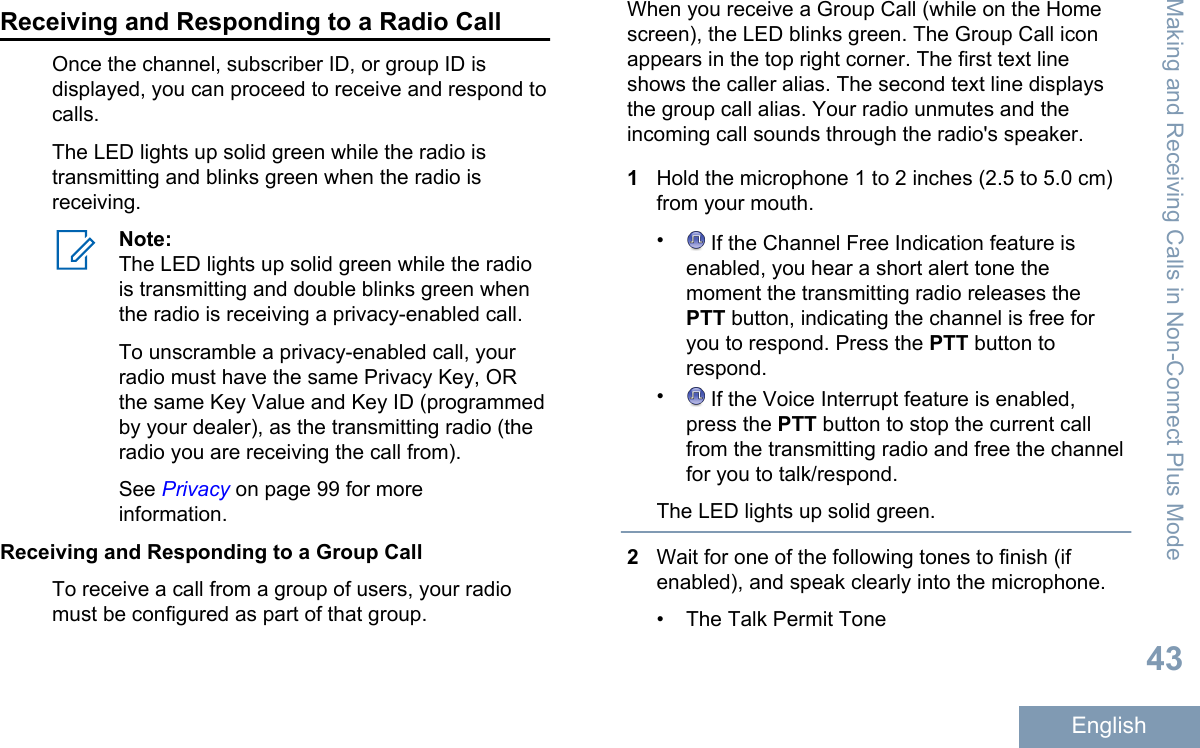
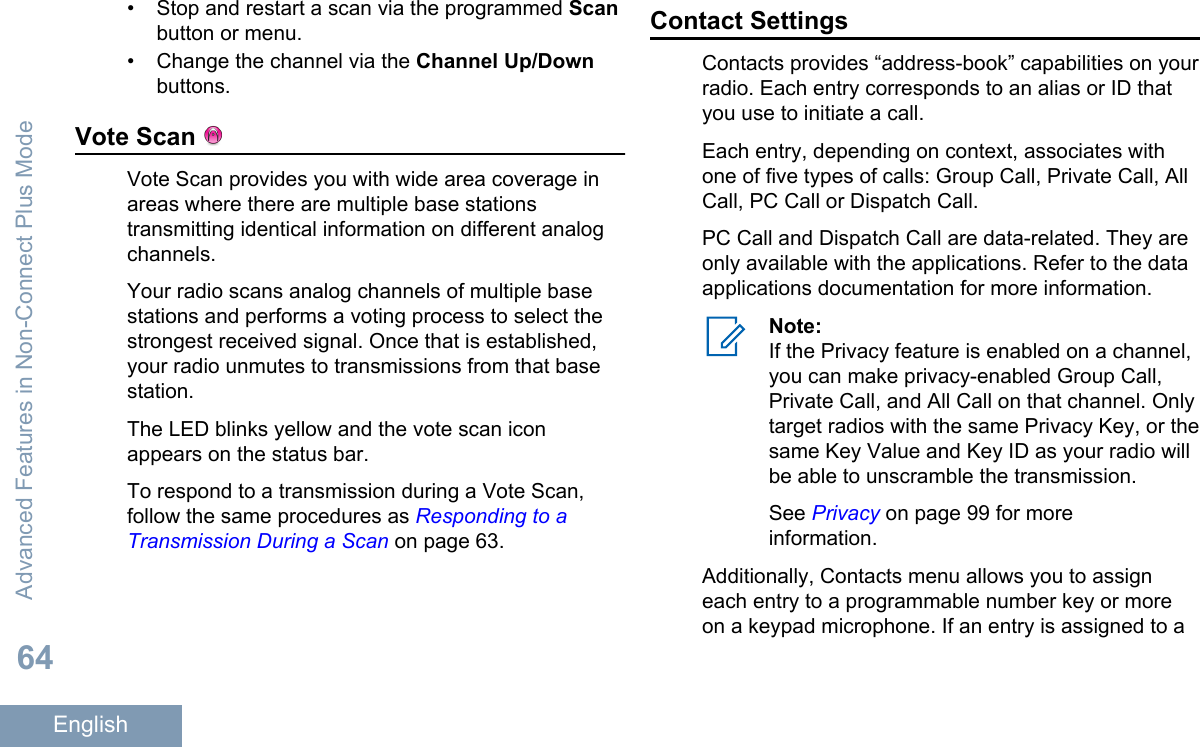
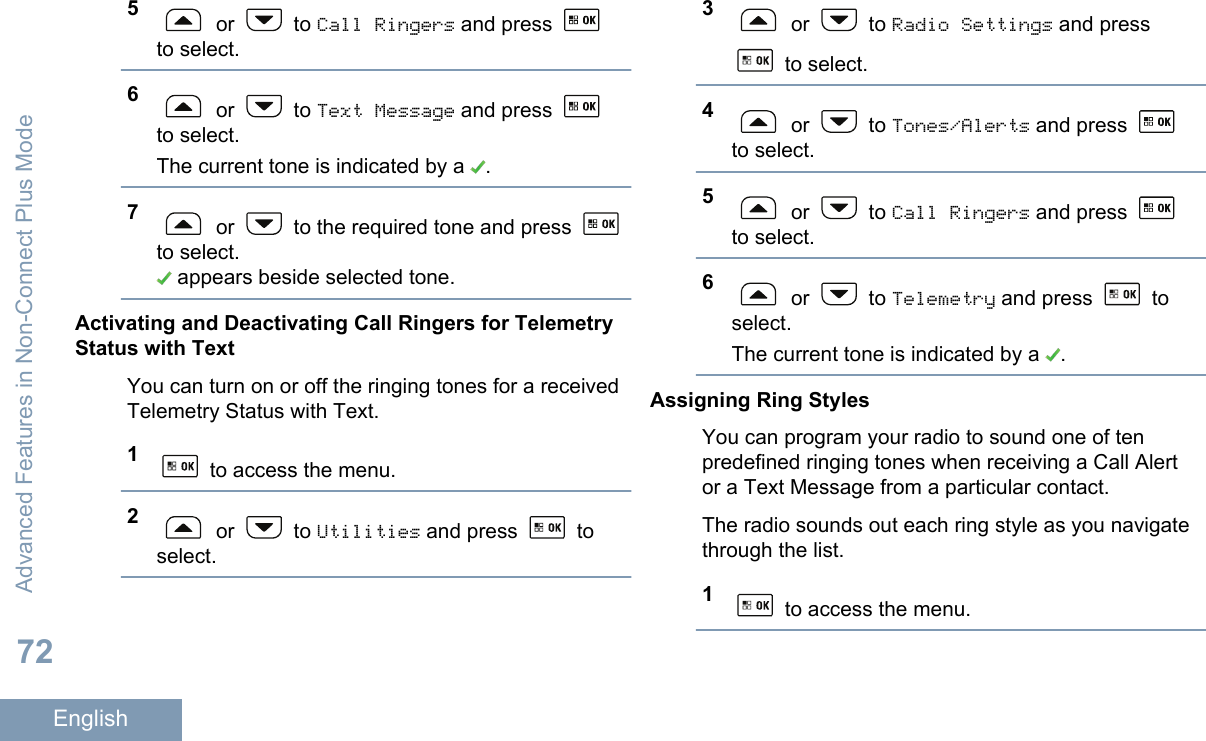
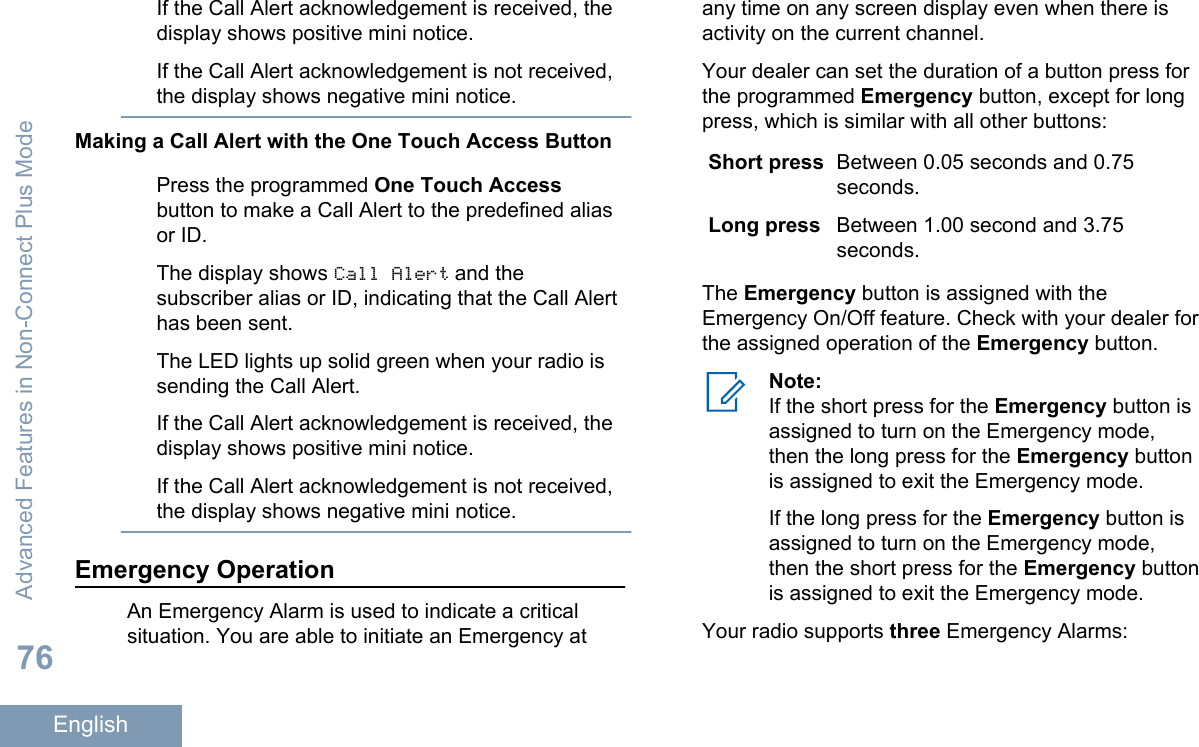
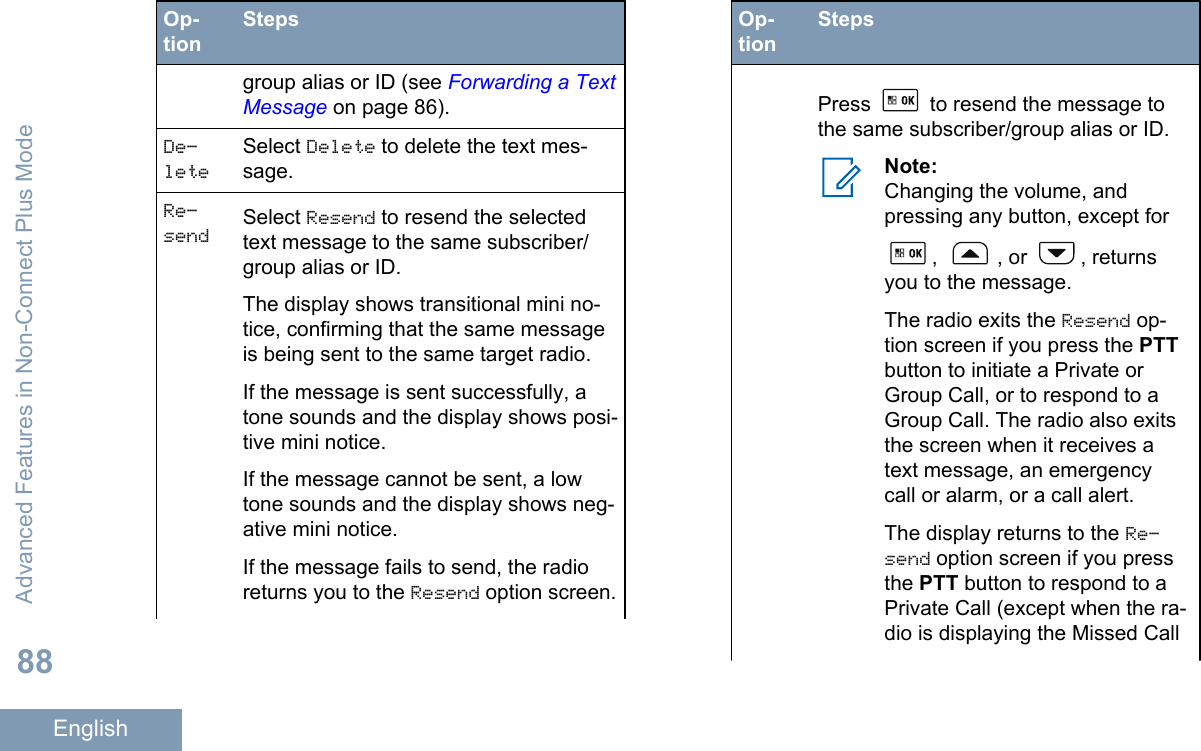
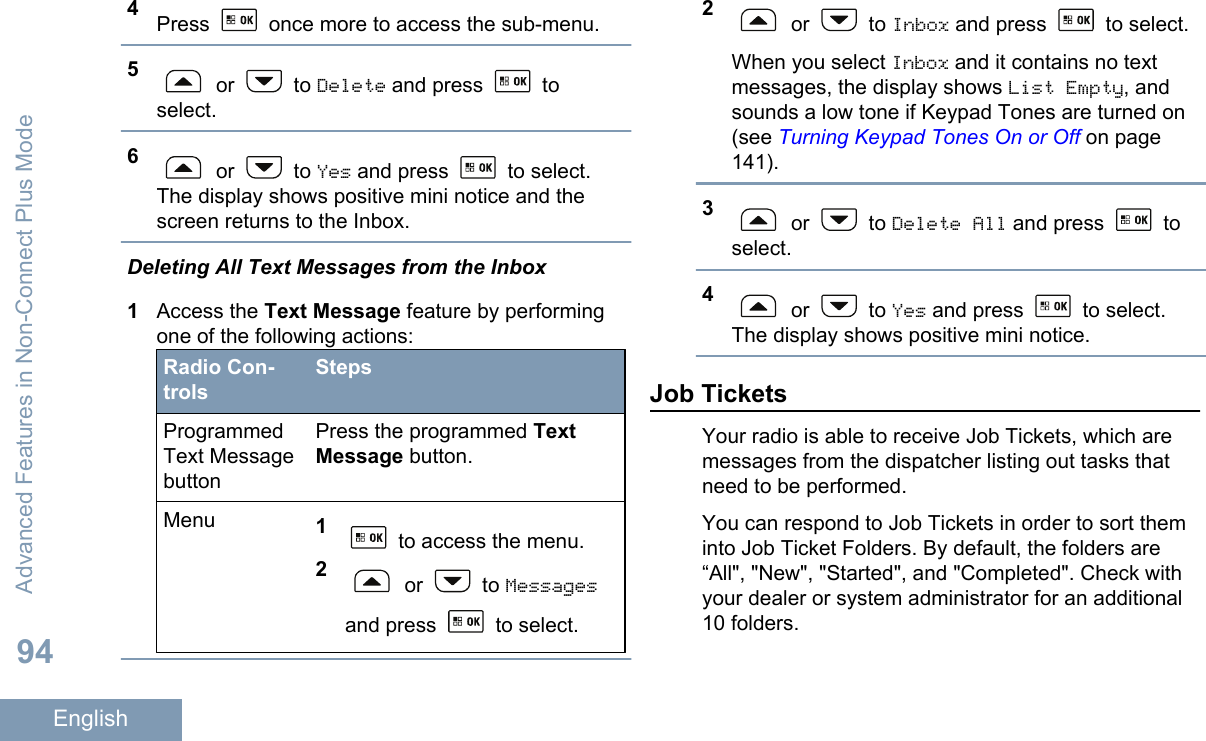
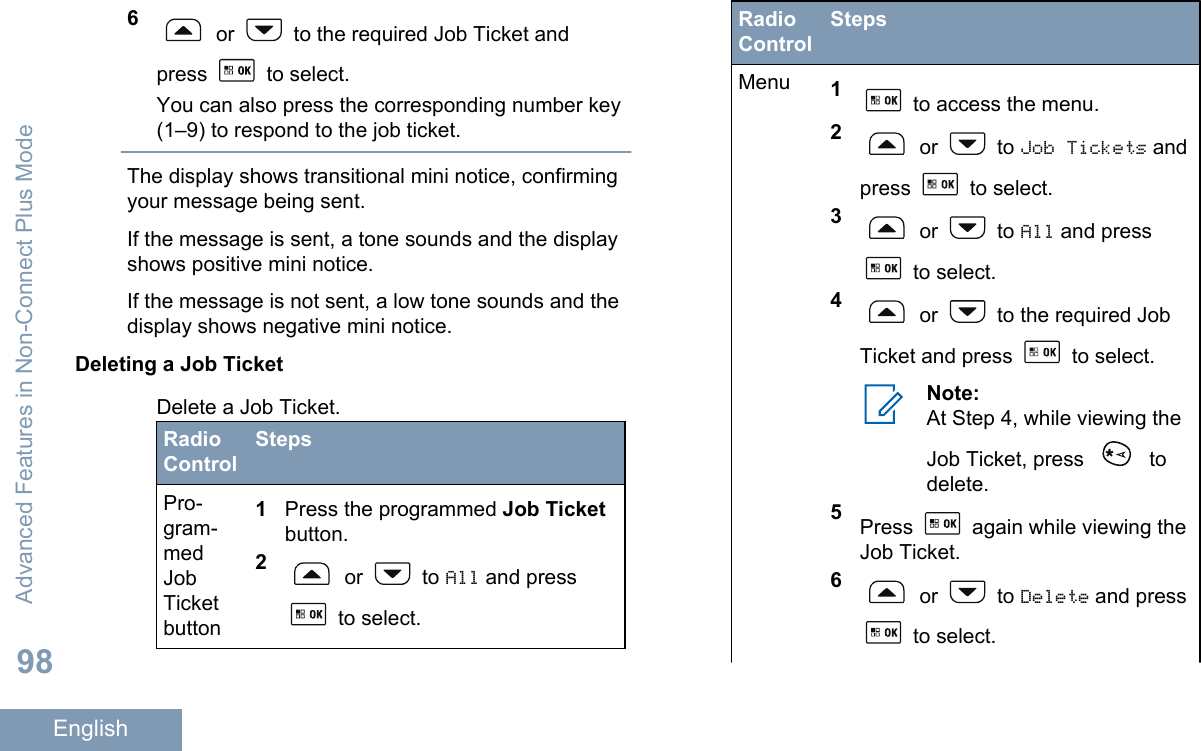
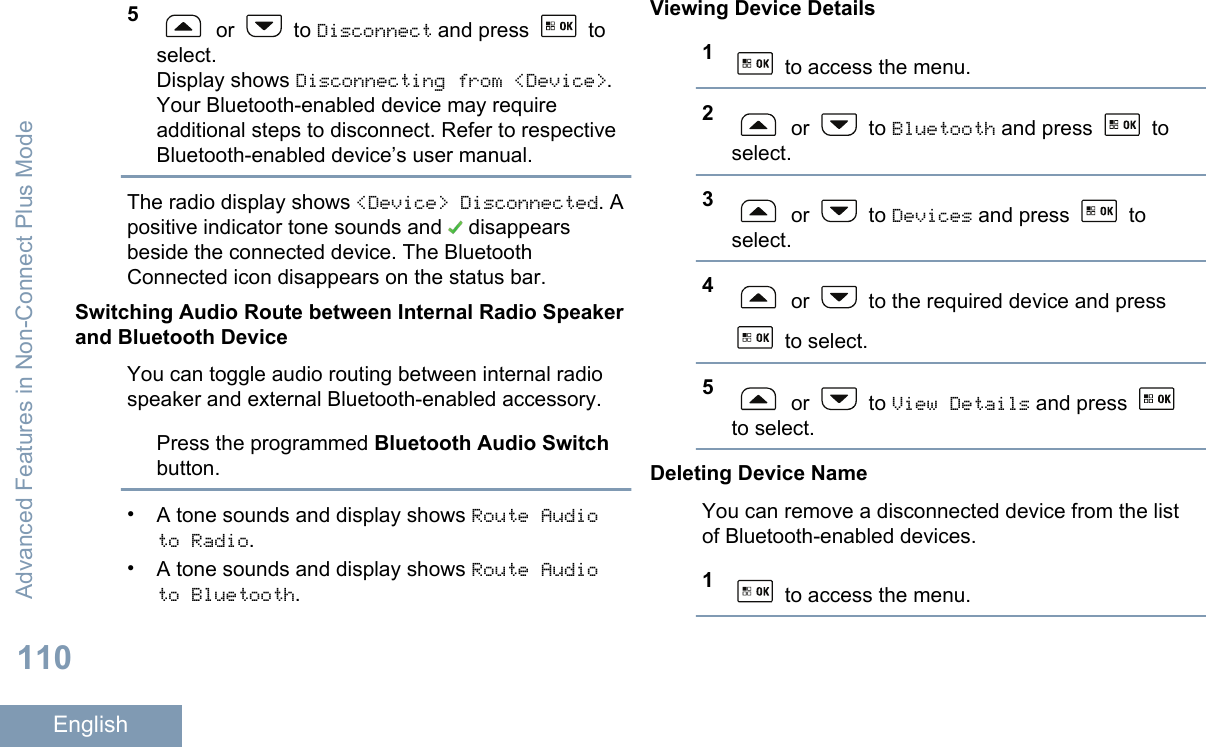
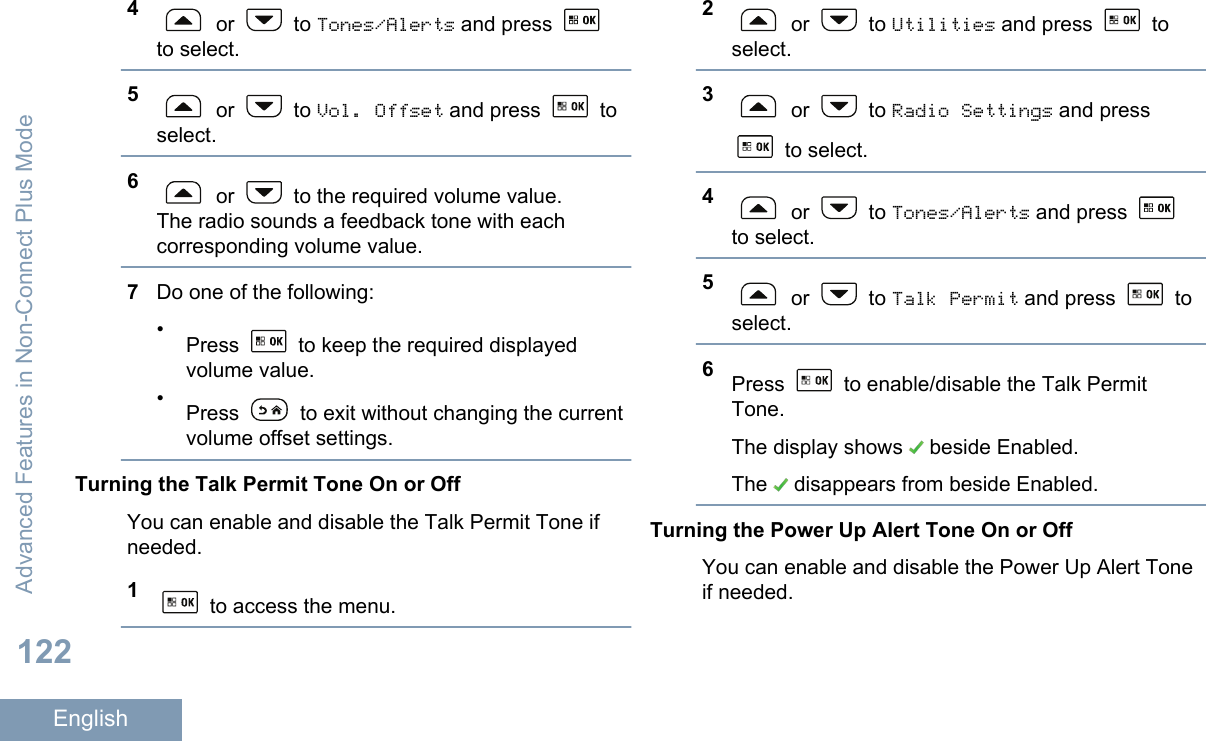
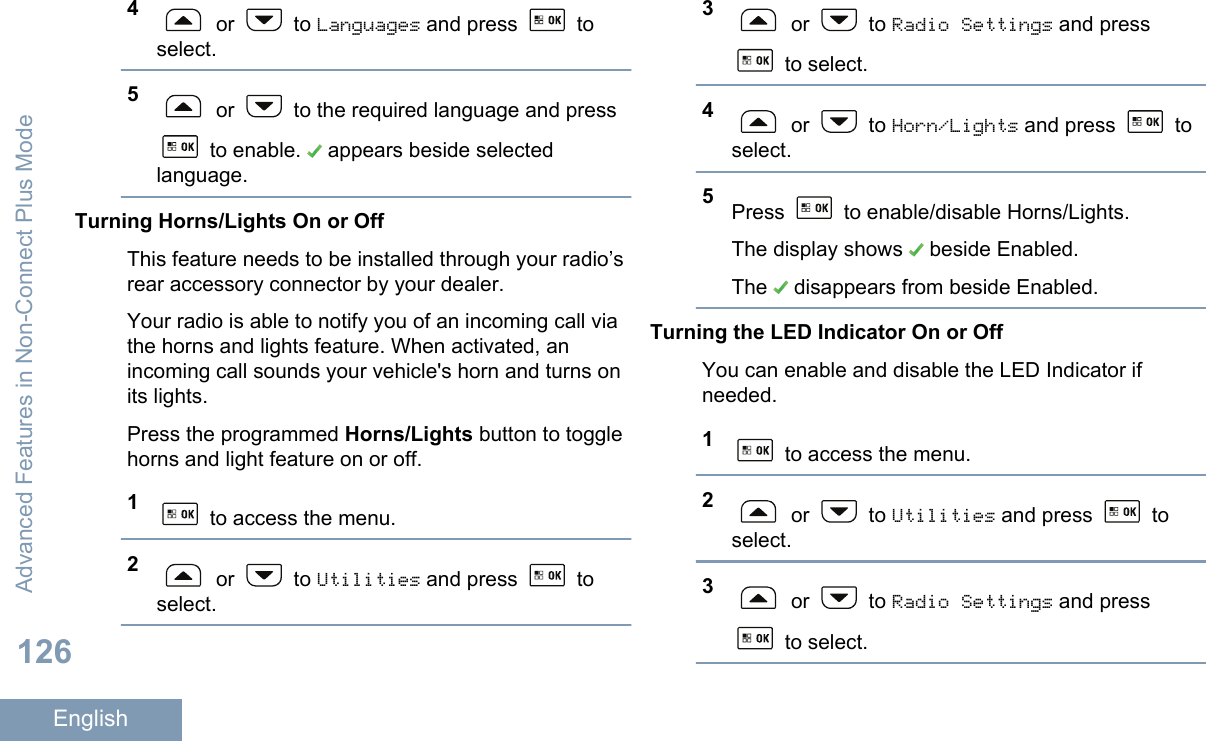
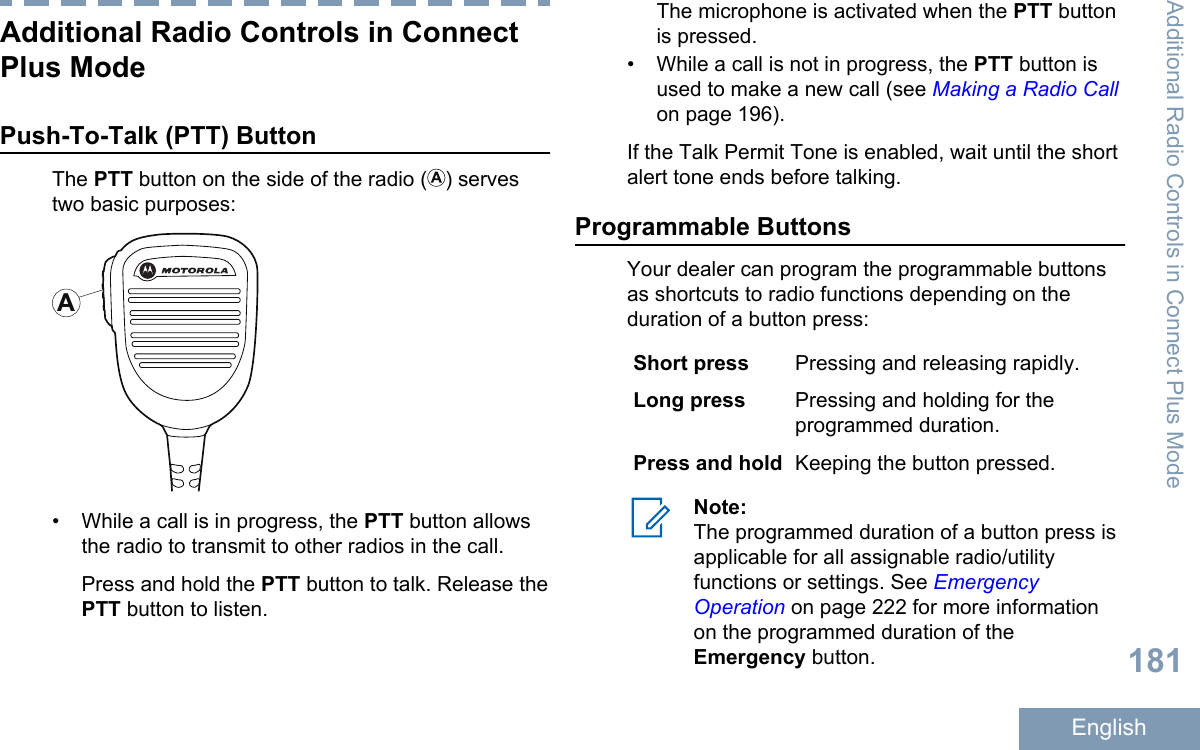
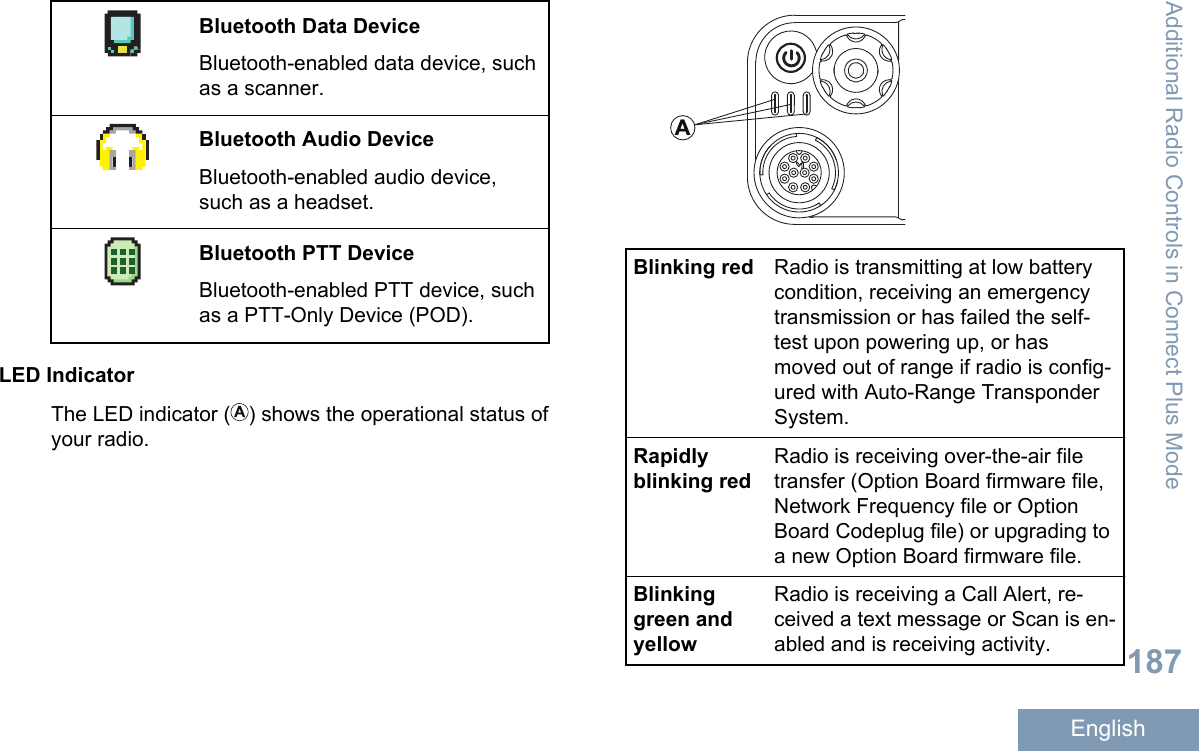
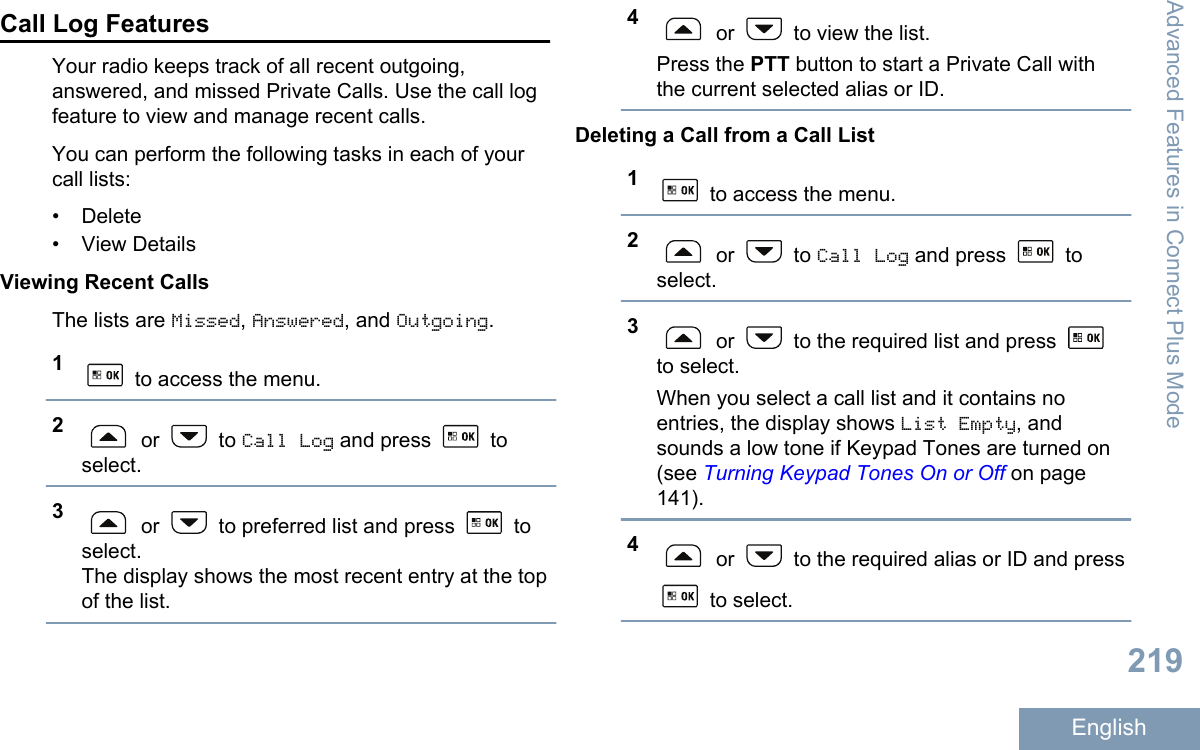
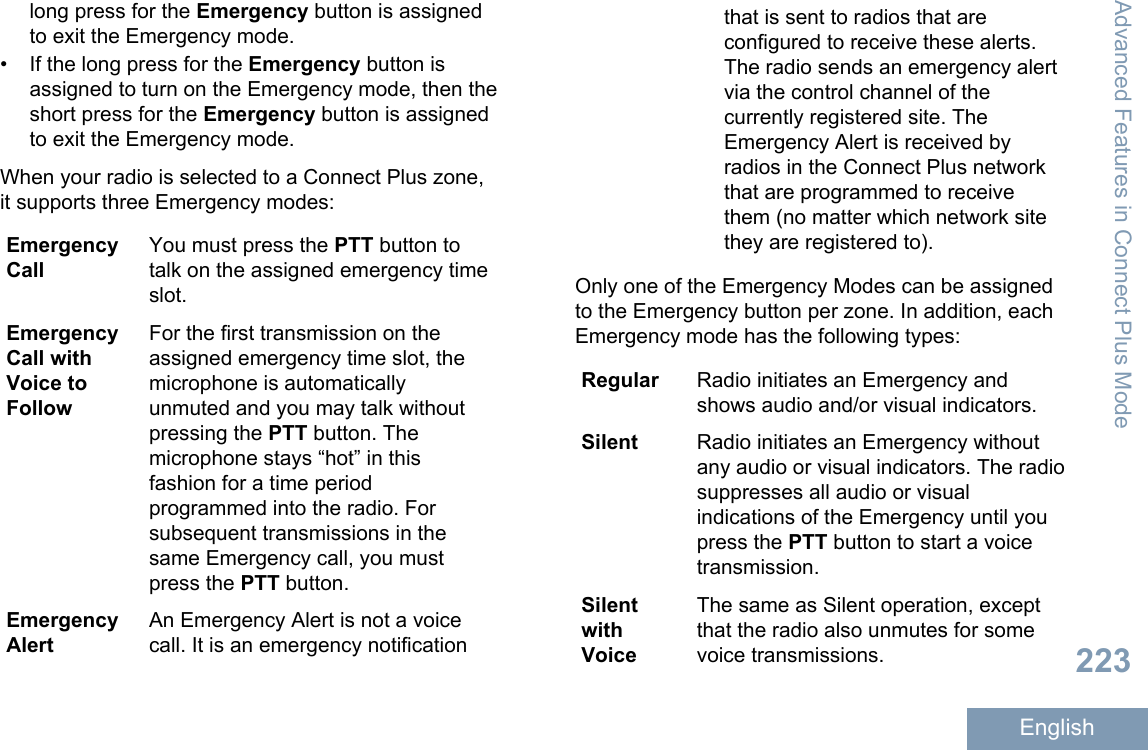
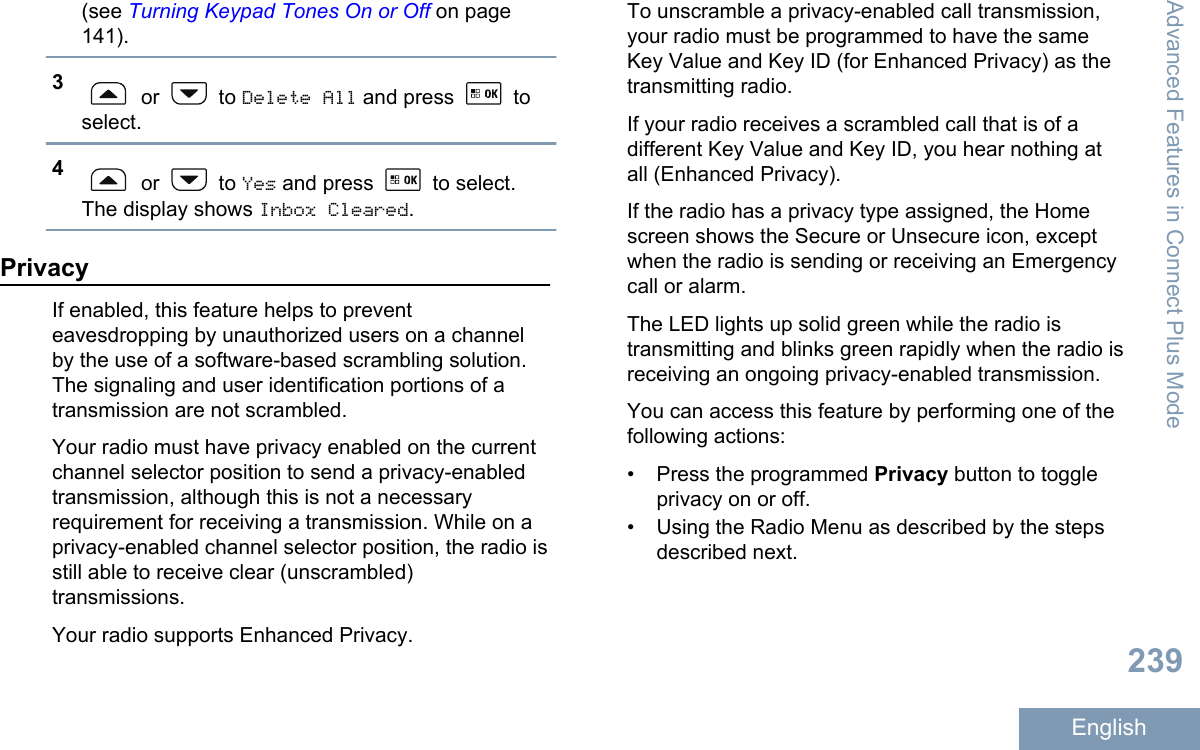
![Identifying Radio ControlsRadio Controls12 3 4 65910 781On/Off/Information Button2Volume/Channel Knob3Display4Menu/OK Button5Scroll Up/Down Buttons6Speaker7Return/Home Button8Front Programmable Buttons[1]9Accessory Connector10 LED IndicatorsUsing the Volume/Channel KnobThe Volume/Channel Knob can be programmed asdual purpose for both volume and channel or as avolume-only control.To adjust the volume, see Adjusting the Volume onpage 22.To change channels, push and hold the knob untilchannel selection screen is displayed, then turn theknob to the required channel.To exit the channel selection state, do one of thefollowing:• Push the Volume/Channel Knob again.•Press .•Press .• Wait for the menu timer to expire.1These buttons are programmable.Identifying Radio Controls24English](https://usermanual.wiki/Motorola-Solutions/92FT7081.Manual/User-Guide-2843028-Page-28.png)
![Manual SiteRoam[2] Starts the manual site search.Mic AGC On/Off Toggles the internalmicrophone automatic gaincontrol (AGC) on or off.Monitor Monitors a selected channelfor activity.Notifications Provides direct access to theNotifications list.Nuisance ChannelDelete[2]Temporarily removes anunwanted channel, except forthe Selected Channel, fromthe scan list. The SelectedChannel refers to the selectedzone or channel combinationof the user from which scan isinitiated.One Touch Access Directly initiates a predefinedPrivate, Phone or Group Call,a Call Alert or a Quick Textmessage.Option BoardFeatureToggles option boardfeature(s) on or off for optionboard-enabled channels.PA On/Off Toggles the radio’s internalpublic address (PA) system onor off.PermanentMonitorMonitors a selected channelfor all radio traffic until functionis disabled.Phone Provides direct access to thePhone Contacts list.Privacy Toggles privacy on or off.Radio Alias and ID Provides radio alias and ID.Radio Check Determines if a radio is activein a system.Radio Enable Allows a target radio to beremotely enabled.Radio Disable Allows a target radio to beremotely disabled.Additional Radio Controls in Non-Connect Plus Mode28English](https://usermanual.wiki/Motorola-Solutions/92FT7081.Manual/User-Guide-2843028-Page-32.png)
![Remote Monitor Turns on the microphone of atarget radio without it givingany indicators.Repeater/Talkaround[2]Toggles between using arepeater and communicatingdirectly with another radio.Scan[2] Toggles scan on or off.Site Info Displays current LinkedCapacity Plus site name andID. Plays site announcementvoice messages for thecurrent site (this function isunavailable when VoiceAnnouncement is disabled).Site Lock On/Off[2] When toggled on, the radiosearches the current site only.When toggled off, the radiosearches other sites inaddition to the current site.Telemetry Control Controls the Output Pin on alocal or remote radio.Text Message Selects the text messagemenu.Transmit InterruptRemote Dekey Stops the transmission of aremote monitored radiowithout giving any indicators,or an ongoing interruptible callto free the channel.Trill EnhancementOn/OffToggles trill enhancement onor off.VoiceAnnouncement forChannelPlays zone and channelannouncement voicemessages for the currentchannel. This function isunavailable when VoiceAnnouncement is disabled.VoiceAnnouncementOn/OffToggles voice announcementon or off.Voice OperatingTransmission(VOX)Toggles VOX on or off.Zone Allows selection from a list ofzones.Additional Radio Controls in Non-Connect Plus Mode29English](https://usermanual.wiki/Motorola-Solutions/92FT7081.Manual/User-Guide-2843028-Page-33.png)
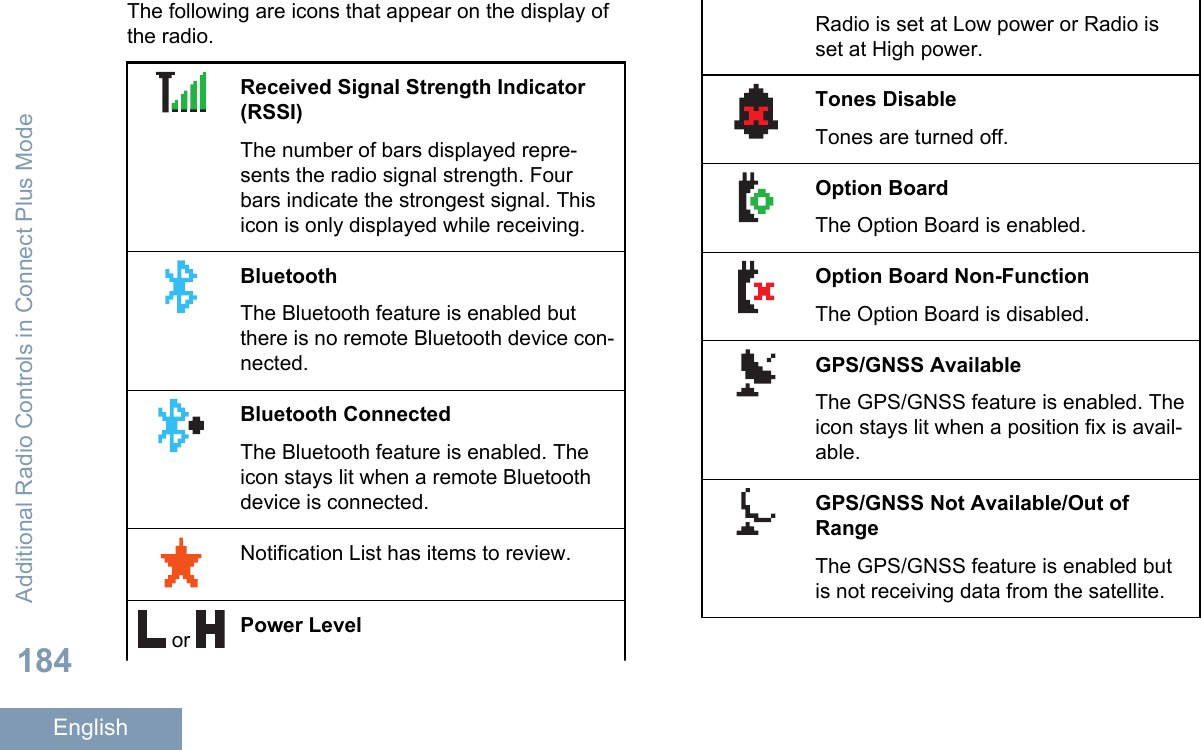
![Radio is set at Low power or Radio isset at High power.Tones DisableTones are turned off.Option BoardThe Option Board is enabled.Option Board Non-FunctionThe Option Board is disabled.Over-the-Air Programming Delay Tim-erIndicates time left before automatic re-start of radio.GPS/GNSS Available The GPS/GNSS feature is enabled. Theicon stays lit when a position fix is avail-able.GPS/GNSS Not Available/Out ofRange The GPS/GNSS feature is enabled butis not receiving data from the satellite.Scan[3][4]Scan feature is enabled.Scan- Priority 1[3][4]Radio detects activity on channel/groupdesignated as Priority 1.Scan- Priority 2[3][4]Radio detects activity on channel/groupdesignated as Priority 2.Vote ScanVote scan feature is enabled.Flexible Receive ListFlexible receive list is enabled.Additional Radio Controls in Non-Connect Plus Mode32English](https://usermanual.wiki/Motorola-Solutions/92FT7081.Manual/User-Guide-2843028-Page-36.png)
![EmergencyRadio is in Emergency mode.SecureThe Privacy feature is enabled.UnsecureThe Privacy feature is disabled.Site Roaming[3]The site roaming feature is enabled.Talkaround[3][4]In the absence of a repeater, radio iscurrently configured for direct radio to ra-dio communication.Wi-Fi Excellent[5]Wi-Fi signal is excellent.Wi-Fi Good[5]Wi-Fi signal is good.Wi-Fi Average[5]Wi-Fi signal is average.Wi-Fi Poor[5]Wi-Fi signal is poor.Wi-Fi Unavailable[5]Wi-Fi signal is unavailable.3Not applicable in Capacity Plus4Not applicable in Linked Capacity Plus5Only applicable for XPR 5550e/XPR 5580eAdditional Radio Controls in Non-Connect Plus Mode33English](https://usermanual.wiki/Motorola-Solutions/92FT7081.Manual/User-Guide-2843028-Page-37.png)


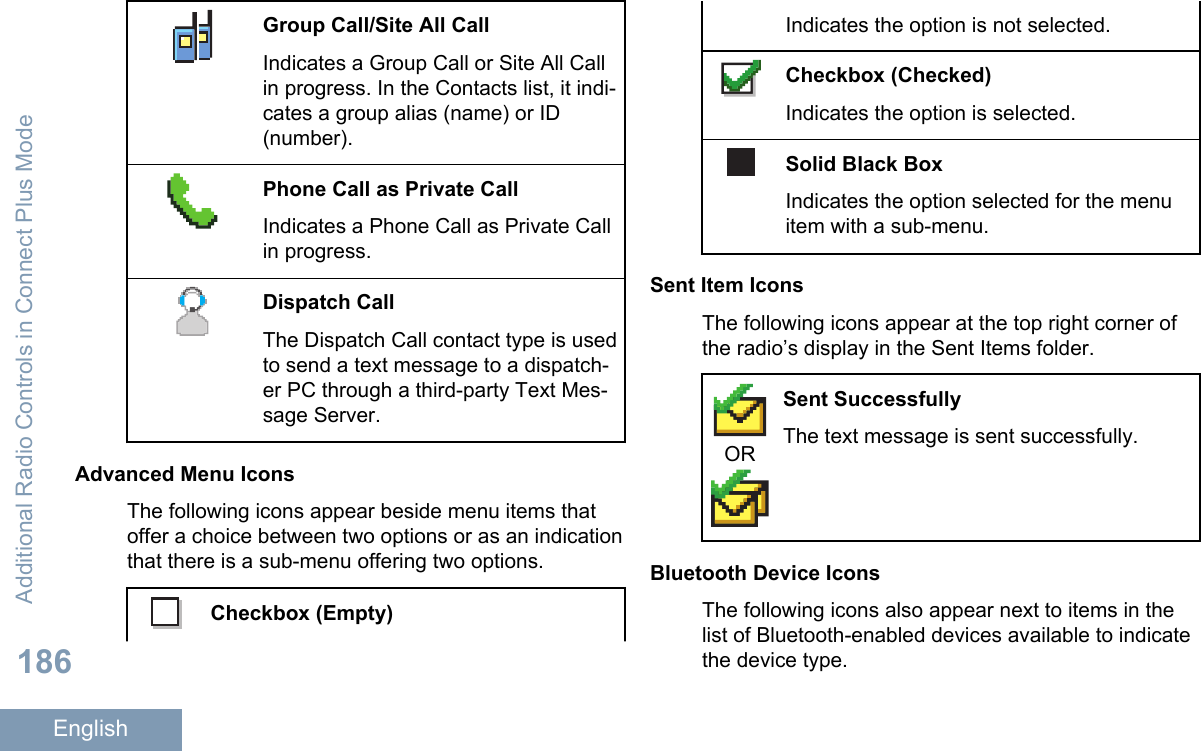
![ScanScan feature is enabled.EmergencyRadio is in Emergency mode.SecureThe Privacy feature is enabled.UnsecureThe Privacy feature is disabled.Site RoamingThe site roaming feature is enabled.Wi-Fi Excellent[6]Wi-Fi signal is excellent.Wi-Fi Good[6]Wi-Fi signal is good.Wi-Fi Average[6]Wi-Fi signal is average.Wi-Fi Poor[6]Wi-Fi signal is poor.Wi-Fi Unavailable[6]Wi-Fi signal is unavailable.Call IconsThe following icons appear on the radio’s displayduring a call. These icons also appear in the Contactslist to indicate ID type.Private CallIndicates a Private Call in progress. Inthe Contacts list, it indicates a sub-scriber alias (name) or ID (number).6Only applicable for XPR 5550e/XPR 5580eAdditional Radio Controls in Connect Plus Mode185English](https://usermanual.wiki/Motorola-Solutions/92FT7081.Manual/User-Guide-2843028-Page-189.png)


![• UHF, 470 – 527 MHz, 1/4 Wave, Through-HoleMount (HAE6030_)• UHF, 403 – 527 MHz, 2.0 dB Gain, Through-HoleMount (HAE6029_)• UHF, 470 – 494 MHz, 3.0 dB Gain, Through-HoleMount (HAE6028_)• UHF, 494 – 512 MHz, 3.0 dB Gain, Through-HoleMount (HAE6027_)Audio• Telephone Style Handset (HMN4098_)• Desktop Microphone (RMN5050_)• Compact Microphone (RMN5052_)• IMPRES 4-Way Navigation Keypad Microphone(RMN5127_)• Heavy Duty Microphone with Enhanced Audio(RMN5053_)• Visor Microphone with Enhanced Audio(RMN5054_)• Operations Critical Wireless Earpiece, 12” Cable(NNTN8125_)• Operations Critical Wireless Push-to-Talk POD(NNTN8127_)• Non-Secure Wireless Headset & Push-to-TalkDevice with Push-to-Talk Audio, 12-Inch Cable(NNTN8189_)• Bluetooth Accessory Kit, SP, 9.5” Cable(NNTN8190_)• Operations Critical Wireless Earpiece, 9.5” Cable(NNTN8126_)• Wireless Covert Kit, includes two sets of 2-WireEarbuds (1 Black and 1 White), 1-Wire Earbud(Black), and a 3.5 mm Adapter to plug into any off-the-shelf headphones (NNTN8296_) [7]• Wireless Neckloop Y-adapter and retention hookfor Completely Discreet Kit (NNTN8385_) [7]• HK200 Bluetooth Headset (89409N)• Compact Microphone Replacement Cable(3075336B07)• Heavy Duty/Keypad Microphone ReplacementCable (3075336B10)• Completely Discreet Earpiece Kit (RLN4922_) [7]• XBT Behind-the-Neck, Non-Secure WirelessHeavy Duty Headset (RLN6490_)• XBT Overhead, Non-Secure Wireless Heavy DutyHeadset (RLN6491_)• MOTOTRBO Bluetooth Accessory Kit with NAPower Supply (RLN6500_)Authorized Accessories List279English](https://usermanual.wiki/Motorola-Solutions/92FT7081.Manual/User-Guide-2843028-Page-283.png)
![• Swivel Earpiece with In-Line Microphone forBluetooth Accessory Kit Pod, Pack of 3(RLN6550_) [7]• Flexible Fit Swivel Earpiece with Boom Mic(PMLN7181_) [7]• Flexible Fit Swivel Earpiece with Boom Mic,Multipack (PMLN7203_) [7]Cables• Power Cable to Battery, 10-foot (3-metre) Cable,15 amp (1 – 25 Watt) (HKN4137_)• Power Cable to Battery, 10-foot (3-metre) Cable,20 amp (1 – 45 Watt) (HKN4191_)• Power Cable to Battery, 20-foot (6-metre) Cable,20 amp (1 – 45 Watt) (HKN4192_)• Mobile and Repeater Rear Accessory ConnectorUniversal Cable (PMKN4018_)• Ignition Sense Cable (RKN4136_)• Mobile Mic Extension Cable, 10 feet(PMKN4033_)• Mobile Mic Extension Cable, 20 feet(PMKN4034_)• Mobile Front (MMP) Programming Cable(HKN6184_)• MAP Programming Cable (PMKN4010_)• MAP Programming and Test Cable (PMKN4016_)• Remote Mount (3-metre) Cable (PMKN4143_)• Remote Mount (5-metre) Cable (PMKN4144_)Desktop Accessories• Radio Power Cable for GPN6145 (GKN6266_)• Desktop Tray without Speaker (GLN7318_)• Desktop Tray with Speaker (RSN4005_)• Switchmode Power Supply (1 – 25 Watt Models)(CE marked) (GPN6145_)• Power Supply and Cable (HPN4007_)• Hardware Kit for Rear Accessory Connector(PMLN5072_)• US Line Cord (3060665A04)• Euro Line Cord (3060665A05)• Power Cable, UK Plug (Straight) (3002695B05)7Your radio is compatible with the accessories listed here. Contact your dealer for details.Authorized Accessories List280English](https://usermanual.wiki/Motorola-Solutions/92FT7081.Manual/User-Guide-2843028-Page-284.png)