Motorola Solutions 99FT3046 CM200 VHF 45 Watt Mobile Radio User Manual 2966C25 O cvr
Motorola Solutions, Inc. CM200 VHF 45 Watt Mobile Radio 2966C25 O cvr
Contents
- 1. Ex 08A Users Manual
- 2. Ex 08B RF Safety Booklet
- 3. Ex 08C Installation Manual
- 4. Revised RF Safety Booklet
- 5. Revised Mobile Installation Manual
Revised Mobile Installation Manual
Radius CM200™/CM300™
& PM400™
Commercial Series
Two-Way Radio Installation Guide
MOTOROLA, the Stylized M Logo, and Radius are registered in the US Patent & Trademark Office.
All other product or service names are the property of their respective owners.
© 2002, 2003 Motorola, Inc. All rights reserved. Printed in U.S.A.
*6802966C25*
68P02966C25-A

i
Table of Contents
Installation Requirements for Compliance with Radio
Frequency (RF) Energy Exposure Safety Standards ............iii
Information for Vehicles with
Electronic Anti-Lock/Anti-Skid Brakes.......................................iv
Installation Warnings .............................................................................................iv
Installation Precautions ..........................................................................................iv
Braking System Tests ............................................................................................iv
Chapter 1 Introduction
1.1 General Information ............................................................................................... 1
1.2 Plan the Installation ............................................................................................... 1
Chapter 2 DC Power Cable Installation
2.1 Planning the Power Cable Installation ................................................................... 2
2.2 Power Cable Installation Procedure ...................................................................... 2
Chapter 3 Trunnion Installation
3.1 Planning the Mounting Trunnion Installation .......................................................... 5
3.2 Trunnion Installation Procedure ............................................................................. 5
Chapter 4 Antenna Installation
4.1 Antenna Installation and Compliance with Radio Frequncy
(RF) Energy Safety Standards................................................................................ 8
4.2 Selecting an Antenna Site/Location on a Metal Body Vehicle................................ 8
4.3 Antenna Installation Procedure .............................................................................. 9
4.4 Completing the Installation .................................................................................... 9
Chapter 5 Installation Options
5.1 Mobile Dashboard Mounting ................................................................................ 10
5.1.1 Installing the Mounting Frame into the Dashboard ................................. 10

ii
5.1.2 Inserting the Radio into the Mounting Frame (Figure 5.1)...................... 10
5.1.3 Removing the Radio from the Mounting Frame ..................................... 11
5.2 External Speaker Installation ...............................................................................11
5.3 Visor Microphone Installation ...............................................................................12
5.3.1 Connecting to the Mobile Radio ............................................................. 12
Chapter 6 Accessory Connections
6.1 Accessory Connector Pin Functions ....................................................................13
6.2 Connection Plan for Accessories .........................................................................15
Chapter 7 Noise Sources
7.1 Introduction ..........................................................................................................16
7.2 Radiated Noise .....................................................................................................16
7.3 Conducted Noise ..................................................................................................17
7.4 Induced Noise ......................................................................................................17
Chapter 8 Operation of a Conventional Ignition System
8.1 Introduction ..........................................................................................................18
8.2 Sources of Ignition Interference ...........................................................................18
Chapter 9 Detection of Noise Sources
9.1 Noise Detection Procedure ..................................................................................20
9.2 Sources of Noise ..................................................................................................21
Chapter 10 Noise Reduction Techniques
10.1 General ................................................................................................................22
10.2 Ignition System Interference ................................................................................22
10.2.1 Engine Maintenance and Tune-Up......................................................... 22
10.2.2 Available Noise Reduction Kits .............................................................. 22
10.2.3 Ignition Coil Interference ........................................................................ 23
10.2.4 Distributor Interference........................................................................... 23
10.2.5 Battery Connections............................................................................... 23
10.3 Alternator ..............................................................................................................24
10.4 Voltage Regulator Noise ......................................................................................25
10.5 Hood and Trunk Lid Noise ...................................................................................25
10.6 Other Electrical Noises .........................................................................................25
10.7 Ground Bonding ...................................................................................................26

Safety-iii
INSTALLATION REQUIREMENTS FOR COMPLIANCE
WITH RADIO FREQUENCY (RF) ENERGY EXPOSURE
SAFETY STANDARDS
ATTENTION!
This radio is intended for use in occupational/controlled conditions, where users have full knowledge
of their exposure and can exercise control over their exposure to meet FCC limits. This radio device is
NOT authorized for general population, consumer, or any other use.
To ensure compliance to RF Energy Safety standards:
• Install only Motorola approved antennas and accessories.
• Be sure that antenna installation is per Chapter 4 of this manual.
• Be sure that Product Safety and RF Safety Booklet enclosed with this radio is available to the end user upon
completion of the installation of this radio.
Before using this product, the operator must be familiar with the RF energy awareness information and
operating instructions in the Product Safety and RF Exposure booklet enclosed with each radio (Motorola
Publication part number 68P81095C99) to ensure compliance with Radio Frequency (RF) energy exposure.
For a list of Motorola-approved antennas and other accessories, visit the following web site which lists
approved accessories for your radio model: http://www.motorola.com/cgiss/index.shtml.

iv
Information for Vehicles with
Electronic Anti-Lock/Anti-Skid Brakes
The following installation suggestions and test procedures are recommended for vehicles with electronic anti-
lock/anti-skid brakes. Refer to your vehicle service manual for your vehicle’s braking system, or contact your
dealer directly.
Installation Warnings
Disruption of the anti-skid/anti-lock braking system by the radio transmitter may result in
unexpected vehicle motion.
Motorola recommends the following radio installation precautions and vehicle braking
system test procedures to ensure that the radio, when transmitting, does not interfere with
the operation of the vehicle braking system.
Installation Precautions
1. Always provide as much distance as possible between the braking modulator unit and the radio, the radio
antenna, and associated transmission line. Before installing the radio, determine the location of the brak-
ing modulator unit in the vehicle. Depending on the make and model of the vehicle, the braking modulator
unit may be located in the trunk, under the dashboard, in the engine compartment, or in some other cargo
area. If you cannot determine the location of the braking modulator unit, refer to the vehicle service man-
ual or contact a dealer for the particular make of the vehicle.
2. If the braking modular unit is located on the left side of the vehicle, install the radio on the right side of the
vehicle, and conversely.
3. Route all radio wiring, including the antenna transmission line, as far away as possible from the braking
modular unit and associated braking system wiring.
4. Never activate the radio transmitter while the vehicle is in motion and the vehicle trunk lid is open.
Braking System Tests
Be sure the following vehicle testing is done in an isolated area. The following procedure checks for the most
common types of interference that may be caused by a radio transmitter to a vehicle braking system:
1. Run the vehicle engine at idle speed and set the vehicle transmission selector to PARK. Release the brake
pedal completely and key the radio transmitter. While NOT speaking into the microphone, verify that there
are no unusual effects (visual or audible) to the vehicle lights, or other electrical equipment and accesso-
ries.
2. Repeat Step 1, except do so while speaking into the microphone.
3. Press the vehicle brake pedal slightly; just enough to illuminate the vehicle brake light(s). Then repeat
Steps 1 and 2.
4. Press the vehicle brake pedal firmly and repeat Steps 1 and 2.
5. Ensure that there is a minimum of two vehicle lengths between the front of the vehicle and any object in
the vehicle’s forward path. Then, set the vehicle transmission selector to DRIVE. Press the brake pedal
just far enough to stop the vehicle motion completely. Key the radio transmitter. Verify that the vehicle does
not start to move while NOT speaking into the microphone.
6. Repeat Step 5, except do so while speaking into the microphone.
7. Release the brake pedal completely and accelerate the vehicle to a speed between 15 and 25 miles (25
and 40 kilometers) per hour. Ensure that a minimum of two vehicle lengths is maintained between the front
of the vehicle and any object in the vehicle’s forward path. Have another person key the radio transmitter,
and verify that the vehicle can brake normally to a moderate stop while NOT speaking into the micro-
phone.
!
WARNING

Information for Vehicles with Electronic Anti-Lock/Anti-Skid Brakes v
8. Repeat Step 7, except do so while speaking into the microphone.
9. Release the brake pedal completely and accelerate the vehicle to a speed of 20 miles (30 kilometers) per
hour. Ensure that a minimum of two vehicle lengths is maintained between the front of the vehicle and any
object in the vehicle’s forward path. Have another person key the radio transmitter, and verify that the vehi-
cle can be braked properly to a sudden (panic) stop while NOT speaking into the microphone.
10. Repeat Step 9, except do so while speaking into the microphone.
11. Repeat Steps 9 and 10, except use a vehicle speed of 30 miles (50 kilometers) per hour.
For radios installed in vehicles fuelled by liquefied petroleum gas, refer to the (U. S.)
National Fire Protection Association standard, NFPA 58, for storage, handling, and/or
container information.
For a copy of the LP-gas standard, NFPA 58, contact the National Fire Protection
Association, One Battery Park, Quincy, MA,.
!
WARNING

vi Information for Vehicles with Electronic Anti-Lock/Anti-Skid

1
Chapter 1
Introduction
1.1 General Information
There are two methods of installing your mobile radio:
1. The standard radio package contains a direct mounting trunnion and power cables.
2. CM200/CM300 mobile radios may be mounted in the dashboard of a car using the required DIN
Mount Kit FTN6083.
An accessory connector on the rear of the radio (see Figure 4-1) enables you to attach different
accessories required for the installation.
A eight-pin telephone type connector on the front control head panel provides for the connection of
various types of microphones.
1.2 Plan the Installation
1. Mount the radio horizontally near the driver, so the driver can easily view, access, and operate
the controls and accessories.
2. Ensure that the location is not exposed to dirt and moisture.
3. Verify that there will be sufficient space around the mobile unit for air flow and installation.
4. Check that there is enough routing space for the power cable connector and the antenna coaxial
cable.
5. Plan the best place to run connections to minimize chafing, pinching, crushing, and overheating
of wires and cables.
CAUTION: In a vehicle with an airbag, make sure that the mounting location of the mobile
radio, or any radio accessory, is not in the deployment path of the air bag.
!
2
Chapter 2
DC Power Cable Installation
2.1 Planning the Power Cable Installation
The 10 foot (3 m) DC power cable shipped with the radio should be long enough to be installed in
most vehicles. Take the following precautions before you begin:
• Whenever possible, avoid routing the cable above the catalytic converter.
• Use grommets whenever a cable has to pass through a hole in a metal panel.
The following table lists power cables available for this radio:
2.2 Power Cable Installation Procedure
Begin the power cable installation as follows:
1. Determine a routing plan, keeping in mind where the radio is to be mounted.
2. Locate an existing hole with grommet in the vehicle fire wall, or use a 3/8-inch (9.5 mm) bit to drill
an access hole in the fire wall. Install a grommet with a 3/16-inch (4.9 mm) inside diameter into
the hole to protect the power cable.
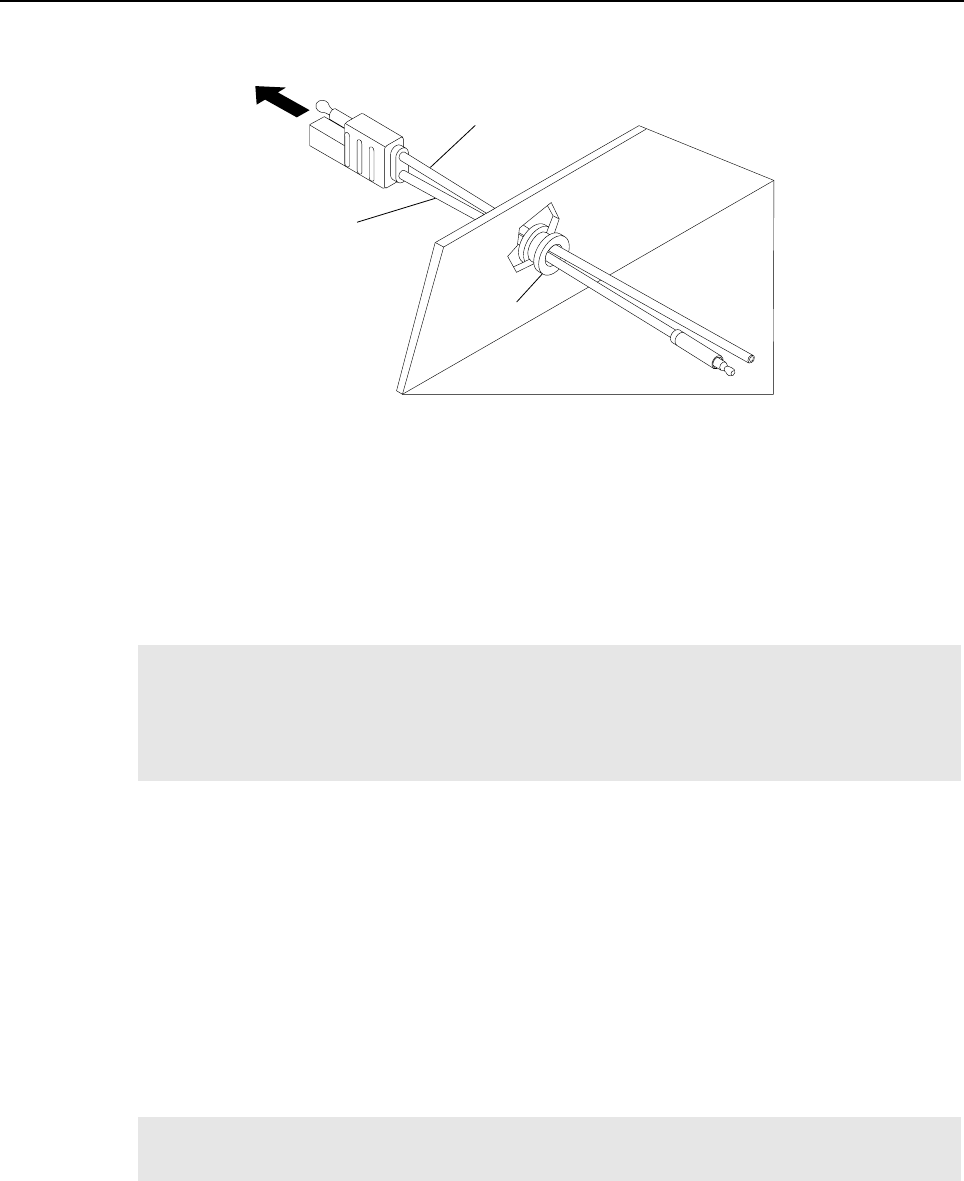
3. From inside the vehicle, feed the red and black leads (without the lugs attached) through the
access hole and into the engine compartment. (See Figure 2-1.)
CAUTION: This radio must be operated only in negative ground electrical systems.
Operating the radio on a positive ground system will cause the cable fuse to short-circuit.
Check the vehicle ground polarity before you begin the installation.
Table 2-1: Power Cables
Number Description Rating
HKN4137_ Low power cable to battery 1-25W; 15A fuse; 14 AWG 3m
HKN4191_ High power cable to battery 40-60W; 20A fuse; 12 AWG 3m
CAUTION: Improper handling with the power cable may short to ground. Ensure that during
radio installation the power cable fuse is removed.
CAUTION: Be very careful not to damage existing wires.
!
!
!
DC Power Cable Installation 3
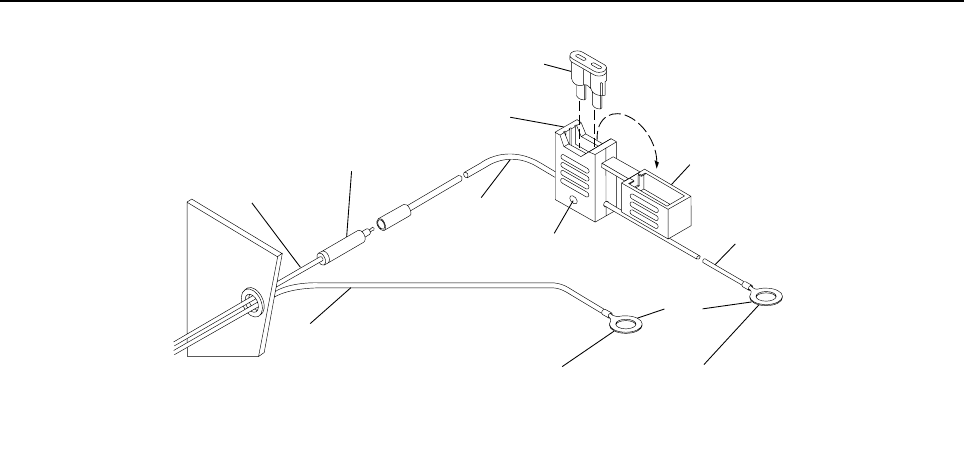
4. Connect the black lead of the power cable to the nearest vehicle chassis ground point, which is
usually the central ground point near the battery (using the provided ring lug if necessary).
Shorten the black lead to remove any excess cable. (See Figure 2-2.)
5. Place the fuse holder close to the battery. Ensure that it is not near any hot engine component.
Mount the fuse holder using its mounting hole and dress the wires as required.
6. Insert the stripped end of the red lead of the fuse holder into the ring lug hole and crimp it.
Connect the fuse holder red adapter lead plug to the mating receptacle on the red lead of the
power cable. (See Figure 2-2.)
7. Connect the power cable black lead directly to the vehicle chassis ground.
8. Connect the red lead ring lug from the fuse holder to the positive (+) battery terminal. Make sure
the adapter cable is connected to the main power cable red lead.
9. Carefully check that all connections are proper. Insert the fuse into the fuse holder and close the
cover. (See Figure 2-2.)
Figure 2-1. Power Cable Routing into the Engine Compartment
NOTE Locate a good vehicle ground point. The vehicle central ground point provides the
best ground. If this is not available, the vehicle frame provides the best ground.
Optimum radio performance can only be achieved with a very low resistance ground
connection. Verify that the connections between the battery negative terminal,
vehicle chassis, and engine block have low resistance.
NOTE Failure to mount the red lead of the power cable kit directly to the battery may result
in severe alternator whine interference.
Black Lead
Red Lead
Firewall
Grommet
Engine Compartment
To Radio
FL08302460
4DC Power Cable Installation
Figure 2-2. Power Cable Assembly
Fuse
Cover
Red Lead
Red Lead
Mounting
Hole
Molded In-Line
Fuse Holder
To Vehicle
Chassis Ground
Engine
Compartment To Battery (+)
Adapter
Firewall
Red Lead
Black Lead
Ring
Lugs
FL08302470

5
Chapter 3
Trunnion Installation
3.1 Planning the Mounting Trunnion Installation
Planning is the key to fast, easy radio installation. Before a hole is drilled or a wire is run, inspect the
vehicle and determine how and where you intend to mount the antenna, radio, and accessories. If you
are using any of the optional accessories, obtain them and plan for their installation using the detailed
instructions included with each accessory. Plan wire and cable runs to provide maximum protection
from pinching, crushing, and overheating.
The mounting trunnion allows the radio to be mounted to a variety of surfaces.
1. Ensure the surface can support the weight of the radio.
2. Although the mounting trunnion can be mounted to a plastic dashboard, it is recommended that
the mounting screws be located so they penetrate the supporting metal frame of the dashboard.
3.2 Trunnion Installation Procedure
1. Select either the transmission hump or an open underneath portion of the dash to mount your
radio. (See Figure 3-1.) When mounting the trunnion on the transmission hump, be careful that
the transmission housing is not affected.
2. Use the trunnion mounting bracket as a template to mark the hole positions on the mounting
surface. Use the innermost three holes for a curved mounting surface, such as the transmission
hump, and the four outermost holes for a flat surface such as under the dash.
3. Center-punch the spots you marked and use a 5/32-inch (4 mm) bit to drill a hole at each location.
4. Secure the trunnion mounting bracket to the mounting surface with the four self-tapping screws
provided. (See Figure 3-1.)
5. Attach the radio to the trunnion mounting bracket using two thumbscrews (Figure 3-2.)
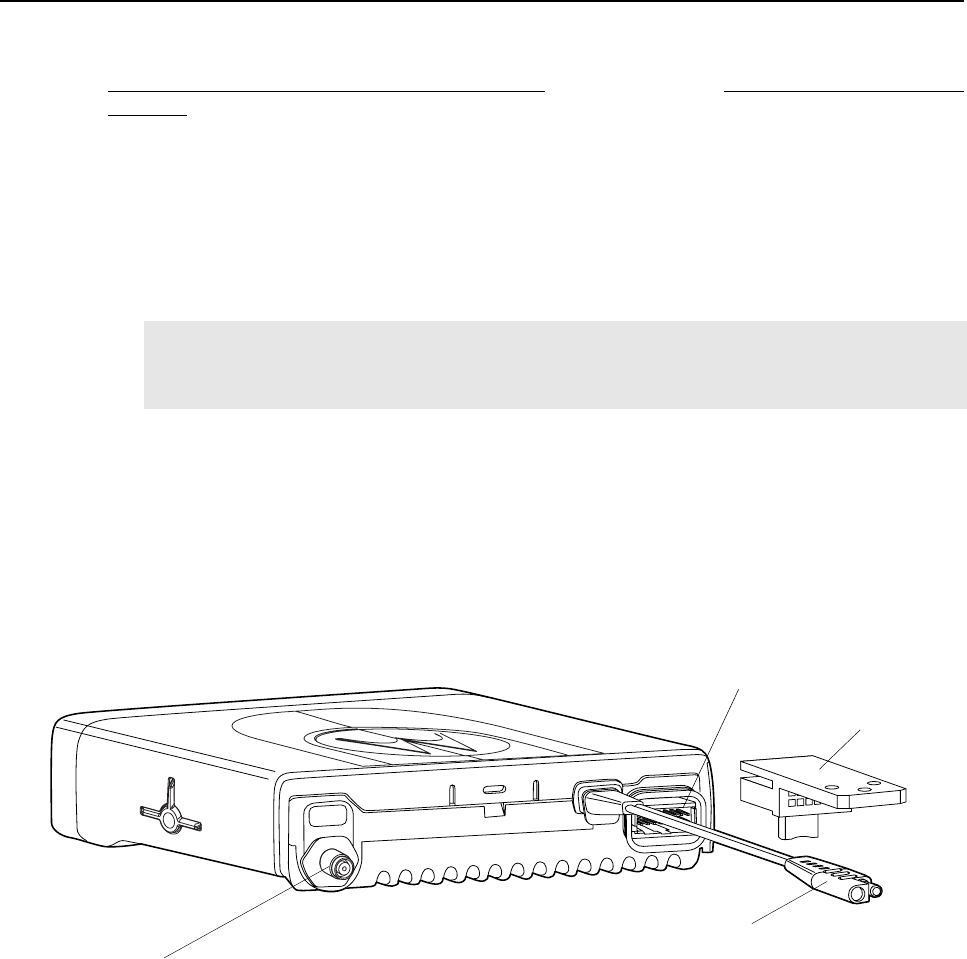
6. If using a Locking Trunnion, lock the radio into the mounting bracket by closing the locking bracket
and locking the cage using the key provided (Figure 3-3.)
CAUTION: The locking bracket (RLN4779) is NOT recommended for overhead mounting
applications.
!
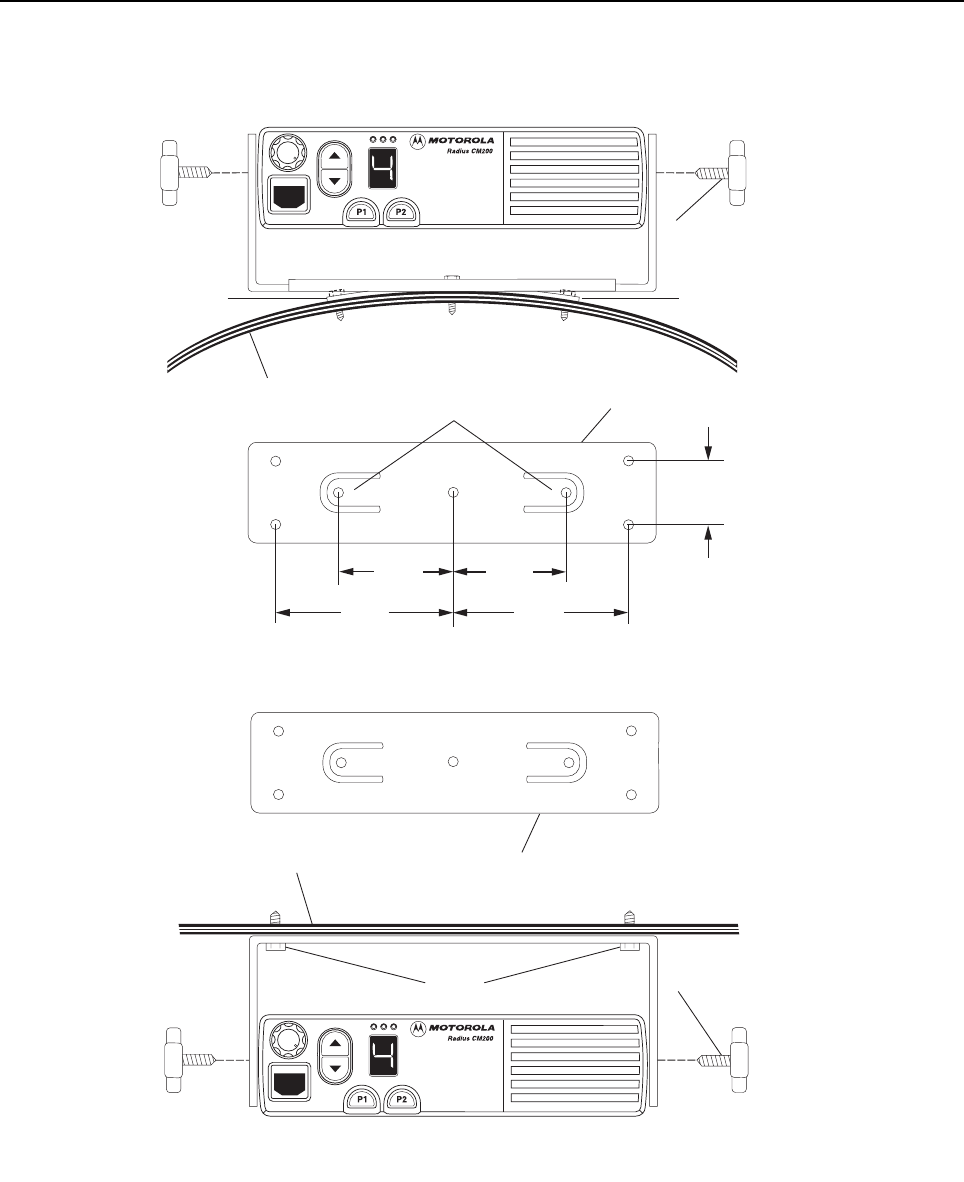
6Trunnion Installation
Tab
BELOW DASH MOUNTING
Mounting Surface
Mounting
Surface
Tab
Thumb Screw
(2)
TRANSMISSION HUMP MOUNTING
Tab
Thumb Screw
(2)
Sheet Metal
Screws
Trunnion Mounting
Bracket
Trunnion Mounting Bracket
FL0830250O -1
1.84"
(46mm)
2.92"
(73mm) 2.92"
(73mm)
1.84"
(46mm)
1.12"
(28mm)
Figure 3-1. Transmission Hump Mounting (Top)
and Below Dash Mounting (Bottom)
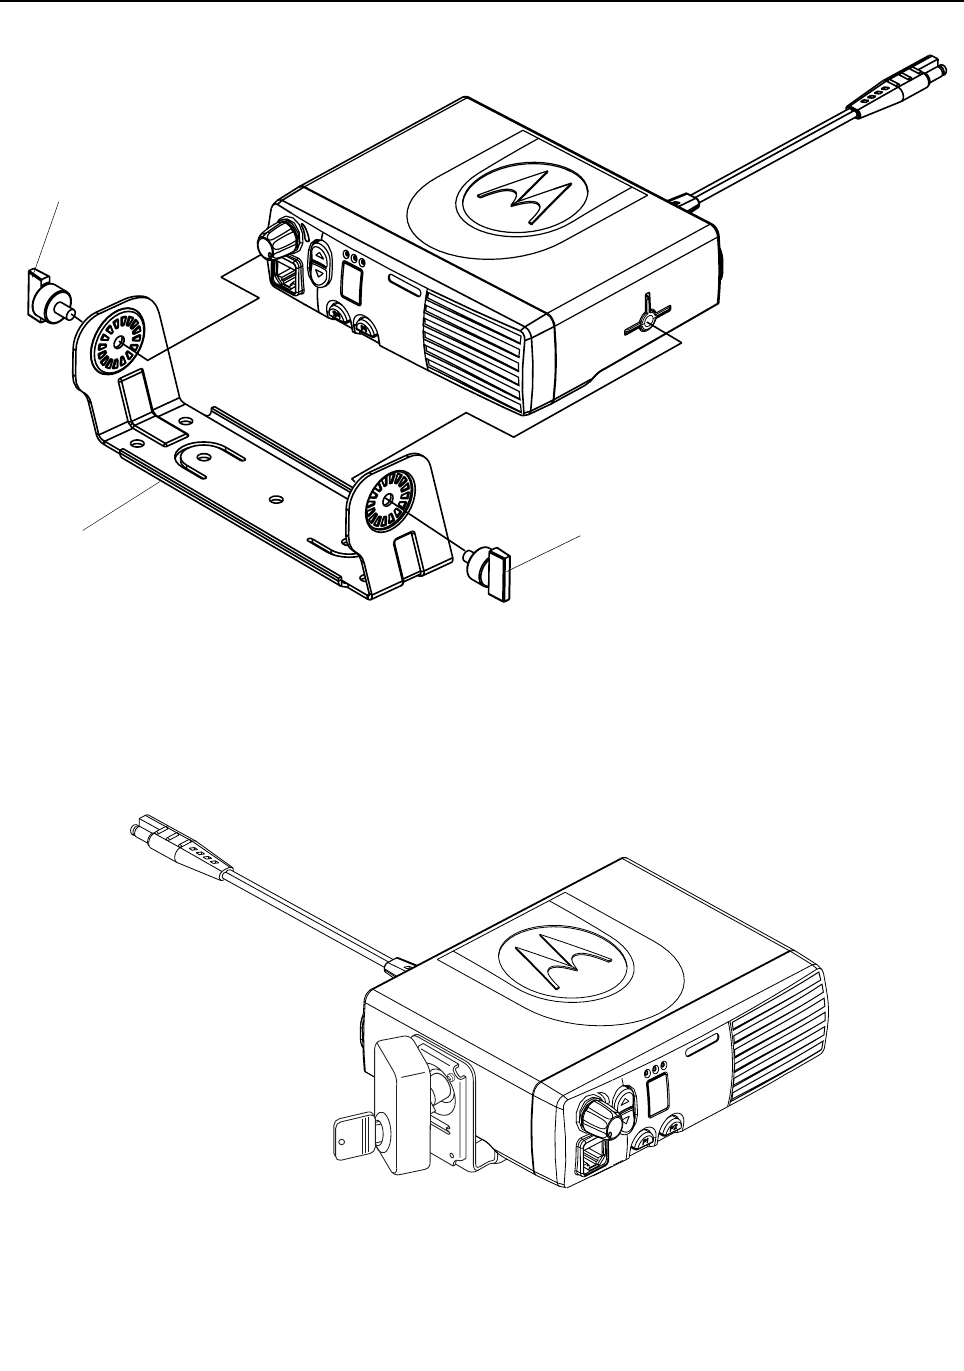
Trunnion Installation 7
Figure 3-2. Radio into Trunnion
Thumb Screw
Thumb Screw
Trunnion
FL0830329O
Figure 3-3. Locking Mounting Bracket (RLN4779)

8
Chapter 4
Antenna Installation
4.1 Antenna Installation and Compliance with Radio Frequency (RF)
Energy Safety Standards
4.2 Selecting an Antenna Site/Location on a Metal Body Vehicle
1. External installation – Check the requirements of the antenna supplier and install the vehicle
antenna external to a metal-body vehicle in accordance with those requirements.
2. Roof top – For optimum performance and compliance with RF Energy Safety standards, mount
the antenna in the center area of the roof.
3. Trunk lid – On some vehicles with clearly defined, flat trunk lids, the antennas of some radio
models (see restrictions below) can also be mounted on the center area of the trunk lid. For
vehicles without clearly defined, flat trunk lids (such as hatchback autos, sport utility vehicles, and
pick-up trucks), mount the antenna in the center area of the roof.
Before installing an antenna on the trunk lid,
• Be sure that the distance from the antenna location on the trunk lid will be at least 85cm (33
inches) from the front surface of the rear seat-back to assure compliance with RF Energy
Safety standards
• Ensure that the trunk lid is grounded by connecting grounding straps between the trunk lid
and the vehicle chassis
IF THESE CONDITIONS CANNOT BE SATISFIED, THEN MOUNT THE ANTENNA ON THE
ROOF TOP!
IMPORTANT
NOTE To assure optimum performance and compliance with RF Energy Safety
standards, this antenna installation guidelines and instructions are limited to
metal-body vehicles with appropriate ground planes and take into account the
potential exposure of backseat passengers and bystanders outside the
vehicle.
NOTE For mobile radios with rated power of 7 watts or less, the only installation restrictions
are to use only Motorola approved antennas and install the antenna externally on
metal body vehicles. For mobile radios with rated power greater than 7 watts, always
adhere to all the guidelines and restrictions in 4.2 below.
Antenna Installation 9
4. Mounting restrictions for certain radio models
For 40 Watt UHF models, the 1/4 wave antenna should be mounted only in the center area of
the roof, not on the trunk lid, to assure compliance with RF Energy Safety standards.
5. Ensure that the antenna cable can be easily routed to the radio. Route the antenna cable as far
away as possible from any vehicle electronic control units and associated wiring.
6. Check the antenna location for any electrical interference.
7. Make sure any other mobile radio antenna on this vehicle is at least 30.48cm (1 foot) away from
this antenna.
4.3 Antenna Installation Procedure
1. Mount the antenna according to the instructions provided with the antenna kit. Run the coaxial
cable to the radio mounting location. If necessary, cut off the excess cable and install the cable
connector.
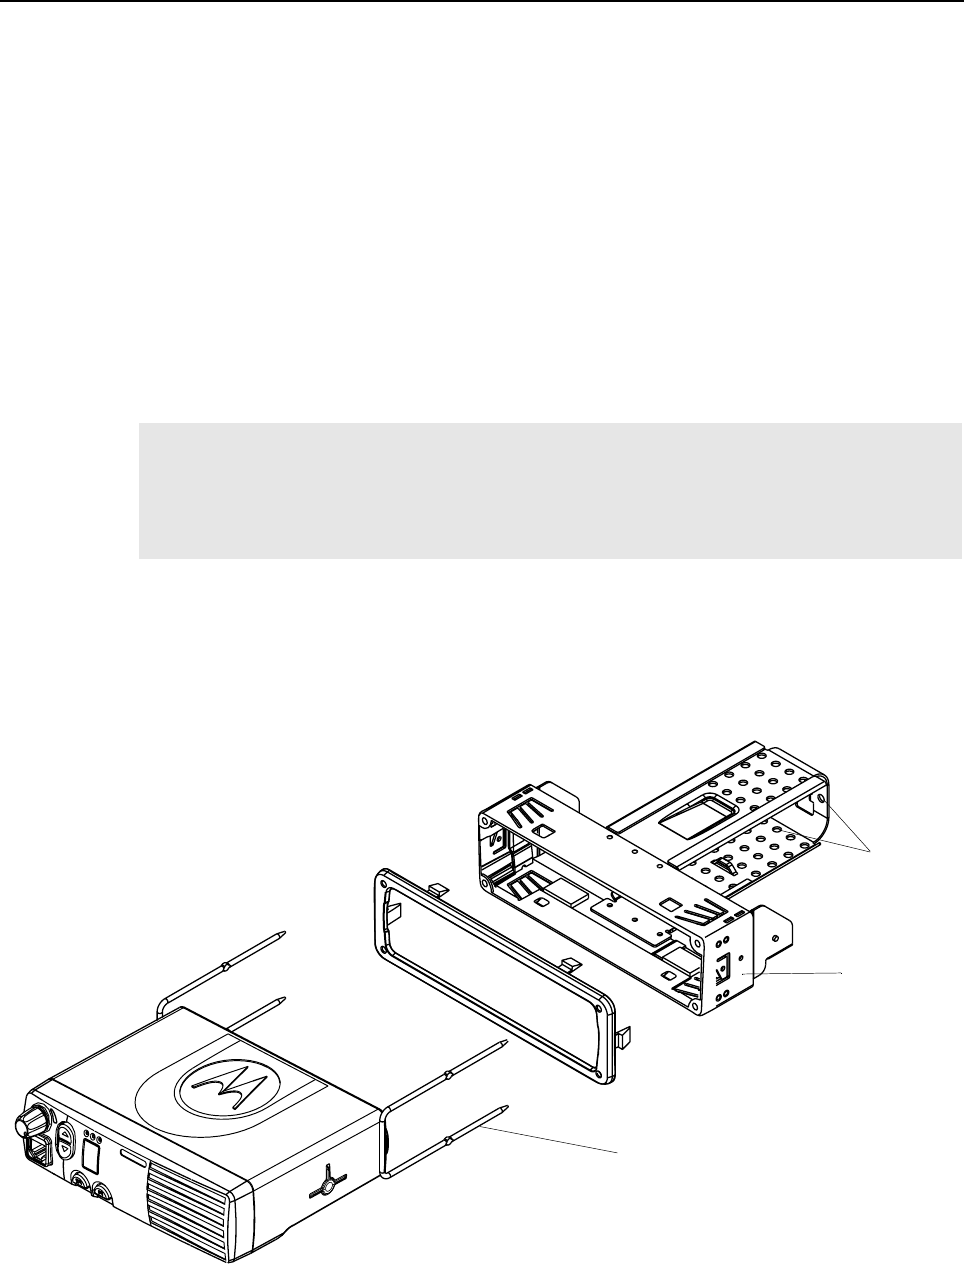
2. Connect the antenna cable connector to the radio antenna connector on the rear of the radio.
(See Figure 4-1.)
4.4 Completing the Installation
1. Mount the microphone clip to a convenient spot near your radio.
2. Your microphone has a telephone-type connector at the end of its cord. Plug the microphone into
the control head connector.
3. To complete your radio installation, plug the power cable into the radio power connector. (See
Figure 4-1.)
NOTE Any two metal pieces rubbing against each other (such as seat springs, shift levers,
trunk and hood lids, exhaust pipes, etc.) in close proximity to the antenna can cause
severe receiver interference.
Figure 4-1. Connections to the Back of Radio
Antenna
Connector
Connector
Housing
Accessory
Connector
Power
Connector
10
Chapter 5
Installation Options
5.1 Mobile Dashboard Mounting
5.1.1 Installing the Mounting Frame into the Dashboard
1. Open the radio cut-out in the dashboard to ISO 7736 specification (182mm x 53mm).
2. Insert the mounting frame into the dashboard cut-out and retain it by bending back the tabs (using
all 6 where possible). Check that the orientation of the frame is correct by ensuring that the word
"TOP" is facing upward.
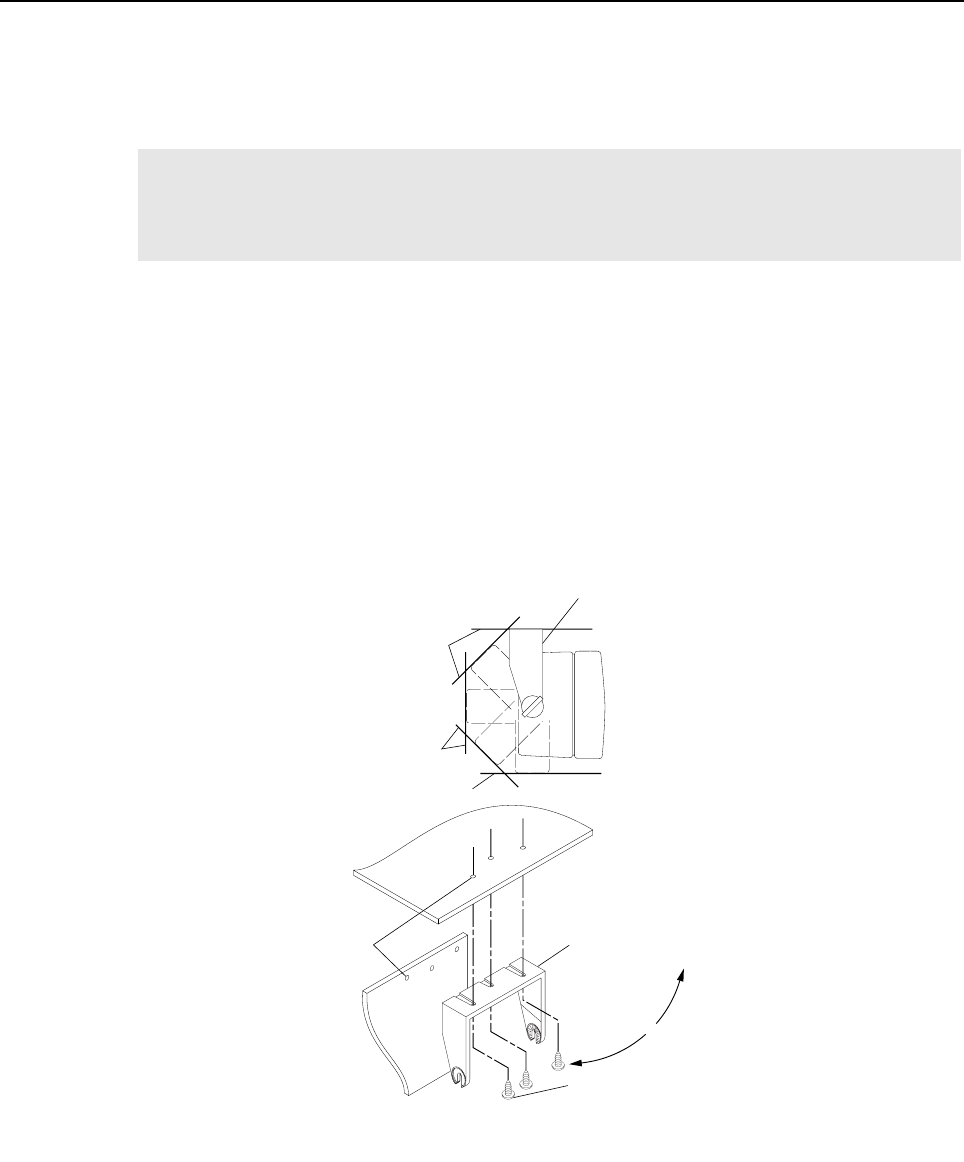
5.1.2 Inserting the Radio into the Mounting Frame (Figure 5.1)
1. Make the necessary connections to the radio for power, antenna, and accessory connector as
shown in Figure 4-1.
2. Plug in all the connectors and push the radio firmly into the mounting frame until the two springs
snap into place.
NOTE 1. The tabs are easily bent back by twisting a large flat-bladed screwdriver in the slot
behind the tabs.
2. For a more secure installation, the mounting frame should also be secured with a
minimum of one screw.
3. The demounting tool can be used as an aid to mounting as well as demounting.
TOP
Figure 5-1. Fitting the Radio into the Frame
Demounting Tool
DIN Mount
FTN6083
Fix screws here to
secure frame
Installation Options 11
5.1.3 Removing the Radio from the Mounting Frame
1. Push the two demounting tools through the openings in the mounting frame until the two springs
release the radio.
2. Slide out the radio.
5.2 External Speaker Installation
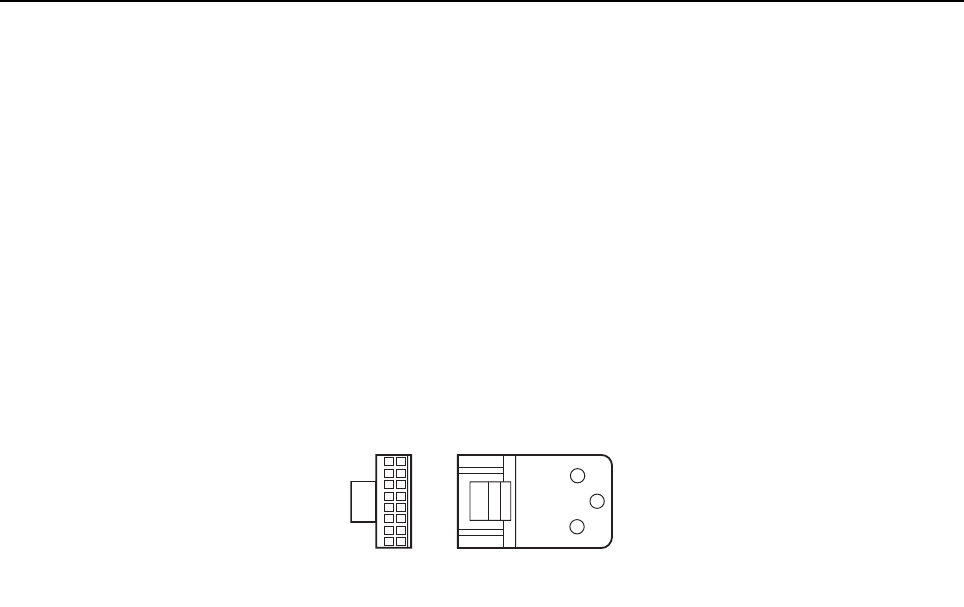
1. Remove the speaker from the trunnion bracket by loosening the two wing screws.
2. Choose a place to mount the speaker.
3. Use the trunnion bracket as a template to mark the locations of the three mounting holes.
4. Centerpunch and drill a 5/32-inch (4 mm) diameter hole at each location.
5. Mount the trunnion bracket with the screws supplied. (See Figure 5-2.)
6. Insert the speaker into the trunnion bracket and tighten the two wing screws.
7. Insert the external speaker accessory plug into the accessory connector of the radio.
NOTE 1. The fixing tabs should be checked for tightness each time the radio is removed.
The tabs are easily tightened by twisting a large flat-bladed screwdriver in the slot
behind the tabs.
2. The mounting frame is not designed for regular mounting and demounting.
Figure 5-2. Mounting the Speaker Under the Dashboard
Dashboard
Firewall
Trunnion Bracket
To
Firewall
Mounting
or
Dashboard
Firewall
10-16 x 5/8’’
Self-Tapping
Screw
0.157’’ (0.399cm)
Diameter
Trunnion
Bracket
Console or Floor
FL0830253O
12 Installation Options
5.3 Visor Microphone Installation
1. Carefully select the installation location for the visor-mounted microphone. Achieve optimum
performance of the microphone’s hands-free circuitry by mounting the microphone in one of two
locations:
• on the sun-visor directly above the driver, or
• on the headliner just above the driver.
The microphone should never be mounted near the window or in a place where the road and ambient
background noise would be substantially high (above 85 dB SPL).
5.3.1 Connecting to the Mobile Radio
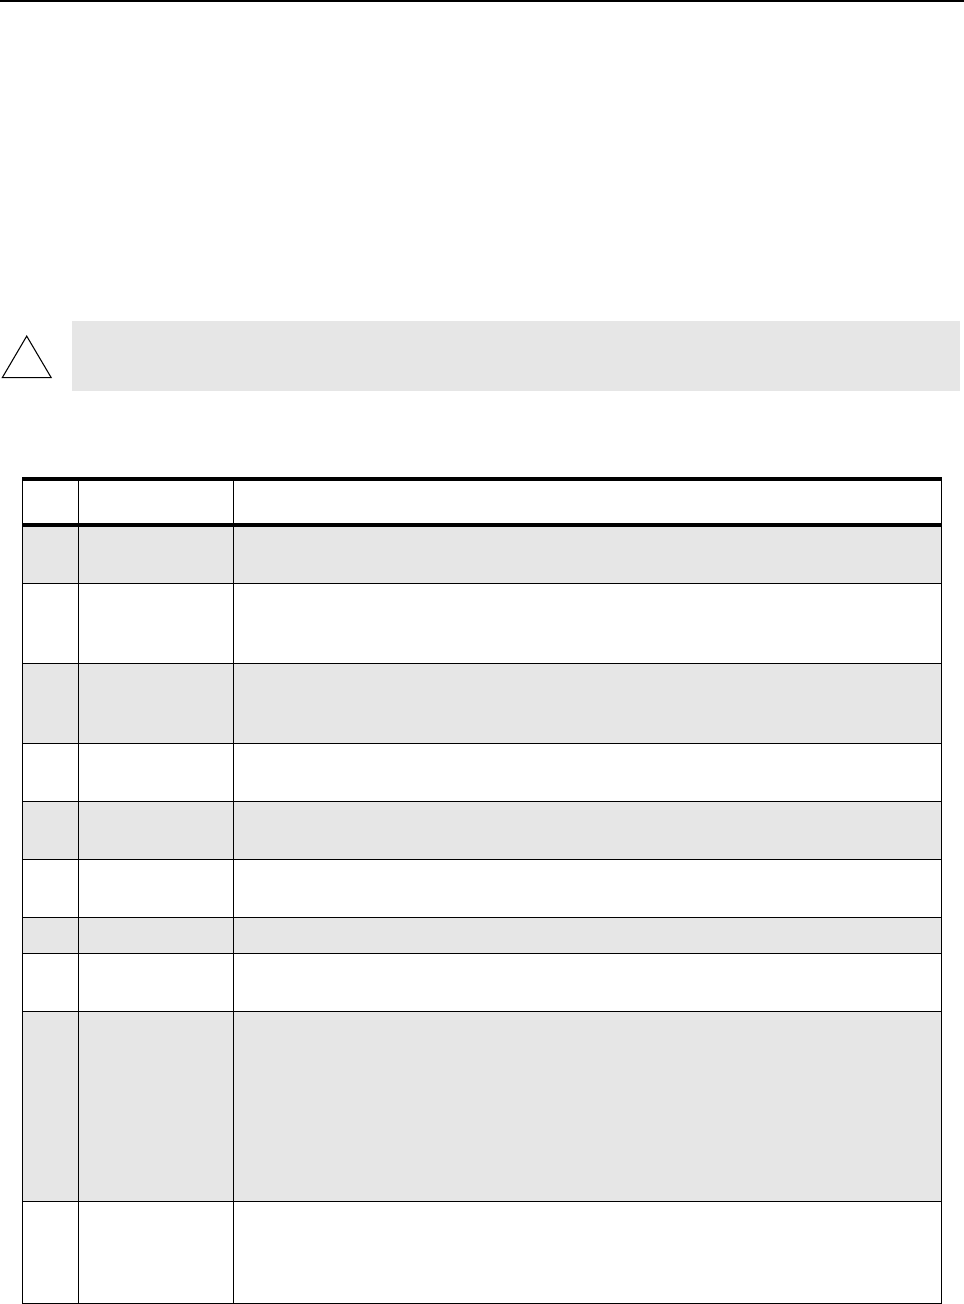
The visor-mounted microphone cable connects to a 16-pin connector block (part of the hardware
supplied): one wire connects to pin 2, and the other wire connects to pin 7 (Figure 5.3).
Figure 5-3. 16-Pin Connector Block
12
15 16
FL0830257O
Viewed from Backside
Accessory Connections 13
Chapter 6
Accessory Connections
6.1 Accessory Connector Pin Functions
This section gives a description of the accessory connector pin functions.
CAUTION: The accessory connections shown are not compatible to some other models of Motorola radios.
Check the appropriate accessory or technical manual for further information.
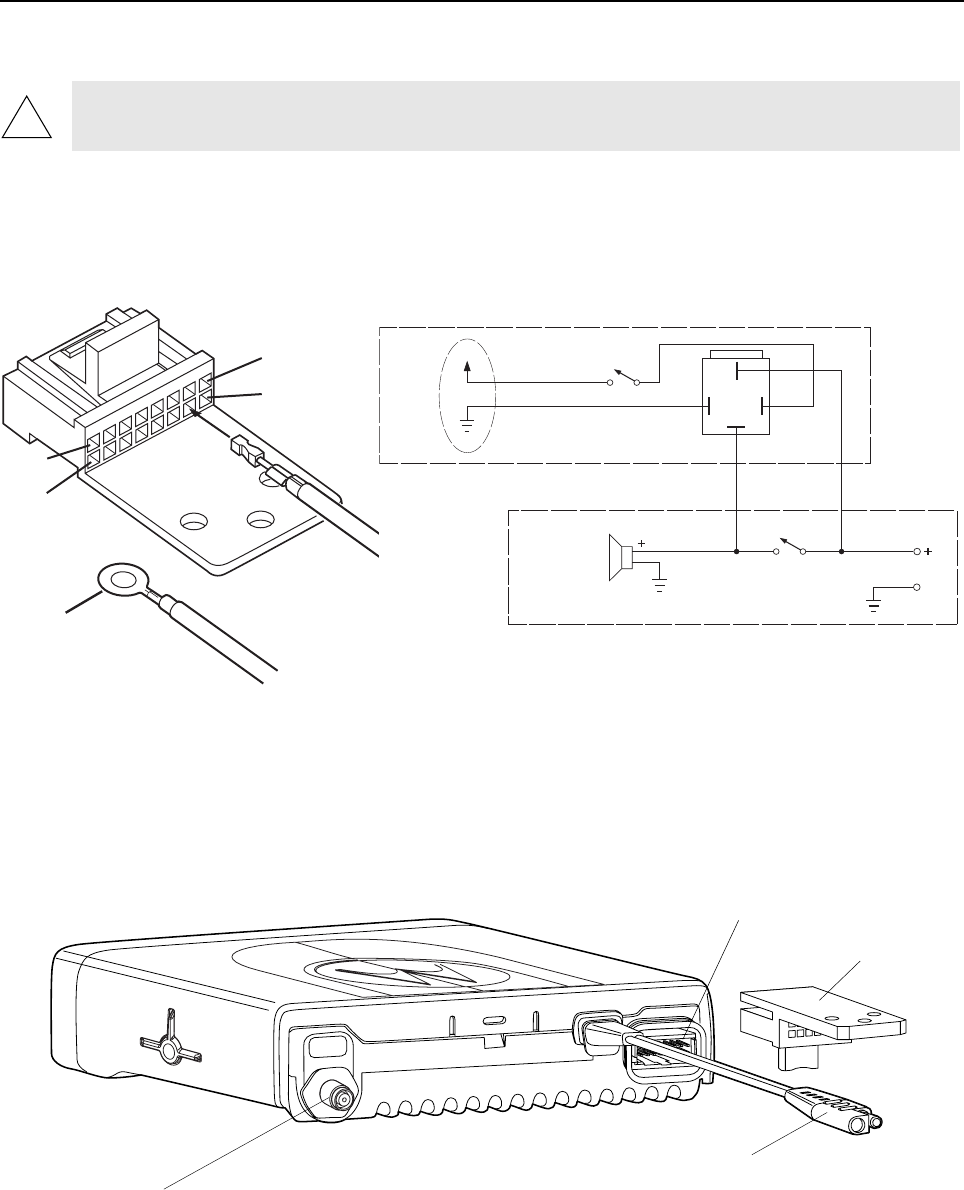
Table 6-1: Connector Pin Functions
Pin Function Description
1External
Speaker (-) Connect external 8 or 4 Ohm speaker to pins 1 and 16.
CAUTION: Bridge-type output. Neither pin 1 nor 16 is Ground.
2 External Mic
Audio Input impedance: 500 Ohms.
80 mV rms at 1 kHz for 60% deviation.
This path is enabled when external mic PTT is keyed.
3External Mic
PTT Put this pin low (less than 0.66 V dc) to key transmitter and enable external mic audio
path. This pin is pulled low via a diode when front panel mic PTT is pulled low to allow
sensing of mic PTT by accessory. This pin is pulled high to 3.3 V dc via 3.3 k Ohms.
4 Programmable
Output Defaults to External Alarm. Provides an active high to 13.8 V dc battery supply. Maxi-
mum current: 0.25 amps.
5Flat_TX_Audio
Input Input impedance: Greater than 35 k Ohms. The nominal input level is 150 mV rms for
60% deviation.
6 SCI Serial Communication Interface (for configuration of this pin as General Purpose Input,
in addition to pins 8, 12, and 14, return the radio to an authorized service center).
7Ground Used as ground.
8 Programmable
I/O Input or output.
9Emergency
Input When connecting the Emergency Footswitch between pin 9 and pin 7, the radio will
sense the connection upon Power Up.
Shorting this pin to Ground by pressing the switch when the radio is OFF, turns ON the
radio in Emergency Mode.
Shorting this pin to Ground by pressing the switch when the radio is ON, activates
Emergency Mode.
To turn OFF a radio that was turned ON by the Emergency Footswitch (ON/OFF knob
in the OFF position) turn the knob to the ON position and then to the OFF position.
10 Ignition Sense For optional 3-wire ignition control, connect this pin to the vehicle ignition-controlled
voltage source for ignition-controlled radio ON/OFF.
To resume NON ignition state, remove the battery connection for 10 seconds; remove
the ignition connection from this pin and reconnect the battery connection.
!

14 Accessory Connections
11 Receiver Audio
Output Programmable (using CPS in the Rx Audio Type): 660 mV rms (de-emphasized/
muted) or 330 mV rms (non-de-emphasized/unmuted) at 60% deviation at 1 kHz.
Default is de-emphasized/ muted. Minimum load resistance: 5 k Ohms..
12 Programmable
I/O Input or output.
13 Switched B+ (Switched Battery Voltage) 13.8 Vdc (500 mA max.) when radio is ON.
14 Programmable
I/O Input or output.
15 Internal Speaker Connected to internal speaker (+) and by internal jumper to pin 16.
16 External
Speaker (+) Connect external 8 or 4 Ohm speaker to pins 1 and 16.
CAUTION: Bridge-type output. Neither pin 1 nor 16 is Ground.
Table 6-1: Connector Pin Functions
Pin Function Description
Accessory Connections 15
6.2 Connection Plan for Accessories
1. Plug the lead with the crimped-on terminal into the #4 socket of the accessory plug. (See Figure
6-1a).
2. Screw the circular terminal into the vehicle chassis.
3. Make all remaining wiring connections per wiring diagram. (See Figure 6-1b).
CAUTION: Do Not short pin 1, 13, or 16 on the accessory connector to Ground; this may damage the
radio.
Figure 6-2. Accessory Connector
!
To Vehicle
Chassis
(Blk)
MAEPF-22954-O
#1
#2
#16 #4
#15
J3-4
Red/Wht
Blk
External Alarm
On-Off Switch
Relay
(Bottom View)
Alarm Device
(Horn or Lights) Horn Relay Contacts
or Light Switch To Vehicle
Battery
Existing Vehicle Wiring
External Alarm Relay Kit
MAEPF-23082-A
Figure 6-1. HLN9328 External Alarm Configuration
a. accessory plug b. wiring diagram.
Antenna
Connector
Connector
Housing
Accessory
Connector
Power
Connector

16
Chapter 7
Noise Sources
7.1 Introduction
Electrical noise generated by the electrical system of a vehicle, as well as local ambient noise, can
interfere with normal operation of mobile radios. Satisfactory operation of a mobile radio may require
slight or heavy noise reduction, depending upon the relative strength of the radio signal, and upon the
ability of the radio to reject undesired noise. These requirements vary from one vehicle to another,
depending upon the vehicle type and required coverage area. When operating in a strong signal area,
a certain amount of noise interference can be tolerated. In weak signal areas, however, noise
reduction becomes very important. As a rule of thumb, noise levels create greatest interference in the
25-50 MHz band and reduce with increasing frequency.
Before attempting any noise reduction procedures, determine the noise source(s). Then, follow a
logical, systematic method of elimination until the interference is eliminated or reduced to an
acceptable level.
Care and patience must be exercised in locating and eliminating noise sources. There may be several
sources of noise, each slightly stronger or weaker than the other. Elimination of one source may seem
ineffective because another noise source remains active at a barely discernible difference in level.
Consult a service manual for the vehicle to determine what noise reduction provisions the
manufacturer applies when AM, AM/FM, or CB radios are installed as original equipment. These
radios are also subject to electrical noise interference, and the manufacturer may install noise
suppression components only upon those vehicles which require radio equipment at the time of
manufacture. These noise suppression components should be added in any first attempt to suppress
noise.
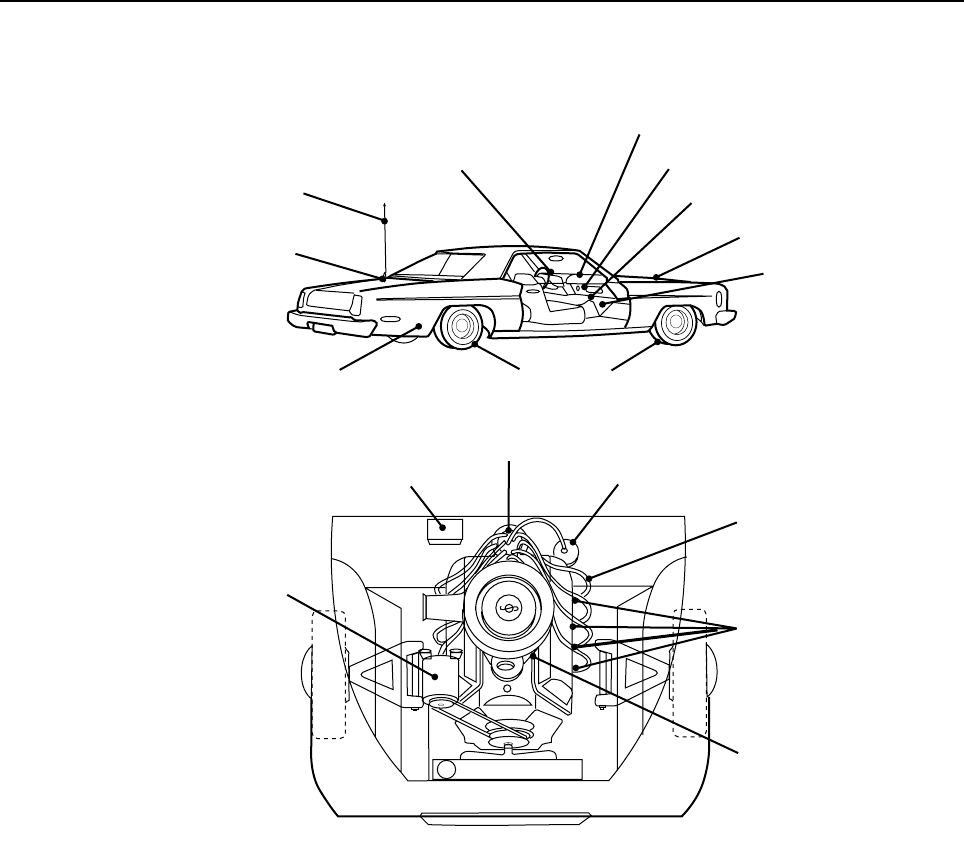
The three major noise sources affecting mobile radio systems are: (1) radiated noise, (2) conducted
noise, and (3) induced noise. (See Figure 7-1 for typical vehicular noise sources.)
7.2 Radiated Noise
Radiated noise enters the radio through the antenna along with the desired signal and can block or
degrade desired communication. It can be generated by power lines, fluorescent lights, or by
electrical discharges from static build-up, ignition systems, or electrical motors. Radiated noise is the
most common cause of mobile radio interference.
When a spark discharge or arc takes place through air, energy is radiated at frequencies from a few
kilohertz to hundreds of megahertz. This spurious radiation may have some energy radiated at a
frequency near or even identical to the desired radio signal. The standard receiver may be unable to
distinguish between the two signals (desired and noise). Therefore they both enter the receiver,
resulting in degradation of the desired signal.
CAUTION: Do not add interference elimination equipment to vehicles equipped with
electronic ignition systems before obtaining advice from the vehicle manufacturer. Addition
of some noise suppression components may interfere with proper operation of electronic
ignition systems and could seriously damage them.
!
Noise Sources 17
It is impractical to prevent all arcing in the standard vehicle electrical system. In an 8-cylinder engine
running at 2,000 RPM, arcing occurs across the spark plugs at a rate of 8,000 sparks per minute or
133 sparks per second. Electrical motors and generators also produce arcs.
7.3 Conducted Noise
Conducted noise enters the radio through the points where the radio is attached to the vehicle’s
electrical system such as battery cables, ignition switch, chassis ground etc. It can be generated by
electrical transients, electrical motors, poor grounding points, or inadequate electrical system filtering
(from alternators, generators, voltage regulators, or weak batteries). Conducted noise can degrade
both transmit and receive performance of a mobile radio.
7.4 Induced Noise
Induced noise enters the radio through the proximity of radio wiring to other wiring in the vehicle.
Electrical currents through the standard vehicular wiring can induce undesirable noise signals into the
radio cabling. Communication is degraded simply because the wiring provides a transformer-type
coupling action without any actual physical connection. Induced noise can degrade both transmit and
receive performance of a mobile radio.
Figure 7-1. Noise Sources
Spark Plugs
Idle Stop
Solenoid
FL0830260-O
Spark Plug
Wires
Alternator or
Generator
Voltage
Regulator Distributor Ignition
Coil
Wheel Static
Electric Fuel Pump
Antenna Ground
or Location
Radiated Noise Pick-up
Inadequate Terminal
or Fuse Block Filtering Windshield Wiper Motor
Heater Air Conditioner Blower
Electric Windows Motors
Hood Static
Power Seat Motor
18
Chapter 8
Operation of a Conventional Ignition System
8.1 Introduction
To effectively reduce ignition interference in a vehicle, it is necessary to understand the operation of
an automobile ignition system.
Ignition is necessary in a gasoline engine to ignite the gasoline vapor and the air mixture in its
cylinders. The system is made up of the battery, distributor, breaker points, coil, condenser, and spark
plugs. The battery is the only electrical source of power in an automobile, so the lower battery voltage
must be stepped up to the high voltage necessary to arc across the spark plug electrodes. This arc
ignites the gas mixture.
8.2 Sources of Ignition Interference
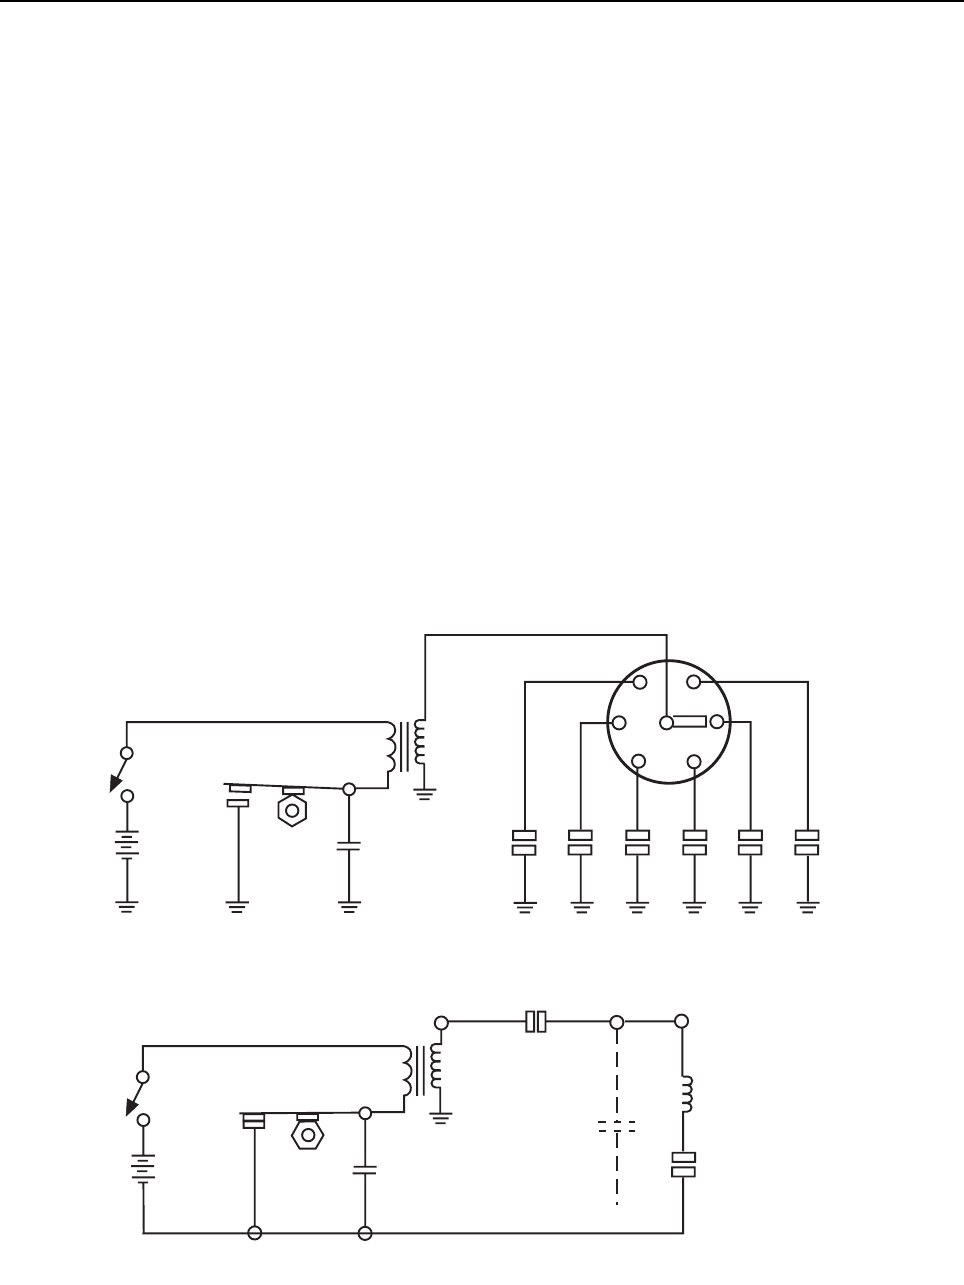
In the conventional ignition system (Figure 8-1) a mechanical circuit breaker (the cam and points in
the distributor) opens the primary circuit of the ignition coil, and high voltage is developed at the
secondary. This high voltage is synchronized and applied to each spark plug by the distributor.
Figure 8-1. Typical Vehicular Ignition System, Simplified Schematic Diagram
HV Lead
Distributor
Spark plug leads
Spark
Plugs
Ignition
Coil
Condenser
Cam
Breaker
Points
Ignition
Switch
Battery
Ignition
Coil
Condenser
Stray
Capacitance
Cam
Breaker
Points
Ignition
Switch
Battery
Rotor Gap
Lead Inductance
Spark Plug Gap
FL0830261-O

Operation of a Conventional Ignition System 19
The battery is connected to the primary winding of the coil through the ignition switch. The primary
circuit is returned to the battery through the breaker points, which are bypassed by the condenser.
The points are normally closed. As the cam shaft is rotated by the engine, it’s lobes or corners open
and close the points in proper synchronization with the piston in each cylinder.
With the ignition switch on and the breaker points closed, coil primary current builds up at a rate
determined by the coil inductance.
When the breaker points open, primary current decreases and, by self-induction, an electromotive
force is induced in the primary which is many times greater than the battery voltage. The high voltage
inducted in the coil secondary causes a spark across the distributor rotor-to-spark plug wire gap and
then across the spark plug gap for a short interval of time when the breaker points open. The
condenser reduces arcing of the points.
The secondary circuit of the ignition coil, including the distributor rotor gap and the spark gap, is the
main source of ignition interference. The lead inductance and stray capacitance provide a tuned
circuit. Because the discharge of the circuit is through a low resistance (ionized spark gap), the circuit
tends to oscillate. The frequency and amplitude of oscillation vary as current changes in the spark
gap.
20
Chapter 9
Detection of Noise Sources
9.1 Noise Detection Procedure
Detection of offending noise sources is the heart of noise suppression because, after the noise
source is identified, the solution becomes obvious. A logical step-by-step procedure is basic to
effective noise suppression.
Use your available equipment to best advantage. A pick-up loop, about one inch in diameter, can be
connected to a portable CB radio or a mobile radio being operated at a frequency similar to the
installed radio frequency but from an isolated supply voltage. The pick-up loop can be moved
throughout the vehicle with the radio used as a radiated noise detector. Be sure the pick-up loop has
sufficient insulation to prevent the input of the radio from coming into direct contact with high voltage
points in the vehicle ignition system.
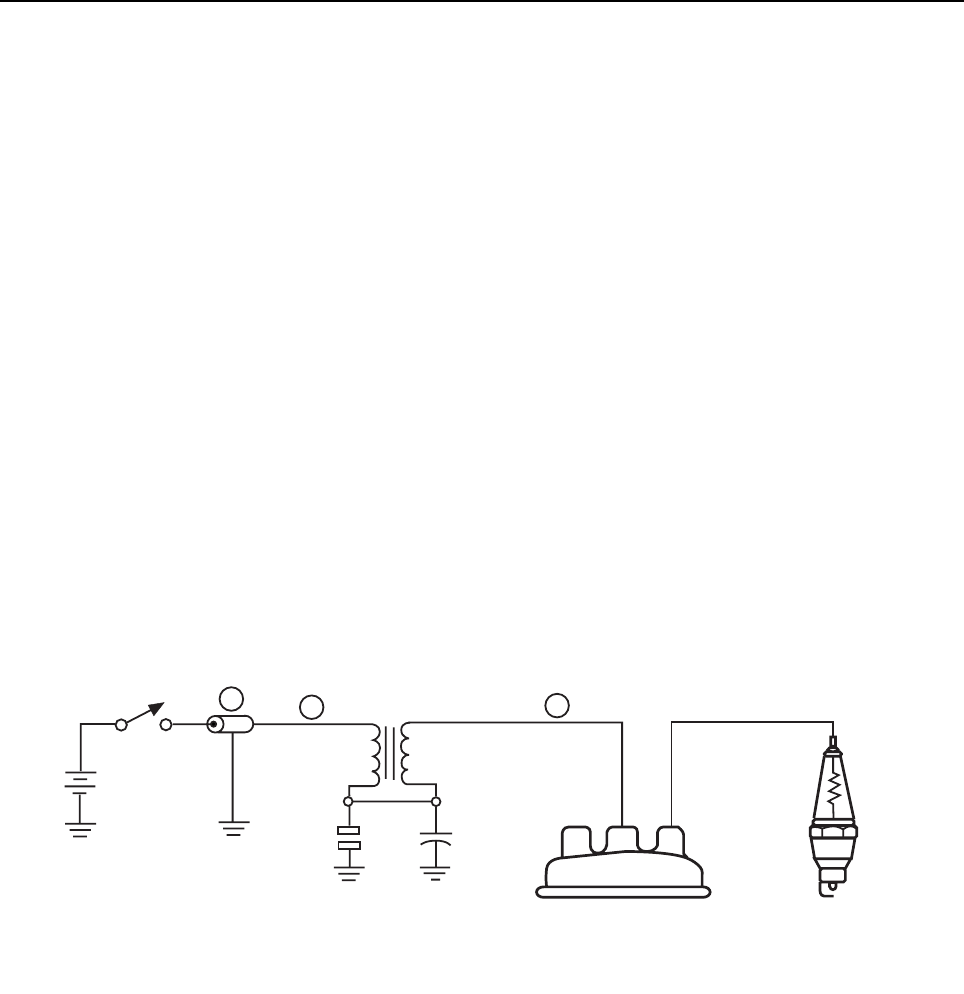
A non-polarized bypass capacitor, which has alligator clips firmly attached, can be used on a trial-
and-error basis to locate wiring which needs additional filtering. Keep capacitor lead lengths short for
best suppression. Ceramic disc capacitors are not as suitable or effective as automotive coaxial
capacitors. (See Figure 9-1for part numbers.)
Figure 9-1. RLN5277 Noise Reduction Kit for Alternator-Equipped Vehicles
Ignition
Switch
Battery
Ignition
Coil
Distributor
Breaker
Points
Resistive Wire
(Note 2)
Resistor
Spark Plugs
(Note 2)
Notes:
1. Noise reduction can only be achieved if components are grounded properly.
2. Items not supplied in kit. See auto parts dealer.
1
23
FL0830262-O

Detection of Noise Sources 21
9.2 Sources of Noise
Some interference is due to geographic location. This interference does not need to be eliminated
since it is possible for the vehicle to be moved away from the interfering noise source. Noise from
power lines, fluorescent lights, and other vehicles (emitting high levels of radiated noise) are
examples of noise which depend upon location. Make certain that you are not attempting to suppress
noise in a vehicle while it is in a noisy location. If you suspect that your location is noisy, simply turn off
everything in the vehicle except the radio and listen to the remaining ambient noise. If the noise level
is objectionable, you may have to noise suppress the vehicle during a less noisy time of day or in a
different, quieter location.
Check the installed radio for conducted and inducted noise by using an unmodulated signal generator
to supply a clean RF signal through a coaxial cable directly to the antenna connector on the radio set.
This should prevent radiated noise from entering the receiver and masking conducted and induced
noise. Make certain that the signal generator is not microphonic and is placed away from the noise of
the engine and exhaust.
Operate the controls for fans, blowers, power windows, headlamps, turn signals, windshield wipers,
and other electrical accessories. Listen for the presence of noise in the received radio signal. This will
allow the source of the interference to be determined. Some noise sources cannot be turned on and
off at will. These sources will need to be attacked piecemeal on a trial and error basis: alternator
whine, voltage regulators, electric fuel pump, and other possible sources. Remember that induced
noise can result from radio wiring being too close to other vehicle wiring. This problem is most easily
solved by proper cable routing at the time of installation.
Radiated noise must be attacked after conducted and induced noise has been satisfactorily
suppressed. The vehicle ignition system is usually the primary source of this interference.
Antenna placement can be critical in some installations. Remember that static discharge generates
static or radiated noise and will probably be generated only when the vehicle is in motion.
Since radiated noise interference is most noticeable in weak signal areas, it is suggested that
suppression be finalized while listening to a weak “on frequency” signal. (The squelch should be
“open” so that even marginal signals can be heard.)

22
Chapter 10
Noise Reduction Techniques
10.1 General
There are three basic ways to suppress noise. The first is the addition of resistance in circuits subject
to ringing. This method is used for the ignition coil HV cable, spark plug wires, and spark plugs. The
second is to filter noise from low voltage wiring using coaxial bypass capacitors. The third is to control
static charge build-up using wipers for movable parts such as automobile hoods and trunk lids, or
flexible bonding leads for fixed members. Static in wheels may also be controlled using collector rings.
Applications of each of these techniques are discussed below.
The vehicle manufacturer’s service manual may also provide noise suppression information which is
valuable in any first attempt at noise suppression.
10.2 Ignition System Interference
10.2.1 Engine Maintenance and Tune-Up
The most important step in reducing ignition noise is ensuring that the engine is in proper tune. Pay
particular attention to the following points if the noise interference from the ignition system is severe:
1. Be sure the spark plugs distributor points, and condenser are in good condition.
2. Be sure ignition timing is properly adjusted.
3. Be sure the distributor cap and rotor are in good condition. They should be replaced at least every
30,000 miles.
4. Be sure that spark plug wires make good, solid contact at each end and are routed as far as
possible from low voltage leads.
5. Many late-model automobiles are equipped with a shield over the distributor points. Check to see
that this shield is properly positioned and securely attached.
10.2.2 Available Noise Reduction Kits
Motorola offers one noise reduction kit: Model TLN5277 for alternator-equipped vehicles. This kit is for
suppression of noise in the primary and secondary of the ignition coil and for bleeding of static
charges on the hood. The TLN5277 also is used to suppress noise from the generator and voltage
regulator. Figure 9-1, on page 20 illustrates the kit’s usage.
Most auto parts dealers can supply 0.05 µF bypass capacitors (condensers), resistive ignition wires,
and resistor spark plugs. The type of spark suppression used in noise reduction should always be in
accordance with the recommendations of the vehicle manufacturer, that is, if spark plugs are to be
replaced with built-in suppressor types, they should be in the proper heat ranges and thread sizes for
the particular engine. In each ignition system, there is a maximum amount of resistance that may be
connected between the distributor and a spark plug. If resistance-type ignition wire is used, the length
of each wire must be limited so that its resistance does not exceed the allowable maximum.
Noise Reduction Techniques 23
10.2.3 Ignition Coil Interference
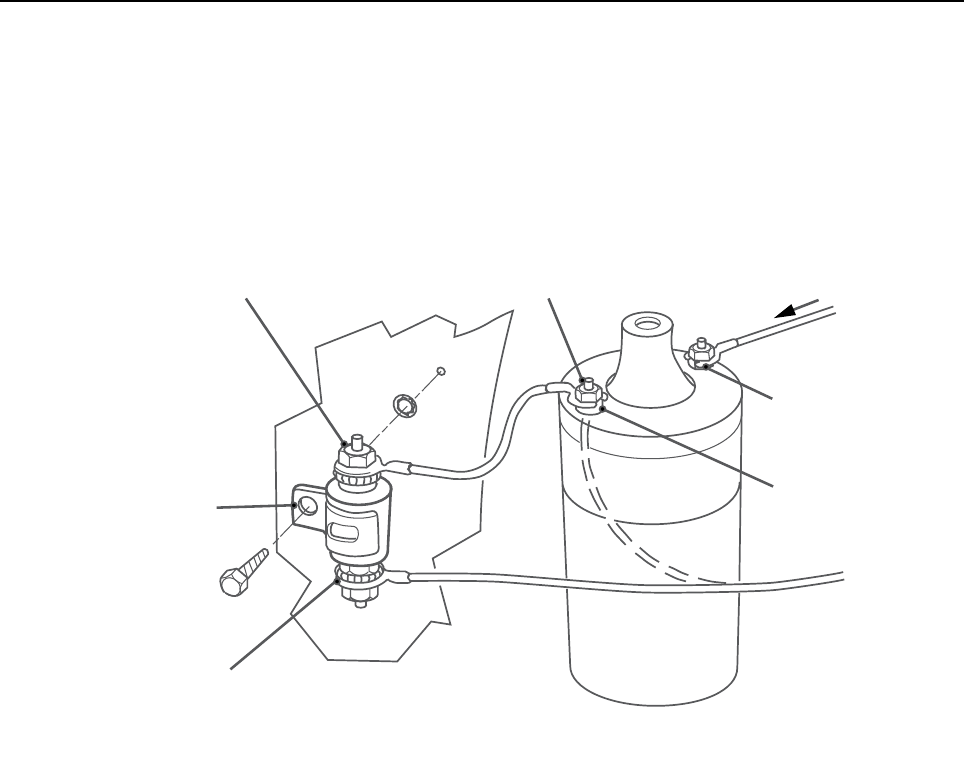
This type of interference is characterized by a popping sound which is most noticeable when the
engine is running slowly. To suppress the noise, connect a 0.1 µF coaxial capacitor (Motorola Part No.
0882571B02) from the battery side of the ignition coil to vehicle ground (see Figure Figure 10-1). This
keeps the distributor noise from being conducted through the battery lead into the electrical system of
the vehicle. Note that some electronic ignition systems do not route the battery lead to the ignition
coil; proper operation of the ignition system can be impaired if the ”input” terminal is bypassed.
10.2.4 Distributor Interference
This type of interference is characterized by popping sounds which are present at all engine speeds.
It is caused by sparking between the rotor and the distributor cap inserts as the rotor turns. To
suppress this noise, use resistance ignition wire to connect the ignition coil to the distributor cap.
10.2.5 Battery Connections
The radio set power cable can pick up noise generated in the vehicle. This can be minimized by
connecting the power cable directly to the battery instead of the fuse block. The battery acts like a
large capacitor (about one Farad for a 50 amp/hour battery), which bypasses induced noise. The
battery ground lead should be securely bonded to the vehicle frame. Undesirable parallel ground
currents can be minimized by using the vehicle frame as a common ground point. If ignition switch
control of the radio is desired, the radio power leads may be connected to the battery through a relay
which is controlled by the ignition switch.
Figure 10-1. Ignition Coil Noise Suppression
Step 3.
Connect wire lead to capacitor
using lockwasher and nut.
Step 1.
Mount Capacitor
(0.1 F Coaxial Type)
to vehicle chassis
using lockwasher
and self-tapping screw.
Step 2.
Disconnect wire (dashed)
from battery post and
connect to capacitor using
lockwasher and nut.
Step 4.
Connect capacitor
lead to battery post. From distributor
Distributor Post
Battery Post
FL0830264-O
24 Noise Reduction Techniques
10.3 Alternator
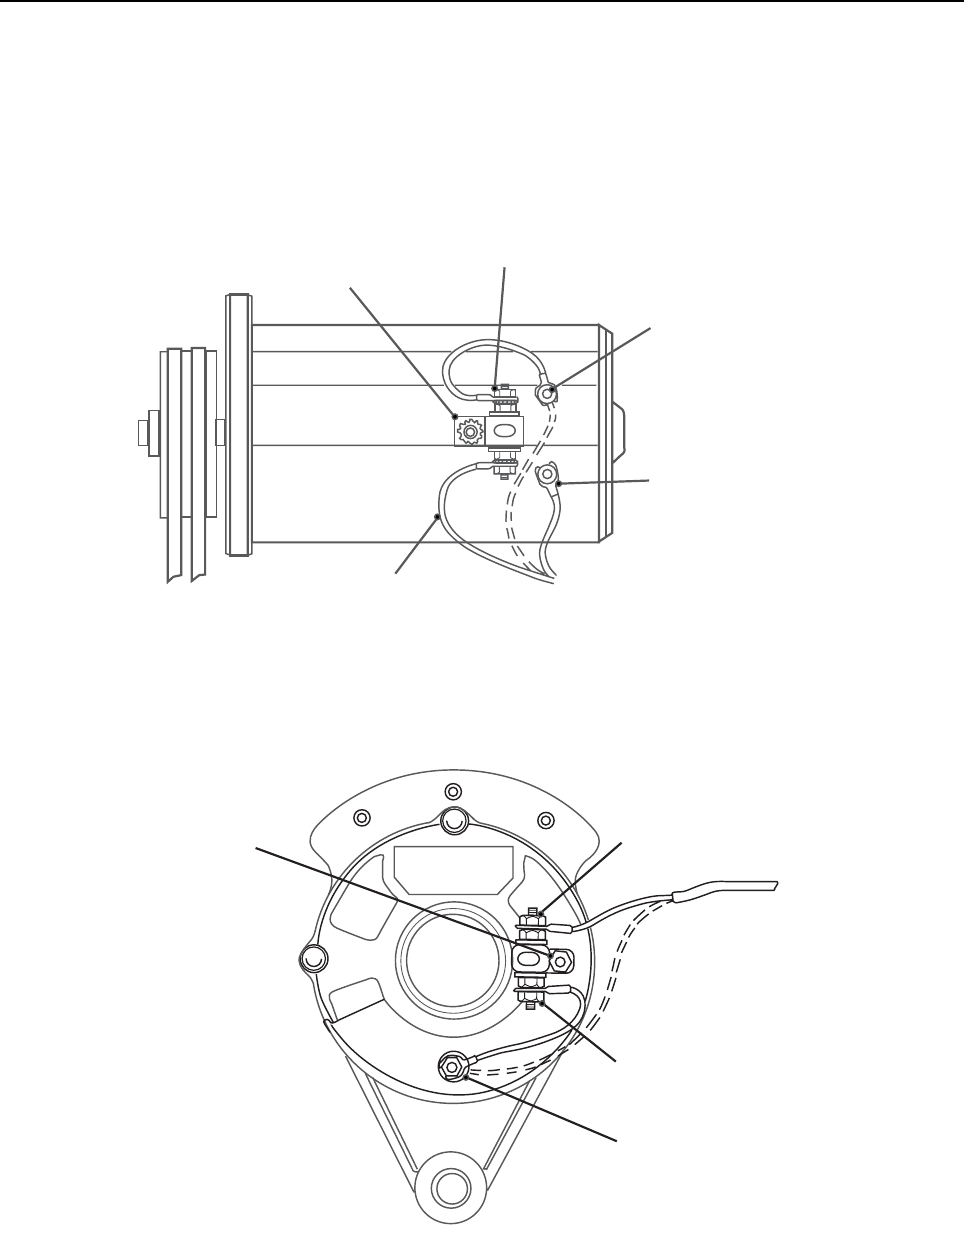
This type of interference is characterized by a high-pitched whine which varies with engine speed. A
0.5 µF coaxial capacitor (Motorola Part No. 0882571B01) can be used to bypass the whine. For
generators, the capacitors is connected in the armature lead. Never use a capacitor in the field lead.
Use the field suppressor assembly supplied in the TLN5277 Noise Reduction Kit. For alternators, the
capacitor is connected in the lead to the battery post (see Figures 10-2 and 10-3).
Figure 10-2. Generator Whine Suppression
Figure 10-3. Alternator Whine Suppression
Step 1.
Mount Capacitor
(0.5 F Coaxial Type)
under generator ground screw.
Step 3.
Connect wire lead to capacitor
using lockwasher and nut.
Step 4.
Connect capacitor
lead to armature post.
Caution:
Do not connect
capacitor to field teminal.
Step 2.
Disconnect wire (dashed)
from armature post and
connect to capacitor using
lockwasher and nut.
FL0830310-O
Step 1.
Mount Capacitor to
(0.5 F Coaxial Type)
under alternator
ground screw.
Step 2.
Disconnect wire from
battery post and connect
to capacitor using
lockwasher and nut.
Step 3.
Connect wire lead to capacitor
using lockwasher and nut.
Step 4.
Connect capacitor
lead to battery post.
Caution:
Do not connect
capacitor to field terminal.
FL0830311-O
Noise Reduction Techniques 25
10.4 Voltage Regulator Noise
This type of interference is characterized by erratic popping noises which change only slightly with
changes in engine speed. The noise is generated by arcing in the vibrating breaker contacts of the
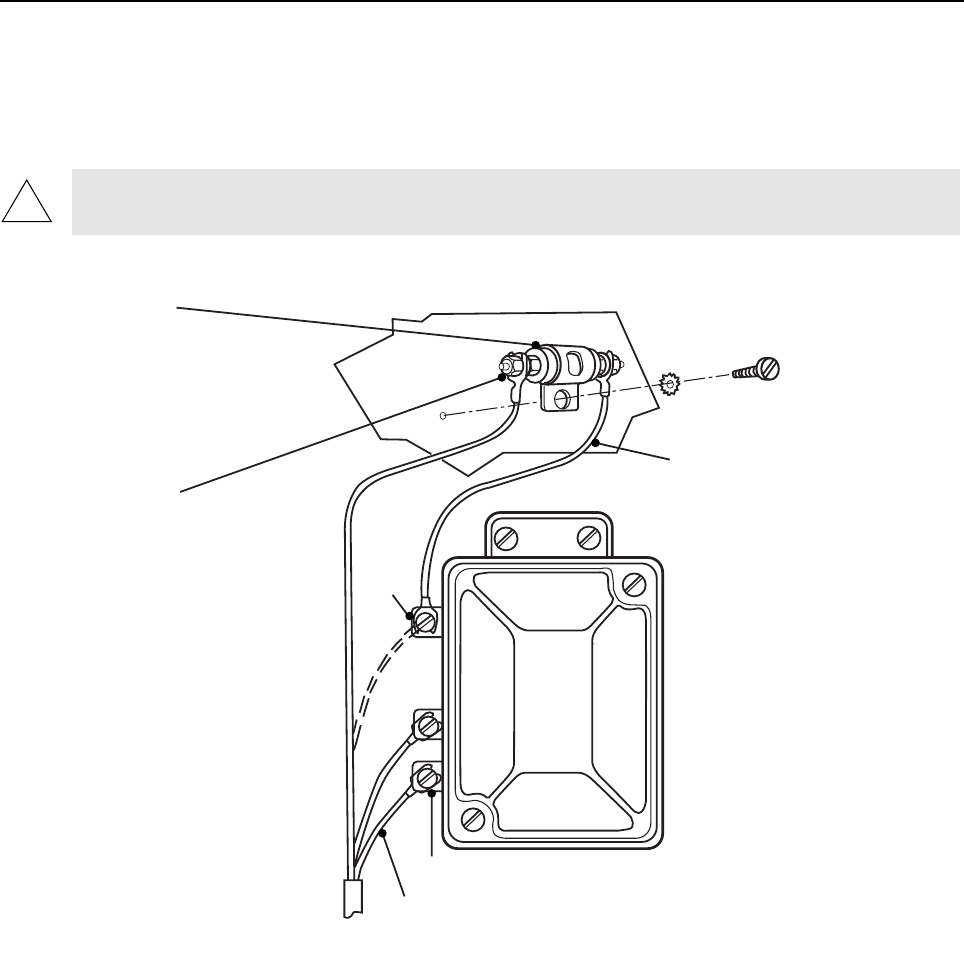
voltage regulator. It can be suppressed by connecting a 0.5 µF coaxial capacitor (Motorola Part No.
0882571B01) in the battery and armature leads of the voltage regulator (see Figure 10-4).
10.5 Hood and Trunk Lid Noise
This type of noise is characterized by irregular popping sounds. It is caused by friction in poorly
bonded automobile hoods or trunk lids. This friction causes static electricity to build up until arcing
occurs. This type of noise is suppressed using a Motorola Hood Wipers and Mounting Hardware Kit
(part of the TLN5277 Noise Reduction Kit) which provides electrical bonding of the hood or trunk to
the vehicle body while permitting them to be opened.
10.6 Other Electrical Noises
Other elements of the electrical system which can generate noise are listed below. These can be
suppressed by connecting a 0.5 µF bypass capacitor between the noise source and ground.
1. Ammeter-to-battery lead
2. Gauges (oil, fuel, temperature)
CAUTION: Disconnect the battery ground terminal before attempting to connect components
to the voltage regulator.
Figure 10-4. Voltage Regulator Noise Suppression
!
FL0830265-O
Step 1.
Mount Capacitor
(0.5 F Coaxial Type)
to vehicle chassis
using lockwasher and
self-tapping screw.
Vehicle
Step 2.
Disconnect wire (dashed)
from battery post and
connect to capacitor
using lockwasher and nut.
Step 3.
Add lead from battery
post to capacitor using
lockwasher and nut.
Armature
A coaxial capacitor can
be added here, if required.
Battery
Post
26 Noise Reduction Techniques
3. Ignition Switch
4. Lamp bulbs (headlamps, tail lamps, dome lamps, etc.)
5. Accessory wiring (electrical fuel pump, electric windshield wipers, heater fan motor, window
openers, etc.)
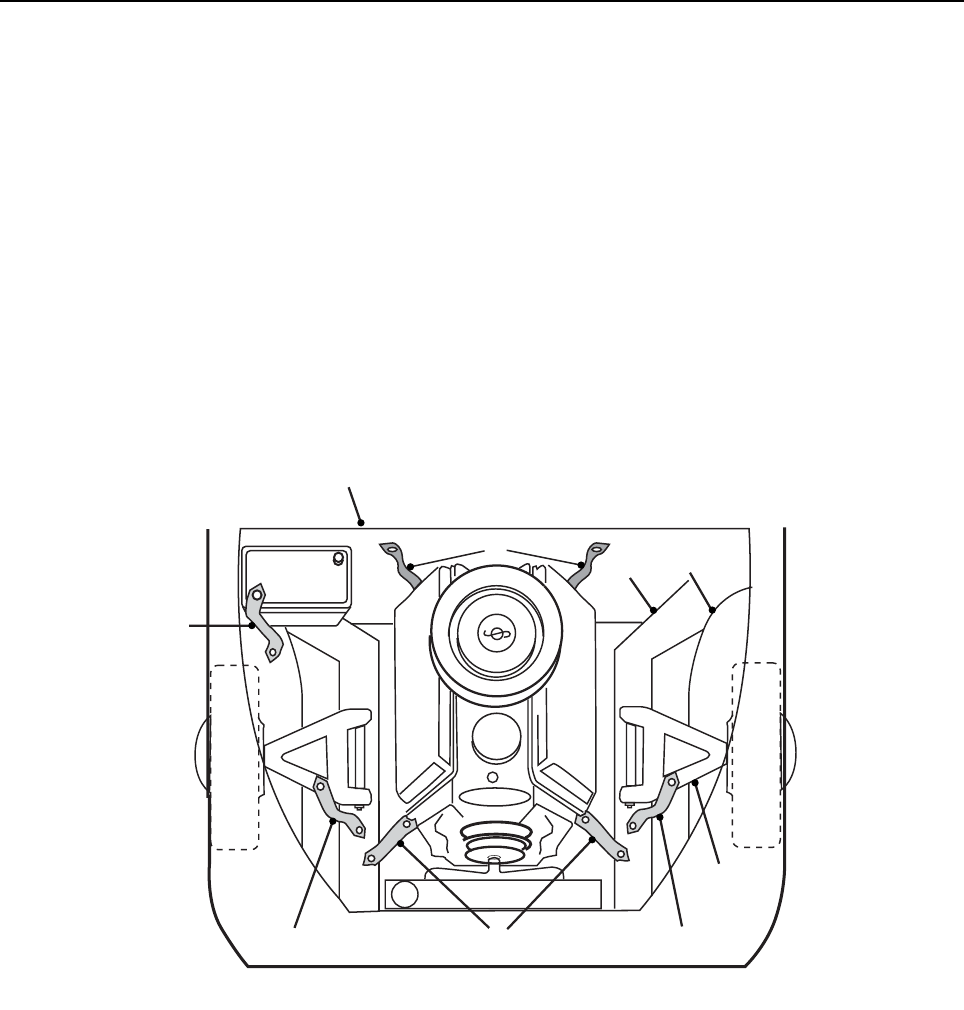
10.7 Ground Bonding
If a vehicle is not properly bonded to ground, static charges can increase. This increase can cause
noise from electrical arcing. This type of noise is suppressed by bonding the part using one-inch wide
ground straps (keep them as short as possible). Some common points where bonding may be helpful
are listed below (see Figure 10-5).
A. From engine block to the firewall.
B. From engine block to vehicle frame at points where the engine is shock-mounted.
C. From the battery ground terminal to the vehicle body.
D. From top of front wheel “A” frames to chassis, particularly in cases where rubber-mounted
members are used.
Figure 10-5. Ground Bonding
Battery
Firewall
Chassis
Fender
Well
Front Wheel
"A" Frame
B
A
C
DD
FL0830266-O

CM200™
Commercial Series
Two-Way Radio Installation Guide
MOTOROLA, the Stylized M Logo, and Radius are registered in the US Patent & Trademark Office.
All other product or service names are the property of their respective owners.
© 2002 Motorola, Inc. All rights reserved. Printed in U.S.A.
*6802966C25*
68P02966C25-O