Motorola Solutions 99FT4046 M1225 Low Power Mobile User Manual M1225 2 eps
Motorola Solutions, Inc. M1225 Low Power Mobile M1225 2 eps
Contents
- 1. Exhibit 8
- 2. exhibit 8
exhibit 8

TX CH1 CH2 CH3 CH4
Operator Guide
for the 4-Channel
M1225 Mobile Radio
Copyright © 1999 Motorola, Inc. All rights reserved
6880906Z68-O

This product is covered by one or more issued U.S. Patents.
Other Patent applications pending.
, MOTOROLA, and RADIUS are registered trademarks of Motorola, Inc.
M1225 is a trademark of Motorola, Inc.

English-1
Introduction. . . . . . . . . . . . . . . . . . . . . . . . . . . . . . . . . . . . . . . . . . . . . . . . . . . . . . . . . . . . . . 2
Safe Mounting of the Radio . . . . . . . . . . . . . . . . . . . . . . . . . . . . . . . . . . . . . . . . . . . . . . . 2
Controls and Visual Indicators . . . . . . . . . . . . . . . . . . . . . . . . . . . . . . . . . . . . . . . . . . . . . . 3
Basic Operating Instructions . . . . . . . . . . . . . . . . . . . . . . . . . . . . . . . . . . . . . . . . . . . . . . . 4
Set Volume. . . . . . . . . . . . . . . . . . . . . . . . . . . . . . . . . . . . . . . . . . . . . . . . . . . . . . . . . . . .4
Select a Channel . . . . . . . . . . . . . . . . . . . . . . . . . . . . . . . . . . . . . . . . . . . . . . . . . . . . . . . 4
Receive . . . . . . . . . . . . . . . . . . . . . . . . . . . . . . . . . . . . . . . . . . . . . . . . . . . . . . . . . . . . . . 4
Transmit . . . . . . . . . . . . . . . . . . . . . . . . . . . . . . . . . . . . . . . . . . . . . . . . . . . . . . . . . . . . . . 5
Monitor On-Off / Volume Set . . . . . . . . . . . . . . . . . . . . . . . . . . . . . . . . . . . . . . . . . . . . . . 5
Standard Programmable Features . . . . . . . . . . . . . . . . . . . . . . . . . . . . . . . . . . . . . . . . . . . 7
Time-Out Timer (T.O.T.) . . . . . . . . . . . . . . . . . . . . . . . . . . . . . . . . . . . . . . . . . . . . . . . . . . 7
Busy Channel Lockout . . . . . . . . . . . . . . . . . . . . . . . . . . . . . . . . . . . . . . . . . . . . . . . . . . . 7
Scan. . . . . . . . . . . . . . . . . . . . . . . . . . . . . . . . . . . . . . . . . . . . . . . . . . . . . . . . . . . . . . . . . 7
Option Button Programmable Features . . . . . . . . . . . . . . . . . . . . . . . . . . . . . . . . . . . . . . . 9
Repeater/Talkaround . . . . . . . . . . . . . . . . . . . . . . . . . . . . . . . . . . . . . . . . . . . . . . . . . . . . 9
Local/Distance . . . . . . . . . . . . . . . . . . . . . . . . . . . . . . . . . . . . . . . . . . . . . . . . . . . . . . . . . 9
Telephone Access/Deaccess . . . . . . . . . . . . . . . . . . . . . . . . . . . . . . . . . . . . . . . . . . . . . . 9
Advantage™ Board Enable/Disable. . . . . . . . . . . . . . . . . . . . . . . . . . . . . . . . . . . . . . . . 10
Hi/Low Power . . . . . . . . . . . . . . . . . . . . . . . . . . . . . . . . . . . . . . . . . . . . . . . . . . . . . . . . . 10
Horn and Lights On/Off . . . . . . . . . . . . . . . . . . . . . . . . . . . . . . . . . . . . . . . . . . . . . . . . . 10
Troubleshooting . . . . . . . . . . . . . . . . . . . . . . . . . . . . . . . . . . . . . . . . . . . . . . . . . . . . . . . . . 11
Table of Contents

2-English
This operator guide contains the information needed to identify the controls
and visual indicators, operation, and troubleshooting for the M1225 mobile
radio.
Information about the radio’s visual and audible indicators is highlighted
and illustrated with icons.
Information about radio safety, mounting, licensing, and other issues to be
considered before operating the radio are contained in the M1225 Installa-
tion/Licensing Guide (Motorola part number 6880905Z15). The guide should
be included in the shipment with your radio. If you need a replacement of the
Installation/Licensing Guide or this Operator Guide, please contact your local
Motorola Radius dealer.
Read this information before using your mobile radio. For the safe and effi-
cient operation of your mobile radio, observe these guidelines.
Read this information before using your mobile radio. For the safe and
efficient operation of your mobile radio, observe these guidelines.
We have organized this manual to help you locate important information. The following
icons signal specific types of information:
Information about the radio’s signalling sounds (tones).
Information about the radio’s signalling lights (LEDs).
Safe Mounting of the Radio
CAUTION: The bottom surface of the radio can become hot. Avoid contact
during prolonged use. Do not mount where the bottom surface can come in
contact with skin.
Introduction
English-3
TX CH1 CH2 CH3 CH4
TX CH1 CH2 CH3 CH4
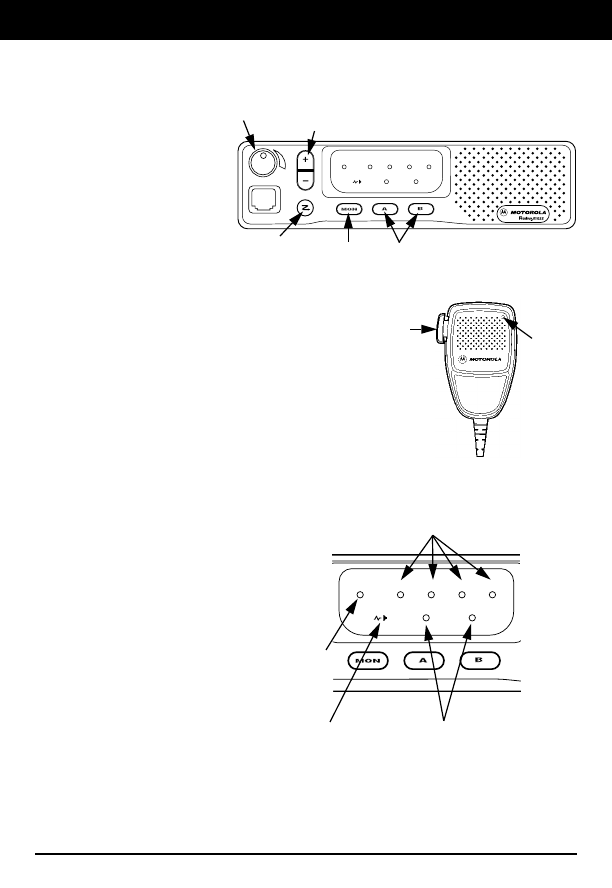
Controls
A. On/Off/Volume Knob
B. Channel Up/Down Button
C. Scan Button
D. Monitor Button
E. Option Buttons (A & B)
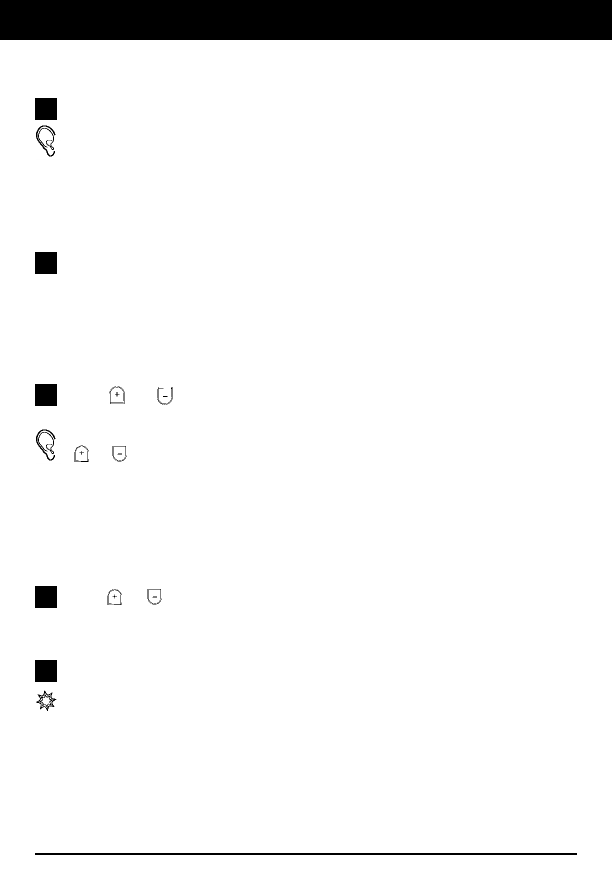
F. Microphone Push-To-Talk (PTT) Button
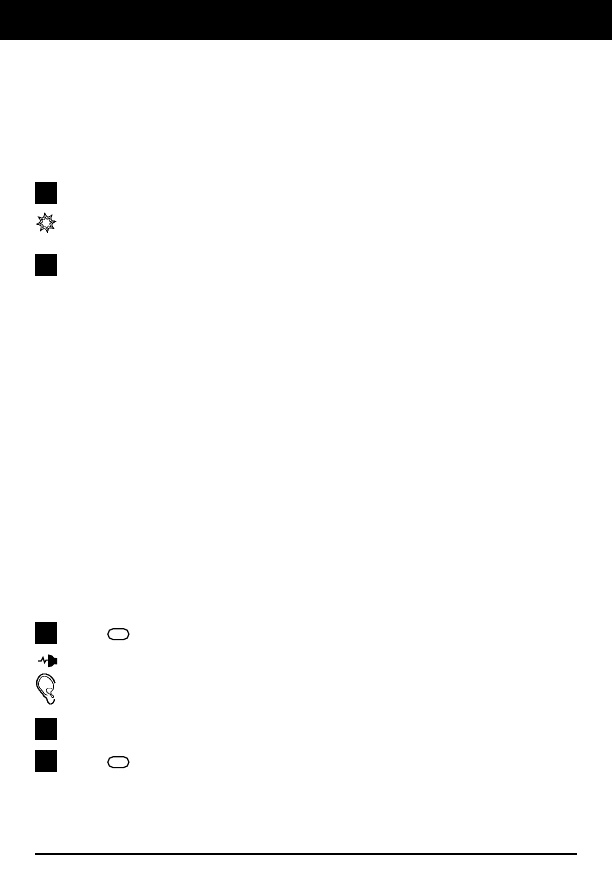
Visual Indicators
1. Light-Emitting Diode (LED)
2. Transmit / Receive Icon
3. Monitor Icon
4. Channel LEDs
5. Option Icons
A
C
B
E
F1
Controls and Visual Indicators
D
2
5
3
4
4-English
Turn the Radio On/Off
Turn the on/off/volume knob until it clicks.
A short, high-pitched tone sounds, indicator successful start-up. If the radio
is not operating properly, a continuous low-pitched alert tone sounds.
Set Volume
Turn the On/Off/Volume knob to adjust the volume to a comfortable listen-
ing level.
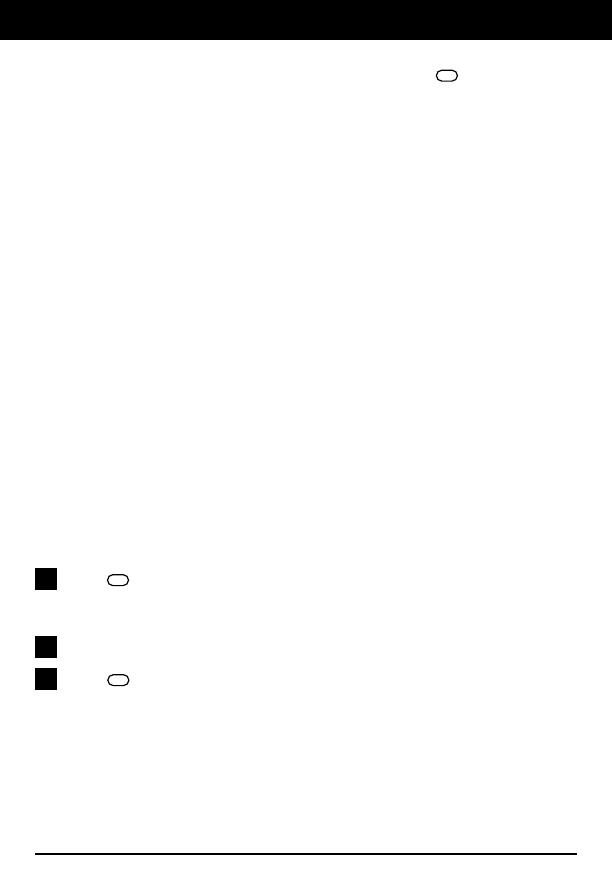
Select a Channel
Press or to select the desired channel
or
press and hold to scroll
through the channels.
A short, high-pitched tone (“good key press”) sounds each time you press
or , or when the radio scrolls to the next channel.
A medium-pitched tone sounds upon returning to the first channel.
Receive
Press or to select the desired channel
or
press and hold to scroll
through the channels.
Make sure the PTT is released.
Listen for voice activity.
The receive icon blinks when the radio is receiving.
1
1
1
1
2
Basic Operating Instructions
English-5
Transmit
NOTE:
In the United States, FCC regulations require you to monitor the channel before you
transmit. Refer to the Programmable Options section of this manual for Monitor
instructions.
Press the PTT.
The transmit icon lights on the display during transmission. The LED on the
microphone also glows red while you are transmitting.
Hold the microphone 2-3 inches (5-8 cm) away from your mouth while
speaking clearly into it.
NOTE:
Do not transmit when a person is within 2 feet (0.6 meter) of the antenna unless that
person is shielded from the antenna by a metal surface such as the roof of the car.
Monitor On-Off/Volume Set
Monitor/Volume Set allows you to monitor the channel for activity when PL is
enabled (same as taking the microphone off hook) or to set the volume.
To Monitor
NOTE:
In the United States, FCC regulations require you to monitor the channel before you
transmit. Although all countries do not have a similar requirement, monitoring the
channel is proper radio etiquette to provide an orderly approach to using shared fre-
quencies.
Press the Monitor/Volume Set button to disable PL.
Lights on the display when Monitor Mode is on.
You hear all activity on your current channel. If Busy Channel Lockout is
programmed, you will only hear activity within your own PL group.
Listen for voice activity.
Press again to exit Monitor Mode.
1
2
1
2
3
Basic Operating Instructions

6-English
Monitor On-Off/Volume Set (Cont’d.)
To Set The Volume
Press and hold the Monitor/Volume Set button for 1 second.
You will hear “static.”
Turn the On/Off/Volume knob, adjust the volume to a comfortable listen-
ing level.
Press again to exit Volume Set Mode.
1
2
3
Basic Operating Instructions
English-7
Time-Out Timer (T.O.T.)
Limits the amount of time you have to transmit. Preprogrammed from
1 to 255 seconds or off.
When you reach the time limit, a continuous, low-pitched tone sounds (until
you release the PTT) and your transmission is cut off.
Busy Channel Lockout
Several groups of radio users may share a channel. Busy channel lockout
monitors channel activity for you (even activity you cannot hear) preventing
you from transmitting while other groups are using a channel.
If the channel is busy when you try to transmit, a series of low-pitched tones
sound until you release the PTT.
Scan
Your radio is equipped with scan, which allows you to search for activity on
multiple channels. When activity is found on a channel, the radio locks on
and suspends scanning. Scan will always search for and go directly to a pri-
ority channel, even if scan has locked onto another channel.
Press to activate the Scan Mode.
The channel LEDs light in the order the channels are scanned.
When activity is found during scan, the active channels’ LED lights.
Press again to deactivate the Scan Mode.
NOTE:
Taking the microphone off hook
during the scan operation temporarily suspends
scanning. For the radio to scan, the microphone must be on hook.
1
2
Standard Programmable Features
8-English
Nuisance Channel Delete
Temporarily deletes an unusually busy channel from the scan list. You can
delete channels only while the radio is in channel scan mode and is receiving
activity on the nuisance channel.
To delete a channel, press and hold for 1 second while the undesired
channel is active.
A high-pitched tone sounds.
To restore deleted channels to the scan list, turn the radio off and on
again or press twice to restore the channel to the scan list.
A low-pitched tone sounds when pressing does not result in a deleted
channel.
1
2
Standard Programmable Features
English-9
Your dealer can program each of the two option buttons (A & B) to per-
form one of the following six options.
1. Repeater/Talkaround
Repeater/Talkaround Mode gives you the option of using a repeater system
for extended range or talking to other radio users in direct range of your radio
without using the repeater. Your radio defaults to Repeater Mode when it is
turned on.
2. Local/Distance
Local/Distance gives you the option of protection from interference. When
Local Mode is set, you will not hear weak transmissions. When Distance
Mode is set you will hear all transmissions including weaker signals. Your
radio defaults to Distance Mode when it is turned on.
3. Telephone Access/Deaccess
Telephone Access/Deaccess allows you to automatically access a repeater
for a telephone call.
Press your pre-programmed Telephone Access/Deaccess option but-
ton (A or B) to automatically send your preprogrammed access code to
the repeater.
Press the PTT to initiate your call.
Press again to automatically send your preprogrammed deaccess
code and disconnect the call.
1
2
3
Option Button Programmable Features

10-English
4. Advantage™ Board Enable/Disable
Advantage Board Enable/Disable allows you to turn the features of an
Advantage Board on and off. Your radio defaults to Advantage Board Disable
Mode when it is turned on.
5. Hi/Low Power
Hi/Low Power allows you to toggle between Hi and Low Power Mode. Your
radio defaults to Hi Power when it is turned on.
6. Horn and Lights On/Off
When your radio is equipped with a Quik-Call II™ Advantage Board or other
RapidCall™ boards, Horn and Lights Mode allows you to activate your vehi-
cles horn and lights when a call is received. Your radio defaults to Horn and
Lights Off Mode when it is turned on.
Option Button Programmable Features
English-11
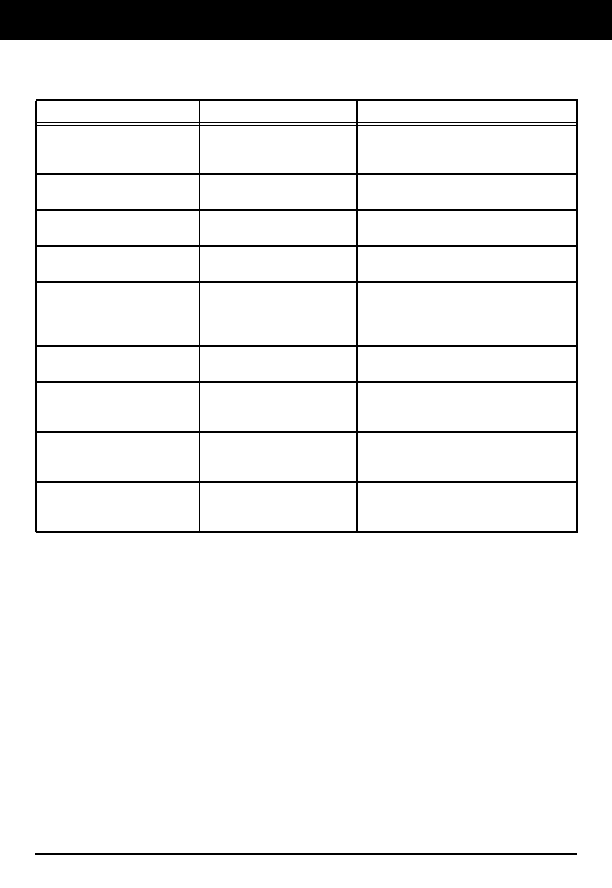
Symptom Problem Solution
Radio is “dead.” No power to radio. Check vehicle battery and all cable con-
nections. If all are o.k., contact your
local dealer for service.
Low-pitched continuous tone
when turning the radio on. Internal defect. Press and release the PTT to stop tone.
Contact your local dealer for service.
Low-pitched short tone when
turning the radio on. Internal defect. Radio may not function properly. Con-
tact your local dealer for service.
Low-pitched continuous tone
while transmitting. Time-Out-Timer expired. Retransmit last part of message.
Limit transmission time.
Low-pitched continuous tone
immediately after pressing
the PTT.
Transmission prohibited (i.e.
on receive-only channel). Contact your system administrator to
identify channels, or change to a chan-
nel with a programmed transmit fre-
quency.
Low-pitched repetitive short
tones after pressing the PTT. Channel busy. Wait for channel to clear. Try transmit-
ting again later.
Radio will not talk to other
radios in system. Radios may be pro-
grammed for different fre-
quencies or groups.
Contact your local dealer to verify fre-
quencies and groups.
Constant static. Interference from electronic
devices (computers, etc.). Ask your local dealer to enable coded
squelch, which screens out this type of
interference.
Limited talk range. Antenna may be placed in
or near a steel or concrete
structure, heavy foliage, etc.
Check antenna position. Relocate
antenna to a higher position away from
interfering materials or structures.
Troubleshooting