Movea DD1 IR/RF Remote Control with LCD User Manual
Movea, Inc IR/RF Remote Control with LCD Users Manual
UserManual.wiki
>
Movea
>
DD1 User Manual
>
Users Manual
Contents
1.
Users Manual
2.
Manual Regulatory
Users Manual
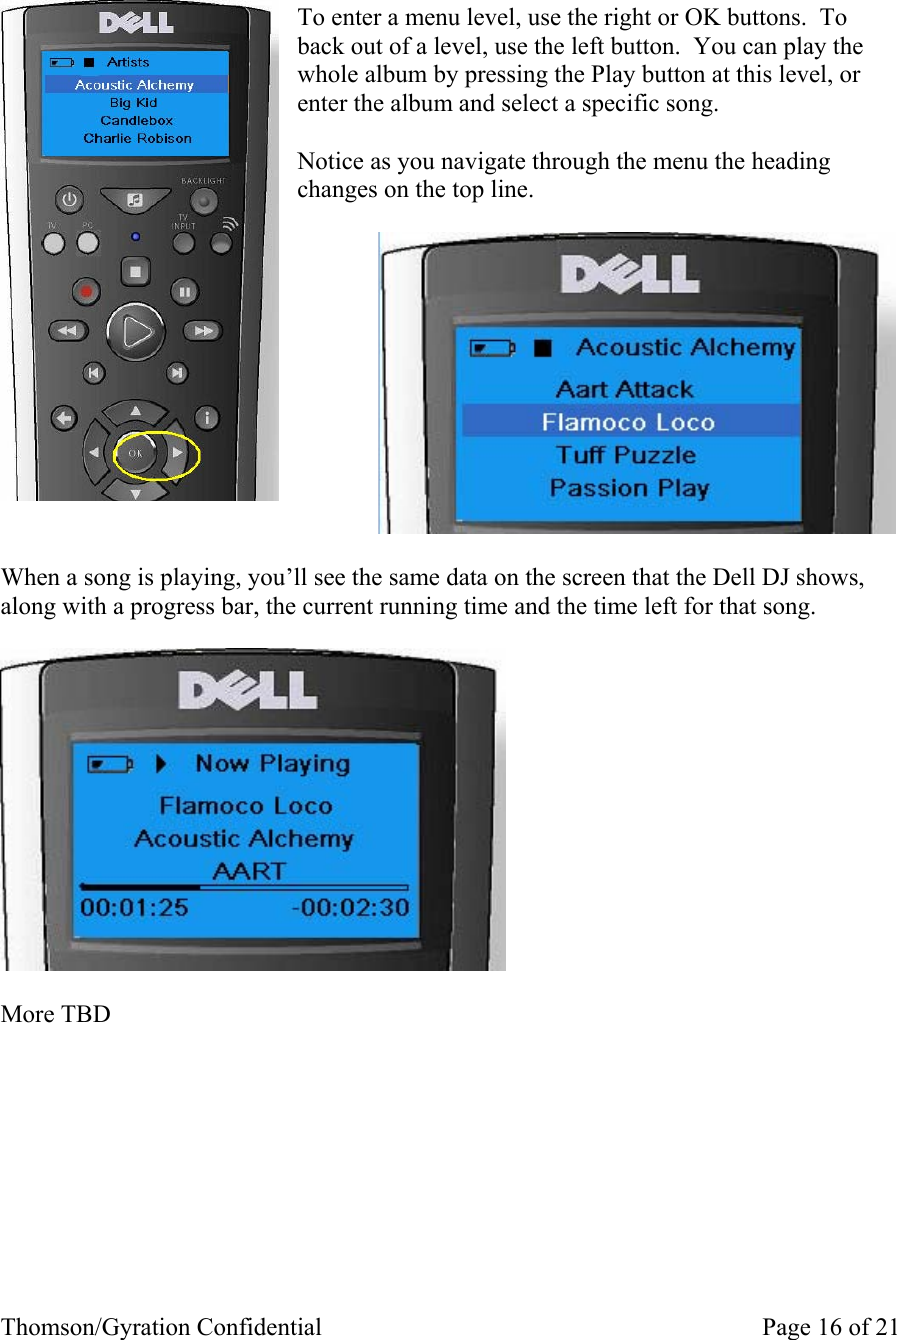
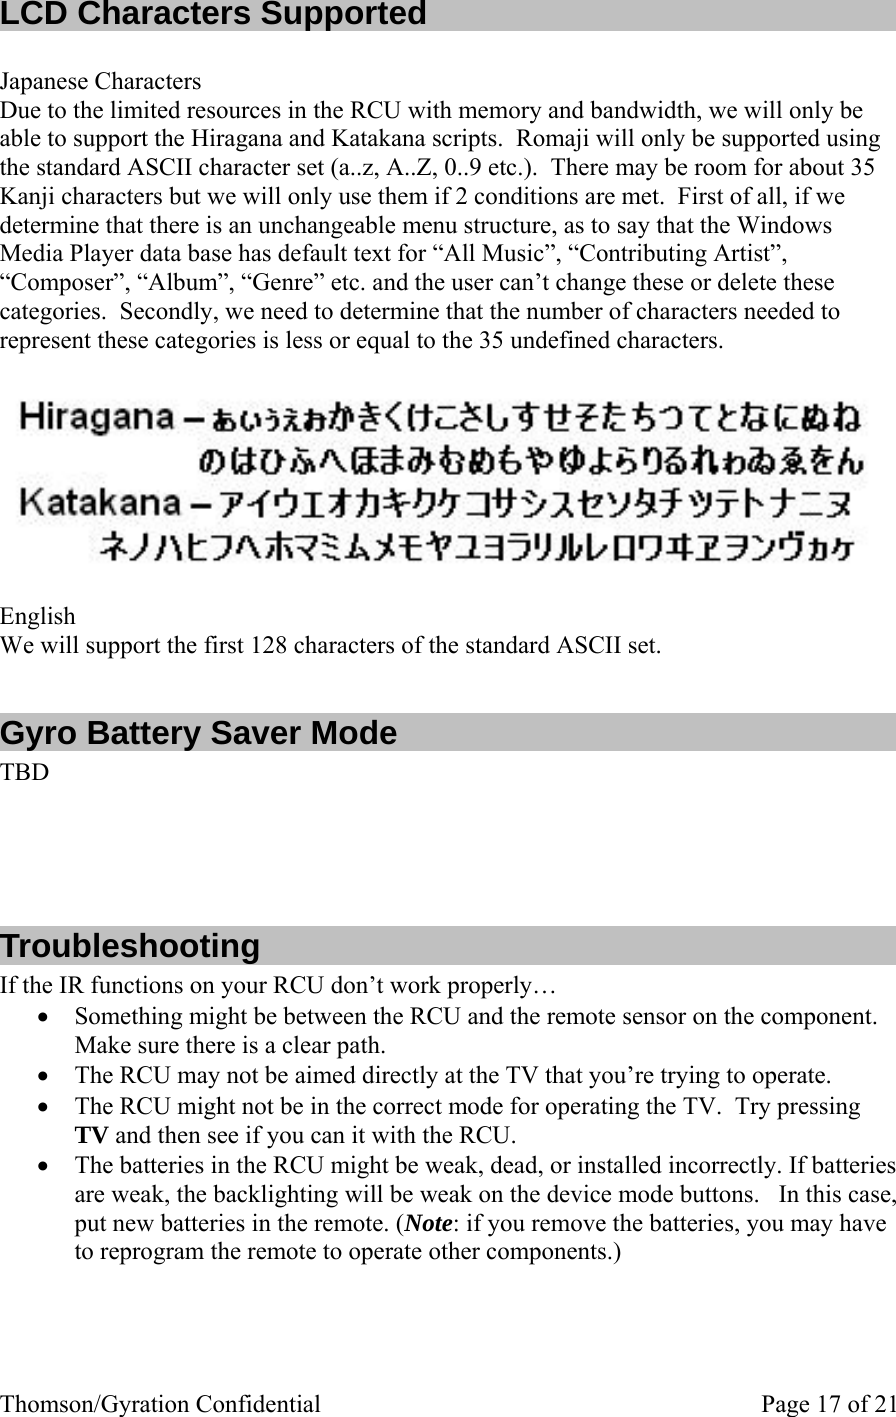
Navigation menu
Upload a User Manual
Namespaces
Wiki Guide
HTML
PDF
Info
Views
User Manual
Discussion / Help
Navigation
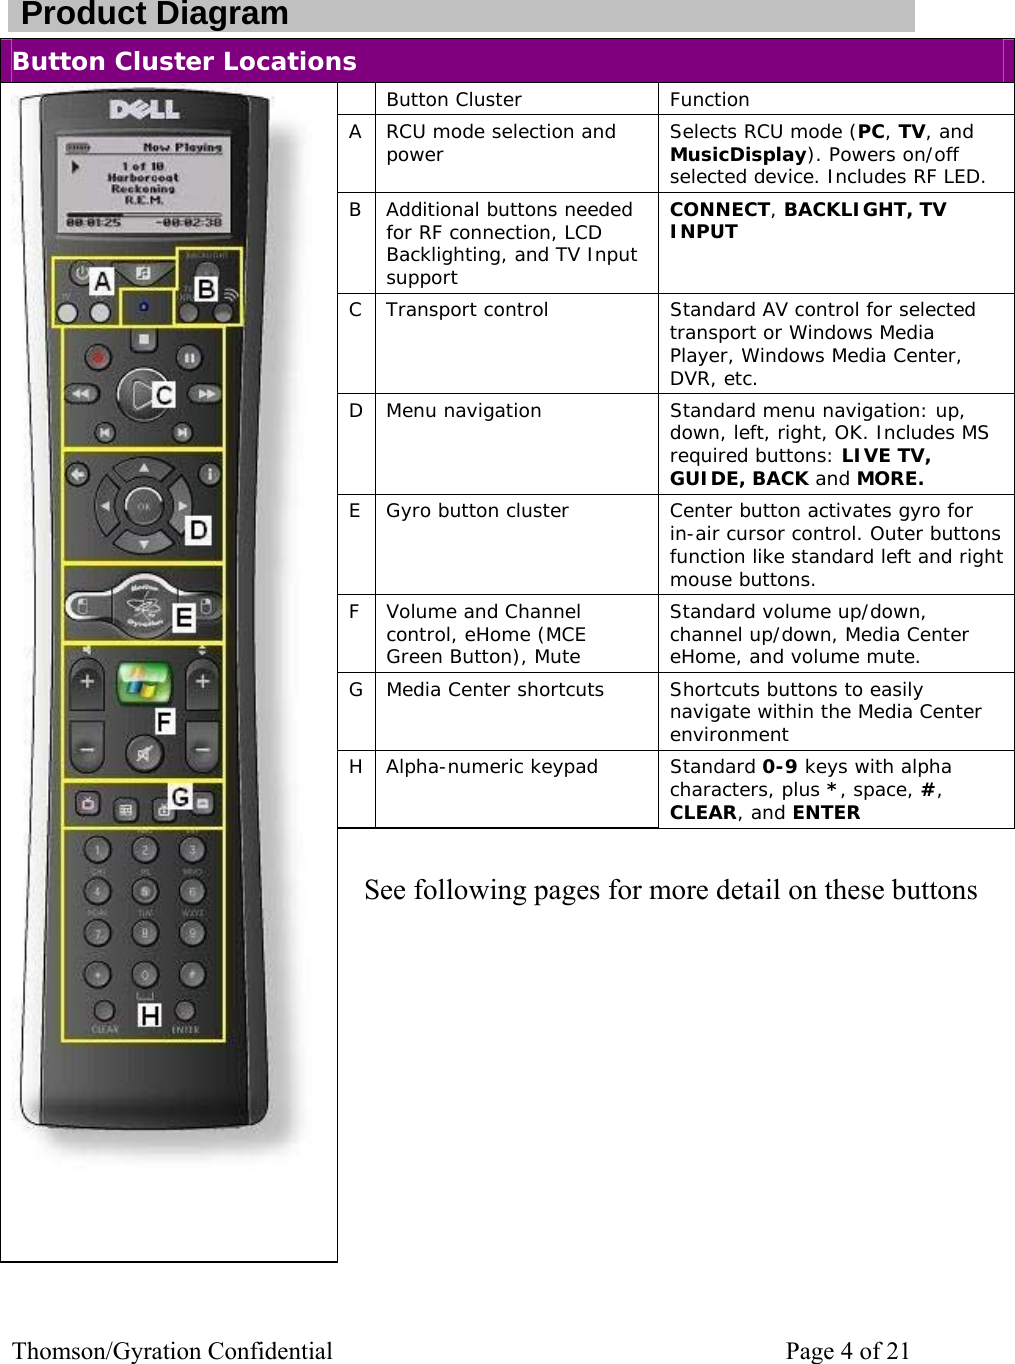
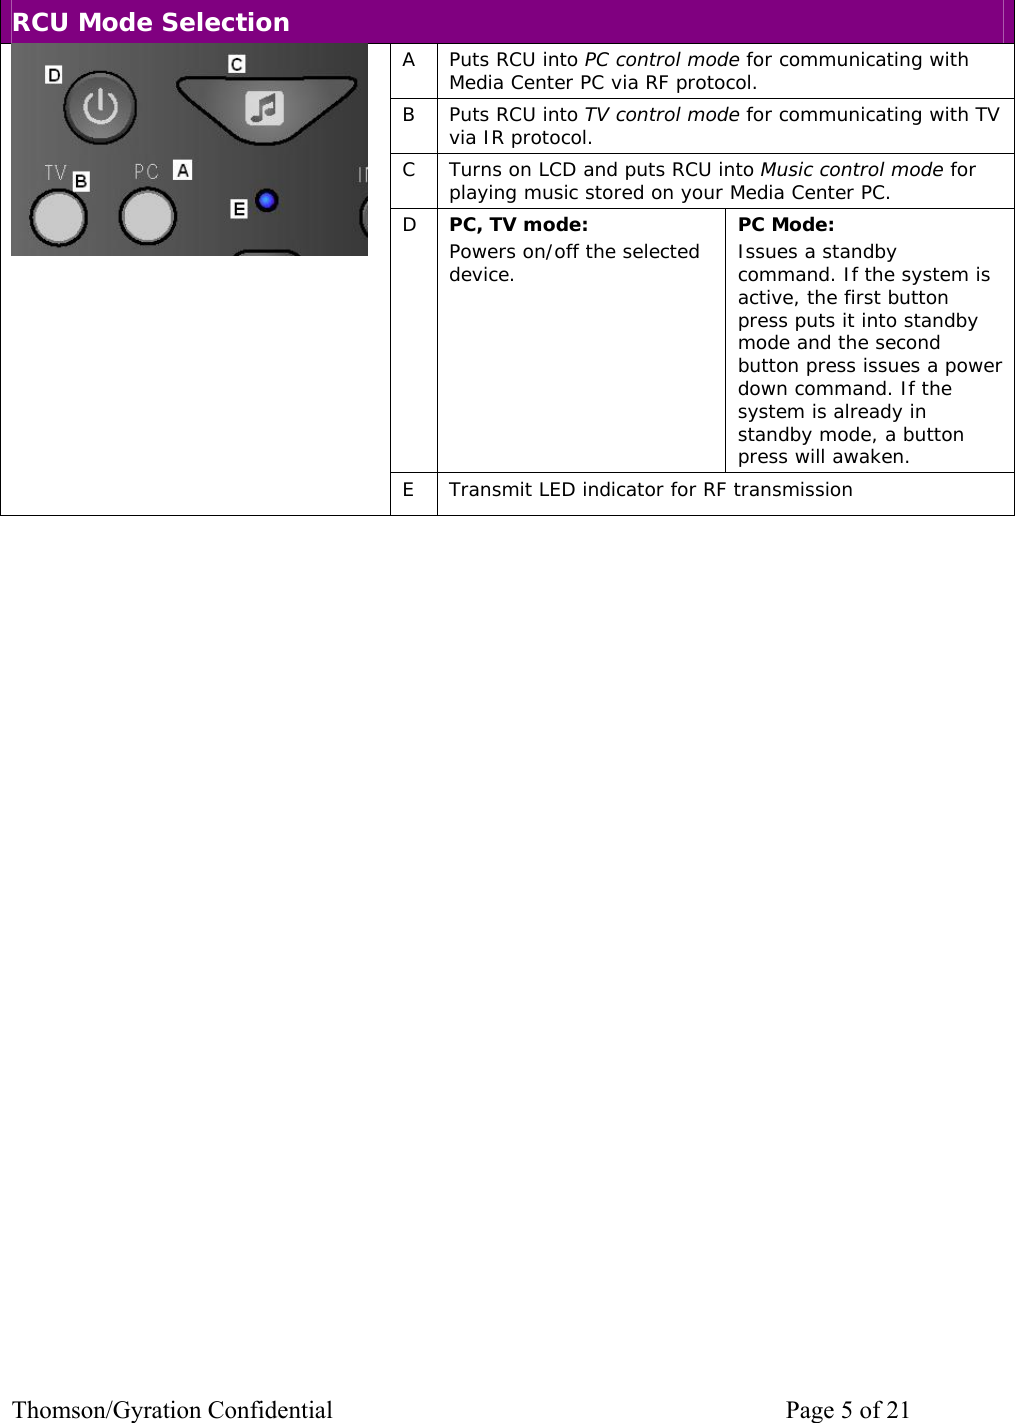
![Thomson/Gyration Confidential Page 2 of 21 Table of Contents Introduction......................................................................................................................... 2 Battery Installation and Information................................................................................... 3 Battery Saver....................................................................................................................... 3 Gyro Operation ................................................................................................................... 3 Product Diagram .................................................................................................................4 Button Cluster Locations .................................................................................................... 4 RCU Mode Selection .......................................................................................................... 5 Transport Control................................................................................................................ 6 Menu Navigation ................................................................................................................ 7 Gyro Activation/Select........................................................................................................ 7 Channel/Volume Control & Media Center Green Button .................................................. 8 MCE Shortcut Buttons........................................................................................................ 8 Numeric Keypad ................................................................................................................. 8 European Addition.............................................................................................................. 9 Backlighting........................................................................................................................ 9 ON/OFF Switch .................................................................................................................. 9 RF Receiver ...................................................................................................................... 10 Setting Up and Synchronizing the Remote and the PC .................................................... 10 Programming the Remote ................................................................................................. 12 Find Out If You Need to Program the Remote................................................................. 12 Programming Methods...................................................................................................... 12 Using Automatic Code Search [This function to be added later] ................................. 12 Using Direct Entry ........................................................................................................ 13 Learning ............................................................................................................................ 13 Learning Tips................................................................................................................ 13 Code Learning............................................................................................................... 13 Learning Commands..................................................................................................... 13 Clearing a Learned Function............................................................................................. 14 Music Mode ...................................................................................................................... 14 LCD Characters Supported ............................................................................................... 17 Gyro Battery Saver Mode ................................................................................................. 17 Troubleshooting ................................................................................................................ 17 Remote Code List ............................................................................................................. 19 HDTV ........................................................................................................................... 19 TV Monitor ................................................................................................................... 19 TV ................................................................................................................................. 19 Errata................................................................................................................................. 21 Introduction This users’ manual describes the operation of the Dell / Gyration Universal 2-in-1 (1 IR devices + 1 RF device) Windows XP Media Center Remote Control Unit (RCU). The](https://usermanual.wiki/Movea/DD1.Users-Manual/User-Guide-648928-Page-2.png)
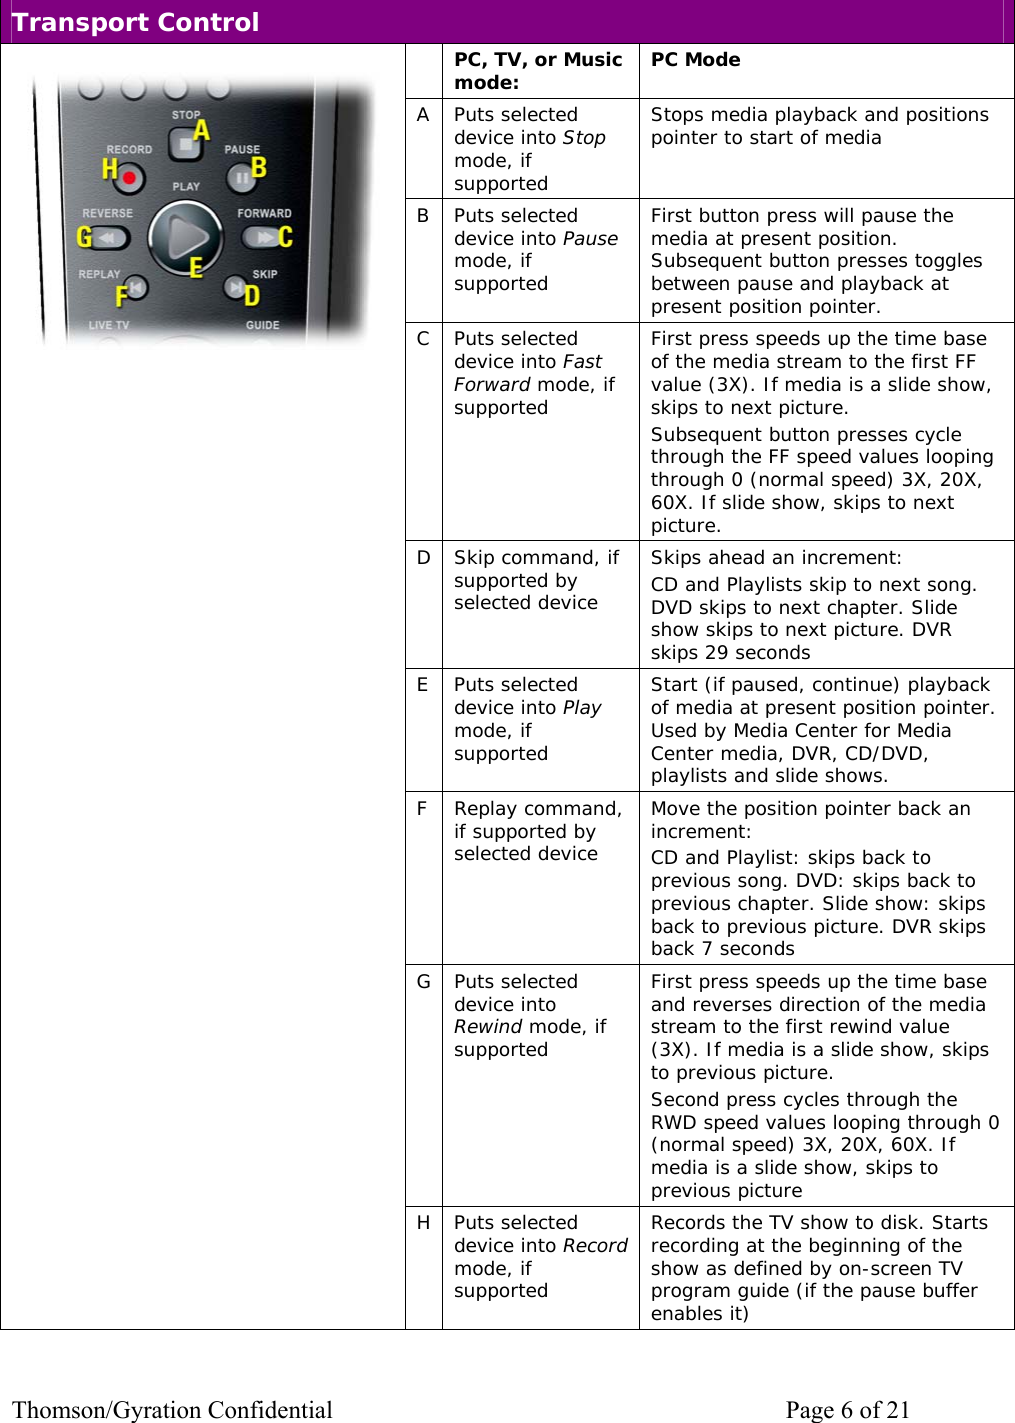
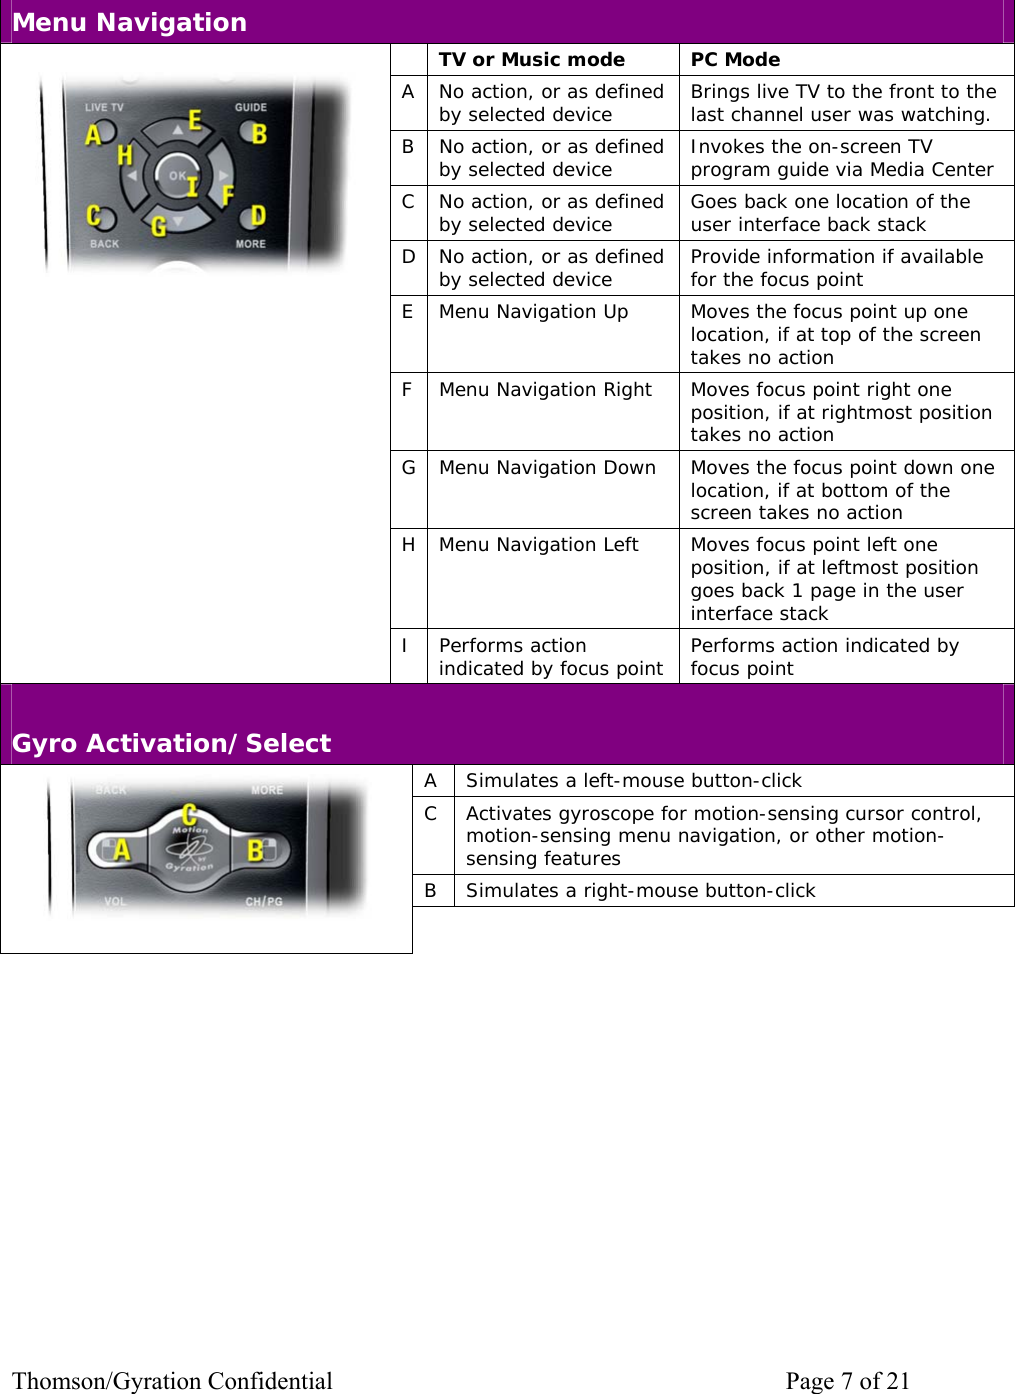
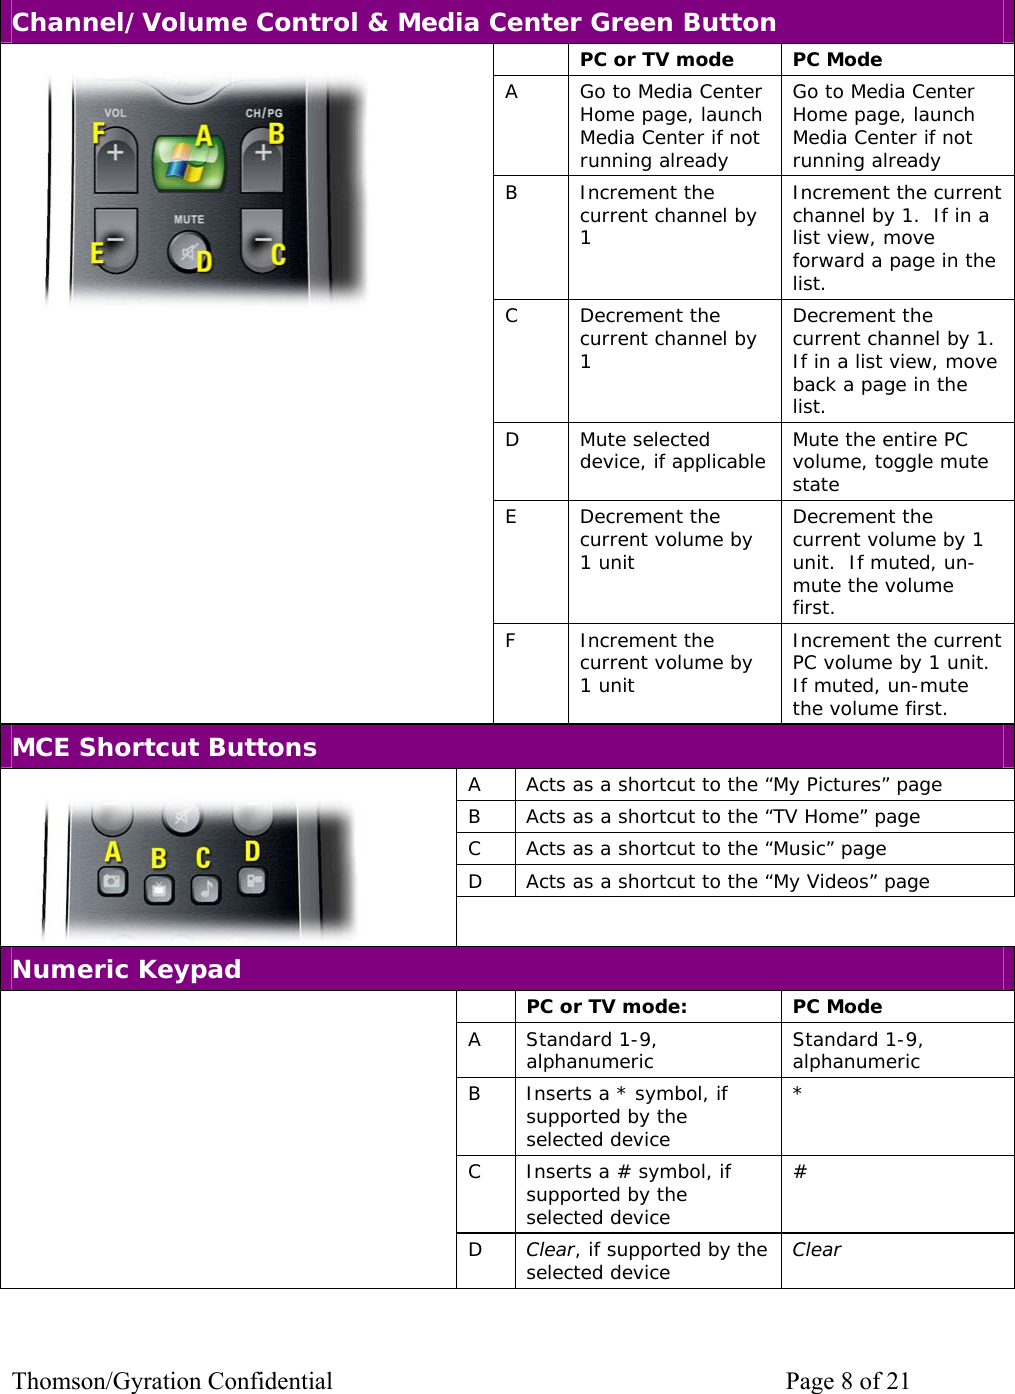
![Thomson/Gyration Confidential Page 3 of 21 RCU contains an embedded micro gyro for motion sensing and in-air control of floating cursor. This RCU features an IR code database and IR learning capabilities to universally control standard home theater TVs. The RCU is also equipped with a 2.4 GHz RF transceiver to send cursor movement information and other commands to the PC via a built in transceiver. The radio frequency (RF) transceiver delivers a range of up to 100 feet with no line-of-sight requirement. The 800 possible channels of the RF transceiver provide high resistance to interference from other radio devices. Battery Installation and Information The Media Center RCU requires four AAA Alkaline batteries. To install the batteries: 1. Remove the battery compartment cover. 2. Insert the batteries, matching the batteries to the (+) and (-) marks inside the battery compartment. 3. Replace the battery compartment cover and snap it into place. Note: Reprogramming may be required after batteries are replaced. Battery Saver The RCU saves battery power by automatically going into a low-power state if no button is pressed after a few seconds. See the Gyro section for gyro battery saver mode. Gyro Operation The RCU provides in-air control of the PC’s cursor via patented gyroscopic motion-sensing technology. This means mouse-like cursor control, from anywhere in the room, without the need of a flat surface. There is no line-of-sight requirement so you don’t have to point the RCU at the PC you are controlling. Remember the following things when using the in-air cursor control feature of the RCU: • Use your thumb to press the gyro and mouse buttons. [add picture of hand holding the RCU] • Click the center button to activate the gyro motion-sensing control. Single click and hold to move the cursor and release it to “park” the cursor where you want it. Double click the center button and release it for continuous cursor movement similar to a standard mouse. • The right and left buttons function like standard mouse right-click and left-click buttons. • Move the cursor by flexing your wrist, not your arm or body, much as you would with a flashlight; side to side and up and down. Placing your arm on an armrest or on your lap will make this motion more comfortable. • The RF Transmit LED indicates when gyro motion or other information is being sent independent of which mode is selected on the RCU.](https://usermanual.wiki/Movea/DD1.Users-Manual/User-Guide-648928-Page-3.png)
![Thomson/Gyration Confidential Page 12 of 21 Programming the Remote The RCU can be programmed to operate many brands of remote-controllable TVs via the IR functions of the RCU. Find Out If You Need to Program the Remote To determine whether the remote needs to be programmed to operate your TV, do the following: 1. Turn on the TV. 2. Point the remote at the TV. 3. Press the TV button. 4. Press ON•OFF to see if the TV responds. If the TV doesn’t respond, you must program the remote to operate it. Programming Methods There are two ways to program the remote control to operate other TV’s: Automatic Code Search and Direct Entry. Using Automatic Code Search [This function to be added later] The following instructions can be used to program the remote to operate each of your components. If you want to stop the automatic code search without programming any of your components, press and hold CLEAR (*) until the indicator on the remote turns off. 1. Turn on the component you want to operate (TV, DVD player, etc.) 2. Press and hold the component button you want to program (TV, AUX, etc.). While holding the component button, press and hold ON/OFF button until the component button on the remote turns on, then release both buttons. 3. Point the remote at the component. 4. Press and release PLAY, then wait 5 seconds or until the component button stops flashing. At this point the remote is searching for the correct code to program. If, after 5 seconds, the component you want to operate does not turn off, press PLAY again to tell the remote to search the next set of codes. Continue pressing and releasing PLAY until the component turns off or you have searched through all of the codes. The component buttons flash when all codes have been searched, the component button turns off, and the RCU exits Automatic Code Search. If the component you want to control does turn off: 1. Press and release REVERSE, then wait 2 seconds. Repeat this step until the component turns back on. 2. To finish, press and hold STOP until the component button on the remote turns off.](https://usermanual.wiki/Movea/DD1.Users-Manual/User-Guide-648928-Page-12.png)

![Thomson/Gyration Confidential Page 14 of 21 3) On the Gyration remote control unit, press and release the button where you want to store the new function (the TV button turns off and then back on). Note: If you press an invalid button on the remote, the TV mode button flashes 4 times to alert you. You’ll have to repeat step 3. 4) Position the source remote facing the bottom of the RCU no more than 2 inches apart [add picture below]. Press and hold the button of the source remote that has the functionality you are recording. Keep pressing the button until the RCU TV mode button light turns off and back on (the source function has been saved to the TV mode on the RCU). Note: If the TV mode button flashes 4 times, the function wasn’t learned. Try again starting with Step 3. 5) The RCU remains in the “learning mode” so you can continue adding functions to different buttons by repeating steps 3 and 4. 6) Press CLEAR to exit the learning mode. Clearing a Learned Function To delete a learned button function, use the procedure below. 1. Press and hold the TV mode button (the TV button lights). Then press and hold the CLEAR button for 3 seconds. Hold both buttons depressed until the TV mode button flashes. 2. Release both buttons. The TV mode button turns on indicating that the remote is now in the Clear Learned Function mode. 3. Press and release the button where learning is to be cleared. The TV mode button blinks off then back on indicating that the function was cleared successfully. 4. Repeat Steps 1 through 3 until all the buttons’ learned functions have been cleared. Note: If an invalid button is pressed, the TV mode button flashes 4 times, then stays on, and the remote remains in Clear Learned Function mode. Repeat Step 3 to continue the clearing process. 5. Press the CLEAR button to return the remote to normal operation. Music Mode Music mode is a revolutionary new way for you to search through and play your favorite songs that you have already setup on your Media Center PC. It links directly to your Windows Media Player library so that you can browse through your Play List and listen to your tunes without going to your computer. It has the same look and feel of your favorite Dell DJ mp3 player, making it easy to navigate and use.](https://usermanual.wiki/Movea/DD1.Users-Manual/User-Guide-648928-Page-14.png)