Movita Technologies C600 Notebook PC User Manual
Movita Technologies Inc. Notebook PC Users Manual
Users Manual

Copyright
Disclaimer
Trademark Recognition
!"# $%
& ' '!(( '!((( (
%
)*+ # ,- ' ,- ( .
#
IMPORTANT INFORMATION

Federal Communications Commission (FCC) - Notebook
/
%.'01%%2
/
/
3
( /
/
4
!" 2
!" (/
!" % /
!" %,)
+%
/2
%
5 5
/
Declaration of Conformity
01%%#
4
!"
!"
SAFETY & COMPLIANCE
Federal Communications Commission (FCC) – Fax/modem
/'67%%2#/
%%
2 8/ 928: / ;
/
( /
% (
. <
;
%%
; /
/
(
%% / !
(/
/ (
/
%% / +&
9%%2'67 67=709:9=::
Canadian Department of Communications-Notebook
. / %
(!8/2
% >/ .
2>>%
VCCI
DHHS- the CD-ROM Drive
"+2/!
4
?@
A
B
?%C+ 0 C+ 82 '2#"@%B
(
?+A
B
UL Battery Caution
"
2 /
" 5
CTR21 Notice
/ % "
D7,E7-,8%!8
9' : 3
'
'

ANNEX II
/%"
D7,E7-,8%!8
9' :3
' 5
'
(/
/
,
ANNEX III
/
/
/
/
(
/

CE Declaration of Conformity
!
" # $ % &
$'()*++*&&, #-! ! '.+*+*&&/ )+*(*&&,0 1
! & $#-! !
0
Standards
!" "
!"#$ $"$"$ " $%&'
(!)*
+,-,
,
.!"#$ !))%' ' $! #' !%
))%$%"%$"$%(!)/"$0*
+,-,-
,-
""$1)"2%& %!$!*
" ,
3,
%$"$$"&"(!"
" ,-
3,-
!' "4 " "(!$' %$"&$
%
)" ,
3,
%$"$% ""(!"
!"#$"%&
+
-
' " " $%&' (!) $%!&
%$"$%#!(!)
* $
2$3
2
'
"4
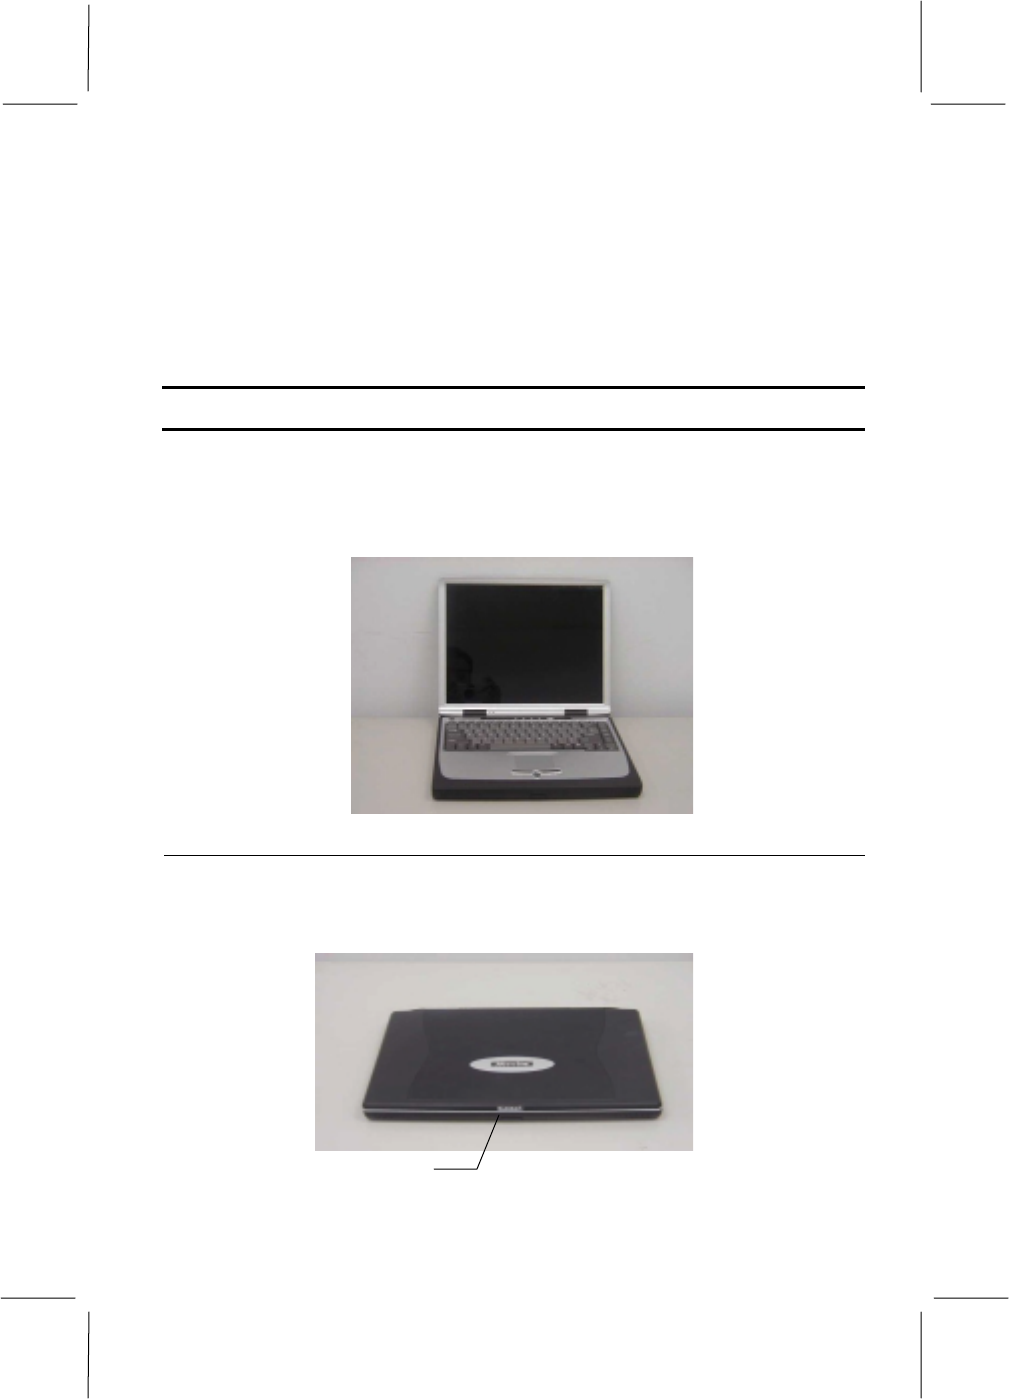
Welcome
!"#$ $ !% !$& '& $"(!)*'+ !& $ ,!(-!&.
'!&%&*$)! '&)!. $, )&' .&$') $ ($&.! "+( )&!!/
!0 !* $*+( '(! *!,$ &$.! ,!-)!$,-!&$ (! +'.&$,!
'$ %&)&!$.*!*&01$,,.'!&'!&$(,!-)!1$,/
To Open the System
(,! !()#.($ ) !%& !,.!% ! !"# !&. $,
(% !"+( )&!!+' $.,-!2.$.(!/
''!&)-!&
)#.($ )
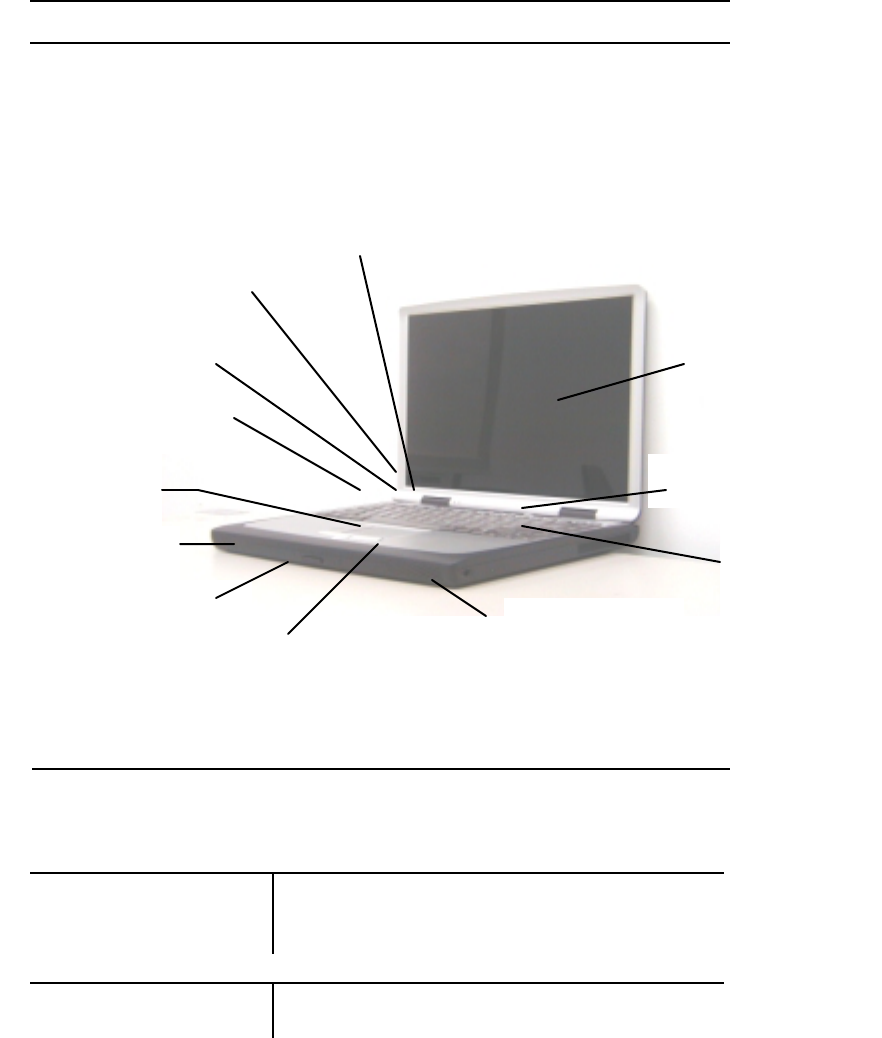
Inside the Notebook
! " # $%
& ' () *
+
Power Indicators
+
!
"#
$%
"&"
#
'(')
*
'
)+(,
"#-
,
Status Indicators
- # - +
* - &.$$ /
0+11-+
!"
#$!"
!"
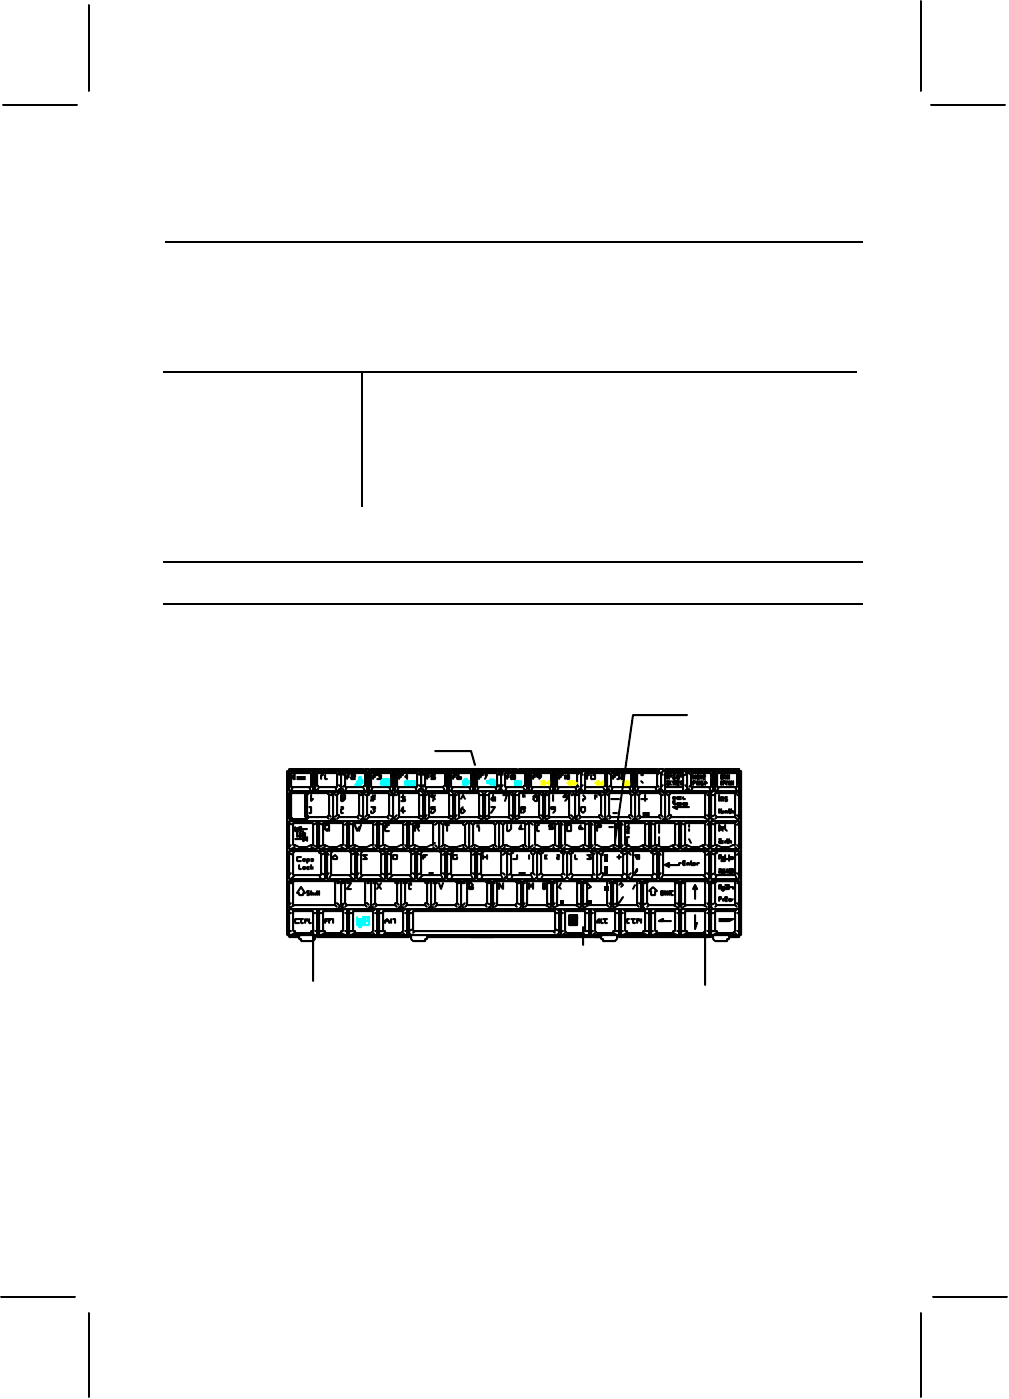
About the Keyboard
-
- +
*
2
)
$.
34
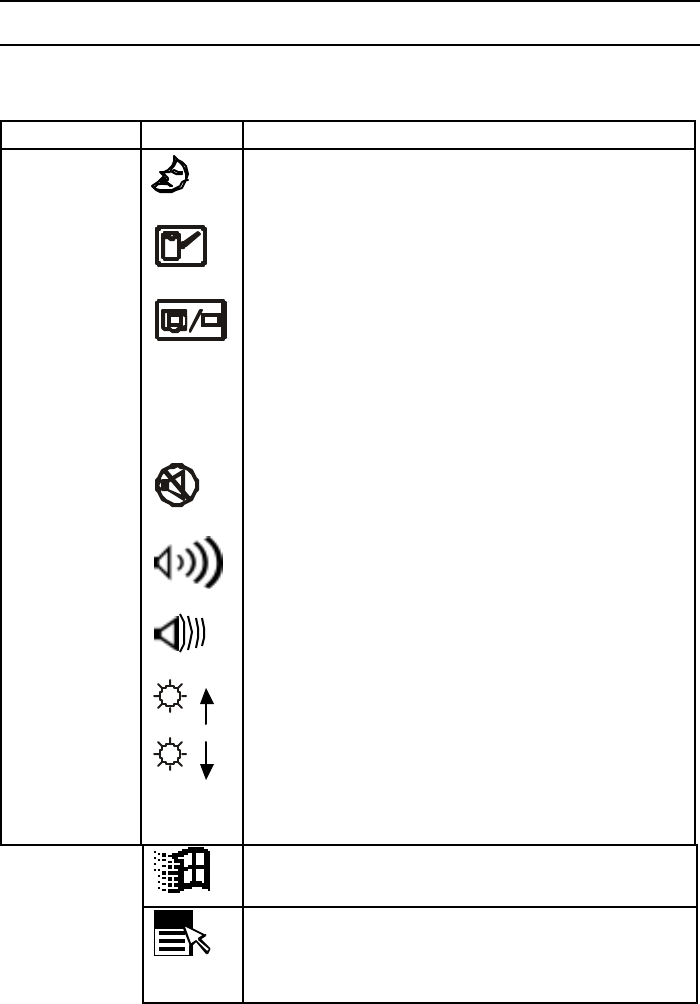
Function Key Reference
5
%
#&'
(%"$)*+
(%"$,
#&-
$)*+
$,
#&*
./0
$.
0+
+
$
#&1
/
+
$
#&2
+
$
#&3
+
$
#&4
/$
#&56
/$
7.
$
.
8$/
8.
$
33
Using the Touchpad
-
-+
+
+
2
- +
+
*
! ! /$ 67
+
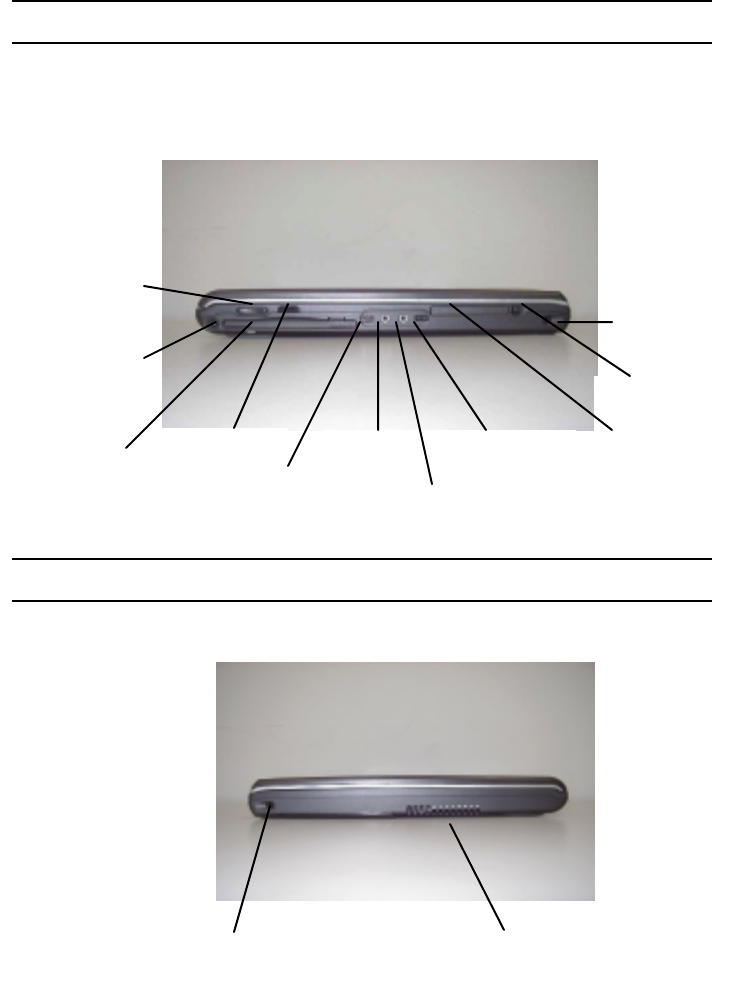
Left-side Description
! "#$!%&&&
'() *#"
Right-side Description
+! ,+--"
!"#
$"
"%
& '
$
'
"%
()*'

'
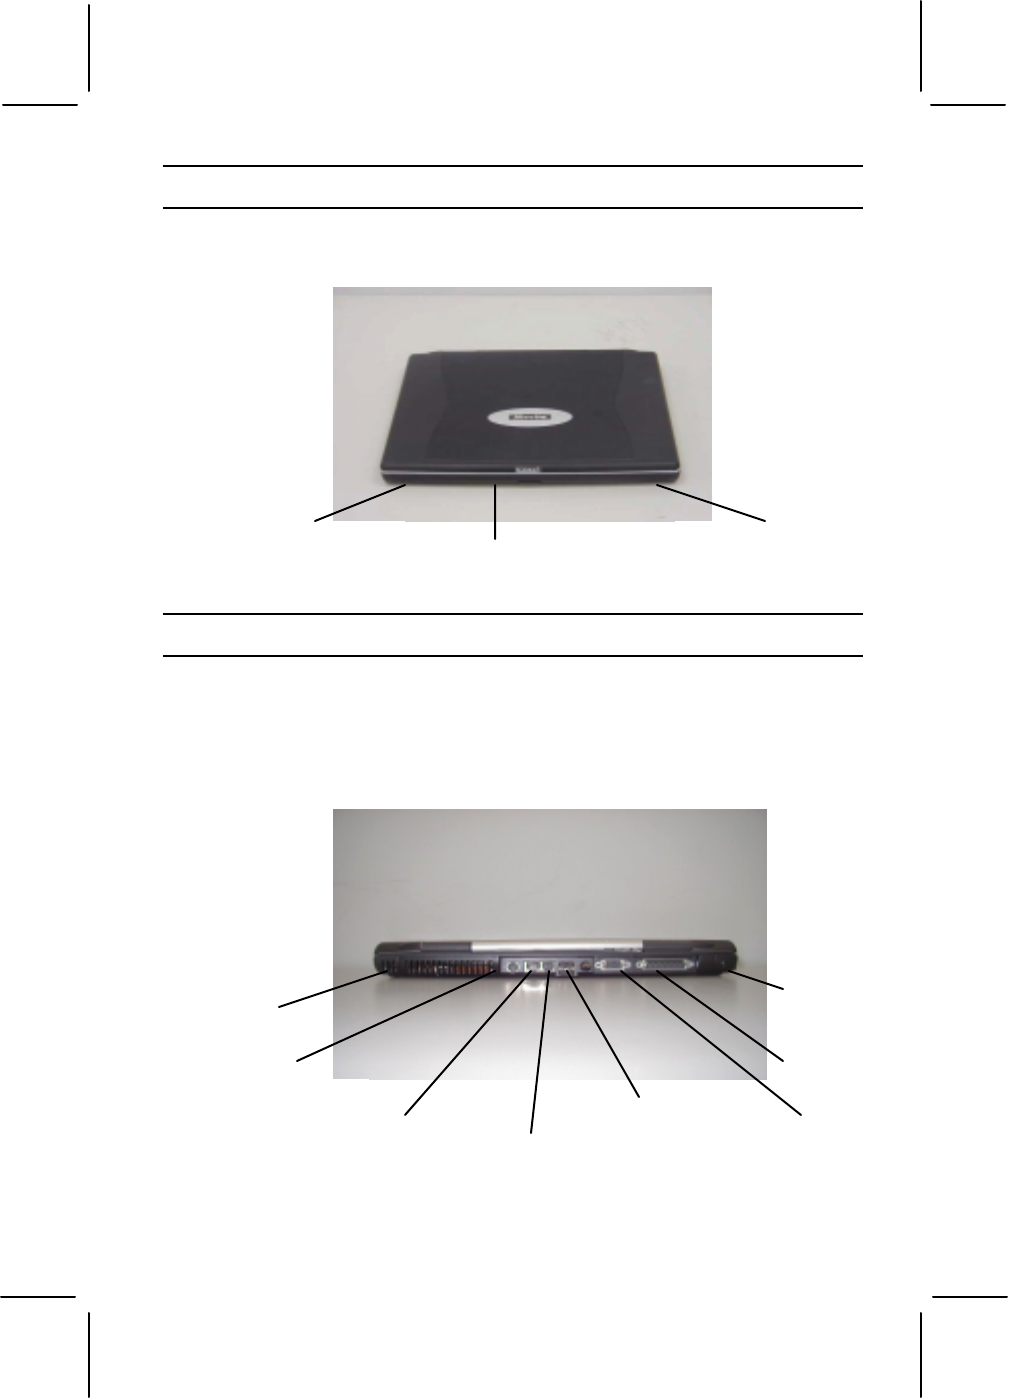
Front Side Description
. ! /0 ,12 /3
.! %0"
Rear Side I/O Ports
+ 21 4 3
3 334 *!2 ".# 5,)6
, $!% , * 7+
.+-"
(+
&"%#, ()*"%#,
+'
$"-./-#-
&0( 1
(
(2$
!"#
$$
/)
&'

)
To connect a parallel, or USB device, we recommend that you
power down the system, connect the device, and then restart the
system. If necessary, you can make changes to the IRQ (interrupt
request) and I/O address of the port, by using the system setup utility.
Using the PS/2 Port
3 0 3/33
8# 3/ 0 +
3 3 /" *!2
5*!2"
Integrated Ethernet Jack
& ,)6"9
, )6 3 4
.#5/3"
Using the Parallel Port
6 3 3/
":3
3 33 3
+:4 "Printer Control Panel
Add New Printer 3 "
/33/.*"
Using the USB Ports
$!%;$!%< 4 "
+ /34= 3+
3/"
6
Security Lock Anchor
+ / /3 4 / 3 "
3 / / /
"
Using the External Monitor Port
0 / 0 ,
;,3/< 3/"
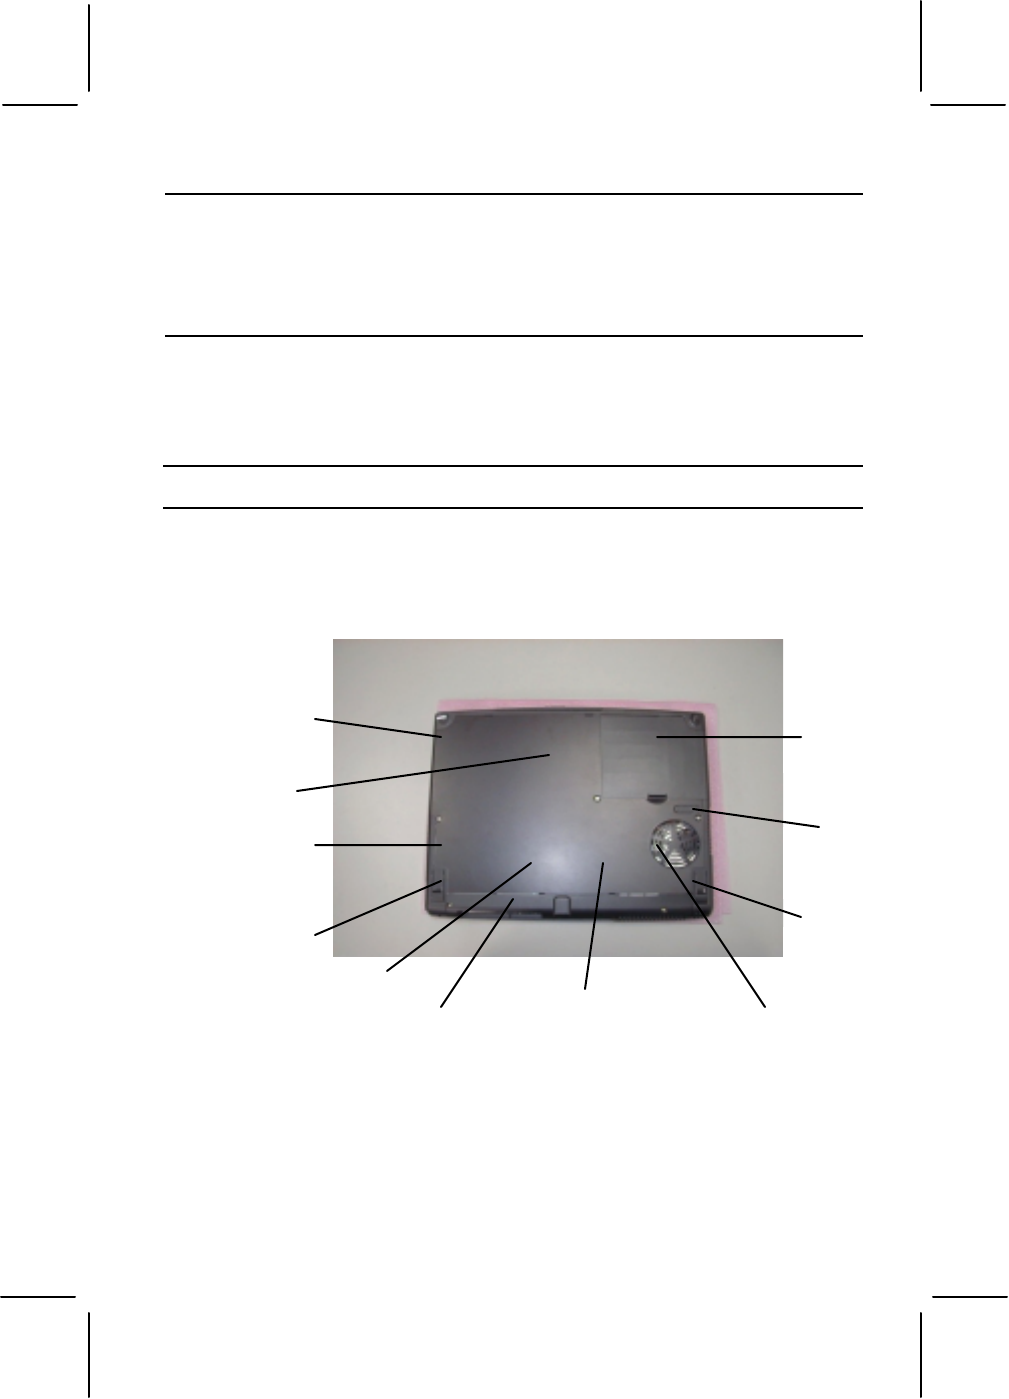
Features on the Unit Base
/ / /3
+343 /3
"; /33
/<
/*
,1
3"
& "
#3$
#
44
()*"
3
(-+
#3&*#3
'#3
(+
#3

>
Connecting Power to the System
It is particularly important that you only use the
AC adapter supplied from your dealer. Otherwise, you may
damage your notebook.
# #+ 3 /
+# 3 / 4 3
4 " # + +/
/3"
Direct current
cable Power indicator
light
AC power cord

?
It is particularly important that you give your battery a
full charge the first time that you use it. We recommend that
you leave the system connected to the AC adapter until the
battery is fully charged. The right indicator lamp on the front
edge of the notebook will stop flashing when the notebook
is fully charged.
" *+ 4 +# 4 3"
" 4 # 4 4
# 4 "
'" *+ / # #
/"
)" + + /4 /+
+4 ++" #
/+++/3"
First Time Start Up
: 3 / / 4 3
34 3/*
33/++3 "
The description below applies to notebooks that
have been pre-installed with an OEM version of Windows
95 or Windows 98. If your system has not been pre-
installed with an OEM Windows, install your own operating
system using retail versions of the operating system
software and following the instructions given with the
software, or by referring to the section
:4 +3 3 33
4 3
" # :4 4 + 4 +
/ 3 3
:4 4 334 " +
:4 4 + / 0 " :
@
3+/0 4 4
* 50/"
" 3 / /3 + 4 4 4
+4 /4 "
" : :4 3 3 ! ,3 +"
/ /
:4 :4
+ 4
"9+ 3+ "
'" + 4 ++ 3 3
3/" !
"
)" ! 4 3 3 /"
3 "
6" ! 4 3 :4 +"
4 3
:4 4" 9
A +B
/0 "
>" ! 4 3 3 + /
#3;1#<" 1# +3
:4 (6 4
3"
?" ! 4 /+ +3 " #
34 /= "
@" : / 4 3
3 3" 9
3 "
(" ! 4 3 C4 4 "$ *
83
"
D"# / 3 4
4 3 / :4 +
3"=4 /0 " 3
:4 ,1 :4 3
3"

(
9 / 3 /3 + 4 4 3
3 3 " 3 4
4 + 33"
System Setup and Installation
This section describes a typical procedure for
rebuilding a hard disk drive. You may not need to carry out
every step on your own hard disk. Read all the README
files that ship with the support software. They may contain
important information that is not included here.
" * :4 1! / 3
33"
" 3 + 4 3
3
E! E 3/"
'" 3 + 4
1!2:4 !7 + "
)" $ 1!2:4 1,# + 4
"
6" 3,1 ,1
" 3 3
3"
>" #3 ,13:4
" :4 /+
3" F /+ 3 !&$*
+"
?" 4 :4 "
@" # :4 3 4
+ 3
3" + + 3
/33 43
"
D
(" 4 3 /
/4 ++
+3:DDD:(@
:5(6 :55 " 4
4 3"
D" . ,&# & 43
/ " 3
"
" . +" +3
!&$* 5!#.."4
2"
" 94 //3 4 +4 3
G
*G2$
G2$
#G2$
*G2$
,1G2$
,1G2$
02G2$3
.#5G2$3

Left-side Description
! "#$!%&&&
'() *#"
Right-side Description
+! ,+--"
!"#
$"
"%
& '
$
'
"%
()*'
'
Front Side Description
. ! /0 ,12 /3
.! %0"
Rear Side I/O Ports
+ 21 4 3
3 334 *!2 ".# 5,)6
, $!% , * 7+
.+-"
(+
&"%#, ()*"%#,
+'
$"-./-#-
&0( 1
(
(2$
!"#
$$
/)
&'

)
To connect a parallel, or USB device, we recommend that you
power down the system, connect the device, and then restart the
system. If necessary, you can make changes to the IRQ (interrupt
request) and I/O address of the port, by using the system setup utility.
Using the PS/2 Port
3 0 3/33
8# 3/ 0 +
3 3 /" *!2
5*!2"
Integrated Ethernet Jack
& ,)6"9
, )6 3 4
.#5/3"
Using the Parallel Port
6 3 3/
":3
3 33 3
+:4 "Printer Control Panel
Add New Printer 3 "
/33/.*"
Using the USB Ports
$!%;$!%< 4 "
+ /34= 3+
3/"
Security Lock Anchor
Using the External Monitor Port
!
" !#
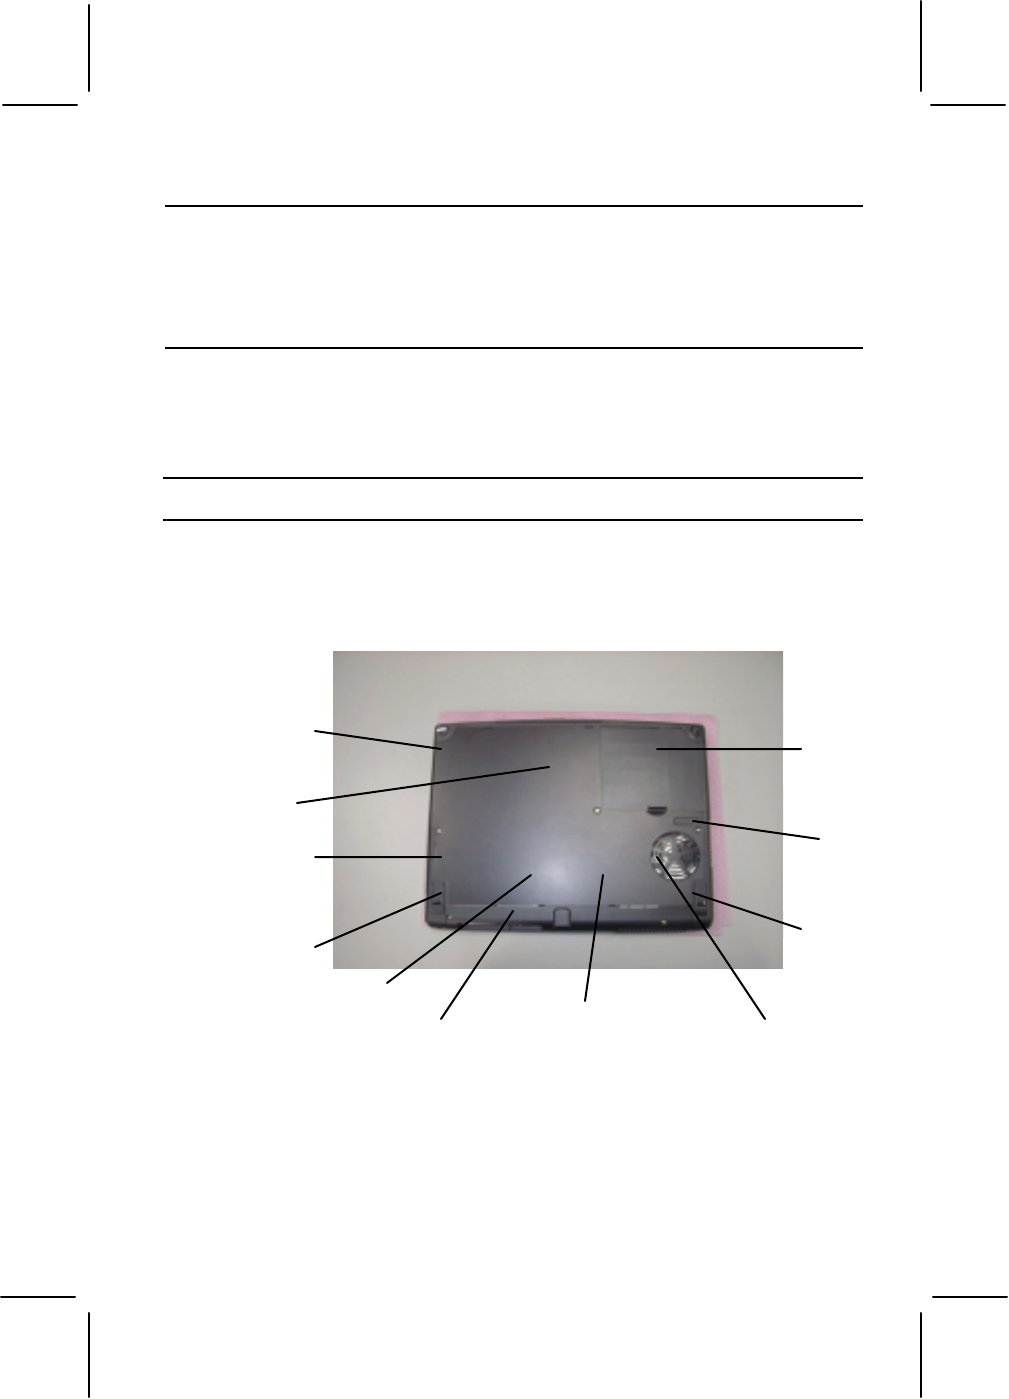
Features on the Unit Base
" $
#
% &
'!()
!
"
#!
*
Connecting Power to the System
It is particularly important that you only use the
AC adapter supplied from your dealer. Otherwise, you may
damage your notebook.
+ +
+
+
Direct current
cable Power indicator
light
AC power cord

,
It is particularly important that you give your battery a
full charge the first time that you use it. We recommend that
you leave the system connected to the AC adapter until the
battery is fully charged. The right indicator lamp on the front
edge of the notebook will stop flashing when the notebook
is fully charged.
& +
- +
+
. & + +
/
+
First Time Start Up
0
&
The description below applies to notebooks that
have been pre-installed with an OEM version of Windows
95 or Windows 98. If your system has not been pre-
installed with an OEM Windows, install your own operating
system using retail versions of the operating system
software and following the instructions given with the
software, or by referring to the section
$% 0
+ 0
0
0 0
1
&2
- 0 0 3 !
0 0
4
.
3
/ 3
3 0
0 4
5 $ 6
* 3
+" (+# (+
0 7
, 3 +
8
1 0
4
7 3 9 :&
;
<+
0
8 $
0 ' !() 0

7
4 )
$
System Setup and Installation
This section describes a typical procedure for
rebuilding a hard disk drive. You may not need to carry out
every step on your own hard disk. Read all the README
files that ship with the support software. They may contain
important information that is not included here.
& 0 '(3
- $
=3'=
. $
'(3>0 %'$3?
/ : '(3>0 %(!)+
$ '!() ' !()
* + '!() 0
' 0
$ @ 3A:&
, % 0
1 + 0
'
'
'
-<
7
0-<<<071
0$27 0$22
< B !A+ ')A
$
B
3A:& $23+BB%
>
- 4
'C
&C'>:
DC'>:
+C'>:
& 'C'>:
'!()C'>:
'D'!()C'>:
%>)C'>:
B+2C'>: